

Ford Thunderbird 2003 - Quick Reference Guide Printing 2 (pdf)
Ford Thunderbird 2003 - Quick Reference Guide Printing 2 (pdf)
Ford Thunderbird 2003 - Quick Reference Guide Printing 2 (pdf)

You also want an ePaper? Increase the reach of your titles
YUMPU automatically turns print PDFs into web optimized ePapers that Google loves.
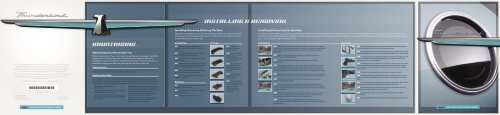
Installing, Removing & Storing The Boot<br />
When the convertible top is in the stored (down) position, you have the option<br />
of covering it with the convertible top boot. When not in use, the boot can be<br />
conveniently stored in your trunk.<br />
Installing & Removing Your Hard-Top<br />
<strong>Thunderbird</strong>’s removable top requires special attention in terms of removal, installation and maintenance. In fact, it should be removed every 3 months or 3000 miles for rear<br />
seal and rear deck cleaning. Before installing or removing your top, please make sure your vehicle is parked on a level surface and be sure you have someone standing by to help<br />
you. (The top weighs approximately 84 lbs.)<br />
This <strong>Quick</strong> <strong>Reference</strong> <strong>Guide</strong> is not intended to replace your vehicle Owner’s <strong>Guide</strong> which<br />
contains more detailed information concerning the features of your vehicle as well as<br />
important safety warnings designed to help reduce the risk of injury to you and your<br />
occupants. Please read your entire Owner’s <strong>Guide</strong> carefully as you begin learning about your<br />
new <strong>Thunderbird</strong> and refer to the appropriate sections when questions arise.<br />
All information contained in this <strong>Quick</strong> <strong>Reference</strong> <strong>Guide</strong> was accurate at the time of duplication.<br />
We reserve the right to change features, operation and/or functionality of any vehicle<br />
specification at any time.<br />
Your <strong>Ford</strong> dealer is the best source for the most current information.<br />
December 2002<br />
Second <strong>Printing</strong><br />
<strong>Quick</strong> <strong>Reference</strong> <strong>Guide</strong><br />
*F3W6J19G217CB*<br />
3W6J-19G217-CB<br />
<strong>Ford</strong> <strong>Thunderbird</strong><br />
Litho in U.S.A.<br />
Maintaining Your Removable Top<br />
Proper maintenance of your removable top will help you enjoy your ownership<br />
experience more fully in the miles to come. Since the tape provided is not<br />
designed to exceed 3 months or 4,000 miles (with the top on the vehicle), it’s<br />
important to apply new tape every time you put the top on your car.<br />
Tape Removal<br />
To remove the old tape, simply pull it off. If you notice adhesive residue on your vehicle, clean the<br />
surface with isopropyl alcohol or a very light non-abrasive soap.<br />
Applying New Tape<br />
Don’t worry about positioning the tape perfectly on your first attempt; the tape won’t bond completely<br />
until it has been in place for more than 24 hours. Only use the tape that has been approved by <strong>Ford</strong> for<br />
use on painted surfaces. Before applying new tape, make sure the surface of your vehicle is clean and dry.<br />
The temperature of the body surface should not be lower than 65 degrees or higher than 90 degrees.<br />
✦ Retract the convertible top to the<br />
✦ Starting at the rear of the door opening, apply<br />
open position.<br />
the tape to the quarter panel. At the rear corner<br />
✦ Wipe the surface with alcohol, using the lint-free<br />
curve, fold the flap downward so it wraps around<br />
cloth that came with your vehicle.<br />
the edge of the sheet metal. Slowly use<br />
pressure while applying the tape, pressing to<br />
✦ Select the piece that was cut for the driver-side smooth out wrinkles and air bubbles.<br />
front (DSF) area of your vehicle and remove the<br />
✦<br />
backing paper.<br />
Repeat the above steps for the passenger front<br />
trim piece, the driver-side rear (DSR) and<br />
passenger-side rear (PSR) pieces.<br />
Installation<br />
01 Unfasten the Velcro strap on the boot.<br />
Unfold the boot and place the boot across the<br />
trim panel.<br />
02 Starting on the driver side, tuck the boot<br />
under the sheet metal, along the side.<br />
03 Fasten the three snaps on the boot to the<br />
trim panel snaps.<br />
04 Walk around to the passenger side and tuck<br />
the boot under the sheet metal, along the side, be<br />
sure to tuck the Velcro strap under the boot.<br />
05 Fasten the three snaps (on the passenger<br />
side of the boot) to the trim panel snaps.<br />
06 Tuck the boot under the panel all of the<br />
way across the back.<br />
Removal<br />
01 Unfasten all three driver side snaps and all<br />
three passenger side snaps.<br />
02 Untuck both sides and the rear of the boot<br />
by sliding it forward.<br />
03 Fold and fasten the Velcro strap.<br />
Storage<br />
01 Position the<br />
boot with the exterior<br />
surface facing up.<br />
02 Fold the outboard<br />
sixth of the boot inward,<br />
exterior surface to<br />
exterior surface. Repeat<br />
for the other side.<br />
03 Flip the boot; fold<br />
the doubled-up ends<br />
toward the center of the<br />
boot. Repeat for the<br />
other side.<br />
04 Fold the boot in<br />
half and secure it with<br />
the Velcro strap.<br />
05 Place the folded<br />
boot in the storage area<br />
in the front of the trunk.<br />
To prevent the boot<br />
from getting dirty it<br />
may be stored in the<br />
plastic bag.<br />
Installation<br />
step 3<br />
step 4<br />
step 6<br />
step 8<br />
01 While the convertible top is in the raised position, make sure it is completely<br />
clean and dry. Lower the convertible top. Open the doors, lower the windows and<br />
clean the area where the removable top is mounted to the body with a clean,<br />
damp cloth.<br />
02 Make sure the wheels on your storage rack are locked; remove the<br />
protective cover and fastening strap.<br />
03 Confirm that the top’s rear locking levers are rotated to the fully<br />
open position.<br />
04 Ask someone to assist you in carrying the top to the vehicle; lower the rear<br />
of the top so that the pins are placed into the bracket receivers. (The receivers<br />
should be lubricated once a year. Apply a small amount of silicon lubricant to the<br />
receivers. Spray the lubricant directly into the holes to avoid damaging trim parts.)<br />
05 Rotate the rear locking levers approximately one-half turn toward the front<br />
of the vehicle. (The levers are on the rear left and right hand sides of the vehicle.)<br />
06 Position the front of the top so that the locating tabs on each side are<br />
placed in the mounting castings.<br />
07 Use the mounting key (located in the tool bag) to loosely install the two<br />
mounting screws and the left and right sides of the windscreen; give them two or<br />
three turns. You’ll note that the screws in the windscreen panel of the vehicle are<br />
already set in place.<br />
08 Pull the rear locking levers fully forward and slightly downward to lock the<br />
rear of the roof in place. The rear levers are locked when you feel the spring<br />
engage; each lever will point toward the front of the vehicle.<br />
09 Use the mounting key to fully tighten the front mounting screws. After<br />
driving approximately 30 to 40 miles, check the front mounting screws to confirm<br />
they’re secure.<br />
Removal<br />
step 2<br />
step 4<br />
step 6<br />
step 7<br />
step 8<br />
01 Prepare the storage rack to accept the removable top. Place the bumper<br />
end of the uprights on the floor, with the wheels facing you.<br />
02 Firmly squeeze the two chrome locking buttons (top and bottom) of one leg<br />
and rotate the leg upward until it locks in place. Repeat this step for the other leg.<br />
03 Turn the rack over on its wheels and place it on a flat surface. Make sure the<br />
center “T” section is fully locked by attempting to move it downward without<br />
releasing the chrome locking buttons.<br />
04 Push down on the two plastic levers on the front wheels to lock the wheels<br />
in place. If you plan to drive with the convertible top down, install the tonneau<br />
cover. Make sure the cover snaps are fastened securely and the cover is firmly<br />
tucked in place.<br />
05 Remove the mounting key from the tool bag (located in the trunk).<br />
06 Using the mounting key, fully loosen the two screws at the front of the top<br />
(one on each side of the windscreen). The screws in the casting areas are set in<br />
place.<br />
07 Undo the locking levers at the rear right and left sides of the vehicle. Rotate<br />
each lever rearward while applying slight upward force to the top.<br />
08 Remove the top and place it on the storage rack, with the rear of the top<br />
resting on the rubber bumpers of the lower legs.<br />
09 Secure the top to the storage rack with the strap assembly included<br />
with the rack.<br />
10 Use the cover that has been provided to keep the top clean when not in use.
From the classic exterior design with chrome grille and porthole windows to the personal luxury of the comfortable, stylish interior, <strong>Thunderbird</strong> is designed to please. This<br />
<strong>Quick</strong> <strong>Reference</strong> <strong>Guide</strong> reviews some of the features you’ll be using most. It also provides directions for installing, removing and maintaining your hard top (if equipped). When you<br />
have time, take advantage of the information provided in your “Interactive Owner Experience” CD-ROM. Use any audio CD player to listen to the information in an audio format, or<br />
use it with your computer for a more interactive experience. (The CD jacket will tell you if your computer meets the minimum configuration requirements.)<br />
You can use the guide alone or with this audio component of your “Interactive Owner Experience” CD-ROM. Whether you use them together, or separately, the <strong>Quick</strong><br />
<strong>Reference</strong> <strong>Guide</strong> and audio tracks are an excellent way to get acquainted with your vehicle.<br />
To use the guide with this audio, refer to the numbered call-outs in the instrument panel section, locate the feature you’d like to learn more about, and then locate the SEEK<br />
control on your audio system. Push the right arrow once to select the next audio track. If you would like to skip ahead, press the right arrow again until the desired selection is<br />
reached. To select a previous track, press the left arrow until the desired selection is reached.<br />
This <strong>Quick</strong> <strong>Reference</strong> <strong>Guide</strong> is not intended to replace the vehicle Owner <strong>Guide</strong> that contains more detailed information concerning the features of your vehicle and<br />
important safety warnings to help reduce the risk of injury to you and your occupants. Always carefully read your entire owner guide when first learning about your vehicle and<br />
consult the appropriate section when questions arise.<br />
03 Headlamp Controls<br />
Turn the control clockwise to the first position to turn on the parking lamps, instrument<br />
panel lamps, license plate lamps and tail lamps. Turn to the second position to turn on<br />
the headlamps. Turn the control counterclockwise to initiate the autolamp system.<br />
Autolamp turns your exterior lamps on and off automatically based on available daylight; it<br />
also keeps the lights on for a short time after the ignition switch is turned off.<br />
04 Traction Control On/Off<br />
Your vehicle is equipped with a Traction Control system that helps you maintain the stability<br />
and steerability of your vehicle by making better use of available traction on slippery road<br />
surfaces, such as snow or ice-covered roads and gravel roads.<br />
The Traction Control switch (located on the left-hand side of the instrument panel) has an<br />
indicator lamp that illuminates when the system is off. The Traction Control system will<br />
automatically turn on every time the ignition is turned off and on.<br />
During Traction Control operation, the traction control active lamp will illuminate. It’s normal<br />
to hear an electric motor type of sound coming from the engine compartment and the engine<br />
will not “rev-up” when you use the accelerator.<br />
If you should become stuck in snow or ice or on a very slippery road surface, try switching the<br />
Traction Control system off. This may allow excess wheel spin to “dig” the vehicle out and<br />
enable a successful “rocking” maneuver.<br />
If a system fault is detected, the traction control OFF indicator will illuminate and your<br />
vehicle should be serviced.<br />
05 Opening the Hood<br />
Pull the hood release handle located at the bottom left of the instrument panel. Go to the<br />
front of your vehicle and release the auxiliary latch (located under the front center of the<br />
hood) by pushing the handle toward the passenger side of the vehicle. Raise the hood until<br />
the lift cylinders hold it open.<br />
06 Windshield Wipers/Washers<br />
To wipe: rotate the end of the control away from you to increase the speed of the wipers;<br />
rotate toward you to decrease the speed of the wipers.<br />
To wash: push the end of the stalk briefly for a single swipe without washer fluid. Briefly push<br />
and hold the end of the stalk for three swipes with washer fluid. Push and hold to have the<br />
wipers and washer fluid activate for up to ten seconds.<br />
07 Speed Control<br />
The speed controls are located on the steering wheel. Press ON to enable speed control.<br />
(You must be traveling at or above 30 miles per hour.) Press SET to set a speed, then + or –<br />
to increase or decrease speed. Pressing RES will return to a previously set speed. To<br />
disengage speed control, press CANCEL or depress the brake pedal.<br />
08 Steering Wheel Audio Controls<br />
Press MEDIA to select AM, FM1, FM2, or CD. Radio Presets: in AM, FM1, or FM2 mode,<br />
use the up or down arrow to select preset radio stations within the selected radio band. CD<br />
Selection: in CD mode, press the up or down arrow to select the next or previous selection<br />
on the CD. Volume: press VOL + or – in any mode to adjust the volume. Mute: press this<br />
control to silence the playing media; press again to return to normal volume. For complete<br />
information on your vehicle’s audio system controls, please see your Owner’s <strong>Guide</strong>.<br />
09 Emission System/Check Engine<br />
It’s normal for this light to illuminate briefly when you start your engine. If the light stays on or<br />
blinks, there could be a problem. Have your vehicle serviced as soon as possible.<br />
10 Anti-lock Brake System<br />
If the ABS light stays illuminated or continues to flash after start-up, a malfunction has been<br />
detected; have the system serviced immediately. Normal braking will continue to function<br />
unless the brake warning light is also illuminated.<br />
11 Climate Control<br />
Your <strong>Thunderbird</strong> is equipped with a Dual Electronic Automatic Temperature Control System.<br />
Please see your Owner’s <strong>Guide</strong> for information on using this system.<br />
12 Heated seats (if equipped)<br />
The heated seat function will activate when the ignition is in the “run” position. Push the right<br />
side of the control for maximum heat; push again to deactivate. Push the left side of the<br />
control for minimum heat; push again to deactivate.<br />
13 Setting the Clock<br />
Press MENU until SELECT HOUR or SELECT MINUTE is displayed. Use SEL to manually<br />
increase or decrease the hours or minutes. Press MENU again to disengage clock mode.<br />
14 Windshield Defrost/Demist<br />
To clear ice or fog from the windshield, press the defrost control; your climate control system will<br />
begin distributing outside air through the windshield defroster ducts and the demister outlets.<br />
15 Power Windows<br />
Press and hold the rear portion of the rocker switch to open the window. Press and hold<br />
the forward portion of the rocker switch to close the window. For one touch down,<br />
press completely down on AUTO and release quickly; press again to stop.


