

Ford F-550 2010 - Quick Reference Guide Printing 1 (pdf)
Ford F-550 2010 - Quick Reference Guide Printing 1 (pdf)
Ford F-550 2010 - Quick Reference Guide Printing 1 (pdf)

Create successful ePaper yourself
Turn your PDF publications into a flip-book with our unique Google optimized e-Paper software.
PREMIUM PLUS In-Dash Six CD/MP3/Satellite Compatible Sound System<br />
(if equipped)<br />
DUAL AUTOMATIC TEMPERATURE CONTROL SYSTEM<br />
WITH HEATED SEATS AND HEATED MIRRORS (if equipped)<br />
Tire Pressure<br />
Check your tire pressure at least<br />
once a month and before long<br />
trips (including the spare). The<br />
recommended specifications are on<br />
the Safety Compliance Certification<br />
Label or Tire Label located on the<br />
B-Pillar or the edge of the driver’s<br />
door. As an added safety feature,<br />
your vehicle has been equipped with<br />
a Tire Pressure Monitoring System<br />
(TPMS) that illuminates a low tire<br />
pressure warning light when one<br />
or more of your tires is significantly<br />
under-inflated. Refer to the Tires,<br />
Wheels and Loading chapter in your<br />
Owner’s <strong>Guide</strong> for more information.<br />
Location of Spare Tire<br />
and Tools<br />
Your vehicle is equipped with a<br />
temporary spare tire which is<br />
designed for emergency use only<br />
and should be replaced as soon<br />
as possible. Due to the different<br />
possible cab configurations, please<br />
refer to the Roadside Emergencies<br />
chapter in your Owner’s <strong>Guide</strong><br />
for spare tire and tool location in<br />
addition to complete details on<br />
how to change your tire.<br />
Roadside Assistance<br />
Your new <strong>Ford</strong> Super Duty comes<br />
with the assurance and support<br />
of 24-hour emergency roadside<br />
assistance. Roadside assistance<br />
includes such services as: lockout<br />
assistance, limited fuel delivery,<br />
battery jump starts, changing a flat<br />
tire, towing, and winch out. To receive<br />
roadside assistance in the United<br />
States, call 1 (800) 241-3673. In<br />
Canada, call 1 (800) 665-2006.<br />
SOS Post-Crash Alert System<br />
Your vehicle is equipped with the<br />
SOS Post-Crash Alert system. This<br />
system provides audible and visual<br />
alarms in the event of a crash<br />
which causes the deployment of<br />
airbags or the activation of the<br />
safety belt pretensioners. The turn<br />
signals will flash and the horn will<br />
sound. To deactivate the system,<br />
press the hazard flasher control ,<br />
or you can press on your<br />
remote transmitter.<br />
Improve Your Fuel Economy<br />
Below are several ways to improve<br />
fuel economy while driving:<br />
• Drive sensibly<br />
• Keep tires properly inflated<br />
• Use cruise control<br />
• Don’t carry more than you need<br />
(you will lose up to 1% in fuel<br />
economy per 100 lbs [45 kg])<br />
• Observe the speed limit (speeds<br />
in excess of 70 mph [112 km/h]<br />
decrease overall fuel economy)<br />
• Make sure your vehicle is<br />
properly maintained<br />
• Check and replace air<br />
filter regularly<br />
• Use recommended grade<br />
of motor oil<br />
• Avoid excessive idling<br />
• Add tonneau cover (available<br />
as a <strong>Ford</strong> accessory)<br />
This <strong>Quick</strong> <strong>Reference</strong> <strong>Guide</strong> is not intended to replace your vehicle Owner’s <strong>Guide</strong> which contains more<br />
detailed information concerning the features of your vehicle, as well as important safety warnings designed to<br />
help reduce the risk of injury to you and your occupants. Please read your entire Owner’s <strong>Guide</strong> carefully as<br />
you begin learning about your new vehicle and refer to the appropriate chapters when questions arise.<br />
All information contained in this <strong>Quick</strong> <strong>Reference</strong> <strong>Guide</strong> was accurate at the time of duplication. We reserve<br />
the right to change features, operation and/or functionality of any vehicle specification at any time. Your <strong>Ford</strong><br />
dealer is the best source for the most current information. For detailed operating and safety information,<br />
please consult your Owner’s <strong>Guide</strong>.<br />
<strong>Ford</strong> Motor Company Customer Relationship Center | P.O. Box 6248 | Dearborn, MI 48121<br />
1-800-392-3673 (FORD) (TDD for the hearing impaired: 1-800-232-5952)<br />
AC3J 19G217 AA<br />
May 2009<br />
First <strong>Printing</strong><br />
<strong>Quick</strong> <strong>Reference</strong> <strong>Guide</strong><br />
Super Duty<br />
Litho in U.S.A.<br />
Use extreme caution when using<br />
any device or feature that may take<br />
your attention off the road. Your<br />
primary responsibility is the safe<br />
operation of the vehicle. Only use<br />
non-essential features and devices<br />
when it is safe to do so.<br />
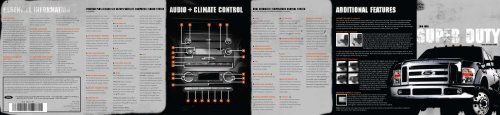
1. SETTING MEMORY PRESETS<br />
To set a station: Select a frequency<br />
band with the AM/FM button, then<br />
select a station. Press and hold a<br />
numbered preset button 1–6 until<br />
the sound returns.<br />
2. TEXT/SCAN FUNCTION<br />
Press and hold for a brief sampling<br />
of radio stations or satellite radio<br />
channels (if equipped). Press again<br />
to stop. In CD/MP3 mode, press<br />
and release to display track title,<br />
artist name, disc title and file name<br />
(if available).<br />
3. AM/FM AND CD SELECT<br />
Press AM/FM repeatedly to cycle<br />
through AM, FM1 or FM2 frequency<br />
bands. Press CD to begin CD play.<br />
4. ON/OFF/VOLUME CONTROL<br />
Press to turn on/off. Turn to<br />
increase/decrease the volume.<br />
5. LOADING CDS<br />
To load a CD into the system,<br />
press LOAD. When prompted,<br />
select the desired slot (1-6)<br />
using the memory presets and<br />
insert the CD into the system.<br />
Press and hold LOAD to autoload<br />
up to six discs.<br />
6. EJECTING CDS<br />
Press to eject a CD. Press and<br />
hold to auto-eject all CDs present<br />
in the system.<br />
7. SEEK FUNCTION<br />
Press to access the next listenable<br />
station , CD track, or previous<br />
satellite radio station.<br />
8.<br />
Press to access SYNC® phone<br />
features (if equipped). If your<br />
vehicle is not equipped with SYNC®,<br />
the display will read NO PHONE.<br />
9. TUNE/DISC SELECTOR<br />
Press to go up or down the radio<br />
frequency or to select a desired disc.<br />
10. MENU<br />
Press repeatedly to access the<br />
following settings, among others:<br />
SPEED VOL (Speed sensitive<br />
volume, if equipped):<br />
The volume automatically changes<br />
slightly with vehicle speed to compensate<br />
for road and wind noise.<br />
Use / to adjust.<br />
SETTING THE CLOCK: Press MENU<br />
until SELECT HOUR or SELECT MINS<br />
is displayed. Press / to adjust the<br />
hours/minutes.<br />
SATELLITE RADIO MENU:<br />
(if equipped): Press MENU when<br />
satellite radio mode is active to<br />
access. Press OK to enter into the<br />
satellite radio menu. Press / to<br />
cycle through additional options.<br />
SIRIUS® Satellite Radio is a<br />
subscription based satellite radio<br />
service that broadcasts music,<br />
sports, news and entertainment<br />
programming. For more information<br />
and a complete list of SIRIUS®<br />
satellite radio channels, visit<br />
www.sirius.com in the United States,<br />
www.sirius-canada.ca in Canada,<br />
or call SIRIUS® at 1–888–539–7474.<br />
11. AUX<br />
Repeatedly press to cycle through<br />
FES/DVD (if equipped), SYNC®<br />
(if equipped), SAT1, SAT2, SAT3<br />
(satellite radio mode, if equipped)<br />
or LINE IN (auxiliary audio mode<br />
if equipped).<br />
VOICE-ACTIVATED NAVIGATION<br />
SYSTEM (if equipped):<br />
Your vehicle may be equipped with<br />
a voice-activated navigation system<br />
which integrates several functions<br />
including voice recognition,<br />
destination entry and SIRIUS®<br />
satellite radio (if equipped) in one<br />
easy to use system. Note: Some<br />
features are unavailable while<br />
driving. Refer to your Navigation<br />
Supplement for more information.<br />
3<br />
4<br />
3<br />
2<br />
1<br />
A<br />
B<br />
C<br />
5<br />
6 7<br />
8 9<br />
D E F G H E I<br />
10<br />
11<br />
K<br />
B<br />
J<br />
A. AUTO<br />
Press to engage automatic<br />
temperature control, and select<br />
the desired temperature using the<br />
temperature control. The system will<br />
automatically determine fan speed,<br />
airflow location, A/C on or off, and<br />
outside or recirculated air to heat or<br />
cool the vehicle, allowing it to reach<br />
the desired temperature.<br />
B. Driver/Passenger<br />
Temperature ControlS<br />
Press to increase or decrease the<br />
temperature on the driver or<br />
passenger side of the vehicle.<br />
C. EXT<br />
Press to display outside temperature.<br />
Press again to display cabin<br />
temperature settings.<br />
D. Fan Speed Control<br />
Press to increase or decrease the<br />
fan speed.<br />
E. Heated seat controls<br />
Press to turn the heated seats on<br />
and off. The heated seats turn off<br />
when the ignition is turned off.<br />
F. Manual override control<br />
Allows you to manually select<br />
where airflow is directed. Press<br />
repeatedly to cycle through all<br />
possible options. To return to full<br />
automatic control, press AUTO.<br />
G. A/C control<br />
Press to activate/deactivate air<br />
conditioning. Use with<br />
(recirculated air) to improve cooling<br />
performance and efficiency.<br />
Engages automatically in AUTO,<br />
(defrost) and (floor/defrost).<br />
H. Recirculation control<br />
Recirculates air in the cabin, thereby<br />
reducing the amount of time needed<br />
to cool down the interior of the<br />
vehicle when used with A/C.<br />
I. Dual<br />
Press to activate dual zone climate<br />
control where the passenger and<br />
driver can set their own individual<br />
climate settings. Press again to<br />
deactivate and return to single zone<br />
where the driver’s climate settings<br />
determine the climate settings for<br />
the entire vehicle.<br />
J. Heated mirrors<br />
Press to defrost the outside rear<br />
view mirrors. The heated mirrors<br />
will turn off after 10 minutes or<br />
can be shut off by pressing the<br />
button again.<br />
K. Defrost<br />
Use to clear ice or fog from the<br />
windshield by distributing air<br />
through the windshield defroster<br />
and demister vents.<br />
MAX A/C OPERATION<br />
Automatic Operation: Press AUTO<br />
for full automatic operation. Do not<br />
override A/C or recirculated air.<br />
Set the temperature to 60˚F (16˚C).<br />
Override Operation: Press<br />
repeatedly to select airflow<br />
distribution. Press A/C and<br />
(together, these provide a colder<br />
airflow). Set temperature to 60˚F<br />
(16˚C). Set to highest front fan<br />
speed initially, then adjust to<br />
maintain comfort.<br />
RAPID HEAT Supplemental<br />
heating system (if equipped)<br />
If your vehicle is equipped with a<br />
diesel engine, it may be equipped<br />
with a supplemental heater to assist<br />
in heating the inside of your vehicle<br />
in cold weather. For maximum<br />
effectiveness, mid to lower blower<br />
speed is recommended during<br />
initial warm-up. When operating in<br />
automatic mode (if equipped),<br />
the climate control system will<br />
determine the appropriate blower<br />
speed for existing conditions.<br />
Memory Feature (if equipped)<br />
Your vehicle may be equipped with a memory feature, which allows your vehicle to ‘remember’ your desired settings<br />
for your seats, mirrors and adjustable pedals (if equipped). To set, move your seat, mirrors and adjustable pedals<br />
(if equipped) to the desired position. Press and hold either memory button 1 or 2 for five seconds. Continue to hold<br />
until two tones are heard. Within three seconds of the second tone, press on your remote transmitter. Your settings<br />
are now saved and will be activated when that remote transmitter is used to unlock your vehicle.<br />
Tailgate Step (if equipped)<br />
Your vehicle may be equipped with a tailgate step that allows easy entry into<br />
the truck bed. To use, open the tailgate. Pull the yellow latch lever to the<br />
unlock position to release the grab handle from its stowed position and raise<br />
the handle upright until you feel it latch and see the latch lever in the lock<br />
position. (The yellow lever only needs to be used when releasing the grab<br />
handle.) Rotate the center molding to unlatch the tailgate. Flip open the panel<br />
to widen the step. Always use the grab handle when stepping up or down on<br />
the tailgate step. Keep the step load (you + load) below 350 lb. (159 kg).<br />
To close the tailgate step, fold the step panel, then lift and fully slide the tailgate step into the tailgate. Slide the latch<br />
at the bottom of the handle, then lower the handle. Never drive with the step deployed. Ensure that you fully close and<br />
latch the tailgate step before moving the vehicle.<br />
Bed Extender (if equipped)<br />
To open the bed extender into tailgate mode, start with the<br />
right side panels by pulling the locking pin toward the<br />
driver’s side of the vehicle. Unlatch the panels and<br />
then rotate the panels toward the tailgate. Rotate<br />
the storage hinge rearward and then rotate the<br />
panels toward the tailgate. Engage locking pin<br />
to the right. Repeat for the left side panels of<br />
the bed extender. Connect the two panels at<br />
the center, then rotate both knobs a quarter<br />
turn clockwise to secure them. Ensure that<br />
the latch rod is inserted into the tailgate<br />
hole and the locking pins on BOTH sides<br />
are engaged into their holes in the pick-up<br />
box. Please refer to your Owner’s <strong>Guide</strong> for<br />
complete details on this feature.<br />
REarview CAMERA (if equipped)<br />
Your vehicle may be equipped with a reverse camera located<br />
on the liftgate, which provides a visual display of the area<br />
behind the vehicle. The display will automatically appear in<br />
the rearview mirror or on the navigation system screen<br />
(if equipped) whenever the vehicle is in Reverse (R) and uses<br />
colors (green, yellow and red) to alert you of your proximity to objects.<br />
Note: Visibility aids do not replace the need to watch where the vehicle is moving. Refer to your Owner’s <strong>Guide</strong> for<br />
safety information, more detail and limitations.<br />
<strong>2010</strong> <strong>Ford</strong><br />
quick reference guide
YOUR <strong>2010</strong> FORD<br />
Service intervals<br />
It is important to maintain your vehicle to keep it running<br />
in peak condition. Engine oil and filter changes along<br />
with fuel filter (two fuel filters on diesel vehicles) and<br />
engine coolant inspection/replacement are common<br />
maintenance items that can be done to prolong the life of<br />
your engine. If you drive your vehicle in severe situations,<br />
more frequent service will be required on some items.<br />
Please refer to the scheduled maintenance information<br />
chapter of your diesel Supplement if your vehicle is<br />
equipped with a diesel engine or the separate Scheduled<br />
Maintenance <strong>Guide</strong> if your vehicle is equipped with a<br />
gasoline engine.<br />
Cold weather starting<br />
To ensure optimum cold weather starting performance,<br />
and improve cabin heating, the 120 volt engine block<br />
heater should be used during any cold weather operation.<br />
The engine block heater is required when the vehicle is to<br />
be started at temperatures below -10°F (-23°C) or colder<br />
for diesel engines and below 0°F (-17°C) for gas engines.<br />
Please refer to Engine Block Heater in the Driving chapter<br />
of your Owner’s <strong>Guide</strong>.<br />
Diesel engine operation (if equipped)<br />
Diesel engines have different starting and operating<br />
procedures than gasoline engines. Please refer to<br />
your diesel Supplement for detailed information on<br />
starting and operating your diesel engine. Key items<br />
to remember are:<br />
Starting the Engine<br />
With the key in the on position, the light will<br />
illuminate if glow plug heat is necessary as a starting aid.<br />
Wait for the light to extinguish before starting the engine.<br />
Turning Off the Engine<br />
It is important to remember that if you have been<br />
operating your vehicle at a high speed or maximum gross<br />
vehicle weight, it is recommended to let the engine idle<br />
for 3-5 minutes so the turbocharged engine can properly<br />
cool down.<br />
Engine Cooling System<br />
The coolant concentration should be maintained at<br />
50/50 mix of coolant and distilled water. The level<br />
of coolant should be maintained at the “COLD FILL”<br />
range in the coolant reservoir. Engine coolant system<br />
anti-freeze and anti-corrosive strength should be checked<br />
and serviced at the mileage or equivalent hour intervals<br />
specified by the maintenance schedule. Refer to your<br />
Owner <strong>Guide</strong> for additional information.<br />
Ultra Low Sulfur Diesel (ULSD) Fuel<br />
The diesel engine requires ultra low sulfur<br />
diesel fuel to control exhaust emissions,<br />
especially when combined with new exhaust<br />
treatment devices such as a Diesel Particulate<br />
Filter (DPF). It is always important to make<br />
sure the proper fuel is used because use of<br />
improper fuel (e.g., high level of biodiesel<br />
fuel or a high sulfur diesel fuel) may cause<br />
serious engine damage. Use of biodiesel<br />
is acceptable as long as the content is no<br />
higher than 5% (B5). If the biodiesel is<br />
rated higher than B5 (such as B10 or B20),<br />
it may damage fuel system components.<br />
Diesel fuel quality is critical for reliable<br />
engine operation. Motorcraft ® Cetane<br />
Booster & Performance Improver can<br />
be added to improve fuel economy,<br />
starting ability, and reduce engine wear.<br />
To avoid cold weather fuel gelling, add<br />
Motorcraft ® Anti-Gel & Performance<br />
Improver to every new tank of fuel.<br />
Draining the Water Separator<br />
Water will gather in the frame-mounted water separator,<br />
called the horizontal fuel conditioning module (HFCM).<br />
The water separator should be drained monthly, or<br />
sooner if the “WATER IN FUEL” lamp illuminates.<br />
Exhaust System<br />
To control exhaust emissions, your diesel Super Duty<br />
is equipped with an exhaust system with clean diesel<br />
after-treatment technology which includes a diesel<br />
oxidation catalytic converter and a diesel particulate<br />
filter (DPF). Do not modify the exhaust after-treatment.<br />
See your Owner’s <strong>Guide</strong> and Diesel Supplement for<br />
more information.<br />
Checking the Air Filter<br />
Your vehicle has an air filtration system with a restriction<br />
indicator gauge that will alert you when you need to<br />
change your filter. The gauge has a viewable indicator<br />
located underhood on the air filter assembly which<br />
should be inspected every oil change.<br />
Engine Oil Specifications for Diesel Engines<br />
Heavier 15W-40 and 5W-40 engine oils are<br />
recommended for temperatures over 50˚F (10˚C) and<br />
must be used for heavy duty driving and trailer towing.<br />
Use Motorcraft oil or an equivalent oil conforming to<br />
<strong>Ford</strong> specification WSS-M2C171–E or API service<br />
categories CJ-4 or CJ-4/SM. It is important to use these<br />
oils because they are compatible with the emission<br />
control equipment of your vehicle to meet the more<br />
stringent emission standards.<br />
Under normal conditions, the engine oil and filter need<br />
to be changed at 10,000 mi (16,093 km) or 6 month<br />
intervals (whichever comes first). Under severe<br />
conditions, the intervals are sooner; 5,000 mi (8,046<br />
km) or 3 months (whichever comes first). Refer to the<br />
scheduled maintenance information chapter of the<br />
Diesel Supplement for specific information on normal<br />
and severe conditions. Use the same engine oil and<br />
filter change intervals when using synthetic engine oil.<br />
1<br />
2<br />
3<br />
4<br />
5<br />
6 7 8 9 10 11 12 13 14 15<br />
16 17 18<br />
1. Service Engine Soon Light<br />
The service engine soon light<br />
illuminates briefly when the ignition<br />
is turned on. If it remains on after<br />
the engine is started, the On Board<br />
Diagnostics System (OBD-II) has<br />
detected a malfunction. If the light is<br />
blinking, an engine misfire is occurring<br />
which could damage your catalytic<br />
converter. Drive in a moderate fashion<br />
and contact your authorized dealer<br />
as soon as possible.<br />
2. ABS Warning Light<br />
If the ABS light stays illuminated<br />
or continues to flash, a malfunction<br />
has been detected, contact your<br />
authorized dealer as soon as<br />
possible. Normal braking is still<br />
functional unless the brake warning<br />
light is also illuminated.<br />
3. Airbag Readiness Light<br />
The airbag readiness light<br />
illuminates briefly when the ignition is<br />
turned on. If this light fails to illuminate,<br />
remains on or continues to flash after<br />
the engine is started, contact your<br />
authorized dealer as soon as<br />
possible. A chime will also sound if<br />
a malfunction in the indicator light<br />
is detected.<br />
4. Brake System<br />
Warning Light<br />
The brake system warning light<br />
illuminates briefly when the ignition<br />
is turned on or when the parking<br />
brake is applied to confirm that the<br />
system is functional. If the light does<br />
not illuminate at this time, contact<br />
your authorized dealer as soon as<br />
possible. If the light continues to<br />
illuminate after the parking brake is<br />
released, your brake fluid is low and<br />
should be inspected immediately by<br />
your authorized dealer.<br />
5. Headlamp CONTROLS<br />
( ) Turns the headlamps off.<br />
: Turns on parking, instrument<br />
panel, license plate and tail lamps.<br />
: Turns on the headlamps.<br />
: Autolamps (if equipped)<br />
Automatically turns the exterior lamps<br />
on/off based on available daylight.<br />
: Turns on fog lamps (if equipped)<br />
by pulling the control towards you.<br />
6. Speed control (if equipped)<br />
To set the speed:<br />
1. Press ON.<br />
2. Accelerate to the desired speed.<br />
3. Press SET + and take your foot off<br />
the accelerator.<br />
• To set a higher speed, press<br />
and hold SET + or press SET +<br />
repeatedly until the desired speed<br />
is reached.<br />
• To set a lower speed, press<br />
and hold SET – or press SET –<br />
repeatedly until the desired speed<br />
is reached.<br />
• To return to a previously set speed,<br />
press RES (Resume).<br />
• To turn off, press the brake pedal<br />
or press OFF.<br />
7. Message Center<br />
The message center displays<br />
information on your vehicle’s<br />
operating functions, as well as<br />
warning messages. Pressing the INFO<br />
button lets you scroll through general<br />
vehicle information such as odometer,<br />
trip odometer, compass, average fuel<br />
economy, distance to empty (fuel)<br />
and engine hours. Engine hours<br />
register how many hours the engine<br />
has been running. This is especially<br />
important if your vehicle is equipped<br />
with a diesel engine as important<br />
maintenance items (engine oil<br />
changes and fuel filter changes) may<br />
be based on engine hours. Please<br />
refer to the scheduled maintenance<br />
information in your Diesel Supplement<br />
for more information.<br />
8. POWER REAR SLIDER WINDOW<br />
(if equipped)<br />
Push the switch, (located behind the<br />
steering wheel)<br />
to open the rear<br />
window. Pull to close<br />
the rear window.<br />
9. TOW/HAUL SWITCH<br />
(if equipped)<br />
To eliminate excessive transmission<br />
shifting, activate the Tow/Haul<br />
feature. This will reduce frequency<br />
of transmission shifting and assist in<br />
transmission cooling. This feature also<br />
provides engine braking in all forward<br />
gears when the transmission is in<br />
the D (Overdrive) position; the engine<br />
braking will slow the vehicle and<br />
assist the driver in controlling the<br />
vehicle when descending a grade.<br />
10. Electronic shift on the<br />
fly 4x4 system (if equipped)<br />
The electronic shift on the fly 4x4<br />
system allows you to choose between<br />
2WD, 4x4 HIGH or 4x4 LOW driving<br />
modes. Choose 2WD to provide power<br />
to the rear wheels only – used mainly<br />
for street and highway driving. This<br />
mode provides optimal smoothness<br />
and fuel economy at high speeds.<br />
Choose 4x4 HIGH to send power to<br />
the rear and front wheels for extra<br />
traction during winter and off-road<br />
conditions. (Not intended for use on<br />
dry pavement.) Choose 4x4 LOW when<br />
you need extra gearing to provide<br />
maximum power to all four wheels at<br />
reduced speeds. This is intended for<br />
use in situations such as deep sand,<br />
steep grades or pulling a boat out of<br />
the water. This mode is not intended<br />
for use on dry pavement. Please refer<br />
to the Driving chapter in your Owner’s<br />
<strong>Guide</strong> for more information.<br />
11. TRACTION CONTROL<br />
SYSTEM (if equipped)<br />
Traction control helps maintain<br />
stability and steerability of your vehicle<br />
during a variety of road conditions.<br />
If your vehicle becomes stuck in the<br />
snow, mud or sand, try turning off the<br />
system to allow wheel spin and help<br />
increase momentum to dig the vehicle<br />
out. The system defaults to on and the<br />
control will illuminate when turned off.<br />
12. POWER ADJUSTABLE<br />
FOOT PEDALS (if equipped)<br />
Press the top of the control to move<br />
the pedals further away from you or<br />
press the bottom of the control to<br />
move the pedals closer to you. The<br />
pedals should only be adjusted when<br />
the vehicle is stopped and in Park (P).<br />
13. REVERSE SENSING<br />
(if equipped)<br />
The reverse sensing system can warn<br />
you if there is an object behind the<br />
vehicle. The system will sound<br />
a warning tone that increases in<br />
frequency as the object gets closer<br />
and will sound continuously when<br />
the object is less than 10 inches<br />
away. Note: Visibility aids do not<br />
replace the need to watch where<br />
the vehicle is moving. Refer to your<br />
Owner’s <strong>Guide</strong> for safety information,<br />
more detail and limitations.<br />
14. Trailer Brake Controller<br />
(if equipped)<br />
The Trailer Brake Controller (TBC)<br />
helps ensure smooth and<br />
effective trailer braking by<br />
powering the trailer’s electric brakes<br />
with a proportional output based on<br />
the towing vehicle’s brake pressure.<br />
Use the GAIN adjustment buttons<br />
(+,–) and the manual control lever<br />
to make adjustments. The system<br />
will display any necessary messages<br />
through your message center. For<br />
complete information on using the<br />
TBC, please refer to the Tires,<br />
Wheels and Loading chapter of your<br />
Owner’s <strong>Guide</strong> for more information.<br />
15. UPFITTER (if equipped)<br />
If your vehicle is equipped with<br />
the Upfitter package, these auxiliary<br />
switches can be customized to<br />
perform additional functions. The<br />
switches deliver 10A, 15A or 30A<br />
of battery power to whatever<br />
accessory is chosen. Refer to the<br />
Body Builder’s Layout Book or visit<br />
www.fleet.ford.com/truckbbas/<br />
non-html/Q117R1.<strong>pdf</strong> for more<br />
detailed information.<br />
16. Auxiliary Power Point<br />
Your vehicle is equipped with a 12V<br />
auxiliary power point which allows<br />
you to power electrical devices<br />
that require up to 12V. For more<br />
information, please refer to your<br />
Owner’s <strong>Guide</strong>.<br />
17. Auxiliary Input Jack<br />
(if equipped)<br />
The auxiliary input jack allows you to<br />
play music from your portable music<br />
player through the vehicle speakers<br />
with high fidelity.<br />
18. USB port (if equipped)<br />
If your vehicle is equipped with<br />
SYNC ® , you will have a USB port<br />
which allows you to plug in media<br />
playing devices, memory sticks<br />
and also to charge devices if they<br />
support this feature. SYNC ® is a<br />
hands-free communications and<br />
entertainment system with special<br />
phone and media features. For<br />
more information, please refer to<br />
the SYNC ® Supplement or to the<br />
SYNC ® section in the Navigation<br />
Supplement. Please also feel free to<br />
visit www.SyncMyRide.com.<br />
Fuel Pump Shut-Off Switch<br />
This device stops the electric fuel<br />
pump from sending fuel to the<br />
engine when your vehicle has had a<br />
substantial jolt. After an accident, if<br />
the engine cranks but doesn’t start,<br />
the switch may have been activated.<br />
The fuel pump shut-off switch is<br />
located on the passenger side of the<br />
instrument panel. You have to open<br />
the passenger side door and remove<br />
the access panel to reset the switch.<br />
For switch reset instructions, please<br />
refer to your Owner’s <strong>Guide</strong>.<br />
Telescoping<br />
mirrorS<br />
(if equipped)<br />
Your vehicle may<br />
be equipped with<br />
manual or power<br />
telescoping<br />
mirrors which can<br />
extend out<br />
2.75 inches<br />
(70 mm). These<br />
mirrors are especially<br />
useful when you are towing a<br />
trailer. Manual mirrors can be<br />
pushed out or pulled in to the<br />
desired position. If your vehicle is<br />
equipped with power telescoping<br />
mirrors, you can simultaneously<br />
position the mirrors using the control<br />
switch on the door trim panel. Press<br />
and hold t or u to telescope the<br />
mirrors outboard or inboard.


