
You also want an ePaper? Increase the reach of your titles
YUMPU automatically turns print PDFs into web optimized ePapers that Google loves.
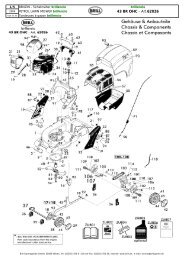
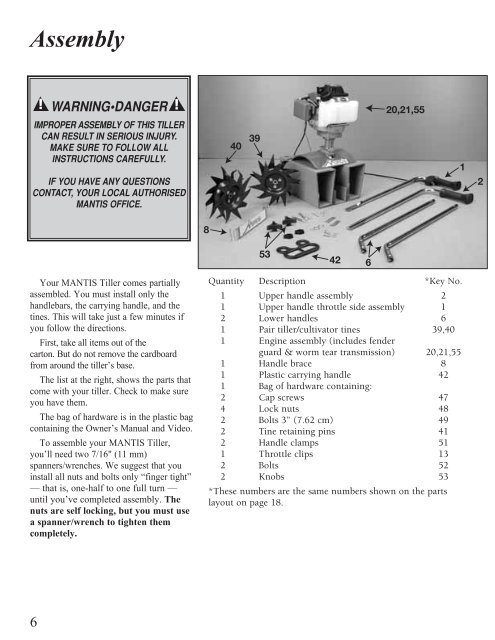
Assembly<br />
! WARNING•DANGER !<br />
IMPROPER ASSEMBLY OF THIS TILLER<br />
CAN RESULT IN SERIOUS INJURY.<br />
MAKE SURE TO FOLLOW ALL<br />
INSTRUCTIONS CAREFULLY.<br />
IF YOU HAVE ANY QUESTIONS<br />
CONTACT, YOUR LOCAL AUTHORISED<br />
MANTIS OFFICE.<br />
40 39<br />
20,21,55<br />
1<br />
2<br />
8<br />
53<br />
42<br />
6<br />
Your MANTIS <strong>Tiller</strong> comes partially<br />
assembled. You must install only the<br />
handlebars, the carrying handle, and the<br />
tines. This will take just a few minutes if<br />
you follow the directions.<br />
First, take all items out of the<br />
carton. But do not remove the cardboard<br />
from around the tiller’s base.<br />
The list at the right, shows the parts that<br />
come with your tiller. Check to make sure<br />
you have them.<br />
The bag of hardware is in the plastic bag<br />
containing the Owner’s Manual and Video.<br />
To assemble your MANTIS <strong>Tiller</strong>,<br />
you’ll need two 7/16" (11 mm)<br />
spanners/wrenches. We suggest that you<br />
install all nuts and bolts only “finger tight”<br />
— that is, one-half to one full turn —<br />
until you’ve completed assembly. The<br />
nuts are self locking, but you must use<br />
a spanner/wrench to tighten them<br />
completely.<br />
Quantity Description *Key No.<br />
1 Upper handle assembly 2<br />
1 Upper handle throttle side assembly 1<br />
2 Lower handles 6<br />
1 Pair tiller/cultivator tines 39,40<br />
1 Engine assembly (includes fender<br />
guard & worm tear transmission) 20,21,55<br />
1 Handle brace 8<br />
1 Plastic carrying handle 42<br />
1 Bag of hardware containing:<br />
2 Cap screws 47<br />
4 Lock nuts 48<br />
2 Bolts 3” (7.62 cm) 49<br />
2 Tine retaining pins 41<br />
2 Handle clamps 51<br />
1 Throttle clips 13<br />
2 Bolts 52<br />
2 Knobs 53<br />
*These numbers are the same numbers shown on the parts<br />
layout on page 18.<br />
6