HyChill Information Manual - HyChill Refrigerants
HyChill Information Manual - HyChill Refrigerants
HyChill Information Manual - HyChill Refrigerants

Create successful ePaper yourself
Turn your PDF publications into a flip-book with our unique Google optimized e-Paper software.
17<br />
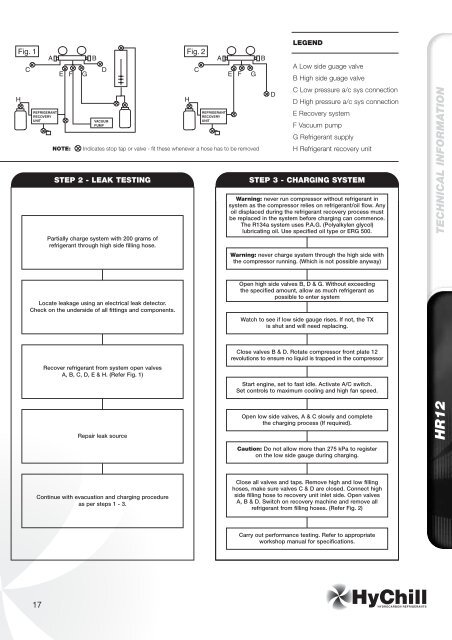
STEP 2 - LEAK TESTING<br />
Partially charge system with 200 grams of<br />
refrigerant through high side filling hose.<br />
Locate leakage using an electrical leak detector.<br />
Check on the underside of all fittings and components.<br />
Recover refrigerant from system open valves<br />
A, B, C, D, E & H. (Refer Fig. 1)<br />
Repair leak source<br />
Continue with evacuation and charging procedure<br />
as per steps 1 - 3.<br />
LEGEND<br />
A Low side guage valve<br />
B High side guage valve<br />
C Low pressure a/c sys connection<br />
D High pressure a/c sys connection<br />
E Recovery system<br />
F Vacuum pump<br />
G Refrigerant supply<br />
H Refrigerant recovery unit<br />
STEP 3 - CHARGING SYSTEM<br />
Warning: never run compressor without refrigerant in<br />
system as the compressor relies on refrigerant/oil flow. Any<br />
oil displaced during the refrigerant recovery process must<br />
be replaced in the system before charging can commence.<br />
The R134a system uses P.A.G. (Polyalkylen glycol)<br />
lubricating oil. Use specified oil type or ERG 500.<br />
Warning: never charge system through the high side with<br />
the compressor running. (Which is not possible anyway)<br />
Open high side valves B, D & G. Without exceeding<br />
the specified amount, allow as much refrigerant as<br />
possible to enter system<br />
Watch to see if low side gauge rises. If not, the TX<br />
is shut and will need replacing.<br />
Close valves B & D. Rotate compressor front plate 12<br />
revolutions to ensure no liquid is trapped in the compressor<br />
Start engine, set to fast idle. Activate A/C switch.<br />
Set controls to maximum cooling and high fan speed.<br />
Open low side valves, A & C slowly and complete<br />
the charging process (If required).<br />
Caution: Do not allow more than 275 kPa to register<br />
on the low side gauge during charging.<br />
Close all valves and taps. Remove high and low filling<br />
hoses, make sure valves C & D are closed. Connect high<br />
side filling hose to recovery unit inlet side. Open valves<br />
A, B & D. Switch on recovery machine and remove all<br />
refrigerant from filling hoses. (Refer Fig. 2)<br />
Carry out performance testing. Refer to appropriate<br />
workshop manual for specifications.<br />
HR12 TECHNICAL INFORMATION