O&M Manual - Landustrie
O&M Manual - Landustrie
O&M Manual - Landustrie

You also want an ePaper? Increase the reach of your titles
YUMPU automatically turns print PDFs into web optimized ePapers that Google loves.
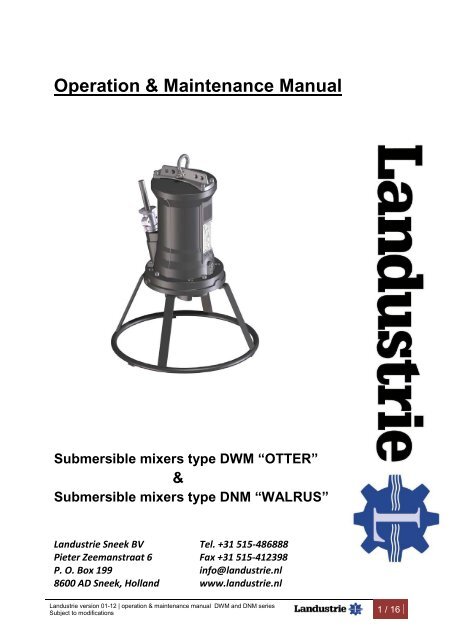
Operation & Maintenance <strong>Manual</strong><br />
Submersible mixers type DWM “OTTER”<br />
&<br />
Submersible mixers type DNM “WALRUS”<br />
<strong>Landustrie</strong> Sneek BV Tel. +31 515-486888<br />
Pieter Zeemanstraat 6 Fax +31 515-412398<br />
P. O. Box 199 info@landustrie.nl<br />
8600 AD Sneek, Holland www.landustrie.nl<br />
<strong>Landustrie</strong> version 01-12 | operation & maintenance manual DWM and DNM series<br />
Subject to modifications<br />
1 / 16
Contents:<br />
Foreword: ............................................................................................................................ 3<br />
Mixer identification: .............................................................................................................. 3<br />
Power supply: ...................................................................................................................... 3<br />
Usage limitations: ................................................................................................................ 3<br />
General safety instructions before installation or maintenance: ........................................... 4<br />
Environment: ....................................................................................................................... 4<br />
Installations: ......................................................................................................................... 5<br />
Hoisting device: ................................................................................................................... 5<br />
Hoisting cable:..................................................................................................................... 5<br />
Operation checks:................................................................................................................ 5<br />
Noise level:.......................................................................................................................... 5<br />
Electrical mixer start options:............................................................................................... 5<br />
Spare parts:......................................................................................................................... 5<br />
Cable connection direct start of the mixer (DOL)................................................................. 6<br />
Cable connections star-delta start of the mixer (YD) ........................................................... 8<br />
Checkpoint first start:........................................................................................................... 9<br />
Maintenance:..................................................................................................................... 10<br />
EC Declaration of conformity: ............................................................................................ 11<br />
Service Contract: ............................................................................................................... 11<br />
Trouble shooting: ............................................................................................................... 12<br />
<strong>Landustrie</strong> version 01-12 | operation & maintenance manual DWM and DNM series<br />
Subject to modifications<br />
2 / 16
Foreword:<br />
This manual includes several warnings, installation guidelines and safety instructions. Before<br />
installation, please read carefully to avoid dangerous situations, which can lead to severe physical<br />
injury, and which could also damage the pump.<br />
Both the DWM and DNM mixer series are typically designed to handle waste water containing long<br />
fibrous materials.<br />
De DNM wear resistant mixers are typically designed for all kinds of weary media, such as sand<br />
mixtures and slurries. The mixer is equipped with a heavy duty Epoxy coating for long operational<br />
use.<br />
The DWM en DNM mixers are designed for professional use only.<br />
Only trained and skilled personal may install, maintain and operate the pump.<br />
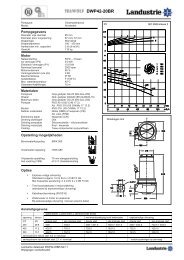
Mixer identification:<br />
The main characteristics are given on the data plate, which is connected to the pump<br />
Bj.<br />
n<br />
In<br />
P<br />
D 400V 3.6A Y 690V 2.1A<br />
Type<br />
No.<br />
Data plate DWP & DNP<br />
Basic version<br />
Legenda:<br />
Type = Type m3/h = N.A. ~ = Number of phases<br />
Code = Product code m = N.A. Hz = Frequency<br />
No. = Serial number rpm = Speed Y of D = Connection (star or delta)<br />
Yr = Year of production P1 = Rated electrical power V = Voltage<br />
kg = Weight [kg] P2 = Shaft power A = Max. current<br />
Ø = Impeller diameter cos phi = Power factor Cert. no. = For ATEX pumps only<br />
Power supply:<br />
The power supply of the mixer is part of the controls of the electrical installation.<br />
Please read carefully the specific user instructions of the electrical installation.<br />
These instructions, including the wiring diagram, are necessary for safe installation.<br />
Usage limitations:<br />
De DWM & DNM mixers in Basic Version may not be installed in potential explosive<br />
atmospheres.<br />
<strong>Landustrie</strong> version 01-12 | operation & maintenance manual DWM and DNM series<br />
Subject to modifications<br />
3 / 16
General safety instructions before installation or maintenance:<br />
The following safety instructions should be followed up very carefully to avoid severe<br />
injury or damage.<br />
Before maintenance or inspection, both mechanical and electrical, always switch off the<br />
mixer.<br />
Turn off the main power supply, log out and tag out according local procedures!<br />
Remove the fuses (if applied) and store them in a safe place.<br />
Switch off the emergency power supply if available.<br />
Alert other people with a clear warning to make aware of this service or maintenance<br />
operation.<br />
For servicing the mixer, and replacing the oil bring the mixer in horizontal position.<br />
This position is also needed to check the rotation of the impeller.<br />
Be aware the recoil can be very powerful, don’t go near rotating parts, or stand close<br />
to the mixer when testing.<br />
Do not put hands or fingers near the impeller if no safety measures are taken!<br />
When it is necessary to inspect the mixer outside the sump, please close the cover<br />
of the sump, and take care about the following:<br />
Check carefully the power cable for bends and jamming.<br />
To avoid cable damage put a decent spacer between cover and the sump<br />
Never use the power cable to hoist the mixer!<br />
Avoid any risk, that might damage the power supply cable.<br />
Always use safety shoes and safety gloves when handling the mixer.<br />
Make sure all safety measures are conform the legal laws and provisions,<br />
such as the specific Labor Safety Instructions for confined spaces.<br />
Environment:<br />
Parts which will be replaced during repair, maintenance or renewal, could contain<br />
materials which could be harmful to the environment.<br />
Please be also aware that some of the components can be very useful for reuse.<br />
The owner is responsible for careful disposal and processing of the materials.<br />
Do this in line with the local environmental regulations.<br />
<strong>Landustrie</strong> version 01-12 | operation & maintenance manual DWM and DNM series<br />
Subject to modifications<br />
4 / 16
Installations:<br />
For the DWM & DNM mixers several installation options are possible.<br />
For all options please check the following point of attention.<br />
Points of attention:<br />
• Adjust start- and stop levels in such a way that the motor will not make more than 20 starts<br />
per hour.<br />
• Check that the motor is adequately cooled.<br />
At full load conditions, at least 2/3 of the motor housing should be<br />
submerged.<br />
Hoisting device:<br />
De submersible mixers can be (re-)installed in the sump by means of an<br />
adequate hoisting device.<br />
<strong>Landustrie</strong> is able to deliver this certified equipment.<br />
Hoisting cable:<br />
If applied, please replace the stainless steel hoisting cable every two years, or<br />
accordingly to local regulations.<br />
Operation checks:<br />
The correct direction of rotation is counter clockwise (ccw),<br />
looking at the impeller (see picture).<br />
Check procedure: Place the mixer into a horizontal<br />
position, start the mixer short time, check visually the<br />
direction of rotation,<br />
Please follow all safety measures!.<br />
The mixer should operate with sufficient cooling conditions.<br />
This means for at least ⅔ part of the motor submerged.<br />
Without this requested cooling condition, the motor runtime is limited to maximum 15<br />
minutes, to avoid overheating. The cooling down time is twice the running time.<br />
Noise level:<br />
The noise level of the mixer will not exceed 70 dB(A).<br />
Electrical pump start options:<br />
The different connections for the cables are specified on page 8 and 9.<br />
Check the cable type, installed on the mixer and verify the data onto the mixer data plate.<br />
Check if the mixer is equipped with extra leads for thermal protection and/ or water in oil detection.<br />
We do strongly recommend to connect the mixer to the mains by authorized personal only.<br />
Please ensure this is done accordingly and in compliance with local regulations.<br />
Spare parts:<br />
For ordering spare parts please contact your supplier.<br />
Parts list and sectional drawings are available on request.<br />
When ordering spare parts, please specify the following data:<br />
• Type, product code, serial number,<br />
This information is available on the data plate of the pump.<br />
<strong>Landustrie</strong> version 01-12 | operation & maintenance manual DWM and DNM series<br />
Subject to modifications<br />
5 / 16
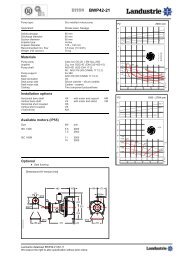
Cable connection direct start of the mixer (DOL)<br />
Without klixons and/ or water in oil detection<br />
1x 4 core cable<br />
2x 4 core cable<br />
L1 L2 L3<br />
L1 L2 L3<br />
L1 L2 L3<br />
BN<br />
GR<br />
BK<br />
GN/YE<br />
Brown<br />
Grey<br />
Black<br />
Green/ Yellow<br />
GNYE BN GR BK<br />
GNYE BN GR BK<br />
BN GR BK BNGR BK<br />
GNYE<br />
L1,L2,L3<br />
3 phase line<br />
BN GR BK<br />
BN GR BK<br />
BN GR BK<br />
BNGR BK<br />
U1 V1 W1 U2 V2 W2<br />
U1 V1 W1<br />
U2 V2 W2<br />
U1 V1 W1<br />
W2 U2 V2<br />
Motor in delta<br />
Motor in star<br />
<strong>Landustrie</strong> version 01-12 | operation & maintenance manual DWM and DNM series<br />
Subject to modifications<br />
6 / 16
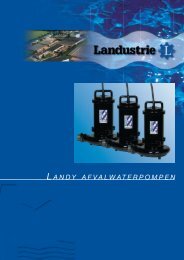
Including klixons and/or water in oil detection<br />
1x 7 core cable<br />
3x 4 core cable<br />
WA<br />
L1 L2 L3<br />
T1 T2<br />
WA<br />
L1 L2 L3<br />
T1 T2<br />
L1 L2 L3<br />
T1 T2 WA<br />
6 1 2 3 4 5<br />
GNYE<br />
6 1<br />
GNYE<br />
2<br />
3<br />
4<br />
5<br />
BNGR BK BN GR BK<br />
GNYE<br />
BN GR BK<br />
6<br />
WA<br />
1 2 3 4 5 6 1 2 3 4 5<br />
WA<br />
BNGR BK<br />
BN GR BK<br />
BN GR BK<br />
WA<br />
T1 T2<br />
U1V1W1<br />
U2V2W2<br />
U1 V1 W1<br />
T1<br />
U2 V2 W2<br />
T2<br />
U1 V1 W1<br />
W2U2<br />
V2<br />
T1 T2<br />
Motor in delta<br />
Motor in star<br />
2x 4 core cable<br />
BN<br />
GR<br />
BK<br />
GN/YE<br />
Brown<br />
Grey<br />
Black<br />
Green/ Yellow<br />
T1, T2 Klixons<br />
WA Water in oil<br />
detection<br />
L1,L2,L3<br />
3 phase line<br />
Motor in delta<br />
Motor in star<br />
<strong>Landustrie</strong> version 01-12 | operation & maintenance manual DWM and DNM series<br />
Subject to modifications<br />
7 / 16
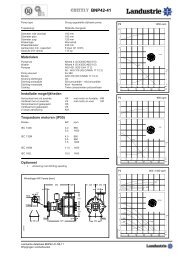
Cable connections star-delta start of the mixer (YD)<br />
Without klixons and/or water in oil detection<br />
2x 4 core cable<br />
1x 10 core cable<br />
U1V1 W1<br />
W2U2 V2<br />
U1V1 W1<br />
W2 U2 V2<br />
BN<br />
GR<br />
BK<br />
GN/YE<br />
Brown<br />
Grey<br />
Black<br />
Green/ Yellow<br />
BN GR BK<br />
BN GR BK<br />
1 2 3 GNYE 4 5 6<br />
L1,L2,L3<br />
3 phase line<br />
GNYE<br />
BN GR BK<br />
BN GR BK<br />
U1 V1 W1<br />
W2 U2 V2<br />
U1 V1 W1<br />
W2 U2 V2<br />
With klixons and/or water in oil detection<br />
3x 4 core cable 1x 7 core cable 1x 10 core cable<br />
+ 1x 4 core cable<br />
U1 V1 W1 W2 U2 V2<br />
BN GR BK BN GR BK<br />
GNYE<br />
T1 T2 WA<br />
BN GR BK<br />
U1V1 W1<br />
1 2 3<br />
W2 U2 V2<br />
GNYE 4 5 6<br />
T1 T2 WA<br />
BN GR BK<br />
U1V1 W1<br />
W2 U2 V2<br />
GNYE<br />
1 2 3 4 5 6<br />
T1 T2 WA<br />
7 8 9<br />
BN<br />
GR<br />
BK<br />
GN/YE<br />
Brown<br />
Grey<br />
Black<br />
Green/Yellow<br />
T1, T2 Klixons<br />
WA Water in oil<br />
detection<br />
L1,L2,L3<br />
3 phase line<br />
BN GR BK BN GR BK BN GR BK 1 2 3 4 5 6 BN GR BK<br />
U1 V1 W1<br />
W2 U2 V2<br />
WA<br />
T1 T2<br />
U1 V1 W1<br />
W2 U2 V2<br />
T1 T2<br />
WA<br />
1 2 3 4 5 6 7 8 9<br />
WA<br />
U1 V1 W1 W2 U2 V2 T1 T2<br />
<strong>Landustrie</strong> version 01-12 | operation & maintenance manual DWM and DNM series<br />
Subject to modifications<br />
8 / 16
Checkpoint first start:<br />
Before installing and start operating the mixer following checkpoints are involved:<br />
• Check on delivery<br />
Remove the mixer from the packing and check for transport damage, such as material<br />
errors, cracks of bended cable.<br />
• Check for completeness of the delivery.<br />
If the delivery is incomplete, or damaged, please contact your supplier immediately.<br />
• Check oil level<br />
Verify the oil level in the seal housing (according to procedures on page 11)<br />
• Check Power supply.<br />
Verify if voltage, frequency and starting method are according to the data as specified on<br />
the pump data plate.<br />
Connect the mixer according to the wiring diagram of the electrical cabinet.<br />
Information about the cable codes can be find on page 8 or 9.<br />
• Check for thermal protection (klixons)<br />
Check the pump for the presence of thermal protection, the connection values for the<br />
standard thermal protection are max. 250V-1.6A. In ‘cold’ condition the switch is closed.<br />
• Check condition cable entry<br />
Especially when the mixer has been stored for a long time. Turn the cable entry, if<br />
necessary to tighten the rubber gland of the cable entry.<br />
• Check motor protection<br />
Verify the presence of the motor protection circuit breaker.<br />
At direct start (DOL) the motor circuit breaker should be set at the current value given on<br />
the data plate of the pump.<br />
At star delta start (YD) the setting of the motor circuit breaker should be 0.6 of the current<br />
value on the data plate of the mixer.<br />
<strong>Landustrie</strong> version 01-12 | operation & maintenance manual DWM and DNM series<br />
Subject to modifications<br />
9 / 16
Maintenance:<br />
Before taking out the mixer from the installation, please switch of the mains, according to the<br />
instructions on page 4.<br />
Clean the mixer adequately!<br />
Take care! The surface of the motor housing can be hot, especially when it is just switched off.<br />
Maintenance schedule:<br />
* After the first 100 operating hours:<br />
- Check the condition of the oil.<br />
If too much water is mixed with the oil, please contact your supplier.<br />
* Every 1000 operating hours or each year:<br />
- Check both the condition of the oil and the oil level.<br />
If too much water is included, please contact your supplier.<br />
- Change the oil if not transparent.<br />
Lubricants:<br />
The bearings of the mixer are greased for life.<br />
Standard oil type for the mechanical seals: Shell Tellus 32, viscosity 32 cSt.<br />
The quantity of the oil depends on the mixer:<br />
DWM/ DNM 22 series: 0,5l.<br />
DWM/ DNM 42 series: 2,0l.<br />
DWM/ DNM 62 series: 2,5l.<br />
Cable entry:<br />
If the mixer is stored for long time, the rubber gland of the cable entry might be diminished.<br />
This can lead to leakage to the motor compartment.<br />
By turning-in the cable entry clockwise, the sealing of the gland will be secured.<br />
Check oil level:<br />
DWM/ DNM 22 series:<br />
Bring the mixer into horizontal position, and remove both the fill plug and the vent plug.<br />
The accurate oil level is reached when the oil level is just below the fill plug.<br />
You can check this to turn the pump a little.<br />
Be aware that the mixer are equipped with 2 or with 3 plugs, depending on the size.<br />
If the level is too low, please add accordingly.<br />
DWM/ DNM 42 series:<br />
Bring the mixer into horizontal position, in such position that 2 plugs are on top and one is beneath.<br />
Remove the two plugs, using one of them as fill plug and the other as vent plug.<br />
The accurate oil level is reached when the oil level is just below the fill plug.<br />
You can check this to turn the mixer a little.<br />
If the level is too low, please add accordingly<br />
DWM/ DNM 62 series:<br />
Bring the pump into vertical position en remove the M20 fill plug, at the counter side of the cable<br />
box.<br />
The accurate oil level is reached when the oil level is just below the fill plug.<br />
If the level is too low, please add accordingly.<br />
Make sure the mixer cannot fall during this procedure.<br />
<strong>Landustrie</strong> version 01-12 | operation & maintenance manual DWM and DNM series<br />
Subject to modifications<br />
10 / 16
EC Declaration of conformity:<br />
DECLARATION OF CONFORMITY<br />
<strong>Landustrie</strong> Sneek bv<br />
Pieter Zeemanstraat 6,<br />
P.O Box 199, 8600 AD Telephone +31 515 - 486888, Fax +31 515 - 412398<br />
SNEEK, THE NEDERLANDS E-mail: info@landustrie.nl, Internet: www.landustrie.nl<br />
Herewith declares , that the submersible mixer series type DWP and DNP, as manufactured by:<br />
<strong>Landustrie</strong> Sneek BV.<br />
in accordance with:<br />
~ Machinery Directive 2006/42/EG, annex IIB<br />
~ EMC-Directive 89/336/EEG<br />
~ Low voltage Directive (LVD 73/23/EEG)<br />
en declares conformity to:<br />
~ the following (parts of) harmonized standards :<br />
NEN-EN-ISO 12100-1 / 2 and EN-ISO-14121,<br />
~ the following (parts of) technical specifications:<br />
NEN-EN 50 081-2, NEN-EN 50 082-2 en EN 60 204<br />
Sneek, 30-03-2011<br />
P.J.M. Jorna, Quality Manager<br />
Service Contract:<br />
Although the quality standards of the <strong>Landustrie</strong> pumps are very high, we do strongly recommend<br />
to close a service contract with your local supplier.<br />
For service- or technical information, please contact:<br />
<strong>Landustrie</strong> version 01-12 | operation & maintenance manual DWM and DNM series<br />
Subject to modifications<br />
11 / 16
Trouble shooting:<br />
Make sure the mains are switched off<br />
during inspection.<br />
Only trained and authorized people may<br />
install and maintain the pump.<br />
Make sure the pump will not start<br />
unexpectedly.<br />
Don’t go near to rotating parts of the pump<br />
Observe the local regulations for installation,<br />
maintenance and repair!<br />
Problem: Possible cause: Required action: Checkpoints:<br />
Mixer does not start No voltage on the terminals Check power supply * main switch<br />
* installation switches<br />
* all auxiliary switches<br />
* voltage relay<br />
Check motor protection<br />
* earth leakage relay<br />
* the auxiliary switches<br />
* motor protection relay<br />
* water in oil relays<br />
Check start- and stop signals * too low level<br />
* obstructed level switches<br />
* engaged emergency stop<br />
* general electrical error<br />
Wrong cable connection Measure cable wires * check motor phases<br />
Blockage impeller Check impeller * impeller jamming<br />
Mixer does not stop No stop signal Check level switches * level switches<br />
* general electrical error<br />
Wrong start / stop signal Check level switches * installation switches<br />
* level switches<br />
* settings level switches<br />
Mixer start and stops Fault in power supply Check power supply * main switch<br />
repeatedly<br />
* installation switches<br />
* switch thermal protection<br />
Level control system not stable Check level switches * installation switches<br />
* level switches<br />
* settings level switches<br />
Motor overload Check motor protection * wrong direction of rotation<br />
* impeller blockage<br />
* motor protection relay<br />
Motor current too high Supply failure Check power supply * voltage monitoring relay<br />
Pump failure Check pump * impeller blockage<br />
* medium specific gravity too high<br />
If the pump still fails please contact:<br />
<strong>Landustrie</strong> version 01-12 | operation & maintenance manual DWM and DNM series<br />
Subject to modifications<br />
12 / 16
Notes:<br />
<strong>Landustrie</strong> version 01-12 | operation & maintenance manual DWM and DNM series<br />
Subject to modifications<br />
13 / 16
Notes:<br />
<strong>Landustrie</strong> version 01-12 | operation & maintenance manual DWM and DNM series<br />
Subject to modifications<br />
14 / 16
Notes:<br />
<strong>Landustrie</strong> version 01-12 | operation & maintenance manual DWM and DNM series<br />
Subject to modifications<br />
15 / 16
Notes:<br />
<strong>Landustrie</strong> version 01-12 | operation & maintenance manual DWM and DNM series<br />
Subject to modifications<br />
16 / 16