Jewelry Illustration - Brynmorgen Press
Jewelry Illustration - Brynmorgen Press
Jewelry Illustration - Brynmorgen Press

You also want an ePaper? Increase the reach of your titles
YUMPU automatically turns print PDFs into web optimized ePapers that Google loves.
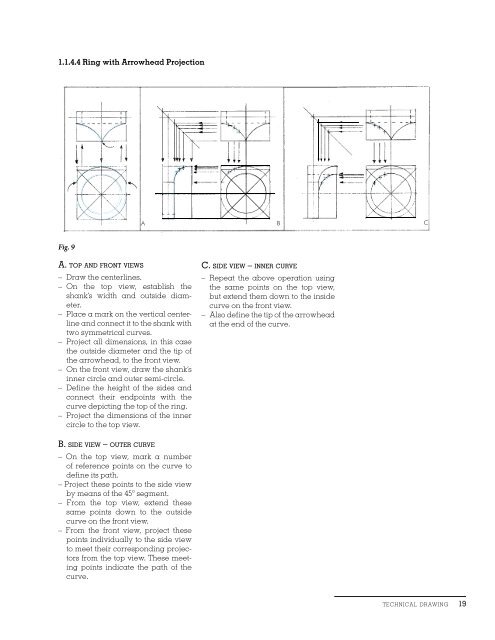
1.1.4.4 Ring with Arrowhead Projection<br />
A<br />
B<br />
C<br />
Fig. 9<br />
A. top and front views<br />
– Draw the centerlines.<br />
– On the top view, establish the<br />
shank’s width and outside diameter.<br />
– Place a mark on the vertical centerline<br />
and connect it to the shank with<br />
two symmetrical curves.<br />
– Project all dimensions, in this case<br />
the outside diameter and the tip of<br />
the arrowhead, to the front view.<br />
– On the front view, draw the shank’s<br />
inner circle and outer semi-circle.<br />
– Define the height of the sides and<br />
connect their endpoints with the<br />
curve depicting the top of the ring.<br />
– Project the dimensions of the inner<br />
circle to the top view.<br />
C. side view – inner curve<br />
– Repeat the above operation using<br />
the same points on the top view,<br />
but extend them down to the inside<br />
curve on the front view.<br />
– Also define the tip of the arrowhead<br />
at the end of the curve.<br />
B. side view – outer curve<br />
– On the top view, mark a number<br />
of reference points on the curve to<br />
define its path.<br />
– Project these points to the side view<br />
by means of the 45º segment.<br />
– From the top view, extend these<br />
same points down to the outside<br />
curve on the front view.<br />
– From the front view, project these<br />
points individually to the side view<br />
to meet their corresponding projectors<br />
from the top view. These meeting<br />
points indicate the path of the<br />
curve.<br />
technical drawing 19