FAST AND PRECISE ONE-MAN LEVELLING! - Laser Levels Online
FAST AND PRECISE ONE-MAN LEVELLING! - Laser Levels Online
FAST AND PRECISE ONE-MAN LEVELLING! - Laser Levels Online

Create successful ePaper yourself
Turn your PDF publications into a flip-book with our unique Google optimized e-Paper software.
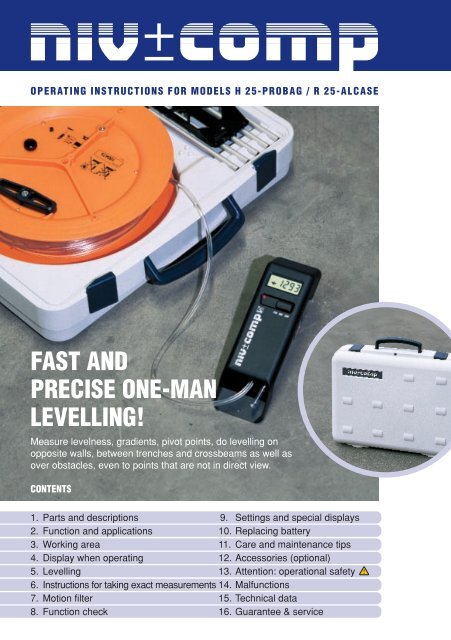
OPERATING INSTRUCTIONS FOR MODELS H 25-PROBAG / R 25-ALCASE<br />
<strong>FAST</strong> <strong>AND</strong><br />
<strong>PRECISE</strong> <strong>ONE</strong>-<strong>MAN</strong><br />
<strong>LEVELLING</strong>!<br />
Measure levelness, gradients, pivot points, do levelling on<br />
opposite walls, between trenches and crossbeams as well as<br />
over obstacles, even to points that are not in direct view.<br />
CONTENTS<br />
1. Parts and descriptions<br />
2. Function and applications<br />
3. Working area<br />
4. Display when operating<br />
5. Levelling<br />
9. Settings and special displays<br />
10. Replacing battery<br />
11. Care and maintenance tips<br />
12. Accessories (optional)<br />
13. Attention: operational safety<br />
6. Instructions for taking exact measurements 14. Malfunctions<br />
7. Motion filter<br />
15. Technical data<br />
8. Function check<br />
16. Guarantee & service
1<br />
PARTS <strong>AND</strong> DESCRIPTIONS<br />
Operating instructions<br />
Handset with display,<br />
LED and button (T)<br />
Winder handle<br />
(on both sides)<br />
Accessories (optional)<br />
Pressure screw (S)<br />
Indicator peg<br />
2<br />
3<br />
FUNCTION <strong>AND</strong> APPLICATIONS<br />
The niv±comp device consists of a hose drum with pull-out winder handles, a special<br />
hose and handset. There is a liquid reservoir with a pressure screw in the centre<br />
of the drum. A high-quality measuring device in the handset determines the<br />
pressure difference resulting from the difference in height between the handset and<br />
liquid reservoir.<br />
The main applications for niv±comp are levelling and taking measurements to check<br />
dimensions in interior construction. Particular attention must be paid to the instructions<br />
on taking exact measurements when using the device outside (Section 6).<br />
WORKING AREA<br />
Hose drum<br />
2,5 m<br />
(4 m*)<br />
48 m<br />
2,5 m<br />
(4 m*)<br />
HORIZONTAL<br />
<strong>AND</strong> VERTICAL<br />
WORKING AREA<br />
*) Measurement using accessories<br />
The device can be used to check the gradient of sloping surfaces as well as being<br />
used in horizontal and vertical positions.
DISPLAY WHEN OPERATING<br />
4<br />
Press button to switch device on<br />
Reference level not yet stable<br />
Reference level is stable, press button to save reference level (Display<br />
)<br />
Level = reference level. Values such as or show deviation<br />
from reference level in millimetres or inches.<br />
Saving new reference level:<br />
Press button until display shows . Then save reference level again<br />
(see above).<br />
The device can be switched off by holding the button down or is<br />
switched off automatically 33 minutes after the button was last pressed.<br />
Flashing LED for use in dark:<br />
Zero level: LED flashes evenly<br />
Too low: LED flashes slowly<br />
Too high: LED flashes quickly<br />
<strong>LEVELLING</strong><br />
Place the case or hose drum in a stable position. The hose drum must not<br />
be moved whilst it is being used for levelling (!).<br />
Turn the pressure screw (S) as far as it will go in the direction marked<br />
“Measure” (indicator peg is down).<br />
Remove handset and roll out a sufficient amount of hose.<br />
Check that hose temperature is the same as that of the surroundings (Section<br />
6).<br />
Switch handset on using button (T) and place at reference level (this exact<br />
position must be used for measurement), alignment of device by eye<br />
is sufficient.<br />
Make sure that the hose is not moving; wait until display is stable, press<br />
button quickly when display has shown stable value …0 for about 3 seconds.<br />
(Display [-ni], then relative height measurement).<br />
Take the handset to the desired position, correct the vertical position until<br />
the display shows a stable value of …0 (levelling) or until the measured<br />
value (control measurement) is reached. The height can now be marked<br />
or read (same procedure for other points to be measured).<br />
To save new reference level:<br />
Press button until display shows again.<br />
To end measurement:<br />
Put handset down (or back in case), roll the hose up making sure it is<br />
clean and not twisted. The pressure screw (S) should be turned as far<br />
as possible in the direction marked “Store” (indicator peg is up) when<br />
the device is being stored.<br />
PLEASE NOTE:<br />
The levelling device and interior of the case should be kept dry at all times.<br />
5
6 INSTRUCTIONS FOR MAKING EXACT MEASUREMENTS<br />
3 m<br />
The following guidelines are important for levelling and making measurements using<br />
niv±comp. It is also important to handle the device carefully and to be aware<br />
of any possible sources of error.<br />
INDOORS CLOUDY WINDY SUNNY<br />
2 m<br />
Outside<br />
building<br />
1 m<br />
Inside<br />
building<br />
0 1 2 3 4 5 6 7 8 9 – mm<br />
Fig. Typical deviation or distribution of measured values depending on hose<br />
radius.<br />
Deviations from reference level are predominantly influenced by the climate and<br />
measurement height in relation to the hose drum. There is, therefore, no standard<br />
deviation value.<br />
PLEASE NOTE:<br />
A high level of accuracy of measurements or reliable information<br />
on distribution of measured values can only<br />
be achieved by taking further control measurements<br />
using the reference level.<br />
The smaller the difference in height between the hose, base unit and handset,<br />
the more reliable the measured results will be (under no circumstances<br />
should you hang the hose from scaffolding).<br />
Turn the pressure screw to the position marked “Measure“ no later than 1<br />
minute before starting to measure.<br />
Do not level several or a sequence of measurement points using the last<br />
point as a starting point (increase in deviation!) but rather mark and check<br />
all points in one session.
It is useful to use some kind of position marker (nail) if one particular reference<br />
level is required often.<br />
The device should be opened and the hose unwound and left for a few<br />
minutes to reach the right temperature if the temperature has changed<br />
significantly (e.g. after transporting the device in a vehicle that was very<br />
warm or cold).<br />
Place the handset exactly on the measurement points and do not change<br />
the marking or visual angles. Deviation from zero level is shown from +/-<br />
0.2 mm.<br />
Do not throw the hose (pressure waves)! Avoid touching the hose with<br />
warm hands when it is cold.<br />
The following applies to taking measurements outdoors:<br />
Climatic influences in the open can lead to increased deviation. Keep the device<br />
and its components out of intensive or changeable levels of sunlight and do not run<br />
the hose over warm surfaces or in areas where temperature is variable (e.g. in currents<br />
of air at building facades).<br />
The best results can be achieved in the open at times where climatic conditions are<br />
favourable (at daybreak). The measurement points should then be worked through<br />
without interruption where possible.<br />
MOTION FILTER<br />
A motion filter can be activated by pressing the button twice when the device is in<br />
levelling mode. The symbol appears briefly. It can sometimes be an advantage<br />
if the reading does not react immediately to interfering vibration of the floor or<br />
hose. The filter can be deactivated by one short press of the button.<br />
FUNCTION CHECK<br />
(See also the section “Malfunctions”)<br />
The following control values can give a rough idea of how niv±comp functions as<br />
a measurement device:<br />
7<br />
8<br />
A) Stability of measured values (at same temperature):<br />
Place the handset in a horizontal position and record the level once you are sure<br />
the reading is stable. The displayed value may only change by a maximum of 1<br />
millimetre if the handset is left in position at this point or if it is returned within a<br />
period of a few minutes.<br />
B) Pressurisation:<br />
Switch the handset on with the pressure screw in the “Measure” position then<br />
place it next to the hose drum and save the level measured.<br />
Turn the pressure screw to its final position “Store”. The value displayed should<br />
lie within a range of 600...1800.
9 SETTINGS <strong>AND</strong> SPECIAL DISPLAYS<br />
It is possible to make corrections to height calibration and to personalise the settings<br />
for the display of measured values using niv±comp. You can call the menu<br />
up by keeping the button pressed down when switching the device on until<br />
is displayed. Let the button go – the settings options will be displayed<br />
slowly in sequence. You can change the settings by pressing the button.<br />
Correct the height display by +1 mm per press of the button.<br />
Correct the height display by -1 mm per press of the button. Corrections<br />
are implemented if you do not press the button for 5 seconds.<br />
We recommend that you take an exact measurement of 1000 mm in<br />
height difference to ensure correct measurement.<br />
or<br />
or<br />
Select the deviation display by +/- or arrow.<br />
Select the height display in inches or millimetres.<br />
Special displays:<br />
Return to factory settings (Reset).<br />
SetUp is being saved (Animation)<br />
Indication that battery should be replaced (from ~20% reserve)<br />
Warning (flash) battery is empty (from ~10% reserve). The device<br />
switches itself off when the battery is exhausted.<br />
Critical temperature change<br />
10<br />
ANZEIGE<br />
PULSIERT<br />
REPLACING BATTERY<br />
Overranging of measured value<br />
for three minutes from 30 minutes after the button was last pressed.<br />
The device then switches itself off. A short press of the button extends<br />
the time.<br />
The battery must be replaced when is displayed.<br />
Undo the screws in the upper cover of<br />
the handset and tighten them lightly after replacing<br />
the battery. Use AA (LR6) alkaline batteries.
TIPS FOR CARE <strong>AND</strong> MAINTENANCE<br />
Always store niv±comp in a dry place and keep it clean to make sure it stays in<br />
good condition for a long time. Wax-free and solvent-free cleaning products only<br />
may be used (washing liquid). The device is best protected from damage when always<br />
packed away after use.<br />
If the device is to be stored for a longer period of time, ensure that it is dry and<br />
that the pressure screw is in the “Store” position.<br />
ACCESSORIES (OPTIONAL)<br />
The accessory package contains a holder, a<br />
tracer arm set, a magnetic holder (max. 10 kg)<br />
and a protective knob.<br />
The accessory package makes it possible to increase<br />
the vertical area where measurements<br />
can be made (see also fig. Working area). The<br />
tracer arms are placed at the top or bottom of<br />
the holder depending on the direction to be<br />
measured in and the protective knob or magnet<br />
is placed on the end of the arm.<br />
ATTENTION: OPERATIONAL SAFETY!<br />
Do not run the hose higher than floor level (Danger: it could be a mantrap or<br />
get caught up in a vehicle).<br />
The protective knob should always be used when using the extension for the<br />
tracer arm from the accessory package!<br />
Do not use the magnetic holder above head height!<br />
MALFUNCTIONS<br />
General functions:<br />
The device will not switch on or switches off randomly: check battery, check battery<br />
contacts. Battery symbol flashes and device switches off: replace battery.<br />
Errors in levelling:<br />
Have you checked the pressure screw and temperature moderation?<br />
Have you followed the instructions on “Measurements outdoors“?<br />
Is the case damp or has water got in?<br />
Levelling errors resulting from bubbles in the hose or sensor connection:<br />
(This is possible as a result of serious neglect of the pressure screw or following<br />
exposure to extreme heat or some other kind of shock) Leave the device in<br />
the storage position for a few days then check it again.<br />
Failure as a result of damp:<br />
Do not let the closed case get damp – dry the device – leave the case open. If<br />
water gets in to the handset, the battery must be removed immediately. The battery<br />
can only be put in again after all parts have been dried thoroughly.<br />
11<br />
12<br />
13<br />
14
15<br />
16<br />
Damage to the hose system:<br />
The hose is thick and robust so slight damage to the outer skin is not critical.<br />
The hose and hose system can withstand great strain. However, repair will be<br />
required if there is a leak of fluid. Clean the fluid (non-toxic / neutral / oily) up using<br />
suitable means and dispose of in accordance with the regulations on waste<br />
oil.<br />
TECHNICAL DATA<br />
Principle of measurement...........................................analogue with digital display<br />
Reproducibility as typical value inside buildings ........................................ ±2 mm<br />
At a maximum distance of measurement point ............................................. 48 m<br />
Vertical working area ................................................................. ± 2,5 m (± 4,0 m)<br />
Manual calibration of height display ..................................................... (mm/Inch)<br />
Operational temperature range approx ................................................. 0...+35 °C<br />
Battery-powered operation ....................................... 1 x AA / LR6 (Alkaline) 1,5V<br />
Power consumption / Operating time ........................................ ~10 mW / 250 h<br />
Automatic switch-off .................................... after 33 mins. if button is not pressed<br />
Low-level of emissions in accordance with EMC product standards.<br />
Shock resistance .............................................. impact from height of approx. 1 m<br />
Storage and transport ...................................... -10...+40 °C (limited -30...+55 °C)<br />
Dimensions .......................................................................... 450 x 420 x 150 mm 3<br />
Weight ............................................................................................. approx. 5,5 kg<br />
Regulations for recycling of electronic scrap, plastics and waste oil apply.<br />
GUARANTEE & SERVICE<br />
Sales and service are available through reputable specialised dealers.<br />
Repairs made during the guarantee period are free of charge, provided it can be<br />
proved that the fault resulted from a material defect or defect in manufacture.<br />
When a claim is made under guarantee, the device should cleaned thoroughly,<br />
packed and returned to the supplier.<br />
The following should be enclosed with the package:<br />
1. Proof of purchase or receipt showing date of purchase,<br />
2. Description of defect.<br />
© by dirotec