Anchor Meadow Stone - Pavestone
Anchor Meadow Stone - Pavestone
Anchor Meadow Stone - Pavestone
You also want an ePaper? Increase the reach of your titles
YUMPU automatically turns print PDFs into web optimized ePapers that Google loves.
<strong>Anchor</strong> <strong>Meadow</strong> <strong>Stone</strong> ®<br />
The new <strong>Anchor</strong> <strong>Meadow</strong> <strong>Stone</strong> ® has attractive earthtone blends and a<br />
rough-hewn texture that achieves the look and feel of natural stone. A flexible, easy-toinstall<br />
3-piece system, the <strong>Anchor</strong> <strong>Meadow</strong> <strong>Stone</strong> ® can reach a height of 2 1 / 2’ (750 mm)<br />
and is a more reliable alternative to timber, boulder or field stone walls. Each stone sold<br />
individually. Retaining wall design and construction vary based on product applicability,<br />
site conditions and local building code regulations. Engineering may be necessary.<br />
COMPOSITION AND MANUFACTURE<br />
<strong>Anchor</strong> <strong>Meadow</strong> <strong>Stone</strong> ® is made from a “no slump” concrete mix. Made under extreme<br />
pressure and high frequency vibrations, <strong>Anchor</strong> <strong>Meadow</strong> <strong>Stone</strong> ® has a compressive<br />
strength greater than 4000psi, a water absorption maximum of 7%.<br />
INSTALLATION<br />
Depending on site conditions and or local building codes, engineering may be required.<br />
Step 1 - Site Preparation: Stake out project. Place a string line level on each string line and<br />
adjust to where all lines are level. Measure down in wall increments using the height of<br />
the wall stone to determine placement of the top of the wall courses. For small landscape<br />
walls (3 courses or less) it is required that the first course be at least partially buried. For<br />
tall walls (4 to 8 courses) the first course should be fully buried at a minimum.<br />
Step 2 - Excavation: All walls require excavation for a prepared base material that<br />
extends a minimum of six (6) inches in front and back of the wall. For small walls, dig<br />
this trench a minimum half the height of the wall stone deep. For tall walls, dig your<br />
trench to a minimum depth of a full wall stone height. Compact floor of this trench<br />
with a compactor or hand tamper.<br />
Step 3 - Base Preparation: For small walls base preparation, an option would be to place<br />
a mixture of dry sand and Portland cement (one shovel of Portland to four shovels of<br />
sand). Place the sand-cement mixture a minimum of four (4) inches at the bottom of the<br />
trench. For tall walls, you’ll need a more substantial base. Granular road base is<br />
preferable at a minimum four (4) inch placement. Compact the material with a<br />
compactor or hand tamper. Engineering may be required.<br />
Step 4 - Leveling: For both small and tall walls a maximum of one-half inch of coarse sand<br />
is allowable to level the top profile of the base material. When placing wall stones, level<br />
the surface of all wall stones in both directions with a carpenter’s level. Replace the<br />
string-line where the top of your wall course will be and check for horizontal level prior<br />
to each course installation.<br />
Step 5 - Laying <strong>Stone</strong>s: Always begin at the lowest point of the wall. Level each stone in<br />
both directions with a minimum two (2) foot carpenter’s level. Once the base course is<br />
complete, continue assembling additional courses by positioning the stones in a running<br />
bond pattern relative to the course beneath, taking care not to align joints vertically.<br />
Securely engage the stone to the lower stones. Backfill and compact material behind the<br />
wall in a four (4) inch to a maximum six (6) inch layer. Install a granular no fines<br />
material as a drainage zone a minimum of four (4) to six (6) inches thickness directly<br />
behind the wall. Compact materials with a compactor or hand tamper. A four (4) inch<br />
perforated plastic pipe may be required behind wall.<br />
Step 6 - Cutting <strong>Stone</strong>s: When building your wall, you may need partial stones to finish<br />
coursing. Place the to-be-cut stone at its finished position in the wall. Mark the cut line.<br />
Typically, a mechanical splitter or gasoline powered concrete hand saw are used to<br />
facilitate cutting of stone. An alternative may be to use a hammer and a chisel. Place<br />
the stone on a hard surface. Position the chisel at the cut mark and proceed to hammer<br />
the chisel scoring the cut line. Score the stone on all sides. Once the perimeter score is<br />
complete, strike the chisel on the score line until it breaks. Always use safety glasses,<br />
gloves and applicable safety standards.<br />
Complete installation and specification details are available by contacting your <strong>Pavestone</strong><br />
Sales Representative.<br />
Note: Colors are shown as accurately as possible in brochures & samples, but due to the nature of the<br />
product, regional color differences and variables in print reproduction, colors may not match exactly.<br />
APPLICATIONS<br />
Landscape Retaining Walls • Tree Rings • Planter<br />
Beds • Garden Terraces • Raised Planters<br />
PRODUCT INFORMATION<br />
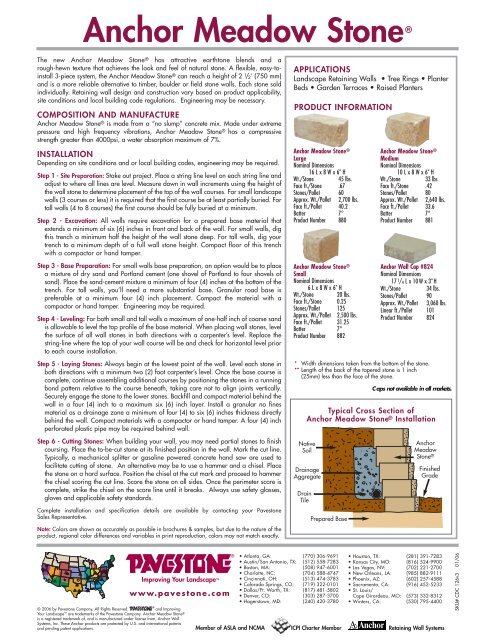
<strong>Anchor</strong> <strong>Meadow</strong> <strong>Stone</strong> ®<br />
Large<br />
Nominal Dimensions<br />
16 L x 8 W x 6" H<br />
Wt./<strong>Stone</strong> 45 lbs.<br />
Face ft./<strong>Stone</strong> .67<br />
<strong>Stone</strong>s/Pallet 60<br />
Approx. Wt./Pallet 2,700 lbs.<br />
Face ft./Pallet 40.2<br />
Batter 7°<br />
Product Number 880<br />
<strong>Anchor</strong> <strong>Meadow</strong> <strong>Stone</strong> ®<br />
Small<br />
Nominal Dimensions<br />
6 L x 8 W x 6" H<br />
Wt./<strong>Stone</strong> 20 lbs.<br />
Face ft./<strong>Stone</strong> 0.25<br />
<strong>Stone</strong>s/Pallet 125<br />
Approx. Wt./Pallet 2,500 lbs.<br />
Face ft./Pallet 31.25<br />
Batter 7°<br />
Product Number 882<br />
Native<br />
Soil<br />
Drainage<br />
Aggregate<br />
Drain<br />
Tile<br />
Prepared Base<br />
<strong>Anchor</strong> <strong>Meadow</strong> <strong>Stone</strong> ®<br />
Medium<br />
Nominal Dimensions<br />
10 L x 8 W x 6" H<br />
Wt./<strong>Stone</strong> 33 lbs.<br />
Face ft./<strong>Stone</strong> .42<br />
<strong>Stone</strong>s/Pallet 80<br />
Approx. Wt./Pallet 2,640 lbs.<br />
Face ft./Pallet 33.6<br />
Batter 7°<br />
Product Number 881<br />
<strong>Anchor</strong> Wall Cap #824<br />
Nominal Dimensions<br />
17 1 / 4 L x 10 W x 3" H<br />
Wt./<strong>Stone</strong> 34 lbs.<br />
<strong>Stone</strong>s/Pallet 90<br />
Approx. Wt./Pallet 3,060 lbs.<br />
Linear ft./Pallet 101<br />
Product Number 824<br />
* Width dimensions taken from the bottom of the stone.<br />
** Length of the back of the tapered stone is 1 inch<br />
(25mm) less than the face of the stone.<br />
Caps not available in all markets.<br />
Typical Cross Section of<br />
<strong>Anchor</strong> <strong>Meadow</strong> <strong>Stone</strong> ® Installation<br />
<strong>Anchor</strong><br />
<strong>Meadow</strong><br />
<strong>Stone</strong> ®<br />
Finished<br />
Grade<br />
w w w. p a v e s t o n e . c o m<br />
© 2006 by <strong>Pavestone</strong> Company. All Rights Reserved. and Improving<br />
Your Landscape are trademarks of the <strong>Pavestone</strong> Company. <strong>Anchor</strong> <strong>Meadow</strong> <strong>Stone</strong> ®<br />
is a registered trademark of, and is manufactured under license from, <strong>Anchor</strong> Wall<br />
Systems, Inc. These <strong>Anchor</strong> products are protected by U.S. and international patents<br />
and pending patent applications.<br />
Member of ASLA and NCMA<br />
• Atlanta, GA: (770) 306-9691<br />
• Austin/San Antonio, TX: (512) 558-7283<br />
• Boston, MA: (508) 947-6001<br />
• Charlotte, NC: (704) 588-4747<br />
• Cincinnati, OH: (513) 474-3783<br />
• Colorado Springs, CO: (719) 322-0101<br />
• Dallas/Ft. Worth, TX: (817) 481-5802<br />
• Denver, CO: (303) 287-3700<br />
• Hagerstown, MD: (240) 420-3780<br />
ICPI Charter Member<br />
• Houston, TX: (281) 391-7283<br />
• Kansas City, MO: (816) 524-9900<br />
• Las Vegas, NV: (702) 221-2700<br />
• New Orleans, LA: (985) 882-9111<br />
• Phoenix, AZ: (602) 257-4588<br />
• Sacramento, CA: (916) 452-5233<br />
• St. Louis/<br />
Cape Girardeau, MO: (573) 332-8312<br />
• Winters, CA: (530) 795-4400<br />
Retaining Wall Systems<br />
SKU# CDC 126v3 01/06


