EXAMION® AQS VET Software Platform-Product
EXAMION® AQS VET Software Platform-Product
EXAMION® AQS VET Software Platform-Product

Create successful ePaper yourself
Turn your PDF publications into a flip-book with our unique Google optimized e-Paper software.
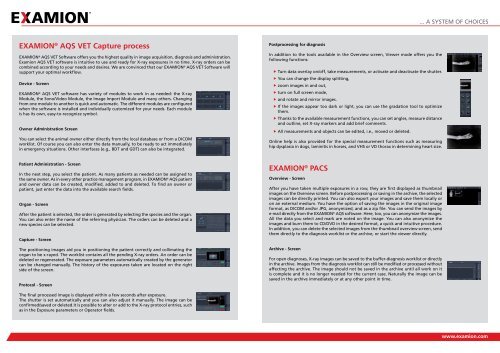
EXAMION ® <strong>AQS</strong> <strong>VET</strong> Capture process<br />
EXAMION ® <strong>AQS</strong> <strong>VET</strong> <strong>Software</strong> offers you the highest quality in image acquisition, diagnosis and administration.<br />
Examion <strong>AQS</strong> <strong>VET</strong> software is intuitive to use and ready for X-ray exposures in no time. X-ray orders can be<br />
combined according to your needs and desires. We are convinced that our EXAMION ® <strong>AQS</strong> <strong>VET</strong> <strong>Software</strong> will<br />
support your optimal workflow.<br />
Device - Screen<br />
EXAMION ® <strong>AQS</strong> <strong>VET</strong> software has variety of modules to work in as needed: the X-ray<br />
Module, the Sono/Video Module, the Image Import Module and many others. Changing<br />
from one module to another is quick and automatic. The different modules are configured<br />
when the software is installed and individually customized for your needs. Each module<br />
is has its own, easy-to-recognize symbol.<br />
Owner Administration Screen<br />
You can select the animal owner either directly from the local database or from a DICOM<br />
worklist. Of course you can also enter the data manually, to be ready to act immediately<br />
in emergency situations. Other interfaces (e.g., bDT and GDT) can also be integrated.<br />
Patient Administration - Screen<br />
In the next step, you select the patient. As many patients as needed can be assigned to<br />
the same owner. As in every other practice management program, in EXAMION ® <strong>AQS</strong> patient<br />
and owner data can be created, modified, added to and deleted. To find an owner or<br />
patient, just enter the data into the available search fields.<br />
Organ - Screen<br />
After the patient is selected, the order is generated by selecting the species and the organ.<br />
You can also enter the name of the referring physician. The orders can be deleted and a<br />
new species can be selected.<br />
Capture - Screen<br />
The positioning images aid you in positioning the patient correctly and collimating the<br />
organ to be x-rayed. The worklist contains all the pending X-ray orders. An order can be<br />
deleted or regenerated. The exposure parameters automatically created by the generator<br />
can be changed manually. The history of the exposures taken are located on the right<br />
side of the screen.<br />
Protocol - Screen<br />
The final processed image is displayed within a few seconds after exposure.<br />
The shutter is set automatically and you can also adjust it manually. The image can be<br />
confirmed/saved or deleted.It is possible to alter or add to the X-ray protocol entries, such<br />
as in the Exposure parameters or Operator fields.<br />
Postprocessing for diagnosis<br />
In addition to the tools available in the Overview screen, Viewer mode offers you the<br />
following functions:<br />
f Turn data overlay on/off, take measurements, or activate and deactivate the shutter.<br />
f You can change the display splitting,<br />
f zoom images in and out,<br />
f turn on full screen mode,<br />
f and rotate and mirror images.<br />
f If the images appear too dark or light, you can use the gradation tool to optimize<br />
them.<br />
f Thanks to the available measurement functions, you can set angles, measure distance<br />
and outline, set X-ray markers and add brief comments.<br />
f All measurements and objects can be edited, i.e., moved or deleted.<br />
Online help is also provided for the special measurement functions such as measuring<br />
hip dysplasia in dogs, laminitis in horses, and VHS or VD thorax in determining heart size.<br />
EXAMION ® PACS<br />
Overview - Screen<br />
After you have taken multiple exposures in a row, they are first displayed as thumbnail<br />
images on the Overview screen. before postprocessing or saving in the archive, the selected<br />
images can be directly printed. You can also export your images and save them locally or<br />
on an external medium. You have the option of saving the images in the original image<br />
format, as DICOM and/or JPG, anonymized, and as a zip file. You can send the images by<br />
e-mail directly from the EXAMION ® <strong>AQS</strong> software. Here, too, you can anonymize the images.<br />
All the data you select and mark are noted on the image. You can also anonymize the<br />
images and burn them to CD/DVD in the desired format, a quick and intuitive procedure.<br />
In addition, you can delete the selected images from the thumbnail overview screen, send<br />
them directly to the diagnosis worklist or the archive, or start the viewer directly.<br />
Archive - Screen<br />
For open diagnoses, X-ray images can be saved to the buffer-diagnosis worklist or directly<br />
in the archive. Images from the diagnosis worklist can still be modified or processed without<br />
affecting the archive. The image should not be saved in the archive until all work on it<br />
is complete and it is no longer needed for the current case. Naturally the image can be<br />
saved in the archive immediately or at any other point in time.<br />
... A SYSTEM OF CHOICES<br />
www.examion.com