679-SI “Self-Install” LED Taillight Conversion - British Cycle Supply
679-SI “Self-Install” LED Taillight Conversion - British Cycle Supply
679-SI “Self-Install” LED Taillight Conversion - British Cycle Supply
- No tags were found...

You also want an ePaper? Increase the reach of your titles
YUMPU automatically turns print PDFs into web optimized ePapers that Google loves.
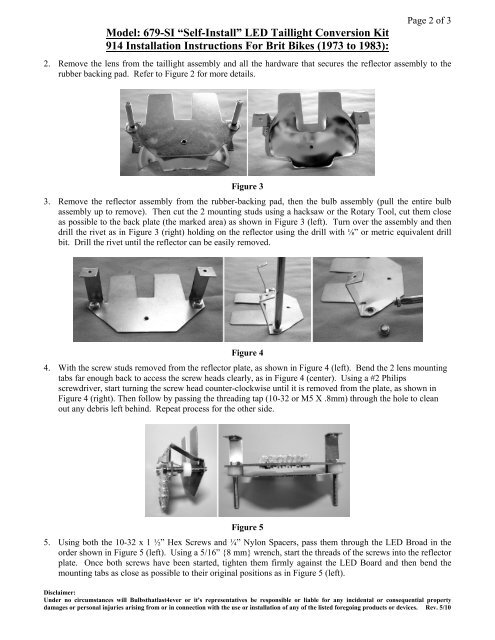
Model: <strong>679</strong>-<strong>SI</strong> <strong>“Self</strong>-<strong>Install”</strong> <strong>LED</strong> <strong>Taillight</strong> <strong>Conversion</strong> Kit914 Installation Instructions For Brit Bikes (1973 to 1983):Page 2 of 32. Remove the lens from the taillight assembly and all the hardware that secures the reflector assembly to therubber backing pad. Refer to Figure 2 for more details.Figure 33. Remove the reflector assembly from the rubber-backing pad, then the bulb assembly (pull the entire bulbassembly up to remove). Then cut the 2 mounting studs using a hacksaw or the Rotary Tool, cut them closeas possible to the back plate (the marked area) as shown in Figure 3 (left). Turn over the assembly and thendrill the rivet as in Figure 3 (right) holding on the reflector using the drill with ⅛” or metric equivalent drillbit. Drill the rivet until the reflector can be easily removed.Figure 44. With the screw studs removed from the reflector plate, as shown in Figure 4 (left). Bend the 2 lens mountingtabs far enough back to access the screw heads clearly, as in Figure 4 (center). Using a #2 Philipsscrewdriver, start turning the screw head counter-clockwise until it is removed from the plate, as shown inFigure 4 (right). Then follow by passing the threading tap (10-32 or M5 X .8mm) through the hole to cleanout any debris left behind. Repeat process for the other side.Figure 55. Using both the 10-32 x 1 ½” Hex Screws and ¼” Nylon Spacers, pass them through the <strong>LED</strong> Broad in theorder shown in Figure 5 (left). Using a 5/16” {8 mm} wrench, start the threads of the screws into the reflectorplate. Once both screws have been started, tighten them firmly against the <strong>LED</strong> Board and then bend themounting tabs as close as possible to their original positions as in Figure 5 (left).Disclaimer:Under no circumstances will Bulbsthatlast4ever or it's representatives be responsible or liable for any incidental or consequential propertydamages or personal injuries arising from or in connection with the use or installation of any of the listed foregoing products or devices. Rev. 5/10