PMI Piranha G2 Manual - Paintball Solutions
PMI Piranha G2 Manual - Paintball Solutions
PMI Piranha G2 Manual - Paintball Solutions
- No tags were found...

Create successful ePaper yourself
Turn your PDF publications into a flip-book with our unique Google optimized e-Paper software.
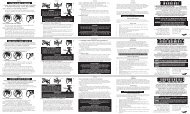
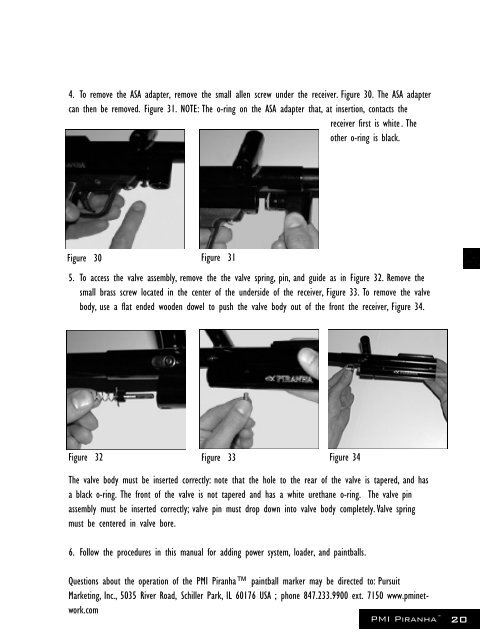
4. To remove the ASA adapter, remove the small allen screw under the receiver. Figure 30. The ASA adaptercan then be removed. Figure 31. NOTE: The o-ring on the ASA adapter that, at insertion, contacts thereceiver first is white. Theother o-ring is black.Figure 30 Figure 315. To access the valve assembly, remove the the valve spring, pin, and guide as in Figure 32. Remove thesmall brass screw located in the center of the underside of the receiver, Figure 33. To remove the valvebody, use a flat ended wooden dowel to push the valve body out of the front the receiver, Figure 34.Figure 32 Figure 33 Figure 34The valve body must be inserted correctly: note that the hole to the rear of the valve is tapered, and hasa black o-ring. The front of the valve is not tapered and has a white urethane o-ring. The valve pinassembly must be inserted correctly; valve pin must drop down into valve body completely.Valve springmust be centered in valve bore.6. Follow the procedures in this manual for adding power system, loader, and paintballs.Questions about the operation of the <strong>PMI</strong> <strong>Piranha</strong> paintball marker may be directed to: PursuitMarketing, Inc., 5035 River Road, Schiller Park, IL 60176 USA ; phone 847.233.9900 ext. 7150 www.pminetwork.com<strong>PMI</strong> <strong>Piranha</strong> 20