
You also want an ePaper? Increase the reach of your titles
YUMPU automatically turns print PDFs into web optimized ePapers that Google loves.
BLIZZARD ® INSTALLATION GUIDE<br />
INSTALLATION DETAILS: ON THE MAIN COURSE<br />
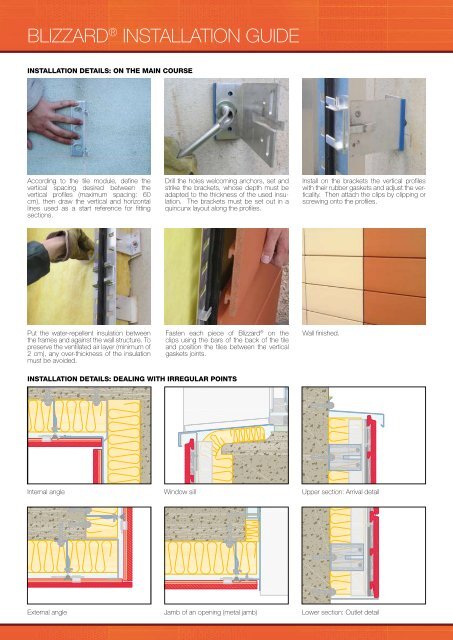
According to the tile module, define the<br />
vertical spacing desired between the<br />
vertical profiles (maximum spacing: 60<br />
cm), then draw the vertical and horizontal<br />
lines used as a start reference for fitting<br />
sections.<br />
Put the water-repellent insulation between<br />
the frames and against the wall structure. To<br />
preserve the ventilated air layer (minimum of<br />
2 cm), any over-thickness of the insulation<br />
must be avoided.<br />
Drill the holes welcoming anchors, set and<br />
strike the brackets, whose depth must be<br />
adapted to the thickness of the used insulation.<br />
The brackets must be set out in a<br />
quincunx layout along the profiles.<br />
Fasten each piece of Blizzard ® on the<br />
clips using the bars of the back of the tile<br />
and position the tiles between the vertical<br />
gaskets joints.<br />
INSTALLATION DETAILS: DEALING WITH IRREGULAR POINTS<br />
Internal angle<br />
External angle<br />
Window sill<br />
Jamb of an opening (metal jamb)<br />
Install on the brackets the vertical profiles<br />
with their rubber gaskets and adjust the verticality.<br />
Then attach the clips by clipping or<br />
screwing onto the profiles.<br />
Wall finished.<br />
Upper section: Arrival detail<br />
Lower section: Outlet detail