
Create successful ePaper yourself
Turn your PDF publications into a flip-book with our unique Google optimized e-Paper software.
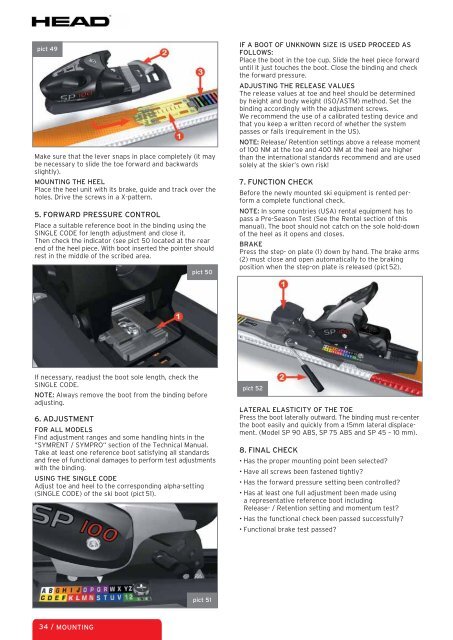
pict 49<br />
Make sure that the lever snaps in place completely (it may<br />
be necessary to slide the toe forward and backwards<br />
slightly).<br />
MOUNTING THE HEEL<br />
Place the heel unit with its brake, guide and track over the<br />
holes. Drive the screws in a X-pattern.<br />
5. FORWARD PRESSURE CONTROL<br />
Place a suitable reference boot in the binding using the<br />
SINGLE CODE for length adjustment and close it.<br />
Then check the indicator (see pict 50 Iocated at the rear<br />
end of the heel piece. With boot inserted the pointer should<br />
rest in the middle of the scribed area.<br />
If necessary, readjust the boot sole length, check the<br />
SINGLE CODE.<br />
NOTE: Always remove the boot from the binding before<br />
adjusting.<br />
6. ADJUSTMENT<br />
FOR ALL MODELS<br />
Find adjustment ranges and some handling hints in the<br />
“SYMRENT / SYMPRO“ section of the Technical Manual.<br />
Take at least one reference boot satisfying all standards<br />
and free of functional damages to perform test adjustments<br />
with the binding.<br />
USING THE SINGLE CODE<br />
Adjust toe and heel to the corresponding alpha-setting<br />
(SINGLE CODE) of the ski boot (pict 51).<br />
34 / MOUNTING<br />
pict 50<br />
pict 51<br />
IF A BOOT OF UNKNOWN SIZE IS USED PROCEED AS<br />
FOLLOWS:<br />
Place the boot in the toe cup. Slide the heel piece forward<br />
until it just touches the boot. Close the binding and check<br />
the forward pressure.<br />
ADJUSTING THE RELEASE VALUES<br />
The release values at toe and heel should be determined<br />
by height and body weight (ISO/ASTM) method. Set the<br />
binding accordingly with the adjustment screws.<br />
We recommend the use of a calibrated testing device and<br />
that you keep a written record of whether the system<br />
passes or fails (requirement in the US).<br />
NOTE: Release/ Retention settings above a release moment<br />
of 100 NM at the toe and 400 NM at the heel are higher<br />
than the international standards recommend and are used<br />
solely at the skier’s own risk!<br />
7. FUNCTION CHECK<br />
Before the newly mounted ski equipment is rented perform<br />
a complete functional check.<br />
NOTE: In some countries (USA) rental equipment has to<br />
pass a Pre-Season Test (See the Rental section of this<br />
manual). The boot should not catch on the sole hold-down<br />
of the heel as it opens and closes.<br />
BRAKE<br />
Press the step- on plate (1) down by hand. The brake arms<br />
(2) must close and open automatically to the braking<br />
position when the step-on plate is released (pict 52).<br />
pict 52<br />
LATERAL ELASTICITY OF THE TOE<br />
Press the boot laterally outward. The binding must re-center<br />
the boot easily and quickly from a 15mm lateral displacement.<br />
(Model SP 90 ABS, SP 75 ABS and SP 45 – 10 mm).<br />
8. FINAL CHECK<br />
• Has the proper mounting point been selected?<br />
• Have all screws been fastened tightly?<br />
• Has the forward pressure setting been controlled?<br />
• Has at least one full adjustment been made using<br />
a representative reference boot including<br />
Release- / Retention setting and momentum test?<br />
• Has the functional check been passed successfully?<br />
• Functional brake test passed?