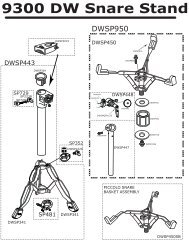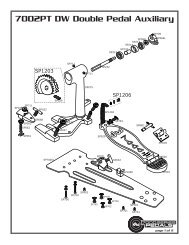
Man these feel really really good. - Drum Workshop
Man these feel really really good. - Drum Workshop
Man these feel really really good. - Drum Workshop

You also want an ePaper? Increase the reach of your titles
YUMPU automatically turns print PDFs into web optimized ePapers that Google loves.
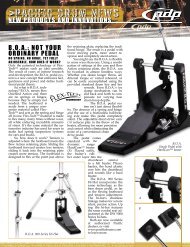
DRUM CLINIC<br />
9 fuNdaMeNTal rudiMeNTs<br />
by deNNy seiwell<br />
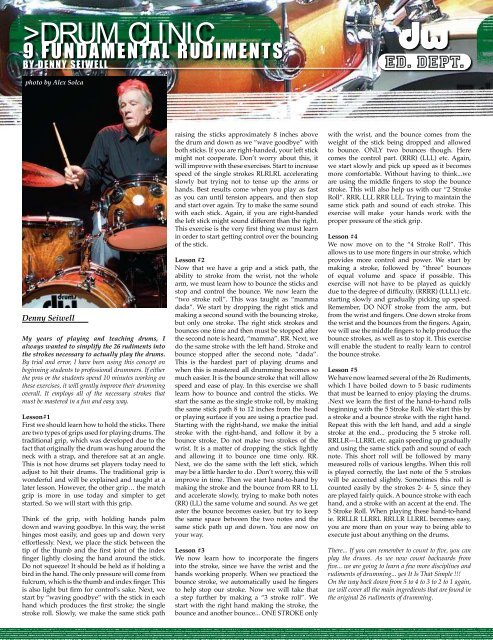
photo by Alex Solca<br />
Denny Seiwell<br />
I n<br />
My years of playing and teaching drums, I<br />
always wanted to simplify the 26 rudiments into<br />
the strokes necessary to actually play the drums.<br />
By trial and error, I have been using this concept on<br />
beginning students to professional drummers. If either<br />
the pros or the students spend 10 minutes working on<br />
<strong>these</strong> exercises, it will greatly improve their drumming<br />
overall. It employs all of the necessary strokes that<br />
must be mastered in a fun and easy way.<br />
Lesson#1<br />
First we should learn how to hold the sticks. There<br />
are two types of grips used for playing drums. The<br />
traditional grip, which was developed due to the<br />
fact that originally the drum was hung around the<br />
neck with a strap, and therefore sat at an angle.<br />
This is not how drums set players today need to<br />
adjust to hit their drums. The traditional grip is<br />
wonderful and will be explained and taught at a<br />
later lesson. However, the other grip… the match<br />
grip is more in use today and simpler to get<br />
started. So we will start with this grip.<br />
Think of the grip, with holding hands palm<br />
down and waving <strong>good</strong>bye. In this way, the wrist<br />
hinges most easily, and goes up and down very<br />
effortlessly. Next, we place the stick between the<br />
tip of the thumb and the first joint of the index<br />
finger lightly closing the hand around the stick.<br />
Do not squeeze! It should be held as if holding a<br />
bird in the hand. The only pressure will come from<br />
fulcrum, which is the thumb and index finger. This<br />
is also light but firm for control’s sake. Next, we<br />
start by “waving <strong>good</strong>bye” with the stick in each<br />
hand which produces the first stroke; the single<br />
stroke roll. Slowly, we make the same stick path<br />
raising the sticks approximately 8 inches above<br />
the drum and down as we “wave <strong>good</strong>bye” with<br />
both sticks. If you are right-handed, your left stick<br />
might not cooperate. Don’t worry about this, it<br />
will improve with <strong>these</strong> exercises. Start to increase<br />
speed of the single strokes RLRLRL accelerating<br />
slowly but trying not to tense up the arms or<br />
hands. Best results come when you play as fast<br />
as you can until tension appears, and then stop<br />
and start over again. Try to make the same sound<br />
with each stick. Again, if you are right-handed<br />
the left stick might sound different than the right.<br />
This exercise is the very first thing we must learn<br />
in order to start getting control over the bouncing<br />
of the stick.<br />
Lesson #2<br />
Now that we have a grip and a stick path, the<br />
ability to stroke from the wrist, not the whole<br />
arm, we must learn how to bounce the sticks and<br />
stop and control the bounce. We now learn the<br />
“two stroke roll”. This was taught as “mamma<br />
dada”. We start by dropping the right stick and<br />
making a second sound with the bouncing stroke,<br />
but only one stroke. The right stick strokes and<br />
bounces one time and then must be stopped after<br />
the second note is heard, “mamma”. RR. Next, we<br />
do the same stroke with the left hand. Stroke and<br />
bounce stopped after the second note, “dada”.<br />
This is the hardest part of playing drums and<br />
when this is mastered all drumming becomes so<br />
much easier. It is the bounce stroke that will allow<br />
speed and ease of play. In this exercise we shall<br />
learn how to bounce and control the sticks. We<br />
start the same as the single stroke roll, by making<br />
the same stick path 8 to 12 inches from the head<br />
or playing surface if you are using a practice pad.<br />
Starting with the right-hand, we make the initial<br />
stroke with the right-hand, and follow it by a<br />
bounce stroke. Do not make two strokes of the<br />
wrist. It is a matter of dropping the stick lightly<br />
and allowing it to bounce one time only. RR.<br />
Next, we do the same with the left stick, which<br />
may be a little harder to do . Don’t worry, this will<br />
improve in time. Then we start hand-to-hand by<br />
making the stroke and the bounce from RR to LL<br />
and accelerate slowly, trying to make both notes<br />
(RR) (LL) the same volume and sound. As we get<br />
aster the bounce becomes easier, but try to keep<br />
the same space between the two notes and the<br />
same stick path up and down. You are now on<br />
your way.<br />
Lesson #3<br />
We now learn how to incorporate the fingers<br />
into the stroke, since we have the wrist and the<br />
hands working properly. When we practiced the<br />
bounce stroke, we automatically used he fingers<br />
to help stop our stroke. Now we will take that<br />
a step further by making a “3 stroke roll”. We<br />
start with the right hand making the stroke, the<br />
bounce and another bounce... ONE STROKE only<br />
with the wrist, and the bounce comes from the<br />
weight of the stick being dropped and allowed<br />
to bounce. ONLY two bounces though. Here<br />
comes the control part. (RRR) (LLL) etc. Again,<br />
we start slowly and pick up speed as it becomes<br />
more comfortable. Without having to think...we<br />
are using the middle fingers to stop the bounce<br />
stroke. This will also help us with our “2 Stroke<br />
Roll”. RRR, LLL RRR LLL. Trying to maintain the<br />
same stick path and sound of each stroke. This<br />
exercise will make your hands work with the<br />
proper pressure of the stick grip.<br />
Lesson #4<br />
We now move on to the “4 Stroke Roll”. This<br />
allows us to use more fingers in our stroke, which<br />
provides more control and power. We start by<br />
making a stroke, followed by “three” bounces<br />
of equal volume and space if possible. This<br />
exercise will not have to be played as quickly<br />
due to the degree of difficulty. (RRRR) (LLLL) etc.<br />
starting slowly and gradually picking up speed.<br />
Remember, DO NOT stroke from the arm, but<br />
from the wrist and fingers. One down stroke from<br />
the wrist and the bounces from the fingers. Again,<br />
we will use the middle fingers to help produce the<br />
bounce strokes, as well as to stop it. This exercise<br />
will enable the student to <strong>really</strong> learn to control<br />
the bounce stroke.<br />
Lesson #5<br />
We have now learned several of the 26 Rudiments,<br />
which I have boiled down to 5 basic rudiments<br />
that must be learned to enjoy playing the drums.<br />
.Next we learn the first of the hand-to-hand rolls<br />
beginning with the 5 Stroke Roll. We start this by<br />
a stroke and a bounce stroke with the right hand.<br />
Repeat this with the left hand, and add a single<br />
stroke at the end... producing the 5 stroke roll.<br />
RRLLR---LLRRL etc. again speeding up gradually<br />
and using the same stick path and sound of each<br />
note. This short roll will be followed by many<br />
measured rolls of various lengths. When this roll<br />
is played correctly, the last note of the 5 strokes<br />
will be accented slightly. Sometimes this roll is<br />
counted easily by the strokes 2- 4- 5, since they<br />
are played fairly quick. A bounce stroke with each<br />
hand, and a stroke with an accent at the end. The<br />
5 Stroke Roll. When playing <strong>these</strong> hand-to-hand<br />
ie. RRLLR LLRRL RRLLR LLRRL becomes easy,<br />
you are more than on your way to being able to<br />
execute just about anything on the drums.<br />
There... If you can remember to count to five, you can<br />
play the drums. As we now count backwards from<br />
five... we are going to learn a few more disciplines and<br />
rudiments of drumming... yes It Is That Simple !!!<br />
On the way back down from 5 to 4 to 3 to 2 to 1 again,<br />
we will cover all the main ingredients that are found in<br />
the original 26 rudiments of drumming.<br />
Lesson 6<br />
Upon reaching the completion of the first five<br />
exercise, we now count backwards with an<br />
exercise for the number 4,3,2 and finally 1. Here<br />
we go!!!!<br />
Having been at #5 we move on to #4 which is<br />
called the “4 Stroke Ruff”. A ruff is a series of<br />
notes played in rapid succession and in musical<br />
terms is made up of grace notes (softer notes<br />
than the original stroke).... so... we are going to<br />
play 4 notes rapidly starting with the right hand.<br />
RLRL. The last note (L in this case) is louder<br />
than the first 3 notes. It should sound like “dig<br />
ida bop” if you said the phrase quickly. With the<br />
accent or louder note being the “bop”. Once you<br />
have played this evenly, try to start the ruff using<br />
the other hand. LRLR, it is played faster than you<br />
can say 1234, hence the dig ida bop phrase....this<br />
is a way cool rudiment!!!<br />
Lesson 7<br />
Coming back down the count of exercises<br />
1,2,3,4,5,4 we are now at 3 again. This is an<br />
exercise very similar to the last one using the<br />
ruff. However this is only 3 strokes long...hence<br />
#3. We start this rudiment by playing two soft<br />
grace notes with the left hand, and a regular<br />
stroke with the right....llR....rrL....llR....rrL.<br />
The grace notes are played softer and spaced<br />
evenly like the 4 stroke ruff, but shorter. In<br />
the demonstration of sticking you will notice<br />
small letters for the grace note, and caps for the<br />
finishing stroke. llR....rrL....etc. going hand-tohand<br />
or starting each time with your other hand<br />
makes this rudiment very fluid to play when the<br />
motion is felt. The grace notes are played very<br />
close to the drum head, and the stroke uses the<br />
stick path used in all other rudiments so far.<br />
Lesson 8<br />
This brings us to the Flam, a rudiment which is<br />
basically 2 notes. A soft one, and a louder note<br />
played almost together. However, the grace note<br />
or 1st note is soft and the second note is louder.<br />
Again, the grace note is played much closer to<br />
the head or playing surface, and the main note<br />
is the same stroke used in all the other exercises.<br />
When you can play this rudiment going from<br />
hand to hand, you will notice a definite pattern<br />
and motion of the hands. This challenges the<br />
student into playing a loud and soft note almost<br />
together, and at the same time.<br />
Lesson 9<br />
This brings us back down from exercises<br />
1,2,3,4,5,--4,3,2 and 1 again. This time we perform<br />
the same single stroke roll that we performed<br />
in exercise #1. This time though, after having<br />
done the prior exercises, we can now hopefully<br />
perform this roll with more agility and speed.<br />
So there you have it, in a nutshell, if you can<br />
remember the exercise connected tot the number<br />
1 through 5 and back down to 1 again you have<br />
an entry level understanding of the 26 rudiments<br />
of drumming. At least enough to move forward<br />
with a few illustrations and exercises designed<br />
to get you behind the drum set and play a few<br />
simple patterns. The next section will give you a<br />
very basic tutoring in drum music as it is written,<br />
so we can help you find your way around the<br />
drum set enough to play a few simple beats.<br />
Congratulations! Who said drummers have no<br />
attention span?<br />
[edge 8.0] 27