
You also want an ePaper? Increase the reach of your titles
YUMPU automatically turns print PDFs into web optimized ePapers that Google loves.
CyberAudit-Web Professional Context Help <strong>Manual</strong>Copyright © <strong>Videx</strong>, <strong>Inc</strong>. 2008-2013 Version 3.0.32All Rights Reserved
Resetting a Flex HubVaultsCyberKey VaultsGranting Access to CyberKey VaultsPower Over Ethernet (POE) for VaultsEmail Notification Settings for CyberKeys Not ReturnedEmail Notification Settings for Vault Door OpenVault 20 FXVault 20 FX OverviewVault 20 FX PropertiesPower Requirements for Vault 20 FXSetting Up and Configuring a Vault 20 FXProgramming a Vault 20 FX from a USB flash drivePush Notification PortValid Keys for Vault 20 FXVault 20 FX Demo ModeCyberKey Vault 1Single CyberKey VaultsSingle CyberKey Vault PropertiesSingle CyberKey Vault Audit TrailsAdding a Single CyberKey VaultSingle CyberKey Vault Status Indicator Lights and TonesWhat is a "Valid" CyberKey for a Single CyberKey Vault?Single CyberKey Vault TonesMiscellaneous Notes about Single CyberKey VaultsSystem KeysSystem KeysGrand MastersAnchorCyberLock ProgrammerUSB ProgrammersReset KeyAdding and Editing System KeysSteps to Add System KeysGrand Master Will Open Locks and Program Emergency KeysGrand Master Will Program LocksLost System KeysLost Base Grand Master
CyberKeysIssue NumbersReplace KeyChange Vault Access NumberAssigning Master Key AccessChange Icon Report for CyberKeysLost KeysDesignating a Lost Key with Disabling PointsHow to Mark a Key as Not Lost and Reset Locks from being Disabling PointsCyberKey Behavior SettingsLock to DownloadHow to Issue a CyberKey to a PersonLost Keys ListUpdating a Key by Issue NumberUpdating a KeyView Audit Trail Data for CyberKeysAudit Trail Events from CyberKeysCyberKey Communications LogUpdating CyberKey FirmwareRFID Access CardsRFID Access CardsSupported RFID Access CardsSteps to Assign an RFID Access CardSchedule Access/ExpirationSchedule PropertiesAdd or Edit HolidaysAdding HolidaysCyberAudit-Web Global SchedulesSet a CyberLock as a CyberPointAdding SchedulesSchedule Time FramesCombining SchedulesMatrix SymbolSchedule IconsSetting Schedules in the Access Matrix with a Bulk OperationMatrix OptionsReports, Notifications, and the Journal of ChangesReportsReportsAdding ReportsReport Properties<strong>Inc</strong>luded People<strong>Inc</strong>luded Locks and CyberPoints<strong>Inc</strong>luded Communicators
Edit Report EventsDate Filter<strong>Inc</strong>luded ColumnsEvent sorting in reportsReport OutputNotificationsEmail NotificationsNotification PropertiesAdding NotificationsExample ReportJournal of ChangesJournal of ChangesJournal of Changes Report ColumnsManagement / MaintenanceDate/Time PreferencesLog FilesBackup and RestoreSteps to Restore a CyberAudit-Web Professional DatabaseUsing Locks and KeysTips for Using a CyberKeyStandard CyberKey Battery Cap RemovalRechargeable CyberKey LED Flash PatternsBeeper and LED Flash Patterns for CyberKey IIHow to manage Lithium-ion polymer batteries used in Rechargeable CyberKeysCyberLock Cleaning InstructionsCyberKey Cleaning InstructionsCyberPoint User TipsGlossary of TermsGlossary
About This <strong>Manual</strong>This manual is intended for the top-level administrator of a CyberAudit-Web Professional system.Functionality and setup is described from this administrator's perspective. It was generated fromCyberAudit-Web Professional context help. Chapters and sections are organized in approximateorder of recommended implementation for a CyberAudit-Web Professional system.Context help is built in to CyberAudit-Web. It is viewable from the many "?" links throughout theapplication web pages. Many pages of the manual are nothing but brief descriptions of the page orsection they reference.The least effective use of this manual would be to print it. It is best used by viewing it on screen asa .pdf file. It enables browsing to related topics through its many hyperlinks. Like a web browser,the Adobe® Reader PDF viewer has forward and back buttons to enhance the browsingexperience.
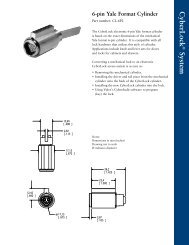
About CyberAudit-Web Professional<strong>Videx</strong> offers several software solutions for small, medium, and large installations. ThisCyberAudit-Web Professional tutorial gives an overview of CyberLock hardware and software. TheGetting Started section provides the easiest order of implementation to set-up a system. The firsttopic is hardware which is the foundation of the system. Afterward, the focus will be WebProfessional features and capabilities.CyberLock HardwareCyberLocks are high security access control cylinders which have no conventional keyway andcan not be picked. These electronic cylinders are the exact dimensions of the mechanical cylindersthey replace. They install into the lock hardware with the same ease of the mechanical cylinderand do not change how the lock hardware functions. No wiring or battery is needed at the lock;power is provided by the battery in the key.With over 200 cylinder designs, CyberLocks install in interior and exterior doors, padlocks,containers, and cabinets.
CyberLock CylinderThe CyberLock cylinder has a circuit board with a micro-processor and memory. Four types ofintelligence are stored in the cylinder: Encrypted access codes that ensure only keys within thesystem work with the lock, the unique ID of the lock cylinder, a record of the last 1100 events, anda lost key list.CyberKeys are highlyprogrammable electronickeys that can not beduplicated. One key canbe used to open any of thelocks in the system.Outside entryways, insidedoors, cabinets, andpadlocks on containers...from beginning to end,only one key is needed.The key is programmedwith the accesspermissions for that user:What locks they areallowed to open, and onwhat days and times. WebPro and Enterprise allowuser keys to downloadlocks. With Enterprisesoftware, user keys canalso program locks.
CyberKeysCyberKeys contain four levels of intelligence:Encrypted access codes to ensure the key is from thesame installation as the lock.The unique ID of the key.Access schedules for the user of the key.Storage of up to 3900 events, both authorized anddenied.The key also houses a clock and the battery that powers the keyand locks.There are two types of CyberKeys: one with a rechargeablebattery and one with a replaceable battery.It's important to note that all the data and schedule information isalways retained in the key, regardless of the status of thebattery.How is it Powered?The battery inside this key is a standard lithium3-volt battery that is easily replaced in the field. Asingle battery will provide between 2000 and 5000openings with a maximum life of one year.When the voltage of the battery is low, the keybeeps much in the same way as a smoke alarm.
The rechargeable battery charges in 1 - 2 hours. Asingle charge will provide an average of 500openings. The rechargeable battery has a five yearlife.When the voltage of the battery is low, the key's redLED will flash. If fully depleted, the key will not workuntil it has been charged and the clock has beenreset by communicating with the software.When a Key and Lock Communicate...The key supplies power to thecylinder and communications areestablished. In a fraction of asecond, a sequence of eventsoccurs to determine if the key mayopen the lock.The cylinder and keyexchange IDs.The key verifies that it hasaccess to the lock ID andthat the it's there during itsscheduled access times.If everything matches up, thekey sends its access code tothe lock. An "Accessgranted" event is written intothe lock and the key.If the key does not haveaccess to the lock at thattime, the key alarms and a"denied" event is written inthe key.
At the same time, the lock checksthe key ID against its list of lostkeys.If the key ID is in the list, the lockdenies entry and the key alarms.A denied event is written in thememory of the lock and the key.The key is also disabled fromworking in any other lock.If the key ID is not on the list of lostkeys, and the lock and key accesscodes match, the key gains access.An "Authorized to Open" event iswritten in the key and the lock.Enhanced SecurityThere are additionalfeatures that provide aneven higher level ofsecurity.For high security areas,CyberLocks can beprogrammed for eithermultiple key custody ordelayed access.Multiple key custody isused to require 2, 3, or 4keys to be presented to thelock before a lock will grantaccess.Delayed access is used incustomer applications thatrequire a delay of a fewseconds or up to 20minutes between the timethe key is first presentedand the time the lock is ableto be opened.CyberKeys, unlikemachanical keys,can be set toexpire regularly,even on a dailybasis.Frequent expirationof keys provides ahigher level ofoverall securitywith:Better keycontrolDecreasedrisk due tolost keysAccess totheinformationregularlydownloadedfrom thekeys
CommunicatorsExpired keys need to be reathorizedbefore they will work again, andcommunicators are the products thekey holders use to reauthorize theirkeys.To find the balance between securityand convenience for the users, thereare many types of communicators tochoose from:AuthorizersIR EncodersUSB and Web StationsCyberKey Authorizer
CyberKey Authorizers are durable and ideal for remote locations. They allow users to convenientlyrenew their expired keys on a daily basis, for a high degree of key control.The CyberKey Authorizer has two components: the hub and the keyport.There are two types of hubs: Web Authorizers and network/modem Authorizers.The Web Authorizer is the more versatile of the two. It can be used on the Internet or a LAN.The network/modem hub can be used to update keys in remote areas that the network does notreach via a dedicated phone line.The keyport allows users to convenientlyupdate their keys. It is rated for outside useand attaches to a single electrical box withsecurity screws. It has an easy-to-read displaythat leads the key holder through the processof updating their key.For example, when the key holder arrives, thekeyport displays "Ready." When the key isplaced in the keyport, if a PIN is required, theLCD display will request the operator to enterit. Once entered, the display will showdownloading, updating, and "Key Ready."
USB IR EncoderThe CyberKey IR Encoder utilizes a standard USB connection.USB StationWeb Station
Grand Master CyberKeyThe Grand Master CyberKey is used to add locks and keys to theProfessional system. Each Grand Master has an encrypted accesscode that can be transferred to new locks and keys during initial set up.At this point, keys are given 24/7 access to every CyberLock in thesystem until the key is given an access schedule usingCyberAudit-Web Professional.Note: The Grand Master should be stored in a safe place when not inuse. It is the basis of the security for the system.CyberLink - A program that communicates with the keys and the database through either an IREncoder or a USB Station. CyberLink will display the key's serial number and the status of thecommunication. Keep the key in contact with the device until the CyberLink software displays"Configuration successful."
CyberAudit-Web Professional uses menus to manage a CyberLock system.Each menu has submenus that can be selected by hovering over the main menu.There are several ways to navigate to different subjects within Web Professional. For example, toget to the first set-up option, select "Options" from the "System" drop down menu, then click "LockOptions" highlighted text. Or select "Options" from the "Locks" drop down menu. Both ways resultin the global options for locks.
Operations for each window appear by clicking the item. For example, to see the address andphone number for Nellie Pyle, click on her name. Click "Properties" from the drop down window asseen above.
How-To'sAdd:CyberKeysCylindersDoorsFlex System HubHolidaysIR EncodersIssue a KeyLAN AuthorizersLocksModem AuthorizersPeopleProgramming JobsSchedulesStationsVault 20 FXWeb AuthorizersReset:CylindersFlex System HubLAN AuthorizersLocksWeb AuthorizersMisc:Audit Trail EventsCyberKey DocumentsCyberLock CleaningDownloading LocksLost KeysLost System KeysSet a CyberLock as a CyberPointUpgrading CyberKey FirmwareWeb Authorizer KeyportCommands
CyberAudit-Web Professional CreditsColoCons icons used in this software provided by Ken Saunders at http://www.MouseRunner.com.Licensed under the Creative Commons license.Silk icon set provided by Mark James at http://www.famfamfam.com/lab/icons/silk/ . Licensed underthe Creative Commons license.Sweetie BasePack icons are provided by Joseph North at http://sweetie.sublink.ca. Licensedunder the Creative Commons license.dbMenu is written by David Boggus at http://www.boggusweb.com.CyberAudit-Web Professional was written entirely in-house by <strong>Videx</strong>, <strong>Inc</strong>.
CyberAudit-Web Professional LicensePLEASE READ THESE TERMS AND CONDITIONS CAREFULLY BEFORE INSTALLING ORUSING THIS SOFTWARE. THE SOFTWARE COVERED BY THIS LICENSE IS COPYRIGHTEDAND LICENSED, NOT SOLD, FOR USE SOLELY UNDER THE TERMS OF THIS LICENSE.VIDEX IS ONLY WILLING TO GRANT YOU A LICENSE TO USE THE SOFTWARE ON THECONDITION THAT YOU ACCEPT ALL TERMS AND CONDITIONS IN THIS LICENSE.1. Definitions"Licensed Software" means the <strong>Videx</strong> owned software delivered under this License, including theoriginal and all whole or partial copies, software documentation, and any updates, upgrades, andenhancements to the <strong>Videx</strong> owned software acquired through technical support."Support Location" means the primary installation point of the Licensed Software where it will beaccessed by the related hardware for the purpose of managing the overall CyberLock system. ASupport Location can consist of more than one site if the purpose is for load balancing and/ornetwork redundancy.2. Scope of LicenseSubject to the payment of applicable fees and acceptance of all terms and conditions in thisLicense, <strong>Videx</strong> grants You a non-exclusive, non-transferable, non-sublicensable right and licenseto use the Licensed Software on one Support Location and to make copies of the LicensedSoftware only as necessary for back-up, load balancing or disaster recovery purposes. Once youhave deployed the Licensed Software, it is not transferable to another Support Location withoutprior written authorization from <strong>Videx</strong>, except if the Licensed Software continues to manage theidentical CyberLock hardware from the original deployment location. You will take all necessarysteps to ensure that any authorized agents, contractors, or third parties who use the LicensedSoftware do so only on Your behalf and fully comply with the terms of this License. You shall nottransfer, sublicense, re-license, rent, or lease the Licensed Software without obtaining prior writtenauthorization from <strong>Videx</strong>. You shall not cause or permit the reverse engineering, disassembly,decompilation, or attempt to derive the source code of the Licensed Software or any updates,upgrades, or extensions. You shall not, at any time, use, copy, modify, or distribute the LicensedSoftware except as expressly permitted in this License. The terms of this License will govern anyupdates, upgrades, and extensions that replace and/or supplement the Licensed Software, unlesssuch updates, upgrades, and extensions are accompanied by a separate License in which casethe terms of that License will govern the Licensed Software.3. ActivationThe Licensed Software was provided with a license number (License Number). You must registerthis License Number with <strong>Videx</strong> to secure an activation code to load and operate the LicensedSoftware. A unique License Number is required for each support location. Failure to register thisLicense Number with <strong>Videx</strong> will render the Licensed Software inoperable.4. Term and TerminationThis License shall remain in effect until terminated by either party under the termination provisionsset forth herein.
Either party may cancel this License for cause based upon a material breach of its terms, providedthe non-breaching party provide written notice to the breaching party specifying the breach andaffording the breaching party a thirty (30) day period in which to cure the breach. In addition, eitherparty may seek any legal or equitable remedy available for any violation of the terms of thisLicense. In the event of a breach of any of the provisions in this License, the parties acknowledgethat the non-breaching party may not have an adequate remedy in money or damages. Thenon-breaching party will therefore be entitled to obtain an injunction against such breach from anycourt of competent jurisdiction immediately upon request without posting a bond. Thenon-breaching partys right to obtain injunctive relief shall not limit its right to seek further remedies.Any terms of this Agreement that by their nature extend beyond termination of this License remainin effect until fulfilled, and apply to both parties' respective successors and assignees.5. SupportTechnical support services for the Licensed Software, other than the services expressly providedfor herein, are not covered by this License. In addition, You agree that <strong>Videx</strong> may utilize itsauthorized agents, distributors, or contractors to provide technical support services for theLicensed Software, including the installation of any updates, upgrades, and extensions. Theprovisions of this Section 5 (Support) shall not prohibit, preclude, or otherwise supersede anyseparate agreement concerning support services for the Licensed Software.6. AssignmentYou may assign all of your rights and obligations under this License to another party only if thatparty agrees to all of the terms and conditions of this License. Upon assignment You must providethe party with a hard copy of this License.7. Warranty, Exclusions, and Limitation of Liability7.1 Limited WarrantyFor a period of sixty (60) days following delivery of the Licensed Software to You, <strong>Videx</strong> warrantsthat the Licensed Software shall perform in all material respects according to <strong>Videx</strong>s specifications.<strong>Videx</strong> does not warrant that Your use of the Licensed Software will be errorfree, virus-free oruninterrupted. Your sole remedy for a breach of this warranty shall be that <strong>Videx</strong> shall usecommercially reasonable efforts to correct the Licensed Software so that it operates according tothe warranty. This warranty shall not apply if the Licensed Software is modified by anyone otherthan <strong>Videx</strong> or an authorized agent of <strong>Videx</strong> acting within the scope of its authority, is misused, orused with software or hardware with which the Licensed Software is not intended to be used.The warranty set forth above will not be enlarged, diminished or affected by, and no obligation orliability will arise from, <strong>Videx</strong>'s rendering of technical advice, assistance or service in connectionwith Your selection or use of the Licensed Software.Certain open source or other-vendor software may be distributed with the Licensed Software orrecommended in connection with its installation and use. Such products are provided orrecommended for Your convenience only. <strong>Videx</strong> makes no representation or warranty of any kindregarding such products. <strong>Videx</strong> offers no support for such products and shall have no liabilityassociated with their use. Your use of these products shall be in accordance with the applicablelicenses for such products.
7.2 ExclusionsTHE LIMITED WARRANTY SET FORTH ABOVE IS THE EXCLUSIVE WARRANTY COVERINGTHE LICENSED SOFTWARE AND REPLACES ALL OTHER WARRANTIES OR CONDITIONS,EXPRESS OR IMPLIED. TO THE FULL EXTENT PERMITTED BY APPLICABLE LAW THELICENSED SOFTWARE AND ANY SUPPORT SERVICES ARE PROVIDED "AS IS," WITH ALLFAULTS AND WITHOUT REPRESENTATIONS OR WARRANTIES OF ANY KIND. VIDEXSPECIFICALLY DISCLAIMS ALL OTHER PROMISES, REPRESENTATIONS OR WARRANTIES,EXPRESS OR IMPLIED, INCLUDING, BUT NOT LIMITED TO, THE IMPLIED WARRANTIES OFMERCHANTABILITY, FITNESS FOR A PARTICULAR PURPOSE, TITLE, NON-INFRINGEMENTOF THIRD PARTY RIGHTS AND ANY IMPLIED WARRANTY ARISING FROM COURSE OFPERFORMANCE OR COURSE OF DEALING.7.3 Limitation of LiabilityTO THE FULL EXTENT NOT PROHIBITED BY APPLICABLE LAW VIDEX SHALL NOT BELIABLE FOR ANY INCIDENTAL OR CONSEQUENTIAL DAMAGES ARISING OUT OF THE USEOF OR INABILITY TO USE THIS PRODUCT, WHETHER ARISING OUT OF CONTRACT,NEGLIGENCE, TORT, OR UNDER ANY WARRANTY, OR OTHERWISE, EVEN IF VIDEX HASBEEN ADVISED OF THE POSSIBILITY OF SUCH DAMAGES OR FOR ANY OTHER CLAIM BYANY OTHER PARTY. VIDEXS LIABILITY FOR DAMAGES IN NO EVENT SHALL EXCEED THECOST OF SOFTWARE LICENSED HEREUNDER. CERTAIN STATES DO NOT ALLOW THEEXCLUSION OF IMPLIED WARRANTIES, OR THE EXCLUSION OR LIMITATION OF CERTAINDAMAGES. IF SUCH LAWS APPLY, CERTAIN EXCLUSIONS OR LIMITATIONS MAY NOTAPPLY; HOWEVER, ALL OTHER RESTRICTIONS AND LIMITATIONS SHALL REMAIN INEFFECT.8. IndemnificationTO THE FULL EXTENT NOT PROHIBITED BY APPLICABLE LAW VIDEX EXPRESSLYDISCLAIMS ALL OBLIGATIONS TO INDEMNIFY, DEFEND, OR HOLD HARMLESS FORCLAIMS ARISING OUT OF THE USE OF THE LICENSED SOFTWARE.9. Generala) If any term or provision of this License is found to be invalid by any court of competentjurisdiction, they are to that extent omitted, and all other provisions shall remain in full force andeffect.b) You may not export or re-export the Software or any copy or adaptation in violation of anyapplicable laws or regulations.c) The Licensed Software and any related documentation are commercial items and thus,pursuant to Section 12.212 of the Federal Acquisition Regulations (FAR) and Defense FederalAcquisition Regulations (DFAR) Supplement Section 227.7202, Government's use, duplication ordisclosure of the Licensed Software is subject to the restrictions set forth by <strong>Videx</strong>. The LicensedSoftware was developed at private expense and was not developed with government funds. It is atrade secret of <strong>Videx</strong> for all purposes of the Freedom of Information Act.
d) The agents, employees, distributors, and dealers of <strong>Videx</strong> are not authorized to makemodifications to this License, nor to make statements, representations, or terms binding on <strong>Videx</strong>.Accordingly, any statements, representations, or terms not made or given directly and expressly by<strong>Videx</strong>, such as reseller presentations, whether oral or written, are not binding on <strong>Videx</strong>. Purchaseorder terms inconsistent with this License are expressly rejected.e) Waiver by either party of any rights under this License shall not be a waiver of or prejudice theparty's right to require strict performance of the same provision in the future or of any otherprovision. Any modification must be in writing and signed by the parties.f) Nothing contained in the License will be construed so as to make the parties partners or jointventurers or to permit either party to bind the other party to any agreement or purport to act onbehalf of the other party in any respect.g) Any notices or written approvals required or permitted under this License will be given, byeither party, in the English language and will be sent in writing by registered mail or nationallyrecognized overnight delivery service, postage prepaid, to the parties at the following addresses:To VIDEX at:Attention: Paul Davis<strong>Videx</strong>, <strong>Inc</strong>.1105 N.E. Circle BoulevardCorvallis, OR 9733010. Governing LawThe laws of the State of Oregon shall govern without reference to the place of execution orperformance. The parties agree that the U.N. Convention on the International Sale of Goods shallnot apply to the License. Any and all disputes between the parties shall be brought and resolvedsolely and exclusively in the state or federal courts located in the State of Oregon, United States ofAmerica. Both parties hereby irrevocably consent to the jurisdiction of such courts and service ofprocess in connection therewith. Any judgment rendered by such courts may be entered andenforced by any court having jurisdiction over the party against which an award is entered or itsassets. Both parties hereby irrevocably waive any objections to the jurisdiction of such courtsbased on any ground, including without limitation improper venue or forum non conveniens.BY CLICKING ON THE "ACCEPT" BUTTON BELOW, OR BY INSTALLING OR USING THISSOFTWARE, YOU ACKNOWLEDGE THAT YOU HAVE READ THE LICENSE ANDUNDERSTAND IT COMPLETELY. FURTHER, YOU ARE BINDING THE ENTITY THATORDERED THE LICENSED SOFTWARE FROM VIDEX TO THE TERMS OF THIS LICENSE,AND ACKNOWLEDGE THAT YOU HAVE THE AUTHORITY TO DO SO.
ConceptsDefines the hardware components that may be used with a CyberLock system as well as thesoftware objects and features used to manage them.
CyberLocksTable Fields:This page allows new CyberLocks to be added to the system as well as edited. The locks arelisted in rows. Each row contains information about the lock including:Name - The name of the CyberLock.Serial - The serial number of the CyberLock.Change Icon - If the lock is not programmed with access codes a red 'C' icon ( )appears in thecolumn. If the system has information for the lock but the lock has not yet been updated, ayellow 'C' icon ( ) appears. Clicking on the change icon for the lock brings up a change iconreport that compares the current settings for the lock with the new settings.Reset Status - If a lock has been reset, a green check mark will be in the Reset column. If alock has been marked to be reset, but not yet reset, there will be both a yellow change icon anda green check mark.Multi-key Mode / Open Delay - A lock may be set to require more than one CyberKey before itopens or to wait a certain amount of time before opening after an authorized key makescontact.Tagged With - The tags the CyberLock is associated with. Click on a link to open the tag'sProperties page.Note: Once a lock is updated or reset, the Programmer Key or Grand Master that communicatedthe change to the lock must be downloaded to CyberAudit-Web to clear the yellow change icon.Operations -Page Navigation is controlled by the arrows bracketing thelink. Clicking the linkwill open more options including browsing to the first and last pages, selecting a page to jumpto, or the number of locks per page.New - Click to add a new lock.- This icon appears if there is more than one CyberLock in the list. It enablesresetting and tagging all selected locks at once using bulk editing.
1.2.- Creates a printable list of the lock records displayed on the page, excluding those notseen because of any applied filters.Clicking in a non-linked section of a lock row will display a drop-down menu of options for the lockthat includes:Properties - Displays the details of the selected CyberLock.Show in Matrix - Creates a filter in the Access Matrix to display the tags and people thathave access to this lock and its associated lock tags.People Access - Generates a report listing people authorized to open the lock.Audit Report - Generates a report of audit trail data associated with the selectedCyberLock.Comm Log - Generates a report of CyberLock status retrieved from the lock whendownloaded by a CyberKey, Grand Master, or CyberLock Programmer.Delete - Removes the selected CyberLock record after confirmation.Filters -Two types of filters are available to help find a lock or set of locks quickly:Filter by Keyword - Use the list filter to reduce the list of CyberLocks displayed.Filter by Tag - A lock tag may be used separately or in combination with the list filter tofurther reduce the list. If lock tags are defined, they will be shown to the left of the list of locks.Click on one of them to reduce the list to locks with that tag.To remove all filters, click on the Remove Filter link near the page controls at the top of the list.Related Topics:Adding LocksAudit Trail EventsCyberLock CleaningDownload a LockImporting LocksLock TagsProgramming JobsReset a LockSet a CyberLock as a CyberPointTags
CyberAudit-Web PeopleIn CyberAudit-Web, People are potential key holders, RFID Access Card holders, or softwareadministrators.They may be granted access to CyberLocks using the Access Matrix.They may be tagged to group them with other people with common properties.They may be issued a CyberKey or RFID Access Card that has a set of access permissions.They may granted individual permission to log in to CyberAudit-Web to administer the system.People are added to CyberAudit-Web using the People list page or they may be added byimporting from a file.
What is a Tag?In CyberAudit-Web, a tag is a free-form way to classify People and Locks. Tags help organizePeople and Locks into logical categories by providing an unlimited number of ways to describethem. There is no "wrong" choice for how to use them. Instead of belonging to one "group,"People and Locks may have any number of tags.Here are some examples how tags may be used.ABC EnterprisesUses people tags to organize their employees by department. The departments are Accounting, Engineering,Human Resources, Maintenance, Marketing, Production, and Support. Employees of each department havea set of locks they must be able to open.ABC creates lock tags to group CyberLocks for access. Finally, using the Access Matrix, ABC grants eachpeople tag access to each of the groups of CyberLocks it requires."Maintenance" is a lock tag. It tags CyberLocks needed to do the Maintenance functions at ABC. The"Maintenance" tag also includes some locks that are tagged with Production and Human Resources becauseall three departments require common access to some locks.Gail Ash, as supervisor of Marketing and Support, is tagged with both "Marketing" and "Support" people tags.This allows her to access both "Marketing" and "Support" tagged CyberLocks. And Norman Cooper, normallytagged with Production, temporarily gets the "Maintenance" tag when Eric Montoya, the regular Maintenanceemployee, goes on vacation.Green Construction CompanyEmploys electricians, plumbers, carpenters, and other specialists. Each employee serves a role in theconstruction process. Green uses CyberLocks to help them maintain control on their supply of raw materials.They use people tags to classify their employees by the role they play in the company. They use lock tags toidentify the CyberLocks each employee group must access.When Green adds a new electrician, Kashif Saleem, they simply tag his record with the "Electrician" peopletag. When they issue him a CyberKey, it will automatically be programmed to open the locks that electriciansat Green Construction need to open.Wilson VendingUses CyberLocks on their vending machines to prevent key duplication and to maintain an audit trail ofactivity for each vending machine asset. Most key holders are either route drivers or service technicians.Wilson uses lock tags to identify the assets and CyberLocks on each route. Then they use people tags toidentify the drivers that will service each route.The service technicians must be able to open a broader group of locks. Wilson again uses lock tags, thistime to identify the assets that fall into each service area. As a result, each asset (CyberLock) gets two tags;
one for its route and one for its service area. The service technicians are then tagged with a descriptor fortheir service area and access is granted to the appropriate group of locks.Finally, auditors for Wilson want to classify the vending assets by the "type" of product they dispense(snacks, cold beverage, hot beverage, money token). They create additional lock tags that add theseadditional descriptors and apply them to the locks. They now use the descriptors to help them createcustomized reports for audit trails from these locks.
SchedulesSchedules allow keys to open locks at specified times. CyberAudit-Web Professional supportsusing up to 49 different schedules.Table Fields:Name - The name assigned to the schedule.Matrix Symbol - The letter or icon used to represent the schedule in the Access Matrix.Times Used in Matrix - The number of common squares in the Access Matrix with theschedule assigned.Master Keys Using - The number of Master Keys restriced by the schedule.Operations:New - Click to add a new schedule.- Creates a printable list of the schedules.Properties - Displays the editable properties of the schedule.Delete - Removes the selected Schedule record after confirmation.Three schedules are always present in CyberAudit-Web:CyberPoint - Assigning a CyberPoint schedule to a cell in the Access Matrix will not allowthose keys to open that lock or locks with that tag. Instead, the key will beep 3 times and recordthe fact that the person contacted the lock. The CyberPoint schedule is great for security guardrounds. Creating a standard schedule and using the CyberPoint schedule to assign to asecurity guard enables the guard to use the same key to both open locks he or she needsaccess to (such as the lock on the door of the employee entrance and his or her personallocker) and to record that security checkpoints were visited during the times they needed to bechecked. CyberPoint schedules are valid at all times, including holidays.Full Access - The Full Access schedule is valid at all times, including holidays.
No Access - The No Access schedule is never valid. This schedule exists for the purpose ofrestricting master key access. When this schedule is used in the Access Matrix for a person ortag with a master key, it will prevent the master key from accessing those locks.Related Topics:Adding CylindersAdding People and CyberKeysAudit Trail EventsCommunicatorsHolidaysNotificationsSet a CyberLock as a CyberPointTags
Holidays"Holidays," which do not have to be literal holidays, are meant to be schedule exceptions inCyberAudit-Web. Any day of a year may be designated a holiday, such as the company CEO'sbirthday.Holidays are meant to block access on specified days which would normally be valid, according tothe time frames within an access schedule. Access can still be granted on holidays, but it must bespecifically added in the Add or Edit Schedule screen, in the "Time Frames" section. Whenspecifying days of the week for a schedule time frame, check the box labeled "Holidays" to allowaccess on days that would normally be excepted from the schedule.Table Fields:Name - The name assigned to the holiday.Date - The month, day, and year of the holiday.Recurring - If the holiday is set to occur every year, a green checkmark will be in this field.Operations:New - Adds a new holiday.- Creates a printable list of the holidays.Properties - Displays the details of the holiday for editing.Delete - Removes the selected holiday record after confirmation.
The Access MatrixThe CyberAudit-Web Access Matrix displays the People and CyberLocks, and Single CyberKeyVaults in the system and facilitates granting access. It lists People and people tags vertically.Vaults, CyberLocks and their tags are listed horizontally.Schedules are designated in the common square where a key and lock meet. Schedules arerepresented by icons or letters. In the Access Matrix above, Maintenance is a tag that consists offour people. The cell where the Maintenance people tag meets the Electrical CyberLock tag showsa " D" which indicates Maintenance has access to the three electrical locks during the " D" schedule.Clicking on a person will open that Person's Properties page. Clicking a people tag will open thetag's properties page. Respective pages for CyberLocks will open by clicking on a lock, lock tag, orVault.
Granting Access to Locks - Access is granted by applying a schedule in the cell where a Personmeets a CyberLock in the matrix. To apply a schedule, click on the common cell. The "CellSchedule" overlay will appear. A dropdown list is used to choose a schedule. Clicking a link to thePeople, lock, or tag name will open the corresponding Properties page. Additionally the "CellSchedule" overlay has a link to create a new schedule.Controlling the Display - The number of displayed CyberLocks and CyberKeys is controlled inthe Display Settings submenu under Access Matrix. The matrix position is represented above thelist of people. The blue section is the current position; the grey section is not currently beingviewed. The view is navigated by the arrows framing the CyberLock and people lists or bydragging the blue box to the desired location in the position box. The numbers by the boxrepresent how many total people and locks are displayed with the current filter (discussed below).Position BoxNavigation - Navigation controls are available for when there is more data than can be displayedon a single page of the Access Matrix.In addition to the Position Box, Navigation controls are available forscrolling data up, down, right, or left. Single-arrow controls scroll onerow or column at a time. Double-arrow controls scroll one page.Navigation Controls
Menu OperationsColumn MenuRow MenuFilters -Another feature to aid in managing locks, lock tags, people or peopletags are the Access Matrix Filters.To find a person or tag quickly, click on the People Filter link and the Filter overlay will appear.Enter the string of characters to filter on. For example, typing "ti" in the people filter will find anypeople or tags containing those letters in that order.
The Keyword filter supports pattern matching by these rules:Matching looks for substrings. he would match she and there.All matching ignores differences between upper case and lower case.Additional substrings may be added to increase the possible matches. Separate each substringwith a space. For example searching for ma against a list containing Peter, Paul, and Marywould result in a list of Mary. A search of ma pa would result in a list of Mary and Paul.Use double quotes to look for a phrase. Within double quotes a space is meaningful. Forexample, " he sat" would not match she sat.Quoted phrases and substrings may be used at the same time. Separate each with a space.A quote character (") cannot be searched.The search is done on both names and IDs.The most recent search will be saved as "Quick Filter" in the dropdown list. If the same search isperformed multiple times, a name can be given to it to save the filter in the dropdown list.Advanced features of the filter overlay include:Finding only TagsHiding unused TagsSorting Tags first so they appear at the top of the resultsCustomizing the matrix dimensions
Related Topics:How-To'sLock TagsMatrix Display SettingsPeoplePeople TagsSchedulesTag Definition
CyberKeysThree types of CyberKeys are available, Standard, Rechargeable, and Blue. All are shownbelow. A Key Comparison document describes the difference among these keys.These documents are common to all keys:CyberKey Product InfoCyberLock CleaningTips for Using a CyberKeyStandard CyberKey documents:Standard CyberKey Battery CapRemovalStandard CyberKey Tones (seeCyberKey Tones.pdf)Rechargeable CyberKey documents:CyberKey Rechargeable LEDFlash GuideBattery ManagementBeeper and LED Patterns forCyberKey II
CyberKey ComparisonThese keys can be used interchangeably with your CyberLock system. The memory capacity andprogrammability are the same.The CyberKey Rechargeable is an excellent choicefor CyberLock® customers that want a small,environmentally-friendly key. There's no need toreplace and discard batteries: the lithium-ion polymerbattery is rechargeable. This battery fully charges intwo hours, provides 500 openings per charge, andlasts for 3 to 4 years. The CyberKey II has a standardmicro USB port and can be charged from that port. Itcan also communicate to CyberAudit-Web using thatsame connection.The Standard CyberKey is an excellent choice forthose who want the convenience of a key withoutrecharging. This key uses a replaceable 3-volt lithiumbattery, easy to source and replace on-the-fly.The durable fiberglass-reinforced case andreplaceable brass tip make this choice a toughperformer in all environments. This key uses acombination of a green LED and a beeper to providefeedback (see CyberKey Tones.pdf) to the user.CyberKey Rechargeables are made with a durablefiber nylon case with brass tip. Highly visible red andgreen LEDs provide feedback to the user on accessevents and key status.
CyberKey Product InfoCyberKeys are electronic keys used to operate CyberLocks.Standard CyberKeys are made of durable nylon-basedplastic and have a replaceable brass tip. They arepowered with a replaceable CR-2 lithium battery. Anindicator light shows battery power and key activation. Aspeaker makes tones indicating access, no access, andcommunication.Battery Life - 2000 to 5000 openings, depending onsettings and battery.CyberKey Rechargeables are made with adurable fiber nylon case with brass tip. Theyhave a rechargeable lithium-ion polymerbattery, and use red and green LEDs toprovide feedback to the key holder on accessevents and key status.Battery fully charges in two hours,provides up to 500 openings percharge, and lasts for 3 to 4 years.The CyberKey II has the same durable nylon-based plastic case as the other CyberKeys and has the samerechargeable lithium-ion polymer battery as the standard CyberKey Rechargeable. In addition it ...Has a standard micro USB portCan be charged using the USB portCan communicate to CyberAudit-Web using CyberLink via the USB portHas both LEDs and a beeper, for visual and audio feedbackDoes not have infrared for communication
CyberKeys have memory that contains encrypted access codes, a list of locks it may access,schedules of dates and times for accessing locks, and a begin/end date range during which thekey will operate. A CyberKey also contains an audit trail of up to 3,900 access events. Each timethe key touches a CyberLock, it records the lock ID, date, time, and authorization status.CyberKeys communicate to CyberAudit-Web either through the tip when placed in a Station orAuthorizer keyport, or by making an infrared connection to an IR device. Infrared devices includePDA/cell phones, PCs with an infrared port or an IR Encoder.Additional Features:CyberKeys can generate a denied event in both the key memory and lock memory.A CyberKey can record when it was removed from a lock.A Standard Cyberkey and CyberKey II beeper can be disabled.Additional Features with CyberAudit-Web Enterprise:A key can use multiple schedules per lock.Schedules can expire independently.Specifications:Operating Temperature - 32° to 122° F; 0° to 50° COperating Conditions - Keep key dry. If exposed to water, remove battery from StandardCyberKeys or cap from CyberKey Rechargeables and allow key to dry completely before use.Number of Locks per Key - Up to 3300 locks can be accessed with a standard user key.A Master key has no limit to the number of locks it can access.Access Schedules - Schedules programmed into CyberKeys provide complete control overspecific days and times that a key will operate. A key can use up to 49 different schedules toaccess locks.Holidays may be set as exceptions to the schedules.Audit Capacities - A CyberKey remembers up to 3900 events with date and time. It can be setto keep only the most recent set of events or to stop operating when its audit trail is full.Electronic Security Features - Key Expiration - a begin/end date range can be set during whichthe key will work.A key retains its audit trail if the power is interrupted.Electronic Rekeying - Rekeying a system is done via the software; no need to install new locksand issue new keys.Related Topics:Add a KeyCyberKey DocumentsCommunicatorsLost Key Help
CommunicatorsCommunicators are a core component of a CyberAudit-Web system. They are the hardwaredevices that enable CyberAudit-Web to download and program CyberKeys, Grand Masters, andCyberLock Programmers.IR EncoderUSB StationWeb StationLAN AuthorizerWeb AuthorizerThe Flex System
Vault 20 FXSingle Key Vault
CyberAudit-Web System HelpCyberAudit-Web offers online help with all aspects of CyberKeys, CyberLocks, Communicators,and the CyberAudit-Web Enterprise software system.Context help answers questions about the current area. Just click the question mark link nearest tothe areain question.If this is the first time using CyberAudit-Web Professional this may help:Getting Started GuideSystem OverviewTroubleshootingContext Help PDF manual (see ProHelp.pdf)Installation Worksheet (see Installation Worksheet.pdf)CyberAudit-Web Professional License AgreementAdd:CyberKeys Modem AuthorizersCylindersPeopleFlex System Programming JobsHolidays RFID Access CardsIR Encoders SchedulesIssue a Key Single Key VaultLAN Authorizers StationsLocks Vault 20 FXWeb AuthorizersReset:LocksLAN AuthorizersWeb AuthorizersMisc:Audit Trail EventsCyberKey DocumentsCyberLock CleaningDownloading LocksLost KeysLost System KeysSet a CyberLock as a CyberPointUpgrading CyberKey FirmwareWeb Authorizer KeyportCommandsDescriptions:Audit Trail Events Flex System LAN Authorizers ReportsCommunicators Grand Master CyberKeys Master Keys StationsCyberLink Holidays Notifications System LogsCyberLock Programmers IR Encoders People TagsCyberPoints Journal of Changes Programming Jobs Web Authorizers
ConventionsThis chapter describes some of the tools and methods used to perform operations inCyberAudit-Web.
CyberAudit-Web Context HelpContext help answers questions about the current area. Just click the question mark link nearest tothe area in question.
MenusCyberAuditWeb - Professional uses menus to manage a CyberLock system. These menusinclude:Each menu has submenus that can be selected by hovering over the main menu.
Change IconA change icon, , indicates that the settings of a lock, key, or communicator have changed in thedatabase but the item still needs to be updated.Update process:Authorizers - No action is required. The Authorizer will be updated automatically by the system.Flex System Hubs - No action is required. The Flex System Hub will be updated automaticallyby the system.KeysLocks - A red change icon ( ) indicates an unprogrammed CyberLock. The CyberLock shouldbe programmed to ensure maximum security.Stations - Launch CyberLink and connect the station with the USB cable.Vaults - No action is required. The Vault will be updated automatically by the system.
The Present IconThe present icon, , indicates that a has connected to the CyberAudit-Web serverCommunicatorwithin the last minute.
The CyberAudit-Web Item Chooser ControlThe CyberAudit-Web Item Chooser is a control used to select items and create lists. Below are twoexamples of Item Choosers.Item Chooser for applying tags to people in a reportTo use the item Chooser control, select items from one list and click the direction arrow to movethem to the other list. Use Ctrl-Click to add individual items to the selection or Shift-Click to select arange of items.Click onto further reduce the list of choices in the item chooser.All items may be filtered byrules:. The Keyword filter supports pattern matching by theseMatching looks for substrings. he would match she and there.All matching ignores differences between upper case and lower case.Additional substrings may be added to increase the possible matches. Separate eachsubstring with a space. For example, searching for ma against a list containing Peter, Paul,and Mary would result in a list of Mary. A search of ma pa would result in a list of Mary andPaul.Use double quotes to look for a phrase. Within double quotes a space is meaningful. Forexample, " he sat" would not match she sat.Quoted phrases and substrings may be used at the same time. Separate each with a space.A quote character (") cannot be searched.The search is done on both names and IDs.
The List FilterList Filters are a component of CyberAudit-Web that enable reducing the list of Locks or People toonly those that match these rules:Matching looks for substrings. he would match she and there.All matching ignores differences between upper case and lower case.Additional substrings may be added to increase the possible matches. Separate each substringwith a space. For example searching for ma against a list containing Peter, Paul, and Marywould result in a list of Mary. A search of ma pa would result in a list of Mary and Paul.Use double quotes to look for a phrase. Within double quotes a space is meaningful. Forexample, " he sat" would not match she sat.Quoted phrases and substrings may be used at the same time. Separate each with a space.A quote character (") cannot be searched.The search is done on both names and IDs.
Wildcard RulesAn astrisk "*" means that any number of characters (including no characters) will match.A question mark "?" means that any single character existing in that position will match.Anything else entered must match exactlyExamples:To search for any person's name that starts with "B" type "B*" in the search box.To search for a four letter name that starts with a "B" type "B???" in the search box.To search for any name with a "B" in it, type "*B*" in the box.
System SetupThis chapter contains information for setting up a CyberAudit-Web Professional system.
CyberAudit-Web Installation KeyDefinition:The Installation Key is derived by CyberAudit-Web from a hardware component of the computer.On Linux systems it uses the MAC address of the first discovered Network Interface Card. OnWindows installations it attempts to identify the components in this order:A <strong>Videx</strong> IR Encoder or USB Station (or Web station connected with the USB cable)The serial number of the computer hard driveA CPU IDNetwork Interface Card MAC addressIf none of these items are located, it will display the message Installation Key InvalidCyberAudit-Web is unable to generate an installation key for this computer. Please install a USBStation or IR Encoder and restart the CyberAudit-Web Professional service (Apache Tomcat).Click here for instructions to restart Apache Tomcat Service, or restart the computer.If you need help, please contact your CyberAudit-Web Professional provider or <strong>Videx</strong>, <strong>Inc</strong>. atsupport@videx.comwww.videx.com541-738-5500The identified component is used as a basis to create and display a unique Installation Key. TheInstallation Key should be in the form of six sets of four alpha-numeric characters followed by twoalpha-numeric characters, for a total of 26 characters separated by hyphens.Installation Key SampleHyphens are optional when entering the Installation Key and License into the CyberAudit-WebSoftware Registration forms. If your CyberAudit-Web computer is offline, enter the Activation Codein the CyberAudit-Web Professional Offline Registration screen and click "Submit".
CyberAudit-Web Professional Data SourceStart a new system - Select this option if there is no previous data to import.Upgrade from CyberAudit-Web Lite - Select this option if upgrading from CyberAudit-WebLite. It will require a backup copy of the Lite database plus the Grand Master CyberKey of thatsystem.Import from CyberAudit Professional 2.0 - This option requires matching one of thepasswords used to create the encrypted access codes for the CyberLocks in the old system. Itwill populate the CyberAudit-Web system with data from a CyberAudit Professional 2.0 system.These items will be imported:LocksAccess Codes ( with mode 6 for lock passwords created since June 2002)KeysSchedulesHolidaysKey Access ProfilesPeopleAuthorizersThese items are not imported:Audit Trail recordsLog of ChangesReportsEmail NotificationsAuthorizer Key assignmentsLost KeysRestore from a CyberAudit-Web Professional backup - Select this option to restore anexisting system.
New DatabaseThe next decision is related to the security of the locks and keys.The keys must match an access code in the cylinder before it gains access. The access codes canbe created in two ways: Using the Grand Master's encrypted access codes or creating accesscodes by entering passwords. Here are the advantages of both to help make this decision.Unlike mechanical systems where a key is limited physically by the possible combinations, theCyberLock system has trillions of possible combinations of access codes.The Grand Master's encrypted access codes are randomly generated, unique codes. <strong>Videx</strong> doesnot keep a record of them. There are no passwords to remember. The Grand Master becomes ahardware key to the system. This is an easier route for system evaluations. Care should be takento ensure the Grand Master used for the access codes is kept in a safe place.When creating passwords, they can be up to 32 characters long. They are case sensitive andspecial characters can be used. Knowing the passwords would allow recreating a database if theoriginal database was lost or corrupted. Creating manual passwords enables systemadministrators to create a reset key.Choose either " Grand Master key" or " <strong>Manual</strong> password entry"by clicking on the radio button.
Access Code SourceAccess codes are the first line of security in CyberLocks. They must be programmed intoCyberLocks using a Grand Master CyberKey or a CyberLock Programmer. Sometimes calledfamily codes, a CyberKey must present one of the access codes in the lock to open it.In the event a system is destroyed because of a loss of computer equipment or other disaster, asystem may be reconstructed using the same access codes. Without those access codes, it isimpossible to rebuild a system.<strong>Manual</strong> Password Entry - This option uses manually entered passwords as the source for theaccess codes. Each password must be 6 to 32 characters. Select passwords that will be difficult toguess. Use a word or phrase that is easily remembered. Avoid using personal names, familynames, company names, dates of birth, Social Security Numbers, etc. A good password includes amixture of upper- and lower-case letters, punctuation, and numbers. An often used example is"All4One." This phrase would be easy to remember, yet still involves both upper- and lower-caseletters and numbers.<strong>Manual</strong>ly entered passwords should be written down and stored in a secure location. If they arecompromised the security of the CyberLock system is compromised as well.<strong>Manual</strong>ly entered passwords enable the system to create and utilize a reset key.Grand Master CyberKey - Grand Master CyberKeys are manufactured with built-in access codes.With trillions of possible codes, these access codes are nearly certain to be unique. When a GrandMaster is used as the source for access codes CyberAudit-Web designates it as the "Base"Grand Master.A "Base" Grand Master should be kept in a secure location when not in use. It may be used torebuild a system if the database is destroyed. If the "Base" Grand Master is lost, it should bedesignated as "lost;" in CyberAudit-Web and replaced with another. This will ensure that no onemay use it to create keys to open the CyberLocks.
Passwords from <strong>Manual</strong> InputsEnter manual inputs to create the access codes for the keys and cylinders. Two passwords areneeded and must be between 6 and 32 characters. They are case sensitive passwords and can'tbe the same. These passwords are directly related to the security of the cylinders and keys - keepthem secure.There are also software administrators passwords that should be added for each administrator.
Add the Grand Master by introducing it to the database through the IR Encoder or Station and theCyberLink software.CyberLink - The program that communicates with the keys and the database through either an IREncoder or a USB Station. CyberLink will display the key's serial number and the status of thecommunication. Keep the key in contact with the device until the CyberLink software displays"Configuration successful."
Passwords from a Grand MasterThe software will step through Programming CyberLocks, CyberKeys, populating the databasewith their serial numbers, launching CyberLink, and updating the Grand Master.
Place the Grand Master's IR in front of the IR Encoder. CyberLink will confirm when to remove theGrand Master. Leave CyberLink running as it will be used several time during set-up.
CyberLink - The program that communicates with the keys and the database through either an IREncoder or a USB Station. CyberLink will display the key's serial number and the status of thecommunication. Keep the key in contact with the device until the CyberLink software displaysConfiguration successful.
Login and PasswordCyberAudit-Web requires a login and password for each system administrator. This page sets upthe login and password for the top level administrator.Logins and Passwords must be 4 to 64 characters. Select passwords that will be difficult to guess.Use a word or phrase that is easily remembered. Avoid using personal names, family names,company names, dates of birth, Social Security Numbers, etc. A good password includes a mixtureof upper- and lower-case letters, punctuation, and numbers. An often used example is "All4One."This phrase would be easy to remember, yet still involves both upper- and lower-case letters andnumbers.The Person Name is used to identify the administrator in CyberAudit-Web in the People records. Italso makes them a potential key holder.
Upgrading from CyberAudit Professional 2.01. Choose "Import from CyberAudit Professional 2.0" from the data source window.2. CyberAudit - Web Professional will attempt to automatically detect the database to import. If none are detected,choose to browse to the database.3. Enter the passwords from the old software.4. Select the time zone.
5. Enter the user name and password that will be used to log in to thesystem.
Import WarningsCyberAudit-Web requires keys with a product hardware version of 102 or greater. Keys with olderhardware versions in the CyberAudit 2.0 database will not be imported into the CyberAudit-Webdatabase.Keys marked as lost in CyberAudit 2.0 are also not imported.One time access is not supported in CyberAudit-Web Professional. Keys that have one timeaccess to locks will be updated to have no access to prevent any unscheduled opennings.
Upgrading from CyberAudit - Web LiteWhen prompted, choose Import from CyberAudit-Web Lite and click the Continue button.Browse to the desired Lite backup (default location - C:\Documents andSettings\*USER*\CyberAudit-Web Lite backups) and click Continue.Insert an IR Encoder.
Update the Grand Master used in the Lite software.The software will automatically progress to the Time Zone selection screen.Select the login and password that will be the root user.
The Access Matrix will be shown and the software is ready to use.
1.2.3.4.5.Getting StartedThis section is an overview of how to get a system set up. For an index of step-by-step directionsof system operations, please visit the How-To page.Order of ImplementationThe order of implementation is not critical. However, for the purpose of efficiency in programminglocks and keys, the following order is recommended:Set system optionsAdd communicationsAdd cylindersAdd schedulesAdd people and keysCreating New, Importing, and Restoring DatabasesThe set-up wizard will step through the set up of the system.Options include creating a New database, Upgrading from CyberAuditWeb-Lite or CyberAuditProfessional system or restoring to a Web Professional backup.
Setting Access ControlTo set access for a key, click on a common intersection for the key and lock. In the exampleabove, Kathrine is to be given access to the Elevator Exhaust lock Monday through Friday plusholidays from 8:00 AM to 5:00 PM.
Update each key using either the Encoder or USB Station and CyberLink. An Authorizer is anotheroption to update keys.In CyberAudit-Web, a tag is a free-form way to classify People and Locks. Tags help organizePeople and Locks into logical categories by providing an unlimited number of ways to describethem. There is no "wrong" choice for how to use them. Instead of belonging to one "group,"People and Locks may have any number of tags. More information on tagsIf a key has been lost, thefirst thing to do is to seewhen the key expires. Oncea key expires, there is nolonger a risk of that keyopening locks. If the key hasalready expired, or if itexpires in a reasonable timeframe, do not mark the keyas lost. Simply use the "NoAccess" schedule for anylock the key had access to.This way if the keycommunicates withCyberAudit-WebProfessional, access will notbe extended. If the key'sexpiration presents anunreasonable risk, mark thekey as lost.A CyberLock Programmer with a Configure type Programming job will reset locks inits list with this setting.Why reset a lock?To move it to a different system or database.To return it to the factory in the event that service or exchange is needed.Additional Note:Resetting a CyberLock does not cause it to lose its audit trail; only its access codes.How to reset a lock
BackupsA backup of the database is made each time it is started. A demand backup may also be made byclicking the "Backup Now" button in the Backup screen. A networked folder may be used to storethe backup on a system other than the local computer.Date and TimeDate and Time formats effect how data is rendered for viewing.
Audit ReportsAudit Reports are used to see the activity history of keys. Audit information includes:Time/Date StampsType of Activity (Access Denied/Granted)Key and Lock NameAudit Reports can be run by lock, key, or the whole system.
Remote AccessCyberAudit-Web may be accessed by other computers on the network and by remoteCommunicators. With this feature enabled, the remote computers may access the CyberAuditWebcomputer by entering https:// in the browser address bar. Thisfeature requires knowledge of general networking and familiarity with any firewall software runningon the host computer or the network.When access to Cyberaudit-Web is local, there is typically no need for a secure connection. Forremote access, HTTPS encrypts and decrypts CyberAudit-Web browser page requests andreturns as well as traffic from remote communicators. The use of HTTPS protects againsteavesdropping and man-in-the-middle attacks.
Email SetupEmail server: - CyberAudit-Web relays its email notification messages through an email server.Enter the email server's IP Address or DNS name here. By default, the email server must supportSMTP on port 25 without secure sockets (TLS).Default FROM email account: - Use this field to identify the sender of the email notification. In thepicture above, CyberAudit is used as the easily recognized account.Email server requires authentication: - An email server that operates on the Internet willtypically only relay messages from authorized accounts. If so, check this box and enter the username and password for the account. Check with the email server administrator if an account isneeded for CyberAudit-Web.Click Save to save the settings.Related Topics:NotificationsReports
Backup OptionsCyberAudit-Web automatically performs a daily backup. The backup is named for the day of theweek. It overwrites previous backups for the weekday.When specifying a backup to a network drive, note that the server installation of CyberAudit-Webdoes not transmit a password to authenticate. The server installation requires either ananonymous connection to the target folder or that the Tomcat service be modified to run as a userwith permissions to that folder.It will also back up its data fileon demand. This form controls where the backup files are placed.An email server must be set up for the record to be saved and for a failed backup notification to besent.
Operating OptionsThe preferences selected under the Options section of CyberAudit-Web affect the operation of thesystem. Preference selection affect the entire system and should be considered early in systemsetup.
Matrix OptionsLock OptionsKey OptionsEmail Notification SetupCommunicator OptionsDate & TimeAudit Data TrimmingBackup OptionsRemote AccessCombine SchedulesRe-key All LocksReactivate the SoftwareSet System Options
Lock OptionsIf CyberLocks will be programmed with Multi-key or delay requirements, it must be enabled fromthis page first. With this enabled, CyberLocks may be further programmed to require that each keyof a multi-key access verifies against a different schedule as shown in CyberAudit-Web's AccessMatrix.Re-keying all locks will require updating all locks and keys in the system.
Multikey - Different SchedulesThis option enables locks set to Multikey require each key holder to have a different schedule togain access. Each person needs to have access at the time the lock is contacted but theschedules allowing access need to differ from each.For example, a casino may want to ensure different groups of personnel attend each opening of asafe. These groups include security, accounting, and management. Each of these groups have adifferent schedule but allow access to the safe lock at the same time period. The safe lock wouldhave a Multikey setting for 3 keys and require each key to have a different schedule.Changing this setting will require that all locks with multi-key access be reprogrammed. All keyswill also need to be updated.
Re-key All LocksRe-keying CyberLocks involves changing the access code for each lock in the system. Every lockin the system must be re-programmed. After the locks are programmmed, every key in the systemmust be updated.Re-keying is only needed when the number of high-risk lost keys exceeds 16 (those requiringDisabling Points), when the passwords for manually entered passwords are compromised, orwhen the base Grand Master is lost.
People and Key OptionsThis page sets up rules and defaults for how CyberKeys will behave .Allow creation of keys that never expire - Expiration is an important means to achieve keycontrol with CyberKeys and CyberLocks. Regular expiration and renewal reduces the exposureand subsequent risk of a lost or stolen key because an expired key will not open locks. There aresome cases where expiration may not be desirable or the consequences of a lost key can beovercome by designating the key as lost or by re-keying the system.Allow master keys - Enables creating master keys that have access to all locks in the system.Memory-full behaviorDisable keys when memory is full - Audit trail data is the other important component of keycontrol with CyberAudit-Web. Regularly downloading the key to update its expiration and fetchits audit trail data ensures a steady stream of information. It also ensures that the CyberKey'sclock is kept up-to-date. moreOverwrite old data when memory is full - There may be cases where the key cannot beregularly downloaded and it is more important to ensure the key continues to operate. This isthe default behavior for those who upgraded from CyberAudit-Web Lite.
Generate "No Access" events in locks - By default, CyberLocks do not record events where thekey is not permitted access. This includes events such as:Out of schedule for lockKey expired or out of scheduleAccess Denied - No PermissionsKey disabledAccess count expendedCyberLocks always record these events:Key DisabledAccess code failedCyberKeys always record "No Access" events in their audit trail. They are recorded as events suchas "Out of Schedule for Lock," "Not in access list," and others. If this option is selected, keys willalso write an "Access Denied" event to the lock's audit trail.Record "Removed From Lock" events - Normally, CyberKeys only record a "Removed FromLock" event if they are left in contact with the lock for more than one minute. If this option isselected, CyberKeys will record the time at which they were removed from a lock after contact,regardless of how long they are left in contact.Disable the key's IR - CyberKeys use an Infrared transceiver to communicate with somecommunicators using IrDA protocol. Other IrDA devices including some laptop computers and PCsmay cause a CyberKey to "chatter" when it comes in proximity. There is no security risk associatedwith this behavior but if no Infrared communicators will be used with the system, this toggle willstop CyberKeys from responding to these other IrDA devices.Low battery warning level - If CyberAudit-Web finds CyberKeys in your system that weremanufactured before 2009, it will display this control at the bottom of the key options frame.For the older keys, this control sets the level at which Standard CyberKeys, communicators, andCyberAudit-Web warn that a key's CR2 lithium battery is nearing end of life.All CyberKeys measure their battery each time they open a lock and during communications. Iftheir battery voltage is below the low battery warning level for 5 or more consecutive readings (1reading on newer keys), the Standard CyberKey will emit a low battery warning beep once every 8seconds for a minute.When setting the low battery warning level, use these guidelines:Low - Standard CyberKeys will open 75 or more CyberLocks per day.Moderate - Standard CyberKeys will open 25-75 openings per day.(default)Aggressive - Standard CyberKeys will open less than 25 openings per day or there is a strongrequirement for key holders to get the low battery warning prior to its end of life.
Default Expiration Rule for New Keys - CyberKey expiration takes effect as soon as it ceases tobe the day or date of expiration. For most expiration rules, that means the key will work till the endof the day or date specified. The key will expire as soon as the clock rolls to 12:00am, since thedate will have advanced. Expirations rules of "minutes" or "hours" will set the key to stop workingat a specific hour and minute of the day.Docking key will extend expiration - Another option is to have the expiration move furtherahead every time the key is updated. This rule is often called a rolling expiration. Since there isno set day or date for key expiration, the key's next expiration is calculated when the key isupdated at a communicator. Each time the key is docked at an Authorizer or IR Encoder, thetime until expiration is reset to the interval specified in the input fields. Note that rollingexpiration by days, weeks, or months extends the key's expiration to midnight(relative to thetime zone of the Authorizer contacted) of the last day.Example: A key with a one day extend expiration updated today at a communicator will be setto expire at the end of the day tomorrow.Note: A rolling expiration of minutes or hours takes priority over the time frames assigned tomaster keys. For example if a master key has a 24 hour rolling expiration and the key isupdated at 10am on Wednesday, it will continue to operate until 10am on Thursday even if timeframes for the master key indicate that key cannot operate on a Thursday.Never Expire - This involves the least keyholder interaction but is the least secure expirationrule because a lost or stolen key can pose an ongoing threat to security. It removes the need toregularly update the key so there will likely be no current audit trail data available for that key.Fixed period expiration rules - The following rules select a specific day of the week, month,or year or the end of a quarter as the key expiration target date.Day of the Week - Select this expiration rule to make the key expire on a specific day ofthe week. The key will function through the end of the selected day, and stop working atmidnight (00:00) of the following day.Monthly Expiration - Select this expiration rule to make the key expire on a specific dayevery month. The key will function through the end of the selected day, expiring atmidnight. If the key should expire on the last day of every month, select the "End ofmonth" option from the bottom of the pull-down menu.Quarterly - If this option is selected, the date of expiration will be set to the end of everythird month, beginning January 1st. Expiration dates will be 31 March, 30 June, 30 Sept.,and 31 Dec.Yearly - Expiration occurs at the end of the selected day.Expiration Renewal Grace - This setting allows a key holder to renew their key before the keyexpires where CyberAudit-Web will move the expiration ahead to the next expiration day, ratherthan the current one. For example, if a key is set to expire weekly on Fridays, and the renewalperiod is set to 12PM, 1 day prior to expiration, the key can be renewed by docking it at acommunicator anytime after Noon on a Friday. The key will then be set to expire the nextFriday. It is set to (1) day prior because expiration occurs at 12AM midnight of the next daywhich is Saturday in this example.
Expiration RulesExpiration is an important means to achieve key control with CyberKeys and CyberLocks. Regularexpiration and renewal reduces the exposure and subsequent risk of a lost or stolen key becausean expired key will not open locks. This form enables setting expiration "rules" to enable ongoingcontrol. In addition, a start date for the key may be set to prevent the key from working before itshould.Start Date - The "Start Date" is the day a key will begin working. By default, it is the day the key isadded to the system.Expiration Rules - CyberKey expiration takes effect as soon as it ceases to be the day or date ofexpiration. For most expiration rules, that means the key will work till the end of the day or datespecified. The key will expire as soon as the clock rolls to 12:00am, since the date will haveadvanced. Expirations rules of "minutes" or "hours" will set the key to stop working at a specifichour and minute of the day.Fixed Date - This rule simply sets a date after which the key will not work.Extend Expiration - Another option is to have the expiration move further ahead every timethe key is updated. This rule is often called a rolling expiration. Since there is no set day or datefor key expiration, the key's next expiration is calculated when the key is updated at acommunicator. Each time the key is docked at an Authorizer or IR Encoder, the time untilexpiration is reset to the interval specified in the input fields. Note that rolling expiration by days, weeks, or months extends the key's expiration to midnight (relative to the time zone of theAuthorizer contacted) of the last day.Example: A key with a one day extend expiration updated today at a communicator will be setto expire at the end of the day tomorrow.Note: A rolling expiration of minutes or hours takes priority over the time frames assigned to
master keys. For example if a master key has a 24 hour rolling expiration and the is updated at10am on Wednesday, it will continue to operate until 10am on Thursday even if time frames forthe master key indicate that key cannot operate on a Thursday.Never Expire - This involves the least keyholder interaction but is the least secure expirationrule because a lost or stolen key can pose an ongoing threat to the system. It removes theneed to regularly update the key so there will likely be no current audit trail data available forthat key.Fixed period expiration rules - The following rules select a specific day of the week, month,or year or the end of a quarter as the key expiration target date.Day of the Week - Select this expiration rule to make the key expire on a specific day ofthe week. The key will function through the end of the selected day, and stop working atmidnight (00:00) of the following day.Monthly Expiration - Select this expiration rule to make the key expire on a specific dayevery month. The key will function through the end of the selected day, expiring atmidnight. If the key should expire on the last day of every month, select the "End ofmonth" option from the bottom of the pull-down menu.Quarterly - If this option is selected, the date of expiration will be set to the end of everythird month, beginning January 1st. Expiration dates will be 31 March, 30 June, 30 Sept.,and 31 Dec.Yearly - Expiration occurs at the end of the selected day.Expiration Renewal Grace - This setting allows a key holder to renew their key before the keyexpires where CyberAudit-Web will move the expiration ahead to the next expiration day, ratherthan the current one. For example, if a key is set to expire weekly on Fridays, and the renewalperiod is set to 12PM, 1 day prior to expiration, the key can be renewed by docking it at acommunicator anytime after Noon on a Friday. The key will then be set to expire the nextFriday. It is set to (1) day prior because expiration occurs at 12AM midnight of the next daywhich is Saturday in this example.Email Expiration Settings for CyberKeys About to ExpireEnabling an expiration email notification will result in an email being sent to the key holder whenthe key is nearing its expiration. This can help remind the key holder to update their key at acommunicator to get a new expiration date and time.To enable this notification:The CyberAudit-Web system must be set up to use a .valid email serverThe owner of the key must have a valid email address in their "People" record. This is usedas the To: field of the email.There must be a valid entry in the From field.
Master Keys in CyberAudit-WebA CyberKey may be granted master access to all locks in the system. When a CyberKey isdesignated as a master key, it can open any lock without granting access to locks or lock tags witha schedule at each juncture in the Access Matrix.Individual master keys will display with the Master Icon (assigned.) in each cell where no schedule isBy default, a master key operates at all times and all days. The operating time may be restricted tooperate only during the time frames of a selected schedule.Finally, a master key normally has access to all locks. It may be given restricted or no access toindividual locks, if desired, through the Access Matrix by assigning a more restrictive or the "NoAccess" schedule.Administrators may choose to use master keys because:Master keys are easier to create and manage when a key is to open most or all CyberLocks inthe system.New locks are being added to the system that the key must open but it is inconvenient to addthe additional permissions and update the key.The number of locks a CyberKey must open exceeds 3300.
Disable keys when event memory becomes fullCyberKeys can hold up to 3900 events in memory. Normally, when the key's memory limit isreached, it begins overwriting the oldest events and continues functioning. If this option is selected,keys within this subsystem will not overwrite events when the memory limit is reached, and willcease to open CyberLocks until the key has been downloaded at a communicator.
Communicators OptionsThis page enables setting networking defaults and the behavior of certain communicators.CyberAudit-Web URL - IP address or DNS name of the computer or server runningCyberAudit-Web.Note: If using the computer's name for the URL, enter the fully qualified domain name.Proxy - Many larger networks route web browsing through a proxy server to reach the Internet.Because the Web Authorizer is fundamentally a web client, its web traffic must also be routedthrough the proxy.Key Record Associations - Flex System Hubs, Web Authorizers, and LAN Authorizers areable to store CyberKey records locally. This allows the Authorizer to program the CyberKeywith the stored access and expiration rules without first contacting CyberAudit-Web. IfCyberAudit-Web is not available, CyberKeys may still be updated.If a key record is not stored locally, the Authorizer will contact CyberAudit-Web for instructionswhen a CyberKey is inserted into the Authorizer's keyport. With network connections,Authorizers can normally contact CyberAudit-Web quickly and program the key in a fewseconds. For Remote Modem LAN Authorizers,however, the process of dialing the modem
and communicating with CyberAudit-Web will take noticably longer. In these cases, it is betterto "pre-load" the key records in the Authorizer so the key updates quickly.CyberAudit-Web automatically pre-loads CyberKey records into both Flex System Hubs andWeb Authorizers. LAN Authorizers may be preloaded using the Authorizer Key Associationpage.PIN Use Overrides - Neither Web Stations nor CyberKey Vaults present a way to enter a PIN.Therefore if a key holder or card holder has a PIN it could preclude them from using thosecommunicators. In some cases system administrators may want to bypass that requirement.Vault door details - If a Single CyberKey Vault's door is left open longer than the selectedamount of time, the Vault will emit a low tone beep once every two seconds.The Hold Open Time is the amount of time the Vault's solenoid will hold the latch release openbefore it times out.
Portable LinksName - Name assigned to the Portable Link. This will cross-reference to CyberKey downloads toindicate where a CyberKey was downloaded.ID - An identifier of the Portable Link. This identifier must be present in the database before thePortable Link may be used.Comment - An optional field for entering additional information.Type - There are two types of Portable Link:IR Encoder- Inserts into a computer's USB port and launches from CyberAudit-Web.CyberKey II - Connects to a computer directly by USB cable.Related Topics:Adding Comm LinksCyberLinkIR Encoder DescriptionOther Communicators
USB StationsThe USB Station is used to communicate and charge. Itincludes a USB-to-USB cable to connect directly to acomputer. In addition, the CyberKey Rechargeable ischarged while connected to the computer. The USBStation is also available with a USB-enabled powersupply for those customers that want the additionaloption of connecting directly to a power outlet to chargetheir key.Related Topics:Adding Stations to CyberAudit-WebOther CommunicatorsStation Light DefinitionsWeb Station information
USB Station informationStation Light DefinitionsHow to add a Web StationWeb StationsThe Web Station is used to communicate and charge. It includes a USB-to-USBcable to connect directly to a computer for configuring the unit and a powertransformer that is used when the Web Station will be used for networkcommunications.Note: Connecting the Web Station to the power transformer automaticallyturns off the USB and turns on networking.After configuring, the Web Station may be used as a USB Station or may insteadbe connected to a network or the Internet. This allows for communicationbetween CyberKeys to both the Professional and Enterprise software. In addition,it charges the CyberKey Rechargeable.
Web AuthorizersThe CyberKey Web Authorizer Hub is a remote interfacedesigned to allow a computer and a key to exchangeinformation via an Ethernet network connection or over theInternet. This allows a CyberLock system spread over a largegeographical area to be controlled from one location. The WebAuthorizer Hub works with Enterprise software version 1.4 orhigher and uses TCP/IP protocols in conjunction with theoption of DHCP or static IP address selection.In addition to being a remote terminal, the Web Authorizer Hubstores key configurations. This storage ability allows it toprogram a key even if it doesn't have a current connection tothe CyberAudit database. It also downloads and stores theaudit trail of known keys that touch a keyport, and relays this tothe database the next time it has a connection. The CyberKeyWeb Authorizer Hub is made of black powder coated extrudedaluminum, and supports (3) RJ-45 connections, as well asUSB connections for programming. Dual LED lights indicatepower and status.The CyberKey Authorizer keyport is part of the CyberKeyAuthorizer system. It requires an Authorizer hub to function. Ithas a single line, eight character display and twelve keys forentering a PIN or other information.The keyport includes mounting hardware for a single outletelectrical box. A Cat-5 patch cable provides power andcommunication from the Authorizer hub. It can be placed up to100 feet away from the hub, outside of the first lock (entryway)of the local CyberLock system. A second keyport can beadded at any time.Installing a Keyport (see Installing a Keyport.pdf)How to add a Web AuthorizerLAN Authorizer Information
The CyberLock Flex SystemThe CyberLock Flex System is a hub plus a family of modules that add the capability to store andissue CyberKeys in indoor or outdoor environments .
Flex System HubAt the heart of the system is the Flex System Hub which fetches and stores CyberKeyprogramming from CyberAudit-Web and controls the Flex System Modules attached to it. Up toeight modules may attach to a single hub. Since the hub stores CyberKey programmingpermissions, it can continue to issue and check-in CyberKeys even in occasions when it is unableto maintain connection with CyberAudit-Web.The modules may be combinations of:Weatherized Key Vault - Stores a CyberKeyat a point of entry or other indoor or outdoorlocation.
RFID Reader - For scanning 13.56 MHzRFID access cards used to identify theperson and their permissions.Data Display - To provide feedback,instructions, and warnings.
Data Knob - Used with the Data Display toenable numeric input for PINs or missionnumbers.Keypad Display - Combines quick numerickeypad input for PINs or mission numbersplus a data display to provide feedback,instructions, and warnings.
Additional Topics:Adding a Flex System Hub and ModulesMounting Flex System ModulesGranting Access to Flex System Weatherized VaultsFlex System Power RequirementsFlex System Module Cable PinoutsFlex System Hub ListView/Edit Flex System ModulesUsing the Data Knob and DisplayLED Indicator on the Weatherized VaultUsing CyberKeys with Flex System Weatherized VaultsFlex System Demo ModeFlex System Audit TrailsFlex System Display MessagesFlex System Hub DiagnosticsFlex System Keyport - For programmingCyberKeys. A flashing green LED indicatesprogramming has completed. Combine witha Keypad Display to request PINs or missionnumbers.
The CyberKey Vault 20 FXThe CyberKey Vault 20 FX is a dynamic key management device supporting and dispensing up to20 CyberKeys. It requires an authorized RFID access card or a valid mission entered at its KeyPadDisplay before it will program and release a CyberKey. Once the key has been programmed withthe user's access permissions it will flash, signaling the user to remove the key from the Vault. Theremaining keys stay locked in the Vault in an unprogrammed state.Additional Topics:Vault 20 FX Demo ModeSetting Up and Configuring a Vault 20 FXProgramming a Vault 20 FX from a USB flash driveVault 20 FX Power RequirementsPower Over Ethernet for VaultsFlex System Hub ListVault 20 FX PropertiesPush Notification PortGranting Access to VaultsValid Keys for Vault 20 FXFlex System Audit Trail EventsFlex System Display MessagesFlex System Special Key Inputs
Single CyberKey VaultThe Single CyberKey Vault is a key cabinet designed toprogram and dispense a single CyberKey. The CyberKey isstored unprogrammed in the cabinet until the approved RFIDcard is presented. After reading the RFID card, the cabinetcommunicates with CyberAudit-Web and programs theCyberKey with permissions.The Vault cabinet body is gray powder-coated aluminum andthe latch can withstand 1200 pounds of force. It can mount toa single-gang electrical box. It connects to the network via aCAT 5 or a CAT 6 patch cable. Initial programming is donevia USB cable. During network operation, the vault can utilizePoE (Power over Ethernet).The Vault reads a 13.56 MHz RFID Access card and canstore any of the following CyberKey models: CK-IR7,CK-RXD, CK-RBT, CK-IR6C and the CK-IR7C. TheCyberKey Vault can also recharge the keys with rechargeablebatteries. The front of the Vault has the RFID card reader aswell as status indicator lights.Finally, the CyberKey Vault has a speaker that emits tones toindicate status such as invalid key inserted or that aCyberKey is ready for use.Additional Links:Adding a Single CyberKey VaultCyberKey Vault Audit Trail EventsCyberKey Vault LEDsSingle CyberKey Vault TonesMiscellaneous Notes about Single CyberKey VaultsUsing CyberLink as an RFID Card ReaderUsing Power Over Ethernet (POE) with VaultsValid Keys for Vaults
LAN Authorizer Product DescriptionThe CyberKey LAN Authorizer is a remote interface that allows CyberAudit-Web and a CyberKeyto exchange information via an Ethernet network connection. An Authorizer with a modem may beadded to this system to enable communications where a network connection is not available.In addition to being a remote terminal, an Authorizer hub stores key configurations. This storageability allows it to program a key even if it doesn't have a current connection to CyberAudit-Web. Italso downloads and stores the audit trail of known keys that touch a keyport and sends it toCyberAudit-Web the next time it has a connection.Several indicator lights show the status of the network and keyport connections. The hub cancontrol two Authorizer keyports. These can be placed up to 100 feet away from the hub.The keyport includes mounting hardware for a single outlet electrical box. For increased security,the Authorizer can be set to require a personal identification number (PIN) before updating a key.How to add a LAN AuthorizerInstalling a Keyport (see Installing a Keyport.pdf)Web Authorizer Information
Audit Data TrimmingCyberAudit-Web automatically trims old audit events from it's database on a periodic basis. Thiskeeps daily backups of CyberAudit-Web smaller and helps ensure that audit reports can bedisplayed in a timely manner. The trimmed audit data cannot be restored to CyberAudit-Web but itcan be imported into Excel or a third party database for SQL queries and reporting.The format of the file is CSV (comma separated value). The general CSV format is documented inRFC 4180. CyberAudit-Web CSV files conform to the following rules:The file is Unicode text encoded as UTF-8. If text fields appear incorrectly after import be sureto specify UTF-8 when importing.One record per line.Lines are terminated using the Windows conventional CRLF (\r\n)Fields in a record are delimited by comma: ,The first line is the table header. It lists the field names for each column. Each field name issuffixed with it's type.Text fields are double quoted.Text fields will never contain newlines.Double quotes within a text field will be escaped by a second double quote.All fields can be NULL (unknown or not-applicable)NULL fields are left emtpy (even text fields). (eg ...,"before null",,"after null",... )Field types are:Integer ( i) Example: 12345Text ( t) Example: "hello world"Boolean ( b) 0 for false, 1 for trueReal ( r) Example: 3.14Time ( m) Example: 14:37:41Date ( d) Example: 2012-02-14Timestamp ( p) Example: 2012-02-14 14:37:41Real numbers will be in either standard or scientific notation. (eg 3.14 or 1.230e-09)Dates and times are output according to ISO 8601 ( yyyy-mm-dd"T"hh:mm:ss). For example:2012-02-28T11:09:03 The time zone designator suffix is ommitted.Dates and times are local to the time zone in which the event occurred unless the field namehas the "_utc" suffix. UTC (aka GMT) times will need to be converted to your local time zonewhen displaying reports.The records should be assumed to be unordered.
Spreadsheet Import -Most spreadsheet programs such as Microsoft Excel can open CSV files directly. However, if theCSV file is over 100MB it may tax the RAM of the computer loading it. Loading it into a databasesuch as: Microsoft Access, OpenOffice Base or MySQL is a good way to overcome the limitation.Microsoft Access -Generic instructions for importing CSV files into Microsoft Access can be found here.Filemaker Pro -Follow these steps:1.2.3.4.5.6.7.Add a new table in the FileMaker databaseAdd fields to the table corresponding to the CSV file you are importing.Note: FileMaker may not parse ISO 8601 dates properly. The workaround is to import themas Text fields.Select File->Import Records->From File...Verify that the fields are aligned properlySelect the UTF-8 character set.Check the box to ignore the first record (header).Import (will be slow for millions of records).
Reactivate the SoftwareReactivating should only be necessary if the CyberAudit-Web license or information about thelicense changes.
System AdministratorsCyberAudit-Web allows and tracks different system administrators. This is useful when the task ofmanaging CyberLocks and CyberKeys needs to be delegated.Navigate to the "Administrators" page.The top level or 'root'() administrator of CyberAudit-Web may add additional administrators toassist in managing the system. All software administrators see the same locks and keys but maybe assigned different permissions.
Administrator LoginsEach CyberAudit-Web system has one "primary" or "root" administrator. This administrator maynever be deleted and no other administrators may change that password. The "root" administratorwill always be the first one in the list.Table Fields:Login - The identifier of the administrator used in the CyberAudit-Web Login page. The rootadministrator is represented by an anchor icon ( ).Associated Person - Links the administrator to a record in the list of people.Operations:New - The root administrator ( ) may click this to add a new administrator.- Creates a printable list of the administrator records.Clicking in a non-linked section of a People record will display a drop-down menu of operations:Properties- Displays editable details of the selected administrator.Journal - Displays a journal of changes for the selected administrator.Delete - Removes the selected Administrator record after confirmation.Automatic Disabling: With the exception of the root administrator, CyberAudit-Web disables anadministrator's login after three consecutive incorrect password entries.Related Topics:Adding AdministratorsSystem HelpSystem Logs
Edit LoginLogin - The identifier of the administrator used in the CyberAudit-Web Login page.Change Password - Check this box to change the password of the administrator.Associated Person - Each CyberAudit-Web Administrator must have a record in the list of list ofpeople.Disable this login - Check this box to temporarily prevent an administrator from logging in toCyberAudit-Web. An administrator's login may also become disabled from failing to properly entertheir password three consecutive times.Permissions - Displays the list of sections in CyberAudit-Web the administrator may modify. Clickhere for a detailed description of the permissions.Journal - Displays a journal of changes for the selected administrator.Delete - Removes the selected Administrator record after confirmation.
Add a New AdministratorCyberAudit-Web Professional permits additional administrators for system management. Inaddition, a set of permissions may be granted to each that restricts their ability to make changes inspecific sections of CyberAudit-Web.Create a Login name or word that will be entered at the login screen. Logins and Passwords mustbe 4 to 64 characters. Select passwords that will be difficult to guess. Use a word or phrase that iseasily remembered. Avoid using personal names, family names, company names, dates of birth,Social Security Numbers, etc. A good password includes a mixture of upper- and lower-caseletters, punctuation, and numbers. An often used example is "All4One." This phrase would be easyto remember, yet still involves both upper- and lower-case letters and numbers.Choose the person who will be an administrator from the dropdown box in the "Associated Person"section or create a new person by selecting the " New Person" radio button.Finally, select the sections of CyberAudit-Web to allow or restrict the new administrator's ability tomake changes. Click here for a detailed description of the permissions.
Associated Person - New PersonUse this option to add a new personnel record to the system and designate that person as anadministrator with a login at the same time. Using this method to add a person to the system onlyadds their name to the list shown in the People & page. If additional details of their personnelrecord are desired, they must be manually added later.
Administrator PermissionsIn CyberAudit-Web Professional, all administrators can see all sections. Permissions determinewhich sections of CyberAudit-Web an administrator can modify.Access to locks - Required for modifying cells in the Access Matrix. Also allows creating,modifying, and deleting schedules and holidays.Lock properties - Enables adding, removing, and naming CyberLocks and CyberPoints,including importing. Also allows assigning a Multi-key Mode / Open Delay if that option isenabled.People properties - Allows adding and removing people, including importing, and editing theirname, email, PIN, phone number, Department or ID, address, and notes.Key properties - Allows issuing and removing keys assigned to people. Enables setting theirbeeper, solennoid hold times and designating them as lost.Reports and email notifications - Enables adding, editing, and deleting reports andnotifications.Communicator properties and options - Allows adding, editing, and deleting all types ofCyberAudit-Web communicators as well as setting up default behaviors and network settings.System options - Allows setting up default behaviors in these system areas:Access Matrix -Hide individual locksHide individual peopleDisplay properties of lock and lock tag labelsLocks -Display or hide multi-key/delay settingsKeys -Set key options and default expirationSystem -Delete system log filesCreate, delete, or restore system backup filesSet the target folder(s) for database backupsUse CyberAudit-Web to check for updatesSet date and time optionstrim audit trail and journal data
Toggle remote accessCombine SchedulesCombinations of permissions are required to perform these actions.ActionCreating and modifying people tags and assigning people tothem.Creating and modifying lock tags and assigning locks tothem.Automatic tag creationPermissionsPeople properties + Access to locks.Lock properties + Access to locks.People properties + Lock properties + Access tolocks.Designating a key assigned to a person as a master key.Key properties + Access to locks.Importing people records from a file People properties + Key propertiesCreating and modifying system keys.Re-key all locksOnly one of two or more permissions is required to perform these actions.ActionPermissionsKey properties + Access to locks + Systemoptions.Access to locks + Lock properties + Systemoptions.Programming Jobs Lock properties OR Reports and email notifications OR Key propertiesEmail setup Communicator properties and options OR System options
CommunicatorsCommunicators are a core component of a CyberAudit-Web system. They are the hardwaredevices that enable CyberAudit-Web to download and program CyberKeys, Grand Masters, andCyberLock Programmers.
Web Authorizers
Web AuthorizersA CyberKey Web Authorizer system consists of an Authorizer keyport and a Web AuthorizerHub. This page lists the Web Authorizers in the system with some of their properties andprovides the means to view or change settings.Table FieldsThe present icon, , indicates that an Authorizer has communicated with CyberAudit-Webwithin the last minute.The change icon, , indicates that the settings of the Authorizer has changed inCyberAudit-Web but the Hub still needs to be updated.Name - Name assigned to the Authorizer Hub.ID - Serial number of the Hub assigned at the factory. Web Authorizers have an ID with theformat HXXXXXXXX.Last Contact - The last date and time that the Web Authorizer contacted CyberAudit-Web.Keyport 1Keyport 2 - The name and ID of the keyport connected to the Authorizer.OperationsNew - Click to add a new Web Authorizer.- Creates a printable list of the Web Authorizers.USB flash memory.Properties - Displays the details of the Authorizer setup.- Downloads the Web Authorizer settings for saving ontoAudit Trail - Generates a report of activities logged by the Web Authorizer. This can behelpful information for monitoring CyberKey activity with an Authorizer or fortroubleshooting.Diagnostics - Brings up the Web Authorizer Diagnostics page to view and enable thestatus of the Web Authorizer remote diagnostic web service and to fetch diagnostics fromthe Web Authorizer.Delete - Removes the selected Web Authorizer record after confirmation.
Related Topics:Adding Web AuthorizersInstalling a KeyportAudit Trail EventsOther CommunicatorsResetting Web AuthorizersWeb Authorizer 2-Key InputsWeb Authorizer DescriptionWeb Authorizer Keyport Messages
Web Authorizer DetailsName - Name assigned to the Web Authorizer hub.ID - Serial number of the hub assigned at the factory. Web Authorizer hubs IDs have theformat HXXXXXXXX.Client Version - Indicates the version numbers of the software components running in theAuthorizer.Last Contact - The last date and time the server succesfully communicated with theAuthorizer hub.Keyport 1 NameKeyport 2 Name - Authorizer hubs support up to 2 keyports. It is important to assign aunique location name to each keyport because user key activity can then be traced tothese locations with dates and times.Keyport 1 IDKeyport 2 ID - Serial number of the keyport. The system automatically discovers and fillsin this value.
CyberAudit-Web URL - The IP address or domain name of the CyberAudit-Web server. Ifthe subsystem preference will be used, the checkbox will be checked.Automatic (DHCP) / <strong>Manual</strong> - As shipped from the factory a reset Web Authorizer willrequest a dynamic IP address. A static address may be assigned if desired (see "GenerateConfiguration File(s)" below).Proxy - Many larger networks require web browsing to be routed through a proxy server toreach the Internet. Because the Web Authorizer is fundamentally a web client, its webtraffic must also be routed through the proxy. If a proxy server is required, its informationmust be entered here.Generate Configuration File(s) - When special configurations are needed, the WebAuthorizer must be updated using a USB Flash Drive. This button creates the files that willbe loaded onto the USB Flash Drive and carried to the Web Authorizer.Audit Trail - Generates a report of activities logged by the Web Authorizer. This can behelpful information for monitoring CyberKey activity with an Authorizer or fortroubleshooting.Delete - Removes the selected Web Authorizer record after confirmation.Additional linksWeb Authorizer DescriptionInstalling a Keyport (see Installing a Keyport.pdf)Steps to add a Web AuthorizerAudit Trail EventsWeb Authorizer Keyport MessagesWeb Authorizer 2-Key InputsResetting Web Authorizers
Setting Up Web AuthorizersWeb Authorizers contact the CyberAudit-Web server as web clients.Click here for instructions to add LAN AuthorizersTo add a Web Authorizer to the system, follow these steps:1.Select "Web Authorizers" from the "Communicators" menu and click thelink.2. Enter the ID of the Web Authorizer. This is found on the label attached to the bottom of the Web Authorizerhub or by using the keyport command.3. Give the Web Authorizer and keyport(s) a name or enter a description of their physical location in the Namefields.
4. Verify that the CyberAudit-Web server address is correct - The CyberAudit-Web server IP address is used bythe Web Authorizer to contact the CyberAudit-Web server. It must be provided to the Web Authorizer to enableit to function correctly within the CyberAudit-Web system. It may be entered in one of two ways:By default, the Web Authorizer is a DHCP client and does not require a proxy server to enable it toconnect to a web site. In this case, the server IP may be manually entered on the Web Authorizerkeyport.If the CyberAudit-Web server will be referred to by domain name instead of IP address or if a proxyserver is required to connect to the CyberAudit-Web service, enter the required information in thesupplied fields. In this case, the Web Authorizer network settings must be written to a USB flashmemory disk drive and carried to each Web Authorizer to load the settings.5. Save the settings and Configure the Web AuthorizerAdditional links:Web Authorizer DescriptionInstalling a Keyport (see Installing a Keyport.pdf)Audit Trail EventsWeb Authorizer Keyport MessagesWeb Authorizer 2-Key InputsResetting Web Authorizers
1.2.Resetting a Web AuthorizerResetting an Authorizer will revert it back to the original, unprogrammed state as it wasshipped from the factory. To reset a Web Authorizer:Disconnect the power and all other cables from the rear of the Authorizer.Use a single Ethernet cable to bridge the ports labeled Keyport1 and Keyport2.3.Reapply power to the Authorizer. The LEDs on the front of the Authorizer will cycle throughthese startup steps:Power LED only - InitializingPower and 1 - Loading software components from memoryPower and 2 - Acquiring network, starting software components and applicationPower solid and 1, 2 flashing - Scanning USBWhen Power stays solid and 1 flashes about once every 4 seconds, the system is operatingnormally. At this point it is ready to configure.Additional links:Web Authorizer DescriptionInstalling a Keyport (see Installing a Keyport.pdf)Steps to add a Web AuthorizerAudit Trail Events
Web Authorizer Keyport MessagesWeb Authorizer 2-Key Inputs
Configuring a Web AuthorizerThere are two ways to configure a Web Authorizer:Reset and enter the server IP from the keyportConfigure with a USB Flash DriveReset and enter the server IP from the keyportA Web Authorizer may be reset and configured in the field if all of these conditions are true:The Web Authorizer will request a dynamic IP address using DHCP.The CyberAudit-Web server can be reached with a known IP address on the defaulthttps:// port 443.No proxy server is required to reach the CyberAudit-Web server.1. . A reset Web Authorizer stores a server IP address of 000.000.000.000. At theReset the Web Authorizerkeyport, enter 999 and press the '#' key. The '*' and '#' keys on an Authorizer keyport function like the"Backspace" and "Enter" keys of a keyboard, respectively. When the IP configuration mode has beenactivated, the keyport display will change to "X--- 000".
2. The letter 'X' indicates theoctet of the IP address beingedited. The number 000indicates the present value ofthe octet. To replace thevalue, enter a new one andpress the '#' key. To keep thecurrent value and move on tothe next octet in the IPaddress, enter 999 and pressthe '#' key again.Octets with 1 or 2 digits maybe entered without leadingzeroes.After all 4 octets have beenset, cycle through the IPaddress again (by entering999# for each) to verify thateach was set correctly. Theexample shows the keyportdisplay at each cycle if the IPhas been set to192.168.121.234.Enter 000# to exit IP addressentry mode and force the WebAuthorizer to sync with theCyberAudit-Web server.Additional linksWeb Authorizer DescriptionInstalling a Keyport (see Installing a Keyport.pdf)Steps to add a Web AuthorizerAudit Trail EventsWeb Authorizer Keyport MessagesWeb Authorizer 2-Key InputsResetting Web Authorizers
If any of these conditions are true...Web Authorizer USB ConfigurationThe Web Authorizer must use a static IP address.The CyberAudit-Web server can only be reached with a domain name or it cannot bereached on the default https:// port 443.A proxy server is required to reach the CyberAudit-Web server....then the Web Authorizer must be configured using a USB Flash Drive.1. Edit the configuration settings for the WebAuthorizer as needed. Save the settings. Thenclick on the "Generate USB Configuration Script"link.2. Save the generated .tar.gz file onto a USB FlashDrive. Before removing the USB Flash Drive fromthe computer, check the files to be sure that thelatest .tar.gz file is on the stick without anappended version number. If not, delete all .tar.gzfiles from the USB Flash Drive and save the filesagain. Then remove the USB Flash Drive fromthe computer and take it to the Web Authorizer.Insert it into either recessed USB port on the WebAuthorizer. If the USB Flash Drive does notdirectly fit into the recessed opening, use anextension as shown in the picture.(Note: A Web Authorizer normally ships with 1of its 2 USB ports covered.)
3. With the USB Flash Drive inserted, unplug thepower cable from the Web Authorizer, wait 3seconds, and re-insert it. After starting up, the WebAuthorizer will update itself from the USB FlashDrive and load the new configuration. When this ishappening, LEDs 1 and 2 flash in unison. Whenloading is completed, the flashing stops and theUSB Flash Drive may be removed. When LED 1flashes once every 4 seconds the Web Authorizeris back to normal operations.The only limit to the number of configurations thatmay be carried by a USB Flash Drive is theamount of memory on the Flash Drive. GenerateConfiguration File(s) creates configurations for allWeb Authorizers in the system and loads themonto the drive.Additional linksWeb Authorizer DescriptionInstalling a Keyport (see Installing a Keyport.pdf)Steps to add a Web AuthorizerAudit Trail EventsWeb Authorizer Keyport MessagesWeb Authorizer 2-Key InputsResetting Web Authorizers
Web Authorizer Audit Trail Events# Message Description Keyport # Datakey ID not16 found inAuthorizerkey ID found in17Authorizerkey removed18from keypad19 keydownloaded20 key configured21PIN ok - key isready22 bad PIN23 communicationswith key failed2425265764656680systemidentifier did notmatchtoo many PINtries: keydisabledno responsefrom host forunknown keykeyportcontrollerrestartkeyport addedto Authorizerkeyportremoved fromAuthorizernon-PINnumbersentered atkeypad (2 orfewer numbers)updateretrieved fromserverNo key record found in the Authorizer's keydatabase. UPLINK HOST is displayed at thekeyport.Key record for key ID found in Authorizer'skey database.Key data was downloaded and stored in theAuthorizer.Key has been updated from the Authorizer'sdatabases but has not yet been enabled.If a PIN was required, it was correctlyentered. The key has been enabled and isready to use - KEYREADY is displayed atthe keyport.A PIN was required. One was entered but itdidn't match the required PIN for the key.Broken or intermittent connection to key orcommunication interrupted. COMMFAIL isdisplayed at the keyport.The database identifier programmed into thekey does not match the one used by theAuthorizer - WRONG PW is displayed at thekeyport.1 or 2 1 or 2 1 or 2 1 or 2 1 or 2 1 or 2 1 or 2 1 or 2 1 or 2 (not implemented) 1 or 2 The Authorizer attempts to contact the hostIP for up to 30 seconds. The keyport displaysUPLINK HOST. If it does not receive aresponse, it displays COMMFAILThe Web Authorizer keyport controller chipreset itself. This will occur as a 'cleanup'action if the chip finds itself in a bad statedue to corrupt or unexpected data.1 or 2 1 or 2 (none)A keyport was plugged into the Authorizer. 1 or 2 A keyport was unplugged from theAuthorizer.The keypad received 1 or 2 characters plusthe '#' key.The Web Authorizer downloaded an updatefrom the server.1 or 2 (none)1 or 2 (none)
81 memory full82 memoryrestored838485868788connectionestablished withserverno connectionto serveroffline too long:resettingremoving allkey recordsadding keyrecord(s)removing keyrecord(s)89 uploadingdiagnostics90919495correcting localdate/timeserver busy:waiting to syncoperationparametersupdatednetworksettingschanging97 applicationstartup98 abnormalterminationMemory in the Web Authorizer has reachedthe minimum allowable level. It will no longerupdate keys.Free memory has been restored above theminimum allowable level. Keys may beupdated.The Web Authorizer has successfullyconnected to and synchronized with theserver. This event is only recorded withsuccessful synchronization after one or moreconnection failures.The Web Authorizer failed to connect to orsynchronize with the server. This event isonly recorded when connection to serverfails after one or more successful attempts.The Web Authorizer has been unable toconnect to Cyberaudit-Web for too long(default 90 seconds). The data columndisplays the number of seconds it was offline.The Web Authorizer received a commandfrom CyberAudit-Web to remove all of its keyrecords.One or more key records were added to theWeb Authorizer's memory. The data columnindicates the number of keys added.One or more key records were removed. Thedata column indicates the number of keysremoved.The Web Authorizer received a commandfrom CyberAudit-Web to upload adiagnostics file.The Web Authorizer received a command toadjust its clock. The data column indicatesthe number of seconds adjusted. A negativenumber indicates the clock was shiftedbackward.This message indicates CyberAudit-Web isbusy processing requests for updated keyrecords for other Web Authorizers.The configuration of the Web Authorizerchanged as a result of a change on theserver. For example, when the serveraddress changes.User modified the network configurationsettings of the Web Authorizer. The WebAuthorizer will then reset itself to apply thechanges.Indicates the Web Authorizer Applicationstarted or restarted.The Web Authorizer application stoppedrunning because of an unexpected condition.(none)(none)(none)(none)(none)(none)(none)(none)(none)(none)(none)(none)(none)Software versionExit or reason codefor factorytroubleshooting.
99 watchdogrestart100 database error101clock adjustedfor dst change102 time zone set103 restart initiatedThe monitoring process of the WebAuthorizer application triggered a restart.The system is attempting recovery from adatabase related issue.The Web Authorizer application detected areason to restart.(none)The error messageas received fromdatabase system.The number ofseconds shifted (+/-)The resulting UTCoffset in seconds101 = unhandledexception or otherunexpectedcondition102 = clientsoftware update103 = normal reboot104 = networkconfigurationchange106 = system halt107 = databasecorruption detected108 = updateddisplay stringsdetected104 key disabledOccurs when a key is returned from amission or on detection of a lost key.1 or 2 serial ID of the keyreceived reboot105 request from(none)serverUSB drive106inserted(none)107 key inserted 1 or 2 serial ID of the key108key cannotsupportrequestedfeaturesThe configuration for the selected key ormission contains features that are notsupported by the firmware in the key.A number that is asum of one or moreof the followingunsupportedfeatures:1 = duplicate lockIDs in lock list2 = fixed usecountdownschedules4 = download lock8 = program lock16 = temporaryactivation32 = enhancedsecurity multi-keyaccess
109attempting keyfirmwareupgradekey firmwareupdatecompletedThe Web Authorizer has identified a knownkey that requires a firmware upgrade andhas started the process.The Web Authorizer has identified a knownkey that requires a firmware upgrade andhas started the process.1 or 2Old version to newversion1101 or 2Old version to newversionOther audit trail event types:CyberKey and CyberLock audit trail eventsVault 1 audit trail eventsComm Link audit trail eventsFlex System audit trail eventsLAN Authorizer audit trail eventsAdditional linksWeb Authorizer DescriptionInstalling a Keyport (see Installing a Keyport.pdf)Steps to add a Web AuthorizerWeb Authorizer Keyport MessagesWeb Authorizer 2-Key InputsResetting Web Authorizers
Web Authorizer Keyport MessagesMessages when IdleMessages with CyberKeysMessages with 2-Key InputNetwork and Server Communication MessagesMessages Scanning USB During StartupSystem ErrorsMessageWAITLOADINGSTARTINGUSB SCANREAD USBCONFIGAPPLIEDNOCONFIGNO USBSTARTINGREMOVEUSBREADYREADY *X___ 192INVALID#NOSERVERDescriptionMessages at StartupThe keyport is waiting for the Authorizer to respond.The Web Authorizer is loading software components from memory.The Web Authorizer is starting software components, acquiring the network andstarting the application.After starting the application, the Web Authorizer checks its USB ports for a USBFlash Drive and scans for a configuration file to load.A USB Flash Drive has been found and the Web Authorizer is searching it for aconfiguration file.A configuration file was found and the changes have been applied.No configuration file was found for the Web Authorizer.No USB Flash Drive was found.USB processing is complete and startup is continuing. Displayed only if a USB Flashdrive was found.If a USB Flash Drive is present after the scanning process is completed, the WebAuthorizer will display this message until the USB Flash Drive is removed.The Web Authorizer is ready but has not synchronized with the CyberAudit-Webserver.The Web Authorizer is ready and has successfully synchronized with theCyberAudit-Web server.The Web Authorizer is in IP Address mode. Entering 999# saves the current valueand moves to the next octet.An invalid IP octet has been entered during IP address assignment.The Web Authorizer has no information about how to contact the CyberAudit-WebServer because it has not been configured yet.Messages at StartupMessages with CyberKeysMessages with 2-Key InputNetwork and Server Communication MessagesMessages Scanning USB During StartupSystem Errors
MessageREADYREADY *DescriptionMessages When IdleThe Web Authorizer is ready but has not synchronized with the CyberAudit-Webserver.The Web Authorizer is ready and has successfully synchronized with theCyberAudit-Web server.Messages at StartupMessages when IdleMessages with 2-Key InputNetwork and Server Communication MessagesMessages Scanning USB During StartupSystem ErrorsMessageDescriptionMessages with CyberKeysWAIT The keyport is waiting for the Authorizer to respond.PIN# Key requires a PIN before it will be enabled.BAD PIN# The PIN input does not match the expected PIN for the key.ISSUE# The server is prompting the user to input an issue number for this key.ISSUE#ORMISSION#The server is prompting the user to input an issue number or a mission number forthis key.BADISSUE#JOB# ORLOGIN #BAD JOB#NEW LOCKLOGIN #BADLOGIN #CANT ADDNEW LOCKDISABLEDCLEARINGREADINGWRITINGVERIFYNOTVERIFIEDKEYREADYLOW BATTFWUdateFWUpd XX%The server has determined that the number input does not match any ISSUE#s in thedatabase.The server is prompting the user to input a job number or an administrator's loginnumber for a programmer or Grand Master.The server has determined that the number input does not match any JOB#s orLOGIN#s in the database.A Grand Master contains newly programmed lock records and requires a login # toadd them.A non-existent login number was given to the above prompt (user can try again).The login number entered does not have permission to add new locks.The Web Authorizer has determined that this key has an active mission or is anun-issued key. In both cases, the Web Authorizer disables the key prior to re-issuing.The key is zeroing the audit trail events and preparing the key to accept aconfiguration.The Web Authorizer displays this message while downloading data from a key.This message is displayed while updating the key's configuration.The key has been configured and the Web Authorizer is confirming successfulconfiguration.The Web Authorizer was not able to verify that the key received the intendedconfiguration.The key has been programmed and is ready to use.The Web Authorizer has determined that this key has a low battery.The Web Authorizer is loading a firmware update into the key. This message appearswith Standard CyberKeys and CyberKey Rechargeables.The Web Authorizer is loading a firmware update into a CyberKey II.
UPGRADESUCCESSBUSY8 DIGITSLINKUPHOSTKEY NOT FOUNDUNKNOWNKEYWRONGKEY TYPEKEYDENIEDKEY GONEKEYCOMMFAILRETURNTO VAULTCLOCKSTOPPEDMEMORYFULLThe Web Authorizer successfully updated the CyberKey firmware.Web Authorizer is processing data received from the key or the server.Issue, Mission, Job and Login numbers all consist of 8 digits. This message isdisplayed when the incorrect number of digits has been entered.The Web Authorizer is attempting to contact the CyberAudit-Web server. Typically thisoccurs when information is needed to program a key that is not in the Authorizer's keyrecord database.This key does not have a key record in the Authorizer and the Authorizer does nothave a designated host server to contact.The server has not found the key ID in the database but has found the key's DB flag isset. This indicates that the key belongs to another database and will be rejected.A different key type among CyberLock Programmers, Grand Masters, or standardCyberKeys was expected. For example, this message could occur if a serial numberwere entered for a standard CyberKey but the serial number belonged to a GrandMaster.A key may not be used for a mission because the mission is not available or the keycannot support the mission configuration.Key was removed from the keyport before completing the session.There were communication failures between the Web Authorizer and the key.A CyberKey assigned to a Vault was inserted into the keyport.The Web Authorizer's clock has stopped, typically because of an extended powerloss. It will continue to display this message when a key is inserted into the keyportuntil the server updates the Authorizer's clock.Memory in the Web Authorizer has reached the minimum allowable level. It will nolonger update keys.Messages at StartupMessages when IdleMessages with CyberKeysNetwork and Server Communication MessagesMessages Scanning USB During StartupSystem ErrorsMessageINSERTKEYONLINE!SERVERCOMMFAILDescriptionMessages with 2-Key InputA 2-Key Input has been received that requires inserting a CyberKey into the keyport.The Web Authorizer successfully synchronized with the CyberAudit-Web serverfollowing a 22# .No response from the CAW server when the Authorizer attempted to contact it orcommunications were interrupted.
MessageSYNC...LOAD HUBFIRMWARESOFTWAREUPDATEUPDATEFAILEDUNKNOWNWEBAUTHTIME OUTNO ROUTECONNECTREFUSEDSSL FAILDNS FAILNET UNREACHABLEUNKNOWNNET ERRDescriptionNetwork and Server Communication MessagesThe Web Authorizer is attempting to synchronize with the CyberAudit-Web server.This will occur automatically every 30 seconds while the Web Authorizer is idle.Displayed during the process of updating Authorizer firmware.Displayed while a Web Authorizer update is being downloaded from the server.Failed to download an update from the server.The Web Authorizer contacted a CyberAudit-Web server but the ID of the WebAuthorizer was not recognized.There was no response from CyberAudit-Web server.No route to host - The Web Authorizer does not have routing to reach theCyberAudit-Web server.The Web Authorizer reached the CyberAudit-Web server but the server is not listeningon the requested port.The Web Authorizer connected to the server on the designated port but was unable toestablish the secure sockets layer.The Web Authorizer could not resolve the CyberAudit-Web server domain name.The Web Authorizer cannot establish connection to a network. This will happen if thenetwork cable is unplugged. After the network cable is re-inserted, allow up to 30seconds for the Web Authorizer to recognize the connection.An unrecognized networking error occurred.Messages at StartupMessages when IdleMessages with CyberKeysMessages with 2-Key InputNetwork and Server Communication MessagesSystem ErrorsMessageDescriptionMessages Scanning USB During StartupUSB SCANThe Web Authorizer is looking for a USB drive, reading from a USB drive, or installinga software update.NO FILE A USB drive was found but does not contain a file named authorizer.tar.gz.REMOVE USBThe Web Authorizer is done processing files on the USB drive. The drive must beremoved before continuing.LOAD HUBFIRMWAREThe Web Authorizer keyport controller module is being updated. DO NOT interrupt thedevice during this process.
Messages at StartupMessages when IdleMessages with CyberKeysMessages with 2-Key InputNetwork and Server Communication MessagesMessages Scanning USB During StartupMessageERROR9B6F51DAERRORShRW1291ERR 101 2System ErrorsDescriptionUnexpected program errors; contact the system administrator if they happenrepeatedly.Additional linksWeb Authorizer Description Installing a Keyport (see Installing a Keyport.pdf)Steps to add a Web AuthorizerWeb Authorizer Keyport MessagesWeb Authorizer 2-Key InputsResetting Web Authorizers
2-Key Inputs for Web AuthorizersSeveral 2-key keypad inputs are supported by Web Authorizers for special functions.InputDescription11# Displays Web Authorizer ID.22#Directs Web Authorizer to synchronize with the CyberAudit-Web server.If successful ONLINE! will display.33# Displays current date and time from the Web Authorizer's clock.55#Special function for displaying the ID of a CyberKey. Prompts INSERTKEY.66#Special function for displaying the battery voltage of a CyberKey.Prompts INSERT KEY.Special function for displaying the next expiration date and time of a77# CyberKey. Prompts INSERT KEY. Keys that are not in the same systemas the Web Authorizer will display UNKNOWN KEY.Additional linksWeb Authorizer DescriptionInstalling a Keyport (see Installing a Keyport.pdf)Steps to add a Web AuthorizerAudit Trail EventsWeb Authorizer Keyport MessagesResetting Web Authorizers
The Present IconThe present icon, , indicates that a Web Authorizer synchronized with the CyberAudit-Webserver within the last minute.
Web Authorizer DiagnosticsThe Web Authorizer Diagnostics page enables the administrator to view the last reported IPaddress of the Web Authorizer plus a router/proxy address and to request a diagnosticsdownload from the Web Authorizer. Clicking the Fetch button will cause the Web Authorizer topost a diagnostics file to CyberAudit-Web where it may be fetched for troubleshooting.The Web Authorizer remote diagnostic web service allows remote troubleshooting and for thepurpose of fixing problems with Web Authorizers. This is convenient for installations whereWeb Authorizers are installed some distance from the server or are otherwise difficult to reachphysically.Many of the features of this web service are useful only for manufacturer technical support.However two useful features are the ability to:1.2.Reboot the Web Authorizer.Inspect or change the CyberAudit-Web Server Address which the Authorizer is currentlyconfigured to use. This is useful if the CyberAudit-Web IP address or DNS name changedwithout updating the Authorizer or if the Authorizer was configured with the wrong address.Limitations:This web service has some limitations to be aware of:You must know the IP address of the web authorizer. This is not a problem if you'veconfigured them with a manual/static IP address. DHCP is more problematic.If the authorizer is behind a firewall you must configure the firewall to allow HTTP trafficthrough port 13647.
If a Web Authorizer reaches CyberAudit-Web through a NAT router or a proxy, it is unlikelythat http requests sent to it can reach it. As an indicator, both the last contact IP addressand the last contact Router/Proxy address are shown. If they are different, routing from theCyberAudit-Web server to the Web Authorizer must be explicitly enabled.Disabling the service requires an additional step: you must reboot the authorizer. This canbe done remotely via the web service.Enabling the ServiceThe service can be enabled on a per-Authorizer basis by clicking the "Enable" button. Toenable it globally for all Web Authorizers add nga.enable_diag_service=true to theCyberAuditWeb.properties file on the server. Once the change icon clears for the Authorizerthe service should be enabled. If the Authorizer has been unable to reach CyberAudit-Webthen the Authorizer must be configured with a USB drive to enable the service.The next time the authorizer synchronizes with the server the diagnostics file will be placed onthe server in /Users/Shared/cawent-backup/diagnostics and the change icon will be cleared.Once the service has been enabled you can reach it by typing an address like the followinginto your browser:http://192.168.0.93:13647/
Portable Links, Stations, and CyberLink
Comm LinksComm Links in CyberAudit-Web refers to a variety of simple communicators that enableupdating CyberKeys at remote locations. None of them store key programming informationdirectly and instead depend on a local software program such as CyberLink or an applicationthat runs on a PDA to establish a connection with CyberAudit-Web. In the case of the webstation, the local software is embedded in the station itself. In all cases, the software serves toexchange information between the key and the CyberAudit-Web system.Below are examples of Comm Links:Web StationUSB StationIR EncoderCyberKey II
CyberLinkCyberLink is a program written in Java® that establishes communications betweenCyberAudit-Web and a CyberKey, CyberLock Programmer, or Grand Master using an IREncoder, USB Station, or Web Station.CyberLink Result Codes
CyberLink Result CodesCyberLink gets result codes from the IR Encoder, USB Station , and Web Station duringcommunications. Many are not directly seen by the user interface. Some results may beinterpreted as errors. Below is the complete list of result codes.Result CodeDescription40 Disconnected - Key is no longer present41 Device reset42434445464748494A4B4C4D, 4E4FFile Not Ready - The communicator has not finished downloadingthe key yet.Wrong Key ID - The current key ID does not match the key IDwhen the session started.Wrong key system code - A database identifier in the instructionsfor the key does not match the identifier in the key.Key file system disabled - The CyberKey will not acceptinstructions because its file system has been disabled.Bad File ID - The CyberKey has rejected a configuration file withan ID that matches the key's current configuration but the file sizeis different.Older File - The CyberKey has rejected a configuration file with anID older than the key's current configuration.File too large - The CyberKey has rejected a configuration filebecause it exceeds 32K.Bad File - The CyberKey has rejected a configuration file becauseit failed the integrity check (product ID, version, or CRC).Too many files - The CyberKey has rejected a configuration filebecause its file system is full.Write Failed - The communicator could not write to the key'smemory.Encryption ErrorIllegal Command - A command contained in the configuration isillegal for the communication mode.Bad Firmware Update File - The IR Encoder, USB Station, or WebStation has rejected a firmware update file because of a meta dataerror.50 Key Communications Interrupted - No response from key.51Wrong Firmware Update File - The IR Encoder, USB Station, orWeb Station has rejected a firmware update file because it was afile intended for another device. For example, this error wouldoccur if IR Encoder firmware were sent to a USB Station.
Using CyberLink as an RFID Card ReaderCyberLink can be used with a CyberKey Vault or a CyberAudit RFID Reader to capture the IDof 13.56MHz RFID access cards. Once captured, it will paste the ID at the cursor location onthe local computer. This is most useful when entering RFID access card IDs into CyberAuditas it verifies the ID stored will match the ID read by the Vault.To enable CyberLink to capture ID scans from a CyberKey Vault, launch CyberLink and dropdown the Options menu. If it is not already "checked", select the Card Scanner menu item toenable it. CyberLink automatically enables the card reader function when it detects aCyberAudit RFID reader.
Then with a CyberKey Vault or a CyberAudit RFID Reader connected, scan an RFID card.The ID will appear briefly on CyberLink's main window and will output to the cursor position inthe current program.
Communicator Issue NumbersCommunicators such as USB Stations, Web Stations, IR Encoders, LAN Authorizers, andSingle Key Vaults may be added to the system by issue number. Issue numbers are placeholders for the unique ID of the device until the real ID is determined.When logged in to CyberAudit-Web and CyberLink is launched, CyberAudit-Webautomatically issues the station, IR Encoder, or Single Key Vault without an issue number.For Stations, IR Encoders, and Single Key Vaults, CyberLink will prompt for an 8-digitissue number if neither the ID of the communicator nor the serial number of the CyberKeyis found in the system and the device was not automatically issued when launched.LAN Authorizers always get an issue number when a new one is added. CyberAudit-Webthen replaces the issue number when it finds a LAN Authorizer at the IP address assignedto it.Web Authorizers and Flex System hubs must always be added using their serial numberID.
Portable Links ListThis page lists the Portable Links (all Comm Linksin the system that are not USB Stations orWeb Stations and enables adding, configuring, and managing them.Table Fields:Name - The name associated with the Link.ID - The serial number or issue number assigned to the Link.Type - The specific type of hardware device of the Comm Link.Comment - Additional (optional) notes about the device.Last IP - The last IP address reported by the computer running CyberLink or of the clientsoftware that exchanges information between CyberAudit-Web and the CyberKey.Key Name - Displays the name of the key currently communicating with the Link.Battery - Displays the current battery level of the key currently communicating with theLink.Operations:New - Click to add a new portable link.- Creates a printable list of the portable link records.Clicking in a non-linked section of a record will display a drop-down menu of operations:Properties - Displays editable details of the portable link.Audit Report - Generates an audit trail logged for the Link.Delete - Removes the selected portable link record after confirmation.Related Topics:Adding StationsCyberLinkOther Communicators
Portable Link PropertiesThis page enables editing the name, Type, and comments of the selected Link. The name willcross-reference to CyberKey 'comm' logs to indicate which station was used to download theCyberKey.In addition it displays the serial number ID of the device.
IR EncoderThe IR Encoder is a USB-to-infrared device designed to enablecommunications between a computer and a CyberKey. It mounts as aUSB mass storage device and can be used with PC and Maccomputers.Other CommunicatorsSteps to add an IR Encoder
Adding a Comm LinkCyberAudit-Web can automatically add Comm Links to the system if one or more of theseconditions is true:CyberLink is launched by someone already logged in to the system using thelink.- or -The serial number ID of the CyberKey II is assigned to someone in the system.If neither of these conditions is met, use the following steps to add a Comm Link to thesystem.1. Select one of the three items fromthe Comm Links submenu.2. Click the "New" link.3. Choose to add by issue number orenter the serial number.4. Click the "Save" button.5. Insert the IR Encoder into a USBport and launch the CyberLinkprogram.
6. If the device was added using anissue number and CyberLink wasnot launched from thelink,the program will prompt to enterthe issue number.7. After the issue number is entered,or if the serial number wasmanually entered, the device willconnect to CyberAudit-Web andlook for a CyberKey.
USB Station ListThis page lists the USB Stations in the system and enables adding, configuring, andmanaging them.Table Fields:Present - If the system has communicated with the USB Station in the last minute, a iconwill be shown.Name - The name associated with the Station.ID - The serial number or issue number assigned to the Station.Last Contact - The last time the server and vault communicated successfully.Last IP - The last IP address reported by the computer running CyberLink.Key Name - Displays the name of the key currently docked in the Station.Battery - Displays the current battery level of the docked key.Operations:New - Click to add a new Station.- Creates a printable list of the Stations.- Starts the CyberLink program that enables the communications between theStation and CyberAudit-Web.Clicking in a non-linked section of a record will display a drop-down menu of operations:Properties - Displays the details of the Station setup.Audit Trail - Generates a report of activities logged during communications with theStation. This can be helpful information for monitoring CyberKey activity with a Station orfor troubleshooting.Delete - Removes the selected Station record after confirmation.
Related Topics:Adding StationsCyberLinkOther CommunicatorsStation DescriptionsStation Light Definitions
USB Station PropertiesThis page enables editing the name of the selected station. The name will cross-reference toCyberKey 'comm' logs to indicate which station was used to download the CyberKey.In addition it displays the serial number ID and current firmware version running in the station.
Web Station ListThis page lists the Web Stations and enables adding, configuring, and managing them.Table Fields:Present - If the system has talked to the Web Station in the last minute, ashown.icon will beChange icon - A icon appears in the column when network settings for the Web Stationrequire updating to match the settings in CyberAudit-Web.Name - The name associated with the Web Station.ID - The serial number or issue number assigned to the Web Station.Last Contact - The last time the server and Web Station communicated successfully.Last IP - The last IP address used by the Web Station during network communications toCyberAudit-Web.Key Name - Displays the name of the key currently docked in the Web Station.Battery Level - Displays the current battery level of the docked key.Operations:New - Click to add a new Station.- Creates a printable list of the Stations.- Starts the CyberLink program that enables the communications between theStation and CyberAudit-Web.Clicking in a non-linked section of a record will display a drop-down menu of operations:Properties - Displays the details of the Station setup.Audit Trail - Generates a report of activities logged during communications with theStation. This can be helpful information for monitoring CyberKey activity with a Station orfor troubleshooting.Delete - Removes the selected Station record after confirmation.
Additional Links:Adding StationsCyberLinkOther CommunicatorsStation DescriptionsStation Light Definitions
Web Station PropertiesSerial - An identifier of the Station. This identifier must be present in the database before theStation may be used. If an issue number is used, the issue number will appear here untilCyberAudit-Web gets the ID of the Station from CyberLink.Name - Name assigned to the Station. This will cross-reference to CyberKey 'comm' log toindicate which Station was used to download the CyberKey.Firmware: - Displays the current firmware versions running on the device.Web Stations must be configured for network settings. Since the Web Station is a web client,it must get a URL to contact CyberAudit-Web.By default it will attempt to get its networking configuration from a DHCP server. If a manualconfiguration is needed that may be entered after selecting the "<strong>Manual</strong>:" option.Audit Trail - Generates a report of activities logged during communications with theWeb Station. This can be helpful information for monitoring CyberKey activity with a WebStation or for troubleshooting.Delete - Removes the selected IR Encoder record after confirmation.
Related Topics:Adding StationsCyberLinkOther CommunicatorsStation DescriptionsStation Light Definitions
Station Light DefinitionsReady Blinking - CyberKey hasbeen configured and is ready to beremoved.Ready Solid - Station is connectedto CyberAuditWeb and is ready toupdate keys.Busy Flashing, Ready Off - Stationis busy processing the key. WatchCyberLink for status information.Busy Flashing, Ready Off - USBconnected Station is unable toprocess the key because the keybelongs to a different system.
Busy Flashing, Ready Flashing -Web Station is unable to process thekey.
Adding a New StationBoth USB Stations and Web Stations are added by following these steps:1. To add a new Station, choose"Stations" from the"Communicators" menu.2. Click the "New" button.3. Stations may be added by issue number or by manually entering the serial number. Enter a name that willidentify the Station. This name will cross-reference to the CyberKey comm log to indicate which Station wasused to download the CyberKey.
4. For Web Stations, networking information must be entered.CyberAudit-Web URL - IP address or DNS name of the computer or server running CyberAudit-Web.The default setting is checked on by default. To change the URL, uncheck the box.Note: If using the computer's name, enter the fully qualified domain name.Automatic (DHCP) / <strong>Manual</strong> - As shipped from the factory, a Web Station will request a dynamic IPaddress. A static address may be assigned if desired. If using a static address for the Web Station incombination with a DNS name for CyberAudit-Web, a valid Primary DNS IP address must be enteredto enable the Web Station to resolve the CyberAudit-Web IP address.5. Click 'Save' to save the newStation record.
6. If adding a USB Station, skip thisstep. After entering and saving thenetwork settings, the Web Stationmust be configured using the USBcable and the CyberLink software.Note: Web Stations have twoseparate modes ofcommunications, USB andEthernet. When no power isconnected from the 12Vtransformer, the Web Station is inUSB mode. Applying powerthrough the power jack toggles it toEthernet mode. The web stationmust be configured in the next stepin USB mode (USB cableconnected, no power connected).7. Plug the Station in via the USBcable and click the "LaunchCyberLink" link.8. If the Station was created using anissue number, enter that number.9. After CyberLink updates the stationand its change icon ( ) clears,the Station will be ready tocommunicate with keys. A WebStation may be disconnected fromUSB and connected to its powercable and Ethernet cable. When itmakes contact withCyberAudit-Web, its green 'Ready'light will glow on the station andthe green OK ( ) will appear inthe stations list page.
View Communicator Audit DataEnter begin and end dates to limit the size of the resulting report. Communicators such asFlex System hubs, Single CyberKey Vaults, LAN Authorizers and Web Authorizers with manyaudit trail records can take noticeable amounts of time to render and display.
Comm Link Audit Trail Events# Event Description22keyThe key was given a file that changed its configurationconfigurationsettings.loaded23keyconfiguration The key was sent a command or configuration file.transferred24The key produced a file containing events or other informationkey downloadedabout the key.Portable Link0 already indatabasePortable Link is-1not in databasekey is not in-2databasedata file was-3baderror talking to-4serverkey download-5file invalidvalid PIN-6requiredprogramming-7 job numberrequiredprogramming-8 job number notfound-9 key/datamismatchkey addition-10deniedkey already-11 exists indatabaseunknown issue-12numberhigh security bit-13setcatalog does-14not existkey is not-15initializeduser is not-16logged incannot auto-17 issue (CommLink or key)Client attempted to issue an already present Portable Link(rare).The Portable Link is not in the database and thus needs to beissued.The key being used is not in the database and thus needs tobe issued.A key file uploaded to the server appears to be corrupt.A generic event indicating unexpected error conditions on theserver.The key file uploaded to the server is intact but malformed insome way.A personnel identification number is required beforeconfiguring this key.A login number or programming job number is required.The given login number or job number was not found.The file uploaded to the server does not appear to be from thecorrect key.The server denied issuing the key for one or more reasons.Client attempted to issue a key that is already in the database.Given key or Portable Link issue number does not exist.The key cannot be issued because its database flag is set (it'salready being used in another database).The client specified an account name that doesn't exist on theserver.The key is new and thus the server needs to see its hardwareinformation before further processing is allowed.( CyberAudit-Web Lite only) User is not allowed to configurekeys because they are not logged into the web application.Failed to automatically issue the Portable Link device orCyberKey (rare).
information fromThe Grand Master is new to the system and thus the server-18 the grandmasterneeds to download information specific to the Grand Master.is missingmission not Client attempted to download a mission configuration that was-20cached not checked out to it.locklistdownload The two files submitted for event processing are from different-21doesn't match keys.event download-22key typemismatch-23 Firmwareupdate requiredNo permission-24 to add newlockskey clock300 correctionrequiredThe type of key presented to the client does not match thetype as it exists in the database. For example, the user istrying to configure a programmer key as a normal user key.Not implemented at this time.The user gave a login number that does not have permissionto add new locks to the system (and the key has new lockevents).The key's clock has drifted from the server clock and needs tobe corrected.CyberKey and CyberLock audit trail eventsVault 1 audit trail eventsWeb Authorizer audit trail eventsLAN Authorizer audit trail eventsFlex System audit trail events
The Flex System
Flex System Hub ListThis page lists the Flex System Hubs in the system and enables adding, configuring, andmanaging them.Table Fields:Present - If the system has communicated with the Flex Hub in the last minute, a icon willbe shown.Change icon - If the system has information for the Flex Hub but the Flex Hub has not yetbeen updated, a icon appears in the column.Name - The name associated with the Flex Hub.ID - The serial number of the Flex Hub.Last Contact - The last time the server and Flex Hub communicated successfully.Modules - The number of connected modules reported at last contact. Click on the link togo to the modules listing page.Module Status -Module status OKModule status problemDemo The hub is in demo modeFXThe device is a Flex System Vault FXThe door is open on a vaultVault Keys -All Weatherized Vault or Vault 20 FX CyberKeys are validThere are one or more invalid keys in Vaults controlled by the hub
Memory Used - The amount of available memory currently used by CyberAudit-Web tostore People and mission records.Power Source - Indicates the source of power currently running the Flex System Hub.- Powered by an external source such as AC power through a transformer.- Powered by an optional battery connected to the molex battery port on theFlex System Hub. In this mode CyberKeys are not charged and the system will havelimited life, typically 5 hours or less depending on frequency of use.Battery Level - Indicates whether a battery is present and its charge level.Operations:- Battery charge level is good.- The battery charge level is below 50% capacity.- Battery life is less than two minutes.- The Flex Hub detected no battery.New - Click to add a new Flex System Hub.- Creates a printable list of the Flex System Hubs.Clicking in a non-linked section of a record will display a drop-down menu of operations:Properties - Displays editable networking details of the selected Flex Hub.Modules - Brings up the Modules listing page with details about the modules bothplanned and currently connected.Audit Report - Generates an audit trail records logged for the Flex Hub.Keys - Displays a page for viewing and editing the list of CyberKeys currently to beused with Weatherized Vaults or a Flex System Vault FX. This menu item only appears onFlex System hubs with one or more Vault modules.Show in Matrix - Displays the Access Matrix with a filter applied for the selected FlexHub to to display the tags and people who have access. This menu item only appears onFlex System hubs with one or more Vault modules.Notification - This is a branched menu to set up emails notifications to send to one ormore email addresses for either of these topics:Informing that the CyberKey has expired but has not been returned to a Vault.Warning that the door on a Weatherized Vault or Vault 20 FX has been left open.This menu item only appears on Flex System hubs with one or more Vault modules.Diagnostics - Another branched menu to retrieve or view detailed status from theselected Flex System Hub.Sync - Causes CyberAudit-Web to attempt to make an immediate TCP/IP connectionwith the Flex System Hub. If the connection attempt is successful, the Flex Hub willimmediately synchronize with CyberAudit-Web rather than waiting for the next synchronizecycle.
Delete - Removes the selected Flex System Hub record after confirmation.Additional Topics:Adding a Flex System Hub and ModulesMounting Flex System ModulesFlex System Power RequirementsFlex System Module Cable PinoutsAbout the Flex SystemVault 20 FX OverviewView/Edit Flex System ModulesGranting Access to Flex System Weatherized VaultsUsing the Data Knob and DisplayLED Indicator on the Weatherized VaultUsing CyberKeys with Flex System Weatherized VaultsFlex System Demo ModeFlex System Audit TrailsFlex System Display MessagesFlex System Special Key InputFlex System Hub DiagnosticsFlex System Hub LED IndicatorsResetting a Flex Hub
View/Edit Flex Hub ModulesView the individual modules attached to a Flex System Hub by clicking a record in the FlexSystem Hub List and selecting Modules.This page contains the list of modules either currently attached or expected to be attached tothe selected Flex System Hub.Table Fields:Port - The number on the RJ-45 port on the Flex System Hub Module Panel. These arenumbered 1-8.Present - If the system has talked to the Vault in the last minute, a icon will be shown. Ifthe type of module for the port does not match the type of module originally added orplanned for the port, a conflict icon, appears.Grade - A green check ( ) indicates the modules are set up in a workable arrangement.All other icons indicate a problem or ambiguity. See the Grade Column section of Adding aFlex System Hub and Modules for more information about the Grade icons.Group - Identifies the set of modules that work together.Display Link - Identifies the Display module and the input devices that work together. Formore information see the Groups and Display Links section of Adding a Flex System Huband Modules.Serial# - The Serial Number ID of the module, if known or the last known attached module.A blank cell indicates the module has not been connected to the port.Module Type - None, Weatherized Vault, Display, Knob, RFID Reader, Keyport, Vault 20FX Key Controller, Vault 20 FX Powerboard.Firmware - Each module has a processor that executes firmware. This column shows thelast reported firmware version of the module.
Name - The name given to the module, if it has one. Assigning a name to a WeatherizedVault can be useful for displaying which vault to open when a CyberKey is checked out orreturned and for audit trail reports to clearly indicate which Vault was used to check out theCyberKey.Status - Additional information about the current status of the module. For WeatherizedVaults, this column indicates whether a CyberKey is present, if it is valid, its battery chargelevel, and whether the vault door is open.Click Edit to modify settings on this page.
Module Conflict IconA module conflict icon, indicates the type of module for the port does not match the type ofmodule originally added or planned for the port on the Flex System Hub.
Go to:Options for Adding Flex System ModulesAbout Groups and Display LinksThe Grade ColumnAdding a Flex System Hub and ModulesAdding a Flex System Hub to CyberAudit-Web1. Select Flex Hubs from the Communicators menu.2.Clickto add a new hub.
3. Enter a name for the hub plus the serial number ID of the Flex Hub. This may be read from the sticker on thebottom of the hub.4. Enter the additional flex hub properties and click Save.5. The hub may now be connected to the network and programmed from USB.Go to:Adding a Flex System Hub to CyberAudit-Web
About Groups and Display LinksThe Grade ColumnOptions for Adding Flex System ModulesModules may be added to a Flex System Hub either before installing them or by automaticallyacquiring them after the Flex System Hub is installed and the modules are plugged in.Adding Flex System Modules before installation - The advantage of this method is thatonce the modules are entered then key and RFID card holders may be granted access tothe Weatherized Vaults or Doors. Once the modules are assigned to the Flex Hub ports,each module type must be paired with a port number on the Hub and clearly noted for theinstaller. If the modules are installed in the wrong ports, there could be conflicts among themodule Groups. Modules installed with the wrong module type will appear with an icon, ,that indicates a conflict.Automatically acquiring Flex System Modules - Unless otherwise configured, a Flex Hubwill automatically add all newly discovered Flex System Modules to Group 1, Display Link1. If the combination of modules does not support this configuration, the CyberAudit-Webadministrator must reassign Groups and Display Links as necessary.Adding Flex System Modules to a Flex System Hub before installing themGo to the Flex System Modules page by selecting a Flex System Hub from the listing pageand selecting Modules from the click menu. Modules may be added by clicking Edit from thispage. This will bring up the Module Edit page for the selected hub.
The Edit Flex Hub Modules page enables:Selecting the modulesMatching them to a port on the hub to which they will connectPre-configuring how they will work together
There are three categories of Flex Hub Module functions; Input, Feedback, and Output. At aminimum each Group on a Flex System Hub requires at least one input and one outputmodule. Each module type falls into these categories as follows:Vault 20 FX Powerboard with Vault 20 FX KeyControllersWeatherized VaultOutputRFID ReaderData KnobInputDisplayFeedbackKeypad DisplayInput andFeedbackKeyportInput and OutputCyberAudit-Web requires every Data Knob to be linked to a distinct Display. Other inputdevices do not requre a display but if a display is present, they may be linked to it.Go to:Adding a Flex System Hub to CyberAudit-WebOptions for adding Flex System ModulesThe Grade Column
About Groups and Display LinksFlex System Modules are arranged in a way to determine which modules work together. Thisis called Groups and Display Links. A Group is a set of modules that operate together. Theseare examples of modules that may be grouped and that will operate together correctly. Thefollowing modules Groups are examples of modules that will function properly together.Weatherized VaultRFID ReaderKeypad Display1-7 Weatherized VaultsRFID ReaderWeatherized VaultData KnobDisplayA Display Link includes a display module plus one or more input devices such as a Data Knobor RFID reader .Go to:Adding a Flex System Hub to CyberAudit-WebOptions for adding Flex System ModulesAbout Groups and Display LinksThe Grade ColumnThe Grade column is an indicator for each module indicating whether the Modules, Groups,and Display Links are present and installed in a workable arrangement. Each module type hasa range of different possible icons as follows:Data KnobMore than one data knob same linkormore than one display with the same linkora keypad display with the same linkorno output module (Keyport or Weatherized Vault or Vault 20 FX )No display with the same linkOK
RFID ReaderMore than one RFID reader same linkormore than one data knob with the same linkorno output module (Keyport or Weatherized Vault or Vault 20 FX )OKDisplayMore than one display in the same linkorkeypad display with the same linkormore than one data knob with the same linkorno output module (Keyport or Weatherized Vault or Vault 20 FX )OKWeatherized VaultNo data knob and no RFID reader and no keypad display in the sameGroupA Keyport in the same GroupOKDoor and I/O moduleDoor and I/O module not supported
Keypad DisplayMore than one keypad display in the same linkora display with the same linkora data knob with the same linkorno output module (Keyport or Weatherized Vault or Vault 20 FX )OKKeyportA Weatherized Vault or a Vault 20 FX in the same GroupVault 20 FX PowerboardNo Vault 20 FX Key Controller in the same Groupandno keypad display or display and data knob in the same GroupA Keyport in the same GroupVault 20 FX Key ControllerNo Vault 20 FX powerboard in the same GroupA Keyport in the same GroupGo to:Adding a Flex System Hub to CyberAudit-WebOptions for adding Flex System ModulesAbout Groups and Display LinksThe Grade ColumnAdditional Links:Mounting Flex System ModulesAbout the Flex SystemVault 20 FX OverviewGranting Access to Flex System Weatherized VaultsUsing the Data Knob and Display
Flex System Hub Properties
GeneralName - The name assigned to the Flex System Hub. This name appears in the AccessMatrix for the purpose of granting access to any connected Weatherized Vaults.ID - The serial number of the hub assigned at the factory. Flex System Hub IDs have theformat OXXXXXXXX.Firmware - Indicates the version number of the software running in the hub. This field willdisplay only after CyberAudit-Web communicates with the hub and captures thisinformation.Demo Mode - Check this box as the first step to setting the Flex System hub into demomodeUpdate Frequency - By default, Flex System Hubs check in for updates withCyberAudit-Web once every 30 seconds. In some cases where there is a per-byte cost ofdata transmission, it may be desirable to reduce the frequency of check-in.CyberAudit-Web does attempt to make an immediate TCP/IP connection with the FlexSystem Hub when an update is pending for the hub. If the connection attempt issuccessful, the Flex Hub will immediately synchronize with CyberAudit-Web rather thanwaiting for the next check-in time. However if it is not possible to make that connection, theadministrator should be aware that any updates the hub affecting configuration or accesspermissions may be delayed until the hub successfully checks in with CyberAudit-Web.NetworkingCyberAudit-Web Server Address - The IP address or domain name of theCyberAudit-Web server. If the system default from communicator options will be used, thecheckbox will be checked.Automatic (DHCP) / <strong>Manual</strong> - Choose the settings appropriate to the subnet where thehub will be installed.Push Notification Port - The network port on the Flex System hub that listens for aTCP/IP signal from the CyberAudit-Web server. This signal tells the hub to immediatelycontact CyberAudit-Web for instructions.Proxy - Many larger networks require web browsing to be routed through a proxy server toreach the Internet. Because the Flex System hub is fundamentally a web client, its webtraffic must also be routed through the proxy. I If a proxy server is required, its informationmust be entered here.Note: Once a Flex System hub has been added and configured, changes to the Proxysettings may only be updated by programming the hub from a USB flash drive.
Open Vault - There may be occasions where Weatherized Vaults or a Vault 20 FX may needto be opened to introduce CyberKeys or remove one that does not belong to that Flex Hub. Inthese circumstances the Vault may be opened either by a specific RFID card, a specific inputnumber, or both. Using this method, the Flex System Hub does not program a CyberKey sowhen the key is removed it has no access permissions. If there are more than oneWeatherized Vaults available in the same group, it rotates through the vaults, selecting adifferent one to open after each input. For the Vault 20 FX it will open the door and brieflyopen each key retainer to allow removing one or more keys. To add a key just insert one intoany available key retainer.Click the Scan card button to use any card reader in the system to capture the ID from anRFID card. CyberAudit-Web will automatically capture the ID and save it if the card is notalready issued to someone in the system.Additional Topics:About the Flex SystemVault 20 FX OverviewAdding a Flex System Hub and ModulesMounting Flex System ModulesFlex System Power RequirementsFlex System Module Cable PinoutsFlex System Hub ListView/Edit Flex System ModulesGranting Access to Flex System Weatherized VaultsUsing the Data Knob and DisplayLED Indicator on the Weatherized VaultUsing CyberKeys with Flex System Weatherized VaultsFlex System Demo ModeFlex System Audit TrailsFlex System Display MessagesFlex System Hub DiagnosticsFlex System Special Key InputFlex System Hub LED IndicatorsResetting a Flex Hub
Programming Flex System Hubs from a USB flash driveThis process requires the use of the USBflash drive packaged with the Flex Systemhub or an equivalent unencrypted USBdrive.Once the Flex System hub has been added to the system it may be programmed with a USBflash drive.1. Click on the LaunchCyberTransfer linkfrom the Flex SystemHubs listing page.2. With theCyberTransferapplication started,insert the USB flashdrive. CyberTransferwill detect it an add itto its list of availabledrives.
3. Click Go.CyberTransfer will pullany available FlexHub data files from thedrive and upload themto CyberAudit-Weband then willdownloadprogramminginstructions for all FlexHubs with changeicons.4. When CyberTransferhas completed,unmount and removethe USB drive.
5. With power applied to the Flex System hub, insert the USB flash drive. The USB LED on the hub will flashbriefly. When the LED is steady on, remove the drive. The hub has now received its configuration and willattempt to connect to CyberAudit-Web as indicated by a flashing CAW LED. When connection has beenestablished, the CAW LED remains steady on.Flex System Hub LED Indicators
Mounting Flex System ModulesThe following chart and drawings contain dimensional information that may be needed formounting CyberLock Flex System Modules and fabricating mounting plates. In most cases it isassumed that modules will mount to a metal mounting plate (not shown) using the gasket plusthe retaining nut with set screw that ships with each module. When tightening the retaining nutit is desireable to align the set screw with the keyway in the module so the screw may becaptured and prevent the nut from turning.
FeatureLarge diameter moduleWeatherized VaultSmall diametermoduleRFID, Display, DataKnobOverall Diameter3 inches (Item A in the dimensiondrawing2 inchesHole diameter 2.647 inches (Item B)Retaining nut diameter 3 inches (Item C)Retaining nut thickness 0.50 inches (Item D)1.77 inches2 inches0.75 inchesRetaining nut set screws#3 Phillips screw driverrecommended#2 Phillips screwdriverRecommended depth behind gasket(includes clearance for RS-485connection cable)3.25 inchesData Knob - 3.00inchesRFID - 2.00 inchesDisplay - 1.50 inches
Hole dimension for small diameter modulesHole dimension for large diameter modules
Flex System Demo ModeDemo Mode enables demonstrating basic functionality of a Flex System Hub. Any recognizedinput to an RFID reader or a data knob will cause the Flex Hub to open the Weatherized Vault. If there are more than one output devices, it alternates opening them. A Flex System Hub isin Demo Mode when new as shipped from the factory.Demo Mode may be toggled from Flex System Hub properties. To switch to demo mode,select Flex Hubs from the Communicators menu to bring up the Flex System Hubs list. Hoverover the desired Flex Hub record and select Properties from the click menu. In the Generalsection Edit Flex Hub properties page, check on Use Demo Mode. Click Save. If the FlexSystem Hub is online CyberAudit-Web will update it at the next communications. Otherwise itmay be updated using the USB flash drive method.Demo Mode does not change the Flex Hub's network settings so the Flex Hub will continue tocheck in with CyberAudit-Web during Demo Mode. While the Flex System Hub is in DemoMode, module settings may not be modified.
Using CyberKeys with Flex System Weatherized VaultsThe Weatherized Vault enables people to check out a CyberKey programmed with a mission.Each Flex System Hub keeps a list of "valid" CyberKeys it may use for issuing missions. Thatlist comes from CyberAudit-Web. If a CyberKey is not a member of that list, the Flex SystemHub will not use that key to program a mission.There are two ways to assign CyberKeys to a Flex Hub;<strong>Manual</strong> Assignments - The list of valid CyberKeys for a Flex Hub may be edited byselecting Keys from the Flex Hub listing page click menu. CyberKey serial number IDsmay be individually added to or removed from the list. The number of Key IDs is limited tothe number of Weatherized Vaults in the system.Automatic Assignments - If an unknown CyberKey is inserted in a Weatherized Vault,the Flex Hub sees it as an invalid key and reports it to CyberAudit-Web. CyberAudit-Webwill automatically add the CyberKey ID to the list of valid keys if:The key ID is not issued to another personThe key ID is not associated with another Flex Hub or VaultThe CyberKey is not a Grand Master CyberKey or CyberLock ProgrammerThe CyberKey is recent enough to support multiple access lists (2005 and later)The number of CyberKeys assigned to the Flex Hub is less than the number ofWeatherized Vault Modules defined for the HubThe Flex Hub CyberKeys page displays an editable list of CyberKey serial numbers assignedto its Vaults. It also displays a list of the CyberKeys currently checked out and a list of anyinvalid CyberKeys inserted into the Vault.
LED Indicator on the Weatherized VaultAn LED on the Weatherized Vault is used to indicate status.LEDOffQuick flash once every twosecondsFlash on/off every secondSolid OnRapid flashingIndicationVault is closed and latched. No key presentVault is closed and has a CyberKey insertedVault latch is retracted. Vault is ready to open.Vault is open.Vault has returned to the closed and latchedposition.
Using the Data Knob and DisplayThe weatherized Data Knob and Display enable a person to enter amission number to check out a CyberKey or to enter a PIN. Once theData Knob and Display are set up in the same Group and Display Link,simply turn the knob to the right or left to cycle through the numbers.When the desired number is reached, press the knob to move to savethat number and move to the next number position. When the entry iscomplete, the hash character (?#?) is used to submit the entry.To backspace, push and hold the knob while turning to the left.The Data Knob can enter up to 16 numbers. Once the 16th number is accepted the entry isautomatically submitted.
Flex System Power RequirementsThe Flex System hub can be supplied from a 12-24 volt power source. It ships with a 2 amp12 volt DC, center post positive, power supply transformer using either 110V or 220V ACpower. While 24V power supplies are less common, some legacy systems may still operate at24 volts and can be supported by the Flex System hub.In addition, the Flex System hub can receive backup power from a battery via a Molex® MiniJr Series connector (39-01-2040) . The system charges the backup battery when transformerinput voltage matches battery system voltage.The Flex System is designed to supply operating power and communicate to its connectedmodules using CAT5 Ethernet patch cable with 8P8C connectors (RJ45) using an RS-485protocol. The cable supplies both communications and power to the module. Thecommunications baud rate limits cable length to a 350 foot (105 meter) maximum under idealconditions. Maximum cable length is further limited by the power requirements of eachmodule. Under most conditions, CAT5 cable may extend 100 feet (30 meters) to any FlexSystem module.The ability to extend beyond 100 feet depends on varying conditions such as actual powersupply voltage, varying loads, multiple module power/surge requirements, and environmentalconditions that affect communications such as electromagnetic interference from machinery,radios, etc.Because of their lower power requirements, under ideal conditions, cable to these modulesmay extend out to the maximum of 350 feet (105 meters):Data KnobDisplayKeypad DisplayRFID ReaderKeyport
Weatherized VaultThe Weatherized Vault module has a higher power requirement. Maximum cable length islargely dependent on input voltage supplied to the Flex System hub.Maximum possible cable distances for the Weatherized VaultInput Power12V input with12V battery backupwith 10V minimumoperating voltage12V input onlyno battery backupwith 11V minimumoperating voltage24V input with orwithout battery backupwith 20V minimumoperating voltageMaximum Range150 feet45 meters250 feet75 meters350 feet105 meters
Flex System Module Cable PinoutCat 5 or Cat 6 cable is recommended for Flex System modules. The following tablereferences standard conductor colors for those cable types with 8P8C (RJ45) connectors.Pin Number Name Conductor Color1 RS-485A white and orange2 RS-485B orange3 Ground white and green4 not used blue5 Ground white and blue6 not used green7 Power Positive white and brown8 Power Positive brown<strong>Reference</strong> pictures:
The Molex® Mini Jr Series Connector
Messages at setup and administrationUser interactionsSystem messages and errorsFlex System Display MessagesMessageUNKNOWNUSBDEVICELOAD NETSETTINGSBAD NETSETTINGSBADPROXYSETTINGSBADCONFIGDOWNLOADSTATUSDOWNLOADFLEXEVENTSDOWNLOADKEYEVENTSUSBREADYCHECKUSBFORMATBADUSBFORMATDescriptionMessages at Setup and AdministrationA USB device was not recognized as a mass storage type by the Flex System hub.The Flex System hub is loading network settings from a USB configuration. Thismessage normally will not be seen because the process happens very quickly.The USB network configuration settings failed an integrity check.The proxy settings received from USB failed an integrity check.The USB configuration file failed an integrity check.Indicates the Flex System hub is writing its status and diagnostic information to a USBflash drive.Indicates the Flex System hub is writing its audit trail events to a USB flash drivebased on instructions received in the fetch diagnostics page.The Flex System hub successfully wrote the requested data to the USB flash drive.The drive may now be removed.The Flex System hub discovered a newly inserted USB flash drive and is determiningwhether it can decipher the format of the drive.The Flex System hub could not decipher the format of the newly inserted USB flashdrive.MessagePIN"BAD PINENTERNEW PINCONFIRMNEW PINREADYREADY*BUSYDescriptionUser InteractionThe person record was found and requires a PIN be entered to validate identity.The PIN entered does not match the PIN on record for the identified person.The user has been identified by RFID card scan or mission number and must create anew PIN. At this point 4 to 8 digits must be entered followed by the ,#,.The user has just entered a new PIN and must enter the new PIN again to confirm it iscorrect.The Flex System hub is idle but it does not have a connection with CyberAudit-Web.The Flex System hub is idle and has a connection to CyberAudit-Web.The Flex System hub is processing a command or request.
UNKNOWNCARDLINKUPHOSTUNKNOWNMISSIONACCESSEXPIREDACCESSOUT OFSCHEDULENOACCESSRETURNKEYKEY INCLOSEVAULTINVALIDKEYREMOVEINVALIDKEYKEY INDISABLEKEYKEY OUTCLOSEVAULTKEY OUTNO KEYSETTINGMISSIONALREADYOUTNOMISSIONASSIGNEDPROGRAMKEYDOWNLOADKEYISSUE"orMISSION"UNKNOWNISSUE"MISSION"KEY COMMFAILThe scanned RFID access card was not recognized.The Flex System hub did not recognize the scanned RFID card, entered mission #, orinserted CyberKey and is attempting to contact CyberAudit-Web for resolution. If it isThe mission entered using the Data Knob or Keypad Display was not recognized.The schedule paired with the Vault(s) has expired for the person attempting access orthe mission is past its Final End Date.Access was attempted to the Vault(s) outside the time frames of the scheduledaccess for the person.The person assigned to the RFID access card or mission # does not have permissionto use the Vault.Instuction to return a CyberKey to a Vault from a mission.Once the Flex System hub determines that the key inserted into the WeatherizedVault is valid it displays this message.An invalid key was inserted into a Weatherized Vault or Vault 20 FX. CyberAudit-Webevaluates the key ID. If that ID is eligible to assign to the Flex Hub, it will do soautomatically and update the hub at the next opportunity.A CyberKey in the current Vault is not valid. If it is in a Weatherized Vault, it must beremoved from the Vault to resume normal operations.A CyberKey was inserted into a Vault 20 FX or Keyport.CyberAudit-Web sent a configuration to the CyberKey to disable all accesspriviledges.A CyberKey was removed from a Weatherized Vault.A CyberKey was removed from a Vault 20 FX or a Keyport.A mission number was found but no corresponding CyberKey programminginstructions were found.The requested mission has already been checked out from another communicatorand may not be checked out again until that mission has been checked in.No mission is assigned to the scanned RFID access card.Displays when the Flex System hub is loading a CyberKey with a mission or disablingit after returning it to a Vault.Displays when the Flex System hub is downloading the audit trail records from aCyberKey.The CyberKey inserted into the KeyPort may be issued to a person or used with amission . The user may enter the unique number followed by '"'.The number entered was not recognized by CyberAudit-Web as either a valid Issuenumber or Mission.Indicates the Flex Hub was not able to maintain good communications with aCyberKey. Typically this occurs because of contamination on the key contacts on theVault and/or the key tips. ( CyberKey Cleaning Instructions)
KEYREADYKEYADDITIONDENIEDKEYASSIGNEDTO VAULTUNKNOWNKEYJOB"ORADMIN"BAD JOB"ORLOGIN"NEWKEYINPUTISSUE"UNKNOWNISSUE"ISSUINGKEYNEW LOCKLOGIN"BADLOGIN"NEW LOCKADDDENIEDOPENVAULTOPENVAULTCLOSEDNO EMPTYVAULTLINKUPHOSTKEYDISABLEDNOKEYRETURNKEYNO VAULTOR DOORThe CyberKey in the Vault or Keyport is programmed and may be removed.CyberAudit-Web cannot issue or use the CyberKey for the requested purpose.A CyberKey assigned to a Vault was inserted in a Keyport.A key inserted into a Keyport is unknown to the current system and its flag is setindicating it belongs to another system.A CyberLock Programmer or Grand Master was inserted into a Keyport andCyberAudit-Web is prompting to enter the programming job number or the adminnumber of the administrator adding or programming CyberLocks.CyberAudit-Web did not find a Programming Job or Administrator number matchingthe number entered.A Grand Master is not a member of the system and must first be issued beforeconfiguring it with a programming job.CyberAudit-Web did not find the Issue Number entered.The entered Issue Number was found and CyberAudit-Web is proceeding to add theGrand Master to the system. It will next prompt for a JOB" or LOGIN".The Grand Master automatically programmed CyberLocks unknown to the system. ALOGIN" is needed to add the locks to the system with visibility at the correctCyberAudit-Web did not find the Login Number entered.CyberAudit-Web did not permit adding lock IDs to the system. Check the permissionsof the administrator associated with the LOGIN".Alternates with the KEY READY message. Instructs to open the Vault to retrieve theprogrammed CyberKey.The door on the Weatherized Vault has been turned away from the locked position.The door on the Weatherized Vault has been returned to the closed and lockedposition.There is no empty Weatherized Vault or key retainer available for returning aCyberKey from a mission.The Flex System hub does not have a record cached for the requested access so it isattempting to notify CyberAudit-Web of the request.A deleted CyberKey has been cleared of all access permissions. It may now beissued to another person or used with a mission.There are no available CyberKeys in the Vault or Vaults but the Vault is open to returna CyberKey if desired.An operation requires a Vault or a Door but there is currently no Vault in the group.
KEYADDITIONDENIEDThe key in the KeyPort cannot be used because the Key is the wrong type or themission is no longer valid.MessageNOVAULTNO VALIDKEYNOTVAULT20 FXIHS DOORCLOSEIHS DOOROPENSTARTIHSCANCELIHSBAD KEYSETTINGRTC STOPMEMORYFULLBOOTLOADFLEX HUBBOOTLOADMODULEBOOTLOADFAILBYPASSMODEDescriptionSystem Messages and ErrorsThe group is configured to use a Vault but no physical connection to a Vault is found.The person has permission to check a CyberKey out from a Vault but the Vault doesnot have a valid CyberKey available to issue.A special key input was entered applicable only to a Vault 20 FX.The Flex Hub received a signal to lock the Door.The Flex Hub received a signal to unlock the DoorThe hub is responding to an Inter-hub signal.The hub received a command to stop responding to an Inter-hub signal.Occurs if a cached record in the Flex System hub for a mission is corrupt.The Flex System hub clock stopped. No access will be granted to either a Vault or aDoor.The Flex System hub memory is full. No additional activity is allowed until it canconnect and upload to CyberAudit-Web.The Flex System hub is updating its firmware from CyberAudit-Web.The Flex System hub is updating the firmware of one of its modules.A firmware update process failed.The Flex System hub needs to contact CyberAudit-Web about an unknown key in itsKeyport but the permission to contact has been disabled.
Flex System Audit Trail Events1 System Reset23Message Description DataFirmwareUpdatedReset toFactory Settings4 All Data Cleared5UTC offsetupdatedA command was sent from CyberAudit-Web to reset thehub. The resulting behavior is the same as a powercycle.CyberAudit-Web sent new firmware. This event isrecorded following the restart after loading the newfirmware.The hub received a reformat command which revertsthe hub to factory settings. <strong>Inc</strong>ludes clearing networksettings. This command is not included inCyberAudit-Web.The hub received and executed a command to deleteall stored permissions.UTC offset read from configuration fileN/AN/AN/AN/AUTC offset inminutes6 Clock Stopped Clock registers indicate the time is no longer reliable N/A7891011121314No transformerpower detectedTransformerpower detectedBattery powerdetectedBattery powernot detectedCritical batterydetectedLow batterydetectedUSB flash drivedetectedUSB flash driveremovedBattery voltage is below 10V on a 12V system or below20V on a 24V systemBattery voltage is below 12V on a 12V system or below24V on a 24V systemA readable USB flash drive was insertedPower status infoPower status infoPower status infoPower status infoPower status infoPower status infoN/AN/A
15Data written toUSBDrive ID, File ID,list of tasksperformed:FetchedcurrentconfigurationdataFetched hubaudit trailFetchedCyberKeyaudit trailsUpdatednetworksettingsCleared hubaudit trailsCleared keyaudit trails16171819202122323334Internal memoryerrorNo networkconnectionNetworkconnectionrestoredFailed tocontactCyberAudit-WebConnectionestablished toCyberAudit-WebConnection toproxy failedConnectionestablished toproxyValid CyberKeyinserted intoVaultInvalidCyberKeyinserted intoVaultCyberKeyremovedThe hub encountered an error reading or writing itmemory.The hub did not detect a networkA network was detectedConnection to CyberAudit-Web was lost. If present, theicon will be cleared in the Flex System Hubs listingpage.Connection to CyberAudit-Web succeeded.The hub did not find the CyberKey serial number in itslist of valid keys for the Vault.The data is the rawhexascii diagnosticbytesThe icon will nowshow in the FlexSystem Hubslisting page.TCP/IP status codeCyberKey serialnumber35 RFID scan ID of the card
363738394142Data receivedfrom I/O moduleKeypad inputreceivedPeople recordverifiedCyberKeyconfigurationverifiedFound issuedkey recordAccess grantedto Vault43 PIN verifiedMission, issue, or PINThe Flex hub found the record of the person who ownsthe keyThe PIN entered matched the PIN on record for theperson.Data receivedInput device,number ofcharacters enteredName of personThe name of themission or keyKey IDName of VaultInput device,number ofcharacters entered44 Request to exit Received RTE input signal Name of door6567Key commfailedKeydownloaded68 Key configured69 Key disabled757677787982Issued keyrecord foundUnknown keyinserted intokeyPortMissionable keyinserted intokeyPortKeydownloadedfrom serverKeyprogrammedfrom serverOut of schedulefor WeatherizedVault(s)83 Mission expired86 RFID not foundCommunications with the CyberKey failed. Ensure allcontacts are clean.The audit trail was captured from a CyberKey.The Flex hub gave the CyberKey an updatedconfigurationThe ability to open CyberLocks was removed from theCyberKeyThe key ID was issued to a person and the record wasfound in the hub database.The key ID is not in the list of vault keys or missionablekeys. The Flex hub attempts to notify CyberAudit-Web.The key ID was found in the Flex hub's list ofmissionable keys. The Flex hub prompts for an ISSUE #or MISSION #.The key was downloaded in response to a request fromCyberAudit-Web.The key was programmed from a configuration sent byCyberAudit-Web.The person attempted to check out a CyberKey from aWeatherized Vault during a time outside of theirscheduled time frames for the vaults on the FlexSystem Hub.The person attempted to check out a mission from aWeatherized Vault after the mission had expired.The hub did not find the ID of the RFID card in its list ofpeople or missions.CyberKey serialnumber IDKey serial numberIDName of personKey serial numberIDConfiguration IDKey serial numberIDKey IDKey IDKey IDKey IDKey IDName of personName of personName of missionID of the card
878896Mission numbernot foundNo storedCyberKeyconfigurationfoundPIN inputmodule notavailableThe hub did not find a mission number matching theone entered at the keypad or data knob.A mission number was found but no correspondingCyberKey programming instructions were found.Access to a Vault requires entry of a PIN but no DataKnob, Keypad, or other device is available in the group.98 Vault opened The Weatherized Vault was opened.99 Vault latchedThe Weatherized Vault lid was returned to the closedposition that captures it in its latch.Mission numberenteredMission templatenameName of PersonName of VaultName of PersonName of VaultRequest detail:107Special actionrequestreceivedAn Input # or RFID card scan generated an Open Vaultrequest.Request toopen VaultRequest toopen Vault20 FX andunlocksocketRequest toremoveinvalid keyfrom a Vault20 FXRequest toopen Vaultto return key108109111112113114115Requestedmission alreadychecked outMission # notfoundKey RinginsertedModulefirmware updatefailedModulefirmware updatesuccessfulHub dataclearedSpecial keypadinputFlex System hubs will track missions checked out andwill not issue a second CyberKey for the same mission.CyberAudit-Web also updates all Flex hubs in thesystem when a mission is checked out from a Vault onanother hub.The Flex hub did not find the mission number entered inits list of cached missions.A Key Ring CyberKey has been identifiedThe hub received a command to clear one or more ofits stored records or data.Three or fewer digits were entered and submitted froma data knob or keypad/display.Name of missionName of personMission # enteredKey IDA list of the datatypes clearedInput received
116117New PIN inputreceivedCyberKeyfirmwareupdated118 Hardware reset119120121123128129Keypad inputrequested fromserverRequestedRFID input sentto serverCard scan -mission optionpresentedMissionselectedFirmwareexecution error(128)Firmwareexecution error(129)The key holder successfully entered and confirmed anew PIN.A hardware reset was performed on the Flex Systemhub.CyberAudit-Web requested user inputCyberAudit-Web requested RFID scan inputRFID input was received for a system where multiplemissions per card are available to selectThe missionContact Flex System resellerContact Flex System reseller130 System Error Error details shown in the data column1312816128163281652817628177Firmwareexecution error(131)External powerdetectedPOE powerdetectedBattery powerdetectedDoor releasebutton releasedDoor releasebutton pressedContact Flex System resellerThe Vault 20 FX powerboard detected primary powersource is now its external (transformer)The Vault 20 FX powerboard detected primary powersource is now Power Over EthernetThe Vault 20 FX powerboard detected primary powersource is now from batteryThe door release button is located inside the front panelof the Vault 20 FX28192 Door opened The door on the Vault 20 FX was opened28193 Door closed The door on the Vault 20 FX was closed2821028211Low batterydetectedCritical batterydetectedThe Vault 20 FX detected low voltage on its battery. Itscharge is less than 50% capacity.Vault 20 battery life is at approximately 2 minutesKeypad or dataknob inputID of the cardMission name ornumberError category anddetailCyberKey and CyberLock audit trail eventsVault 1 audit trail eventsComm Link audit trail events
Web Authorizer audit trail eventsLAN Authorizer audit trail events
Flex System Special Key InputSpecial functions are available to Flex Systems which have a Keypad/Display or Data Knobmodule. Entering the combination of numbers shown below will bring up information about theFlex System hub or the CyberKey inserted in the Keyport.Input Description Display11#Displays the full ID of the FlexSystem hub without the leading "O"XXXXXXXX22#Forces the Flex System hub tocontact or "Sync" with itsCyberAudit-Web server.While attempting to connect toCyberAudit-Web:SYNC...For success: ONLINE!For failures:NET UNREACHABLE - The DNS nameor IP address of the CyberAudit-Webserver is not within the networking rangeof the hub.NO SERVER - The hub has no DNSname or address of a CyberAudit-Webserver in its configurationNO ROUTE - The hub does not haveadequate information to contact theCyberAudit-Web server. This errorwould appear if the hub had not yetbeen programmed from USBTIME OUT - The hub timed out waitingfor a response from the CAW serverCONNECT REFUSED - TheCyberAudit-Web server refused aconnection to the hub. This would occurif the hub attempted to use an incorrectportSSL FAIL - The SSL link withCyberAudit-Web failedDNS FAIL - The hub was unable toresolve the DNS name of theCyberAudit-Web serverUNKNOWN NET ERR - A networkingerror occured outside the range of theones shown above
33#Displays the current date, time, UTCoffset, and day of week of the FlexSystem hub.If system clock is OK:yyyy-mm-ddhh:mm:ssUTC offsetday of weekIf system clock is not reliable:CLOCKED STOPPED55#Used to show the unique CyberKey8-character ID in combination with aKeyport.If a Keyport is available:INSERT KEY THEN PRESS #If no Keyport is available:NO FLEX KEYPORT66#Checks and displays the batteryvoltage and warns if the voltage islow.If a Keyport is available:INSERT KEY THEN PRESS #If no Keyport is available:NO FLEX KEYPORT77#Displays the key expiration status. Ifthe key has not expired it shows thenext expiration date. Otherwise itshows either KEY EXPIRED orNEVER EXPIRES.If a Keyport is available:INSERT KEY THEN PRESS #If no Keyport is available:NO FLEX KEYPORT88#This input is used with a Vault 20 FXto release an invalid key. The dooron the Vault 20 FX must me openbefore this request will be executed.If an invalid key is present, the displayshows a map of the CyberKey retainersand the released invalid key isrepresented with an uppercase 'X'.111#Displays the current IP address ofthe Flex System hub. If the IPaddress is 0.0.0.0 then the IPaddress has not yet been set.CLIENTIPxxx.xxx.xxx.xxx999#Displays the resolved IP address ofthe CyberAudit-Web server. If the IPaddress is 0.0.0.0 then the IPaddress has not yet been set.SERVERIPxxx.xxx.xxx.xxxAll other inputsless than 4charactersReports as unknown input.UNKNOWN CODE
Flex System Hub DiagnosticsFlex System hub Diagnostics involves capturing and reporting the a hub's system status andconfiguration. This configuration may be captured the next time the hub checks in withCyberAudit-Web or by using a USB flash drive. Diagnostic logging provides verbose loggingof Flex Hub activities for the specified period of time. Diagnostic logs may be useful fortechnical support troubleshooting.Open the Fetch Diagnostics page by clicking on Fetch Diagnostics from a Flex System hubrecord in the Flex Hub list page.If using a USB flash drive, audit trail data from both the Flex System hub and from CyberKeysdownloaded by the hub may be added to the diagnostic request.
When the diagnostic file is captured, either directly from the network check-in or by uploadinga USB flash drive, it is added to the list in the Diagnostics files list page. Click on a diagnosticrecord in that list and click Audit Report to view the diagnostic data.
Flex System Hub LED IndicatorsThe Flex System Hub has four LED status indicators on its power panel.LEDCAWUSBModBatStatusSteady ON - Connected to its CyberAudit-Web serverFlashing - Searching for a connectionFlashing - Reading USB flash driveSteady ON - Reading complete remove USB flash driveOFF - No USB flash drive detectedPeriodic flash - Actively checking for modulesOFF - No battery detectedSlow flash (1 per second) - Battery chargingSteady ON - Battery full chargeRapid flash - Running on battery power
Resetting a Flex HubResetting a Flex System Hub clears its networking, permissions, and audit trail data. ThisHardware Reset is done with these steps:1. Remove power from the FlexHub.2. Using an Ethernet patch cable, connect one end to any of the eight numbered module connectionports.
3. Connect the other end of the patch cable to the Aux port on the other end of the Flex SystemHub.4. With the Ethernet patch cable jumpered from the two ports, restore power to thehub.The hub typically restarts within 5 seconds. The reset is complete when the CAW LED flashes.
LAN Authorizers
LAN AuthorizersThe CyberKey LAN Authorizer system consists of an Authorizer keyport and a LAN AuthorizerHub. This page lists the LAN Authorizers in the system with some of their properties andprovides the means to view or change settings.Table FieldsThe present icon, , indicates that an Authorizer has communicated with CyberAudit-Webwithin the last minute.The change icon, , indicates that the settings of the Authorizer have changed inCyberAudit-Web but the Hub still needs to be updated.Name - Name assigned to the Authorizer hub.ID - Serial number of the hub assigned at the factory. A hub that has been found by thesystem will have an ID with the format hXXXXXXXX.Last Contact - The last date and time that CyberAudit-Web successfully communicatedwith the Authorizer.Keyport 1Keyport 2 - The name and ID of the keyport connected to the Authorizer.OperationsNew - Click to add a new LAN Authorizer.- Creates a printable list of the LAN Authorizers.Properties - Displays the details of the Authorizer setup.Audit Trail - Generates a report of activities logged by the LAN Authorizer. This can behelpful information for monitoring CyberKey activity with an Authorizer or fortroubleshooting.Keys - If LAN Authorizers store key records (based on the setting in CommunicatorOptions) this will bring up the list of keys that have programming instructions stored in theselected Authorizer and will allow adding or removing additional key assignments.Sync - Sets the icon which causes Cyberaudit-Web to try to contact the Authorizer.Delete - Removes the selected LAN Authorizer record after confirmation.
Related Topics:Adding LAN AuthorizersInstalling a KeyportLAN Authorizer DescriptionOther CommunicatorsResetting LAN Authorizers
LAN Authorizer DetailsName - Name assigned to the Authorizer hub.ID - Serial number of the hub assigned at the factory. A hub that has communicated withthe system will have an ID with the format hXXXXXXXX.Firmware - Indicates the version number of software running in the Authorizer.IP AddressSubnet Mask - Network settings for the hub.GatewayKeyport 1 NameKeyport 2 Name - Authorizer hubs support up to 2 keyports. It is important to assign aunique location name to each keyport because user key activity can then be traced tothese locations with dates and times.Keyport 1 IDKeyport 2 ID - Serial number of the keyport. The system automatically discovers and fillsin this value.Type - Indicates the mode of communications to the server.Network - Authorizer will communicate with the server by a network connection only.Local Modem - Authorizer communicates with the server by a network connection.Its modem serves as a communication link between the server and remote modemAuthorizers.
Remote Modem - Communicates with the server by phone line via one or two localmodem Authorizers.Local Properties - Local Modem Authorizers may be toggled to either dial any remotemodem Authorizer in the database or only those on a given list.Remote Properties - Remote Modem Authorizers must have at least one Local Authorizerto dial. A second one may be selected if desired.Audit Trail - Generates a report of activities logged by the LAN Authorizer. This can behelpful information for monitoring CyberKey activity with an Authorizer or fortroubleshooting.Keys - If LAN Authorizers store key records (based on the setting in CommunicatorOptions) this will bring up the list of keys that have programming instructions stored for theselected Authorizer.Sync - Sets the icon which causes Cyberaudit-Web to try to contact the Authorizer.Delete - Removes the selected LAN Authorizer record aftefter confirmation.Related Topics:Keypad MessagesClick here for instructions to add and set up modem Authorizers
Adding a LAN Authorizer1. Select "LAN Authorizers" from the "Communicators" drop down menu.2. Click the "New" link.3. Fill in the appropriate information. Field description and Modem Authorizer instructions.4. Click the "Save" button.5. Set up the Authorizer.
6. CyberAudit-Web will immediately attempt to communicate with the new Authorizer. If successful, it will loadaccess codes, schedules, and holidays in the Authorizer's memory. When successful, CyberAudit-Web willclear the change icon flag in the database. At that time, a page reload will cause the change icon to clear.
Setting Up LAN AuthorizersClick here for instructions to add Web AuthorizersClick here for instructions to add modem AuthorizersTo add a network Authorizer to the system, follow these steps:1. Set the Authorizer IP - The LAN Authorizer must be programmed with an IP address reachable via a LAN orWAN. A reset Authorizer has an IP address of 192.168.192.192. Enter '999' press the '#' key. The '*' and '#'keys on an Authorizer keyport function like the "Backspace" and "Enter" keys of a keyboard, respectively.When the IP configuration mode has been activated, the keyport display will change to "X--- 192". Note: if thekeyport of a reset LAN Authorizer does not display "X--- 192" after '999' has been entered, the LANAuthorizer's firmware will need to be updated before an IP address can be set manually.2. The letter 'X' indicates the octet of the IP addressbeing edited. The number 192 indicates thepresent value of the octet. To replace the value,enter a new one and press the '#' key. To keep thecurrent value and move on to the next octet in theIP address, enter a 3-digit number greater than255 and press the '#' key. After all 4 octets havebeen set, cycle through the IP address again (byentering a number greater than 255 for each) toverify that each was set correctly. The examplebelow shows the keyport displaying that the IP hasbeen set to 192.168.121.234.
3. Give the LAN Authorizer and keyport(s) a name - or enter a description of their physical location in theName fields.Enter the Authorizer network addresses - The IP address is used by the server to contact the Authorizer.The Subnet and Gateway IPs are used by the Authorizer when it initiates communication back to the server.4. Click Save to commit the changes to thedatabase - This will close the Add New LANAuthorizer page.5. CyberAudit-Web will immediately attempt to communicate with the new Authorizer. If successful, it will loadaccess codes, schedules, and holidays in the Authorizer's memory. Once synced, the change icon will clear.Click here for instructions to add modem Authorizers
Resetting a LAN AuthorizerResetting an Authorizer will revert it back to the original, unprogrammed state as it wasshipped from the factory. To reset a LAN Authorizer:Disconnect the power and all other cables from the rear of the Authorizer.Use a single Ethernet cable to bridge the ports labeled Keyport1 and Keyport2.Reapply power to the Authorizer. The LEDs on the front of the Authorizer will cycle throughvarious patterns as the memory and component configurations are being re-initialized.The reset process is finished when the LEDs labeled Keyport1 and Keyport2 on the front ofthe Authorizer continuously flicker in unison.
The present iconThe present icon, , indicates that an Authorizer was successfully contacted the last time thesystem attempted to communicate with it.If this icon is not displayed, then the Authorizer could not be contacted during the lastcommunication attempt.Troubleshooting Help
LAN Authorizer Audit Trail Events# Message Description Keyport # Data16171819key ID notfound inAuthorizerkey ID found inAuthorizerkey removedfrom keypadkeydownloaded20 key configured21PIN ok - key isready22 bad PIN232425264849505152communicationswith key failedsystemidentifier did notmatchtoo many PINtries: keydisabledno responsefrom host forunknown keyno modempresent or failedto initializemodemmodem failed toconnect tophone numberperiodicEthernetconnectioncheck failedconnected tophone numbermodem ringindicatorreceivedNo key record for key in the Authorizer'skey database. UPLINK HOST is displayedat the keyport.Key record for key ID found in theAuthorizer's key database.Key data was downloaded and is stored inthe Authorizer.Key has been updated from theAuthorizer's databases but has not yetbeen enabled.If a PIN was required, it was correctlyentered. The key has been enabled and isready to use - KEYREADY is displayed atthe keyport.A PIN was required. One was entered but itdidn't match the required PIN for the key.Broken or intermittent connection to the keyor communication was interrupted.COMMFAIL is displayed at the keyport.The database identifier programmed intothe key does not match the one used bythe Authorizer - WRONG PW is displayedat the keyport.1 or 2 1 or 2 1 or 2 1 or 2 1 or 2 1 or 2 1 or 2 1 or 2 1 or 2 (not implemented) 1 or 2 The Authorizer attempts to contact the hostIP for up to 30 seconds. The keyportdisplays UPLINK HOST. If it does notreceive a response, it displays COMMFAIL.This could occur if there is NO DIALTONE,BUSY, NO ANSWER.Authorizers set up for use on a networksend out an ARP every 45 seconds to fetchthe MAC address of the CyberAudit-Webserver. If there is no response for 1 hour,this event is recorded.Dial out successful - connected to hostmodem. Keyport displays CONNECT.1 or 2 noneKeyport displays RING. (none)
53 power-on resetPower was restored after being off. Keyportdisplays WAIT, then REBOOT HUB, then(none)HUBREADY.54-55 hub reset Hub was reset. Settings cleared. (none)Clock stopped. This could occur from an56 Clock stopped extended power loss, greater than 24(none)hours.64keyport addedto AuthorizerA keyport was plugged into the Authorizer. 1 or 2 6566keyportremoved fromAuthorizernon-PINnumbersentered atkeypad (2 orfewer numbers)A keyport was unplugged from theAuthorizer.The keypad received 1 or 2 characters plusthe '#' key.1 or 2 (none)1 or 2 LAN Authorizer Keyport MessagesOther audit trail event types:CyberKey and CyberLock audit trail eventsVault 1 audit trail eventsComm Link audit trail eventsWeb Authorizer audit trail eventsFlex System audit trail events
Working with Modem AuthorizersModem Authorizers may be used in place of network Authorizers where network service is notavailable. A CyberAudit-Web system uses one modem Authorizer to dial another. Hence thereare two types of modem Authorizer:Local Modem Authorizers - These Authorizers are connected to a network and arereachable by CyberAudit-Web. They are used to bridge communications from phonesystem to network and network to phone system.Remote Modem Authorizers - These Authorizers are located where networkcommunications are not available.The figure below illustrates the relationship and positioning of the two Authorizer types.
===============================Adding a Local Modem AuthorizerAdd Remote ModemTo add a local modem Authorizer, do steps 1 through 4 in the Setting Up Authorizers help.Then follow these steps:1. Select "Local Modem" as the Authorizer Type.2. Enter the phone number that the local modem Authorizer will be connected to.3. In the Local Properties frame:Dial any remote - The local modem may be used to dial any remote modem Authorizer inthe database as indicated by the linked Diagram.Dial from the list - The local modem Authorizer may only be used to dial remote modemAuthorizers selected from the list. Use Shift-Click or Control-Click to select multiple lines.The resulting positioning could appear like this linked Diagram.4. Click Save to commit the changes to the database - This will close the Add NewAuthorizer page
===============================Adding a Remote Modem AuthorizerAdd Local ModemTo add a remote modem Authorizer, do steps 2 and 3 in the Setting Up Authorizers help.Then follow these steps:1. Select "Remote Modem" as the Authorizer Type.2. Enter the phone number that the remote modem Authorizer will be connected to.3. In the Remote Properties frame:
Primary Local Authorizer - This dropdown selects the local modem Authorizer that will bedialed when the remote Authorizer tries to communicatate with CyberAudit-Web. A primarylocal Authorizer must be selected.Secondary Local Authorizer - This dropdown selects an alternate local modemAuthorizer to dial if the primary cannot be contacted (line busy, no answer). This selectionis optional. If both a primary and a secondary are selected, the resulting configurationmight be similar to this linked Diagram.
Configuration where Local Modem Authorizers may dial any RemoteModem Authorizers
Configuration where Local Modem Authorizers may only dial specificRemote Modem Authorizers
Configuration where Remote Modem Authorizers may dial up to two LocalModem Authorizers
SyncSelect "Sync" from the Lan Authorizers click menu to force CyberAudit-Web to contact theLAN Authorizer. When contact is made, CyberAudit-Web determines whether its configurationflags match the system. This may be useful if the server's IP address has changed or theAuthorizer firmware has been updated.
Keyport Messages Generated by LAN AuthorizersModem Authorizer MessagesAuthorizers Messsages Generated by the ServerMessagePIN#WAITKEY NOT FOUNDHUBREADYREBOOT HUBREADYREADY *KEYREADYLOW BATTBAD PIN#WRONG PWKEY FAILCOMMFAILLINKUPHOSTHUB BUSYWAITKEYPADDISABLEDCLOCKSTOPKEYLOCKEDLOAD HUBFIRMWAREUPDATEBOOTLOADSEC CODEBAD CODEDescriptionKey record in the Authorizer requires a PIN before key will be enabled.The keyport is waiting for the Authorizer to respond.This key does not have a key record in the Authorizer and the Authorizer does nothave a designated host server to contact.The Authorizer successfully completed a power-on reset.The Authorizer is restarting after power-on.The Authorizer is ready but it is not connected to a network device. This would benormal for a remote modem connection.The Authorizer is ready and connected to a network device.The key has been programmed and is ready to use.The Authorizer has determined that this key has a low battery.The PIN input does not match the expected PIN for the key.The database identifier between the Authorizer and the key do not match.Keyport was unable to communicate with the key.No response from the CAW server when Authorizer attempted to contact it.The Authorizer is attempting to contact the CAW server. Typically this occurs to getinformation to program a key that is not in the Authorizer's key record database.This message is displayed when the server has instructed the Authorizer to erase oneof its databases; schedules, key records, holidays, etc.The server has temporarily disabled the keyport during an update. This temporarilyprevents a key from being processed.The Authorizer's clock has stopped, typically because of an extended power loss. Itwill continue to display this message when a key is inserted into the keyport until theserver updates the Authorizer's clock.The Authorizer has reached the number of times it will allow retrying a PIN.Displayed during the process of updating Authorizer firmware.Displayed during the process of updating Authorizer firmware.The Authorizer is prompting for a security code.The security code does not match the one the Authorizer is expecting.
Authorizer Modem MessagesTopMessageDIAL MODEMINIT MODEMHANGUPMODEMCONNECTRINGNO CARRIERMODEM ERRORNO DIAL TONEDescriptionAuthorizer is attempting to connect with another Authorizer.Authorizer is loading the modem from its stored configuration.Authorizer is terminating its modem connection.Authorizer has established a modem connection with another Authorizer.The Authorizer being called displays this message.Connection dropped by remote.Internal error. Possible hardware or configuration problem.No phone line detected when attempting to dial out.Keyport Messages Generated by CyberAudit-WebTopMessagePLS WAITCOMMFAILLOOKUPUNKNOWNKEYISSUE#ISSUE#ORMISSION#BAD ISSUE#JOB# ORLOGIN #BAD JOB#NEW LOCKLOGIN #CANT ADDNEW LOCKPIN#BAD PIN#DISABLEDCLEARINGDescriptionA short period of time is expected after removing a key to allow the processing of thekey's events from an Authorizer. The server will also display this message whileissuing or missioning a key, or gathering status information.This message will be displayed by the server if an exceptional error occurred while theserver programs a key.The server is determining if the key is known to the system and if it should be issued,missioned, and/or dynamically programmed.The server has not found the key ID in the database but has found the key's DB flag isset. This indicates that the key belongs to another database and is rejected by theserver.The server is prompting the user to input an issue number for this key.The server is prompting the user to input an issue number or a mission number forthis key.The server has determined that the number input does not match any numbers in thedatabase.The server is prompting the user to input a job number or an administrator's loginnumber for a Programmer or Grand Master.The server has determined that the number input does not match any JOB#s orLOGIN#s in the database.A Grand Master contains newly programmed lock records and requires a login # toadd them.The login number entered does not have permission to add new locks.If a PIN is required to program this key, the server will prompt with this message.The server has determined that the PIN input does not match the expected PIN for thekey.The server has determined that this key has an active mission or is a deleted key. Inboth cases, the server disables the key prior to re-issuing.The key is zeroing the audit trail events and preparing to accept a configuration.
READINGWRITINGKEYREADYINSERT KEYLOW BATTNOREADINGDB FLAGERROROLD KEYREMOVEKEYDISABLEDCAN NOTPROGRAMThe server will display this message while gathering information for programming thiskey.This message is displayed while the key's new configuration is being written to it.The key has been configured and is ready to use.The server will prompt with this message in response to a 2 digit input requesting anID(55#) or battery voltage check(66#).The server has determined that this key has a low battery.The server can not read the battery voltage of this key.The server was unable to check the database flag for this key.The server has determined that this key has firmware too old to be used byCyberAudit-Web.The server has determined that this key was designated as lost and is now disabled.The server has determined that this key can not be programmed for one of severalreasons.The person may not have permission to add keys.If the key currently has an active mission, it would need to be completed firstbefore reissuing.This key may not have the required firmware to support configuring locks,downloading locks, or multiple access.HUB BUSYDOWNLOADDATABUSYUPDATINGREADY #The server is busy gathering status information from an Authorizer.The server is downloading and processing events from an Authorizer, including datadownloaded from CyberKeys.The server is writing instructions to an Authorizer.Indicates the server has completed its current job and is ready for new input oranother key.
Key Records in AuthorizersAll Authorizers may optionally store key records in their memory. This allows the Authorizer toprogram the CyberKey with its set of expiration and access permissions regardless of whetherCyberAudit-Web is available on the network. These "cached" records enable the Authorizer toprogram the key very quickly.If a key record is not stored locally, the Authorizer will contact CyberAudit-Web for instructionswhen a CyberKey is inserted into the Authorizer's keyport. With network connections,Authorizers can normally contact CyberAudit-Web quickly and program the key in a fewseconds. For Remote Modem LAN Authorizers, however, the process of dialing the modemand communicating with CyberAudit-Web will take noticably longer. In these cases, it is betterto "pre-load" the key records in the Authorizer so the key holder does not experience the longwait times.A memory calculator at the bottom of the page computes and displays the percent of LANAuthorizer memory.
Vaults
CyberKey VaultsVault 20 FXSingle Key VaultFlex System Weatherized Vault
Granting Access to CyberKey VaultsPermission to check out or return a CyberKey to a Vault must be explicitly granted to a personthrough the Access MatrixAfter one or more Vaults have been added to the system, they become available to grant accessto them.Grant access to Vaults by first selecting Show in Matrix from the list page click menu for the SingleKey Vault or the Flex System Hub.A filtered Access Matrix will appear. Click cellsin the Matrix to grant access one-by-one orselect Bulk Schedule Change to grant or revokeaccess in bulk.
Power Over Ethernet (POE) for VaultsPower may be supplied to CyberKey Vaults via Power Over Ethernet (POE) using the IEEE802.3af industry standard. The following chart shows the pinouts.IEEE 802.3afusing datapairsIEEE 802.3afusing sparepairsPin 1 Pin 2 Pin 3 Pin 4 Pin 5 Pin 6 Pin 7 Pin 8RXDC+RXDC+TXDCsparespareTXDCsparespareRX RX TX DC+ DC+ TX DC- DC-* Note: <strong>Inc</strong>onsistent implementation of the 802.3af specification using data pairs may preventVaults from recognizing available power. In general POE over spare pairs will have fewerinconsistencies.In addition, a splitter made or endorsed by the manufacturer of the POE device may be a morereliable alternative to deliver standard power to the Vault.
Email Notification Settings for CyberKeys Not ReturnedAn email notification may be sent to one or more recipients when a CyberKey is not returned to thesystem after checking it out from a Vault. A "TO" email address must be provided as well as theamount of time elapsed after the key expires. The actual key expiration date and time is calculatedfrom the expiration rules of the card holder.Email SettingsNote: - A valid email server must be identified in the Email Setup page for this feature to be used.
Email Notification Settings for Vault Door OpenAn email notification may be sent to one or more recipients when the door on a Single Key Vault,Vault 20, or Weatherized Vault is left open beyond a certain amount of time. A "TO" email addressmust be provided as well as the amount of time elapsed that the Vault has been opened.Note: - A valid email server must be identified in the Email Setup page for this feature to be used.
Vault 20 FX
Vault 20 FX OverviewThe CyberKey Vault 20 FX is a dynamic key management device supporting and dispensingup to 20 CyberKeys. It requires an authorized RFID access card or a valid mission entered atits KeyPad Display before it will program and release a CyberKey. Once the key has beenprogrammed with the user's access permissions it will flash, signaling the user to remove thekey from the Vault. The remaining keys stay locked in the Vault in an unprogrammed state.Additional Topics:Vault 20 FX Demo ModeSetting Up and Configuring a Vault 20 FXProgramming a Vault 20 FX from a USB flash driveVault 20 FX Power RequirementsPower Over Ethernet for VaultsFlex System Hub ListVault 20 FX PropertiesPush Notification PortGranting Access to VaultsValid Keys for Vault 20 FXFlex System Audit Trail EventsFlex System Display MessagesFlex System Special Key Inputs
Vault 20 FX PropertiesGeneralName - The name assigned to the Vault 20 FX. This name appears in the Access Matrixfor the purpose of granting access to any connected Weatherized Vaults.ID - The serial number of the hub assigned at the factory. Flex System Hub IDs have theformat OXXXXXXXX. The serial number ID must be manually entered when adding theVault 20 FX.
Firmware - Indicates the version number of the software running in the hub. This field willdisplay only after CyberAudit-Web communicates with the hub and captures thisinformation.Demo Mode - Check this box as the first step to setting the Vault 20 FX hub into demomodeUpdate Frequency - By default a Vault 20 FX checks in for updates with CyberAudit-Webonce every 30 seconds. In some cases where there is a per-byte cost of datatransmission, it may be desirable to reduce the frequency of check-in. CyberAudit-Webdoes attempt to make an immediate TCP/IP connection with the Vault 20 FX when anupdate is pending for the hub. If the connection attempt is successful, the Vault 20 FX willimmediately synchronize with CyberAudit-Web rather than waiting for the next check-intime. However if it is not possible to make that connection, the administrator should beaware that any pending updates the hub affecting configuration or access permissionsmay be delayed until the hub successfully checks in with CyberAudit-Web.Alarm if open longer than - If the door on the Vault 20 FX is left open for longer than thespecified time it will cause the beeper in its RFID module to beep repeatedly as a warningto close the door.NetworkingCyberAudit-Web Server Address - The IP address or domain name of theCyberAudit-Web server. If the subsystem preference will be used, the checkbox will bechecked.Automatic (DHCP) / <strong>Manual</strong> - Choose the settings appropriate to the subnet where thehub will be installed.Push Notification Port - The network port on the Flex System hub that listens for aTCP/IP signal from the CyberAudit-Web server. This signal tells the hub to immediatelycontact CyberAudit-Web for instructions.Proxy - Many larger networks require web browsing to be routed through a proxy server toreach the Internet. Because the Vault 20 FX is fundamentally a web client, its web trafficmust also be routed through the proxy. If a proxy server is required, its information must beentered here.Note: Once a CyberKey Vault 20 FX has been added and configured, changes to theProxy settings may only be updated by programming its hub from a USB flash drive.
Open Vault - There may be occasions where the Vault 20 FX may need to be opened tointroduce CyberKeys or to remove one that does not belong to that Vault. In thesecircumstances the Vault may be opened either by a specific RFID access card, a specificinput number, or both. Using this method, the Vault 20 FX does not program a CyberKey sowhen the key is removed it has no access permissions. For the Vault 20 FX this input willopen the door and open one the key retainer in the upper left of the cabinet. If there is aCyberKey present in that retainer it may be removed. Each subsequent scan or keypad inputwill open the next retainer moving from left to right. To remove an invalid CyberKey, enter 88#after the door is open. To add a key just insert one into any available key retainer.Click the Scan card button to use any card reader in the system to capture the ID from anRFID card. CyberAudit-Web will automatically capture the ID and save it if the card is notalready issued to someone in the system.
Power Requirements for Vault 20 FXThe CyberKey Vault 20 FX is designed to receive primary power from a 12 volt DC, centerpositive, power supply transformed from 110-220V AC power. It will require 1AMP minimum.The Vault 20 FX manufacturer offers both 110V and 220V power transformers.In addition, two backup power sources may be employed.Battery - The Vault 20 FX is designed to use a HR 1221W F2 Sealed Lead-Acid battery.Battery output is 12 volts, 4 Amp/Hours. On its own without POE the fully charged batterycan typically provide operational power to the Vault 20 FX for 5 hours or more with typicaluse. When primary power is restored, it will recharge the battery at a rate of approximately10% of capacity. At that rate, a Vault 20 FX that has run on battery power forapproximately 2½ hours will return to fully charged within 5 hours after transformer poweris restored.Power Over Ethernet - POE may be used as a source of trickle charge to extend thebattery life while it is providing power to the Vault 20 FX. With moderate use (issuing up to100 keys per day), and a battery in good condition POE can keep the cabinet batterycharged enough to power the cabinet for several days. This is not, however,recommended as a source of power long term.Note: Although the Vault 20 FX hub has a Molex® Mini Jr Series connector for a backupbattery, that connector should not be used when the hub is installed in a Vault 20 FX becausethe hub does not supply power to either the main power board or the key retainer modules ofthe Vault.
Setting Up and Configuring a Vault 20 FXItems required:A CyberKey to open theCyberLock on the Display/CardReader panel of the Vault 20 FX.The USB Memory stick that camewith the CyberKey Vault 20 FXpackageThe Vault 20 FX Serial NumberLabel card.Note: A CyberKey Vault 20 may be set up and configured with CyberAudit-Web either beforeor after mounting (see V20 Mounting Instructions.pdf).
Steps:PowerConnect power and Ethernet.EthernetWhen the vault starts up it will be in demo mode. If there are already CyberKeys in the cabinet, scan anRFID card or enter 4 or more digits on the Keypad. The Vault 20 FX will select a key and release it.Repeat the process for each key until all are removed. When all the keys have been removed from theVault, close the door.
Since the Vault 20 FX is fundamentally a FlexSystem Device it is added to the system as aFlex System hub. From the Communicatorsmenu, open the Flex Hubs list page.Clickto add a new hub.
In the Add new Flex Hub page,Enter a name for the Vault 20 FX.Enter its serial number from the Vault 20 FX Serial Number Label card into the ID field.Update network settings as appropriate. The Vault 20 is a web client and will attempt to reachCyberAudit-Web via https. Ensure that the networking settings are correct so that the Vault 20 FXcan reach CyberAudit-Web from the subnet where it will be installed. The Push Notification Portas well as Key Programming and Open Vault setttings may be entered now or later and may bechanged at any time. The settings in the Vault 20 FX will be automatically updated as long as itmaintains its network connection to CyberAudit-Web.Click Save to save the new Vault 20 FX record.
Insert the USB Memory Stick into the localcomputer which is logged in toCyberAudit-Web.The Vault 20 FX may now be connected to the network and programmed from USB.Go to the Locks page and add the Lock ID,again referring to the Vault 20 FX SerialNumber Label card. Refer to the Vault 20 FXwhen naming the lock.
Programming a Vault 20 FX from a USB flash driveThis process requires the use ofthe USB flash drive packagedwith the Vault 20 FX or anequivalent unencrypted USBdrive.Once the Flex System hub has been added to the system it may be programmed with a USBflash drive.1. Click on theLaunchCyberTransfer linkfrom the FlexSystem Hubslisting page.2. With theCyberTransferapplication started,insert the USBflash drive.CyberTransfer willdetect it an add itto its list ofavailable drives.
3. Click Go.CyberTransfer willpull any availableFlex Hub data filesfrom the drive andupload them toCyberAudit-Weband then willdownloadprogramminginstructions for allFlex Hubs in thesystem withchange icons.4. WhenCyberTransfer hascompleted,unmount andremove the USBdrive.
5. Open the frontpanel of the Vault20 FX and set itaside.
6. With powerapplied to theVault 20 FX, insertthe USB flashdrive. The USBLED on the hubwill flash briefly.When the LED issteady on, removethe drive. The hubhas now receivedits configurationand will attempt toconnect toCyberAudit-Webas indicated by aflashing CAWLED. Whenconnection hasbeen established,the CAW LEDremains steady on.
7. Return the frontpanel to the Vault20 FX.
Push Notification PortBoth Flex System Hubs and Web Authorizers periodically contact CyberAudit-Web to reporttheir status and fetch updates. By default that occurs once every 30 seconds. In addition,CyberAudit-Web attempts to notify a hub using TCP/IP on port 80 when it has an update forthat hub. This "push notification" causes the hub to contact CyberAudit-Web immediatelyrather than wait for its normal check-in time. If desired, port 80 may be changed to anothervalue on a hub-by-hub basis using the Push Notification Port setting in the hub propertiespage. The result of this notification is that online hubs can get instructions to update key andvault records in nearly real time.In cases where TCP/IP traffic is routed in both directions between CyberAudit-Web and theFlex System hub or Web Authorizer, push notifications will occur automatically. In some casesthe hub may not be on the same network as CyberAudit-Web. An example of this is whenCyberAudit-Web is being served on the Internet and the hub is behind a NAT router. ThePush Notification Port enables the use of port forwarding on the router to direct thosenotifications to hubs in the local network.
Valid Keys for Vault 20 FXThe CyberKey Vault 20 FX enables people to check out a CyberKey programmed with amission. Flex System hub, including the Vault 20 FX, keeps a list of "valid" CyberKeys it maystore in its Vault(s) for issuing missions. That list comes from CyberAudit-Web. If a CyberKeyis not a member of that list, that key may not be used.There are two ways to assign CyberKeys to a Vault 20 FX;<strong>Manual</strong> Assignments - The list of valid CyberKeys may be edited by selecting KeyInventory from the Flex Hub listing page click menu. CyberKey serial number IDs may beindividually added to or removed from the list. The number of Key IDs is limited to thenumber of key sockets in the Vault 20 FX (20).Automatic Assignments - If an unknown CyberKey is inserted in a Vault 20 FX, the Vaultsees it as an invalid key and reports it to CyberAudit-Web. CyberAudit-Web willautomatically add the CyberKey ID to the list of valid keys if:
The key ID is not issued to another personThe key ID is not associated with another Flex Hub or VaultThe CyberKey is not a Grand Master CyberKey or CyberLock ProgrammerThe CyberKey is a rechargeable CyberKey (excluding CyberKey Blue)The number of CyberKeys assigned to the hub is less than the number of totalavailable key socketsIf an invalid CyberKey is inserted into a Vault 20 FX, scan an RFID access card, enter amission or the Open Vault inputto open the vault door then enter 88# at the keypad to releaseand remove the invalid key.The Vault 20 FX Key Inventory page displays an editable list of CyberKey serial numbersassigned to the Vault. It also displays a list of the CyberKeys currently checked out and a listof any invalid CyberKeys inserted into the Vault.
Vault 20 FX Demo ModeUntil it has been paired with a CyberAudit?Web system, the Vault 20 FX will boot into demomode when power is connected to the cabinet. This allows for verification and demonstrationof basic system operation.Entering Demo ModeConnect power to the cabinet. The display will briefly show the <strong>Videx</strong> logo, thenthe word "READY" for about 15 seconds.At this point, the Vault is ready for demonstration. If no action is taken, the displaywill show the <strong>Videx</strong> logo again, then go black after about 20 seconds.Inserting KeysNote:The Vault 20 FX accepts CK-RXD CyberKeys.Scan an RFID card or enter four or more digits on the keypad, followed by #. Thecabinet will beep and release the door latch. The keypad display will show a mapof the key locations inside the cabinet. The letter o represents an open socket.Open the door.Insert a key into any open socket. The display will briefly show DOWNLOAD KEY. . .. . . and then KEY IN.Repeat Step 3 for each key, until all keys have been inserted.Close the door. The display will showREADY, then go black after 20 seconds.Note: If the door is held open for longer than 1 minute, the light in the center of the RFID reader modulewill change from green to red, and the cabinet will begin to beep. This is the "Door Open" alarm. Tosilence it, close the door.
Removing KeysScan an RFID card or enter four or more digits on the keypad, followed by #. Thecabinet will beep and release the door latch. The keypad display will show a mapof the key locations inside the cabinet represented by the letter v. The letter orepresents an open socket, and the letter X represents the key which has beenreleased for removal.Open the door. The key indicated by the letter X will be flashing.Remove the key. The display will show KEY OUT.Close the door. The display will showREADY, then go black after 20 seconds.Number Code FunctionsEntering a 2-digit code on the keypad, followed by the # key, will cause the cabinet to performvarious functions which are a subset of those available in Normal Mode. These functions areas follows:11#: displays the serial number of the Vault 20 FX, minus the leading O.22#: causes the Vault 20 FX to contact its CyberAudit-Web server. If successful,it displays "ONLINE!". Otherwise, it displays an error message indicating thecause of the failure.33#: displays the date and time from the Vaults clock.44#: not used in demo mode55#: not used in demo mode66#: not used in demo mode77#: not used in demo mode88#: unlatches the Vault door. The display shows the key map.
99#: not used in demo mode00#: exits whatever mode the system was in and returns to normal operation.The display shows "READY".
CyberKey Vault 1
Single CyberKey VaultsThis page lists the Single CyberKey Vaults in the system and enables adding, configuring, andmanaging them.Table Fields:Present - The present icon, , indicates that a Vault has communicated withCyberAudit-Web within the last minute.Change icon - If the system has information for the vault but the vault has not yet beenupdated, a icon appears in the column.Name - The name associated with the vault.Serial or Issue # - The serial number or issue number assigned to the vault.Last Contact - The last time the server and vault communicated successfully.Key - Displays the name of the key currently docked at the vault.- Displays if the docked key is valid for the vault and if not.Battery Level - Displays the current battery level of the docked key.Door - If the vault door is open, is displayed. means the door is closed.Operations:- Click this button to create a printable report for the current list.Clicking in a non-linked section of a record will display a drop-down menu of operations:Properties - Displays editable details of the selected vault.Show in Matrix - Displays the Access Matrix with a filter applied for the selectedVault to to display the tags and people who have access.Audit Report - Generates an audit trail logged for the vault.
Notification - Enables setting up an email notification to send to one or more emailaddresses informing that the CyberKey has expired but has not been returned to theVault.Delete - Removes the Vault from the system after confirmation.Additional Links:About Single CyberKey VaultsAdding a Single CyberKey VaultSingle CyberKey Vault Audit Trail EventsSingle CyberKey Vault LEDsSingle CyberKey Vault TonesMiscellaneous Notes about Single CyberKey VaultsUsing CyberLink as an RFID Card ReaderUsing Power Over Ethernet (POE) with VaultsValid Keys for Single CyberKey Vaults
Single CyberKey Vault PropertiesName - The descriptive name or location of the Single CyberKey Vault. This name will beused to cross reference the Vault when running Audit Trails on a person with an RFID AccessCard.ID - The serial number identifier of the Vault.Valid Vault Key - This property determines which CyberKeys will be valid to use in the Vault.There are two choices that determine a valid key:1.2.Same - key must be returned to the same vault. This setting might be chosen whenThere is only one Vault in a location and you want some assurance that when a keyis checked out of the Vault it will be returned to the same Vault.The Vault holds a ring of one or more mechanical keys and the Vault has beennamed to indicate the Key Ring it holds.In Same mode, only one CyberKey is considered 'valid'.Shared - key may be returned to any Vault. This setting might be chosen whenThere are multiple Vaults in the same general location and it doesn't matter whichVault gets the returned key.
2.Email Notification for CyberKeys Not Returned - CyberAudit-Web can send an email to notifyone or more recipients that a CyberKey checked out from the Vault has not been returned.Networking - A Vault must be configured for network settings. Since the Vault is a web client,it must get an address or DNS name to contact CyberAudit-Web.By default it will attempt to get its networking configuration from a DHCP server. If a manualconfiguration is needed, that may be entered after selecting the "<strong>Manual</strong>:" option.Show in Matrix - Displays the Access Matrix with a filter applied for the selected Vaultto to display the tags and people who have access.Audit Report - Generates an audit trail logged for the vault.Notification - Enables setting up an email notification to send to one or more emailaddresses informing that the CyberKey has expired but has not been returned to the Vault.Delete - Removes the Vault from the system after confirmation.
Single CyberKey Vault Audit TrailsA set of logs is kept by CyberAudit-Web in response to certain events. Use this log for trackingcheck-out and check-inof the key, activities, and troubleshooting. It is available for each Vaultfrom the drop-down menu in the Vaults page.EventDoor Status Events601 Door opened602 Door closedEvents working with theCyberKeyDescription624 Valid key detected <strong>Inc</strong>ludes name or serial number of the CyberKey.608 PIN required609Error - Key is from adifferent system614 Key type mismatch623Key is not valid forVaultThe card holder requires a PIN for validation and no PIN bypass has beenset. Therefore the Vault cannot issue the key.The detected CyberKey is not valid because it is not a member of thecurrent database and its database flag is set.The detected CyberKey is not valid because it is a CyberLock Programmer,Grand Master, or it does not support the minimum set of features becausethe key is an early model CyberKey.The detected CyberKey failed the validity test.607 Key disabled All access permissions have been removed from the key.606 Key configured A configuration has been sent to the key.605 Key readyThe CyberKey has been programmed and confirmed. The Ready LED isflashing. The key is ready for use.625 Comm error with key The data column contains the error number.628 Low battery629Key does not respondto communications604 Key removedEvents about the RFIDAccess Card630631621611Access approved forcard with no keypresent in VaultAccess approved forcard with invalid keypresent in VaultAccess approved forcard with key presentin VaultNo mission has beenassigned to the cardThe battery level of the CyberKey in the Vault is low. If the key has areplaceable battery it should be changed. If the key has a rechargeablebattery the Charging LED should be on.This could occur if the key's battery is too low to support communications.This allows the card holder to open the door and insert a CyberKey.This allows the card holder to remove the invalid key.The Vault was holding a valid key when the RFID Access card waspresented. CyberAudit-Web then proceeded to program the CyberKey.No mission has been assigned to the card and the Vault properties requirea card mission to program the key and grant access.
612 Mission denied706707Card access denied -Mission expiredKey Ring in vault doesnot match the missionKey RingAn otherwise good mission was denied because the card holder alreadyhas an active mission and subsystem rules prohibit having more than oneactive mission at a time.The mission template associated with the RFID access card is past its FinalEnd Date and may no longer be used to check out a mission.The CyberKey in the Vault does not have the same serial number as theKey Ring requested by the mission template of the RFID card or the statictemplate of the Vault.615 Unknown card The RFID Access card was not found in the system.616617618619RFID cards aredisabled for thesubsystemDuplicate ID foundwith a different cardCard access denied -no permission to vaultOut of schedule forVaultEvents about the Vaultand networkcommunicationsThe subsystem must permit the use of RFID cards in subsystempreferences.A duplicate ID from a card was found but the manufacturer ID or lot# did notmatch.The RFID card is recognized as a member of the system but it has nopermissions to check out the CyberKey from the Vault.The RFID card has permissions to check out the CyberKey from the Vaultbut not at this time.620 Power restored This indicates the Vault returned from a power loss or was otherwise reset.626627Connection to serverestablishedConnection to serverlost701 Vault Network Reset702Timeout on commandconfirmationOther audit trail event types:CyberKey and CyberLock audit trail eventsComm Link audit trail eventsWeb Authorizer audit trail eventsLAN Authorizer audit trail eventsFlex System audit trail eventsIf the Vault has been online but goes off line this event will be logged byCyberAudit-Web. This event is not logged if CyberAudit-Web is restartedwhile the Vault is off line.Logs within approximately 90 seconds of not receiving a packet from theVault.The Vault 1 reset its networking program because it was unable to connectto CyberAudit-Web.CyberAudit-Web issued a command to the Vault 1 but did not receiveconfirmation from the Vault that it had received that command.
Adding a Single CyberKey VaultFollow these steps to add a Single CyberKey Vault to the system:1. In communicatoroptions, enter the URLthat the vault will use toreach CyberAudit-Web.
2. Connect the CyberKeyVault to the computervia the USB cable. Alsoconnect the powercable.3. Open the Single KeyVaults page underCommunicators.4. Click the LaunchCyberLink link.CyberLink willautomatically add theVault to the list. Wait forCyberLink to updatenetwork settings andfor the change icon toclear.
5. Click on the Vaultrecord in the list andselect Properties.6. Give the Vault a name,select the appropriatesettings and networkingand click Save.7. If networking requiresupdating, CyberLink willdo it within 30 seconds.Wait for the changeicon to clear.
8. You may insert aCyberKey in the Vaultnow to associate withthe Vault. Any13.56MHz RFIDAccess Card will triggerthe vault to release itsdoor latch. If the key isvalid for the Vault,CyberLink will displayKey is valid for vaultYou may now removethe keyAt this point the keyshould be removed andthe Vault may bedisconnected from USBand power, mounted inplace, and connectedto the network.
Single CyberKey Vault Status Indicator Lights and TonesThe Single CyberKey Vault uses both status indicator lights and tones to indicate status anderror conditions.RFIDreaderlight incenter ofpanelPowerFlashes continuously when the Vault is powered. Off when there is no power or if the RFIDunit is not functioning.Steady on when the Vault is powered and ready to use. Off when there is no power.Charging Steady on when the Vault is charging a CyberKey battery. Otherwise off.ChargeCompleteSteady on when the Vault is holding a CyberKey Rechargeable and the key's battery is at fullcharge. Otherwise off.ReadyOff when the Vault has no connection to a computer or server.Steady on with a USB connection to any computer.Steady on when the Vault establishes network connection to CyberAudit-Web in thedatabase or account to which it was added.Flashing alternately with the Busy LED when CyberAudit-Web denies access to anRFID Access Card. This sequence is repeated seven times. Denied Vault access isalso accompanied with a single low-tone. And if a valid CyberKey is present,CyberAudit-Web ensures that the key is disabled and sounds the disable tones.Flashing when the CyberKey in the Vault has been programmed and is ready for use.When the flashing starts it is accompanied by a single low-high audio tone combinationand a release of the door latch.BusyOff when idleFlashing when the Vault is attempting to process the inserted CyberKey.Flashing alternately with the Ready LED when CyberAudit-Web denies access to anRFID Access Card.Flashing alternately with the Key Present LED during network communications whenCyberAudit-Web discovers the inserted CyberKey is invalid. This is accompanied witha continuous alternating high-low tone sequence.
KeyPresentOff when the Vault cannot detect a CyberKeySteady on when a CyberKey is detectedFlashing alternately with the Busy LED when CyberAudit-Web discovers an invalidkey.Note: All lights flash on simultaneously and the Vault emits a single tone when it successfullyreads an RFID Access Card.
1.2.What is a "Valid" CyberKey for a Single CyberKey Vault?A valid key for a Single CyberKey Vault is one that is allowed to be inserted while the Vault ison line with CyberAudit-Web. If a CyberKey is found to be "Invalid", CyberAudit-Web willcause the Vault to siren with alternating high-low tones and alternately flash the Busy and KeyPresent LEDs.Vault property settings include two choices that determine a valid key:Same - key must be returned to the same Vault. This setting might be chosen whenThere is only one Vault in a location and you want some assurance that when a keyis checked out of the Vault it will be returned to the same Vault.The vault holds a ring of one or more mechanical keys and you have labeled theVault to indicate the Key Ring it holds.In Same mode, only one CyberKey is considered 'valid'.Shared - keys may be returned to any Vault. This setting might be chosen whenThere are multiple Vaults in the same general location and it doesn't matter whichVault gets the returned key.Additional notes:Each card swipe is treated as a separate transaction and completely processed before thenext card swipe is processed.CyberAudit-Web will ensure that a Vault's CyberKey is disabled following any RFID accesscard scan where the card does not have permissions to get the key.Vaults do not program invalid keys, even when the keys are known by the system. Forexample if Joe Brown has an issued CyberKey, the Vault will not download and update it.
Single CyberKey Vault TonesTone/SignalLow tone three times per five secondscontinuously until the door is closed.A high-low tone combination once persecond continuously.This is combined with alternatingflashes of the Busy and Key PresentLEDs.A single quick low-high tonesequence.This is combined with a flashingReady LED.A single quick low-high-low tonesequence.This is combined with eight alternatingflashes of the Busy and Ready LEDsA single low tone.StatusThe Vault door has been left open toolong. By default this time is 30seconds but is adjustable incommunicator options.CyberAudit-Web has detected that theVault is holding an invalid key.The CyberKey in the vault has beenprogrammed and is ready for use.CyberAudit-Web has disabled theCyberKey in the Vault.If a valid CyberKey is present in theVault, CyberAudit-Web will alsoensure the Key has been disabledwith the accompanying tones andflashes.CyberAudit-Web has denied access toan RFID Access card.Miscellaneous Notes about Single CyberKey Vaults
Miscellaneous Notes about Single CyberKey VaultsHow to release the door latch on a Vault.The vault will release the latch on the door under these circumstances:1. The latch will always release for 5 to 10 seconds after powering up.2. When the unit is new, it will open from successfully scanning any RFID access card.3. When the unit goes online and connects to CyberAudit-Web over the network,CyberAudit-Web sets the unit in secure mode. In that mode, the Vault will only openwhen CyberAudit-Web sends it an instruction to open based on these rules:A valid CyberKey is present in the vault - Only cards authorized for the vaultand are entitled to check out the mission will get access. For example a cardwith a mission may not get access if the card holder already has anothermission checked out and would violate the rule of 'one mission at a time' insubsystem preferences.An invalid CyberKey is present in the vault or no CyberKey is present in thevault - The cabinet will open to any card that is in the CyberAudit-Webdatabase.If an invalid card is presented, CyberAudit-Web will ensure that the key has been disabledand will instruct the Vault to emit a single low tone card denied beep ahead of thelow-high-low key key disabled tone set.CyberAudit-Web handles each card swipe as a separate transaction and completelyprocesses one swipe before the next card swipe is processed. Card swipes are ignoredwhile CyberAudit-Web is processing the Vault's CyberKey.The Vault operates in either USB mode or Network mode. USB mode is only for setting upthe Vault and using the Vault with CyberLink as a scanner for RFID Access Cards. Whenboth power and USB are connected the Vault operates in USB mode. Power and Ethernetmust be connected without USB to enable full Vault functionality.The Vault may be powered using Power Over Ethernet (POE).
System KeysSystem Keys have special capabilities within CyberAudit-Web.Grand Master CyberKey - May be used to open any lock in the system, program anyunprogrammed CyberLock with a selected set of access codes, configuring programmed locksusing a programming job and generate emergency keys.CyberLock Programmer - Used to program or download locks using a programming job.USB Programmer - Connects to a USB port on a PC and used to program or download locksusing a programming job.Subsystem Reset Key - Uses a subsystem code to reset any CyberLock programmed withthat code.
System KeysSystem keys are a special class of CyberKey used for specific tasks in a CyberLock system. Theyconsist of Grand Master Keys, CyberLock Programmers, and USB Programmers. This pageenables defining and managing these keys.In addition, systems created by manually entering passwords for the CyberLock access codes mayalso create a reset key.Table Fields:Name - The name or descriptor of the system key.Serial or Issue # - The identifier of the system key. A serial number will start with a 'K'. Issuenumbers are 8 digits.Change Status - If the system has information for the system key but the key has not yet beenupdated, a yellow 'C' icon appears in the column.Base GM - Systems whose CyberLock access codes originate from a Grand Master willdisplay one of the Grand Master records with an anchor icon ( ). This indicates that the GrandMaster was the source of those access codes.Type - Grand Master, Programmer, or Reset (for systems whose CyberLock access codesoriginate from manually entered passwords)Operations:New - Click to add a new system key.- Creates a printable list of the system keys.Clicking in a row in the list of system keys will display a drop-down menu of options that includes:Properties - Displays the details of the selected system key.Audit Trail - Generates an audit trail report associated with the system key.
Comm Log - Generates a report of key status logged by communicators when the systemkey is downloaded.Lost - Initiates the steps to mark a system key as . lostDelete - Removes the selected system key after confirmation.
Grand MastersThe Grand Master CyberKey is a key with multiple functionality. Each GrandMaster contains unique, pre-programmed encrypted codes which mayoptionally be used to program locks and keys.When used with CyberAudit-Web Professional, this key may be used in one oftwo ways:1.2.As an enhanced CyberLock Programmer that can also programlocks with one touchTo open locks and generate emergency keys. Emergency keys willopen any lock with the same system. Those keys will then expire after aspecified duration of time.
AnchorThe Anchor icon,for the subsystem., indicates that this Grand Master is the original source of the Access Codes
CyberLock ProgrammerThe CyberLock Programmer is a device that is used to program and downloadCyberLocks in conjunction with the Professional and Enterprise softwaresolutions. The Programmer case is made of a durable nylon-based plastic. Anindicator light shows battery power and activation. A speaker makes tonesindicating communication and programming status. Although the Programmerresembles a key, it will not open a CyberLock.Once programmed, the Programmer's memory contains the needed encryptedaccess codes, a list of locks to program, and the programming instructions forthose locks.The CyberLock Programmer is also used to download the audit trail from alock.
USB ProgrammersThe USB Programmer is a USB device which provides the ability to exchange information betweena CyberLock and CyberAudit-Web Professional or CyberAudit-Web Enterprise. In addition, it canload a programming job to download or program CyberLocks for use when the computer will beoffline. The resulting data may be uploaded to CyberAudit-Web later when the computer is backonline.Specifically, the USB Programmer can do the following:1.2.3.Add a new, unprogrammed lock to CyberAudit-Web. (requires permissions through a login andpassword)Program locks that require it either online or through a programming job.Download audit data from locks that are part of the current system via a programming job.Unlike with CyberLock Programmers, Grand Master CyberKeys, and CyberKeys, the number oflock downloads that may be done is not limited by the memory of a CyberKey.The USB Programmer cannot open CyberLocks.
Reset KeyA reset key is available for systems created by manually entering passwords for the lock accesscodes. When a reset key touches a lock in its system it clears the access codes and configurationsfrom the lock thereby resetting it to the original (unprogrammed) factory configuration. It does not,however, remove its audit trail data.A reset key can be made from any standard CyberKey.Because of its ability to open any lock in the system and clear the access codes, a reset keyshould be kept in a secure location.
Adding and Editing System KeysAdd a new System Key ( Grand Master or reset key) by issue number or manually enter the serialnumber and assign it a meaningful name.In addition, Grand Masters can be set to open locks and program emergency keys that will openany lock for the specified time. They can also be set to program locks with one touch whereas aProgrammer key must touch the lock, be updated with the software, and touch the lock once againto finish programming it.When editing a system key that has already been entered in the system, the replace operationenables issuing a system key with the same settings as the previous one.
Steps to Add System KeysSubsystem keys include Reset keys, Grand Master keys, CyberLock Programmers, and USBProgrammers.1. Choose "System Keys"from the "Keys" menu.2. Click the New button.3. Choose to add a newsystem key by issue orserial number andenter a name for thekey.
4. Select the type of System Key. Choices are Grand Master, Programmer, and Reset. If Grand Master is selectedselect its function between programming locks or opening locks and generating emergency keys.5. Update the key.Update throughissue numberUpdate throughmanually enteredserial number
Grand Master Will Open Locks and Program Emergency KeysGenerally, Grand Masters will be used either for accessing locks, programming emergency keys,or programming locks. If the Grand Master will be used as a Programmer, this function wouldgenerally be disabled.Grand Masters can create emergency keys that open any locks added within their system. Thekeys created are master keys that operate 24-7 until they expire. Valid operating times include:1 - 64 minutes1 - 24 hours1 - 127 daysFinally, Grand Masters must be activated by contacting a CyberLock before they will program theemergency keys. After that contact, they will be active for two minutes as indicated by their LEDthat flashes every second. Programming a key restarts the two minute timer in the Grand Master.After the 2 minutes elapse, the LED flashes once every eight seconds.
Grand Master Will Program LocksA Grand Master is a versatile tool that can perform a variety of functions in CyberAudit-Web. It hasall the functionality of a CyberLock Programmer because it can program and download locks. Inaddition it automatically programs any unprogrammed CyberLock with one touch. This is incontrast to CyberLock Programmers which require contacting the lock, downloading to thesoftware, then re-contacting the CyberLock.
Lost System KeysClick here for instructions concerninga lost Base Grand Master.Follow these steps if a Grand Master key is lost:1. Find the key in the System Keys window, click on a non-linked section of its row, and choose"Lost."2. Select the "This key is Lost" option. Check the box to automatically create a , if desired.Programming Job NumberThen choose which locks should be set as disabling points. When the key contacts one of these disabling locks,the key is denied access and becomes disabled for all of its access permissions.
3. Click the "Save" button.4. The disabling points will be displayed to confirm the selected locks will need to be updated. Click "Save" toproceed. This will cause change icons to appear for the designated locks.5. The key will be removed from the SystemKeys window and added to the Lost Keyswindow.6. Lost keys are viewed in the Lost Keyssection in the "People & Keys" drop downmenu.
7. Update the Programmer Key or Grand Master using the Programming Job associated with the lost key.8. Touch the locks designated as disablingpoints.
9. Update the Programmer Key or Grand Master again.10. The change icons will clear for the disabling points.11. If the key is updated, the change icon will clear on the "Lost Keys" page and the key isdisabled.
Lost Base Grand MasterFollow these steps if a base Grand Master key is lost:1. Find the base key inthe System Keyswindow, click on anon-linked section of itsrow, and choose "Lost."2. If the Grand Master was lost or stolen, a new one will be required to regain control of the system. If it wasdestroyed or broken, it is no longer a threat to the system.3. Click the "Save" button.4. If the GM was lost or stolen, a new Grand Master needs to be added to thesystem.5. Once a new GM is presented, the lost one will be moved to the "Lost Keys" list and the new base GM will beshown in system keys..
LocksThis section describes functionalities found under the Locks menu of CyberAudit-Web.
Lock PropertiesThis page displays the properties for an individual CyberLock and allows them to be edited.Serial - The unique ID of the CyberLock. This cannot be edited. The CyberLock can, however,be replaced by clicking on the link.Name - An identifier for the lock. The name selected here will also be displayed in the audit traildata downloaded from CyberKeys or downloaded from the CyberLock.Reset - Checking this box tells CyberAudit-Web that the CyberLock is to be reset. This willclear all access codes from the lock and return it to factory settings after updating it.Tag information is also displayed on this page. Use the item chooser to add or remove associationto tags. In the picture above, the A - Gate 3 lock is associated with two tags - Gates and Padlocks.Show in Matrix - Creates a filter in the Access Matrix to display the tags and people havingaccess to this lock and its associated lock tags.Audit Trail - Generates a report of audit trail data associated with the selected CyberLock.Comm Log - Generates a report of communication logs retrieved from the lock whendownloaded by a CyberKey, Grand Master, or CyberLock Programmer.Delete - Removes the selected CyberLock record after confirmation.
Multi-Key Mode and Open Delay SettingsMulti-key mode and open delay are advanced settings for a CyberLock.Multi-key mode - Indicates the number of user keys that must be presented to the CyberLockto open it.Each key must be presented to the CyberLock, then the first key must be returned to open it.The keys must be presented within a set time frame to open the lock.For 2 keys, the process must be completed within 60 seconds.For 3 keys, the process must be completed within 90 seconds.For 4 keys, the process must be completed within 120 seconds.Open Delay - Indicates the amount of time the key will wait between contacting an authorizedlock and receiving authorization to open it.When the key is presented to the lock, it begins a countdown timer.While that key is counting down, it may open other non-open delay locks. Contacting anotheropen delay lock will stop the countdown for the first lock and start a new countdown.After the countdown is complete, IrDA CyberKeys will beep for up to 5 minutes to indicate theyare ready to open the lock. Previous models will beep for up to 60 seconds. After the beepingtimes out, the key will no longer open the lock and the process must be started over.Additional Notes:Master keys bypass multi-key and open delay settings in locks.Locks will accept either a multi-key mode or an open delay - not both.
Add a Lock <strong>Manual</strong>ly1. Click on the "New" link in the "LocksList" page.2. Enter the serial number and name of the lock. Add any that should be associated with it as well. Click thetags"Save" button when finished.
3. Place a serial number label on thecylinder and the location sheet (seeInstallation Worksheet.pdf). Write thelocation the cylinder will be installed.4. Create a Programming Job that includes the new lock(s).
5. Update the CyberLock Programmer andenter the Job Number associated withthe new locks.6. Touch the locks once more to programthem into the system. Finally, updatethe Programmer Key to clear thechange icons.
To add locks with a Grand Master:Adding Locks with a Grand Master
1. to theAdd the Grand MasterCyberAudit-Web system with theoption to program new locks withone touch. Place the GM key's IRport in line-of-sight to the IR Encoderor insert it into the USB Station. Ifnot already running, launch theCyberLink program. Leave the fieldblank and click 'OK' when promptedfor a job number. The CyberLinkprogram will update the GrandMaster with the access codes for thecylinders.
2. Place a serial number label on thecylinder and the location sheet. Writethe location the cylinder will beinstalled. Then touch the GrandMaster to a cylinder. It will emit abuzz. A second touch will cause theGrand Master to siren. This is anormal and expected response.3. Now, the Grand Master contains theserial numbers of each newlyprogrammed cylinder it contacted. Ifnot still running, launch CyberLinkfrom the title bar and place the GMkey's IR port in line-of-sight to the IREncoder or insert it into the USBStation. The CyberLink program willdownload the serial numbers of allthe cylinders touched in the last stepinto the database. They will now bevisible from the Locks page withoutchange icons. You are now ready torefer to the location sheet to namethe locks in CyberAudit-Web.
1. Place a serial number label on thecylinder and the location sheet. Writethe location the cylinder will be installed.Then insert the Programmer into thecylinder. It will emit a short buzz sound.Repeat this for each cylinder.Adding Locks with a CyberLock Programmer
2. Now, the Programmer contains theserial numbers of each unprogrammedcylinder it contacted. Launch CyberLinkfrom the title bar and place the key's IRport in line-of-sight to the IR Encoder orinsert it into the USB Station. CyberLinkwill download the serial numbers of allthe cylinders touched in the last step.When the download is complete, thenew unprogrammed locks will be visiblefrom the Locks page, each of them withchange icons.3. After downloading, CyberLink willprompt for an 8 digit job number. Enterthe job number or the '11111111' (8ones) Job Number. This will loadprogramming instructions into theCyberLock Programmer for all the lockswith change icons (up to 1250 total).4. Touch the locks once more to program them into the system. Finally, update the Programmer Key to clear thechange icons. You are now ready to refer to the location sheet to name the locks in CyberAudit-Web.
Importing Lock DataCyberLocks and CyberPoints may be imported from a file to populate CyberAudit-Web or toupdate the names of existing locks. In addition, they may be tagged with one or more lock tagsusing the item chooser.The file format should be standard Comma Separated Values (as exported from most spreadsheetprograms).Each line is one row of data.Commas separate the fields.Fields with embedded commas must be surrounded by double quotes.Fields with embedded double quotes must have all the double quotes doubled then the entirefield is surrounded with double quotes.New-line and carriage return characters embedded in a field are not permitted.The import supports these fields; only Lock ID is required.FieldLock IDLocknameRequired InfoYesStarts with 'L' followed by 8 hexadecimal digits. Lower case letters in the ID will bepromoted to upper case.NoIf left blank the CyberLock or CyberPoint will be named with the ID. Names may be amaximum of 128 characters.If there are any errors on the import due to invalid ID or name formats, the error will be reported onthe Import Lock page and no rows from the import file will be inserted or updated.Once the locks are imported, they may need to be programmed with a Grand Master or CyberLockProgrammer.
Naming Locks1. Once the Grand Master or Programmer has finished downloading, the Access Matrix of the Web Professionalsoftware will display the serial number of each lock (and key in the case of the Grand Master) it has programmed.To name a lock, click the label for that lock.
2. Change the name field to reflect where the lock will be located. Add the cylinder to any tags it is associatedwith.3. Click the "Save" button.
Programming LocksProgram locks by:Using a Grand MasterUsing a CyberLock ProgrammerImporting from a CSV FileAdding <strong>Manual</strong>ly
Programming JobsProgramming Jobs are a means by which selected groups of CyberLocks can be configured ordownloaded. They provide a way to explicitly select the list of locks to process. It enables anadministrator to delegate the task of carrying out the job to others.Each Programming Job has a unique ID. When a CyberLock Programmer or Grand Master ispresented to a communicator, it will prompt for a Job Number. By entering this unique ID,CyberAudit-Web loads the key with the correct set of instructions.Each Programmer or Grand Master can accomodate Programming Jobs of up to 1250 locks.CyberAudit-Web recognizes a "reserved" Job Number of ' 11111111'. Using that number will set upthe Programmer or Grand Master with all of the CyberLocks in the system that need to beprogrammed, up to the 1250 lock maximum.Table Fields:Job Number - The number assigned to the Job. This number must be entered in thecommunicator that updates the Programming Key to load the correct Job into memory.Name - The name assigned to the Job.Type - Two types of Jobs can be created: Download and configure. Download Jobs capture theaudit trail events out of the selected locks. Configure Jobs update the selected locks to themost current system configuration.Number of Locks - The number of locks associated with the Job.Operations:New - Adds a new Job.- Creates a printable list of the programming jobs.Properties - Displays the details of the Job for editing.Delete - Removes the selected Job record after confirmation.How to Create a Programming Job
Related Topics:CommunicatorsDownloading LocksGrand MasterProgrammerProgramming Locks
Programming Job PropertiesThe Job Number is randomly generated when the Job is created and may be changed on thispage. This number will be entered at the keyboard or keyport when the Grand Master orCyberLock Programmer is presented to the communicator.A name may be given to the Job as well as comments.Two types of Jobs are available:Configure - A Configure Job updates locks that have change icons.Download - Download Jobs are used to download the audit trails from the locks in the Job.To select the locks for the current Job, use the item chooser to move them from "Available Locks"box to "Selected Locks". An additonal filter is available to reduce the list of locks in the list to onlythose with a pending change ( ).
Steps to Create a Programming Job1. Select "Programming Jobs" from the"Locks" menu.2. Click on the "New" link to open the "JobProperties" page.3. Make note of the Job Number which must be entered when loading a Job into a Programmer Key. Name the Job,if desired.
4. Choose whether to have the Job download the audit events from locks or program the locks with the latestconfiguration. Then use the item chooser to choose which locks to include in the Job and click the "Save" button.A filter is available to find locks quickly.5. Update the Programmer Key or GrandMaster and enter the Job Numberassociated with the locks.
6. Touch the locks.7. Update the Programmer Key or Grand Master again to clear change icons and/or add the audit information to thedatabase.
Downloading a CyberLock with a CyberKeyUse a Programmer or Grand Master to download locksClick on the "People and Keys" menu.Click on the person that is to downloada lock and select "Properties."Click on the "Lock to Download" link.
Click on the "This lock or CyberPoint" radial button and move the desired lock from the "Available Locks"section to the "Selected Lock" section.Click the "Save" button.Update the key.Touch the CyberLock or CyberPointwith the key and wait for the key tobeep, indicating it has finisheddownloading the events.Update the key again to load theevents into the database.
Steps to Reset CyberLocksCyberLocks are given access codes when they enter the CyberAudit-Web system. This preventsthem from being opened by unauthorized CyberKeys. If a CyberLock is to be removed from thesystem or is sent to the factory for service, it must be reset. These are the steps for resetting aCyberLock.1. Create a Programming Job. Alternately, use the '11111111' (8 ones) Job Number when updating the ProgrammerKey or Grand Master to load all locks that have change icons into the key.2. Find the lock in the list of CyberLocks.Click on the row and click 'Properties'from the menu.
3. Check the "Reset" checkbox and clickthe "Save" button.4. The lock is now marked for reset,indicated by the green check mark withthe yellow change icon.5. Update a Programmer Key using the'11111111' Job Number or the JobNumber that includes the lock to bereset.6. Touch the lock with the ProgrammerKey. A short buzz followed by threebeeps indicates the lock has been reset.Update the key once again to clear thechange icon.
Reset LockChecking the "Reset" checkbox notifies the system that a lock should be restored to its originalfactory configuration.A CyberLock Programmer with a Configure type programming job will reset locks in its list with thissetting.Why reset a lock?To move it to a different system or database.To return it to the factory in the event that service or exchange is needed.Additional Note:Resetting a CyberLock does not cause it to lose its audit trail; only its access codes.Steps to reset a lock
Change Icon Report for CyberLocksA Change Icon report is available when the record in the CyberLock listing page has a ChangeIcon. Clicking on the Change Icon brings up the report.The report compares current lock settings with the new ones. If the lock has a ProgrammingChange Loaded marked as true a new configuration has already been loaded into a ProgrammerKey or Grand Master and changes may not be reversed.
Lock Properties - TagsUse the item chooser to add and remove lock tag associations for the selected lock. To find tagsquickly, use the filter below the boxes.
Locks Bulk EditWith "Bulk Editing" a CyberAudit-Web administrator may apply the same settings and tags to aselected group of CyberLocks. Operations include:Reset - Checking this box tells CyberAudit-Web whether the selected CyberLocks are to bereset. Resetting clears the access codes from the lock and returns it to factory settings afterupdating it.Note: CyberPoints may not be reset.Tagged - Assigns or removes one or more lock tags to or from the selected locks.Delete All - Removes the selected CyberLocks after confirmation.
Lock TagsLock tags are used to group CyberLocks together both for management and function. CyberPointsmay also be tagged with Lock tags.Table Fields:Name - The name assigned to the lock tag.Locks / CyberPoints with this Tag - The number of locks or CyberPoints associated with thetag. Clicking a link here will open the Locks or CyberPoints list page with a filter applied so onlythe tagged items appear. For example, clicking the "2" in the "Common" row will display twolocks in the list.
People with Access - The number of people that have access to locks with this tag. Clickingthe link will generate a report listing the people who have access to the tagged lock(s) viaschedule and tag.Operations:New - Click to add a new lock tag.- Creates a printable list of the lock tags.Clicking in a row in the list of lock tags will display a drop-down menu of options that includes:Properties - Displays the details of the lock tag for editing.Show in Matrix - Opens the Access Matrix with a filter applied for only the selected tag.Audit Report - Generates a report of audit trail for the tagged locks.
People Access - Generates a report showing the people and people tags having accesspermissions to the selected tag. It is the same information as the Show in Matrix operation butshown in report form.Comm Log - Generates a report of CyberLock status retrieved from all of the tagged lockswhen downloaded by a CyberKey, Grand Master, or CyberLock Programmer.Locks tagged - Opens the Lock list page with a filter applied to show only the tagged locks.Delete - Removes the selected lock tag record after confirmation.Related Topics:Adding LocksCyberLock CleaningReset a LockTags
Lock Tag PropertiesA tag's name can be changed on this page. Locks and CyberPoints not tagged are listed in the"Available Locks" frame of the item chooser. CyberPoints and locks that are tagged are in the"Selected Locks" frame. Locks can be quickly found using the filter.
Replace LockOne lock may be replaced with another lock, keeping all the settings, key access permissionsand tag associations.A lock already in the database may be used to replace another lock.If settings are different, the new lock may need to be updated after replacing the old lock.
View Audit Trail Data for CyberLocksView data beginning ... and ending - Only the audit trail data since the beginning date throughthe end date will be shown.View Data Downloaded from keys/locks - Data from CyberKeys is retrieved each time aCyberKey is programmed with a Communicator. Data from the lock must be retrieved explicitlythrough instructions to a CyberKey, Grand Master, or CyberLock Programmer.View dates and times not rendered to a time zone - By default, CyberAudit-Web attempts torender all times retrieved from CyberKeys and CyberLocks to a Time Zone. The accuracy of thisprocess depends on having accurate time zone information either in the database, the key, orboth. In some cases time zone information might not be available. Examples of this include:Times from audit data prior to programming a CyberKey for the first timeTimes from lock audit data where the key is not and never was a member of the databaseCyberAudit-Web Professional has always recorded the raw value of dates and times from audittrail data as retrieved from CyberKeys and CyberLocks. Check this box to view this data withoutrendering it to a time zone.View repetition count for each event - Audit trail events are recorded by CyberKeys andCyberLocks with a 2 second resolution. If the same event happens more than once within that 2second window, CyberAudit-Web increments a counter within the same record. This is called a"repetition count." Keys or locks with recurring repetition counts may indicate poor contact and maybenefit from cleaning.
Programmed or DownloadedThis column of the lock audit trail specifies whether the lock was programmed or downloaded. If itwas programmed it will show C, if it was downloaded it will show D.Related Topics:Audit Trail EventsReports
Communication LogsWhen a CyberLock or CyberPoint is downloaded, a record is kept of the download "session." Thesession information is viewable from the Communications Log.Date and Time Downloaded by CyberAudit-Web - This is the date and time thatCyberAudit-Web pulled the audit trail data from the CyberKey, Grand Master, or CyberLockProgrammer and recorded it in the system.Key - The CyberKey, Grand Master, or CyberLock Programmer that downloaded the lock.Records Added to the Database - A CyberLock holds up to the most recent 1100 events in itsmemory. This memory is never cleared but the oldest record is overwritten. If the count ofrecords reported in this field is near 1100 events, it is likely the older records have beenoverwritten with the newer ones. This count will never report exactly 1100 because:Some records in the lock's memory are used to store the date of the resulting date andtime.Records with identical key IDs, timestamps, and audit trail events are only recorded oncein the database.Lock is Programmed - Indicates whether the lock has been secured with access codes. If noinformation was captured when the lock record was written, this field will be blank.Access Codes - Indicates which access codes have been programmed into the lock.1 - The lock contains a system code. This indicates the locks came from a system wheremanual passwords were entered.2 - The lock contains an access code. All programmed locks will contain this code.3 - The lock contains a secondary access code. If there is no This indicates the lockseither came from a system where a Grand Master was the source of the access codes ora CyberAudit-Web Enterprise system.If this information was not captured when the lock record was written, this field will be blank.Lost Keys - The number of individual lost keys currently programmed into the lock. If thisinformation was not captured when the lock record was written, this field will be blank.Mode/Delay - Indicates whether multiple keys are required or a delay has been set in the lock.If this information was not captured when the lock record was written, this field will be blank.MKDS - Indicates whether a multi-key setting requires each key present a different schedule. Ifthis information was not captured when the lock record was written, this field will be blank.Access Count - The CyberLock increments this counter each time it authorizes a CyberKey toopen it. This can be an indicator of the number of openings the CyberLock has had over its life.
CyberPointsA CyberPoint is an electronic tag designed to serve as a data checkpoint during security guardtours. CyberPoints differ from CyberLocks in that:There is no need to program CyberPoints. They are ready to install and use.They have no moving parts.They have no editable settings.CyberPoint User Tips
CyberPoint ListThis page displays the CyberPoints in the system.Operations -Page Navigation is controlled by the arrows bracketing thelink. Clicking the linkwill open more options including browsing to the first and last pages, selecting a page to jumpto, or the number of CyberPoints per page.New - Click to add a new CyberPoint.- Creates a printable list of the CyberPoints displayed on the page, excluding those notseen because of any applied filters.1.2.Clicking in a non-linked section of a CyberPoint row will display a drop-down menu of optionsfor the CyberPoint that includes:Properties - Enables editing the CyberPoint name and tags.Audit Trail - Generates a report of audit trail data associated with the selected CyberPoint.Comm Log - Generates a report of CyberPoint status retrieved from the CyberPoint whendownloaded by a CyberKey, Grand Master, or CyberLock Programmer.Delete - Removes the selected CyberPoint record after confirmation.Filters -Two types of filters are available to help find a CyberPoint or set of CyberPoints quickly:Filter by Keyword - Use the list filter to reduce the number of CyberPoints displayed.Filter by Tag - A lock tag may be used separately or in combination with a Keyword filter tofurther reduce the list. If lock tags are defined they will be shown to the left of the list ofCyberPoints. Click on one of them to reduce the list to CyberPoints with that tag.
To remove all filters, click on the Remove Filter link near the page controls at the top of the list.
CyberPoint PropertiesThis page displays the properties for an individual CyberPoint and enables editing them.Serial - The unique ID of the CyberPoint. This cannot be editedName - An identifier for the CyberPoint. The name selected here will also be displayed in theaudit trail data downloaded from CyberKeys or downloaded from the CyberPoint.Tag information is also displayed on this page. Use the item chooser to add or remove associationto tags.Audit Trail - Generates a report of audit trail data associated with the selected CyberPoint.Comm Log - Generates a report of CyberPoint status retrieved from the lock whendownloaded by a CyberKey, Grand Master, or CyberLock Programmer.Delete - Removes the selected CyberPoint record after confirmation.
PeopleThe People section of CyberAudit-Web provides a way to manage both key holders andadministrators.
PeopleThis page displays information about people and the CyberKeys associated with them.Table Fields:Name - The person's name.Key Serial/Issue Number - The CyberKey the person uses. The serial number will start with a'K' whereas issue numbers are 8 digits.Change Status - If the system has information for the key but the key has not yet beenupdated, a yellow 'c' icon appears in the column. Clicking on the change icon for the lock bringsup a change icon report for the CyberKey.Next Expiration - The date the key is set to expire.Master Key - Displays a check mark if the key is a master key.Tagged With - Lists the tags associated with the key.Operations:Page Navigation is controlled by the arrows bracketing thelink. Clicking the linkwill open more options including browsing to the first and last pages, selecting a page to jumpto, or the number of people per page.New - Click to add a new record.
- Creates a printable list of the people records displayed on the page, excluding those notseen because of any applied filters.Clicking in a non-linked section of a People record will display a drop-down menu of operations:Properties - Displays editable details of the selected person.Show in Matrix - Displays the Access Matrix with a filter applied for the selected person todisplay the tags and locks this person and this person's tags may access.Accessible Locks - Generates a report showing the person's access permissions to locksand Doors via the Access Matrix, tags, and master key. Clicking on the link shows the details ofthese access permissions sorted by lock.Audit Report - Generates a lock access audit trail logged for the person.Comm Log - Generates a report of key status logged by communicators when a CyberKeyis downloaded.Delete - Removes the selected People record after confirmation.Filters -Two types of filters are available to help find a person or set of people quickly:1.2.Filter by Keyword - Use the list filter to reduce the list of people displayed.Filter by Tag - A people tag may be used separately or in combination with the list filter tofurther reduce the list. If people tags are defined they will be shown to the left of the list ofpeople. Click on one of them to reduce the list to people with that tag.To remove all filters, click on the Remove Filter link near the page controls at the top of the list.Related Topics:Add a PersonCommunicatorsDownloading LocksInformation About CyberKeysLost KeysPeople Options
People TagsTagsUpdating Keys
People DetailsProperties for a people record includes information about the person, their tags, and theirCyberKey.Key or Card section - One CyberKey or RFID access card may be issued to each person. Itssettings are controlled in this frame.How to issue a CyberKey or RFID Access CardReplace - Replaces the key if it is lost or broken. The new key will automatically have the samesettings and schedules as the replaced key.Hardware info - Design model and firmware version can be helpful during troubleshooting.Expiration - The date the key will expire.Behavior - Displays whether or not the beeper is on and how long a key will hold the solenoidof a lock open.Master Key Mode - Displays whether or not the key is a master key and the schedule it isrestricted by, if applicable.Locks to Download - This shows the locks the key is to download.Lost Key - Shows if the key is marked as lost in the system.Delete - Allows removal of the current key from the system, after confirmation.
Person section:Name - The person's name will appear in the system and in email notifications exactly how it isdisplayed here.Email - If email notifications are enabled, this is the address to which corresponding emails willbe sent.PIN - If PINs are required to update keys, this is where they are assigned. PINs increasesecurity because they authenticate that the person updating the key is the same personassigned to have that key.Phone Number - A phone number the person can be reached at.Department or ID - An identifier such as employee ID. This field may used to identify the uniquePeople record. It is called personnel ID when using people import operations.Address - Home address.Notes - Any additional information pertaining to the person.Tags - The tags associated with the person are listed in the "Selected Tags" window. Availabletags are listed in the "Available Tags" window. A filter is available for finding tags quickly.Show in Matrix - Displays the Access Matrix with a filter applied for the selected person todisplay the tags and locks this person and this person"s tags may access.Accessible Locks - Generates a report showing the person's access permissions to locksand Doors via the Access Matrix, tags, and master key. Clicking on the link shows the details ofthese access permissions sorted by lock.Audit Trail - Generates a lock access audit trail logged for the person.Comm Log - Generates a report of key status logged by communicators when a CyberKeyis downloaded.Delete - Removes the selected people tag record after confirmation.
Adding People and Keys1. People can be added to the databasemanually or by importing a commaseparated values file. To add peoplemanually, select "People" from the menu.2. Click the "New" link.3. There are three options for key assignments:No key - The person has no key assigned to them.Issue by number - An issue number is assigned to this person. The first time the key given to theperson makes contact with the database, the issue number must be entered for the key to beupdated. This allows the administrator to grab any unassigned key and give it to a person. Afterconfiguration, the issue 5 number will be replaced by the key's serial number in the "PeopleProperties" page.Enter serial number - <strong>Manual</strong>ly entering the serial number of the key will allow the person to updatethe key the first time without needing an issue number. Use this method only if specific keys arebeing assigned to people.
4. Click "Apply."5. There are several areas to define how a key may behave. For example, clicking "Expiration" will open a form thatdetermines how often a key carrier will need to update and download their key. Reminder: The frequency ofexpiring a key addresses security, key control, most recent data in the database, and lost keys.This form allows configuration of Expiration, behavior, master key capability, locks to download, and lost keys.6. Click "Apply."
7. Update the KeyUpdate through issuenumberUpdate through manually enteredserial number
Importing Personnel DataPeople records may be imported from a file to populate CyberAudit-Web or to update the names ofexisting records. In addition, they may be tagged with one or more people tags using the itemchooser.The rules are as follows:Each line is one row of data.Commas separate the fields.Fields with embedded commas must be surrounded by double quotes.Fields with embedded double quotes must have all the double quotes doubled then theentire field is surrounded with double quotes.New-line and carriage return characters imbedded in a field are not permitted.Data is controlled through the first data column referred to as 'personnel ID'. This columnmust contain data and must be unique. Data is appended, changed, or removed based onthese rules:A row with a personnel ID that is not in the system will insert a record with the datafrom that row. It must also contain data in the first column (name).A row with a personnel ID that is in the system will update the record with any data inthe included columns. Columns with no data will not be changed.A row with a personnel ID that is in the system with no other data will delete the recordafter a confirmation.
Fields are read in the following order. All fields use the string datatype. Values are written into thedatabase as they are read; any more than 15 fields on a line are ignored. A field with no value, anempty string or fields with missing values (fewer than 15 values in a row) will be written as anempty string. Values longer than the max size for the field will be truncated. The name field isrequired; a row with an empty name is ignored. If there are any errors parsing or inserting thevalues from a file, all changes made for the file are rolled back. If there is an existing person in thedatabase with the same name, the row is either ignored or (if the overwrite box is checked) valuesare overwritten.FieldnoField NameMaxsize Details1 personnel ID 64 A string value. Leading and trailing spaces are removed.2 name 643 department 2554 email address 2555 address 2556 phone number 647 PIN 8 4 to 8 digits8 notes 2559user defined 1 (Enterprise only -leave this field empty for CAW 255 optionalProfessional)10user defined 2 (Enterprise only -leave this field empty for CAW 255 optionalProfessional)11user defined 3 (Enterprise only -leave this field empty for CAW 255 optionalProfessional)12user defined 4 (Enterprise only -leave this field empty for CAW 255 optionalProfessional)13user defined 5 (Enterprise only -leave this field empty for CAW 255 optionalProfessional)14 CyberKey ID 9optionalThis field is only used to issue a key.15 key name 128 optionalOnly applies to a key added with a value in column 14.optional16 card RFID 64This field is only used to issue a card to a person. AnRFID card may not be issued if the person already has aCyberKey.17 card name 64optionalOnly applies to a card added with a value in column 16.18 door access number 16optional(Enterprise only - leave this field empty for CAWProfessional)
People and Keys Bulk EditThis page allows the selected people from the people list page to be modified in one"bulk"operation. If no filter was applied, every People record in the system will be affected by thechanges. Key expiration, Behavior, Master key mode, and Delete are all operation options for abulk edit. Tags may be applied or removed from the selected people using the item chooser.
People TagsPeople tags are used to group keyholders together both for management and function.Table Fields:Tag Name - The name assigned to the people tag.People with this Tag - The number of people associated with the tag.Clicking the link in the "People with this Tag" column will open the People page filtered so only thepeople with that tag appear. For example, clicking the "7" in the "Airport Staff" row will show the 7people tagged with Airport Staff.
Clicking the link in the "Locks with Access" will generate a report listing which locks the peoplehave access to via which schedule and tag.Operations- Click to add a new people tag.- Creates a printable list of the people tags.Clicking in a row in the list of people tags will display a drop-down menu of options that includes:Properties - Displays the details of the people tag.Show in Matrix - Opens the Access Matrix with a filter applied for only the selected tag.Accessible Locks - Generates a report showing the access permissions granted to thetage for locks and Doors via the Access Matrix.Audit Report - Generates an audit trail report for People associated with the tag.Comm Log - Generates a report of key status logged by communicators when a CyberKeyis downloaded for all keys associated with this tag.People Tagged - Opens the People window with a filter applied to show only the peopleassociated with this tag.Delete - Removes the selected people tag record after confirmation.Related Topics:Add People and CyberKeysCyberKeysPeopleTag Definition
People Tag PropertiesA tag's name can be changed on this page. The people not currently associated with the selectedtag are listed in the "Available People" box. The people that are associated with it are in the"Selected People" box. People can be quickly found using the filter.
People with this TagPeople that don't belong to the selected tag are listed in the Available People box while everyonewho does belong is listed in the Selected People box. Use the arrows between the two boxes toadd or remove people from the tag. Filters can also be used here. Typing letters in the Keywordsbox will filter people names. A tag may also be chosen that will list people that belong to that tagbut not the currently selected one in Available People. People that belong to both tags appear inSelected People. For example, in the picture below, Martha Keller belongs to both the HumanResources and Night tags.
CyberKeysThis section contains information enabling, configuring, and manageing CyberKeys.About CyberKeysAdd a PersonCommunicatorsDownloading LocksInformation About CyberKeysLost KeysPeople TagsTagsUpdating Keys
Issue NumbersAn issue number is a unique, 8-digit number generated by CyberAudit-Web and linked to the key holder'srecord. With Issue Numbers, the administrator can give the key holder any CyberKey not already in thesystem.When the the CyberKey is presented to a communicator, it will prompt the user for an "ISSUE#". When avalid Issue Number is entered, the CyberKey will be programmed with the access privileges granted by theadministrator. During this communication, the CyberKey's ID will replace the Issue Number in the key record.Related Topics:Adding People and KeysMissions
Replace KeyThe Replace operation in CyberAudit-Web issues a new key to a person that has the samepermissions and settings as their previous key. In addition, it marks the previous key as lost.Without taking further action, if the previous CyberKey is presented to a communicator it will beautomatically disabled.Replace with Issue Number - Select this option if an issue number will be used for thereplacement key.Replace with entered Serial Number - Select this option to enter a serial number for thereplacement key.Click "Save" to complete the operation. The new CyberKey must be updated at a communicator tocomplete the replacement and make the new key operational..
Change Vault Access NumberVault Access Numbers are used in combination with a Flex System Keypad/Display and Vault tocheck out a CyberKey. To change that number, use the text box in the Change Vault AccessNumber page.
Assigning Master Key AccessFollow these steps to assign master key access to a CyberKey:1. Click on the People & Keysmenu.2. Click on the desired personnel record and select Properties from the clickmenu.If the person or key has not yet been added, click here for instructions.3. Click on the Master Key Modelink.4. Click on the Set as master key checkbox.5. Select a schedule of days and times during which the master key will operate(Optional).6. Click "Save."
Change Icon Report for CyberKeysA CyberKey gets a change icon when some action or operation in CyberAudit-Web affects thedesired settings in the key. The Change Icon report for a CyberKey shows the category of changethat caused the key to require an update.
Lost KeysThis page enables designating a key as "lost." A "lost" key in CyberAudit-Web is automaticallydisabled when it contacts a communicator. In addition, locks may be programmed to disable thatkey. When the key contacts one of these disabling locks, the key is denied access and becomesdisabled for all of its access permissions.Select "This key is Lost (with the following disable points)" to toggle the key as lost. If the key isfound again, its "lost" status may be toggled with the selection "This key is not Lost." AnyCyberLocks programmed as disable points must be programmed again to remove that key ID fromtheir list.Steps to designate a lost key and program disabling points
Designating a Lost Key with Disabling PointsWhen a key is lost, it may be designated as lost in CyberAudit-Web. Doing so tellsCyberAudit-Web to disable that key if it docks with a communicator.Lost System Key InstructionsMark a Key as Not Lost and Reset Disabling Points1. Find the key inthe Keyswindow, clickon its row, andchoose"Properties."2. Click the LostKey link in theKey or Cardsection of thePropertiespage.
3. Select the This key is Lost option. Check the box to automatically create a Programming Job Number, if desired.Then choose which locks should be set as disabling points. When the key contacts one of these disabling locks, thekey is denied access and becomes disabled for all of its access permissions.4. Click Save.5. The disablingpoints will bedisplayed toconfirm theselected lockswill need to beupdated. ClickSave toproceed. Thiswill causechange iconsto appear forthe designatedlocks.
6. The key is now marked as lost and is a member of the CyberAudit-Web Lost Keys list. If it is updated at anycommunicator, it will be disabled.7. Update the Programmer Key or Grand Master using the Programming Job associated with the lost key.
8. Touch thelocksdesignated asdisablingpoints with theProgrammer orGrand Master.9. Update the Programmer Key or Grand Master again.
10. The change icons will clear for the disabling points.11. If the key isupdated, thechange iconwill clear onthe "LostKeys" pageand the keyis disabled.Additional Notes:Locks can be designated as disable points for a maximum of 16 keys.If a key is found again, the key may be removed from a lock's disable list. When all locks arecleared for that key, the key may be used again in the system.Locks with that key in their disabling list must be reprogrammed to remove that key.Otherwise, the key will become disabled again when it touches one of those locks.Remove the Locks from the Disabling Lock List
How to Mark a Key as Not Lost and Reset Locks from being Disabling Points1. Go to the LostKeys page.2. Find the lost key and select Properties.
3. Select the This key is not Lost radio button. And click on the Create Programming Job checkbox. Make note of the number - thisnumber used to clear the key ID from the lock's list of lost keys. Click Save.4. Update a GrandMaster orCyberLockProgrammerusing the jobnumber createdin step 3.
5. Update the locks that were set as disabling points. Important - if the key touches a lock that is still set as a disabling point, the kwork in ANY lock until the key is updated again.6. Update the keyagain tosynchronizewithCyberAudit-Weband clear anylock changeicons.
CyberKey Behavior SettingsCheck off Enable Beeper to turn off CyberKey sounds during operation. The key will continue tomake sounds during communications.The Solenoid Hold Time is the length of time that the lock pin is held in the open position beforere-latching. Typically, the minimum setting of 1 second is adequate and provides the best batterylife.
Lock to DownloadCyberKeys with product ID 105 or greater can download a CyberLock. They may download:None - No locks will be downloaded.All accessible locks and CyberPoints - Data from each accessible lock or CyberPoint willdownloaded and saved until there is not enough free memory left in the key to hold a full lockdownload (1100 events).A specific lock or CyberPoint - Selected from the list of locks accessible by the key.Note: CyberKeys must have access to locks they are to download.Steps to download a CyberLockDownloading a specific lock is a one-time job. Once the key has downloaded the lock and the keyhas been re-configured by a communicator, the instruction to download the lock is cleared. Use aprogramming job to keep a persistent instruction to download a specific set of locks.
How to Issue a CyberKey to a Person1.From the "People List" page, click the row of the person the key will be assigned to and choose "Properties."2. There are five options for assigning a CyberKey:No key - The person has no key assigned to them.Issue key by number - An issue number is assigned to this person. The first time the key given to theperson makes contact with the database, the issue number must be entered for the key to be updated. Thisallows the administrator to grab any unassigned key and give it to a person. After configuration, the issuenumber will be replaced by the key's serial number in the "People Properties" page.Enter key serial number - <strong>Manual</strong>ly entering the serial number of the key will allow the person to update thekey the first time without needing an issue number. Use this method only if that specific key is being givento the person.Enter vault access number - A vault access number may be used with a Flex System Vault and a KeypadDisplay or a Knob and Display.Issue RFID Access Card - An RFID access card may be used at a Flex System Vault or a Single Key Vaultin lieu of issuing a CyberKey. Any RFID reader in the system may be used to read the card ID and enter itinto the system. When prompted, it will read and store any card ID that is not already in the system. Or thecard ID may be entered manually from the keyboard.
Note: CyberKey issue numbers, vault access numbers, and door access numbers must be collectively unique.3. Click Apply
4. Update the Key or check one out from a Vault.Update through issue numberUpdate through manually entered serialnumber
Lost Keys ListThis page is the list of all CyberKeys that have been marked as "lost" in the system. Keys may bemarked as lost either directly or by using the Replace operation.Table FieldsKey Serial - The ID or serial number of the lost key.Change Status - A change icon indicates the lost key is still "at-large." CyberAudit-Web has noconfirmation that the key has been disabled. CyberAudit-Web knows that a lost key has beendisabled when:A communicator programs the key after it has been marked as lost....or...A CyberLock programmed as a disabling point is downloaded and the audit trail containsa "Key disabled" event for that key.Next Expiration - Indicates when the CyberKey will expire. After expiration the key is no longera threat to open locks.Key Type - Indicates whether the lost CyberKey is a Grand Master, a reset key, or a "Standard"CyberKey issued to a key holder.Master Key - A check mark ( ) indicates the lost key is a master key.Last Issued To - The name of the person who had the key when it was designated as lost.Disable Points - The number of CyberLocks that have been designated as disable points.Operations -- Creates a printable list of the lost keys.Clicking in a non-linked section of a Lost Key record will display a drop-down menu of operations:Properties - Displays the editable details of the lost key.Audit Trail - Generates a lock access audit trail logged for the key.Comm Log - Generates a report of key status logged by communicators when a CyberKeyis downloaded.Delete - Removes the lost key record after confirmation.
Steps to designate a lost key and program disabling points
Updating a Key by Issue Number1. The issue number appears in the properties page as well as the People List. Any unassigned key may be given toa key holder when using an issue number. The issue number serves as a place holder for CyberAudit-Web untilthe real key ID is presented at the communicator.2. Click on "Launch CyberLink" tostart the software.3. The user must update the keybefore it will gain access to thedesignated locks.
4. When prompted, enter the issuenumber associated with theperson's key.6. The change icon is now clearedin the People List and the issuenumber has been replaced withthe key's serial number.
Updating a Key1. The key holder must receive thekey with the correct serial numberand update it before it will gainaccess to the designated locks. Ifusing an IR Encoder or USBStation, Click the "LaunchCyberLink" link to start the software.2. Update the key.3. Once configuration is complete,CyberLink will indicate the updatewas a success. If using anAuthorizer, "KEYREADY" willappear on the keyport display.
4. The change icon is now cleared inthe People List.
View Audit Trail Data for CyberKeysView data beginning ... and ending - Only the audit trail data since the beginning date throughthe end date will be shown.When viewing data from CyberKeys, certain data may be added to the audit trail in addition toaccess activity:View battery and reset events - Checking this box adds CyberKey system events to the auditreport. These include events about the battery level and other CyberKey system level logs.View dates and times not rendered to a time zone - By default, CyberAudit-Web attempts torender all times retrieved from CyberKeys and CyberLocks to a Time Zone. The accuracy of thisprocess depends on having accurate time zone information either in the database, the key, orboth. In some cases time zone information might not be available. Examples of this include:Times from audit data prior to programming a CyberKey for the first timeTimes from lock audit data where the key is not and never was a member of the databaseCyberAudit-Web Professional has always recorded the raw value of dates and times from audittrail data as retrieved from CyberKeys and CyberLocks. Check this box to view this data withoutrendering it to a time zone.View repetition count for each event - Audit trail events are recorded by CyberKeys andCyberLocks with a 2 second resolution. If the same event happens more than once within that 2second window, CyberAudit-Web increments a counter within the same record. This is called a"repetition count." Keys or locks with recurring repetition counts may indicate poor contact and maybenefit from cleaning.<strong>Inc</strong>lude key communication events - Checking this box adds CyberKey communication eventsto the audit report. This includes CyberKey system events about downloading data and loading anew configuration.
Audit Trail Events from CyberKeysCyberLock Events-10EventWrite EventFailedDescriptionFailure to write to memory. Applies to CyberKeys manufactured after October2008.-9 E2 Access Failure to read memory. Applies to CyberKeys manufactured after October 2008.-7 Power restored-6 Software reset-5ScheduledBatteryReading-4 Dead Battery-3 Low Battery-2 CyberPointContact1 Reset2 Multi-keyaccess key 13 Multi-keyaccess key 24 Multi-keyaccess key 35 Multi-keyaccess key 46888Authorized toopenAuthorized toopen (bypassmultikey)Authorized toopen (bypassdelay)Authorized toopen (b)When the key comes up from low or no voltage, the processor starts and triggersthis event. Applies to CyberKeys manufactured after October 2008.A reset of the key at the factory during manufacture or service. Lock columncontains voltage data from battery and capacitor. Applies to CyberKeysmanufactured after October 2008.The key reads and records its battery level daily, after midnight local time. Lockcolumn contains voltage data from battery and capacitor. Applies to CyberKeysmanufactured after October 2008.The battery voltage dropped below operating voltage during one of it periodicreads or during a lock opening. If the read was during a lock opening, the keyemitted a single high tone beep followed by a low tone beep once every eightseconds for one minute. Lock column contains voltage data from battery andcapacitor. Applies to CyberKeys manufactured after October 2008.The key's battery was below its threshold during one of the key's periodic reads orduring a lock opening. If the read was during a lock opening, the key emitted a lowtone beep once every eight seconds for one minute. Lock column contains voltagedata from battery and capacitor. Applies to CyberKeys manufactured after October2008.Contact with a CyberPoint or contact with a lock using a CyberPoint schedule.For keys manufactured after October 2008 this is a non-power related CPU reset.For keys manufactured before that time it is a general reset that applies to all thecategories shown below as event -2 to -20.The first key for multi-key access was accepted by the lock.The second key for multi-key access was accepted by the lock.The third key for multi-key access was accepted by the lock.The fourth key for multi-key access was accepted by the lock.Lock has a multi-key setting bypassed from instruction in schedule.Lock has a delay setting bypassed from instruction in schedule.Lock had no multi-key or delay setting when key was configured. Key wasconfigured to bypass multi-key or delay for this lock.*
791011121314Master keyauthorizedProgrammer orCyberPointcontactLock resetattemptedUnprogrammedlock -authorizedNo lock ID -authorizedKey in lockmore than 1minute -orremovedfromlockAccess codefailedProgrammer contact -or- Contact with lock using a CyberPoint schedule. Keybeeped 3 times.Subsystem reset keys only.If a key is operating within its key schedule (i.e. not expired) and if the key is notdisabled, it is automatically authorized to open a lock that is not programmed.This event should never occur. It indicates that the lock was not set up with an ID.It cannot be programmed and will not function in a CyberAudit system.Keys in a subsystem may be configured to report all "removed from lock" events.The message text will depend on this settingThis message will occur if:*A lock contains different access codes than expected by the databasebecause it has been moved to or from a different database.The lock has been updated with new access codes but the key has not.The lock does not contain the access code that a master key isprogrammed to use.15Keyauthorizationfailed/blockedby lockThe key has been disabled either by:1.2.The lock because the key was designated as "lost" and the lock wasdesignated as a disabling point orDisabled when updating and removed from the communicator beforeupdating was complete.1617Hardwaremismatch -access deniedOut ofschedule forlockThis event should never occur. It indicates manufacturing difference between lockand key.The key found the lock ID in its lock list but the time of contact with the lock wasnot during the associated schedule valid operating time.the time frame did not match the current timethe day did not match the current dayit is before the schedule is to beginthe schedule has expired18Key expired orout of scheduleIf it is a master key, it could generate this event if:the key schedule time frame did not match the current timethe key schedule day did not match the current dayit is before the key is to begin operatingthe key has expired
19Access Denied- NoPermissions20 Key disabled21Access countexpendedThe ID of the Lock was not found in the key's lock list.This is a special "out of schedule" condition set by communicatorsto disable aCyberKey when it prompting for a PIN or returning a CyberKey to a Vault.Applies to one-time access and fixed-use countdown schedules.Audit Trail Events from CyberLocksCyberKey EventsEvent34 Multi-keyaccess key 135 Multi-keyaccess key 236 Multi-keyaccess key 337 Multi-keyaccess key 4384040403941424344Authorized toopenAuthorized toopen (b)Authorized toopen (bypassmultikey)Authorized toopen (bypassdelay)Master keyauthorizedProgrammer orCyberPointcontactLock resetsuccessfulUnprogrammedlock -authorizedNo lock ID -authorized46 Access denied47KeyauthorizationblockedDescriptionThe first key for multi-key access was accepted by the lock.The second key for multi-key access was accepted by the lock.The third key for multi-key access was accepted by the lock.The fourth key for multi-key access was accepted by the lock.The key was granted access and no multi-key or delay lock setting was found.Lock had a multi-key setting which the key bypassed from an instruction in theschedule corresponding to the lockLock had a delay setting which the key bypassed from an instruction in theschedule corresponding to the lockProgrammer contact -or- Contact with lock using a CyberPoint schedule. Keybeeped 3 times.System reset keys only - if a reset key grants access but does not successfullyreset the lock, the lock will record a "Master key authorized" event.This event should never occur. It indicates that the lock was not set up with an ID.It cannot be programmed and will not function in a CyberAudit system.The lock reports this event when it receives a "bad access code." Keys in asubsystem may be set to generate"no access" events in locks they are notpermitted to open. In those cases where access is denied, they send a "badaccess code" to the lock to generate this event.The key has been disabled by the lock because the key was designated as "lost"and the lock was designated as a disabling point.***
48257Hardwaremismatch -access deniedNo overlapwith previouslock downloadThis event should never occur. It indicates manufacturing difference between lockand key.This will happen if the lock has rolled over since the last time it was downloaded. Itindicates there is a gap in the data retrieved from the lock.Other audit trail event types:Vault 1 audit trail eventsComm Link audit trail eventsWeb Authorizer audit trail eventsFlex System audit trail eventsLAN Authorizer audit trail events
CyberKey Communications LogThe Communications Log shows information regarding CyberKey update activity. Each row is arecord of the a communication that shows the key's ID, a timestamp, the battery voltage, what thekey's clock was at the time of download, where it was downloaded, how many audit events wererecorded, the time zone, and any communications errors.
Updating CyberKey FirmwareUpdating the firmware is available only for CyberKey Rechargeable and CyberKey Plus keys.Note: The key must be downloaded first because the firmware can only be updated if no eventsexist in the key.1. Launch CyberLink.2. If events exist in the key'smemory, download them.Select "Settings..." from the"Options" menu.3. On the end of the URL, add"FW_Upgrade"(case-sensitive).
4. Present the key to the IREncoder.5. When prompted, choose thedesired FW version and clickthe "Proceed" button.6. When prompted, remove thekey.Note: Reconfigure the keyonce the update is complete toreload its access. Remember toremove the "FW_Upgrade"from the URL in the settingspage.
RFID Access CardsRFID Access cards can grant access to CyberKey Vaults .
RFID Access CardsCyberAudit-Web uses RFID Access Cards to gain access to products like the Single CyberKeyVault, and RFID readers in the Flex System.A CyberAudit RFID Reader may be used to read the ID of RFID Access Cards to assign the cardsto people.
Supported RFID Access Cards<strong>Videx</strong>® products such as the Single CyberKey Vault and the CyberKey Vault 20 FX, and the RFIDReader of the CyberLock Flex System read the ID from RFID Access Cards. The following cardsmay be read and decoded by <strong>Videx</strong> products:13.56MHz - ISO/IEC 14443 format type A and B cards including:MIFARE Classic Type A and B.Legic®13.56MHz - ISO 15693 format cards including:I-CODENote: <strong>Videx</strong> RFID readers may not be able to retrieve the ID of RFID Access Cards with additionallayers of encryption or operating system dependencies. Examples of this include:MIFARE DESFire and MIFARE DESFire EV1FIPS security above 'BASIC CHUID'TWIC security levels 2, 3, 4Any card technology that uses Secure Identity Object (SIO) wrappersUsing CyberLink as an RFID Card Reader
Steps to Assign an RFID Access Card1. From the "People List" page, click the row of the person the RFID Access Card will be assigned to and choose "Properties."2. There are four options for key assignments:No key - The person has no key assigned to them.Issue by number - An issue number is assigned to this person. The first time the key given to the personmakes contact with the database, the issue number must be entered for the key to be updated. This allowsthe administrator to grab any unassigned key and give it to a person. After configuration, the issue numberwill be replaced by the key's serial number in the "People Properties" page.Enter key serial number - <strong>Manual</strong>ly entering the serial number of the key will allow the person to updatethe key the first time without needing an issue number. Use this method only if that specific key is beinggiven to the person.Issue Card - An RFID access card may be used at a Single Key Vault in lieu of issuing a CyberKey.Normally CyberLink should be used to read the card ID and enter it into the ID field.Choose Issue Card to issue an RFID Access Card.
3. Click Apply4. Scan an unassigned RFID card at any Vault or RFID reader in the system or click the link to enter the IDmanually.
Schedule Access/ExpirationThe Access Section of CyberAudit-Web brings together three components that control access toLocks:Schedules - Time frames whithin which access will be grantedHolidays - Special dates which may be used as exceptions to times when access is normallypermitted by a scheduleAccess Matrix - A graphical grid where the intersection of locks and people may be used toassign a schedule and thereby grant access to the lock
Schedule PropertiesSchedules should be given a descriptive name and can appear as either a letter or "Icon" in theAccess Matrix. Icons may be added or deleted using the link that appears when working withicons. Time frames are used by schedules to specify when a key can gain access to locks.
Add or Edit HolidaysEnter the holiday's name and date then choose if it is recurring every year or just once. Manyholidays are on the same day every year.
Adding Holidays1. To add a holiday, click "Holidays" from the "Schedules"drop down menu.2. Click the "New" link.3. Type the name of the holiday and choose the appropriatedate.4. Click the "Save" button.
CyberAudit-Web Global SchedulesCyberAudit-Web includes three global schedules which cannot be removed or edited. Thesespecial schedules are called CyberPoint, Full Access, and No Access.Using the CyberPoint schedule in the Access Matrix will not allow them to open any of thelocks paired with it, but will record whether or not the person contacted the lock. CyberPointschedules are great for security guard rounds. Creating a standard schedule and using theCyberPoint schedule to assign to a security guard enables the guard to use the same key toboth open locks he or she needs to access (such as the lock on the door of the employeeentrance and >his or her personal locker) and to record that security checkpoints were visitedduring the times they needed to be checked. CyberPoint schedules are valid at all times,including holidays.The Full Access schedule is valid at all times, including holidays.The No Access schedule is never valid. This schedule exists for the purpose of restrictingmaster key access. When this schedule is assigned to a master key, it will prevent the masterkey from accessing those locks to which the schedule is applied.
Set a CyberLock as a CyberPointAssigning a CyberPoint schedule to a cell in the Access Matrix will not allow those keys to openthat lock or locks with that tag. Instead, the key will beep 3 times and record the fact that theperson contacted the lock. The CyberPoint schedule is great for security guard rounds. Creating astandard schedule and using the CyberPoint schedule to assign to a security guard enables theguard to use the same key to both open locks he or she needs access to (such as the lock on thedoor of the employee entrance and his or her personal locker) and to record that securitycheckpoints were visited during the times they needed to be checked. CyberPoint schedules arevalid at all times, including holidays.To set a lock as a CyberPoint, choose the common square in the Access Matrix and choose theCyberPoint schedule. Then update the key.
Adding SchedulesHolidays are "exceptions to the rule" for the keys. For example, normally this schedule would allowthe key to gain access on Tuesday's from 8:00am to 5:00pm. New Year's Day falls on a Tuesday.If New Year's is added as a holiday and the "Holiday" box is un-checked, the key will NOT gainaccess to the lock.Adding Holidays1. To add a schedule, click the "Schedules" menu.2. Click the "New"Link.
3. Type in a descriptive name such as "Day" for the daycrew. The Matrix Symbol is used as an identifier for theschedule in the Matrix. It can be either a letter or anicon.4. Click the "New" button on the right of the "Time Frames" section and adjust the start and stop times. Uncheck thedays that the keys should not gain access.5. Click the "Save" button.
Schedule Time FramesA schedule time frame specifies the day(s) of the week and a time range during which a CyberKeymay access CyberLocks or a person may open a Door or a Vault. A schedule can have up toseven time frames. When a key is programmed at a communicator, it is given a list of locks it mayaccess and the times it will be permitted to open them. A key will be granted access to a lock if thelock is in one of the key's lock lists and the current time of access is during the scheduled timeframes permitted for access. In the same way, a person will be granted access to a Vault duringthe time frames of their scheduled access.
Combining SchedulesWhen this page opens, CyberAudit-Web performs a simple check to determine if there are one ormore groups of duplicate schedules in the system. It also checks all schedules to determine if anyhave any full access (24/7) time frames. All groups found are reported on the page.Click Go to remove the duplicates and consolidate to one. The oldest or original schedule will bekept and will replace each use of duplicates in the Access Matrix.
Matrix SymbolSchedules should be given a descriptive name and can appear as either a letter or "Icon" in theAccess Matrix. Icons may be added or deleted using the link that appears when working withicons.
Schedule IconsIcons can be added to represent different schedules. The image will be resized if it is larger than23x23 pixels. For a finer grained picture, use a photo editing program to resize the image and saveit in PNG, GIF, or JPEG format.Table Fields:Icon - The icon that represents the schedule in the Access Matrix.Built-in - Icons that are pre-loaded with the software have a green checkmark in this field.Used By - The schedule associated with the icon.Operations:New - Adds a new schedule icon.Delete - Removes the selected icon record after confirmation.
Setting Schedules in the Access Matrix with a Bulk OperationThis page enables an administrator to set a schedule for a row or column in the Access Matrix.Schedules may be set for a person against a selected set of locks and lock tags. Schedules for alock are set against selected people and people tags.The Item Chooser -Item choosers enable selecting the tags or individual items that will be targets of the bulk scheduleoperation. A list filter is available to narrow the view of tags or individual locks for selection.The Filter -This filter limits which cells will be changed by the bulk schedule change operation. When the BulkSchedule Change page opens, it is set to the current filter in the matrix for the affected locks orpeople. Cells not matching this filter are guaranteed to remain uneffected by the bulk schedulechange operation.To use a filter that's not in this list, return to the matrix and create a new filter. After the filter isready, initiate the bulk change operation again.
Matrix OptionsDisplay Settings -To manage the total number of CyberLocks and people displayed in the matrix per page, adjustthe horizontal and vertical limits. Horizontal will change the number of locks. Vertical changes thenumber of people. To display the number of people or locks that belong to each tag, check the boxnext to "Show count of items in each tag."CyberAudit-Web normally attempts hides individual locks and people in the matrix. It will do sowhen:a lock or person is a member of one or more tags andthe lock or person does not have any schedules designated for any of its cells in the accessmatrix.Clear the checkbox for locks and/or keys to prevent CyberAudit-Web from hiding the individuals.Column Labels -Some lock names may be too long to display in the allocated space for the column label graphic.Both the length of the label and the font size used to generate the graphic may be changed to apreferred setting.Automatic Tag Creation -
CyberAudit-Web Professional can automatically create lock tags and people tags to simplify theAccess Matrix. This will ease access control management within the system.
Automatic Tagging gives the most benefit if the matrix has a lot of repetition. In other words, whenthe same group of people have access to the same lock or locks using the same schedule, theywill be grouped together in a single tag.If the results of the automatic tagging are undesireable, restore the database to its previous state.
Reports, Notifications, and the Journal of ChangesThe Reports and Notifications section serves to building and generating reports of activities andevents, setting email notifications, and tracking changes to the system.
ReportsReports are an extremely powerful and highly customizable way of organizing data fromCyberAudit-Web.
ReportsPeople, events, dates and locks (among other things) included in the report can all bespecified by the administrator. The order in which columns and rows appear is customizable.The Reports Listing PageTable FieldsReport Name - Describes what the report is about.<strong>Inc</strong>luded People - The number of selected people.<strong>Inc</strong>luded Locks and CyberPoints - The number of selected CyberLocks andCyberPoints.<strong>Inc</strong>luded Communicators - The number of unique communicators selected.<strong>Inc</strong>luded Doors - The number of unique Doors selected.<strong>Inc</strong>luded Events - The number of unique audit trail events selected.OperationsNew - Click to create a new report.- Creates a printable list of the reports.Properties - Displays the details of the report and enables editing each report category.View - Executes the report. Displays it in a pop-up window.
Delete - Removes the selected report after confirmation.Related Topics:Example report How to add reportsJournal of ChangesNotificationsPeople
Adding ReportsFollow these steps to add a report.1. Select the "Reports" menu.2. Click the "Add" button.3. Name the report and click "Save."
4. The report is configured by choosing what to look at in thesecategories:PeopleLocks and CyberPointsCommunicatorsEventsDate FilterData is organized in columns and output to the chosen format.
Report PropertiesReports may be customized on the following categories:Report Name - Describes what the report is about. Click (Rename) to set or change thename.<strong>Inc</strong>luded People - Filters output to a selected set of people.<strong>Inc</strong>luded Locks and CyberPoints - Filters output to a selected set of CyberLocks andCyberPoints.<strong>Inc</strong>luded Communicators - Filters output to a selected set of communicators.<strong>Inc</strong>luded Events - Filters output to a selected set of events.Date Filter - Enables selecting days, dates, and times of the audit trail events.<strong>Inc</strong>luded Columns - Specifies the report columns and their order and the sorting rules.
<strong>Inc</strong>luded PeopleUse this form to select the people and their keys to include in the report. When the report iscreated, all People and Keys will be included. To filter the list to only selected people and tags, click <strong>Inc</strong>lude only the following tags and people. People and tags may be selected using theitem chooser.Uncheck the Current People Only checkbox to additionally include audit trail data for peoplethat have been removed from the system.
<strong>Inc</strong>luded Locks and CyberPointsUse the item chooser in this form to select the CyberLocks, lock tags, and CyberPoints toinclude in the report. When the report is created, all items are included. To filter the list to onlyselected ones, click the <strong>Inc</strong>lude only the following radio button.Uncheck the Current Locks Only checkbox to additionally include audit trail data for locks andCyberpoints that have been removed from the system.
<strong>Inc</strong>luded CommunicatorsWhen the All Communicators radio button is selected, CyberAudit-Web does not includecommunicators in its selection criteria and therefore no records are filtered out.To filter the report to records for a selected set of communicators use the item chooser in thisform.
Edit Report EventsEvents refers to the type of activity recorded by the CyberKey, CyberLock, or communicator.Use the form to select the type of events to include in the report. When the report is created,all event types will be included. To filter the list to only selected ones, click the "SpecificEvents" radio button. The two categories of events, Locks and Keys, may be selected usingItem Chooser. The selection of event types may be reduced by clicking a radio button on theFilter by Event Source frame.CyberKey and CyberLock audit trail eventsVault 1 audit trail eventsComm Link audit trail eventsWeb Authorizer audit trail eventsFlex System audit trail eventsLAN Authorizer audit trail events
Date FilterA range of selections are available for selecting the days, dates, and times of the events toinclude.When the report is created, all event dates and times will be included. There are threeinclusive categories available to restrict them.Dates - Dates may be restricted by...A Range of two dates. The report will include dates beginning with the first entered date,ending with the second entered date, and all dates in between. The date range specified isinclusive of the start and stop dates. That is, events occuring on those dates will beincluded in the report.A Period of days, weeks, months, or years backward from when the report is executed. Forexample selecting 2 weeks will instruct CyberAudit-Web to calculate 2 weeks ago from thepoint in time the report is requested and include all events in that period. Click on <strong>Inc</strong>ludeevents back to the beginning of the day to include events back to the beginning of thecalculated day. For example, if the '2-week' period report is executed on Wednesday, 15October at 11:45 AM, CyberAudit-Web will calculate the start date and time at Wednesday,1 October at 11:45 AM. The checkbox selection would move the start to Wednesday, 1October at 12:00 AM.Days of the Week - Any combination of weekdays may be selected to display. Uncheckeddays will be excluded from the report.Time of Day - All times of the day inclusive beginning with the Start Time and ending with theStop Time. A Stop Time of 00:00 or 24:00 is interpreted as the end of the day.
<strong>Inc</strong>luded ColumnsChanging options in this section allows the administrator to specify which columns from eachrecord to include in the report and the order in which those columns should be displayed, fromleft to right. Columns should be selected that are appropriate for the criteria selected in theother sections for CyberKeys, CyberLocks, People, Doors, and Communicators.Use the item chooser to select and re-order the columns that will appear in the report.Note: Audit trail events will not fill data in every column. For example a Vault opened using anRFID access card will not include any reference about a CyberKey or a CyberLock.Available columns include:Key Name - The name assigned to the CyberKey.Key Serial - The serial number of the CyberKey.Mission Number - If the event occured while the key was programmed by a missionnumber, it will display in this column.Card Name - The name of the RFID access card.Card RFID - The serial number of the RFID access card.Lock Name - The name of the CyberLock at the time of the audit trail event.Lock Serial - The serial number of the CyberLock.Custom fields for CyberLocks - Any custom fields specified for CyberLocks may beincluded in the report.Downloaded or Configured - Indicates whether a CyberLock was downloaded orprogrammed when this event occured.Date - The date and time that the event occured.Raw Key Date/Time - Displays the date and time as recorded directly from the CyberKeyor CyberLock without rendering it to a time zone.Download Date- The date and time that the event data was downloaded from aCyberKey, CyberLock Programmer, or Communicator.Event - The type of event that occured - what happened.Source - The device that recorded the event; CyberKey, CyberLock, or Communicator.
Person - The name of the person who was issued the CyberKey at the time of the audittrail event.People Custom Fields - Any custom fields specified for People may be included in thereport. Custom fields are defined in Global Preferences.Communicator - The name of the communicator associated with the audit trail event.Communicator Serial - The serial number of the communicator.Port Number - Authorizer Hubs have ports 1 and 2 for accomodating keyports. FlexSystem Hubs support a variety of modules among their 8 ports. Audit trail eventsoriginating from these devices will often reference a port.Port Serial - The serial number of the Authorizer keyport or Flex System module.Port Name - The name of the Authorizer keyport or Flex System module.Group Number - The Flex System group number associated with the audit trail record.Audit trail records from DoorsThe administrator may also specify the order and direction (ascending or descending) bywhich the records should be sorted.
Event sorting in reportsThe order of this list determines the order in which the set of returned records is displayed inthe report.To sort records (rows) by a certain column, select that column from the drop-down list in theproper sort position, then select either Ascending or Descending to specify the direction of thesort. To remove unwanted sort directives from the list, select the blank option for theremaining slots. In the example below, the rows of the report will be displayed in reversechronological order. Rows that have the same date will then be sorted alphabetically byperson name.
Report OutputQuick View - Outputs HTML to a web page. Data may then be printed. If the contents ofthe page are selected (using Select All) the contents may be copied and pasted into aspreadsheet.Download XML - Outputs XML to a file.Download TSV(Tab Separated Values) - Outputs ASCII text file with column names on aheader line followed by the data.
Notifications
Email NotificationsNotifications are reports sent by email. CyberAudit-Web periodically scans for new auditevents to determine if it matches the criteria of one or more Notification reports. Typically thisoccurs once each 1-2 minutes. Email Notifications must reference an available email server inEmail notification setup.There are two types of Notifications:Low Battery - This type of Notification is for the administrator who wants to receive anemail when any person's key battery is low. Battery level is checked when a key isdownloaded and if it is at or below the threshold of 2.51 volts since the last check will bereported in the email message.The only field used from this type of report is personnel (only keys assigned to people inthis list will be considered). Other fields from the report are ignored.Notification based on Report Events - The events included in this notification are filteredbased on the report selected. The lock, people, event type and time filters of the report areused. Date filters from the report are not used. Events that would be listed in the report aresent as emails.Table FieldsNotification Name - Describes what the Notification is about.Notification Type - Notifications are based either on the events generated from the criteriaof a report or on a low battery level when a CyberKey is downloaded.Based on Report - Both Notification types, Report Events and Low Battery, mustreference an existing report to match the criteria or people.OperationsNew - Click to create a new Notification.- Creates a printable list of the Notifications.Properties - Displays the details of the Notification and enables editing.Delete - Removes the selected Notification after confirmation.Related Topics:
Audit Trail EventsJournal of ChangesReports
Notification PropertiesNotification Name - Describes what the Notification is about.Notification Type - There are two types of Notifications:Low Battery - When a CyberKey is downloaded, the Notification process checks thebattery voltage against the low battery warning level. If the CyberKey's batteryvoltage is at or below that level, an email is generated.Based on Report Events - When the CyberKey is downloaded, the Notificationprocess checks the audit trail for events that match the criteria of the report. If theevents are found, an email is generated.Report Source - Select the report to reference. If the report doesn't exist yet, enter aname for the new one. When the Notification is saved, CyberAudit-Web will create a newreport by that name.Email settings - To: , From: , and Subject: are required.
Follow these steps to add notifications.Adding Notifications1. Select "Notifications" from the "Reports" menu.2. Click the "Add" button.3. Name the notification and select whether it will be based on a or on low battery events. Thenreportenter the email settings and click "Save."
Example Report
Journal of Changes
Journal of ChangesThe journal of changes is a record of all changes that have been made to the database. Itincludes...Changes made through the interface.Changes made in the background by the server.Because the number of entries can grow quite large, there are filters to aid in getting only theentriesof interest. Those filters are:Filter on Date only reports changes made on or after the date supplied.Filter on Login (by Person's Name) reports changes made by a specific personnel entry.It includes all logins for the person.
Filter on what was changed permits you to select a specific item or class of items.Categories include:Keys (all types)Locks (and Cyberpoints)Access CodesLAN AuthorizersFlex System Hubs andModulesVaultsPeopleReportsSchedulesRFIDCardsTagsLoginsHolidaysProgrammingJobsPortable LinksNote: When searching for names or serial numbers, wildcards should be used.Multiple selections can be made.NotificationsWebAuthorizersStationsFlex SystemPatternsFilter on the Type of Action Taken permits you to only consider the operation taken. Themost common being Edit, Add (which includes adding to a group), and Delete. FrequentlyAdd will also produce an Edit. Other types of actions include:Logon tracks when a particular login signs onto the system.Logoff detects a user that physically logs out of the system (not logins that timeout).Fix <strong>Inc</strong>onsistency is used for a number of routines that run periodically checking forand repairing inconsistent states in the database.
Journal of Changes Report ColumnsThe columns included in the report include:Date - The Date and Time that the change took place, the date is rendered to the login'stimezoneChange Category - The type of item changedID of Changed - This a unique identifier for the item that was changed. Sometimes this isa serial number, but for most items this a number generated and used internally by thisapplication.Name of Changed - This is the name that has been associated with an item. For mostitems this is more familiar and useful than the ID.Operation Type - The changes made have been broken up into several catagories:EditAdd - Frequently an add is immediately followed by an edit.Delete - Items that are deleted can no longer be seen by anyone but the top leveladministrator.Add/Remove Visibility - The name and title with this operation refer to the login thatmade the change, check the details to find the administrators who gained or lostvisibility as a result.Copy & Move - Refers to Access Lists, Schedules, and Group Operations. It doesn'tget used for visibility changes, they are reporteed individually under add visibility andremove visibility.Logon - Records the time that a user logs into the system.Logoff - Records the time that a user logs out of the system, but doesn't includelogins that timeout.Fix <strong>Inc</strong>onsistency - Produced by routines that run periodically to check for and repairinconsistencies in the database. These events are only visibile to the topleveladministrator.
Details - The details button will bring up a page of more detailed information about thechange that was made. Most notably, an edit operation will log the state of the item afterthe changes have been applied.
Management / MaintenanceArticles in this section describe a variety of maintenance and utility functions available from theSystem menu.
Date/Time PreferencesDate order, separator, year digits, format and time zone are set on this page. The format chosenwill appear in the audit trails.
Log FilesLog Files are used to troubleshoot the system.Table Fields:File Name - The name of the log.Modified Date - The date and time the log was last changed.Size - The total space the log takes on the disk.Operations:Download - Saves the log in a specified location. This makes emailing the log easy whentroubleshooting.Open - Opens the log for viewing.Delete - Removes the log from the system after confirmation.Print - Creates a printable list of the log files.
Backup and RestoreTo create a new backup click the "Backup Now" link.To restore to a previous time, click on the desired backup and choose "Restore."Table Fields:Created On - The date and time that the backup was done.Size - The size of the backup file.File Name - The full name of the backup file. Note that the name contains the 'created on' dateand time.Operations:Restore - Returns the system to the selected backup after confirmation.Delete - Removes the backup file after confirmation.Print - Creates a printable list of the backup files.
Steps to Restore a CyberAudit-Web Professional DatabaseThese steps are used for new systems or when CyberAudit-Web detects no database is present.1.Select "Restore aCyberAudit-Web Professionalbackup."1.Choose a backup (default path: C:\Program Files\<strong>Videx</strong>\CyberAudit-WebProfessional\tomcat\cawpro-backup) and click the "Restore" button.1.Log in.
Using Locks and KeysThis section contains important information to assist in keeping CyberLocks and CyberKeysworking well.
Tips for Using a CyberKeyConduct a training session for CyberKey users. Let them try their key in a lock before it isinstalled.Insert the key straight into the lock, not at an angle.Press the key firmly into the lock until it has been rotated away from the home position.When opening a lock, wait for a solid light on the key prior to turning. The lock should turn onlyif the light is on. You may hear or feel a click, depending on background noise.To prevent undue wear, do not use the key to pull open a door.Periodically inspect the key tip for wear. If it is worn, replace it.When the battery in the key is running low, the key will emit a warning. This is a beep or flashthat happens once every eight seconds, for a period of one minute. The key will repeat thiscycle up to once an hour. It may also do this when it contacts a lock.When changing the battery in a Standard CyberKey, the operation must be completed withinone minute. If it is not, the key may need to be updated at a communicator to restart its clock.When updating a key, wait for the display to read "KEYREADY" before removing the key.The default solenoid retention time is one second. Some users may require more time to rotatethe key. Consider increasing this value to two or three seconds. Note: <strong>Inc</strong>reasing the time willreduce the life of the battery.If a lock does not respond immediately to an authorized key, try holding it in the lock for up totwenty seconds to see if the lock will open. The lock may have been in "tamper delay" mode.Normal operation is restored when an authorized key opens it.If a key sirens or flashes when contacting a lock, it does not have authorization to open thatlock. Try updating it at a communicator. If this does not resolve the issue, please contact yoursystem administrator.To ensure good electrical contact between keys and locks, it may be necessary to periodicallyclean contaminants from the tip of the key and the face of the lock.Clean the contact pins inside the key tip using the cleaning brush (<strong>Videx</strong> part number BRUSH).To clean locks, refer to the CyberLock Contact Cleaning Instructions.
Standard CyberKey Battery Cap RemovalNote: These instructions are for CyberKeys with replaceable batteries.Step 1:Use a ball-point pen to depress the upper lobe of one of thelatches which holds the battery cap in place.Step 2:Lift the battery cap up, then toward the latch on the oppositeside.Step 3:After replacing the battery, hook one side of the battery caponto a latch, then snap the opposite end into place over theother latch.
Rechargeable CyberKey LED Flash PatternsEvent Green LED Red LED NoteAccess Granted Steady green OffLED remains on forduration of solenoid holdtime or until key isremoved from lock.Access Denied - ExpiredLong flash - once perOffor out of schedulesecondKey ExpiredKey DisabledOn for 1 second3 flashesAccess Denied - Nopermissions, wrong Off Rapid flashaccess codeBattery OK One flash per 8 seconds OffBattery LowOffRed flash each 8seconds until the batteryis charged or there is nomore power in the batteryBattery Charging OffShort Flash each 1secondBattery ChargedShort flash each 1secondOffDead Battery Off OffCommunications Irregular flash with red Irregular flash with greenCyberPoint Contact Steady green Quick red flashDownload LockSteady green with slightflickerSteady red with slightflickerResetting a lock as aSubsystem Reset KeySteady green 3 flashesDelay instruction receivedfrom lock - CyberKey in Steady green 3 flasheslockDelay time has beenserved - CyberKey out oflock1 second green 3 red flashes per secondKey left in LockRapid flashOne flash after eachminuteMulti Key Access Steady GreenThree flashes for eachkey after firstKey Disabled 1 second green 3 red flashes per secondCommunication failedwith retry1/2 second flash every 4seconds1/2 second flash every 4secondsOccurs if "flash afterexpiration" is set or if thekey touches a disablingpoint.In charger or when idle inStationIn charger or when idle inStationFlashing pattern willcontinue for 3 to 5minutes with this event.Also applies to keys setto 'flash' after expiration.With this event, the keywill continue this patternuntil it is reprogrammedor runs out of power.Can occur in a WebStation that cannotconnect toCyberAudit-Web.
Beeper and LED Flash Patterns for CyberKey IIThis chart applies to CyberKey II model CK-RXD2. Note that since CyberKey II executes multipleprocesses that light and beeper patterns may exhibit minor pattern variations.Action/Event LED Beeper NoteAccess Granted Steady ON NoneLED stays on for theduration of the solenoidhold time.Access Denied Rapid Flash Two-tone alarm Duration ~8 secondsCommunicationsIrregular flashIrregular buzzing andbeeps, depending onconnection method.CyberPoint Contact Three flashes Three beepsNumber of flashes andbeeps will be reduced ifcontact with theCyberPoint is notmaintained.Download LockResetting a lock as areset keyDelay instructionreceived from CyberLockDelay time servedSteady ON with slightflickerQuick LED flash thensteady ON when accessis grantedOne flash then quickflashes while contactwith the lock ismaintainedRepeating two LEDflashes per secondBuzzing duringdownloadOne beepOne beepRepeating two beeps persecondKey left in lock Rapid flash One beep per minuteMulti-key access, firstkeyMulti-key access,second, third, or fourthkeyTwo quick flashes Two beepsTwo quick flashes One beepIdle - Battery OKOne flash per 10secondsNone
Battery lowOne flash per 10secondsOne beep per 10seconds. Five beepstotal.Battery Charging Two flashes per second NoneBattery ChargedOne flash per twosecondsNone
How to manage Lithium-ion polymer batteries used in RechargeableCyberKeysChargingLithium-ion batteries deliver full power after the initial charge. Nopriming is required. There is no need to charge the battery anylonger on the first charge than on any subsequent charge.CyberKey Rechargeables typically require one to two hours tofully charge.It is not necessary to remove the CyberKey from the chargerimmediately after the battery is fully charged. The chargerautomatically reduces the charge current when the battery is full.Although rechargeable CyberKeys may remain in the charger formany hours or even several days, it is not recommended to leaveit in a charger continuously as this prevents it from dischargingnormally and will slowly shorten its life.Lithium-ion batteries do not need to be fully charged beforeremoving from the charger. Partial charging does not harm thebattery. It is best to charge the lithium-ion battery at least once permonth. No additional maintenance is needed.DischargingRechargeable CyberKeys prefer a partial rather than a fulldischarge. Full discharges should be avoided. Several partialdischarges with frequent recharges are better. Recharging apartially charged lithium-ion battery does not cause harm becausethere is no "memory effect" so it is OK to charge the battery often.The battery will lose some charge capacity over time due to agingwhether used or not. Over time, the battery will naturally degradeand will not hold the same amount of charge as when new. This istrue for all lithium-ion batteries. This slow degradation will not benoticed by most users during the life of the battery if therecommended charge/discharge cycles are followed.StorageIf the CyberKey is to be stored for a period of time, it is best to firstfully charge it and then recharge it monthly to prevent it fromdischarging below 50%. If Bluetooth has been enabled on aCyberKey Blue it should be disabled in the key prior to storage.Cool storage temperature is also important. The ideal storagetemperature is 59° F (15° C).HeatThe rechargeable CyberKey should not be charged or left in hightemperatures such as strong sunlight or hot cars. Exposure toheat approaching 129° F (50° C) will shorten the life of the battery.Temperatures above this level may overheat the battery andincrease the risk of fire.
DisposalLithium-ion batteries should be recycled when their service life isover.LifeThe battery typically delivers 300-500 full charge/dischargecycles. Using a quarter of the battery and then recharging it isequivalent to one quarter charge cycle.The lithium-ion battery in rechargeable CyberKeys is NOTfield-replaceable.
CyberLock Cleaning InstructionsWith time, dirt or residue may accumulate on the face of a CyberLock.If foreign material builds up where a CyberKey makes contact with thelock, it may cause intermittent performance. Lack of good contactbetween key and lock is indicated when an authorized key (with a goodbattery) contacts a lock and the light on the key does not turn on.CyberLocks manufactured since the start of 2005 have a stainless steelcontact area. They can be identified by their silver color and 2 contacts.Please contact your CyberLock vendor for instructions on cleaningother styles of CyberLock.Clean lock face with brush.Cleaning Instructions: Use <strong>Videx</strong>'s stainless steel brush (part numberBRUSH) to scrub the nose and contact points in small circular motions.Do this for several seconds. Once the face and contacts of aCyberLock have been cleaned, they should be bright and shiny.Warning: Never scrape the contacts with a sharp tool, as this maycause damage. When cleaning a CyberLock, DO NOT use sprays orlubricants!CyberKey CleaningA clean lock face
CyberKey Cleaning InstructionsVisually inspect inside the key tip for foreignmaterial like lint or dirt. If present, use atoothpick or other small tool to remove thematerial. The key tip metal housing can beremoved to better expose the contact pins.Clean the contact pins using the stainless steelbrush (part number BRUSH). If the tip isremoved, make sure to reinstall the insulator andtighten the screw. DO NOT overtighten.Warning: Do not use cleaners or other liquidswhen cleaning a CyberKey.Clean pins with brush.If these procedures fail to provide satisfactoryresults, please contact your CyberLock vendor.CyberLock CleaningClean pins.
CyberPoint User Tips1.2.3.4.5.6.Conduct a training session forCyberPoint users. Let them inserttheir key in a CyberPoint.Insert key straight into theCyberPoint, not at an angle.Do not twist or turn the key whilethe key is inside the CyberPoint.Wait until the key beeps threetimes. This means that the transferof information is completedbetween the CyberPoint and key.For good electrical contact, it mayoccasionally be necessary toclean contaminants from the tip ofthe key and the face of theCyberPoint. <strong>Videx</strong> provides astainless steel bristle brush thatworks well for doing this; pleasecontact <strong>Videx</strong> for details.After touching a CyberPoint, thekey may emit a low batterywarning. This is a beep thatsounds once every eight secondsfor one minute. This warningmeans the battery should bereplaced.
Glossary of Terms
GlossaryAccess Code An access code is an encrypted password that is programmed into locks and keys.A CyberKey must present one of these Access Codes to the CyberLock in order to gain access.AJAX - A web technology that allows pages to refresh automatically, thus providing up to dateinformation in their contents. Most listing pages in CyberAudit-Web use AJAX to keep themupdated.Audit Trail The audit trail is the activity recorded by the CyberKey and the CyberLock. Each AuditTrail record typically contains information about an event that occurred within the lock or key. Italso includes the date and time that the event happened. There are also Communicator audittrails. These show activity at the Keyports as well as network communications and activities withCyberKeys.Configuration File - A special file that contains settings for a Web Authorizer, Vault 20, or FlexSystem Hub. This file is saved to a USB flash drive and physically transferred to one of thesecommunicators.Database Identifier A database identifier is information recorded in a CyberKey that indicates thekey is currently a member of a database. This helps prevent accidentally adding the CyberKey to asecond system.Delay A wait period required of keys before a lock will open. The CyberKey keeps track of thetime and will beep to let the key holder know when the lock can be opened. Delay cannot becombined with multiple-key access. Master keys ignore the delay setting. Also a schedule typemay be created to Ignore multi-key and delay settings.Expiration A date and/or time after which a CyberKey will stop working. It must then bere-authorized by a communicator. An Expiration can be a fixed date, fixed to a calendar period orbased on a rolling re-authorization time period.Holidays A list of dates that act as additions to the weekly grid in schedules. A day is valid ifeither the appropriate day or the holiday boxes are checked. Each Subsystem can have up to 126holidays. Holidays may be set as one-time or occurring every year.Lock List A list of lock IDs paired with a schedule stored in a CyberKeys memory. It controls ifand when a key may open a given lock. The lock list is programmed into the key with eachcommunication. It may also contain additional information such as treating the lock as aCyberPoint.Lost Key A CyberKey can be designated as Lost in a CyberLocks memory. A CyberLock will notallow access to a lost key even if that key contains permission to open the lock. Also see DisablingPoint.Master Key A setting that allows a CyberKey access to all locks which are programmed with aspecific access code. A Master key has either full access or a restricted time range. Master keyscan also have a list of locks for which they behave like a standard user key.
Master Key Schedule A special schedule that restricts when a Master key will function. It isessentially an on/off schedule for the key that is checked prior to any other operation. Master Keyoperating times may be created uniquely for each key or the key may use one of the existing,pre-defined schedules.Multi-Key Access A CyberLock with this setting requires more than one CyberKey to open it.Master keys ignore the multi-key setting. See also the Schedule, Ignore multi-key and delaysettings.Password Text that is encrypted and provides security for a CyberLock Installation. This text canbe composed of letters, numbers, and/or special characters. CyberAudit passwords haveconfigurable strength requirements, including length, case, numeric, special character anddifference requirements. There are 3 types of passwords, System, Access Code and Loginpasswords. The System, Access Code passwords are the basis for the codes used by keys andlocks but are not used to log in.PIN Personal Identification Number. A PIN can be assigned to a person for use in conjunction witha communicator to provide an additional level of security. When required, the correct PIN must beentered before the key is re-authorized.Primary (TopLevel) - The top level administrator node may have multiple logins. The original loginis designated by the word (primary) following its name. This login cannot be deleted.Reset Key A Reset Key is a specially configured CyberKey which removes configurations fromCyberLocks. Resetting a lock restores it to its original (un-programmed) factory configuration.Almost any CyberKey will then open the lock.Scheduletimes.A set of access time frames and rules. A standard schedule includes up to 7 accessTamper Delay A tamper delay is a wait period that a lock may require of keys before it willcommunicate. It may occur when the lock denies entry to a key. For each denied key touch, thisdelay is incremented; it should never exceed 20 seconds. The first good key to touch the lock willserve the delay. After gaining access, it will then cancel it so that subsequent authorized keys areunaffected.User Key A general term describing a standard CyberKey that has not been programmed as aMaster Key.HardwareAuthorizer A device for updating CyberKeys and retrieving logs from CyberKeys. An Authorizercan interact with CyberKeys without a real-time connection to CyberAudit-Web. CyberAudit-Webautomatically retrieves and sends information to Authorizers as needed. See also: LAN Authorizerand Web Authorizer.Brush A stainless steel wire brush used for cleaning CyberLocks and CyberKeys for the purposeof restoring and maintaining good electrical connection between them.
Control Key A type of CyberKey that is used to install or remove interchangeable core cylinders.It has a special tip that engages the cylinder retention mechanism. Like a regular CyberKey, itmust have permissions to open a lock. This is also called a core key or a change key.CyberKey An electronic key used to open CyberLock cylinders. CyberKeys contain three levels ofintelligence:Encrypted access codes which provide security for an installation.Access privileges for the key holder.Audit trail records of up to 3900 events.CyberKey Recharging Station - A standalone docking station (not connected toCyberAudit?Web) that charges one or more Rechargeable CyberKeys. It connects to a wall outletusing a standard <strong>Videx</strong> 12V DC, minimum 300mA transformer.CyberLock An electronic version of an existing mechanical lock that provides access control andan audit trail for many types of lock hardware. No wiring is required. There are currently over 200designs of CyberLock.CyberLock Programmer A type of a CyberKey that is designed to program information intolocks, download the audit trails from locks or reset locks. It can program up to 1250 locks at a time.It can download 3 to 7 lock audit trails at a time. Unlike a CyberKey, Programmers will not open alock.CyberPoint CyberPoints are electronic tags designed to serve as data checkpoints duringsecurity guard tours. CyberPoints have no editable settings and require no programming. When aprogrammed CyberKey touches a CyberPoint, the key beeps three times. CyberPoints may beadded to CyberAudit 2.0 and CyberAudit-Web Enterprise so that they can be downloaded forreporting purposes.Grand Master CyberKey A Grand Master CyberKey can program CyberLocks and CyberKeys. Itcan be configured to behave like a CyberLock Programmer. See the separate entry for CyberLockProgrammer. It also can be configured to create time limited emergency master keys.Interchangeable Core A type of lock cylinder that can be removed without disassembling thedoor hardware. Used to make mechanical re-keying easier. Interchangeable core CyberLocksnever need to be removed since all CyberLocks can be electronically re-keyed. Cylinders areavailable that are physically compatible the Best and Schlage interchangeable cores.Keyport The Keyport provides the user interface for the CyberKey Authorizer. It consists of anumeric keypad, an LED display, and a docking receptacle for CyberKeys.Key Retaining Some CyberLocks will not release a key when they are in the open position. Thisensures that users return the lock to the closed position.LAN Authorizer - An Authorizer which connect to the CyberAudit?Web server via either anEthernet network or a modem. It the earlier model of Authorizer. Because it is 10Base-T UDP, it isnot useable over the Internet. It may also have communication difficulty on some networks wheremore advanced or proprietary settings are used on routers and switches.
Lock Programming Devices CyberLock Programmer, USB CyberLock Programmer, GrandMaster CyberKey, and a standard user key if so configured.Serial Cablex A custom cable that is used to update LAN Authorizer firmware. The LANAuthorizer interface is a telephone jack connector (RJ-11). The PC interface is available in either9-pin or 25-pin serial connectors. Pin-out specifications are available on request.Sounds, KeyAlarm or Siren, single beep, triple beep, short buzz or chatter, long buzz or chatter.USB Station - A communicator which attaches to a computers USB port. It uses the CyberLinkapplication to communicate with the CyberAudit?Web server, and can also be used as a chargingstation for rechargeable CyberKeys.Web Authorizer - An Authorizer which communicates using secure HTTP to CyberAudit-Web at100MbS, can use DHCP to obtain an IP address, and can communicate with the CyberAudit?Webserver over the Internet.SoftwareAccess Matrix - The CyberAudit-Web Access Matrix displays the People and CyberLocks in thesystem and facilitates granting access. It lists People and people tags vertically. CyberLocks andtheir tags are listed horizontally.Administrator Administrators are those who may log in to CyberAudit-Web, view audit trails orother administrators activities, or make changes to components in the system.Administrator Permissions Permissions control functions of the CyberAudit-Web available tothat node. Each permission shown corresponds to a function in the program.Communicators Communicators are the devices by which CyberKeys and CyberLocks aredownloaded and programmed. The categories of Communicators includes Authorizers, PortableLinks, Stations, and Vaults.CyberLink A Java client application that enables using an IR Encoder. USB Station, or aCyberKey II with CyberAudit-Web. It is also used to set up the networking on Web Stations andSingle CyberKey Vaults and can be used with the CyberAudit RFID Reader to capture the ID ofthe cards.Disabling Point A lock that has one or more CyberKey IDs in its lost key list. Keys in the list willbe disabled upon contact. They will cease to work in any lock until reprogrammed as a non-lostkey.Emergency Key A key that has been granted temporary access to all locks in a subsystem by aGrand Master key. Temporary access time ranges include 1 to 64 minutes, 1 to 24 hours or 1 to127 days.IR Encoder A custom USB to Infrared adapter made to use with CyberKeys. An IR Encoderfunctions with the CyberLink software. Unlike an IrDA adapter, the IR Encoder shows up as aremoveable drive on both Windows and Mac OSX systems.
Portable Link A remote communication device with IrDA port used for downloading and updatingCyberKeys and CyberLock Programmers. Both Pocket PC based PDAs and PCs may beconsidered as Portable Links.Issue Number An issue number is a unique, 8-digit number generated by the system that acts asa temporary placeholder for some item. Items that can be represented by issue numbers includeCyberKeys and Portable Links. CyberKey issue numbers are linked to a key holders record. Whenthe key holder places a CyberKey not already in the system into or in front of a communicator,CyberAudit-Web prompts to enter an issue number. When the number has been correctly entered,the CyberKey will be programmed according to the settings associated with the issue number. Thekey serial number will take the place of the issue number in the system.Journal of Changes Whenever a CyberAudit-Web administrator makes changes toCyberAudit-Web, it is logged in the system. A journal is available to view either overall or filteredrecords among several categories. It includes what was changed, who changed it, and when thechange was made.Key Types, Software User Key, Master key, Reset Key, Lost Key. See individual entries.Physically, these are all standard CyberKeys.Programmer Job Programmer Jobs are a way by which CyberLocks can be configured,downloaded or reset by CyberAudit-Web. Each job is designated by a Job number which is usedto identify it to a CyberKey Authorizer or Portable Link. Any Programmer can be assigned anyProgramming Job. Since CyberAudit-Web is designed to handle a large number of locks it may beuseful to divide up these tasks and delegate them to others, who can deal with locks in smallerbatches.Schedule, Standard A set of Access times and rules. It includes up to 7 access times. It is themost commonly used type of schedule.Schedule, CyberPoint This type of schedule will not open locks. Instead, the key treats the locklike a CyberPoint. It is commonly used for guard tours.Start Date and Stop Date, Key The key will work only between these dates regardless of whatother settings exist in schedules or temporary access.Time Frame A definable time range having start and stop times and selectable days of the weekplus holidays. Time frames are part of a Schedule.