EL DIABLO 60 Owners Manual - Genz Benz
EL DIABLO 60 Owners Manual - Genz Benz
EL DIABLO 60 Owners Manual - Genz Benz

Create successful ePaper yourself
Turn your PDF publications into a flip-book with our unique Google optimized e-Paper software.
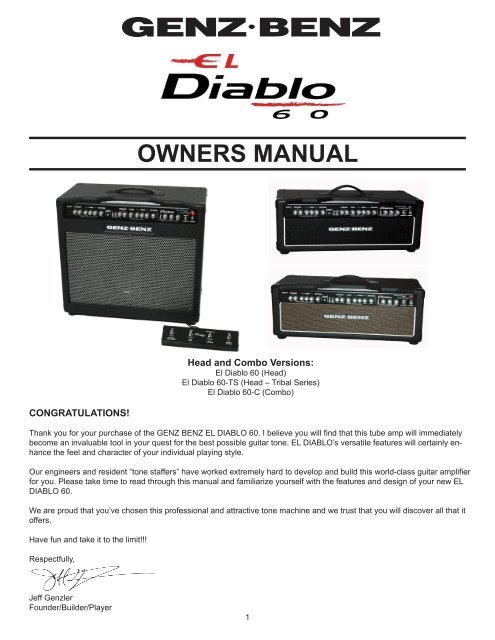
OWNERS MANUALHead and Combo Versions:El Diablo <strong>60</strong> (Head)El Diablo <strong>60</strong>-TS (Head – Tribal Series)El Diablo <strong>60</strong>-C (Combo)CONGRATULATIONS!Thank you for your purchase of the GENZ BENZ <strong>EL</strong> <strong>DIABLO</strong> <strong>60</strong>. I believe you will find that this tube amp will immediatelybecome an invaluable tool in your quest for the best possible guitar tone. <strong>EL</strong> <strong>DIABLO</strong>’s versatile features will certainly enhancethe feel and character of your individual playing style.Our engineers and resident “tone staffers” have worked extremely hard to develop and build this world-class guitar amplifierfor you. Please take time to read through this manual and familiarize yourself with the features and design of your new <strong>EL</strong><strong>DIABLO</strong> <strong>60</strong>.We are proud that you’ve chosen this professional and attractive tone machine and we trust that you will discover all that itoffers.Have fun and take it to the limit!!!Respectfully,Jeff <strong>Genz</strong>lerFounder/Builder/Player
FEATURES:• Pentode <strong>60</strong> Watt/Triode 30 Watt Output Section• Two Versatile Tube Channels• Four Button Footswitch Included• Master Effects Loop• Frequency Compensated D.I. Section• Ruby Tubes® Long Pan Reverb• GBE 1240-V75 Loudspeaker (combo version)CAUTIONS AND WARNINGS:• Six Triode Preamp Stages (3-12AX7’s)• Two Power Tubes (w/Ruby Tubes® <strong>EL</strong> 34’s)• Military Spec. Double-sided Glass Epoxy Circuit Boards• All Custom Wound Transformers• Transformer Based Phase Inverter for Optimum Power TubeGrid Drive• Heavy-duty Steel Chassis, Mounted within a Sturdy BirchPlywood Cabinet• Tube amplifiers, especially high-powered tube amps, generate heat. Allow at least 4 inches (<strong>60</strong>mm) of clearancearound the back of the amplifier cabinet. Keep clear of curtains and other flammable materials. Avoid contact withhot tubes.• Do not expose amplifier to moisture, rain, splashed water, beverages, etc.• Be sure that a speaker load is connected to the amplifier before applying power; otherwise damage to the amplifiercould result.• Be sure that the amplifier is properly grounded. Do not defeat the ground pin on the AC power input plug. Theground is there to protect the user from the possibility of shock.• Be sure that the AC power (mains) voltage selector switch is configured for the proper voltage (115 volts or 230volts) for the area you are located before connecting the amplifier to the power source. In the event of athunderstorm, remove the power plug from the wall socket to prevent damage due to the possibility of lighteningstrikes.• Turn off power to the amplifier (or place in standby) when changing wiring connections to prevent damage tospeakers from possible (and unexpected) loud noises.• WARNING: This amplifier is capable of extreme high decibel output. Always protect your hearing. Your hearing isan invaluable tool in appreciating the tone of <strong>EL</strong> <strong>DIABLO</strong> <strong>60</strong>.• There are no user-serviceable parts inside the chassis. Refer all service to qualified service personnel.• Always unplug the amp when changing the power or preamp tubes. Never touch the tubes if they are still hot.• Always wait to move the amp after use until the tubes have cooled. This will prevent tube damage and extendtube life. A few minutes should be sufficient.• While we have made every attempt to outline all general cautions, the ultimate responsibility for safe operation ofthis or any amplifier product rests with the consumer. Common sense should be practiced at all times when usingthe amplifier.AMPLIFIER OVERVIEW:The GENZ BENZ <strong>EL</strong> <strong>DIABLO</strong> <strong>60</strong> contains a unique combination of circuits, including vintage tube circuits, carefullyengineered “hot-rod” tube circuits and advanced tone shaping techniques. <strong>EL</strong> <strong>DIABLO</strong> <strong>60</strong> delivers unique tone, driveand versatility, which is exemplified by the 10 distinctive tone variations easily accessible through the four buttonfootswitch (included). This flexibility allows endless possibilities to craft your own personal repertoire of tone andexpression.The unique PENTODE / TRIODE design of the tube amplifier adds to the versatility of the <strong>EL</strong> <strong>DIABLO</strong> <strong>60</strong>—essentially 2 different amps in one!! In the <strong>60</strong>-watt PENTODE MODE the amp responds with its bold, “spanky”,rich clean tone and classic overdrive sustain, all the way into aggressive Hi Gain brutality and all points in between.With the 30-watt TRIODE MODE the El Diablo <strong>60</strong> produces a more vintage, fuller, fatter tone with a more dynamicresponse and increased power tube break-up with a darker complexity. Experimentation with all of this flexibility willreward you with a tremendous tonal pallet for your specific playing style or song selection.
The WARM CHANN<strong>EL</strong> offers full, round pristine clean response cascading up to pushed vintage gain with warmupper mid break-up, rich bass and abundant sustain.The HOT CHANN<strong>EL</strong> takes you from rich classic tube break-up to full-bodied hi gain splendor. The option of aDynamic or Compressed setting insures the amplifier responds to your every touch; no squashed tone or harshbuzziness here!!Both channels utilize our ACTIVE TONE NETWORK for signal shaping of the guitar signal to the tube power amp.This unique tone network is an incredible tool for enhancing your guitar tone. Each frequency offers a true +/- 15dB of cut or boost and will provide dramatic changes with just some minor adjustments. It may be very different fromyour previous amps, so experiment with some moderate settings at first to gain a “feel” for how versatile a tool thisnetwork can be.Our GLOBAL section offers master controls of the internal Ruby Tubes® reverb, amplifier output volume and ourunique Attack circuit that provides a wide range of variable upper mid frequency boost that enhances pick attack andbite which is extremely effective as a lead boost and cutting through the mix.Overall, we ask you to take some time and experiment with the many options and tonal variations that you willdiscover at your fingertips within the <strong>EL</strong> <strong>DIABLO</strong> <strong>60</strong>. Reading through the OWNER’S MANUAL will give you anexcellent baseline of knowledge and insight as to the tone you can accomplish and harness for your individualplaying style.FRONT PAN<strong>EL</strong> OVERVIEW:WARM CHANN<strong>EL</strong>:1. ¼” INPUT JACK - This jack is unbalanced and high impedance to allow for the correct matching of the instrument’spick-ups with the input circuitry of the amplifier. The input circuitry has been carefully engineered to minimizepick-up loading and maximize tone and sustain. This is a tube buffered input stage. This is a premium 12AX7 tubespecifically selected for its low micro-phonics and high gain characteristics.2. GAIN CONTROL – The Warm channel Gain Control provides a variety of gain settings, from “spanky clean” to“pushed” vintage sustain.3. VOLUME CONTROL – This preamp volume controls the overall volume of the Warm channel. Use this controltogether with the Gain Control to balance out the overall output of this channel. If your channel Gain Control is set veryhigh, we do not recommend running this control “all the way up”. Due to the tremendous gain potential in our Tone section,this may cause some unwanted distortion.4-6. TONE SECTION – Three tone circuits are included for the Warm channel. The bass, mid and treblefrequencies have been pre-selected in order to provide articulate, full-range tone shaping response specificallytailored to the design of the <strong>EL</strong> <strong>DIABLO</strong> <strong>60</strong>. As you can see, these circuits provide a huge cut or boost of 15dB, offeringuntold flexibility in tone shaping. Use this section with subtle changes—click by click--at first so that you can gain a “feel”for the versatility of our tone network. We do not recommend running all tone controls at the full +15dB position, due tothe extreme gain this could cause along with some unwanted distortion of the network.7. REVERB CONTROL – This control pot adjusts the signal send level to the on-board Ruby Tubes® long pan reverb.This control works in conjunction with the global reverb control. Different styles of lush, or “splashy” warm analog reverbsare possible by running the channel reverb high and the global control low and also vise versa. Experiment withthese settings to find the sound that best suits your style.
HOT CHANN<strong>EL</strong>:8-10. CHANN<strong>EL</strong> S<strong>EL</strong>ECTOR SWITCH AND INDICATOR LIGHTS – This is your channel selector switch for the Warm orHot channels. The placement of this switch between the channels and the bright marker LED’s clearly illustrates whichchannel is active.11. GAIN SWITCH / CLASSIC or HIGH – This gain switch sets the gain structure for the Hot channel. Use this switchin conjunction with the Hot Channel Gain control. With a little experimentation it will be easy to hear that driving the gaincontrol in the maximum position is not as critical as on other amps. Articulate high gain splendor can be achieved withoutcranking the gain to 10. This switch should be in the out position when the footswitch is used.12. TEXTURE SWITCH / DYNAMIC or COMPRESSED – This switch changes the character of this tube channel.Changing from Dynamic to Compressed provides another tonal variation for the guitarist. The Compressed setting offersadditional compression of the signal along with a more aggressive, overdriven character, ideal for tight and punchy bassresponse. This feature is more distinctive depending upon the setting of the Gain Control. This switch should be in theout position when the footswitch is used.13. GAIN CONTROL – The Hot channel gain control provides a variety of gain settings; from a richly saturated clean toneto fully overdriven high gain nirvana. Use this control in conjunction with the Gain Switch for this channel. Lower settingswill provide a less overdriven tone.14.VOLUME CONTROL - This preamp volume controls the overall volume of the Hot channel. Use this control togetherwith the Gain Control and Gain Switch to set the overall volume of this channel. If your channel Gain control is set veryhigh, we do not recommend running this control “all the way up”. Due to the tremendous potential gain of the El Diablo <strong>60</strong>this may cause some unwanted feedback or squeal from the preamp tubes becoming micro-phonic.15. TUBE CONTOUR CONTROL – This is a unique circuit to the <strong>EL</strong> <strong>DIABLO</strong> design. This Contour control adds an additional“tone stack” within the tube preamp, which interacts with and changes the loading of the tube as the control knobis turned. When the control is left of center, it produces a more midrange tone and adds a more “vintage” character tothe tone. When used from the center position to the far right, it produces a more modern tone with more bass and highs.This circuit will also interact with the Classic and High gain settings and the Dynamic and Compressed settings.16-18. TONE SECTION – Three tone circuits are included for the Hot channel. The bass, mid and treble frequencieshave been pre-selected in order to provide articulate, full-range tone shaping response specifically tailored to thedesign of the <strong>EL</strong> <strong>DIABLO</strong> <strong>60</strong>. As you can see, these circuits provide a huge cut or boost of 15dB offering untold flexibilityin tone shaping. We do not recommend running all tone controls at the full +15dB position. To avoid having the preamptubes becoming micro-phonic and producing feedback or squeal, keep the treble and attack features to moderate (below2:00) settings, when using maximum gain settings at high volumes.19. REVERB CONTROL – This control pot adjusts the signal send level to the on-board ACCUTRONICS® long panreverb. This control works in conjunction with the global reverb control. Different styles of lush or “splashy” warm analogreverbs are possible by running the channel reverb high and the global control low and also vise versa. Experiment withthese settings to find the sound that best suits your style.20. GLOBAL ATTACK SWITCH – Different than a presence, this unique circuit boosts a specific range of upper midfrequencies which enhances pick attack and bite. This “frequency multiplier” circuit is extremely effective as a lead boostand helps to cut through the mix. This circuit can be engaged in either preamp channel or gain setting and can add amore aggressive attack to any tone setting on the amp. This switch should be in the out position when the footswitch isused.21. GLOBAL ATTACK LEV<strong>EL</strong> CONTROL – This level control provides a variable amount of Attack “boost” to the amp.22. GLOBAL REVERB CONTROL – This control adjusts the level of the reverb return signal from the on board RubyTubes® long pan reverb. This control works in conjunction with the channel reverb send controls to provide differentstyles of warm, lush analog reverb.
23. GLOBAL VOLUME CONTROL – This knob controls the final output stage of the amplifier and is the Master Volumefor the <strong>EL</strong> <strong>DIABLO</strong>. It should be noted that this control is best set between the 9 o’clock and 2 o’clock positions.Each channel volume should be adjusted accordingly to achieve the desired total amplifier output. For lower volumesettings, you can power the unit down to 30 watts with the PENTODE / TRIODE power level selector switch on theback panel.24. STANDBY SWITCH – The standby switch removes the high voltage from the plate circuit of the output tubes toprotect the tubes from “cathode stripping” when first powering up the amplifier. The recommended start-upprocedure is to place the standby switch in the standby position, turn on the power switch and allow the amplifier towarm up for at least 30 seconds before switching the standby switch to the operate position. This will help to prolongthe life of your output tubes.25. POWER SWITCH – This switch turns on the AC power to the amp. When this switch is turned on, power is appliedto the heater circuits of all tubes, the high voltage power supplies are allowed to stabilize and the low voltagepower supplies are energized. Power should be switched on only with the standby switch in the standbyposition. Refer to #24 for information concerning the operation of the standby function.REAR PAN<strong>EL</strong> OVERVIEW:1. VOLTAGE CHART – Your <strong>EL</strong> <strong>DIABLO</strong> <strong>60</strong> is truly a “world class” amplifier. This voltage chart is provided so thatchoosing the correct fusing for the desired international country is simple and accurate. The <strong>EL</strong> <strong>DIABLO</strong>’s internalpower transformer can be re-wired for 100 volt use for JAPAN.WARNING: ONLY A FACTORY QUALIFIED SERVICE TECHNICIAN SHOULD EVER ATTEMPT THIS ALTERA-TION.2. VOLTAGE S<strong>EL</strong>ECTOR SWITCH - This switch changes the voltage of the AC power with which the amp will operate.115 volts is the standard in the USA and CANADA. 230 volts is the standard for most of EUROPE and SOUTHAMERICA. Consult the voltage chart if you plan to use this amp for a different voltage other than how it was shippedfrom the factory so that the proper fuse can be inserted. The <strong>DIABLO</strong> <strong>60</strong> is rated for operation on both 50 Hz and <strong>60</strong>Hz power sources.3. IEC RECEPTACLE & FUSE HOLDER – The detachable power cord should be inserted here before the cord isplugged into an AC power source. Within the bottom portion of this receptacle is a small drawer that holds the mainspower fuse. An extra fuse is included in this plastic receptacle. It may be necessary to use a small tool to pry thesmall drawer open.WARNINGS:• NEVER OPEN THIS FUSE HOLDER WITH THE POWER CORD PLUGGED IN .• USE ONLY THE FUSE VALUE AS INDICATED IN THE VOLTAGE CHART.• NEVER ATTEMPT TO DISABLE THE MAINS POWER FUSE.4. FOOTSWITCH INPUT – This 5 pin DIN connector is where <strong>EL</strong> <strong>DIABLO</strong>’s 4-button footswitch should be attached.A 25-foot cord is attached to the heavy-duty steel footswitch. This should provide plenty of room for the performerto get out in front of the amp. Some internal circuitry “clicking” may be heard if the amp is on when this footswitch isplugged in. This is normal and is actually part of the circuitry that provides the noiseless switching on the <strong>EL</strong> DIAB-LO <strong>60</strong>. NOTE: The front panel function switches over-ride the footswitch functions. The front panel function switchesshould be in the out position when the footswitch is used.
5. EFFECTS LOOP – The <strong>EL</strong> <strong>DIABLO</strong> is designed with a serial effects loop. The effects loop is a post master sectionloop and is an ideal place to send the entire preamp signal out to another amp using only the send jack, or toinsert a global effect such as a compressor (serial effect) or a digital effects processor (a serial effect when used withthe processor’s own “wet/dry” mix control). The return is also a handy input for connecting the power amp stage tothe output of another preamp or signal source.6. LINE OUTPUT – This ¼” jack provides an unbalanced signal that is derived after the power amplifier and outputtransformer. This line level output is ideal for driving a powered speaker that requires a line level input, or for drivingan additional instrument amplifier that requires an instrument level signal. This signal is frequency compensated toemulate the same tone coming through the amplifiers speaker cabinet.7. SPEAKER OUTPUTS – These parallel speaker jacks are provided for connecting to the guitar cabinet of choice.It is important to become familiar with using the impedance selector switch and impedance calculator so that theproper cabinet impedance is selected for the safe and efficient operation of this high output tube amplifier. Note: TheEl Diablo <strong>60</strong> combo version comes loaded with an 8-ohm loudspeaker.WARNINGS:• NEVER UNPLUG THE SPEAKER CABLE FROM THE GUITAR CABINET WHEN THE AMP IS ON!!!• DO NOT OPERATE THIS AMP WITHOUT A SPEAKER LOAD PLUGGED INTO ONE OF THE SPEAKERJACKS.• THE <strong>EL</strong> <strong>DIABLO</strong> <strong>60</strong> OFFERS SOME PROTECTION AGAINST THIS DAMAGE BUT IT IS NEVER A GOODIDEA TO OPERATE ANY TUBE AMP WITHOUT A SPEAKER LOAD ATTACHED.8. IMPEDANCE S<strong>EL</strong>ECTOR SWITCH – This 3 position switch is designed to easily select the appropriate outputtransformer impedance tap for the desired cabinet load being used. A 16 ohm, 8 ohm and 4 ohm position is offered.It is important to know the total impedance of the guitar cabinets being used with your amp. It is importantfor amplifier performance, tube life and output transformer protection to select the correct impedance for your chosenguitar cabinet. Consult the rear panel impedance calculator for this information.9. IMPEDANCE CALCULATOR – As part of making the GENZ BENZ <strong>EL</strong> <strong>DIABLO</strong> <strong>60</strong> both user- friendly and convenientto use, we have included a comprehensive impedance chart so that this information is always accessible to theuser.10. PENTODE <strong>60</strong>/TRIODE 30 POWER MODE – This switch easily and safely reduces the output power of the ampfrom <strong>60</strong> watts to 30 watts by changing the parameters by which the power tubes function—Pentode or Triode. In the<strong>60</strong>-watt PENTODE MODE, the amp responds with its “spanky”, rich Clean tone and Classic overdrive sustain, allthe way into aggressive Hi Gain brutality and all points in between. In the 30-watt TRIODE MODE, the El Diablo <strong>60</strong>produces a more vintage, fuller, fatter tone with a more dynamic response and increased power tube break-up with adarker complexity.
Pentode/Triode Background Information – The native mode of virtually all power tubes in guitar amplification isthe power pentode. In a conventional pentode topology fixed bias amplifier, the screen grid connects to the screensupply via screen resistors and the screen potential varies (somewhat) with the audio signal thus increasing theefficiency of the amplifying process and maintaining more controlled linear high frequency response. There is asonic difference that is added by these additional control elements though, and some may prefer alternate modes ofoperation.Power triodes do have a mellowness and warmth that is a desirable tonal character for many players. A true powertriode has only an anode, cathode and one control grid. Without suppressor (and beam forming) grids, there is alack of control of the electron stream, which can cause electrons to stray from the intended path and collide withunintentional targets. This wastes energy and thus efficiency, but provides a unique tonal character that guitaristsseek. Fortunately, several methods exist that allow us to operate pentode power tubes in triode mode by fixing thescreen grid more solidly to the plate supply (with the TRIODE/PENTODE switch), effectively eliminating the screen’s“useful” effect from the circuit. This “false-triode” mode effectively makes the circuit (including the tube itself) behaveas a power triode. The high frequency character changes, the output impedance changes, and the circuit’s efficiencydecreases just as one would expect from a power triode output circuit. This provides the mellower/darkercomplexity of the amp in the Triode mode. This is a personal choice that is available to you on the El Diablo <strong>60</strong> andprovides you the flexibility for further experimentation in tone.TUBE BIAS SECTION – The Tube Selector switch is provided for setting the correct bias for the power tubesused. The <strong>EL</strong> <strong>DIABLO</strong> <strong>60</strong> ships from the factory with a matched set of Ruby Tubes® <strong>EL</strong> 34 power tubes. The <strong>EL</strong><strong>DIABLO</strong> will also operate with 6L6 or 5881 power tubes. When using either of these tubes, the bias should be set tothe 6L6 position. For harmonic complexity and maximum power, we recommend <strong>EL</strong>34’s. When switching the tubetypes or brand of tubes, your amp should be re-biased to obtain optimum performance, tone and tube longevity.SETTING THE BIAS – Generally your amp will only need to be re-biased if you are replacing the power tubes.However, if you replace the Ruby Tubes® <strong>EL</strong>34 power tubes with the same brand and type having the same “PC’number located on the label at the base of the tube, then re-biasing is not necessary. To re-bias your amp you willneed a small screwdriver and a multi-meter or volt/ohm meter set to measure DC voltage. (If you do not have thisequipment, skill, experience or do not feel comfortable making these adjustments, you should have a qualified technicianperform this procedure.)1. First make sure the Tube Selector switch located in the Tube Bias section on the rear panel matches thetube type installed. Then, with the Master Volume turned all the way down, turn the Power switchON leaving the Standby switch in the Standby position.2. Set your test meter to read DC voltage. Then place the negative (black) lead of your meter into the blackTest Point located in the Tube Bias section on the rear panel. Then place the positive (red) lead ofyour meter into the red Test Point. Depending on the size of your test leads, you may have to hold them inthe Test Points to assure a good connection.3. After the tubes have warmed up for about a minute, turn the Standby switch to the Operate position andread the voltage on your meter. With a small screwdriver, you will need to adjust the Bias Adjust trimpot located just above the Test Points so that your meter reads about 0.<strong>60</strong>0 volts if you are using <strong>EL</strong>34tubes and about 0.450 volts if you are using 6L6 tubes. Turning the Bias Adjust trim pot clockwisewill increase the voltage and turning it counterclockwise will decrease the voltage.4. After initially setting the bias, allow your amp to warm up for about 5 more minutes then retest and readjustthe bias as indicated above. Exact readings are not critical and some fluctuation is normal. Just try to getas close to the target voltage as possible.5. Your amp is now biased and ready to play!Tube Bias Background Information – All amplifiers (solid-state or tube) require bias to work properly. In a singleended amplifier, the requirements are simple in that the tube should be “biased” or operated so that with no signalpresent, DC current should flow through the output stage (tube and transformer) at approximately 1/2 the maximumdesign value. When the signal transitions “positive”, the current increases from the quiescent position and when thesignal transitions “negative”, the current decreases from the quiescent position. So you can see that if there was nobias, there would be no quiescent current, thus no way to operate properly for the negative “going” portion of thesignal, limiting the negative side of the waveform. Too much bias would limit the amount of current you could add forpositive “going” signals, limiting that side of the waveform.
For a push-pull output stage (tube amps), the scenario is different, since one tube amplifies the positive “going”portion of the signal and the other tube amplifies the negative “going” portion of the signal. In fact, if the world wasperfect, we would need no bias since the positive side of zero would be handled completely by one tube and thenegative side of zero would be handled completely by the other tube. This would be the proper definition of “classB operation”. Since tubes are not perfect devices, the transition at zero is not very linear… as one tube turns off,the other tube may not be quite ready to turn on. This can lead to a discontinuity of the signal around zero which isthe worst possible place for it to occur—as it is highly audible and rather ugly sounding. The solution once again isto bias both tubes slightly “on” to allow for a more graceful handoff between the positive and negative sides of thesignal, called “AB operation”. This is done by adjusting the bias just enough to achieve the necessary results. Toomuch bias and current will be wasted as heat dissipates within the power tubes and output transformer, greatlyshortening your power tube’s useful life. Too little bias may give the amp a cold, grainy texture.WARNINGS:· POWER TUBES BECOME VERY HOT DURING AND AFTER BEING USED.· NEVER CHANGE THE POWER TUBES UNTIL THEY HAVE COOLED FOR AT LEAST 15 MINUTES.· NEVER CHANGE THE TUBES WITH THE AMP ON!!!· DANGEROUS AND/OR LETHAL HIGH VOLTAGES ARE PRESENT INSIDE THE AMPLIFIER CHASSIS.REFER ALL SERVICING TO QUALIFIED SERVICE PERSONS.SPEAKER CABINET (combo version)• The El Diablo <strong>60</strong> combo’s enclosure is constructed from ¾” birch plywood in a rear-ported cabinet design. Thishelps to support the low frequency response of the internal loudspeaker.• The loudspeaker is our GBE 1240-V75 loudspeaker—the same model used in our popular GFLEX cabinets.• The combo offers a removable back if desired, but we recommend keeping the back attached for the full responseof the El Diablo <strong>60</strong>’s brute force.GETTING STARTED:• Since your <strong>EL</strong> <strong>DIABLO</strong> <strong>60</strong> ships with all tubes installed and the amplifier fully tested, biased and burned-in at thefactory, the user set-up is quite simple.• Un-box your <strong>EL</strong> <strong>DIABLO</strong> and verify that the AC input voltage selector switch matches the power in your area.• Verify that you have the correct mains cord-set for your area. This piece of information is primarily for ourinternational customers who may have a choice of power receptacles in their country.• Make sure to send in your warranty registration card.• Read your owner’s manual. There is valuable information and safety tips in this manual and the knowledge youlearn here will translate into enjoyable quality tone for years to come.OPERATING EXAMPLES:The sample settings that follow are intended as guidelines and a starting place to help you explore all the tones yournew El Diablo has to offer.Ultimately, your guitar, pickups and technique will have a tremendous effect on your tone; adjust these settings tosuit your own unique style. Please remember though, your El Diablo has a highly reactive EQ section. The controlshave detents to encourage the player to use subtle adjustments. You will be amazed how a “few clicks” will changethe tone and feel of your amp.DROP TUNINGHigh gain, modern metal(Pentode Mode)
INDUSTRIALTight grind with edge(Pentode Mode)CLASSIC EDGE “BROWN” SOUNDNeed we say more?(Pentode Mode)HI-GAIN BRITTISH STACK(Pentode Mode)“BLACK MAGIC WOMAN”Warm and vocal solo time(Triode Mode)BLACK FACE WARMTHSetting is very touch sensitive-Dig in for a nice break-up(Triode Mode)CRUNCH RHYTHMTurn up the master for tons of bark and grind(Pentode Mode)
TEXAS THINGBig and gritty(Pentode Mode)HOT BLUESExpressive lead tone with gain clarity(Pentode Mode)WOOLY BLUESGreat vintage blues overdrive(Triode Mode)WARM JAZZ(Pentode Mode)SPANK & SPARKLEAdd a touch of reverb for a Chicago blues tone(Pentode Mode)TUBE COMPLIMENT (as shipped):1 ea. 12AX7CZ(Tesla/JJ)2 ea. 12AX7AC4(Ruby Tubes)2 x <strong>EL</strong> 34(RubyTubes)10
SPECIFICATIONS: (All Models)RATED OUTPUT POWER:2 x <strong>EL</strong> 34 power tubes: Pentode <strong>60</strong> watts / Triode 30 watts2 x 6L6 power tubes: Pentode 50 watts / Triode 25 wattsPOWER CONSUMPTION:350 watts max.FUSES:Main power fuse (rear panel): 3 amp Slo Blo (100v, 115v), 1.5 amp Slo Blo (230 v)Power tube heater fuse (internal): 3 amp Slo BloCHANGING TUBES:Always use caution when changing tubes. The power switch on the amplifier should be turned off and the powercable unplugged from the source.CHANGING POWER TUBES - The tubes should be cool. When changing the power amp tubes slip off the springloadedsilver tube retainer and carefully work the tubes out of the ceramic socket by pulling down while rockingthe tube slightly and gently. When re-installing power tubes, note that both the tube base and the pin positions are“keyed” to the socket. Make sure that you seat the tube base properly in the socket and carefully push it tight intothe socket. Confirm that the BIAS SWITCH is in the correct position for the type of power tubes being used.CHANGING PREAMP TUBES - The tubes should be cool. Each preamp tube is secured with a special tube retainerthat keeps the tube seated properly and also helps to counter-act unwanted tube micro-phonics. A small Phillipsscrewdriver will be needed to unscrew the round tube retainer. After this retainer has been removed, rock the tubeslightly and gently while pulling up on the tube and remove it carefully. When re-installing preamp tubes, note thatthe pin positions are “keyed” to the socket. Make sure that you seat the tube pins properly in the socket and carefullypush it tight into the socket. Reattach the round tube retainer. Make sure the rubber grommet inside the tuberetainer securely holds down the preamp tube.Important note: It is critical to the optimum performance of the El Diablo <strong>60</strong> that a premium high grade12AX7 tube is used for the first tube in the signal chain (located directly behind the input jack). This tubemust be selected for its very low micro-phonic content in order to minimize high gain feedback or squeal inthe Hot channel when using maximum gain settings at high volumes.OUTPUT TUBE BIAS – Refer to the Tube Bias Section listed previously in this owner’s manual.WARNING!• The use and operation of this device constitutes an agreement of full release of any and all liability connected withits use. Only persons familiar with the operation of high-powered professional audio equipment should attempt tooperate this device.• In addition, by use of this device, the user agrees to hold <strong>Genz</strong> <strong>Benz</strong> and its designers, sales agents, and all otheraffiliates and related parties harmless in the event of any accident, injury, damage or loss resulting from such use.• Manufacturer’s sole responsibility is to provide a warranty on the specified performance of the product under normaloperating conditions for a period of 3 years.11
THREE YEAR LIMITED WARRANTYTRANSFERABLE<strong>Genz</strong> <strong>Benz</strong> warrants the <strong>EL</strong> <strong>DIABLO</strong> <strong>60</strong> to be free from defects in materials and workmanship, for a period of 3 yearsfrom the date of purchase, when purchased from an authorized <strong>Genz</strong> <strong>Benz</strong> dealer.Tubes are warranted for a period of 6 months from the date of purchase.Visit www.genzbenz.com for complete warranty information.SAFE OPERATING REQUIREMENTS:• Never set an amplifier on anything that will tip over or collapse under its weight.• Provide a minimum distance of 25.4 mm (1 inch) around all sides of the amplifier for sufficient ventilation. Theventilation should not be impeded by covering the amplifier’s vent openings with items such as newspapers, tablecloths, curtains, etc.• No naked flame sources, such as lighted candles, should be placed on the El Diablo <strong>60</strong> amplifier.• This amplifier should not be exposed to dripping or splashing and no objects filled with liquids, such as vases or drinks,should be placed on this product.• The El Diablo <strong>60</strong> amplifier should be connected to a mains socket outlet (power receptacle) with a protective earth(ground) connection at all times.• The amplifiers mains plug (power plug) is considered the disconnect device and the connection must remain accessibleat all times.• This amplifier is capable of producing sound pressure levels that may cause hearing loss.• There are no user serviceable parts and hazardous operating voltages are present inside this unit. Always consult aqualified repair facility for service.Declaration of Conformity(89/336 EEC-EMC Directive)Manufacturer’s Name:Manufacturer’s Address:<strong>Genz</strong> <strong>Benz</strong>, a division of KMC Music Corporation7811 East Pierce StreetScottsdale, AZ 85287, U.S.A.Product Type:Audio AmplifierModel Number:<strong>EL</strong><strong>DIABLO</strong><strong>60</strong>, <strong>EL</strong><strong>DIABLO</strong><strong>60</strong>-C, <strong>EL</strong><strong>DIABLO</strong><strong>60</strong>-TSOperating Power Condition: 5/230 V, 50/<strong>60</strong> HzEffective Date: 01-01-2006Conforms to the Following Standards: [X] EN 55013: 2001 + A1: 2003[X] EN 55020: 2002 + A1: 2003[X] EN <strong>60</strong>065[X] IEC 61000-3.3: 1994 + A1: 2001[X] IEC 61000-4.2[X] IEC 61000-4.3[X] IEC 61000-4.4[ ] FCC 47CFR Part 15-B, Class B[X] RoHS Directive 2002/95/EC[X] WEEE Directive 2002/96/EC[X] CE Mark LV Directive 73/23 EEC7811 E. Pierce Street, Scottsdale, AZ 85257PH: 480-941-0705 FAX: 480-946-2412www.genzbenz.comA KMC Music Corporation Company, Bloomfield, CTREV 4<strong>Genz</strong> <strong>Benz</strong> and El Diablo are trademarks of <strong>Genz</strong> <strong>Benz</strong>/KMC Music12