

2012 DINGHY ROUNDUP - Towing World
2012 DINGHY ROUNDUP - Towing World
2012 DINGHY ROUNDUP - Towing World

Create successful ePaper yourself
Turn your PDF publications into a flip-book with our unique Google optimized e-Paper software.
TOWING ACCESSORIES<br />
The research has been done, the financing<br />
arranged, the papers signed … and that<br />
new dinghy vehicle is now sitting in your<br />
driveway. You’ve shopped carefully to pick a<br />
model that’s certified by its manufacturer for<br />
flat towing, you’ve checked the vehicle’s<br />
weight to confirm that it’s within your motorhome’s<br />
safe towing capabilities and you’ve<br />
ordered it with any requisite factory options to<br />
make it towable with all wheels rolling.<br />
Now what?<br />
As any seasoned motorhome owner will tell<br />
you, there are a lot of steps involved in getting<br />
a new vehicle to the point where it can be<br />
towed safely. Unfortunately, no automaker offers<br />
a plug-and-play solution that makes its<br />
products ready for safe dinghy towing right<br />
from the factory. Thus, it’s up to you (and perhaps<br />
a knowledgeable towing equipment<br />
dealer) to get the job done right.<br />
<strong>DINGHY</strong> WIRING<br />
One of the most important aspects of dinghy<br />
prep involves connecting the wiring between<br />
the two vehicles. Tail-, brake- and turn signals<br />
on the back of the dinghy are required in all 50<br />
states and all Canadian provinces, so this isn’t<br />
a step that you can overlook. (Neither side<br />
clearance nor backup lights are required, and<br />
are rarely used.)<br />
The most common source of dinghy wiring<br />
confusion centers on differences in the way the<br />
turn-signal lights are wired on various cars and<br />
motorhomes. Some models are wired to supply<br />
turn-signal power to the same bulbs that are<br />
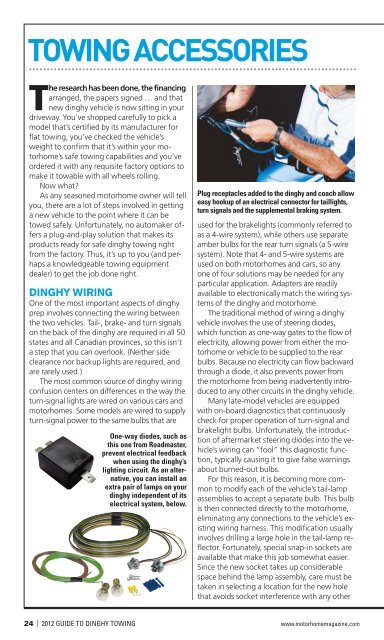
One-way diodes, such as<br />
this one from Roadmaster,<br />
prevent electrical feedback<br />
when using the dinghy’s<br />
lighting circuit. As an alternative,<br />
you can install an<br />
extra pair of lamps on your<br />
dinghy independent of its<br />
electrical system, below.<br />
Plug receptacles added to the dinghy and coach allow<br />
easy hookup of an electrical connector for taillights,<br />
turn signals and the supplemental braking system.<br />
used for the brakelights (commonly referred to<br />
as a 4-wire system), while others use separate<br />
amber bulbs for the rear turn signals (a 5-wire<br />
system). Note that 4- and 5-wire systems are<br />
used on both motorhomes and cars, so any<br />
one of four solutions may be needed for any<br />
particular application. Adapters are readily<br />
available to electronically match the wiring systems<br />
of the dinghy and motorhome.<br />
The traditional method of wiring a dinghy<br />
vehicle involves the use of steering diodes,<br />
which function as one-way gates to the flow of<br />
electricity, allowing power from either the motorhome<br />
or vehicle to be supplied to the rear<br />
bulbs. Because no electricity can flow backward<br />
through a diode, it also prevents power from<br />
the motorhome from being inadvertently introduced<br />
to any other circuits in the dinghy vehicle.<br />
Many late-model vehicles are equipped<br />
with on-board diagnostics that continuously<br />
check for proper operation of turn-signal and<br />
brakelight bulbs. Unfortunately, the introduction<br />
of aftermarket steering diodes into the vehicle’s<br />
wiring can “fool” this diagnostic function,<br />
typically causing it to give false warnings<br />
about burned-out bulbs.<br />
For this reason, it is becoming more common<br />
to modify each of the vehicle’s tail-lamp<br />
assemblies to accept a separate bulb. This bulb<br />
is then connected directly to the motorhome,<br />
eliminating any connections to the vehicle’s existing<br />
wiring harness. This modification usually<br />
involves drilling a large hole in the tail-lamp reflector.<br />
Fortunately, special snap-in sockets are<br />
available that make this job somewhat easier.<br />
Since the new socket takes up considerable<br />
space behind the lamp assembly, care must be<br />
taken in selecting a location for the new hole<br />
that avoids socket interference with any other<br />
24 | <strong>2012</strong> GUIDE TO <strong>DINGHY</strong> TOWING www.motorhomemagazine.com