Download - Zimmer Dental
Download - Zimmer Dental
Download - Zimmer Dental
- No tags were found...

You also want an ePaper? Increase the reach of your titles
YUMPU automatically turns print PDFs into web optimized ePapers that Google loves.
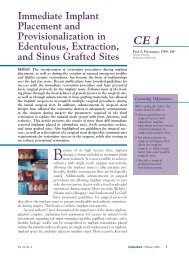
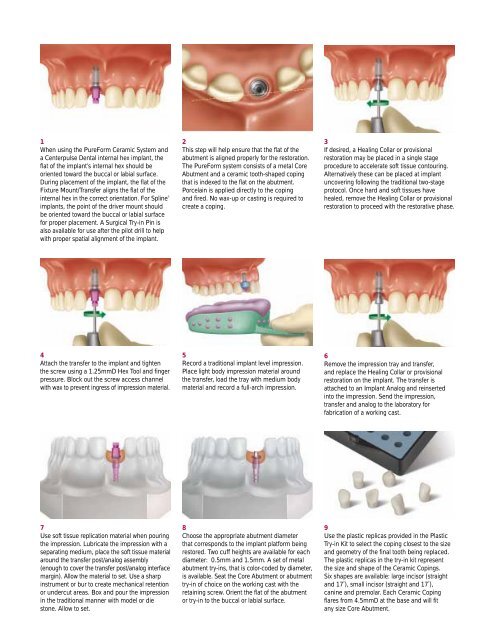
1When using the PureForm Ceramic System anda Centerpulse <strong>Dental</strong> internal hex implant, theflat of the implant’s internal hex should beoriented toward the buccal or labial surface.During placement of the implant, the flat of theFixture Mount/Transfer aligns the flat of theinternal hex in the correct orientation. For Spline ®implants, the point of the driver mount shouldbe oriented toward the buccal or labial surfacefor proper placement. A Surgical Try-in Pin isalso available for use after the pilot drill to helpwith proper spatial alignment of the implant.2This step will help ensure that the flat of theabutment is aligned properly for the restoration.The PureForm system consists of a metal CoreAbutment and a ceramic tooth-shaped copingthat is indexed to the flat on the abutment.Porcelain is applied directly to the copingand fired. No wax-up or casting is required tocreate a coping.3If desired, a Healing Collar or provisionalrestoration may be placed in a single stageprocedure to accelerate soft tissue contouring.Alternatively these can be placed at implantuncovering following the traditional two-stageprotocol. Once hard and soft tissues havehealed, remove the Healing Collar or provisionalrestoration to proceed with the restorative phase.4Attach the transfer to the implant and tightenthe screw using a 1.25mmD Hex Tool and fingerpressure. Block out the screw access channelwith wax to prevent ingress of impression material.5Record a traditional implant level impression.Place light body impression material aroundthe transfer, load the tray with medium bodymaterial and record a full-arch impression.6Remove the impression tray and transfer,and replace the Healing Collar or provisionalrestoration on the implant. The transfer isattached to an Implant Analog and reinsertedinto the impression. Send the impression,transfer and analog to the laboratory forfabrication of a working cast.7Use soft tissue replication material when pouringthe impression. Lubricate the impression with aseparating medium, place the soft tissue materialaround the transfer post/analog assembly(enough to cover the transfer post/analog interfacemargin). Allow the material to set. Use a sharpinstrument or bur to create mechanical retentionor undercut areas. Box and pour the impressionin the traditional manner with model or diestone. Allow to set.8Choose the appropriate abutment diameterthat corresponds to the implant platform beingrestored. Two cuff heights are available for eachdiameter: 0.5mm and 1.5mm. A set of metalabutment try-ins, that is color-coded by diameter,is available. Seat the Core Abutment or abutmenttry-in of choice on the working cast with theretaining screw. Orient the flat of the abutmentor try-in to the buccal or labial surface.9Use the plastic replicas provided in the PlasticTry-in Kit to select the coping closest to the sizeand geometry of the final tooth being replaced.The plastic replicas in the try-in kit representthe size and shape of the Ceramic Copings.Six shapes are available: large incisor (straightand 17˚), small incisor (straight and 17˚),canine and premolar. Each Ceramic Copingflares from 4.5mmD at the base and will fitany size Core Abutment.