Guns 2011-11.pdf - Jeffersonian
Guns 2011-11.pdf - Jeffersonian
Guns 2011-11.pdf - Jeffersonian
- No tags were found...
You also want an ePaper? Increase the reach of your titles
YUMPU automatically turns print PDFs into web optimized ePapers that Google loves.
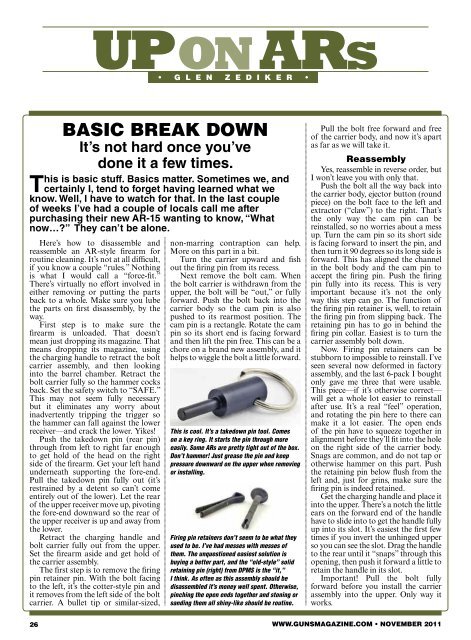
• G L E N Z E D I K E R •TBasic Break DownIt’s not hard once you’veHere’s how to disassemble andreassemble an AR-style firearm forroutine cleaning. It’s not at all difficult,if you know a couple “rules.” Nothingis what I would call a “force-fit.”There’s virtually no effort involved ineither removing or putting the partsback to a whole. Make sure you lubethe parts on first disassembly, by theway.First step is to make sure thefirearm is unloaded. That doesn’tmean just dropping its magazine. Thatmeans dropping its magazine, usingthe charging handle to retract the boltcarrier assembly, and then lookinginto the barrel chamber. Retract thebolt carrier fully so the hammer cocksback. Set the safety switch to “SAFE.”This may not seem fully necessarybut it eliminates any worry aboutinadvertently tripping the trigger sothe hammer can fall against the lowerreceiver—and crack the lower. Yikes!Push the takedown pin (rear pin)through from left to right far enoughto get hold of the head on the rightside of the firearm. Get your left handunderneath supporting the fore-end.Pull the takedown pin fully out (it’srestrained by a detent so can’t comeentirely out of the lower). Let the rearof the upper receiver move up, pivotingthe fore-end downward so the rear ofthe upper receiver is up and away fromthe lower.Retract the charging handle andbolt carrier fully out from the upper.Set the firearm aside and get hold ofthe carrier assembly.The first step is to remove the firingpin retainer pin. With the bolt facingto the left, it’s the cotter-style pin andit removes from the left side of the boltcarrier. A bullet tip or similar-sized,done it a few times.his is basic stuff. Basics matter. Sometimes we, andcertainly I, tend to forget having learned what weknow. Well, I have to watch for that. In the last coupleof weeks I’ve had a couple of locals call me afterpurchasing their new AR-15 wanting to know, “Whatnow…?” They can’t be alone.non-marring contraption can help.More on this part in a bit.Turn the carrier upward and fishout the firing pin from its recess.Next remove the bolt cam. Whenthe bolt carrier is withdrawn from theupper, the bolt will be “out,” or fullyforward. Push the bolt back into thecarrier body so the cam pin is alsopushed to its rearmost position. Thecam pin is a rectangle. Rotate the campin so its short end is facing forwardand then lift the pin free. This can be achore on a brand new assembly, and ithelps to wiggle the bolt a little forward.This is cool. It’s a takedown pin tool. Comeson a key ring. It starts the pin through moreeasily. Some ARs are pretty tight out of the box.Don’t hammer! Just grease the pin and keeppressure downward on the upper when removingor installing.Firing pin retainers don’t seem to be what theyused to be. I’ve had messes with messes ofthem. The unquestioned easiest solution isbuying a better part, and the “old-style” solidretaining pin (right) from DPMS is the “it,”I think. As often as this assembly should bedisassembled it’s money well spent. Otherwise,pinching the open ends together and stoning orsanding them all shiny-like should be routine.Pull the bolt free forward and freeof the carrier body, and now it’s apartas far as we will take it.ReassemblyYes, reassemble in reverse order, butI won’t leave you with only that.Push the bolt all the way back intothe carrier body, ejector button (roundpiece) on the bolt face to the left andextractor (“claw”) to the right. That’sthe only way the cam pin can bereinstalled, so no worries about a messup. Turn the cam pin so its short sideis facing forward to insert the pin, andthen turn it 90 degrees so its long side isforward. This has aligned the channelin the bolt body and the cam pin toaccept the firing pin. Push the firingpin fully into its recess. This is veryimportant because it’s not the onlyway this step can go. The function ofthe firing pin retainer is, well, to retainthe firing pin from slipping back. Theretaining pin has to go in behind thefiring pin collar. Easiest is to turn thecarrier assembly bolt down.Now. Firing pin retainers can bestubborn to impossible to reinstall. I’veseen several now deformed in factoryassembly, and the last 6-pack I boughtonly gave me three that were usable.This piece—if it’s otherwise correct—will get a whole lot easier to reinstallafter use. It’s a real “feel” operation,and rotating the pin here to there canmake it a lot easier. The open endsof the pin have to squeeze together inalignment before they’ll fit into the holeon the right side of the carrier body.Snags are common, and do not tap orotherwise hammer on this part. Pushthe retaining pin below flush from theleft and, just for grins, make sure thefiring pin is indeed retained.Get the charging handle and place itinto the upper. There’s a notch the littleears on the forward end of the handlehave to slide into to get the handle fullyup into its slot. It’s easiest the first fewtimes if you invert the unhinged upperso you can see the slot. Drag the handleto the rear until it “snaps” through thisopening, then push it forward a little toretain the handle in its slot.Important! Pull the bolt fullyforward before you install the carrierassembly into the upper. Only way itworks.26WWW.GUNSMAGAZINE.COM • NOVEMBER <strong>2011</strong>


