Owner's Manual (.pdf) - Larsen & Brusgaard
Owner's Manual (.pdf) - Larsen & Brusgaard
Owner's Manual (.pdf) - Larsen & Brusgaard
- No tags were found...
Create successful ePaper yourself
Turn your PDF publications into a flip-book with our unique Google optimized e-Paper software.
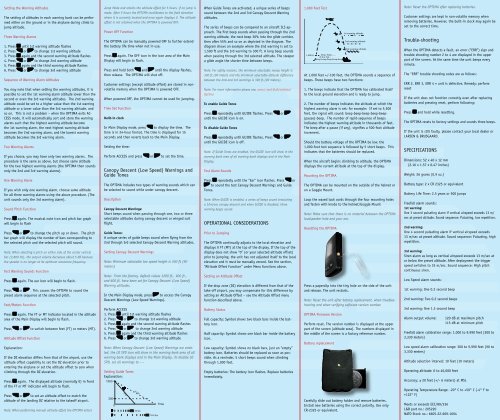
Setting the Warning AltitudesThe setting of altitudes in each warning bank can be performedeither on the ground or in the airplane during climb tojump altitude.Three Warning Alarms1. Press until 1st warning altitude flashes2. Press or to change 1st warning altitude3. Press again and the second warning altitude flashes4. Press or to change 2nd warning altitude5. Press again and the third warning altitude flashes6. Press or to change 3rd warning altitudeSequence of Warning Alarm AltitudesYou may note that when setting the warning altitudes, it ispossible to set the 1st warning alarm altitude lower than thesecond or even the 3rd warning altitudes. The 2nd warningaltitude could be set to a higher value than the 1st warningaltitude or a lower value than the 3rd warning altitude, andso on. This is not a problem – when the OPTIMA exits AC-CESS mode, it will automatically sort and store the warningalarms such that the highest warning altitude becomethe 1st warning alarm, the next highest warning altitudebecomes the 2nd warning alarm, and the lowest warningaltitude becomes the 3rd warning alarm.Two Warning AlarmsIf you choose, you may have only two warning alarms. Theprocedure is the same as above, but choose same altitudefor the two highest warning alarms (the OPTIMA then soundsonly the 2nd and 3rd warning alarms).One Warning AlarmIf you wish only one warning alarm, choose same altitudefor all three warning alarms using the above procedure. (Theunit sounds only the 3rd warning alarm).Sound Pitch FunctionPress again. The musical note icon and pitch bar graphwill begin to flashPress or to change the pitch up or down. The pitchbar graph will display the number of bars corresponding tothe selected pitch and the selected pitch will sound.Note: When selecting a pitch on either side of the center verticalbar (3,800 Hz), the output volume decreases about 5 dB becausethe speaker is no longer at its optimum resonance frequency.Test Warning Sounds FunctionPressagain. The ear icon will begin to flash.Press or . This causes the OPTIMA to sound thepreset alarm sequence at the selected pitch.Feet/Meters FunctionPress again. The FT or MT indicator located in the altitudearea of the Main Display will begin to flash.Press or to switch between feet (FT) or meters (MT).Altitude Offset FunctionExplanation:If the DZ elevation differs from that of the airport, use thealtitude offset capability to set the DZ elevation prior toentering the airplane or set the altitude offset to zero whenclimbing through the DZ elevation.Press again. The displayed altitude (normally 0) in frontof the FT or MT indicator will begin to flash.Press or to set an altitude offset to match thealtitude of the landing DZ relative to the takeoff airport.Note: When performing manual altitude offset the OPTIMA entersJump Mode and retains the altitude offset for 5 hours, if no jump ismade. After 5 hours the OPTIMA recalibrates to the field elevationwhere it is currently located and once again displays 0. The altitudeoffset is not retained when the OPTIMA is powered OFF.Power OFF FunctionThe OPTIMA can be manually powered OFF to further extendthe battery life time when not in use.Press again. The OFF icon in the icon area of the MainDisplay will begin to flash.Press and hold both and until the display flashes,then release. The OPTIMA will shut off.Customer settings (except altitude offset) are stored in nonvolatilememory when the OPTIMA is powered OFF.When powered OFF, the OPTIMA cannot be used for jumping.Time Set FunctionBuilt-in clockIn Main Display mode, press to display the time. Thetime is in 24-hour format. The time is displayed for 15seconds and then reverts back to the Main Display.Setting the time:Perform ACCESS and press or to set the time.Canopy Descent (Low Speed) Warnings andGuide TonesThe OPTIMA includes two types of warning sounds which canbe selected to sound while under canopy descent.DescriptionCanopy Descent Warnings:Short beeps sound when passing through one, two or threeselectable altitudes during canopy descent or winged suitflight.Guide Tones:A unique series of guide beeps sound when flying from the2nd through 3rd selected Canopy Descent Warning altitudes.Setting Canopy Descent WarningsNote: Minimum selectable low speed height is 300 ft (90meters)Note: From the factory, default values 1200 ft., 900 ft.,and 600 ft. have been set for Canopy Descent (Low Speed)Warning altitudes.In the Main Display mode, press to access the CanopyDescent Warnings (Low Speed Warnings).Perform ACCESS1. Press until 1st warning altitude flashes2. Press or to change 1st warning altitude3. Press again and the second warning altitude flashes4. Press or to change 2nd warning altitude5. Press again and the third warning altitude flashes6. Press or to change 3rd warning altitudeNote: When Canopy Descent (Low Speed) Warnings are enabled,the LO SPD icon will show in the warning bank area of allwarning bank displays and in the Main Display. To disable LOSPD, set all warnings to - - -Setting Guide TonesExplanation: When Guide Tones are activated, a unique series of beepssound between the 2nd and 3rd Canopy Descent Warningaltitudes.The series of beeps can be compared to an aircraft ILS approach.The first beep sounds when passing through the 2ndwarning altitude, the next beep 30% into the glide corridor,then after 55% and so on as depicted in the diagram. Thediagram shows an example where the 2nd warning is set to1,500 ft and the 3rd warning to 300 ft. A long beep soundswhen passing through the 3rd selected altitude. The steepera glide angle the shorter time between beeps.Note: For safety reasons, the minimum selectable swoop height is300 ft.(90 meter) and the minimum selectable altitude differencebetween the 2nd and 3rd warnings is 300 ft.(90 meters).Note: For more information please see, www.L-and-B.dk/articles/OptimaTo enable Guide TonesPress repeatedly until GUIDE flashes. Press oruntil the GUIDE icon is on.To disable Guide TonesPress repeatedly until GUIDE flashes. Press oruntil the GUIDE icon is off.Note: If Guide Tones are enabled, the GUIDE icon will show in thewarning bank area of all warning bank displays and in the MainDisplay.Test Alarm SoundsPress repeatedly until the ”Ear” icon flashes. Press orto sound the test Canopy Descent Warnings and GuideTones.Note: When GUIDE is enabled, a series of beeps sound simulatinga 10m/sec canopy descent and when GUIDE is disabled, threewarning beeps sound.OPERATIONAL CONSIDERATIONSPrior to JumpingThe OPTIMA continually adjusts to the local elevation anddisplays 0 FT (MT) at the top of the display. If the top of thedisplay does not show “0” (or your selected altitude offset)prior to jumping, the unit has not adjusted itself to the localelevation and it must be manually zeroed. See the section,“Altitude Offset Function” under Menu functions above.Setting an Altitude OffsetIf the drop zone (DZ) elevation is different from that of thetake-off airport, you may compensate for this difference bysetting an Altitude Offset – see the Altitude Offset menufunction described above.Battery StatusFull capacity: Symbol shows two black bars inside the batteryicon.Half capacity: Symbol shows one black bar inside the batteryicon.Low capacity: Symbol shows no black bars, just an “empty”battery icon. Batteries should be replaced as soon as possible.As a reminder, 5 short beeps sound when climbingthrough 1,000 feet.Empty batteries: The battery icon flashes. Replace batteriesimmediately.1,000 Feet TestAt 1,000 feet +/-100 feet, the OPTIMA sounds a sequence ofbeeps. These beeps have two functions:1. The beeps indicate that the OPTIMA has calibrated itselfto the local ground elevation and is ready to jump.2. The number of beeps indicates the altitude at which thehighest warning alarm is set; for example: If set to 5,500feet, the signal will sound: beep-beep-beep-beep-beep-(pause)-beep. The number of rapid-sequence of beepsindicates the highest warning altitude in thousands of feet.The beep after a pause (if any), signifies a 500-foot altitudeincrement.Should the battery voltage of the OPTIMA be low, the1,000-foot test sequence is followed by 5 short beeps. Thisindicates that the batteries should be replaced.When the aircraft begins climbing to altitude, the OPTIMAdisplays the current altitude at the top of the display.Mounting the OPTIMAThe OPTIMA can be mounted on the outside of the helmet oron a Goggle Mount.Loop the waxed tack cords through the four mounting holesand fasten with knobs to the helmet/Goggle MountNote: Make sure that there is no material between the OPTIMAloudspeaker hole and your ear.Resetting the OPTIMAPress a paperclip into the tiny hole on the side of the unitand release. The unit restarts.Note: Reset the unit after battery replacement, when troubleshootingand when verifying software version number.OPTIMA Firmware VersionPerform reset. The version number is displayed at the upperpart of the screen (altitude area). The numbers displayed inthe middle of the screen is a factory reference number.Battery replacementCarefully slide out battery holder and remove batteries.Install new batteries using the correct polarity. Use onlyCR-2325 or equivalent.Note: Reset the OPTIMA after replacing batteries.Customer settings are kept in non-volatile memory whenremoving batteries. However, the built-in clock may again beset to the correct time.Trouble-shootingWhen the OPTIMA detects a fault, an error (“ERR”) sign andtrouble shooting number 2 to 4 are displayed in the upperpart of the screen. At the same time the unit beeps everyminute.The “ERR” trouble shooting codes are as follows:ERR 2, ERR 3, ERR 4 = unit is defective. Remedy: performresetIf the unit does not function correctly even after replacingbatteries and pressing reset, perform following:Pressand hold while resetting.The OPTIMA resets to factory settings and sounds three beeps.If the unit is still faulty, please contact your local dealer orLARSEN & BRUSGAARD.SPECIFICATIONSDimensions: 52 x 40 x 12 mm(2.16 x 1.57 x 0.47 inches)Weight: 26 grams (0.9 oz.)Battery type: 2 x CR 2325 or equivalentBattery Life Time: 2.5 years or 500 jumpsFreefall alarm sounds:1st warning:One 3 second pulsating alarm if vertical airspeed exceeds 13 m/sec at preset altitude. Sound sequence: Pulsating, low repetition.2nd warning:One 4 second pulsating alarm if vertical airspeed exceeds13 m/sec at preset altitude. Sound sequence: Pulsating, highrepetition.3rd warning:Siren alarm as long as vertical airspeed exceeds 13 m/sec ator below the preset altitude. After deployment the triggerspeed switches to 35 m/sec. Sound sequence: High pitchcontinuous siren.Low Speed alarm sounds:1st warning: One 0.2 second beep2nd warning: Two 0.2 second beeps3rd warning: One 1.3 second beepAlarm output volume:120 dB at maximum pitch115 dB at minimum pitchFreefall alarm calibration range: 1,000 to 9,990 feet (300 to3,330 meters)Low speed alarm calibration range: 300 to 9,990 feet (90 to3,330 meters)Altitude selection interval: 10 feet (10 meters)Operating altitude: 0 to 40,000 feetAccuracy: ± 20 feet (+/- 6 meters) at MSLOperating Temperature Range: -20° C to +50° C (-4° F to+122° F)Meets or exceeds EEC/89/336L&B part no.: 205220NATO Stock no.: 6605-22-609-1694


