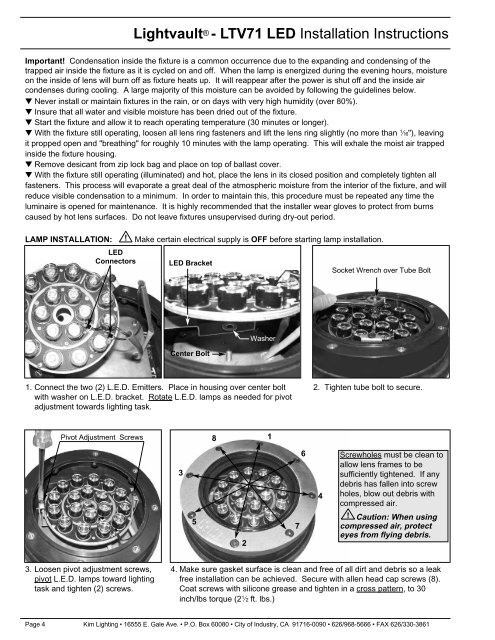
Lightvault ® - <strong>LTV71</strong> <strong>LED</strong> <strong>Installation</strong> <strong>Instructions</strong>Important! Condensation inside the fixture is a common occurrence due to the expanding and condensing of thetrapped air inside the fixture as it is cycled on and off. When the lamp is energized during the evening hours, moistureon the inside of lens will burn off as fixture heats up. It will reappear after the power is shut off and the inside aircondenses during cooling. A large majority of this moisture can be avoided by following the guidelines below.▼ Never install or maintain fixtures in the rain, or on days with very high humidity (over 80%).▼ Insure that all water and visible moisture has been dried out of the fixture.▼ Start the fixture and allow it to reach operating temperature (30 minutes or longer).▼ With the fixture still operating, loosen all lens ring fasteners and lift the lens ring slightly (no more than A"), leavingit propped open and "breathing" for roughly 10 minutes with the lamp operating. This will exhale the moist air trappedinside the fixture housing.▼ Remove desicant from zip lock bag and place on top of ballast cover.▼ With the fixture still operating (illuminated) and hot, place the lens in its closed position and completely tighten allfasteners. This process will evaporate a great deal of the atmospheric moisture from the interior of the fixture, and willreduce visible condensation to a minimum. In order to maintain this, this procedure must be repeated any time theluminaire is opened for maintenance. It is highly recommended that the installer wear gloves to protect from burnscaused by hot lens surfaces. Do not leave fixtures unsupervised during dry-out period.LAMP INSTALLATION:!<strong>LED</strong>ConnectorsMake certain electrical supply is OFF before starting lamp installation.<strong>LED</strong> BracketSocket Wrench over Tube BoltCenter BoltWasher1. Connect the two (2) L.E.D. Emitters. Place in housing over center boltwith washer on L.E.D. bracket. Rotate L.E.D. lamps as needed for pivotadjustment towards lighting task.2. Tighten tube bolt to secure.Pivot Adjustment Screws 81352764Screwholes must be clean toallow lens frames to besufficiently tightened. If anydebris has fallen into screwholes, blow out debris withcompressed air.! Caution: When usingcompressed air, protecteyes from flying debris.3. Loosen pivot adjustment screws,pivot L.E.D. lamps toward lightingtask and tighten (2) screws.4. Make sure gasket surface is clean and free of all dirt and debris so a leakfree installation can be achieved. Secure with allen head cap screws (8).Coat screws with silicone grease and tighten in a cross pattern, to 30inch/lbs torque (2K ft. lbs.)Page 4 <strong>Kim</strong> <strong>Lighting</strong> • 16555 E. Gale Ave. • P.O. Box 60080 • City of Industry, CA 91716-0090 • 626/968-5666 • FAX 626/330-3861
Lightvault ® - <strong>LTV71</strong> <strong>LED</strong> <strong>Installation</strong> <strong>Instructions</strong>KIM LIGHTING LIMITED WARRANTYWhen installed in accordance with <strong>Kim</strong> <strong>Installation</strong> <strong>Instructions</strong> and accepted trade practices, thefollowing shall apply:General Product Limited Warranty CoverageAll material and component parts used in the manufacture of <strong>Kim</strong> Products, are warranted to be freefrom defects of material and/or workmanship for a period of 1 year from date of sale, with the followingexceptions:Auxiliary EquipmentAll auxiliary equipment (such as lamps, ballasts, and transformers) provided by and/or included in <strong>Kim</strong>Products shall carry the component manufacturer's warranty.Copper and Bronze Landscape ComponentsCopper and Bronze Landscape fixture components shall be warranted against defects of materialand/or workmanship, and failure due to corrosion, for a period of 25 years from date of sale. <strong>Kim</strong><strong>Lighting</strong>'s brass components are constructed from several brass parts that are manufactured byvarious methods at various times. Since brass naturally deepens in color as it ages through the normaloxidation process, these parts may exhibit subtle differences in coloration when the product is new.This is normal and expected. These color differences will be eliminated shortly after installation throughthe normal brass oxidation process.Composite In-Grade ComponentsComposite In-Grade fixture components installed below grade, shall be warranted against defects ofmaterial and/or workmanship, and failure due to corrosion, for a period of 7 years from date of sale.Aluminum Landscape ComponentsAluminum Landscape fixture components not in direct contact with soil, shall be warranted againstdefects of material and/or workmanship for a period of 3 years from date of sale. Aluminum fixturecomponents in direct contact with soil shall be warranted from defects of material and failure fromcorrosion for a period of 1 year from date of sale.Stainless Steel ComponentsStainless steel landscape components (Lens Rings) installed in the outdoor environment shall showsigns of oxidation after 5 to 6 years of install and is dependent on the application and its environment.A proper maintenance and cleaning program will extend the beauty of the stainless steel.Limit of Liability and General ConditionsOnly products which are installed, used and maintained in accordance with applicable <strong>Kim</strong>instructions, specifications and accepted trade practices, are covered by the <strong>Kim</strong> Warranty. Duringthe warranty period, with proof of purchase, <strong>Kim</strong> will repair or replace with the same or similar product,at <strong>Kim</strong>'s option, without charge. Labor costs are the owner's responsibility and are excluded from thiswarranty. This warranty is void if the product is modified, tampered with, misapplied, poorly installed,improperly maintained, or subjected to abnormal conditions.Repair or replacement as provided under this warranty is the exclusive remedy of the purchaser. Thiswarranty is in lieu of all other warranties, expressed or implied, including any implied warranty of fitnessfor a particular application. <strong>Kim</strong> <strong>Lighting</strong> shall not be liable to the purchaser for indirect orconsequential damages.How may we serve you better?Please let us know. Visit our website at:www.kimlighting.comYour concerns are important to us.Page 5 <strong>Kim</strong> <strong>Lighting</strong> • 16555 E. Gale Ave. • P.O. Box 60080 • City of Industry, CA 91716-0080 • 626/968-5666 • FAX 626/330-3861


