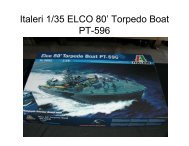
Italeri 1/35 Elco 80" PT-596 - ipmssantarosa
Italeri 1/35 Elco 80" PT-596 - ipmssantarosa
Italeri 1/35 Elco 80" PT-596 - ipmssantarosa
- No tags were found...

Create successful ePaper yourself
Turn your PDF publications into a flip-book with our unique Google optimized e-Paper software.
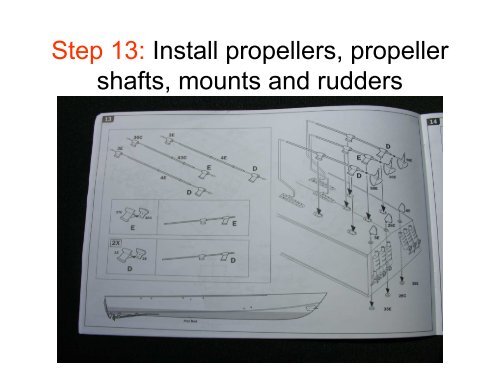
Step 13: Install propellers, propellershafts, mounts and rudders
Step 13: Propellers and ruddersinstalled
Step 14: Install deck on hull withscrews, assemble stand
Step 14: Deck has been installed onhull. Note next deck color done with oilpaints
Step 14: With the deck installed itsstarting to look like a <strong>PT</strong> boat
Step 15: .50 caliber gun turretassembly
Step 15: .50 caliber gun turretcomplete. Tissue was used for thecanvas ammo covers
Step 15: Both turrets completed
Step 16: Assemble port sidetorpedoes. Used thread instead of kitsupplied wire
Step 16: Port and starboard torpedoracks assembled
Step 16: Basic torpedoes assembled
Step 16: Port and starboard torpedoesassembled with PE fins
Step 16: Torpedo racks painted. Notethat one rack, the forward rack on theport side was dark grey, all others werelight grey
Step 16: Torpedoes painted and intheir racks
Step 17: Assemble starboard sidetorpedoes and racks
Step 17: Port side torpedo racksassembled
Step 17: Port side torpedoes in theirracks
Step 17: Port side torpedo and rackmounted on the deck
Step 18: Port side 5” rocket tubeassembly
Step 18: Rocket tube assembled. Notescratch built electrical boxes andconduits
Step 18: Rocket tubes after paintingand detailing
Step 19: Starboard rocket tubeassembly
Step 19: Rocket tubes assembled
Step 19: Rocket tube assembled andpainted
Step 19: Rocket tube installed on deck
Step 20: Assembly of the ready ammocontainers for the 20mm, 37mm and 5”rockets
Step 20: The 37mm containerscompleted and on the deck
Step 20: The 20mm ammo magazinesand box complete and on the deck
Step 21: Assembly of the 37mm and20mm cannons
Step 21: 20mm cannon completed.Note the shell catch bag made fromtissue and the grab bars were added
Step 21: 20mm completed and on thedeck
Step 21: 37mm completed andinstalled on the deck
Step 21: 37mm is complete except forthe operating handle which is moldedinto the figures hands.
Step 22: This step installs all of thepreviously assembled parts except .50MG canvas spray protector
Step 22: In this step I have taken tissueand wet it with white glue and placed iton the inside and outside of aft .50 MGspray deflector to simulate canvas
Step 22: You can see how the tissuestarts to wrinkle and look like canvas
Step 22: Here we see some of thedeck fittings that were placed wayback on Step 2
Step 22: Here is the aft .50MGposition with the simulated canvasaround it
Step 22: Some more completed itemsnow on the deck
Step 22: More completed parts havebeen installed on the deck
Step 23: Install more parts fromprevious steps onto the deck
Step 23: Completed parts installed ondeck
Step 23: Completed parts on thestarboard side
Step 23: Starboard torpedoes installed
Step 23: Starboard 5” rocket tubesinstalled
Step 24: Assembly of the 40mmcannon
Step 24: Cannon assembled. Notealuminum barrel
Step 25: Assembly complete. Part 30Dwas placed on the deck on a previousstep
Step 25: Assembly completed andpainted with Polly Scale Black-Green
Step 26: Assemble and place moredeck fittings that were placed in aprevious step. Also places 40mmcannon and assembles and paints theDingy.
Step 26: Dingy has been painted.Paper straps were used with the PE tiedown hardware
Step 26: 40mm cannon placed ondeck pedestal
Step 27: Assemble mast with PE radardish
Step 27: Mast assembled and primedwith Tamiya fine white primer
Step 27: Mast is now painted withpaper flag installed
Step 28: Places mast on deck house,stanchions for safety rope, and aftrunning light
Step 28: Mast placed on deck
Step 28: Stanchions and running lightpainted and placed on deck
Step 29: Assemble and paint theanchor and deck fittings. Place safetyrope
Step 29: Anchor rope placed
Step 29: Safety rope installed
Step 29: Anchor assembled andpainted and placed on deck
Step 29: This concludes the <strong>Italeri</strong> <strong>PT</strong>Boat kit parts. Figures and weatheringto follow