INSTRUCTION MANUAL - Ashford Hobby
INSTRUCTION MANUAL - Ashford Hobby
INSTRUCTION MANUAL - Ashford Hobby

You also want an ePaper? Increase the reach of your titles
YUMPU automatically turns print PDFs into web optimized ePapers that Google loves.
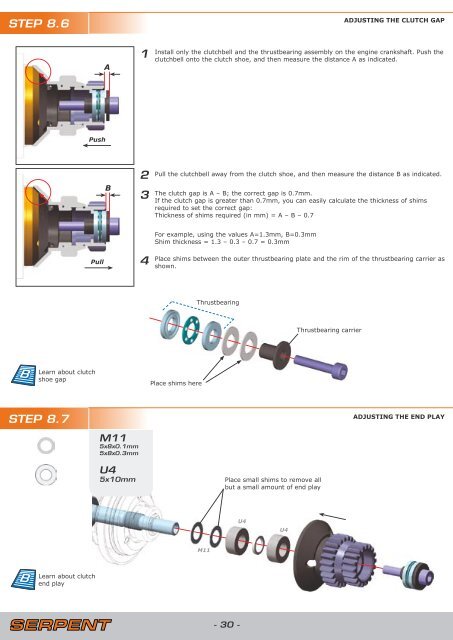
STEP 8.6ADJUSTING THE CLUTCH GAPA1Install only the clutchbell and the thrustbearing assembly on the engine crankshaft. Push theclutchbell onto the clutch shoe, and then measure the distance A as indicated.PushB23Pull the clutchbell away from the clutch shoe, and then measure the distance B as indicated.The clutch gap is A – B; the correct gap is 0.7mm.If the clutch gap is greater than 0.7mm, you can easily calculate the thickness of shimsrequired to set the correct gap:Thickness of shims required (in mm) = A – B – 0.7For example, using the values A=1.3mm, B=0.3mmShim thickness = 1.3 – 0.3 – 0.7 = 0.3mmPull4Place shims between the outer thrustbearing plate and the rim of the thrustbearing carrier asshown.ThrustbearingThrustbearing carrierLearn about clutchshoe gapPlace shims hereSTEP 8.7M115x8x0.1mm5x8x0.3mmU45x10mmPlace small shims to remove allbut a small amount of end playADJUSTING THE END PLAYU4U4M11Learn about clutchend play- 30 -