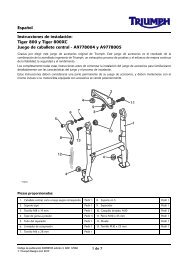
Footboard Control and Mounting Kit, Rider_UK EN.fm - Triumph ...
Footboard Control and Mounting Kit, Rider_UK EN.fm - Triumph ...
Footboard Control and Mounting Kit, Rider_UK EN.fm - Triumph ...

Create successful ePaper yourself
Turn your PDF publications into a flip-book with our unique Google optimized e-Paper software.
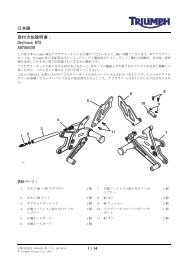
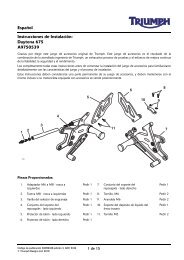
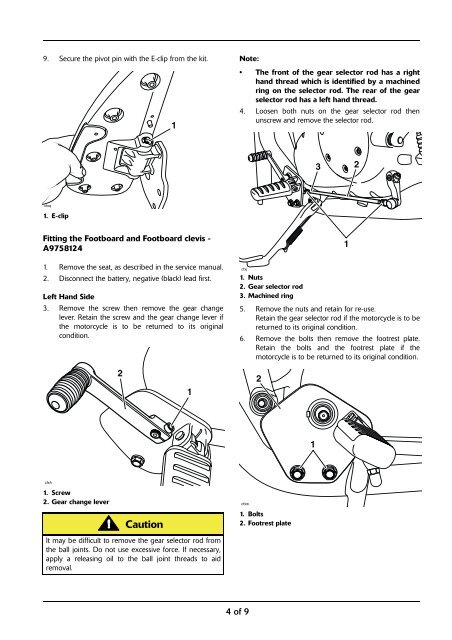
9. Secure the pivot pin with the E-clip from the kit.1Note:• The front of the gear selector rod has a righth<strong>and</strong> thread which is identified by a machinedring on the selector rod. The rear of the gearselector rod has a left h<strong>and</strong> thread.4. Loosen both nuts on the gear selector rod thenunscrew <strong>and</strong> remove the selector rod.32cfxq1. E-clipFitting the <strong>Footboard</strong> <strong>and</strong> <strong>Footboard</strong> clevis -A97581241. Remove the seat, as described in the service manual.2. Disconnect the battery, negative (black) lead first.Left H<strong>and</strong> Side3. Remove the screw then remove the gear changelever. Retain the screw <strong>and</strong> the gear change lever ifthe motorcycle is to be returned to its originalcondition.cfxj1. Nuts2. Gear selector rod3. Machined ring5. Remove the nuts <strong>and</strong> retain for re-use.Retain the gear selector rod if the motorcycle is to bereturned to its original condition.6. Remove the bolts then remove the footrest plate.Retain the bolts <strong>and</strong> the footrest plate if themotorcycle is to be returned to its original condition.12121cfxh1. Screw2. Gear change levercfxwCaution1. Bolts2. Footrest plateIt may be difficult to remove the gear selector rod fromthe ball joints. Do not use excessive force. If necessary,apply a releasing oil to the ball joint threads to aidremoval.4 of 9