How to refill “Cartridge Refillable 207 bar Alu / empty ... - Mammut
How to refill “Cartridge Refillable 207 bar Alu / empty ... - Mammut
How to refill “Cartridge Refillable 207 bar Alu / empty ... - Mammut

You also want an ePaper? Increase the reach of your titles
YUMPU automatically turns print PDFs into web optimized ePapers that Google loves.
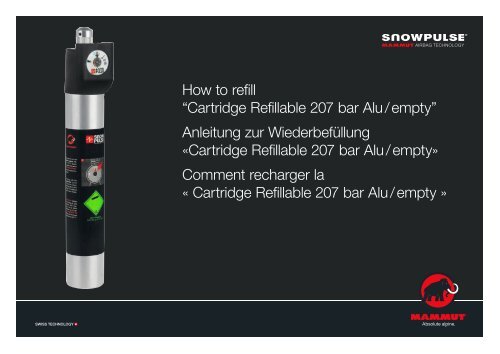
<strong>How</strong> <strong>to</strong> <strong>refill</strong><strong>“Cartridge</strong> <strong>Refillable</strong> <strong>207</strong> <strong>bar</strong> <strong>Alu</strong> / <strong>empty</strong>”Anleitung zur Wiederbefüllung«Cartridge <strong>Refillable</strong> <strong>207</strong> <strong>bar</strong> <strong>Alu</strong> / <strong>empty</strong>»Comment recharger la« Cartridge <strong>Refillable</strong> <strong>207</strong> <strong>bar</strong> <strong>Alu</strong> / <strong>empty</strong> »
Instructions for <strong>refill</strong>ing <strong>Mammut</strong>/Snowpulse Inflation System 2.0airbag cartridge <strong>207</strong> Bar <strong>Alu</strong>Introduction:The <strong>“Cartridge</strong> <strong>Refillable</strong> <strong>207</strong> Bar <strong>Alu</strong>” can be <strong>refill</strong>ed afteruse. It can also be exchanged/<strong>refill</strong>ed at various retail outletssuch as specialty retailers, dive shops or paintball s<strong>to</strong>resin the US and Canada. You can find official Refill Locationslisted on our website www.mammut.ch/airbagsThe cartridge was developed <strong>to</strong> match the Americanstandards, but can also be sold and used in Europe.Information for European Cus<strong>to</strong>mersThe cartridge can also be <strong>refill</strong>ed in Europe at paintball farmsor dive shops. The adapter between pressure source andcartridge is most likely <strong>to</strong> be available at paintball farms. Thenecessary adapter is not always available in European diveshops, but can be ordered at your <strong>Mammut</strong> dealer.Anleitung zur Wiederbefüllungdes <strong>Mammut</strong>/SnowpulseInflation System 2.0Airbag Cartridge <strong>207</strong> Bar <strong>Alu</strong>Einleitung:Die «Cartridge <strong>Refillable</strong> <strong>207</strong> Bar <strong>Alu</strong>» kann nach der Benutzungwiederbefüllt werden. In den USA und Kanada kannsie auch an verschiedenen Verkaufsstellen wie etwa Fachgeschäften,Tauchshops oder Paintballshops ausgetausch<strong>to</strong>der wiederbefüllt werden. Zugelassene Refill-Stationenfinden Sie auf unserer Website www.mammut.ch/airbagsDie Kartusche wurde nach US-amerikanischen Normenkonzipiert, kann aber auch in Europa verkauft und verwendetwerden.Informationen für Kunden in EuropaDie Kartusche kann auch in Europa in Paintballfarms oderTauchshops wiederbefüllt werden. Der Adapter zwischenDruckquelle und Kartusche ist in den meisten Paintballfarmsverfüg<strong>bar</strong>. In europäischen Tauchshops ist der erforderlicheAdapter nicht immer vorrätig, kann aber über Ihren <strong>Mammut</strong>-Händler bestellt werden.Instructions pour le remplissage descar<strong>to</strong>uches <strong>207</strong> Bar <strong>Alu</strong> pour airbagsdotés du <strong>Mammut</strong>/SnowpulseInflation System 2.0Introduction :La « Cartridge <strong>Refillable</strong> <strong>207</strong> Bar <strong>Alu</strong> » peut être rechargéeaprès utilisation. Elle peut également être échangée/rechargée à différents points de vente tels que les détaillantsspécialisés, les boutiques de plongée ou les magasins depaintball aux États-Unis et au Canada. Vous trouverez la listeofficielle de nos stations de remplissage sur notre site Webwww.mammut.ch/airbagsLa car<strong>to</strong>uche a été conçue pour répondre aux normesaméricaines, mais peut également être vendue et utilisée enEurope.Informations pour les clients européensLa car<strong>to</strong>uche peut également être rechargée en Europe surles terrains de paintball ou dans les boutiques de plongée.Un adaptateur entre la source de pression et la car<strong>to</strong>ucheest la plupart du temps disponible sur les terrains de paintball.L’adaptateur nécessaire n’est pas <strong>to</strong>ujours disponibledans les boutiques de plongée européennes, mais peut êtrecommandé auprès de votre revendeur <strong>Mammut</strong>.
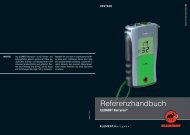
00The following <strong>to</strong>ols are needed for the <strong>refill</strong> operation:A Adapter Scuba Tank <strong>to</strong> Cartridge (US-Version or EU-Version).The “Adapter Scuba Tank <strong>to</strong> Cartridge” is the adap<strong>to</strong>rbetween a scuba tank and the <strong>“Cartridge</strong> <strong>Refillable</strong> <strong>207</strong> Bar<strong>Alu</strong>” <strong>to</strong> allow <strong>refill</strong> from a scuba tank.The US-Version is compatible with scuba tanks from the US/CA. The EU-Version is compatible with scuba tanks from EU.B Compressed air source (scuba tank or compressor). Ifscuba tanks are used, typically 2 or 3 tanks will be used insuccession <strong>to</strong> allow <strong>refill</strong> <strong>to</strong> a full 3000 psi.C Refill Kit (1× gasket ring and 1× burst disc)D Bench viseE Clear vessel full of water, large enough <strong>to</strong> submerge theentire air cartridge, and a soft brush.F Huskey HVS-100 Silicon greaseG A <strong>to</strong>rque wrench capable of measuring 24 new<strong>to</strong>n-metersor the equivalent (17.7 foot-pounds or 212.4 inch-pounds)with a 13/16" or 20 mm socketA EUCFolgendes Werkzeug brauchen Sie für die Wiederbefüllung:A Adapter Scuba Tank <strong>to</strong> Cartridge (US-Version oderEU-Version). Der «Adapter Scuba Tank <strong>to</strong> Cartridge» ist derAdapter zwischen einer Druckluftflasche und der «Cartridge<strong>Refillable</strong> <strong>207</strong> Bar <strong>Alu</strong>», der das Wiederbefüllen mit einerDruckluftflasche ermöglicht.Die US-Version ist mit US-amerikanischen und kanadischenDruckluftflaschen kompatibel. Die EU-Version ist mit europäischenDruckluftflaschen kompatibel.B Druckluftquelle (Druckluftflasche oder Kompressor). BeiDruckluftflaschen werden in der Regel 2 oder 3 Flaschenbenötigt, um die Kartusche komplett auf <strong>207</strong> <strong>bar</strong> (3000 psi)aufzufüllen.C Refill Kit (1 Dichtungsring und 1 Abdeckplättchen)D Schraubs<strong>to</strong>ckE Ein durchsichtiger Behälter mit Wasser, gross genugzum Eintauchen der gesamten Kartusche, und eine weicheBürste.F Huskey HVS-100 SilikonfettG Ein Drehmomentschlüssel zum Messen von 24 New<strong>to</strong>n-Metern (17,7 foot-pound bzw. 212,4 inch-pound) mit einer20 mm (13/16") NussLes outils suivants sont nécessaires pour effectuerl’opération de remplissage :A Adapter Scuba Tank <strong>to</strong> Cartridge (version américaineou européenne). L’« Adapter Scuba Tank <strong>to</strong> Cartridge » estl’adaptateur entre une bouteille de plongée et la « Cartridge<strong>Refillable</strong> <strong>207</strong> Bar <strong>Alu</strong> », qui permet un rechargement à partird’une bouteille de plongée.La version américaine est compatible avec des bouteillesde plongée américaines ou canadiennes. La versioneuropéenne est compatible avec des bouteilles de plongéeeuropéennes.B Source d’air comprimé (bouteille de plongée ou compresseur).En cas d’utilisation de bouteilles de plongée, 2 ou3 bouteilles successives sont généralement nécessairespour permettre un remplissage complet à 3 000 psi/<strong>207</strong> <strong>bar</strong>.C Kit de remplissage (1 joint et 1 disque de rupture)D Étau d’établiE Récipient transparent rempli d’eau, assez grand pourimmerger <strong>to</strong>ute la car<strong>to</strong>uche d’air, et brosse souple.F Graisse à base de silicone Huskey HVS-100G Clé dynamométrique capable de mesurer 24 new<strong>to</strong>nsmètresou l’équivalent (17,7 ft-lb ou 212,4 in-lb) avec douillede 20 mm (13/16")A US/CAProduct may vary from illustrationBDDEG
Important Notes––The cartridge has <strong>to</strong> be <strong>empty</strong>.––Empty the cartridge only with the trigger mechanism of theairbag system.––Don’t release the contents any other way (safety hazard).––Make sure that you <strong>refill</strong> the correct cartridge. Only the<strong>“Cartridge</strong> <strong>Refillable</strong> <strong>207</strong> Bar <strong>Alu</strong>” can be <strong>refill</strong>ed.––The <strong>“Cartridge</strong> Non-<strong>Refillable</strong> 300 Bar Steel” & “CarbonCartridge Non-<strong>Refillable</strong> 300 Bar” are EU-standard cartridgesand can only be <strong>refill</strong>ed at the manufacturer.––The cartridge must be filled <strong>to</strong> no more than <strong>207</strong> <strong>bar</strong> /3000 psi at 20 °C / 67 °F.––Always use a second pressure gauge <strong>to</strong> check the workingpressure when filling.––Only <strong>refill</strong> the cartridge with dry breathable air. Don‘t <strong>refill</strong>using any other type of air or compressed gas.––Check the pressure of the cartridge before EVERY use.– – If you have any doubt about this <strong>refill</strong> process have theinstallation checked by an expert, such as your dealer.You can find official Refill Locations listed on our websitewww.mammut.ch/cartridge-<strong>refill</strong>Wichtige Hinweise––Die Kartusche muss leer sein.––Leeren Sie die Kartusche nur mit dem Auslösemechanismusdes Airbagsystems durch eine Probeauslösung.––Entleeren Sie den Inhalt nicht auf andere Weise (Sicherheitsrisiko).––Achten Sie darauf, die richtige Kartusche wiederzubefüllen.Nur die «Cartridge <strong>Refillable</strong> <strong>207</strong> Bar <strong>Alu</strong>» kann wiederbefülltwerden.––Die «Cartridge Non-<strong>Refillable</strong> 300 Bar Steel» und «CarbonCartridge Non-<strong>Refillable</strong> 300 Bar» sind Kartuschen nachEU-Norm und können nur vom Hersteller wiederbefülltwerden.––Die Kartusche darf nur bis maximal <strong>207</strong> <strong>bar</strong> (3000 psi) bei20 °C (67 °F) befüllt werden.––Verwenden Sie immer einen zweiten Druckmesser, um denArbeitsdruck beim Befüllen zu prüfen.––Befüllen Sie die Kartusche nur mit trockener Atemluft.Befüllen Sie sie nicht mit anderer Luft oder Druckgas.––Überprüfen Sie vor JEDEM Gebrauch den Fülldruck derKartusche.––Wenn Sie sich bezüglich der Wiederbefüllung nicht sichersind, lassen Sie sich von einem Fachmann wie zumBeispiel Ihrem Händler helfen.Zugelassene Refill-Stationen finden Sie auf unserer Websitewww.mammut.ch/cartridge-<strong>refill</strong>Important––La car<strong>to</strong>uche doit être vide.––Videz uniquement la car<strong>to</strong>uche avec le mécanisme dedéclenchement du système d’airbag.––Ne libérez pas le contenu d’une quelconque autre manière(risque d’accident).––Assurez-vous de recharger la bonne car<strong>to</strong>uche. Seule la« Cartridge <strong>Refillable</strong> <strong>207</strong> Bar <strong>Alu</strong> » peut être rechargée.––La « Cartridge Non-<strong>Refillable</strong> 300 Bar Steel » et la « CarbonCartridge Non-<strong>Refillable</strong> 300 Bar » sont des car<strong>to</strong>uchesconformes aux normes européennes et peuvent uniquementêtre rechargées chez le fabricant.––La car<strong>to</strong>uche ne doit pas être remplie à plus de <strong>207</strong> <strong>bar</strong>/3 000 psi à 20 °C/67 °F.––Toujours utiliser un second manomètre pour vérifier lapression de service lors du remplissage.––Remplissez uniquement la car<strong>to</strong>uche avec de l’air secrespirable. N’utilisez pas d’autre type d’air ou de gazcomprimé pour le remplissage.––Vérifiez la pression de la car<strong>to</strong>uche avant CHAQUEutilisation.––Si vous avez un doute quant à la procédure de remplissage,faites vérifier l’équipement par un spécialiste tel quevotre revendeur.Vous trouverez la liste officielle de nos stations de remplissagesur notre site Webwww.mammut.ch/cartridge-<strong>refill</strong>
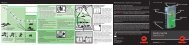
1. Prepare the Cartridge for Refilling01 Unscrew the cartridge from the airbag system.02 If your cartridge has a “Protective Housing” remove itfrom cartridge.03 Check that the cartridge is in good condition. Visuallyinspect for obvious corrosion or missing/broken parts.04 Make sure the cartridge is <strong>empty</strong>. It is <strong>empty</strong> when thepressure gauge indicates 0 psi (= 0 <strong>bar</strong>). If the cartridge hasbeen used the burst disc has a hole. If the cartridge is a new“<strong>empty</strong>” version the burst disc will not have a hole in it andthe gauge must be verified <strong>to</strong> be at 0 psi (0 <strong>bar</strong>).1. Die Kartusche für die Wiederbefüllungvorbereiten01 Kartusche vom Airbagsystem abschrauben.02 Wenn die Kartusche eine Schutzkappe hat, dieseabnehmen.03 Den Zustand der Kartusche prüfen. Dabei auf Rost oderfehlende/beschädigte Teile achten.04 Prüfen, ob die Kartusche leer ist. Sie ist dann leer, wennder Druckmesser 0 <strong>bar</strong> (0 psi) anzeigt. Wenn die Kartuschebenutzt wurde, hat das Abdeckplättchen ein Loch. Wennes sich um eine neue, «leere» Kartuschenversion handelt,hat das Abdeckplättchen kein Loch, und es muss geprüftwerden, ob der Druck 0 <strong>bar</strong> (0 psi) beträgt.1. Préparation de la car<strong>to</strong>uche pourle remplissage01 Dévissez la car<strong>to</strong>uche du système d’airbag.02 Si votre car<strong>to</strong>uche possède une coque de protection,retirez-la de la car<strong>to</strong>uche.03 Vérifiez que la car<strong>to</strong>uche est en bon état. Assurez-vousque la car<strong>to</strong>uche ne présente pas de signes de corrosion oude pièces manquantes/endommagées.04 Assurez-vous que la car<strong>to</strong>uche est vide. Elle est videlorsque le manomètre indique 0 psi (= 0 <strong>bar</strong>). Si la car<strong>to</strong>uchea été utilisée, le disque de rupture est troué. Si la car<strong>to</strong>ucheest une version neuve « vide », le disque de rupture neprésentera pas de trou en son centre et vous devrez vérifierque la pression est de 0 psi (0 <strong>bar</strong>).01020400BLUEGREENRED
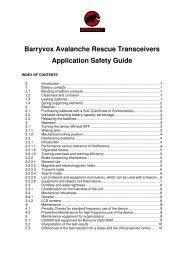
05 Carefully place the valve body of the cartridge in a benchvise. Use rubber or aluminum vise jaws <strong>to</strong> protect the cartridgefrom damage. Ensure that you clamp the cartridge at theValve Body and not by the cartridge body or the gauge.06 Remove the protective cap and connec<strong>to</strong>r. The connec<strong>to</strong>rcan be removed using a wrench (20 mm or 13/16 inch). Thereare two different size connec<strong>to</strong>rs that may be encountered.Both versions will fit a 13/16" spark plug socket, but the fit isoften very snug.07 Once the connec<strong>to</strong>r is removed you will find two itemson the valve (1× gasket ring and 1× burst disc).Discard bothitems, making sure that none are stuck inside the connec<strong>to</strong>r.08 Replace these two items (see illustration). On <strong>to</strong>p of thethreaded Valve End, place a gasket ring and then a burstdisc. Always install these items in the correct order (burstdisc on <strong>to</strong>p of gasket ring as shown). Mistaken use of twoburst discs could result in the airbag not inflation, sotake extra care!09 Screw the connec<strong>to</strong>r on<strong>to</strong> the Cartridge. If using a <strong>to</strong>rquewrench the connec<strong>to</strong>r must be tightened <strong>to</strong> the proper <strong>to</strong>rquesetting (see illustration). The correct <strong>to</strong>rque <strong>to</strong> tighten theconnec<strong>to</strong>r is 24 Nm (17 ft-pd or 212.4 in-lb). Less <strong>to</strong>rque canlead <strong>to</strong> leakage, excessive <strong>to</strong>rque can damage the cartridge.If a <strong>to</strong>rque wrench is not used a submersion leak-test mustbe performed after filling.05 Den Ventilkörper der Kartusche vorsichtig in einenSchraubs<strong>to</strong>ck platzieren. Schraubs<strong>to</strong>ckbacken aus Gummioder <strong>Alu</strong>minium verwenden, um die Kartusche nicht zubeschädigen. Darauf achten, dass die Kartusche amVentilkörper und nicht am Kartuschenkörper oder an derDruckanzeige eingeklemmt wird.06 Schutzkappe und Verbindungsstück abnehmen. DasVerbindungsstück kann mit einem Schraubenschlüssel(20 mm bzw. 13/16") entfernt werden. Es gibt zwei verschiedeneVerbindungsstückgrössen. Beide passen in einen20-mm-Kerzenstutzen (13/16"), sitzen aber oft sehr eng.07 Wenn das Verbindungsstück entfernt wurde, sind zweiTeile auf dem Ventil zu sehen (1 Dichtungsring und 1 Abdeckplättchen).Beide Teile abnehmen und darauf achten,dass kein Teil im Verbindungsstück klemmt.08 Die beiden Teile ersetzen (siehe Abbildung). Auf das Ventilendemit dem Gewinde oben einen Dichtungsring und dannein Abdeckplättchen aufsetzen. Die beiden Teile immer in derrichtigen Reihenfolge aufsetzen (Abdeckplättchen auf denDichtungsring, siehe Abbildung). Achtung: Ein versehentlichesEinsetzen zweier Abdeckplättchen könnte dazuführen, dass der Airbag nicht ausgelöst wird.09 Verbindungsstück auf die Kartusche schrauben. Wennein Drehmomentschlüssel verwendet wird, muss dasVerbindungsstück auf den richtigen Drehmomentwert festgezogenwerden (siehe Abbildung). Das korrekte Drehmomentfür das Anziehen des Verbindungsstücks ist 24 Nm (17 ft-lbbzw. 212,4 in-lb). Ein geringeres Drehmoment kann dazuführen, dass die Kartusche leckt, ein zu hohes Drehmomentkann sie beschädigen. Wenn kein Drehmomentschlüsselverwendet wird, muss nach dem Befüllen ein Dichtigkeitstestdurchgeführt werden.05 Placez avec précaution le corps de soupape de la car<strong>to</strong>uchedans un étau d’établi. Utilisez des mâchoires d’étauen caoutchouc ou en aluminium pour ne pas endommagerla car<strong>to</strong>uche. Veillez à serrer la car<strong>to</strong>uche au niveau du corpsde soupape et non pas du corps de la car<strong>to</strong>uche ou de lajauge.06 Ôtez le bouchon de protection et le connecteur. Leconnecteur peut être enlevé à l’aide d’une clé à molette(20 mm ou 13/16"). Il existe deux tailles de connecteurs quevous êtes susceptible de trouver. Les deux versions s’adaptentà une douille de bougie de 20 mm (13/16"), mais cetteadaptation est souvent très juste.07 Une fois le connecteur ôté, vous trouverez deux élémentssur la soupape (1joint et 1disque de rupture). Enlevez cesdeux éléments en vous assurant qu’aucun d’eux n’est coincéà l’intérieur du connecteur.08 Replacez ces deux éléments (cf. illustration). À l’extrémitéde la soupape filetée, placez un joint, puis un disque derupture. Placez <strong>to</strong>ujours ces éléments dans le bon ordre (ledisque de rupture sur le joint comme indiqué sur le schéma).En cas d’utilisation incorrecte de deux disques derupture, l’airbag risque de ne pas se gonfler, faitesdonc très attention !09 Vissez le connecteur sur la car<strong>to</strong>uche. Si vous utilisez uneclé dynamométrique, le connecteur doit être serré à l’aidedu couple de serrage adapté (cf. illustration). Le serrageadapté pour le connecteur est de 24 Nm (17 ft-lb ou 212,4in-lb). Un serrage insuffisant peut conduire à une fuite, unserrage excessif peut endommager la car<strong>to</strong>uche. Si vousn’utilisez pas de clé dynamométrique, un test d’étanchéitépar submersion doit être réalisé après le remplissage.05 060709080BLUEGREENRED0Torque = 24 Nm(212 in/lb)BLUEGREENRED
2. Refill the <strong>“Cartridge</strong> <strong>Refillable</strong><strong>207</strong> Bar <strong>Alu</strong>”10 Connect the “Adapter Scuba Tank <strong>to</strong> Cartridge” <strong>to</strong> yourcompressed air source.11 Connect your cartridge <strong>to</strong> the “Adapter Scuba Tank <strong>to</strong>Cartridge”. The protective cap must be screwed in place onthe cartridge during the filling operation.12 Slowly open the valve of your compressed air source.13 Fill the cartridge until the pressure gauge on the adapterindicates the correct working pressure of <strong>207</strong> <strong>bar</strong> / 3000 psi(cartridge gauge should indicate green). Filling should takearound 1–2 minutes.Note: During filling always additionally check the pressurefrom the gauge on the “Adapter Scuba Tank <strong>to</strong> Cartridge” aswell as from the cartridge gauge.14 You will notice that the cartridge warms up as it fills. Thisis normal. Let it cool down <strong>to</strong> room temperature (20 °C / 68 °F)before checking the pressure again. The pressure gauge ofthe cartridge has <strong>to</strong> be in the green zone at room temperature(20 °C / 68 °F). Pressure is OK if the cartridge gaugeneedle is on the black line above or below the green zonewhen the adap<strong>to</strong>r gauge reads 3000 psi. Fill again if thecorrect pressure is not reached after cooling down <strong>to</strong> roomtemperature.2. Die «Cartridge <strong>Refillable</strong><strong>207</strong> Bar <strong>Alu</strong>» befüllen10 Den «Adapter Scuba Tank <strong>to</strong> Cartridge» an die Druckluftquelleanschliessen.11 Kartusche an den «Adapter Scuba Tank <strong>to</strong> Cartridge»anschliessen. Die Schutzkappe muss während des Befüllensauf die Kartusche geschraubt sein.12 Langsam das Ventil der Druckluftquelle öffnen.13 Kartusche befüllen, bis die Druckanzeige am Adapterden korrekten Arbeitsdruck von <strong>207</strong> <strong>bar</strong> (3000 psi) anzeigt(Druckmesser sollte grün zeigen). Das Befüllen dauertetwa ein bis zwei Minuten.Hinweis: Beim Füllen sollte der Druck sowohl an der Druckanzeigeam «Adapter Scuba Tank <strong>to</strong> Cartridge» als auch ander Druckanzeige der Kartusche geprüft werden.14 Die Kartusche erwärmt sich beim Befüllen. Das istnormal. Auf Raumtemperatur (20 °C / 68 °F) abkühlen lassenund dann den Druck erneut prüfen. Die Druckanzeige derKartusche muss sich bei Raumtemperatur (20 °C / 68 °F) imgrünen Bereich befinden. Der Druck ist in Ordnung, wenn dieAnzeigenadel der Kartusche auf der schwarzen Linie überoder unter dem grünen Bereich ist, wenn der Adapterdruck<strong>207</strong> <strong>bar</strong> (3000 psi) beträgt. Wenn der korrekte Druck nachdem Abkühlen auf Raumtemperatur nicht erreicht wurde,erneut befüllen.2. Remplissage de la « Cartridge<strong>Refillable</strong> <strong>207</strong> Bar <strong>Alu</strong> »10 Reliez l’« Adapter Scuba Tank <strong>to</strong> Cartridge » à votresource d’air comprimé.11 Reliez votre car<strong>to</strong>uche à l’« Adapter Scuba Tank <strong>to</strong>Cartridge ». Le bouchon de protection doit être vissé sur lacar<strong>to</strong>uche lors de l’opération de remplissage.12 Ouvrez lentement la soupape de votre source d’aircomprimé.13 Remplissez la car<strong>to</strong>uche jusqu’à ce que le manomètrede l’adaptateur indique la pression de service adéquate de<strong>207</strong> <strong>bar</strong>/3 000 psi (la jauge de la car<strong>to</strong>uche devrait se trouverdans la zone verte). Le remplissage devrait durer une à deuxminutes.Remarque : Lors du remplissage, vérifiez <strong>to</strong>ujours à la foisla pression de la jauge sur l’« Adapter Scuba Tank <strong>to</strong> Cartridge» et sur la jauge de la car<strong>to</strong>uche.14 Vous remarquerez que la car<strong>to</strong>uche se réchauffe au furet à mesure du remplissage : ce phénomène est normal.Laissez la car<strong>to</strong>uche revenir à température ambiante(20 °C/68 °F) avant de vérifier à nouveau la pression. L’aiguilledu manomètre de la car<strong>to</strong>uche doit être dans la zone verte àtempérature ambiante (20 °C/68 °F). La pression est bonnesi l’aiguille de la jauge de la car<strong>to</strong>uche est située sur la lignenoire inférieure ou supérieure de la zone verte lorsque lajauge de l’adaptateur est à 3 000 psi/<strong>207</strong> <strong>bar</strong>. Remplissezà nouveau si la pression adéquate n’est pas atteinte lors dure<strong>to</strong>ur à température ambiante.1310 EU 10 US/CA 1112131300BLUEGREENREDBLUEGREENRED0BLUEGREENRED
15 To separate the cartridge from the adapter, press the ventbut<strong>to</strong>n or open the pressure release valve on the adap<strong>to</strong>r.16 Remove the protective cap, and submerge the fullcart ridge in water. Use a soft brush <strong>to</strong> remove all air bubbles.After 5 minutes, without removing the cartridge from thewater check for any air bubbles that have developed – theymay be quite small. If any are present, wipe them off andsubmerge again. If, after another 5 minutes, there are new airbubbles present, the cartridge should not be used. If thereare no air bubbles the cartridge is good <strong>to</strong> use.17 Thoroughly dry the cartridge. Use a small amount ofHuskey HVS-100 silicone grease on a rag, and wipe thison the threads and all exposed surfaces of the connec<strong>to</strong>r,including in the recess and on the burst disc, making sure<strong>to</strong> wipe off any excess grease.18 Put “Protective Housing” back on cartridge19 Be sure <strong>to</strong> check the pressure-level on the cartridgegauge before EVERY use.15 Zum Abtrennen der Kartusche vom Adapter den Ventilknopfdrücken oder das Druckablassventil am Adapteröffnen.16 Schutzkappe abnehmen und die volle Kartusche inWasser eintauchen. Mit einer weichen Bürste alle Luftblasenentfernen. Nach 5 Minuten (ohne Herausnehmen derKartusche aus dem Wasser) kontrollieren, ob sich neueLuftblasen – auch sehr kleine – gebildet haben. Falls Luftblasenvorhanden sind, diese abwischen und die Kartuscheerneut ins Wasser legen. Wenn nach weiteren fünf Minutenneue Luftblasen vorhanden sind, darf die Kartusche nichtverwendet werden. Wenn keine Luftblasen vorhanden sind,kann die Kartusche verwendet werden.17 Kartusche sorgfältig abtrocknen. Eine kleine MengeHuskey HVS-100 Silikonfett auf einen Lappen geben unddamit auf die Gewinde und alle Oberflächen des Verbindungsstücksauftragen, einschliesslich der Aussparung unddem Abdeckplättchen. Überschüssiges Fett abwischen.18 Das Schutzgehäuse wieder auf die Kartusche setzen.19 Druckanzeige an der Kartusche vor JEDER Verwendungprüfen.15 Pour séparer la car<strong>to</strong>uche de l’adaptateur, appuyez surle bou<strong>to</strong>n d’évacuation ou sur la soupape de décharge depression située sur l’adaptateur.16 Ôtez le bouchon de protection et immergez <strong>to</strong>ute lacar<strong>to</strong>uche dans l’eau. Utilisez une brosse souple pourenlever <strong>to</strong>utes les bulles d’air. Après 5 minutes, sans sortirla car<strong>to</strong>uche de l’eau, vérifiez si des bulles d’air se sontformées, même très petites. S’il y en a, essuyez-les etimmergez à nouveau la car<strong>to</strong>uche. Si, après 5 nouvellesminutes, de nouvelles bulles se sont formées, la car<strong>to</strong>uchene doit pas être utilisée. S’il n’y a pas de bulles, la car<strong>to</strong>uchepeut être utilisée.17 Séchez soigneusement la car<strong>to</strong>uche. Déposez une petitequantité de graisse à base de silicone Huskey HVS-100sur un chiffon et appliquez-la sur les filetages et <strong>to</strong>utes lessurfaces exposées au connecteur, notamment dans lelogement et sur le disque de rupture, en veillant à essuyer<strong>to</strong>ut excès de graisse.18 Replacez la coque de protection sur la car<strong>to</strong>uche19 Vérifiez le niveau de pression sur la jauge de la car<strong>to</strong>ucheavant CHAQUE utilisation.15 16 17 18
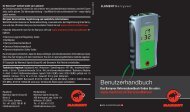
3. Parts Diagram for<strong>“Cartridge</strong> <strong>Refillable</strong> <strong>207</strong> Bar <strong>Alu</strong>”3. Teileübersicht für«Cartridge <strong>Refillable</strong> <strong>207</strong> Bar <strong>Alu</strong>»3. Schéma des pièces de la« Cartridge <strong>Refillable</strong> <strong>207</strong> Bar <strong>Alu</strong> »01 Protective Housing 01 Schutzgehäuse02 Protective Cap 02 Schutzkappe03 Verbindungsstück04 Abdeckplättchen03 Connec<strong>to</strong>r05 Dichtungsring06 Ventilende mit Gewinde07 Quick Disconnect04 Burst Disc08 Druckmesser09 Ventilkörper10 Kartuschenkörper06 Threaded valve end05 Gasket ring01 Coque de protection02 Bouchon de protection03 Connecteur04 Disque de rupture05 Joint06 Extrémité de la soupape filetée07 Déconnexion rapide08 Manomètre09 Corps de soupape10 Corps de car<strong>to</strong>uche07 Quick disconnect09 Valve body08 Pressure gauge10 Cartridge body
<strong>Mammut</strong> Sports Group AGBirren 5 | CH-5703 SeonPhone +41 (0)62 769 81 81info@mammut.ch | www.mammut.ch