Ford GT Exhaust System Installation PN-140310 - Borla
Ford GT Exhaust System Installation PN-140310 - Borla
Ford GT Exhaust System Installation PN-140310 - Borla

You also want an ePaper? Increase the reach of your titles
YUMPU automatically turns print PDFs into web optimized ePapers that Google loves.
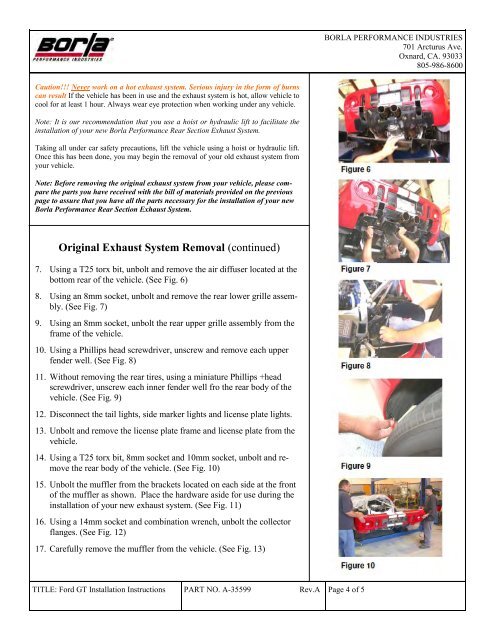
Caution!!! Never work on a hot exhaust system. Serious injury in the form of burns<br />
can result If the vehicle has been in use and the exhaust system is hot, allow vehicle to<br />
cool for at least 1 hour. Always wear eye protection when working under any vehicle.<br />
Note: It is our recommendation that you use a hoist or hydraulic lift to facilitate the<br />
installation of your new <strong>Borla</strong> Performance Rear Section <strong>Exhaust</strong> <strong>System</strong>.<br />
Taking all under car safety precautions, lift the vehicle using a hoist or hydraulic lift.<br />
Once this has been done, you may begin the removal of your old exhaust system from<br />
your vehicle.<br />
Note: Before removing the original exhaust system from your vehicle, please compare<br />
the parts you have received with the bill of materials provided on the previous<br />
page to assure that you have all the parts necessary for the installation of your new<br />
<strong>Borla</strong> Performance Rear Section <strong>Exhaust</strong> <strong>System</strong>.<br />
Original <strong>Exhaust</strong> <strong>System</strong> Removal (continued)<br />
7. Using a T25 torx bit, unbolt and remove the air diffuser located at the<br />
bottom rear of the vehicle. (See Fig. 6)<br />
8. Using an 8mm socket, unbolt and remove the rear lower grille assembly.<br />
(See Fig. 7)<br />
9. Using an 8mm socket, unbolt the rear upper grille assembly from the<br />
frame of the vehicle.<br />
10. Using a Phillips head screwdriver, unscrew and remove each upper<br />
fender well. (See Fig. 8)<br />
11. Without removing the rear tires, using a miniature Phillips +head<br />
screwdriver, unscrew each inner fender well fro the rear body of the<br />
vehicle. (See Fig. 9)<br />
12. Disconnect the tail lights, side marker lights and license plate lights.<br />
13. Unbolt and remove the license plate frame and license plate from the<br />
vehicle.<br />
14. Using a T25 torx bit, 8mm socket and 10mm socket, unbolt and remove<br />
the rear body of the vehicle. (See Fig. 10)<br />
15. Unbolt the muffler from the brackets located on each side at the front<br />
of the muffler as shown. Place the hardware aside for use during the<br />
installation of your new exhaust system. (See Fig. 11)<br />
16. Using a 14mm socket and combination wrench, unbolt the collector<br />
flanges. (See Fig. 12)<br />
17. Carefully remove the muffler from the vehicle. (See Fig. 13)<br />
TITLE: <strong>Ford</strong> <strong>GT</strong> <strong>Installation</strong> Instructions PART NO. A-35599 Rev.A Page 4 of 5<br />
BORLA PERFORMANCE INDUSTRIES<br />
701 Arcturus Ave.<br />
Oxnard, CA. 93033<br />
805-986-8600