sds – polyacrylamide gel electrophoresis - Ontario Genomics Institute
sds – polyacrylamide gel electrophoresis - Ontario Genomics Institute
sds – polyacrylamide gel electrophoresis - Ontario Genomics Institute
You also want an ePaper? Increase the reach of your titles
YUMPU automatically turns print PDFs into web optimized ePapers that Google loves.
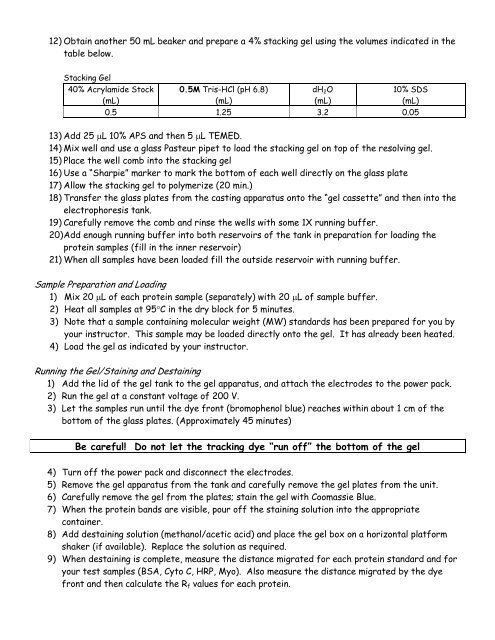
12) Obtain another 50 mL beaker and prepare a 4% stacking <strong>gel</strong> using the volumes indicated in thetable below.Stacking Gel40% Acrylamide Stock(mL)0.5M Tris-HCl (pH 6.8)(mL)dH 2 O(mL)10% SDS(mL)0.5 1.25 3.2 0.0513) Add 25 L 10% APS and then 5 L TEMED.14) Mix well and use a glass Pasteur pipet to load the stacking <strong>gel</strong> on top of the resolving <strong>gel</strong>.15) Place the well comb into the stacking <strong>gel</strong>16) Use a “Sharpie” marker to mark the bottom of each well directly on the glass plate17) Allow the stacking <strong>gel</strong> to polymerize (20 min.)18) Transfer the glass plates from the casting apparatus onto the “<strong>gel</strong> cassette” and then into the<strong>electrophoresis</strong> tank.19) Carefully remove the comb and rinse the wells with some 1X running buffer.20) Add enough running buffer into both reservoirs of the tank in preparation for loading theprotein samples (fill in the inner reservoir)21) When all samples have been loaded fill the outside reservoir with running buffer.Sample Preparation and Loading1) Mix 20 L of each protein sample (separately) with 20 L of sample buffer.2) Heat all samples at 95C in the dry block for 5 minutes.3) Note that a sample containing molecular weight (MW) standards has been prepared for you byyour instructor. This sample may be loaded directly onto the <strong>gel</strong>. It has already been heated.4) Load the <strong>gel</strong> as indicated by your instructor.Running the Gel/Staining and Destaining1) Add the lid of the <strong>gel</strong> tank to the <strong>gel</strong> apparatus, and attach the electrodes to the power pack.2) Run the <strong>gel</strong> at a constant voltage of 200 V.3) Let the samples run until the dye front (bromophenol blue) reaches within about 1 cm of thebottom of the glass plates. (Approximately 45 minutes)Be careful! Do not let the tracking dye “run off” the bottom of the <strong>gel</strong>4) Turn off the power pack and disconnect the electrodes.5) Remove the <strong>gel</strong> apparatus from the tank and carefully remove the <strong>gel</strong> plates from the unit.6) Carefully remove the <strong>gel</strong> from the plates; stain the <strong>gel</strong> with Coomassie Blue.7) When the protein bands are visible, pour off the staining solution into the appropriatecontainer.8) Add destaining solution (methanol/acetic acid) and place the <strong>gel</strong> box on a horizontal platformshaker (if available). Replace the solution as required.9) When destaining is complete, measure the distance migrated for each protein standard and foryour test samples (BSA, Cyto C, HRP, Myo). Also measure the distance migrated by the dyefront and then calculate the R f values for each protein.


