wl-42 parts - Westendorf
wl-42 parts - Westendorf
wl-42 parts - Westendorf
- No tags were found...

Create successful ePaper yourself
Turn your PDF publications into a flip-book with our unique Google optimized e-Paper software.
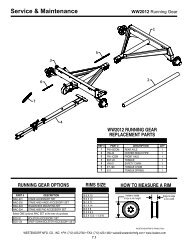
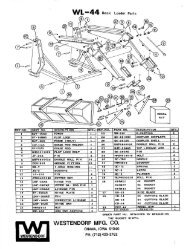
Service & Maintenance392WL-<strong>42</strong> LIFT CYLINDERREPLACEMENT PARTSWL-<strong>42</strong> Cylinders745681REF # PART # DESCRIPTION QTY.1 L-10 LIFT CYLINDER 12 L-1001 BARREL 13 L-1010 RAM 14 G-B GLAND 15 P-B PISTON 16 HJN1614 1" JAM NUT 17 HFN1614 1" NUT 18 L-819AS PORT 19 ZER1805 GREASE FITTING 210 #4CK REPAIR KIT *NOTE: * Repair kit contains <strong>parts</strong> to repair one cylinder372WL-21 / WL-27 / WL-<strong>42</strong> BUCKETCYLINDER REPLACEMENT PARTS5641REF # PART # DESCRIPTION QTY.1 B-1 CYLINDER 12 B-101 BARREL 13 B-110 RAM 14 G-A GLAND 15 P-A PISTON 16 HFN1614 1" NUT 17 ZER1805 GREASE FITTING 18 #1CK REPAIR KIT *NOTE: * Repair kit contains <strong>parts</strong> to repair one cylinder372WL-<strong>42</strong> OPTIONAL 3" BUCKETCYLINDER REPLACEMENT PARTS4561REF # PART # DESCRIPTION QTY.1 B-4 BUCKET CYLINDER 12 B-401 BARREL 13 B-410 RAM 14 G-E GLAND 15 P-B PISTON 16 HFN1614 1" NUT 17 ZER1805 GREASE FITTING 18 #4CK REPAIR KIT *NOTE: * Repair kit contains <strong>parts</strong> to repair one cylinderSTEPS TO REPAIR CYLINDER1) Extend the ram out as far as possible.2) At the ram end of the cylinder barrel you will find a snap ringlocated either on the face or inside the notch of the gland.3) Locate the snap ring eyes (you may need to turn the glandinside the barrel to find the snap ring eyes). Compress thesnap ring with snap ring pliers.4) Remove the ram assembly (ram, gland, & piston) from barrel.5) Notice the direction they're pointing so they can be properlyre-assembled.6) Remove the jam nut and/or hex nut from the end of the ram.7) Remove the old seals and rings and replace them with thenew seals and rings. (Seal kits are packaged for severaldifferent cylinders. You may have extra <strong>parts</strong>)8) Clean cylinder with cleaner and a clean lint free cloth.9) Lubricate the seals and rings to aid assembly.10) Assemble the cylinder by reversing the order.CYLINDER REPAIR TIPS• When disassembling cylinders, keep the <strong>parts</strong> in correctorientation. Remove <strong>parts</strong> in sequence.• Note the direction of the piston and gland. Lay out old sealsand <strong>parts</strong> as they are removed.• Assemble cylinder in proper order; lubricate to aid assembly.WESTENDORFMFG PWB319170WESTENDORF MFG. CO., INC. • PH: (712) <strong>42</strong>3-2762 • FAX: (712) <strong>42</strong>3-1460 • sales@westendorfmfg.com • www.loaders.com3