You also want an ePaper? Increase the reach of your titles
YUMPU automatically turns print PDFs into web optimized ePapers that Google loves.
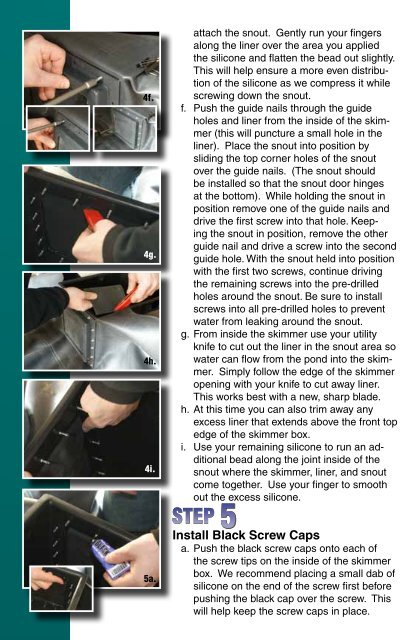
4f.4g.4h.4i.attach the snout. Gently run your fingersalong the liner over the area you appliedthe silicone and flatten the bead out slightly.This will help ensure a more even distributionof the silicone as we compress it whilescrewing down the snout.f. Push the guide nails through the guideholes and liner from the inside of the skimmer(this will puncture a small hole in theliner). Place the snout into position bysliding the top corner holes of the snoutover the guide nails. (The snout shouldbe installed so that the snout door hingesat the bottom). While holding the snout inposition remove one of the guide nails anddrive the first screw into that hole. Keepingthe snout in position, remove the otherguide nail and drive a screw into the secondguide hole. With the snout held into positionwith the first two screws, continue drivingthe remaining screws into the pre-drilledholes around the snout. Be sure to installscrews into all pre-drilled holes to preventwater from leaking around the snout.g. From inside the skimmer use your utilityknife to cut out the liner in the snout area sowater can flow from the pond into the skimmer.Simply follow the edge of the skimmeropening with your knife to cut away liner.This works best with a new, sharp blade.h. At this time you can also trim away anyexcess liner that extends above the front topedge of the skimmer box.i. Use your remaining silicone to run an additionalbead along the joint inside of thesnout where the skimmer, liner, and snoutcome together. Use your finger to smoothout the excess silicone.5a.Install Black Screw Capsa. Push the black screw caps onto each ofthe screw tips on the inside of the skimmerbox. We recommend placing a small dab ofsilicone on the end of the screw first beforepushing the black cap over the screw. Thiswill help keep the screw caps in place.


