TIMES
Peace Corps Times - March/April 1985 - Peace Corps Online
Peace Corps Times - March/April 1985 - Peace Corps Online
- No tags were found...

You also want an ePaper? Increase the reach of your titles
YUMPU automatically turns print PDFs into web optimized ePapers that Google loves.
Features<br />
(continued from page 13)<br />
found that asking someone else to<br />
teach has several advantages: the<br />
trainer serves as a role model (especially<br />
important for showing women<br />
that they can do this kind of work),<br />
language difficulties are avoided, the<br />
trainer's own skills are reinforced,<br />
and the groundwork is being laid for<br />
woodstove dissemination to continue<br />
after my departure. I have found,<br />
however, that I need to be attentive<br />
when an inexperienced trainer is<br />
leading a session. Many beginning<br />
- - --<br />
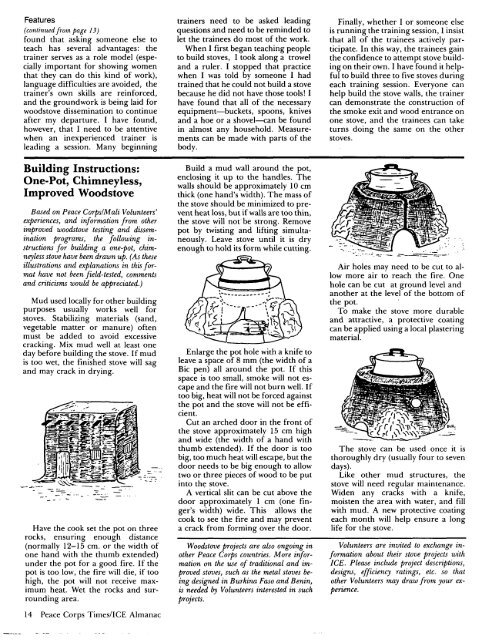
Building Instructions:<br />
One-Pot, Chimneyless,<br />
Improved Woodstove<br />
Based on Peace CorpslMali Volunteers'<br />
experiences, and information from other<br />
improved woodstove testing and dissemination<br />
programs, the following instructions<br />
for building a one-pot, chimneyless<br />
stove have been drawn up. (As these<br />
illustrations and explanations in this format<br />
have not been field-tested, comments<br />
and criticisms would be appreciated.)<br />
Mud used locally for other building<br />
purposes usually works well for<br />
stoves. Stabilizing materials (sand,<br />
vegetable matter or manure) often<br />
must be added to avoid excessive<br />
cracking. Mix mud well at least one<br />
day before building the stove. If mud<br />
is too wet, the finished stove will sag<br />
and may crack in drying.<br />
Have the cook set the pot on three<br />
rocks, ensuring enough distance<br />
(normally 12-15 cm. or the width of<br />
one hand with the thumb extended)<br />
under the pot for a good fire. If the<br />
pot is too low, the fire will die, if too<br />
high, the pot will not receive maximum<br />
heat. Wet the rocks and surrounding<br />
area.<br />
14 Peace Corps TimesIICE Almanac<br />
trainers need to be asked leading<br />
questions and need to be reminded to<br />
let the trainees do most of the work.<br />
When I first began teaching people<br />
to build stoves, I took along a trowel<br />
and a ruler. I stopped that practice<br />
when I was told by someone I had<br />
trained that he could not build a stove<br />
because he did not have those tools! I<br />
have found that all of the necessary<br />
equipment-buckets, spoons, knives<br />
and a hoe or a shovel--can be found<br />
in almost any household. Measurements<br />
can be made with parts of the<br />
body.<br />
Build a mud wall around the pot,<br />
enclosing it up to the handles. The<br />
walls should be approximately 10 cm<br />
thick (one hand's width). The mass of<br />
the stove should be minimized to prevent<br />
heat loss, but if walls are too thin,<br />
the stove will not'be strong. Remove<br />
pot by twisting and lifting simultaneously.<br />
Leave stove until it is dry<br />
enough to hold its form while cutting.<br />
Enlarge the pot hole with a knife to<br />
leave a space of 8 mm (the width of a<br />
Bic pen) all around the pot. If this<br />
space is too small, smoke will not escape<br />
and the fire will not burn well. If<br />
too big, heat will not be forced against<br />
the pot and the stove will not be efficient.<br />
Cut an arched door in the front of<br />
the stove approximately 15 cm high<br />
and wide (the width of a hand with<br />
thumb extended). If the door is too<br />
big, too much heat will escape, but the<br />
door needs to be big enough to allow<br />
two or three pieces of wood to be put<br />
into the stove.<br />
A vertical slit can be cut above the<br />
door approximately 1 cm (one finger's<br />
width) wide. This allows the<br />
cook to see the fire and may prevent<br />
a crack from forming over the door.<br />
Woodstove projects are also ongoing in<br />
other Peace Corps countries. More information<br />
on the use of traditional and improved<br />
stoves, such as the metal stoves being<br />
designed in Burkina Faso and Benin,<br />
is needed by Volunteers interested in such<br />
projects.<br />
Finallv. whether I or someone else<br />
, ,<br />
is running the training session, I insist<br />
that all of the trainees actively participate.<br />
In this way, the trainees gain<br />
the confidence to attempt stove building<br />
on their own. I have found it helpful<br />
to build three to five stoves during<br />
each training session. Everyone can<br />
help build the stove walls, the trainer<br />
can demonstrate the construction of<br />
the smoke exit and wood entrance on<br />
one stove, and the trainees can take<br />
turns doing the same on the other<br />
stoves.<br />
Air holes may need to be cut to allow<br />
more air to reach the fire. One<br />
hole can be cut at ground level and<br />
another at the level of the bottom of<br />
the pot.<br />
To make the stove more durable<br />
and attractive, a protective coating<br />
can be applied using a local plastering<br />
material.<br />
The stove can be used once it is<br />
thoroughly dry (usually four to seven<br />
days).<br />
Like other mud structures, the<br />
stove will need regular maintenance.<br />
Widen any cracks with a knife,<br />
moisten the area with water. and fill<br />
with mud. A new protective coating<br />
each month will help ensure a long<br />
life for the stove.<br />
Volunteers are invited to exchange information<br />
about their stove projects with<br />
ICE. Please include project descriptions,<br />
designs, efficiency ratings, etc. so that<br />
other Volunteers may draw from your experience.