Loctite Fixmaster Marine Chocking Application Guide
Loctite® Fixmaster® Marine Chocking Application Guide
Loctite® Fixmaster® Marine Chocking Application Guide
- No tags were found...

You also want an ePaper? Increase the reach of your titles
YUMPU automatically turns print PDFs into web optimized ePapers that Google loves.
<strong>Application</strong> <strong>Guide</strong><br />
<strong>Application</strong> <strong>Guide</strong><br />
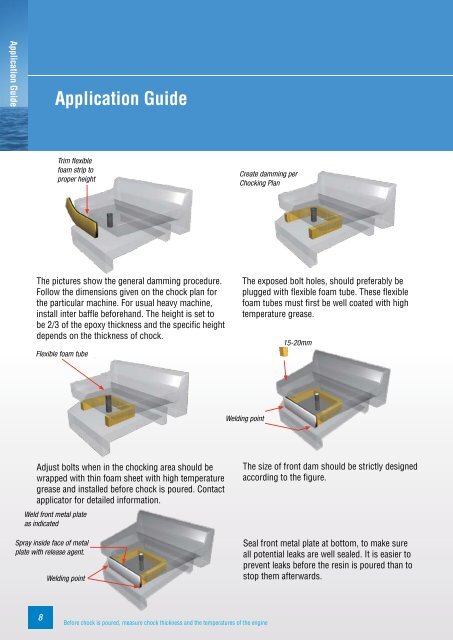
Trim flexible<br />
foam strip to<br />
proper height<br />
Create damming per<br />
<strong>Chocking</strong> Plan<br />
The pictures show the general damming procedure.<br />
Follow the dimensions given on the chock plan for<br />
the particular machine. For usual heavy machine,<br />
install inter baffle beforehand. The height is set to<br />
be 2/3 of the epoxy thickness and the specific height<br />
depends on the thickness of chock.<br />
Flexible foam tube<br />
The exposed bolt holes, should preferably be<br />
plugged with flexible foam tube. These flexible<br />
foam tubes must first be well coated with high<br />
temperature grease.<br />
15-20mm<br />
Welding point<br />
Adjust bolts when in the chocking area should be<br />
wrapped with thin foam sheet with high temperature<br />
grease and installed before chock is poured. Contact<br />
applicator for detailed information.<br />
Weld front metal plate<br />
as indicated<br />
Spray inside face of metal<br />
plate with release agent.<br />
Welding point<br />
The size of front dam should be strictly designed<br />
according to the figure.<br />
Seal front metal plate at bottom, to make sure<br />
all potential leaks are well sealed. It is easier to<br />
prevent leaks before the resin is poured than to<br />
stop them afterwards.<br />
8<br />
Before chock is poured, measure chock thickness and the temperatures of the engine