

Salesforce1 Admin Cheat Sheet
1LIAk47
1LIAk47
- No tags were found...

You also want an ePaper? Increase the reach of your titles
YUMPU automatically turns print PDFs into web optimized ePapers that Google loves.
The Record View<br />
You can use the enhanced page layout editor in the full Salesforce site to customize the<br />
layout of an object’s record detail pages and adjust which fields and related lists appear.<br />
You have two options for handling page layouts for your mobile users: re-engineer your<br />
existing page layouts, or create new page layouts that are mobile-friendly from the outset.<br />
In <strong>Salesforce1</strong>, page layouts drive these areas of the mobile experience:<br />
Record Related Information and Detail Pages<br />
When you view a record in <strong>Salesforce1</strong>, you see the fields, Visualforce pages, and related<br />
lists that are based on the record type and the user’s profile. Related lists show up as<br />
single-line cards containing the name of the page or related list. Tapping the related list<br />
card displays its details.<br />
Mobile Cards<br />
You can add expanded lookups and mobile-enabled Visualforce pages to the Mobile<br />
Cards section of your page layout to have them show up as mobile cards in <strong>Salesforce1</strong>.<br />
The elements you place in this section don’t show up on a record’s detail page in the full<br />
Salesforce site. They only appear on the record’s related information page in <strong>Salesforce1</strong>.<br />
Publisher Actions<br />
In <strong>Salesforce1</strong>, actions you configure on the page layout show up in the publisher, which<br />
users access by tapping<br />
Page Layout Assignment<br />
To assign a mobile page layout to a user’s profile, navigate to Page Layout Assignment.<br />
• For standard objects, click Customize > Object > Page Layouts and then click<br />
Page Layout Assignment.<br />
• For custom objects click Create > Objects, click the object, scroll down to the Page<br />
Layout section, and click Page Layout Assignment.<br />
1. Click Edit Assignment.<br />
2. Click the Page Layout to Use drop-down list.<br />
3. Select the Profile you want to use and then Save.<br />
Displaying Visualforce Pages<br />
To enable Visualforce pages for the <strong>Salesforce1</strong> mobile app, edit the page in Setup and<br />
select Available for Salesforce mobile apps.<br />
The standard Visualforce tag library is optimized for desktop browsers, and doesn't always<br />
provide a good mobile experience. In fact, some Visualforce components are not supported<br />
on a mobile device.<br />
Before you enable Visualforce pages for mobile users, test the pages in a mobile browser or<br />
emulator to see how they look and behave on a mobile device. Note that you can’t hack the<br />
URL using the standard https:///apex/yourPageName<br />
to open the Visualforce page in <strong>Salesforce1</strong>. You must view the pages by accessing the page<br />
within either the browser, emulator or the <strong>Salesforce1</strong> app.<br />
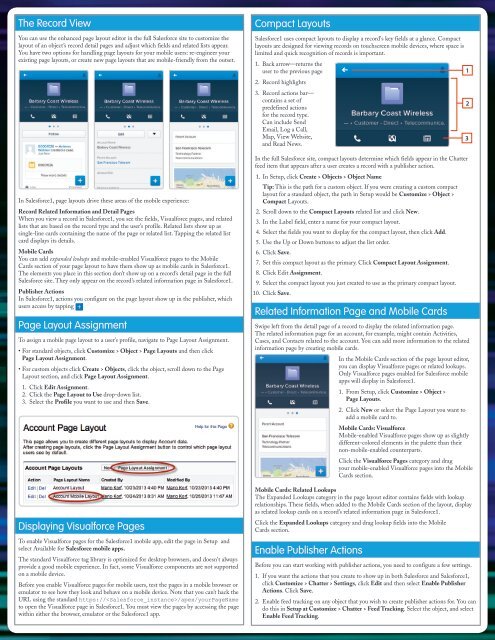
Compact Layouts<br />
<strong>Salesforce1</strong> uses compact layouts to display a record's key fields at a glance. Compact<br />
layouts are designed for viewing records on touchscreen mobile devices, where space is<br />
limited and quick recognition of records is important.<br />
1. Back arrow—returns the<br />
user to the previous page<br />
1<br />
2. Record highlights<br />
3. Record actions bar—<br />
contains a set of<br />
predefined actions<br />
for the record type.<br />
Can include Send<br />
Email, Log a Call,<br />
Map, View Website,<br />
and Read News.<br />
In the full Salesforce site, compact layouts determine which fields appear in the Chatter<br />
feed item that appears after a user creates a record with a publisher action.<br />
1. In Setup, click Create > Objects > Object Name<br />
Tip: This is the path for a custom object. If you were creating a custom compact<br />
layout for a standard object, the path in Setup would be Customize > Object ><br />
Compact Layouts.<br />
2. Scroll down to the Compact Layouts related list and click New.<br />
3. In the Label field, enter a name for your compact layout.<br />
4. Select the fields you want to display for the compact layout, then click Add.<br />
5. Use the Up or Down buttons to adjust the list order.<br />
6. Click Save.<br />
7. Set this compact layout as the primary. Click Compact Layout Assignment.<br />
8. Click Edit Assignment.<br />
9. Select the compact layout you just created to use as the primary compact layout.<br />
10. Click Save.<br />
Related Information Page and Mobile Cards<br />
Swipe left from the detail page of a record to display the related information page.<br />
The related information page for an account, for example, might contain Activities,<br />
Cases, and Contacts related to the account. You can add more information to the related<br />
information page by creating mobile cards.<br />
In the Mobile Cards section of the page layout editor,<br />
you can display Visualforce pages or related lookups.<br />
Only Visualforce pages enabled for Salesforce mobile<br />
apps will display in <strong>Salesforce1</strong>.<br />
1. From Setup, click Customize > Object ><br />
Page Layouts.<br />
2. Click New or select the Page Layout you want to<br />
add a mobile card to.<br />
Mobile Cards: Visualforce<br />
Mobile-enabled Visualforce pages show up as slightly<br />
different-colored elements in the palette than their<br />
non-mobile-enabled counterparts.<br />
Click the Visualforce Pages category and drag<br />
your mobile-enabled Visualforce pages into the Mobile<br />
Cards section.<br />
Mobile Cards: Related Lookups<br />
The Expanded Lookups category in the page layout editor contains fields with lookup<br />
relationships. These fields, when added to the Mobile Cards section of the layout, display<br />
as related lookup cards on a record’s related information page in <strong>Salesforce1</strong>.<br />
Click the Expanded Lookups category and drag lookup fields into the Mobile<br />
Cards section.<br />
Enable Publisher Actions<br />
Before you can start working with publisher actions, you need to configure a few settings.<br />
1. If you want the actions that you create to show up in both Salesforce and <strong>Salesforce1</strong>,<br />
click Customize > Chatter > Settings, click Edit and then select Enable Publisher<br />
Actions. Click Save.<br />
2. Enable feed tracking on any object that you wish to create publisher actions for. You can<br />
do this in Setup at Customize > Chatter > Feed Tracking. Select the object, and select<br />
Enable Feed Tracking.<br />
2<br />
3