Gladiator Contract Catalog - Inside Advantage
Gladiator Contract Catalog - Inside Advantage
Gladiator Contract Catalog - Inside Advantage

You also want an ePaper? Increase the reach of your titles
YUMPU automatically turns print PDFs into web optimized ePapers that Google loves.
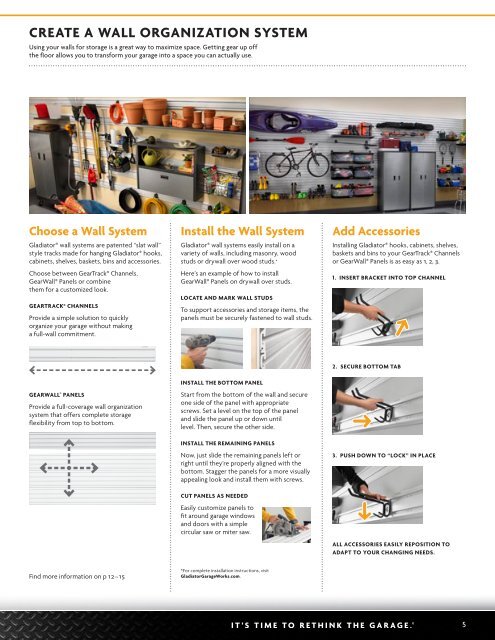
CREATE A WALL ORGANIZATION SYSTEM<br />
Using your walls for storage is a great way to maximize space. Getting gear up off<br />
the floor allows you to transform your garage into a space you can actually use.<br />
Choose a Wall System<br />
<strong>Gladiator</strong>® wall systems are patented “slat wall”<br />
style tracks made for hanging <strong>Gladiator</strong>® hooks,<br />
cabinets, shelves, baskets, bins and accessories.<br />
Choose between GearTrack® Channels,<br />
GearWall® Panels or combine<br />
them for a customized look.<br />
GEARTRACK® CHANNELS<br />
Provide a simple solution to quickly<br />
organize your garage without making<br />
a full-wall commitment.<br />
GEARWALL ® PANELS<br />
Provide a full-coverage wall organization<br />
system that offers complete storage<br />
flexibility from top to bottom.<br />
Find more information on p 12–15<br />
Install the Wall System<br />
<strong>Gladiator</strong>® wall systems easily install on a<br />
variety of walls, including masonry, wood<br />
studs or drywall over wood studs. *<br />
Here’s an example of how to install<br />
GearWall® Panels on drywall over studs.<br />
LOCATE AND MARK WALL STUDS<br />
To support accessories and storage items, the<br />
panels must be securely fastened to wall studs.<br />
INSTALL THE BOTTOM PANEL<br />
Start from the bottom of the wall and secure<br />
one side of the panel with appropriate<br />
screws. Set a level on the top of the panel<br />
and slide the panel up or down until<br />
level. Then, secure the other side.<br />
INSTALL THE REMAINING PANELS<br />
Now, just slide the remaining panels left or<br />
right until they’re properly aligned with the<br />
bottom. Stagger the panels for a more visually<br />
appealing look and install them with screws.<br />
CUT PANELS AS NEEDED<br />
Easily customize panels to<br />
fit around garage windows<br />
and doors with a simple<br />
circular saw or miter saw.<br />
*For complete installation instructions, visit<br />
<strong>Gladiator</strong>GarageWorks.com.<br />
Add Accessories<br />
Installing <strong>Gladiator</strong>® hooks, cabinets, shelves,<br />
baskets and bins to your GearTrack® Channels<br />
or GearWall® Panels is as easy as 1, 2, 3.<br />
1. INSERT BRACKET INTO TOP CHANNEL<br />
2. SECURE BOTTOM TAB<br />
3. PUSH DOWN TO “LOCK” IN PLACE<br />
ALL ACCESSORIES EASILY REPOSITION TO<br />
ADAPT TO YOUR CHANGING NEEDS.<br />
5