

2012 Catalog of Cycling Bags - Inertia Designs
2012 Catalog of Cycling Bags - Inertia Designs
2012 Catalog of Cycling Bags - Inertia Designs

Create successful ePaper yourself
Turn your PDF publications into a flip-book with our unique Google optimized e-Paper software.
PANNIER ADJUSTMENT<br />
Step A: The first step in adjusting <strong>Inertia</strong> panniers (excluding fixed hook models)<br />
is fitting the top hooks to your rack.<br />
1) To position the bags for your desired heel clearance, back pedal with your<br />
foot at the approximate angle it would be in a true forward stroke, your heel<br />
should just miss the bag.<br />
Panniers, Pannier Suspension/Adjustment Instructions<br />
13<br />
2) If needed, loosen the top ”J” hooks (see A in Fig. 1) and reposition<br />
them on the cross bar. The objective is to have your hooks as far apart<br />
as possible for stability (try to butt them to the rack’s cross members,<br />
this helps as an index for getting the bag on quickly and also adds to<br />
the stability <strong>of</strong> the system).<br />
3) Retighten hooks at new positions.<br />
Note: With the <strong>Inertia</strong> crossbar system<br />
the bag can be positioned <strong>of</strong>f the back<br />
<strong>of</strong> the rack yet still remain solidly<br />
mounted due to the added rigidity<br />
provided by the cross bar. This allows<br />
for less frame sheet thickness and a<br />
lighter bag.<br />
Step B: If the rear hook is moved forward<br />
you will most likely need to shift<br />
the ”S” hook to the front pocket <strong>of</strong> the<br />
stabilizing webbing (B). The goal is to<br />
have the ”S” hook roughly centered<br />
between the top hooks.<br />
A A<br />
Fig. I B<br />
BUNGEE SUSPENSION<br />
Ideal for moderate loads on paved or groomed conditions where simplicity is a priority.<br />
1) Adjust top hooks (Step A above under Pannier Adjustment).<br />
2) Select appropriate lower webbing pocket for the bungee to pass through (see B in Fig. I above). Pick the pocket that is<br />
roughly on the center line <strong>of</strong> the two hooks, e.g. if the bag is shifted back from the rider, use the front bungee pocket.<br />
3) Attach ”S” hook to bottom ”leg” <strong>of</strong> rack.<br />
4) Pull up on handle <strong>of</strong> pannier to tension bungee and place top hooks on top rail <strong>of</strong> rack at points determined above.<br />
5) Ride<br />
Note: If you have a shorter rack and need more bungee tension follow the steps in Fig. II.<br />
<strong>Inertia</strong> Panniers are set for a standard 12” rack. If you have a shorter rack, such as on a recumbent, you can easily<br />
shorten the bungee. Fig. II<br />
1) Pry collar away from mounted end with screwdriver or blunt knife.<br />
2) Pull through sufficient bungee for a proper fit.<br />
3) Replace collar with pliers. Keep excess bungee attached until you are sure the fit is correct, then cut leaving at<br />
least 1/4” exposed, melt end with a flame.<br />
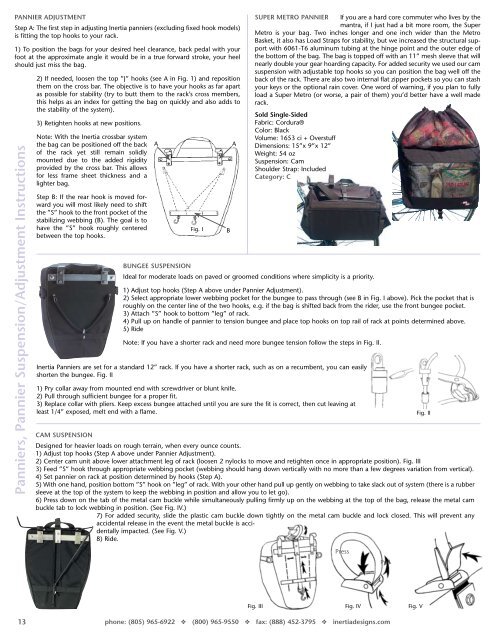
SUPER METRO PANNIER If you are a hard core commuter who lives by the<br />
mantra, if I just had a bit more room, the Super<br />
Metro is your bag. Two inches longer and one inch wider than the Metro<br />
Basket, it also has Load Straps for stability, but we increased the structural support<br />
with 6061-T6 aluminum tubing at the hinge point and the outer edge <strong>of</strong><br />
the bottom <strong>of</strong> the bag. The bag is topped <strong>of</strong>f with an 11” mesh sleeve that will<br />
nearly double your gear hoarding capacity. For added security we used our cam<br />
suspension with adjustable top hooks so you can position the bag well <strong>of</strong>f the<br />
back <strong>of</strong> the rack. There are also two internal flat zipper pockets so you can stash<br />
your keys or the optional rain cover. One word <strong>of</strong> warning, if you plan to fully<br />
load a Super Metro (or worse, a pair <strong>of</strong> them) you’d better have a well made<br />
rack.<br />
Sold Single-Sided<br />
Fabric: Cordura®<br />
Color: Black<br />
Volume: 1653 ci + Overstuff<br />
Dimensions: 15”x 9”x 12”<br />
Weight: 54 oz<br />
Suspension: Cam<br />
Shoulder Strap: Included<br />
Category: C<br />
CAM SUSPENSION<br />
Designed for heavier loads on rough terrain, when every ounce counts.<br />
1) Adjust top hooks (Step A above under Pannier Adjustment).<br />
2) Center cam unit above lower attachment leg <strong>of</strong> rack (loosen 2 nylocks to move and retighten once in appropriate position). Fig. III<br />
3) Feed ”S” hook through appropriate webbing pocket (webbing should hang down vertically with no more than a few degrees variation from vertical).<br />
4) Set pannier on rack at position determined by hooks (Step A).<br />
5) With one hand, position bottom ”S” hook on ”leg” <strong>of</strong> rack. With your other hand pull up gently on webbing to take slack out <strong>of</strong> system (there is a rubber<br />
sleeve at the top <strong>of</strong> the system to keep the webbing in position and allow you to let go).<br />
6) Press down on the tab <strong>of</strong> the metal cam buckle while simultaneously pulling firmly up on the webbing at the top <strong>of</strong> the bag, release the metal cam<br />
buckle tab to lock webbing in position. (See Fig. IV.)<br />
7) For added security, slide the plastic cam buckle down tightly on the metal cam buckle and lock closed. This will prevent any<br />
accidental release in the event the metal buckle is accidentally<br />
impacted. (See Fig. V.)<br />
8) Ride.<br />
Fig. III<br />
Press<br />
Pull<br />
Fig. IV Fig. V<br />
phone: (805) 965-6922 � (800) 965-9550 � fax: (888) 452-3795 � inertiadesigns.com<br />
Fig. II