

Roadside Revegetation
RoadsideReveg_PollinatorHabitat_DRAFTv1-1_sept2016
RoadsideReveg_PollinatorHabitat_DRAFTv1-1_sept2016

You also want an ePaper? Increase the reach of your titles
YUMPU automatically turns print PDFs into web optimized ePapers that Google loves.
<strong>Roadside</strong> <strong>Revegetation</strong><br />
An Integrated Approach to Establishing<br />
Native Plants and Pollinator Habitat<br />
Draft Version 1.1 — September 2016<br />
U.S. Department of Transportation<br />
Federal Highway Administration
Technical Report Documentation Page<br />
1. Report No. 2. Government Accession No. 3. Recipient's Catalog No.<br />
4. Title and Subtitle<br />
<strong>Roadside</strong> <strong>Revegetation</strong>: An Integrated Approach to Establishing Native Plants<br />
and Pollinator Habitat<br />
7. Contributing Author(s)<br />
Amit Armstrong, Ph.D., P.E., Federal Highway Administration<br />
Robin Christians, WSP | Parsons Brinckerhoff<br />
Vicky Erickson, United States Forest Service<br />
Jennifer Hopwood, Xerces Society<br />
Matt Horning, Ph.D., United States Forest Service<br />
Andrea Kramer, Ph.D., The Chicago Botanic Garden<br />
Lynda Moore, United States Forest Service<br />
Deirdre Remley, Federal Highway Administration<br />
Shane Roberts, WSP | Parsons Brinckerhoff<br />
Mark Skinner, United States Forest Service<br />
David Steinfeld, Native Restoration Consultant<br />
Todd Teuscher, WSP | Parsons Brinckerhoff<br />
Abbey White, The Chicago Botanic Garden<br />
9. Performing Organization Name and Address<br />
WSP | Parsons Brinckerhoff<br />
1600 Broadway Street, Suite 1100, Denver, CO 80202<br />
USDA-Forest Service, Pacific Northwest Region<br />
1220 SW 3rd Avenue, Portland, Oregon 97204<br />
Xerces Society for Invertebrate Conservation<br />
628 NE Broadway, Suite 200, Portland, OR 97232<br />
12. Sponsoring Agency Name and Address<br />
Federal Highway Administration, 1200 New Jersey Avenue, SE<br />
Washington, DC 20590<br />
5. Report Date<br />
September 2016<br />
6. Performing Organization Code<br />
8. Performing Organization Report No.<br />
10. Work Unit No. (TRAIS)<br />
11. Contract or Grant No.<br />
13. Type of Report and Period Covered<br />
14. Sponsoring Agency Code<br />
15. Supplementary Notes<br />
Contracting Officer's Representative: Amit Armstrong, Ph.D., P.E., FHWA<br />
16. Abstract<br />
Native plants are a foundation of ecological function, affecting soil conservation, wildlife habitat, plant communities, invasive<br />
species, and water quality. Establishing locally-adapted, self-sustaining plant communities can also support transportation<br />
goals for safety and efficiency. Past obstacles to establishing native plant communities on roadsides have been technical,<br />
informational, and organizational. Effective strategies and practical techniques for revegetating the disturbed conditions with<br />
limited resources must be made available to practitioners. Multiple disciplines including engineering, soil science, ecology,<br />
botany, and wildlife science must work cooperatively and not in isolation.<br />
<strong>Roadside</strong>s play an important role in the conservation of declining wild pollinators and in supporting the health of managed<br />
pollinators. Throughout the revegetation process, practitioners and designers can enhance roadsides to benefit pollinators.<br />
This report offers an integrated approach to facilitate the successful establishment of native plants and pollinator habitats<br />
along roadsides and other areas of disturbance associated with road modifications. It guides readers through a comprehensive<br />
process of: 1) initiating, 2) planning, 3) implementing, and 4) monitoring a roadside revegetation project with native plants<br />
and pollinator habitat.<br />
17. Key Words<br />
pollinators, integrated roadside vegetation management,<br />
butterflies, bees, moths, nectar plants, host plants, roadside<br />
habitat, reduced mowing, native plants, roadside landscape<br />
design, roadside maintenance<br />
19. Security Classif. (of this report)<br />
Unclassified<br />
20. Security Classif. (of this page)<br />
Unclassified<br />
18. Distribution Statement<br />
No restriction. This document is available to the public from<br />
the sponsoring agency website.<br />
21. No. of Pages<br />
xx<br />
22. Price<br />
$0.00<br />
Form DOT F 1700.7 (8-72)<br />
Reproduction of completed page authorized
<strong>Roadside</strong> <strong>Revegetation</strong>: An Integrated<br />
Approach to Establishing Native Plants and<br />
Pollinator Habitat<br />
Draft Version 1.1 — September 2016<br />
CONTRIBUTING AUTHORS<br />
Amit Armstrong, Ph.D., P.E., Federal Highway Administration<br />
Robin Christians, WSP | Parsons Brinckerhoff<br />
Vicky Erickson, USDA-Forest Service<br />
Jennifer Hopwood, Xerces Society<br />
Matt Horning, Ph.D., USDA-Forest Service<br />
Andrea Kramer, Ph.D., The Chicago Botanic Garden<br />
Lynda Moore, USDA-Forest Service<br />
Deirdre Remley, Federal Highway Administration<br />
Shane Roberts, WSP | Parsons Brinckerhoff<br />
Mark Skinner, Ph.D., USDA-Forest Service<br />
David Steinfeld, Native Restoration Consultant<br />
Todd Teuscher, WSP | Parsons Brinckerhoff<br />
Abbey White, The Chicago Botanic Garden<br />
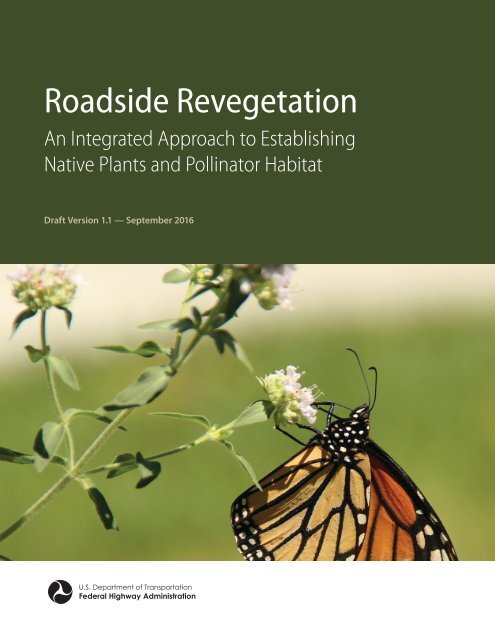
Cover photo courtesy of Jennifer Hopwood<br />
U.S. Department of Transportation<br />
Federal Highway Administration
TABLE OF CONTENTS<br />
Acronyms and Abbreviations<br />
Preface<br />
xviii<br />
xix<br />
1— Introduction 1<br />
1.1 An Integrated Approach 2<br />
1.2 The Ecological Context of Roads 2<br />
1.2.1 Past Oversights 3<br />
1.2.2 Present Awareness 3<br />
1.2.3 Trends in Road Construction 4<br />
1.2.4 Challenges and Opportunities 4<br />
1.2.5 Why Revegetate <strong>Roadside</strong>s With Native Plants? 5<br />
1.3 Objectives of this Report 6<br />
1.4 Scope 7<br />
1.5 Approach 7<br />
1.5.1 What is the “<strong>Roadside</strong>”? 8<br />
1.5.2 What are Native Plants? 9<br />
1.5.3 Why the Emphasis on pollinators? 9<br />
1.5.4 Goal-Oriented, Context-Sensitive, and Integrated 10<br />
1.6 How this Report is Organized 11<br />
1.6.1 Initiation Overview 13<br />
1.6.2 Planning Overview 13<br />
1.6.3 Implementation Overview 14<br />
1.6.4 Monitoring and Management Overview 14<br />
1.7 Summary 14<br />
2— Initiation Part One: Cooperators and Processes for Road Projects 15<br />
2.1 Introduction 16<br />
2.2 Preliminary Tasks of Initiation 16<br />
2.2.1 Initiate Recordkeeping 16<br />
2.2.2 Identify Cooperators and Agencies: Who is Involved? 17<br />
2.2.3 Define Cooperator Processes, Timelines, and Milestones 17<br />
2.2.4 Define Objectives: What is the Project Trying to Accomplish? 17<br />
2.3 The Process of Road Development 19<br />
2.3.1 Road Planning and Programming 19<br />
2.3.2 Road Project Development 20<br />
2.3.3 Construction 22<br />
2.3.4 Maintenance 22<br />
2.4 Next Steps 23<br />
<strong>Roadside</strong> <strong>Revegetation</strong>: An Integrated Approach to Establishing Native Plants and Pollinator Habitat<br />
iv
TABLE OF CONTENTS<br />
3— Initiation Part Two: Road Plans and Terminology 24<br />
3.1 Introduction 25<br />
3.2 Reading Plans 25<br />
3.2.1 Plan View 25<br />
3.2.2 Profile View 26<br />
3.2.3 Cross-Section View 27<br />
3.2.4 Typical Views 28<br />
3.2.5 Summary of Quantities Table 28<br />
3.3 Interpreting Engineering Views for <strong>Revegetation</strong> Planning 29<br />
3.4 Understanding Technical Concepts and Terminology 30<br />
3.5 Next Steps 31<br />
3.6 Road Concepts and Terminology 31<br />
3.6.1 Road Components 31<br />
3.6.2 Road Structural Section and Materials 32<br />
3.6.3 Surface Drainage 32<br />
3.6.4 Culverts and Drainage Crossings 33<br />
3.6.5 Miscellaneous Terms 34<br />
4— Planning Phase One: Orient 35<br />
4.1 Introduction 36<br />
4.2 Define <strong>Revegetation</strong> Objectives 37<br />
4.3 Gather Pre-field Information 39<br />
4.3.1 Climate 39<br />
4.3.2 Soils 42<br />
4.3.3 Vegetation 43<br />
4.3.4 Pollinators 44<br />
4.3.5 Road Plans 45<br />
4.4 Define <strong>Revegetation</strong> Units 45<br />
4.5 Locate Reference Sites 48<br />
4.6 Gather Field Information 49<br />
4.6.1 Vegetation Assessment 50<br />
4.6.2 Soils Assessment 52<br />
4.6.3 Pollinators 52<br />
4.7 Define Desired Future Condition 54<br />
4.8 Next Steps 55<br />
<strong>Roadside</strong> <strong>Revegetation</strong>: An Integrated Approach to Establishing Native Plants and Pollinator Habitat<br />
v
TABLE OF CONTENTS<br />
5— Planning Phase Two: Assess Site 56<br />
5.1 Introduction 57<br />
5.1.1 Limiting Factors 57<br />
5.2 Water Input 59<br />
5.2.1 Precipitation 59<br />
5.2.2 Rainfall Interception 61<br />
5.2.3 Infiltration 63<br />
5.2.4 Road Drainage 64<br />
5.3 Available Water Storage and Accessibility 65<br />
5.3.1 Soil Texture 65<br />
5.3.2 Rock Fragments 69<br />
5.3.3 Soil Structure 70<br />
5.3.4 Rooting Depth 73<br />
5.3.5 Mycorrhizal Fungi 75<br />
5.4 Water Loss 77<br />
5.4.1 Wind 79<br />
5.4.2 Aspect 81<br />
5.4.3 Competing Vegetation 82<br />
5.4.4 Soil Cover 83<br />
5.5 Nutrient Cycling 83<br />
5.5.1 Topsoil 84<br />
5.5.2 Site Organic Matter 86<br />
5.5.3 Soil Nitrogen and Carbon 88<br />
5.5.4 Nutrients 94<br />
5.5.5 pH and Salts 97<br />
5.6 Surface Stability 100<br />
5.6.1 Rainfall and Wind 101<br />
5.6.2 Freeze-Thaw 103<br />
5.6.3 Soil Cover 105<br />
5.6.4 Surface Strength 106<br />
5.6.5 Infiltration Rates 107<br />
5.6.6 Slope Gradient 108<br />
5.6.7 Surface Roughness 110<br />
5.6.8 Slope Length 111<br />
5.7 Slope Stability 112<br />
5.7.1 Permeability 113<br />
5.7.2 Restrictive Layer 115<br />
5.7.3 Water Input 116<br />
5.7.4 Slope Length 117<br />
5.7.5 Slope Gradient 118<br />
5.7.6 Soil Strength 118<br />
5.8 Weeds 120<br />
5.8.1 Weed Sources and Their Growing Environment 121<br />
<strong>Roadside</strong> <strong>Revegetation</strong>: An Integrated Approach to Establishing Native Plants and Pollinator Habitat<br />
vi
TABLE OF CONTENTS<br />
5.9 Pests 127<br />
5.9.1 Mammals 128<br />
5.9.2 Insects 129<br />
5.9.3 Diseases 131<br />
5.10 Human Interface 131<br />
5.10.1 Road Maintenance 131<br />
5.10.2 Recreational Use 133<br />
5.11 Inventory Site Resources 133<br />
5.11.1 Topsoil 134<br />
5.11.2 Duff and Litter 134<br />
5.11.3 Subsoil and Parent Material 135<br />
5.11.4 Woody Material 135<br />
5.11.5 Plant Materials 135<br />
5.12 Phase Two Summary and Next Steps 135<br />
6— Planning Phase Three: Vegetation Analysis 136<br />
6.1 Introduction 137<br />
6.2 Select Species for Propagation 137<br />
6.3 Identify Target Plant Requirements 138<br />
6.3.1 Ensure Local Adaptation and Maintain Genetic Diversity 140<br />
6.3.2 Consider Plant Establishment Methods 144<br />
6.3.3 Select Plant Material Installation and Maintenance Methods 147<br />
6.3.4 Determine Outplanting Windows 148<br />
6.3.5 Determine Sowing Windows 152<br />
6.4 Next Steps 152<br />
7— Planning Phase Four: Integrate and Strategize 153<br />
7.1 Introduction 154<br />
7.2 Assemble Plan 154<br />
7.3 Finalize <strong>Revegetation</strong> Units and Desired Future Conditions 154<br />
7.4 Integrate and Develop <strong>Revegetation</strong> Strategies 156<br />
7.5 Assemble the <strong>Revegetation</strong> Plan 158<br />
7.5.1 Networking 159<br />
7.5.2 Timelines 159<br />
7.5.3 Fiscal Concerns 159<br />
7.6 Next Steps 159<br />
8— <strong>Revegetation</strong> Plan Example 160<br />
Preface 161<br />
<strong>Roadside</strong> <strong>Revegetation</strong>: An Integrated Approach to Establishing Native Plants and Pollinator Habitat<br />
vii
TABLE OF CONTENTS<br />
9— Implementation 208<br />
9.1 Introduction 209<br />
9.2 Review Plans with Construction Engineer 209<br />
9.3 Review Treatment Details and Timelines 211<br />
9.4 Develop Contracts 213<br />
9.5 Install Treatments 214<br />
9.6 Example Statement of Work 215<br />
9.6.1 Location of work 215<br />
9.6.2 Description of Work and Standards 215<br />
9.6.3 Contractor Quality Control Plan 216<br />
9.6.4 Government Quality Assurance Plan 216<br />
9.6.5 Measurement and Payment 217<br />
9.6.6 Government Furnished Material 217<br />
9.6.7 Schedule 218<br />
9.7 Keep Good Records 218<br />
9.8 Carry Out Quality Assurance 219<br />
9.9 Implement Early Maintenance and Monitoring 219<br />
9.10 Conclusion 220<br />
10— Implementation Guides 221<br />
10.1 Soil and Site Treatments 222<br />
10.1.1 Fertilizers 223<br />
10.1.2 Tillage 233<br />
10.1.3 Mulches 239<br />
10.1.4 Topsoil 251<br />
10.1.5 Organic Matter Amendments 257<br />
10.1.6 Lime Amendments 265<br />
10.1.7 Beneficial Soil Microorganisms 268<br />
10.1.8 Topographic Enhancements 278<br />
10.2 Obtaining Plant Materials 281<br />
10.2.1 Collecting Wild Seeds 281<br />
10.2.2 Collecting Wild Cuttings 288<br />
10.2.3 Collecting Wild Plants 297<br />
10.2.4 Nursery Seed Production 302<br />
10.2.5 Nursery Cutting Production 310<br />
10.2.6 Nursery Plant Production 315<br />
10.3 Installing Plant Materials 327<br />
10.3.1 Seeding 327<br />
10.3.2 Hydroseeding 337<br />
10.3.3 Installing Cuttings 349<br />
10.3.4 Installing Plants 355<br />
<strong>Roadside</strong> <strong>Revegetation</strong>: An Integrated Approach to Establishing Native Plants and Pollinator Habitat<br />
viii
TABLE OF CONTENTS<br />
10.4 Post Installation Care of Plant Materials 363<br />
10.4.1 Introduction 364<br />
10.4.2 Animal Protection 364<br />
10.4.3 Shade Cards 365<br />
10.4.4 Tree Shelters 366<br />
10.4.5 Irrigation 369<br />
11— Monitoring and Management 375<br />
11.1 Introduction 376<br />
11.2 Revisit Project Objectives and DFCs 377<br />
11.3 Develop Monitoring Strategy and Procedures 377<br />
11.3.1 Define Scope 378<br />
11.3.2 Determine Location, Timing, and Frequency 380<br />
11.3.3 Develop Sampling Methods 380<br />
11.3.4 Summarize Monitoring Strategy 380<br />
11.4 Record Data and Observations 381<br />
11.5 Evaluate Data and Apply Any Corrective Measures 382<br />
11.6 Organize, File and Report Project Results 383<br />
11.7 Share Lessons Learned 383<br />
11.8 <strong>Roadside</strong> Maintenance and Management 383<br />
11.9 Conclusion 384<br />
12— Monitoring Procedures 385<br />
12.1 Introduction 386<br />
12.1.1 What is being monitored? 386<br />
12.1.2 What is the shape of the sampling area? 386<br />
12.1.3 What is the objective behind monitoring? 387<br />
12.2 Soil Cover Procedure 387<br />
12.2.1 Sampling by Fixed Frame 388<br />
12.2.2 Sampling by Digital Camera 389<br />
12.3 Species Cover Procedure 390<br />
12.4 Species Presence Procedure 391<br />
12.5 Plant Density Procedure 392<br />
12.6 Plant Attributes Procedure 393<br />
12.7 Sampling Area Design 394<br />
12.7.1 Linear Sampling Areas 395<br />
12.7.2 Rectilinear Sampling Areas 396<br />
12.7.3 Dispersed Area Sampling 397<br />
12.8 Sample Size Determination 399<br />
<strong>Roadside</strong> <strong>Revegetation</strong>: An Integrated Approach to Establishing Native Plants and Pollinator Habitat<br />
ix
TABLE OF CONTENTS<br />
12.8.1 Comparing Means with Standards – Linear Sample Size Determination 400<br />
12.8.2 Comparing Means with Standards – Rectilinear Sample Size Determination 401<br />
12.8.3 Comparing Means with Standards – Dispersed Area Sample Size Determination 401<br />
12.8.4 Sample Size for Comparing Means among Treatment Groups 402<br />
12.9 Statistical Analysis Using Confidence Intervals 403<br />
12.9.1 Determine Standards Compliance 403<br />
12.9.2 Determine Treatment Differences 408<br />
12.9.3 Determine Trends 410<br />
12.10 Pollinator Monitoring Procedures 412<br />
13— Pollinator-Specific Case Studies 414<br />
13.1 I-35 Corridor (aka “The Monarch Highway”) Case Studies 415<br />
13.1.1 Bringing Prairie Back to Iowa: Iowa’s Integrated <strong>Roadside</strong> Vegetation Management Program and Living Roadway Trust Fund 415<br />
13.1.2 Iowa’s Natural Selections Program Increases Iowa Native Seed 416<br />
13.2 A Case Study from the Southeast U.S. 417<br />
13.2.1 Florida Resolves to Protect Wildflowers on <strong>Roadside</strong>s 417<br />
Bibliography 419<br />
Appendix 442<br />
Native <strong>Revegetation</strong> Plants for Pollinators in the I-35 Corridor 442<br />
Iowa — Native <strong>Revegetation</strong> Plants for Pollinators 457<br />
Kansas — Native <strong>Revegetation</strong> Plants for Pollinators 466<br />
Minnesota — Native <strong>Revegetation</strong> Plants for Pollinators 476<br />
Missouri — Native <strong>Revegetation</strong> Plants for Pollinators 485<br />
Oklahoma — Native <strong>Revegetation</strong> Plants for Pollinators 496<br />
Texas — Native <strong>Revegetation</strong> Plants for Pollinators 505<br />
Figures<br />
Figure 1-1 | Pollinator habitat on roadside 2<br />
Figure 1-2 | Prior road construction 3<br />
Figure 1-3 | Recently planted trees on an obliterated section of highway in Oregon 5<br />
Figure 1-4 | Unsuccessful roadside revegetation on steep slopes 6<br />
Figure 1-5 | <strong>Roadside</strong> native plant community 7<br />
Figure 1-6 | <strong>Roadside</strong>s are disturbed areas 8<br />
Figure 1-8 | Vegetated linear corridors as habitat for pollinators and other wildlife 10<br />
Figure 1-9 | <strong>Roadside</strong> mowing 11<br />
Figure 1-10 | The Project Cycle 11<br />
Figure 2-1 | Project coordination 18<br />
Figure 3-1 | Example plan view 26<br />
Figure 3-2 | Example profile view 26<br />
Figure 3-3 | First example cross-section 27<br />
Figure 3-4 | Second example cross-section 27<br />
<strong>Roadside</strong> <strong>Revegetation</strong>: An Integrated Approach to Establishing Native Plants and Pollinator Habitat<br />
x
TABLE OF CONTENTS<br />
Figure 3-5 | Example typical view 28<br />
Figure 3-6 | Example typical view of installation trail and turnout. 28<br />
Figure 3-7 | Interpretation of plan view showing revegetation zones 29<br />
Figure 3-8 | Cross-section showing revegetation zones as interpreted from engineering plans 29<br />
Figure 3-9 | Terms used to define roads 30<br />
Figure 3-10 | Terms used to define roads: cross-section 30<br />
Figure 3-11 | Culvert components 33<br />
Figure 3-12 | Terms used to describe road slopes 34<br />
Figure 4-1 | NOAA and NRCS Weather Stations 40<br />
Figure 4-2 | Spring and fall freeze probability graphs 40<br />
Figure 4-3 | Rainfall probability graphs 41<br />
Figure 4-4 | Precipitation trends 41<br />
Figure 4-5 | Soils maps generated from the Web Soil Survey website 42<br />
Figure 4-6 | Ecoregional <strong>Revegetation</strong> Assistant 44<br />
Figure 4-7 | BAMANA website displays pollinator sightings for locations around the US 45<br />
Figure 4-8 | Cut and fill slopes often define revegetation units 47<br />
Figure 4-9 | <strong>Revegetation</strong> objectives and treatments are defined for each revegetation unit 47<br />
Figure 4-10 | Succesional processes vary by microsite 49<br />
Figure 5-1 | Limiting factors to revegetation 57<br />
Figure 5-2 | Nine site characteristics that can limit plant growth 58<br />
Figure 5-3 | 30-Year Normal Precipitation: August (1981–2010) 59<br />
Figure 5-4 | Root and short growth 60<br />
Figure 5-5 | Fill slope microcatchments 62<br />
Figure 5-6 | Planting pockets 62<br />
Figure 5-7 | Moisture holding capacity of mulch or litter 63<br />
Figure 5-8 | Surface-applied compost 64<br />
Figure 5-9 | Live silt fence 65<br />
Figure 5-10 | Soil textural triangle 66<br />
Figure 5-11 | Soil texture by feel method 67<br />
Figure 5-12 | Soil texture and available water-holding capacity 68<br />
Figure 5-13 | Estimating rock fragment content from roadcuts 69<br />
Figure 5-14 | Soil sieves for estimating rock content 70<br />
Figure 5-15 | Compacted soil 71<br />
Figure 5-16 | Poor draining soils due to soil compaction 71<br />
Figure 5-17 | A soil core is used to determine bulk density and water-holding capacity 71<br />
Figure 5-18 | A shovel can be used to determine depth to compaction 72<br />
Figure 5-19 | Mycorrhizal fungi extend root systems 75<br />
Figure 5-20 | Non-mycorrhizae inoculated seedlings versus inoculated seedlings 77<br />
Figure 5-21 | Evapotranspiration rates 78<br />
Figure 5-22 | Relationships among evapotranspiration, soil moisture,and plant moisture stress 79<br />
Figure 5-23 | Plant moisture stress 79<br />
Figure 5-24 | Temperature recording device 81<br />
Figure 5-25 | Effective mulch cover 83<br />
Figure 5-26 | Topsoil 85<br />
Figure 5-28 | Nutrients in Douglas-fir and alder 86<br />
Figure 5-27 | Nutrients in forests stands 86<br />
Figure 5-29 | Relative rates of decomposition by C:N and particle size 87<br />
Figure 5-31 | Release of available nitrogen through decomposition 88<br />
Figure 5-30 | Large wood creates pollinator habitat and reduces soil erosion 88<br />
Figure 5-32 | Managing nitrogen capital 89<br />
<strong>Roadside</strong> <strong>Revegetation</strong>: An Integrated Approach to Establishing Native Plants and Pollinator Habitat<br />
xi
TABLE OF CONTENTS<br />
Figure 5-33 | Determining total N threshold values from reference sites 90<br />
Figure 5-34 | Raising nitrogen levels 93<br />
Figure 5-35 | The 13 essential mineral nutrients 95<br />
Figure 5-36 | Soil pH levels across the US 97<br />
Figure 5-38 | Soils with high salts 98<br />
Figure 5-37 | Soluble salt affects on plants 98<br />
Figure 5-39 | pH meter 99<br />
Figure 5-40 | Wind erosion 101<br />
Figure 5-42 | Areas in US with high winds 102<br />
Figure 5-41 | Rainfall intensities across the US 102<br />
Figure 5-43 | Freeze-thaw effects on planted seedlings 104<br />
Figure 5-44 | Freeze-thaw ice crystals 104<br />
Figure 5-45 | Soil erosion affects seed germination 105<br />
Figure 5-46 | Soils are protected by a soil cover 105<br />
Figure 5-47 | Many sites take more than one year to fully revegetate 106<br />
Figure 5-48 | Sandy soils have low surface strength 106<br />
Figure 5-49 | Infiltration rates 107<br />
Figure 5-50 | Portable rainfall simulator 107<br />
Figure 5-51 | Dry ravel 108<br />
Figure 5-52 | <strong>Revegetation</strong> methods and slope gradients 109<br />
Figure 5-53 | Effects of steep and gentle gradient slopes on revegetation 109<br />
Figure 5-54 | Surface roughness creates favorable environment for germination 110<br />
Figure 5-55 | Surface erosion increase with distance downslope 111<br />
Figure 5-56 | Structures that shorten slope length 112<br />
Figure 5-57 | Slumps and slides 112<br />
Figure 5-58 | Water pressure and slope stability 113<br />
Figure 5-60 | Restrictive layers and ground water 115<br />
Figure 5-59 | Restrictive layers can decrease slope stability 115<br />
Figure 5-61 | Live pole drains 116<br />
Figure 5-63 | Effects of roots on slope stability 119<br />
Figure 5-62 | Plant roots and slope stability 119<br />
Figure 5-64 | Invasive species 122<br />
Figure 5-65 | Hay often contains weed seeds 123<br />
Figure 5-66 | Quality topsoil is low in weed seeds 124<br />
Figure 5-67 | Gopher mounds 128<br />
Figure 5-68 | Deer browsed seedlings 128<br />
Figure 5-69 | Plastic netting can protect seedlings from animal browsing 129<br />
Figure 5-70 | Chemical control of roadside vegetation 132<br />
Figure 5-71 | Road signs identify areas to protect 132<br />
Figure 5-72 | Graveling road surfaces can lead to burying roadside vegetation 133<br />
Figure 5-73 | Creating shredded wood for mulch 134<br />
Figure 6-1 | Steep roadcuts require erosion a control working group 138<br />
Figure 6-2 | Example of a specialist species 138<br />
Figure 6-3 | The Target Plant Concept 140<br />
Figure 6-4 | Provisional seed zones 143<br />
Figure 6-5 | Early planning for plant material procurement 147<br />
Figure 6-6 | Planting long-tube stocktypes with an expandable stinger 148<br />
Figure 6-7 | Survivorship can vary between spring and fall plantings 148<br />
Figure 6-8 | Case Study – Low elevation, Western Cascade site 149<br />
Figure 6-9 | Case Study – Cool, arid site 150<br />
<strong>Roadside</strong> <strong>Revegetation</strong>: An Integrated Approach to Establishing Native Plants and Pollinator Habitat<br />
xii
TABLE OF CONTENTS<br />
Figure 6-10 | Case Study – High elevation site 151<br />
Figure 7-1 | Reference Site 1 154<br />
Figure 7-2 | Reference Site 2 154<br />
Figure 7-3 | Define limiting factors on the site 155<br />
Figure 7-4 | List possible mitigating measures for limiting factors 155<br />
Figure 7-5 | Case Study – Design potential revegetation strategies 158<br />
Figure 7-6 | Case Study – Compare revegetation strategies 158<br />
Figure 9-1 | Example implementation timeline 211<br />
Figure 9-2 | Example contract 214<br />
Figure 9-3 | Example of contract daily diary 218<br />
Figure 10-1 | Threshold values of nitrogen 223<br />
Figure 10-2 | Determining nitrogen needs 224<br />
Figure 10-3 | Example of a fertilizer label for an “all purpose” fertilizer 225<br />
Figure 10-4 | Reduced seed germination after exposure to fertilizer 228<br />
Figure 10-5 | Example of calculating fertilizer application rates to reduce nitrogen 229<br />
Figure 10-6 | Strategies for applying slow and fast release fertilizers 231<br />
Figure 10-7 | Benefits of ripping and mulching vary by soil type 234<br />
Figure 10-8 | Winged subsoiler 235<br />
Figure 10-9 | Subsoiler tine and wing configurations determine effectiveness 236<br />
Figure 10-10 | Subsoiling grapple rake 237<br />
Figure 10-11 | Trackwalking compacts soils 238<br />
Figure 10-12 | Soil imprinting with modified excavator bucket 238<br />
Figure 10-13 | Long-fibered mulches 239<br />
Figure 10-14 | Hydromulch 240<br />
Figure 10-15 | Erosion mat 240<br />
Figure 10-16 | Sheet mulch 241<br />
Figure 10-17 | Mulch conserves soil moisture and inhibits weed establishment 241<br />
Figure 10-18 | Different types and textures of mulches 242<br />
Figure 10-19 | Large mulching operation 243<br />
Figure 10-20 | Blowing equipment is used to apply mulch on steep slopes 245<br />
Figure 10-21 | Field trials of species and materials 246<br />
Figure 10-22 | Squirreltail seeds 248<br />
Figure 10-23 | Straw blower 248<br />
Figure 10-24 | Salvaged soil can be tested for nitrogen content 253<br />
Figure 10-26 | Soil textures suitable as loam barrow 254<br />
Figure 10-25 | Soil quantity needed for a certain depth can be estimated 254<br />
Figure 10-27 | Nutrients in forest biomass 260<br />
Figure 10-27 | Determining amount of compost to apply 264<br />
Figure 10-30 | Approximate liming rates for disturbed soils 267<br />
Figure 10-29 | Determining how much liming material to apply 267<br />
Figure 10-31 | Symbiotic relationships of plants 268<br />
Figure 10-32 | Mycorrhizal fungi 269<br />
Figure 10-33 | Soil inoculum can be collected in the field 270<br />
Figure 10-34 | Ectomycorrhizal inoculum 271<br />
Figure 10-35 | Ectomycorrhizae 271<br />
Figure 10-36 | Arbuscular mycorrhizal fungi 272<br />
Figure 10-37 | Commercial AMF inoculants 272<br />
Figure 10-38 | Nitrogen fixing bacteria 273<br />
Figure 10-39 | Nitrogen fixing plants 274<br />
Figure 10-40 | Amount of nitrogen is related to the cover of nitrogen-fixing plants 275<br />
<strong>Roadside</strong> <strong>Revegetation</strong>: An Integrated Approach to Establishing Native Plants and Pollinator Habitat<br />
xiii
TABLE OF CONTENTS<br />
Figure 10-41 | Nitrogen-fixing bacteria are commercially available 276<br />
Figure 10-42 | Nitrogen-fixing bacteria will multiply as inoculated plants grow 277<br />
Figure 10-44 | Planting pockets are effective at capturing runoff water 279<br />
Figure 10-43 | Topographic enhancement strategies 279<br />
Figure 10-46 | Constructed wetlands are effective at capturing runoff water 280<br />
Figure 10-45 | Microcatchments are effective at capturing runoff water 280<br />
Figure 10-47 | Planting islands mimic natural surroundings 280<br />
Figure 10-48 | Planting island cross section 281<br />
Figure 10-49 | Early planning is essential when collecting wild seeds 282<br />
Figure 10-50 | Determining wild seed needs 283<br />
Figure 10-51 | Wild collected seed needs to be cleaned 284<br />
Figure 10-52 | Seed ripens throughout the season for some plant species 285<br />
Figure 10-53 | Recording seed collection information is imperative 286<br />
Figure 10-54 | Wild cutting collection timeline 289<br />
Figure 10-55 | Designers should avoid harvesting actively growing material 294<br />
Figure 10-56 | Determining the needed amount of cuttings 295<br />
Figure 10-57 | As with seeds, collection information for cuttings is essential 296<br />
Figure 10-58 | Salvaged wetland plants 300<br />
Figure 10-59 | Included soil with salvaged plants 300<br />
Figure 10-60 | Mechanical tree spade 301<br />
Figure 10-60 | Salvage as much of the root ball as possible 301<br />
Figure 10-62 | Transplant wildlings immediately after collection 302<br />
Figure 10-63 | Commercially grown native seed growout fields 302<br />
Figure 10-64 | Plan early for seed production 303<br />
Figure 10-66 | Determine amount of seed needed 304<br />
Figure 10-65 | Pure live seed 304<br />
Figure 10-67 | Seed harvesting equipment 308<br />
Figure 10-68 | Seed harvesting and drying 309<br />
Figure 10-69 | Visit seed producers to assess crop quality 309<br />
Figure 10-70 | Proper storage is essential to ensure seed viability 310<br />
Figure 10-71 | Stooling beds produce cuttings 311<br />
Figure 10-72 | Stoolings baeds are managed production facilities 312<br />
Figure 10-74 | Plan early to ensure cuttings are ready for a project 314<br />
Figure 10-73 | Different cutting types serve unique purposes in revegetation 314<br />
Figure 10-75 | Target Plant Concept revisited 316<br />
Figure 10-76 | Engage nurseries early for plant materials 317<br />
Figure 10-78 | Determining plant spacing 318<br />
Figure 10-77 | Determining planting needs 318<br />
Figure 10-79 | Carefully consider container size 319<br />
Figure 10-80 | Match stocktype to site conditions and planting method 320<br />
Figure 10-82 | Effects of transplant shock can last years 321<br />
Figure 10-81 | Well-balanced nursery stock 321<br />
Figure 10-83 | Nursery plants are grown from a variety of source materials 322<br />
Figure 10-84 | Rooted cuttings 323<br />
Figure 10-85 | Seedling grading criteria 324<br />
Figure 10-86 | Seed mix on variable substrate 328<br />
Figure 10-87 | Broadcast seeding 329<br />
Figure 10-90 | Ripper-seeder-harrow equipment 330<br />
Figure 10-88 | Seeds pressed into soil surface 330<br />
Figure 10-89 | Seeds mixed under soil surface 330<br />
<strong>Roadside</strong> <strong>Revegetation</strong>: An Integrated Approach to Establishing Native Plants and Pollinator Habitat<br />
xiv
TABLE OF CONTENTS<br />
Figure 10-91 | Seed sowing and mixing equipment 331<br />
Figure 10-92 | Seeds drilled under soil surface 331<br />
Figure 10-93 | Seeds covered with long-fibered mulch 331<br />
Figure 10-94 | Seeds mixed into long-fibered mulch 332<br />
Figure 10-95 | Seeds applied in hydromulch 332<br />
Figure 10-96 | Seed mix sowing calculations 333<br />
Figure 10-97 | Hydraulic seeder 337<br />
Figure 10-98 | Hydromulch application time estimate 338<br />
Figure 10-100 | Duration inside hydroseeder can reduce germination of seed 341<br />
Figure 10-99 | Grass seed morphology 341<br />
Figure 10-101 | Hydraulic seeder nozzles 342<br />
Figure 10-102 | Fertilizer in hydroseeder mix 343<br />
Figure 10-103 | Hydromulch as a bonded fiber matrix 343<br />
Figure 10-104 | Slurry tank size and slurry composition 344<br />
Figure 10-105 | Hydraulic mulch and tackifiers 344<br />
Figure 10-106 | High viscosity tackifiers 345<br />
Figure 10-107 | Calculating slurry coverage per tank 349<br />
Figure 10-109 | Live stake planting orientation 350<br />
Figure 10-108 | Bud orientation on cuttings 350<br />
Figure 10-110 | Waterjet stinger 351<br />
Figure 10-113 | Live brush layers 352<br />
Figure 10-111 | Water tank with pump 352<br />
Figure 10-112 | Hand-stuck cuttings 352<br />
Figure 10-114 | Live fascines 354<br />
Figure 10-115 | The Target Plant Concept 355<br />
Figure 10-115 | Outplanting window 355<br />
Figure 10-117 | Calculating number of plants needed 356<br />
Figure 10-119 | Planting patterns are based on project objectives 356<br />
Figure 10-118 | Calculating the planting unit area 356<br />
Figure 10-120 | Tile spade shovels 357<br />
Figure 10-122 | Expandable stinger 358<br />
Figure 10-121 | Power auger 358<br />
Figure 10-123 | Pot planter 359<br />
Figure 10-124 | Plants integrated with engineered structures 359<br />
Figure 10-125 | Managing plant inventories 360<br />
Figure 10-127 | Estimating spacing between plants 361<br />
Figure 10-126 | Protect nursery stock during transportation 361<br />
Figure 10-128 | Healthy root structure is important 362<br />
Figure 10-129 | Monitoring outplanting results informs future decisions 363<br />
Figure 10-130 | Rigid netting 364<br />
Figure 10-131 | Shade cards 366<br />
Figure 10-132 | Corrugated plastic tree shelter 366<br />
Figure 10-133 | Rigid tubing tree shelter 367<br />
Figure 10-134 | Effects of tree shelters 367<br />
Figure 10-134 | Tree shelters and germinating seeds 368<br />
Figure 10-135 | Deep pot irrigation 369<br />
Figure 10-137 | Water delivery 370<br />
Figure 10-138 | Large water holding tanks 372<br />
Figure 11-1 | The Project Cycle 376<br />
Figure 11-2 | Photo points 379<br />
<strong>Roadside</strong> <strong>Revegetation</strong>: An Integrated Approach to Establishing Native Plants and Pollinator Habitat<br />
xv
TABLE OF CONTENTS<br />
Figure 12-1 | Quick guide to monitoring chapter 386<br />
Figure 12-2 | Fixed frame for transect sampling 388<br />
Figure 12-3 | Fixed frame for measuring soil cover 388<br />
Figure 12-4 | Soil cover procedure 389<br />
Figure 12-5 | Sampling on a road cut 389<br />
Figure 12-6 | 20-point grid in soil cover monitoring plot 390<br />
Figure 12-7 | Species cover procedure 391<br />
Figure 12-8 | Species presence procedure 392<br />
Figure 12-9 | Plant density procedure 393<br />
Figure 12-10 | Plant attributes procedure 394<br />
Figure 12-11 | Linear sampling areas 395<br />
Figure 12-12 | Random assignment of quadrats 396<br />
Figure 12-13 | Rectilinear sampling areas 397<br />
Figure 12-14 | Systematic sampling of dispersed areas 398<br />
Figure 12-15 | Sampling dispersed areas with an offset grid 399<br />
Figure 12-16 | Determining the number of transects 401<br />
Figure 12-17 | Example data analysis results 403<br />
Figure 12-18 | Confidence intervals for linear sampling designs 404<br />
Figure 12-19 | Example data to confirm accuracy 405<br />
Figure 12-20 | Confidence intervals for rectilinear sampling designs 406<br />
Figure 12-21 | Confidence intervals for sampling dispersed areas 407<br />
Figure 12-22 | Possible scenarios when comparing standards to confidence intervals 408<br />
Figure 12-23 | Comparing treatment differences 409<br />
Figure 12-24 | Interpreting results with confidence intervals 410<br />
Figure 12-25 | Analysing changes in attributes over time 411<br />
Figure 12-26 | Example results with confidence intervals 411<br />
Tables<br />
Table 1.1 | Overview of <strong>Roadside</strong> <strong>Revegetation</strong> Report 12<br />
Table 3-1 | Definitions of views 25<br />
Table 4-1 | Phase one of planning involves six steps 36<br />
Table 4-2 | Terms used in defining revegetation objectives 38<br />
Table 4-3 | Native plants are used to meet road and revegetation objectives 38<br />
Table 4-4 | Common revegetation units often associated with road components 46<br />
Table 4-5 | A comprehensive species list 51<br />
Table 4-6 | Limitations and opportunities for creating good pollinator habitats 53<br />
Table 5-2 | Calculating the nitrogen deficit of a site – an example 92<br />
Table 5-3 | Soil testing methods 96<br />
Table 6-1 | Selecting species to propagate 139<br />
Table 6-2 | Comparison of plant material types for revegetation planning 146<br />
Table 6- 3 | Comparison of different plant establishment methods 147<br />
Table 9-1 | How to calculate area from road plans 212<br />
Table 9-2 | Planned Weston-Elgin <strong>Revegetation</strong> Project plant materials for fall planting of 2005 and 2006 216<br />
Table 10.1 | Analysis of some common fertilizers 226<br />
Table 10.2 | Estimated nitrogen release rates for some commercially available fertilizers 227<br />
Table 10.4 | Recommended design features for some tillage equipment 236<br />
Table 11-1 | Example of a basic monitoring summary 381<br />
Table 11-2 | Example Field Monitoring Form 382<br />
<strong>Roadside</strong> <strong>Revegetation</strong>: An Integrated Approach to Establishing Native Plants and Pollinator Habitat<br />
xvi
TABLE OF CONTENTS<br />
Insets<br />
Inset 2-1 | <strong>Roadside</strong> vegetation and driver safety 19<br />
Inset 2-2 | Example of an environmental regulation requirement 21<br />
Inset 5-1 | Measuring available water-holding capacity 68<br />
Inset 5-2 | Soil testing 91<br />
Inset 5-3 | Bottlecap test for surface stability 106<br />
Inset 5-4 | General advice for managing weeds (Sheley 2005) 121<br />
Inset 5-5 | Prevention: Working groups to establish weed-resistant plant communities 126<br />
Inset 6-1 | Locally adapted plant materials 142<br />
Inset 6-2 | What to do if there are no locally adapted native seed sources available 143<br />
Inset 7-1 | Case Study – Define site, limiting factors, and desired future conditions 155<br />
Inset 7-2 | Strategies 157<br />
Inset 10-1 | Spot-fertilizing seedlings 224<br />
Inset 10-2 | Contract specifications for a winged subsoiler 236<br />
Inset 10-3 | Case Study: Erosion mats with native grasses and forbs 247<br />
Inset 10-16 | Source identified straw bales 248<br />
Inset 10-4 | Pine straw industry 251<br />
Inset 10-5 | How much is soil water-holding capacity increased by incorporating organic matter? 258<br />
Inset 10-6 | The Seal of Testing Assurance Program 260<br />
Inset 10-7 | Compost production 262<br />
Inset 10-8 | Cation exchange capacity (CEC) 266<br />
Inset 10-9 | Example of contract specifications for purchasing mycorrhizal inoculum 274<br />
Inset 10-10 | How does biological nitrogen fixation work? 278<br />
Inset 10-11 | Stages of grass seed maturity 285<br />
Inset 10-12 | Seed tests 287<br />
Inset 10-13 | State certified seed testing laboratories 288<br />
Inset 10-14 | How to tell the difference between male and female willows and cottonwoods 291<br />
Inset 10 -15 | Testing method for determining rooting potential for willow and cottonwood species 292<br />
Inset 10-17 | Native plant nurseries produce two main stocktypes 316<br />
Inset 10-18 | Assessing poor quality nursery stock 325<br />
Inset 10-19 | Seed metering and delivery systems 335<br />
Inset 10-20 | Calibrating seed densities for mulch blowing 336<br />
Inset 10-21 | Keeping track of the numbers 348<br />
Inset 10-22 | When should seedlings or rooted cuttings be substituted for live cuttings? 353<br />
Inset 10-23 | Measuring plant moisture stress 371<br />
Inset 11-1 | Photo point monitoring 378<br />
<strong>Roadside</strong> <strong>Revegetation</strong>: An Integrated Approach to Establishing Native Plants and Pollinator Habitat<br />
xvii
TABLE OF CONTENTS<br />
ACRONYMS AND ABBREVIATIONS<br />
AASHTO — American Association of State Highway and<br />
Transportation Officials<br />
AMF — Arbuscular mycorrhizal fungi, formerly called<br />
endomycorrhizae<br />
AOSA — Association of Official Seed Analysts<br />
AWHC — Available Water-holding Capacity<br />
BAMONA — Butterflies and Moths of North America<br />
BFM — Bonded Fiber Matrix<br />
BLM — Bureau of Land Management<br />
BPA — Bonneville Power Administration<br />
CCE — Calcium Carbonate Equivalent<br />
CEC — Cation Exchange Capacity<br />
COTR — Contracting Officer’s Technical Representative<br />
CRF — Control-release Fertilizers<br />
DFC — Desired Future Condition<br />
DOT — Department of Transportation<br />
EPA — U.S. Environmental Protection Agency<br />
ET — Evapotranspiration Rate<br />
EWPPS — Ecoregional Workhorse and Pollinator Plant Selector<br />
FHWA — Federal Highway Administration<br />
GIS — Geographic Information System<br />
HWY — Highway<br />
IBDU — Isobutylidene Diurea<br />
IRVM — Integrated <strong>Roadside</strong> Vegetation Management<br />
MTDC — Missoula Technology & Development Center<br />
NAPT — North American Proficiency Testing<br />
NOAA — National Oceanic and Atmospheric Administration<br />
NRCS — Natural Resources Conservation Services<br />
OM — Organic Matter<br />
PAM — Polyacrylamides<br />
PLS — Pure Live Seed<br />
PMS — Plant Moisture Stress<br />
PNW — Pacific Northwest<br />
PVC — Polyvinyl Chloride<br />
RGP — Root Growth Potential<br />
RQD — Rock Quality Design Index<br />
SMP — Shoemaker-McLean-Pratt buffer<br />
STA — Seal of Testing Assurance<br />
TAWHC — Total Available Water-holding Capacity<br />
TMECC — Test Methods of the Examination<br />
of Compost and Composting<br />
TZ — Tetrazolium<br />
USDA — U.S. Department of Agriculture<br />
USFS — U.S. Forest Service<br />
WFLHD — Western Federal Lands Highways Division<br />
<strong>Roadside</strong> <strong>Revegetation</strong>: An Integrated Approach to Establishing Native Plants and Pollinator Habitat<br />
xviii
PREFACE<br />
In 1998, the Western Federal Lands Highway Division (WFLHD) partnered with the USDA<br />
Forest Service Pacific Northwest Region (USFS-PNW) to revegetate highway rights-of-way in<br />
the western United States with native plants. This partnership culminated in the release of<br />
the 2007 Technology Deployment Report “<strong>Roadside</strong> <strong>Revegetation</strong>: An Integrated Approach<br />
to Establishing Native Plants” (FHWA-WFL/TD 07-005) funded under the Federal Lands<br />
Highway Technology Deployment Initiatives and Partnership Program and the Coordinated<br />
Technology Implementation Plan. While the original report was being written, the authors<br />
had the opportunity to test and evaluate many of the techniques that it described.<br />
In the decade since this report was published, the importance of pollinator species and their<br />
decline has become a significant public concern. Though little is known about the status of<br />
most of North America’s native pollinators, what data does exist suggests that numerous species<br />
are experiencing declines similar to or more severe than the decline seen in honey bees, which<br />
since 2006, has accounted for annual hive losses of 29 percent or more. One-quarter of North<br />
America’s native bumble bees have experienced similarly steep declines, including species<br />
that were formerly common. Because of a variety of factors, the iconic monarch butterfly in<br />
North America is now vulnerable to extinction, having suffered significant population declines<br />
since the late 1990s.<br />
What does this have to do with roadsides? A report contracted by the U.S. Department of<br />
Transportation Federal Highway Administration to ICF International and Xerces Society<br />
for Invertebrate Conservation reported the findings of a literature review that focused on<br />
pollinators and roadsides (Hopwood and others 2015) with a follow-up report (Hopwood and<br />
others 2016) that applied these findings to developing a set of best management practices<br />
for roadsides in relation to creating and maintaining favorable pollinator habitat. One of the<br />
major opportunities addressed in these documents is the potential that roadsides could play<br />
in benefiting pollinators by providing habitat for foraging, breeding, and nesting, while linking<br />
fragmented habitats to aid in the dispersal of pollinators. The key to providing these services<br />
is in the establishment and maintenance of healthy native plant communities along roadsides.<br />
To address some of these issues and opportunities, Associate Administrator of Federal Lands<br />
Timothy Hess, in late 2015, issued a memorandum stating that “…the Office of Federal Lands<br />
implements the use of the revegetation procedures provided in the manual…” and that “…the<br />
Office of Federal Lands Highway will lead the update of the <strong>Roadside</strong> <strong>Revegetation</strong> manual to<br />
include guidelines specific to the use of pollinator friendly plant species in the revegetation of<br />
roadsides.” In meeting these objectives, the Federal Highway Administration (FHWA) brought<br />
together an interdisciplinary team of scientists to review the 2007 report in light of the current<br />
understanding of pollinators and roadsides. This updated report is a product of their effort.<br />
The Intended Audience<br />
This publication was written specifically for the “designer,” those individuals or members of<br />
a road design team who will be directly involved in planning, implementing, monitoring, or<br />
maintaining a revegetation project. The first 10 chapters are directed toward those who will<br />
be developing a revegetation plan or the contract specifications that are a result of the plan.<br />
These are typically members of a road design team who have some experience in revegetation<br />
planning. It is also for contractors who specialize in developing revegetation plans for the<br />
road design team.<br />
Chapters 9 and 10 are intended for those who may be involved in implementing a revegetation<br />
plan, including project engineers, road building contractors, revegetation contractors, or<br />
members of the road design team. These chapters give the background (the “why” and<br />
“how”) for contract specifications that are specific to a revegetation treatment. The last two<br />
<strong>Roadside</strong> <strong>Revegetation</strong>: An Integrated Approach to Establishing Native Plants and Pollinator Habitat<br />
xix
PREFACE<br />
chapters (Chapters 11 and 12) are written specifically for those who will be monitoring the<br />
success of a revegetation project. These individuals will have some experience in developing<br />
and implementing a monitoring plan, that includes assessing specific plant and pollinator<br />
attributes in a statistical format. Several portions of the manual are written for personnel<br />
who will be maintaining the revegetation project years after the project is completed. These<br />
sections are in Chapters 10 and 11. For managers and others who just want an overview of the<br />
revegetation process, the report “A Manager’s Guide to <strong>Roadside</strong> <strong>Revegetation</strong> Using Native<br />
Plants” (FHWA-WFL/TD-07-006) is recommended.<br />
<strong>Roadside</strong> <strong>Revegetation</strong>: An Integrated Approach to Establishing Native Plants and Pollinator Habitat<br />
xx
INTRODUCTION<br />
1— Introduction<br />
1.1 An Integrated Approach<br />
1.2 The Ecological Effects of Roads<br />
1.3 Objectives of This Report<br />
1.4 Scope<br />
1.5 Approach<br />
1.6 How This Report is Organized<br />
1.7 Summary<br />
<strong>Roadside</strong> <strong>Revegetation</strong>: An Integrated Approach to Establishing Native Plants and Pollinator Habitat 1
INTRODUCTION<br />
1.1 AN INTEGRATED APPROACH<br />
Integrating societal goals for safe, efficient transportation<br />
with goals for ecological health is a crucial issue that<br />
is receiving increased attention from transportation<br />
agencies (Forman and others 2003; NRC 2005). Today,<br />
most road projects involve modifications to existing roads<br />
rather than new construction (NRC 2005). As roads are<br />
modified or updated section by section, a tremendous<br />
opportunity presents itself to remedy the oversights of<br />
the past, mitigate environmental impacts, and improve<br />
conditions for healthy ecosystems (Figure 1-1).<br />
Native plants are a foundation of ecological function,<br />
affecting soil conservation, wildlife and pollinator habitat,<br />
plant communities, invasive species, and water quality.<br />
Although all of these ecological functions are important,<br />
recently emphasis has been placed on supporting pollinators<br />
and this facet is highlighted throughout this updated<br />
report. Establishing locally adapted, self-sustaining plant<br />
communities can also support transportation goals for<br />
safety and efficiency. Protecting existing native vegetation<br />
during construction and establishing native plants on<br />
roadsides following disturbance is key to integrating road<br />
systems into natural systems.<br />
Past obstacles to establishing native plant communities<br />
on roadsides have been technical, informational, and organizational.<br />
Effective strategies and practical techniques<br />
for revegetating the disturbed conditions with limited<br />
resources must be made available to practitioners. Multiple<br />
disciplines, ranging from engineering to soil science,<br />
ecology, botany, entomology, landscape architecture, and<br />
wildlife science, must be able to work cooperatively, not<br />
in isolation. Finally, improved interagency cooperation<br />
and planning processes that consider ecological effects<br />
at every step are necessary.<br />
This report offers an integrated approach to facilitate<br />
the successful establishment of native plants along roadsides and other areas of disturbance<br />
associated with road modifications. It guides readers through a comprehensive process of<br />
initiating, planning, implementing, maintaining and monitoring a roadside revegetation<br />
project with native plants.<br />
1.2 THE ECOLOGICAL CONTEXT OF ROADS<br />
Figure 1-1 | Pollinator<br />
habitat on roadside<br />
<strong>Roadside</strong>s offer an opportunity for improving<br />
ecosystems by establishing and<br />
maintaining native plant communities.<br />
Photo: Kirk Henderson<br />
Although only accounting for 0.5 percent of the land surface area of the United States, our<br />
road system infrastructure is large, covering over 10 million acres (Forman and others 2003),<br />
widespread, and affects all but our most protected lands (NRC 2005). The total road corridor<br />
(paved road plus roadside or right-of-way) covers over 1 percent of the nation’s land surface,<br />
an area equal to the size of South Carolina (Forman and Alexander 1998). If unpaved roads are<br />
also included, the percentages increase (FHWA 2008). The ecological effects of roads extend<br />
into a zone far beyond the edge of the pavement, with effects including habitat fragmentation,<br />
wildlife mortality, noise and chemical pollution, disruption of hydrologic cycles and water<br />
quality, increased erosion, and the potential creation of transportation corridors for noxious<br />
and invasive weeds that can invade adjacent lands. With these considerations, an estimated<br />
<strong>Roadside</strong> <strong>Revegetation</strong>: An Integrated Approach to Establishing Native Plants and Pollinator Habitat 2
INTRODUCTION<br />
15 to 20 percent of the United States is ecologically affected by roads (Forman and Alexander<br />
1988). The enormous challenge of understanding and mitigating the ecological effects of roads<br />
deserves attention and dedication on local, regional, and national scales.PAST OVERSIGHTS<br />
1.2.1 PAST OVERSIGHTS<br />
Much of the existing road network in the United States was<br />
designed and constructed prior to the 1970s, in an era before<br />
ecological health became a widespread concern among American<br />
citizens and before ecological science had evolved to address<br />
large-scale issues (Forman and others 2003). Safety and efficiency<br />
were the primary goals of transportation programs in the past,<br />
and the ecological context of roadways were largely overlooked<br />
in planning, construction, and maintenance efforts. The effects of<br />
roads on natural systems (habitat fragmentation; interruption of<br />
natural flows of water; and disturbances to animals, plants and their<br />
pollinators, soils, and other resources) were not well understood or<br />
considered (Figure 1-2). Lack of awareness about these factors led<br />
to a largely antagonistic perception of the relationships between<br />
natural systems and road systems.<br />
For example, without effective revegetation of the road disturbance<br />
with desirable plants, undesirable vegetation can encroach on the<br />
roadway. Undesirable vegetation can disrupt safety and visibility,<br />
leading to expensive and potentially hazardous maintenance<br />
measures. Conflicts with neighboring land uses could result if<br />
corridors for invasive weeds are established or if vegetation control<br />
measures are viewed as a health or safety concern by the community. These are all issues<br />
that arise when ecology and revegetation science are not considered during road design,<br />
construction, or modification. Eventually, poorly integrated or addressed natural processes<br />
can threaten the function and structural integrity of the road itself, leading to premature<br />
deterioration of the road’s infrastructure (Berger 2005).<br />
Figure 1-2 | Prior road construction<br />
Most existing roads were constructed<br />
prior to 1970, before ecological health<br />
became a widespread concern.<br />
1.2.2 PRESENT AWARENESS<br />
For over 20 years, the ecological effects of roads have been increasingly recognized by the<br />
Federal Highway Administration and by state and county transportation agencies (NRC 2005).<br />
Today, road effects on ecological processes are major concerns among private citizens, land<br />
management agencies, and the transportation community. Consequently, an emphasis has<br />
been placed on the integration of ecological considerations into all phases of road design and<br />
construction processes. For example, legislation in some areas now requires road modification<br />
and construction projects to restore aquatic connectivity; fish passages have been built to<br />
reconnect natural water flows under roads. Other projects have modified roads that were<br />
deemed particularly dangerous to endangered species. These roads are being made more<br />
permeable to wildlife, greatly reducing losses by improving habitat connectivity, ensuring<br />
better visibility for drivers and animals, and creating safer underpasses or overpasses for wildlife<br />
(Forman and others 2003). Given the recent decline of pollinator species, there is now a greater<br />
emphasis on supporting pollinators by creating habitat on roadsides. A National Pollinator<br />
strategy has recently been released tasking federal agencies to do more to support pollinators<br />
in order to reverse pollinator declines (see Section 1.5.3 Why the emphasis on pollinators?).<br />
Efforts to limit inappropriate road expansion and to obliterate unnecessary roads remain<br />
important. Where modification and increased capacity are needed, ecological health, safety,<br />
and efficient transport should not be seen as mutually exclusive goals. Understanding roadside<br />
<strong>Roadside</strong> <strong>Revegetation</strong>: An Integrated Approach to Establishing Native Plants and Pollinator Habitat 3
INTRODUCTION<br />
environments, how they interface with adjoining lands, and how to minimize environmental<br />
impacts has become a key focus of the Federal Highway Administration. Given political will<br />
and proper levels of attention, integration of environmental concerns with transportation<br />
can result in significant gains.<br />
1.2.3 TRENDS IN ROAD CONSTRUCTION<br />
Roads are widespread, fairly permanent fixtures on the landscape and in the culture of the<br />
United States. Given current trends, road networks are expected to persist and expand over<br />
time. Current modifications predominantly involve updating infrastructure to increase capacity<br />
and to improve safety, including widening roads, replacing bridges, and reducing or altering<br />
curves and grades to make the road safer for motorists (NRC 2005). The opportunity to integrate<br />
ecological goals with transportation was largely overlooked when the road networks were<br />
originally constructed. However, as the nation’s roads are being updated and modified, the<br />
opportunity cannot be ignored. While attempts to integrate ecological factors are positive,<br />
much of the potential for improved integration is still largely unrealized. This has been due,<br />
in part, to a shortage of practical information and the absence of an integrated approach to<br />
the challenge. The question is, what can be done to balance societal desires for safe, efficient<br />
transport with requirements for a healthy environment? In other words, what can be done to<br />
help road systems function better with natural systems?<br />
1.2.4 CHALLENGES AND OPPORTUNITIES<br />
The fact that the nation’s road networks are in varying states of updates, repairs, and<br />
maintenance presents an opportunity to improve road systems so that they integrate better<br />
with natural systems. Planners and practitioners strive to understand detrimental effects<br />
associated with roads and how to mitigate them by minimizing the ecological footprint of<br />
roads and maximizing potential ecological benefits. Many groundbreaking resources have<br />
emerged to support these efforts. Road Ecology: Science and Solutions (Forman and others 2003)<br />
places the challenges into comprehensive frameworks, illuminating goals and principles for<br />
an ecological approach to transportation issues. Multiple intervention points are identified<br />
to help road systems function better with natural systems, integrating transportation goals<br />
for safety and efficiency with approaches to protect water, soil, vegetation, wildlife, and<br />
aquatic life. The Federal Highway Administration published a landmark book called <strong>Roadside</strong><br />
Use of Native Plants (Harper-Lore and Wilson 2000) that brought the issue of native plant<br />
communities on roadsides to the forefront in the transportation community, highlighting<br />
the importance of native plants and their broad utility. The National Research Council of the<br />
National Academies of Science expanded on the frameworks identified in Forman and others<br />
(2003) in its publication, Assessing and Managing the Ecological Impacts of Paved Roads (2005).<br />
Processes within the Federal Highway Administration, state departments of transportation,<br />
and other agencies are being improved for better integration.<br />
In addition to these advances directly related to roads, many advances in the field of restoration<br />
ecology have distilled essential principles applicable to severely degraded sites (e.g.,<br />
Munshower 1994; SER 2004; Clewell and others 2005; Claassen 2006). In addition, vegetation<br />
specialists from a variety of organizations have come to consensus about what truly defines<br />
a “native” plant and have developed seed collection, transfer, and propagation guidelines to<br />
ensure that locally adapted materials are used for optimum results (Withrow- Robinson and<br />
Johnson 2006, Bower and others 2014, Basey and others 2015). In both the public and private<br />
sectors, seed and plant producers and installers have been developing innovative methods<br />
to meet unique site conditions.<br />
Recently, the opportunity to support declining pollinator species through habitat creation<br />
on roadsides has been addressed with great success (Hopwood and others 2015, Hopwood<br />
<strong>Roadside</strong> <strong>Revegetation</strong>: An Integrated Approach to Establishing Native Plants and Pollinator Habitat 4
INTRODUCTION<br />
and others 2016, and case studies in this report). Designers have created “pollinator-friendly”<br />
roadside habitat, and agency maintenance departments have altered procedures to better<br />
maintain these habitats with a focus on the needs of pollinators.<br />
While the publications above assess the best available conceptual and theoretical information,<br />
each also recognizes extensive needs for further work, particularly in developing practical<br />
approaches to integrating ecological needs with transportation goals. Central to ecosystem<br />
function is native vegetation (SER 2004). However, much of the pertinent information<br />
related to protecting and establishing native plants on roadsides has been scarce, scattered,<br />
unexamined, or not translated into practice. This report is intended to bridge some of the<br />
informational, technical, and organizational gaps to facilitate successful roadside revegetation<br />
with native plants. An integrated approach is offered to support both designers and field-based<br />
practitioners in successfully revegetating roadsides and obliterated roads with native plant<br />
communities (Figure 1-3).<br />
1.2.5 WHY REVEGETATE ROADSIDES WITH NATIVE PLANTS?<br />
Figure 1-3 | Recently planted<br />
trees on an obliterated section<br />
of highway in Oregon<br />
Most road projects today do not involve<br />
building new roads, but rather modifying<br />
or obliterating existing roads.<br />
Long-term economic and ecological advantages can be gained by establishing desirable native<br />
plant communities on roadsides (Berger 2005). <strong>Roadside</strong> vegetation can support safety goals by<br />
reducing headlight glare, reinforcing the road alignment, serving as crash barriers, protecting<br />
view planes and visibility, controlling snow drifts, and reducing wind speeds (Forman and<br />
others 2003). Pollinator-friendly plants species (namely showy flowering plants) can improve<br />
the experience of the road user by creating natural beauty via plant form and color diversity<br />
along the roadside, in addition to improving driver performance by reducing monotony<br />
and stress. Importantly, creating pollinator habitat along roadsides can directly support<br />
imperiled pollinators such as the iconic monarch butterfly (Danaus plexippus), economically<br />
important managed species such as the European honey bee (Apis mellifera), as well as a<br />
wide variety of native pollinators including wild bees, butterflies, moths, flies, beetles, and<br />
wasps. A self-sustaining native plant community on a roadside stabilizes slopes, protecting<br />
water and soil quality. In addition, the establishment of healthy native plant communities is<br />
often the best long-term defense against invasive and noxious weeds. Maintenance costs<br />
for managing problematic vegetation are reduced, as is the pollution and controversy that<br />
sometimes results from roadside herbicide use (Berger 2005). Establishing healthy roadside<br />
vegetation can also help sequester carbon dioxide, one of the factors responsible for global<br />
climate change (Palumbo and others 2004, Ament and others 2013).<br />
Using native vegetation supports every aspect of the goals identified as best management<br />
practices by the transportation community for road design. These include goals to:<br />
◾◾<br />
Produce a safe, cost effective, environmentally friendly, and practical road design that<br />
is supported by and meets the needs of the users<br />
◾◾<br />
Protect water quality and reduce sediment loading into water bodies<br />
◾◾<br />
Avoid conflicts with land use<br />
◾◾<br />
Protect sensitive areas and reduce ecosystem impacts<br />
◾◾<br />
Maintain natural channels, natural stream flow, and passage for aquatic organisms<br />
◾◾<br />
Minimize ground and drainage channel disturbance<br />
◾◾<br />
Control surface water on the road and stabilize the roadbed driving surface<br />
◾◾<br />
Control erosion and protect exposed soil areas<br />
◾◾<br />
Implement needed slope stabilization measures and reduce mass wasting<br />
◾◾<br />
Avoid problematic areas<br />
◾◾<br />
Stormproof and extend the useful life of the road (Keller and Sherar 2003)<br />
<strong>Roadside</strong> <strong>Revegetation</strong>: An Integrated Approach to Establishing Native Plants and Pollinator Habitat 5
INTRODUCTION<br />
◾◾<br />
Create and maintain pollinator-friendly habitats (Hopwood and others 2015)<br />
Clearly, the goals of safe and efficient transportation and the goals of establishing and protecting<br />
native vegetation overlap; when properly integrated, native vegetation supports road<br />
objectives. At the same time, considering vegetation as part of road planning processes aids<br />
in minimizing and mitigating the ecological footprint of roads during and after construction.<br />
Native plants can provide wildlife habitat and improved connectivity for the length of the<br />
road (Forman and others 2003). Understanding vegetation and forage preferences, and<br />
careful design that accounts for visibility and safety, can guide animals to safe passageways<br />
for travel while minimizing dangerous interactions with vehicles. The presence of birds and<br />
small animals can be enhanced when appropriate plant species are established. Processes<br />
that work for roadside revegetation are also applicable to the process<br />
of obliterating roads where roads are no longer needed.<br />
Despite the potential benefits, many past attempts at roadside revegetation<br />
have not succeeded. Although revegetation was considered<br />
important, some efforts emphasized seeding of exotic plants; these<br />
species were perceived as inexpensive, readily available, and easy<br />
to establish on disturbed sites however, this practice has not been<br />
effective or self-sustaining on many projects; either the exotic plants<br />
spread to become problematic, or failed to persist because they were<br />
not locally appropriate species. Once established, exotics may preclude<br />
reintroduction of desirable natives. In other cases, little consideration was<br />
given to establishing roadside vegetation during or after construction; if<br />
vegetation was considered, it was often as an afterthought. A short-term<br />
approach to revegetating roadside disturbances often predominated<br />
past efforts, while efforts toward long-term development of native plant<br />
communities did not receive adequate consideration. The ineffectiveness<br />
of revegetation efforts in the past has resulted in such problems as soil<br />
erosion and landslides that affected water quality (Figure 1-4). Visually,<br />
unvegetated road disturbances diminish the experience of the road user and economically<br />
translate into high costs associated with ongoing maintenance.<br />
Past shortcomings may be attributed to past approaches that were often piecemeal and lacking<br />
the cooperation and coordination of disciplines necessary to fully integrate native vegetation<br />
into the road planning and construction processes. <strong>Revegetation</strong> specialists typically worked<br />
in isolation from engineers, and sometimes even the biological specialists (soil scientists,<br />
botanists, wildlife biologists) failed to coordinate their knowledge and efforts. Success will<br />
require both practical and technical information and a systematic, comprehensive approach.<br />
Figure 1-4 | Unsuccessful roadside<br />
revegetation on steep slopes<br />
Steep slopes are often difficult to revegetate<br />
and many past attempts at<br />
roadside revegetation did not succeed.<br />
1.3 OBJECTIVES OF THIS REPORT<br />
This report brings theoretical and practical information to bear on the challenge of revegetating<br />
roadsides with native plants. Written by and for project designers and field-based practitioners,<br />
it synthesizes a comprehensive, holistic approach that can be used to effectively revegetate<br />
roadsides and other similarly disturbed areas. Given the unique ecological factors at play on<br />
each project, the report is not prescriptive, but rather provides principles and a step-by-step<br />
process for designers to use in the field to generate and implement their own locally appropriate,<br />
context-sensitive revegetation plan. Examples and proven strategies are offered to serve these<br />
goals. Topics covered include how to:<br />
◾◾<br />
Improve interagency cooperation in order to think ecologically about road modifications<br />
and make revegetation an integral part of road design<br />
◾◾<br />
Coordinate information and efforts to bring multiple disciplines such as soil science,<br />
genetics, botany, ecology, wildlife science, landscape design and engineering together<br />
for a holistic approach to revegetation<br />
<strong>Roadside</strong> <strong>Revegetation</strong>: An Integrated Approach to Establishing Native Plants and Pollinator Habitat 6
INTRODUCTION<br />
◾◾<br />
Integrate goals for native vegetation establishment with transportation goals for safety,<br />
function, and efficiency<br />
◾◾<br />
Mitigate harsh, drastically disturbed conditions of road disturbance areas to enable<br />
native plants to establish through natural colonization and/or active replanting<br />
◾◾<br />
Apply a step-by-step planning, implementation, and monitoring process, including<br />
mid-course corrections, to overcome potential pitfalls, resulting in cost-effective,<br />
successful establishment of native plants<br />
1.4 SCOPE<br />
The complexity of ecologically sensitive road design, implementation, and maintenance will<br />
require increasing cooperation from multiple sectors of society and multiple fields of practice<br />
and expertise. This report should be of interest not only to field-level practitioners and<br />
project designers in both public and private sectors, but also to transportation and planning<br />
professionals; land managers; policy-makers; owners and operators of roads on county, state,<br />
and federal scales; and concerned citizens. Any agency or organization involved in altering,<br />
developing, operating, maintaining, or decommissioning roads will find this publication<br />
useful. The report is especially intended to serve field-based practitioners and planners of<br />
diverse backgrounds whose goal is to establish locally appropriate, low-maintenance native<br />
plant communities on roadsides.<br />
Because integration of multiple sources of expertise is necessary for effective long-term revegetation,<br />
this report does not assume that the designer has a particular specialized background<br />
but more, a broad level understanding of such disciplines as botany, plant propagation, soil<br />
science, genetics, entomology, and engineering. The designer may involve one or more of<br />
these specialists during the planning process, depending on the project’s complexity. The<br />
report states where specific expertise may be required. Key milestones for communication<br />
and integration between engineers and non-engineers are highlighted.<br />
The approach in this report is applicable to any type of road-related project that involves<br />
disturbances to soil and vegetation. <strong>Revegetation</strong> of roadsides adjacent to dirt, gravel, and<br />
paved roads would involve similar processes, although differences in scale and intensity<br />
of efforts would be required. This report applies to new construction or reconstruction<br />
and modifications of existing roadways. The principles and practices are also applicable in<br />
revegetating other drastically disturbed sites with similar limiting factors to roadsides, such<br />
as gas, oil, or powerline rights-of-way and mine reclamation projects.<br />
This report focuses on opportunities for integration during road construction or modification.<br />
Long-term maintenance and management of established roadsides is discussed briefly, with<br />
references to related management practices and guidelines such as Integrated <strong>Roadside</strong><br />
Vegetation Management (IRVM) (Berger 2005). Roads must be made more permeable to<br />
natural flows of water, animals, and plants to help mitigate the ecological effects of the<br />
road. Efforts to improve habitat connectivity and road permeability, as well as storm-water<br />
drainage and created wetlands, can be supported by the revegetation practices described in<br />
this report. However, specific mitigations for these important topics are beyond the scope of<br />
this publication. Also beyond the scope are the myriad other potential ecological and social<br />
issues that affect, and are affected by, the engineering and transportation planning processes.<br />
Issues of social justice and community planning are not addressed. Larger policy-making and<br />
planning procedures are also beyond the scope of this report.<br />
1.5 APPROACH<br />
The establishment of native plant communities in order to re-initiate natural processes of<br />
succession is a cornerstone of most ecological restoration work (Dorner 2002)(Figure 1-5).<br />
Effective revegetation on highly disturbed roadsides aims to initiate or accelerate processes<br />
Figure 1-5 | <strong>Roadside</strong> native<br />
plant community<br />
The establishment of native plant communities<br />
is the cornerstone of ecological<br />
restoration.<br />
<strong>Roadside</strong> <strong>Revegetation</strong>: An Integrated Approach to Establishing Native Plants and Pollinator Habitat 7
INTRODUCTION<br />
Figure 1-6 | <strong>Roadside</strong>s<br />
are disturbed areas<br />
“<strong>Roadside</strong>” refers to disturbed areas<br />
resulting from road construction, modification,<br />
or improper maintenance.<br />
of natural succession following disturbances. Three aspects are generally considered: 1) health<br />
(the functional processes of the ecosystem); 2) integrity (species composition and community<br />
structure); and 3) sustainability (resistance to disturbance and resilience) (Clewell and others<br />
2005). While restoring plant communities to a pre-disturbance state is not a goal (or even a<br />
feasible idea) on highly disturbed roadsides, each of the above three ecosystem aspects can<br />
be improved with appropriate roadside revegetation practices. The establishment of reference<br />
sites, or natural models for the desired recovery process, is key to identifying and overcoming<br />
limiting factors and accelerating succession by establishing native plants.<br />
Native species play an important role in ecosystem development. If native species can<br />
colonize and become established on a disturbed site, the processes of succession, including<br />
soil genesis and nutrient cycling, are initiated (Brown and Amacher 1999). In most cases,<br />
native plants are established on roadsides through seeding or planting, although sometimes<br />
passive revegetation (natural colonization) is possible where native seed banks are nearby<br />
and limiting factors are mitigated.<br />
1.5.1 WHAT IS THE “ROADSIDE”?<br />
In this report, the term “roadside” refers to any area of disturbance associated with road<br />
maintenance, modification, or construction, including waste areas and source pits associated<br />
with construction (Figure 1-6). The roadside includes the sides of the road corridor beyond the<br />
paved road (shoulders and verges), including impacted or maintained roadside areas within the<br />
right-of- way. The roadside area is sometimes narrow, but sometimes extends several hundred<br />
feet or more beyond the edge of the road surface, depending on the project. In some situations,<br />
revegetation efforts may encompass areas beyond the right-of-way that are affected by or<br />
affect the road. The area where the revegetation specialists will focus their efforts is usually<br />
dependent on two factors: ownership of the right-of-way and surrounding lands, and areas of<br />
disturbance (construction footprint). Most roadsides are drastically disturbed environments,<br />
where soil may be severely compacted and consist of a mixture of subsoil and parent material<br />
(Figure 1-7). Beneficial microorganisms, nutrients, and organic matter necessary to sustain plant<br />
growth may be absent or severely depleted. Often, slopes can be very steep and inaccessible,<br />
exposed to the erosive effects of wind and water. These environments represent a revegetation<br />
challenge of high intensity and magnitude.<br />
Figure 1-7 | <strong>Roadside</strong>s can be highly<br />
disturbed<br />
<strong>Roadside</strong>s are often drastically disturbed<br />
and infertile environments with no topsoil,<br />
severe compaction, and a lack of<br />
beneficial microorganisms. They include<br />
obliterated roads and borrow sites as<br />
shown in this photograph.<br />
<strong>Roadside</strong> <strong>Revegetation</strong>: An Integrated Approach to Establishing Native Plants and Pollinator Habitat 8
INTRODUCTION<br />
1.5.2 WHAT ARE NATIVE PLANTS?<br />
Recent Policies Mandating<br />
Native Plants for <strong>Revegetation</strong><br />
Many land management agencies have policies<br />
mandating the use of native plants as<br />
the first choice in revegetation efforts. For<br />
example, the USDA Forest Service has the<br />
following policies in place applicable to road<br />
projects on Forest Service lands:<br />
1. National Native Plant Materials Policy:<br />
“Native plant materials are the first choice<br />
in revegetation…” (USFS 2005)<br />
2. BAER Manual (FSM 2523): “…when practical,<br />
use genetically local sources of native<br />
species…” (USFS 2003)<br />
3. National Fire Plan Strategy: “…promote<br />
the establishment of local sources of native<br />
seed and other plant material…” (USFS/<br />
USDI 2001)<br />
4. R6 <strong>Revegetation</strong> Policy: “…use local native<br />
plants to the extent practicable…”<br />
(USFS 2004)<br />
5. NW Forest Plan; Interior Columbia Basin<br />
Ecosystem Management Project: “…<br />
maintain and restore native species and<br />
ecosystems…” (USFS/USDI 1994; USFS<br />
2006)<br />
6. Federal Register Notices: “…promote the<br />
use of native plant materials in revegetation<br />
for restoration and rehabilitation…<br />
native plant materials are the first choice<br />
in revegetation for restoration and rehabilitation<br />
efforts.” (FRN 2006)<br />
7. National Strategy to Promote the Health<br />
of Honey Bees and Other Pollinators: “…<br />
establish a reserve of native seed mixes,<br />
including pollinator-friendly plants…”<br />
(Pollinator Health Taskforce 2015)<br />
8. National Seed Strategy for Rehabilitation<br />
and Restoration: “…ensure the availability<br />
of genetically appropriate seed…” (BLM/<br />
WO/GI 2015)<br />
“Native plants,” as defined in this report, are locally adapted, genetically appropriate native<br />
plant materials (Withrow-Robinson and Johnson 2006). These plants are best suited evolutionarily<br />
to the local conditions, and generally require less maintenance and persist longer<br />
than non-local species. When properly established, they form plant communities with the<br />
potential to be self-sustaining and self-perpetuating over time, requiring little or no input<br />
from humans to persist. Native plants also support more robust communities of pollinators,<br />
birds, and other small wildlife.<br />
Challenges to establishing native plants on roadsides are significant, partially due to<br />
difficulties in obtaining appropriate materials. However, the technological capacity of native<br />
plant propagation and outplanting efforts in both private and public sectors has increased<br />
significantly in the past two decades. Innovative stocktypes and application methods have<br />
made roadside revegetation more effective. Recent policy mandates from many federal<br />
agencies that manage roads now require the use of native plant materials as the first choice<br />
in revegetation efforts, thereby making roadside revegetation an important and expanding<br />
frontier for native plant suppliers.<br />
1.5.3 WHY THE EMPHASIS ON POLLINATORS?<br />
An estimated 85 percent of the world’s flowering plants depend on animals for pollination<br />
(Ollerton et al. 2011). Animal pollinators visit flowering plants seeking floral resources and, in<br />
the process, incidentally transfer pollen from anthers (male reproductive structures of the<br />
flower) to stigmas (female reproductive structures), vectoring fertilization and allowing these<br />
flowering plants to reproduce. Pollinators rely on flowering plants for food, requiring nectar<br />
(a sugar-rich liquid) and sometimes pollen itself (a source of protein) as sources of energy<br />
and nutrition. Most animal pollinators are insects, such as honey bees, bumble bees, flies,<br />
and butterflies. However, vertebrates such as birds (e.g., hummingbirds), mammals (e.g., bats,<br />
rodents) and some reptiles pollinate certain plant species. The pollination services provided<br />
by pollinators are essential to the health and persistence of the plant species that depend on<br />
them and for the wildlife that in turn depends upon the plants for food and shelter.<br />
Pollinators are also important to human health and the global economy. More than 75 percent<br />
of the world’s 115 principal cultivated crops are reliant on animal pollinators or benefit from<br />
animal pollination. Roughly 35 percent of global crop production is dependent on pollination<br />
by animals (Klein et al. 2007). Insect-pollinated forage plants such as alfalfa and clover also<br />
provide feed for livestock. Pollinator-dependent food crops, namely fruits, vegetables, and nuts,<br />
make up a critical component of our diet (McGregor 1976). The majority of minerals, vitamins,<br />
and nutrients needed to maintain human health (such as vitamin C, lycopene, calcium, and<br />
folic acid) come from crop plants that depend partially or fully on animal pollinators (Eilers<br />
and others 2011). Consequently, pollinators provide essential agricultural services with a high<br />
economic value. A recent worldwide estimate suggests pollinators in general contribute 9.5<br />
percent ($216 billion per year) to crop value (Gallai and others 2009). In the Unities States it is<br />
estimated that pollinators (both managed and wild) contribute $29 million in farm income<br />
annually (Calderone 2012). Importantly, native pollinators specifically have been shown to<br />
contribute approximately $1 billion to the California crop economy (Chaplin-Kramer and<br />
others 2011).<br />
Globally, pollinators are in decline (National Research Council 2007; Potts et al. 2010). In the<br />
United States, wild pollinators such as monarch butterflies and many bumble bee species, as<br />
well as colonies of managed honey bees, are experiencing declines due to a loss of habitat,<br />
the spread of disease, overuse of pesticides, and various other factors (National Research<br />
Council 2007; Hatfield and others 2015; Jepson and others 2015). Pollinator declines threaten<br />
the viability of agricultural productivity and the health of natural ecosystems.<br />
<strong>Roadside</strong> <strong>Revegetation</strong>: An Integrated Approach to Establishing Native Plants and Pollinator Habitat 9
INTRODUCTION<br />
Photo: USFS Chris Jensen<br />
Photo: USFS Lynda Moore<br />
Photo: BPA Justin Moffett<br />
Photo: USFS Lynda Moore<br />
Figure 1-8 | Vegetated linear<br />
corridors as habitat for<br />
pollinators and other wildlife<br />
Linear corridors such as irrigation canals<br />
(top), utility rights-of-way (second from<br />
top), roadways (second from bottom),<br />
and river ways and riparian areas (bottom),<br />
present opportunities to reconnect<br />
fragmented pollinator habitats.<br />
With at least 17 million acres of roadsides in the United States, roadside vegetation can serve<br />
as much needed habitat for pollinators, offering food, breeding, or nesting opportunities<br />
and connectivity that can aid pollinator dispersal (Hopwood and others 2015). <strong>Roadside</strong>s can<br />
support a diversity of generalist pollinators, including bumble bees, honey bees, butterflies,<br />
and hummingbirds as well as rare or federally listed species. <strong>Roadside</strong>s sustain plants that<br />
are sources of pollen and nectar for adult pollinators as well as host plants for the caterpillars<br />
of butterflies and moths. The availability of floral resources influences the abundance and<br />
diversity of butterflies and bees found on roadsides (Saarinen and others 2005; Hopwood<br />
2008), and pollinators on roadsides benefit in particular from native plants (Ries and others<br />
2001; Hopwood 2008). <strong>Roadside</strong>s also can provide pollinators with shelter, sites for nesting or<br />
egg-laying, and overwintering habitat. Pollinators have complex life cycles, with different needs<br />
at different stages of their lives. <strong>Roadside</strong>s can provide resources for a portion of the life cycle<br />
of some species, while providing resources needed for the entire life cycle of other species.<br />
Evidence also suggests that the linear shape and connectivity of roadsides may help pollinators<br />
to move through landscapes in search of food or in pursuit of new habitat (Ries and others<br />
2001; Dirid and Cryan 1991). <strong>Roadside</strong>s extend through all landscapes and can be particularly<br />
important sources of habitat for pollinators in highly altered landscapes such as intensely<br />
managed agricultural lands (Figure 1-8).<br />
Not all roadsides are equally beneficial to pollinators. <strong>Roadside</strong>s that are intensively mown,<br />
blanket-sprayed with herbicides, or planted with introduced grasses support far fewer<br />
species of pollinators and smaller population densities than roadsides managed for native<br />
plants (Smallidge and Leopold 1997; Johst and others 2006; Reis and others 2001). <strong>Roadside</strong><br />
vegetation management influences how pollinators use roadsides, and even influences the<br />
number of pollinators killed by vehicles. For example, butterfly vehicle mortality rates increase<br />
with more frequent mowing and decrease with high plant diversity in roadside vegetation<br />
(Skorka and others 2013) (Figure 1-9).<br />
<strong>Roadside</strong>s play an important role in the conservation of declining wild pollinators and<br />
in supporting the health of managed pollinators. Throughout the revegetation process,<br />
practitioners and designers can enhance roadsides to benefit pollinators.<br />
1.5.4 GOAL-ORIENTED, CONTEXT-SENSITIVE, AND INTEGRATED<br />
The overall approach in every aspect of this report is goal-oriented, context-sensitive, and<br />
integrated (Clark and others 2001). The goals of establishing and protecting native plant<br />
communities are considered along with transportation goals, including safety, efficiency, and<br />
cost-effectiveness for the life of the road. This is not an idealistic approach; while recognizing<br />
that resources are limited and conditions are degraded, the approach is technically and<br />
economically feasible while still enabling the integration of roads with ecological processes.<br />
Sensitivity and appropriateness to the local context are essential parts of successful revegetation.<br />
This report is intended to facilitate the process of developing locally appropriate,<br />
context-sensitive prescriptions on a project-by-project basis, integrating top-down and<br />
ground-up information to meet the specific challenges at hand. For this reason, the report<br />
does not provide cookbook-type “recipes” or specific prescriptions. For example, no “onesize-fits-all”<br />
seed mix exists for roadside revegetation. The process and tools needed to arrive<br />
at context-sensitive solutions are not difficult to apply; by following the steps outlined in this<br />
report, practitioners will be able to generate the information they need.<br />
The approach integrates multiple disciplines from both private and public sector partners in<br />
a comprehensive process for effective revegetation with native plants. The report was written<br />
with inputs from specialists in soil science, genetics, landscape architecture, entomology,<br />
botany, ecology, plant pathology, environmental management, and engineering, and is based<br />
on experiences in revegetating a range of diverse projects, and the principles and methods<br />
used are broadly applicable nationwide.<br />
<strong>Roadside</strong> <strong>Revegetation</strong>: An Integrated Approach to Establishing Native Plants and Pollinator Habitat 10
INTRODUCTION<br />
Figure 1-9 | <strong>Roadside</strong> mowing<br />
Although mowing a clear zone directly<br />
adjacent to the pavement poses little<br />
harm to pollinators, frequent roadside<br />
mowing of the entire roadside can<br />
decrease the densities of pollinators.<br />
Photo: Idaho Transportation Department<br />
1.6 HOW THIS REPORT IS ORGANIZED<br />
The process of roadside revegetation consists of four stages: 1) Initiation, 2) Planning, 3)<br />
Implementation, and 4) Monitoring and Management (Figure 1-9). (Table 1-1). In Initiation,<br />
the revegetation specialist must gain an understanding of the agencies and cooperators<br />
involved in order to develop key relationships and navigate through the decision-making<br />
process. Synchronizing timelines for revegetation with road planning and construction is<br />
essential to ensure that conservation and revegetation is an integral part of the process.<br />
The Initiation chapters also help the reader to effectively interpret engineered road plans<br />
and communicate with other specialists using standard terminology. The Planning chapters<br />
guide the reader through the process of understanding project objectives, assessing the<br />
site, designing mitigating treatments, strategizing revegetation procedures, and creating a<br />
revegetation plan. The Implementation chapters provide information on how to execute the<br />
project in the field, including coordinating contracts, budgets, and schedules. Implementation<br />
Guides provide practical “how-to” information for working with soil and site treatments,<br />
obtaining plant materials, installing plant materials, and caring for plants in the field. Finally,<br />
the Monitoring/Management chapters describe how to assess the overall effectiveness of the<br />
revegetation project and to correct any shortcomings in order to achieve project objectives.<br />
A summary of the process is provided in Figure 1-10 and Table 1-1.<br />
Implementation<br />
Figure 1-10 | The Project Cycle<br />
Monitoring/<br />
Management<br />
The<br />
Project<br />
Cycle<br />
Planning<br />
The project cycle consists of four phases:<br />
initiation, planning, implementation,<br />
and monitoring/management.<br />
Initiation<br />
Adapt<br />
and<br />
Improve<br />
Initiation<br />
of<br />
Future Projects<br />
<strong>Roadside</strong> <strong>Revegetation</strong>: An Integrated Approach to Establishing Native Plants and Pollinator Habitat 11
INTRODUCTION<br />
Table 1.1 | Overview of <strong>Roadside</strong> <strong>Revegetation</strong> Report<br />
Section Chapter Goal Tasks<br />
Initiation Part One Chapter 2 Understand<br />
cooperators and<br />
decision processes<br />
Set up recordkeeping<br />
Identify cooperators: Who is involved?<br />
Define cooperator processes, timelines, and milestones<br />
Define objectives: What is the project trying to accomplish?<br />
Initiation Part Two Chapter 3 Understand road<br />
plans and terminology<br />
Read and interpret road construction plans<br />
Understand key concepts and terminology<br />
Planning Phase One Chapter 4 Orient to the project Determine revegetation objectives<br />
Define revegetation units<br />
Select reference sites<br />
Define the desired future conditions<br />
Planning Phase Two Chapter 5 Assess site Identify limiting factors<br />
Consider mitigating measures for limiting factors<br />
Assess site resources<br />
Planning Phase Three Chapter 6 Analyze vegetation Complete vegetation assessment<br />
Create a comprehensive species list<br />
Define plant communities and successional processes<br />
Determine which species and groups of species<br />
will be used on the project<br />
Identify target plant requirements<br />
Create menu of potential stocktypes and plant establishment methods<br />
Planning Phase Four Chapter 7 Integrate and<br />
strategize<br />
Finalize revegetation units and DFCs<br />
Integrate survey information and develop potential revegetation strategies<br />
Compare and select revegetation strategies<br />
Assemble revegetation plan<br />
Chapter 8 Example plan Example revegetation plan<br />
Implementation Chapters<br />
9 and 10<br />
Implement<br />
Review plans with construction engineer<br />
Review revegetation treatment details and timelines<br />
Develop contracts<br />
Install treatments<br />
Keep good records<br />
Carry out quality control<br />
Implement early maintenance and monitoring<br />
Monitoring &<br />
Management<br />
Chapters<br />
11 and 12<br />
Monitor, evaluate,<br />
correct, improve<br />
Revisit project objectives and DFCs<br />
Develop monitoring strategy and protocols<br />
Record data and observations<br />
Evaluate data and apply any corrective measures<br />
Organize and file project results<br />
Share lessons learned<br />
<strong>Roadside</strong> <strong>Revegetation</strong>: An Integrated Approach to Establishing Native Plants and Pollinator Habitat 12
INTRODUCTION<br />
1.6.1 INITIATION OVERVIEW<br />
Effective roadside revegetation requires not only technical skills but an ability to cultivate<br />
relationships with specialists from other disciplines and navigate the decision processes so<br />
a project will run smoothly. Road construction, alteration, or decommissioning involves a<br />
variety of land management agencies, programs, and regulations. The process of initiating a<br />
project is discussed in two parts. Initiation Part One orients the reader to learn about agency<br />
procedures for the organizations involved with road projects. Timelines, budgetary issues,<br />
and interface opportunities are outlined to enable the revegetation specialist to integrate<br />
revegetation efforts with the overall process of road planning and construction. Attending<br />
meetings and coordinating with key contacts within agencies are important tasks in the early<br />
stages of the project.<br />
Initiation Part Two provides the revegetation specialist with information to understand the<br />
current project site conditions, as well as predict the future condition of the project site<br />
following road construction. The revegetation specialist will become familiar with reading<br />
and interpreting road plans and understanding terminology. This ability enables the specialist<br />
to communicate effectively about engineering plans, contribute fully to minimizing adverse<br />
environmental impacts, and ensure that revegetation is an integral part of the efforts.<br />
1.6.2 PLANNING OVERVIEW<br />
Planning forms the foundation of future work. The Planning section of the report guides<br />
the reader through a comprehensive, holistic process culminating in the production of a<br />
revegetation plan. The process of planning is organized into four phases.<br />
Phase One involves defining four essential aspects of the project: 1) the project objectives; 2)<br />
the management areas (revegetation units); 3) the models (reference sites); and 4) the specific<br />
goals for each revegetation unit (desired future conditions (DFCs)). Defining these steps requires<br />
a preliminary assessment of site characteristics, including vegetation, climate, and soil.<br />
Phase Two defines site attributes and limiting factors. Factors critical for plant establishment,<br />
such as soil and climate, are assessed. Obstacles to revegetation, as well as available resources,<br />
are examined. A field investigation of each revegetation unit describes the site in depth and<br />
reveals how site characteristics will either support or limit achieving the DFCs. Based on the<br />
determination of limiting factors, a menu of possible mitigating measures for ensuring plant<br />
establishment (short-term) and plant community development (long-term) is developed.<br />
Phase Three matches plant species, genetic sources, stocktypes, and planting methods to<br />
the environmental conditions of the site. The vegetation is surveyed and analyzed. From<br />
a comprehensive list of species and plant communities present on the reference sites, the<br />
revegetation specialist determines which species are best adapted to the site and best suited to<br />
revegetation needs. Options for sources, stocktypes, and application methods are considered<br />
in order to achieve the desired results.<br />
Phase Four combines all elements into a comprehensive strategy for revegetation. The possible<br />
options for site mitigation and revegetation methods are compared and considered, and the<br />
most promising are selected. Choices will be based on site factors and plant needs, and on<br />
other considerations, such as costs and availability of materials and services. There are always<br />
several ways to meet the revegetation objectives, and different options are considered in Phase<br />
Four. When preferred strategies have been selected, budgets and schedules are developed<br />
and recommendations are compiled and presented in the <strong>Revegetation</strong> Plan.<br />
<strong>Roadside</strong> <strong>Revegetation</strong>: An Integrated Approach to Establishing Native Plants and Pollinator Habitat 13
INTRODUCTION<br />
1.6.3 IMPLEMENTATION OVERVIEW<br />
Implementation involves coordinating and cooperating with different contractors and agency<br />
personnel before, during, and after construction of the road. Treatments for soils and site<br />
conditions, obtaining plant materials, and installing and caring for plants are part of the<br />
implementation process. These chapters will help the designer review plans with engineers,<br />
finalize treatment details and timelines, and develop the contracts necessary to successfully<br />
carry out the treatments. Keeping good records and carrying out quality assurance and<br />
early maintenance activities are essential aspects of the implementation phase. In all cases,<br />
coordinating the revegetation work with road construction and maintenance personnel is a<br />
major challenge and a key opportunity to improve conditions for native plants.<br />
Implementation Guides are short sections illustrating how to implement and/or contract for<br />
a particular treatment or mitigation measure. Guides are provided for working with soil/site<br />
treatments, obtaining plant materials, installing plant materials, and caring for plants.<br />
1.6.4 MONITORING AND MANAGEMENT OVERVIEW<br />
Monitoring is necessary to determine if goals defined at the outset of the project have been<br />
met. Scope, methods, and parameters for monitoring are determined on a project-by-project<br />
basis. These must be developed so that sufficient and meaningful information is obtained<br />
efficiently and interpreted properly. Keeping written records throughout the process of<br />
roadside revegetation is essential to evaluate each project.<br />
Monitoring continues several years after implementation, providing a chance to assess effectiveness<br />
and correct any shortcomings. In the Planning section, project objectives describe<br />
an overall vision for the project. The desired future conditions refined the objectives into<br />
specific, measurable goals for the project site. Monitoring is an opportunity to evaluate the<br />
effectiveness of the revegetation efforts as they relate to objectives and goals.<br />
Monitoring is essential for adaptive management of the project. Adaptive management is a<br />
systematic approach to good management guided by a process of regularly assessing and<br />
learning from what works and does not work on a project (Figure 1-9). As a project develops,<br />
monitoring can be used to assess progress and plan any necessary corrections.<br />
When statistical methods are necessary, Monitoring Protocols describe statistical sampling<br />
design, data collection techniques, and analysis methods for quantifiable parameters to<br />
determine the success of roadside revegetation projects.<br />
The revegetation of roadsides with native plant communities is a developing field. Practitioners<br />
are encouraged to share lessons learned, including successes and failures, to improve the<br />
knowledge base for future work.<br />
1.7 SUMMARY<br />
Balancing ecological health with safe and efficient transportation is an enormous challenge.<br />
To protect environmental health and sustain the native plant communities of roadsides,<br />
conservation and revegetation efforts must be an integral part of road design and construction.<br />
The process of roadside revegetation requires communication, interdisciplinary<br />
practice, and interagency cooperation. This report guides designers and specialists through<br />
a comprehensive process for initiating, planning, implementing, and monitoring a project in<br />
order to successfully establish and perpetuate native plant communities and support essential<br />
pollinators in roadside habitats.<br />
<strong>Roadside</strong> <strong>Revegetation</strong>: An Integrated Approach to Establishing Native Plants and Pollinator Habitat 14
INITIATION PART ONE: COOPERATORS AND PROCESSES FOR ROAD PROJECTS<br />
2— Initiation Part One:<br />
Cooperators and<br />
Processes for Road<br />
Projects<br />
2.1 Introduction<br />
2.2 Preliminary Tasks of Initiation<br />
2.3 The Process of Road Development<br />
2.4 Next Steps<br />
<strong>Roadside</strong> <strong>Revegetation</strong>: An Integrated Approach to Establishing Native Plants and Pollinator Habitat<br />
15
INITIATION PART ONE: COOPERATORS AND PROCESSES FOR ROAD PROJECTS<br />
2.1 INTRODUCTION<br />
Incorporating ecological thinking into all aspects of road design, construction, modification<br />
and maintenance is a goal of the transportation community (NRC 2005; Forman and others<br />
2003). The Federal Highway Administration, state departments of transportation, and other<br />
federal, state, and county agencies that work with roads seek to meet this goal. One way this<br />
goal is being addressed is to integrate issues of native plant revegetation (including protection<br />
of existing vegetation) into the larger design and construction processes of road projects.<br />
Considering revegetation in isolation from, or as an appendix to, the larger road project is<br />
a trend of the past that often resulted in failure. Instead, revegetation planning is now an<br />
integral part of road planning.<br />
To ensure successful integration of revegetation issues with the overall road project, as the<br />
revegetation specialist and a field-based practitioner you need to define the cooperators and<br />
agencies involved, know how their processes and timelines work, and get involved at the<br />
appropriate times and with the appro¬priate people. You should expect to be involved in<br />
planning and construction processes whenever soil and vegetation disturbances are planned.<br />
Agency schedules, milestones, and budgetary issues must be defined to effectively synchronize<br />
the revegetation efforts with road development and construction.<br />
Road projects may be administered from local, state, or federal levels, or sometimes from a<br />
combination of all three levels. In terms of timing, road projects can be complex and span<br />
many years, whereas other projects are streamlined and quick. It is beyond the scope of this<br />
manual to cover all the specific pro¬cedures and processes for every agency involved in road<br />
projects. This chapter, however, provides an overview to successfully navigate the various<br />
processes for your project. Your involvement and input is important from the inception of a<br />
project through completion. The earlier you can get involved, the more input you will have.<br />
The preliminary steps for initial involvement are:<br />
◾◾<br />
Set up recordkeeping.<br />
◾◾<br />
Identify cooperators: Who is involved?<br />
◾◾<br />
Define cooperator processes, timelines, and milestones.<br />
◾◾<br />
Define objectives: What is the project trying to accomplish?<br />
This chapter provides an overview of each of these steps, followed by a discussion of typical<br />
road development processes which include key points of involvement.<br />
2.2 PRELIMINARY TASKS OF INITIATION<br />
<strong>Roadside</strong> revegetation is a complex process, involving many agencies and individuals. A single<br />
revegetation specialist should be appointed to coordinate the planning, implementing, and<br />
monitoring/adaptive management of the revegetation aspects of the road project. You may<br />
enlist specialists from other natural resource disciplines to help with the revegetation planning<br />
so that expertise in botany, landscape architecture, soil science, engineering, hydrology,<br />
wildlife biology, geology, and ecology is available for the project as necessary. You should<br />
be the coordinator of the technical and organizational aspects of the revegetation project,<br />
as well as the contact between revegetation efforts and the other aspects of road planning<br />
and construction.<br />
2.2.1 INITIATE RECORDKEEPING<br />
When initiating a project, it is important to set up a good system for keeping records and<br />
documenting the progress. Starting a diary with regular entries of meetings and site visits is a<br />
good, basic start. As the project progresses, narratives, data, photos, contracts, specifications,<br />
<strong>Roadside</strong> <strong>Revegetation</strong>: An Integrated Approach to Establishing Native Plants and Pollinator Habitat<br />
16
INITIATION PART ONE: COOPERATORS AND PROCESSES FOR ROAD PROJECTS<br />
and other information will need to be organized and stored. The diary can begin to serve as<br />
a case history for the project. The information will be invaluable when implementing and<br />
later assessing the project. For now, start a folder in the computer (to include all e-mails and<br />
electronic documents) and a folder in the filing system for hardcopies, plan drafts, notes, and<br />
a daily journal.<br />
2.2.2 IDENTIFY COOPERATORS AND AGENCIES: WHO IS INVOLVED?<br />
The process for road development will vary depending on the location of the road, which<br />
road- related programs and agencies are involved, and the complexity of the project.<br />
Interagency cooperation will almost always be part of the process. You must identify the<br />
agencies and individuals involved in the road construction project and their respective roles<br />
and responsibilities. It is especially important to identify: (1) who is the land owning agency,<br />
(2) who maintains the road, (3) who will be carrying out the road construction project, and<br />
(4) who is funding the project. All agencies and individuals involved have the responsibility<br />
to abide by rules and regulations as they work with the road.<br />
2.2.3 DEFINE COOPERATOR PROCESSES, TIMELINES, AND MILESTONES<br />
Once you have identified the cooperators, you need to understand their processes, timelines,<br />
and milestones so that you can be involved with the right people at the right time. The timing,<br />
responsibilities, and, most important, processes associated with each agency will vary. While<br />
this may seem complicated, many agencies have a procedural manual that describes how a<br />
project is carried out from conception to completion, defining the timelines, milestones, roles<br />
and responsibilities, terminology, and how funding works. Locate these documents and agency<br />
manuals and use them. Initial meetings are also an ideal time to clarify these processes, when<br />
you first begin working with agency personnel.<br />
Each agency has certain approvals and procedural activities, including some that involve<br />
fulfilling environmental regulations. You need to define these activities and determine how<br />
your work fits with them. The steps in the approval process are often important milestones<br />
for the agency, and must be understood so that you can be part of decisions while there is<br />
still room for your input. Defining appropriate roles is essential so that you can coordinate<br />
with the proper people, follow protocols, and avoid duplicating efforts.<br />
Many variables affect the overall timelines from inception to construction. Timelines vary<br />
depending on the complexity of the project, the amount of controversy involved, and the<br />
availability of funds. Some projects take less than two years, while some can take over ten<br />
years. In all cases, the earlier you can get involved in the process, the better opportunities you<br />
will have to develop your plan and acquire the materials and support you need. This chapter,<br />
Figure 2-1, the agency procedural manuals, and your contacts within agencies can help you<br />
develop your own schedule and contact list specific to your project. Reviewing Figure 2-1<br />
with the assigned road project engineer and discussing milestones, timelines, procedures,<br />
budgets, and roles is an effective approach to getting yourself oriented to the complex process<br />
of road development.<br />
Coordinating revegetation with the larger processes of road construction is essential. While the<br />
timelines and agencies involved will vary, this figure illustrates some of the key opportunities<br />
for communication and integration.<br />
2.2.4 DEFINE OBJECTIVES: WHAT IS THE PROJECT TRYING TO ACCOMPLISH?<br />
Once you understand the agencies and processes for each phase of the project, you need<br />
to understand how your work relates to the overall objectives of the project. Objectives can<br />
<strong>Roadside</strong> <strong>Revegetation</strong>: An Integrated Approach to Establishing Native Plants and Pollinator Habitat<br />
17
INITIATION PART ONE: COOPERATORS AND PROCESSES FOR ROAD PROJECTS<br />
be found in the programming documents that originally identified the need for the project.<br />
These objectives often center around improving safety or updating the road infrastructure.<br />
Phase One of the planning process (see Chapter 4) describes how to identify the objectives<br />
of the road project and translate them into specific goals for revegetation.<br />
Environmental protection and maximizing the ability of the roadside to regenerate native<br />
vegetation will be one goal. The revegetation specialist should be involved when disturbances<br />
to soil and vegetation are planned. You are the key link to understanding the potential<br />
disturbances that might be caused and how to best minimize or mitigate them. Your input can<br />
help planners because you will know what types of disturbances can be feasibly revegetated<br />
with native plants. If a disturbance to soil and vegetation will not allow for revegetation,<br />
alternatives to that type of disturbance will need to be considered. Your input is crucial for<br />
assessing potential strategies and alternatives. The project objectives also help you determine<br />
the types of native vegetation that are most appropriate for your work. Are you working in<br />
a wildlife corridor? Is it a scenic drive? Is it an ecologically sensitive area with more intensive<br />
recovery needed? Are the slopes very steep?<br />
Recognize that safety, efficiency, and protecting and enhancing environmental health are<br />
all important priorities in road projects. While safety concerns may at times limit what is<br />
appropriate in roadside revegetation (e.g., tall trees along a roadside may be a desirable<br />
choice environmentally, but not from a safety or visibility standpoint), these concerns should<br />
not be viewed as an impediment to successfully revegetating roadsides. Instead, you simply<br />
need to be aware of how your revegetation work can complement safety objectives. Gain an<br />
understanding of safety issues, particularly regarding visibility and the ability of drivers to<br />
recover if they drive off the road and into the roadside area. (See discussion of how to define<br />
roadside revegetation zones in Chapter 4.)<br />
Figure 2-1 | Project coordination<br />
Coordinating revegetation with the<br />
larger processes of road construction<br />
is essential. While the timelines and<br />
agencies involved will vary, this figure<br />
illustrates some of the key opportunities<br />
for communication and integration.<br />
<strong>Roadside</strong> <strong>Revegetation</strong>: An Integrated Approach to Establishing Native Plants and Pollinator Habitat<br />
18
INITIATION PART ONE: COOPERATORS AND PROCESSES FOR ROAD PROJECTS<br />
2.3 THE PROCESS OF ROAD DEVELOPMENT<br />
While each road agency will divide up and define tasks differently, in general the process of<br />
road development has four stages: (1) planning and programming, (2) project development,<br />
(3) construction, and (4) maintenance. There are many opportunities for integration at each of<br />
these phases. For revegetation work, the implementation phase often begins well before road<br />
construction begins (with the collection of plant materials for propagation). <strong>Revegetation</strong> efforts<br />
continue after road construction is completed. Figure 2-1 compares the revegetation process<br />
with the overall road development process, showing process steps where interface is crucial.<br />
During road project development, a number of meetings will take place involving representatives<br />
from the agencies and interests involved with the project. Setting revegetation objectives,<br />
such as developing pollinator habitat, occurs during the planning and programming phase.<br />
During the planning phase, meetings usually take place at the preliminary, intermediate,<br />
and final stages of the road plan. Ideally, the revegetation specialist should attend all these<br />
meetings. This ensures that good communication takes place and that trust is built during<br />
the road planning process. Meetings also ensure that regulations and requirements are met<br />
and that proper channels are utilized to get the job done. During the construction phase,<br />
the construction engineer and other key players carrying out the project will probably meet<br />
on a weekly basis. Attending some of these meetings is valuable so you can both learn and<br />
contribute as the project progresses. Clarify with your key contacts (such as the construction<br />
engineer) the most appropriate times to attend meetings. Contractors, inspectors, and other<br />
stakeholders may also be at meetings or at the field site at any given time; clarify with your<br />
key contact the channels for communicating with other individuals who are involved with<br />
the project.<br />
2.3.1 ROAD PLANNING AND PROGRAMMING<br />
The process of deciding when to modify or build a section of road is often lengthy. Transportation<br />
planners identify and prioritize functional, structural, and safety issues regarding roads. If an<br />
issue is becoming problematic, alternatives to address it will be considered (FHWA 2005). Once<br />
it has been determined that a road will be modified or updated, a budget and schedule are<br />
created. At this point, the project has been “programmed” for a specific delivery year. This<br />
process usually identifies the following:<br />
◾◾<br />
Project purpose and need<br />
◾◾<br />
Roles and responsibilities of partnering agencies<br />
◾◾<br />
List of project alternatives established<br />
◾◾<br />
Primary contacts for project<br />
◾◾<br />
Preliminary project delivery schedule with milestones<br />
◾◾<br />
Collection and analysis of traffic data (accident history, average daily traffic volumes, etc.)<br />
◾◾<br />
Preliminary construction cost estimate<br />
◾◾<br />
Environmental concerns for the project (cultural and natural resource) and estimation<br />
of the affected environment (WFLHD 2005 p. 8)<br />
Inset 2-1 | <strong>Roadside</strong> vegetation<br />
and driver safety<br />
Greater safety for the traveling<br />
public is the primary objective of<br />
many road projects. As the revegetation<br />
specialist, you do not want to<br />
propose vegetation strategies that<br />
might make the roadway less safe.<br />
Integrating revegetation goals with<br />
safety goals requires an awareness<br />
of visibility issues, wildlife interactions,<br />
and other factors. Many road<br />
developers are interested in the<br />
concept of a “forgiving” roadside: a<br />
roadside environment that allows a<br />
driver to recover safely if they drive<br />
off the road into the roadside. Typically<br />
there will be a zone adjacent to<br />
the road where low grassy surfaces,<br />
or shrubs instead of trees, will be<br />
desirable for safety reasons. The<br />
roadside distance you need to consider<br />
to make a roadside forgiving<br />
depends on the speed limit of the<br />
highway and the traffic volume. If<br />
both of these are high, a forgiving<br />
roadside will be a safety priority.<br />
A revegetation specialist will probably not be involved in a project until after it is programmed,<br />
although at times one might be called in to assess the feasibility of various alternatives.<br />
<strong>Roadside</strong> <strong>Revegetation</strong>: An Integrated Approach to Establishing Native Plants and Pollinator Habitat<br />
19
INITIATION PART ONE: COOPERATORS AND PROCESSES FOR ROAD PROJECTS<br />
2.3.2 ROAD PROJECT DEVELOPMENT<br />
The road project development process begins after the project is programmed and ends<br />
when construction begins. Depending on environmental concerns and right-of-way issues,<br />
the project development process may take between one and five years.<br />
The road project development phase usually has three sub-phases. These involve developing,<br />
analyzing, and considering approaches and alternatives to the project until a strategy and<br />
specifications of how to best proceed are shared in the final plan. The process usually involves:<br />
◾◾<br />
Preliminary (road construction plans 30 percent complete)<br />
◾◾<br />
Intermediate (road construction plans 50 to 70 percent complete)<br />
◾◾<br />
Final (road construction plans 70 to 100 percent complete, hand off to construction)<br />
Preliminary Phase<br />
The preliminary development phase involves collecting information and initiating contacts<br />
with parties who are interested in or affected by the road construction (local and adjacent<br />
landowners, resource agencies, regulatory agencies, and any other potentially affected<br />
parties). The preliminary phase is necessary to refine purpose and need, to develop a range<br />
of alternatives to address purpose and need, and to obtain the approvals and clearances<br />
to allow the project to proceed. This includes commitments for environmental mitigation.<br />
The preliminary phase takes the road construction plans to about 30 percent completion.<br />
Once approvals and clearances are obtained, funds can typically be committed to continue<br />
development of the project.<br />
◾◾<br />
Usually the preliminary phase will include the development and identification of:<br />
◾◾<br />
Preliminary construction plans (usually drafts about 30 percent complete) of the<br />
proposed alternatives (plan/profile sheets, typical sections, major work items identified<br />
and located)<br />
◾◾<br />
Preliminary construction cost estimates for alternatives<br />
◾◾<br />
Resource surveys (wetlands, archeological sites, and biological assessments)<br />
◾◾<br />
Preliminary construction schedule<br />
◾◾<br />
Identification of impacts and mitigation<br />
◾◾<br />
Environmental approvals and selection of alternatives for implementation<br />
◾◾<br />
List of contacts for the project<br />
For the revegetation specialist, the preliminary phase is a crucial one. This phase represents the<br />
best opportunity for input regarding issues associated with revegetation, including disturbances<br />
planned for existing soil and vegetation on the site. Significant features of the preliminary<br />
revegetation plan should be incorporated during this road planning phase. By the time of<br />
environmental approvals, the vegetative concepts and the necessary commitments of resources<br />
and funds should be integrated with the plan, as revegetation will be an important aspect of<br />
environmental protection and mitigation. The appropriate level of detail for the revegetation<br />
plan during the preliminary phase depends on the project. For the revegetation specialist,<br />
environmental guidelines may be predetermined by legislation that specifies goals for the<br />
project regarding issues of soil stabilization, percent native vegetative cover, and protection of<br />
water quality. The revegetation specialist must be aware of these guidelines, and design them<br />
into the final revegetation plan. Approvals are key milestones for the revegetation specialist<br />
regarding availability of funds to carry out site assessments and revegetation planning work<br />
including preliminary mapping and seed collections.<br />
Intermediate Phase<br />
<strong>Roadside</strong> <strong>Revegetation</strong>: An Integrated Approach to Establishing Native Plants and Pollinator Habitat<br />
20
INITIATION PART ONE: COOPERATORS AND PROCESSES FOR ROAD PROJECTS<br />
The next phase of road development moves towards 50 to 70 percent completion of the road<br />
construction plans. This phase involves refining plans, obtaining rights-of-way and permits,<br />
and creating detailed plans and profile sheets. The intermediate set of plans will include major<br />
budget items and quantities, information pertaining to environmental concerns (such as<br />
erosion control plans), and major elements such as grading, drainage, and other issues defined.<br />
At the intermediate stage, the revegetation specialist should be far along in the development<br />
of the revegetation plan. Mitigating measures have been identified for impacted areas and<br />
contracts for seed and seedling production have begun. The intermediate set of road plans<br />
will include specifications for how the road project will be carried out. These specifications<br />
and contract requirements are key tools for the revegetation specialist.<br />
Special Contract Requirements: A Key Tool for <strong>Revegetation</strong><br />
In every phase of road development, there are two key components: (1) plans (drawings) and<br />
(2) specifications (contract descriptions). The plan sheets are drawings, blueprint-like visual<br />
representations of the proposed work as described in Chapter 3. Specifications are standards,<br />
provisions, and requirements that each agency provides to contractors or employees to carry<br />
out the work. A “special contract requirement” is a type of specification. In general, special or<br />
standard specifications are written descriptions of intent, preferred methodology, timing, and<br />
standards for accomplishing the work. Standard specifications are uniformly carried out for<br />
most projects. Special requirements address context-sensitive concerns for a particular project.<br />
Special contract requirements are modifications of existing specifications found within the<br />
agency manual, or newly written specifications that are designed to address special concerns<br />
not adequately addressed in the standard contract specifications. For example, a standard<br />
specification may exist for chipping woody debris; however, the standard specification does<br />
not address size requirements of the chipped material. On your project, you may require<br />
a uniform size of material that should be shredded and screened, rather than chipped, to<br />
create optimal mulch for the project. To meet this requirement, you can create a specification<br />
about required size (such as three inches or less in diameter) and processing needs (such as<br />
shredded and screened rather than chipped). Careful research is often needed to adequately<br />
develop and describe a special contract requirement, but it is essential in order to achieve the<br />
Inset 2-2 | Example of an environmental regulation requirement<br />
“Final Stabilization” Regulation (adapted from EPA 2006)<br />
“Final stabilization” means that all soil disturbing activities at the site have been completed and that a uniform perennial vegetative cover<br />
with a density of at least 70 percent of the native background vegetative cover for the area has been established on all unpaved areas and<br />
areas not covered by permanent structures, or equivalent permanent stabilization measures.<br />
“Final Stabilization” (adapted from EPA 2006) means that:<br />
1) All soil disturbing activities at the site have been completed and either of the two following criteria are met:<br />
a) a uniform (i.e., evenly distributed, without large bare areas) perennial vegetative cover with a density of 70 percent of the native background<br />
vegetative cover for the area has been established on all unpaved areas and areas not covered by permanent structures, or<br />
b) equivalent permanent stabilization measures (such as the use of riprap, gabions, or geotextiles) have been employed.<br />
2) When background native vegetation will cover less than 100 percent of the ground (e.g., arid areas, beaches), the 70 percent coverage<br />
criteria is adjusted as follows: if the native vegetation covers 50 percent of the ground, 70 percent of 50 percent (0.70 X 0.50 = 0.35) would<br />
require 35 percent total cover for final stabilization. On a beach with no natural vegetation, no stabilization is required.<br />
3) In arid and semi-arid areas only, all soil disturbing activities at the site have been completed and both of the following criteria have been met:<br />
a) Temporary erosion control measures (e.g., degradable rolled erosion control product) are selected, designed, and installed along with<br />
an appropriate seed base to provide erosion control for at least three years without active maintenance, and<br />
b) The temporary erosion control measures are selected, designed, and installed to achieve 70 percent vegetative coverage within three years.<br />
<strong>Roadside</strong> <strong>Revegetation</strong>: An Integrated Approach to Establishing Native Plants and Pollinator Habitat<br />
21
INITIATION PART ONE: COOPERATORS AND PROCESSES FOR ROAD PROJECTS<br />
desired results in the field. In the future, generically applicable special contract requirements<br />
may become adopted as standard requirements if they come to be utilized on most projects.<br />
Special contract requirements are an important tool for revegetation specialists to communicate<br />
special expectations with contractors and to set standards for performance. You can specify to<br />
contractors what the requirements are, and how requirements might be met, measured, and<br />
paid for. Special contract requirements will be part of the contract, not an afterthought. By<br />
the intermediate phase, attention should have been given to modifying or creating contract<br />
requirements to meet the revegetation needs of the project. When specifications are not<br />
available for what you are trying to achieve, you need to be able to describe the work in terms<br />
of where, when, what needs to happen. Special contract requirements are included in the<br />
final contract for the road construction project.<br />
Final Phase<br />
The final set of road plans will include the design elements of the <strong>Revegetation</strong> Plan, as well<br />
as all the details for road construction. Plan sheets and contract specifications will be fully<br />
developed. Final cost estimates will be provided along with a comprehensive schedule. The<br />
work of the revegetation specialist in developing the revegetation plan, as well as efforts to<br />
reduce the construction footprint and protect native vegetation on the project site, will be<br />
an integral part of the road construction plan. At this point, finalizing the revegetation plan<br />
will be necessary. It is also time to coordinate with contractors and agencies in order to time<br />
availability of plants with outplanting windows.<br />
2.3.3 CONSTRUCTION<br />
Following project development, the construction phase begins. Road construction can take<br />
one to three years. Sometimes there is a formal milestone when the project is handed off<br />
to construction personnel. If so, the construction engineer becomes an essential contact<br />
for the revegetation specialist, who may attend some of the weekly meetings that will take<br />
place during road construction. The construction phase of a road is completed when there is<br />
a formal acceptance of the road by the road owning agency. For the revegetation specialist,<br />
implementation and monitoring phases of revegetation may begin before road construction<br />
(with ordering plant materials, etc.) and continue following completion of construction.<br />
2.3.4 MAINTENANCE<br />
Following construction of the road, the work of the revegetation specialist will usually continue<br />
for an additional one to three years until the revegetation is fully implemented. Also, the<br />
activities centered on monitoring and adaptive management of the establishing vegetation<br />
will continue to take place. These types of activities may continue for up to five years after the<br />
road construction is complete. The submission of a final monitoring report is the milestone<br />
marking the end of the revegetation specialist’s efforts on the project. Coordination with the<br />
road owning agency and the individuals who carry out road maintenance will be essential<br />
to ensure that native vegetation continues to thrive on the site. For example, the agency<br />
taking ownership, often the county, could have maintenance methods that may ultimately<br />
<strong>Roadside</strong> <strong>Revegetation</strong>: An Integrated Approach to Establishing Native Plants and Pollinator Habitat<br />
22
INITIATION PART ONE: COOPERATORS AND PROCESSES FOR ROAD PROJECTS<br />
undo portions of the revegetation, such as blanket herbicide use as standard practice along<br />
roadsides. It is essential to check what maintenance methods are utilized and to coordinate<br />
efforts to ensure that management is appropriate for the native vegetation. The transportation<br />
agencies will continue to monitor the road to ensure that the problem that led to the road<br />
modification (infrastructure decay, safety issues, etc.) was adequately addressed by the project.<br />
2.4 NEXT STEPS<br />
Effective integration of revegetation requires an understanding of the key agencies, programs,<br />
and relationships involved, as well as how decision processes work to move a road project<br />
forward. Successful navigation of the decision processes requires not only technical skills, but<br />
an ability to cultivate relationships and get involved at the appropriate times and with the<br />
appropriate people. Road construction, alteration, or decommissioning involves a variety of land<br />
management agencies, programs, and regulations. Understanding the procedures, timelines,<br />
and organizational structure of the agencies involved in a road project is essential in order for<br />
the revegetation specialist to contribute effectively throughout the process of road planning<br />
and construction. Attending meetings and coordinating with key contacts within agencies<br />
are important tasks. The revegetation specialist is ideally involved at the beginning when the<br />
project is programmed, and continues through and following construction. It is important<br />
to note (as illustrated on the timeline) that the implementation phase of revegetation begins<br />
while the overall project development process is still underway. Waiting until construction<br />
begins is not feasible because locally-adapted native plant materials almost always must be<br />
propagated in advance. The next step is to acquire the engineering plans for the road and to<br />
begin designing for revegetation.<br />
<strong>Roadside</strong> <strong>Revegetation</strong>: An Integrated Approach to Establishing Native Plants and Pollinator Habitat<br />
23
INITIATION PART TWO: ROAD PLANS AND TERMINOLOGY<br />
3— Initiation Part Two:<br />
Road Plans and<br />
Terminology<br />
3.1 Introduction<br />
3.2 Reading Plans<br />
3.3 Interpreting Engineering Views for <strong>Revegetation</strong> Planning<br />
3.4 Understanding Technical Concepts and Terminology<br />
3.5 Next Steps<br />
3.6 Road Concepts and Terminology<br />
<strong>Roadside</strong> <strong>Revegetation</strong>: An Integrated Approach to Establishing Native Plants and Pollinator Habitat<br />
24
INITIATION PART TWO: ROAD PLANS AND TERMINOLOGY<br />
3.1 INTRODUCTION<br />
Road construction often results in the drastic alteration of the surrounding landscape. In order<br />
to define what these alterations will be and how to best plan revegetation, you need to be<br />
able to interpret construction plans and terminology. This will enable you to define the current<br />
site conditions and to visualize the future condition of the site following road construction.<br />
This chapter explains how to read and interpret:<br />
◾◾<br />
Plan views<br />
◾◾<br />
Profile views<br />
◾◾<br />
Cross-section views<br />
◾◾<br />
Typical views<br />
◾◾<br />
Summary of quantities tables<br />
The chapter then explains how to use these engineering views for revegetation planning,<br />
including determining the vegetation zones that begin where the pavement ends. A glossary<br />
with illustrations is provided in order to understand technical concepts and terminology for<br />
effective communication with others involved in road design and construction.<br />
3.2 READING PLANS<br />
The plan consists of construction drawings and specifications for each section of road or project.<br />
The four most common views of plans utilized by the designer are plan views, cross-section<br />
views, profile views, and typical views. Each of these is defined in Table 3-1. Examples and<br />
guides for interpreting each of these views are provided below. Each engineering plan you<br />
receive will include a legend defining both abbreviations and symbols used throughout;<br />
learn to read these. Another invaluable component of the engineering plan is the tabulation<br />
of plan quantities table.<br />
Table 3-1 | Definitions of views<br />
View<br />
Plan<br />
Profile<br />
Cross-section<br />
Typical<br />
Definition<br />
A drawing depicting a section of the road from a bird’s eye view.<br />
A drawing depicting the vertical plane along the longitudinal centerline of the road, expressed in elevation or gradient.<br />
A drawing depicting a section of the road viewed vertically, as if cut across the width of the road.<br />
A drawing depicting features of a particular design, installation, construction or methodology.<br />
Source: Keller and Sherar 2003<br />
3.2.1 PLAN VIEW<br />
The plan view shows the existing and proposed road locations from a bird’s eye view. It is<br />
important to note that plan sets, in particular road plans, once displayed distances in meters.<br />
This practice was discontinued nationwide in the early 2000s and distances are now displayed<br />
in US Customary Units (feet). The proposed road is usually designated with solid lines (Figure<br />
3-1A). The solid centerline (of the road to be constructed) is divided into 100 foot sections (large<br />
ticks), often with 20 foot subdivisions also designated (small ticks – not shown). Each 100 foot<br />
<strong>Roadside</strong> <strong>Revegetation</strong>: An Integrated Approach to Establishing Native Plants and Pollinator Habitat<br />
25
INITIATION PART TWO: ROAD PLANS AND TERMINOLOGY<br />
division is called a station, representing a discrete, surveyed, and identifiable point within the<br />
road corridor. Each station is identified with a unique number that indicates its distance from<br />
the beginning of the project. For example, the station 19+000 indicates this point is 19,000<br />
feet from the start of the project; 19+040 indicates this point is 19,040 feet from the start. This<br />
short-hand identifier is also used to indicate the placement of road-related infrastructure, such<br />
as culverts, the beginning and end of guard-rail construction, or the placement of a sign. In<br />
the field, stations are identifiable as vertically aligned numbers written on wooden stakes<br />
and driven into the ground, facing the roadway. Not only do the stations provide locations,<br />
they help to locate revegetation units. The plans also show the top of the cut slope (Figure<br />
3-1B, dotted line), bottom of the fill slopes (Figure 3-1C, dashed lines), and the location of the<br />
original road (Figure 3-1D, shaded area). In this example, the original road will be obliterated.<br />
Plans include right of way lines. These are, in effect, the property lines of the roadway and an<br />
important boundary for the revegetation specialist.<br />
18+800<br />
R/W<br />
C<br />
18+900<br />
CP<br />
Culvert<br />
19+000<br />
D<br />
Obliterate<br />
Old Road<br />
19+100<br />
Line to be<br />
Constructed<br />
19+200<br />
Figure 3-1 | Example plan view<br />
99182<br />
A<br />
N 3˚ 46' 49" E<br />
R/W<br />
CP<br />
CONTROL POINTS<br />
Name Northing Easting Elevation<br />
99182 255434.166 1410786.002 1696.398<br />
99183 255544.687 1410818.803 1701.670<br />
99184 255862.861 1410840.869 1704.295<br />
R/W<br />
CP<br />
99183<br />
B<br />
R/W<br />
CP<br />
99184<br />
3.2.2 PROFILE VIEW<br />
The profile view is a trace of a vertical plane intersecting a particular surface of the proposed<br />
road construction (Figure 3-2E). It corresponds to the longitudinal centerline of the road bed<br />
in the plans. Profile grade means either elevation or gradient of the trace, depending on the<br />
context. The trace of the existing road is shown as a dashed line (Figure 3-2F) and a dotted line<br />
(Figure 3-2G). A vertical scale provides useful information about the profile of construction<br />
grades throughout the project. This view shows where the proposed road will be lower than<br />
the existing road (Figure 3-2H) and areas where it will be higher (Figure 3-2I). Where the planned<br />
road is lower, material will usually be removed and used in areas needing fill. Additional<br />
1710<br />
1708<br />
1706<br />
1704<br />
1702<br />
1700<br />
1698<br />
18+800<br />
18+900<br />
I<br />
F<br />
19+000<br />
H<br />
19+100<br />
19+200<br />
Figure 3-2 | Example profile view<br />
1696<br />
1694<br />
1692<br />
1690<br />
1688<br />
G<br />
E<br />
information is often displayed adjacent to and locatable by the station numbers, such as<br />
volumes of excavation and embankment work, guard-rail placement, or wall placements.<br />
<strong>Roadside</strong> <strong>Revegetation</strong>: An Integrated Approach to Establishing Native Plants and Pollinator Habitat<br />
26
INITIATION PART TWO: ROAD PLANS AND TERMINOLOGY<br />
3.2.3 CROSS-SECTION VIEW<br />
Cross-sections are views of the slopes perpendicular to the direction of the road. They display<br />
a vertical section of the ground or structure at right angles to the centerline or baseline of<br />
Figure 3-3 | First example cross-section<br />
Figure 3-4 | Second example cross-section<br />
the roadway. Depending on the length and topographic complexity of the road, there can be<br />
hundreds of cross-sections. Each cross-section is referenced back to a station. For example, the<br />
cross-section shown in Figure 3-3 depicts the slope at Station 18+940. It shows the proposed<br />
road (Figure 3-3J), and the natural ground line as a dotted line (Figure 3-3K). This section will<br />
have material brought in and placed as fill (Figure 3-3L). The cross-section in Figure 3-4 shows<br />
a through cut at 19+000. Material will be removed from the natural ground line (Figure 3-4K)<br />
to the proposed ground line – solid line (Figure 3-4M).<br />
Cross-section and plan views are used together to view the proposed road three-dimensionally.<br />
From these views, a more detailed revegetation plan can be developed. Each cross-section<br />
can be reviewed and a set of revegetation criteria can be developed for similar cross-sections<br />
throughout the project.<br />
Cross- sections show the proposed slope gradients for cut and fill slopes and provide the<br />
designer a means to determine slope steepness. Like stationing, the method of depicting<br />
slopes has changed over the years. Older plan sets often depicted slopes as a ratio of one unit<br />
horizontal to one unit vertical. Several years ago, however, slope ratios were brought more<br />
in line with other disciplines and are now depicted as one unit vertical to one unit horizontal<br />
(vertical:horizontal). When slopes are flatter than 1:1 (45° or 100%), the slope is expressed as<br />
the ratio of one unit vertical to the number of units horizontal. For slopes steeper than 1:1, the<br />
slope ratio is expressed as number of units vertical to one unit horizontal. To avoid confusion,<br />
it is wise to notate the ratio by indicating the vertical and horizontal, for example 1V:2H, and<br />
to think in terms of rise over run (see Section 5.6.6.1 Slope Gradient – How to Assess).<br />
<strong>Roadside</strong> <strong>Revegetation</strong>: An Integrated Approach to Establishing Native Plants and Pollinator Habitat<br />
27
INITIATION PART TWO: ROAD PLANS AND TERMINOLOGY<br />
Figure 3-5 | Example typical view<br />
Figure 3-6 | Example typical view<br />
of installation trail and turnout.<br />
3.2.4 TYPICAL VIEWS<br />
Typical views graphically illustrate the design or construction details of the structures or other<br />
components that will be encountered in the road project. They can cover such structures as<br />
retaining walls, road surfaces, guardrails, ditch lines, plant installation, etc. They may be shown<br />
in profile, cross-section, or plan views. Like special contract requirements (see Chapter 2),<br />
typical views are useful in helping communicate a new or modified approach to an existing<br />
methodology or construction technique.<br />
3.2.5 SUMMARY OF QUANTITIES TABLE<br />
Tabulation of plan quantities list quantities, types of materials, and performance specifications.<br />
For example, when working on federal or state projects, standardized specifications for<br />
construction are invaluable. The FHWA handbook: Standard Specifications for Construction<br />
of Roads and Bridges on Federal Highway Projects, is cited as “FP-03,” or “FP-14” indicating<br />
“Federal Project” Standard Specifications issued in 2003 or 2014, respectively. The state<br />
<strong>Roadside</strong> <strong>Revegetation</strong>: An Integrated Approach to Establishing Native Plants and Pollinator Habitat<br />
28
INITIATION PART TWO: ROAD PLANS AND TERMINOLOGY<br />
departments of transportation have analogous manuals as well. Tabulation of plan quantities<br />
references not only the particular item specification number in the FP manual, but also the<br />
station number(s) of the planned work. Information of interest for the revegetation specialist<br />
includes the number of hectares of clearing and grubbing, hectares of obliterated roads listed<br />
by station, and the number of cubic meters of wood mulch to be produced. The summary<br />
of quantities Table provides a single Table summarizing all tabulation of plan quantity tables<br />
located throughout the plan. It generally does not include station numbers. Learn how to<br />
locate and read these tables.<br />
3.3 INTERPRETING ENGINEERING VIEWS FOR REVEGETATION<br />
PLANNING<br />
Road construction, management, and safety concerns result in distinct revegetation zones<br />
along roadsides. Properly interpreting plans helps define where these zones may be and<br />
what types of vegetation may be established. While the sizes and characteristics will vary, the<br />
zones which parallel the road can be grouped into four categories. Zone 1 begins immediately<br />
adjacent to the road surface (black top) and includes the road shoulder (compacted gravel,<br />
coarse subsoil, etc.), the bottom of the drainage ditch, and portions of cut and fill slopes. This<br />
first zone is generally considered to be up to 10 feet from the pavement edge and is often<br />
barren of vegetation due in part to herbicide application, road salts, frequent ditch cleaning,<br />
and/or mowing. Prior to revegetating Zone 1, determine how close local, state, and federal road<br />
managing agencies will allow vegetation to be established next to the road. Zone 2 begins at<br />
roughly 10 feet from the pavement edge and continues laterally to about 30 feet. This zone<br />
may begin at the ditch bottom or at some point on a cut or fill slope, and may continue to the<br />
limit of the construction zone. Within Zone 2, grasses and forbs can thrive, but larger forbs,<br />
shrubs, and trees usually are not planted or encouraged due to safety, maintenance, and<br />
visibility issues. Beyond 30 to 50 feet from the pavement edge, Zone 3 begins in which larger<br />
forbs and shrubs can be planted. Past about 75 feet from the pavement edge, Zone 4 begins<br />
with largely unrestricted revegetation potential. Understanding these zones is necessary to<br />
Figure 3-7 | Interpretation of plan<br />
view showing revegetation zones<br />
Figure 3-8 | Cross-section showing<br />
revegetation zones as interpreted<br />
from engineering plans<br />
<strong>Roadside</strong> <strong>Revegetation</strong>: An Integrated Approach to Establishing Native Plants and Pollinator Habitat<br />
29
INITIATION PART TWO: ROAD PLANS AND TERMINOLOGY<br />
coordinate revegetation with road management practices and safety considerations (Forman<br />
and others 2003).<br />
To define the zones and begin to interpret engineering plans for revegetation work, information<br />
from plan sheets and quantity tabulations is applied to the plan map as shown in Figure 3-7.<br />
Each area can be considered a revegetation unit or subunit. An estimate of the area in each<br />
of these units can be calculated and used in determining how many seedlings or pounds of<br />
seeds will be needed. These criteria can be graphically displayed on a typical cross-section<br />
(Figure 3-8). On this cross-section, the criteria can be expressed as follows: from 20 to 60<br />
feet grasses/forbs will be hydroseeded; from 60 to 100 feet shrubs will be planted; and on<br />
obliterated roads, trees will be planted. The slopes given in cross-sections can help define the<br />
types of revegetation methods available.<br />
3.4 UNDERSTANDING TECHNICAL CONCEPTS AND<br />
TERMINOLOGY<br />
The ability to understand and utilize the technical concepts and terminology that road<br />
engineers use is essential to roadside revegetation planning. Not only is this invaluable in<br />
understanding what is happening on the project site, but it is necessary in order to describe<br />
where revegetation efforts will be carried out. The section below introduces key technical<br />
concepts and terminology.<br />
Figure 3-9 | Terms used to define roads<br />
Figure 3-10 | Terms used to<br />
define roads: cross-section<br />
<strong>Roadside</strong> <strong>Revegetation</strong>: An Integrated Approach to Establishing Native Plants and Pollinator Habitat<br />
30
INITIATION PART TWO: ROAD PLANS AND TERMINOLOGY<br />
3.5 NEXT STEPS<br />
The ability to read and understand construction plans and utilize road-related terminology<br />
will be helpful in all aspects of roadside revegetation. This ability enables the designer to<br />
contribute effectively to road design and construction processes, as well as to communicate<br />
revegetation needs and goals to others involved with the project. Following the initiation<br />
phase is the four-step planning phase to create a revegetation plan.<br />
3.6 ROAD CONCEPTS AND TERMINOLOGY<br />
The following terminology was adapted from Keller and Sherar 2003.<br />
3.6.1 ROAD COMPONENTS<br />
◾◾<br />
Berm – A ridge of rock, soil, or asphalt, typically along the outside edge of the road<br />
shoulder, used to control surface water. It directs surface runoff to specific locations<br />
where water can be removed from the road surface without causing erosion.<br />
◾◾<br />
Buttress – A structure designed to resist lateral forces. It is typically constructed of large<br />
riprap rock, gabions, or well-drained soil to support the toe of a slope in an unstable area.<br />
◾◾<br />
Cross-Section – A drawing depicting a section of the road sliced across the whole<br />
width of the road. Can also apply to a stream, slope, or slide.<br />
◾◾<br />
Cut Slope (Back Slope or Cut Bank) – The artificial face or slope cut into soil or rock<br />
along the inside edge of the road<br />
◾◾<br />
Cut-and-fill – A method of road construction in which a road is built by cutting into<br />
the hillside and spreading the spoil materials in adjacent low spots and as compacted<br />
or side-cast fill slope material along the route. A “balanced cut-and-fill” utilizes all of<br />
the “cut” material to generate the “fill.” In a balanced cut-and-fill design there is no<br />
excess waste material and there is no need for hauling additional fill material. Thus<br />
cost is minimized.<br />
◾◾<br />
Ditch (Side Drain) – A channel or shallow canal along the road intended to collect<br />
water from the road and adjacent land for transport to a suitable point of disposal. It<br />
is commonly along the inside edge of the road. It also can be along the outside edge<br />
or along both sides of the road.<br />
◾◾<br />
End Haul – The removal and transportation of excavated material off-site to a stable<br />
waste area (rather than placing the fill material near the location of excavation).<br />
◾◾<br />
Fill Slope (Embankment Slope) – The inclined slope extending from the outside<br />
edge of the road shoulder to the toe (bottom) of the fill. This is the surface formed<br />
when excavated material is placed on a prepared ground surface to construct the road<br />
subgrade and roadbed template.<br />
◾◾<br />
Grade (Gradient) – The slope of the road along its alignment. This slope is expressed<br />
as a percentage and is the ratio of elevation change compared to distance traveled.<br />
For example, a +4 percent grade indicates a gain of 4 units of measure in elevation for<br />
every 100 units of measure traveled.<br />
◾◾<br />
Natural Ground (Original Ground Level) – The natural ground surface of the terrain<br />
that existed prior to disturbance and/or road construction.<br />
◾ ◾ Plan View (Map View) – View seen when looking from the sky towards the ground<br />
(bird’s-eye view).<br />
<strong>Roadside</strong> <strong>Revegetation</strong>: An Integrated Approach to Establishing Native Plants and Pollinator Habitat<br />
31
INITIATION PART TWO: ROAD PLANS AND TERMINOLOGY<br />
◾◾<br />
Reinforced Fill – A fill that has been provided with tensile reinforcement through<br />
frictional contact with the surrounding soil for the purpose of greater stability and load<br />
carrying capacity. Reinforced fills are comprised of soil or rock material placed in layers<br />
with reinforcing elements to form slopes, walls, embankments, dams, or other structures.<br />
The reinforcing elements range from simple vegetation to specialized products such<br />
as steel strips, steel grids, polymeric geogrids, and geotextiles.<br />
◾◾<br />
Retaining Structure – A structure designed to resist the lateral displacement of soil,<br />
water, or any other type of material. It is commonly used to support a roadway or gain<br />
road width on steep terrain. They are often constructed of gabions, reinforced concrete,<br />
timber cribs, or mechanically-stabilized earth.<br />
◾◾<br />
Right-of-Way – The strip of land over which facilities such as roads, railroads, or power<br />
lines are built. Legally, it is an easement that grants the right to pass over the land of<br />
another.<br />
◾◾<br />
Road Center Line – An imaginary line that runs longitudinally along the center of the<br />
road.<br />
◾◾<br />
Roadbed – Width of the road used by vehicles, including the shoulders, measured at<br />
the top of subgrade.<br />
◾◾<br />
Roadway (Construction Limits or Formation Width) – Total horizontal width of land<br />
affected by the construction of the road, from the top of cut slope to the toe of fill or<br />
graded area.<br />
◾◾<br />
Side-Cast Fill – Excavated material pushed on a prepared or unprepared slope next<br />
to the excavation to construct the roadbed. The material is usually not compacted.<br />
◾◾<br />
Shoulder – The paved or unpaved strip along the edge of the traveled way of the road.<br />
An inside shoulder is adjacent to the cut slope. An outside shoulder is adjacent to an<br />
embankment slope.<br />
◾◾<br />
Traveled Way (Carriageway) – That portion of the road constructed for use by moving<br />
vehicles including traffic lanes and turnouts (excluding shoulders).<br />
◾◾<br />
Through Cut – A road cut through a hill slope or, more commonly, a ridge, in which<br />
there is a cut slope on both sides of the road.<br />
◾◾<br />
Through Fill – Opposite of a through cut, a through fill is a segment of road that is<br />
entirely composed of fill material, with fill slopes on both sides of the road.<br />
3.6.2 ROAD STRUCTURAL SECTION AND MATERIALS<br />
◾◾<br />
Borrow Pit (Borrow Site) – An area where excavation takes place to produce materials<br />
for earthwork, such as a fill material for embankments. It is typically a small area used<br />
to mine sand, gravel, rock, or soil without further processing.<br />
◾◾<br />
Quarry – A site where stone, riprap, aggregate, and other construction materials are<br />
extracted. The material often has to be excavated with ripping or blasting, and the<br />
material typically needs to be processed by crushing or screening to produce the<br />
desired gradation of aggregate.<br />
3.6.3 SURFACE DRAINAGE<br />
◾◾<br />
Armor – Rocks or other material placed on headwalls, on soil, or in ditches to prevent<br />
water from eroding and undercutting or scouring the soil.<br />
◾ ◾ Drainage Structure – A structure installed to control, divert, or move water off or across<br />
a road, including but not limited to culverts, bridges, ditch drains, fords, and rolling dips.<br />
<strong>Roadside</strong> <strong>Revegetation</strong>: An Integrated Approach to Establishing Native Plants and Pollinator Habitat<br />
32
INITIATION PART TWO: ROAD PLANS AND TERMINOLOGY<br />
◾◾<br />
French Drain (Underdrain) – A buried trench, filled with coarse aggregate, and typically<br />
placed in the ditch line along the road, which acts to drain subsurface water from a wet<br />
area and discharge it to a safe and stable location. French drains may use variable sizes<br />
of rock but do not have a drain pipe in the bottom of the trench.<br />
◾◾<br />
Inslope – The inside cross-slope of a road subgrade or surface, typically expressed as a<br />
percentage. Inslope is used to facilitate the draining of water from a road surface to an<br />
inside ditch. An insloped road has the highest point on the outside edge of the road and<br />
slopes downward to the ditch at the toe of the cut slope, along the inside edge of road.<br />
Figure 3-11 | Culvert components<br />
◾◾<br />
Outslope – The outside cross-slope of a road subgrade or surface, typically expressed<br />
as a percentage. Outslope is used to facilitate the draining of water from a road directly<br />
off the outside edge of the road. An outsloped road has the highest point on the uphill<br />
or inside of the road and slopes down to the outside edge of the road and the fill slope.<br />
◾◾<br />
Riprap – Well-graded, durable, large rock, ideally with fractured surfaces, sized to resist<br />
scour or movement by water and installed to prevent erosion of native soil material.<br />
3.6.4 CULVERTS AND DRAINAGE CROSSINGS<br />
◾◾<br />
Catch Basin – The excavated or constructed basin at the inlet of a culvert cross-drain<br />
pipe, used to store water and direct it into the culvert pipe.<br />
◾◾<br />
Culvert – A drainage pipe, usually made of metal, concrete, or plastic, set beneath the<br />
road surface to move water from the inside of the road to the outside of the road, or<br />
under the road. Culverts are used to drain ditches, springs, and streams that cross the<br />
road. The invert is the floor or the bottom of the structure at its entrance.<br />
◾◾<br />
Headwall – A concrete, gabion, masonry, or timber wall built around the inlet or outlet<br />
of a drainage pipe or structure to increase inlet flow capacity, reduce risk of debris<br />
damage, retain the fill material, and minimize scour around the structure.<br />
◾◾<br />
Inlet – The opening in a drainage structure or pipe where the water first enters the<br />
structure.<br />
◾◾<br />
Outlet – The opening in a drainage structure or pipe where the water leaves the<br />
structure. The outlet is usually lower than the inlet to ensure that water flows through<br />
the structure.<br />
<strong>Roadside</strong> <strong>Revegetation</strong>: An Integrated Approach to Establishing Native Plants and Pollinator Habitat<br />
33
INITIATION PART TWO: ROAD PLANS AND TERMINOLOGY<br />
3.6.5 MISCELLANEOUS TERMS<br />
◾◾<br />
Angle of Repose – The maximum slope or angle at which a granular material, such as<br />
loose rock or soil, will stand and remain stable.<br />
◾◾<br />
Gabions – Baskets (usually made of wire) filled with rocks (or broken pieces of concrete)<br />
about 10-20 cm in size, used for building erosion control structures, weirs, bank<br />
protection, or retaining structures.<br />
Figure 3-12 | Terms used to<br />
describe road slopes<br />
◾◾<br />
Road Decommissioning – Permanently closing a road through techniques that<br />
include blocking the entrance, scattering limbs and brush on the roadbed, replanting<br />
vegetation, adding waterbars, removing fills and culverts, or reestablishing natural<br />
drainage patterns. The basic road shape, or template, is still in place. The end result is<br />
to terminate the function of the road and mitigate the adverse environmental impacts<br />
of the road.<br />
◾◾<br />
Road Obliteration – A form of road closure that refills cut areas, removes fills and<br />
drainage structures, restores natural contours, revegetates the area, and ultimately<br />
attempts to restore the natural ground shape and condition. Most adverse environmental<br />
impacts of the road are eliminated.<br />
◾◾<br />
Silt Fence – A temporary barrier used to intercept sediment-laden runoff from slopes.<br />
It is typically made of porous geotextile material.<br />
◾◾<br />
Streamside Management Zone – The land, together with the associated vegetation,<br />
immediately in contact with the stream and sufficiently close to have a major influence<br />
on the total ecological character and function of the stream. It is a buffer area along a<br />
stream where activities are limited or prohibited.<br />
<strong>Roadside</strong> <strong>Revegetation</strong>: An Integrated Approach to Establishing Native Plants and Pollinator Habitat<br />
34
PLANNING PHASE ONE: ORIENT<br />
4— Planning Phase One:<br />
Orient<br />
4.1 Introduction<br />
4.2 Step One — Define <strong>Revegetation</strong> Objectives<br />
4.3 Step Two — Define and Map <strong>Revegetation</strong> Units<br />
4.4 Step Three — Locate and Describe Reference Sites<br />
4.5 Step Four — Define Desired Future Conditions<br />
4.6 Next Steps<br />
<strong>Roadside</strong> <strong>Revegetation</strong>: An Integrated Approach to Establishing Native Plants and Pollinator Habitat<br />
35
PLANNING PHASE ONE: ORIENT<br />
4.1 INTRODUCTION<br />
Careful planning is essential to the success of any roadside revegetation project. In this phase,<br />
the designer performs the following tasks, as described in Table 4-1:<br />
◾◾<br />
Defines revegetation objectives<br />
◾◾<br />
Gathers pre-field information<br />
◾◾<br />
Defines revegetation units<br />
◾◾<br />
Locates reference sites<br />
◾◾<br />
Gathers field information<br />
◾◾<br />
Defines the desired future condition<br />
Table 4-1 | Phase one of planning involves six steps<br />
Activity<br />
Definition<br />
Step 1. Determine project objectives Describe the general purpose and goals of the road project as determined by societal, ecological,<br />
and transportation needs, environmental regulations, and other factors. Develop revegetation<br />
objectives, including pollinator habitat enhancement, erosion control, water quality enhancement,<br />
weed control, and carbon sequestration.<br />
Step 2. Gather pre-field information Prior to field surveys, review reports and websites that describe soils, vegetation, climate, and<br />
pollinators for the project area.<br />
Step 3. Define revegetation units Classify areas within the project site that are similar enough to be appropriate for similar strategies<br />
and treatments. Homogenous sites will have only a few units; sites with greater diversity (different<br />
soil types, microclimates, vegetation types, management needs, etc.) will have more revegetation<br />
units. Each unit should be distinct in terms of ecology, management requirements, or both.<br />
Step 4.<br />
Locate reference sites for each<br />
revegetation unit<br />
Locate natural or revegetated areas that will serve as models for desirable recovery of native plant<br />
communities. One or more reference sites are identified for each revegetation unit in the project area.<br />
Step 5. Gather field information Survey reference sites, as well as the road project in general, for vegetation, soils, climate, and<br />
pollinator habitat that will provide baseline ecological data for developing the revegetation plan.<br />
Step 6.<br />
Specify desired future conditions<br />
for each revegetation unit<br />
Create specific, measurable goals for each revegetation unit, usually defined in terms of the percentage<br />
of vegetative cover, ground cover, species composition, plant growth, plant density, and<br />
pollinator diversity and abundance.<br />
It is important to first understand the road project objectives and translate them into the<br />
objectives for revegetating the site. Because road project objectives and roadside environments<br />
are different for each project, each project will have a unique set of revegetation objectives.<br />
<strong>Revegetation</strong> objectives are guides for developing a revegetation plan and are stated broad<br />
terms such as the following:<br />
◾◾<br />
Increase pollinator habitat<br />
◾◾<br />
Reduce soil erosion<br />
◾◾<br />
Improve water quality<br />
◾◾<br />
Increase soil stabilization<br />
◾◾<br />
Reduce the spread of noxious weeds<br />
◾◾<br />
Enhance aesthetic experience<br />
<strong>Roadside</strong> <strong>Revegetation</strong>: An Integrated Approach to Establishing Native Plants and Pollinator Habitat<br />
36
PLANNING PHASE ONE: ORIENT<br />
Once revegetation objectives are developed, they direct the development and implementation<br />
of the revegetation plan and the monitoring plan.<br />
The next step is to understand the environment of the project site: its climate, soils, natural<br />
vegetation, and potential as pollinator habitat. Much of this information is available in<br />
reports and on websites. Collecting and reviewing this information gives the planner a more<br />
comprehensive understanding of the project prior to conducting a site visit. The site visits<br />
check the accuracy of the background information, and this information is refined to the<br />
project scale. Soils, vegetation, and climate are surveyed, and areas with similar environments<br />
and common objectives are grouped into management areas, called revegetation units.<br />
<strong>Revegetation</strong> units are distinct areas within the project that have different management<br />
strategies. A project consisting of sites with little variation in topography, soils, vegetation<br />
types, and microclimate may comprise a single revegetation unit. Most project sites, however,<br />
contain different soils, climate, and vegetation types, and therefore require the delineation<br />
of several distinct revegetation units.<br />
Once revegetation units have been delineated, reference sites are located in or near the project<br />
site. Reference sites serve as models for revegetation planning, and later for monitoring and<br />
evaluating project success (SER 2004). Reference sites can be undisturbed areas as well as areas<br />
that have been disturbed but have recovered. In either case, reference sites demonstrate a<br />
desirable trajectory of recovery. For roadside revegetation purposes, some of the best reference<br />
sites have undergone some disturbance but have revegetated over time with functioning<br />
communities of native plants. Reference sites illustrate desirable developmental pathways<br />
and plant communities that should be attainable for the revegetation units.<br />
At this point, background information is sufficient to effectively survey the road project. Plant<br />
surveys of reference sites are used to develop a comprehensive species list that will be used to<br />
develop species lists for each revegetation area. Confirming the soils and climate information<br />
obtained during pre-field data collection will be used to develop the appropriate soil and<br />
site improvement treatments, as well as the type of plant materials to provide. Assessing<br />
the quality of the pollinator habitat and diversity and quantity of pollinator species will lead<br />
to development of appropriate improvement measures. By the end of the field survey, the<br />
designer should have a good understanding of the effects that the road project will have on<br />
soils, vegetation, climate, and pollinator habitat and with this information develop the DFCs<br />
for each revegetation unit. DFCs specify guidelines (percentage of vegetative cover, plant<br />
species, etc.) appropriate for each revegetation unit in the project area. The DFCs will later<br />
become the basis for developing a monitoring plan.<br />
4.2 DEFINE REVEGETATION OBJECTIVES<br />
The design objectives of a road project guide the development of the revegetation plan. As<br />
discussed in Chapter 2, road objectives usually involve goals of improving safety and efficiency,<br />
as well as environmental health. <strong>Revegetation</strong> objectives develop from road objectives and<br />
become the foundation of the revegetation and monitoring plans. It is important to develop<br />
a clear set of revegetation objectives early in the planning phase. When these objectives are<br />
understood and expectations are clear, the development and implementation of a revegetation<br />
plan are easier and more successful. Most roadside revegetation projects share the common<br />
objective of initiating and/or accelerating the process of natural succession near the roadside<br />
in order to establish self-sustaining native plant communities (Brown and Amacher 1999;<br />
Clewell and others 2005). This objective usually reflects larger project goals, stated in terms<br />
of increasing pollinator habitat, protecting soil and water resources, enhancing roadside<br />
aesthetics, limiting invasive plants, and improving road safety and function while protecting<br />
environmental health. Later in the planning process, revegetation objectives are used to<br />
develop specific goals (stated as DFCs) for evaluating the success of the revegetation work.<br />
Table 4-2 defines some terms commonly used in defining revegetation objectives. Clarifying<br />
<strong>Roadside</strong> <strong>Revegetation</strong>: An Integrated Approach to Establishing Native Plants and Pollinator Habitat<br />
37
PLANNING PHASE ONE: ORIENT<br />
whether the overall goal is reclamation or restoration, for example, is an essential distinction<br />
for defining revegetation objectives.<br />
Table 4-2 | Terms used in defining revegetation objectives<br />
Term<br />
<strong>Revegetation</strong><br />
Restoration<br />
Reclamation<br />
Rehabilitation<br />
Definition<br />
The goal is to reestablish vegetation on a disturbed site. This is a general term that may refer to restoration, reclamation,<br />
and rehabilitation.<br />
This is the re-creation of the structure and function of the plant community identical to that which existed before<br />
disturbance. The goal of restoration is conservation, with the intention of maximizing biodiversity and functioning.<br />
This is the re-creation of a site that is designed to be habitable for the same or similar species that existed prior to<br />
disturbance. Reclamation differs from restoration in that species diversity is lower and projects do not re-create<br />
identical structure and function to that before disturbance. However, a goal of long-term stability with minimum<br />
input is implied.<br />
This process creates alternative ecosystems that have a different structure and function from the pre-disturbance<br />
community, such as a park, pasture, or silvicultural planting.<br />
Adapted from Allen and others 1997<br />
Table 4-3 illustrates some of the most common road-related revegetation objectives as they<br />
relate to the road design goals. Most revegetation projects state several objectives to address<br />
both short-term and long-term outcomes. For example, short-term, immediate revegetation<br />
objectives on most projects include erosion control and water quality protection through<br />
mulch and vegetative cover. A long-term revegetation objective would be to establish a native<br />
plant community, with a range of plant species, that benefit pollinators by increasing foraging,<br />
breeding, and nesting habitats. While short-term objectives might rely on quick-growing<br />
ground covers such as grasses and forbs, long-term objectives are often broadened to include<br />
such revegetation treatments as planting deep-rooted tree and shrub seedlings to stabilize<br />
roadsides, creating visual screens of road infrastructure, and/or supporting sustained native<br />
plant community development.<br />
<strong>Revegetation</strong> objectives are often developed by the designer and design team and are<br />
supported by, or integrated with, public documents such as Environmental Assessments or<br />
Environmental Impact Statements. The objectives sometimes originate from a state or federal<br />
agency and motivated by environmental concerns and regulations regarding water quality,<br />
erosion control, and vegetation establishment. In the early stages of planning, revegetation<br />
objectives are broad and general. As the project evolves, objectives are translated into more<br />
precise and measurable goals (DFCs). After the installation is complete, DFCs and revegetation<br />
objectives will be used to monitor, evaluate, and manage the project.<br />
Table 4-3 | Native plants are used to meet road and revegetation objectives<br />
<strong>Revegetation</strong> Objective<br />
Pollinator Habitat Enhancement<br />
Function of Native Plants<br />
An important revegetation objective is to improve pollinator habitat by selecting a mix of plant species and<br />
site improvements that encourage foraging, breeding, nesting, and overwintering of a variety of pollinator<br />
species.<br />
<strong>Roadside</strong> <strong>Revegetation</strong>: An Integrated Approach to Establishing Native Plants and Pollinator Habitat<br />
38
PLANNING PHASE ONE: ORIENT<br />
<strong>Revegetation</strong> Objective<br />
Erosion Control<br />
Water Retention<br />
Visual Enhancement<br />
Weed Control<br />
Wildlife Enhancement<br />
Cost Management<br />
Function of Native Plants<br />
Controlling surface erosion and thereby protecting soil and water quality is a high priority on road construction<br />
projects. Native grasses, forbs, and other herbaceous plants can help meet this challenge, particularly<br />
when they are accompanied by appropriate mulching treatments. Deep-rooted native trees and shrubs can<br />
also enhance stability of cut and fill slopes.<br />
Runoff from road surfaces and cut slopes concentrate water into ditches during rainstorm events, increasing<br />
the amount of water that normally enters natural drainage ways. Practices that use native plants in the<br />
design, such as constructed wetlands and bioretention swales, amended ditches and fills, filter strips, can<br />
help retain much of this water on the project site, reducing the amount of sediments and road pollutants<br />
from entering stream courses. The additional water increases the productivity of the established plants.<br />
Vegetation is often used to enhance the aesthetic experience of the traveler. Wildflowers add beauty in<br />
spring; deciduous trees change color in fall; and evergreen species stay green all year. Vegetation can also be<br />
used to hide structures such as gabion walls or slopes covered by riprap.<br />
<strong>Roadside</strong>s can be corridors for the transport and establishment of noxious or invasive weed species. Once<br />
established, weeds are hard to eradicate and become seed sources for further encroachment. Revegetating<br />
with desirable native species minimizes opportunities for problem species to establish.<br />
Many roads intercept animal corridors. Designing native plantings into animal underpasses or overpasses<br />
can make roads more permeable to wildlife. The presence of birds and small animals can be enhanced when<br />
appropriate plant species are reestablished.<br />
Advanced planning, an integrated approach, and the use of appropriate stocktypes and equipment all<br />
facilitate successful and cost-effective revegetation.<br />
4.3 GATHER PRE-FIELD INFORMATION<br />
The revegetation plan is developed by obtaining an understanding of the road design and by<br />
gathering pre-field information on the soil, climate, vegetation, and pollinators of the project<br />
site. Much of this information can be obtained prior to visiting the project site. A good pre-field<br />
review of information can make the time in the field more efficient and effective.<br />
4.3.1 CLIMATE<br />
Local climate plays a dominant role in the success or failure of the revegetation effort.<br />
Knowledge of local climate factors can help delineate the appropriate revegetation units and<br />
develop achievable DFCs. In later phases of the planning process, climate data will be used to<br />
determine appropriate revegetation treatments.<br />
Obtaining climate records from a variety of sources is the first step in conducting a climate<br />
assessment. There are many sources of climate records for the United States (Figure 4-1). One<br />
source is the Western Regional Climate Center website www.wrcc.dri.edu/coopmap that displays<br />
the location of the National Oceanic and Atmospheric Administration (NOAA) Cooperative<br />
Stations in the United States and provides historical weather data for most stations. Each<br />
weather station has helpful graphics, such as spring and fall “freeze probabilities” (Figure<br />
4-2) that can be used to determine the best dates for sowing seeds and planting seedlings.<br />
Another available graphic is the probability of precipitation throughout the year, which can<br />
be used to determine if supplemental irrigation is necessary (Figure 4-3). Finding a weather<br />
station closest to the project site will be helpful in understanding the influence climate will<br />
have on the project.<br />
<strong>Roadside</strong> <strong>Revegetation</strong>: An Integrated Approach to Establishing Native Plants and Pollinator Habitat<br />
39
PLANNING PHASE ONE: ORIENT<br />
The PRISM website, www.prism.oregonstate.edu/explorer, allows the user to locate the project<br />
Figure 4-1 | NOAA and NRCS<br />
Weather Stations<br />
The United States has an extensive system of<br />
weather stations maintained by National Oceanic<br />
and Atmospheric Administration (NOAA)<br />
and Natural Resources Conservation Services<br />
(NRCS). These maps show the locations of<br />
weather stations in the Puget Sound area.<br />
Stations administered by NOAA are shown<br />
on the left and those by NRCS on the right.<br />
Historic climate summaries and interpretative<br />
graphs for each station can be downloaded<br />
from each website.<br />
Figure 4-2 | Spring and fall<br />
freeze probability graphs<br />
In addition to historic weather station data,<br />
the Western Regional Climate Center has many<br />
useful graphs (located on the left-hand side of<br />
the weather station data screen), such as the<br />
“Spring and Fall Freeze Probability” curves.<br />
The graph on the left shows the probability<br />
of temperatures dropping to sub-freezing<br />
temperatures during the winter through<br />
summer in South Lake Tahoe, California. At<br />
this site, planting might be planned when<br />
there is less than a 30-percent probability that<br />
temperatures will drop below 24° F to reduce<br />
the risk of seedling damage as the plants are<br />
coming out of dormancy. This would put the<br />
planting date sometime around the middle<br />
of May. In contrast, Sacramento, California, to<br />
the west and near sea level has a very different<br />
climate as shown in the graph on the right.<br />
According to these curves, it is improbable that<br />
temperatures ever reach 24° F in winter and<br />
spring; therefore, plants could be installed at<br />
any time during the winter.<br />
<strong>Roadside</strong> <strong>Revegetation</strong>: An Integrated Approach to Establishing Native Plants and Pollinator Habitat<br />
40
PLANNING PHASE ONE: ORIENT<br />
site on a map of the United States, so instead of using data from a single weather station located<br />
miles away from the project, this website creates a weather profile specific to the project site.<br />
It does this by extrapolating data from surrounding weather stations using a digital elevation<br />
model and expert knowledge of complex climatic patterns. This website also displays weather<br />
trends and anomalies (e.g., extreme heat) that can be helpful in planning (Figure 4-4).<br />
Figure 4-3 | Rainfall probability graphs<br />
Another helpful graph from the Western<br />
Regional Climate Center, www.wrcc.dri.edu/<br />
coopmap, displays the probablility of receiving<br />
precipitation through the year. The graph<br />
on the left below shows the probability of<br />
receiving 2 inches of rainfall in a 30-day period<br />
for a station in southwestern Oregon. This graph<br />
indicates that it is highly unlikely this will ever<br />
happen during the summer, which may lead<br />
the practitioner to consider supplemental<br />
watering or some other measure to keep plants<br />
alive during the first year after the seedlings are<br />
planted. In comparison, the graph on the lower<br />
right shows the probabilities that 2 inches of<br />
precipitation would occur in 30 days in upstate<br />
New York any time of the year is more than<br />
90 percent, indicating that irrigation of newly<br />
planted seedlings may not be necessary.<br />
Figure 4-4 | Precipitation trends<br />
The PRISM website allows the user to obtain<br />
extrapolated weather data for any point in<br />
the United States. By identifying the project<br />
location on an interactive map of the U.S., a report<br />
is generated that summarizes site-specific<br />
climate information for that area. In addition,<br />
this website displays climate information in a<br />
variety of ways that may be helpful in revegetation<br />
planning. This map, for instance, shows<br />
precipitation trends for the past five years<br />
across the U.S., which can be useful during the<br />
development of the revegetation plan.<br />
<strong>Roadside</strong> <strong>Revegetation</strong>: An Integrated Approach to Establishing Native Plants and Pollinator Habitat<br />
41
PLANNING PHASE ONE: ORIENT<br />
NRCS maintains a website, www.wcc.nrcs.usda.gov/snow, that reports historic and real-time<br />
weather data from automatic weather stations located in remote mountainous areas of the<br />
western United States. If your project is near one of these stations, then it is easy to monitor<br />
current weather conditions.<br />
4.3.2 SOILS<br />
More than 95 percent of the counties in the United States have soil surveys either completed or<br />
in the process of completion by Natural Resources Conservation Services (NRCS). Information<br />
from these surveys is available on the Web Soil Survey website http://websoilsurvey.sc.egov.<br />
usda.gov/App/HomePage.htm. By delineating the road project area on the Web Soil Survey<br />
map, a customized soils report specific to the project area is generated (Figure 4-5). Included in<br />
the report are profile descriptions, characteristics, and capabilities for each soil mapping unit.<br />
A typical profile description is provided and includes topsoil depth, soil textures, rock content,<br />
soil depth, available water holding capacity, permeability rates, and drainage classes. More<br />
detailed information on each soil series, such as laboratory results for nutrients, water retention<br />
curves, and other soil properties, is available at http://ncsslabdatamart.sc.egov.usda.gov/.<br />
Figure 4-5 | Soils maps generated<br />
from the Web Soil Survey website<br />
The Web Soil Survey, http://websoilsurvey.<br />
sc.egov.usda.gov/App/HomePage.htm, can<br />
be used to develop a custom soils report for<br />
most highway projects in the U.S. On Figure<br />
4-5, a 10-mile stretch of road is being proposed<br />
for reconstruction through several counties<br />
in Kansas. To understand the soils, the study<br />
area is delineated on the Web Soil Survey<br />
Interactive Map of the U.S. which generates a<br />
site-specific soils report (A). Within the report<br />
is a map of the project area with the locations<br />
of each soil mapping unit. For each mapping<br />
unit, the report describes the soil profile and<br />
soil characteristics (C). In this example, a prominent<br />
soil mapping unit in the planning area<br />
is “7170—Reading silt loam” (B). It is a deep<br />
stream terrace soil described in the report (C).<br />
The Web Soil Survey also allows the user to<br />
query the project site for areas of similar land<br />
capabilities or limitations. For this project site,<br />
one of the maps generated was areas where<br />
high seedling mortalities may be expected (D).<br />
Grouping of soil mapping units can also be<br />
used in the development of revegetation units.<br />
<strong>Roadside</strong> <strong>Revegetation</strong>: An Integrated Approach to Establishing Native Plants and Pollinator Habitat<br />
42
PLANNING PHASE ONE: ORIENT<br />
The information generated from these reports is for undisturbed soils, therefore the use of<br />
this information needs to be adapted to the type of disturbance expected to occur within<br />
the project. For example, on a project where topsoil is to be removed, it can be assumed<br />
that the soil remaining after construction will be the subsoil and not topsoil. The designer<br />
would consider the characteristics of the subsoil (B horizon) described in the Web Soil Survey<br />
report rather than the topsoil. If the topsoil is to be salvaged, the Web Soil Survey report can<br />
provide a general characterization of the topsoil that will be removed. It can also give a good<br />
description of an undisturbed reference site soil which may be helpful if restoration of the<br />
original site is the objective.<br />
In addition, the Soil Data Explorer portion of the website creates a series of maps based on soil<br />
interpretations. Depending on the county the survey was conducted in, a wide range of maps<br />
are available, including suitability for hand planting, potential for seedling mortality, forest<br />
and range productivity, soil pH, hydrologic soil groups, depth to restrictive layers, and more.<br />
Most lands administered by the USDA Forest Service have separate soils reports in addition<br />
to, or in lieu of, the NRCS soils report. These reports are often referred to as a Soil Resource<br />
Inventory report and can be obtained at the Forest Service District Office. The agency also<br />
maintains a national inventory and mapping ARC-GIS application that includes a soil database<br />
as well as information on geology, potential natural vegetation, and Terrestrial Ecological<br />
Units Inventory (TEUI).<br />
4.3.3 VEGETATION<br />
Ecoregions and Seed Zones<br />
Ecoregions are defined areas in North America that have similar geographic, vegetative,<br />
hydrologic, and climatic characteristics. Several ecoregion systems are available; however, for<br />
the purposes of this publication, the ecosystem maps developed by the U.S. Environmental<br />
Protection Agency (www.epa.gov/eco-research/ecoregions) are used. The United States is<br />
divided into four ecoregion levels, each level representing increasing degrees of detail:<br />
◾◾<br />
Level I – 12 broad ecoregions<br />
◾◾<br />
Level II – 25 ecoregions<br />
◾◾<br />
Level III – 105 ecoregions<br />
◾◾<br />
Level IV – 967 ecoregions<br />
Because ecoregion maps identify areas with similar environmental characteristics, they are<br />
useful in planning, monitoring, information sharing, and management. The Level III ecoregion<br />
map has also been used to provide recommendations for seed use and movement of species<br />
and geographic areas where empirical genetic information is lacking (Bower and others 2014).<br />
Used in conjunction with climate data, such as minimum winter temperature and aridity, Level<br />
III ecoregions are a good starting point for guiding source selection of revegetation species.<br />
See Chapter 6 for a more detailed discussion of seed zones and seed transfer guidelines.<br />
Ecoregional Workhorse and Pollinator Plant Selector<br />
A spatially explicit online planning tool is being developed by the FHWA that will list the<br />
recommended workhorse and pollinator-friendly plant species for all Level III ecoregions in<br />
the continental United States (Figure 4-6). The data used to create these lists were vetted by<br />
botanical experts and gathered from reliable botanical sources such as the Missouri Botanic<br />
<strong>Roadside</strong> <strong>Revegetation</strong>: An Integrated Approach to Establishing Native Plants and Pollinator Habitat<br />
43
PLANNING PHASE ONE: ORIENT<br />
Figure 4-6 | Ecoregional<br />
<strong>Revegetation</strong> Assistant<br />
The Ecoregional Workhorse and Pollinator<br />
Plant Selector (EWPPS), being<br />
developed by the FHWA, will allow the<br />
designer to obtain a list of appropriate<br />
workhorse and pollinator-friendly plant<br />
species for any location in the United<br />
States. Each workhorse species will<br />
display the plant attributes important<br />
for plant establishment and pollinator<br />
habitat enhancement. Please note that<br />
this image is a mockup of the future<br />
product and is displayed to demonstrate<br />
the concept of the online tool.<br />
Garden and the USDA PLANTS database. For each plant species, the plant selector will provide<br />
attributes such as flowering season and preference for sun that will denote whether a given<br />
species is a workhorse (e.g., stabilizes soils), or pollinator-friendly (e.g., has showy yellow flowers).<br />
For pollinator-friendly plant species the selector will denote which general groups of pollinators<br />
the plant species will benefit. Moreover, using data generated at the Chicago Botanic Garden<br />
(White and others 2016) the plant selector will also indicate if a species of interest is commercially<br />
available. The first steps in revegetation planning, specific to developing pollinator habitat,<br />
will be to use the Ecoregional Workhorse and Pollinator Plant Selector (EWPPS) to identify<br />
potential workhorse species for the project area. From this list, other plant species may be<br />
selected based on development of a site-specific pollinator working group (see Chapter 6).<br />
4.3.4 POLLINATORS<br />
During the early stages of planning, it is important to identify “at-risk” pollinator species that<br />
may be affected by the project so that special measures can be taken to protect or enhance<br />
populations. A good source for identifying at-risk species is the Xerces Society Red Lists of<br />
at-risk pollinators website (www.xerces.org/red-lists). This site lists bees, butterflies, and moths<br />
that are at-risk by state. It also provides links to recovery plans for species listed under the<br />
Federal Endangered Species Act. Other sources of information for at-risk pollinators are the<br />
wildlife and forestry departments of state and federal agencies.<br />
<strong>Roadside</strong> <strong>Revegetation</strong>: An Integrated Approach to Establishing Native Plants and Pollinator Habitat<br />
44
PLANNING PHASE ONE: ORIENT<br />
Figure 4-7 | BAMANA website<br />
displays pollinator sightings<br />
for locations around the US<br />
Websites, such as the BAMONA, can<br />
display specific locations where pollinators<br />
have been sighted. The search for a<br />
specific county in Maine brings up a list<br />
of butterfly and moth sightings.<br />
Many good websites are devoted to pollinator species. The Butterflies and Moths of North<br />
America (BAMONA) (www.butterfliesandmoths.org/) (Figure 4-7) and eButterfly (www.e<br />
butterfly.org/ebutterflyapp/#/maps) websites are citizen scientist websites that provide access<br />
to data about butterflies and moths in North America. Sightings of butterfly and moth species<br />
are shown on maps of the U.S. for many species on these websites, including a description<br />
of each species. These maps allow the designer to determine if specific pollinator species are<br />
near the project area. The crowd-sourcing website BugGuide (http://bugguide.net/node/<br />
view/15740) is an online citizen science group that collects images of North American insects<br />
and offers an insect identification service for submitted images. Specific to the monarch<br />
butterfly is the Monarch Joint Venture website (www.monarchjointventure.org/). This is a<br />
good resource for monarch butterfly biology, and the site also presents a map that displays<br />
current monarch butterfly sightings throughout the U.S.<br />
4.3.5 ROAD PLANS<br />
Understanding the design of the road project and how the site will appear after construction<br />
are important in developing a revegetation plan. Prior to a field review, an evaluation of road<br />
plans and reports should be conducted. Road plans show road cuts, road fills, drainages,<br />
ditches, disposal areas, abandoned roads, and engineered structures, which typically require<br />
different revegetation strategies. As discussed in the next section, these road components<br />
often become the basis or foundation of the revegetation unit map. Most road plans include<br />
a series of cross sections that provide slope steepness and shape, components that directly<br />
guide revegetation design. Many road projects include Storm Water Pollution Prevention Plans<br />
that describe how water will be controlled, directed, and treated. These reports address the<br />
requirements and expectations for soil cover and revegetation and should be understood<br />
prior to developing a revegetation plan. Refer to Chapter 3 for how to read road plans, profiles,<br />
cross-sections, and typical views.<br />
4.4 DEFINE REVEGETATION UNITS<br />
<strong>Revegetation</strong> units are areas with similar revegetation treatments and environment (e.g., soils,<br />
climate, and vegetation potential). In mountainous terrain, there may be several revegetation<br />
<strong>Roadside</strong> <strong>Revegetation</strong>: An Integrated Approach to Establishing Native Plants and Pollinator Habitat<br />
45
PLANNING PHASE ONE: ORIENT<br />
areas in a mile of roadside due to changes in aspect, soil type, and road drainage. Roads in<br />
mid-western states, however, often have only one revegetation unit that may encompass much<br />
of a project area because of the uniformity of the landscape. The first step in developing a<br />
revegetation unit is grouping major soil types together with similar characteristics important<br />
for reestablishing native plant communities. For example, a project site with a group of soils<br />
that are less than a foot deep would have a different set of revegetation treatments than<br />
deeper soils and for that reason would be identified as a revegetation unit based on soil<br />
depth. Grouping soils into revegetation units can also be done through the Ecological Sites<br />
section of the Web Soil Survey. As described in Figure 4-5, a soils map and report are created<br />
on the Web Soil Survey by delineating the project area on the interactive map of the U.S. At<br />
the same time, a map can also be produced that groups soils by similar capabilities to create<br />
distinct plant communities called “ecological sites” www.nrcs.usda.gov/wps/portal/nrcs/main/<br />
national/technical/ecoscience/desc/. The ecological sites section of the Web Soil Survey also<br />
lists the major native species for each ecological site for many parts of the U.S.<br />
<strong>Revegetation</strong> units also designate areas that have the same revegetation objective. For example,<br />
a road project may include a constructed wetland for maintaining or improving water quality.<br />
In another area the objective may be to enhance pollinator habitat. These areas would be<br />
designated as separate revegetation units because they would have different revegetation<br />
treatments and species, which might include a pollinator species mix for the pollinator habitat<br />
unit and an erosion species mix for the wetland unit. In addition, soil improvement treatments<br />
for the wetland would be developed to enhance wetland species and maintain the proper<br />
functioning of a constructed wetland. This may include creating manufactured soil that is<br />
specific to wetland species and water filtration.<br />
Road components also play a large role in delineating revegetation units (Figure 3-6 and Figure<br />
3-9). In mountainous terrain, cut slopes and fill slopes are usually separate revegetation units<br />
because of the differences in soil depth, slope gradient, and road drainage between the two<br />
slopes. Table 4-4 shows revegetation units commonly associated with the components of a road.<br />
The revegetation plan includes a revegetation unit map that locates revegetation units on<br />
the road project map (Figure 4-8 and Figure 4-9). The revegetation plan further describes the<br />
soils, climate, and vegetation of each revegetation unit and how the revegetation objectives<br />
will be met.<br />
Table 4-4 | Common revegetation units often associated with road components<br />
Road Component<br />
Cut Slopes<br />
Ditches<br />
Shoulders<br />
Fill Slopes<br />
Culvert Outlets<br />
Engineered Slopes<br />
Bridges<br />
Disposal or Staging Areas<br />
Abandoned Roads<br />
Types of <strong>Revegetation</strong> Units<br />
Cutslopes, snow drift fence, pollinator habitat<br />
Amended ditches, wetlands, biorention swales, bioswales<br />
Shoulders<br />
Fill slopes, filter strips, amended fill slopes, wave-attennuating bioscreens, snow drift fence, pollinator habitat<br />
Vegetated culvert outlets<br />
Reinforced soil slopes, vegetated MSE walls, bioengineered slopes<br />
Stream restoration terraces and slopes<br />
Restored areas, pollinator habitat<br />
Restored obliterated road, pollinator habitat<br />
<strong>Roadside</strong> <strong>Revegetation</strong>: An Integrated Approach to Establishing Native Plants and Pollinator Habitat<br />
46
PLANNING PHASE ONE: ORIENT<br />
Figure 4-8 | Cut and fill slopes<br />
often define revegetation units<br />
Major road components such as cut<br />
slopes, fill slopes and abandoned road<br />
sections often define revegetation units<br />
because of similar soils, objectives, and<br />
revegetation treatments. This road<br />
project has 4 revegetation units that<br />
correspond to cut slopes, fill slopes,<br />
abandoned road, and bioretention<br />
swale.<br />
Figure 4-9 | <strong>Revegetation</strong> objectives<br />
and treatments are defined<br />
for each revegetation unit<br />
This revegetation unit map was based<br />
on soil types, road components, and<br />
revegetation objectives. Each unit has<br />
a desired future condition and types of<br />
treatment that will be employed.<br />
The road objective for the road reconstruction project described below was to reduce existing<br />
curves for traffic safety while increasing pollinator habitat and decreasing the effects of road<br />
runoff and soil erosion on water quality. The road plans call for realigning the road, leaving an<br />
abandoned section of road, and greater area in cut slopes. During the planning phase, four<br />
revegetation units were identified based on soils and road objectives. <strong>Revegetation</strong> Unit I is<br />
the abandoned section of road to be restored by removing pavement, subsoiling the subbase,<br />
<strong>Roadside</strong> <strong>Revegetation</strong>: An Integrated Approach to Establishing Native Plants and Pollinator Habitat<br />
47
PLANNING PHASE ONE: ORIENT<br />
adding fill, and applying salvaged topsoil. Since the area is a pollinator habitat emphasis area,<br />
the seed mix will have more than 50 percent pollinator forb species. Flowering shrubs and trees<br />
will be planted in clumps. Salvaged logs from the road clearing operation will be randomly<br />
placed upright and on the ground for pollinator nesting habitat. Unit II includes fill slopes that<br />
will be amended with shredded wood to increase infiltration rates and capture and filtrate<br />
road surface runoff water. A low-growing native grass and forb seed mix will be applied. Unit<br />
III includes steep-cut slopes with high erosion potential that will be terraced and a seed mix<br />
primarily composed of grasses for erosion control will be applied in a bonded fiber matrix<br />
(BFM). Unit IV is a shallow draw where all road ditch water collects. It will be constructed as a<br />
bioretention swale to retain and filter sediments and road pollutants from the water before<br />
entering the stream. Wetland seedlings will be planted.<br />
Figure 4-9 was based on soil types, road components, and revegetation objectives. Each unit<br />
has a desired future condition and types of treatment that will be employed.<br />
4.5 LOCATE REFERENCE SITES<br />
Reference sites provide a natural model for possible vegetation outcomes and are important<br />
for defining DFCs, as well as evaluating and monitoring the project following implementation<br />
(SER 2004). They can also be used to document the types and amounts of pollinator species<br />
that may be present in putatively natural environments near the project area.<br />
Each revegetation unit should have at least one corresponding reference site that models the<br />
expected outcome or DFC of the unit. Ideally the reference site shows how a revegetation unit<br />
might recover from disturbances at different points in time after road construction. Reference<br />
sites can be considered a snapshot, or series of snapshots, of possible future outcomes. They<br />
demonstrate a point in time along a desirable developmental trajectory for a plant community.<br />
Using reference sites to understand the possible vegetative outcomes after disturbances will<br />
help the designer develop realistic expectations and provide a guide to the development of<br />
appropriate revegetation strategies for each revegetation unit. The most important aspect<br />
of reference sites is that they provide examples of plant communities from which designers<br />
can chose individual species for use in the revegetation project. The designer may sometimes<br />
choose to obtain baseline ecological data from several reference sites and then assemble<br />
DFCs (SER 2004).<br />
The two types of reference sites are disturbed and undisturbed. Disturbed reference sites are<br />
areas, typically old road cuts and road fills, that have recovered, whereas undisturbed reference<br />
sites are relatively pristine sites that lack major disturbances in the recent past. For most road<br />
projects, disturbed reference sites are the most helpful because they represent sites that are<br />
ecologically similar to the revegetation unit and have recovered from disturbances similar to<br />
those planned. Undisturbed reference sites may also be used when ecological restoration is<br />
an objective or when suitable disturbed reference sites are not available.<br />
Disturbed reference sites can be categorized several ways:<br />
◾◾<br />
Type of disturbance<br />
◾◾<br />
Length of time after the disturbance<br />
◾◾<br />
Desirability of the recovered vegetation<br />
Disturbed reference sites can be old road cuts and fills, abandoned roads, ground-based<br />
logging sites, waste areas, rock source sites, ski runs, or other areas that have recovered from<br />
major soil disturbances. Disturbed reference sites often show a range of possible vegetative<br />
outcomes years after disturbance. Some sites will show good recovery and include stable soil,<br />
be visually pleasing, and populated by functioning communities of native plants. Others might<br />
show what can go wrong if revegetation is not carried out properly, including erosion, poor<br />
ground cover, weed infestation, and a lack of native vegetation. Understanding the conditions<br />
that lead to these vegetative outcomes can be a guide to avoiding them in the future.<br />
<strong>Roadside</strong> <strong>Revegetation</strong>: An Integrated Approach to Establishing Native Plants and Pollinator Habitat<br />
48
PLANNING PHASE ONE: ORIENT<br />
Disturbed reference sites are the best models to demonstrate what is<br />
possible on the site in terms of vegetation, what trajectories succession might<br />
take (with or possibly without human intervention), and ways to effectively<br />
intervene in order to facilitate desired outcomes. Disturbed reference sites<br />
are invaluable in developing realistic DFCs. Ideally, the type of disturbance<br />
on a disturbed site should match the type of road construction disturbance<br />
that will occur on the revegetation unit. For example, if the road cut after<br />
construction will be denuded of topsoil, then a disturbed reference site<br />
should be found that lacks topsoil.<br />
The stage of recovery is also important. It is ideal to find several disturbed<br />
reference sites that represent different successional stages of site recovery<br />
(Figure 4-10). For instance, a revegetation unit would ideally be represented<br />
by a recently disturbed site (several years after disturbance), a recently<br />
recovered site (5 to 25 years after disturbance), and a fully recovered site<br />
(over 25 years since disturbance).<br />
While there is no such thing as a “pristine” plant community, an “undisturbed”<br />
reference site is an area that has not been heavily affected by ground-disturbing<br />
activities. Undisturbed reference sites indicate the highest potential<br />
of a revegetation unit and are most often used as models when the goal is<br />
ecological restoration (re-creation of a plant community identical to that<br />
which existed before disturbance). The description of soil, climate, and<br />
vegetation in an undisturbed reference area often become the framework<br />
for the DFC. It provides the designer with an understanding of those site<br />
characteristics or components necessary for healthy ecological functioning.<br />
The process of selecting and describing reference sites is best accomplished<br />
in an interdisciplinary manner. The discussions that are generated<br />
between soils and vegetation specialists are generally far more thorough in<br />
knowledge and understanding of recovery processes than if surveys were<br />
conducted separately. Disturbed reference sites can be located by driving<br />
the roads in and around the project area and finding areas that appear<br />
similar to the type of road construction being planned for a revegetation<br />
unit. Revegetated road cuts of various ages are good reference sites for<br />
cut slope revegetation units.<br />
4.6 GATHER FIELD INFORMATION<br />
Surveying reference sites, as well as the project area in general, for soils, climate, and vegetation<br />
will provide baseline ecological data for developing the revegetation plan. If creating pollinator<br />
habitat is a revegetation objective, then reference sites and the project area are also surveyed<br />
to assess pollinator habitat quality and pollinator populations. This survey will provide insight<br />
into which pollinator species might be supported or enhanced by the revegetation project. The<br />
goal of the field survey is to obtain sufficient information from reference sites to realistically<br />
define DFCs. During an initial survey, the appropriate survey intensity can be determined<br />
based on information needs and knowledge gaps. For example, if one of the revegetation<br />
objectives is to restore an abandoned road to a DFC similar to a neighboring forest, then a<br />
survey of vegetation and soils of an undisturbed and disturbed neighboring forest would be<br />
conducted to describe the site characteristics and species composition.<br />
The data used to define revegetation units (see Section 4.3 Gather Pre-field Information)<br />
should be reviewed prior to the field surveying of reference sites. Information regarding land<br />
ownership, site history, resources, and past and current management is also valuable. Specialists<br />
who might have knowledge of the soils, vegetation, climate, and hydrology, as well as locals<br />
who can provide information on the site’s history, should be contacted.<br />
Figure 4-10 | Succesional<br />
processes vary by microsite<br />
Successional processes and plant communities<br />
vary considerably based on microsite<br />
conditions. In this example, plant<br />
communities developed differently on<br />
north-facing and south-facing slopes.<br />
<strong>Roadside</strong> <strong>Revegetation</strong>: An Integrated Approach to Establishing Native Plants and Pollinator Habitat<br />
49
PLANNING PHASE ONE: ORIENT<br />
4.6.1 VEGETATION ASSESSMENT<br />
The objective of assessing the vegetation of a reference site is to create a comprehensive<br />
species list that will guide in the selection of species to be used for revegetating the project<br />
area. A good method for compiling a comprehensive species list is to choose a representative<br />
cross section of each reference site that will characterize the range of plant species for that<br />
unit. Intuitively controlled surveys, such as these, maximize floristic knowledge yet are less<br />
time and effort intensive than complete floristic inventories. Usually, a few plant species are<br />
not easily identified in the field. Samples of these species can be brought back to the office<br />
for identification by specialists. If more detailed data collection is desired, such as a complete<br />
floristic inventory, surveys along transects or grids may be conducted.<br />
Once species are identified, a comprehensive species list is developed for the project (Table 4-5).<br />
This list will be used throughout the life of the project for selecting species for plant propagation,<br />
weed control, and plant protection. It includes some or all of the following attributes:<br />
◾◾<br />
Species name (common and scientific). Since common names for plant species<br />
change throughout the country, it is important to list both the scientific and common<br />
names of each species. The PLANTS database (http://plants.usda.gov) is a good source<br />
for obtaining the current scientific and common names. The PLANTS database also<br />
includes the short species code symbol for field documentation.<br />
◾◾<br />
<strong>Revegetation</strong> unit. Identify the revegetation units where the species occurred.<br />
◾◾<br />
Ecological settings. Plants are identified by the ecological setting they are most<br />
commonly found in. A relative rating by temperature (cold, cool, warm, hot) and<br />
moisture (dry, moist, wet) gives a quick profile of the ecological setting. Some portions<br />
of the U.S. are covered by plant association maps or reports that were developed by<br />
federal agencies and are good sources for identifying the ecological setting of a species.<br />
Another way to describe the ecological setting of a species is by using the Ecological<br />
Site Assessment section of the Web Soil website (see Section 4.3.2 Soils). This part of the<br />
website groups soil mapping units into ecological site units and dominant plant species.<br />
◾◾<br />
Amplitude. Ecological amplitude is the recurrence of a species across a wide array<br />
of ecological settings. A species found in all ecological settings would have a high<br />
ecological amplitude, while a species found in only one ecological setting would have<br />
a low ecological amplitude.<br />
◾◾<br />
Abundance. The quantity, dominance, or cover of a species found in a revegetation<br />
unit is the abundance.<br />
◾◾<br />
Life form. Group each species by life form: (1) tree, (2) shrub, (3) annual grass, (4) perennial<br />
grass, (5) annual forb, (6) perennial forb, or (7) wetland species (e.g., sedges, rushes)<br />
◾◾<br />
Nativity. Identify whether the species is native to the local area or introduced. The<br />
PLANTS database identifies the nativity of all plant species in the U.S.<br />
◾◾<br />
Weed status. The PLANTS database identifies the noxious weeds for each state. State-listed<br />
noxious weeds are found under the heading “Introduced, Invasive, and Noxious<br />
Plants” under the “PLANTS Topics” sidebar. Contacting the local State agency incharge<br />
of maintaining the lists, usually state departmnents of Ag is highly recommended.<br />
◾◾<br />
Threatened and endangered. State and federal protected plants are found in the<br />
PLANTS database under the heading “Threatened & Endangered” on the “PLANTS<br />
Topics” sidebar.<br />
◾ ◾ Succession. Determine the seral stage a species is most commonly associated with: (1)<br />
early, (2) mid, (3) late, or (4) climax. Visiting reference sites and adjacent areas at different<br />
ages of recovery following disturbance will help provide an understanding of where each<br />
species fits into ecological succession. Figure 4-10 illustrates how plant communities<br />
develop differently over time depending on site conditions and successional processes.<br />
<strong>Roadside</strong> <strong>Revegetation</strong>: An Integrated Approach to Establishing Native Plants and Pollinator Habitat<br />
50
PLANNING PHASE ONE: ORIENT<br />
Table 4-5 | A comprehensive species list<br />
Upon completion of a vegetation survey of the reference sites, a comprehensive species list<br />
is developed for the project. The spreadsheet will be used to determine the plant species mix<br />
that will be used in each revegetation unit.<br />
Scientific Name Common Name <strong>Revegetation</strong><br />
Unit<br />
Amplitude Abundance Life Form Nativity Weed Status Threatened &<br />
Endangered<br />
Succession<br />
Ecological<br />
Setting<br />
Pollinator<br />
Friendly<br />
Achillea<br />
millefolium<br />
common<br />
yarrow<br />
2,3 High High Perennial Forb Native - - Early All Yes<br />
Abies grandis grand fir 1 High High Tree Native - - Late All No<br />
Abies lasiocarpa subalpine fir 1 High Mod Tree Native - - Late Cool No<br />
Acroptilon repens<br />
Russion<br />
knapweed<br />
2,3 Low Low Perennial Forb Introduced “B” Quarantine - Early/Mid Warm/Dry No<br />
Agastache<br />
urticifolia<br />
Agoseris<br />
aurantiaca<br />
horsemint 2,3 High High Perennial Forb Native - - Early All Yes<br />
orange agoseris 2,3 High Mod Perennial Forb Native - - Early All Yes<br />
Agoseris glauca pale agoseris 2,3 High Mod Perennial Forb Native - - Early All Yes<br />
Agoseris<br />
grandiflora<br />
bigflower<br />
agoseris<br />
2,3 High Mod Perennial Forb Native - - Early All Yes<br />
Allium<br />
acuminatum<br />
tapertip onion 4 Low Low Perennial Forb Native - - Early Wet ?<br />
Allium fimbriatum fringed onion 4 Low Low Perennial Forb Native - - Early Warm/Dry ?<br />
Allium macrum rock onion 4 Low Low Perennial Forb Native - - Early Wet ?<br />
Allium madidum swamp onion 4 Low Mod Perennial Forb Native - - Early Wet ?<br />
<strong>Roadside</strong> <strong>Revegetation</strong>: An Integrated Approach to Establishing Native Plants and Pollinator Habitat 51
PLANNING PHASE ONE: ORIENT<br />
◾◾<br />
Pollinator friendly. Reference the Ecoregional Workhorse and Pollinator Plant Selector<br />
to determine if a species is beneficial to pollinators. Take note of plant flower colors as<br />
a variety of colors will support a greater diversity of pollinating insects. Also identify<br />
opportunities to increase the period of time flowers are available to pollinators (Figure<br />
4-6). See Appendix A, I-35 Monarch Corridor Plant Lists: Workhorse Plant Species that<br />
Support Pollinators. In addition to the Ecoregegional Workhorse and Pollinator Plant<br />
Selector, other sources of reliable information, such as species distribution maps by<br />
county from the PLANTS website, can give more detailed guidance to selection of<br />
appropriate species.<br />
4.6.2 SOILS ASSESSMENT<br />
Understanding the soil characteristics of each reference site is essential to effectively define<br />
DFCs and develop revegetation treatments. The soils report that is generated from the Web<br />
Soil Survey website for a road project gives a close approximation of the characteristics of<br />
undisturbed soils for the project area and should be checked in the field. It is important to<br />
remember that the soils after road construction will not resemble the natural soils found in<br />
the soil survey. For this reason, it is important to find disturbed reference sites that are similar<br />
to the disturbance of the revegetation unit. The following information can be collected for<br />
topsoil and subsoil:<br />
◾◾<br />
Soil texture (see Section 5.3 Available Water Storage and Accessibility)<br />
◾◾<br />
Rock fragments (see Section 5.3 Available Water Storage and Accessibility)<br />
◾◾<br />
Rooting depth (see Section 5.3 Available Water Storage and Accessibility)<br />
◾◾<br />
Topsoil depth (see Section 5.5 Nutrient Cycling)<br />
◾◾<br />
Nutrient levels (see Section 5.5 Nutrient Cycling)<br />
◾◾<br />
Soil structure (see Section 5.3 Available Water Storage and Accessibility)<br />
◾◾<br />
Litter and duff layers (see Section 5.4 Water Loss)<br />
◾◾<br />
Site organic matter (see Section 5.5 Nutrient Cycling)<br />
◾◾<br />
Infiltration rates (see Section 5.2 Water Input)<br />
Collecting and interpreting soils information are described in Chapter 5.<br />
4.6.3 POLLINATORS<br />
Habitat Assessment<br />
During the field review, an assessment of the pollinator habitat and pollinator species populations<br />
is conducted for the project area. Pollinator habitat assessment includes evaluating<br />
the road project plans within the context of the larger planning area for creating habitat<br />
supportive for general and at-risk pollinator species. Table 4-6 is a checklist that can be used<br />
to identify those factors important for creating pollinator-friendly habitat. Factors that limit<br />
pollinator health or habitat can be mitigated or improved through management treatments<br />
or practices which will be presented in Version 1.2.<br />
Pollinator Monitoring<br />
<strong>Revegetation</strong> projects, specific to improving pollinator habitat, may require a pre- and<br />
post-construction assessment of pollinator species. Monitoring techniques for these assessments<br />
are discussed in Chapter 12.<br />
<strong>Roadside</strong> <strong>Revegetation</strong>: An Integrated Approach to Establishing Native Plants and Pollinator Habitat<br />
52
PLANNING PHASE ONE: ORIENT<br />
Column Heading<br />
Nectar/Pollen Sources<br />
Breeding habitat<br />
Water source<br />
Shelter<br />
Landscape Connectivity<br />
Nesting habitat<br />
Road Mortality<br />
Vegetation Management<br />
Column Heading<br />
Overlapping and sequential bloom periods<br />
Plant diversity<br />
Floral abundance<br />
Host plants<br />
Permanent<br />
Intermittent<br />
Shrubs<br />
Trees<br />
Rocks<br />
Bridges, caves, mines<br />
Snags<br />
Large wood<br />
Fragmented Habitat<br />
Remnant Habitat<br />
Barriers to Movement<br />
Neighboring Pesticide Use<br />
Corridors<br />
Introduced Plant Species<br />
Large down wood<br />
Bare Soil<br />
Grasses<br />
Shrubs<br />
Trees<br />
Collision<br />
Barriers to Movement<br />
<strong>Roadside</strong> Contamination<br />
Herbicides<br />
Mowing<br />
Grazing<br />
Fire<br />
Haying<br />
Biological Control<br />
Table 4-6 | Limitations and<br />
opportunities for creating<br />
good pollinator habitats<br />
provides a list of things to consider for<br />
creating pollinator habitat but does not<br />
provide a description or good standards<br />
– for example how many different species<br />
should be in bloom at the same time and<br />
what is a good diversity of plants that will<br />
support pollinators.<br />
Provided by: Marion Carey (WSDOT)<br />
<strong>Roadside</strong> <strong>Revegetation</strong>: An Integrated Approach to Establishing Native Plants and Pollinator Habitat<br />
53
PLANNING PHASE ONE: ORIENT<br />
4.7 DEFINE DESIRED FUTURE CONDITION<br />
Once revegetation units and corresponding reference sites have been described, the DFC<br />
can be defined for each unit. The DFC is the translation of the revegetation objectives into<br />
measurable goals for each revegetation unit. Specifically, the DFC defines the desired or<br />
expected composition of vegetation at a particular point in time after the completion of the<br />
revegetation work.<br />
An example DFC would be, “one year after seeding, vegetative ground cover will be 40 percent<br />
and of this cover, 50 percent will be composed of native forb species beneficial to pollinators.”<br />
Stating expectations in this manner will (1) clarify how the site will appear after treatments,<br />
(2) narrow down the appropriate revegetation treatments to meet the DFC, and (3) define<br />
measurable criteria, or thresholds, for monitoring the success of a project.<br />
Commonly stated DFC criteria include the following:<br />
◾◾<br />
Vegetative ground cover<br />
◾◾<br />
Bare soil cover<br />
◾◾<br />
Native grass cover<br />
◾◾<br />
Number of species of native grasses<br />
◾◾<br />
Native forb cover<br />
◾◾<br />
Number of species of native forb species<br />
◾◾<br />
Seedling survival<br />
◾◾<br />
Seedling density (plants per area)<br />
◾◾<br />
Tree growth (height per year)<br />
◾◾<br />
Coarse pollinator diversity<br />
◾◾<br />
Pollinator abundance<br />
Stating the DFC in measurable terms and with a time frame ensures that the project team,<br />
regulatory agencies, and the public have similar expectations of how the project will appear<br />
in the years following its completion. Quantifying the objectives also focuses the monitoring<br />
plan to collect only the information necessary to determine if project objectives were met.<br />
For example, if one of the objectives is erosion control, a DFC might be, “the amount of bare<br />
soil one year after road construction will be less than 20 percent.” Monitoring procedures<br />
would focus on measuring bare soil after one year. If another objective is to increase pollinator<br />
species, then a measurable threshold for success might be, “an increase of 50 percent pollinator<br />
abundance over reference site populations three years after seeding.” Monitoring, in this case,<br />
would measure general pollinator types in reference sites and revegetation unit three years<br />
after completion of the project.<br />
Another benefit in defining DFCs is that it often will generate a discussion of whether they are<br />
actually achievable without investing in soil improvement or additional plant establishment<br />
methods. Unless DFCs are stated and discussed, individual team members will develop their<br />
own concept of what success looks like. For example, a road project was being proposed<br />
next to a river with high fisheries values. The Storm Water Pollution Prevention Plan that had<br />
been prepared for the project stated that the cut slopes would have 100 percent ground<br />
cover, which would result in very low sediment delivery to the stream after construction.<br />
Team members discussed this DFC and concluded that it was unachievable because of the<br />
lack of topsoil and shallow soils. This left the team the choice of either modifying the DFC or<br />
improving the soil quality.<br />
When developing DFCs, it is important to consider the plant community succession that<br />
is likely to occur on each revegetation unit. In some cases, planting early seral species at<br />
the outset may work. By year 3, when the early seral species begin to decline, the late seral<br />
<strong>Roadside</strong> <strong>Revegetation</strong>: An Integrated Approach to Establishing Native Plants and Pollinator Habitat<br />
54
PLANNING PHASE ONE: ORIENT<br />
species may be increasing. In other cases, it may be necessary to intervene immediately after<br />
seeding or planting in order to meet the revegetation objectives of the project. For example,<br />
short-term revegetation planning might call for seeding grasses and forbs to stabilize the<br />
site. One year later, the site might be revisited to remove any invasive species before they<br />
produce seeds. Two years later, the site might be revisited to interplant conifers and shrubs.<br />
These three intervention points (seeding, weeding, and planting trees) speed succession in<br />
the desired direction.<br />
4.8 NEXT STEPS<br />
With the revegetation units defined, reference sites described, and desired future conditions<br />
drafted, Phase One is complete. In Phase Two, the site attributes critical for plant establishment<br />
and long-term plant community development are described for each revegetation unit. The<br />
assessment of soils and climate made during the field survey of reference sites will be used<br />
to single out site characteristics that are either obstacles to, or resources for, achieving DFCs.<br />
Based on the determination of limiting factors, a menu of the possible mitigating measures<br />
is developed. Once the limiting factors are understood, the vegetation is analyzed in greater<br />
depth in Phase Three. From the comprehensive species list, a mix of species are selected that<br />
best meet project objectives. Selection of stocktypes, seeding/planting methods, planting<br />
times, and plant maintenance are made. In Phase Four, all planning elements are pulled<br />
together into a revegetation plan.<br />
<strong>Roadside</strong> <strong>Revegetation</strong>: An Integrated Approach to Establishing Native Plants and Pollinator Habitat<br />
55
PLANNING PHASE TWO: ASSESS SITE<br />
5— Planning Phase Two:<br />
Assess Site<br />
5.1 Introduction<br />
5.2 Water Input<br />
5.3 Available Water Storage and Accessibility<br />
5.4 Water Loss 5.5 Nutrient Cycling<br />
5.6 Surface Stability<br />
5.7 Slope Stability<br />
5.8 Weeds<br />
5.9 Pests<br />
5.10 Human Interface<br />
5.11 Inventory Site Resources<br />
5.12 Phase Two Summary and Next Steps<br />
<strong>Roadside</strong> <strong>Revegetation</strong>: An Integrated Approach to Establishing Native Plants and Pollinator Habitat<br />
56
PLANNING PHASE TWO: ASSESS SITE<br />
5.1 INTRODUCTION<br />
Phase Two identifies site factors that will limit revegetation establishment, defines the possible<br />
mitigating measures that can be employed to reduce the effects of limiting conditions on<br />
plant growth, and surveys those site attributes that can be used as resources to accomplish<br />
revegetation objectives. By the end of Phase Two, the designer should have the following:<br />
◾◾<br />
Identified limiting factors<br />
◾◾<br />
Considered mitigating measures for limiting factors<br />
◾◾<br />
Assessed site resources<br />
5.1.1 LIMITING FACTORS<br />
Site conditions that affect plant establishment and growth are referred to as limiting factors<br />
(Figure 5-1). Odum (1971) defines limiting factors as “any condition which approaches or<br />
exceeds the limits and tolerance (of a plant species).” He further states that “the chief value of<br />
the concept of limiting factors lies in the fact that it gives the ecologist an ‘entering wedge’ into<br />
the study of complex situations. Environmental relations of organisms are apt to be complex,<br />
so that it is fortunate that not all possible factors are of equal importance in a given situation or<br />
for a given organism.” For the designer, defining the limiting factors on any particular project<br />
or site is an essential process in developing a revegetation plan because it identifies from a<br />
multitude of site factors only those that are roadblocks to successful revegetation. Not only<br />
does this simplify a complex analysis, it requires the designer to systematically consider all site<br />
factors, focusing on those of greatest concern. For example, typical revegetation treatments<br />
conventionally call for the blanket use of fertilizers without assessing if nutrients are really<br />
limiting to plant growth. In many cases, other limiting factors to revegetation, such as low<br />
rainfall, compacted soils, low organic matter, and poor rooting depth, are more limiting.<br />
Without a comprehensive assessment of limiting factors, the prescription for fertilizer is akin<br />
to a physician prescribing medicine before the patient has been properly diagnosed. While<br />
soil fertility is often important on many highly disturbed sites, it might not be the primary<br />
limiting factor to revegetation on the site.<br />
This manual has grouped the site characteristics essential for plant growth into nine limiting<br />
factors to revegetation typically encountered in the western United States. These factors are<br />
further broken down into component parts, or parameters (Figure 5-2). In this chapter each<br />
limiting factor to revegetation and corresponding parameters are discussed in terms of why<br />
they are important to plant establishment and growth, how they are assessed, and what<br />
mitigating measures can be applied to make them less limiting.<br />
The information used in defining limiting factors for each revegetation unit can be obtained<br />
from the surveys and reports conducted in Phase One. In this process, it is important that an<br />
assessment of every limiting factor and corresponding parameter be made for each revegetation<br />
unit based on the expected condition of the site after disturbance. For this assessment, the<br />
types of post-construction disturbance must be clearly understood.<br />
Mitigating measures are the site treatments that will reduce or eliminate the site conditions<br />
limiting to revegetation. There are usually several ways to mitigate each limiting factor. In<br />
this phase, mitigating measures are identified and briefly described for each limiting plant<br />
factor and parameter. While some of the mitigating measures might seem impractical for a<br />
particular revegetation project, they nevertheless should be considered in this part of the<br />
assessment. Figure 5-2 can be used as a checklist – a means of quickly assessing a site for its<br />
potential to grow plants while preventing the possibility of overlooking factors important for<br />
successful revegetation. Much like pilots or surgeons use checklists, the designer can use the<br />
limiting factors list to simplify a “complex situation” and quickly identify what is important<br />
from what is not.<br />
Figure 5-1 | Limiting factors<br />
to revegetation<br />
Limiting factors to revegetation can be<br />
displayed as unequal boards of a barrel.<br />
Water can only be held to the level of<br />
most limiting factor.<br />
<strong>Roadside</strong> <strong>Revegetation</strong>: An Integrated Approach to Establishing Native Plants and Pollinator Habitat<br />
57
PLANNING PHASE TWO: ASSESS SITE<br />
Figure 5-2 | Nine site characteristics<br />
that can limit plant growth<br />
Limiting factors to revegetation can be displayed<br />
as unequal boards of a barrel. Water can<br />
only be held to the level of most limiting factor.<br />
This chapter is organized by limiting factors. It is not important to read the whole chapter, but<br />
it can be helpful to read portions, especially those that pertain to a limiting factor identified<br />
for a project. Each limiting factor section discusses how to assess or record the factor and how<br />
to mitigate for it. Case Study 7.1 is an example of how the Limiting Factor Table can be used<br />
as a checklist for identifying potential limitations to revegetation and developing mitigating<br />
measures or treatments to overcome each limiting factor. Many of the mitigating measures<br />
discussed in this section are presented in further detail in the Implementation Guides.<br />
A process for developing the most appropriate set of mitigating measures into an integrated<br />
revegetation strategy will be covered in Phase Four.<br />
<strong>Roadside</strong> <strong>Revegetation</strong>: An Integrated Approach to Establishing Native Plants and Pollinator Habitat<br />
58
PLANNING PHASE TWO: ASSESS SITE<br />
5.2 WATER INPUT<br />
Water input refers to the moisture supplied to the soil through rainfall, snowmelt, and road<br />
drainage. This moisture recharges the soil and becomes the primary source of water for plant<br />
establishment and growth. Water input is influenced by obstacles that capture, or intercept,<br />
water before it can enter the soil, including standing live or dead vegetation and soil cover<br />
(litter, duff, and mulch). Surface infiltration rates also regulate entry of surface water. If infiltration<br />
rates are low, water that would normally enter the soil runs off the surface and is unavailable.<br />
The primary site factors that affect water input are as follows:<br />
◾◾<br />
Precipitation<br />
◾◾<br />
Interception<br />
◾◾<br />
Infiltration<br />
◾◾<br />
Road drainage<br />
In the western United States, water input is at its lowest levels from late spring through early<br />
fall. This is also the period when plants require the most soil moisture for survival and growth.<br />
During the summer, when water input is low, the soil profile dries out as vegetation withdraws<br />
moisture. As soil moisture is depleted, plants cease growing; if soil moisture is not recharged,<br />
plants will go into dormancy or die. It is critical that any water from precipitation arriving<br />
during the dry season enters the soil and is stored for later plant use.<br />
5.2.1 PRECIPITATION<br />
In wildlands revegetation, the only source of soil water comes through precipitation in the<br />
form of rainfall or snowmelt. In the western United States, this typically occurs from late fall<br />
through mid-spring, a period when plants are dormant and least able to utilize soil moisture<br />
for growth. Water that is not stored in the soil during these events is lost from the site either<br />
to ground water or runoff. The period when plants need soil moisture the most occurs during<br />
a five- to six-month period, from April through October. For most sites in the western United<br />
States, the amount of moisture that occurs in this period is less than a quarter of the total<br />
annual rainfall. Precipitation is also extremely low during the middle of the summer (Figure 5-3).<br />
Figure 5-3 | 30-Year Normal<br />
Precipitation: August (1981–2010)<br />
Plant survival and growth depend on the<br />
precipitation that occurs in the years following<br />
planting or seeding. Drought periods in the<br />
summer are common in the western United<br />
States (west of the 1-inch line) but less common<br />
in the eastern United States, as shown<br />
in this map of the U.S. which depicts normal<br />
precipitation over a 30-year period for the<br />
month of August. Much of California, Oregon,<br />
Nevada, Idaho, and Washington receive less<br />
than one-half inch of rainfall in August as compared<br />
to many areas in the mid-western and<br />
eastern United States that receive more than<br />
4 inches of rainfall in August (map generated<br />
from http://prism.oregonstate.edu/).<br />
<strong>Roadside</strong> <strong>Revegetation</strong>: An Integrated Approach to Establishing Native Plants and Pollinator Habitat<br />
59
PLANNING PHASE TWO: ASSESS SITE<br />
Plant survival and growth hinge on the precipitation that occurs in the years following planting<br />
or seeding. Very low precipitation in summer is common in the western United States (those<br />
areas west of the 1-inch line) but less common in the eastern United States, as shown in this<br />
map of the U.S. which depicts normal precipitation over a 30-year period for the month of<br />
August. Much of California, Oregon, Nevada, Idaho, and Washington receive less than one-half<br />
inch of rainfall in August as compared to many areas in the mid-western and eastern United<br />
States that receive more than 4 inches of rainfall in the same month. This pattern is typical of<br />
other months during the growing season (map generated from http://prism.oregonstate.edu/).<br />
Vegetation native to the western United States has evolved to compensate for the limited supply<br />
of moisture during the growing season (Figure 5-4). During spring, when soils are charged with<br />
moisture from winter precipitation and soil temperatures increase, plants produce new roots,<br />
followed by new foliage. As the soil dries out and plants undergo mild moisture stresses, new<br />
root and foliage growth cease. During summer, soil continues<br />
to dry and plants respond to even greater moisture<br />
stress by shutting down their physiological functions and<br />
6<br />
becoming dormant. By mid to late summer, when available<br />
soil moisture is depleted and evapotranspiration rates are<br />
5<br />
high, plants will show stress symptoms (browning, loss of<br />
needles and leaves); under extreme circumstances, plants<br />
4<br />
will die. By late summer and early fall, rain returns and the<br />
Roots<br />
soil slowly moistens again, reducing plant moisture stress<br />
3<br />
and signaling plants to grow new roots.<br />
2<br />
The primary characteristic of precipitation for plant survival<br />
is the quantity of rainfall delivered in each storm event<br />
1<br />
during the dry season. Storm events that deliver more than<br />
one-quarter inch of rainfall can wet the surface portion of the<br />
0<br />
Jan<br />
soil profile and reduce plant moisture stress. Precipitation<br />
events that deliver less than this amount rarely supply<br />
enough water to enter the soil, especially if interception<br />
and runoff rates are high.<br />
Precipitation – How to Assess<br />
Average monthly rainfall for a project area can be accessed through climate websites, as<br />
discussed in Chapter 4. For more site-specific information, precipitation can be collected<br />
on-site using rain gauges that capture and record precipitation.<br />
Two types of precipitation gauges are available: digital and non-digital. The advantages of<br />
digital gauges are that they record the amount and intensity of rainfall at the time it occurred;<br />
the downside is cost (although prices are falling). Many types of digital rain gauges are available,<br />
ranging in price and quality. It is important to select a digital rain gauge that is rugged,<br />
self-maintaining, and can record for long periods of time. In addition, many remote stations<br />
have the capacity to transmit data via the web so it is easy to keep current on weather events.<br />
Non-digital rain gauges are basically cylinders that collect and store precipitation while<br />
preventing evaporation. The gauges are monitored by simply measuring the water in the<br />
cylinder. The disadvantage of non-digital rain gauges is that they only report the rainfall that<br />
has occurred between site visits. They do not provide the dates when rainfall occurred and<br />
do not record rainfall intensities.<br />
Mitigating for Low Precipitation<br />
For projects where rainfall is limited during the growing season, making the most of rain<br />
and snowmelt that falls throughout the year is an important part of successful revegetation<br />
planning. In most cases, supplemental watering will not be feasible. However, if very little<br />
water input occurs during the summer, temporary supplemental water could be considered<br />
Precipitation (in)<br />
Shoots<br />
Feb Mar Apr May Jun<br />
Months<br />
Roots<br />
Jul Aug Sep Oct Nov Dec<br />
Figure 5-4 | Root and short growth<br />
In the western United States, root and<br />
shoot growth occur when moisture is<br />
available in the spring. Growth ceases<br />
by early summer when there is very<br />
little rainfall. Root growth takes place<br />
again from late September through<br />
November when soils are recharged by<br />
fall rainstorms.<br />
<strong>Roadside</strong> <strong>Revegetation</strong>: An Integrated Approach to Establishing Native Plants and Pollinator Habitat<br />
60
PLANNING PHASE TWO: ASSESS SITE<br />
during plant establishment. This can take an active form, such as irrigation, or a passive form,<br />
such as redirecting surface water to planted seedlings.<br />
Irrigation<br />
Irrigation can be expensive, and it is generally used only on projects with high visibility or when<br />
rapid establishment is necessary for slope stability. These are projects where revegetation<br />
objectives include minimizing the risk of seedling failure or enhancing vegetation growth.<br />
Several basic types of irrigation systems are used in roadside revegetation. They are grouped<br />
into fixed systems, such as overhead sprinkler and drip irrigation, and manually applied systems.<br />
Fixed systems are discussed in Section 10.4.5.2 Drip Irrigation. Manual systems require water<br />
to be delivered directly to each plant, either from a hose or water container.<br />
If only a few applications are necessary, the entire project can be irrigated by hand. Personnel<br />
can water each seedling or seeded area using a water truck or hydroseeding equipment (with<br />
water only), although care must be taken to avoid pulling hoses over establishing plants.<br />
Creating basins around seedlings will pond the surface-applied water and keep it concentrated<br />
in the seedling root zone. However, a better way to be certain that water will be delivered<br />
directly to the roots is to integrate the deep pot irrigation system into drip or manually applied<br />
irrigation methods (Bainbridge and others 2001). Pipes made from polyvinyl chloride (PVC) or<br />
other materials are placed at depths of 1 to 2 feet beside the seedling at the time of planting.<br />
The pipes are then filled with water when the soils dry out in summer. The advantage of deep<br />
pipe irrigation is that water is delivered directly to the root system and, because the water is<br />
placed deeper in the soil, roots are forced to extend farther into the soil for moisture. Refer<br />
to Section 10.4.5.1 Deep Pot Irrigation, for how to install this system.<br />
For any irrigation method, it is important to monitor the wetting pattern of each irrigation.<br />
This will ensure that water is applied at the appropriate rates. Digging a hole where the water<br />
has been applied at least several hours after irrigation will show how far the water has moved<br />
into the soil profile. Duration of irrigations can be adjusted accordingly.<br />
Water Harvesting<br />
Water harvesting is the alteration of local topography to capture runoff water and concentrate<br />
it in areas where it can be used by plants. Water harvesting designs can be applied to roadside<br />
revegetation in several ways. They include, but are not limited to, contour bench terraces, runoff<br />
strips, and fill slope microcatchments. Fill slope microcatchments take advantage of water<br />
that drains off road surfaces and shoulders during intense rainstorms by capturing runoff in<br />
berms or depressions created at the base of the road shoulder (Figure 5-5). Shrubs and trees<br />
planted in these catchment areas will receive greater soil moisture. Contour bench terraces<br />
are structures carved out of cut and fill slopes that collect and store runoff water. When filled<br />
with topsoil or amended soil, they are referred to as planting pockets. Figure 5-6 shows how<br />
planting pockets collect water. Even very low rainfall events, which would normally be of<br />
insufficient quantity to moisten the soil surface, can recharge soil in planting pockets and fill<br />
slope microcatchments. Sediments will also be deposited on the benches and pockets during<br />
rainstorms, building the soil up over time and reducing soil erosion. Water harvesting not only<br />
supplies additional water to plants but reduces sediment and peak flow water to the stream<br />
system. Road practices that intercept water and sediments from the road surface for water<br />
quality improvement are also a source of additional water for plant growth. These include<br />
amended slopes, filter strips, amended ditches, bio-retention swales, and constructed wetlands.<br />
In addition, some of these structures create surface-water sources for pollinator species.<br />
5.2.2 RAINFALL INTERCEPTION<br />
The amount of water entering the soil profile from a rainfall event can be significantly reduced<br />
by the interception of live or dead vegetation cover. Rainfall is captured through a series of<br />
layers, beginning with the tree and shrub canopy, the ground cover, litter, and duff, and is<br />
<strong>Roadside</strong> <strong>Revegetation</strong>: An Integrated Approach to Establishing Native Plants and Pollinator Habitat<br />
61
PLANNING PHASE TWO: ASSESS SITE<br />
returned to the atmosphere through evaporation. During the dry season, moisture from a<br />
low rainfall event might not reach the soil.<br />
Figure 5-5 | Fill slope microcatchments<br />
Fill slope microcatchments take advantage<br />
of the low infiltration rates of compacted fill<br />
slopes. Water moves off impervious road surfaces<br />
and compacted road shoulders during<br />
rainstorms (A), and is captured in berms or<br />
flattened areas below the road shoulder (B). If<br />
this area is ripped and amended with organic<br />
matter (e.g., filter strips, amended fill slopes),<br />
it becomes a very good environment for<br />
establishing shrubs and trees. Berms and/<br />
or flattened areas are also catchments for<br />
sediments.<br />
Figure 5-6 | Planting pockets<br />
Planting pockets are designed to capture<br />
water from upslope runoff (A), that collects in<br />
a slight depression (B). Captured water wets<br />
the soil after each rainstorm and drains into<br />
the fractured bedrock (C). Soil is protected<br />
from surface erosion on the downhill side of<br />
the pocket with mulch or erosion fabric (D).<br />
Rainfall Interception – How to Assess<br />
Rainfall interception can be determined by the soil cover and vegetation that exist on the<br />
site after construction. In most cases, there will be very little vegetation and ground cover.<br />
It is therefore important to understand the effects of various types of ground cover used in<br />
revegetation on the rainfall interception. The depth and water-holding capacity of the material<br />
will determine the effect on water input.<br />
Water-holding capacity of a surface cover can be measured through testing labs specializing in<br />
composts. Alternatively, it can be measured by collecting the soil layer (duff, litter, mulch) and<br />
drying it at 230° F in a drying oven (a crockpot can be used, adjusting the temperatures using a<br />
meat thermometer). When the sample is dry, it is placed in a 5-inch-long by 3-inch-round PVC<br />
pipe with a flat piece of cardboard secured to the bottom of the tube to prevent the material<br />
from falling out. The PVC pipe is weighed and placed in a bucket that is filled with water to<br />
the top of the pipe. The sample is removed and allowed to drain.<br />
After several hours the pipe is reweighed. The material in the pipe is removed and the pipe<br />
plus cardboard is weighed. The moisture holding capacity of the material (by percentage of<br />
dry weight) is as follows:<br />
(wet weight – container & cardboard) - (dry weight – container & cardboard))/(dry<br />
weight – container & cardboard)*100<br />
Figure 5-7 can be used to approximate how much rainfall is intercepted based on the moisture-holding<br />
capacity of the soil cover.<br />
<strong>Roadside</strong> <strong>Revegetation</strong>: An Integrated Approach to Establishing Native Plants and Pollinator Habitat<br />
62
PLANNING PHASE TWO: ASSESS SITE<br />
Mitigating for High Rainfall Interception<br />
It is important to consider the water-holding capacities of the mulches or soil covers to be used,<br />
especially on arid sites. Highly decomposed, fine-textured composts have high water-holding<br />
capacities compared to coarser-textured composts and hold more moisture after a rainstorm.<br />
Coarser materials, such as shredded wood, bark, wood chips, and wood strands, hold less water,<br />
allowing more rainwater to enter the soil. In addition, because fine-textured composts hold<br />
more water than course mulches or soil, they are good growing media for desirable native<br />
plants as well as undesirable weed species. The question that should be asked when selecting<br />
a soil cover is whether it is to be used as a mulch or a growing media. If a mulch, then a coarse<br />
material should be used; if growing media, a fine compost should be used.<br />
5.2.3 INFILTRATION<br />
Infiltration is the ability of the soil surface to absorb water from rainfall, snowmelt, irrigation,<br />
or road drainage. When infiltration rates are slower than the amount of water applied to the<br />
surface of the soil, runoff will occur and this water will not be available for plant uptake. In<br />
addition, runoff can detach and transport soil, causing soil erosion, decreased water quality,<br />
and increased peak flows. See Section 5.6.5, Infiltration Rates, for a discussion of infiltration<br />
rates on surface stability.<br />
The size, abundance, and stability of soil aggregates in the surface soil determine the infiltration<br />
rates. Large stable pores created by worms, insects, and channels left behind from decayed<br />
roots will absorb water quickly and have high infiltration rates; soils that have been compacted,<br />
had their topsoil removed, or are low in organic matter will have poor infiltration rates.<br />
Under undisturbed conditions, infiltration rates are typically high, especially where a litter<br />
and duff cover exists. When soil cover is removed, the impact from rain splash can seal the<br />
soil surface, creating a crust that will significantly reduce infiltration rates. Infiltration rates are<br />
also reduced when the soil is compacted by heavy equipment or traffic.<br />
Rainfall Absorbed (inches)<br />
1<br />
0.9<br />
0.8<br />
0.7<br />
0.6<br />
0.5<br />
0.4<br />
0.3<br />
0.2<br />
0.1<br />
3" thick<br />
2" thick<br />
1" thick<br />
0<br />
0 25 50 75<br />
Moisture Holding Capacity (% of dry weight)<br />
Figure 5-7 | Moisture holding<br />
capacity of mulch or litter<br />
The amount of rainfall intercepted by<br />
soil cover (e.g., mulch or litter) is dependent<br />
on its water- holding capacity<br />
and thickness.<br />
Infiltration – How to Assess<br />
The most accurate method to measure field infiltration rates the rainfall simulator (Figure<br />
5-50). This equipment is calibrated to simulate the appropriate drop size and impact velocity<br />
of many rainfall events (Grismer and Hogan 2004). The rainfall simulator is expensive to operate<br />
and is not routinely used by the designer. The most common application for this technology<br />
is in comparing different mitigating measures, such as mulches and tillage methods, on<br />
infiltration capacity.<br />
Without conducting rainfall simulation tests, infiltration rates must be inferred by measuring<br />
soil strength using a soil penetrometer, bulk density measurements (see Section 5.3.3, Soil<br />
Structure), and from site characteristics such as visual observation of compaction and the<br />
percentage of soil cover. For most construction activities that remove surface cover or disturb<br />
the topsoil, it can be assumed that infiltration rates will be reduced to levels that will create<br />
overland flow under most rainfall intensities.<br />
Mitigating for Low Infiltration Rates<br />
Minimize Compaction<br />
Driving heavy equipment over soils causes compaction and reduces infiltration rates. After<br />
sites have been prepared for seeding or planting, heavy equipment must not be driven over<br />
soils. Such practices that are often recommended for erosion control, such as trackwalking,<br />
can actually decrease infiltration rates and adversely affect the establishment and cover of<br />
native plants. These practices may not be appropriate on all soil types and should be assessed<br />
on a site-specific basis (Grismer and Hogan 2007).<br />
<strong>Roadside</strong> <strong>Revegetation</strong>: An Integrated Approach to Establishing Native Plants and Pollinator Habitat<br />
63
PLANNING PHASE TWO: ASSESS SITE<br />
Tillage<br />
Infiltration rates can be increased through soil tillage, including subsoiling, ripping, and<br />
disking (see Section 10.1.2, Tillage). In most cases, tillage will reduce compaction and increase<br />
macro-pore space in the surface soil, as well as create surface roughness that further increases<br />
infiltration rates. Depending on the stability of the surface material and the level of organic<br />
matter, the effects of tillage on infiltration might only be effective for a short time. Under<br />
some conditions, tillage needs to be planned into the design of the road. Concentrated water<br />
from poorly designed road drainage or inadequate road maintenance has the potential to<br />
create deep gullies on tilled soils. Steep slopes in areas of high precipitation have a higher risk<br />
of slope failure if tilled slopes are not designed appropriately (see Section 5.7.2, Restrictive<br />
Layer). Deeper tillage and sculpting the subsoil are some methods to reduce these risks (see<br />
Section 10.1.2, Tillage).<br />
Organic Amendments and Tillage<br />
Incorporating organic amendments into the soil surface using a bucket of an excavator<br />
can create large, stable pores. However, unless the pores are interconnecting, they will not<br />
drain well (Claassen 2006). One method for creating continuous pores is to use long, slender<br />
organic material, such as shredded bark or wood, composted yard waste, straw, or hay (see<br />
Section 10.1.5, Organic Matter Amendments). Compared to short A organic materials such as B C<br />
wood chips, longer materials can increase infiltration rates. Incorporating higher quantities<br />
of organic matter in the soil will also increase porosity because of the potential of the organic<br />
material to overlap and interconnect.<br />
Mulch and Tillage<br />
Applying mulch by itself does not necessarily increase infiltration rates, although it can reduce<br />
sediment yields (Hogan and Grismer 2007). However, combined with surface tillage in the form<br />
of subsoiling or ripping prior to application of mulch, infiltration rates can be significantly<br />
increased. Mulch fills in the micro-basins left from the tillage operation (Figure 5-8).<br />
Establish Vegetation<br />
Ultimately, the best method to increase infiltration is to create conditions for a healthy vegetative<br />
cover. Good vegetative cover will produce soils with extensive root channels, aggregated soil<br />
particles, and good litter layers.<br />
5.2.4 ROAD DRAINAGE<br />
Depending on how the road is designed, surface road water from precipitation events is either<br />
dispersed or concentrated. Dispersed water is often seen on outslope or crowned roads, where<br />
water moves in sheets over the road surface during rainstorms and into the fill slopes. This<br />
water can be captured by water harvesting methods, as discussed in Section 5.2.1.2, Mitigating<br />
for Low Precipitation. Concentrated water occurs where runoff from the road surface and<br />
cut slopes, as well as intercepted water from seeps and streams, is collected in ditches that<br />
flow into culverts or other road drainage structures. When designed into the road drainage<br />
system, this water can be available for plant growth. Live silt fences, bio-retention swales,<br />
and constructed wetlands are some structures that take advantage of this additional water.<br />
Road Drainage – How to Assess<br />
Road drainage is assessed by identifying drainage patterns on the road plans. Often the Storm<br />
Water Pollution Prevention Plans will show the detailed direction of surface road water. Culvert<br />
outlets are the areas most likely to have concentrated water that can be considered for use<br />
for plant establishment and standing water for pollinator habitat.<br />
A<br />
Figure 5-8 | Surfaceapplied<br />
compost<br />
Surface-applied compost has greater<br />
surface area contact with the soil when<br />
it is applied to roughened surfaces<br />
(B), compared to smooth surfaces (A).<br />
Creating a rough surface prior to the<br />
application of compost creates better<br />
rooting, greater surface stability, and<br />
faster organic matter decomposition.<br />
Tilling the soil, through subsoiling and<br />
ripping, to depths of 1 to 2 feet (C)<br />
will break up compaction and create<br />
channels for compost to move into the<br />
soil, increasing soil contact and creating<br />
greater infiltration rates.<br />
A<br />
B<br />
<strong>Roadside</strong> <strong>Revegetation</strong>: An Integrated Approach to Establishing Native Plants and Pollinator Habitat<br />
64
PLANNING PHASE TWO: ASSESS SITE<br />
Mitigating for Road Drainage<br />
Species Selection<br />
In areas below culverts, soil moisture is typically higher than surrounding areas after rainstorms<br />
or snow melt. These areas may be suitable for more moisture-sensitive plant species that<br />
require increased soil moisture. When planted with plant species that support pollinators,<br />
these sites will increase pollinator habitat.<br />
Large Wood<br />
Obstacles, such as large wood, can be placed at the base of culverts or perpendicular to the<br />
slope to slow concentrated water and increase soil moisture in these areas. Large wood also<br />
provides nesting habitat or shelter for a number of pollinator species.<br />
Biotechnical Slope Protection<br />
Gullies can form below culvert outlets and, for this reason, these sites are often armored with<br />
rock. Moisture-loving vegetation, such as willows, sedges, and rushes, can be integrated into<br />
the hardened surfaces, such as live silt fences, as shown in Figure 5-9 and as discussed in<br />
Section 10.3.3, Installing Cuttings.<br />
Water Harvesting<br />
Road surfaces, shoulders, and to a lesser extent, cut and fill slopes are impermeable surfaces<br />
that create runoff water during precipitation. Utilizing this water for plant growth, as shown<br />
in Figure 5-5, is a form of water harvesting.<br />
5.3 AVAILABLE WATER STORAGE AND ACCESSIBILITY<br />
The previous section discussed how water enters the soil surface. This section describes how<br />
water is stored in the soil and how soil water is accessed by roots. Where precipitation is<br />
low or infrequent during the growing season, the amount of water a soil can hold between<br />
rainstorms is important from a plant survival and growth standpoint.<br />
The total available water-holding capacity (TAWHC) is the sum of all water stored in the soil<br />
profile that is available to plant roots. The amount of water that a soil can store is primarily a<br />
function of the following:<br />
◾◾<br />
Soil texture<br />
◾◾<br />
Rock fragments<br />
◾◾<br />
Soil structure<br />
◾◾<br />
Rooting depth<br />
◾◾<br />
Mycorrhizae<br />
Figure 5-9 | Live silt fence<br />
In gullies, draws, intermittent streams,<br />
or below culvert outlets, live willow<br />
stakes (see Section 10.3.3.2, Live Stakes)<br />
are placed in rows, creating what is<br />
referred to as a live silt fence, to slow<br />
water velocities and catch sediment and<br />
debris (Polster 1997). The stakes root and<br />
establish into plants over time.<br />
The amount of water a soil stores and how easily it is accessible by roots determines the types<br />
of species and the amount of vegetative cover a site can support.<br />
5.3.1 SOIL TEXTURE<br />
Soils are composed of minerals of varying sizes, ranging from clay (the smallest) to stone (the<br />
largest). Each mineral particle in a soil sample can be grouped into six categories depending on<br />
its size: clay (8 in [20 cm]). The fine soil fraction is composed of a combination of sand, silt, and clay size<br />
particles. The proportion of these size groups in a soil is called the soil texture.<br />
Figure 5-10 shows 12 soil textural classes by their proportions of sand, silt, and clay as defined by<br />
the U.S. Department of Agriculture classification system (Soil Survey Staff 1975). Two other soil<br />
<strong>Roadside</strong> <strong>Revegetation</strong>: An Integrated Approach to Establishing Native Plants and Pollinator Habitat<br />
65
PLANNING PHASE TWO: ASSESS SITE<br />
classification systems, the American Association of State Highway and Transportation Officials<br />
(AASHTO) and the Unified Soil Classification systems, are used for geotechnical engineering.<br />
These two systems use different particle size ranges and include parameters such as liquid<br />
limit and plasticity in classifying soils. There is no accurate way of converting values from these<br />
systems to the USDA textural classes.<br />
Soil texture is an important function of soil water storage because the unique arrangement<br />
of pores created in each texture class holds differing quantities of moisture. Clays are typically<br />
thin, wafer-like particles with highly charged surface areas that retain large amounts of water.<br />
Clay particles are often arranged to form small void spaces, or micropores, that also store<br />
water. Sands, on the other hand, are large, rounded particles that have a very low surface<br />
area and therefore do not hold as much water. The large pores (macropores) that are created<br />
when sand particles are adjacent to each other are good for air and water flow but poor for<br />
storing water. Soils high in silts hold more water than sands because of the greater quantity<br />
of micropores. However, silt particles are not charged, therefore holding less water than clays.<br />
100% Sand<br />
80<br />
90 10<br />
70 30<br />
CLAY<br />
60 40<br />
50<br />
SILTY<br />
50<br />
CLAY<br />
40<br />
SANDY<br />
CLAY<br />
60<br />
CLAY LOAM<br />
SILTY CLAY<br />
30 B<br />
LOAM<br />
70<br />
SANDY CLAY<br />
LOAM<br />
20 80<br />
LOAM<br />
A<br />
SILTY LOAM<br />
10 90<br />
LOAMY<br />
SANDY LOAM<br />
SILT<br />
SAND<br />
SAND<br />
90<br />
% Clay<br />
80<br />
70<br />
60<br />
100% Clay<br />
50<br />
% Sand<br />
40<br />
20<br />
30<br />
% Silt<br />
20<br />
10<br />
100% Silt<br />
Figure 5-10 | Soil textural triangle<br />
The soil textural triangle defines 12 textural<br />
classes based on the percentage of sand, silt,<br />
and clay in a soil sample. The textural classes<br />
make it easy to describe soils without having<br />
to state percentage of sand, silt, and clay. To<br />
use the textural triangle, locate the percentage<br />
of sand on the bottom side of the triangle<br />
and trace the line up to the left-hand side of<br />
the triangle. Do the same with either the silt<br />
or clay percentages on the other two sides of<br />
the triangle (follow silt diagonally down to the<br />
lower left and clay across from left to right).<br />
Where the two lines intersect is the textural<br />
class for that soil. For example, a soil with 75%<br />
sand and 15% clay would be a sandy loam (A).<br />
A soil with 30% clay and 35% silt would have<br />
a clay loam texture (B).<br />
Soil Texture – How to Assess<br />
Soil texture can be determined fairly accurately in the field using the “feel” test. This is done<br />
with the aid of a soil sieve (2 mm opening size) and a bottle of water. Obtain a fairly dry field<br />
sample and separate the fine fraction from the coarse fragments with the sieve (note the<br />
volume of gravel in the sample). Take a sample of the fine fraction in the palm of the hand<br />
and moisten it with water. The soil is rubbed between the fingers and thumb and classified<br />
using the decision tree in Figure 5-11.<br />
For a more exact determination of soil texture, a sample of soil can be sent to a soils laboratory<br />
for a particle size distribution test. This test will report the percentage of sands, silts, and clays<br />
in the sample. A Web Soil Survey report (Section 4.3.2, Soils) generated for the project area<br />
will also provide a reliable classification of the soil texture.<br />
Knowing soil texture is essential for estimating the available water-holding capacity (AWHC)<br />
of a soil. Figure 5-12 shows some typical available water-holding capacities for various soil<br />
<strong>Roadside</strong> <strong>Revegetation</strong>: An Integrated Approach to Establishing Native Plants and Pollinator Habitat<br />
66
PLANNING PHASE TWO: ASSESS SITE<br />
Start: Place soil in palm of hand. Add water slowly and knead the soil into a smooth and<br />
plastic consistency, like moist putty.<br />
Does the soil remain in a ball when squeezed?<br />
Yes<br />
No<br />
Add more water<br />
Add dry soil<br />
Figure 5-11 | Soil texture by feel method<br />
Adapted from Colorado State University Extension<br />
Publication (#7.723 at www.ext.colostate.<br />
edu/pubs/garden/07723.html)<br />
Yes<br />
Yes<br />
Is the soil too dry?<br />
No<br />
Is the soil too dry?<br />
No<br />
Sand<br />
Place ball of soil between thumb and foref inger, gently compressing<br />
the soil with the thumb, squeezing it upward into a ribbon. Form a<br />
ribbon of uniform thickness and width. Allow ribbon to emerge and<br />
extend over the forefinger, breaking from its own weight.<br />
Does the soil form a ribbon?<br />
No<br />
Yes<br />
Loamy Sand<br />
What kind of ribbon does it form?<br />
Forms a weak<br />
ribbon less<br />
than 1" before<br />
breaking<br />
Forms a ribbon<br />
1-2" before<br />
breaking<br />
Forms a ribbon<br />
2" or longer<br />
before breaking<br />
LOAM CLAY LOAM CLAY<br />
Does it feel<br />
very gritty?<br />
Yes<br />
Sandy<br />
Loam<br />
Yes<br />
Sandy Clay<br />
Loam<br />
Yes<br />
Sandy<br />
Clay<br />
No<br />
Does it feel<br />
equally gritty<br />
and smooth?<br />
Yes<br />
Loam<br />
Yes<br />
Clay<br />
Loam<br />
Yes<br />
Clay<br />
No<br />
Does it feel<br />
very smooth?<br />
Yes<br />
Silt<br />
Loam<br />
Yes<br />
Silty Clay<br />
Loam<br />
Yes<br />
Silty<br />
Clay<br />
textures. The values in this figure are generalized, but are acceptable for making recommendations<br />
on most revegetation projects. The Web Soil Survey and Soil Characterization Data<br />
websites (Section 4.3.3, Vegetation) may have available water-holding capacities for soils in the<br />
project area. For a more accurate assessment, samples can be sent to soils labs for moisture<br />
determination. This is a specialized test and not all labs offer this test; therefore, it is important<br />
to contact the lab prior to collecting samples. Water-holding capacity can also be measured<br />
using the methods outlined in Inset 5-1.<br />
Mitigating for Textures with Low Water-Holding Capacities<br />
Organic Amendments<br />
Incorporation of organic amendments (e.g., compost) can increase the water-holding<br />
capacity of a soil. Because the water-holding capacity of each type of organic matter varies<br />
by composition and degree of weathering, the effect on soil water-holding capacity by any<br />
organic matter being considered is assessed prior to application (see Section 10.1.5, Organic<br />
Matter Amendments, for assessment methods). Sandy textured soils benefit most from organic<br />
<strong>Roadside</strong> <strong>Revegetation</strong>: An Integrated Approach to Establishing Native Plants and Pollinator Habitat<br />
67
PLANNING PHASE TWO: ASSESS SITE<br />
Available Water Holding Capacity<br />
(inches per foot depth)<br />
25<br />
2<br />
1.5<br />
1<br />
0.5<br />
0<br />
Sand<br />
0.7<br />
Loamy sand<br />
0.9<br />
2<br />
1.4<br />
Sandy loam<br />
Loam<br />
Soil Textural Classes<br />
2.1<br />
Silt loam, clay loam<br />
sandy clay loam<br />
Sandy clay, silty clay, clay<br />
2.3<br />
Figure 5-12 | Soil texture and<br />
available water-holding capacity<br />
General relationship between soil texture<br />
and available water-holding capacity soils<br />
(adapted after Ley and others 1994). As clays<br />
increase in a soil, so does water-holding capacity.<br />
Typically, clay loam soils hold more than<br />
twice as much water as sandy textured soils.<br />
The presence of humus in topsoil increases<br />
water-holding capacity of loams and sandy<br />
loams at a rate of 2.25 percent water to each<br />
percent rise in soil humus (Jenny 1980), which<br />
equates to an approximately 0.75 percent<br />
increase in water holding capacity for every<br />
1 percent increase in organic matter.<br />
matter additions, especially those with plant available water of 9 percent or less (Claassen<br />
2006), which are typically sands, loamy sands, and sandy loam soils. Testing several different<br />
rates of incorporated organic matter on soil moisture-holding capacity prior to selection will<br />
help determine the appropriate amount of material to apply.<br />
Clay<br />
The water-holding capacity of sandy textured soils can be increased by incorporating soils<br />
with higher clay fractions into the sandy soils. These soils should have no more than 40 percent<br />
clay fraction (e.g., clay loam, sandy clay loam, and silty clay loam textures). The addition of<br />
clays should be at rates that result in new soil textures similar to loams, silt loams, or sandy<br />
clay loams. Higher rates of clay addition are not recommended. It is always important to test<br />
the additions of any soil to another to understand what the effects on water-holding capacity<br />
and structure might be. Ideally this should be done in the field in small plots.<br />
Polyacrylamides<br />
Polyacrylamides are hydrophilic polymers that absorb many times their weight in water. They<br />
are used to increase the water-holding capacity of greenhouse growing media. The value of<br />
using these materials in revegetation projects, however, is questionable based on the low plant<br />
response rates, high material costs, and difficulty of incorporating these materials evenly into<br />
the soil. A study, located at several semi-arid sites, showed that two rates of polyacrylamide<br />
Inset 5-1 | Measuring available water-holding capacity<br />
(modified after Wilde and others 1979)<br />
Available water-holding capacity (AWHC) can be measured in the field by collecting soil samples from a reference site or disturbed site in<br />
mid- to late summer when soils are presumably at their driest. Collect samples in bulk density rings in the same manner as sampling for bulk<br />
density (see Section 5.3.3, Soil Structure). After removing the ring from the soil, secure a piece of cardboard at each end of the ring to keep the<br />
soil from falling out, then place it an airtight plastic bag to ensure the sample stays intact during transport. When ready to take measurements,<br />
remove the top cardboard piece and weigh the sample. Place the sample in a bucket and fill with water to just the top of the ring. Allow the<br />
sample to saturate with water. Once the soil is fully saturated, remove the ring and allow it to drain. After 24 hours, remove the soil from<br />
the ring and weigh the soil (this is the wet weight), Also weigh the ring and cardboard (allow the cardboard to dry first). To calculate the dry<br />
weight, subtract the weight of the dry cardboard and ring from the original dry sample weight.<br />
Available water-holding capacity (inches of available water per foot) = (wet weight – dry weight)/volume of cylinder) * 12.<br />
<strong>Roadside</strong> <strong>Revegetation</strong>: An Integrated Approach to Establishing Native Plants and Pollinator Habitat<br />
68
PLANNING PHASE TWO: ASSESS SITE<br />
crystals incorporated into road fills had no differences in native grass cover and survival and<br />
growth of outplanted pine seedlings from the controls (Riley and others 2013). Any full-scale<br />
use of polyacrylamides should be tested at different rates on the sites being revegetated. In<br />
addition, determining how polyacrylamide crystals would be evenly mixed into the soil is an<br />
important consideration when considering use of these materials.<br />
5.3.2 ROCK FRAGMENTS<br />
Mountain soils and highly disturbed sites are typically high in rock fragments. The presence<br />
of rock fragments is important because rock reduces the amount of water and nutrients a soil<br />
can hold. At high volumes in the soil, rock fragments will limit the biomass and vegetative<br />
cover a site can support.<br />
The rock classification system classifies rock fragments into five size ranges: fine gravels (.08<br />
to 0.2 in), medium gravels (0.2 to 0.8 in), coarse gravels (0.8 to 3 in), cobble (3 to 10 in), and<br />
stone (>10 in).<br />
Highly weathered rock can retain some soil moisture depending on the size of the rock fragments<br />
and degree of weathering (Flint 1983). For practical purposes, however, it is usually assumed<br />
that the presence of cobbles and stone rock fragments in the soil will reduce the available<br />
water-holding capacity of the soil proportionally. For example, a sandy loam soil without rock<br />
fragments has a water-holding capacity of 1.4 inches per foot of soil (Figure 5-12). When 30<br />
percent large rock fragments are added to the soil profile, the available water-holding capacity<br />
is reduced to 70 percent, or 0.98 inches of available water (1.4 * 0.7 = 0.98). Alternatively, fine<br />
and medium gravels (0.08 to .8 inches in diameter) hold some moisture. A rule of thumb is that<br />
these fine and medium gravels reduce water-holding capacity by two-thirds of their volume.<br />
In the above example, if 30 percent of the soil were composed of medium and fine gravels,<br />
the available water in this soil would be 1.12 inches per foot (1.4 - (1.4 * 0.3 * 0.66)).<br />
Rock Fragments – How to Assess<br />
Rock fragment content is usually determined in the field. Large rock fragments, such as cobble<br />
and stones, are estimated in a variety of ways. The most common methods are surveying<br />
freshly exposed road cuts or observing soil excavation during road construction. Estimating<br />
the volume can be difficult, and often the amount of rock is over- or under-estimated. One<br />
method of estimating large rock in road cuts is to take a digital picture and lay a grid over the<br />
surface, as shown in Figure 5-13. Whenever rock is estimated from old road cuts, it must be<br />
discerned whether a portion of the rock is masked by soil that might have moved over the<br />
rock. A freshly exposed road cut provides the most accurate approximation of rock content.<br />
Rock encountered while digging a soil pit will provide a more accurate estimate of larger coarse<br />
fragments. Cobbles and stones, if they can be moved, are set apart from the soil when the pit<br />
is excavated. The volume of cobbles and stones is then visually compared to the volume of<br />
soil excavated from the soil pit to estimate the percentage of rock fragments.<br />
Gravel content is determined from the excavated soil by sieving it through several soil sieves.<br />
Sieves are available through most engineering equipment companies (Figure 5-14). The 2 mm<br />
sieve (also referred to as a #10 sieve) is the most important sieve to use because it separates<br />
the gravels from the soil fraction. Another useful sieve is the ¾-inch sieve because it separates<br />
the fine and medium gravels from the coarse gravels. This sieve can be used in the field to<br />
remove larger rock fragments from the soil sample to reduce the weight of the sample. When<br />
soils are dry, they are easier to sieve in the field; however, when they are moist, they must be<br />
air dried first before they can be sieved. The gravel and soil volumes are visually estimated.<br />
It is important to include the volume of cobbles and stones estimated in the field with the<br />
gravels estimated through sieving to calculate the total rock fragments in a soil:<br />
Figure 5-13 | Estimating rock<br />
fragment content from roadcuts<br />
The amount of rock in a section of soil<br />
can be roughly estimated from road<br />
cuts. Large rock can be determined by<br />
laying a grid of 20 circles over a photograph<br />
of a road cut and recording the<br />
number of circles intercepting rock (in<br />
the center of the circle). This value is<br />
divided by the total number of circles<br />
in the grid to obtain the percentage of<br />
subsoil in rock fragments. In the picture<br />
below, subsoil contains approximately<br />
25% large rock (5 intercepted rocks<br />
divided by 20 points).<br />
<strong>Roadside</strong> <strong>Revegetation</strong>: An Integrated Approach to Establishing Native Plants and Pollinator Habitat<br />
69
PLANNING PHASE TWO: ASSESS SITE<br />
% rock fragments in profile = (100 - % cobbles and stone) * % gravels in sample<br />
For example, a soil is estimated to have 25 percent cobbles and stones from observing road<br />
cuts and from several soil pits. Sieving shows that 50 percent of the sieved soil is composed of<br />
gravels. The soil would be composed of 25 percent cobbles and stones, 37.5 percent gravels<br />
((100 – 25) * 0.50), and 37 percent soil.<br />
Mitigating for High Rock Content<br />
Rock Removal<br />
Screening rock fragments from the soil will increase the available water- holding capacity of a soil.<br />
The greatest benefit from screening is with soils that are very high in cobble and stone,<br />
where the reduction in volume of rock in the soil would be significant. One type of screen is<br />
the “grizzly feeder” which acts as a giant sieve to sort out rock of any size depending on the<br />
screen opening widths. Screened soils have the greatest benefit where soils are shallow or a<br />
good ground cover is required (e.g., grasses and forbs).<br />
Incorporate Compost<br />
Compost incorporated in the soil at high rates will increase the water-holding capacity of a<br />
rocky soil (see Section 10.1.5, Organic Matter Amendments). Depending on the size of the<br />
coarse fragments, incorporation can be difficult.<br />
Surface Apply Compost<br />
A more practical method to mitigate for rocky soils is to apply composts to the soil surface<br />
without mixing. When surface applied, composts can be good growing media for seeds of<br />
grasses and forbs (see Section 10.1.3, Mulches). At rates greater than 3 inches applied to the<br />
surface, seeds germinate well and establish into seedlings that can access moisture and nutrients<br />
not only from the compost, but also some moisture from the rocky soil below the compost.<br />
Be aware that on steep slopes, if the site is is not prepared correctly, the layer between the<br />
compost and soil can become a slip plane on slopes when compost becomes saturated with<br />
water (see Section 5.7 Slope Stability).<br />
Apply Topsoil<br />
If topsoil is available, it can also be applied over a rocky soil (see Section 10.1.4, Topsoil). Topsoil<br />
will have to be placed deep enough to compensate for the quantity of rock in the soil being<br />
covered. On steep slopes, preparation of the site prior to application of topsoil is important<br />
to avoid slope stability issures (Section 5.7 Stability).<br />
Planting Islands<br />
On very rocky sites, rocky soils can be mitigated by focusing mitigating measures into planting<br />
islands (see Section 10.1.8, Topographic Enhancements). Where topsoil, compost, or screened<br />
soil is limited, this material can be concentrated in mounds, pockets, or benches strategically<br />
located throughout a revegetation.<br />
Figure 5-14 | Soil sieves for<br />
estimating rock content<br />
The number 10 sieve (2 mm opening)<br />
on the right separates soil particles (C)<br />
from rock particles (B and A). The 3/4<br />
inch sieve on the left separates the fine<br />
and medium gravels (B) from the coarse<br />
gravels (A).<br />
5.3.3 SOIL STRUCTURE<br />
Just as soils are composed of many-sized mineral particles, they are also composed of different-sized<br />
voids (also referred to as pores) whose influence is responsible for water movement,<br />
water storage, air flow, and root penetration. Small pores (micropores) strongly influence the<br />
moisture-holding capacity of soils, while large pores (macropores) are responsible for water<br />
movement, air flow, and root penetration. The arrangement of large pores is called soil structure.<br />
It is qualitatively observed as cracks, channels, aggregates, crumbs, and clods in the soil, and<br />
described by alternative terms such as friability and tilth. Water flow and root penetration<br />
depend on good soil structure. If soil structure is poor or compacted, roots are less able to<br />
<strong>Roadside</strong> <strong>Revegetation</strong>: An Integrated Approach to Establishing Native Plants and Pollinator Habitat<br />
70
PLANNING PHASE TWO: ASSESS SITE<br />
penetrate the soil to access water. Soil structure is important for other soil functions such as<br />
air flow, drainage, permeability, infiltration, and essential habitat for most soil organisms. Soils<br />
with good structure are typically very productive.<br />
Soil structure is significantly reduced by operating heavy equipment over soils. The pressure<br />
applied by heavy equipment compacts the macropores, reducing soil volume and increasing<br />
soil density. This impact is called soil compaction (Figure 5-15). The effects of soil compaction<br />
on tree growth are well documented (Poff 1996). Trees growing on highly compacted soils have<br />
far less root, stem, and leaf production than those growing on non-compacted sites. Studies<br />
have shown a linear relationship between the increase in surface soil bulk density and decrease<br />
in height growth of young Douglas-fir and ponderosa pine trees (Froehlich and McNabb 1984).<br />
It should be assumed that soils will be highly compacted after construction due to the use of<br />
heavy equipment. In addition to reducing the potential of a construction site to grow vegetation,<br />
compaction also increases runoff and sediment during rainstorm events, which can impact<br />
water quality. On sites where summer rainfall is limiting, there will also be less water entering<br />
the soil, reducing the amount of water available for plant growth.<br />
Compaction can occur several feet below the soil surface, depending on soil texture, moisture,<br />
and the type and weight of equipment being operated. Very compacted soil layers can<br />
significantly reduce or eliminate root penetration. Where compacted layers occur, downward<br />
water movement is restricted and water may saturate the soil layers above the compacted layer.<br />
The resulting saturated soil conditions can be very restrictive to root growth because of the<br />
lack of oxygen and the propensity for higher incidence of disease (Steinfeld and Landis 1990)<br />
and seedling mortality (Figure 5-16). Compacted layers will naturally recover to their original<br />
porosity through root penetration, animal activity, and freeze-thaw events, but recovery can<br />
take 20 to 70 years (Wert and Thomas 1981; Froehlich and others 1983).<br />
Soil Structure – How to Assess<br />
It is easy to qualitatively differentiate good soil structure from compacted soil, but measuring<br />
it quantitatively can be difficult. Indirect field tests to quantify soil structure include bulk<br />
density and penetrometer tests.<br />
The bulk density test measures the dry weight of a standard volume of soil. If the soil has a<br />
high porosity, the bulk density values will be low; if the soil is compacted, the bulk density will<br />
be high. In this method, a cylindrical tube is driven into the soil with a portable bulk density<br />
sampler and a soil core is removed (Figure 5-17). The soil is shaved evenly on both ends so<br />
that the soil is exactly the shape and volume of the cylinder. The soil is then removed from<br />
the cylinder, oven-dried, and weighed.<br />
Bulk Density = weight of soil (g) / cylinder volume (cc)<br />
Bulk density values of a disturbed site must be related back to the bulk density of an adjacent<br />
reference site to make the values meaningful. Remaining within a 15 percent increase in bulk<br />
density over reference site values is ideal. Unfortunately, the bulk density method is time<br />
consuming and cannot be conducted on soils with high rock fragments.<br />
A less quantitative, but more practical, method of measuring soil porosity is with a soil penetrometer.<br />
This equipment measures soil strength instead of density. Compacted soils have<br />
greater strength, and greater resistance to penetration by a penetrometer, than non- compacted<br />
soils. Several types of penetrometers can be purchased for field work – penetrometers that<br />
measure the resistance as a continuous pressure is applied to the probe and penetrometers<br />
(impact penetrometers) that measure the number of blows of a hammer to drive the penetrometer<br />
into a specified depth. A monitoring procedure for assessing compaction using an<br />
impact penetrometer has been developed by the NRCS (Herrick and others 2005b). The most<br />
practical and economical field method for assessing compaction, however, is simply using a<br />
long shovel, as shown in Figure 5-18. In this method, a site is traversed and, at predetermined<br />
Figure 5-15 | Compacted soil<br />
Compacted soils are created by heavy<br />
equipment operating over soil. The<br />
large pore spaces are compressed and<br />
the impacted soils often form a platy<br />
structure as shown in this photograph.<br />
Figure 5-16 | Poor draining<br />
soils due to soil compaction<br />
Compacted soils drain very slowly,<br />
as the puddles on the surface of the<br />
obliterated road in this photograph<br />
indicate. During rainfall or snowmelt,<br />
soils can stay saturated for days and<br />
even weeks. Establishing seedlings<br />
during this period can be very difficult<br />
because roots cannot survive when soils<br />
are poorly drained. Seedlings shown<br />
in this photograph were dead within<br />
three months.<br />
Figure 5-17 | A soil core is used<br />
to determine bulk density and<br />
water-holding capacity<br />
<strong>Roadside</strong> <strong>Revegetation</strong>: An Integrated Approach to Establishing Native Plants and Pollinator Habitat<br />
71
PLANNING PHASE TWO: ASSESS SITE<br />
intervals, a shovel is pushed into the ground to determine how loose the soil is. By applying<br />
the entire body weight to the shovel and observing the distance the shovel penetrates the soil,<br />
a qualitative measurement of soil compaction can be made. A rule of thumb is that a shovel<br />
penetrating over 12 inches deep indicates a soil with a very high porosity; penetration below<br />
3 inches deep indicates a very low porosity.<br />
Whether a shovel is used or a soil penetrometer, the readings are affected by rock content and<br />
soil moisture. When soils are dry, they have greater strength and higher resistance to penetration.<br />
This is why any comparative sampling (e.g., comparing reference site to construction site soils)<br />
using a penetrometer must be done at the same moisture levels. Encountering large rocks<br />
can be confused with hitting a compacted layer. When this occurs, sampling should be done<br />
at several adjacent points until the penetrometer can be pushed into the soil without hitting<br />
rock. On very rocky soils, the penetrometer is not a practical tool.<br />
Mitigating for Poor Soil Structure<br />
Tillage<br />
Breaking up compacted layers can be done effectively when deep tillage equipment is operated<br />
correctly (see Section 10.1.2, Tillage).<br />
Incorporate Organic Matter<br />
The effectiveness of deep tillage can be enhanced if organic matter is incorporated into the<br />
soil prior to tillage (see Section 10.1.5, Organic Matter Amendments). Organic matter can<br />
keep the soil from settling back to higher, pre-tillage densities. Application rates at which<br />
organic matter showed positive effects on soil structure was observed at a ratio of 25 percent<br />
incorporated organic matter to 75 percent soil by volume (Claassen 2006). Longer shreds of<br />
organic matter are preferred over smaller, chip sizes because the longer strands create interconnecting<br />
pathways for water, air, and roots while increasing soil strength (Claassen 2006).<br />
The additions of non-composted organic matter, however, will tie-up nitrogen for a period<br />
of time. While this might be problematic in the short term, the importance of developing soil<br />
structure for long-term site recovery often overrides concerns about the lack of immediately<br />
available nitrogen.<br />
Operate Heavy Equipment with Care<br />
Soil compaction is greatest when soils are moist. To limit the amount of soil compaction,<br />
schedule equipment operation during times when soils are dry. Compaction can also be<br />
minimized by using smaller equipment (Amaranthus and Steinfeld 1997) or leaving slash or<br />
deep mulch on the soil surface (which provides cushion).<br />
Avoid Last Minute Compaction<br />
Soil compact is unavoidable during construction, but compacting soils after mitigating treatments<br />
have been implemented, such as tillage, must be avoided. In many cases the benefits<br />
of mitigating treatments have been nullified by the lack of attention to heavy equipment<br />
operations after topsoil additions or tillage treatments have been made. For example, topsoil<br />
salvage and placement, as discussed repeatedly in this manual, benefit the site in many ways.<br />
But this expensive mitigating measure loses much of its value if the soils are compacted during<br />
or after soil placement. Once topsoil is deep-tilled, every effort should be made to avoid any<br />
further equipment operation on the site.<br />
Encourage Mycorrhizae Establishment<br />
Mycorrhizal fungi build soil structure through hyphae and water stable organic glues (e.g.,<br />
glomalin). Section 5.3.5.2, Mitigating for Lack of Mycorrhizal Fungi, covers methods beneficial<br />
for establishing mycorrhizae.<br />
Figure 5-18 | A shovel can be used<br />
to determine depth to compaction<br />
A simple, qualitative method of determining<br />
compacted layers is to mark the<br />
face of a long shovel with a ruler. Pushing<br />
the shovel in the ground with the entire<br />
body weight and observing the distance<br />
the shovel penetrates can indicate the<br />
depth to a compacted layer.<br />
<strong>Roadside</strong> <strong>Revegetation</strong>: An Integrated Approach to Establishing Native Plants and Pollinator Habitat<br />
72
PLANNING PHASE TWO: ASSESS SITE<br />
5.3.4 ROOTING DEPTH<br />
Rooting depth is the distance from the surface of the soil to the lowest point that roots can<br />
penetrate. It encompasses any strata (e.g., topsoil, subsoil, and parent material) that can be<br />
accessed by plant roots. The deeper the rooting depth of a disturbed site, the greater the total<br />
available water storage and the higher the productivity of the site.<br />
Rooting depth is affected by restrictive layers that block root penetration to lower strata (see<br />
Section 5.7.2, Restrictive Layer). For example, the rooting depth of a post-construction site is<br />
estimated at 6 feet deep. However, further investigation finds that there is a highly compacted<br />
layer at 12 inches, which would limit most, if not all, root penetration below that point. The<br />
rooting depth under these conditions has been reduced to only 1 foot of soil instead of 6<br />
feet. Restrictive layers also include soils with very high or very low pH, toxic materials, or a<br />
high water table.<br />
Rooting depths vary by plant species and age of the vegetation. Most mature tree species<br />
have deep root systems that access subsoil and parent material; roots of grasses and forbs<br />
are predominantly limited to surface soils. Annual grasses and forbs require less rooting<br />
depth than perennial grasses and forbs, with the roots of these species growing in the upper<br />
surfaces of the soil. The age of the vegetation also determines the abundance and location of<br />
roots. Newly established seedlings have shallow roots but, as the plants mature, root systems<br />
expand to access moisture deeper in the soil.<br />
Rooting patterns and root morphology play a role in how plants access soil water. Some<br />
species have finer-textured root systems that access tightly held soil moisture; other species<br />
have aggressive root systems that can penetrate deeply into cracks between rock fragments.<br />
Grasses, for instance, have shallower root systems than trees and shrubs, but their small size<br />
and high density in the surface soil gives them an advantage in shallow soils.<br />
Rooting Depth – How to Assess<br />
Rooting depth should be estimated from reference sites during planning and post-construction,<br />
but it is not always an easy parameter to measure. Observing road cuts is often the best means<br />
to determine rooting depth. Rock type (e.g., granite, sandstone, and schist), fracturing patterns,<br />
rock weathering, and the degree of rock fracturing will provide an indication of rooting depth.<br />
Observing the amount and type of roots in the fractures of existing road cuts will give a good<br />
idea of rooting depth.<br />
Fracturing and weathering of rock can also be determined from geotechnical analysis. If the<br />
bedrock has been drilled, the drill log report can provide an indication of degree and depth of<br />
rock fracturing and weathering. One way that rock quality is assessed is through a classification<br />
called the Rock Quality Designation Index (RQD). This system rates the bedrock by how much<br />
fracturing is observed in the cores. It is calculated by measuring the pieces of rock in the core<br />
sample that are longer than 10 cm, summing the length of these pieces, and dividing by the<br />
total length of the core (Deere and Deere 1988). A small RQD means that the bedrock is highly<br />
fractured whereas a high RQD means the bedrock is massive. A RQD may be poor from an<br />
engineering standpoint because of the high fractures, but favorable from a revegetation<br />
standpoint because cracks will hold some moisture and allow root penetration. A RQD rated<br />
as “very poor,” “poor,” and even “fair” should be somewhat favorable to root penetration.<br />
Rooting depth is also affected by the presence of a restrictive layer caused either naturally<br />
or by compaction. How to determine the presence of these layers is addressed in Section<br />
5.3.3.1, Soil Structure – How to Assess, and Section 5.7.2.1, Restrictive Layer – How to Assess.<br />
The literature contains many references to defining the depth of soil needed to support<br />
different plant communities. For example, 18 inches of soil has been shown to support simple<br />
grassland ecosystems, but more diverse native grassland communities are reported to require<br />
up to 4 feet or more (Munshower 1994). These figures can be misleading if they are not put in<br />
<strong>Roadside</strong> <strong>Revegetation</strong>: An Integrated Approach to Establishing Native Plants and Pollinator Habitat<br />
73
PLANNING PHASE TWO: ASSESS SITE<br />
the context of site climate and soil type. In many respects, it is more useful to state the TAWHC<br />
of a site rather than the rooting depth. The TAWHC is the total amount of moisture that a soil<br />
can store for plant growth when fully charged with water.<br />
Table 5-1 shows how the TAWHC is calculated. Using the same format and equations, a similar<br />
spreadsheet can be created by copying the equations into the “Results” column. In this example,<br />
there is 1 foot of topsoil and 2 feet of subsoil over a highly fractured basalt. The topsoil has a<br />
loam texture and available water-holding capacity of 2.0 inches (estimated from Figure 5-12 or<br />
obtained from lab results) but, because of the rock fragments, it is reduced by approximately<br />
0.4 inch. The subsoil has a high water-holding capacity because of high clay content, but the<br />
available water-holding capacity is reduced by half due to rock. Highly fractured basalt is<br />
encountered at a depth of 2 feet, and it is estimated from the road cut that approximately 30<br />
percent is actually fractured. Within these weathered fractures is a gravelly clay loam textured<br />
material storing approximately 0.5 inch of water. The TAWHC for this site would be the sum<br />
of all sections of soil (approximately 3.2 inches).<br />
TAWHC is useful for comparing water relationships between revegetation units and reference<br />
sites. For example, the TAWHC for a post-construction soil is 3.6 inches compared to an adjacent<br />
reference site, which is 6 inches. If the desired future condition of the post-construction soil is<br />
to be similar to the adjacent reference site, then the TAWHC of 3.6 inches must be increased<br />
upward toward 6 inches for the site to be capable of supporting the vegetative community<br />
occurring on the reference site.<br />
Table 5.1 | Calculating total available water-holding capacity<br />
The total available water-holding capacity (TAWHC) is the total amount of moisture that a soil can store for plant growth when fully charged with<br />
water. TAWHC values for each revegetation unit are helpful for determining which species will perform well and in developing the mitigating<br />
measures necessary to increase water-holding capacity or rooting depth. TAWHC is calculated by determining the texture, rock fragment content,<br />
and depth of each soil layer, and calculating how much water each layer will optimally store. The water- holding capacity of each soil layer is added<br />
together to obtain the TAWHC for the soil profile.<br />
Soil<br />
Strata<br />
0 to 1'<br />
1 to 2'<br />
2 to 5'<br />
Soil Characteristics Data Results Equations<br />
AWHC of texture (inches / foot): 2 (A) 2 From Figure 5.11 or lab results<br />
Small Rock (%): 20 (B) 0.264 = A * (B / 100) * 0.66<br />
Large Rock (%):<br />
Thickness (ft):<br />
5<br />
1<br />
(C)<br />
(D)<br />
0.1<br />
1<br />
= A * (C / 100)<br />
(the thickness of soil section)<br />
Available water by section:<br />
1.6 (E) = (A - B - C) * D<br />
AWHC of texture (inches / foot): 2.2 (F) 2.2 From Figure 5.11 or lab results<br />
Small Rock (%)<br />
Large Rock (%):<br />
35<br />
25<br />
(G)<br />
(H)<br />
0.5082<br />
0.55<br />
= F * (G / 100) * 0.66<br />
= F * (H / 100)<br />
Thickness (ft): 1 (I) 1 (the thickness of soil section)<br />
Available water by section:<br />
1.1 (J) = (F - G - H) * I<br />
AWHC of texture (inches / foot): 2.2 (K) 2.2 From Figure 5.11 or lab results<br />
Small Rock (%)<br />
Large Rock (%):<br />
35<br />
70<br />
(L)<br />
(M)<br />
0.5082<br />
1.54<br />
= K * (L / 100) * 0.66<br />
= K * (M / 100)<br />
Thickness (ft): 3 (N) 3 (the thickness of soil section)<br />
Available water by section:<br />
0.5 (O) = (K - L - M) * N<br />
Total Available Water Holding Capacity (inches): 3.2<br />
= Sum of (E, J, O)<br />
<strong>Roadside</strong> <strong>Revegetation</strong>: An Integrated Approach to Establishing Native Plants and Pollinator Habitat<br />
74
PLANNING PHASE TWO: ASSESS SITE<br />
Mitigating for Poor Rooting Depth<br />
Increase Available Water-Holding Capacity<br />
Improving the water-holding capacity of the existing soil will increase TAWHC. Mitigating<br />
measures discussed in Section 5.3.1, Soil Texture, and Section 5.3.2, Rock Fragments, can be<br />
used to increase soil moisture.<br />
Tillage<br />
If restrictive layers due to compaction are encountered, deep tillage should be considered.<br />
Section 10.1.2, Tillage, provides guidelines for deep tillage.<br />
Apply Topsoil<br />
Increasing rooting depth and TAWHC can be accomplished by applying topsoil (see Section<br />
10.1.4, Topsoil).<br />
Planting Islands<br />
Mitigating measures, such as applying topsoil, organic matter incorporation, deep tillage, and<br />
other measures that increase water-holding capacity, can be focused in strategic locations,<br />
such as planting islands. This will conserve materials and reduce costs (see Section 10.1.8,<br />
Topographic Enhancements).<br />
Blasting<br />
Strategic blasting to shatter the parent material has been suggested as a possible means of<br />
increasing rooting depth (Claassen 2006).<br />
5.3.5 MYCORRHIZAL FUNGI<br />
The discussion to this point has addressed the primary factors responsible for soil water storage<br />
(soil texture, rock, and rooting depth) and ease of a plant through its roots to reach this water<br />
(soil structure). In this section, the discussion turns to how plants increase the efficiency of<br />
accessing water through mycorrhizae. While mycorrhizae provide many other benefits to the<br />
site in addition to water enhancement, they are covered in depth in this section because of<br />
the importance of water to establishing vegetation on highly disturbed sites in the western<br />
United States.<br />
Mycorrhiza is the unique symbiotic relationship between fungi (called mycorrhizal fungi) and<br />
host plants. To the naked eye, many mycorrhizal fungi appear as a fine web or netting that<br />
seems to connect the root system to the surrounding soil (Figure 5-19), and in essence, this is<br />
exactly what is occurring. The extremely small hyphae of the mycorrhizal fungi are actually<br />
taking on the form and function of an extended root. Because mycorrhizal hyphae are up to<br />
five times smaller, they are able to access spaces in the soil not easily accessible by larger plant<br />
roots. Mycorrhizal hyphae not only provide the plant with greater access to soil moisture and<br />
nutrients, they also surround and protect roots from soil pathogens. In return, the host plant<br />
supplies carbohydrates to keep the mycorrhizal fungi alive.<br />
Mycorrhizae play a critical role in site restoration by building soil structure. Hyphae and water<br />
stable organic “glues,” such glomalin, are excreted by the mycorrhizal fungi and bind soil<br />
particles together into aggregates. These aggregates stabilize the soil, improving soil structure<br />
(see Section 5.3.3, Soil Structure) important for good air exchange and water permeability. This<br />
basic soil building process, or repair, facilitates the creation of nutrient reserves and nutrient<br />
cycling essential for restoring ecosystems (Miller and Jastrow 1992). Mycorrhizal fungi can<br />
also improve survival of tree and grass seedlings (Steinfeld and others 2003; Amaranthus and<br />
Steinfeld 2005). A healthy population of mycorrhizal fungi has also been shown to increase plant<br />
biomass and cover (Wilson and others 1991; Brejda and others 1993; Sobek and others 2000),<br />
and increase the diversity of native species (Smith and others 1998; Charvat and others 2000).<br />
Figure 5-19 | Mycorrhizal<br />
fungi extend root systems<br />
Mycorrhizal fungi can greatly increase<br />
the surface area of the root system.<br />
The ectomycorrhizal fungi attached<br />
to the pine root system (A) comprise<br />
most of the absorptive surface shown<br />
in this photograph. The mycorrhizae<br />
include brown branched structures<br />
(B) and white hyphae or filaments (C).<br />
(Photo courtesy of Mike Amaranthus,<br />
Mycorrhizal Applications).<br />
<strong>Roadside</strong> <strong>Revegetation</strong>: An Integrated Approach to Establishing Native Plants and Pollinator Habitat<br />
75
PLANNING PHASE TWO: ASSESS SITE<br />
Ninety percent of all terrestrial plants form symbiotic relationships with mycorrhizal fungi. Of<br />
the thousands of known species, most generally fall into two categories – ectomycorrhizal<br />
fungi and arbuscular mycorrhiza fungi.<br />
Arbuscular mycorrhizal fungi (AMF), formerly called endomycorrhizae, are the most commonly<br />
occurring mycorrhizal fungi, forming on 75 to 85 percent of plant species. These include<br />
legumes, composites, grasses, bulbs, most shrubs, and ferns. In addition, AMF occur on many<br />
tree species, including redwoods and some cedars, and many types of tropical trees. AMF<br />
grow inside the roots of the host plant and extend hyphae out into the soil. These fungi are<br />
more general in their association with plant species, meaning that one mycorrhizal species<br />
can form an association with a broad spectrum of plant species. AMF reproduce in two ways:<br />
by forming single spores outside of the root and from fungal structures (vesicles and hyphae)<br />
present inside a colonized root system. Arbuscular mycorrhizal fungi do not disperse their<br />
spores in the wind, but instead are dispersed from root to root or by animals. For this reason,<br />
recolonization of drastically disturbed sites by arbuscular mycorrhizal fungi can be slow,<br />
especially if there are limited sources of healthy, undisturbed soils nearby to repopulate the site.<br />
Unlike arbuscular mycorrhiza fungi, ectomycorrhizal fungi, as the name implies, coat the<br />
outside of the roots with hyphae that extend out into the soil. Ectomycorrhizal fungi form on<br />
5 to 10 percent of plant species, the majority of which are forest trees in the western United<br />
States. Species include Douglas-fir, western larch, true firs, spruce, hemlock, oak, manzanita,<br />
willows, and cottonwood. These fungi form a netting of fine hyphae around the root system<br />
that is often observable on nursery produced seedlings inoculated with mycorrhizal spores.<br />
Unlike AMF, the relationship between ectomycorrhizal fungi and host species is very specific.<br />
Many ectomycorrhizal fungi species have evolved to associate with only one plant species.<br />
Ectomycorrhizal fungi produce fruiting bodies, such as mushrooms, puffballs, and truffles,<br />
that yield reproductive spores for wind or animal dispersal.<br />
AMF and ectomycorrhizae do not associate with all plant species. For instance, in the western<br />
United States, arbutoid mycorrhizae forms on manzanita and madrone, while huckleberry form<br />
ericoid mycorrhizae. Still another 10 to 15 percent of the plant species in the United States<br />
do not form mycorrhizae at all. Many of these plant species have evolved root systems that<br />
function similarly to mycorrhizae and therefore give them an advantage over many mycorrhizal<br />
plant species, especially during early plant establishment when mycorrhizae inoculum may<br />
be limiting. This advantage is why many plant species, considered highly aggressive weeds,<br />
are non-mycorrhizal species.<br />
Mycorrhizal Fungi – How to Assess<br />
Where soils have been drastically disturbed, it can be assumed that the mycorrhizal fungal<br />
propagules are drastically reduced or absent from the site. The size and severity of the disturbance<br />
determine the diversity and quantity of mycorrhizal fungi. As the level of disturbance<br />
increases, the density of viable fungi propagules typically decreases. Small disturbances<br />
surrounded by native forests or rangelands often reestablish quickly; in larger disturbances,<br />
where topsoil has been removed, recolonization by mycorrhizal fungi may take years.<br />
Some laboratories offer testing for mycorrhiza fungi, but these are expensive tests. Since<br />
it is unlikely that mycorrhizal fungi will be found in recently disturbed sites lacking topsoil,<br />
conducting these tests for most projects is unnecessary.<br />
Mitigating for Lack of Mycorrhizal Fungi<br />
For most construction projects, the management of mycorrhizae should be considered in<br />
the early stages of project planning. Several strategies are available to enhance mycorrhizal<br />
colonization.<br />
<strong>Roadside</strong> <strong>Revegetation</strong>: An Integrated Approach to Establishing Native Plants and Pollinator Habitat<br />
76
PLANNING PHASE TWO: ASSESS SITE<br />
Minimize Soil Disturbance<br />
Operations that maintain topsoil will often preserve mycorrhizal inoculum and maintain soil<br />
nutrition. Partially disturbed topsoil is often adequate for reestablishing mycorrhizal plant<br />
species. Partial disturbances include clearing and grubbing of road right-of-way vegetation,<br />
ground-based logging, and light to moderate intensity burns. Colonized root systems left<br />
behind in these operations are sources of inoculum for endomycorrhizae.<br />
Leave Undisturbed Areas<br />
The movement of AMF into highly disturbed sites is slow. Spores are transported by soil<br />
erosion and animal movement but not by air. Leaving small areas of native vegetation and<br />
undisturbed soils within the larger disturbance reduces the travel distance of AMF, facilitating<br />
a quicker repopulation of the disturbed site. This practice is especially important where the<br />
size of the disturbance is large.<br />
Salvage Topsoil<br />
Reapplying topsoil to drastically disturbed sites is commonly done<br />
when quality native topsoil is available (see Section 10.1.4, Topsoil).<br />
Topsoil obtained from non-forested sites, such as meadows,<br />
rangelands, and unforested clear-cuts, is typically high in AMF<br />
which is important for grass and forb establishment. Salvaged<br />
topsoil forested sites will have mycorrhizae suitable for tree species<br />
as well as grass and forbs.<br />
Apply Topsoil to Planting Holes<br />
If topsoil is very limiting, placing healthy topsoil into holes prior to<br />
planting seedlings is an effective method of introducing an inoculum<br />
to a disturbed site. Collecting soils as inoculum from young, actively<br />
growing forests has been shown to be suitable inoculum for young<br />
tree seedlings (Amaranthus and Perry 1987).<br />
Apply Commercially Available Mycorrhizal Fungi Inoculums<br />
Applying commercially available mycorrhizal fungi inoculum is another method used to repopulate<br />
highly disturbed sites (see Section 10.1.7, Beneficial Soil Microorganisms). Commercially<br />
available sources of mycorrhizal inoculums are available for ectomycorrhizal and AMF plant<br />
species. These inoculums can be applied in hydroseeding slurries, as seed coats and root<br />
dips, through irrigation systems, or incorporated into the soil by broadcasting or banding.<br />
Fine grades of mycorrhizal inoculum are applied to the surface of the soil and will move into<br />
the soil surface with rainfall. Coarser-textured commercial inoculums must be incorporated<br />
in the soil to make them effective. When purchasing live plants from a nursery, rooting media<br />
can be inoculated with mycorrhizal fungi during nursery culture (Figure 5-20).<br />
Reduce Fertilizer Use<br />
While the application of fertilizer can increase plant biomass in the short term, it can also<br />
suppress mycorrhizal infection (Jaspers and others 1979; Claassen and Zasoski 1994). However,<br />
at lower rates, fertilizers have been shown to help plant establishment and improve mycorrhizal<br />
colonization (Claassen and Zasoski 1994).<br />
Figure 5-20 | Non-mycorrhizae<br />
inoculated seedlings versus<br />
inoculated seedlings<br />
The response of adding mycorrhizae<br />
spores to non-inoculated seedlings<br />
can sometimes be dramatic. Both sets<br />
of sticky currant (Ribes viscosissimum)<br />
seedlings shown in this photograph<br />
were stunted for months after seed<br />
germination. AMF spores were applied<br />
to the surface of each seedling container<br />
on the left with immediate growth response,<br />
while those on the right without<br />
mycorrhizae remained stressed (photo<br />
taken 50 days after inoculation).<br />
5.4 WATER LOSS<br />
Water loss is the depletion of soil moisture through transpiration (loss of water through leaves/<br />
needles) and evaporation of soil moisture from the soil surface. The rate at which evaporation<br />
and transpiration draw moisture from the soil profile is the evapotranspiration (ET) rate. ET<br />
rates change daily (rates rise through the day with increasing temperatures and winds speeds<br />
and decrease at night), weekly (as weather systems move through), and seasonally (rising in<br />
spring and summer and decreasing in fall and winter) (Figure 5-21).<br />
<strong>Roadside</strong> <strong>Revegetation</strong>: An Integrated Approach to Establishing Native Plants and Pollinator Habitat<br />
77
PLANNING PHASE TWO: ASSESS SITE<br />
The plant is a conduit for water transport between the atmosphere, which demands water<br />
from the plant, and the soil, which acts as a bank of water. When ET rates are low, plants<br />
can easily pull water from the soil through the leaves to the atmosphere. As soil moisture is<br />
depleted through time, there is less moisture to draw from and plants come under greater<br />
stress. With rising temperatures, lower humidity, and lack of rainfall, plants will be under very<br />
high moisture stress levels (Figure 5-22). The amount of stress that a plant is under is referred<br />
to as plant moisture stress (PMS) (Figure 5-23). PMS is at its highest from middle through late<br />
summer in the western United States, when the ET rates are at their highest and soil moisture<br />
levels at their lowest.<br />
Water loss due to ET can be influenced by a number of abiotic and biotic factors, primarily:<br />
◾◾<br />
Wind<br />
◾◾<br />
Site aspect<br />
◾◾<br />
Competing vegetation<br />
◾◾<br />
Humidity<br />
◾◾<br />
Soil cover<br />
Evapotranspiration<br />
Precipitation<br />
Moisture De cit<br />
Germination<br />
p Oct<br />
Nov Dec<br />
Inches<br />
Inches<br />
10<br />
9<br />
8<br />
7<br />
6<br />
5<br />
4<br />
3<br />
2<br />
1<br />
0<br />
10<br />
9<br />
8<br />
7<br />
6<br />
5<br />
4<br />
3<br />
2<br />
1<br />
0<br />
Portland, OR<br />
Jan Feb Mar Apr May Jun Jul Aug Sep Oct Nov Dec<br />
Bend, OR<br />
Months<br />
Evapotranspiration<br />
Precipitation<br />
Moisture De cit<br />
Germination<br />
Jan Feb Mar Apr May Jun Jul Aug Sep Oct Nov Dec<br />
Months<br />
Inches<br />
10<br />
9<br />
8<br />
7<br />
6<br />
5<br />
4<br />
3<br />
2<br />
1<br />
0<br />
Bend, Figure OR5-21 | Evapotranspiration rates<br />
Evapotranspiration (ET) rates can be found for many<br />
climate stations at http://www.wrcc.dri.edu. Plotting<br />
monthly evapotranspiration rates with precipitation<br />
rates (also found at this website) gives a good indication<br />
of the climate during plant establishment<br />
and growth phases. The following graphs show<br />
that the climate in Portland, OR has a very favorable<br />
environment (low ET and high precipitation) for seed<br />
germination in March; plant establishment should<br />
Janbe Feb adequate Mar Apr without May the Junneed Jul for Aug extra Sep mitigating Oct Nov Dec<br />
measures. The weather<br />
Months<br />
in the fall is also conducive to<br />
germination and plant establishment. The climate at<br />
Bend, OR during April and May, when seeds in that<br />
area germinate, has very high ET rates and very low<br />
rainfall; mitigating measures such as applying mulch<br />
over the seeds at sowing might be critical for success.<br />
<strong>Roadside</strong> <strong>Revegetation</strong>: An Integrated Approach to Establishing Native Plants and Pollinator Habitat<br />
78
PLANNING PHASE TWO: ASSESS SITE<br />
Relative Moisture<br />
High<br />
Low<br />
Soil Moisture<br />
A<br />
ET<br />
PMS<br />
Jan Feb Mar Apr May Jun Jul Aug Sep Oct Nov Dec<br />
Months<br />
Figure 5-22 | Relationships among<br />
evapotranspiration, soil moisture,and<br />
plant moisture stress<br />
Conceptual relationship between evapotranspiration<br />
(ET), soil moisture, and plant moisture stress (PMS).<br />
In the western United State, PMS lags behind ET in<br />
late spring because soil moisture is still moderate to<br />
high from the winter rains. By mid summer (A), plant<br />
moisture stress has increased to its greatest level in<br />
the year because soil moisture is at its lowest. Newly<br />
planted seedlings undergo extreme stress during this<br />
period. Unless the seedlings are dormant or their root<br />
systems have grown deeper into the soil, where there<br />
is greater access to soil moisture, seedlings will die. In<br />
late summer and early fall, cooler weather returns and<br />
rains wet the soil, driving ET and PMS rates down again.<br />
D<br />
E<br />
F<br />
Figure 5-23 | Plant moisture stress<br />
Plant moisture stress (PMS) is a measure of the tension<br />
or pull of moisture through a vascular plant. Much like a<br />
straw, when the demand for moisture at the surface of<br />
leaves is high, moisture is drawn from the stomata. This<br />
creates a pull of water through the leaves, stem, and<br />
down to the roots, which draws water from the soil.<br />
C<br />
A<br />
B<br />
Location Water Potential<br />
(MPa)<br />
Soil (A)<br />
- 0.1<br />
Plant Roots (B) - 0.3<br />
Plant Stem (C) - 0.6<br />
Plant Leaf (D) - 0.9<br />
Plant Stomata (E) - 25.0<br />
Atmosphere (F) - 125.0<br />
5.4.1 WIND<br />
Wind is often overlooked as a factor in the success or failure of establishing native vegetation,<br />
but it can play a major role, especially on sites where summers are hot and dry and soil<br />
moisture levels are low. Until seedlings become established, wind can place extremely high<br />
demands for moisture on newly planted seedlings, severely limit growth, and ultimately lead<br />
to death. Wind can also be an important factor for surface stability, as discussed in Section<br />
5.6, Surface Stability.<br />
<strong>Roadside</strong> <strong>Revegetation</strong>: An Integrated Approach to Establishing Native Plants and Pollinator Habitat<br />
79
PLANNING PHASE TWO: ASSESS SITE<br />
Wind – How to Assess<br />
Wind speed equipment is available but is most likely too costly for most designers. Site visits<br />
during different times of the year can give some indication whether wind is a problem. Other<br />
site characteristics, such as position on the slope (e.g., ridgelines are more prone than valley<br />
floor), or proximity to forested environments – as forests often reduce wind speeds – can be<br />
used to infer wind strengths and directions. In many environments, prevailing winds often come<br />
from one, or sometimes two, directions. Existing vegetation can provide clues to prevailing<br />
wind directions (e.g., trees bent away from the prevailing wind). Road construction itself may<br />
change wind patterns (e.g., creating a wind tunnel by constructing a through cut or removing<br />
a swath of existing vegetation). Some visual indicators of wind erosion are wind scour (see<br />
Figure 5-40 in Section 5.6, Surface Stability), exposed roots, and areas of soil deposition.<br />
County and state departments of transportation employees are often good resources for<br />
local weather information.<br />
Mitigating for High Wind<br />
Road Design<br />
Designing islands of undisturbed vegetation to help break up wind patterns can aid vegetation<br />
establishment. The taller the plants left undisturbed, the greater the wind protection. Established<br />
trees, particularly those with low-growing branches, provide the greatest protection from wind.<br />
Wind Barriers<br />
Obstacles that block wind at the soil surface can be effective for early seedling survival. These<br />
obstacles can include trees and tall shrubs, filter fabric, stabilized logs, large rocks, berms, and<br />
stumps. In using these structures, seedlings should be planted on the windward side.<br />
Tree Shelters<br />
Tree shelters completely surround seedlings and block them from the wind (see Section 10.4.4,<br />
Tree Shelters). They are an effective means of reducing ET rates created by high winds during<br />
early establishment. Once the vegetation has emerged from the top of the tube, however,<br />
tree shelters no longer protect the emerging foliage from the wind.<br />
Shade Cards<br />
Shade cards are sometimes used to block wind, but they are less effective than the fully enclosed<br />
tree shelter (see Section 10.4.3, Shade Cards). When used to block wind, shade cards must<br />
be placed on the windward side of the seedling, which is not necessarily the same location<br />
that cards would be placed if protection from sun is the objective. Often two shade cards are<br />
placed around the seedling for added protection against the wind. Placement of the shade<br />
cards at the height of the foliage affords greater protection to the seedling.<br />
Appropriate Species Selection<br />
The drying and damaging effects of wind are important considerations in appropriate species<br />
selection. A simple assessment of soil type and rainfall may not account for the effects of<br />
wind. Choosing hardier, wind-tolerant, and more drought-tolerant species may be necessary<br />
to establish vegetation on windswept sites. Find reference sites in windy locations to indicate<br />
which species are adapted to wind.<br />
Leave Surface Roughened<br />
A roughened soil surface can create a micro-basin or relief that protects young germinants<br />
from the drying effects of wind during the establishment phase (see Section 10.1.2, Tillage).<br />
<strong>Roadside</strong> <strong>Revegetation</strong>: An Integrated Approach to Establishing Native Plants and Pollinator Habitat<br />
80
PLANNING PHASE TWO: ASSESS SITE<br />
5.4.2 ASPECT<br />
Aspect is the direction a slope is facing and is one of the predominant site characteristics<br />
affecting evapotranspiration. South and west aspects receive more solar radiation during<br />
the day and are warmer and drier, with higher ETs than north and east aspects. Soils on these<br />
south and west aspects dry out faster than north and east slopes. In spring, during seed<br />
germination, south and west aspects can dry very quickly between rainstorms, reducing the<br />
rates of germinating seeds. As seedlings emerge and grow through spring and early summer,<br />
temperatures on the south and west slopes continue to rise to very high levels, creating very<br />
unfavorable conditions for seedling establishment. Even with planted seedlings, high surface<br />
temperatures can damage stems near the ground line, severely affecting seedling survival<br />
and establishment (Helgerson and others 1992).<br />
In climates where moisture is not the limiting factor, south and west slopes are often very<br />
productive and have greater cover. Warmer soil and air temperatures create a longer growing<br />
season, offsetting the effects of moisture stress on plant growth.<br />
On high elevation sites, north and east aspects are cool, with much shorter growing seasons,<br />
compared to the south and west aspects, resulting in very different compositions of species.<br />
At high elevations, soils on south and west slopes stay warmer longer in the fall, providing an<br />
opportunity to plant in the late summer in time for seedlings to become established before<br />
winter arrives. During spring, at all elevations, south and west slopes warm up much sooner<br />
than north slopes, resulting in earlier seed germination and plant growth. The difference in<br />
soil temperatures between north and south aspects is a consideration for determining when<br />
to plant and what species to use.<br />
Aspect – How to Assess<br />
Aspect is measured in the field by facing the fall line of the slope (the imaginary line a ball<br />
would roll) and taking a compass bearing downslope. A “northeast slope,” “northeast aspect,”<br />
“northeast exposure,” or “northeast-facing slope” all refer to an aspect with a compass bearing<br />
facing northeast.<br />
Aspect can also be measured from topographic maps by drawing an arrow perpendicular<br />
to the contour lines and pointing the tip of the arrow downslope. Aspect is often a factor<br />
for delineating one revegetation unit from another due to the strong influence it has on the<br />
growth and survival of seeds, seedlings, and cuttings.<br />
Soil and air temperatures differ greatly between aspects, and taking temperature measurements<br />
can be important for assessing the effects of aspect on revegetation. There are many types<br />
of recording devices available on the market, but only equipment that can download data to<br />
spreadsheets for analysis and graphing should be considered. Some equipment has become<br />
so inexpensive that more than one unit can be purchased (Figure 5-24).<br />
Mitigating for South and West Aspects<br />
For most sites, any treatment that will shade vegetation on the south and west slopes from<br />
intense solar radiation should increase survival and growth of establishing plants.<br />
Overstory Vegetation<br />
Keeping overstory trees at a minimum density of one tree per tenth acre is a rule of thumb for<br />
reducing soil temperatures below lethal levels on south aspects (Helgerson and others 1992).<br />
Shade Cards<br />
Shade cards can significantly increase seedling survival on south aspects (Hobbs 1982; Flint<br />
and Childs 1984) (see Section 10.4.3, Shade Cards). They must be placed close to planted<br />
Figure 5-24 | Temperature<br />
recording device<br />
Temperature recording technology has<br />
become smaller and very inexpensive.<br />
The iButton® shown next to the nickel<br />
can record more than a year of temperature<br />
data.<br />
<strong>Roadside</strong> <strong>Revegetation</strong>: An Integrated Approach to Establishing Native Plants and Pollinator Habitat<br />
81
PLANNING PHASE TWO: ASSESS SITE<br />
seedlings so that the stem and lower portion of the seedlings are shaded from the afternoon<br />
sun (Helgerson and others 1992).<br />
Obstacles<br />
Large obstacles that cast significant amounts of shade on young seedlings will create a more<br />
favorable environment for seedling establishment and increase seedling survival (Minore 1971).<br />
These include stabilized logs, large rocks, berms, and stumps. Seedlings should be planted on<br />
the north and east side of these features to be shaded from the afternoon sun.<br />
Mulch<br />
On south exposures, the use of mulches as a moisture barrier should be considered for seedlings,<br />
seeds, and cuttings (see Section 10.1.3, Mulches). Avoid placing mulch in direct contact with<br />
the stem of the seedling.<br />
Species Mix<br />
The composition of species will probably be different for north and south aspects. Species<br />
adapted to hotter and drier environments are used for revegetating south exposures; those<br />
adapted to cool, moist environments are used on north aspects. Elevation can offset the effects<br />
of aspect. For example, species that grow on low elevation, north aspects often occur several<br />
thousand feet higher on south aspects because of the difference in temperatures. Reference<br />
site vegetation surveys will guide in the selection of appropriate species for each exposure.<br />
Plant Material Rates<br />
South aspects often require a higher density of seedlings, cuttings, and seeds than north<br />
aspects to offset the expected higher mortality rates. Adjusting for increased mortality rates<br />
is made when calculating plant materials rate for seeds (see Section 10.3.1, Seedling), cuttings<br />
(see Section 10.2.2.5, Determine Survival Potential), and plants (see Section 10.2.6, Nursery<br />
Plant Production).<br />
Planting and Sowing Windows<br />
Take advantage of warmer spring and fall soil temperatures on the south exposures by sowing<br />
and planting earlier on these sites (see Chapter 6).<br />
5.4.3 COMPETING VEGETATION<br />
Controlling competing vegetation around planted seedlings, whether native or non-native,<br />
reduces the rate at which water is withdrawn from the root zone and increases the potential for<br />
survival and growth. The rate at which water is depleted is a function of the type and amount<br />
of competing species. Grass species, for example, have a very fibrous root system in the upper<br />
soil horizon that allows them to withdraw moisture very quickly and efficiently during dry<br />
weather. Unless grasses are controlled, especially in the western United States, it is very difficult<br />
to achieve good survival or growth of planted seedlings in areas with high densities of grass.<br />
Perennial forbs are generally less competitive than grasses because their root systems are<br />
deeper and less concentrated in the surface where the seedlings are withdrawing moisture.<br />
Revegetating with a seed mix is also affected by the type and quantity of competing vegetation.<br />
Those species that germinate earlier than the seeded species in the spring or fall will deplete<br />
soil moisture before the seeded species can establish. Cheatgrass is an example of an annual<br />
species that establishes quickly when soil temperatures are cool during early spring, depleting<br />
the surface soil moisture just as perennial species are beginning to germinate. How to assess<br />
and mitigate for competing vegetation is discussed in detail in Section 5.8, Weeds.<br />
<strong>Roadside</strong> <strong>Revegetation</strong>: An Integrated Approach to Establishing Native Plants and Pollinator Habitat<br />
82
PLANNING PHASE TWO: ASSESS SITE<br />
5.4.4 SOIL COVER<br />
The thickness and composition of material that covers the soil surface influence many important<br />
soil properties covered in this manual, such as infiltration rates, interception losses, soil<br />
temperatures, surface erosion, runoff, and soil moisture loss. The following discussion focuses<br />
on soil cover as it affects soil moisture loss through evaporation.<br />
Under undisturbed conditions, soil cover is predominantly composed of duff, litter, and stems<br />
that block the escape of soil moisture through evaporation (Figure 5-25). Mulches are also<br />
unfavorable seedbeds for weed seeds because duff and litter dry out quickly. Disturbed soils,<br />
on the other hand, are mostly composed of bare soil. Evaporation from the surface of bare soil<br />
can be high, extending to at least 6 inches below the soil surface, affecting seed germination<br />
and seedling establishment rates. Until roots of planted or seeded seedlings have extended<br />
farther into the soil profile, surface drying will negatively affect seedling establishment,<br />
especially on sites where water input and storage are already limiting.<br />
Air<br />
Rainfall<br />
Evaporation<br />
Soil Cover – How to Assess<br />
Soil cover can be measured on undisturbed and disturbed reference sites or post-construction<br />
sites through the ground cover monitoring procedures outlined in Section 12.2, Soil Cover<br />
Procedure. In this procedure, the percentage of area in litter, duff, rock, vegetation, and bare<br />
soil is recorded and periodic measurements of litter and duff thickness are made.<br />
Mitigating for Low Soil Cover<br />
Mulches for Seedlings and Cuttings<br />
Mulches create a more favorable environment for establishing seedlings and cuttings not only<br />
by reducing surface evaporation, but also by decreasing the amount of competing vegetation.<br />
There are two types of mulches for seedlings and cuttings – organic aggregate and sheet<br />
mulches. The organic aggregates are thickly applied ground wood or bark, while the sheet<br />
mulches are made from non-permeable or slightly permeable plastic, newspaper, or geotextile.<br />
Both types are placed around the base of the seedling and cover at least a radius of 1.5 feet<br />
from the base of the seedling (see Section 10.1.3, Mulches, for how to install).<br />
Mulches for Sown Seeds<br />
Selecting and applying mulches over sown seeds differ from those selected for planted<br />
seedlings and cuttings. Mulch application for seedlings and cuttings is typically too thick for<br />
seeds to germinate and grow through. An ideal seedbed mulch is one that is applied at the<br />
highest rates without affecting seedling emergence. Long-fibered mulches, such as straw,<br />
hay, shredded wood, or wood strands, create the greatest loft or thickness. At the optimum<br />
thickness, these mulches allow some light to penetrate and space for seedlings to emerge.<br />
Short-fibered mulches, such as wood fiber and paper found in hydromulch products, are<br />
more compact and create less loft. While these products reduce erosion rates, they are not<br />
necessarily good as seed covers (see 10.3.2 Hydroseeding).<br />
Figure 5-25 | Effective mulch cover<br />
An effective mulch for seed cover is one<br />
that is stable and allows good airflow<br />
and rainfall entry, while reducing evaporation<br />
from the soil surface.<br />
5.5 NUTRIENT CYCLING<br />
Nutrient cycling is the process by which sites store and release essential nutrients for plant<br />
survival and growth. There are 13 elements, or mineral nutrients, and each fills a specific role or<br />
function in plant development and each possesses individual characteristics of movement and<br />
storage in the soil. This manual will not attempt to explain the role and function of each mineral<br />
nutrient (there are many good textbooks on this subject). It will instead focus on how nutrients<br />
cycle through vegetation and soils; how they are captured, stored, and released; and what site<br />
components are essential to support these processes. In contrast to an agricultural system of<br />
managing optimum growth in crops through fertilization, the goal in wildlands revegetation<br />
<strong>Roadside</strong> <strong>Revegetation</strong>: An Integrated Approach to Establishing Native Plants and Pollinator Habitat<br />
83
PLANNING PHASE TWO: ASSESS SITE<br />
is to create an environment that will support a self-sustaining native plant community that<br />
can develop through successional processes. This includes facilitating the establishment of<br />
nutrient cycles in a way that conserves, cycles, and builds nutrients in the system.<br />
Mineral nutrients are stored in: soil, live or dead vegetation, and rock. They are slowly released<br />
over time at varying rates. The rates at which nutrients are released from each source will<br />
determine their availability for plant uptake. Rock and fallen trees, for example, both hold<br />
essential nutrients but release them to the soil at significantly differing rates. The fallen tree<br />
can take up to 100 years to decompose and release its nutrients; the weathering of rock might<br />
take over 100,000 years. Soil, on the other hand, can release nutrients in the order of weeks<br />
and months. Once released, these nutrients are taken up by plants, lost through leaching or<br />
erosion, or reabsorbed in the soil.<br />
On undisturbed sites, there is a dynamic exchange of nutrients throughout the year. Plants<br />
absorb nutrients from the soil through the root system and assimilate them into vegetative<br />
biomass. As plants, or portions of plants, die, they drop leaves, branches, and stems to the<br />
ground where they eventually decompose and return nutrients to the soil. The nutrients are<br />
stored in the soil and once again become available for plant uptake. This natural process of<br />
nutrients moving from soil to vegetation and back again is referred to as nutrient cycling. The<br />
factors important in nutrient cycling are as follows:<br />
◾◾<br />
Topsoil<br />
◾◾<br />
Site organic matter<br />
◾◾<br />
Soil carbon and nitrogen<br />
◾◾<br />
Nutrients<br />
◾◾<br />
Soil pH and salinity<br />
In a healthy plant community, nutrients are constantly recycled with a minimum amount of<br />
nutrients lost from the site. On drastically disturbed sites, however, nutrient cycling functions<br />
poorly, if at all. The topsoil, which holds the greatest concentrations of available nutrients and<br />
supports the primary microbial activity on the site, is missing or mixed with the subsoil. Organic<br />
matter, which is a primary source of long-term nutrient supply and an energy source, has also<br />
been removed. Soil nitrogen, the most critical nutrient for plant growth and site revegetation,<br />
is lacking. Soil nitrogen governs how quickly vegetation will return to a disturbed site and<br />
how much biomass it will ultimately support (Bloomfield and others 1982). Its availability is<br />
closely regulated by the amount of carbon present in the soil, which is also in flux on highly<br />
disturbed sites.<br />
For many sites that lack topsoil, the subsoil in its place may have pH values that are higher or<br />
lower than the pH of the original topsoil. pH values at extreme ranges affect nutrient cycling<br />
by making many nutrients insoluble and unavailable for plant uptake. In addition, increased<br />
soil salinity, which can be caused by soil disturbance and amendments, can disrupt nutrient<br />
availability and provide unfavorable conditions for plant establishment.<br />
5.5.1 TOPSOIL<br />
The topsoil is the horizon directly below the litter layer that is characterized by high organic<br />
matter, abundant roots, healthy microbial activity, good infiltration rates, high porosity, high<br />
nutrient content, and high water-holding capacity (Jackson and others 1988; Claassen and<br />
Zasoski 1998). Most nutrient cycling takes place in the topsoil where the greatest biological<br />
activity occurs. Decomposing microorganisms flourish, feasting on dead vegetation and roots,<br />
releasing stored nutrients back to the soil. Most life forms occur in forest, prairie, and range<br />
topsoils, including mammals, reptiles, amphibians, snails, earthworms, insects, nematodes,<br />
algae, fungi, viruses, bacteria, actinomycetes, and protozoa (Trappe and Bollen 1981). The top<br />
6 inches of an acre of forest topsoil can contain as much as a ton of fungi and a half of a ton of<br />
<strong>Roadside</strong> <strong>Revegetation</strong>: An Integrated Approach to Establishing Native Plants and Pollinator Habitat<br />
84
PLANNING PHASE TWO: ASSESS SITE<br />
bacteria and actinomycetes apiece (Bollen 1974). Topsoil depth is highly correlated with the<br />
nutritional status of the soil and, in forests of the western United States, has been found to be<br />
highly correlated to site productivity (Steinbrenner 1981). Topsoils possess humus, which is what<br />
gives topsoils their dark color (Figure 5-26). Humus is a stable end-product of decomposition,<br />
important for nutrient storage, soil structure, and water-holding capacity.<br />
Sites lacking topsoil have significantly reduced productivity, and obtaining even<br />
minimal revegetation can be very difficult. Planted seedlings often fail or growth<br />
is significantly reduced, resulting in inadequate plant cover to protect the soils<br />
from erosion. Growth of planted trees can be reduced by one-third to one-half<br />
when planted in subsoil instead of topsoil (Youngberg 1981). Restoring these<br />
sites to functioning plant communities is unlikely without mitigating measures.<br />
Topsoil – How to Assess<br />
On undisturbed sites, topsoil is visually differentiated from the underlying subsoil<br />
by having darker colors, less clay, better soil structure, and higher abundance of<br />
fine roots. In forest soils, topsoil depths can be more difficult to differentiate from<br />
subsoils because the color changes are not always distinct. Other attributes, such<br />
as the abundance of roots, lack of clays, increased soil structure, and lower bulk<br />
density, can be used instead. Section 5.11.1, Topsoil, provides a general approach<br />
to surveying a site for topsoil. On construction sites, topsoil has either been<br />
removed and stockpiled or mixed in with the subsoil.<br />
Mitigating for Lack of Topsoil<br />
Minimize Soil Disturbance on “Fragile Soils”<br />
Where soils are especially fragile and reconstructing topsoil conditions is difficult, it is particularly<br />
important to keep the “disturbance footprint” to a minimum (Claassen and others 1995). Sites<br />
with fragile soils include decomposed granitic soils, serpentine soils, high elevation soils, and<br />
very acidic or basic soils.<br />
Salvage and Reapply Topsoil<br />
An effective practice in revegetating highly disturbed sites is salvaging and reapplying topsoils<br />
(see Section 10.1.4, Topsoil). This practice has been found to greatly increase plant growth<br />
and ground cover (Claassen and Zasoski 1994). Topsoil salvage and application require good<br />
planning, implementation oversight, and topsoil surveys. In the planning phase, a survey of the<br />
planned road corridor identifies the location of topsoil, the depth, and nutrient status through<br />
laboratory testing (see Section 5.11.1, Topsoil). After topsoil is removed and appropriately stored,<br />
it is reapplied to the disturbed site, ideally at depths similar to pre-disturbance reference sites.<br />
Create Manufactured Topsoil<br />
When topsoil is not available, “manufactured topsoil” can be created in situ or produced offsite<br />
and imported (see section 10.1.4.5, Manufactured Topsoil). Manufactured topsoil will lack the<br />
native seed bank and some of the biological components of topsoil, but it can re-create a<br />
rooting zone high in nutrients and organic matter, with good water-holding capacity, porosity,<br />
and infiltration.<br />
Create Planting Islands<br />
If sources of manufactured or natural topsoil are scarce or too costly for broad scale applications,<br />
placing available topsoil in strategic locations, such as planting islands, can create a mosaic<br />
of productive growing sites.<br />
Figure 5-26 | Topsoil<br />
Topsoil is the upper soil horizon and is<br />
generally darker, more friable, and has<br />
more roots than subsoil.<br />
<strong>Roadside</strong> <strong>Revegetation</strong>: An Integrated Approach to Establishing Native Plants and Pollinator Habitat<br />
85
PLANNING PHASE TWO: ASSESS SITE<br />
5.5.2 SITE ORGANIC MATTER<br />
Site organic matter (OM) consists of plant materials in all stages of<br />
500<br />
decomposition, including wood, bark, roots, branches, needles,<br />
leaves, duff, litter, and soil organisms. From a nutrient cycling<br />
standpoint, site organic matter assimilates nutrients drawn from<br />
the soil into live vegetation. Depending on the type of vegetation<br />
and the productivity of the site, the amount of nutrients held in<br />
organic matter can be significant. Figure 5-27 shows the quantities<br />
of four major nutrients held in the organic matter of a young<br />
Douglas-fir stand, and Figure 5-28 shows the quantity of major<br />
400<br />
300<br />
200<br />
175<br />
32<br />
163<br />
nutrients found in the application of 2 inches of material derived<br />
from Douglas-fir and alder. These two examples show the possible<br />
100<br />
nutrient reserves that organic matter can contribute to a disturbed<br />
125<br />
site if they are kept on the site or processed into mulch or soil<br />
amendments and reapplied.<br />
0<br />
Nitrogen<br />
While plants are essential in nutrient cycling, equally important<br />
are the decomposing organisms that release nutrients to the soil.<br />
Decomposers consist of thousands of specialized species of animals, insects, fungi, bacteria,<br />
and actinomycetes that survive on organic matter. Decomposing organisms not only release<br />
nutrients but are essential to the development of soil structure (see Section 5.3.3, Soil Structure).<br />
On an undisturbed site, organic matter is in all stages of decomposition, from recently dead<br />
trees to soil humus, the end product of hundreds of years of decomposition. This understanding<br />
is important for restoring a site to a functioning plant community since it is a reminder that<br />
nutrients are released throughout the life cycle of a plant community, not just at the beginning<br />
of a revegetation project. A site that has a range of organic matter in all stages of decomposition<br />
not only conserves nutrients but slowly meters them out over time. In addition, organic matter<br />
is an essential nesting habitat for many pollinator species. For example, tunnel-nesting bees<br />
nest in dead standing trees or piths of stems and twigs of shrubs, grasses, and forbs.<br />
The rate at which organic matter decomposes and releases nutrients is a function of: soil to<br />
OM contact, OM particle size, the carbon-to- nitrogen ratio (C:N), temperature, and moisture.<br />
Decomposition rates of organic matter are highest in soil because the greatest microbial activity<br />
occurs when soil is in direct contact with OM (Slick and Curtis 1985; Rose and others 1995).<br />
Pounds per acre<br />
26<br />
41<br />
19<br />
Litter and Duff<br />
Roots<br />
Branches and Foliage<br />
Bole and Bark<br />
32<br />
24<br />
100<br />
90<br />
137<br />
37<br />
179<br />
117<br />
Phosphorus Potassium Calcium<br />
Figure 5-27 | Nutrients<br />
in forests stands<br />
Most of the nutrients found in a young<br />
Douglas-fi r stand reside in the litter, duff,<br />
and branches (adapted from Cole and<br />
Johnson 1981).<br />
Pounds per Acre<br />
1,000<br />
900<br />
800<br />
700<br />
600<br />
500<br />
400<br />
300<br />
200<br />
Douglas- r sawdust<br />
Douglas- r bark<br />
Red alder sawdust<br />
Red alder bark<br />
Figure 5-28 | Nutrients in Douglas-fir and alder<br />
Comparison of pounds per acre of nutrients resulting<br />
from bark or wood from Douglas-fi r and alder trees,<br />
based on 2 inches of applied organic matter (Rose<br />
and others 1995).<br />
100<br />
0<br />
Nitrogen<br />
Phosphorous<br />
Calcium<br />
Potassium<br />
Magnesium<br />
<strong>Roadside</strong> <strong>Revegetation</strong>: An Integrated Approach to Establishing Native Plants and Pollinator Habitat<br />
86
PLANNING PHASE TWO: ASSESS SITE<br />
Organic matter placed on the surface of the soil as mulch will decompose at a much slower<br />
rate than organic matter incorporated into the soil because there is less contact with the soil.<br />
Organic matter particle size plays an important role in the rate of decomposition. Within the<br />
soil profile, the smaller-sized OM fractions decompose faster than the larger fractions due to<br />
greater surface area in contact with soil. Roots, leaves, needles, and very finely ground sawdust<br />
or bark often decompose much faster than larger materials, such as buried logs or large<br />
diameter branches. Materials with high carbon to nitrogen ratios (C:N), such as wood or bark,<br />
decompose much slower than materials with low C:N, such as green leaves and grass cuttings.<br />
As Figure 5-29 illustrates, high C:N organic matter will take much longer to decompose than<br />
low C:N material, but both will decompose faster when they are reduced in size.<br />
Moisture and temperature also control decomposition rates; cold and dry environments have<br />
very slow rates compared to warm, moist sites.<br />
High<br />
Decomposition Rates<br />
Years Decades<br />
Organic Matter – How to Assess<br />
C:N Ratio<br />
Months Years<br />
Duff and litter on reference sites can be measured through transects or plots (see Chapter 12).<br />
Estimating forest biomass of down, woody materials in different size classes can be done using<br />
photo series guides (Maxwell and Ward 1976a, 1976b, 1979). Fire specialists are experienced<br />
in estimating the amount of biomass in forested environments.<br />
Low<br />
Small<br />
Particle Size<br />
Large<br />
Mitigating for Lack of Site Organic Matter<br />
Salvage and Reapply Litter and Duff<br />
Duff and litter can store a significant amount of nutrients, especially on sites where layers are<br />
deep. It can be salvaged separately (see Section 10.1.3.11, Litter and Duff) or mixed together<br />
when topsoils are salvaged (see Section 10.1.4, Topsoil).<br />
Process and Apply Organic Matter<br />
Road projects constructed through forested sites can generate high amounts of biomass. These<br />
materials can be good sources for slow-release nutrients and carbon. Methods of processing<br />
this material and reapplying it to constructed slopes are discussed in Section 10.1.3, Mulches,<br />
Processed organic matter can be applied directly to the soil surface as a mulch or mixed into<br />
the soil as a soil amendment. High C:N organic materials, such as sawdust and bark, can be<br />
placed on the soil surface to prevent long-term nitrogen tie-up in the soil or composted for<br />
several years to lower the C:N ratio before adding as a soil amendment. Lower C:N materials,<br />
such as leaves, needles, and branches, can be incorporated in the soil with some addition of<br />
slow-release nitrogen to reduce the effects of nitrogen tie-up.<br />
Apply Composts to Soil Surface<br />
When compost is applied to the surface of the soil (compost blanket), it functions as a soil cover<br />
to protect the soil from surface erosion while slowly decomposing and adding nutrients as the<br />
plant community develops. Decomposition rates of surface-applied compost are slower than<br />
if it were incorporated into the soil because there is very little soil contact at the soil surface.<br />
Nutrients are released at a slower rate and are available to the site longer. Leaving the soil<br />
surface very rough prior to the application of compost creates more soil-to-compost contact,<br />
which can increase the rate of decomposition of the compost. Tackifiers are added to compost<br />
to reduce the potential for the material to move off the site. Compost blankets function very<br />
differently than mulches; compost blankets are great media for seed germination and plant<br />
establishment whereas mulches are not (see Section 10.1.3, Mulches).<br />
Salvage and Place Large Wood<br />
Large wood can be salvaged and placed in areas such as abandoned roads for long-term site<br />
productivity, microsite planting, pollinator nesting habitat, and soil erosion control structures<br />
(Figure 5-30). When placed in contact with the soil, large wood helps stabilize the surface<br />
Figure 5-29 | Relative<br />
rates of decomposition by<br />
C:N and particle size<br />
<strong>Roadside</strong> <strong>Revegetation</strong>: An Integrated Approach to Establishing Native Plants and Pollinator Habitat<br />
87
PLANNING PHASE TWO: ASSESS SITE<br />
of the soil from sheet and wind erosion, and can be used as buttresses to stabilize slopes.<br />
Seedlings planted on the north side of the logs can be protected from wind and sun during<br />
establishment. Large and small wood can be placed at the outlets of culverts as obstacles to<br />
capture and store sediments, reducing the amount of sediment reaching live streams (Burroughs<br />
and King 1989; Ketcheson and Megahan 1996). When large wood is placed upright, it can be<br />
used as barriers to off-road vehicle traffic, nesting habitat for many pollinator species, and<br />
feeding and nesting habitat for a range of wildlife species.<br />
5.5.3 SOIL NITROGEN AND CARBON<br />
Nitrogen (N) is discussed separately from the other mineral nutrients because of its critical<br />
importance to plant growth and long-term development of plant communities. Carbon (C) is<br />
included in this discussion because of its unique relationship to nitrogen availability. Carbon<br />
governs the amount of available nitrogen in the soil while nitrogen regulates the rate at which<br />
carbon is broken down. Both factors play a critical role in microbiological activity and the<br />
development of soil properties.<br />
Carbon to Nitrogen Ratio (C:N)<br />
Carbon is the energy source for soil microorganisms, and practically all site nitrogen eventually<br />
passes through these microorganisms (Woodmansee and others 1978). The rate at which carbon<br />
(or organic matter) decomposes is directly related to the amount of available nitrogen and<br />
the type of dominant microbes present in the soil. The greater the nitrogen, the greater the<br />
decomposition rates. If decomposing organisms do not find sufficient nitrogen in the organic<br />
matter, they will withdraw it from the soil, leaving little or no nitrogen for plant growth. This is<br />
usually a temporary condition, lasting several years. The tie-up of nitrogen can greatly affect<br />
the establishment of vegetation if organic amendments, such as composts, wood chips, or<br />
straw, are incorporated into the soil without supplemental nitrogen.<br />
With time, nitrogen is eventually released from the organic matter by microbial activity. This<br />
nitrogen, plus nitrogen released from dead and decomposing microorganisms, becomes<br />
available for plant growth. As organic matter breaks down further, there becomes a net<br />
increase in available nitrogen. In the last stage of decomposition, microorganisms move to a<br />
steady rate of decomposition, releasing a constant nitrogen supply (Figure 5-31). This process<br />
can take several years or more depending on site factors and organic matter levels. C:N is an<br />
Figure 5-30 | Large wood<br />
creates pollinator habitat<br />
and reduces soil erosion<br />
Placement of large wood adds long-term<br />
organic matter while creating microsites<br />
for planting seedlings and habitat for<br />
pollinators and wildlife. Large wood can<br />
also slow runoff and detain sediments<br />
from surface soil erosion.<br />
Available N<br />
Unavailable N<br />
0<br />
Soil<br />
N<br />
High<br />
C<br />
added<br />
N<br />
immobilized<br />
C:N Ratio<br />
Low<br />
Net increase<br />
in available N<br />
Figure 5-31 | Release of available<br />
nitrogen through decomposition<br />
Available nitrogen (N) levels change as organic matter<br />
carbon (C) is added to the soil. High ratios move to<br />
low ratios during decomposition. Nitrogen is tied up<br />
in microorganisms during the immobilization phase<br />
(blue shaded area) and unavailable to plants. With<br />
time, nitrogen becomes available again and, at some<br />
point, exceeds the original level (green shaded area).<br />
Nitrogen is then released at a constant rate (modified<br />
after Havlin and others 1999).<br />
Time<br />
<strong>Roadside</strong> <strong>Revegetation</strong>: An Integrated Approach to Establishing Native Plants and Pollinator Habitat<br />
88
PLANNING PHASE TWO: ASSESS SITE<br />
indicator of whether nitrogen will be limiting or in surplus. A C:N of 30:1 or greater indicates<br />
that decomposing organisms have consumed the available nitrogen in the soil, leaving little if<br />
any available nitrogen for plant growth. Plants respond by turning yellow and stunted. A C:N<br />
below 18:1 is an indication that the decomposing organisms are releasing available nitrogen<br />
from the breakdown of organic matter at rates that exceed their need, thereby increasing<br />
nitrogen for plant uptake (Claassen 2006). For example, undisturbed topsoils typically have<br />
ratios of 10:1 to 12:1, which indicates that nitrogen is sufficiently available for plant growth<br />
(Tisdale and Nelson 1975). Dry hay, on the other hand, has a C:N around 40:1, indicating nitrogen<br />
will probably be limiting for some period of time if the hay is incorporated into the soil.<br />
The use of high C:N materials is often discouraged because of concerns about tying up<br />
nitrogen. However, there are strategies where the use of high C:N materials can aid in achieving<br />
project goals. One use of high C:N materials is to apply it to the soil surface or incorporate<br />
it into the top several inches of soil to intentionally tie up nitrogen. The lower availability of<br />
N at the surface creates a less than optimum growing environment for the establishment of<br />
annual weedy species, which thrive on high nitrogen environments (see Section 5.8.1.2, Weed<br />
Sources – How to Limit).<br />
Soil Nitrogen Capital<br />
Soil nitrogen capital can be categorized into three<br />
nitrogen pools, or reserves, based on its availability<br />
in the soil:<br />
◾◾<br />
Available nitrogen (referred to as “extractable<br />
nitrogen”)<br />
◾◾<br />
Slowly available nitrogen (referred to as<br />
“mineralizable nitrogen”)<br />
◾◾<br />
Unavailable nitrogen (“humified organic” or<br />
“fresh” forms)<br />
Nitrogen capital can be viewed much like our banking system. Cash received from the bank<br />
teller is comparable to “available nitrogen.” When money runs low, the teller replenishes it<br />
with money from the bank vault (similar to “slowly available nitrogen”). Banks are backed up<br />
by money held in an extremely large banking reserve system (“unavailable nitrogen”). While<br />
this money is not accessible, it is very important for the long-term stability of the banking<br />
system. Unavailable nitrogen is like the banking reserve system in that it backs up the nitrogen<br />
system and ultimately releases nitrogen to the plant community.<br />
As with the banking reserve system, having high reserves of both slowly available and<br />
unavailable nitrogen ensures that available nitrogen levels will be released at constant rates<br />
over time which is necessary for the development of a sustainable plant community. Figure<br />
5-32 shows the relationship of different revegetation treatments on nitrogen capital.<br />
On highly disturbed sites, all nitrogen reserves are low. The course of action in typical<br />
revegetation projects is to apply inorganic fertilizers during the seeding operation. While<br />
this immediately makes nitrogen available, it does little for increasing long-term nitrogen<br />
reserves. Within a year of application, most soils will need more available nitrogen to sustain<br />
plant growth. Alternatively, organic fertilizers provide a combination of available and slowly<br />
available nitrogen. These fertilizers release nitrogen over several years but are typically applied<br />
at rates not great enough to bring the nitrogen reserves up to levels for long-term plant<br />
community establishment (Claassen and Hogan 1998). Applying topsoil, composts, or low C:N<br />
organic matter into the soil are mitigation treatments that create the reserves of unavailable<br />
and slowly available nitrogen important for a constant supply of available nitrogen over time.<br />
A<br />
Undisturbed<br />
B C D<br />
Drastically<br />
disturbed<br />
Inorganic<br />
fertilizer<br />
Organic<br />
fertilizer<br />
Available Nitrogen Slowly available Nitrogen Unavailable Nitrogen<br />
E<br />
Compost<br />
Figure 5-32 | Managing<br />
nitrogen capital<br />
Undisturbed sites (A) have very high<br />
total nitrogen levels, with over 95% tied<br />
up in organic matter and not available<br />
(green). Slowly available nitrogen (blue)<br />
makes up 1% to 3% of the total nitrogen;<br />
available nitrogen for plant uptake<br />
(orange) is less than 2% of the total<br />
nitrogen. Nitrogen capital is essentially<br />
removed on drastically disturbed sites<br />
(B). The addition of inorganic fertilizer (C)<br />
dramatically increases available nitrogen<br />
but does little to build nitrogen capital.<br />
The application of organic fertilizers<br />
(D) raises the available and the slowly<br />
available nitrogen but does not add to<br />
the long-term reserves. Adding compost<br />
to the soil can increase available, slowly<br />
available, and total nitrogen reserves<br />
(E) to levels comparable to undisturbed<br />
soils (A).<br />
<strong>Roadside</strong> <strong>Revegetation</strong>: An Integrated Approach to Establishing Native Plants and Pollinator Habitat<br />
89
PLANNING PHASE TWO: ASSESS SITE<br />
Minimum Soil Nitrogen Levels<br />
Total soil nitrogen is the sum of available, slowly available, and unavailable nitrogen reserves.<br />
The level of total soil nitrogen varies by plant community and ecoregion. It can range from<br />
20,000 lb/ac in deep forest soils of the Washington and Oregon coast (Heilman 1981) to as<br />
low as 800 lb/ac in desert grasslands of southern New Mexico (Reeder and Sabey 1987).<br />
Shortgrass prairies in northeastern Colorado and shrub-steppe prairies of the Great Basin<br />
have a range of total nitrogen from 4,000 to 5,000 lb/ac (Reeder and Sabey 1987). Sites that<br />
are drastically disturbed often have nitrogen rates below 700 lb/ac. These sites cannot fully<br />
support vegetative cover. A minimum, or threshold, level of total soil nitrogen required for a<br />
self-sustaining ecosystem has been suggested at 625 lb/ac (Bradshaw<br />
and others 1982) to 670 lb/ac (Dancer and others 1977) for drastically<br />
3,000<br />
disturbed sites. But Claassen and Hogan (1998) suggest much higher<br />
rates might be necessary. In their research on granitic soils in the<br />
2,500<br />
Lake Tahoe area, they found a good relationship between total soil<br />
nitrogen and the percentage of plant cover. Sites with greater than 40<br />
2,000<br />
percent ground cover contained at least 1,100 lb/ac total soil nitrogen<br />
in the surface foot of soil. This implies that to maintain a minimum of<br />
1,500<br />
40 percent plant cover, sites like these must contain at least 1,100 lb/<br />
ac of nitrogen, with higher nitrogen levels necessary for higher plant<br />
1,000<br />
cover (Figure 5-33).<br />
Target levels for available nitrogen released annually from nitrogen<br />
sources for plant growth range from below 27 to 50 lb/ac (Munshower<br />
1994). These are nitrogen levels that should be considered when<br />
calculating fertilizer rates (see Section 10.1.1.6, Determine Fertilizer<br />
Application Rates).<br />
Total N (lbs/ac)<br />
500<br />
0<br />
Undisturbed<br />
Topsoil<br />
Undisturbed Disturbed<br />
Subsoil Fair<br />
<strong>Revegetation</strong><br />
Disturbed<br />
Poor<br />
<strong>Revegetation</strong><br />
Post-<br />
Construction<br />
Soils<br />
Target<br />
Nitrogen<br />
Levels<br />
Threshold<br />
Def icit<br />
Soil Nitrogen and Carbon – How to Assess<br />
Nitrogen Testing<br />
Soil testing for nitrogen can be conducted for: topsoils that will be salvaged, reference sites,<br />
and post-construction soil materials. Procedures for collecting soil samples are presented in<br />
Inset 5-2. The following nitrogen tests are available:<br />
◾◾<br />
Total nitrogen – Total nitrogen is an important test to request; the results will be used<br />
to determine nitrogen thresholds and nitrogen amendment needs. The common total<br />
nitrogen tests are Leco and Kjeldahl. Total nitrogen has been found to correlate well<br />
with plant cover (Claassen and Hogan 1998).<br />
◾◾<br />
Mineralizable nitrogen – This test requires the soil samples to be incubated for a<br />
period of time and then tested for available nitrogen. The results indicate the amount<br />
of slowly available nitrogen present in the sample. While this test is not widely used,<br />
it nevertheless is a very good test to perform because the results correlate well with<br />
expected plant cover (Claassen and Hogan 1998). There are several types of incubation<br />
tests, so it is good to confer with the soil laboratory as to which tests would be most<br />
appropriate.<br />
◾◾<br />
Extractable nitrogen – This test is less meaningful since it only indicates available<br />
nitrogen, not what is in reserve. This test is often included in a soil testing package. The<br />
extractable N pool has the lowest correlation to the amount of plant cover growing<br />
on a site (Claassen and Hogan 2002). The most common test for extractable nitrogen<br />
is 2N KCl extract.<br />
Figure 5-33 | Determining total N<br />
threshold values from reference sites<br />
In this example, the total N threshold<br />
was estimated at 1,100 lb/ac (average<br />
of disturbed reference sites with “poor”<br />
and “fair” revegetation). Total N in<br />
post-construction soils was 650 lb/ac,<br />
making these soils deficient by 450 lb/<br />
ac. The undisturbed topsoils of reference<br />
sites showed a total N of 2,430 lb/ac,<br />
which set the target levels of nitrogen<br />
between 1,100 and 2,430 lb/ac.<br />
Nitrogen testing for composts and organic matter should be done by laboratories specializing<br />
in these tests. These laboratories should follow the testing procedures outlined in the Test<br />
<strong>Roadside</strong> <strong>Revegetation</strong>: An Integrated Approach to Establishing Native Plants and Pollinator Habitat<br />
90
PLANNING PHASE TWO: ASSESS SITE<br />
Inset 5-2 | Soil testing<br />
Soil testing is a means of describing those soil characteristics that<br />
cannot be observed or accurately measured in the field. The tests<br />
include analysis of chemical properties, including pH, soluble salts,<br />
macronutrients, micronutrients, and organic matter, as well as physical<br />
properties such as density, water-holding capacity, and texture.<br />
Soil testing is costly and if not sampled, analyzed, and interpreted<br />
properly can lead to unneeded and expensive soil amendments and<br />
application practices. In many respects, it is better not to test soils<br />
than to test them or interpret the results incorrectly. Some laboratory<br />
test results found for many soil series in the U.S. is available at http://<br />
ncsslabdatamart.sc.egov.usda.gov/.<br />
Soil testing is performed with topsoil recovery surveys and reference<br />
site surveys (discussed in other sections) to identify soil physical and<br />
chemical factors that will limit plant growth, develop site-specific<br />
soil quality targets, and develop a set of revegetation treatments<br />
that will increase short- and long-term soil productivity targets. The<br />
three components of soil testing are soil sampling, lab analysis, and<br />
interpretation of lab results. Adhering to an established procedure for<br />
each component of soil testing is critical for developing appropriate<br />
revegetation treatments.<br />
Sampling soil – Soil sampling is the field collection of soils in a manner<br />
that best represents the soils of an area. The number of soil samples<br />
taken within a project area is usually kept to a minimum because of<br />
the expense of collecting and handling the samples and the cost of<br />
laboratory analysis. Taking too few samples to describe a project<br />
site, however, can be misleading, especially if the soils are extremely<br />
variable. This leaves the designer with the challenge of determining the<br />
best approach to collecting soil samples in a way that most accurately<br />
represents the sites being described.<br />
The following guidelines are useful in developing a sampling strategy<br />
for soil testing:<br />
Determine the area to be sampled – The areas to be sampled are<br />
called sampling areas and they typically encompass a vegetation<br />
unit, an individual topsoil stockpile, similar topsoil salvage areas, or a<br />
reference site. For most projects, only one soil sample is collected from<br />
a sampling area. For this reason, it is important to select a collection<br />
site (an area where soil samples are collected) that best represents the<br />
sampling area. Only for small sampling areas, such as topsoil stockpiles<br />
or reference sites, will the collection site be the same as the sampling<br />
area. For larger sampling areas, such as revegetation units or topsoil<br />
salvage areas, the collection site will be a smaller, representative area<br />
within the sampling area.<br />
Collect multiple subsamples – Once a collection site has been<br />
identified, a set of subsamples are collected. Collecting soil from one<br />
point is never enough. The number of subsamples to collect within a<br />
collection site should be based on the site’s variability. Small collection<br />
sites generally require fewer subsamples than larger areas because<br />
these sites are usually less variable. Undisturbed sites are typically<br />
more homogenous than disturbed sites and therefore require fewer<br />
subsamples. Guidelines for the numbers of subsamples to collect range<br />
from 6 for very homogenous sites to 35 for large, heterogeneous sites.<br />
Randomly collect subsamples – Subsamples should be collected<br />
randomly within the collection site. For small areas like reference sites<br />
or stockpiled soil, the samples can be collected on a grid system. For<br />
very large areas, samples can be collected in a zigzag or “W” pattern<br />
at predetermined intervals.<br />
Determine sampling depth – The objectives for soil sampling are<br />
reviewed and the sampling depth is determined. If the objective is to<br />
characterize the soil for topsoil recovery, then the soil samples must<br />
be collected only in the topsoil horizon, in which case the depth of the<br />
topsoil will have to be determined prior to sampling. If it is known that<br />
the surface soil including duff and litter will be removed to 15 inches<br />
during topsoil salvage, then collection depth would be a sample 15<br />
inches deep that included the duff and litter layers. If soil sampling<br />
objectives are to determine the nutrient levels of a topsoil pile, the<br />
entire pile becomes the collection site and the subsamples are collected<br />
from various depths within the piles, as well as around the pile to<br />
obtain a representative sample. If the designer felt that the interior of<br />
the pile was significantly different in nutrient status or mycorrhizae,<br />
then the pile could be stratified into two collection sites – the exterior<br />
of the pile and the interior – and sampled separately. It may also be<br />
important to sample the subsoil since this will be the condition of the<br />
soil after construction and before mitigation.<br />
Collect a representative slice of soil – It is important to evenly sample<br />
the predetermined depth of soil. For example, if the sampling depth<br />
is 0 to 15 inches deep, then the entire section of soil must be equally<br />
sampled for each subsample.<br />
Mix subsamples – Subsamples for a sampling area are placed in a<br />
clean bucket and mixed thoroughly. From the composite subsamples,<br />
the required amount of soil is removed to send to the lab for analysis.<br />
Determine coarse fragment content – If the soils are high in coarse<br />
fragments, the samples can be sieved in the field. If the soils are dry,<br />
a 2 mm sieve can be used. This will reduce the amount of soil to haul<br />
out of the survey area and also give an estimate of the coarse fragment<br />
content. Soils can be sieved back at the office prior to sending to the<br />
lab. If the samples are wet or moist, they will need to be air dried prior<br />
to sieving. The percent coarse fragment content is recorded, which<br />
includes large and small coarse fragments. This information will be<br />
used later to modify the lab results.<br />
Selecting a lab – The criteria for selecting a soil lab is typically based on<br />
costs, turnaround time, analytical tests, and consulting services. Most<br />
labs offer pH, nutrients, nitrogen, and organic matter tests for under<br />
$80 per sample (2016 prices) and deliver the results within two weeks<br />
of receiving the soil samples. For an added fee, laboratories will<br />
interpret the results of the analysis. While these are important reasons<br />
for selecting a lab, the primary criteria for selecting a lab should be<br />
based on the quality of the testing facilities.<br />
<strong>Roadside</strong> <strong>Revegetation</strong>: An Integrated Approach to Establishing Native Plants and Pollinator Habitat<br />
91
క<br />
క<br />
క<br />
క<br />
PLANNING PHASE TWO: ASSESS SITE<br />
A common assumption is that all labs are of similar quality in their<br />
analytical testing, and that if a group of labs were sent the same soil<br />
sample they would report similar results for most tests. This is not<br />
typically the case, as several university reviews of laboratories have<br />
shown (Neufeld and Davison 2000; Rose 2004). In one comparison,<br />
eight reputable laboratories reported widely differing results for all<br />
soil nutrients when sent identical soil samples (Rose 2004). One reason<br />
for the variation in results is that usually several testing procedures<br />
can be used to quantify a soil parameter. Some methods have greater<br />
accuracy and precision than others. The soil testing industry at this<br />
time has not settled on an agreed upon set of analytical methods<br />
to use. Even when the same tests are performed, labs often report<br />
different levels of accuracy (Rose 2004).<br />
Soil laboratories can voluntarily participate in the North American<br />
Proficiency Testing (NAPT) program that will assess the quality of their<br />
analytical procedures. In this program, NAPT periodically sends all<br />
participating labs identical soil samples. Each lab analyzes the samples<br />
for mineral nutrients using established analytical procedures, then<br />
sends the results back to NAPT. The results from all labs are compiled<br />
and analyzed statistically and each lab is sent a report on how their<br />
results compared to the other participating labs. NAPT suggest that<br />
the accuracy be less than 10 percent of industry values and precision<br />
no greater than 15 percent of industry values (Neufeld and Davison<br />
2000). These reports are not available to the public, but laboratories<br />
might share them if asked. NAPT is not a certification program but is<br />
often a basis for a soil lab quality control program.<br />
The following is a checklist for selecting a high-quality lab (modified<br />
from Neufeld and Davison 2000):<br />
Does the lab have a quality control program? If they do, ask<br />
them to explain it.<br />
Does it participate in a proficiency testing program (such as<br />
NAPT)?<br />
Will they share the results of proficiency testing program?<br />
Does the lab use established analytical methods (the most<br />
appropriate for soils in the geographic area being tested)?<br />
If a “no” is given for the answers to any of these questions, another<br />
soil testing facility should be considered. If the selection is between<br />
a couple of labs, consider sending duplicate soil samples with known<br />
properties (“checks”) to each lab and compare the results using the<br />
NAPT suggested standards for accuracy and precision. Soil “checks”<br />
can be purchased through a proficiency testing program. Once a lab<br />
is selected, continue to ask for quality control reports. If the budget<br />
allows, periodically send duplicate “check” soil samples with regular<br />
soil samples to assess accuracy and precision.<br />
Methods of the Examination of Compost and Composting (TMECC) explained in Section 10.1.3,<br />
Mulches, and Section 10.1.5, Organic Matter Amendments.<br />
Nitrogen Analysis<br />
Soils laboratories report nitrogen in a variety of units, such as gr/l, ppm, mg/kg, ug/g, and<br />
percent. Unless these values are converted to pounds per acre, it is difficult to determine<br />
rates of fertilizer, compost, or topsoil necessary to restore site nitrogen. Use Table 5-2 (Line<br />
E) to convert lab values to total pounds per acre of nitrogen. These calculations account for<br />
Table 5-2 | Calculating the nitrogen deficit of a site – an example<br />
A Total soil nitrogen (N) 0.025 % From soil test of post construction soils - gr/l, ppm, mg/kg, ug/g divide by 10,000 for %<br />
B Thickness of soil layer 0.5 feet The thickness of soil represented in (A).<br />
C Soil bulk density 1.4 gr/cc Unless known, use 1.5 for compacted subsoils, 1.3 for undisturbed soils, 0.9 for<br />
light soils such as pumice<br />
D Fine soil fraction 70 % 100% minus the rock fragment content - from estimates made from sieved soil<br />
prior to sending to lab<br />
E N in soil layer: A * B * C * D * 270 = 331 lbs/ac Calculated amount of total nitrogen in soil layer. To convert to kg/ha: E * 1.12<br />
F Minimum or threshold N levels 1,100 lbs/ac Determined from reference sites or literature<br />
G N deficit: F - E = 769 lbs/ac Minimum amount of N to apply to bring up to threshold<br />
<strong>Roadside</strong> <strong>Revegetation</strong>: An Integrated Approach to Establishing Native Plants and Pollinator Habitat<br />
92
PLANNING PHASE TWO: ASSESS SITE<br />
soil bulk density, soil thickness, and coarse fragment content, which affect the total nitrogen<br />
levels of a site.<br />
Nitrogen Thresholds and Deficits<br />
Each plant community has a total nitrogen requirement that must be met in order to develop<br />
into a functioning and self-sustaining system. For successful revegetation efforts, a practical<br />
goal is to meet the minimum target, or threshold level, for total nitrogen. Threshold values,<br />
however, are not found in textbooks and must be developed from soil tests of disturbed and<br />
undisturbed reference sites. Conducting nitrogen tests on disturbed reference sites where<br />
revegetation efforts have succeeded, as well as reference sites where revegetation efforts<br />
have failed, can help determine a threshold value (Figure 5-3). Alternatively, conducting soil<br />
tests on undisturbed reference sites will define the optimum nitrogen levels and also bracket<br />
target nitrogen levels. Converting soil test results into total nitrogen per acre is shown in<br />
Table 5-2, line E.<br />
Post-construction soils are typically deficient in nitrogen. In order to develop a strategy for<br />
bringing soil nitrogen above threshold levels, it is important to determine<br />
the approximate nitrogen deficit. Table 5-2 shows how this is calculated<br />
by subtracting the total nitrogen value of post-construction soils (Line<br />
1,300<br />
E) from the threshold nitrogen value (Line F).<br />
1,200<br />
Carbon Analysis<br />
Carbon is determined directly using the combustion method (Leco<br />
instrument) or indirectly with the Walkley-Black and/or loss-on-ignition<br />
methods. Depending on the testing methods, carbon will either be<br />
reported as % organic matter or % carbon. To convert % organic matter<br />
to % carbon, multiply the value by 0.5 to 0.58 (Tisdale and Nelson 1975).<br />
When soils laboratories receive soils samples, they sieve out any materials<br />
greater than 2 mm. For this reason, it is important to sieve rock fragments,<br />
but not larger organic matter, from the soil samples prior to sending them<br />
to the lab. Request that the lab not sieve the larger organic matter from<br />
the sample so that the results report out in total carbon and nitrogen.<br />
C:N<br />
C:N is calculated by dividing % carbon by % nitrogen from the laboratory<br />
results obtained for nitrogen and carbon tests.<br />
Mitigating for Low Soil Nitrogen<br />
Develop a Strategy<br />
It is important to develop a strategy for increasing nitrogen over time, especially on sites that<br />
are deficient in nitrogen. The strategy takes into account the accumulation of nitrogen by all<br />
available sources – topsoil, mulch, compost, fertilizers, and nitrogen-fixing plants. Figure 5-34<br />
shows an example of a strategy for increasing total soil nitrogen to a threshold level.<br />
Topsoil<br />
Salvaging and reapplying topsoil is an excellent way to increase total soil nitrogen on drastically<br />
disturbed sites. The depth to apply topsoil should be similar to the soil depth found in<br />
undisturbed reference sites or pre-construction soils. If topsoil material is limited, then using<br />
the calculations shown in Table 5-2 can help determine the minimum depths to apply topsoil.<br />
Section 10.1.4, Topsoil, discusses methods to salvage and apply topsoil. To determine if there<br />
is a tie-up or surplus of nitrogen in the salvaged topsoil, soil tests can be conducted for C:N<br />
ratios. Topsoils with C:N ratios greater than 25:1 could benefit from the addition of nitrogen,<br />
while ratios less than 8:1 will have the necessary nitrogen for plant growth.<br />
Composts<br />
Total N (lbs/ac)<br />
1,100<br />
1,000<br />
900<br />
800<br />
700<br />
600<br />
500<br />
400<br />
300<br />
200<br />
100<br />
0<br />
Background<br />
1st Year<br />
Slow-release<br />
fertilizer<br />
Threshold<br />
Background<br />
3rd Year<br />
N-Fix<br />
Mulch<br />
Background<br />
7th Year<br />
Figure 5-34 | Raising nitrogen levels<br />
Raising nitrogen levels on nitrogen-deficient<br />
sites to threshold levels requires<br />
developing a long-term strategy. In this<br />
example, the site began with a background<br />
N of 650 lb/ac. After application<br />
of a slow-release fertilizer at 1,000 lb/ac<br />
during the first year, the site accumulated<br />
50 lb N (assumes N was captured by<br />
plants or soil microorganisms and not<br />
leached from the soil). In the third year,<br />
an additional 3,000 lb slow-release fertilizer<br />
was applied, which increased total N<br />
to 850 lb/ac. By the seventh year, woody<br />
mulch that was applied during sowing<br />
had mostly decomposed, releasing approximately<br />
200 lb N. Nitrogen-fixing<br />
plants were well established by then and<br />
had contributed approximately 100 lb N.<br />
<strong>Roadside</strong> <strong>Revegetation</strong>: An Integrated Approach to Establishing Native Plants and Pollinator Habitat<br />
93
PLANNING PHASE TWO: ASSESS SITE<br />
Applied on the soil surface and incorporated, composts can supply sufficient soil nitrogen for<br />
long-term site needs. Application rates for composts can be calculated using the methods<br />
shown in Table 5-2. Testing and application methods for compost are discussed in Section<br />
10.1.3, Mulches, and Section 10.1.5, Organic Matter Amendments.<br />
Nitrogen-Fixing Plants<br />
Significant quantities of nitrogen can be supplied by nitrogen-fixing plants (see Section 10.1.7,<br />
Beneficial Soil Microorganisms). Establishing nitrogen-fixing plants is a means of meeting<br />
short-term goals by reducing the need to apply fertilizers and long-term goals by increasing<br />
the total nitrogen on the site.<br />
Fertilizers<br />
Applying nitrogen-based fertilizers to drastically disturbed soils is another means of increasing<br />
nitrogen levels, but it requires an understanding of fertilizers (composition and release), how<br />
the soils will capture and store nutrients, and how plants will respond to increased levels of<br />
available nitrogen. As the calculations in Table 5-2 demonstrate, nitrogen-based fertilizers<br />
cannot deliver enough nitrogen in one application for long-term site recovery of drastically<br />
disturbed sites. However, applied judiciously within an overall nitrogen strategy using topsoil,<br />
composts, and nitrogen-fixing plants, nitrogen-based fertilizers can be an effective tool in<br />
site recovery.<br />
Not all sites or conditions require fertilizers. It might not be necessary to fertilize soils that<br />
have high total N levels and low C:N ratios. In fact, applying fast-release fertilizers may be a<br />
disadvantage on some sites by favoring weedy annuals over perennial species. A discussion<br />
on selecting fertilizers, calculating application rates, and determining methods of application<br />
is provided in Section 10.1.1, Fertilizers.<br />
Biosolids<br />
Biosolids are rich in slow and fast releasing nitrogen and, if sources are available nearby, are<br />
a good means of raising soil nitrogen.<br />
5.5.4 NUTRIENTS<br />
This section broadly discusses the remaining mineral nutrients essential for plant growth<br />
(Figure 5-35). There are many references devoted to the role of nutrients in plant nutrition<br />
and the designer is directed to these sources for a more detailed discussion of each nutrient<br />
(Tisdale and Nelson 1975; Thorup 1984; Munshower 1994; Havlin and others 1999; Claassen<br />
2006). Historically, the majority of research in soil fertility and mineral nutrients was conducted<br />
with the agricultural objective of optimizing crop yields through annual inputs of fertilizers,<br />
soil amendments, and irrigation. The primary objective of wildland restoration, however,<br />
is to restore or re-create self-sustaining plant communities that, once established, require<br />
very little input of resources. Unlike agriculture, revegetation of highly disturbed sites is not<br />
approached with the objective of optimizing the site for a single, high-yielding crop, but to<br />
develop a system of interrelated species that have evolved and adapted to site conditions. In<br />
wildland restoration, it is more important to re-create the components of the local soils than<br />
to change nutrient status based on agricultural models. For example, from an agricultural<br />
perspective, a serpentine soil has an imbalance of calcium and magnesium. Unless fertilizers<br />
containing a “correct” ratio of calcium and magnesium are applied to adjust this imbalance,<br />
the soils will be unsuitable for crop species. In wildland restoration, the approach is guided<br />
by the nutrient needs of the species endemic to the site, not to a generic agricultural crop.<br />
Since serpentine plant species have evolved on soils with these nutrient ratios, their nutrient<br />
requirements are vastly different than those of agricultural crops, or even native vegetation<br />
growing on adjacent, non-serpentine soils. In this example, the calcium-to-magnesium ratio<br />
would not be seen as an imbalance for native serpentine plant establishment, but perhaps as<br />
a “requirement” for certain endemic species to recolonize the site. This requires the designer<br />
<strong>Roadside</strong> <strong>Revegetation</strong>: An Integrated Approach to Establishing Native Plants and Pollinator Habitat<br />
94
PLANNING PHASE TWO: ASSESS SITE<br />
Figure 5-35 | The 13 essential<br />
mineral nutrients<br />
to compare post-construction mineral nutrient status to that of undisturbed or recovered<br />
reference sites to determine if there are deficiencies. Amendments can then be applied to<br />
bring nutrients and other soil factors to pre-disturbance levels or to levels that meet project<br />
revegetation objectives.<br />
Success in wildland restoration is determined by its species richness, not biomass production or<br />
whether it is a self-sustaining and resilient system, not a system that requires constant energy<br />
inputs. By these standards, applying the basic agricultural model to wildland revegetation<br />
is limited.<br />
Nutrients – How to Assess<br />
The objective of nutrient analysis is to compare nutrient levels of post-construction, disturbed<br />
soils with those of pre-disturbance, or reference site, soils. Where there are large discrepancies,<br />
a strategy can be developed to bring low post-construction levels up to minimum nutrient<br />
levels. Since this is a comparative analysis, it is essential that the sampling, collection, and<br />
testing methods are identical.<br />
Nutrient tests are often performed on salvaged topsoil, reference sites, post-construction slopes,<br />
and areas where there have been failures in revegetation. A guide to sampling soils for nutrient<br />
analysis is presented in Inset 5-2. Nutrient testing can be used to evaluate total soil nutrient<br />
levels for long-term nutrient availability, as well as available levels, for immediately available<br />
nutrients for plant growth. Table 5-3 lists soil tests common to the western United States.<br />
With soil laboratory results from reference sites and post-construction sites, determine which<br />
nutrients, if any, are deficient using the process outlined in Section 10.1.1.2, Develop Nutrient<br />
Thresholds and Determine Deficits. If a nutrient is found deficient, fertilizers, composts, topsoil,<br />
or other organic amendments can be applied to the soil to bring the nutrient above threshold<br />
levels. A process for determining fertilizer type, application rates, and application methods is<br />
presented in Section 10.1.1, Fertilizers.<br />
<strong>Roadside</strong> <strong>Revegetation</strong>: An Integrated Approach to Establishing Native Plants and Pollinator Habitat<br />
95
PLANNING PHASE TWO: ASSESS SITE<br />
Table 5-3 | Soil testing methods<br />
Common soil testing methods for the western United States (Horneck and others 1989; Munshower<br />
1994; Teidemann and Lopez 2004). Note: Composts use a different set of tests due to high organic<br />
matter (see Section 10.1.4, Topsoil, and Section 10.1.5, Organic Matter Amendments).<br />
Tests Type Test Method Notes<br />
Boron Available Hot-Water<br />
Boron Available Aqueous extract of a soil paste<br />
Calcium, Magnesium Available Ammonium Acetate<br />
Calcium, Magnesium Available Aqueous extract of a soil paste In semi-arid to arid soils<br />
Molybdenum Available Ammonium oxalate-oxi acid extraction<br />
Nitrate Available Aqueous extract of a soil paste (Saturated paste) Accepted extrant for western soils<br />
Nitrate Available CaO extract & Cd reduction<br />
Nitrogen (ammonium<br />
and nitrate)<br />
Nitrogen<br />
(Mineralizable)<br />
Available<br />
Slowly -<br />
Available<br />
KCL Extraction<br />
Anaerobic Incubation<br />
Nitrogen (Total) Total Kjeldahl N<br />
Nitrogen (Total) Total Combustion (Leco Instrument)<br />
Organic Matter Total Loss - Ignition Best used for soil high in or-ganic matter<br />
Organic Matter Total Walkley-Black Method<br />
Organic Matter Total Combustion (Leco Instrument) Reports out in Total C<br />
pH<br />
Aqueous extract of a soil paste (saturated paste)<br />
Phosphorus Available Olsen Sodium Bicarbonate For arid and semi-arid soils<br />
Phosphorus Available Dilute Acid-Flouride (Bray-P1) For mesic sites<br />
Phosphorus Available AB-DIPA Reports out at half the rates of Olsen method<br />
Potassium Available Sodium Acetate<br />
Potassium Available Olsen Sodium Bicarbonate For arid and semi-arid soils<br />
Potassium Available Ammonium Acetate<br />
Sodium Available Ammonium Acetate Displacement<br />
Sodium Available CTPA<br />
Sulfate Sulfur Available Aqueous extract of a soil paste (saturated paste)<br />
Sulfate Sulfer Available CaHPO4 & ICP<br />
Zinc, Copper,<br />
Manga-nese, Iron<br />
Available CTPA Iron is not performed in Oregon because not<br />
found deficient<br />
<strong>Roadside</strong> <strong>Revegetation</strong>: An Integrated Approach to Establishing Native Plants and Pollinator Habitat<br />
96
PLANNING PHASE TWO: ASSESS SITE<br />
Mitigating for Low Nutrients<br />
Topsoil<br />
Salvaging and reapplying topsoil are important for restoring nutrients to pre-construction<br />
levels, especially on sensitive soils (e.g., serpentine and granitic soils). The depth to apply<br />
topsoil should be at levels found in undisturbed reference sites or pre-construction soils, or<br />
can be calculated by methods described in Figure 10.25 in Section 10.1.4, Topsoil.<br />
Compost<br />
Incorporating composts is a good method for increasing nutrients to pre-disturbance levels.<br />
Determining which type of compost to select and how much to apply is discussed in Section<br />
10.1.5, Organic Matter Amendments.<br />
Fertilizers<br />
As discussed in Section 5.5.3, Soil Nitrogen and Carbon, fertilizers should be used within an<br />
overall nutrient strategy. See Section 10.1.1, Fertilizers, for a discussion on application methods,<br />
fertilizer types, timing, and other important aspects of fertilization.<br />
Biosolids<br />
Biosolids are rich in nutrients. If sources are available and transportation economical, this is a<br />
good way to add nutrients to disturbed sites.<br />
5.5.5 PH AND SALTS<br />
pH is the measurement of soil acidity or alkalinity based on a logarithmic scale of 0 to 14.<br />
Soils with pH values below 7 are acidic, and those above 7 are basic. Basic soils have high<br />
amounts of bases (positively charged ions), such as calcium, magnesium, potassium, sodium,<br />
and phosphates. Basic soils have developed under arid and semi-arid climates and are found<br />
throughout the Basin and Range, Colorado Plateau, and portions of the Great Plains. Acidic<br />
soils have formed in wetter climates, where the continued movement of water through the<br />
soil profile has leached the bases from the soil. Acidic soils are common in the eastern United<br />
States, the coast range and mountains of the Pacific Northwest, and the Gulf states (Figure<br />
5-36). Topsoils are typically more neutral when compared to underlying subsoil, whether the<br />
soils are acidic or basic. In some cases, the topsoil buffers the plant root systems from the<br />
underlying, inhospitable subsoil conditions. When topsoils are removed during construction,<br />
Figure 5-36 | Soil pH levels across the US<br />
The soils of the United States have a range of<br />
soil pH values, from less than 5.0 to greater than<br />
8.0. Very basic soils (high pH) are widespread<br />
in areas of the United States that receive low<br />
rainfall. Acidic soils (low pH) occur in areas of<br />
very old soils common in the eastern United<br />
States or in areas of high rainfall common to<br />
the Pacific Northwest (http://www.bonap.<br />
org/2008_Soil/pH20110321.png).<br />
<strong>Roadside</strong> <strong>Revegetation</strong>: An Integrated Approach to Establishing Native Plants and Pollinator Habitat<br />
97
PLANNING PHASE TWO: ASSESS SITE<br />
subsoils become the growing environment and, unless mitigating measures are taken, the<br />
results are disastrous for plant establishment.<br />
Soil acidity or alkalinity, as measured by pH, affects mineral nutrient availability, mineral toxicity<br />
(Palmer 1990), and nitrogen fixation (Thorup 1984). In acid soils, the ability of plants to utilize<br />
many nutrients decreases, especially for calcium and magnesium. As soil pH becomes more<br />
acid (less than 4.5), aluminum becomes more soluble and more toxic to plant growth. Low<br />
pH soils also hinder the establishment of nitrogen-fixing plants, such as legumes (Bloomfield<br />
and others 1982). Significant loss of rhizobia viability has been documented at pH levels less<br />
than 6 (Brown and others 1982).<br />
Basic soils with pH values of 8.0 or greater indicate the presence of calcium carbonate (Thomas<br />
1967). Calcium and magnesium are at such high levels that they can interfere with the uptake<br />
of other nutrients, notably phosphorus, iron, boron, copper, and zinc (Campbell and others<br />
1980). High pH soils typically have high salt levels, which can also restrict the growth of many<br />
plants. For example, as soil pH approaches 9, sodium concentrations become toxic to plants<br />
(Tisdale and Nelson 1975).<br />
Soil salinity is the measure of the total amount of soluble salts in a soil. The term soluble<br />
salts refers to the inorganic soil constituents, or ions, that are dissolved in the soil water. The<br />
principal soluble salts in a soil contain the cations sodium, calcium, and magnesium, and the<br />
anions chloride, sulfate, and bicarbonate (Landis and Steinfeld 1990).<br />
Almost all plants are susceptible to salt injury under certain conditions, with germinants and<br />
young seedlings being particularly susceptible to high salt levels (Figure 5-37). Soluble salts<br />
can injure plants in several ways:<br />
◾◾<br />
Reduced soil moisture – Salts can lower the free energy of water molecules, causing<br />
an osmotic effect and thereby reducing the moisture availability to plants.<br />
◾◾<br />
Reduced soil permeability – High salt concentrations (specifically sodium salts) can<br />
change the soil structure by reducing the attraction of soil particles, causing them<br />
to disperse. Pore space is lost and air and water movement within the soil profile are<br />
restricted.<br />
◾◾<br />
Direct toxicity – High levels of certain ions, including sodium, chloride, and boron,<br />
can injure plant tissue directly.<br />
◾◾<br />
Altering nutrient availability – Certain nutrients as salts can change the availability<br />
and utilization of other plant nutrients (Landis 1981; Landis and Steinfeld 1990).<br />
Soluble Salts<br />
mS/cm or mmhos/cm<br />
3,500<br />
3,000<br />
2,500<br />
2,000<br />
1,500<br />
1,000<br />
500<br />
High Salt<br />
Hazard -<br />
Damage<br />
to Plants<br />
Moderate<br />
Salt Hazard -<br />
Injury to<br />
Germinants<br />
Low Salt<br />
Hazard<br />
Figure 5-37 | Soluble salt<br />
affects on plants<br />
Soluble salts will injure germinants<br />
and, at high concentrations, damage<br />
established plants. (Values are based<br />
on the saturated media extract method<br />
of conductivity measurement.) Soil<br />
laboratories often report conductivity<br />
in dS/m units. To convert to mS/cm or<br />
mmhos/cm, multiply by 100.<br />
Figure 5-38 | Soils with high salts<br />
Soils with high salt content typically occur in<br />
regions of the United States with low annual<br />
precipitation (http://bonap.org/2008_Soil/<br />
saline.png).<br />
<strong>Roadside</strong> <strong>Revegetation</strong>: An Integrated Approach to Establishing Native Plants and Pollinator Habitat<br />
98
PLANNING PHASE TWO: ASSESS SITE<br />
High salt levels are common in arid climates where there is inadequate precipitation to leach<br />
salts out of the plant root zone (Figure 5-38). Topsoils tend to be lower in salts than subsoils,<br />
so during construction when topsoil is removed, the resulting soils can be very high in salts<br />
and pH. In addition, high salt concentrations can be created by poor soil drainage resulting<br />
from compaction; when excessive amounts of fertilizer, manure, or compost are applied; or<br />
when de-icing chemicals applied to roads run off and enter the soil (Parent and Koenig 2003).<br />
pH and Salts – How to Assess<br />
The pH and soluble salts tests are standard analytical measurements that should be run for<br />
all soil samples sent for nutrient analysis. pH tests should also be run on soil organic matter<br />
amendments considered for mulch or incorporation into the soil. These tests are accurate, with<br />
pH results differing between laboratories by 0.1 to 0.2 points (Thomas 1967). pH and soluble<br />
salts can also be tested by the practitioner on site or back at the office using reasonably priced<br />
equipment. When considering the purchase of a portable pH meter, it should also be able to<br />
measure soluble salts and have a tip that can be submerged easily in a soil slurry.<br />
The most accurate method of assessing pH and salinity is through lab analysis. However, quick,<br />
reliable estimates can be made with a hand-held pH/electrical conductivity meter using the<br />
Saturated Media Extract method for preparing samples (Figure 5-39). This method requires<br />
a small amount of soil (50 cc) be placed in a jar. Just enough distilled water is stirred into the<br />
soil to make the surface “glisten” but not readily flow. The mixture is allowed to stand for<br />
approximately 15 minutes. If the probe can be inserted into the soil so that the sensors are<br />
completely covered, then a pH and conductivity reading can be directly made. If the probe<br />
cannot be submerged in the slurry, then a larger sample of soil or a gravity or vacuum filtration<br />
system solution should be used to extract enough water to test.<br />
Figure 5-39 | pH meter<br />
Most portable pH meters will also measure<br />
salts (electrical conductivity). Many<br />
probes can be directly inserted into the<br />
saturated media.<br />
Mitigating for Low pH Soils<br />
Apply Liming Materials<br />
Raising the pH through the application of liming materials is a common agricultural practice<br />
that can be applied to revegetating road sites (see Section 10.1.6, Lime Amendments).<br />
Apply Appropriate Fertilizers<br />
Some commercial fertilizers, especially ammonium-based fertilizers such as ammonium nitrate,<br />
ammonium sulfate, and ammonium phosphate, will reduce pH (Havlin and others 1999) and<br />
should be limited on acidic soils. Fertilizers that have calcium, magnesium, or potassium in<br />
the formula are more appropriate for low pH soils. Examples of these fertilizers are calcium<br />
nitrate, potassium nitrate, and magnesium sulfate.<br />
Apply Lime with Organic Matter<br />
Incorporation of lime will lower pH. On acid soils, application of lime with organic matter will<br />
raise the pH of the soil (see Section 10.1.6, Lime Amendments).<br />
Apply Topsoil<br />
Where topsoils have been removed leaving very basic or very acidic subsoils, reapplying<br />
topsoil or manufactured topsoil can moderate pH levels.<br />
Mitigating for High pH Soils<br />
Apply Sulfur<br />
Agricultural soils can be treated with sulfur to lower pH, but high quantities of sulfur and<br />
irrigation must be applied to lower the pH just slightly (Havlin and others 1999). The use of<br />
sulfur in wildland revegetation therefore is not a widely practiced method.<br />
<strong>Roadside</strong> <strong>Revegetation</strong>: An Integrated Approach to Establishing Native Plants and Pollinator Habitat<br />
99
PLANNING PHASE TWO: ASSESS SITE<br />
Irrigation<br />
Applying irrigation water is another method of reducing soil pH by leaching out bases.<br />
However, the amount of water needed to lower pH levels can be very high; in most cases,<br />
using irrigation is not a viable mitigating measure. It is also difficult to find irrigation water in<br />
arid environments that is low in bases and salts. Applying irrigation water high in bases will<br />
raise pH and salt levels in the soil, compounding the problem.<br />
Apply Organic Matter<br />
Incorporated composts or other types of organic matter can lower soil pH as the organic<br />
matter decomposes (Havlin and others 1999). For arid sites, however, the pH and conductivity<br />
of the organic matter must be tested prior to purchase to avoid the possibility of introducing<br />
organic matter high in salts.<br />
Add Nutrients<br />
To compensate for the tie-up of certain nutrients, the addition of nutrients through fertilization<br />
might be considered. The benefits of using fertilizers on arid soil must be offset by the possibility<br />
of creating fertilizer salt problems.<br />
Mitigating for Salts<br />
Since high levels of soluble salts are usually caused by poor soil management, the key to<br />
mitigating high salinity is to avoid creating the conditions that could cause those levels.<br />
In soils where internal drainage is poor, prevention may be the only feasible approach for<br />
reducing salt problems.<br />
Avoid Mulch or Soil Amendments with High Salinity<br />
Testing all materials to be applied to the site will aid in the prevention of increased salt levels<br />
in the soil. Amendment materials with electrical conductivity readings in excess of 1,000 mS/<br />
cm should be avoided.<br />
Reduce Commercial Fertilizers<br />
Some commercial fertilizers, control-release fertilizers (CRF) in particular, can significantly<br />
increase the soluble salts found in the soil. This can be a major problem when using CRF in<br />
arid conditions. The fertilizer will begin to release following wet, warm spring conditions, but<br />
will not be leached through the soil without significant rainfall through the summer. Salts can<br />
build up to damaging levels, both on the surface and in the plant root zone.<br />
Apply Gypsum with Irrigation<br />
Incorporation of gypsum (calcium sulfate) followed by leaching can be effective in situations<br />
where sodium is the cause of high soluble salts (e.g., de-icing materials have been applied<br />
to roads). The calcium in gypsum will displace sodium, and the sodium will then leach out of<br />
the soil profile with irrigation or rainfall (UMES 2004).<br />
Irrigation<br />
Application of irrigation water could leach salts from the soil. The amount of water depends<br />
on the soil type. In arid soils, application of 6 inches of water can reduce salinity levels by 50<br />
percent; 12 inches can reduce salinity levels by 80 percent; and 24 inches can reduce salinity<br />
levels by 90 percent (UMES 2004). Application of irrigation water would need to occur over<br />
several days. However, for most sites, this is not practical due to high costs.<br />
5.6 SURFACE STABILITY<br />
Surface stability is the tendency of the soil to remain in place under the erosive forces of rain,<br />
wind, and gravity. Good surface stability is essential for establishing plants, reducing erosion,<br />
and maintaining high water and air quality. When seeds are applied to unstable surfaces, they<br />
<strong>Roadside</strong> <strong>Revegetation</strong>: An Integrated Approach to Establishing Native Plants and Pollinator Habitat<br />
100
PLANNING PHASE TWO: ASSESS SITE<br />
often move off the site through water or wind erosion leaving the site barren of vegetation. Soil<br />
is also removed in this process, which reduces the productivity of the site. Excessive erosion<br />
also affects the survival of planted seedlings by removing soil and exposing roots.<br />
Site factors that influence surface stability and soil erosion are as follows:<br />
◾◾<br />
Rainfall and wind<br />
◾◾<br />
Freeze-thaw<br />
◾◾<br />
Soil cover<br />
◾◾<br />
Surface strength<br />
◾◾<br />
Infiltration rates<br />
◾◾<br />
Slope gradients<br />
◾◾<br />
Surface roughness<br />
◾◾<br />
Slope lengths<br />
All surface erosional processes start first with the detachment of soil through the forces of<br />
rainfall, wind, or frost heave. These forces loosen seeds and soil, making them more susceptible<br />
to movement off the site. Surface runoff, during rainstorm events, is the primary factor in moving<br />
seeds and soil into stream channels, resulting in lost seeds and water quality problems. This<br />
occurs when infiltration rates (the rate water moves through the soil surface) are lower than<br />
rainfall rates. If slope gradients are steep, slope lengths are long, or surface roughness is low,<br />
surface water picks up energy and transports greater amounts of soil and seeds downslope.<br />
As this energy increases, water becomes concentrated with enough force to cut through the<br />
surface of the soil, creating rills and gullies. The degree to which soils detach is directly related<br />
to the percentage of soil cover protecting the soil (more cover, less erosion) and to the soil<br />
strength, or the capacity for individual soil particles to hold together under erosional forces.<br />
The result of soil erosion can often be detected on road cuts by noting how much sediment is<br />
in the ditch line. If the ditch is full of recently deposited sediment (recently deposited sediment<br />
usually lacks vegetation), there is a good chance that sediment came from the cut slope. An<br />
inspection of the surface of the cut slope will indicate if the sediment originated there. Gravels,<br />
cobbles, and even small plants will show the results of soil movement (see Figure 5-43, Figure<br />
5-45, and Figure 5-46).<br />
5.6.1 RAINFALL AND WIND<br />
Each site has unique rainfall and wind patterns that will affect the stability of the soil surface.<br />
High rainfall intensities and high winds can move seeds and soil particles off-site through<br />
erosional processes (Figure 5-40). In water erosion, raindrops begin the erosion process.<br />
Raindrops have been likened to small bombs. In heavy rainstorms, they fall with such force<br />
(possibly between 15 and 20 miles per hour) that, when they hit the soil surface, they create<br />
an impact that can blast the soil or seeds several feet away and leave behind small craters.<br />
After such events, the soils surface is compacted and sealed with fine soil particles that can<br />
significantly reduce surface infiltration rates.<br />
The intensity of rainfall determines how much soil is detached. A high intensity rainfall will<br />
detach more soil particles than a low intensity rainfall. But detachment is only one aspect of<br />
erosion; it takes surface runoff to move soil and seeds downslope. If an intense rainstorm lasts<br />
only a short period, there may be insufficient water to exceed infiltration rates and water will<br />
absorb into the soil. If the duration is long, some water will not enter the soil, but run over<br />
the surface carrying soil and seeds downslope. The most critical weather events are those<br />
that bring high intensity rainstorms of long duration. High intensity rainfall is common in the<br />
central and eastern United States, whereas in the western U.S., high intensity storm events<br />
are less frequent and typically occur during summer thunderstorms or major winter storm<br />
Figure 5-40 | Wind erosion<br />
Wind erosion not only blows seeds, soil,<br />
and mulches off the soil surface, it will<br />
also expose roots of established plants.<br />
Non-cohesive soils, like sands and silts,<br />
are most prone to wind erosion.<br />
<strong>Roadside</strong> <strong>Revegetation</strong>: An Integrated Approach to Establishing Native Plants and Pollinator Habitat<br />
101
PLANNING PHASE TWO: ASSESS SITE<br />
systems (Figure 5-41). Precipitation in the form of snow is not typically a<br />
problem for surface erosion. Snow protects the soil surface from rainfall<br />
splash, and snowmelt usually occurs at such slow rates that even soils with<br />
low infiltration can absorb the water.<br />
When projects are located in areas of high winds, surface soils are susceptible<br />
to wind erosion. Wind forces will detach soil particles and seeds and move<br />
them offsite. In extreme conditions, high winds can remove several inches<br />
of surface soil, exposing roots (Figure 5-40). Wind erosion is a factor in<br />
establishing native plants in the Great Plains and portions of the eastern<br />
temperature forests ecoregions (Figure 5-42).<br />
Rainfall and Wind – How to Assess<br />
It is unlikely that climate reports or weather records will give the duration<br />
and intensities of rainfall events for site level planning. Digital rainfall gauges are available that<br />
record the amount of rainfall and the time it occurred. This information is used to determine<br />
duration and intensity. While the cost of this equipment is high, it is becoming more affordable.<br />
Many types of digital rain gauges are available, ranging in price and quality. It is important to<br />
select a digital rain gauge that is rugged, self-maintaining, and can record for long periods<br />
of time.<br />
Permanent wind speed equipment is available but is most likely beyond the reach of most<br />
project budgets. Site visits during different times of the year provide some indication if wind<br />
is a problem. Site characteristics, such as position on slope (ridgelines are more prone to wind<br />
than a valley floor), proximity to forested environments (forests often reduce wind speeds),<br />
or shelterbelts can be used to infer wind forces. Vegetation can also indicate the effect of<br />
wind. For example, prevailing winds can be determined from the growth habits of trees and<br />
shrubs on site. Local residents may also provide some information on local weather events.<br />
Assessing the risk of wind erosion can be determined by knowing soil texture. Those soils<br />
most prone to wind erosion are non-cohesive soils, ranging from silts to coarse sands. Clay<br />
soils (cohesive soils) and very rocky soils are far less prone to wind erosion.<br />
Figure 5-41 | Rainfall<br />
intensities across the US<br />
Rainfall intensities increase moving from<br />
northwest to southeast across the United<br />
States. The differences in intensities<br />
can be dramatic, ranging from 0.2 inches/hour<br />
in Nevada to 2.6 inches/hour in<br />
Florida for a 2-year, 1-hour storm event<br />
(http://www.fhwa.dot.gov/engineering/<br />
geotech/pubs/05037/07a.cfm).<br />
Figure 5-42 | Areas in US with high winds<br />
High winds are the primary cause of soil erosion<br />
in many areas of the United States. This<br />
map shows areas where wind erosion could<br />
strongly influence the establishment of native<br />
plants (areas in red) (https://infosys.ars.usda.<br />
gov/WindErosion/nrcs/weq.html).<br />
<strong>Roadside</strong> <strong>Revegetation</strong>: An Integrated Approach to Establishing Native Plants and Pollinator Habitat<br />
102
PLANNING PHASE TWO: ASSESS SITE<br />
Mitigating for High Rainfall and Wind<br />
Minimize Disturbance<br />
In areas of high rainfall or sites where water quality values are high (near streams or rivers), the<br />
best engineering design is to keep the footprint of the construction project disturbance to a<br />
minimum. Not only does this reduce the risk of delivering sediment to the aquatic system, it<br />
can reduce project costs by reducing the amount of area needing revegetation.<br />
Integrate Erosion Practices<br />
On disturbed sites, especially those near streams, the integration of erosion practices with<br />
plant establishment techniques offers the best approach to stabilizing the soil surface. These<br />
include practices such as increasing soil cover, shortening slopes, reducing slope gradients,<br />
leaving roughened surfaces, increasing infiltration rates, and quickly establishing native<br />
vegetative cover. These will be covered in the following sections.<br />
Use Appropriate Mulching Practices<br />
A surface mulch is one of the best practices for controlling surface erosion (see Section 5.6.3,<br />
Soil Cover); however, mulches can blow off the soil surface under strong winds. Some materials,<br />
such as wood strand mulches (see Section 10.1.3.10, Wood Strands), have been tested under<br />
high wind conditions and, because of higher weights and interlocking particles, these materials<br />
are more resistant to high winds. Lighter mulch materials, such as straw and hay, are more<br />
susceptible to removal by winds.<br />
On windy sites, straw and hay are often crimped into the soil, but this operation can also cause<br />
soil compaction. Tackifiers used with hydromulches are used effectively to stabilize straw and<br />
hay mulches. Mulches placed on roughened soil surfaces can also reduce the potential that<br />
the mulches will be lost by wind.<br />
Install Windbreaks<br />
Windbreaks or a shelterbelt is a line of trees that reduce the wind velocity and reduce the<br />
potential for erosion on the downward side of the trees.<br />
Place Large Woody Material<br />
Down woody material, such as trees and large branches, can block the soil surface from wind<br />
and rainfall.<br />
5.6.2 FREEZE-THAW<br />
Freeze-thaw is the process of ice formation and ice melting that occurs in a 24-hour cycle<br />
within the surface of the soil. At night, temperatures drop at the soil surface and water begins<br />
to freeze within the soil pores, creating ice crystals. As ice crystals continue to form, water<br />
is drawn from the soil below through capillary action to replace the water that created the<br />
ice crystals. During freezing, ice crystals expand in the soil and push soil aggregates apart<br />
(Ferrick and Gatto 2004), weakening the internal structure of the soil. When soils thaw the<br />
following day, soil strength is greatly reduced (Gatto and others 2004), leaving the soil surface<br />
significantly less resistant to erosional forces. Freeze-thaw is considered one of the least<br />
understood aspects of soil erosion (Ferrick and Gatto 2004) and yet accounts for significant<br />
annual soil losses (Froese and others 1999).<br />
The formation of ice crystals will destabilize the seed germination environment. Freeze-thaw<br />
cycles affect germinating seeds by creating ice crystals that physically push the new seedlings<br />
above the soil surface, exposing the emerging roots to extremely harsh conditions for seedling<br />
establishment, including low humidity, high temperatures, and sunlight. On steeper slopes,<br />
soil particles and germinating seeds move downslope after each freeze-thaw cycle, further<br />
destabilizing the seed germination environment. Freeze-thaw processes can also affect<br />
<strong>Roadside</strong> <strong>Revegetation</strong>: An Integrated Approach to Establishing Native Plants and Pollinator Habitat<br />
103
PLANNING PHASE TWO: ASSESS SITE<br />
seedling establishment. Long periods of freeze-thaw cycles can push seedlings out of the<br />
ground, exposing roots and, in many cases, killing seedlings (Figure 5-43).<br />
Soils most susceptible to freeze-thaw effects are those with a high silt content or soils that are<br />
compacted. Soils are most susceptible when they are cold and wet. Silt-sized particles have pore<br />
sizes that are small enough to pull moisture to the layers that are freezing through capillary<br />
action, yet large enough to form ice crystals (Ballard 1981). Sandy soils do not draw moisture to<br />
the freezing layer because the pores are too big. Clays, on the other hand, have good capillary<br />
characteristics, yet do not have large enough pores for ice crystals to form (Ferrick and Gatto<br />
2004). Sands are susceptible to freeze-thaw when they are compacted because the size of the<br />
pores is reduced, encouraging capillary rise (Gatto and others 2004). Soil cover, which includes<br />
litter, duff, and organic mulches, does not typically have good capillary rise characteristics, and<br />
therefore are less frost-susceptible. In addition, soil cover offers good thermal protection, which<br />
moderates the degree of freezing and thawing at the soil surface. The effects of freeze-thaw<br />
on surface stability increases as slope gradients steepen; the steeper the slopes, the greater<br />
the movement of seeds and soil downslope each day. For example, a seed or soil particle on<br />
a steep slope rises 2 inches on top of an ice crystal (Figure 5-44) but when the crystal melts,<br />
the seed or soil particle drops to a different point farther downslope. After many freeze-thaw<br />
cycles, the distance traveled by the seed or soil particle can be significant.<br />
Figure 5-43 | Freeze-thaw<br />
effects on planted seedlings<br />
Continual freeze-thaw conditions can<br />
push root systems of planted seedlings<br />
out of the ground, reducing growth and<br />
potentially killing seedlings.<br />
Freeze-Thaw – How to Assess<br />
Freeze-thaw processes typically occur in the spring and fall, when soil moisture levels are high<br />
and soil temperatures are cold. Soil surfaces that have undergone freeze-thaw cycles will have<br />
a very loose crust that will collapse when touched or walked upon. Gravels are often perched<br />
on pedestals, but give way under light pressure.<br />
Project areas with bare surface soils high in silts or compacted sands should be considered<br />
prone to freeze-thaw processes, while soils with deep mulch or litter layers are less susceptible.<br />
Mitigating for Freeze-Thaw<br />
Apply Mulch<br />
Available research on the mitigation of freeze-thaw effects is slim, but it can be assumed<br />
that practices, such as applying an organic mulch, will insulate the soil surface and minimize<br />
the effects of freeze-thaw. The deeper the mulch layer, the less propensity for freeze-thaw<br />
at the surface. Hydromulch applications at typical rates of 1,000 to 2,000 lb/ac are too thin<br />
to moderate surface temperatures or strong enough to resist the destabilizing effects of ice<br />
crystal formation on surface strength. Deep application of most mulches however, will bury<br />
seeds, resulting in poor seedling emergence. An alternative to is to apply needles or wood<br />
strands because these materials can be applied at greater depths and still allow light through<br />
for seedling emergence. For planted seedlings, the application of very deep mulches will<br />
reduce the effects of freeze-thaw.<br />
Till Compacted Soils<br />
Sandy soils are very susceptible to freeze-thaw if they are compacted. Loosening soils through<br />
tillage is perhaps the best method of mitigating the effects of freeze-thaw on these soil textures<br />
(see Section 10.1.2, Tillage).<br />
Avoid Wet Soils<br />
Planting or sowing in soils with high water tables and poorly draining soils should be avoided.<br />
The extra moisture in these soils will continue to supply water for ice crystal formation. Planted<br />
seedlings can be pushed out of the soil in these environments (Figure 5-43).<br />
Maintain Some Overstory Canopy<br />
Trees and shrubs will moderate surrounding temperatures, reducing the potential for freeze-thaw.<br />
Figure 5-44 | Freezethaw<br />
ice crystals<br />
Ice crystals that form under freeze-thaw<br />
conditions can lift soil particles over 2<br />
inches above the original surface. Later<br />
in the day the crystals will melt and the<br />
particles will drop.<br />
<strong>Roadside</strong> <strong>Revegetation</strong>: An Integrated Approach to Establishing Native Plants and Pollinator Habitat<br />
104
PLANNING PHASE TWO: ASSESS SITE<br />
5.6.3 SOIL COVER<br />
Soil cover is the layer directly above the surface of the soil. In an undisturbed environment,<br />
soil cover is composed of a combination of duff, litter, live plants, and rock. Soil cover is very<br />
important for surface stability because it dissipates energy from rain drop impact, protecting<br />
the soil from high intensity rainfall events. Furthermore, soil cover will slow the movement of<br />
runoff and capture sediments and seeds, preventing them from moving downslope. Section<br />
5.4, Water Loss, discusses how soil cover is important for reducing evaporation; this section<br />
will discuss its role in stabilizing the soil surface and reducing erosion.<br />
When the soil surface lacks cover, it is subject to the direct forces of raindrop impact, overland<br />
flow, wind, and gravity. These forces not only move soil offsite, affecting water and air quality,<br />
but they also displace seeds or remove soil from around newly developing seedlings (Figure<br />
5-45). A lack of soil cover will impact revegetation objectives by reducing the quantity of seeds<br />
that will germinate. Seedlings that do emerge will be negatively affected by soil splash and<br />
sheet erosion that remove soil from around the seedling roots. The severity of soil erosion<br />
and seed movement is directly related to the percentage of bare soil.<br />
After construction, most organic soil cover is removed. What remains is bare soil and coarse<br />
fragments (gravel, cobble, and stone). Left unprotected, bare soil will erode during rainstorms,<br />
leaving a pavement of coarse fragments (Figure 5-46). If the amount of coarse fragments in<br />
the soil is high, then the percentage of the soil surface covered by coarse fragments will also<br />
be high. By the third year, erosion rates on unprotected bare soils typically fall to a tenth of the<br />
rate of the first-year rate because of the formation of a coarse fragment surface (Megahan 1974;<br />
Ketcheson and others 1999). While this process produces less sedimentation to stream systems,<br />
the high coarse fragments at the soil surface are a poor environment for seed germination.<br />
For this reason, it is important to quickly stabilize the soil surface after soil exposure and why<br />
most road contracts call for temporary road stabilization during the construction period.<br />
Figure 5-45 | Soil erosion<br />
affects seed germination<br />
Soil cover protects the surface from<br />
rainfall impact. Not only is soil removed<br />
during rainstorms, affecting germination<br />
and seedling establishment,<br />
but seedlings that do emerge can be<br />
covered with soil that splashes from<br />
rainfall impact. Seedlings will not grow<br />
through an encasement of soil.<br />
Soil Cover – How to Assess<br />
Soil cover can be measured by establishing transects and recording the percentage of rock,<br />
vegetation, litter, duff, and bare soil. A monitoring procedure for measuring soil cover is<br />
presented in Chapter 12.<br />
Mitigating for Low Soil Cover<br />
The primary objective of most revegetation projects is to stabilize the soil surface and create<br />
an optimum environment for seeds to germinate and plants to establish. Initial surface<br />
stabilization must remain effective until plants become established and can protect the<br />
surface from erosion through vegetative cover. Therefore, the selection of surface stabilization<br />
methods must be based on: how effectively does the material stabilize the soil surface, does<br />
the material allow good seed germination and plant establishment, and how long does it<br />
remain effective (longevity).<br />
Apply Mulch<br />
A variety of mulches with varying qualities and longevities should be considered based on<br />
the erosional potential and revegetation needs of each site (see Section 10.1.3, Mulches).<br />
Short-fiber materials, such as wood fiber and paper products found in hydromulches, applied<br />
with a tackifier are a very effective short-term surface cover for protecting soil from rainfall<br />
impact. However, after a few months, these products are usually no longer effective. Higher<br />
rates of hydromulch and tackifier, which make up BFM products, have a higher degree of<br />
soil protection and greater longevity (up to a year). On many sites where the environment is<br />
optimum for establishing native plants, protection for less than a year is adequate. However,<br />
on sites that are cold, arid, or semi-arid, the establishment of vegetative cover can take longer<br />
Figure 5-46 | Soils are<br />
protected by a soil cover<br />
Larger materials, such as gravels (A)<br />
and wood chips (B), protect the soil and<br />
sown seeds by absorbing the energy of<br />
rainfall impact. While unprotected soil<br />
and seeds are removed through splash<br />
and sheet erosion, protected soil remains<br />
in pedestals, sometimes several inches<br />
above the surface of the soil. Seeds that<br />
do remain on or near the surface have a<br />
difficult time germinating through the<br />
surface crust created by rainfall impact<br />
(C). Plants that do establish will have roots<br />
exposed by successive rainfall events.<br />
<strong>Roadside</strong> <strong>Revegetation</strong>: An Integrated Approach to Establishing Native Plants and Pollinator Habitat<br />
105
PLANNING PHASE TWO: ASSESS SITE<br />
than one year (Figure 5-47) and soil surface protection will require longer-lasting mulches such<br />
as straw, pine needles, hay, shredded wood, wood strands, or erosion fabrics.<br />
5.6.4 SURFACE STRENGTH<br />
When soil cover is removed, the surface of the soil is exposed to the erosive forces of raindrop<br />
impact, overland flow, freeze–thaw, and wind. How strongly soil particles bind together will<br />
determine the degree by which soil particles are detached and moved through soil erosion.<br />
Topsoils with good aggregation and high organic matter will be more stable than subsoils<br />
or soils low in organic matter. Clay soils have greater strength than soils dominated by sands<br />
and silts which are non-cohesive. Seeds have no cohesive properties and, when sown on the<br />
surface of the soil without mulches or tackifiers, are very susceptible to erosive forces.<br />
Surface Strength – How to Assess<br />
Determining the soil texture of the surface soil is a simple way to determine soil strength (see<br />
Section 5.3.1, Soil Texture). Soils low in clays (
PLANNING PHASE TWO: ASSESS SITE<br />
5.6.5 INFILTRATION RATES<br />
Infiltration is the ability of the soil surface to absorb water from rainfall, snowmelt, irrigation,<br />
or road drainage. A high infiltration rate indicates that the soil surface can transmit high rates<br />
of water; a low rate indicates that the surface has low capability of absorbing water. When<br />
infiltration rates are lower than the rate of water input, runoff or overland flow will occur. Under<br />
these conditions, runoff can detach and transport soil particles, resulting in soil erosion and,<br />
in many cases, off-site water quality problems (Figure 5-49). Overland flow can also remove<br />
sown seeds.<br />
The size, abundance, and stability of soil surface pores determine the infiltration rates of a<br />
soil. Large stable pores created by worms, insects, and channels created by decaying root<br />
systems will absorb water quickly and have high infiltration rates, while surfaces that have<br />
been compacted, have had their topsoil removed, or are low in organic matter will have poor<br />
infiltration rates.<br />
Under undisturbed conditions, infiltration rates are usually high, especially where a litter and<br />
duff cover exists. When soil cover is removed, the impact from raindrops can seal the soil<br />
surface, creating a crust that will significantly reduce infiltration rates. Infiltration rates are<br />
also reduced when soil is compacted by heavy equipment traffic.<br />
Infiltration Rates – How to Assess<br />
The most accurate equipment for measuring infiltration rates is the rainfall simulator. This<br />
equipment simulates rainstorms of different intensities under controlled conditions and<br />
measures how the soil surface responds. Infiltration rates are determined at the point when<br />
runoff occurs. The amount of runoff water is measured at the bottom of the plot to calculate<br />
runoff rates and sediment yields (Figure 5-50). While most rainfall simulators were developed<br />
for agricultural operations, several have been developed specifically for wildland conditions.<br />
These simulators were built for transportability and conservation of water since construction<br />
sites are often in remote locations and far from water sources. The “drop-forming” rainfall<br />
simulator, developed for wildland use, delivers rainfall at the drop size or impact velocity<br />
determined for the climate of the project site (Grismer and Hogan 2004).<br />
Using the rainfall simulator in revegetation planning is expensive, yet it is an important tool<br />
and should not be discounted because of the cost. Specifically, rainfall simulation used to<br />
compare the effects of different mitigating measures, such as mulches or tillage, on runoff<br />
and sediment production takes the guess work out of whether such measures are effective.<br />
This quantitative evaluation of erosion control methods might be essential in areas where<br />
water quality objectives are critical.<br />
In most cases, infiltration rates are estimated under routine field investigation by inference<br />
from site conditions. Infiltration rates can be considered high when the soil surface has not<br />
been disturbed and has a high percentage of cover. With compaction and loss of surface cover,<br />
infiltration rates are proportionally reduced. It is often assumed that construction activities<br />
that remove surface cover or disturb the topsoil will have very low infiltration rates that will<br />
create overland flow under most rainfall intensities.<br />
Mitigating for Low Infiltration Rates<br />
Avoid Compaction<br />
Where possible, avoid operating heavy equipment on undisturbed soils or soils that have been<br />
tilled. Coordinate with project engineers to verify that site preparation does not compromise<br />
the compacted roadbed prism which is engineered as a structural entity.<br />
Figure 5-49 | Infiltration rates<br />
When precipitation exceeds infiltration<br />
rates, water collects on the surface of<br />
the soil and begins to move downslope,<br />
causing erosion. On this site, litter and<br />
duff layers that typically protect the<br />
surface from rainfall impact have been<br />
removed, causing low infiltration rates.<br />
B<br />
A<br />
C<br />
Figure 5-50 | Portable<br />
rainfall simulator<br />
A portable “drop-forming” rainfall simulator<br />
developed by scientists at the<br />
University of California Davis (Grismer<br />
and Hogan 2004) delivers water droplets<br />
through hundreds of needles (A).<br />
Pressure is increased or decreased to<br />
simulate rainstorm events. Droplets hit<br />
the soil surface within a plot frame (B) and<br />
runoff water is collected at the bottom<br />
of the frame (C) to measure runoff rates<br />
and sediment production.<br />
<strong>Roadside</strong> <strong>Revegetation</strong>: An Integrated Approach to Establishing Native Plants and Pollinator Habitat<br />
107
PLANNING PHASE TWO: ASSESS SITE<br />
Tillage<br />
Infiltration rates can be increased through soil tillage (see Section 10.1.2, Tillage) which reduces<br />
compaction, increases macropore space, and creates surface roughness. Depending on the<br />
erosional characteristics of the site, the positive effects of tillage on infiltration rates might<br />
only remain effective through a series of rainfall events.<br />
Incorporating Organic Matter<br />
Incorporating organic matter into the soil surface can increase the longevity of infiltration<br />
rates created through tillage by forming stable macropores (see Section 10.1.5, Organic Matter<br />
Amendments). Unless macropores are interconnecting or continuous, however, they will not<br />
drain well (Claassen 2006). One method for creating continuous pores is to incorporate long,<br />
slender organic material, such as shredded wood or hay, that overlaps and interconnects within<br />
the soil. Higher application rates of shredded wood or straw will result in greater porosity and<br />
infiltration rates.<br />
Surface Mulch<br />
Applying surface mulch will reduce the effects of rainfall impact on surface sealing and reduce<br />
soil erosion rates (see Section 10.1.3, Mulches). It does not, however, necessarily increase<br />
infiltration rates. Studies have shown that, while sediment yield can be less with the application<br />
of mulches, runoff rates are not necessarily reduced (Grismer and Hogan 2007).<br />
Plant Cover<br />
The best long-term way to increase infiltration is to create conditions for a healthy vegetative<br />
cover. Good vegetative cover will produce soils with extensive root channels, aggregated soil<br />
particles, and good litter layers.<br />
5.6.6 SLOPE GRADIENT<br />
Slope angle or gradient is important in surface stability because it directly affects how soil<br />
particles will respond to erosional forces; the steeper the slope, the greater the erosional forces<br />
will act on the surface of the soil. Slope gradient is a dominant factor in water erosion and dry<br />
ravel erosional processes. In water erosion, the rate of soil loss and runoff from disturbed soil<br />
surfaces increases incrementally as slope gradient steepens. In dry ravel erosion, the surface<br />
remains stable until a specific slope gradient is reached, and then soil particles move downslope<br />
under the direct effects of gravity. This critical angle is called the angle of repose and it can be<br />
likened to the angle that accumulated sands make in an hourglass. Only non-cohesive soils,<br />
composed of sands, silts, or gravels, have an angle of repose; soils with significant amounts<br />
of clays typically do not.<br />
Dry ravel is the downslope movement of individual particles by rolling, sliding, and bouncing<br />
(Rice 1982). It occurs more frequently as soils dry out and is triggered by vibrations from vehicles,<br />
animals, planes, and wind turbulence. Dry ravel creates a constant supply of material to the<br />
ditches at the bottom of the slopes making these slopes very difficult to revegetate unless<br />
the surface is stabilized. Seeds that germinate on steep, raveling slopes typically will not have<br />
enough time to put roots down deep enough to stabilize the surface before the emerging<br />
seedling moves or is buried by soil particles rolling down from above. Figure 5-51 shows the<br />
angle of repose of a cutslope composed of a sandy soil.<br />
Slope Gradient – How to Assess<br />
Slope gradient is quantified in several ways, as shown in Figure 5-52. For road construction<br />
projects, slope is usually expressed as the rise (vertical distance) over run (horizontal distance).<br />
A 1:3 road cut, for example, defines a slope that rises 1 foot over every 3 feet of distance.<br />
Biologists, including range, forest, and soil scientists, use percent slope as a measure of slope<br />
Figure 5-51 | Dry ravel<br />
When cut and fill slopes reach their angle<br />
of repose, non-cohesive soils move<br />
downslope at a continuous rate. The soil<br />
surface is constantly moving and never<br />
stable long enough for seeds to germinate<br />
and plants to become established.<br />
These slopes can remain barren for years.<br />
Soils that are high in sands and gravels<br />
are the most susceptible to dry ravel. In<br />
this picture, trees became established<br />
below rock outcrops, where the surface<br />
was protected from dry ravel.<br />
<strong>Roadside</strong> <strong>Revegetation</strong>: An Integrated Approach to Establishing Native Plants and Pollinator Habitat<br />
108
PLANNING PHASE TWO: ASSESS SITE<br />
angle. This is calculated by measuring the number of feet rise over a 100-foot length. Slope<br />
gradient as expressed in degrees is not commonly used.<br />
Slope gradient can be measured in the field using a handheld instrument called a clinometer.<br />
This equipment reads slope angle in percent slope and in degrees. Readings from a clinometer<br />
can be converted to rise over run notation using the chart in Figure 5-52. Road construction<br />
plans display the slope gradients for every cross-section corresponding to road station<br />
numbers (see Figure 3-3, in Section 3.2.3, Cross-Section View). Using these cross-sections,<br />
slope gradients can be identified on the plan map by color coding the run:rise for cut and fill<br />
slopes. For instance, 1:1 cut and fill slopes might be highlighted red for areas of concern, while<br />
those areas with gradients 1:3 or less might be light green, favorable areas for mitigation work.<br />
This exercise can quickly identify areas with the highest risk for soil erosion and difficulty in<br />
establishing vegetation.<br />
Slope angle plays a key role in revegetation planning because of its potential limitation on the<br />
types of mitigation measures that can be implemented. Figure 5-52 shows which practices are<br />
generally limited to gentle slopes and which can be implemented on steep slopes.<br />
200 ft<br />
250 ft<br />
100 ft<br />
50 ft<br />
Slope<br />
V:H<br />
% Slope<br />
Degrees<br />
2:1 200 65<br />
1:1 100 45<br />
1:1.5 66 34<br />
1:2 50 25<br />
1:3 33 18<br />
1:5 20 11<br />
50 ft 100 ft<br />
A<br />
V:H<br />
% Slope<br />
Degrees<br />
2:1 200 65<br />
1:1 100 45<br />
1:1.5 66 34<br />
1:2 50 25<br />
1:3 33 18<br />
1:5 20 11<br />
<strong>Revegetation</strong> Methods<br />
Hay/Straw Mulch<br />
Wood Strand<br />
Rip/Chisel<br />
Mechanical Planting<br />
Hand Planting<br />
Cat Track<br />
Top Soil<br />
Hand Seedling<br />
Blown Compost<br />
Hydromulch<br />
B<br />
Figure 5-52 | <strong>Revegetation</strong> methods and slope gradients<br />
For engineering work, slope is generally expressed as the rise<br />
(V) over run (H). For slopes flatter than 1:1, (45° or 100%), slope<br />
gradient is expressed as the ratio of one unit vertical to a number<br />
of units horizontal. For example a 1:2 slope gradient indicates<br />
that there is one unit rise to 2 units horizontal distance. For<br />
slopes steeper than 1:1, it is expressed as the number of units<br />
vertical to one unit horizontal (e.g., 2:1 indicates that there is<br />
a 2 unit rise to 1 unit horizontal distance). In general to avoid<br />
confusion, it is wise to notate the ratio by indicating the vertical<br />
(V) and horizontal (H), when defining gradient (e.g., 2V:1H).<br />
Range and forest sciences use % slope gradient to describe slope<br />
angle. Slope gradient refers to the number of feet elevation<br />
rise over 100 feet. A 66% slope gradient indicates that for every<br />
100 feet, there is a 66 foot vertical distance rise. Slope gradient<br />
controls what type of revegetation treatments can be used (B).<br />
The steeper the slope gradient, the fewer tools are available.<br />
Vertical Distance from Ditch<br />
60 ft<br />
30 ft<br />
A<br />
B<br />
Roadbed<br />
Ditch<br />
1:1<br />
C<br />
30 ft<br />
60 ft<br />
Horizontal Distance from Ditch<br />
D<br />
1V:1.5H<br />
1V:2H<br />
Natural ground 1V:2H<br />
E<br />
Figure 5-53 | Effects of steep and gentle<br />
gradient slopes on revegetation<br />
The trade–off between designing steep cuts that are difficult to<br />
revegetate or creating gentle slopes that disturb more area is<br />
demonstrated in this example. The centerline (A) of a new road<br />
intersects the 1V:2H natural ground (A to D). Fifteen horizontal<br />
feet of material must be excavated from the center of the road<br />
(A) to the ditch (B) to create the road bed. The resulting road<br />
cut will have varying lengths depending on how steep it is<br />
designed. A 1:1 cut slope will expose a 25 ft cut from the ditch<br />
(B) to the top of the cut slope (C). A 1V:1.5H slope (B to D) will<br />
lengthen this exposure threefold to approximately 80 ft. A<br />
1V:2H slope (B to E) is not achievable since it remains parallel<br />
to the natural ground slope.<br />
<strong>Roadside</strong> <strong>Revegetation</strong>: An Integrated Approach to Establishing Native Plants and Pollinator Habitat<br />
109
PLANNING PHASE TWO: ASSESS SITE<br />
Mitigating for Steep Slope Gradients<br />
Lengthen Cut or Fill Slopes<br />
Slope gradient can be reduced by increasing the length of the disturbance. This will make<br />
the revegetation effort easier and more successful, but will increase the amount of area, or<br />
construction footprint, of the project.<br />
Road planners consider many factors when they design the steepness of cuts and fills. A<br />
common strategy is to create cut and fill slope gradients as steep as possible. This practice<br />
disturbs far less land, resulting in less area to revegetate, and because there is less exposed<br />
soil, the potential for soil erosion is considerably reduced. Furthermore, there is a substantial<br />
cost savings with less excavation and revegetation work. Figure 5-53 shows an example of how<br />
increasing the steepness of a cut slope on a typical 1V:2H natural ground slope substantially<br />
decreases the length of disturbed soils.<br />
The main drawback of steepening slopes from a designer’s standpoint, however, is that steeper<br />
slopes are much harder to revegetate and the selection of revegetation practices available are<br />
reduced as the steepness of the slope increases. Vegetation on steeper slopes are also harder<br />
to maintain using practices such as mowing. On sites with 1V:5H slopes or less, all revegetation<br />
practices are possible; on slopes approaching 1:1, the threshold of most revegetation practices<br />
has been reached, as well as the limit of what can be successfully revegetated. It is important<br />
to work with the design engineers early in the planning stages to consider the effects of slope<br />
gradient on meeting revegetation objectives.<br />
Create Steep, Hardened Structures<br />
Creating hardened structures or walls, such as retaining walls, crib walls, gabion walls,<br />
mechanically stabilized earth walls, or log terrace structures at the base of a steep slope, will<br />
allow gentler slope gradients to be constructed above the structure. With adequate planning,<br />
these structures can be revegetated.<br />
5.6.7 SURFACE ROUGHNESS<br />
Slopes that have roughened surfaces trap water during the initial stages of runoff (Darboux<br />
and Huang 2005). Roughened surfaces consist of microbasins that capture and store soil<br />
particles and seeds that detach in the erosional processes. Seeds that have been transported<br />
short distances into these depressions are often buried by sediments. Moderate seed covering<br />
from transported soil can enhance germination as long as the seeds are not buried too deeply.<br />
Microbasins can also be relatively stable during the period for seed germination and seedling<br />
establishment.<br />
Surface roughness also reduces the effects of wind by reducing wind speed at the soil surface.<br />
Seeds may be blown into the depressions and become covered by transported soil. For both<br />
wind and water erosion, however, as the microbasins fill up with sediments, they become less<br />
effective in capturing sediments and seeds (Figure 5-54).<br />
Surface Roughness – How to Assess<br />
The simplest method for assessing surface roughness is to take several measurements of the<br />
distance between the top and bottom of the microbasin and average these values. Also count<br />
the number of microbasins in a 5-foot distance perpendicular to the slope direction. Shallow,<br />
closely spaced microbasins may create more area for seed germination but will also fill up<br />
faster with sediments, while microbasins that are deeper and farther apart will take longer to<br />
fill up and be more effective for erosion control but may have less surface area for optimum<br />
plant establishment from seeds.<br />
Figure 5-54 | Surface<br />
roughness creates favorable<br />
environment for germination<br />
Surface roughness consists of microbasins<br />
that are favorable to seed germination<br />
and early plant establishment.<br />
<strong>Roadside</strong> <strong>Revegetation</strong>: An Integrated Approach to Establishing Native Plants and Pollinator Habitat<br />
110
PLANNING PHASE TWO: ASSESS SITE<br />
Mitigation for Smooth Soil Surfaces<br />
Leave Surface Roughened<br />
Many project engineers have a tendency to “beautify” construction sites at the end of a<br />
road project by smoothing soil surfaces. While basic landscape shaping is essential, the soil<br />
surface should be left as rough as possible. In many instances, leaving cut slopes “unfinished”<br />
or in the “clearing and grubbing” stage provides excellent seed bed diversity and growing<br />
environment. The diversity of micro-habitats provides greater climatic and soil environments<br />
for seed germination. An exception to this rule is where erosion control matting is used for<br />
slope stabilization. For the matting to function best, it needs complete contact with the soil<br />
surface. On roughened surfaces matting will “tent” over depressions. On smooth surfaces<br />
the correctly installed matting will contact the soil surface, hold seeds in place and stabilize<br />
the slope soils.<br />
Surface Imprinting<br />
Imprinting the soil surface to create micro-relief has been shown to be effective in reducing<br />
runoff and soil erosion and increasing plant establishment (see Section 10.1.2.4, Roughen<br />
Soil Surfaces).<br />
Tillage<br />
Tilling the surface soil layers will leave the site in a roughened condition (see Section 10.1.2,<br />
Tillage). This practice can have other beneficial effects on the soil, such as loosening compacted<br />
soils.<br />
5.6.8 SLOPE LENGTH<br />
Another factor influencing soil erosion and seed transport is the length of slope. As the slope<br />
lengthens, so does the potential for transport of sediments and seeds. On very long slopes,<br />
the erosive force begins as sheet erosion at the top of the disturbance and<br />
often turns into rills and, in extreme cases, gullies at the bottom of the slope<br />
(Figure 5-55).<br />
A<br />
Slope Length – How to Assess<br />
Slope length can be measured in the field or from road plans. From road<br />
plans, slopes can be grouped into different lengths using the road cross<br />
sections (see Chapter 3). In the field, the effects of different slope lengths<br />
can be assessed by observing erosional features on existing disturbed areas.<br />
New or old disturbances can be used as references for critical slope lengths.<br />
Figure 5-55 demonstrates that at some point downslope rills begin to form.<br />
The distance that this occurs is the maximum length of slope for this slope<br />
angle and soil type before severe erosion takes place. This distance will vary by<br />
other factors addressed in this section (e.g., soil cover, climate, slope gradient,<br />
surface strength, surface roughness, and infiltration rates).<br />
B<br />
Mitigating Measures for Long Slopes<br />
Install Barriers<br />
Fiber rolls, straw wattles, downed wood, , silt fences, or compost berms or compost socks<br />
can be laid on the surface as obstructions or barriers to reduce slope length. To be effective,<br />
they must be placed in contact with the soil and perpendicular to the slope gradient. Straw<br />
wattles, hay bales, and silt fences must be trenched into the soil.<br />
Figure 5-55 | Surface erosion<br />
increase with distance downslope<br />
Surface roughness consists of microbasins<br />
that are favorable to seed germination<br />
and early plant establishment.<br />
<strong>Roadside</strong> <strong>Revegetation</strong>: An Integrated Approach to Establishing Native Plants and Pollinator Habitat<br />
111
PLANNING PHASE TWO: ASSESS SITE<br />
Create Benches<br />
The creation of slope breaks can<br />
reduce slope length. These breaks<br />
include benches, steps, or trenches<br />
cut into the slope. The reduced<br />
gradient at these breaks slows<br />
the velocity of overland flow and<br />
collects sediments (Figure 5-56).<br />
If either practice is applied in a long<br />
continuous line, they must be constructed<br />
on contour to the slope. If<br />
they are not level, water can collect<br />
and move along the structure, much like a channel, and eventually spill onto the slope below,<br />
creating rills and gullies. (The exception to this is the construction of live pole drains to redirect<br />
water off-site for slope stability [see Section 10.3.3.4, Live Fascines]). When placed properly<br />
along the contour, slope distances are shortened and the structures collect sediments and<br />
create areas for plant growth. Plants that are grown above barriers or near the bottom edge<br />
of benches can take advantage of water and sediments that collect during rainstorms. Native<br />
vegetation can be incorporated into many of these designs to take advantage of increased<br />
soil moisture and sediment accumulation. The distance that these structures are placed apart<br />
from each other should be less than the critical distance where rills are expected.<br />
5.7 SLOPE STABILITY<br />
This discussion is directed to non-engineers to simplify and make accessible basic slope stability<br />
concepts that must be understood in developing revegetation strategies. It is by no means<br />
a substitute for professional engineering expertise. Technical references for slope stability<br />
are many (including Carson and Kirby 1972; Spangler and Handy 1973; Brunsden and Prior<br />
1984; Denning and others 1994), to which the reader is referred for a comprehensive review<br />
of this subject. For a detailed evaluation of the role of vegetation in slope stability, the reader<br />
is referred to Gray and Leiser (1982).<br />
Creating stable slopes is essential for establishing healthy plant communities, but the reverse<br />
is equally true – establishing native vegetation is critical for stabilizing slopes. The following<br />
discussion takes the latter perspective of how to create the most favorable environment for<br />
establishing vegetation on potentially unstable slopes and how this approach can be integrated<br />
into the overall strategy of slope stabilization. A vegetated slope adds stability to slopes by<br />
holding the soil together through a network of root systems and by removing water from the<br />
soil, which is the primary driving force behind most landslides.<br />
Figure 5-56 | Structures that<br />
shorten slope length<br />
Structures that shorten the slope length<br />
can slow surface runoff, collect sediments<br />
and increase soil moisture. Typical<br />
treatments include: a) placement of fiber<br />
rolls, logs, straw waddles, and compost<br />
berms; b) benches, steps, and trenches;<br />
c) willow waddles; and d) willow brush<br />
layers. Strategic placement of plants<br />
can take advantage of increased soil<br />
moisture by planting where roots can<br />
access the additional moisture. Most<br />
species do not respond well to being<br />
buried by sediment and should be<br />
planted above or below depositional<br />
areas (A and B). However, some species,<br />
such as willow, root where the stems are<br />
buried, and these species can be planted<br />
where sediments are expected to be<br />
deposited (C and D).<br />
Slumps<br />
• moderate slope gradients<br />
• circular failure movement<br />
• cohesive soils<br />
• deep soils<br />
• slow moving<br />
Debris Slides<br />
• steep slope gradients<br />
• planar failure movement<br />
• non-cohesive soils<br />
• shallow<br />
• fast moving<br />
Figure 5-57 | Slumps and slides<br />
Common landslides typically associated<br />
with road construction. Modified after<br />
Varnes (1978) and Bedrossian (1983).<br />
<strong>Roadside</strong> <strong>Revegetation</strong>: An Integrated Approach to Establishing Native Plants and Pollinator Habitat<br />
112
PLANNING PHASE TWO: ASSESS SITE<br />
Slope stability is the resistance of natural or artificial slopes to fail through gravitational forces.<br />
The landforms resulting from slope failures are called landslides and they are described by their<br />
morphology, movement rates, patterns, and scale. This section will focus on two general types<br />
of landslides that are common to road cuts and fills – slumps and debris slides (Figure 5-57).<br />
Slumps typically occur on deep soils that are cohesive (e.g., rich in clays). They tend to be deep<br />
seated and slow moving. Viewed in profile, the failure occurs in a circular motion, resulting in<br />
a series of tilted blocks and circular cracks. Debris slides are shallow, fast-moving landslides<br />
that form on non-cohesive soils (e.g., sandy, gravelly). These landslides occur on steep slopes.<br />
Water is the driving force behind most slope stability problems encountered in road projects.<br />
It comes as rainstorms, snowmelt, and often as diverted surface water from road drainage.<br />
As water increases in a potentially unstable slope, the added weight of the water in the soil<br />
plus the increased pressure of water in the pores (pore water pressure) eventually exceeds<br />
the strength of the soil and the slope fails (Figure 5-58).<br />
Increased water to a slope is especially a problem where a restrictive layer (e.g., a layer of soil<br />
that limits water movement) is close to the soil surface. As water moves through the surface<br />
horizon and encounters a restrictive layer, it builds up in the pores of the horizon above it,<br />
increasing water pressure. The saturated horizon becomes heavier and eventually the slope<br />
fails under the added weight of water and increased pore water pressure.<br />
The faster water moves through soil, the less susceptible a slope is to failure. The measured<br />
rate at which water is transmitted through a soil mass is its permeability. When permeability<br />
is high, water quickly moves out of the soil pores, reducing the potential for increased pore<br />
water pressure and slope weight. When permeability is low, water slowly moves through soil<br />
and builds up in the soil pores. On gentle slopes, this is typically not a problem, but as slope<br />
gradients increase, gravitational forces acting on the slope raise the potential for slope failure.<br />
Slope length is another factor important to water movement because the longer the slope,<br />
the greater the buildup of water near the base of the slope. This phenomenon explains why<br />
many slope failures occur in the mid to lower portions of fill slopes.<br />
Whether a slope fails or not is ultimately due to the strength of the soil. Soil strength is affected<br />
by the amount of clay present in the soil (the more clay, the greater the soil strength), the<br />
level of compaction (the greater soil compaction, the more stable the soil), and the presence<br />
of roots (more roots are better). Compaction of soils to increase soil strength usually takes<br />
priority in road design over creating optimum soil conditions for root growth. With this practice,<br />
not only are there fewer root systems to add slope stability, there is also reduced vegetative<br />
cover, which is important for intercepting and removing water from the soil. A road design<br />
that integrates vegetation into the stability of the slope can meet both road and revegetation<br />
objectives, but it will take a collaborative approach.<br />
This section will discuss each of the following parameters as they relate to increasing slope<br />
stability through revegetation treatments:<br />
◾◾<br />
Permeability<br />
◾◾<br />
Restrictive layers<br />
◾◾<br />
Water input<br />
◾◾<br />
Slope length<br />
◾◾<br />
Slope gradient<br />
◾◾<br />
Soil strength<br />
Figure 5-58 | Water pressure<br />
and slope stability<br />
Water pressure is greatest when soils are<br />
saturated. Slopes release this pressure<br />
through channels created by decomposing<br />
roots, animal burrows, and worm<br />
holes. When pressures become greater<br />
than the strength of the soil, slopes fail.<br />
This picture of a decomposed root releasing<br />
water pressure was taken 30 minutes<br />
before the road cut failed.<br />
5.7.1 PERMEABILITY<br />
The rate at which a volume of water moves through soil material is its permeability (technically<br />
referred to as hydraulic conductivity). Soils that have moderate to high permeability rates<br />
tend to be more stable than those with low permeability rates. Where permeability is low,<br />
<strong>Roadside</strong> <strong>Revegetation</strong>: An Integrated Approach to Establishing Native Plants and Pollinator Habitat<br />
113
PLANNING PHASE TWO: ASSESS SITE<br />
water fills the soil pores but does not drain quickly, adding additional weight to the slope and<br />
increasing the pore pressure. Both factors reduce the overall strength of slopes and increase<br />
the likelihood that slope movement will occur when other conditions are right.<br />
Soils with large interconnecting pores have a higher permeability than soils with smaller<br />
pores that are less interconnecting. Soil textures that are well-graded (soils that have only<br />
one particle size) typically have a higher permeability than poorly graded soils (soils having<br />
a range of particle sizes from clays to small gravels). For example, poorly graded granitic soils<br />
have low permeability rates because the different-sized particles are neatly packed together,<br />
restricting the pathways for water flow. Well-graded soils, such as pure sands and gravels, have<br />
high permeability because pores are large and interconnecting. Alternatively, compacted<br />
soils often have low permeability rates because of the reduced or destroyed interconnecting<br />
macropores.<br />
Permeability – How to Assess<br />
Simple field tests, such as percolation tests, historically utilized in assessing septic leach fields,<br />
can be used for determining permeability rates. A small hole is excavated and water is poured<br />
to a specified depth. The time to drain the water from the pit is measured in inches per hour.<br />
These tests are run at different soil depths to determine if permeability rates change. Results<br />
from percolation tests are subject to significant variability. Nevertheless, they can indicate the<br />
relative permeability of different soil types or different soil disturbances.<br />
Engineering laboratory tests for determining permeability include the constant head<br />
permeameter for coarse-grained soils. In this test, a soil sample is placed in a cylinder at the<br />
same density as the soils in the field. Water is introduced and allowed to saturate the sample. A<br />
constant water elevation, or head, is maintained as the water flows through the soil. The volume<br />
of water passing through the sample is collected and this provides a direct measurement of<br />
the flow rate per unit of time. The test can be repeated at various densities to determine the<br />
corresponding permeability. The test can also be repeated for various additions of organic<br />
amendments and compaction levels to determine the effects of these treatments on permeability.<br />
A soil lab should be consulted for how to collect and submit samples for these tests.<br />
Where testing is not feasible, engineering and soil texts can give ranges for expected permeability<br />
based upon the soil gradation and classification. A field assessment can also give some<br />
indication of permeability rates. Subsoils or soils lacking organic matter that have a range of<br />
soil particle sizes, from clays through small gravels, have a propensity for low permeability<br />
rates, especially when they are compacted (see Section 5.3.3.1, Soil Structure – How to Assess).<br />
Mitigating for Low Permeability<br />
Tillage<br />
Loosening compacted soil through tillage practices (see Section 10.1.2, Tillage) increases<br />
permeability by creating large fractures or pathways for water to flow. However, tilled soils<br />
often return to near-original permeability as the soils settle over time.<br />
Organic Amendments<br />
Long-fibered organic matter, such as shredded wood, tilled deeply into the soil will increase<br />
the infiltration and permeability of the soil because larger, interconnecting pore spaces are<br />
created (see Section 10.1.5, Organic Matter Amendments). Several studies evaluating the<br />
incorporation of unscreened yard waste suggests that an optimum rate of organic matter<br />
additions for increasing infiltration and improving soil structure is approximately 25 percent<br />
compost to soil volume (Claassen 2006). In addition, incorporating organic matter can increase<br />
slope stability because amended soils are lighter in weight than non-amended soils (mineral<br />
soils can weigh 10 to 20 times more than soils amended with 25 percent organic matter). The<br />
reduced soil weight lowers the driving forces that create unstable slopes.<br />
<strong>Roadside</strong> <strong>Revegetation</strong>: An Integrated Approach to Establishing Native Plants and Pollinator Habitat<br />
114
PLANNING PHASE TWO: ASSESS SITE<br />
5.7.2 RESTRICTIVE LAYER<br />
A restrictive layer is any soil horizon or stratum (including unfractured bedrock) that has<br />
very low permeability. As water flows through a surface horizon with good permeability and<br />
encounters a restrictive layer, the rate of downward water movement slows and water builds<br />
up in the pores above. The boundary between the permeable surface layer<br />
and the harder subsurface material is often a zone of weakness, sometimes<br />
referred to as a slip plane. Slope failure occurs when the pores in the soils<br />
above the restrictive layer become saturated with water to a point where<br />
the pore water pressure and soil weight exceed the soil strength. The depth<br />
of slope failure depends on the thickness of the soils above the restrictive<br />
layer. On slopes where the restrictive layer is near the surface, slope failure, if<br />
it occurs, will be shallow (Figure 5-59). Where the contact is deeper, the soil<br />
movement will be more extensive. The types of landslides that occur with<br />
restrictive layers are debris slides.<br />
Restrictive Layer – How to Assess<br />
Restrictive layers in natural settings can be inferred by the presence of seeps<br />
and springs. These features occur most often at the point where a restrictive<br />
layer is intercepted or exposed to the surface. These can be intermittent<br />
features that are observed in the winter or spring but are dry in the fall or summer. The<br />
vegetation around permanent and temporary seeps and springs is typically composed of<br />
water-loving species, such as sedges (Carex spp.) and rushes (Juncus spp.). Figure 5-60 shows<br />
how a seep is created when a cut slope intersects a restrictive layer.<br />
On construction sites, restrictive layers can be created by placing a loose soil or compost<br />
over highly compacted subsoil. These layers can be identified in the field by determining soil<br />
strength using a soil penetrometer or shovel to find compacted or dense soils (see Section<br />
5.3.3, Soil Structure). On roadbed fill slopes or road cut slopes the compaction of the soils can<br />
be assumed. This layer is then assessed for the approximate amounts of silt and clay using the<br />
field texturing method. Dense or compacted soil layers that are high in silts and clays are likely<br />
to be very restrictive to water movement. Field permeability tests can be used to determine<br />
the rates of water flow (see Section 5.7.1.1, Permeability – How to Assess). Often restrictive<br />
layers are not observed until after construction when they manifest as intermittent seeps or<br />
wet areas in cut and fill slopes. Geotechnical investigation will determine if these features are<br />
due to shallow water movement associated with restrictive layers or interception of deeper<br />
subsurface water.<br />
Figure 5-59 | Restrictive layers<br />
can decrease slope stability<br />
In this photograph, a restrictive layer is<br />
very close to the soil surface. During a rain<br />
storm, water moved through the shallow<br />
soil layer and encountered a restrictive<br />
layer. Water then moved downslope,<br />
through the soil, building up pressure,<br />
until the increased pore pressure and<br />
soil weight exceeded the strength of<br />
the soil. At this point, the mid to lower<br />
slopes failed.<br />
Seeps<br />
Ground Water<br />
Restrictive Layer<br />
Figure 5-60 | Restrictive<br />
layers and ground water<br />
Groundwater moves downslope above restrictive<br />
soil layers. Seeps are seen in road<br />
cuts where the restrictive layer is exposed.<br />
Increased soil water that occurs above restrictive<br />
layers can decrease slope stability.<br />
<strong>Roadside</strong> <strong>Revegetation</strong>: An Integrated Approach to Establishing Native Plants and Pollinator Habitat<br />
115
PLANNING PHASE TWO: ASSESS SITE<br />
Mitigating for Restrictive Layers<br />
Tillage<br />
If restrictive layers are within several feet of the soil surface, site treatments that break up<br />
portions of this layer can increase permeability, which will increase stability. Site treatments<br />
that accomplish this are bucket tillage, deep ripping, spading, and fill cut (benching and<br />
backfilling), which are discussed in Section 10.1.2, Tillage. The drawback to tillage is that it will<br />
reduce soil strength in the short term until roots occupy the soil and increase soil strength.<br />
Temporary irrigation systems have been installed on sites where quick establishment of grass<br />
cover during summer and fall is essential for slope stabilization prior to winter precipitation<br />
(Hogan 2007). Tillage techniques that leave a deep uneven subsurface profile reduce the<br />
potential for downslope debris slides.<br />
Organic Amendments<br />
Where possible, the incorporation<br />
of organic matter will help keep the<br />
restrictive layer from returning to its<br />
original soil density and allow more<br />
time for roots to establish (see Section<br />
10.1.5, Organic Matter Amendments).<br />
As described above, soil strength is<br />
reduced until vegetation becomes<br />
established, but the negative effects<br />
of reduced soil strength are offset<br />
by the increased permeability and<br />
reduced soil weight of the organic<br />
amendments.<br />
Key-In Surface Material Installations<br />
Installation of straw wattles, staked in place on contour, prior to installation of topsoil or<br />
compost can hold permeable surface layers in place long enough for plant root systems to<br />
knit the layers together. Fully biodegradable wattles should be used.<br />
Live Pole Drains<br />
Live pole drains are constructed to intercept water from seepage areas and remove it through<br />
a system of interconnecting willow bundles to more stable areas, such as draws, ditches, or<br />
other waterways (Figure 5-61). The interception and flow of water encourages the establishment<br />
and growth of willow cuttings along the length of the live pole drain.<br />
5.7.3 WATER INPUT<br />
Water, which is the driving force behind most landslides, comes through rainfall, groundwater<br />
flow, snow melt, or diverted from other areas through road drainage. Landslides often occur<br />
after a series of strong winter storms have delivered a high amount of rainfall over a short<br />
period of time. Under these conditions, soils have not had sufficient time to drain before the<br />
next storms arrive and water in the soil builds up to a very high pressure (Figure 5-58). With<br />
additional storms the combination of increased pore water pressure and additional weight of<br />
water in the slopes eventually leads to slope failure. Landslides can occur where water from<br />
road ditches or other road features drain water onto marginally unstable slopes. Major site<br />
factors that affect water input are rainfall duration and intensity, rain-on-snow events, and<br />
road drainage.<br />
A<br />
B<br />
Figure 5-61 | Live pole drains<br />
Slumps are characterized by scarps,<br />
cracks, and benches. Water collects<br />
on benches and in cracks where it is<br />
transmitted into the slide mass, creating<br />
continued instability. Slopes can be<br />
stabilized by removing water through<br />
a series of hand-dug surface ditches.<br />
Using the cracks as guides for the<br />
location of ditches, they are filled in<br />
with soil and dug wide enough for a<br />
willow fascine (see Section 10.3.3.4, Live<br />
Fascines) to be placed in the bottom (A).<br />
Called “live pole drains” (Polster 1997),<br />
these structures not only quickly move<br />
surface water from the slide to more<br />
stable areas, but the willow cuttings<br />
in the fascines, encouraged by the<br />
presence of high soil moisture, grow<br />
into dense vegetation (B) that stabilize<br />
the slide through the deep rooting and<br />
dewatering.<br />
<strong>Roadside</strong> <strong>Revegetation</strong>: An Integrated Approach to Establishing Native Plants and Pollinator Habitat<br />
116
PLANNING PHASE TWO: ASSESS SITE<br />
Water Input – How to Assess<br />
See discussions under Section 5.2, Water Input, for how to assess water input.<br />
Mitigating for High Water Input<br />
Proper Surface Drainage<br />
Increased water is the driving force behind slumps and debris slides. Designing proper water<br />
drainage is probably the most important measure to implement for slope stability (Gedney<br />
and Weber 1978). Where road water is inadvertently routed into potentially unstable areas,<br />
there is a greater potential for slope failure (Fredricksen and Harr 1981). Road projects that<br />
are designed to move storm water away from or out of unstable slopes as quickly as possible<br />
through road and slope drainage structures increase slope stability. In some cases, installing<br />
a curb at the top of the cut slope will effectively move water away from unstable slopes below.<br />
Coordinate with engineers to insure that surface runoff, during construction of phased projects,<br />
is addressed prior to completion of final stormwater system.<br />
Species Selection<br />
Select species that have adapted to wet soils. These include sedges (Carex spp.), rushes<br />
(Juncus spp.), bulrushes (Scirpus spp.), willows (Salix spp.), cottonwoods (Populus spp.), and<br />
cedars (Thuja spp. and Chamaecyparis spp.). Since each species has a unique way, or strategy,<br />
of modifying the moisture regime of a site, planting a mixture of species is a way of ensuring<br />
that all strategies are represented on the site. For instance, willows establish quickly and can<br />
draw large quantities of moisture from the soil, but only when the willows have leaves. Cedars,<br />
on the other hand, are slower to establish, but longer lived. They can withdraw moisture from<br />
the soil during the winter, unlike deciduous species. When they are well established, they<br />
intercept large amounts of water in the crowns, preventing precipitation from reaching the<br />
soil. Trees have a great ability to significantly deplete moisture at considerable depths (Gray<br />
and Leiser 1982). Wetland species, such as rushes and sedges, unlike many tree and shrub<br />
species, grow well in saturated soils.<br />
Live Pole Drains<br />
The live pole drain (Polster 1997) is a biotechnical engineering technique where continuous<br />
willow bundles (Figure 5-61) are placed across a slope, much like an open drain, to redirect water<br />
to a more stable area, such as channels and draws. Where small slump failures have occurred<br />
during or after construction, live pole drains can be installed to increase slope drainage, add<br />
root strength, and remove soil moisture from the slide mass.<br />
5.7.4 SLOPE LENGTH<br />
Slope length is important for stability because the longer the slope, the more water concentrates<br />
in the lower portion of the slope. Increased water increases pore water pressure and soil<br />
weights, thereby decreasing the stability of the mid to lower sections of long slopes. This is one<br />
reason why slumps are often observed in the mid to lower slope positions of longer fill slopes.<br />
Slope Length – How to Assess<br />
Slope length can be obtained from road plans or measured directly in the field using a tape.<br />
Mitigation for Long Slopes<br />
Live Pole Drains<br />
Using live pole drains (discussed in the previous section), shortens the distance water is<br />
transmitted through the hill slope by intercepting surface and subsurface water in ditches<br />
<strong>Roadside</strong> <strong>Revegetation</strong>: An Integrated Approach to Establishing Native Plants and Pollinator Habitat<br />
117
PLANNING PHASE TWO: ASSESS SITE<br />
at frequent slope intervals. Captured water is transmitted downslope through a system of<br />
continuous fascines to a stable channel (Figure 5-61).<br />
Create Benches<br />
Another method of reducing slope length can be the creation of a slope break, such as benches,<br />
steps, or trenches cut into the slope. The reduced gradient at these breaks slows the velocity<br />
of overland flow and collects sediments. However, unless the water is directed off the slope,<br />
total water input to the slope is not reduced.<br />
5.7.5 SLOPE GRADIENT<br />
As slope gradient increases, the destabilizing gravitational forces acting on the slope become<br />
greater. On a level surface, the gravitational force stabilizes the soil mass. As the slope gradient<br />
increases, the strength of the slope to resist sliding along the failure plane decreases.<br />
Slope Gradient – How to Assess<br />
Assessing slope gradient is discussed in Section 5.6.6.1, Slope Gradient – How to Assess.<br />
Mitigating for Steep Slopes<br />
Mitigating measures for steep slopes are discussed in Section 5.6.6.2, Mitigating for Steep<br />
Slope Gradients.<br />
5.7.6 SOIL STRENGTH<br />
Soil strength (technically referred to as shear strength) is the characteristic of soil particles to<br />
resist downslope forces. Physical and biological factors play roles in soil strength. The major<br />
physical factors contributing to increased soil strength are reduced porosity (compacted soils),<br />
greater range of particle sizes (poorly graded soils), greater angularity of the soil particles,<br />
greater surface roughness, and the presence of silts and clays that add cohesive strength<br />
(Hall and others 1994).<br />
The biological components of increased soil strength are the matrix of roots that reinforce<br />
the surface horizon, roots that anchor an unstable soil mantle to stable subsoils or rock, and<br />
stems (e.g., trunks of trees) that add support to the soil immediately uphill (Hall and others<br />
1994) (Figure 5-62). The physical factors, unfortunately, do not always support the biological<br />
factors. For example, high porosity soils are of particular interest to the designer because of<br />
the role porosity plays in root growth. From an engineering standpoint, however, high porosity<br />
soils have lower soil strength because soil particles are not packed closely together and are<br />
less interlocking. Balancing the needs of creating a healthy soil for optimum vegetation while<br />
still maintaining slope stability until established vegetation adds root strength to the soil is a<br />
challenge to engineers and revegetation specialists. A road design that creates soils with high<br />
porosity will also decrease soil strength in the short term; however, if this practice increases<br />
the biological productivity of the site, the long-term result is a net increase in soil strength<br />
(Gray and Leiser 1982).<br />
The growth habits of native species can greatly influence slope stability because each species<br />
has a unique rooting pattern and root tensile strength. For instance, grass roots are very<br />
fibrous and abundant in the surface horizon, adding surface stability when the grass cover<br />
is high. Grass and forb roots, however, add very little soil strength at deeper depths because<br />
their roots are not as strong and do not penetrate as deeply as tree roots (Gray and Leiser<br />
1982). Alternatively, roots of shrub and tree species are long and deep rooted, with relatively<br />
high tensile strength (Gray and Leiser 1982). The main advantage of tree and shrub species is<br />
<strong>Roadside</strong> <strong>Revegetation</strong>: An Integrated Approach to Establishing Native Plants and Pollinator Habitat<br />
118
PLANNING PHASE TWO: ASSESS SITE<br />
the long vertical roots (taproots) that can cross failure planes and bind the soil<br />
strata together (Figure 5-62).<br />
Soil Strength – How to Assess<br />
The designer will probably not perform engineering tests for soil strength, yet<br />
knowing a little about these tests could be important, especially if the designer<br />
is making recommendations that soils on potentially unstable sites be deeply<br />
tilled or amended with organic matter.<br />
A common method engineers use to estimate soil strength is to correlate soil<br />
classification (from sieve analysis and the characteristics of clay particles) with<br />
published literature values. Shear vanes or cone penetrometers are good<br />
methods to approximate the strength of fine-grained soils in the field, and<br />
published research is used to correlate these readings with laboratory shear<br />
strength test results.<br />
The triaxial shear test is a more precise laboratory method to determine shear<br />
strength of soils. In this test, a long cylinder of the soil is placed in a latex<br />
membrane and submerged in a clear plastic cylinder filled with water. A vertical<br />
pressure is applied to the cylinder at a slow rate until the soil sample shears. Very<br />
sensitive strain gauges measure the soil displacement, applied forces, and any<br />
pore water pressures that develop. Various water pressures are applied to the<br />
cylinder to simulate the confining pressure of soil depth (Brunsden and Prior<br />
1984). This test can be used to determine the shear strength of soils that have<br />
been amended with organic materials.<br />
Mitigating for Low Soil Strength<br />
Biotechnical Engineering Techniques<br />
Many biotechnical slope stabilization techniques use vegetative cuttings from willows or other<br />
easy-to-root species to structurally reinforce the soil. As these materials root, they add further<br />
stabilization to slopes through interconnecting root systems and soil moisture withdrawal.<br />
These practices include stake planting, pole planting, joint planting, brush layers, and branch<br />
packing (see Section 10.3.3, Installing Cuttings).<br />
Shrub and Tree Seedlings<br />
On drier sites, where willow cuttings are less likely to survive and grow, shrub and tree seedlings<br />
can be used. While these species are slower growing, they usually have deeper root systems<br />
and persist longer once they are established. Grass and forb species can quickly establish on<br />
Figure 5-62 | Plant roots<br />
and slope stability<br />
Plant roots and stems increase slope<br />
stability by (A) reinforcing the surface<br />
horizon through a matrix of roots, (B)<br />
anchoring surface horizons to rock or<br />
subsoils, and (C) stems supporting the<br />
soil upslope.<br />
Figure 5-63 | Effects of roots<br />
on slope stability<br />
This debris slide (noted by its shallow, steep<br />
appearance) took place two years after construction<br />
when the grass and forbs were fully<br />
established. Establishing shrub species, rather<br />
than grass and forb species, on steep, potentially<br />
unstable slopes, would be better for long<br />
term stability because shrub species are deeper<br />
rooting and have higher root tensile strength.<br />
<strong>Roadside</strong> <strong>Revegetation</strong>: An Integrated Approach to Establishing Native Plants and Pollinator Habitat<br />
119
PLANNING PHASE TWO: ASSESS SITE<br />
drier sites, but soil strength is limited to the surface of the soil profile where the roots are most<br />
abundant. For this reason, grasses and forbs do not provide as much stability (Figure 5-63).<br />
On potentially unstable sites, grasses should be grown between shrub and tree seedlings to<br />
add soil strength to the surface soil while tree and shrub species become established. On dry<br />
sites, however, grasses must be excluded around seedlings or vegetative cuttings until they<br />
have become established. Because of the steep, shallow nature of many of these sites, planting<br />
seedlings is not always practical or successful. Hydroseeding or hand sowing, covered by a<br />
surface mulch that will protect the surface from erosion for several years while the shrubs<br />
become established, should be considered.<br />
Soil Improvement<br />
Improving soil productivity will increase root densities and enhance slope stability (Hall and<br />
others 1994). Mitigating measures that improve water storage, organic matter, and nutrients<br />
should, with time, increase slope stability. Some practices, such as soil tillage, reduce soil<br />
strength in the short-term. However, once plants have become established more roots occupy<br />
the soil and slope stability is increased. Tillage should be integrated with practices that quickly<br />
reestablish vegetation to ensure that slope stability is not compromised in the short term. On<br />
slopes where root strength is critical for stability in the first year after construction, irrigation<br />
could be considered to quickly establish a dense vegetation cover.<br />
Temporary Soil Stabilitation<br />
It is important to implement erosion control practices that stabilize the surface of steep slopes<br />
while vegetation develops a strong root system and top growth. Where trees are inappropriate<br />
because of clear zones and shrubs inappropriate because of sight lines, erosion control products<br />
work well to stabilize soils while grasses and forbs establish.<br />
5.8 WEEDS<br />
The unwanted vegetation on a project site and surrounding area is referred to, in this document,<br />
as weeds. <strong>Roadside</strong>s are often major conduits for the transportation of weeds, which can<br />
be problematic not only for roadside ecology but also for the general ecosystem health of<br />
surrounding lands and economic well-being of adjacent farmers, ranchers, gardeners, and<br />
other land managers. A poorly revegetated roadside contributes to the spread of weeds and<br />
detracts from environmental health. However, the implementation of a good revegetation<br />
plan can benefit surrounding environments. The best revegetation plans focus not only on<br />
controlling weeds, but on establishing healthy native plant communities that are resistant to<br />
the invasion of weeds.<br />
The term weeds denotes any species that limits successful revegetation due to increased<br />
competition for site resources (light, nutrients, moisture). The comprehensive species list,<br />
developed during the vegetation assessment (Section 4.6.1, Vegetation Assessment), identified<br />
those species on the federal, state, or local lists of noxious weeds or invasive species. These<br />
species were identified from the PLANTS database (http://plants.usda.gov). A further review<br />
of the comprehensive species list will identify aggressive species that may not be on the<br />
state weed lists but may be important to control. Since these lists are frequently updated, it<br />
is important to check the most current lists.<br />
The potential for weed species to become established after construction is a function of two<br />
factors:<br />
◾◾<br />
Growing environment – Areas within the construction project that are favorable for<br />
weed establishment. These areas are often highly disturbed sites with bare soils.<br />
◾ ◾ Weed sources – There are two general sources of weeds, those existing on the site or<br />
near the site prior to construction and those brought into the project as a result of road<br />
construction. Sources of existing weeds are existing seed banks or plant propagules in<br />
the project or adjacent to the project. Weed sources that are brought into the project<br />
<strong>Roadside</strong> <strong>Revegetation</strong>: An Integrated Approach to Establishing Native Plants and Pollinator Habitat<br />
120
క<br />
క<br />
క<br />
క<br />
క<br />
క<br />
PLANNING PHASE TWO: ASSESS SITE<br />
come from unwashed vehicles and hydromulch equipment and also from project<br />
materials such as imported gravels, soil, compost, hay, and borrow material. After<br />
construction, weeds can be brought from grazing animals.<br />
The project team should consider developing a weed management strategy in the early<br />
stages of planning that addresses how to control existing and potential weeds sources and<br />
how to create a weed-resistant growing environment after construction. Ideally, this strategy<br />
should be implemented two to three years prior to actual construction, continued through<br />
the construction phase, and up to three years post-construction. Depending on the severity,<br />
additional long-term treatments of weeds may be needed. The strategy must also address the<br />
effects of each weed treatment on pollinator health and habitat, as well as water quality and<br />
other project objectives. Inset 5-4 offers some guidance in developing a weed management<br />
strategy.<br />
The weed management strategy for a revegetation project should also conform to the IRVM<br />
program that may have been developed for that particular highway. The IRVM is “an approach<br />
to right-of-way maintenance that combines an array of management techniques with sound<br />
ecological principles to establish and maintain safe, healthy and functional roadsides” (Brant<br />
and others 2015). It applies many of the Integrated Pest Management concepts developed<br />
for agriculture, horticulture, and forestry to roadside vegetation management. The IRVM<br />
elements include prevention, monitoring, action thresholds, pest treatments, and evaluation<br />
(NRVMA 1997). Most states use IRVM, and some have formal IRVM programs. Contact the state<br />
Department of Transportation (DOT) for the individual IRVM program specific to the project.<br />
5.8.1 WEED SOURCES AND THEIR GROWING ENVIRONMENT<br />
The foundation of a weed management strategy is to create a growing environment that<br />
encourages the development of a healthy native plant community that is resistant to the<br />
introduction and spread of weeds. For most weeds to become established, there must first<br />
be an opening, or space, in the native plant community for plants to grow. These conditions<br />
occur in disturbed areas associated with recent construction or in places where native plants<br />
and soil have been removed or disrupted. Secondly, the disturbed environment must be<br />
favorable for weeds to take hold and thrive. This requires that the soils and climate be optimal<br />
for the environmental needs of the species. Third, the weed species must have an advantage<br />
over native species. If a weed is more resilient or robust in its growth habits in both adjacent<br />
lands and disturbed sites, then it is more likely to become established.<br />
While weed species come from sources already present on or adjacent to the project site,<br />
they are also inadvertently brought onto the site from outside sources such as construction<br />
equipment, cars and trucks, shoes and socks, and in materials used on the project such<br />
as gravel and rock used for road construction materials. All too often, weeds arrive during<br />
the revegetation efforts in contaminated mulches, topsoil, hydroseeding equipment, and<br />
uncertified seed sources.<br />
Inset 5-4 | General advice for<br />
managing weeds (Sheley 2005)<br />
The goal should be to develop<br />
weed-resistant plant communities.<br />
The first priority should be to<br />
protect uninfested areas and<br />
areas that have desirable species<br />
available to colonize the<br />
site once the weed species are<br />
treated.<br />
Establish not only early seral<br />
species, but a diversity of midand<br />
late-seral species filling<br />
ecological niches in order to<br />
prevent invasion of weeds.<br />
Any prevention program should<br />
be comprehensive and complete.<br />
There are no silver bullets. Managing<br />
weeds is time consuming,<br />
complex, and an iterative process.<br />
Try things and then adapt.<br />
Early detection and rapid response<br />
are critical to preventing<br />
weed infestation. Develop a<br />
systematic, thoughtful detection<br />
strategy early in the planning<br />
phases. Look for new patches or<br />
problematic sources before they<br />
spread, and treat appropriately.<br />
Weed Sources – How to Assess<br />
Weed populations are identified and located during vegetation surveys (Section 4.6.1, Vegetation<br />
Assessment) and topsoil surveys (Section 5.11.1, Topsoil). County weed boards and county and<br />
state road management staff are also a source of information, as they track and treat weeds.<br />
From these surveys, a noxious weed map can be constructed that will aid in the development<br />
of a weed control strategy for the project site.<br />
The backbone of a weed control strategy is a thorough understanding of the life history and<br />
ecology of the important weed species of the project. Information about many weed species<br />
in the U.S. can be found on the PLANTS database (http://plants.usda.gov) in PDF documents<br />
called Plant Guides located on each weed species Plant Profile page. The Invasive Species<br />
<strong>Roadside</strong> <strong>Revegetation</strong>: An Integrated Approach to Establishing Native Plants and Pollinator Habitat<br />
121
PLANNING PHASE TWO: ASSESS SITE<br />
Assessment Protocol (I-Rank) is another source of information on nonnative plants in the U.S.<br />
(www.natureserve.org/explorer). This website describes some of the important characteristics<br />
of the weed species and ranks each on its threat to native plant communities and difficulty<br />
of control.<br />
The questions to answer for each important weed species include the following:<br />
◾◾<br />
Life form<br />
◾◾<br />
How it reproduces<br />
◾◾<br />
Longevity of propagule<br />
◾◾<br />
Propagation period<br />
◾◾<br />
Distance of propagule spread<br />
◾◾<br />
Optimum growth habitat<br />
◾◾<br />
Aggressiveness (Figure 5-64)<br />
◾◾<br />
Life cycle<br />
◾◾<br />
Weed establishment needs<br />
◾◾<br />
Light needs<br />
◾◾<br />
Importance for pollinators<br />
◾◾<br />
Treatment options<br />
From this information a strategy can be developed for each weed species that addresses<br />
how to reduce the weed source, how to limit the optimum growing environment, and how<br />
to control the weed species if it becomes present.<br />
Weed Sources – How to Limit<br />
Photo: Sally Long, Dorena Genetic Resource Center.<br />
Figure 5-64 | Invasive species<br />
Invasive plants such as Himalayan<br />
blackberry [Rubus discolor (Weihe &<br />
Nees)] (left) and Scotch broom [Cytisus<br />
scoparius (L.) Link] (right) are aggressive<br />
colonizers of disturbed sites such as<br />
roadsides.<br />
Control of weeds falls into two categories – prevention and treatment. Preventing the<br />
introduction of a weed species is always the preferred strategy because it is easier and more<br />
economical to prevent the introduction than to control or eliminate weeds once they have<br />
become established. There are many possible entry points for weeds, such as the following:<br />
◾◾<br />
Local weed populations – Locate weed populations early in the planning phases. Early<br />
detection and rapid response are critical to preventing weed infestation. Identify and<br />
treat new patches before they spread (Sheley 2005). Assess weed populations in areas<br />
adjacent to the project and work with neighboring landowners to control specific weeds.<br />
◾◾<br />
Vehicles and equipment – Portable wash stations are often set up to thoroughly wash<br />
the tires, wheel wells, and chassis of vehicles and equipment to eliminate the possibility<br />
that weed seeds are brought in from other projects or areas.<br />
◾◾<br />
Erosion control seeding – Rye grasses are non-native and commonly used for temporary<br />
or permanent erosion control seeding and often in fill material for wattles. These grasses<br />
persist in the landscape and are difficult to eradicate once introduced. Using native<br />
grasses, or sterile hybrid grass seeds in erosion control mixes can eliminate that issue.<br />
◾◾<br />
Hydroseeding tanks, range drills, and other seed delivery systems – Unless<br />
equipment is brand new, seed delivery systems have been used at other projects and<br />
can contain plant species that are not wanted on the next site. A thorough cleaning and<br />
inspection of this equipment are essential in eliminating the potential introduction of<br />
undesirable plant materials. Hydroseeding tanks must be washed out and range drills<br />
air-blown before entering the project site.<br />
◾◾<br />
Commercial seed sources – Commercial grass and forb seed sources, whether native<br />
or non-native, can contain weed seeds that were harvested along with the native seeds.<br />
The quantity of this material is dependent on the weed control practices and seed<br />
<strong>Roadside</strong> <strong>Revegetation</strong>: An Integrated Approach to Establishing Native Plants and Pollinator Habitat<br />
122
PLANNING PHASE TWO: ASSESS SITE<br />
cleaning technology implemented by the seed producer. Because of the possibility of<br />
contamination of native seeds with weed seeds, seed testing must be conducted for<br />
all seeds that are purchased or procured. Purity tests will identify the contaminants<br />
in a seedlot, including weed seeds, other plant seeds, and inert material. Testing is<br />
conducted through certified seed labs according to the standards of the Association<br />
of Seed Technologists Association. Conduct labs tests for the presence of state-listed<br />
noxious weeds and other crop species; however, it is important to check state and<br />
federal lists to determine if any local weed species should be added to the testing list.<br />
Consider not purchasing seeds with weed seeds or untested weed component.<br />
◾◾<br />
Mulches – Buy mulch that is free of weed seeds. Hay and straw mulches are of special<br />
concern. Some states certify hay or straw as “weed-free.” This means that the material<br />
is free of noxious weeds. It does not mean that the material is free of seeds, however.<br />
Some straw comes from the stubble left after a seed harvest of native grasses, which<br />
often includes unharvested seeds. These seeds are viable and will establish into plants<br />
when the straw is applied. If this is the origin of the straw, it is important to obtain the<br />
species and seed zone of the seed crop to determine if this material is of appropriate<br />
genetic source. A site visit prior to hay or straw cutting is a good way to assess if there<br />
are seeds of weed species in the material (Figure 5-65).<br />
◾◾<br />
Compost sources – Compost sources are not always free of weeds, especially if the<br />
materials were not composted properly. Compost must reach lethal temperatures<br />
and remain there long enough for plant seeds to be rendered nonviable. Fresh, moist<br />
compost piles, where temperatures are maintained between 140 to 160 degrees F for<br />
at least several days, will kill most pathogens and weed seeds (Epstein 1997; Daugovish<br />
and others 2006). When obtaining compost, make sure that the supplier complies with<br />
standards that meet the time-temperature requirements to ensure destruction of weed<br />
seeds. Testing and analysis information is available from the United States Composting<br />
Council (see Section 10.1.5, Organic Matter Amendments).<br />
◾◾<br />
Gravel, sand, and rock sources – Prior to acquiring road building materials such as<br />
sand, gravel, and rock, determine if this material comes from a source that is free of<br />
undesirable weeds. A plant survey of the source area will identify whether the material<br />
is suitable.<br />
◾◾<br />
Haul routes and waste areas – Treat or avoid infested areas.<br />
◾◾<br />
Topsoil – The topsoil survey should identify areas of weeds (see Section 5.11.1, Topsoil).<br />
These areas should be mapped out and avoided when the topsoil is salvaged. If topsoil<br />
is purchased, the piles should be inspected prior to approval (Figure 5-66). Salvaged<br />
topsoil should be stored and maintained in a manner that limits weeds from becomming<br />
established.<br />
◾◾<br />
Sand, gravel, rock, or topsoil storage – Inspect areas where topsoil, gravel, rock,<br />
sand, or other materials to be used on the construction project will be stockpiled. If<br />
there are weeds nearby, it is very likely that seeds will end up on these piles, especially<br />
if the piles are to remain there for over a year. Remove these populations prior to<br />
stockpiling materials.<br />
◾◾<br />
Hedgerows and windbreaks – Planting windbreaks with non-native species, such<br />
as autumn olive, privet, honeysuckle, buckthorn, and multiflora rose, introduces<br />
fast-growing, highly competitive species (Harper-Lore and others 2013).<br />
◾◾<br />
Livestock grazing – Cattle can bring weed seeds from offsite where they have been<br />
grazing. Until native vegetation has become established, it is important to keep livestock<br />
out of the area.<br />
Figure 5-65 | Hay often<br />
contains weed seeds<br />
Hay bales often contain seeds from<br />
undesirable species that will germinate<br />
once the hay is spread. Prior to purchasing<br />
hay, find out what species were<br />
grown in the field. Some states have<br />
certified weed-free programs. However,<br />
“weedfree” does not mean the hay will<br />
be seedless. Some of these seeds might<br />
not be desired in a project area.<br />
<strong>Roadside</strong> <strong>Revegetation</strong>: An Integrated Approach to Establishing Native Plants and Pollinator Habitat<br />
123
PLANNING PHASE TWO: ASSESS SITE<br />
Weed Sources – How to Treat<br />
Despite best efforts to reduce the entry of weed sources and limit<br />
the growing environment for weed establishment, weeds often<br />
become established on projects. When this happens, treating weeds<br />
through mowing, herbicides, grazing, fire, biological control, and<br />
hand-pulling may be necessary. It is important that the weed control<br />
contractor is familiar with target weeds and is able to differentiate<br />
between desirable native species and target weeds.<br />
Choosing a particular weed treatment should meet the intent of the<br />
objectives outlined in the IRVM plan developed for the road system.<br />
Since pollinator species can be strongly affected by how weeds are<br />
controlled, it is important to develop weed treatments that minimize<br />
the negative effects on pollinator populations and habitat. Two<br />
recent publications from the U.S. Department of Transportation<br />
(Hopwood and others 2015, Hopwood and others 2016) review the<br />
best management practices for controlling roadside vegetation<br />
while optimizing pollinator habitat and reducing pollinator mortality.<br />
◾◾<br />
Mowing – Mowing is frequently used to maintain roadside vegetation by reducing<br />
invasive weeds and woody plants, improving driver sight lines, allowing vehicle pull<br />
off, and reducing the risk of wildfires. Typically, vegetation along the side of the road is<br />
mowed at regular intervals. Mowing at the wrong times can directly kill pollinator eggs<br />
or larvae present on the vegetation. Mowing can also indirectly affect adult pollinators<br />
by temporarily removing host and flowering plants. For these reasons, mowing during<br />
the growing season should be limited, carefully timed, or avoided when possible. This is<br />
especially important if the habitat supports endangered or rare and sensitive pollinator<br />
species. Higher mowing frequencies reduce native plant growth, plant diversity (Parr<br />
and Way 1988), the ability of forbs to compete with grasses (Williams et al. 2007), and<br />
decrease the amount of nectar and pollen present on the roadside. More frequent<br />
mowing can also increase the roadkill of pollinators, especially butterflies (Skorka<br />
and others 2013). Therefore, minimizing the number of times a roadside is mowed is<br />
important for benefiting many pollinator species.<br />
◾◾<br />
Manual – Hand-pulling weeds can be the most exhaustive but complete method of<br />
controlling specific weeds. One strategy for hand-pulling is the Bradley Method (Brock<br />
2016) which prioritizes the areas to be weeded, beginning in undisturbed areas first,<br />
and then working out toward more heavily infested areas. Weeders minimize ground<br />
disturbance to reduce the amount of bare soil where weeds can reestablish.<br />
◾◾<br />
Herbicides – Herbicides are used to control woody vegetation as well as invasive weed<br />
species on roadsides. It is important to use the appropriate products and application<br />
rates that are effective in controlling the target weed species yet have minimal effects<br />
on non-target plant species. In addition, understanding how quickly the herbicide<br />
being applied degrades on the site will insure that seed germination and restoration<br />
planting is not negatively affected. Judicious use of herbicides through spot spraying and<br />
applying herbicides during the appropriate stage of a weed’s life history are important<br />
to ensure optimum weed treatment while minimizing the effects of herbicides on<br />
desirable plant and pollinator species.<br />
◾◾<br />
Grazing – Grazing is used to limit tree and shrub invasion, provide structural diversity,<br />
and encourage the growth of nectar-rich plants. Yet livestock grazing is only beneficial<br />
to plant diversity, and in turn, pollinators, at low to moderate levels at short periods<br />
of time separated by long recovery periods (Hopwood and others 2016). Grazing can<br />
negatively affect insect communities by changing the plant community structure and<br />
diversity (Kruess and Tscharntke 2002). Insufficient forage from grazing can decrease<br />
A<br />
B<br />
Figure 5-66 | Quality topsoil<br />
is low in weed seeds<br />
Know the origin and quality of the<br />
topsoil. Topsoil sources contain seeds<br />
of the species that grew on them prior<br />
to salvage. In this picture, the topsoil<br />
pile on the right (B) was salvaged from<br />
a nearby pasture and the pile on the left<br />
(A) from an undisturbed native forest<br />
site. The pasture topsoil pile revegetated<br />
quickly (within 3 months after<br />
stockpiling) because of the abundance<br />
of non-native seeds in the soil. The forest<br />
topsoil revegetated slower because<br />
there were less seeds. Application of<br />
the pasture topsoil (B) resulted in a site<br />
dominated by introduced pasture plant<br />
species.<br />
<strong>Roadside</strong> <strong>Revegetation</strong>: An Integrated Approach to Establishing Native Plants and Pollinator Habitat<br />
124
PLANNING PHASE TWO: ASSESS SITE<br />
bumble bee populations (Carell 2002; Hatfield and LeBuhn 2007) and destroy potential<br />
nest sites through trampling (Sugden 1985). Intensive grazing can also affect butterfly<br />
populations through trampling (Warren 1993) and altering plant community composition<br />
(Stoner and Joern 2004).<br />
◾◾<br />
Fire – Prescribed fire is used to manage roadside vegetation in some regions of the<br />
United States have a history of natural fires. Prescribed fire can benefit pollinators<br />
through restoration or maintenance of suitable habitat (Huntzinger 2003), but it<br />
can also be harmful when not applied appropriately. Timing burns to have the least<br />
impact on pollinators and limiting the scale and frequency of each burn are important<br />
pollinator-friendly practices. Burning only small portions of a road project every 3 to 5<br />
years will leave important refuge habitat for pollinators (Black and others 2011).<br />
◾◾<br />
Biological control – Biological control is the process of introducing natural enemies of<br />
introduced weed species. Currently, biological weed control is not widely implemented<br />
by state DOTs, but several have released natural enemies to weeds such as purple<br />
loosestrife (Lythrum salicaria), leafy spurge (Euphorbia esula) (Johnson 2000), yellow<br />
star thistle (Centaurea solstitialis), and Russian thistle (Salsola kali) (Harper-Lore and<br />
others 2013).<br />
◾◾<br />
Mechanical removal – Weed populations can be removed during road construction.<br />
Removal of populations is accomplished by excavating the soils below the populations<br />
at least a foot deep and transporting the weed-contaminated material offsite to a<br />
storage area.<br />
Local agricultural extension specialists are good contacts to discuss the best controls for the<br />
weed species present on the project. Plant Guides located on the profile page of the PLANTS<br />
database often provide control treatments for specific weed species. Other resources include<br />
a publication by Harbor-Lore and others (2013) that describes how to control 40 common<br />
weed species in the U.S.<br />
Weed Growing Environment – How to Assess<br />
Each weed species has unique environmental needs that must be considered when assessing<br />
if a site environment is conducive to that species invasion. The following are site factors to<br />
evaluate:<br />
◾◾<br />
Bare soil surface – Most weed seeds need bare soil to germinate and become established.<br />
Procedures for monitoring bare soil are presented in Chapter 12.<br />
◾◾<br />
Soil nitrogen – Many annual weeds out-compete native plants on soils that are high<br />
in nitrogen because they are more adapted to utilizing nitrogen during early plant<br />
establishment. Unless fertilizers are added to the site, soil nitrogen levels are typically<br />
low after construction.<br />
◾◾<br />
Light – Most weeds require full or partial sunlight to thrive (Penny and Neal 2003).<br />
◾◾<br />
Soil quality – Establishing a healthy native plant community after construction greatly<br />
reduces the possibility for weed invasion. Optimum native plant establishment is dependent<br />
on the condition of the soil and climate. For example, a site with loose, reapplied<br />
topsoil is much more likely to support a native plant community than a compacted site<br />
lacking topsoil and organic matter. Unlike perennial plants, the roots of most annual<br />
weed species occur in the surface layer (Jackson and others 1988; Claassen and others<br />
1995) and do not require deeper soils to survive and grow. Annual species therefore<br />
have an advantage over perennials on compacted or shallow soils.<br />
Based on the assessment of these factors, risk maps can be developed showing the location of<br />
weed sources in or adjacent to the project and the optimum habitats for each weed species.<br />
<strong>Roadside</strong> <strong>Revegetation</strong>: An Integrated Approach to Establishing Native Plants and Pollinator Habitat<br />
125
క<br />
క<br />
క<br />
క<br />
PLANNING PHASE TWO: ASSESS SITE<br />
The combination of these maps will show the high risk areas and can be used to develop a<br />
strategy for weed control.<br />
Weed Growing Environment – How to Limit<br />
The presence of weed propagules does not necessarily ensure that they will establish and<br />
thrive. The conditions of the environment must be favorable for weed establishment. Some<br />
mitigating measures that can be taken to limit the environment where weeds can gain a<br />
foothold are as follows:<br />
◾◾<br />
Minimize ground disturbance – Reducing the footprint of the project results in less<br />
area being disturbed and exposed to possible weed invasion. Avoid ill-timed blading,<br />
mowing, dredging, and other ground-disturbing activities (Harper-Lore and others 2013).<br />
◾◾<br />
Develop optimum environments for quick native plant recovery – Developing<br />
mitigating measures that create an optimum environment for native plant recovery<br />
will limit the establishment and spread of weeds (Sheley 2005). Site factors that restrict<br />
downward root growth of native perennial plant roots (e.g., compacted soil) give the<br />
advantage to weed species. Treat soil and seed-bed preparation as an investment.<br />
◾◾<br />
Retain shade – To reduce the vigor of undesirable plants, retain as much shade as<br />
possible.<br />
◾◾<br />
Apply mulch – A mulch can be applied to the surface of a disturbed soil to create a poor<br />
germination environment for weed seeds (Section 10.1.3, Mulches). The mulch should<br />
have high void spaces (typical of long-fiber mulch materials) and low water-holding<br />
capacity, which are unfavorable characteristics for seed germination. The deeper the<br />
mulch, the less weeds will become established. Depending on the weed species, 2 to<br />
4 inches of mulch are required to effectively control the establishment of many weed<br />
species (Pellett and Heleba 1995; Ozores-Hampton 1998; Ozores-Hampton and others<br />
2002; Penny and Neal 2003).<br />
◾◾<br />
Oversow native seed mix – Sowing native seeds at high rates will flood bare soil with<br />
the seeds of desirable species, reducing the germination sites where weed species can<br />
become established. The objective of this strategy is to fill the voids first with desirable<br />
species to crowd out unwanted species (see Section 10.3.1, Seeding).<br />
◾◾<br />
Develop a weed-resistant working group seed mix – Where appropriate, use a<br />
working group seed mix that resists weed establishment (Inset -5).<br />
◾◾<br />
Establish desirable non-native plants if establishment of natives is not feasible<br />
– Due to surrounding site limitations, project parameters, timelines, or other circumstances,<br />
using locally adapted native plant materials may not always be possible. For<br />
example, if the project is surrounded largely by contiguous populations of cultivars,<br />
using locally adapted plant materials may not be worth the effort. If the surrounding<br />
area is primarily native species, careful selection of cultivars should be considered.<br />
Many cultivar species, both native and introduced, have the potential to cross with their<br />
locally adapted native equivalent genera (see Section 6.3.1, Ensure Local Adaptation<br />
and Maintain Genetic Diversity).<br />
◾◾<br />
Avoid applying nitrogen fertilizers in the first year – High rates of nitrogen fertilizers<br />
can encourage the growth of weedy annuals at the expense of the establishment and<br />
growth of native perennials (McLendon and Redente 1992; Claassen and Marler 1998),<br />
whereas perennial grasses have a competitive advantage at lower nitrogen levels<br />
(Welker and others 1991). Application rates of up to 108 lb/ac N(121 kg/ha N) have<br />
been shown to promote the establishment of introduced grasses over less competitive<br />
native grasses (DePuit and Coenenberg 1979). High rates of nitrogen fertilizers can<br />
also affect revegetation efforts by decreasing species richness and increasing the<br />
presence of non-native species (Munshower 1994; Wedin and Tilman 1996). When<br />
Inset 5-5 | Prevention: Working<br />
groups to establish weedresistant<br />
plant communities<br />
(adapted after Sheley 2005)<br />
In order to develop weed-resistant<br />
plant communities, representatives<br />
of working groups that best fit the<br />
site are necessary. Working groups<br />
have the following components:<br />
Annual forb component<br />
Taprooted forb component<br />
Bunchgrass component<br />
Rhizomatous perennial grass<br />
component<br />
These species occupy multiple niches<br />
and can prevent the invasion of<br />
weed species. For more information,<br />
see Chapters 4 and 6.<br />
<strong>Roadside</strong> <strong>Revegetation</strong>: An Integrated Approach to Establishing Native Plants and Pollinator Habitat<br />
126
PLANNING PHASE TWO: ASSESS SITE<br />
nitrogen fertilizer is applied at seeding, root systems of native perennials establish in<br />
the upper portion of the soil. The decrease in deep roots gives the annual weed species<br />
a competitive growth advantage (Claassen and others 1995). Limiting the amount of<br />
nitrogen fertilizer used the first year (during vegetation establishment) will help force<br />
the roots of perennials deeper into the soil where there is more moisture. The deeper<br />
root system increases the competitive advantage of the native perennials over the<br />
annual weeds. This strategy, however, does not preclude the need for fertilization. One<br />
option is not to apply fertilizer until a year after sowing when the native plants have<br />
become established (see Section 10.1.1, Fertilizers).<br />
◾◾<br />
Apply high C:N materials to high nitrogen sites – If soils are high in nitrogen, applying<br />
a high C:N material (e.g., wood products or hay) to the surface of the soil, or mixed into<br />
the soil, is another strategy to reduce the amount of available nitrogen for annual weed<br />
growth (REAP 1991; St John 1999). Over time, the organic material will break down and<br />
release nitrogen for uptake by perennials.<br />
5.9 PESTS<br />
Many plant and animal species pass through or inhabit a newly revegetated site. When these<br />
organisms become problematic, they are called “pests.” Part of good revegetation planning<br />
is to recognize the conditions where species might become pests on the project. This section<br />
focuses on mammals, insects, and diseases that are the most common types of pests found<br />
on revegetation projects.<br />
Many problems can be prevented through good design and management. For example,<br />
matching the appropriate plant species and stocktypes to the site reduces the potential of<br />
damage by insects and diseases.<br />
Where deer populations are high, planting unpalatable species reduces the risk that deer will<br />
over-browse newly planted vegetation or be encouraged to browse near the highway, creating<br />
a hazard to motorists. In many cases, the best investment is to preclude problems by protecting<br />
plants instead of attempting to control or destroy pests after they move in. However, not<br />
every sign of an animal or disease is cause for concern. Some loss due to herbivory or disease<br />
should be expected. Planning for some replanting after the first season is a good strategy to<br />
help establish native plants while allowing for some herbivory. During early establishment,<br />
when plants are most susceptible to life-threatening damage, treatment might be necessary.<br />
When this is the case, consider the system as a whole and select the least impactful, long-term<br />
treatment. For example, protection of plants with a physical barrier or a repellent spray might<br />
be better in the long-term than introducing a poison into the food chain that might also affect<br />
the animals that prey on the pests.<br />
The following is a general discussion of mammals, insects, and diseases that can cause the<br />
most problems to the reestablishment of native vegetation. This is by no means a complete<br />
list of issues or of mitigating measures. The reader is directed to other sources, such as Cleary<br />
and others (1988) and Helgerson and others (1992), for more a more thorough discussion of<br />
this topic.<br />
Foraging mammals, such as deer, elk, gophers, and voles, may remove or destroy portions<br />
of the plant foliage or root systems. Feeding insects will weaken and, in some cases, kill<br />
establishing plants by feeding on roots, stems, and foliage. Diseases can be transported to<br />
the site on nursery stock and manifest under stressful transplanting conditions. Problems<br />
are usually encountered where the species are not appropriate for the site (e.g., dry species<br />
planted in a wetland), where there is not enough diversity in the species being planted, or<br />
on sites where soils are limiting (e.g., poorly drained soils). Unfortunately, the effects of pests<br />
on revegetation are not always easy to assess prior to implementation. Often the pest is not<br />
discovered until after revegetation has occurred.<br />
<strong>Roadside</strong> <strong>Revegetation</strong>: An Integrated Approach to Establishing Native Plants and Pollinator Habitat<br />
127
PLANNING PHASE TWO: ASSESS SITE<br />
5.9.1 MAMMALS<br />
Mammals forage on the foliage, bark, and roots of young seedlings. In moderation, mammals<br />
will do minimal damage to a revegetation project. Where herbivory is high, however, these<br />
animals can cause major damage to a newly planted site. The mammals of greatest concern<br />
to revegetation are the northern pocket gopher, deer, elk, and livestock.<br />
Northern Pocket Gophers<br />
Pocket gophers forage on all parts of the plant depending on<br />
the season. Seedling stems are often completely debarked,<br />
thereby killing trees (Figure 5-67). Gopher-damaged seedlings<br />
lean to one side and are easily pulled from the soil (Helgerson<br />
and others 1992). Equally disruptive to plant establishment is the<br />
amount of soil that is brought to the surface during burrowing.<br />
Fresh gopher mounds can account for up to 18 percent of the<br />
soil surface (Laycock and Richardson 1975) and often bury newly<br />
establishing grasses, forbs, and seedlings. Gophers prefer soils<br />
that are low in rock fragments (
PLANNING PHASE TWO: ASSESS SITE<br />
Planting non-palatable species in areas where high deer or elk populations are expected is a<br />
good preventive measure. Protecting seedlings from deer and elk browsing can be accomplished<br />
through fencing, applying animal repellents, installing plastic netting around seedlings, and<br />
planting large seedlings. Animal repellents are applied on or around the seedlings with the<br />
objective of rendering the seedlings unpalatable for browsing.<br />
Fencing large planting areas to keep out elk and deer is used in places where herds are<br />
large. However, placing physical barriers, such as netting or tree shelters, around individual<br />
seedlings is the most common method of protecting seedlings. Rigid and non-rigid netting<br />
are commercially available products and are claimed to be made from photo-degradable<br />
plastics that should break down after several years in the field (Figure 5-69). They are placed<br />
around the seedling after it is planted. Tree shelters will also protect seedlings during the early<br />
stages of establishment. Section 10.4.4 Tree Shelters, , discusses these treatments in detail.<br />
Livestock<br />
Damage to revegetation projects can be high in areas that are intensively grazed by cows<br />
or sheep. In areas with large livestock populations, planted tree seedlings can be injured<br />
by rubbing and trampling. Newly establishing native grass and forb cover can be harmed<br />
through grazing and by the high-pressure hoof marks tearing up the new roots and surface<br />
soil, leaving the site exposed to non-native annual species.<br />
Prevention and Treatment<br />
Restricting the entry of livestock for several years after planting or sowing, or until native grasses<br />
and forbs have established, is the best prevention measure. This is typically accomplished by<br />
fencing the entire area being revegetated. Fencing is most effective when it is installed prior<br />
to establishing native vegetation. For this reason, having the fence installed as part of the road<br />
contract will ensure that livestock is controlled prior to revegetation work. Working with the<br />
local USDA Forest Service or U.S. Department of the Interior Bureau of Land Management range<br />
conservationist will be necessary to ensure that damage by livestock is kept to a minimum.<br />
Figure 5-69 | Plastic netting<br />
can protect seedlings from<br />
animal browsing<br />
Rigid plastic netting is placed around<br />
seedlings after planting to protect the<br />
young seedling from animal browsing.<br />
The plastic is photo-degradable and<br />
breaks down in several years after the<br />
seedling is established.<br />
5.9.2 INSECTS<br />
A variety of insects can damage newly planted seedlings, as discussed briefly in this section.<br />
Since this is a specialized field, the designer is advised to consult technical or academic expertise<br />
if insect problems are extensive on a revegetation project. Investigating an infestation should<br />
occur as soon as a major infestation occurs since damage can occur rapidly. Insect damage is<br />
grouped into four classes (Helgerson and others 1992), based on where insect feeding occurs:<br />
◾◾<br />
Sap-suckers – foliage<br />
◾◾<br />
Root beetles – root system<br />
◾◾<br />
Terminal feeders – terminal shoots<br />
◾◾<br />
Secondary bark beetles – stems<br />
It is very difficult during the planning stages to determine if insects will be a limiting factor.<br />
However, the local agency reforestation personnel should be consulted to determine which<br />
insects pose potential damage.<br />
Insects – How to Assess<br />
Damage to seedlings by insects is often overlooked because the injury usually occurs long<br />
before the seedling shows visible signs of stress. By this time, the insect has often left the<br />
scene, leaving only the telltale sign of activity. When dead or dying seedlings are discovered,<br />
it is important to systematically evaluate the seedling from the root system to the terminal<br />
bud for the presence of insects, insect damage, and disease (which will be discussed in the<br />
<strong>Roadside</strong> <strong>Revegetation</strong>: An Integrated Approach to Establishing Native Plants and Pollinator Habitat<br />
129
PLANNING PHASE TWO: ASSESS SITE<br />
following section). If insects are found, individuals should be collected for later identification.<br />
It is important to look under the leaves for aphids and scrape the entire seedling with a sharp<br />
knife to observe boring and tunneling. Much of the damage caused by insects and disease<br />
occurs under the bark of the stems and roots themselves. A hand lens is helpful to detect<br />
microscopic damage. The following discusses some of the most prominent insects that<br />
damage conifer seedlings. Non-conifer species will have their own unique associated pests.<br />
Nevertheless, determining to which of the four classes the insect belongs is a start in making<br />
an appropriate assessment.<br />
◾◾<br />
Sap-Suckers – Sap-suckers include the Cooley spruce gall adelgid (Adelges cooleyi) and<br />
the giant conifer aphids (Cinara spp.) which feed on succulent foliage of tree seedlings.<br />
While these can cause shoot deformity and foliage loss, aphids will normally not kill<br />
seedlings. The appearance of aphid ants (which cultivate aphid populations) on the<br />
leaves are indications that aphids are present.<br />
◾◾<br />
Root Beetles – The root bark beetles (Hylastes nigrinus) and root-collar weevil (Steremnius<br />
carinatus) girdle the roots and stems of conifer seedlings and will weaken or kill newly<br />
planted seedlings. The damage can be mistaken for herbivory by small mammals, but<br />
the lack of teeth marks and the below-ground location of the damage are indications<br />
that the damage is caused by root beetles.<br />
◾◾<br />
Terminal Feeders – The larvae of this group of insects feed on the terminal shoots<br />
of young conifers, killing much of the new growth. Continued annual attack by these<br />
insects can severely stunt conifer seedlings. The major insects include white pine weevil<br />
(Pissodes strobi [Peck]), ponderosa pine tip moth (Rhyacionia zozana), western pine shoot<br />
borer (Eucosma sonomana), and the cone worm (Dioryctria spp.).<br />
◾◾<br />
Secondary Bark Beetles – The Douglas-fir engraver beetle (Scolytus unispinosus)<br />
attacks the stems of stressed seedlings, creating galleries under the bark that weaken<br />
or kill Douglas-fir seedlings.<br />
Mitigating for Insects<br />
Plant a Variety of Species<br />
Insects are often host-specific, meaning they attack only one species. For this reason, a<br />
preventative measure is to plant a variety of species. If an insect infestation occurs, it would<br />
not affect all the seedlings planted.<br />
Plant Healthy Stock<br />
Insects often attack weakened seedlings or seedlings under stress. Planting only healthy<br />
seedlings, appropriate to the site, reduces the potential damage by insects.<br />
Create a Healthy Soil Environment<br />
Seedlings grown on poor sites, or on sites outside of the species’ environmental ranges, will be<br />
placed under stress and become candidates for insect damage. Planting seedlings on optimal<br />
growing sites will produce healthy seedlings resistant to insect damage. Judicious use of<br />
fertilizers (that is, avoid over-fertilization) is also important for pest prevention. For example,<br />
sucking insects often attack plants that have been over-fertilized with nitrogen.<br />
Install Bud Caps<br />
Some terminal feeders can be controlled through the use of bud caps that are placed over<br />
the terminal in the spring prior to shoot growth (Goheen 2005). Bud caps are materials made<br />
out of paper or fine cloth that temporarily cover the terminal and prevent adult insects from<br />
laying eggs on the bud.<br />
<strong>Roadside</strong> <strong>Revegetation</strong>: An Integrated Approach to Establishing Native Plants and Pollinator Habitat<br />
130
PLANNING PHASE TWO: ASSESS SITE<br />
5.9.3 DISEASES<br />
Diseases affect all species used in revegetation, but assessing and mitigating for individual<br />
species is normally not done on revegetation projects. If disease occurs, it is often the result<br />
of trying to establish plant species in the wrong environment. For instance, species adapted<br />
to dry environments will be susceptible to root diseases if planted in wet soils where root<br />
pathogens are present. Species that have evolved to wet soil conditions are less likely to be<br />
affected. While diseases might be present on a site, this does not necessarily mean that plants<br />
will be affected. Much like humans, plants are always surrounded by a variety of pathogens,<br />
but it is not until they are put under stress that they become more susceptible to infection.<br />
The resistance of a plant to disease is therefore dependent on its health.<br />
Planting appropriate species, using genetically appropriate stock, purchasing high quality<br />
plant materials, improving the soil, and mitigating for climate extremes all play an essential<br />
role in creating healthy plants capable of resisting diseases. If diseases are found on seedlings<br />
after planting, often they came from the nursery. While diseases will weaken the seedlings<br />
from the nursery, it is unlikely that the diseases will spread through the soils or site and infect<br />
other plants. Since the revegetation environment is dissimilar to the nursery or agricultural<br />
environment, diseases from the nursery tend not to persist on the plant materials once they<br />
are installed. Plants that have a minor infection might recover when grown in the wild. Diseases<br />
that run rampant in grass seed beds at seed production facilities are less likely to infect grasses<br />
when they are seeded on revegetation projects because the growing environment in the<br />
wild is very different.<br />
5.10 HUMAN INTERFACE<br />
An often overlooked factor of revegetating roadsides is the unplanned effects humans can<br />
have on site recovery. The human interface is the disturbance resulting from human activities<br />
that limit plant establishment and growth. These potential disturbances must be considered<br />
very early in the planning stages to ensure that they are integrated into the revegetation plan.<br />
Disturbances fall into two categories – road maintenance and recreation use. Roads must be<br />
maintained, but sometimes road maintenance activities negatively affect the establishment<br />
and growth of vegetation. Road corridors can also be sites of unplanned recreational use by<br />
off-road vehicles, which can leave a site compacted and devoid of vegetation.<br />
5.10.1 ROAD MAINTENANCE<br />
Roads are periodically maintained for many reasons, including clearance for sight and safety,<br />
weed control, fire hazard reduction, winter safety, erosion control, and utilities maintenance.<br />
Each of these activities affects plant growth in either a positive or negative way.<br />
Road Maintenance – How to Assess Impacts on <strong>Revegetation</strong><br />
Road maintenance objectives should be understood at the beginning of the project. A<br />
meeting should be held with the agency that will oversee the maintenance of the road after<br />
construction to discuss how to integrate revegetation and road maintenance objectives.<br />
Questions or issues to resolve include the following:<br />
◾◾<br />
Will the ditches be cleaned out or bladed? If so, how far up the cut slope will this activity<br />
cause instability?<br />
◾◾<br />
Will herbicides be used (Figure 5-70)? If so, how far from the road shoulder? How often?<br />
◾◾<br />
How far away will trees be cut for “line of sight” and will this distance change on curves?<br />
◾◾<br />
What utilities are in the road corridor and will vegetation affect them?<br />
<strong>Roadside</strong> <strong>Revegetation</strong>: An Integrated Approach to Establishing Native Plants and Pollinator Habitat<br />
131
PLANNING PHASE TWO: ASSESS SITE<br />
◾◾<br />
Are the roads treated with gravel during the winter for traction? If so, how much gravel<br />
is annually applied? How far is it swept into the road shoulder or road corridor? Are the<br />
gravels recovered by scraping the shoulders?<br />
◾◾<br />
Is fire an issue and will fire protection treatments include thinning of vegetation?<br />
◾◾<br />
What about salts or other non-herbicide contaminants?<br />
This is a partial list, and every project will have its own set of questions. The more these issues<br />
can be addressed early in the planning stage, the more effective the revegetation plan will be.<br />
Mitigation for Road Maintenance Impacts<br />
Blading for Erosion Control<br />
Ditches at the base of steep cut slopes are depositional areas for rock and soil that have moved<br />
down from the slopes above. The rock and soil may fill the ditches, disrupting the flow of<br />
water in the ditch and creating potential road drainage problems during storms. Blading is the<br />
removal of the material that has filled in the ditchline and is a normal maintenance procedure<br />
for erosive cut slopes. This operation not only removes plants that were established in the<br />
ditchline, but also destabilizes the surface slopes immediately above the ditch. This can affect<br />
the revegetation of the entire slope. Mitigating measures include engineering design that<br />
reduces slope gradients (see Section 5.6.6.2, Mitigating for Steep Slope Gradients) or changing<br />
the road drainage system so that cleaning of ditches is not necessary. If neither measure is<br />
possible, assess whether it is worth implementing revegetation treatments, since revegetating<br />
unstable slopes is usually unsuccessful.<br />
Herbicide for Vegetation Control<br />
Contact the government agency responsible for controlling weeds or vegetation in the road<br />
corridor and discuss its strategy for weed control. In areas where vegetation must be maintained,<br />
signs can be issued to notify operators not to apply herbicides (Figure 5-71).<br />
Graveling for Winter Safety<br />
In areas where gravels are applied to road surfaces for traction during snow or icy conditions,<br />
there will be a buildup of gravels on the sides of the road through sweeping of the road surface<br />
or snow-blowing. Vegetation that has been established in these areas is often completely<br />
covered with gravel when the snow melts. It is important to learn if the road maintenance<br />
agency will recover this gravel for reuse or let it accumulate. If gravel is recovered, this area<br />
will be in constant state of disturbance. Determine the salvage distance and consider the<br />
revegetation stategies in this zone. In areas where gravels are not salvaged, select the species<br />
that will survive and grow in this unique growing environment. One strategy is to select species<br />
that respond favorably to being covered by gravels. These include species such as manzanita<br />
and willows that root from their stems when covered by soil or gravel. Tap-rooted species,<br />
such as lupines, can take advantage of such conditions because they can access moisture deep<br />
in the gravel deposits (Figure 5-72). Examine shoulders of existing roads to identify species<br />
that have adapted to these conditions and use these species for revegetating these areas.<br />
Clearance for “Line of Sight” and Safety<br />
Trees and shrubs are often thinned or removed in areas where line-of-sight is impeded. Good<br />
communication with the government agency responsible for maintaining the road during the<br />
planning phase will help identify those areas not suitable for shrub and tree species. Select<br />
grasses and forbs or low growing shrubs (less than 2 to 3 feet tall) for these areas.<br />
Protection of Utilities<br />
Do not plant trees under or near utility structures, such as power lines. Discuss the planting<br />
plans with the maintenance agency to find out if other utilities need protection.<br />
Figure 5-70 | Chemical control<br />
of roadside vegetation<br />
Road maintenance treatments for<br />
control of vegetation include the use<br />
of herbicides on roadsides. There is no<br />
need to seed these areas if they will be<br />
treated chemically. A meeting with road<br />
maintenance personnel to understand<br />
how roadside vegetation will be managed<br />
can reduce revegetation costs and<br />
benefit pollinator species.<br />
Figure 5-71 | Road signs<br />
identify areas to protect<br />
Placing no-spray signs is a method of<br />
identifying areas to protect from herbicide<br />
application.<br />
<strong>Roadside</strong> <strong>Revegetation</strong>: An Integrated Approach to Establishing Native Plants and Pollinator Habitat<br />
132
PLANNING PHASE TWO: ASSESS SITE<br />
Figure 5-72 | Graveling road<br />
surfaces can lead to burying<br />
roadside vegetation<br />
Gravel applied to road surfaces in winter<br />
for traction is swept or blown to the<br />
side, burying vegetation. Some species,<br />
such as Lupinus spp. (inset in lower left<br />
of photograph), have adapted to these<br />
conditions and do well. Species such as<br />
pinemat manzanita (Arctostaphylos nevadensis)<br />
also do well when covered by<br />
gravels because the plant will produce<br />
roots from buried stems.<br />
5.10.2 RECREATIONAL USE<br />
The road corridor is often used for recreational purposes that can disturb established<br />
vegetation. This recreation is not usually sanctioned or intended, but it exists in certain areas<br />
nonetheless. Recreational disturbances include off-road vehicle travel, mountain bike use,<br />
trails to recreational sites, and Christmas tree cutting.<br />
Recreational Use – How to Assess Impacts on <strong>Revegetation</strong><br />
The environmental assessment should identify the public’s demand for these activities and<br />
how they will affect short- and long-term vegetation goals. Abandoned roads that have been<br />
revegetated, for instance, are often desirable places for off-road vehicles because they are<br />
open and flat. Roads bordering recreation destinations, such as favorite fishing spots, will<br />
have demands for access trails or scenic views that the public does not want blocked by tall<br />
vegetation. Public scoping should identify these needs.<br />
Mitigation for Recreation Impacts<br />
There are several approaches to mitigation, most of which are forms of awareness, protection,<br />
and exclusion. Intruders can be excluded physically with barriers, such as ditches, fences, and<br />
large rocks. Before these measures are put in place, communication should be tried first. For<br />
example, a sign explaining native revegetation efforts may help make potential users aware<br />
that they should take their activities elsewhere. Local residents are often great sources for<br />
ideas on how to approach these problems; off-road vehicle clubs are another. Educating the<br />
public on the purpose for the revegetation treatments can go a long way toward protection.<br />
Short paragraphs in the local newspapers or on the FHWA website for each project will help.<br />
Using local contractors to implement the revegetation work and engaging local residents<br />
brings ownership to the project.<br />
5.11 INVENTORY SITE RESOURCES<br />
Most project sites contain resources that can be used to meet revegetation objectives.<br />
Identifying these potential resources early in the planning process is essential so that they<br />
<strong>Roadside</strong> <strong>Revegetation</strong>: An Integrated Approach to Establishing Native Plants and Pollinator Habitat<br />
133
PLANNING PHASE TWO: ASSESS SITE<br />
are not inadvertently wasted. The more that local resources are used, the more<br />
cost-effective, efficient, and effective the revegetation efforts may be. Physical<br />
resources to inventory include topsoil, duff, litter, parent materials, woody<br />
materials, logs, plant materials (seeds, seedlings, and cuttings), large rocks, and<br />
water (seeps, springs, creeks). Intangibles should also be considered, such as<br />
community cooperation and the local knowledge base.<br />
5.11.1 TOPSOIL<br />
One of the most important site resources for revegetation is topsoil. If considered<br />
early in the planning process, topsoil can be salvaged and reapplied to disturbed<br />
sites after construction. This is one of the best ways of increasing productivity<br />
on a disturbed site (see Section 10.1.4, Topsoil).<br />
Topsoil is inventoried early in the planning process to evaluate topsoil quality<br />
and quantity, costs, and the feasibility of removal and storage. Topsoil recovery is an expensive<br />
operation requiring knowledge of basic soil attributes. For this reason, it is a good idea to<br />
conduct a soil survey or assessment of those locations that will be disturbed. An example of<br />
soil and site information commonly collected for topsoil recovery is shown in Table 5-4. The<br />
road in this example is planned through undisturbed forested lands. Soils data is collected<br />
every 50 meters (at road stations) due to the high variability of the soils in this area. Where<br />
soils are very uniform, distances between plots can be increased. Soil texture, rock fragments,<br />
and depth of the topsoil are measured in the field. At selected intervals, or on different soil<br />
types, a sample is collected for lab analysis.<br />
During topsoil survey, other site attributes that could affect the quality of topsoil should be<br />
noted, especially the locations of all noxious weeds. These weeds can be treated or removed<br />
prior to topsoil salvage or the weed-infested areas can be avoided to prevent the spread these<br />
weeds across the project area.<br />
The outcome of the topsoil survey is a short report and map in the revegetation plan showing<br />
the areas and depth to salvage topsoil. The report should discuss the fertility of the topsoil,<br />
how it should be stored, and whether the duff and litter are removed and stored separately.<br />
Areas should also be identified where topsoil should not be collected, such as areas of noxious<br />
weeds or high rock. The volume of topsoil can be calculated based on soil depth and area of<br />
the road prism.<br />
Figure 5-73 | Creating<br />
shredded wood for mulch<br />
Woody material from road clearing can<br />
be ground up into shredded wood and<br />
used as a mulch or soil amendment.<br />
5.11.2 DUFF AND LITTER<br />
Duff and litter are the dead plant materials that have accumulated on the surface of the soil.<br />
The level of decomposition differentiates litter from duff. Litter is the layer of recently fallen,<br />
undecomposed leaves, needles, and branches; duff (which occurs immediately below the litter<br />
layer) is litter that is decomposed beyond recognition. The duff layer is a dark, light-weight<br />
organic layer. It is a large reserve of nutrients and carbon, and has a high water-hold capacity.<br />
Litter and duff layers protect the soil from erosion by absorbing the energy of rainfall impact<br />
and reducing overland flow. Combined, the litter and duff layers can be very thick, ranging<br />
from 1 to 4 inches depending on the productivity and climate of the site.<br />
Litter layers typically have viable seeds originating from the overstory vegetation. Under the<br />
right conditions, these seeds will germinate. If collected, stored and reapplied correctly, this<br />
natural seed bank can be used as a seed source. See Section 10.1.3.11, Litter and Duff, for a<br />
discussion of methods for collection and application.<br />
Litter and duff layers can be assessed at the same time that topsoil surveys are conducted by<br />
measuring the depths at collection intervals using a ruler.<br />
<strong>Roadside</strong> <strong>Revegetation</strong>: An Integrated Approach to Establishing Native Plants and Pollinator Habitat<br />
134
PLANNING PHASE TWO: ASSESS SITE<br />
5.11.3 SUBSOIL AND PARENT MATERIAL<br />
Certain subsoils and parent materials can be salvaged during road construction and used to<br />
produce manufactured topsoil (see Section 10.1.4.5, Manufactured Topsoil). Textures low in<br />
rock content, including sandy loams, silt loams, loam, and sandy clay loams, are often good<br />
materials for manufactured soils. These are often found in areas where the parent materials<br />
are derived from alluvial or windblown deposits. They include river sands, pumice, volcanic<br />
sands, and loess.<br />
5.11.4 WOODY MATERIAL<br />
Woody material consists of live and dead plant materials that are cleared in the early stages<br />
of road construction. This material includes tree boles, root wads, bark, and branches. During<br />
clearing and grubbing, these materials are often concentrated in piles and burned. All of these<br />
materials can be ground up as shredded wood and used as surface mulches (Figure 5-73)<br />
(see Section 10.1.3.7, Wood Fiber) or soil amendments (see Section 10.1.5, Organic Matter<br />
Amendments). Large wood can be used for biotechnical engineering structures, obstacles for<br />
erosion control, or placed upright or on the ground for pollinator habitat and site productivity.<br />
Substituting shredded wood derived from these materials for composts and soil amendments<br />
can lower overall project costs.<br />
5.11.5 PLANT MATERIALS<br />
Suitable plant materials are often destroyed during road construction. These consist of seeds<br />
(see Section 10.2.1, Collecting Wild Seeds), plants (see Section 10.2.3, Collecting Wild Plants),<br />
and cuttings (see Section 10.2.2, Collecting Wild Cuttings). If these materials are collected from<br />
the construction site prior to disturbance and stored correctly, they can be used, instead of<br />
propagated or purchased plant materials, to revegetate the project. Surveys of the project site<br />
prior to construction will indicate the location and abundance of appropriate plant materials.<br />
5.12 PHASE TWO SUMMARY AND NEXT STEPS<br />
Planning Phase Two identified site factors that limit revegetation, defined possible mitigating<br />
measures, and inventoried site resources. Phase Three will outline how vegetation will be<br />
assessed and analyzed in order to match plant materials and revegetation methods to the site<br />
attributes. Phase Four guides the designer through integrating the components from each<br />
phase into a revegetation plan.<br />
<strong>Roadside</strong> <strong>Revegetation</strong>: An Integrated Approach to Establishing Native Plants and Pollinator Habitat<br />
135
PLANNING PHASE THREE: VEGETATION ANALYSIS<br />
6— Planning Phase Three:<br />
Vegetation Analysis<br />
6.1 Introduction<br />
6.2 Vegetation Assessments<br />
6.3 Develop Species Lists for the Project<br />
6.4 Identify Target Plant Requirements<br />
6.5 Next Steps<br />
<strong>Roadside</strong> <strong>Revegetation</strong>: An Integrated Approach to Establishing Native Plants and Pollinator Habitat 136
PLANNING PHASE THREE: VEGETATION ANALYSIS<br />
6.1 INTRODUCTION<br />
Phase One began by defining the overall objectives of the revegetation project, the management<br />
areas (revegetation units), and the natural models (reference sites). It included conducting<br />
preliminary assessments of vegetation, climate, soils, and pollinator status, and concluded with<br />
development of the DFC for each revegetation unit. Phase Two covered how to determine which<br />
site factors either limit or encourage the establishment of vegetation and which treatments<br />
can be used to improve the project site for plant establishment. Phase Three describes how<br />
to select the species and target plant requirements for each revegetation unit. Target plant<br />
requirements include types of plant material to use (stocktypes), genetic considerations,<br />
timing of outplanting window, and outplanting tools and techniques.<br />
6.2 SELECT SPECIES FOR PROPAGATION<br />
From the comprehensive species spreadsheet developed in Chapter 4 (Table 4-5), each species<br />
is evaluated for its potential to be used on the project. This is accomplished by sorting the<br />
spreadsheet using some or all of the following criteria:<br />
◾◾<br />
Nativity. If the revegetation objectives call for using native plants, then species on the<br />
comprehensive species list are first sorted by whether it is native or not.<br />
◾◾<br />
Workhorse species. The next sort is by workhorse species. Workhorse species is a term<br />
used to describe locally adapted native plants that: (1) have broad ecological amplitude,<br />
(2) high abundance, and (3) are relatively easy to propagate. A list of workhorse species<br />
for ecoregions (Level III) can be obtained using the EWPPS tool discussed in Section<br />
4.3.3.2, Ecoregional Workhorse and Pollinator Plant Selector. Because these lists are still<br />
in development, some species may need to be evaluated for potential as a workhorse<br />
species based on the project objectives and needs.<br />
To determine if a species, not listed as a workhorse in the Ecoregional <strong>Revegetation</strong><br />
Assistant tool, is a potential workhorse species, sort the comprehensive species list<br />
by amplitude and abundance columns. Those species that have high amplitude and<br />
abundance are good candidates for workhorse species status. From these species,<br />
evaluate how easy they are to propagate. This includes the availability of the starter<br />
plant materials, how easy the species is to propagate in the nursery or seed production<br />
fields, how well the seeds store, the survival of the plant materials once they are installed<br />
on the project, and expense.<br />
◾◾<br />
Availability of starter plant materials. Seeds, plants, and cuttings often have to be<br />
collected in the wild and supplied to the nursery or seed producer for plant production,<br />
seed increase, or stooling beds. Species that are difficult to obtain or collect are not<br />
good candidates for workhorse species status (see Section 10.2.1, Collecting Wild Seeds,<br />
through Section 10.2.3, Collecting Wild Plants).<br />
◾◾<br />
Nursery and seed production. Species that are difficult to propagate in the nursery,<br />
stooling beds, or seed production fields do not make good workhorse species (see<br />
Section 10.2.4, Nursery Seed Production, through Section 10.2.6, Nursery Plant Production).<br />
Since new techniques in propagating native species is constantly improving,<br />
talking to nursery managers or seed growers, in addition to referring to documented<br />
plant production protocols available on the internet, is important in maintaining a<br />
current workhorse species list.<br />
◾◾<br />
Longevity. Seeds that have a poor shelf life under seed standard storage practices<br />
(seed germination that drops significantly after one year in storage) are often not good<br />
candidates (see Section 10.2.4, Nursery Seed Production).<br />
◾ ◾ Field establishment. The ease that a plant material will establish on a project site<br />
will determine if a species is a workhorse species (see Section 10.3, Collecting Wild<br />
<strong>Roadside</strong> <strong>Revegetation</strong>: An Integrated Approach to Establishing Native Plants and Pollinator Habitat 137
PLANNING PHASE THREE: VEGETATION ANALYSIS<br />
Plants, and Section 10.4, Post Installation Care of Plant Materials). Some species do not<br />
perform well because breaking seed dormancy and obtaining good germination may<br />
be difficult. Other species, planted as seedlings, experience unusually high transplant<br />
shock that significantly reduces plant survival.<br />
◾◾<br />
Expense. The total costs for establishing native plants on the project site is the easiest<br />
measure of whether a species is a good candidate for workhorse species status.<br />
◾◾<br />
Working groups. A working group is a mix of workhorse species developed for a specific<br />
ecological function or management objective. One of the best ways to develop working<br />
groups is to sort the comprehensive species list by ecological setting and succession.<br />
This will assemble species into groups that naturally occur together. From these groups,<br />
working groups are developed based on project objectives, such as pollinator habitat<br />
enhancement, weed control, visual enhancement, conservation management, and<br />
erosion control (Figure 6-1). The development of these working groups is often the<br />
basis for a project’s seed mixes and planting mixes for each revegetation unit.<br />
◾◾<br />
Specialist species. Species that are important for achieving project objectives yet<br />
do not meet the workhorse species criteria for seed propagation are called specialist<br />
species (Figure 6-2). These species may still be propagated; however, since there may<br />
be very little information about seed propagation, the number of species placed in this<br />
category should be prioritized and limited. Projects that contain special microclimates<br />
or soils may require a unique mix of specialist species (e.g., a wetland working group),<br />
while other projects may require a specific species to meet a project objective (e.g.,<br />
milkweed as host plant for monarch butterfly). If only a small quantity of specialist<br />
species is needed, then methods other than seed propagation should be considered.<br />
These include collecting plant materials in the wild or growing seedlings in the nursery.<br />
Once the spreadsheet is complete, the species and stocktypes to propagate can be selected.<br />
6.3 IDENTIFY TARGET PLANT REQUIREMENTS<br />
After compiling a list of species to use for revegetation, the next steps are to determine the<br />
optimal propagation methods for each species and to identify the most appropriate plant<br />
material sources for a particular site or revegetation objective.<br />
A useful tool for selecting the plant materials best suited to the project is the Target Plant<br />
Concept (Landis 2009), Figure 6-3. The Target Plant Concept is an integrated sequential process<br />
for evaluating plant material requirements within the context of project objectives and site<br />
characteristics that may influence the suitability of seed sources or stock types, as well as the<br />
timing and optimal method of outplanting. The concept is based on the premise that there is<br />
no such thing as an “ideal” all-purpose seed mix, genetic source, or stock type that will always<br />
Figure 6-1 | Steep roadcuts require<br />
erosion a control working group<br />
Steep roadcuts on the North Umpqua<br />
Highway in Oregon required an erosion<br />
control working group that hold the<br />
slopes together and keep them from<br />
sloughing and eroding into road ditches.<br />
An erosion control working group<br />
composed of Roemer’s fescue (Festuca<br />
roemerii), blue wildrye (Elymus glaucus),<br />
and California brome (Bromus carinatus)<br />
was applied with high rates of hydromulch<br />
and tackifier to the cutslopes. One<br />
year after application, cutslopes had a<br />
high cover of these native grass species<br />
which significantly reduced sloughing<br />
and erosion.<br />
Figure 6-2 | Example of<br />
a specialist species<br />
Aspen does not meet “workhorse”<br />
criteria because it is challenging to<br />
propagate (starter material is difficult<br />
to obtain and plants require special<br />
protection from browsing after outplanting).<br />
However, for a project on<br />
the Umatilla National Forest, Oregon,<br />
aspen is very important for ecological<br />
reasons, and therefore propagated as a<br />
specialist species.<br />
<strong>Roadside</strong> <strong>Revegetation</strong>: An Integrated Approach to Establishing Native Plants and Pollinator Habitat 138
PLANNING PHASE THREE: VEGETATION ANALYSIS<br />
Table 6-1 | Selecting species to propagate<br />
The comprehensive species list developed in Table 4-5 can be used to determine the species that are most appropriate to use<br />
on the project. In this example, non-native species were removed from the list, leaving only native species. Then potential<br />
workhorse species were determined by their amplitude, abundance, and ease of propagation. A species such as Achillea<br />
millefolium, for instance, is considered a workhorse species because it fits all criteria – high abundance, high amplitude, and<br />
easy to propagate. Whether this species is used for this project depends on whether it is a member of a particular working<br />
group that meets a specific project objective. Because Achillea millefolium fits into the “visuals” working group, which is an<br />
important road objective, this species is selected for propagation. Agastache urticifolia is also showy and has a high amplitude<br />
and abundance. However, very little is known about the propagation of this species. While this species has the potential of<br />
being a workhorse species, it will be grown as a trial in small quantities. Allium fibrillum and Allium macrum are specialist<br />
species that occur together in a unique meadow habitat. Since this road project provides an opportunity to enhance meadow<br />
habitat, these two species are placed in a “conservation” working group. They are considered specialists because they have low<br />
abundance, low amplitude, and little is known about their propagation, yet they are an important component of the working<br />
group. These species will be selected for use on the project; however, since little is known about seed propagation, seeds will<br />
be sent to a nursery for plant or bulb propagation.<br />
Scientific Name Common Name Amplitude Succession Ecological<br />
Setting<br />
Stocktype Propagation Workhorse<br />
Species<br />
Working Group Specialist Propagate<br />
Achillea millefolium common yarrow High High Early All Seeds Easy Visuals Yes<br />
Agastache urticifolia horsemint High High Early All Seeds Unknown Visuals Trials<br />
Agoseris aurantiaca orange agoseris High Mod Early All Seeds Unknown<br />
Agoseris glauca pale agoseris High Mod Early All Seeds Unknown<br />
Agoseris grandiflora bigflower agoseris High Mod Early All Seeds Unknown<br />
Abies grandis grand fir High High Late All Plants Easy Yes<br />
Abies lasiocarpa subalpine fir High Mod Late Cool Plants Difficult<br />
Allium acuminatum tapertip onion Low Low Early Wet Bulbs Difficult<br />
Allium fibriatum fringed onion Low Low Early Warm/Dry Bulbs Difficult Conservation Yes Yes<br />
Allium macrum rock onion Low Low Early Wet Bulbs Difficult Conservation Yes Yes<br />
Allium madidum swamp onion Low Mod Early Wet Bulbs Difficult<br />
<strong>Roadside</strong> <strong>Revegetation</strong>: An Integrated Approach to Establishing Native Plants and Pollinator Habitat 139
PLANNING PHASE THREE: VEGETATION ANALYSIS<br />
work in any situation. Instead, the fitness of the plant material is determined<br />
by its appropriateness to the site in which it will be outplanted. Because every<br />
site is unique, seed mix and sourcing decisions should be tailored to each<br />
site or project to the extent possible. Otherwise, time and investments in site<br />
preparation, plant propagation, and outplanting may be wasted.<br />
At this phase in the overall planning process, two of the steps in the Target<br />
Plant Concept have previously been covered: the objectives for establishing<br />
vegetation (Section 4.2, Define <strong>Revegetation</strong> Objectives) and the factors that<br />
possibly play the largest role in limiting plant survival and growth on each<br />
revegetation unit (Chapter 5).<br />
The remaining target plant requirements to consider are as follows:<br />
◾◾<br />
What are appropriate genetic sources for each species?<br />
◾◾<br />
What type of plant material should be used (seeds, cuttings, containerized or bareroot<br />
seedlings, or salvaged plants)?<br />
◾◾<br />
What methods will be used to install plant materials and what post-installation plant<br />
care is appropriate?<br />
◾◾<br />
What is the proper season for outplanting or seeding (the outplanting or seeding<br />
window)?<br />
1. Objectives of Outplanting Project<br />
2. Type of Plant Material<br />
3. Genetic Considerations<br />
4. Limiting Factors on<br />
Outplanting Site<br />
5. Timing of Outplanting Window<br />
6. Outplanting Tools and Techniques<br />
Figure 6-3 | The Target<br />
Plant Concept<br />
The Target Plant Concept identifies six<br />
requirements for establishing native<br />
plants (adapted from Landis 2009).<br />
6.3.1 ENSURE LOCAL ADAPTATION AND MAINTAIN GENETIC DIVERSITY<br />
Seed Zones and Transfer Guidelines<br />
It is important to know the original collection source and genetic background of target plant<br />
materials to ensure better long-term adaptation to local conditions and protect plant-pollinator<br />
relationships and the genetic resources of local plant communities. Seed transfer guidelines<br />
(how far plant material can be transferred from point of origin to the project with minimal risk<br />
of maladaptation) were initially developed for commercially important forest tree species. This<br />
was the outcome of years of research that revealed that failures in tree planting establishment<br />
were sometimes the result of moving seeds too far from their source of origin. More recently,<br />
research has been completed or is under way to develop seed zones and transfer guidelines<br />
for grasses, forbs, and shrub species commonly used in revegetation activities, particularly<br />
in the western U.S. (e.g., Table 1 in Bower and others 2014; St. Clair and others 2013; Johnson<br />
and others 2013; Horning and others 2010).<br />
Seed sources that originate within the specific seed zone where a planting site is located<br />
are likely to be well adapted, with improved survival, reproductive success, and resiliency<br />
in harsh sites and changing climate conditions. Genetic research indicates there is no fixed<br />
number determining the geographic distance that plants might be successfully moved (e.g.,<br />
within a 50-mile radius). Rather, “local” is best defined in terms of the environment (local<br />
climate and soils) rather than absolute distance. Many factors contribute to the environmental<br />
conditions to which a plant species must adapt, including rainfall, aridity, maximum and<br />
minimum temperatures, aspect, soil drainage, and pH. The scale of adaptation also varies<br />
greatly among species. Some species (genetic generalists) can tolerate broader movement<br />
across environmental gradients than others (genetic specialists) and still be well adapted to<br />
local conditions and regions (Rehfeldt 1994; Johnson and others 2010). Thus, plant movement<br />
guidelines derived from empirical genetic studies are specific to the individual species and<br />
geographic area where the research was conducted.<br />
In addition to improving the success of revegetation projects, seed zones can create efficiencies<br />
and economies of scale in commercial markets and seed banking programs and partnerships<br />
(Erickson 2008). This will reduce the cost of native plant material production and use, as well<br />
<strong>Roadside</strong> <strong>Revegetation</strong>: An Integrated Approach to Establishing Native Plants and Pollinator Habitat 140
PLANNING PHASE THREE: VEGETATION ANALYSIS<br />
as increase the availability of genetically appropriate plant materials. Despite the numerous<br />
benefits, genetic guidelines for plant material movement are lacking for many native grass, forb,<br />
and shrub species used in roadside revegetation and pollinator habitat enhancement activities.<br />
In these cases, generalized provisional seed zones (Figure 6-4) (Bower and others 2014) may<br />
be useful in guiding seed movement and sourcing plant materials. The generalized guidelines<br />
are based on climate data (winter minimum temperatures and aridity) and boundaries of the<br />
Environmental Protection Agency (EPA) Level III ecoregions (see Section 4.3.3.1, Ecoregions<br />
and Seed Zones) to delineate areas that are similar climatically yet differ ecologically. These<br />
provisional seed zones can be considered a starting point for guidelines for seed transfer<br />
and should be used in conjunction with appropriate species-specific information as well as<br />
local knowledge of microsite differences. Inset 6-1 and Inset 6-2 provide further details on the<br />
provisional seed zones, as well as other information and tools to assist designers in choosing<br />
appropriate plant materials for revegetation and pollinator plantings. Provisional seed zones<br />
have been incorporated into the EWPPS online tool discussed in Section 4.3.3.2, Ecoregional<br />
Workhorse and Pollinator Plant Selector as an independent map layer.<br />
Genetic Variation<br />
Another important issue in selecting native plant materials is maintaining genetic variation<br />
in the populations established in revegetation work. This is especially important to ensure<br />
resiliency in the context of a rapidly changing climate. Plant populations must be genetically<br />
variable to be able to adapt and respond to changing stresses and climates. Collection and<br />
propagation procedures, as well as agronomic and nursery production methodologies, need<br />
to conserve sufficient genetic diversity to enhance revegetation success and buffer against<br />
environmental stresses and changes in both the short and long term (see Chapter 10.2.1<br />
Collecting Wild Seeds and Chapter 10.2.4 Nursery Seed Production). In addition, a sufficient<br />
number of unrelated seed parents (in outcrossing species) must be included to ensure that<br />
inbreeding does not become a problem in the future. Both issues come down to numbers – the<br />
more plants that contribute to the new population, the more genetic variation will be captured<br />
and the lower the likelihood that relatives will mate (less inbreeding). These criteria should<br />
be considered by managers, whether they are buying plant materials or collecting their own.<br />
Failing to consider genetic variation when selecting plant materials could have significant<br />
consequences on the viability and sustainability of revegetation efforts. Yet it is easy to imagine<br />
how variability can be eroded. If plants are propagated from a very small and inadequate<br />
sampling of the population, genetic variation of the propagated plants will be greatly reduced.<br />
Reproductive strategies vary widely among species. No single collection and propagation<br />
protocol will ensure the genetic integrity of all types of plants used in revegetation. However,<br />
the issue of genetic variation cannot be ignored. The following should be considered when<br />
purchasing or collecting native plant materials:<br />
◾◾<br />
Number of parents. There is sufficient genetic research for woody forest species to<br />
recommend having a minimum of 20 unrelated seed parents represented in a collection<br />
in order to capture most of the genetic variation in a population. A similar number of<br />
individual parents should be included in cutting beds of clonally propagated species.<br />
Additional plant material would be needed if contribution by parents (of seeds or<br />
cuttings) is unequal. For dioecious species, attention to male-female ratios is essential<br />
to ensure adequate representation of both sexes. For species such as grasses, it is<br />
important to consult a geneticist familiar with those plant groups for guidance as to<br />
what an adequate parent population might be.<br />
◾ ◾ Source sites (stands). To represent the population of a seed zone well, seeds or cuttings<br />
should be collected from multiple sites within the zone. A similar numbers of parents<br />
should be sampled from each site. Seek out larger communities to help meet parent<br />
selection criteria.<br />
<strong>Roadside</strong> <strong>Revegetation</strong>: An Integrated Approach to Establishing Native Plants and Pollinator Habitat 141
PLANNING PHASE THREE: VEGETATION ANALYSIS<br />
◾◾<br />
Individual parents within a selected source. Individual maternal parents (seed<br />
plants) should be well separated from each other yet not isolated from other plants<br />
of the same species. This will allow cross pollination by numerous paternal parents. A<br />
similar amount of seeds should be collected from each parent.<br />
Section 10.2, Obtaining Plant Materials, provides additional guidance on ensuring genetic<br />
diversity when collecting seed and cuttings. Guidelines have also been developed to help<br />
designers work with seed producers and nurseries that follow practices for maintaining high<br />
genetic variability throughout the native plant material production process (e.g., Basey and<br />
others 2015).<br />
Inset 6-1 | Locally adapted plant materials<br />
Choosing the right plant materials for a project is fundamental to<br />
revegetation success, both in the short and long term. With inappropriate<br />
seed mixes, projects may fail outright (e.g., low germination<br />
or high seedling mortality) or lead to more cryptic problems in the<br />
future, such as poor regeneration potential, phenological asynchrony<br />
with dependent pollinators, genetic degradation of surrounding plant<br />
communities, and loss of resiliency and adaptive capacity in responding<br />
to new stresses (e.g., invasive plant species or climate change).<br />
A large number of studies have shown that locally derived and genetically<br />
diverse plant sources are likely to be best adapted to prevailing<br />
climatic and environmental conditions (Hufford and Mazer 2003;<br />
Savolainen and others 2007; Johnson and others 2010). This means<br />
that in addition to matching species assemblages to a project site,<br />
designers must also understand and consider the seed source origin<br />
and genetic diversity of available plant materials to be successful<br />
(McKay and others 2005; Crémieux and others 2010; Mijnsbruggea<br />
and others 2010; Schröder and Prasse 2013). Moreover, federal and<br />
state agencies are increasingly suggesting or requiring the use of<br />
locally adapted and regionally appropriate native plant materials in<br />
revegetation work based on site characteristics and ecological setting<br />
(see Appendix 1 in Johnson and others 2010).<br />
Because restoration with native plants is still relatively new in the<br />
United States, the supporting research, infrastructure, and plant<br />
material development programs are in the early stages of development.<br />
Genetic guidelines for determining what is local are often lacking for<br />
many native species of interest (Erickson 2008; Johnson and others<br />
2010). As a consequence, native plants of inappropriate or unknown<br />
origin are being sold and planted, including some that may originate<br />
well outside of the area targeted for planting.<br />
Provisional Seed Zones<br />
Seed zones help identify where plant materials originated and how<br />
far they can be moved. Empirical seed zones for individual species<br />
are developed through field trials in which a large number of seed<br />
sources from a wide range of source environments are evaluated for<br />
important adaptive traits, such as growth rate and vegetative and<br />
reproductive phenology. By relating measured traits to climate or<br />
other environmental variables, researchers are able to create maps<br />
and delineate areas (seed zones) that are relatively homogenous with<br />
respect to adaptive genetic variation. The seed zones represent areas<br />
within which seed and plant materials can be transferred with little<br />
risk of maladaptation or other adverse consequences (Campbell 1986;<br />
Sorensen 1992; Rehfeldt 1994; Erickson 2004; St. Clair and others 2005).<br />
Generalized or “provisional” seed zones (Bower and others 2014) have<br />
been developed for the continental United States using minimum<br />
temperature and aridity variables in combination with EPA Level III<br />
Ecoregions (Omernik 1987). The resulting map (Figure 6-4) captures<br />
much of the variation existing in adaptive seed zones (Bower and others<br />
2014; Kramer and others 2015). Therefore, the combined generalized<br />
or “provisional” seed zone and ecoregion mapping approach is a good<br />
starting place for species and geographic areas where empirical seed<br />
zones are unavailable.<br />
In creating the provisional seed zones, temperature minimum values<br />
were grouped into 13 discrete classes that reflect the temperature<br />
bands used in the USDA plant hardiness zone map (USDA Agricultural<br />
Resource Service 2012). The hardiness map is familiar to designers<br />
and land managers and has been widely used for decades. An annual<br />
heat:moisture index (AH:M) was used as a measure of aridity to<br />
distinguish areas that are warm and wet (low-moderate aridity), cold<br />
and wet (low aridity), warm and dry (high aridity), and cold and dry<br />
(moderate-high aridity). Index values were divided into six discrete<br />
classes, with higher values indicating more arid environments.<br />
Intersection of the minimum winter temperature with the AH:M layer<br />
created unique climatically delineated (temperature-aridity) zones. In<br />
the final map, EPA Level III Ecoregions were overlaid on climate zones<br />
to identify areas that differ ecologically although they may be similar<br />
climatically (Figure 6-4).<br />
The provisional seed zones, along with empirical seed zones for some<br />
native plants, are available online in the Seed Zone Mapper application<br />
(http://www.fs.fed.us./wwetac/threat_map/SeedZones_Intro.<br />
html). Provisional seed zones have also been incorporated into the<br />
Ecoregional Workhorse and Pollinator Plant Selector (EWPPS) online<br />
tool discussed in Section 4.3.3.2, Ecoregional Workhorse and Pollinator<br />
Plant Selector, as an independent map layer.<br />
<strong>Roadside</strong> <strong>Revegetation</strong>: An Integrated Approach to Establishing Native Plants and Pollinator Habitat 142
PLANNING PHASE THREE: VEGETATION ANALYSIS<br />
Provisional<br />
Seed Zones<br />
Figure 6-4 | Provisional seed zones<br />
Provisional seed zones for native plants<br />
(color polygons) are unique climatically<br />
delineated (temperature-aridity) areas<br />
nested within EPA Level III Ecoregion<br />
boundaries (black lines). The provisional<br />
zones can be used to guide seed sourcing<br />
decisions when species-specific<br />
genetic information is lacking (Bowers<br />
and others 2014).<br />
Inset 6-2 | What to do if there are no locally adapted native seed sources available<br />
Adapted from Erickson and others 2003; Aubry and others 2005<br />
The volume of seeds needed for a revegetation project may not<br />
always be available in sufficient quantities, particularly when plans<br />
have changed or the revegetation specialist has not been involved<br />
until the latter stages of the project. In these instances, three choices<br />
are available to the revegetation specialist: (1) wait several years until<br />
the appropriate seeds are available; (2) use introduced species that are<br />
non-persistent, non-invasive, or sterile, or (3) use non-native cultivars<br />
or non-local native cultivars.<br />
Defer Seeding<br />
If the appropriate species or seed sources are not available, then<br />
consider not seeding until the appropriate seeds become available.<br />
In the interim, soil cover for erosion control should be considered.<br />
Non-Local Native Species<br />
Native species that do not occur naturally in the local ecosystem, or<br />
native plant material that does not originate from genetically local<br />
sources, may be considered. These types of plant materials may include<br />
commercial cultivars. A cultivar is “a distinct, often intentionally bred<br />
subset of a species that will behave uniformly and predictably when<br />
grown in an environment to which it is adapted” (Aubry and others<br />
2005). These cultivars are generally not preferable for wildland use<br />
due to concerns over adaptability, genetic diversity level, and the<br />
potential for genetic contamination, or “swamping,” of local native<br />
gene pools, including those of threatened, endangered, and sensitive<br />
plants (Millar and Libby 1989; Knapp and Rice 1994; Linhart 1995;<br />
Montalvo and others 1997; Lesica and Allendorf 1999; Hufford and<br />
Mazer 2003). Because commercial cultivars are typically selected<br />
for agronomic traits, such as high fecundity, vegetative vigor, and<br />
competitive ability, their use may also adversely impact resident plant<br />
populations through direct competition and displacement. Cultivars<br />
bred for traits such as showiness may have little value to pollinators<br />
due to low pollen and nectar production. Plant-pollinator relationships<br />
could be disrupted if the growth and reproductive cycle of non-locally<br />
sourced plants is different or out of sync with pollinator needs (Norcini<br />
and others 2001; Houseal and Smith 2000; Gustafson and others 2005).<br />
This is especially a concern with specialist pollinators that are reliant<br />
on the nectar and pollen from a small subset of plant species and<br />
synchronize their annual emergence to the flowering time of their<br />
host plants. Cultivars of native species (and introduced look-alikes<br />
such as sheep fescue [Festuca ovina]) can also be problematic if they<br />
are difficult to distinguish from native germplasm. This could severely<br />
complicate efforts to collect and propagate local material and waste<br />
valuable economic resources.<br />
Because of these numerous concerns, cultivars should be used<br />
sparingly, with project objectives clearly understood. Consult with<br />
the seed producer or distributor before buying seeds and ask for the<br />
most appropriate cultivar for the project area, where the source for<br />
the cultivar was collected (geographic location and elevation), and<br />
how many collections were made. The seeds should be certified with a<br />
certification tag attached to each seed bag. Tests for seed germination,<br />
purity, noxious weeds, and seeds per pound should be obtained.<br />
Introduced Species<br />
When appropriate seed sources are unavailable, sterile hybrids or annual/<br />
biennial/perennial introduced plant species that are non-persistent<br />
and non-invasive may be considered. Preferred non-native species are<br />
those that will not aggressively compete with the naturally occurring<br />
native plant community, invade plant communities outside the project<br />
area, persist in the ecosystem over the long term, or exchange genetic<br />
material with local native plant species. Some of these species include<br />
sterile hybrids, such as Regreen (a wheat x wheatgrass sterile hybrid)<br />
and annuals such as common oat (Avena sativa) and common wheat<br />
(Triticum aestivum). Exotic species that have not already been introduced<br />
into the area, or that have been found to be aggressive and/or persistent,<br />
should be avoided. Non-native species that were commonly used in<br />
the past and that should be avoided include Kentucky bluegrass (Poa<br />
pratensis), smooth brome (Bromus inermis), crested wheatgrass (Agropyron<br />
cristatum), orchardgrass (Dactylis glomerata), yellow and white<br />
sweetclover (Melilotus officinalis and M. albus), alsike clover (Trifolium<br />
hybridum), and alfalfa (Medicago sativa), among others. These species<br />
are generally no longer recommended due to their highly aggressive<br />
nature, resulting in widespread losses or displacement of native species<br />
and plant communities in western wildlands.<br />
<strong>Roadside</strong> <strong>Revegetation</strong>: An Integrated Approach to Establishing Native Plants and Pollinator Habitat 143
PLANNING PHASE THREE: VEGETATION ANALYSIS<br />
6.3.2 CONSIDER PLANT ESTABLISHMENT METHODS<br />
Once species have been selected and genetically appropriate sources of plant materials have<br />
been identified, the next step is to determine the most appropriate plant materials for the<br />
project. Revegetating with native plants commonly involves multiple methods to reestablish<br />
vegetation on the project site. The following are possible considerations:<br />
◾◾<br />
Maximizing natural regeneration/recovery<br />
◾◾<br />
Salvage existing plants<br />
◾◾<br />
Direct seeding<br />
◾◾<br />
Outplanting nursery stock<br />
In areas with relatively good soil stability that are bordered by healthy populations of viable<br />
native species, the existing seed bank and natural regeneration processes are key parts of<br />
re-establishing native vegetation on road sites. Minimizing the road footprint and damage<br />
from road construction are important aspects of any type of planning but are especially key if<br />
revegetation tactics involve supporting natural regeneration over more intensive revegetation<br />
interventions. In these cases, as long as topsoil is saved, the disturbance from road construction<br />
might serve to scarify the native seed bank. Often the option of maximizing natural regeneration<br />
is not sufficient to fully revegetate a roadside environment; nevertheless, it should always be<br />
considered as a possibility. Salvaging and reapplying duff and litter layers to disturbed surfaces<br />
can aid in maximizing natural regeneration. The revegetation plan should acknowledge aspects<br />
of the revegetation process that are expected to develop naturally (Clewell and others, 2005).<br />
However, if native seed regeneration is not sufficient to revegetate the site, additional plant<br />
materials will need to be obtained and established. Plant materials may include the following:<br />
◾◾<br />
Seeds<br />
◾◾<br />
Cuttings<br />
◾◾<br />
Plants<br />
Determining which plant material to select for revegetation depends on the type of species<br />
being grown. For example, conifer trees have been shown to establish better and faster from<br />
plants than from seed or cuttings. Alternatively, grasses can be established from plants, but<br />
growing grass plants and planting them is very expensive compared to using seeds. Some<br />
species, however, do not produce reliable crops of seeds and therefore other plant materials,<br />
such as cuttings, will have to be used. Table 6-2 and Table 6-3 compare the advantages and<br />
disadvantages of different establishment methods and stocktypes. Various Implementation<br />
Guides (see Chapter 10) describe in more detail the process for obtaining plant materials.<br />
Seeds<br />
Seeds are collected in the wild from native stands of grasses, forbs, shrubs, trees, and wetland<br />
plants. This plant material is used for seeding projects, such as hydroseeding of cut and fill<br />
slopes or other large areas of bare soil. Seeds of grass and forb species are best used for direct<br />
sowing, whereas seeds of shrubs and tree species are best used to grow nursery plants. If large<br />
amounts of grass or forb seeds are required for a project, seed collections can be increased<br />
through seed increase contracts. It can take up to three years to obtain enough seeds for<br />
a revegetation project – one year to collect the wild seeds and one to two years for seed<br />
increase. One of the advantages of using seeds asis that the plant material is that seeding<br />
can be an inexpensive method of reestablishing plants for a large area. Guides to collecting<br />
wild seeds, increasing seeds, and salvaging topsoil, duff, and litter are provided in Chapter<br />
10, Implementation guides.<br />
<strong>Roadside</strong> <strong>Revegetation</strong>: An Integrated Approach to Establishing Native Plants and Pollinator Habitat 144
PLANNING PHASE THREE: VEGETATION ANALYSIS<br />
Cuttings<br />
Cuttings are taken from stems, roots, or other plant parts and directly planted on the project<br />
site or grown into rooted cuttings at a nursery for later outplanting. Only a few species, such as<br />
willow (Salix spp.) and cottonwood (Populus spp.), can be easily established from direct sticking<br />
of cuttings on a project site. Other species, such as quaking aspen (Populus tremuloides), can be<br />
established from cuttings in a controlled nursery environment but not in the field. Propagating<br />
plants from cuttings of most species is not possible under most growing conditions. Cuttings<br />
are collected in the wild in the winter and either stored or immediately planted on the project<br />
site. If large quantities of cuttings are required, they can be propagated by growing them in<br />
stooling beds for several years at a nursery or other growing facility. Guides to working with<br />
cuttings are presented in Chapter 10.<br />
Plants<br />
Trees and shrubs are typically established using nursery stock rather than by direct seeding<br />
for several reasons. First, obtaining seeds from most tree and shrub species is expensive; in<br />
many years, they can be difficult to find or collect. Second, shrub and tree seeds germinate and<br />
grow into seedlings at a slower rate than grass and forb species, giving them a disadvantage<br />
on the sites where grasses and forbs are present. Starting shrubs and conifers from large<br />
plants instead of seeds gives them a competitive advantage over grasses and forbs because<br />
roots are often longer and better developed, allowing access to deeper soil moisture. Grass<br />
and forb species are seldom established from nursery-grown plants because of the high cost.<br />
Exceptions are when grass or forb seeds are rare or difficult to collect or increase (often referred<br />
to as “recalcitrant” species); if species are difficult to establish from seeds on disturbed sites;<br />
or when the project requires restoring threatened or sensitive species that are typically not<br />
considered workhorse species.<br />
Plants are typically grown in a nursery or agricultural setting. However, for some projects,<br />
plants are salvaged from the construction site or adjacent areas. Sometimes salvaged plants<br />
are simply relocated quickly from one area to another. At other times, they may be transplanted<br />
into a nursery and replanted at a later time. Plants that are grown in a nursery require a lead<br />
time of one to two years from the time of ordering to availability. A variety of stocktypes are<br />
available from nurseries, including small to very large plants – plants in containers or those<br />
without soil around the roots (bareroot) – and plants grown in greenhouse environments or<br />
field-grown plants (Table 6-2). Selecting a stocktype will depend on the needs of the project,<br />
as there are multiple options for propagation and establishment, as well as many stocktypes<br />
to choose from.<br />
For any stocktype, various desired characteristics should be defined, including age, size, chance<br />
of survival on the site, ability to compete with other vegetation and/or tolerate animal effects,<br />
and methods that will be necessary to outplant and maintain the stocktype. For bareroot<br />
stocktypes, size, age, and potential survival rates should be considered. For cuttings, consider<br />
if the project requires containerized cuttings (with a root system in a container), heeled or<br />
bareroot cuttings (with roots but no container), or simply cuttings to stick directly in the ground<br />
on the project site. For cuttings, length, caliper, and conditions of storage are also important<br />
factors. For container plants, no standard terminology exists for describing the different types<br />
of container plants available (Landis and others 1992). They are usually described by their<br />
container type, referring to the volume and usually the shape of the container. Size and age<br />
of the plant are also described. When ordering container plants, consider age, caliper, height,<br />
and root size and depth, as well as any other special characteristics that might help the plant<br />
survive on the project site (Table 6-3).<br />
Salvaging plants from the project area can be an important component of protecting native<br />
plant diversity on the project site. Sometimes salvaged plants are simply relocated instantly<br />
from one area to another. Other times, they may be transplanted or moved to a nursery area,<br />
<strong>Roadside</strong> <strong>Revegetation</strong>: An Integrated Approach to Establishing Native Plants and Pollinator Habitat 145
PLANNING PHASE THREE: VEGETATION ANALYSIS<br />
Table 6-2 | Comparison of plant material types for revegetation planning<br />
Type Advantages Disadvantages<br />
Balled-in-burlap<br />
The plant is grown in the field, dug up<br />
with its roots and surrounding soil, and<br />
wrapped in a protective material such as<br />
burlap.<br />
Bare-root<br />
The plant is sold without any soil around<br />
its roots.<br />
Container<br />
The plant is sold in a container of potting<br />
media or soil with drainage holes. Sizes<br />
and shapes or containers range from very<br />
small to very large.<br />
Liners/Plugs<br />
A small plant, rooted cutting, or seedling<br />
that is ready for transplanting. They are<br />
often used for herbaceous plants and<br />
grasses.<br />
Well-developed root systems increase chances of<br />
survival on site<br />
Provide shade and earlier establishment of upper<br />
canopy on site<br />
Less expensive<br />
Easier to transport to site; lightweight to carry<br />
around for planting<br />
Roots have not been restricted by containers<br />
Well-established root systems with intact soil<br />
Provide “instant” plants on site<br />
Available in a variety of sizes; many are available<br />
year-round<br />
Can be planted all year long<br />
Well-established root systems with intact soil.<br />
Easy to transplant; plant material pops out of<br />
containers easily<br />
Expensive<br />
Large and heavy to transport<br />
Requires care not to let root systems dry out<br />
before planting.<br />
Difficult to establish in dry sites or sites with<br />
warm, sunny spring seasons.<br />
Native soil not used in nursery; transplant shock<br />
may occur when roots try to move into native soil<br />
Can be expensive<br />
Can be difficult to transport to and around site if<br />
large numbers are used<br />
Can be difficult to provide irrigation until established;<br />
may actually require more maintenance<br />
than plug<br />
Same as above<br />
Smaller plants may take longer to establish;<br />
require more initial maintenance<br />
Cuttings<br />
A piece of branch, root, or leaf that is<br />
separated from a host plant and used to<br />
create a new plant. These may be placed<br />
in a rooting medium or stuck directly into<br />
the ground for planting.<br />
Salvage<br />
Native plants that are removed from a<br />
site (to a nursery, storage area, or directly<br />
to another field location) before ground<br />
disturbance at that site occurs. (Can<br />
also refer to salvaged cuttings or seed<br />
sources.)<br />
Adapted from Dorner 2002<br />
Inexpensive to produce; cutting may easily be<br />
taken on site or from nearby site<br />
Etasy and light to transport; known to work well<br />
in rocky areas or areas difficult to access<br />
Can use plant material that would otherwise be<br />
destroyed<br />
Plant material could be local to site<br />
Relatively inexpensive<br />
Small or young salvage plants often adapt more<br />
readily to transplant than do mature specimens<br />
No established root systems<br />
Timing of taking cuttings and planting them is<br />
important; varies among species and limited to<br />
dormant periods<br />
Different native plants respond differently to<br />
being dug up; some loss could be expected<br />
Requires fairly intensive measures to protect<br />
plants and ensure they have adequate irrigation<br />
<strong>Roadside</strong> <strong>Revegetation</strong>: An Integrated Approach to Establishing Native Plants and Pollinator Habitat 146
PLANNING PHASE THREE: VEGETATION ANALYSIS<br />
Table 6- 3 | Comparison of different plant establishment methods<br />
Characteristic Wild Cuttings Seeds Nursery Plants<br />
Efficient use of seeds and cuttings N/A No No Yes<br />
Cost of establishment High Moderate Low Moderate<br />
Ability to establish difficult species Yes No No Yes<br />
Option of using specific genotypes No No Yes Yes<br />
Precise scheduling of plant establishment Yes Yes No Yes<br />
Control of stand composition and density Yes Yes No Yes<br />
Matching stockypes to site conditions No No No Yes<br />
Depletion of adjacent plant stands Yes Yes No No<br />
cared for, and then re-planted at an appropriate time. As much native soil as possible is included<br />
when digging the salvaged plants, as this soil not only supports the health of the plants but<br />
also contains the native seedbank and root fragments of it and adjacent plants. “Salvage” may<br />
also involve harvesting cuttings or seeds from plants that are going to be removed during<br />
the road construction process.<br />
Depending on the species, genetics, site limiting factors, and specific project objectives, some<br />
concept of the appropriate “target” stocktypes will already be defined. For example, some<br />
plants respond well to certain propagation methods; some will be salvaged (“wildings”) from<br />
the site; and some are obvious candidates for direct seedling applications in order to facilitate<br />
fast regeneration. The needs and characteristics of a particular species will help determine<br />
if direct seeding, nursery propagation, or other methods are the more appropriate strategy.<br />
Many options can be considered, some of which are summarized in Table 6-3.<br />
Installation of Plants<br />
(1 week-3 years)<br />
Develop & Initiate<br />
Contracts<br />
(1-3 years)<br />
Plant Material<br />
Collections<br />
(1-2 years)<br />
Scheduling<br />
Timing is a key factor for obtaining plant materials because many native plants or seeds<br />
are not widely available from nurseries and seed companies. Even if a species is available,<br />
the odds are that it is not from a local source that is genetically adapted to the project site.<br />
Therefore, it is essential to identify plant material needs early. It usually takes a lead time of<br />
two to four years to administer seed collection, seed increase, and seedling propagation<br />
contracts. Sometimes three years may be required to achieve sufficient quantities of seeds.<br />
Plants (seedlings, cuttings, and so on) ordered from nurseries take a great deal of advanced<br />
planning for both seed collection and for plant propagation. Failure to realize the lead time<br />
necessary for seed collection and propagation of appropriate native plant materials is one of<br />
the most common mistakes made in revegetation projects (Figure 6-5).<br />
6.3.3 SELECT PLANT MATERIAL INSTALLATION AND MAINTENANCE METHODS<br />
Many methods are available for installing plant materials on a project site. Seeds can be<br />
applied through hydroseeding equipment, disked or drilled into the soil surface, broadcast<br />
sown, imprinted, and/or covered with a variety of types of mulch. A variety of techniques are<br />
also available for installing cuttings and plants, including an expandable stinger (Figure 6-6),<br />
waterjet stinger, pot planter, auger, and a shovel. These methods are discussed in Chapter 10.<br />
Delivery of Plants<br />
(1 week-2 years)<br />
Plant Material<br />
Increase/Growout<br />
(1-3 years)<br />
Figure 6-5 | Early planning for<br />
plant material procurement<br />
Early planning for plant material procurement<br />
is essential. Depending on<br />
plant species, stocktype, and quantity<br />
desired it can take up to three years or<br />
more to obtain suffient plant material.<br />
Due to the biology of plants, a missed<br />
window of collection may result in a full<br />
year’s delay.<br />
Outplanting may occur across multiple<br />
growing seasons, requiring several delivery<br />
and installation events spanning<br />
a timeframe of years.<br />
<strong>Roadside</strong> <strong>Revegetation</strong>: An Integrated Approach to Establishing Native Plants and Pollinator Habitat 147
PLANNING PHASE THREE: VEGETATION ANALYSIS<br />
Figure 6-6 | Planting longtube<br />
stocktypes with an<br />
expandable stinger<br />
Match stocktypes to outplanting options<br />
and equipment available. The expandable<br />
stinger (A) is a special planting<br />
machinery that attaches to the arm of<br />
an excavator. Long-tube stocktypes are<br />
placed in the stinger and pushed in the<br />
soil (B). The stinger opens and plants the<br />
seedling in the soil (C, D). This machinery<br />
can reach very steep, rocky slopes that<br />
are inaccessible for manual planting.<br />
A<br />
After plant materials have been installed, care is required until they are well-established. This<br />
includes protection from browsing animals, high temperatures, winds, competing vegetation,<br />
and drought. Measures that can mitigate for browsing animals include installing netting and<br />
tree shelters, over-planting to compensate for expected browse, as well as applying animal<br />
repellents. If netting or tree shelters are used, it is important to account for their removal in the<br />
implementation budget and contract. Seedlings can be protected from high temperatures and<br />
wind with shade cards, tree shelters, and large obstacles, such as logs. Competing vegetation<br />
is controlled through weeding, mulch, or herbicides. In extremely dry conditions, soil moisture<br />
can be supplemented by using irrigation systems.<br />
6.3.4 DETERMINE OUTPLANTING WINDOWS<br />
In addition to ensuring enough lead time to successfully carry out native revegetation goals, the<br />
optimum seasons for planting must be determined. There are advantages and disadvantages<br />
to carrying out operations at any time of the year, and determining the timeframe should be<br />
based on the species, plant material, and site factors.<br />
The optimum time of year to outplant for greatest plant survival is called the outplanting<br />
window. It is determined by graphing the annual precipitation, temperatures, and snow<br />
accumulation of a site. This information can be obtained from climate stations, as described in<br />
Phase One. Outplanting windows are also defined by the species, stocktype, and outplanting<br />
methods. For example, two different species of bunch grass might have very different survival<br />
rates depending on when they were outplanted. Figure 6-7 shows survival rates for bluebunch<br />
wheatgrass (Pseudoroegneria spicata), that survived better when planted in fall, and spreading<br />
needlegrass (Achnatherum richardsonii), that survived better when planted in spring.<br />
Several factors are important for determining outplanting windows, including soil temperatures<br />
in late winter and early spring, precipitation during spring and early summer, soil temperatures<br />
in fall, precipitation in fall, and snow cover. Three examples of identifying outplanting windows<br />
are provided in Figure 6-8, Figure 6-9, and Figure 6-10. Applying the following set of guidelines<br />
to the climate data will help clarify the optimum times to plant.<br />
% Survival of Transplants<br />
90<br />
80<br />
70<br />
60<br />
50<br />
40<br />
30<br />
20<br />
10<br />
0<br />
Fall Planted<br />
Spring Planted<br />
A. richardsonii<br />
P. spicata<br />
Figure 6-7 | Survivorship can vary<br />
between spring and fall plantings<br />
Outplanting must be timed properly<br />
for best results given site conditions<br />
and species requirements (reproduced<br />
from Page and Bork 2005).<br />
<strong>Roadside</strong> <strong>Revegetation</strong>: An Integrated Approach to Establishing Native Plants and Pollinator Habitat 148
PLANNING PHASE THREE: VEGETATION ANALYSIS<br />
Soil Temperatures in Late Winter and Spring<br />
Seedlings must develop new roots soon after they are planted to become established and<br />
survive the hot (and in many regions, dry) summer of the first growing season. For most species,<br />
new root growth occurs when soil temperatures exceed 42° F. Waiting for soil temperatures<br />
to warm to 42° F in the spring before outplanting, however, will shorten the period when<br />
soil moisture is available to the seedling. For this reason, a common restoration strategy is to<br />
outplant seedlings as soon after the last threat of a deep frost in the winter has passed, even<br />
if the soil temperatures are below 42° F.<br />
Figure 6-8 | Case Study – Low elevation, Western Cascade site<br />
The project site is located near Tiller, Oregon, where winters are wet<br />
and relatively mild, and summers are dry and hot. North slopes support<br />
Douglas-fir, incense cedar, and madrone. South slopes support ponderosa<br />
pine, oaks, and grasses. During summer, strong drying winds<br />
blow up the valley in the afternoon. Weather station records, from a<br />
U.S. Regional Climate Station located several miles away, show daily<br />
maximum summer temperatures in July and August averaging 84° F.<br />
The site has two planting windows. The spring planting window starts<br />
after the risk of the last winter cold front in mid-February has passed<br />
and ends two months before monthly precipitation dips below 1.5<br />
inches. The fall planting window begins as soon as the first fall rains<br />
wet the soil profile and ends one month prior to soil temperatures<br />
dropping below 42° F.<br />
Long dry summers, coupled with high temperatures and strong winds,<br />
create challenges to establishing seedlings. Outplanting in the fall or in<br />
mid to late winter is essential in order to develop new roots. Removing<br />
grass and other vegetation from around the seedling and applying a<br />
mulch fabric in March increases soil moisture. In places, tree shelters<br />
and shade cards placed around seedlings can protect them from the<br />
drying effects of the afternoon wind.<br />
Hydroseeding in October with mulch and tackifier will keep seeds in<br />
place long enough to germinate in November. Complete seedling<br />
establishment will occur by the following April.<br />
Average Rainfall (in)<br />
6<br />
5<br />
4<br />
3<br />
2<br />
1<br />
Low Elevation Westside Cascades: Riddle, OR<br />
Spring<br />
Planting<br />
Window<br />
0 0<br />
Jan Feb Mar Apr May Jun Jul Aug Sep Oct Nov Dec<br />
Months<br />
Fall<br />
Planting<br />
Window<br />
70<br />
60<br />
50<br />
40<br />
30<br />
20<br />
10<br />
Average Temperature (˚F)<br />
<strong>Roadside</strong> <strong>Revegetation</strong>: An Integrated Approach to Establishing Native Plants and Pollinator Habitat 149
PLANNING PHASE THREE: VEGETATION ANALYSIS<br />
Figure 6-9 | Case Study – Cool, arid site<br />
The climate at this project site is typified by dry, mild summers and<br />
cold winters with a snow pack extending from late fall to late winter.<br />
(Climate data was from a weather station located near the town of<br />
Chiloquin, Oregon.) Ponderosa pine, quaking aspen, and bitterbrush<br />
are the dominant vegetation on the site. The planting window begins<br />
immediately after snowmelt. Precipitation drops off significantly in<br />
April and May. Planting must be completed no later than the first week<br />
of April when monthly precipitation drops below 1.5 inches. Note that<br />
soil temperatures during the recommended planting windows are<br />
cooler than 42° F. Nevertheless, it is more important to plant early on<br />
arid sites than wait until soil temperatures warm. Rainstorms in the<br />
fall do not deliver enough moisture to recharge the soil before mean<br />
fall temperatures drop below 42° F. Early planting can take place in<br />
the fall if seedlings are irrigated at the time of planting. Seedlings<br />
on south slopes should be mulched to conserve soil moisture, while<br />
seedlings on cooler north aspects would benefit from, but may not<br />
require, mulch.<br />
Grass and forb seeding in September and October is essential because<br />
most seeds from this area require a stratification period. Seeds will not<br />
germinate in the fall because of the lack of continuous fall moisture and<br />
low temperatures. Germination occurs immediately after snowmelt<br />
in the spring. Seed germination can be poor because the soil surface<br />
dries out quickly due to low humidity, high solar radiation, and low<br />
precipitation. Mulching the seedbed with ground wood fiber or straw<br />
will maintain high humidity around germinating seeds. Spring seeding<br />
can be successful if seeds are soaked for several days prior to seeding<br />
and if seeding is done as soon as snows have melted.<br />
Average Rainfall (in)<br />
6<br />
5<br />
4<br />
3<br />
2<br />
1<br />
Snow Pack<br />
Spring<br />
Planting<br />
Window<br />
Eastside Cascade Site: Chiloquin, OR<br />
0 0<br />
Jan Feb Mar Apr May Jun Jul Aug Sep Oct Nov Dec<br />
Months<br />
Snow Pack<br />
70<br />
60<br />
50<br />
40<br />
30<br />
20<br />
10<br />
Average Temperature (˚F)<br />
Precipitation in Spring and Summer<br />
Much of the western United States experiences dry summers, with winters receiving most<br />
of the precipitation. Under this regime, soils lose their moisture in the summer and recharge<br />
from storms that occur in the fall and winter. Plants have adapted to this climate by growing<br />
new roots and leaves during spring, when soil moisture is high, and becoming dormant in<br />
summer, when soil moisture is depleted.<br />
The most critical factor for seedlings that are outplanted in the spring is the length of time<br />
available for the seedling to develop new roots before soil moisture is depleted. Sites with<br />
little or no precipitation in the spring or summer will dry out faster than sites with high spring<br />
and summer precipitation. A guideline is that an average monthly precipitation of less than<br />
1.5 inches will do little to recharge a dry soil during late spring through fall. Figure 6-8, Figure<br />
6-9, and Figure 6-10 show spring outplanting windows for three very different project sites.<br />
On low elevation sites west of the Cascade Mountains, the planting window can be fall and<br />
spring (Figure 6-8), whereas high elevation sites might have a planting window only in late<br />
spring (Figure 6-10).<br />
Soil Temperatures in Fall<br />
If outplanting is planned for late summer or early fall, it is important that soils have high<br />
moisture and temperatures are warm enough to encourage new roots to grow into the soil<br />
before winter arrives. On cold sites where seedlings are not protected by snow, the upper<br />
<strong>Roadside</strong> <strong>Revegetation</strong>: An Integrated Approach to Establishing Native Plants and Pollinator Habitat 150
PLANNING PHASE THREE: VEGETATION ANALYSIS<br />
Figure 6-10 | Case Study – High elevation site<br />
This site is located in the high Cascade Mountains at 4,800 feet<br />
elevation. Mixed stands of mountain hemlock and noble fir occupy<br />
the site. Snowpack begins in November and is present on the site until<br />
May. Seedlings must be planted as soon as the snow leaves the site.<br />
Thunderstorms will typically wet the soil by late summer, opening a<br />
second planting window sometimes as early as late August. Competing<br />
vegetation must be controlled around container seedlings planted at<br />
this time to maintain high soil moisture for the remainder of the fall.<br />
Scalping vegetation immediately after planting and applying a mulch<br />
will help maintain high soil moisture. As temperatures begin to drop<br />
in late summer, evaporative demands on the planted seedlings are<br />
reduced. Planting must be completed by late September to ensure that<br />
seedlings will have some time to develop new roots. North aspects<br />
will have cooler soil temperatures and should be planted sooner than<br />
south aspects.<br />
Weather station data indicate average minimum air temperatures<br />
are cold during the growing season. Applying tree shelters around<br />
seedlings will increase daily air temperatures, creating a more favorable<br />
environment for seedling growth. North aspect seedling plantings<br />
might benefit more from tree shelters than south aspect plantings.<br />
Sowing can take place in the late spring, immediately after snowmelt,<br />
and again in the fall. Late spring sowing will be significantly enhanced<br />
by applying mulch over the seedbed and/or pregerminating seed<br />
prior to sowing. Seeds of species that do not require stratification<br />
should germinate within a month after sowing in late spring. Species<br />
requiring stratification should be sown in the fall.<br />
Average Rainfall (in)<br />
7<br />
6<br />
5<br />
4<br />
3<br />
2<br />
1<br />
High Elevation Site: Santiam Pass, OR<br />
Snow Pack<br />
Late Spring<br />
Planting<br />
Window<br />
0 0<br />
Jan Feb Mar Apr May Jun Jul Aug Sep Oct Nov Dec<br />
Months<br />
Late Summer<br />
Planting<br />
Window<br />
Snow Pack<br />
80<br />
70<br />
60<br />
50<br />
40<br />
30<br />
20<br />
10<br />
Average Temperature (˚F)<br />
portions of the soil profile will typically freeze (e.g., frost heave) and can dislodge seeds or<br />
seedlings exposing roots to desiccation. Fall outplanted seedlings that have not established<br />
new roots below the frost line risk desiccation by wind or sun exposure in winter because<br />
little to no water is available to the seedling. For greatest success, soil temperatures should<br />
remain above 42° F for at least one month after seedlings are planted in the fall for root<br />
development and seedling establishment prior to winter. Figure 6-10 shows a late summer<br />
planting window on a high elevation site where precipitation is high in September and soil<br />
temperatures are above 42° F.<br />
Soil temperatures are significantly warmer on south aspects, which means that outplanting<br />
windows on south exposures are often temporally broad and extend further into the fall than<br />
planting sites on north aspects, given soil moisture is adequate for root growth. Weather<br />
stations do not report soil temperatures. However, they can be extrapolated from average<br />
monthly air temperatures with a certain degree of reliability. Placing recording thermometers<br />
in the soil before construction will give more exact soil temperatures.<br />
Precipitation in Fall<br />
When outplanting seedlings in the fall, high soil moisture is essential for seedling survival and<br />
growth. Fall soil moisture can be very low, and the only means of recharging a dry soil is through<br />
rainstorms or irrigation. Two or more inches of rain over a period of at least several days are<br />
often required to moisten most dry soils. Many sites in the western United States, however,<br />
seldom have rainstorm events great enough to moisten the top 12 inches of soil before cold<br />
soil temperatures occur. Fall planting on these sites has a low potential for seedling survival.<br />
<strong>Roadside</strong> <strong>Revegetation</strong>: An Integrated Approach to Establishing Native Plants and Pollinator Habitat 151
PLANNING PHASE THREE: VEGETATION ANALYSIS<br />
On sites with sufficient fall precipitation, planting windows are open as soon as a rainstorm<br />
event wets the surface 12 inches of soil.<br />
Snow Cover<br />
Seedlings should not be planted through snow, so outplanting windows are open before snow<br />
accumulation and after snowmelt. Be aware, however, that cold water from melting snow keeps<br />
soil temperatures low. Soil temperatures should be monitored during or following snowmelt.<br />
6.3.5 DETERMINE SOWING WINDOWS<br />
The outplanting windows for seed sowing may be different than those for planting nursery<br />
stock. Optimum planting times for seeds are called “sowing windows.” Sowing windows<br />
change by site environment, sowing methods, and seed needs. Seeds will germinate and<br />
develop into healthy, viable plants when: seed stratification requirements are met and seeds<br />
are in a warm, moist environment during germination. Seed stratification requires a cold,<br />
moist period, ranging from a few weeks to several months, during which time the seeds are<br />
conditioned for germination. This usually occurs naturally in the western United States during<br />
early to mid-spring, but it can be induced artificially in seed coolers.<br />
After seed stratification requirements have been met, a moist, warm period must follow<br />
in which seeds and soil do not appreciably dry down. Drying during this time can prevent<br />
germination and kill new germinants. In the western United States, these conditions are<br />
best met by sowing seeds in late summer to early fall. On warm, moist sites (e.g., Figure 6-8),<br />
seeds that require a very short stratification period will germinate in early fall and begin to<br />
establish ground cover before winter rains occur. Fall-sown seeds requiring stratification will<br />
have moisture and temperature requirements met during winter. On drier sites (Figure 6-9),<br />
fall-sown seeds will not germinate due to lack of precipitation.<br />
If fall sowing is not possible, sowing can take place in late winter or early spring. Sowing at<br />
this time generally results in less vigorous stands of grass and forb seedlings because there<br />
is a shorter period of favorable conditions for seeds to germinate and seedlings to become<br />
established. Another drawback of spring sowing is that some species will not receive the<br />
required cold, moist period to break seed dormancy and germinate. Once germination has<br />
occurred, several months of periodic precipitation with average air temperatures exceeding<br />
40° F are required for successful establishment of ground cover.<br />
Spring sowing can be enhanced in several ways. A mulch applied over the seeds will help<br />
maintain higher seed moisture levels and keep soil moisture in the soil for a longer period.<br />
Seeds requiring stratification can be artificially stratified for spring sowing to achieve earlier<br />
germination. Care must be taken that the seeds do not mold or begin to germinate during this<br />
period, or dry down for sowing. The effect of hydromulch equipment on germinating native<br />
species seeds is unknown at this time; seeds may be damaged if sown using this method.<br />
6.4 NEXT STEPS<br />
By the end of Phase Three, the designer will have completed an assessment and analysis of<br />
the native vegetation on the revegetation units and reference sites. In addition, the designer<br />
will have refined the DFCs for short- and long-term goals; gained an understanding of the<br />
species, plant communities, and successional processes; analyzed species and communities in<br />
order to select the species to be used for revegetation; and reviewed potential plant material<br />
types and seeding or outplanting methods to consider in order to revegetate the site. Now it<br />
is time to move to Phase Four, where all the elements will be integrated into a comprehensive<br />
strategy for road design, site treatments, and revegetation – the <strong>Revegetation</strong> Plan.<br />
<strong>Roadside</strong> <strong>Revegetation</strong>: An Integrated Approach to Establishing Native Plants and Pollinator Habitat 152
PLANNING PHASE FOUR: INTEGRATE AND STRATEGIZE<br />
7— Planning Phase Four:<br />
Integrate and<br />
Strategize<br />
7.1 Introduction<br />
7.2 Finalize <strong>Revegetation</strong> Units and DFCs<br />
7.3 Integrate and Develop <strong>Revegetation</strong> Strategies<br />
7.4 Select a <strong>Revegetation</strong> Strategy<br />
7.5 Assemble the <strong>Revegetation</strong> Plan<br />
7.6 Next Steps<br />
<strong>Roadside</strong> <strong>Revegetation</strong>: An Integrated Approach to Establishing Native Plants and Pollinator Habitat<br />
153
PLANNING PHASE FOUR: INTEGRATE AND STRATEGIZE<br />
7.1 INTRODUCTION<br />
In Phase One of the planning process, project objectives were clarified and revegetation units<br />
and reference sites were defined (Figure 7-1 and Figure 7-2). Preliminary DFCs were developed<br />
for each revegetation unit. During Phase Two, site attributes were defined, including limiting<br />
factors, options for mitigation, and available resources. In Phase Three, vegetation was analyzed<br />
to consider species, stocktypes, and plant establishment options. In Phase Four, the final phase<br />
of planning, the work of all the previous phases is pulled together. Phase Four integrates the<br />
understanding of site limitations and resources, mitigation options, species, and seeding or<br />
outplanting methods into a comprehensive strategy for revegetating the site. This integrated<br />
strategy will culminate in the <strong>Revegetation</strong> Plan.<br />
The steps for developing the revegetation plan in Phase Four are as follows:<br />
◾◾<br />
Finalize revegetation units and DFCs<br />
◾◾<br />
Integrate survey information and develop potential revegetation strategies<br />
◾◾<br />
Compare and select revegetation strategies<br />
7.2 ASSEMBLE PLAN<br />
A case study is provided to illustrate the thought process for the development and selection<br />
of revegetation strategies on a project.<br />
7.3 FINALIZE REVEGETATION UNITS AND DESIRED FUTURE<br />
CONDITIONS<br />
Phase Four provides the opportunity to review, refine, and finalize revegetation units and<br />
the DFCs for each unit. The boundaries of revegetation units may be revised now that the<br />
sites have been more thoroughly surveyed. Additional ecological or management-based<br />
information may support creating additional revegetation units. Alternately, if management<br />
will be similar, an area originally divided into several revegetation units might<br />
be consolidated into one. Once the revegetation units are finalized, the DFCs for<br />
each unit can be finalized as well.<br />
DFCs can be revised based on the information gathered during these assessments.<br />
For example, with more detail about the local native species and their specific<br />
requirements, some factors may emerge as less or more limiting for the species in<br />
your project. Water input might be low on the site. However, if native drought-tolerant<br />
(xeric) species abound, water will be less limiting for these species than if<br />
you were attempting to revegetate with more water-loving (mesic) species. It is<br />
possible that less mitigation for water will be necessary than originally assumed.<br />
The process of refining DFCs is essential in order to ensure that the objectives are<br />
feasible given the native species and ecological processes on the site.<br />
Reference sites provided information on existing vegetation and illustrated<br />
what might happen on a site in one year, five years, or several decades. These<br />
reference sites model how revegetation units might be expected to respond<br />
to change and management. The potential successional development of each<br />
revegetation unit should be reviewed. Asking what the revegetation units could look like in<br />
both short-term (1-3 years) and long-term (5, 10, 15+ years) timeframes is part of the process<br />
for finalizing DFCs.<br />
An example of how DFCs were developed for a project is described in Inset 7-1. In this case<br />
study several reference sites were selected, ranging from desirable to undesirable vegetation<br />
conditions. Defining site characteristics from a range of reference sites helped develop a<br />
realistic DFC for the project.<br />
Figure 7-1 | Reference Site 1<br />
This site has been barren since construction.<br />
Soils are compacted and sheet<br />
erosion is active.<br />
Figure 7-2 | Reference Site 2<br />
This reference site is composed of<br />
squirreltail (Elymus elymoides subsp.<br />
elymoides) and Oregon sunshine (Eriophyllum<br />
lanatum), representing the<br />
desired future condition of this project.<br />
<strong>Roadside</strong> <strong>Revegetation</strong>: An Integrated Approach to Establishing Native Plants and Pollinator Habitat<br />
154
PLANNING PHASE FOUR: INTEGRATE AND STRATEGIZE<br />
Inset 7-1 | Case Study – Define site, limiting factors, and desired future conditions<br />
<strong>Revegetation</strong> Unit Description<br />
Five revegetation units were defined for this road project. The<br />
revegetation unit in this case study was defined from surveys of several<br />
reference sites and local reports.<br />
Soils are generally deep sandy loams (less than 20% rock fragments)<br />
derived from pumice parent material. Topsoils are 6 to 8 inches deep.<br />
Duff and litter layers are 2 to 3 inches deep. Infiltration rates are very<br />
high unless duff and litter layers are removed and soil is compacted.<br />
Slope gradients are less than 5H:1V, except for a few areas that approach<br />
2H:1V. The climate is semi-arid, with an annual precipitation of 10 inches,<br />
delivered as snow in winter and intense thunderstorms in the summer<br />
months. Winters are very cold; summers are warm. Evapotranspiration<br />
rates are high from spring through fall. Vegetation on undisturbed<br />
reference sites is dominated by ponderosa pine, quaking aspen,<br />
bitterbrush, ceanothus, and Idaho fescue.<br />
Disturbance Description<br />
All vegetation will be removed and roots and stumps grubbed. Topsoil<br />
will be removed, leaving at least 2 feet of subsoil for rooting. Soils will<br />
be compacted, and the site is expected to appear similar to the photo<br />
of Reference Site 1 (Figure 7-1).<br />
Limiting Factors and Mitigating Measures<br />
Figure 7-3 shows the potential limiting factors associated with this<br />
revegetation unit. Figure 7-4 displays possible mitigating measures<br />
that could be employed to overcome each limitation.<br />
Desired Future Condition<br />
The revegetation objectives for this unit are to develop a low growing<br />
stand of native grasses and forbs that are not attractive as deer forage,<br />
exclude invasive weeds, and add visual interest to a high recreational<br />
use road. Based on reference sites or recently recovered disturbances,<br />
vegetative cover of a well- established grass and forb stand is 50%<br />
to 70% in mid summer, with 10% to 30% bare soil. Vegetation establishment<br />
is very low the first year, with less than 20% cover typically<br />
occurring. DFC thresholds after the first year include: 20% vegetative<br />
cover, 30% bare soil, no knapweed. DFC thresholds after the third year<br />
include: 65% vegetative cover, 30% bare soil, no knapweed. Vegetative<br />
cover must be composed of 90% native vegetation.<br />
Site assessments that define limiting factors for each revegetation<br />
unit in Phase Two become the basis for developing a revegetation<br />
strategy. For example, Figure 7-3 shows how limiting factors were<br />
summarized for a proposed project. By listing the limiting factors,<br />
the revegetation specialist can focus on only the most important<br />
site parameters requiring mitigation. Figure 7-4 lists the potential<br />
mitigating measures available in this case study for each limiting factor.<br />
Figure 7-3 | Define limiting factors on the site<br />
Figure 7-4 | List possible mitigating measures for limiting factors<br />
<strong>Roadside</strong> <strong>Revegetation</strong>: An Integrated Approach to Establishing Native Plants and Pollinator Habitat<br />
155
PLANNING PHASE FOUR: INTEGRATE AND STRATEGIZE<br />
7.4 INTEGRATE AND DEVELOP REVEGETATION STRATEGIES<br />
There are no “silverbullet” products or treatment methods that will transform a project<br />
site into a functioning plant community. A comprehensive understanding of the site and<br />
how revegetation treatments alone or in combination with other treatments will affect soil<br />
characteristics, plant establishment, and future successional processes is the key to successful<br />
revegetation. Several revegetation strategies can be developed for each revegetation unit<br />
by creating various combinations of mitigating measures. It is important to assess how these<br />
strategies compare with each other and how the combination of mitigating measures within<br />
a strategy will interact. Strategies are often developed around major actions or themes. For<br />
instance, the three strategies in the case study shown in Inset 7-2 were based on mitigating<br />
for the lack of topsoil by:<br />
◾◾<br />
Strategy 1: Adding fertilizer<br />
◾◾<br />
Strategy 2: Reapplying topsoil<br />
◾◾<br />
Strategy 3: Blowing compost mulch<br />
These are very different approaches, and the resulting strategies will vary considerably.<br />
Developing revegetation strategies is an integrative and collaborative process between<br />
vegetation and soils specialists and the project engineers. This requires a good understanding<br />
of the site limitations, site resources, and experience with a variety of mitigating measures. All<br />
reasonable possibilities should be considered before any are rejected.<br />
Figure 7-6 illustrates how strategies can be qualitatively compared. In this method, limiting<br />
factors are identified for positive or negative effects on plant growth. Each of these characteristics<br />
is assessed for the conditions expected after construction with no mitigation measures<br />
employed, and qualitatively given a rating as follows:<br />
◾◾<br />
- - Severely limiting<br />
◾ ◾ - Limiting<br />
◾◾<br />
Somewhat limiting<br />
◾ ◾ + Not limiting<br />
◾ ◾ + + Beneficial<br />
◾ ◾ + + + Very beneficial<br />
The selection of one strategy over others should be based on revegetation objectives and<br />
feasibility of applying the treatment, including considerations for economics, available skills,<br />
and resources.<br />
When selecting a strategy, both short-term and long-term planning are required. Mitigating<br />
limiting factors for long-term revegetation success however, does not always directly aid in<br />
early establishment of plant materials. Success during early plant establishment depends<br />
almost entirely on conditions in a narrow environment at the soil surface (six inches above<br />
and below the surface), while conditions must focus on soil quality at much deeper depths<br />
and aerial factors much higher than the soil surface. Until plants can grow out of this narrow<br />
surface zone, they will continue to be affected by climate extremes (moisture, temperature,<br />
and so on), competition, and animal damage. The first few weeks after the installation of<br />
plant materials is often the most critical period in the revegetation process; plants should<br />
not be considered “established” until at least 1 to 2 years of growth. Developing revegetation<br />
strategies that meet both short and long-term revegetation goals is not always possible and<br />
there will be times when meeting short-term revegetation goals might have to give way to<br />
assuring long-term site recovery.<br />
<strong>Roadside</strong> <strong>Revegetation</strong>: An Integrated Approach to Establishing Native Plants and Pollinator Habitat<br />
156
క<br />
క<br />
క<br />
క<br />
క<br />
క<br />
క<br />
క<br />
క<br />
PLANNING PHASE FOUR: INTEGRATE AND STRATEGIZE<br />
Inset 7-2 | Strategies<br />
STRATEGY 1<br />
Subsoil till the top two feet of soil to break up compaction.<br />
Fertilize with a slow-release fertilizer.<br />
Use working group of nitrogen-fixing species (lupine, ceanothus<br />
and bitterbrush) and hydroseed in fall with wood fiber mulch.<br />
Short-term and long-term effects<br />
Subsoil tillage reduces compaction and increases surface stability by<br />
roughening the surface, increasing infiltration and reducing freezethaw<br />
potential. Subsoil tillage also increases rooting depth.<br />
Fertilizers will provide nitrogen and other nutrients for seedling<br />
establishment. Sufficient nitrogen may not be present to meet<br />
vegetation cover thresholds, but higher nitrogen levels in the soil<br />
might encourage annual weed growth.<br />
Emergence of sown seeds could be poor, especially if there are<br />
periods of dry spring weather during germination. Surface soil holds<br />
very little moisture in exposed, dry areas, and the wood fiber in the<br />
hydromulch will not provide enough moisture around seeds for<br />
germination. Mycorrhizal inoculum is important on dry sites, but<br />
has not been added to the hydroseed mix. This could result in poor<br />
establishment of seedlings.<br />
Discussion<br />
This is the least expensive strategy, and the least likely to create<br />
conditions for long-term revegetation. Nevertheless, the deep,<br />
non-compacted soils, though lacking in organic matter, should be<br />
able to support a good stand of nitrogen-fixing species. This could<br />
restore nitrogen to the soil and build soil biomass over time.<br />
STRATEGY 2<br />
Salvage and reapply 6 to 9 inches of topsoil, then subsoil till<br />
to 24 inches.<br />
Apply seeds through hydroseeding equipment and cover with<br />
an application of straw mulch and tackifier.<br />
Use a working group of visually pleasing species (predominately<br />
showy forb species).<br />
Short-term and long-term effects<br />
Topsoil will increase the water-holding capacity in the surface soil,<br />
as well as rooting depth, nutrients, organic matter, infiltration rates,<br />
and mycorrhizal inoculum. Knapweed (Centaurea spp.) infestation is<br />
possible if care is not taken to avoid areas of knapweed during soil<br />
salvage operations. Long-term nitrogen needs for the site are met<br />
with the additions of topsoil, but short-term nitrogen availability for<br />
seedling establishment might be low. Subsoil tillage increases rooting<br />
depth, surface stability through surface roughening, and infiltration.<br />
Tillage also reduces the freeze-thaw potential. Application of straw will<br />
increase germination and early seedling establishment due to higher<br />
humidity around seeds during germination. Straw also protects the<br />
soil surface from rainfall splash during thunderstorms. Straw can be<br />
a source of weeds if certified straw has not been purchased.<br />
Discussion<br />
This is the most expensive measure, but will potentially support the<br />
highest amount of plant cover over the long-term. All major limiting<br />
factors have been mitigated in this strategy.<br />
STRATEGY 3<br />
Apply 2-inch layer of compost to soil surface using a compost<br />
blower.<br />
Apply seeds and mycorrhizal inoculum during this operation.<br />
Use a working group of visually pleasing species (predominately<br />
showy forb species).<br />
Short-term and long-term effects<br />
Soil moisture is increased around the seeds due to the higher water-holding<br />
capacity of compost. Seeds are buried during compost<br />
blowing, increasing the chances of germination and establishment.<br />
Smaller seeds buried under the deeper thicknesses of compost will<br />
have poor emergence. Nutrients are supplied through the compost<br />
for short- and long-term plant community needs. Nutrients are not as<br />
accessible on the surface of the soil, requiring a portion of the grass and<br />
forb root systems to be growing into the compost. Mycorrhizal fungi<br />
are supplied through commercial inoculum. Soils are still compacted,<br />
limiting rooting depth.<br />
Discussion<br />
This strategy should be adequate to establish plants. Since soils are<br />
still compacted, meeting long-term vegetative cover targets might be<br />
difficult. This strategy could be improved if the compost were applied<br />
to previously tilled soil, or applied to the surface and then tilled into<br />
the soil to mix the compost and loosen the soil.<br />
Select <strong>Revegetation</strong> Strategy<br />
Comparing the revegetation strategies with their effects on the limiting<br />
factors of the site, a selection of the most appropriate revegetation<br />
strategy can be made.<br />
Since the amount of topsoil was of limited supply for the project,<br />
Strategy 2 (topsoil placement) was selected for the gentler terrain<br />
where it could be easily placed. Strategy 3 (mulch application) was<br />
selected for the steeper gradients. Strategy 1 was not selected because<br />
it was the least likely to meet the revegetation objectives (DFCs) of<br />
the project.<br />
Select a <strong>Revegetation</strong> Strategy<br />
The spreadsheets shown in Figure 7-3, Figure 7-4, and Figure 7-5 are<br />
helpful in summarizing site attributes for defining limiting factors,<br />
keeping track of potential mitigating measures, and comparing<br />
revegetation strategies for each revegetation unit. Following this<br />
process can lead to an informed decision on selecting a revegetation<br />
strategy for each revegetation unit.<br />
<strong>Roadside</strong> <strong>Revegetation</strong>: An Integrated Approach to Establishing Native Plants and Pollinator Habitat<br />
157
PLANNING PHASE FOUR: INTEGRATE AND STRATEGIZE<br />
Figure 7-5 | Case Study – Design potential revegetation strategies<br />
Figure 7-6 | Case Study – Compare revegetation strategies<br />
Evaluate each strategy using a qualitative system for comparison<br />
7.5 ASSEMBLE THE REVEGETATION PLAN<br />
At the end of Phase Four, revegetation strategies for all revegetation units have been selected.<br />
If the planning process went well, writing the actual plan should simply be a compilation of<br />
the various strategies. <strong>Revegetation</strong> Plans vary in length and depth. At a minimum, a plan will<br />
typically include the following components:<br />
◾◾<br />
<strong>Revegetation</strong> objectives<br />
◾◾<br />
Description and map of each revegetation unit<br />
◾◾<br />
Desired future conditions for each revegetation unit<br />
◾◾<br />
Analysis of site attributes (limiting factors and resources) and type of vegetation<br />
◾◾<br />
Description of mitigating measures<br />
◾◾<br />
Description of the revegetation strategy, including plant materials/stocktypes and<br />
application methods for each unit<br />
◾◾<br />
Key contacts and responsibilities<br />
◾◾<br />
Budget and timelines<br />
<strong>Roadside</strong> <strong>Revegetation</strong>: An Integrated Approach to Establishing Native Plants and Pollinator Habitat<br />
158
PLANNING PHASE FOUR: INTEGRATE AND STRATEGIZE<br />
◾◾<br />
Strategies for monitoring achievement of DFCs<br />
◾◾<br />
Strategies for correcting shortcomings based on monitoring information<br />
An example <strong>Revegetation</strong> Plan is provided in Chapter 8.<br />
7.5.1 NETWORKING<br />
The revegetation plan is a valuable tool for communicating with the Federal Highway Administration,<br />
other government agencies, state DOT and the general public. The degree that<br />
a revegetation project succeeds is often proportional to the quality of these interactions. It<br />
requires identifying the agency players, affected or key community members, and local and<br />
regional workforce (see Chapter 2) and understanding their concerns. The best written plans<br />
are of little value if these relationships are not established and maintained. It is important to<br />
share versions of the plan with, and solicit input from, others involved in the project.<br />
7.5.2 TIMELINES<br />
From inception through implementation and monitoring, construction projects span many<br />
years. A timeline can help organize the series of steps required for a successful revegetation<br />
project, and should include all aspects and details of the project. The timeline is basically a<br />
“to do” list with corresponding “due dates.” Awareness of timing is crucial, especially when<br />
obtaining plant materials. More information on timelines is provided in the Implementation<br />
Guide to Obtaining Plant Materials (see Section 10.2, Obtaining Plant Materials).<br />
7.5.3 FISCAL CONCERNS<br />
Budgets are necessary to estimate costs. Methods to build budgets and timelines are outside<br />
the scope of this publication, but there are many resources available to assist with the process.<br />
When the Planning Phase is complete, it will be time to move to the Implementation Phase.<br />
During implementation, the <strong>Revegetation</strong> Plan will be translated into task orders and<br />
prescriptions that specify how, when, where, and by whom the plan will be implemented.<br />
7.6 NEXT STEPS<br />
Phase Four, the final phase of the planning process, integrates all the information gathered<br />
from the previous three phases. The understanding of limiting factors and resources, mitigation<br />
options, species, and planting methods are combined into a comprehensive strategy for<br />
revegetating the site. The steps of Phase Four are to: (1) finalize revegetation units and DFCs;<br />
(2) integrate survey information and develop potential revegetation strategies; (3) compare and<br />
select revegetation strategies; and (4) assemble the plan. A case study with a decision matrix<br />
illustrates how to weigh various options and strategies to choose the most appropriate ones<br />
for the project. Phase Four culminates in the writing of the <strong>Revegetation</strong> Plan, which details<br />
the strategy and provides schedules and budgets for the project. The <strong>Revegetation</strong> Plan is an<br />
important tool for communicating with agencies, individuals, and the community about the<br />
project. An example <strong>Revegetation</strong> Plan is provided in the next chapter.<br />
<strong>Roadside</strong> <strong>Revegetation</strong>: An Integrated Approach to Establishing Native Plants and Pollinator Habitat<br />
159
REVEGETATION PLAN EXAMPLE<br />
8— <strong>Revegetation</strong><br />
Plan Example<br />
<strong>Roadside</strong> <strong>Revegetation</strong>: An Integrated Approach to Establishing Native Plants and Pollinator Habitat<br />
160
REVEGETATION PLAN EXAMPLE<br />
PREFACE<br />
The following sample <strong>Revegetation</strong> Plan (the Plan) was written for a Federal Highway Administration<br />
WFLHD project that is currently in the planning stage. The Plan highlights actions to<br />
be taken by the USDA Forest Service Region 6 Restoration Services Team in association with<br />
WFLHD. The Plan was previously submitted to WFLHD and will be used in the permitting process<br />
by the Contractor and Contracting Officer’s Representative during the implementa¬tion phase<br />
and will be referred to during the monitoring phase. <strong>Revegetation</strong> Plans are unique to each<br />
project. This sample plan is provided here as a stand-alone document in the larger manual<br />
and is meant only as a reference from which to develop a project-specific <strong>Revegetation</strong> Plan.<br />
This Plan is unique to the Restoration Services Team in that it is the first to intentionally include<br />
elements in the planning, imple¬mentation, and monitoring phases with the specific goal<br />
of increasing plant-pollinator interactions. Areas that would support pollinator insects with<br />
moderate effort and alteration were identified as distinct revegetation units during the planning<br />
phase. Plant species lists were developed during the planning phase to include plants known<br />
to increase nectar availability and to provide nesting, breeding, and refuge benefits. Plant<br />
materials for these species were collected for seed increase and grow-out. Minor grading to<br />
create depressions for water retention, large woody debris placement to create microhabitats,<br />
and out-planting will occur during the implementation phase in an effort to increase pollinator<br />
habitat. Pollinator abundance and diversity information will be collected during the monitoring<br />
phase to better understand practices that increased pollinator use within the project area and<br />
to identify opportunities for improving these approaches on future projects.<br />
<strong>Roadside</strong> <strong>Revegetation</strong>: An Integrated Approach to Establishing Native Plants and Pollinator Habitat<br />
161
REVEGETATION PLAN EXAMPLE<br />
Restoration Services Team- R6 USDA Forest Service<br />
63095 Deschutes Market Rd, Bend, OR 97701<br />
HISTORIC COLUMBIA<br />
RIVER HIGHWAY<br />
STATE TRAIL:<br />
SEGMENTS A-C FINAL<br />
REVEGETATION PLAN<br />
June 2016<br />
Prepared for:<br />
Federal Highway Administration<br />
Western Federal Lands Highway Division<br />
610 East Fifth Street, Vancouver, WA 98661<br />
<strong>Roadside</strong> <strong>Revegetation</strong>: An Integrated Approach to Establishing Native Plants and Pollinator Habitat<br />
162
REVEGETATION PLAN EXAMPLE<br />
TABLE OF CONTENTS<br />
Background _____________________________________________________________________________________ 3<br />
<strong>Revegetation</strong> Plan_______________________________________________________________________________ 8<br />
Strategy _________________________________________________________________________________________ 8<br />
Plant Species of Special Interest _________________________________________________________________ 8<br />
Wyeth Trailhead and Parking Lot ________________________________________________________________ 9<br />
Wyeth Campground Entrance and Gorton Creek Bridge ______________________________________ 12<br />
Mitigation Site #2 _____________________________________________________________________________ 14<br />
Stepped, Plantable MSE Wall __________________________________________________________________ 17<br />
Summit Creek Viaduct _________________________________________________________________________ 18<br />
HCRHST Embankments (Cuts and Fills) and Planned Idle Spots ______________________________ 19<br />
Staging Area(s) ________________________________________________________________________________ 21<br />
Non-Native Plant Control _____________________________________________________________________ 22<br />
Monitoring Plan _______________________________________________________________________________ 23<br />
Success Criteria _______________________________________________________________________________ 24<br />
Approximate Timeline & Budget _____________________________________________________________ 25<br />
Appendix One- Plant Species Suite ___________________________________________________________ 31<br />
Appendix Two- Walker Macy Planting Plans __________________________________________________ 32<br />
Appendix Three- Oregon Noxious Weed List _________________________________________________ 41<br />
References ____________________________________________________________________________________ 44<br />
USDA Forest Service Region 6 Restoration Services Team<br />
63095 Deschutes Market Rd, Bend, OR 97701<br />
Telephone: (541) 588-2695<br />
Prepared by<br />
Submitted June 8, 2016<br />
<strong>Roadside</strong> <strong>Revegetation</strong>: An Integrated Approach to Establishing Native Plants and Pollinator Habitat<br />
163
REVEGETATION PLAN EXAMPLE<br />
BACKGROUND<br />
Background<br />
The Historic Columbia River Highway (HCRH), originally constructed between 1913 and 1922,<br />
took full advantage of the unparalleled beauty of the Columbia River Gorge. The highway<br />
dazzled tourists and locals alike as it meandered near breathtaking waterfalls, panoramic<br />
vistas, and spell binding geomorphology. Many of these scenic features such as nearly thirty<br />
named waterfalls, including Multnomah Falls and Hole-in-the-Walls, and the Crown Point<br />
Vista House still delight travelers today. The construction of Interstate 84 during the late<br />
1940s and early 1950s disrupted the HCRH, leaving much of it in fragmented segments.<br />
Directive was given to the State of Oregon in 1986 via the Columbia River Gorge National<br />
Scenic Area Act, to reconnect the fragments of the historic highway. Further direction was<br />
provided by the Oregon Legislature in 1987 to the Oregon Department of Transportation<br />
(ODOT) to facilitate the development of the Historic Columbia River Highway State Trail<br />
(hereafter HCRHST) by preserving and enhancing existing HCRH segments. Since then,<br />
multiple partner agencies including the Federal Highway Administration-Western Federal<br />
Lands Highway Division (WFLHD), ODOT, Oregon Parks and Recreation Department (OPRD),<br />
the U.S. Forest Service (USFS), the State Historic Preservation Office, and private entities have<br />
collaborated to reconnect the HCRH fragments. Sixty-two of 73 miles are currently open<br />
along the HCRHST, in the form of drivable motor vehicle roads and foot or bicycle paths.<br />
There are approximately eleven miles remaining of the original HCRH for which plans are in<br />
place to reconnect and incorporate into the HCRHST.<br />
This document specifically addresses revegetation efforts planned by the U.S. Forest Service<br />
Region 6 Restoration Services Team (RST) within Segments A through C of the HCRHST. These<br />
segments cover from approximately one half mile west of the Wyeth Campground (west end<br />
of Segment A) to Lindsey Creek at the eastern end of Segment C, slightly less than ten miles<br />
west of the town of Hood River, Oregon (Figure 1). The combined length of Segments A-C is<br />
3.08 miles and spans from station 499+89.18 at the west, to station 151+73.53 to the east.<br />
Plans for Segments A-C call for developing a parking lot and trailhead on the west end, a<br />
mitigation area of approximately 5 acres, and new interpretive resting spots along the trail.<br />
<strong>Revegetation</strong> efforts will be closely coordinated with Walker Macy, a Portland Landscape<br />
Design firm.<br />
Page 3<br />
Historic Columbia River Highway State Trail, Segments A-C Final <strong>Revegetation</strong> Plan<br />
<strong>Roadside</strong> <strong>Revegetation</strong>: An Integrated Approach to Establishing Native Plants and Pollinator Habitat<br />
164
REVEGETATION PLAN EXAMPLE<br />
BACKGROUND<br />
FIGURE 1. SITE MAP OF THE HISTORIC COLUMBIA RIVER HIGHWAY STATE TRAIL, SHOWING SEGMENTS<br />
A-C (YELLOW BOX) AND GENERAL PROJECT AREA. SEGMENT IMAGE DESIGNED BY QUATREFOIL, INC.<br />
Page 4 Historic Columbia River Highway State Trail, Segments A-C Final <strong>Revegetation</strong> Plan<br />
<strong>Roadside</strong> <strong>Revegetation</strong>: An Integrated Approach to Establishing Native Plants and Pollinator Habitat<br />
165
REVEGETATION PLAN EXAMPLE<br />
BACKGROUND<br />
Past Use<br />
The project area of the HCRHST has a long history of human utilization. Evidence including<br />
remnants of poured concrete foundations, door stoops, invasive plants, imported fill material,<br />
trails and roads are found throughout the project area. In addition, creek channels have been<br />
re-routed and straightened, culverts have been installed, and surface water flow patterns have<br />
been altered significantly. Many of the hardscaped artifacts will be preserved in place, while<br />
non-native vegetation will be eliminated.<br />
Soils<br />
Native soils in the majority of the project area are of the Wyeth Series. This soil type is well<br />
drained and consists of very cobbly loam, having formed from basalt colluvium. The project<br />
area experiences rapid runoff and moderate permeability.<br />
Climate<br />
The elevation is about 120 feet above mean sea level. The area is influenced by winds from<br />
the Columbia River Gorge (Fig. 2) and on average, the greatest precipitation occurs during the<br />
month of December with six inches (Fig. 3). The average growing season in nearby Hood River,<br />
Oregon occurs from approximately late April through mid- to late October, with about 183<br />
frost free days. The maximum average temperatures are around 83°F in July, with the lowest<br />
minimums being around 30°F in December. Annual average humidity is highest in December<br />
at 84%, and lowest in July at 51% (2004-2014).<br />
Page 5<br />
Historic Columbia River Highway State Trail, Segments A-C Final <strong>Revegetation</strong> Plan<br />
<strong>Roadside</strong> <strong>Revegetation</strong>: An Integrated Approach to Establishing Native Plants and Pollinator Habitat<br />
166
REVEGETATION PLAN EXAMPLE<br />
BACKGROUND<br />
FIGURE 2. AVERAGE MONTHLY WIND SPEEDS IN HOOD RIVER, OREGON. DATA ARE AVERAGED FROM 1980-2010.<br />
SOURCE: USA.COM HISTORIC WEATHER DATA<br />
°F<br />
100<br />
50<br />
0<br />
Mean Climatic Conditions at<br />
Starvation Creek Trailhead 2004-<br />
2014<br />
Jan<br />
Feb Mar Apr May June July Aug Sept Oct Nov Dec<br />
8.0<br />
6.0<br />
4.0<br />
2.0<br />
0.0<br />
I<br />
n<br />
c<br />
h<br />
e<br />
s<br />
Precipitation Max Air Temp Mean Air Temp Min Air Temp<br />
FIGURE 3. THE AVERAGED MAXIMUM, MINIMUM, MEAN AIR TEMPERATURE AS WELL AS PRECIPITATION AT<br />
STARVATION CREEK TRAILHEAD. DATA ARE AVERAGED ACROSS 2004-2014. NOTE THE TWO DIFFERENT AXES.<br />
SOURCE: PRISM TIME SERIES DATA FOR LATITUDE 45.7055N/LONGITUDE -121.5855W<br />
Page 6<br />
Historic Columbia River Highway State Trail, Segments A-C Final <strong>Revegetation</strong> Plan<br />
<strong>Roadside</strong> <strong>Revegetation</strong>: An Integrated Approach to Establishing Native Plants and Pollinator Habitat<br />
167
REVEGETATION PLAN EXAMPLE<br />
BACKGROUND<br />
Trail Construction<br />
The trail is planned to be 12 feet wide, with two foot shoulders on either side. In some areas<br />
of constriction the trail width will be reduced to 10 feet. One exception is the planned<br />
pedestrian viaduct near Summit Creek that will be 14 feet wide. Grades will be limited to<br />
approximately five percent and when able, the trail surface will be sloped to the north. There<br />
will also be an additional five foot construction allowance on either side of the trail for<br />
temporary work access. In addition to the trail itself, plans call for a new trailhead with parking<br />
lot at the western terminus, a new motorist/pedestrian bridge over Gorton Creek, a pollinator<br />
meadow and mitigation area, a pedestrian viaduct near Summit Creek, and two new<br />
interpretive idle spots along the trail. <strong>Revegetation</strong> efforts will be proportional to the need for<br />
restoration and public visibility of each location.<br />
Page 7<br />
Historic Columbia River Highway State Trail, Segments A-C Final <strong>Revegetation</strong> Plan<br />
<strong>Roadside</strong> <strong>Revegetation</strong>: An Integrated Approach to Establishing Native Plants and Pollinator Habitat<br />
168
REVEGETATION PLAN EXAMPLE<br />
REVEGETATION PLAN<br />
<strong>Revegetation</strong> Plan<br />
Strategy<br />
Locally sourced, genetically adapted plant materials will be utilized for this project. The<br />
canopy within segments A-C is quite varied; ranging from open meadow to partial forest<br />
canopy to dense woods. The mitigation site near the historic Wyeth trailhead is a mostly open<br />
area, surrounded by trees. However, there is a large infestation of invasive weeds (namely<br />
Himalayan blackberry (Rubus armeniacus) and Scotch broom (Cytisus scoparius)) that occupy<br />
greater than 40% cover. Once the Himalayan blackberry and Scotch broom are treated there<br />
will be very little to no canopy cover over the majority of the almost five acre site. This<br />
location is well suited to be left as an open meadow and as such has been designated as an<br />
area where we will focus revegetation efforts on creating a pollinator-supporting habitat (see<br />
Mitigation Site #2 discussion below). This emphasis on pollinator habitat for this area<br />
specifically addresses action items in the National Pollinator Strategy and the National Native<br />
Seed Strategy, in addition to other FHWA/WFLHD and Forest Service strategies.<br />
Appendix 1 shows the suite of species that are planned for revegetation efforts. The plant<br />
species suite represents native plants that are present at the project site, at adjacent reference<br />
sites, or for which there are documented records of them having once been native and<br />
present but which have been out competed by introduced species. The suite is broad and not<br />
all species will be utilized at all sites. The most common container size used will be D27s.<br />
These containers are 2.5 inches wide by 7 inches long, and have a capacity of 27 cubic inches.<br />
This size pot accommodates a wide range of shrub and tree species and has proven reliable<br />
under similar out-planting conditions. Grass and forb seed will either be hydroseeded or hand<br />
broadcasted.<br />
The planting goal of RST is to: 1) create good line-of-sight and facilitate public safety (as<br />
designed in Walker Macy planting plans); 2) create a natural appearance that is consistent<br />
with the surrounding environs; and 3) create habitat to support pollinators. RST will draw on<br />
the planting notes and design of Walker Macy (Appendix 2) but will incorporate multiple<br />
native species of the designated height classes into each planting area and blur the<br />
boundaries of the planting areas to create a random and natural appearing pollinator-friendly<br />
habitat.<br />
Plant Species of Special Interest<br />
There are no known threatened, endangered, or sensitive plants within the area to be directly<br />
affected by this project (Robin Dobson, pers. comm.). RST is aware of only one observation of<br />
Page 8<br />
Historic Columbia River Highway State Trail, Segments A-C Final <strong>Revegetation</strong> Plan<br />
<strong>Roadside</strong> <strong>Revegetation</strong>: An Integrated Approach to Establishing Native Plants and Pollinator Habitat<br />
169
REVEGETATION PLAN EXAMPLE<br />
REVEGETATION PLAN<br />
a sensitive plant species within the project vicinity, which occurs in a plant buffer of Segment<br />
B near station 105+50 (CH2M Hill 2014). This occurrence of long-bearded hawkweed<br />
(Hieracium longiberbe) is not expected to be affected. Although there are no known plants of<br />
concern within the area to be directly affected there are additional areas of potential habitat<br />
for long bearded hawkweed and Columbia kittentails (Synthyris missurica ssp. stellata). If RST<br />
Restoration Specialists observe a species of concern they will salvage plants and care for them<br />
ex situ at Dorena Genetic Resource Center, a USFS plant center in Cottage Grove, Oregon, or<br />
adjacent to the affected area in similar habitat (on or near the project site). The plants would<br />
then be resituated in their original location, or the nearest suitable location if the original is no<br />
longer available, once the potential for disturbance has passed.<br />
Wyeth Trailhead and Parking Lot<br />
The planned parking lot at the Wyeth Trailhead incorporates a number of planting locations<br />
that encompass approximately one acre in area, including a drainage catch basin in the center<br />
and nine to twelve distinct planting pockets integrated into the outer curb. This area, more so<br />
than any other along the project, is designed with an eye toward more traditional landscape<br />
and horticultural practices. RST will work closely with Walker Macy to maintain public safety<br />
and line-of-sight while creating multi-seasonal interest.<br />
RST will conduct weed control throughout the area prior to planting, especially near the<br />
entrance. There is currently a robust population of Scotch broom growing along Wyeth Road<br />
and continuing beyond the ownership boundary to the west. Although it would be ideal to<br />
treat the larger surrounding area (approximately four acres) to reduce future Scotch broom<br />
re-establishment, funding for this work is not currently available. Therefore, only the area<br />
referenced on the project plan sheets will receive treatment; less than one tenth of an acre.<br />
Once treated, the open area on the west side of the trailhead entrance will be planted with<br />
species that support pollinator-plant interactions (Table 1a). Efforts will be made to maintain<br />
visuals of the trailhead sign and entrance while blocking the view of the new vault toilet<br />
facility from the traveling public on Wyeth Road.<br />
Contracting responsibility will be coordinated between WFLHD and RST. WFLHD will place 18”<br />
of weed-free topsoil or borrow material into all planting areas other than the planting pockets.<br />
The RST contactor will be responsible for providing weed-free topsoil to be combined with<br />
compost for use in the planting pockets and the two large planting beds on either side of the<br />
parking lot entrance. WFLHD will remove the non-native black locust trees currently on site.<br />
Page 9<br />
Historic Columbia River Highway State Trail, Segments A-C Final <strong>Revegetation</strong> Plan<br />
<strong>Roadside</strong> <strong>Revegetation</strong>: An Integrated Approach to Establishing Native Plants and Pollinator Habitat<br />
170
REVEGETATION PLAN EXAMPLE<br />
REVEGETATION PLAN<br />
Table 1b depicts tree and shrub species to be incorporated into the parking lot landscape<br />
plan. Native trees will be installed in the curb planting pockets and will be approximately 1-2”<br />
caliper and 4-6’ tall.<br />
TABLE 1A. PLANTS TO POTENTIALLY BE USED IN REVEGETATION EFFORTS NEAR THE ENTRANCE TO THE WYETH<br />
TRAILHEAD PARKING LOT. ‘XX’ DENOTES SEEDING RATHER THAN TRANSPLANTING TO BE UTILIZED. STOCK TYPE<br />
DEFINITIONS ARE AS FOLLOW: ‘S’ SEED; ‘RL10’ 10 CUBIC INCH CONTAINER VOLUME; ‘D27’ 27 CUBIC INCH<br />
CONTAINER VOLUME; ‘D40’ 40 CUBIC INCH CONTAINER VOLUME; ‘#1’ ONE GALLON CONTAINER; ‘#5’ FIVE GALLON<br />
CONTAINER; ‘B&B’ BALLED AND BURLAPPED.<br />
Common Botanical Zone Stock Type Spacing<br />
(on center)<br />
common yarrow Achillea millefolium var. A S XX<br />
occidentalis<br />
pearly everlasting Anaphalis margaritacea A S XX<br />
narrow-leaf milkweed Asclepias fascicularis A S, RL10 4"<br />
showy milkweed Asclepias speciosa A S, RL10 4"<br />
aster Aster spp. A S XX<br />
mountain brome Bromus carinatus A S XX<br />
Howell's reedgrass Calamagrostis howellii A S XX<br />
Pacific dogwood Cornus nuttallii B #1 15’<br />
blue wildrye Elymus glaucus ssp. glaucus A S XX<br />
smooth alumroot Heuchera glabra A S 4”<br />
lupine Lupinus latifolius. A S 4”<br />
creeping Oregon grape Mahonia repens A D27 4'<br />
Sandberg’s bluegrass Poa secunda A S XX<br />
self heal Prunella vulgaris A S XX<br />
checkermallow Sidalcea spp. A RL10 XX<br />
goldenrod Solidago canadensis A S XX<br />
fringecups Tellima grandiflora A RL10 4”<br />
western serviceberry Amelanchier alnifolia B #1, #5 8’<br />
Pacific dogwood Cornus nuttallii B #1 15’<br />
oceanspray Holodiscus discolor B D40 8’<br />
Oregon grape Mahonia aquifolium B D27, D40 4’<br />
Douglas fir Pseudotsuga menziesii B D27, B&B 15’<br />
red flowering currant Ribes sanguineum B #1, #5 4’<br />
baldhip rose Rosa gymnocarpa B D27, B&B 4’<br />
common snowberry Symphoricarpos albus B D27, D40 4’<br />
trailing snowberry Symphoricarpos mollis B D27, D40 4'<br />
western red cedar Thuja plicata B #1, B&B 15'<br />
Page 10<br />
Historic Columbia River Highway State Trail, Segments A-C Final <strong>Revegetation</strong> Plan<br />
<strong>Roadside</strong> <strong>Revegetation</strong>: An Integrated Approach to Establishing Native Plants and Pollinator Habitat<br />
171
REVEGETATION PLAN EXAMPLE<br />
REVEGETATION PLAN<br />
TABLE 1B. PLANTS TO BE USED IN THE WYETH TRAILHEAD PARKING LOT, INCLUDING THE DRAINAGE BASIN. ‘XX’<br />
DENOTES SEEDING RATHER THAN TRANSPLANTING TO BE UTILIZED. STOCK TYPE DEFINITIONS ARE AS FOLLOW: ‘S’<br />
SEED; ‘RL10’ 10 CUBIC INCH CONTAINER VOLUME; ‘D27’ 27 CUBIC INCH CONTAINER VOLUME; ‘D40’ 40 CUBIC<br />
INCH CONTAINER VOLUME; ‘#1’ ONE GALLON CONTAINER; ‘#5’ FIVE GALLON CONTAINER; ‘B&B’ BALLED AND<br />
BURLAPPED.<br />
Common Botanical Zone Stock Type Spacing<br />
(on center)<br />
common yarrow Achillea millefolium var. A S XX<br />
occidentalis<br />
narrow-leaf milkweed Asclepias fascicularis A S, RL10 4"<br />
showy milkweed Asclepias speciosa A S, RL10 4"<br />
creeping Oregon grape Mahonia repens A D27, D40 4'<br />
western sword fern Polystichum munitum A Short 4, #1 4'<br />
fringecups Tellima grandiflora A RL10 4”<br />
grand fir Abies grandis B #1, B&B 15’<br />
vine maple Acer circinatum B #1, #5 8’<br />
western serviceberry Amelanchier alnifolia B #1, #5 8’<br />
redosier dogwood Cornus sericea spp. sericea B D27, D40 8’<br />
Oregon ash Fraxinus latifolia B #1, #5 15’<br />
oceanspray Holodiscus discolor B D40 8’<br />
Oregon grape Mahonia aquifolium B D27, D40 4’<br />
osoberry Oemleria cerasiformis B #1, #5 8’<br />
ninebark Physocarpus capitatus B #1, #5 8’<br />
Douglas fir Pseudotsuga menziesii B D-27, B&B 15’<br />
red flowering currant Ribes sanguineum B #1, #5 4’<br />
thimbleberry Rubus parviflorus B D27, D40 4’<br />
elderberry Sambucus nigra B D27 8’<br />
common snowberry Symphoricarpos albus B D27, D40 4’<br />
trailing snowberry Symphoricarpos mollis B D27, D40 4'<br />
western red cedar Thuja plicata B #1, B&B 15'<br />
Page 11<br />
Historic Columbia River Highway State Trail, Segments A-C Final <strong>Revegetation</strong> Plan<br />
<strong>Roadside</strong> <strong>Revegetation</strong>: An Integrated Approach to Establishing Native Plants and Pollinator Habitat<br />
172
REVEGETATION PLAN EXAMPLE<br />
REVEGETATION PLAN<br />
Wyeth Campground Entrance and Gorton Creek Bridge<br />
The trail will cross the existing entrance to the Wyeth Campground and continue toward the<br />
east over the newly constructed Gorton Creek Bridge. WFLHD will install a water filling station<br />
near the Wyeth Campground entrance, adjacent to the grassy campground overflow area.<br />
They will also install a split-railed fence, positioned about halfway between the edge of the<br />
planting area and the edge of the trail along the length of the overflow area. At the request of<br />
the USFS (Columbia River Gorge National Scenic Area), RST will treat the planting area<br />
between the grassy overflow area and the trail with a mix of low growing shrubs, forbs, and<br />
clumping grasses. These will be planted sparsely and randomly in order to assimilate the<br />
surrounding environment, yet densely enough to provide visual and physical separation<br />
between the overflow area and the trail.<br />
RST will install riparian plantings in disturbed ground at and near the new Gorton Creek<br />
Bridge. In an effort to maintain adequate water flow yet prevent backup, WFLHD has<br />
determined no live staking will occur in the rip-rapped areas. All other construction related<br />
areas near the creek will be planted. Table 2 below depicts the suite of species that is available<br />
for use in these areas.<br />
Page 12<br />
Historic Columbia River Highway State Trail, Segments A-C Final <strong>Revegetation</strong> Plan<br />
<strong>Roadside</strong> <strong>Revegetation</strong>: An Integrated Approach to Establishing Native Plants and Pollinator Habitat<br />
173
REVEGETATION PLAN EXAMPLE<br />
REVEGETATION PLAN<br />
TABLE 2. THE SUITE OF SPECIES AVAILABLE FOR PLANTING AT THE WYETH CAMPGROUND AND<br />
GORTON CREEK. STOCK TYPE DEFINITIONS ARE AS FOLLOW: ‘S’ SEED; ‘RL10’ 10 CUBIC INCH CONTAINER<br />
VOLUME; ‘D27’ 27 CUBIC INCH CONTAINER VOLUME; ‘D40’ 40 CUBIC INCH CONTAINER VOLUME; ‘#1’ ONE<br />
GALLON CONTAINER; ‘#5’ FIVE GALLON CONTAINER; ‘B&B’ BALLED AND BURLAPPED.<br />
Common Botanical Zone Stock Type Spacing<br />
(on center)<br />
common yarrow Achillea millefolium var. A S XX<br />
occidentalis<br />
pearly everlasting Anaphalis margaritacea A S XX<br />
narrow-leaf milkweed Asclepias fascicularis A S, RL10 4"<br />
showy milkweed Asclepias speciosa A S, RL10 4"<br />
mountain brome Bromus carinatus A S XX<br />
Howell's reedgrass Calamagrostis howellii A S XX<br />
blue wildrye Elymus glaucus ssp. glaucus A S XX<br />
lupine Lupinus latifolius A S 4"<br />
creeping Oregon grape Mahonia repens A D27, D40 4'<br />
Sandberg’s bluegrass Poa secunda A S XX<br />
licorice fern Polypodium glycyrrhiza A Short 4 2'<br />
western sword fern Polystichum munitum A Short 4, #1 4'<br />
goldenrod Solidago canadensis A S XX<br />
fringecups Tellima grandiflora A RL10 4"<br />
vine maple Acer circinatum B #1, #5 8'<br />
western serviceberry Amelanchier alnifolia B #1, #5 8'<br />
redosier dogwood Cornus sericea spp. sericea B D27, D40 8'<br />
Oregon ash Fraxinus latifolia B #1, #5 15'<br />
oceanspray Holodiscus discolor B D40 8'<br />
Oregon grape Mahonia aquifolium B D27, D40 4'<br />
osoberry Oemleria cerasiformis B #1, #5 8'<br />
Douglas fir Pseudotsuga menziesii B D27, B&B 15'<br />
thimbleberry Rubus parviflorus B D27, D40 4'<br />
elderberry Sambucus nigra B D27 8'<br />
common snowberry Symphoricarpos albus B D27, D40 4'<br />
trailing snowberry Symphoricarpos mollis B D27, D40 4'<br />
Page 13<br />
Historic Columbia River Highway State Trail, Segments A-C Final <strong>Revegetation</strong> Plan<br />
<strong>Roadside</strong> <strong>Revegetation</strong>: An Integrated Approach to Establishing Native Plants and Pollinator Habitat<br />
174
REVEGETATION PLAN EXAMPLE<br />
REVEGETATION PLAN<br />
Mitigation Site #2<br />
The open area of approximately five acres, less than half a mile east of the Wyeth Trailhead<br />
and parking lot, is designated as a mitigation site. Restoration of this area will not only serve<br />
as mitigation for impacts incurred as a result of the project, but will also address Section 3 of<br />
the 2014 Presidential Memorandum “Creating a Federal Strategy to Promote the Health of<br />
Honey Bees and Other Pollinators” which provides directive to increase and improve<br />
pollinator habitat. Plant species that provide feeding, nesting, resting, and rearing (e.g., host<br />
plant) benefits to pollinating insects will be utilized to support and encourage plant-pollinator<br />
interactions. To this end, attention will be paid not only to nectar producing plants but also to<br />
plant architecture, the creation of micro-habitats and climates through the use of large and<br />
small woody material, depressions to retain moisture, areas of vegetative refuge, patches of<br />
bare ground (necessary for some ground nesting pollinator species), as well as other<br />
pollinator sustaining habitat characteristics.<br />
Given the location of this project, two pollinator species of conservation concern will be<br />
supported explicitly. First, the imperiled western bumble bee (Bombus occidentalis) will be<br />
supported in this important part of its remaining range by providing a large and diverse<br />
resource of nectaring plants. Second, and more specifically, we will create breeding habitat to<br />
support the imperiled Monarch butterfly (Danaus plexippus). Milkweed is the only known<br />
plant genus to serve as host plant for the Monarchs in the lower 48 states. We will incorporate<br />
two species of milkweed (Asclepias fascicularis and A. speciosa) in the plantings at Mitigation<br />
Site #2, upon which Monarchs may lay their eggs. Critically, the local area which includes<br />
other nearby locations in the Columbia River Gorge, is a known Monarch migration and<br />
breeding area with observations of Monarchs close to the project area.<br />
Mitigation Site #2 includes a pump house, a wellhead, and remnants of old buildings<br />
including steps, foundations, etc. These artifacts will remain in place, as is. There are also a<br />
number of old roads, the majority of which are gravel/crushed aggregate. WFLHD will remove<br />
the material from the old road prisms, spread shredded woody material over the entire<br />
mitigation site (4-6” deep), and incorporate the material to a depth of at least 18” by either<br />
ripping or using an excavator bucket.<br />
Aesthetic augmentation will include the creation of an earthen berm by WFLHD to screen the<br />
pump house, and RST will select and install appropriate vegetation to enhance this screening.<br />
Topographic sculpting will create terrain variation to mimic existing conditions found<br />
elsewhere on the project site. Plants will be installed in the pollinator meadow in random<br />
Page 14<br />
Historic Columbia River Highway State Trail, Segments A-C Final <strong>Revegetation</strong> Plan<br />
<strong>Roadside</strong> <strong>Revegetation</strong>: An Integrated Approach to Establishing Native Plants and Pollinator Habitat<br />
175
REVEGETATION PLAN EXAMPLE<br />
REVEGETATION PLAN<br />
groupings with some individual plants interspersed throughout, or broadcast seeded to create<br />
a natural appearing end meadow-woodland complex.<br />
Because of the very different light and canopy regimes at the edge of the existing forest that<br />
surrounds the meadow, a different suite of species will be utilized in this area than those in<br />
the open habitat. There is a desire among the partners involved with this project to leave the<br />
area of Mitigation Site #2 somewhat open and create a meadow-like habitat to support the<br />
previously discussed pollinator initiatives. As such, plant species installed at this site will<br />
include more forbs, low shrubs, and native grasses than trees. It is expected that without<br />
regular maintenance the natural seed rain from the surrounding trees will eventually convert<br />
the open area into a treed area over time. This will not be facilitated through active<br />
revegetation efforts by RST, however.<br />
The species suite to be utilized in pollinator meadow of Mitigation Site #2 will include some<br />
or all of the plants in Table 3a below. The mix used for the forested ecotone is reflected in<br />
Table 3b.<br />
Page 15<br />
Historic Columbia River Highway State Trail, Segments A-C Final <strong>Revegetation</strong> Plan<br />
<strong>Roadside</strong> <strong>Revegetation</strong>: An Integrated Approach to Establishing Native Plants and Pollinator Habitat<br />
176
REVEGETATION PLAN EXAMPLE<br />
REVEGETATION PLAN<br />
TABLE 3A. POTENTIAL PLANTS TO BE USED IN REVEGETATION EFFORTS TO ENHANCE POLLINATOR-PLANT<br />
INTERACTIONS AT THE OPEN HABITAT OF MITIGATION SITE #2. ‘XX’ DENOTES SEEDING RATHER THAN<br />
TRANSPLANTING TO BE UTILIZED. STOCK TYPE DEFINITIONS ARE AS FOLLOW: ‘S’ SEED; ‘RL10’ 10 CUBIC INCH<br />
CONTAINER VOLUME; ‘D27’ 27 CUBIC INCH CONTAINER VOLUME; ‘D40’ 40 CUBIC INCH CONTAINER VOLUME; ‘#1’<br />
ONE GALLON CONTAINER; ‘#5’ FIVE GALLON CONTAINER; ‘B&B’ BALLED AND BURLAPPED.<br />
Common Botanical Zone Stock Type Spacing<br />
(on center)<br />
common yarrow Achillea millefolium var. A S XX<br />
occidentalis<br />
pearly everlasting Anaphalis margaritacea A S XX<br />
narrow-leaf milkweed Asclepias fascicularis A S, RL10 4"<br />
showy milkweed Asclepias speciosa A S, RL10 4"<br />
Aster Aster spp. A S XX<br />
mountain brome Bromus carinatus A S XX<br />
Howell's reedgrass Calamagrostis howellii A S XX<br />
Pacific dogwood Cornus nuttallii B #1 15’<br />
blue wildrye Elymus glaucus ssp. glaucus A S XX<br />
smooth alumroot Heuchera glabra A S 4”<br />
Lupine Lupinus latifolius A S 4”<br />
creeping Oregon grape Mahonia repens A D27 4'<br />
Sandberg’s bluegrass Poa secunda A S XX<br />
self heal Prunella vulgaris A S XX<br />
checkermallow Sidalcea spp. A RL10 XX<br />
goldenrod Solidago canadensis A S XX<br />
fringecups Tellima grandiflora A RL10 4”<br />
western serviceberry Amelanchier alnifolia B #1, #5 8’<br />
Pacific dogwood Cornus nuttallii B #1 15’<br />
oceanspray Holodiscus discolor B D40 8’<br />
Oregon grape Mahonia aquifolium B D27, D40 4’<br />
Douglas fir Pseudotsuga menziesii B D27, B&B 15’<br />
red flowering currant Ribes sanguineum B #1, #5 4’<br />
baldhip rose Rosa gymnocarpa B D27, B&B 4’<br />
common snowberry Symphoricarpos albus B D27, D40 4’<br />
trailing snowberry Symphoricarpos mollis B D27, D40 4'<br />
western red cedar Thuja plicata B #1, B&B 15'<br />
Page 16<br />
Historic Columbia River Highway State Trail, Segments A-C Final <strong>Revegetation</strong> Plan<br />
<strong>Roadside</strong> <strong>Revegetation</strong>: An Integrated Approach to Establishing Native Plants and Pollinator Habitat<br />
177
REVEGETATION PLAN EXAMPLE<br />
REVEGETATION PLAN<br />
TABLE 3B. PLANTS TO BE UTILIZED AT THE ECOTONE BETWEEN THE EXISTING FORESTED AREA AND THE NEWLY<br />
CREATED POLLINATOR MEADOW AT MITIGATION SITE #2. STOCK TYPE DEFINITIONS ARE AS FOLLOW: ‘S’ SEED;<br />
‘RL10’ 10 CUBIC INCH CONTAINER VOLUME; ‘D27’ 27 CUBIC INCH CONTAINER VOLUME; ‘D40’ 40 CUBIC INCH<br />
CONTAINER VOLUME; ‘#1’ ONE GALLON CONTAINER; ‘#5’ FIVE GALLON CONTAINER; ‘B&B’ BALLED AND<br />
BURLAPPED.<br />
Common Botanical Zone Stock Type Spacing<br />
(on center)<br />
creeping Oregon grape Mahonia repens A D27, D40 4'<br />
licorice fern Polypodium glycyrrhiza A Short 4 2'<br />
western sword fern Polystichum munitum A Short 4, #1 4'<br />
grand fir Abies grandis B #1, B&B 15'<br />
vine maple Acer circinatum B #1, #5 8'<br />
western serviceberry Amelanchier alnifolia B #1, #5 8'<br />
Pacific dogwood Cornus nuttallii B #1 15'<br />
Oregon ash Fraxinus latifolia B #1, #5 15'<br />
Oregon grape Mahonia aquifolium B D27, D40 4'<br />
osoberry Oemleria cerasiformis B #1, #5 8'<br />
western white pine Pinus monticola B D27 15'<br />
Douglas fir Pseudotsuga menziesii B D27, B&B 15'<br />
red flowering currant Ribes sanguineum B #1, #5 4'<br />
thimbleberry Rubus parviflorus B D27, D40 4'<br />
elderberry Sambucus nigra B D27 8'<br />
common snowberry Symphoricarpos albus B D27, D40 4'<br />
Stepped, Plantable MSE Wall<br />
There is a stepped, plantable mechanically stabilized earth (MSE) wall to be constructed from<br />
approximately ST 44+05 to ST 63+88. The height of this wall will vary from about 10-30 feet<br />
tall and it is planned to be 1,983 linear feet long. WFLHD will place topsoil along the entire<br />
base of the wall, burying the first two to three steps and creating a 3:1 slope (H:V). RST will<br />
place weed-free topsoil mixed with compost (1:1) over the remaining exposed wall to provide<br />
a continuous slope and effectively eliminating the appearance of steps. Shrubs and small trees<br />
will be randomly planted at the toe of the slope to provide vegetative screening, as well as<br />
sparsely planted along the newly created slope. RST will hydroseed the entire area with<br />
hydromulch, grass and forb seed, and tackifier. Irrigation will be an option item should the<br />
RST specialist determine it necessary for the survival of the plants. See Table 4 for the suite of<br />
potential restoration plants to be used on the plantable MSE wall.<br />
Page 17<br />
Historic Columbia River Highway State Trail, Segments A-C Final <strong>Revegetation</strong> Plan<br />
<strong>Roadside</strong> <strong>Revegetation</strong>: An Integrated Approach to Establishing Native Plants and Pollinator Habitat<br />
178
REVEGETATION PLAN EXAMPLE<br />
REVEGETATION PLAN<br />
TABLE 4. PLANT SUITE THAT MIGHT BE UTILIZED FOR VEGETATING THE STEPPED, PLANTABLE MSE<br />
WALL. ‘XX’ DENOTES SEEDING RATHER THAN TRANSPLANTING TO BE UTILIZED. STOCK TYPE DEFINITIONS ARE AS<br />
FOLLOW: ‘S’ SEED; ‘RL10’ 10 CUBIC INCH CONTAINER VOLUME; ‘D27’ 27 CUBIC INCH CONTAINER VOLUME; ‘D40’<br />
40 CUBIC INCH CONTAINER VOLUME; ‘#1’ ONE GALLON CONTAINER; ‘#5’ FIVE GALLON CONTAINER; ‘B&B’ BALLED<br />
AND BURLAPPED.<br />
Common Botanical Zone Stock Type Spacing<br />
(on center)<br />
common yarrow Achillea millefolium var. A S XX<br />
occidentalis<br />
pearly everlasting Anaphalis margaritacea A S XX<br />
mountain brome Bromus carinatus A S XX<br />
blue wildrye Elymus glaucus ssp. glaucus A S XX<br />
smooth alumroot Heuchera glabra A RL10 4"<br />
creeping Oregon grape Mahonia repens A D27, D40 4'<br />
Sandberg’s bluegrass Poa secunda A S XX<br />
licorice fern Polypodium glycyrrhiza A Short 4 2'<br />
western sword fern Polystichum munitum A Short 4, #1 4'<br />
fringecups Tellima grandiflora A RL10 4"<br />
western serviceberry Amelanchier alnifolia B #1, #5 8'<br />
Oregon grape Mahonia aquifolium B D27, D40 4'<br />
osoberry Oemleria cerasiformis B #1, #5 8'<br />
Douglas fir Pseudotsuga menziesii B D27, B&B 15'<br />
red flowering currant Ribes sanguineum B #1, #5 4'<br />
thimbleberry Rubus parviflorus B D27, D40 4'<br />
common snowberry Symphoricarpos albus B D27, D40 4'<br />
trailing snowberry Symphoricarpos mollis B D27, D40 4'<br />
Summit Creek Viaduct<br />
The extensive pedestrian viaduct planned near Summit Creek will present specific challenges<br />
to revegetation efforts. The viaduct will cover approximately 0.16 acres and will prevent<br />
precipitation and direct sunlight from reaching the surface of the ground below the viaduct<br />
deck. Currently there are micro-habitats that have a variety of vegetation growing at the toe<br />
slope of rock walls. Soil accumulates at the junction of the rock wall and ground, and<br />
precipitation drips down the face of the rock; both contribute to the ability to support plant<br />
life. <strong>Revegetation</strong> efforts will take advantage of similar micro-habitats under the viaduct,<br />
utilize shade tolerant plant species, and incorporate organic matter into the soil to aid in<br />
Page 18<br />
Historic Columbia River Highway State Trail, Segments A-C Final <strong>Revegetation</strong> Plan<br />
<strong>Roadside</strong> <strong>Revegetation</strong>: An Integrated Approach to Establishing Native Plants and Pollinator Habitat<br />
179
REVEGETATION PLAN EXAMPLE<br />
REVEGETATION PLAN<br />
moisture retention. The primary contractor will place topsoil conserved from the project at the<br />
viaduct footings to bring the soil up to existing native soil depths and provide planting<br />
medium. Please refer to Table 5 for candidate species for planting near the Summit Creek<br />
Viaduct.<br />
TABLE 5. PLANTS POTENTIALLY TO BE USED IN REVEGETATION EFFORTS AT THE SUMMIT CREEK VIADUCT. ‘XX’<br />
DENOTES SEEDING RATHER THAN TRANSPLANTING TO BE UTILIZED. STOCK TYPE DEFINITIONS ARE AS FOLLOW: ‘S’<br />
SEED; ‘RL10’ 10 CUBIC INCH CONTAINER VOLUME; ‘D27’ 27 CUBIC INCH CONTAINER VOLUME; ‘D40’ 40 CUBIC<br />
INCH CONTAINER VOLUME; ‘#1’ ONE GALLON CONTAINER; ‘#5’ FIVE GALLON CONTAINER; ‘B&B’ BALLED AND<br />
BURLAPPED.<br />
Common Botanical Zone Stock Type Spacing<br />
(on center)<br />
common yarrow Achillea millefolium var. A S XX<br />
occidentalis<br />
pearly everlasting Anaphalis margaritacea A S XX<br />
smooth alumroot Heuchera glabra A RL10 4"<br />
creeping Oregon grape Mahonia repens A D27, D40 4'<br />
licorice fern Polypodium glycyrrhiza A Short 4 2'<br />
western sword fern Polystichum munitum A Short 4, #1 4'<br />
fringecups Tellima grandiflora A RL10 4"<br />
western serviceberry Amelanchier alnifolia B #1, #5 8'<br />
redosier dogwood Cornus sericea spp. sericea B D27, D40 8'<br />
oceanspray Holodiscus discolor B D40 8'<br />
Oregon grape Mahonia aquifolium B D27, D40 4'<br />
osoberry Oemleria cerasiformis B #1, #5 8'<br />
baldhip rose Rosa gymnocarpa B D27, D40 4'<br />
thimbleberry Rubus parviflorus B D27, D40 4'<br />
common snowberry Symphoricarpos albus B D27, D40 4'<br />
HCRHST Embankments (Cuts and Fills) and Planned Idle Spots<br />
In coordination with WFLHD, RST will provide the primary contractor with a native grass and<br />
forb seed mix to use on exposed trail embankments during and post construction as a part of<br />
erosion control measures. RST will install native plants (Table 6) throughout the construction<br />
limits once construction activity ceases. Due to the effort to create a natural appearing setting,<br />
native shrubs and forbs will be planted in groupings, spread at varying intervals, and in a mix<br />
of species. Some areas, such as near Shell Rock Mountain and the new idle spots might not<br />
require any plant installation other than seed for erosion control efforts. The planting plans<br />
Page 19<br />
Historic Columbia River Highway State Trail, Segments A-C Final <strong>Revegetation</strong> Plan<br />
<strong>Roadside</strong> <strong>Revegetation</strong>: An Integrated Approach to Establishing Native Plants and Pollinator Habitat<br />
180
REVEGETATION PLAN EXAMPLE<br />
REVEGETATION PLAN<br />
from Walker Macy will be referenced to maintain line-of-site and safety, utilizing shorter<br />
plants directly adjacent to the trail and creating a natural appearing visual experience.<br />
Slopes of greater than average length or slope (1:2) will receive a mulch application of weedfree<br />
compost or shredded woody material, applied to a depth of 1-2 inches, and a final grass<br />
seed application. The addition of mulch and final seeding will assist to preserve slope integrity,<br />
decrease weed recruitment and establishment, and facilitate moisture retention. Practices that<br />
increase soil compaction are best avoided and it is ideal that slopes be left in a roughened<br />
condition (i.e., use a toothed rock bucket rather than smoothing bucket, avoid back<br />
blading, etc.).<br />
TABLE 6. POTENTIAL PLANT SPECIES TO BE UTILIZED ON CUT/FILL SLOPES AND PLANNED IDLE SPOTS OF HISTORIC<br />
COLUMBIA RIVER HIGHWAY STATE TRAIL. ‘XX’ DENOTES SEEDING RATHER THAN TRANSPLANTING TO BE UTILIZED.<br />
STOCK TYPE DEFINITIONS ARE AS FOLLOW: ‘S’ SEED; ‘RL10’ 10 CUBIC INCH CONTAINER VOLUME; ‘D27’ 27 CUBIC<br />
INCH CONTAINER VOLUME; ‘D40’ 40 CUBIC INCH CONTAINER VOLUME; ‘#1’ ONE GALLON CONTAINER; ‘#5’ FIVE<br />
GALLON CONTAINER; ‘B&B’ BALLED AND BURLAPPED.<br />
Common Botanical Zone Stock Type Spacing<br />
(on center)<br />
common yarrow Achillea millefolium var. A S XX<br />
occidentalis<br />
pearly everlasting Anaphalis margaritacea A S XX<br />
mountain brome Bromus carinatus A S XX<br />
Howell's reedgrass Calamagrostis howellii A S XX<br />
blue wildrye Elymus glaucus ssp. glaucus A S XX<br />
lupine Lupinus latifolius A S 4"<br />
creeping Oregon grape Mahonia repens A D27, D40 4'<br />
Sandberg’s bluegrass Poa secunda A S XX<br />
licorice fern Polypodium glycyrrhiza A Short 4 2'<br />
western sword fern Polystichum munitum A Short 4, #1 4'<br />
self heal Prunella vulgaris A S XX<br />
fringecups Tellima grandiflora A RL10 4"<br />
Oregon grape Mahonia aquifolium B D27, D40 4'<br />
baldhip rose Rosa gymnocarpa B D27, D40 4'<br />
thimbleberry Rubus parviflorus B D27, D40 4'<br />
common snowberry Symphoricarpos albus B D27, D40 4'<br />
trailing snowberry Symphoricarpos mollis B D27, D40 4'<br />
Page 20<br />
Historic Columbia River Highway State Trail, Segments A-C Final <strong>Revegetation</strong> Plan<br />
<strong>Roadside</strong> <strong>Revegetation</strong>: An Integrated Approach to Establishing Native Plants and Pollinator Habitat<br />
181
REVEGETATION PLAN EXAMPLE<br />
REVEGETATION PLAN<br />
Staging Area(s)<br />
The potential suite of plant species for restoration of staging areas is diverse. The<br />
staging area(s) can encompass a variety of environments with differing light regimes,<br />
infiltration rates, and habitats. Other than weed control, most revegetation efforts will be<br />
delayed until after staging equipment and material are removed by WFLHD. Table 7 shows<br />
the species that may be used in revegetation efforts of staging areas.<br />
TABLE 7. PROPOSED REVEGETATION SPECIES FOR STAGING AREA(S) UTILIZED. ‘XX’ DENOTES SEEDING RATHER<br />
THAN TRANSPLANTING TO BE UTILIZED. STOCK TYPE DEFINITIONS ARE AS FOLLOW: ‘S’ SEED; ‘RL10’ 10 CUBIC INCH<br />
CONTAINER VOLUME; ‘D27’ 27 CUBIC INCH CONTAINER VOLUME; ‘D40’ 40 CUBIC INCH CONTAINER VOLUME; ‘#1’<br />
ONE GALLON CONTAINER; ‘#5’ FIVE GALLON CONTAINER; ‘B&B’ BALLED AND BURLAPPED.<br />
Common Botanical Zone Stock Type Spacing (on<br />
center)<br />
common yarrow Achillea millefolium var. A S XX<br />
occidentalis<br />
pearly everlasting Anaphalis margaritacea A S XX<br />
mountain brome Bromus carinatus A S XX<br />
Howell's reedgrass Calamagrostis howellii A S XX<br />
blue wildrye Elymus glaucus ssp. glaucus A S XX<br />
lupine Lupinus latifolius A S 4"<br />
creeping Oregon grape Mahonia repens A D27, D40 4'<br />
Sandberg’s bluegrass Poa secunda A S XX<br />
licorice fern Polypodium glycyrrhiza A Short 4 2'<br />
western sword fern Polystichum munitum A Short 4, #1 4'<br />
goldenrod Solidago canadensis A S XX<br />
fringecups Tellima grandiflora A RL10 4"<br />
grand fir Abies grandis B #1, B&B 15'<br />
vine maple Acer circinatum B #1, #5 8'<br />
western serviceberry Amelanchier alnifolia B #1, #5 8'<br />
Pacific dogwood Cornus nuttallii B #1 15'<br />
redosier dogwood Cornus sericea spp. sericea B D27, D40 8'<br />
Oregon ash Fraxinus latifolia B #1, #5 15'<br />
oceanspray Holodiscus discolor B D40 8'<br />
Oregon grape Mahonia aquifolium B D27, D40 4'<br />
osoberry Oemleria cerasiformis B #1, #5 8'<br />
Douglas fir Pseudotsuga menziesii B D27, B&B 15'<br />
red flowering currant Ribes sanguineum B #1, #5 4'<br />
thimbleberry Rubus parviflorus B D27, D40 4'<br />
elderberry Sambucus nigra B D27 8'<br />
common snowberry Symphoricarpos albus B D27, D40 4'<br />
trailing snowberry Symphoricarpos mollis B D27, D40 4'<br />
western red cedar Thuja plicata B #1, B&B 15'<br />
Page 21<br />
Historic Columbia River Highway State Trail, Segments A-C Final <strong>Revegetation</strong> Plan<br />
<strong>Roadside</strong> <strong>Revegetation</strong>: An Integrated Approach to Establishing Native Plants and Pollinator Habitat<br />
182
REVEGETATION PLAN EXAMPLE<br />
NON-NATIVE PLANT CONTROL<br />
Non-Native Plant Control<br />
Weed Control Plan<br />
All Oregon Noxious Class ‘A’ and ‘B’ weeds will be treated within the construction limits<br />
(Appendix Three). The one exception to this is herb Robert (Geranium robertianum) which<br />
will not be targeted for treatment, as determined during site visits with WFLHD, ODOT,<br />
CH2M, CRGNSA, and RST. Of the targeted Class A and B species the following Class B<br />
species have been noted within Segments A-C: Canada thistle (Cirsium arvense), English<br />
ivy, Himalayan blackberry, Scotch broom, perennial peavine (Lathyrus latifolius), and St.<br />
Johnswort (Hypericum perforatum). Although not listed by the State, periwinkle (Vinca<br />
minor) will also be targeted for control, as will other species that appear to impede<br />
restoration efforts. Table 8 provides an estimated schedule of non-native plant treatment.<br />
Only approved herbicides and surfactants will be used and all aquatic setbacks adhered to.<br />
Personnel from partnering agencies including the Mt. Hood National Forest, Columbia<br />
River Gorge National Scenic Area, Oregon Parks and Recreation Department, and Oregon<br />
Department of Transportation will be consulted regarding permissible herbicides and<br />
surfactants.<br />
Himalayan blackberry<br />
Himalayan blackberry will be sprayed with glyphosate or triclopyr + surfactant from a<br />
backpack sprayer or an ATV. In the area of Mitigation Site #2 the plants will then mowed<br />
no sooner than 3 weeks after the first spray treatment, allowed to re-sprout, and<br />
chemically treated again. The area with the greatest concentration of Himalayan<br />
blackberry is Mitigation Site #2, but the plants do occur throughout the segments. RST will<br />
chemically treat these populations where they occur, but most likely will not utilize<br />
mowing.<br />
Scotch Broom<br />
Scotch broom populations are most robust at the Wyeth Trailhead/parking lot and at<br />
Mitigation Site #2. There are plants scattered throughout other areas of segments A-C, as<br />
well as along Wyeth Road near the proposed Wyeth Trailhead and parking lot. Treatments<br />
should include these plants that are in close proximity along Wyeth Road to prevent<br />
immediate recolonization of Wyeth parking lot. Plants less than three feet in length will<br />
receive herbicide treatment and left in place; those greater than three feet in length will be<br />
wrenched out, including as much root as is possible, and removed from the project site.<br />
Additional weeds<br />
In addition to the above, periwinkle has been observed scattered throughout segments A-<br />
C. Populations of these plants will be treated at the same time as the others previously<br />
discussed. Periwinkle will be sprayed with either glyphosate or triclopyr.<br />
Page 22<br />
Historic Columbia River Highway State Trail, Segments A-C Final <strong>Revegetation</strong> Plan<br />
<strong>Roadside</strong> <strong>Revegetation</strong>: An Integrated Approach to Establishing Native Plants and Pollinator Habitat<br />
183
REVEGETATION PLAN EXAMPLE<br />
MONITORING PLAN<br />
Monitoring Plan<br />
The agreed upon parameters to evaluate native plant revegetative success for this project<br />
are percent cover and plant stem density (Table 8). Because of this, monitoring will be<br />
conducted at 1/100 th acre plots distributed randomly throughout the project area. In an<br />
effort to ascertain unbiased data the plots will not be fixed and will occur in different<br />
locations from year to year. A minimum of ten (10) plots will be analyzed within the<br />
boundaries of Mitigation Site #2 and ten (10) additional plots will be randomly distributed<br />
throughout the project area. Native species cover and stem density will be recorded within<br />
each plot, as well as other variables.<br />
Noxious weed success criteria is total percent cover. Prior to construction RST will conduct<br />
ocular estimation of non-native plant cover within Mitigation Site #2 and repeat annually.<br />
Percent cover of each non-native species will be noted within each plot described above;<br />
at Mitigation Site #2 as well as throughout the project area. Refer to Table 9 for an<br />
estimated monitoring timeline and Table 10 for overall costs associated with this project.<br />
In addition to native and non-native plants, monitoring protocol for pollinating insects will<br />
be conducted at the newly created pollinator meadow of Mitigation Site #2. Of particular<br />
interest are native bees and Monarch butterflies. The streamlined bee monitoring<br />
procedure developed by the Xerces Society will be utilized twice per year after plant<br />
establishment. During the surveys all pollinators observed will be noted including wasps,<br />
flies, honey bees, native bees, Monarch butterflies, other butterflies, moths, ants, etc.<br />
Page 23<br />
Historic Columbia River Highway State Trail, Segments A-C Final <strong>Revegetation</strong> Plan<br />
<strong>Roadside</strong> <strong>Revegetation</strong>: An Integrated Approach to Establishing Native Plants and Pollinator Habitat<br />
184
REVEGETATION PLAN EXAMPLE<br />
SUCCESS CRITERIA<br />
Success Criteria<br />
TABLE 8. CRITERIA UPON WHICH NATIVE AND NON-NATIVE PLANT SUCCESS WILL BE MEASURED.<br />
Item Benchmark Timeframe Notes<br />
Noxious weed control ≤ 20% cover By year 3 Oregon Noxious Weed List A and B<br />
Noxious weed control ≤ 10% cover By year 5 Oregon Noxious Weed List A and B<br />
Planting density<br />
≥ 400 woody stems per By year 5<br />
acre<br />
Native plant percent cover ≥ 20% cover By year 1<br />
Native plant percent cover ≥ 40% cover By year 3<br />
Native plant percent cover ≥ 80% cover By year 5<br />
Native plant diversity ≥ 5 woody species<br />
comprise ≥ 5% total cover<br />
By year 5<br />
If performance standards<br />
not met<br />
Use of adaptive<br />
management practices<br />
As early as detected<br />
May include replanting, reseeding,<br />
noxious weed removal,<br />
improvement of soil quality,<br />
irrigation, mulch.<br />
Page 24<br />
Historic Columbia River Highway State Trail, Segments A-C Final <strong>Revegetation</strong> Plan<br />
<strong>Roadside</strong> <strong>Revegetation</strong>: An Integrated Approach to Establishing Native Plants and Pollinator Habitat<br />
185
REVEGETATION PLAN EXAMPLE<br />
APPROXIMATE TIMELINE & BUDGET<br />
Approximate Timeline & Budget<br />
TABLE 9. THE FOLLOWING TABLE DEPICTS THE ESTIMATED TIMELINE OF REVEGETATION EFFORTS PLANNED BY RST WITHIN SEGMENTS A-C OF THE HISTORIC COLUMBIA RIVER HIGHWAY STATE<br />
TRAIL.<br />
Task 2016 2017 2018 2019 2020 2021<br />
Spring<br />
Summer<br />
Fall<br />
Winter<br />
Spring<br />
Summer<br />
Fall<br />
Winter<br />
Spring<br />
Summer<br />
Fall<br />
Winter<br />
Spring<br />
Summer<br />
Fall<br />
Winter<br />
Spring<br />
Summer<br />
Fall<br />
Winter<br />
Spring<br />
Summer<br />
Fall<br />
Winter<br />
Weed treatment<br />
Collect plant propagules<br />
Grow-out plant<br />
propagules<br />
Install plants (as ready)<br />
Monitor non-native plants<br />
Monitor native plants<br />
Monitor pollinator species<br />
Page 25 Historic Columbia River Highway State Trail, Segments A-C Final <strong>Revegetation</strong> Plan<br />
<strong>Roadside</strong> <strong>Revegetation</strong>: An Integrated Approach to Establishing Native Plants and Pollinator Habitat<br />
186
REVEGETATION PLAN EXAMPLE<br />
APPROXIMATE TIMELINE & BUDGET<br />
TABLE 10. ESTIMATED BUDGET FOR REVEGETATION EFFORTS AND PLANT MATERIAL ON SEGMENTS A-C OF HCRHST.<br />
Estimated <strong>Revegetation</strong> Costs for HCRHST Segments A-C<br />
Project<br />
Phase<br />
Planning<br />
Cost Category<br />
Pre-field project orientation and planning<br />
Site visits<br />
Days Units Rate Cost<br />
2016<br />
Overhead<br />
8%<br />
2016<br />
Pass<br />
Through<br />
1% Total Cost<br />
4 $450.00 $1,800.00 $144.00 $1,944.00<br />
40 $450.00 $18,000.00 $1,440.00 $19,440.00<br />
Prepare draft revegetation plan(s) 10 $450.00 $4,500.00 $360.00 $4,860.00<br />
Contracting - (ID/IQ) 10 $450.00 $4,500.00 $360.00 $4,860.00<br />
Travel, Perdiem (CONUS: $83/$46) 10 $129.00 $1,290.00 $103.20 $1,393.20<br />
Vehicle ($15 day/.56 mile) based on<br />
2,000 miles<br />
40 $43.00 $1,720.00 $137.60 $1,857.60<br />
Planning Days 64<br />
Plant material costs (see plant material<br />
spreadsheet)<br />
$88,220.25<br />
Planning Perdiem & Vehicle $3,250.80<br />
Total Planning Salary $31,104.00<br />
Total Planning Costs Including Plant<br />
Materials<br />
$122,575.05<br />
Implementation<br />
Finalize revegetation plan 5 $450.00 $2,250.00 $180.00 $2,430.00<br />
Field contract (ID/IQ) administration 35 $450.00 $15,750.00 $1,260.00 $17,010.00<br />
Scheduled meetings - in person, phone 5 $450.00 $2,250.00 $180.00 $2,430.00<br />
Transport, staging, and storage of plant<br />
materials (USFS)<br />
$3,000.00 $240.00 $3,240.00<br />
Restoration Activity Costs - *<br />
Contracted item<br />
* Hydroseeding (acre) 5 $3,000.00 $15,000.00 $150.00 $15,150.00<br />
* Hand planting ferns (TPOT9 "short-one") 1,150 $9.00 $10,350.00 $103.50 $10,453.50<br />
* Hand planting forbs (RL-10) 1,225 $2.25 $2,756.25 $27.56 $2,783.81<br />
* Hand planting trees/shrubs (D-27) 4,010 $5.00 $20,050.00 $200.50 $20,250.50<br />
*<br />
*<br />
*<br />
*<br />
Compost/Mulch - purchase and delivery<br />
(y³)<br />
350 $45.00 $15,750.00 $157.50 $15,907.50<br />
Compost/Mulch installation - trail fills,<br />
cuts, other (acre)<br />
4 $2,000.00 $8,000.00 $80.00 $8,080.00<br />
Final grading and decompaction<br />
mitigation site (acre)<br />
3 $1,500.00 $3,750.00 $37.50 $3,787.50<br />
Noxious weed control and monitoring - 5<br />
yrs (acre)<br />
10 $6,000.00 $60,000.00 $600.00 $60,600.00<br />
Misc. materials and supplies $1,000.00 $80.00 $1,080.00<br />
Travel, Perdiem (CONUS: $83/$46) 10 $129.00 $1,290.00 $103.20 $1,393.20<br />
Vehicle ($15 day/.56 mile) based on<br />
1,500 miles<br />
30 $43.00 $1,290.00 $103.20 $1,393.20<br />
Implementation Days 45<br />
Page 26<br />
Historic Columbia River Highway State Trail, Segments A-C Final <strong>Revegetation</strong> Plan<br />
<strong>Roadside</strong> <strong>Revegetation</strong>: An Integrated Approach to Establishing Native Plants and Pollinator Habitat<br />
187
REVEGETATION PLAN EXAMPLE<br />
APPROXIMATE TIMELINE & BUDGET<br />
Implementation Salary $21,870.00<br />
Implementation Perdiem, Vehicle,<br />
Misc. & Transport of Plant Materials<br />
$7,106.40<br />
Total Contract Costs $137,012.81<br />
Total Implementation Costs $165,989.21<br />
Monitoring<br />
Total Costs<br />
Establishment phase (year one) 4<br />
$450.00<br />
$1,800.00 $144.00 $1,944.00<br />
Effectiveness phase (years two-five) 16<br />
$450.00<br />
$7,200.00 $576.00 $7,776.00<br />
Final report 1<br />
$450.00<br />
$450.00 $36.00 $486.00<br />
Misc. materials and supplies $1000.00 $0.00 $0.00<br />
Travel, Perdiem (CONUS: $83/$46) 10<br />
$129.00<br />
$1,290.00 $103.20 $1,393.20<br />
Vehicle ($15 day/.56 mile) based on 21<br />
$903.00 $72.24 $975.24<br />
1,500 miles<br />
$43.00<br />
Monitoring Days<br />
21<br />
Monitoring Salary $10,206.00<br />
Monitoring Perdiem & Vehicle $2,368.44<br />
Total Monitoring Costs $12,574.44<br />
Total FS overhead @ 8% $5,622.64<br />
Total pass-through (contracting) @ 1% $1,356.56<br />
Planning Total<br />
Implementation Total<br />
Monitoring Total<br />
Total Project <strong>Revegetation</strong> Costs<br />
(USFS)<br />
Construction Budget (WFLHD)<br />
Total <strong>Revegetation</strong> % of Construction<br />
#DIV/0!<br />
$117,675.05<br />
$165,989.21<br />
$12,574.44<br />
$303,217.91<br />
Page 27<br />
Historic Columbia River Highway State Trail, Segments A-C Final <strong>Revegetation</strong> Plan<br />
<strong>Roadside</strong> <strong>Revegetation</strong>: An Integrated Approach to Establishing Native Plants and Pollinator Habitat<br />
188
REVEGETATION PLAN EXAMPLE<br />
APPROXIMATE TIMELINE & BUDGET<br />
Plant Material Costs for HCRHST Segments A-C<br />
1. PLANT MATERIAL COLLECTION http://plants.usda.gov/java/<br />
1a. Seed Collection for Increase - Hand<br />
Forbs/Graminoids/Ferns<br />
Species Schedule Cost/lb. Total lbs. Notes Cost<br />
Achillea millifolium var. occidentalis (yarrow) In stock $0.00 $0.00<br />
Anaphalis margaritacea (pearly everlasting) collect fall 2015/16 $600.00 2 $1,200.00<br />
Asclepias speciosa (showy milkweed) In stock $0.00 $0.00<br />
Polypodium glycyrrhiza (licorice fern) (In<br />
collect fall 2015/16 $0.00 20-30 $100.00<br />
stock)<br />
fronds<br />
Bromus carinatus/marginatus (mtn./California collect fall 2015/2016 $600 2 $1,200<br />
brome)<br />
Calamogrostis howellii (Howell's reedgrass) collect fall 2015/16 $600 2 $1,200.00<br />
Dsechampsia elongata (slender hairgrass) In stock $0.00 $0.00<br />
Elymus glaucus (bue wildrye) In stock $0.00 $0.00<br />
Tellima grandiflora (fringe cups) collect fall 2015/16 $600.00 1 $600.00<br />
Lupinus spp.<br />
collect fall 2015/16 (In $300.00 5 $1,500.00<br />
Stock?)<br />
Poa secunda (Sandberg's blugrass) collect fall 2015/16 $550.00 3 $1,650.00<br />
Polysticum munitum (western sword fern) collect fall 2015/16 $0.00 20-30 $100.00<br />
fronds<br />
Sidalcea oregana (checkermallow) collect fall 2015/16 $400.00 2 $800.00<br />
Tolmiea menziesii (piggyback plant) collect fall 2015/16 $600.00 1 $600.00<br />
$7,750.00<br />
Shrubs/Hardwoods/Conifers<br />
Species Schedule Cost/lb. Total lbs. Notes Cost<br />
Acer circinatum (vine maple) collect fall 2015/16 $200 2 $400.00<br />
Amelanchier alnifolia (western serviceberry) collect fall 2015/16 $200 3 $600.00<br />
Cornus nuttallii (Pacific dogwood) collect fall 2015/16 $300 2 $600.00<br />
Cornus sericea spp. sericea (dogwood) collect fall 2015/16 $200 2 $400.00<br />
Corylus cornuta (hazelnut) collect fall 2015/16 $300 3 $900.00<br />
Holodiscus discolor (oceanspray) collect fall 2015/16 $300 2 $600.00<br />
Mahonia aquifolium (tall Oregongrape) collect fall 2015/16 $200 2 $400.00<br />
Mahonia nervosa (dwarf Oregon grape) collect fall 2015/16 $200 2 $400.00<br />
Oemleria cerasiformis (osoberry) collect fall 2015/16 $300 2 $600.00<br />
Rosa gymnocarpa (dwarf rose) collect fall 2015/16 $200 2 $400.00<br />
Rubus parviflorus (thimbleberry) collect fall 2015/16 $200 2 $400.00<br />
Symphoricarpos albus (common snowberry) collect fall 2015/16 $200 2 $400.00<br />
Symphoricarpos mollis (creeping snowberry) collect fall 2015/16 $300 2 $600.00<br />
$6,700.00<br />
1b. Cuttings<br />
Stem Cuttings - Shrubs/Hardwoods<br />
Species Schedule Cost/Cutti Total No. Notes Cost<br />
ng<br />
Cornus sericea spp. sericea (dogwood)<br />
collect fall 2016/17 (In $1.00 250 $250.00<br />
stock)<br />
Holodiscus discolor (oceanspray) collect fall 2016/17 $1.00 165 $165.00<br />
Mahonia aquifolium (tall Oregon grape) collect fall 2016/17 $1.00 550 $550.00<br />
Mahonia repens (crp. Oregon grape)<br />
collect fall 2016/17 (In<br />
stock)<br />
$1.00 475 $475.00<br />
Page 28<br />
Historic Columbia River Highway State Trail, Segments A-C Final <strong>Revegetation</strong> Plan<br />
<strong>Roadside</strong> <strong>Revegetation</strong>: An Integrated Approach to Establishing Native Plants and Pollinator Habitat<br />
189
REVEGETATION PLAN EXAMPLE<br />
APPROXIMATE TIMELINE & BUDGET<br />
Populus balsamifera ssp. trichocarpa<br />
collect fall 2016/17 (In $1.00 25 $25.00<br />
(cottonwood)<br />
stock)<br />
Rubus parviflorus (thimbleberry) collect fall 2016/17 $1.00 225 $225.00<br />
Symphoricarpos albus (common snowberry) collect fall 2016/17 (In $1.00 520 $520.00<br />
stock)<br />
Symphoricarpos mollis (creeping snowberry) collect fall 2016/17 $1.00 650 $650.00<br />
$2,860.00<br />
Root/Rhizome Cuttings - Graminoids/Ferns/Shrubs/Hardwoods<br />
Species Schedule Cost/Cutti Total No. Notes Cost<br />
ng<br />
Polystichum munitum (sword fern) collect fall 2015/16/17 $4 1800 $7,200.00<br />
Mahonia aquifolium (tall Oregon grape) collect fall 2015/16/17 $3 550 $1,650.00<br />
Mahonia repens (crp. Oregon grape) collect fall 2015/16/17 $3 825 $2,475.00<br />
Blechnum spicant (deer fern) collect fall 2015/16/17 $4 200 $800.00<br />
$12,125.00<br />
2. SEED CLEANING/TESTING/STORAGE http://fsweb-ochdes.r6.fs.fed.us/seed-extractory/<br />
Service Notes Cost<br />
2a. Seed Cleaning Total all spp. and fruit BSE $4,000.00<br />
types<br />
2b. Seed Testing Total all spp. and fruit TZ only $1,404.00<br />
types<br />
2c. Seed Storage Total granary and freezer BSE $1,000.00<br />
2d. Allotment Fees - Seed In/Out Check-in/check-out from<br />
Extractory<br />
~27 lots@$30x2 $2,620.00<br />
$9,024.00<br />
3. PLANT MATERIALS PRODUCTION/INCREASE add link<br />
3a. Seed Increase<br />
Species Production Schedule Cost/lb Total lbs. Notes Cost<br />
Calamogrostis howellii (Howell's reedgrass) Sow July 2016 $35.00 150 $5,250.00<br />
Poa secunda (Sandberg's blugrass) Sow July 2016 $17.50 200 $3,500.00<br />
Bromus carinatus/marginatus (mtn./California Sow July 2016 $9.50 400 $3,800.00<br />
brome)<br />
Elymus glaucus (bue wildrye) Sow July 2016 $9.75 400 $3,900.00<br />
3b.Container Plants<br />
http://fsweb.ipnf.r1.fs.fed.us/nurs/nurspage.html<br />
Species Production Schedule Stock-type Cost/pla<br />
nt<br />
Notes<br />
Total<br />
No.<br />
$16,450.00<br />
Acer circinatum (vine maple) D-27 $3.00 50 $150.00<br />
Amelanchier alnifolia (western serviceberry) D-27 $3.00 225 $675.00<br />
Cornus nuttallii (Pacific dogwood) D-27 $3.00 50 $150.00<br />
Cornus sericea spp. sericea (dogwood) (In stock) D-27 $3.00 250 $750.00<br />
Corylus cornuta (hazelnut) D-27 $3.00 100 $300.00<br />
Holodiscus discolor (oceanspray) D-27 $3.00 315 $945.00<br />
Mahonia aquifolium (tall Oregongrape) D-27 $3.00 600 $1,800.00<br />
Mahonia repens (crp. Oregon grape) (In stock) D-27 $3.00 675 $2,025.00<br />
Oemleria cerasiformis (osoberry) D-27 $3.00 100 $300.00<br />
Rosa gymnocarpa (dwarf rose) D-27 $3.00 525 $1,575.00<br />
Rubus parviflorus (thimbleberry) D-27 $3.00 225 $675.00<br />
Symphoricarpos albus (common snowberry) (In stock) D-27 $3.00 520 $1,560.00<br />
Symphoricarpos mollis (creeping snowberry) D-27 $3.00 800 $2,400.00<br />
Asclepias speciosa (showy milkweed) RL-10 $1.75 225 $393.75<br />
Cost<br />
Page 29<br />
Historic Columbia River Highway State Trail, Segments A-C Final <strong>Revegetation</strong> Plan<br />
<strong>Roadside</strong> <strong>Revegetation</strong>: An Integrated Approach to Establishing Native Plants and Pollinator Habitat<br />
190
REVEGETATION PLAN EXAMPLE<br />
APPROXIMATE TIMELINE & BUDGET<br />
Tellima grandiflora (fringe cups) RL-10 $1.75 600 $1,050.00<br />
Tolmiea menziesii (piggyback plant) RL-10 $1.75 400 $700.00<br />
Lupinus latifolius (Lupine) RL-10 $1.75 250 $437.50<br />
Polypodium glycyrrhiza (licorice fern) (In<br />
short one $10.00 225 $2,250.00<br />
stock)<br />
Polystichum munitum (sword fern) short one $10.00 925 $9,250.00<br />
Total 1,150 $27,386.25<br />
Grand Total 7,060<br />
4. AVAILABLE PLANT MATERIALS<br />
http://fsweb-ochdes.r6.fs.fed.us/seed-extractory/<br />
Type Location Quantity Cost/unit Notes<br />
Total<br />
No.<br />
Cost<br />
4a. Stored Seed - granary/inventory<br />
Achillea millifolium var. occidentalis (yarrow) Mt Hood NF 2 $150 lbs. $300<br />
Elymus glaucus (bue wildrye)<br />
BFI or mt hood/barlow 20 $20 lbs. $400<br />
RD<br />
Bromus carinatus/marginatus (mtn./California CRGNSA 20 $15 lbs. $300<br />
brome)<br />
Deschampsia elongata (slender hairgrass) Mt Hood NF 5 $35 lbs. $175<br />
Lupinus latifolius (broadleaf lupine) Check seed zone 5 $150 lbs. $750<br />
4b. Surplus Nursery Stock N/A $0.00<br />
4c. Surplus Seed N/A $0.00<br />
$1,925.00<br />
5. SALVAGE and TRANSPORT<br />
Species Schedule Stock-type Cost/pla<br />
nt<br />
Notes<br />
Total<br />
No.<br />
Pre ROW clearing salvage & grow-out Fall/Winter - 2015/16/17 $4,000.00<br />
$4,000.00<br />
6. CONTINGENCY PLANT MATERIALS<br />
Species Schedule Stock-type Notes<br />
Cost<br />
$0.00<br />
Plant Material Costs (USFS): $88,220.25<br />
Overhead @ 8%: $7,057.62<br />
Total Plant Material Costs: $95,277.87<br />
Page 30<br />
Historic Columbia River Highway State Trail, Segments A-C Final <strong>Revegetation</strong> Plan<br />
<strong>Roadside</strong> <strong>Revegetation</strong>: An Integrated Approach to Establishing Native Plants and Pollinator Habitat<br />
191
REVEGETATION PLAN EXAMPLE<br />
APPENDIX ONE<br />
Appendix One- Plant Species Suite<br />
POTENTIAL SUITE OF PLANT SPECIES TO BE USED IN REVEGETATION EFFORTS OF SEGMENTS A-C OF HCRHST. STOCK<br />
TYPE DEFINITIONS ARE AS FOLLOW: ‘S’ SEED; ‘RL10’ 10 CUBIC INCH CONTAINER VOLUME; ‘D27’ 27 CUBIC INCH<br />
CONTAINER VOLUME; ‘D40’ 40 CUBIC INCH CONTAINER VOLUME; ‘#1’ ONE GALLON CONTAINER; ‘#5’ FIVE GALLON<br />
CONTAINER; ‘B&B’ BALLED AND BURLAPPED.<br />
Common Botanical Zone Stock Type Spacing<br />
(on center)<br />
common yarrow Achillea millefolium var. A S XX<br />
occidentalis<br />
pearly everlasting Anaphalis margaritacea A S XX<br />
narrow-leaf milkweed Asclepias fascicularis A S, RL10 4"<br />
showy milkweed Asclepias speciosa A S, RL10 4"<br />
Aster Aster spp. A S XX<br />
mountain brome Bromus carinatus A S XX<br />
Howell's reedgrass Calamagrostis howellii A S XX<br />
blue wildrye Elymus glaucus ssp. glaucus A S XX<br />
smooth alumroot Heuchera glabra A RL10 4"<br />
Lupine Lupinus latifolius A S 4"<br />
creeping Oregon grape Mahonia repens A D27, D40 4'<br />
Sandberg’s bluegrass Poa secunda A S XX<br />
licorice fern Polypodium glycyrrhiza A Short 4 2'<br />
western sword fern Polystichum munitum A Short 4, #1 4'<br />
self heal Prunella vulgaris A S XX<br />
checkermallow Sidalcea spp. A S XX<br />
goldenrod Solidago canadensis A S XX<br />
fringecups Tellima grandiflora A RL10 4"<br />
grand fir Abies grandis B #1, B&B 15'<br />
vine maple Acer circinatum B #1, #5 8'<br />
western serviceberry Amelanchier alnifolia B #1, #5 8'<br />
Pacific dogwood Cornus nuttallii B #1 15'<br />
redosier dogwood Cornus sericea spp. sericea B D27, D40 8'<br />
Oregon ash Fraxinus latifolia B #1, #5 15'<br />
oceanspray Holodiscus discolor B D40 8'<br />
Oregon grape Mahonia aquifolium B D27, D40 4'<br />
osoberry Oemleria cerasiformis B #1, #5 8'<br />
ninebark Physocarpus capitatus B #1, #5 8'<br />
western white pine Pinus monticola B D27 15'<br />
Douglas fir Pseudotsuga menziesii B D27, B&B 15'<br />
red flowering currant Ribes sanguineum B #1, #5 4'<br />
baldhip rose Rosa gymnocarpa B D27, D40 4'<br />
thimbleberry Rubus parviflorus B D27, D40 4'<br />
elderberry Sambucus nigra B D27 8'<br />
common snowberry Symphoricarpos albus B D27, D40 4'<br />
trailing snowberry Symphoricarpos mollis B D27, D40 4'<br />
western red cedar Thuja plicata B #1, B&B 15'<br />
Page 31<br />
Historic Columbia River Highway State Trail, Segments A-C Final <strong>Revegetation</strong> Plan<br />
<strong>Roadside</strong> <strong>Revegetation</strong>: An Integrated Approach to Establishing Native Plants and Pollinator Habitat<br />
192
REVEGETATION PLAN EXAMPLE<br />
APPENDIX TWO<br />
Appendix Two- Walker Macy Planting Plans<br />
Page 32 Historic Columbia River Highway State Trail, Segments A-C Final <strong>Revegetation</strong> Plan<br />
<strong>Roadside</strong> <strong>Revegetation</strong>: An Integrated Approach to Establishing Native Plants and Pollinator Habitat<br />
193
REVEGETATION PLAN EXAMPLE<br />
APPENDIX TWO<br />
Page 33 Historic Columbia River Highway State Trail, Segments A-C Final <strong>Revegetation</strong> Plan<br />
<strong>Roadside</strong> <strong>Revegetation</strong>: An Integrated Approach to Establishing Native Plants and Pollinator Habitat<br />
194
REVEGETATION PLAN EXAMPLE<br />
APPENDIX TWO<br />
Page 34 Historic Columbia River Highway State Trail, Segments A-C Final <strong>Revegetation</strong> Plan<br />
<strong>Roadside</strong> <strong>Revegetation</strong>: An Integrated Approach to Establishing Native Plants and Pollinator Habitat<br />
195
REVEGETATION PLAN EXAMPLE<br />
APPENDIX TWO<br />
Page 35 Historic Columbia River Highway State Trail, Segments A-C Final <strong>Revegetation</strong> Plan<br />
<strong>Roadside</strong> <strong>Revegetation</strong>: An Integrated Approach to Establishing Native Plants and Pollinator Habitat<br />
196
REVEGETATION PLAN EXAMPLE<br />
APPENDIX TWO<br />
Page 36 Historic Columbia River Highway State Trail, Segments A-C Final <strong>Revegetation</strong> Plan<br />
<strong>Roadside</strong> <strong>Revegetation</strong>: An Integrated Approach to Establishing Native Plants and Pollinator Habitat<br />
197
REVEGETATION PLAN EXAMPLE<br />
APPENDIX TWO<br />
Page 37 Historic Columbia River Highway State Trail, Segments A-C Final <strong>Revegetation</strong> Plan<br />
<strong>Roadside</strong> <strong>Revegetation</strong>: An Integrated Approach to Establishing Native Plants and Pollinator Habitat<br />
198
REVEGETATION PLAN EXAMPLE<br />
APPENDIX TWO<br />
Page 38 Historic Columbia River Highway State Trail, Segments A-C Final <strong>Revegetation</strong> Plan<br />
<strong>Roadside</strong> <strong>Revegetation</strong>: An Integrated Approach to Establishing Native Plants and Pollinator Habitat<br />
199
REVEGETATION PLAN EXAMPLE<br />
APPENDIX TWO<br />
Page 39 Historic Columbia River Highway State Trail, Segments A-C Final <strong>Revegetation</strong> Plan<br />
<strong>Roadside</strong> <strong>Revegetation</strong>: An Integrated Approach to Establishing Native Plants and Pollinator Habitat<br />
200
REVEGETATION PLAN EXAMPLE<br />
APPENDIX TWO<br />
Page 40 Historic Columbia River Highway State Trail, Segments A-C Final <strong>Revegetation</strong> Plan<br />
<strong>Roadside</strong> <strong>Revegetation</strong>: An Integrated Approach to Establishing Native Plants and Pollinator Habitat<br />
201
REVEGETATION PLAN EXAMPLE<br />
APPENDIX THREE<br />
Appendix Three- Oregon Noxious Weed List<br />
Page 41<br />
Historic Columbia River Highway State Trail, Segments A-C Final <strong>Revegetation</strong> Plan<br />
<strong>Roadside</strong> <strong>Revegetation</strong>: An Integrated Approach to Establishing Native Plants and Pollinator Habitat<br />
202
REVEGETATION PLAN EXAMPLE<br />
APPENDIX THREE<br />
Page 42<br />
Historic Columbia River Highway State Trail, Segments A-C Final <strong>Revegetation</strong> Plan<br />
<strong>Roadside</strong> <strong>Revegetation</strong>: An Integrated Approach to Establishing Native Plants and Pollinator Habitat<br />
203
REVEGETATION PLAN EXAMPLE<br />
APPENDIX THREE<br />
Page 43<br />
Historic Columbia River Highway State Trail, Segments A-C Final <strong>Revegetation</strong> Plan<br />
<strong>Roadside</strong> <strong>Revegetation</strong>: An Integrated Approach to Establishing Native Plants and Pollinator Habitat<br />
204
REVEGETATION PLAN EXAMPLE<br />
REFERENCES<br />
References<br />
The following resources were not cited directly, but were referenced in the development of<br />
this document.<br />
Bennett, Max. 2007. Managing Himalayan blackberry in western Oregon riparian areas.<br />
Oregon State University Extension Service, Oregon State University. Corvallis, Oregon.<br />
Bergerson, Terry. 2012. Visitor survey of day-use visitors at Starvation Creek State Park.<br />
Oregon Parks and Recreation Department.<br />
Biggerstaff, Matthew and Christopher Beck. 2007. Effects of method of English ivy removal<br />
and seed addition on regeneration of vegetation in a southeastern Piedmont forest.<br />
The American Midland Naturalist 158: 206-220.<br />
Binelli, Eliana K., Gholz, Henry L., and Mary L. Duryea. 2000. Chapter 4: Plant succession and<br />
disturbances in the urban forest ecosystem. In: Restoring the urban forest ecosystem.<br />
The School of Forest Resources and Conservation, Florida Cooperative Extension<br />
Service, Institute of Food and Agricultural Sciences, University of Florida.<br />
CH2MHill, Inc. 2014. Wetlands/Waters delineation report, Historic Columbia River Highway<br />
State Trail Segments A-D. Columbia River Gorge National Scenic Area Task Order No.<br />
T-13-001, Modification 004, Task 3.8 Multi-Discipline IDIQ Contract No. DTFH70-10-D-<br />
00020.<br />
CH2MHill, Inc. 2014. Mitigation Plan: OR DOT CRGNSA 100(1) Historic Columbia River<br />
Highway State Trail (Segments A-D) Columbia River Gorge National Scenic Area Task<br />
Order No. T-13-001, Modification 006, Task 3.9 Multi-Discipline IDIQ Contract No.<br />
DTFH70-10-D-00020.<br />
CH2MHill, Inc. 2015. Draft Design Acceptance Package, Historic Columbia River Highway State<br />
Trail: Gorton Creek to Lindsey Creek (Segments A-C). Prepared for Western Federal<br />
Lands Highway Division and Oregon Department of Transportation.<br />
Dlugosch, Katrina M. 2005. Understory community changes associated with English ivy<br />
invasions in Seattle’s urban parks. Northwest Science 79(1): 52-59.<br />
Dobson, Robin. 2015. Personal communication. Email to author, April 20, 2015.<br />
Flory, Luke S. and Keith Clay. 2009. Invasive plant removal method determines native plant<br />
community responses. Journal of Applied Ecology 46: 434-442.<br />
Page 44<br />
Historic Columbia River Highway State Trail, Segments A-C Final <strong>Revegetation</strong> Plan<br />
<strong>Roadside</strong> <strong>Revegetation</strong>: An Integrated Approach to Establishing Native Plants and Pollinator Habitat<br />
205
REVEGETATION PLAN EXAMPLE<br />
REFERENCES<br />
Green, George L. 1981. Soil survey of Hood River County area, Oregon. United States<br />
Department of Agriculture, Soil Conservation Service, in cooperation with the Oregon<br />
Agricultural Experiment Station.<br />
Hood River County Chamber of Commerce. Hood River County, About Hood River.<br />
Hoodriver.org<br />
Hopwood, Jennifer, Black, Scott, and Scott Fleury. 2016. Pollinators and roadsides: Best<br />
management practices for managers and decision makers. Prepared for the Federal<br />
Highway Administration.<br />
Invasive plant species assessment working group. Invasive plant species fact sheet: Periwinkle<br />
Vinca minor. www.invasivespecies.IN.gov<br />
King County Noxious Weed Control Program. 2014. Himalyan blackberry best management<br />
Practices.<br />
Michigan Department of Natural Resources. 2012. Invasive species- Best control practices:<br />
black locust (Robinia pseudoacacia).<br />
Oregon Plant Atlas, Oregon Flora Project. Oregon State University.<br />
www.oregflora.org/atlas.php<br />
Pollinator Health Task Force. 2015. National strategy to promote the health of honey bees and<br />
other pollinators. The White House.<br />
Quatrefoil, Inc. 2010. The Historic Columbia River Highway State Trail plan- Wyeth to Hood<br />
River.<br />
Steinfeld, David E., Riley, Scott A., Wilkinson, Kim M., Landis, Tom D., Riley, Lee E.. 2007.<br />
<strong>Roadside</strong> revegetation: An integrated approach to establishing native plants. Federal<br />
Highway Administration, Western Federal Lands Highway Division report number<br />
FHWA-WFL/TD-07-005.<br />
United States Department of Agriculture, Forest Service. 2009. Gifford Pinchot National Forest<br />
south zone invasive plant treatment 2009 implementation plan.<br />
United States Department of the Interior, Bureau of Land Management. National seed<br />
strategy for rehabilitation and restoration.<br />
http://www.blm.gov/ut/st/en/prog/more/CPNPP/0/seedstrategy.html<br />
Page 45<br />
Historic Columbia River Highway State Trail, Segments A-C Final <strong>Revegetation</strong> Plan<br />
<strong>Roadside</strong> <strong>Revegetation</strong>: An Integrated Approach to Establishing Native Plants and Pollinator Habitat<br />
206
REVEGETATION PLAN EXAMPLE<br />
REFERENCES<br />
Ward, K., Cariveau, E., May, M., Roswell, M., Vaughan, N., Williams, R., Winfree, R., Isaacs, and K.<br />
Gill. 2014. Streamlined bee monitoring protocol for assessing pollinator habitat.<br />
Portland, OR: The Xerces Society for Invertebrate Conservation.<br />
Wisconsin Department of Natural Resources. 2004. Black locust (Robinia pseudoacacia).<br />
Page 46<br />
Historic Columbia River Highway State Trail, Segments A-C Final <strong>Revegetation</strong> Plan<br />
<strong>Roadside</strong> <strong>Revegetation</strong>: An Integrated Approach to Establishing Native Plants and Pollinator Habitat<br />
207
IMPLEMENTATION<br />
9— Implementation<br />
9.1 Introduction<br />
9.2 Review Plans with Construction Engineer<br />
9.3 Review Treatment Details and Timelines<br />
9.4 Develop Contracts<br />
9.5 Install Treatments<br />
9.6 Keep Good Records<br />
9.7 Carry Out Quality Assurance<br />
9.8 Implement Early Maintenance and Monitoring<br />
9.9 Conclusion<br />
<strong>Roadside</strong> <strong>Revegetation</strong>: An Integrated Approach to Establishing Native Plants and Pollinator Habitat<br />
208
IMPLEMENTATION<br />
9.1 INTRODUCTION<br />
A successful revegetation project requires not only good planning, but effective implementation<br />
of the plan. The Initiation Phase of this report (Chapters 2 and 3) described the organizations,<br />
decision processes, and technical concepts involved in beginning a roadside revegetation<br />
project. The Planning Phase (Chapters 4 through 7) culminated in the <strong>Revegetation</strong> Plan,<br />
combining strategies for mitigating limiting factors, utilizing site resources, and revegetating<br />
the site. Now, in the Implementation Phase, the plan will unfold in the field.<br />
The shift from the Planning Phase to the Implementation Phase involves a change in approach.<br />
The planning process tends to be orderly and systematic, with the planner able to take an<br />
idealized bird’s eye perspective of how the project might best proceed. In contrast, implementation<br />
is approached from the ground up, and requires flexibility and adaptability in order<br />
to fulfill the objectives of the plan while working with the unpredictable realities of the field.<br />
While the plan guides the project, few projects are implemented exactly as planned. Each<br />
project is unique, with its own set of issues and challenges. Schedules and supplies change,<br />
unforeseen circumstances intrude, and new opportunities emerge. Teamwork, cooperation, and<br />
effective communication with project managers and inspectors will enable the revegetation<br />
specialist to utilize all available resources to make the revegetation plan successful. Good<br />
planning and a systematic approach to implementation lay the groundwork to acquire necessary<br />
materials to revegetate the site, including services, seeds, topsoil, and nursery-grown plants.<br />
In the Implementation Phase, flexibility, adaptability, and creativity in obtaining and installing<br />
these materials will be important. For example, seed mixes, application rates, and installation<br />
methods might have to be modified due to new information or unforeseen circumstances.<br />
Lessons learned can lead to new and innovative approaches to revegetation.<br />
The tasks for successfully implementing a revegetation plan are to:<br />
◾◾<br />
Review plans with construction engineer<br />
◾◾<br />
Review revegetation treatment details and timelines<br />
◾◾<br />
Develop contracts<br />
◾◾<br />
Install treatments<br />
◾◾<br />
Keep good records<br />
◾◾<br />
Carry out quality control<br />
◾◾<br />
Implement early maintenance and monitoring<br />
This chapter is a general overview of the implementation process. Following this chapter,<br />
Implementation Guides provide details on the key factors to consider, including soil and site<br />
treatments, obtaining plant materials, and installing and caring for plants.<br />
9.2 REVIEW PLANS WITH CONSTRUCTION ENGINEER<br />
The Initiation Phase highlighted the key working relationships for the revegetation specialist<br />
to develop during the revegetation process. For some projects, the same engineer will be<br />
the contact from project inception through its completion. For more complex projects, the<br />
design engineer may hand off the road plans for the construction engineer to implement.<br />
Regardless, developing a good relationship with the engineer who will be on-site during road<br />
construction is important for implementing a successful revegetation plan. A relationship with<br />
both staffs is essential. The design engineer will assure that revegetation plans are designed<br />
into the construction plans, schedules, materials lists, and so on. The construction engineer,<br />
who will be on site during all phases of road construction, will interpret and implement<br />
designs with the input and interpretation of the revegetation specialist. Complex designs,<br />
such as soil-faced gabion walls, planting pockets, plantable rockeries, and so on, require more<br />
involvement from all participants.<br />
<strong>Roadside</strong> <strong>Revegetation</strong>: An Integrated Approach to Establishing Native Plants and Pollinator Habitat<br />
209
IMPLEMENTATION<br />
The construction engineer can greatly facilitate all aspects of revegetation by providing<br />
construction timelines by road segment, modifications, updates, site specific information,<br />
and treatments by segment. The construction engineer can also help with techniques,<br />
experience, and equipment, and assure that any special contract requirements are upheld and<br />
implemented correctly. Remember that the Implementation Phase for revegetation begins<br />
prior to road construction and continues after construction is complete, so if there are two<br />
separate engineers, activities must be coordinated with both.<br />
Before construction begins, a meeting should be scheduled with the construction engineer<br />
to discuss the <strong>Revegetation</strong> Plan. This meeting will cover the objectives for revegetation and<br />
the tasks that need to be coordinated with road construction activities. The revegetation<br />
plan should be taken to the project site and issues that might be associated with the various<br />
revegetation tasks should be discussed. The construction engineer needs to be aware of all<br />
details of the revegetation treatments and how they are to be implemented. Plan on-site project<br />
reviews early to discuss plans and allow ample time to overcome difficulties in integrating<br />
construction and revegetation design. Identify and assess potential areas of conflict between<br />
road construction activities and revegetation objectives. Review these potential conflicts<br />
one- by-one, and discuss ways to resolve them. Special contract requirements (discussed in<br />
Chapter 2) should also be reviewed. These may cover topics such as topsoil salvage, slope<br />
treatments, or other key practices. The construction engineers will also have ideas that can<br />
help translate revegetation plans to construction contractors.<br />
Of course, it is best to minimize site disturbances in the first place. During the Planning Phase,<br />
collaboration with the design engineer is essential in potentially reducing the size of the<br />
construction footprint of the project. The construction engineer can often identify opportunities<br />
for reducing potential problems, in some cases, making changes that can modify or even<br />
eliminate certain construction or revegetation treatments.<br />
During these meetings, it is critical to respect and learn from the experience and insights of<br />
the construction engineer. They may have worked with revegetation treatments on other road<br />
projects and could have ideas on installation methods on the current project. There are many<br />
ways to achieve revegetation objectives; collaboration between the construction engineer and<br />
the revegetation specialist will always create the best results. With your combined expertise,<br />
new and innovative approaches can also be created.<br />
After the development of treatment details and timelines, another meeting should be scheduled<br />
to get the construction engineer’s input and to double-check quantities, areas, supplies, and<br />
equipment for revegetation treatments. As road construction proceeds, periodic meetings<br />
should be scheduled to discuss conflicts and refine revegetation plans.<br />
Before road construction begins, roles and responsibilities on the job site need to be clearly<br />
defined. Refer to procedural manuals for the agencies involved and make sure you follow their<br />
chain of authority. The revegetation specialist must coordinate directly with the construction<br />
engineer. The construction engineer will be directing all phases of road construction, and you<br />
must always ask permission to communicate directly with any of the contractors. Remember,<br />
your role as a revegetation specialist is not to direct the construction contractors, but to play an<br />
advisory role so that all contract requirements can be carried out effectively and on schedule.<br />
The more that you are on site during all phases of construction, the stronger your relationships<br />
with the construction engineer and construction contractors will be. These strong working<br />
relationships will ensure that all revegetation plans will be implemented successfully. Sometimes,<br />
spur-of-the-moment meetings must be called to address immediate problems or to adapt to<br />
shifting tactics. You must understand that all road projects will not go exactly as planned, so<br />
be as responsive as possible.<br />
<strong>Roadside</strong> <strong>Revegetation</strong>: An Integrated Approach to Establishing Native Plants and Pollinator Habitat<br />
210
IMPLEMENTATION<br />
9.3 REVIEW TREATMENT DETAILS AND TIMELINES<br />
The <strong>Revegetation</strong> Plan will outline all of the treatment details, quantities, and schedules for the<br />
project. However, details often need to be revised or defined more specifically. Accurate and<br />
reasonable calculations and schedules will help the revegetation specialist collaborate more<br />
effectively with contractors and agency suppliers. At this stage of the process, you should refine<br />
calculations and timelines in sufficient detail to begin the contracting process. Calculating and<br />
rechecking areas to be treated, needed equipment and supplies, and schedules and budgets<br />
will ensure that contracted items are accurately identified and defined.<br />
In general, four types of implementation activities take place in revegetation, and the Implementation<br />
Guides following this chapter give specific details and follow the same general<br />
organization:<br />
◾◾<br />
Implementing Site and Soil Treatments: fertilizers, tillage, mulches, topsoil, organic<br />
matter amendments, lime amendments, beneficial soil microorganisms, and topographic<br />
enhancements<br />
◾◾<br />
Obtaining Plants: collecting wild seeds, collecting wild cuttings, collecting wild plants,<br />
nursery seed production, nursery cutting production, and nursery plant production<br />
◾◾<br />
Installing Plants: seeding, hydroseeding, installing cuttings, installing plants<br />
◾◾<br />
Caring for Plants: post installation care<br />
Advanced planning is essential. Many implementation tasks begin up to three years before<br />
road construction. Proper planning will ensure that all materials will be ready at the appropriate<br />
time during the construction phase. (Planting can occur as early as year one in a multi-year<br />
construction project.) Be aware that procuring plant materials and implementing mitigating<br />
treatments will involve separate schedules with different contractors. Therefore, developing<br />
an implementation timeline is essential in order to keep all scheduling details straight. An<br />
example of an implementation timeline is shown in Figure 9-1.<br />
Most timelines have interdependent and time-linked tasks. In Figure 9-1, for instance, the<br />
hydroseeding contract is dependent on the success of the seed increase contract. Before that,<br />
the seed increase contract depends on the wildland seeds collected by agency personnel or<br />
Tasks<br />
Noxious weed treatment<br />
Wild seed collection<br />
Seed increase<br />
Seed storage<br />
Seedling procurement<br />
Topsoiling<br />
Fertilizer procurement<br />
Mycorrhizae procurement<br />
Hydroseeding<br />
Planting<br />
Seedling mulching<br />
Browsing control<br />
Implementation<br />
Road Construction<br />
-3 -2 -1 0 1 2 3<br />
Year<br />
Figure 9-1 | Example<br />
implementation timeline<br />
Example implementation timeline.<br />
Implementing the revegetation plan<br />
often requires separate schedules and<br />
different contractors, so coordination<br />
is essential.<br />
<strong>Roadside</strong> <strong>Revegetation</strong>: An Integrated Approach to Establishing Native Plants and Pollinator Habitat<br />
211
IMPLEMENTATION<br />
contractors. The success of the hydroseeding contract rests on the successful execution of two<br />
tasks that must begin years before hydroseeding implementation. Detailed schedules and<br />
timelines are necessary to coordinate these activities. The Implementation Guides provide<br />
more detailed information on how to organize and schedule the various tasks.<br />
When creating timelines for tasks, be sure to incorporate the advance time needed to issue<br />
contracts. This is especially crucial when ordering plant materials, which will require several years<br />
before needed species and quantities can be grown. However, even for routine procurement<br />
of equipment or supplies, nine to twelve months of advance notice will result in better prices,<br />
since suppliers will have more time to plan their orders. Reputable contractors have plenty of<br />
work and may not be available on short notice. Implementation Guides provide more detail<br />
on scheduling and contracting timelines for individual tasks.<br />
Renting equipment and calculating quantities of materials is an essential part of implementation.<br />
In many cases, the construction engineer can provide you with information regarding<br />
cubic volumes, surface areas, and haul distances as they refer to plans and specifications.<br />
Accurate calculations are essential to develop contracts for various tasks. Table 9-1 shows<br />
example calculations to determine areas being treated. Further details on developing quantity<br />
specifications for the various tasks of implementation can be found in the Implementation<br />
Guides following this chapter.<br />
Once treatment details and timelines have been developed, meet with the construction engineer<br />
and review quantities, timing, materials, and equipment, as well as overall strategies. If areas<br />
are only estimates at this stage due to possible changes while the road is constructed, express<br />
them as ranges (e.g., 40 to 50 acres) when issuing contracts. After the site has been prepared,<br />
you can narrow these ranges down to exact numbers. Be sure to allow for contingencies,<br />
especially when ordering seeds. Once you feel confident about the details and timing, develop<br />
contracts to carry out the work.<br />
Table 9-1 | How to calculate area from road plans<br />
Station Slope Length (m) Distance between<br />
stations (m)<br />
Area (m2)<br />
20 + 1000 3 20 60<br />
20 + 1020 4 20 80<br />
20 + 1040 6 20 120<br />
20 + 1060 7 20 140<br />
20 + 1080 6 20 120<br />
20 + 1100 4 20 80<br />
20 + 1120 2 20 40<br />
Total 640<br />
Acres 0.16<br />
<strong>Roadside</strong> <strong>Revegetation</strong>: An Integrated Approach to Establishing Native Plants and Pollinator Habitat<br />
212
IMPLEMENTATION<br />
9.4 DEVELOP CONTRACTS<br />
A contract functions as a detailed plan for each task or set of tasks, communicating the desired<br />
outcome for the work. Contracts are essential tools for implementing revegetation treatments.<br />
Even if the work is to be carried out by personnel within the agency, approaching the tasks<br />
as if they were private contracts will facilitate clear communications and a high-quality job.<br />
(Check agency procedural manuals for how to create in-house agreements.) The <strong>Revegetation</strong><br />
Plan and the treatment details (developed above) are used to create a contract. The contract<br />
details the implementation work to be done by the contractor or agency personnel for that<br />
task, with clear definitions of roles and schedules.<br />
Depending on the complexity of the project, multiple contractors are usually involved. As<br />
emphasized previously, developing contracts well in advance of the work is necessary in order<br />
to ensure proper scheduling. Contracts vary by the type of work to be done and by the types<br />
of parties involved. In general a contract should define:<br />
◾◾<br />
Supplies/services to be provided<br />
◾◾<br />
Scope of work (size, schedule, and so on)<br />
◾◾<br />
Project location<br />
◾◾<br />
Contractor obligations<br />
◾◾<br />
<strong>Revegetation</strong> specialist obligations<br />
◾◾<br />
Delivery details (who, how, when, including timelines and deadlines)<br />
◾◾<br />
Quality standards<br />
◾◾<br />
Contractor quality assurance plan (to be provided by contractor)<br />
◾◾<br />
<strong>Revegetation</strong> specialist quality assurance plan (to be provided by revegetation specialist<br />
who will be inspecting the contractor’s work)<br />
◾◾<br />
Price<br />
◾◾<br />
Payment method (submission of invoices, approval of work)<br />
◾◾<br />
Contractor’s designated representative (so you only coordinate with one person)<br />
◾◾<br />
Safety plan<br />
◾◾<br />
Other terms and conditions (e.g., what to do in the event of changes)<br />
Usually you will put out a call for proposals for a task with most of the above details included.<br />
Contractors will provide their offers for completing the work, including their plans for safety<br />
and quality control. For technical work, the contractor usually provides an explanation of the<br />
proposed technical approach for each task to be performed. The most suitable contractor<br />
is selected for the task and then the details are worked out in writing. Make sure that the<br />
contractor designates one representative to be your contact person for the project; having<br />
just one “point of contact” reduces confusion and makes communication easier. Also, when<br />
detailing “other terms and conditions,” especially for plant materials, make sure there are<br />
clauses that cover possible variations in quantity or quality. For example, low quality seeds<br />
may still be usable, but perhaps a fair price reduction can be agreed upon if the germination<br />
is below the contract specifications.<br />
Quality control is essential for every implementation task. Quality control plans assure that<br />
the contracted tasks were performed as planned. Usually the contractor provides a quality<br />
control plan describing how their organization will monitor their work and assure that the<br />
contract is efficiently fulfilled. The revegetation specialist must also define, in advance, the<br />
standards by which work will be assessed and detail how work will be inspected. Predefined<br />
quality standards are essential to assure that everyone is working towards the same clearly<br />
defined goal to achieve the DFCs for the project. More information on quality control is<br />
<strong>Roadside</strong> <strong>Revegetation</strong>: An Integrated Approach to Establishing Native Plants and Pollinator Habitat<br />
213
IMPLEMENTATION<br />
provided in the next section. An example contract (between the USDA Forest Service and a<br />
private contractor) is provided on the following pages.<br />
9.5 INSTALL TREATMENTS<br />
The <strong>Revegetation</strong> Plan, in part, is based on the construction plans<br />
and predicted post- construction outcomes. Some treatments<br />
need to be installed during construction. An example would be<br />
where cut slopes are excavated to heights beyond the reach of<br />
hydroseed guns. These areas need to be seeded during excavation.<br />
After road construction is complete, it is often learned that the<br />
predictions do not exactly match the reality. In addition, materials<br />
available may change. To adapt to these unplanned changes,<br />
implementation tasks are updated during and after construction<br />
based on actual changes to the site or actual materials available at<br />
the time of implementation. A concise revegetation plan, combined<br />
with clear contract performance work statements and consistent<br />
communication, will provide an adaptive framework from which<br />
change can readily occur.<br />
Prior to installation of treatments, several questions should be asked<br />
and evaluated. First, determine if there are any major unplanned<br />
construction changes that require new road plans and cross-sections.<br />
If so, these changes need to be documented on the revegetation<br />
map and a plan needs to be developed to revegetate them. Second,<br />
reassess the limiting factors to revegetation success as described in<br />
Chapter 5. For example, is the rooting depth as predicted? Is there<br />
fracturing in the bedrock? Are some slopes steeper than originally<br />
designed? Was ground water intercepted? Is there enough topsoil<br />
salvaged to reapply at the planned rates? Are there areas of instability?<br />
Did unexpected weeds show up? If any of the answers are<br />
different than planned, mitigation treatments should be reevaluated.<br />
Third, reevaluate the revegetation unit map. Are the units located<br />
on the map correctly? Are the descriptions still valid? If they are not,<br />
then make the changes so each management unit can be developed<br />
properly. Adaptive management is ongoing throughout all phases.<br />
Change is a certainty, and preparedness provides options and allows<br />
the revegetation specialist to respond to these situations.<br />
The status of available materials must be determined. The final<br />
inventories should be obtained from the agency staff and contractors.<br />
The inventories will include the quantities of each species for<br />
seeds and/or seedlings, topsoil supply, and so on. Producers may<br />
not be able to deliver the exact quantities ordered. Seed producers<br />
may have succeeded in growing more seeds for certain species<br />
while producing less of other species. The nursery may have been affected by frosts, insects,<br />
disease, or other events that reduced the inventory for some species but not others. Just as<br />
likely, the nursery could have extra seedlings available for some species that could make up<br />
the shortage of others. Guided by the objectives and DFCs of the <strong>Revegetation</strong> Plan, the<br />
revegetation specialist must adapt to these changes and carry out the implementation tasks<br />
to the best of your ability using the materials and resources at hand.<br />
Figure 9-2 | Example contract<br />
<strong>Roadside</strong> <strong>Revegetation</strong>: An Integrated Approach to Establishing Native Plants and Pollinator Habitat<br />
214
IMPLEMENTATION<br />
9.6 EXAMPLE STATEMENT OF WORK<br />
Weston-Elgin Road Construction Project, HWY 2014<br />
M.P. 10.695 to M.P. 20.77<br />
Walla Walla Ranger District, Umatilla National Forest<br />
Umatilla County, Oregon<br />
Elevation 3,800 to 5,000 ft<br />
9.6.1 LOCATION OF WORK<br />
The project area is located in Umatilla County, near Tollgate, OR and east of Athena, OR on<br />
Highway 204. Project is located between MP 10.65 and MP 20.77. Athena is located midway<br />
between Pendleton, OR and Walla Walla, WA along Highway 11. See attached map.<br />
Construction of the road will span two seasons and require seeding and planting work to be<br />
performed in both the fall of 2005 and 2006, with the majority of work completed in 2005.<br />
9.6.2 DESCRIPTION OF WORK AND STANDARDS<br />
Item 1. Hydraulically apply seeds, mulch, fertilizer, and tackifier to finished cut and fill slopes<br />
associated with new road construction. Provide permanent seeding for up to 45 acres of cut,<br />
fill, and adjacent obliterated road surfaces. Government will furnish all seeds. The majority<br />
of slopes will average 1V:2H with a small amount of 1V:1.5H. Areas are adjacent to existing<br />
paved road and/or graveled surfaces. The majority of work (95%) can be performed from the<br />
tower; however, a hose lay (up to 100 ft) will be required for a single large fill. The permanent<br />
seeding work window for this project will be between October 1 and November 15, 2005–6,<br />
unless alternative dates are mutually agreed upon.<br />
Hydraulically combine and apply EcoFibre® (http://www.canforpfd.com) @ 2,000 lb/acre,<br />
Biosol® (http://www.pawneebuttesseed.com) at 1,200 lb/acre and Super Tack® at manufacturer’s<br />
recommended rate; add XL crosslinker at 40% the weight of Super Tack® (http://www.<br />
ranteccorp.com) for slopes 1V:2H or steeper (approximately 5 ac).<br />
Equivalent products may be substituted at the discretion of the government.<br />
Item 2. Hand-plant 1+0 container and bareroot hardwood nursery stock in fall 2005. Handplant<br />
1+0 hardwood container nursery stock and 2+0 conifer container stock in fall 2006. Use<br />
hand tools to plant styro-15 plugs, styro-40 plugs, and bareroot plant materials. Plant spacing<br />
distances will be assigned by the Contracting Officer’s Technical Representative (COTR) for<br />
each site. Plant up to 10,700 individuals (in total, 2 years) in cut and fill slopes, obliterated road<br />
surfaces, and a short segment of riparian zones. Areas are adjacent to existing paved road<br />
and/or graveled surfaces. Planting work window for this project will be between October 1<br />
and November 15, 2005–6, unless alternative dates are mutually agreed upon.<br />
Contractor will be responsible for loading, transporting, and care of all living plant material<br />
once in possession in both 2005 and 2006. Contractor is responsible for all scheduling and<br />
delivery of plant materials from a private nursery in Milton-Freewater, Oregon. The facility<br />
is located on HWY 11 and is approximately 40 to 45 minutes from the project. Upon award,<br />
location and contact information will be provided.<br />
Item 3. Pneumatically install compost/mulch erosion blanket w/tackifier and seeds. Apply an<br />
even coverage 2 inches in depth over 2 acres of slopes ranging from 1V:2H to 1V:1.5H. Access<br />
will be from existing roads. Contractor must provide compost specifications to the COTR<br />
prior to start work date. Compost must conform to U.S. composting council standards and<br />
be state certified in Oregon and Washington. See evaluating compost quality (http://www.<br />
<strong>Roadside</strong> <strong>Revegetation</strong>: An Integrated Approach to Establishing Native Plants and Pollinator Habitat<br />
215
IMPLEMENTATION<br />
Table 9-2 | Planned Weston-Elgin<br />
<strong>Revegetation</strong> Project plant materials<br />
for fall planting of 2005 and 2006<br />
Species Stocktype and Quantity Total by Species<br />
Bareroot Styro-15 Styro-40<br />
Alnus viridis s. sinuata 0 30 0 30<br />
Amelanchier alnifolia 0 0 720 720<br />
Cornus sericea s. sericea 0 175 0 175<br />
Holodiscus discolor 0 0 1,160 1,160<br />
Physocarpus malvaceus 476 250 1,330 2,056<br />
Populus trichocarpa 0 0 80 80<br />
Rosa woodsii 0 0 263 263<br />
Rubus parviflorus 0 0 204 204<br />
Sambucus nigra s. cerulea 0 192 0 192<br />
Sorbus scopulina 0 0 620 620<br />
Spiraea splendens 0 0 100 100<br />
Total 2005 476 647 4,477 5,600<br />
1+0 Symphoricarpos<br />
albus<br />
0 0 1,500 1,500<br />
2+0 Conifers 0 - 2,700 2,700<br />
1+0 Additional shrubs - - 900 900<br />
Total 2006 5,100<br />
compostingcouncil.org) for standards of acceptable compost. An accessible compost storage<br />
site will be provided within one (1) mile of the installation site. Site is accessible to trucks<br />
and trailers.<br />
9.6.3 CONTRACTOR QUALITY CONTROL PLAN<br />
The Contractor shall prepare a brief Quality Assurance Plan and submit it with the completed bid.<br />
9.6.4 GOVERNMENT QUALITY ASSURANCE PLAN<br />
A qualified USFS COTR will be on site during all phases of project fieldwork, providing technical<br />
support and ensuring that project objectives are met. The contractor is fully expected to take<br />
<strong>Roadside</strong> <strong>Revegetation</strong>: An Integrated Approach to Establishing Native Plants and Pollinator Habitat<br />
216
IMPLEMENTATION<br />
an active role in providing, sharing, and advising in technical aspects that may benefit the<br />
project outcome.<br />
The following plan is to be used by the Government for quality assurance.<br />
Item 1. Application. Hydroseeding slurry mixture, rate of application, uniformity, and coverage<br />
will be inspected. Apply hydroseeding mix so no holes exist. Apply so that no gaps exist<br />
between the matrix and the soil. Application is not allowed over frozen ground or snow or<br />
during periods of extended rainfall. A tracer (mulch or dye) sufficient to visibly measure coverage<br />
and progress is mandatory in each slurry unit. Follow-up monitoring to determine germination<br />
and survival will be carried out during May, July, and September 2006-7. Monitoring will be<br />
used to assess the effectiveness of treatment and determine whether follow-up treatments<br />
are needed to adequately stabilize seeded slopes. A follow-on contract may be issued for<br />
additional hydroseeding, if necessary, as determined by monitoring.<br />
All equipment shall be free of weed seeds. Hydroseeding equipment shall be clean and<br />
free of all previous seeds, fertilizer, mulch, or any hydroseeding products used on prior<br />
jobs. Equipment will be inspected prior to initial applications. If equipment does not pass<br />
inspection, the contractor will be required to clean equipment off-site at an approved facility<br />
before returning to the project site. The Government may not be held liable for lost time due<br />
to re-cleaning of equipment.<br />
Item 2. Shrub and tree planting. Vertical planting depth, site selection, species appropriateness,<br />
handling, mechanical damage during planting, that is, excessive broken branches, tops,<br />
and roots, excessive damage to bark which exposes cambium, will be inspected. Due to<br />
the perishable nature of trees and shrubs, care and protection is considered critical and will<br />
be carefully monitored throughout the planting schedule to ensure proper care. The COTR<br />
will frequently observe planting in progress, dig trees and/or shrubs to check underground<br />
planting quality, and observe planting methods. Follow-up monitoring to determine survival<br />
and establishment will be carried out during May, July, and September 2006-7. Monitoring will<br />
be used to assess the effectiveness of plantings and determine whether follow-up treatments<br />
are needed to adequately stabilize selected slopes. A follow-on contract may be issued for<br />
additional planting, if necessary, as determined by monitoring.<br />
Item 3. Pneumatically install compost/mulch erosion blanket with tackifier, fertilizer, and seeds.<br />
Evenness and consistency of application to slopes will be monitored. Ingredients, additives,<br />
and injection will be monitored as well. Application is not permitted over frozen ground or<br />
snow or during periods of extended rainfall. Contractor must provide compost specifications<br />
to the COTR prior to work start date. Standards must conform to U.S. Composting Council<br />
standards. See evaluating compost quality (http://www.compostingcouncil.org) for standards<br />
of acceptable compost. The COTR will evaluate test results for compost furnished by contractor<br />
and randomly inspect and/or take samples from material stored on site. Government will<br />
furnish seeds.<br />
9.6.5 MEASUREMENT AND PAYMENT<br />
Payment for hydroseeding will be on a per acre basis. Additional acreage will be paid at the<br />
stated contract price and performed via a follow-on contract.<br />
Payment for installed compost erosion blanket will be on a per acre basis. Payment for hand<br />
shrub and tree planting will be on a per plant basis.<br />
9.6.6 GOVERNMENT FURNISHED MATERIAL<br />
The government shall provide all seeds to the project site. The government shall produce<br />
all conifers and shrubs; contractor is responsible for pick-up, delivery, and care during the<br />
contract period.<br />
<strong>Roadside</strong> <strong>Revegetation</strong>: An Integrated Approach to Establishing Native Plants and Pollinator Habitat<br />
217
IMPLEMENTATION<br />
9.6.7 SCHEDULE<br />
Treatment/Year 2005<br />
(Acres/Plants)<br />
2006<br />
(Acres/Plants)<br />
Total<br />
(Acres/Plants)<br />
1) Hydroseeding 40 ac 5 ac 45 ac<br />
2) Hand-plant 5,100 plants 5,600 plants 10,700 plants<br />
3) Install compost and seeds 2 ac 2 ac<br />
9.7 KEEP GOOD RECORDS<br />
During the Implementation Phase, keeping records often seems<br />
like a low priority. The field work demands a high level of energy<br />
and attention, and time for keeping records may tend to fall by the<br />
wayside. However, records are invaluable, and recordkeeping is an<br />
essential part of implementation. Records are essential in the shortterm<br />
for reporting and accountability, including communicating<br />
with contractors and agencies. In the long-term, records are needed<br />
to assess what was done, what worked, and what did not work as<br />
the project unfolded so that optimal results can be recreated and<br />
failures can be avoided on future projects. It is almost impossible to<br />
remember what was done on a project several weeks, months, or<br />
years after implementation. However, it will be necessary to know<br />
what happened. Without good records, there will be no way of<br />
piecing together the causes of failure or success and little ability<br />
to share “lessons learned” with peers. Record-keeping and daily<br />
diaries are very important from a contractual view as well. As part<br />
of doing business, there is always a chance of a dispute leading to<br />
a claim by a contractor. Good records provide the foundation the<br />
contracting officer will need to defend the contract administrator.<br />
Keep a notebook or manila folder that contains the final revegetation<br />
plan, contracts, diaries, spread-sheets, receipts, maps, and<br />
correspondence. Since the majority of this information may be<br />
electronic, keep a folder on your computer that contains all e-mails,<br />
spreadsheets, budgets, plans, and contracts. E-mails and phone<br />
conversations can be stored in one spreadsheet for all projects.<br />
The process of photo documentation of project development (as<br />
described in Chapter 11) is also important.<br />
Keeping a simple daily log (or diary) is also invaluable. Take a<br />
few moments to jot down what happened at the project site<br />
each day until implementation is complete. Include thoughts of<br />
how things are going, any anticipated changes, and challenges<br />
and opportunities. An example daily diary form and template<br />
is provided in Figure 9-3. While the example shows a diary for<br />
contract work, the same template can be utilized to keep records<br />
of your own work, that of other agencies, and overall project development.<br />
Records are also used to develop reports when it is necessary to document accomplishments<br />
to date. Reporting requirements vary, but some type of accomplishment report is usually due<br />
quarterly or annually. Monitoring reports (discussed more in Chapters 11 and 12) are essential<br />
in order for environmental agencies to ensure that you fulfilled objectives and appropriately<br />
Page 1 of 1<br />
Contract Daily Diary<br />
1. PROJECT SITE Upper Grange Road<br />
2. CONTRACT NO.<br />
54-46-37<br />
(Reference FSH 6309.11)<br />
3. PROJECT<br />
Upper Grange Road <strong>Revegetation</strong> (working on Reveg Units 1-3 today)<br />
4. CONTRACTOR 5. CONTRACTOR REPRESENTATIVE ON SITE<br />
Plant and Protect Inc.<br />
Jane McLean<br />
6. OFFICIALS ON SITE<br />
Me (Davis Lee)<br />
7. DATE 8. DAY OF WEEK 9. TIME ARRIVED 10. TIME DEPARTED 11. WEATHER<br />
6/7/06 Wed. 07:30 16:00<br />
Overcast, Thunderclouds west<br />
12. TEMPERATURE ˚F 13. GROUND CONDITION 14. CONTRACT TIME 15. DAYS USED 16. COMPLETION DATE<br />
Min. 45 Max. 55 Moist, rm — good condition<br />
6/7/06 to 6/14/06 1<br />
17. TIME USED (%) 18. WORK COMPLETED (%) 19. WORK ON SCHEDULE 20. CONTRACTOR'S WORK - (X Appropriate Box)<br />
14% 20%<br />
X YES<br />
NO X Acceptable Unacceptable Explain In Narrative<br />
21. CHANGE ORDERS/AMENDMENTS ISSUED 22. WORK ORDERS ISSUED (Include SUSPEND/RESUME)<br />
No changes yet, may reschedule tomorrow if<br />
Install hydromulch (blow on compost &<br />
heavy rain continues tonight.<br />
seed mix)<br />
23. MATERIALS FURNISHED TO JOB SITE (Furnished by G-Govt., C-Cont; S-Subcont.) 24. LIST EQUIPMENT ON SITE (Furnished by G-Govt., C-Cont; S-Subcont.)<br />
Seed mix RRCA5. 50 lbs for use w/mulch (G)<br />
Type Contract Item Number and Location of Use Hours Used<br />
Mack truck w/ lowboy (C)<br />
537 yards of certi ed compost (for mulch) (C)<br />
Cat 9506 loader (C)<br />
Kenworth truck with Finn blower<br />
Jane's SUV (C)<br />
Hydroseeder (C)<br />
Trailer w/ mulch loads<br />
25. List Contract Payments, Reports, Correspondence, ETC. 26. Workers On Site Number<br />
Item<br />
Prep Submit<br />
Classi cation<br />
PRIME SUB<br />
Harry Medford (truck)<br />
1<br />
Julio Valdovinos (hydro)<br />
1<br />
Lila Carev (mulch)<br />
1<br />
Jane McLean 1<br />
27. Government Provided Services Adequately and Timely<br />
YES<br />
NO - Explain in Narrative<br />
28. NARRATIVE REPORT<br />
Met with Jane and crew (Harry, Julio, Lila) from 07:30 - 08:15. Looked over project site and reviewed<br />
compost/seed installation strategy. Talked safety: tra c, orange vests, PPE, working around equipment,<br />
evacuation plan in case of injury, equipment, footing OK! I inspected compost, appears high quality (collected<br />
6 samples to be combined for test later). 08:30 crew began to unload and stage equipment, loading compost<br />
into blower (25 yds) mounted on Mack truck. Jane and Davis inspect reveg units/areas and explored secondary<br />
source of water (east end) if needed, permit OK. 09:30 crew began blowing compost/seed mix onto Reveg<br />
Units 1 & 3. Good job with careful hose placement. 14:00, rain began, a sprinkle then a downpour. 16:00,<br />
stopped work for day, compost becoming heavy with too much water so not blowing as far. If dries out<br />
overnight, will resume application tomorrow. Otherwise will have to postpone until dry enough to blow.<br />
Looks like rate can be 7-8 loads/day possible in good conditions. No other issues.<br />
29. SIGNATURE<br />
Davis Lee 06/07/06<br />
Distribution: Original - CO (weekly); copies: COR, SO, PROJ ENG<br />
Previous editions of this form are obsolete<br />
30. TITLE<br />
Reveg Specialist<br />
Figure 9-3 | Example of<br />
contract daily diary<br />
31. ADDTL SPACE NEEDED<br />
(Continued on 6300-21)<br />
FS-6300-20 (5/96)<br />
<strong>Roadside</strong> <strong>Revegetation</strong>: An Integrated Approach to Establishing Native Plants and Pollinator Habitat<br />
218
IMPLEMENTATION<br />
addressed environmental regulations. While putting these reports together, take a few hours<br />
to organize the files and summarize the information in them. At the completion of the entire<br />
project, a final report is assembled based on the records that were kept throughout the project.<br />
For this reason, good record-keeping is essential.<br />
9.8 CARRY OUT QUALITY ASSURANCE<br />
To evaluate the effectiveness of implementation work, quality assurance standards are set<br />
and quality is monitored until each task is complete. The standards for quality assurance are<br />
linked to the DFCs that were set in the Planning Phase. In other words, many of the quality<br />
assurance standards translate aspects of the DFCs (e.g., desired percent vegetative cover)<br />
into short-term standards for implementation work (e.g., quantity of seeds applied). Details<br />
for quality assurance standards are defined in the contract specifications. The contractor will<br />
provide monitoring and inspection of their own work to assure that tasks are carried out as<br />
contracted. The revegetation specialist is responsible for assessing the quality of each task to<br />
assure all tasks were satisfactorily completed and all contract requirements have been met<br />
so the contractor can be released from further obligations and fully paid.<br />
On revegetation contracts, project objectives or standards are typically referred to as contract<br />
specifications. For example, a hydroseeding contract has a specification to apply 30 lb of seeds,<br />
1,000 lb of wood fiber mulch, and 50 lb/ac of tackifier. Quality control for this task might be<br />
to count the pounds of seeds, wood fiber, and tackifier going into the hydroseeder tank and<br />
measure the area to which the mix is applied. This assessment can assure that the rate of<br />
materials applied on a per-acre basis is appropriate. If the calculated amount of material per<br />
acre does not match the stated objective or contract specifications, the amount is adjusted<br />
to meet the specifications. Quality assessment not only assures that the contractor meets his<br />
or her obligations, but alerts them when specifications are not being met so that corrections<br />
can be made. For any task, quality assurance standards describe what form of measurements<br />
will be used to assess the work.<br />
9.9 IMPLEMENT EARLY MAINTENANCE AND MONITORING<br />
Just after implementation, short-term monitoring of the project begins. Short-term monitoring<br />
is necessary to confirm that efforts to establish vegetation on the site were effective, and to<br />
correct shortcomings to ensure project objectives are achieved. Quality assurance confirmed<br />
that the predetermined amounts of fertilizer, tackifier, hydromulch, and seeds were put into the<br />
hydroseeding tank as specified, and that the materials were placed in the correct areas at the<br />
correct density. Short-term monitoring then determines whether the revegetation objectives<br />
of the plan were met using these rates and materials. For example, were germination rates<br />
sufficient? Are the plants surviving and becoming established? Short-term monitoring assesses<br />
project development as it relates to the DFCs. If objectives are not being met, determining the<br />
reason(s) should become a priority before further revegetation work is proposed. Short-term<br />
monitoring and management of roadside revegetation projects is discussed in Chapters 11<br />
and 12. The information from short-term monitoring determines the level of maintenance<br />
that will be carried out to keep the project developing as planned.<br />
Timelines for roadside revegetation projects can span several seasons or even several years,<br />
which means that early maintenance of some road segments will be taking place at the same<br />
time that other segments are being implemented. Sometimes, maintenance work is built into<br />
the contract as part of implementation. Once contract work is completed and the contractor<br />
has been released (final satisfactory inspection), maintenance begins. Most maintenance<br />
tasks will have been planned in advance, such as applying fertilizers after three months, or<br />
passing through to control weeds. Early maintenance also includes identifying and correcting<br />
unforeseen problems quickly. Unforeseen events include weather problems (e.g., drought), an<br />
unexpected invasion of weeds, impacts of pests, vandalism, or other issues that might mean<br />
<strong>Roadside</strong> <strong>Revegetation</strong>: An Integrated Approach to Establishing Native Plants and Pollinator Habitat<br />
219
IMPLEMENTATION<br />
that the project will not develop as planned unless corrections are made. If corrective measures are<br />
needed, additional contracts may be issued to carry out the tasks. Road maintenance must also be<br />
coordinated with the revegetation plan. This could ensure that herbicide is not applied to the newly<br />
planted areas. Discussion of monitoring and management continues in Chapter 11.<br />
9.10 CONCLUSION<br />
The Implementation Phase calls for flexibility, adaptability, and opportunism. At times, the implementation<br />
work demands a willingness to travel to the construction site on short notice to assess issues<br />
as they arise. The process requires the vision to fulfill the overall project objectives while working<br />
with, and adapting to, the resources and conditions at hand. Keeping channels of communication<br />
open with the construction engineer and with the revegetation contractors is an essential aspect<br />
of effective implementation. Advanced scheduling and careful calculations of timing, supplies, and<br />
services needed are necessary. Issuing clear contracts for implementation work, regular evaluations<br />
and quality assurance as treatments are carried out, and good recordkeeping are necessary to ensure<br />
the revegetation is implemented effectively. Short-term maintenance and monitoring help to identify<br />
and correct any shortcomings quickly in order to fulfill project objectives. The Implementation Guides<br />
following this chapter provide further details about individual implementation tasks, including working<br />
with soil and site treatments, obtaining plant materials, installing and caring for plants.<br />
<strong>Roadside</strong> <strong>Revegetation</strong>: An Integrated Approach to Establishing Native Plants and Pollinator Habitat<br />
220
IMPLEMENTATION GUIDES<br />
10— Implementation<br />
Guides<br />
10.1 Soil and Site Treatments<br />
Fertilizers<br />
Tillage<br />
Mulches<br />
Topsoil<br />
Organic Matter Amendments<br />
Lime Amendments<br />
Beneficial Soil Microorganisms<br />
Topographic enhancements<br />
10.2 Obtaining Plant Materials<br />
Collecting Wild Seeds<br />
Collecting Wild Cuttings<br />
Collecting Wild Plants<br />
Nursery Seed Production<br />
Nursery Cutting Production<br />
Nursery Plant Production<br />
10.3 Installing Plant Materials<br />
Seeding<br />
Hydroseeding<br />
Installing Cuttings<br />
Installing Plants<br />
10.4 Post Installation Care of Plant Materials<br />
Introduction<br />
Animal Protection<br />
Shade Cards<br />
Tree Shelters<br />
Irrigation<br />
Invasive Plant Control<br />
Maintenance<br />
<strong>Roadside</strong> <strong>Revegetation</strong>: An Integrated Approach to Establishing Native Plants and Pollinator Habitat<br />
221
IMPLEMENTATION GUIDES<br />
Chapter 10 details the practices common to most revegetation projects. It is divided into 19<br />
subchapters, called implementation guides, which summarize the important information<br />
needed to execute each practice.<br />
Implementation guides are grouped into four subject areas:<br />
◾◾<br />
10.1 Soil and Site Treatments<br />
◾◾<br />
10.2 Obtaining Plant Materials<br />
◾◾<br />
10.3 Installing Plant Materials<br />
◾◾<br />
10.4 Post -Installation Care of Plant Materials<br />
The eight guides in Section 10.1, Soil and Site Treatments, explain how to improve site and<br />
soil conditions prior to the installation of plant materials. These guides cover the mitigating<br />
measures most often referenced in Chapter 5.<br />
Section 10.2, Obtaining Plant Materials, covers six implementation guides that pertain to<br />
collecting and propagating plant materials. These guides describe how to take the species<br />
lists developed in Chapter 6 and obtain the desired species in the wild as seed, cuttings, or<br />
seedlings. These guides also cover how to increase gathered wild collections at nurseries to<br />
ensure that the revegetation project has sufficient quantities of plant materials.<br />
Once plant materials are obtained from the wild or from nurseries, they are installed on the<br />
project site. The four guides in Section 10.3, Installing Plant Materials, cover the techniques<br />
for sowing seed, installing cuttings, and planting seedlings. They also cover how to determine<br />
the quality of the plant materials and how to care for them during storage and transportation.<br />
Section 10.4, Post -Installation Care of Plant Materials, outlines those practices that take place<br />
after the installation of plant materials. These practices help ensure that plants will become<br />
established. Practices include protecting seedlings from animal browsing, installing shade<br />
cards, irrigating, and installing tree shelters.<br />
10.1 SOIL AND SITE TREATMENTS<br />
Most post-construction sites are in poor condition for plant growth and will require the<br />
implementation of mitigating measures if full or even partial revegetation is expected. The<br />
following set of implementation guides cover the common mitigating measures for improving<br />
site conditions after construction. The implementation guide to fertilizers (Section 10.1.1,<br />
Fertilizers) covers how to determine the quantity, type, and application method of fertilizers.<br />
Section 10.1.2, Tillage, describes the common practices of tilling the soil to improve water<br />
infiltration and root growing environment. Improving seed germination and reducing surface<br />
erosion can be accomplished through the application of mulches, which is detailed in Section<br />
10.1.3, Mulches.<br />
Section 10.1.4, Topsoil, outlines the removal, storage, and application of topsoil to reconstruct<br />
soil on highly disturbed sites. For sites where topsoil is not available or in short supply, organic<br />
matter can be applied to improve post-construction soils. Section 10.1.5, Organic Matter<br />
Amendments, discusses the types of organic matter available, how to determine rates, and<br />
how it is applied. On some sites where the topsoil has been removed, pH levels will need to<br />
be raised to improve plant growth. Section 10.1.6, Lime Amendments, details the methods for<br />
determining liming rates, materials, and application methods. Many sites devoid of topsoil will<br />
require the introduction of mycorrhizae or nitrogen fixing plants. Section 10.1.7, Beneficial Soil<br />
Microorganisms, covers how to obtain and apply the appropriate sources of these important<br />
biological organisms. <strong>Revegetation</strong> projects can be enhanced by integrating plants into<br />
bioengineering structures, water capture features, or planting islands or pockets. These are<br />
discussed in Section 10.1.8, Topographic Enhancements.<br />
<strong>Roadside</strong> <strong>Revegetation</strong>: An Integrated Approach to Establishing Native Plants and Pollinator Habitat<br />
222
IMPLEMENTATION GUIDES<br />
10.1.1 FERTILIZERS<br />
Introduction<br />
Fertilizers are used to bring soil nutrients up to levels essential for establishing and maintaining<br />
a desired plant community. When applied within a soil fertility strategy, fertilizer can be a<br />
great tool for revegetation. In recent years, however, the use of fertilizers on roadsides has<br />
come under greater public scrutiny and more restrictive water quality laws. Many roads are<br />
adjacent to streams, lakes, or residential areas which can be affected by runoff or leaching of<br />
inappropriately applied fertilizers. It is important for the revegetation specialist to learn how<br />
to develop fertilizer prescriptions that integrate short- and long-term site fertility goals with<br />
water quality objectives.<br />
Use of commercial fertilizer is only one of many options to increase nutrient levels. A soil<br />
fertility strategy should also consider the application of topsoil, mulch, compost, wood<br />
waste, biosolids, and/or the planting of nitrogen-fixing species. This section will guide the<br />
revegetation specialist through the steps necessary to develop a site<br />
specific fertilizer prescription. The process for developing a fertilizer<br />
3,000<br />
prescription follows these steps:<br />
◾◾<br />
Determine nutrient thresholds and deficits<br />
◾◾<br />
Delineate areas to be fertilized<br />
◾◾<br />
Select fertilizer analysis<br />
◾◾<br />
Select fertilizer release rates<br />
◾◾<br />
Determine application rates<br />
◾◾<br />
Determine timing and frequency<br />
◾◾<br />
Select application method<br />
The fertilizer prescription is the basic instruction for ordering and<br />
applying fertilizers.<br />
Develop Nutrient Thresholds and Determine Deficits<br />
All sites have a minimum, or threshold, level of nutrients that must be met for each plant<br />
community to become functioning and self-sustaining (see Section 5.5, Nutrient Cycling).<br />
Threshold values can be determined by comparing soil tests from several disturbed and<br />
undisturbed reference sites (see Chapter 4). Disturbed reference sites should range from poor<br />
success to good. Based on nutrient values from good and poor revegetation sites, a target<br />
can be estimated between these values. Figure 10-1 gives an example of how a nitrogen<br />
threshold value was obtained by evaluating the total soil nitrogen levels from two disturbed<br />
reference sites, one considered “fair” revegetation and one considered “poor.” The threshold<br />
was set between these two nitrogen levels. Threshold levels represent the minimum level<br />
of nutrients needed for a site. However, higher nutrient levels are more desirable. In fact,<br />
the target nitrogen levels in this example for establishing and maintaining the original plant<br />
community would be closer to the undisturbed reference site.<br />
To determine whether any nutrient is deficient, post-construction soils must be collected and<br />
tested. The values obtained from these tests are compared against target values to determine<br />
if a deficiency exists. By comparing post-construction nutrient values against threshold<br />
values, the nutrient deficit can be estimated for each nutrient. Figure 10-2 shows an example<br />
of how nitrogen deficits are calculated based on post-construction soil tests and established<br />
threshold levels. In this example, total soil nitrogen is determined from soil tests. Since soil<br />
testing facilities report nutrients in a variety of rates, it is important to convert the rates to<br />
percentages. This is done by dividing values that come as gr/l, ppm, mg/kg, and ug/g by<br />
Total N (lbs/ac)<br />
2,500<br />
2,000<br />
1,500<br />
1,000<br />
500<br />
0<br />
D<br />
Undisturbed<br />
RS - Topsoil<br />
B<br />
Disturbed RS<br />
(“fair”<br />
revegetation)<br />
A<br />
Disturbed RS<br />
(“poor”<br />
revegetation)<br />
Soil Condition<br />
C<br />
Post<br />
Construction<br />
Soils<br />
Target Nitrogen<br />
Levels<br />
Threshold<br />
Deficit<br />
Figure 10-1 | Threshold<br />
values of nitrogen<br />
Threshold values are determined from<br />
reference sites. In this example, the<br />
threshold was established at 1,100 lb/<br />
ac, which was between the total N of<br />
a disturbed reference site with “poor”<br />
revegetation (A) and one with “fair”<br />
revegetation (B). Total N in post- construction<br />
soils was 650 lb/ac (C), making<br />
these soils deficient by 450 lb/ac. The<br />
undisturbed topsoil of reference sites<br />
showed a total N of 2,430 lb/ac (D),<br />
which sets the target levels of nitrogen<br />
between 1,100 and 2,430 lb/ac.<br />
<strong>Roadside</strong> <strong>Revegetation</strong>: An Integrated Approach to Establishing Native Plants and Pollinator Habitat<br />
223
క<br />
క<br />
క<br />
క<br />
క<br />
IMPLEMENTATION GUIDES<br />
10,000 to convert to a percentage. Converting<br />
percentage of nutrient in the lab sample to lb/<br />
ac of the nutrient requires multiplying percent<br />
of nutrient, soil layer thickness, soil bulk density,<br />
and fine soil fraction together with a constant<br />
(line D). This is the pounds of nutrient in an<br />
acre of soil on the post-construction site. To<br />
determine the nutrient deficit, the pounds<br />
of nutrients per acre is subtracted from the<br />
threshold level. This value becomes the basis<br />
for determining fertilizer prescriptions.<br />
The availability of many nutrients is regulated<br />
by soil pH. As discussed in Section 5.5.5, pH<br />
and Salts, many nutrients are tied up in low pH<br />
and high pH soils. Calcium and magnesium are less available at low pH; phosphorus, iron,<br />
manganese, boron, zinc and copper become unavailable in high pH soils. It is important to<br />
compare the pH of post-construction soils with reference site soils to determine if the pH is<br />
substantially different between the two. If the pH of post-construction soils is different, then<br />
taking measures to bring the pH closer to pre-disturbance values should be considered when<br />
developing a nutrient strategy (See Section 5.5.5.3, Mitigating for High pH Soils, Section<br />
5.5.5.4, Mitigating for Salts, Section 10.1.5, Organic Matter Amendments, and Section 10.1.6,<br />
Lime Amendments).<br />
Figure 10-2 | Determining<br />
nitrogen needs<br />
Determining the amount of nitrogen (N)<br />
needed to bring soils up to a nitrogen<br />
threshold can be calculated from equations<br />
shown in this spreadsheet.<br />
Delineate Areas to be Fertilized<br />
The post-construction project site should be delineated by distinct areas where fertilizer<br />
prescriptions differ. These differences are usually based on post-construction soil type changes,<br />
topsoil salvage, organic amendment additions, or the species and plant material being grown.<br />
Inset 10-1 | Spot-fertilizing seedlings<br />
Fertilizing shrub or tree seedlings is done by placing fertilizer in each seedling hole or on the soil<br />
surface after each seedling has been planted. This practice has some risks, because fertilizers release<br />
salts which can damage roots. Studies have shown that placing fertilizers or liming materials in the<br />
planting hole or on the soil surface around seedlings at the time of planting can significantly decrease<br />
seedling survival, especially on droughty sites (Nursery Technical Cooperative 2004; Jacobs and others<br />
2004; Walker 2002).<br />
To reduce the likelihood of seedling damage, follow these practices:<br />
Assess the need for fertilizer (do not apply if nutrient levels are adequate).<br />
Use slow release fertilizers with low salt indexes.<br />
Use low rates of fertilizer if applying at the time of planting.<br />
If applying in seedling hole at planting, use low fertilizer rates and place fertilizer to the side at<br />
least 3 inches away from the root system.<br />
Preferably broadcast fertilizers on the soil surface after seedlings are well established.<br />
When slow-release fertilizers are spread around well-established seedlings (several years after planting), seedlings often respond favorably,<br />
especially on highly disturbed sites. Walker (2005) showed that slow-release fertilizers broadcast three years after seedlings were planted,<br />
increased stem diameter and shoot volume over the control seedlings by 143 percent and 104 percent respectively five years after the fertilizer<br />
was applied. In this study, rates of .05 grams of nitrogen per seedling showed the greatest response (at 8 percent nitrogen analysis, this would<br />
be over a half pound of bulk slow-release fertilizer per plant).<br />
<strong>Roadside</strong> <strong>Revegetation</strong>: An Integrated Approach to Establishing Native Plants and Pollinator Habitat<br />
224
IMPLEMENTATION GUIDES<br />
Areas adjacent to, or that feed into, live water are often delineated and treated with lower rates<br />
of fertilizer. Note: If seedlings of shrubs and trees are being planted, spot fertilization should<br />
be considered in addition to, or in lieu of, fertilizing the entire area (Inset 10-1).<br />
Select Fertilizer Analysis<br />
There are a variety of commercially available fertilizers that can be used for fertilizing disturbed<br />
sites associated with road construction. The composition, or makeup, of the fertilizer is called<br />
the fertilizer analysis. Each container of fertilizer will have a label with a stated “guaranteed<br />
analysis” that indicates the percentage of each nutrient contained in the fertilizer (Figure 10-3).<br />
The label is your guide for determining which fertilizers to select and how much to apply.<br />
Table 10-1 and Table 10-2 give analysis values for many common fertilizers. Labels can also<br />
be obtained from the manufacturer or fertilizer representatives.<br />
The fertilizer label reports the nutrients as a percentage. The example label for a 50 lb bag of<br />
fertilizer in Figure 10-3 shows 21 percent nitrogen (N), which indicates that 10.5 lb of material<br />
in the bag is made up of nitrogen (50 * 21/100=10.5). The bag also contains 0.02 percent<br />
boron (B), which indicates that there is 0.01 lb boron in the bag. Calculating the amount of<br />
phosphorous and potassium in the bag is a little trickier because the convention for reporting<br />
these nutrients is P2O5 and K2O instead of elemental P and K. To convert P2O5 to P, the analysis<br />
for P is divided by 2.29. The percentage of P in the bag in Figure 10-3 is actually 2.2 percent,<br />
not 5 percent (5.0%/2.29=2.2). K2O is divided by 1.21 to obtain 1.6 percent K.<br />
Fertilizers are selected based on whether they contain the nutrients that are deficient on the<br />
project site. For example, if nitrogen, phosphorus, and boron are deficient, only fertilizers<br />
that contain these nutrients need be considered. Most fertilizers contain more than one<br />
nutrient. For instance, ammonium sulfate contains nitrogen and sulfur; triple superphosphate<br />
contains phosphorus, sulfur and calcium. Organic fertilizers often contain a range of macro<br />
and micronutrients. Fertilizers containing more than one nutrient should be considered if<br />
the nutrients contained in these fertilizers are deficient in post-construction soils. Table 10-1<br />
and Table 10-2 show the combination of nutrients that are available in some commercially<br />
available fertilizers.<br />
Fertilizer selection should focus first on the macronutrients (nitrogen, potassium, and<br />
phosphorus) that are deficient. These three nutrients are considered most important for<br />
long-term site recovery. If they are not deficient, chances are that the remaining nutrients are<br />
not either. On most highly disturbed sites, nitrogen is most likely to be deficient. This nutrient<br />
should be considered first when approaching fertilizer selection. Table 10-2 lists common<br />
nitrogen fertilizers with typical label analysis. Nutrients other than nitrogen can be supplied<br />
by fertilizers shown in Table 10-1. It is common to apply more than one fertilizer to meet the<br />
various nutrient requirements of the soil.<br />
21-5-20<br />
All Purpose Fertilizer<br />
Guaranteed Minimum Analysis<br />
Total nitrogen (N) 21.00 %<br />
Ammonium nitrogen (6.50 %)<br />
Nitrate nitrogen (12.40 %)<br />
Urea nitrogen (2.10 %)<br />
Available phosphate (P 2<br />
0 5<br />
) 5.00 %<br />
Soluble potash (K 2<br />
O) 20.00 %<br />
Boron (B) 0.02 %<br />
Copper (Cu) 0.01 %<br />
Iron (Fe) 0.10 %<br />
Water soluble manganese (Mn) 0.05 %<br />
Molybdenum (Mo) 0.01 %<br />
Water soluble zinc (Zn) 0.07 %<br />
Figure 10-3 | Example of a fertilizer<br />
label for an “all purpose” fertilizer<br />
The top numbers (in bold) represent the<br />
percentage of nitrogen, phosphorus,<br />
and potassium respectively (21%N,<br />
5% P2O5 , and 20% K2O). Multiplying<br />
these percentages by the pounds of<br />
bulk fertilizer applied per acre will give<br />
the quantity of each nutrient applied<br />
per acre. In this analysis, 500 pounds of<br />
fertilizer in this analysis would deliver<br />
105 lbs N, 25 lbs P2O5 ,100 lb K2O, 0.1<br />
lbs B, 0.05 lbs Cu, and so on.<br />
Select Fertilizer Release Rates<br />
Fertilizers are grouped by how quickly they break down and release nutrients to the soil. They<br />
are either fast-release or slow-release. Release rates are important because they will determine<br />
the rates at which nutrients become available to plants during the year. If nutrients are released<br />
during periods when vegetation cannot use them, some will be lost from the site through soil<br />
leaching. This is not only a waste of fertilizer, but can be source of ground water pollution.<br />
Fast-Release Fertilizers – Fast-release fertilizers are highly soluble fertilizer salts that dissolve<br />
rapidly and move quickly into the soil during rainstorms or snowmelt. The fertilizer label will<br />
give an indication of how quickly nutrients are released. Terms such as “soluble,” “available,”<br />
or “water soluble” indicate that these nutrients are released relatively quickly. “Ammonium”<br />
and “nitrate” forms of nitrogen are also indications of fast-release fertilizers. The fertilizer<br />
label shown in Figure 10-3 would indicate that this bag contains a fast-release fertilizer and<br />
most of the nitrogen would be relatively mobile and available to plant growth within the<br />
<strong>Roadside</strong> <strong>Revegetation</strong>: An Integrated Approach to Establishing Native Plants and Pollinator Habitat<br />
225
IMPLEMENTATION GUIDES<br />
Table 10.1 | Analysis of some common fertilizers<br />
Nitrogen fertilizers are shown in Table 10 2.<br />
Available Nutrients (typical values)<br />
Mono-ammonium<br />
phosphate<br />
% N % P O % P % K O % K % S % Ca % Cu % Fe % Mn % Zn % B % Mo % Mg<br />
11 48 21 24<br />
Ammonium phosphate 82<br />
Diammonium<br />
phosphate<br />
17 47 21 21<br />
Phosphorus<br />
Single superphosphate 19 12 20<br />
Triple superphosphate 45 20 1 13<br />
Phosphoric acid 53 23<br />
Dicalcium phosphate<br />
Soluble potassium<br />
phosphate<br />
Superphosphoric acid 80 35<br />
Potassium<br />
Potassium chloride 61 50<br />
Potassium nitrate 13 45 37<br />
Potassium sulphate 51 42 18<br />
EDTA 10 10 10 10<br />
HEEDTA 6 7 7 9<br />
NTA 8<br />
Micronutrients<br />
DTPA 10<br />
EDDHA 6<br />
Granular borax 11.3<br />
Copper sulfate 25<br />
Ferrous sulfate 20<br />
Sodium molybdate 40<br />
Zinc sulfate 36<br />
Zinc chelate 4<br />
Dolomitic limestone 21 11<br />
Ca & Mg<br />
Magnesium sulfate 43<br />
Gypsum 23<br />
Epsom salt<br />
(Epsogrow brand)<br />
13 10<br />
<strong>Roadside</strong> <strong>Revegetation</strong>: An Integrated Approach to Establishing Native Plants and Pollinator Habitat<br />
226
IMPLEMENTATION GUIDES<br />
Table 10.2 | Estimated nitrogen release rates for some commercially available fertilizers<br />
Most release rates were obtained from lab testing. How they actually release on-site will vary from site to site, depending on temperature, moisture,<br />
and whether the fertilizer was placed on the surface or incorporated into the soil. If slow-release fertilizers are broadcast on the soil surface, release<br />
rates should be slower than if incorporated into the soil where the conditions are better for break down. Arid sites should have slower rates of release<br />
than sites with high moisture; cold sites should take longer to release nutrients than warm sites. First year nitrogen release rates for fertilizers are<br />
identified with an asterisk were adapted from Claassen and Hogan (1998). Non-asterisk fertilizers were based on best guess estimates.<br />
Available Nutrients<br />
Source<br />
N %<br />
1st year N release<br />
(%)<br />
% P O % K O<br />
Ammonium nitrate 34 99 to 100 0 0<br />
Ammonium phosphate* 10 99 to 100 34 0<br />
Ammonium sulfate 21 99 to 100 0 0<br />
Anhydrous ammonia 82 99 to 100 0 0<br />
Biosol® * 7 50 to 70 2 3<br />
Calcium nitrate 15.5 99 to 100 0 0<br />
Diammonium phosphate 18 99 to 100 46 0<br />
Fertil-Fibers® * 6 50 to 70 4 1<br />
Gro-Power® * 5 95 to 99 3 1<br />
IBDU 29 95 to 99 3 10<br />
Osmocote 18-6-12® * 18 95 to 99 16 12<br />
Polyon PCU 40® * 30 99 to 100 0 0<br />
Potassium nitrate 13 99 to 100 0 45<br />
Ringer® * 5 50 to 70 10 5<br />
Sustane® * 5 50 to 70 2 4<br />
Urea 46 99 to 100 0 0<br />
<strong>Roadside</strong> <strong>Revegetation</strong>: An Integrated Approach to Establishing Native Plants and Pollinator Habitat<br />
227
IMPLEMENTATION GUIDES<br />
first growing season. Ammonium nitrate, ammonium sulfate, potassium nitrate, and urea are<br />
several examples of fast-release fertilizers.<br />
“Water soluble” or “available” nutrients do not always remain available or soluble after they<br />
are applied to the soil. Available forms of phosphorus, for instance, react in the soil to form less<br />
soluble compounds; potassium gets bound up in soils with moderate to high proportions of<br />
clay; and many of the micronutrients (e.g., zinc, copper, manganese) become unavailable when<br />
applied to soils with low pH (see Section 5.5.5, pH and Salts). Unless soils<br />
are sandy or rocky, it can be assumed that many of the nutrients stated<br />
as “available,” except for nitrogen and sulfur, will become somewhat<br />
immobile once they are applied. Over time, however, these nutrients<br />
100<br />
will become available for plant uptake.<br />
90<br />
The advantages of fast-release fertilizers are they are relatively inexpensive,<br />
easy to handle, immediately available to the plant, and can<br />
80<br />
be applied through a range of fertilizer spreading equipment. Disadvantages<br />
are that some nutrients, such as nitrogen, will leach through<br />
70<br />
the soil profile if they are not first taken up by plants or captured by soil<br />
microorganisms in the break down of carbon. Nitrates from fast-release<br />
60<br />
fertilizers have been found to leach through sandy soils to depths that<br />
50<br />
are 4 times the rate of rainfall (Dancer 1975). For example, for sites with<br />
annual rainfalls of 12 inches, nitrate could move to a depth of four feet<br />
40<br />
if it was not taken up by plants or soil organisms. At this depth, nitrogen<br />
would be out of range of most establishing root systems.<br />
Since fast-release fertilizers are salts, they have a potential to burn foliage<br />
and roots, especially when fertilizers are applied at high concentrations<br />
or when applied during dry weather (see Section 5.5.5.2, Mitigating for<br />
Low pH Soils). High concentrations of fast-release fertilizers can also<br />
Trifolium<br />
repens<br />
affect germination rates (Figure 10-4) because of the high soluble salt levels (Brooks and Blaser<br />
1964; Carr and Ballard 1979). Salt damage can be reduced by mixing fast-release fertilizers at<br />
lower concentrations or by applying them during rainy weather.<br />
Slow-Release Fertilizers – These fertilizers are designed to release nutrients at a much slower<br />
rate. To be labeled slow-release fertilizer, some states require a specific amount of nitrogen<br />
to be in a slow-release form. Forms of nitrogen shown on the label as “slowly-available” or<br />
“water- insoluble” are good indicators that a fertilizer is in a slow-release form. The advantages of<br />
using slow-release fertilizers are (1) nutrients are supplied at a time when plants are potentially<br />
growing; (2) less frequent applications; (3) less potential for leaching into ground water; and<br />
(4) less potential to cause salt injury. The disadvantages are that many slow-release fertilizers<br />
are bulky, cost more to purchase and apply, and are limited by the type of fertilizer application<br />
equipment that can be used. On the whole, however, slow-release fertilizers have greater<br />
applicability for revegetating disturbed sites than fast-release fertilizers.<br />
Slow-release fertilizers come in either organic or inorganic forms. Organic fertilizers include<br />
animal manures (including chicken, steer, cow), bone meal, fish emulsion, composted sewage<br />
sludge, and yard waste. Unprocessed organic fertilizers are hard to apply to roadside projects<br />
because they are bulky and high in moisture. Commercially available organic fertilizers, such<br />
as Fertil-Fiber and Biosol®, have been processed to remove most moisture, which makes<br />
them easier to apply through most fertilizer spreading equipment.<br />
The agents responsible for release of nutrients from organic fertilizers are decomposing soil<br />
bacteria. When soil bacteria are active, the release of nutrients is high; when dormant, the rate is<br />
low. The release of nutrients is therefore a function of moisture and temperature, which governs<br />
the rate of bacterial growth. Warm temperatures and high moisture, conditions conducive<br />
to plant growth, are also favorable for the break down of organic fertilizers. Because of this,<br />
the release of nutrients from the decomposition of organic fertilizers often coincides with<br />
the period when plants are growing (spring and fall) and the need for nutrients is greatest.<br />
% Germination<br />
30<br />
Without Fertilizer<br />
Festuca<br />
arundinacea<br />
With Fertilizer<br />
Festuca<br />
rubra<br />
Lolium<br />
perenne<br />
Figure 10-4 | Reduced<br />
seed germination after<br />
exposure to fertilizer<br />
Germination of seeds for some species<br />
can be reduced following exposure to<br />
a 10-30-10 fertilizer solution at a rate<br />
of 750 lbs fertilizer per 1,000 gallon hydroseeder<br />
(after Carr and Ballard 1979).<br />
<strong>Roadside</strong> <strong>Revegetation</strong>: An Integrated Approach to Establishing Native Plants and Pollinator Habitat<br />
228
IMPLEMENTATION GUIDES<br />
The nutrient release mechanism of slow-release organic fertilizers reduces the risk that highly<br />
mobile nutrients, such as nitrogen, will be released in the winter months when plants are<br />
incapable of absorbing them and the potential for leaching is greatest.<br />
Inorganic forms of slow-release fertilizers were developed for the horticulture and landscape<br />
industries where they have become an effective method of fertilizing nursery plants. These are<br />
an expensive form of fertilizer and have not been tested on roadside revegetation conditions.<br />
Nevertheless, they should not be overlooked in their potential applicability for some native<br />
revegetation projects.<br />
Inorganic slow-release fertilizers include ureaform, nitroform, IBDU (isobutylidene diurea),<br />
sulfur-coated urea, and polymer-coated nitrogen, phosphorus, and potassium. These fertilizers<br />
have varying mechanisms for nutrient release. Fertilizer granules coated with materials that<br />
release nutrients only during warm, moist conditions assure that nutrients are available<br />
during the period that plants are most likely to be growing. These coatings include sulfur<br />
(e.g., sulfur- coated urea) and polymers. Each fertilizer<br />
has its own formulated nutrient release rate, which<br />
varies from 3 months to 18 months. Release rates are<br />
available from the manufacturers for most inorganic,<br />
slow-release fertilizers. However, it should be noted that<br />
these rates were developed for 70° F soil temperatures<br />
(Rose 2002), which are higher than soil temperatures<br />
in the western United States during the spring and fall<br />
when roots and foliage are growing. If roadside soils<br />
are colder than 70° F, nutrient release will take longer<br />
than what the manufacturer states.<br />
Determine Fertilizer Application Rates<br />
A Nitrogen (N) de cit 769 lbs/ac Calculated from example in Figure 10.2<br />
B N in fertilizer 8 % From fertilizer label<br />
C Total bulk fertilizer needed: A * 100/B = 9,613 lbs/ac To eliminate de cit<br />
D Est. rst year N release rate of fertilizer 40 % From Table 10.2 or obtain from manufacturers<br />
E Available N rst year in fertilizer from 1st<br />
year application: B * C * D/10,000 = 308 lbs/ac N available to plants and soil<br />
F Short-term N target ( rst year) 50 lbs/ac Depends on C:N ratio, plant cover, and age (see text)<br />
G Excess nitrogen: E - F = 258 lbs/ac Wasted N-could leach from soils into water<br />
H Adjusted rates of fertilizer to add:<br />
F * 100/D * 100/B = 1,563 lbs/ac To assure that N released rst year is not wasted<br />
I Remaining N de cit: A - (H * B/100) = 644 lbs/ac Additional N needed as later applications<br />
of fertilizer<br />
Fertilizer rates are determined for each deficient nutrient<br />
as shown in Figure 10-5. The calculation in this example<br />
was done to eliminate a nitrogen deficit of 769 lb/ac. Using a slow- release fertilizer with 8<br />
percent nitrogen, the amount of bulk fertilizer necessary to bring nitrogen levels to minimum<br />
targets is 9,613 lb/ac (769*100/8=9,613), which is an extremely high rate of fertilizer to apply. On<br />
the other hand, using a fast-release fertilizer with higher nitrogen analysis, such as ammonium<br />
nitrate (33 percent N), would reduce the amount of bulk fertilizer to 2,330 lb (769*100/33<br />
= 2,330). While there would be less weight with this more concentrated fertilizer, this is<br />
considered a dangerous rate of fertilizer to apply. It would be risky and wasteful considering<br />
the potential for leaching high amounts of nitrate through soil into the ground water or<br />
the possibility of creating high salt levels toxic to plant growth. This example illustrates the<br />
difficulty in developing fertilizer prescriptions to meet long-term nutrient targets. How does<br />
the revegetation specialist develop a fertilizer strategy to meet short-term and long-term<br />
plant needs without over- or under-fertilizing?<br />
The approach presented in this section is based on building long-term nutrient objectives<br />
around meeting short-term nutrient needs of the establishing plant community. For example,<br />
applying fertilizer at the time of sowing requires very low rates of available nitrogen to meet<br />
the first year needs of the establishing vegetation. Any extra fertilizer has the potential of<br />
being wasted. As the vegetation develops over the next few years, the ability of the plant<br />
community to take up more available nutrients increases and the fertilizer rates would be<br />
gradually increased. This practice, however, is seldom employed in roadside revegetation<br />
projects. In fact, the typical fertilizer practice does just the opposite – high rates of fertilizers<br />
are put on with seeds before there are even plants to utilize the available nutrients. In this<br />
practice, there is no return to the site in later years to assess whether additional applications of<br />
fertilizers might be essential for vegetation maintenance or growth. The approach we advocate<br />
Figure 10-5 | Example of<br />
calculating fertilizer application<br />
rates to reduce nitrogen<br />
<strong>Roadside</strong> <strong>Revegetation</strong>: An Integrated Approach to Establishing Native Plants and Pollinator Habitat<br />
229
IMPLEMENTATION GUIDES<br />
is applying the appropriate mix of fertilizers to meet the annual needs of the vegetation while<br />
building long- term nutrient capital until the plant community is self-sustaining.<br />
Since nitrogen is the key nutrient in establishing plant communities, this approach requires<br />
setting short-term and long-term nitrogen requirements of the plant community being<br />
established. Calculating long-term nitrogen targets is covered in Section 10.1.1.2, Develop<br />
Nutrient Thresholds and Determine Deficits. Short-term targets are more difficult to set because<br />
they change over time. They are governed by:<br />
◾◾<br />
Soil type<br />
◾◾<br />
C:N<br />
◾◾<br />
Climate<br />
◾◾<br />
Amount of vegetative cover<br />
◾◾<br />
Type of vegetation<br />
◾◾<br />
Age of vegetation<br />
Some general guides can be helpful in setting short-term nutrient targets for available nitrogen.<br />
Applying fertilizer at the time of sowing, for instance, will require very low rates of available<br />
nitrogen the first year since vegetation will not be established well enough to utilize it. Rates<br />
can be set below 25 lb/ac when applying fertilizer with seeds. When vegetation is becoming<br />
established, available N can range from 25 to 50 lb/ac (Munshower 1994: Claassen and Hogan<br />
1998). After plant establishment, rates can be increased to account for increased plant utilization<br />
above this amount. These suggested rates should be adjusted upward on sites where high<br />
C:N soil amendments, such as shredded wood or straw, have been incorporated into the soil<br />
to compensate for nitrogen tie-up. Calculating precise rates of supplemental nitrogen for<br />
incorporated organic amendments is very difficult. In nursery settings, rates of over 100 lb of<br />
supplemental nitrogen have been recommended for incorporated straw, sawdust, and other<br />
high C:N materials (Rose and others 1995). However, applying supplemental rates in wildland<br />
settings should be done with caution, utilizing trials where possible to determine more precise<br />
fertilizer rates. Utilizing periodic soil analysis can give the revegetation specialist a better<br />
understanding of the soil nitrogen status. To keep testing costs low, only available nitrogen<br />
and total nitrogen need to be tested (see Section 5.5, Nutrient CyclingNutrient Cycling, for<br />
soil sampling and testing methods).<br />
In determining how much fertilizer to apply, it is important to estimate how much nitrogen will<br />
be available the first year and the second year. Manufacturers have this information for most<br />
inorganic slow release fertilizers, and Claassen and Hogan (1998) performed tests on organic<br />
slow release fertilizers (shown in Figure 10-2). Release rate determinations are performed in<br />
the laboratory. How fertilizers actually release in the field will vary by the environment. In the<br />
example described in Figure 10-5, the first year release rate of nitrogen from the slow-release<br />
organic fertilizer was estimated at 40 percent. This was a guess based on the manufacturer’s<br />
estimates of 55 percent release, but because it was being applied to a semi-arid site where<br />
decomposition of the fertilizer would be slow, the rate was dropped to 40 percent (Line D in<br />
10.5). If 40 percent of the nitrogen became available the first year, 60 percent would remain<br />
for the following years (Line E). At this release rate, 308 lb/ac of nitrogen would become<br />
available the first year after application (Line F). While this is an extremely high rate, consider<br />
the application of ammonium nitrate at 100 percent first year release, which would supply<br />
769 lb/ac (Line A) of immediately available nitrogen. Recalculating fertilizer rates using a more<br />
realistic rate of 50 lb/ac available nitrogen needed the first year after application (Line F), bulk<br />
fertilizer application rates would be 1,563 lb/ac (Line H). At this new rate, the site would have<br />
sufficient first- and second-year supplies of nitrogen, but lack adequate nitrogen the following<br />
years. The remaining deficit to meet long-term nitrogen targets would be approximately<br />
644 lb/ac, which must be supplied through later applications of fertilizer or other carriers<br />
of nitrogen (topsoil, compost, biosolids, wood waste, mulch, and nitrogen-fixing plants). A<br />
<strong>Roadside</strong> <strong>Revegetation</strong>: An Integrated Approach to Establishing Native Plants and Pollinator Habitat<br />
230
IMPLEMENTATION GUIDES<br />
nutrient strategy should be built around reducing<br />
nitrogen deficits over time.<br />
The process outlined in Figure 10-5 can be used<br />
for other deficient nutrients. Understanding the<br />
availability of other nutrients is problematic. Many<br />
nutrients become fixed in the soils and their availability<br />
is dependent on highly variable factors such<br />
as soil texture, pH, and placement in the soil. It is<br />
a reasonable assumption that unless the soils are<br />
sandy or very rocky, that all nutrients, aside from<br />
nitrate or ammonium forms of nitrogen, are relatively<br />
unavailable the first year after application. With time,<br />
however, they will slowly become available.<br />
Determine Timing and Frequency<br />
The primary reason to fertilize is to supply nutrients<br />
during periods when plants can take them up for<br />
growth. The demand for nutrients changes throughout<br />
the year depending on the physiological state of<br />
each plant. In nursery settings, fertilizers are adjusted<br />
throughout the year at rates and formulations that<br />
correspond to the requirements of the plant. While<br />
we do not have that capability in wildland settings,<br />
we can use the fertilizers available to us more wisely<br />
by applying our understanding of how the assortment<br />
of fertilizers function in meeting the nutrient<br />
requirements of plant communities. At least two plant<br />
growth phases should be considered in the timing of<br />
fertilizer application: (1) seed germination and plant<br />
establishment and (2) post-plant establishment.<br />
Seed Germination and Plant Establishment Phase<br />
– Traditionally, fast-release fertilizers have often<br />
been applied at high rates in the fall in the northern<br />
United States during the seed sowing operation. This<br />
practice is a quick and easy way to apply fertilizers.<br />
However, the timing can result in ineffective and<br />
wasteful use of fertilizers (Figure 10-6B) (Dancer<br />
1975). In addition, application of fast-release fertilizers<br />
at this time can potentially pollute water sources.<br />
Slow-release fertilizers are more appropriate for<br />
seed sowing in the fall because much of the fertilizer<br />
should last through the winter, releasing nutrients<br />
in the spring (Figure 10-6D).<br />
Plant Growth<br />
Fall Winter Spring Summer Fall<br />
Time<br />
E<br />
Perennial grasses and forbs do not require high levels of nitrogen for germination and early<br />
establishment (Reeder and Sabey 1987). In fact, elevated levels of available nitrogen can be a<br />
problem because it encourages the rapid establishment and growth of annual weed species<br />
over slower-growing perennial grass and forbs (McLendon and Redente 1992; Claassen<br />
and Marler 1998). Applying high rates of fertilizers during germination and early seedling<br />
establishment should be reconsidered in terms of how much fertilizer is actually needed in<br />
Time<br />
the establishment phase and how much will be available later for plant growth (see Section<br />
10.1.1.6, Determine Fertilizer Application Rates).<br />
N Availability<br />
A<br />
Sowing<br />
Germination<br />
A. When seeding occurs in the fall, seeds typically<br />
do not<br />
C<br />
germinate until the following Plant Growth spring,<br />
at which time there is rapid growth. Fast-release During<br />
the summer, growth rates slow. Growth rates<br />
accelerate again in the fall.<br />
N Availability<br />
N Availability N Availability<br />
Fall Winter Spring Summer Fall<br />
Time<br />
Plant Growth<br />
A<br />
Sowing<br />
E<br />
Germination<br />
Plant Growth<br />
Fast-release<br />
Slow-release<br />
Fall Winter Spring Summer Fall<br />
Time<br />
Fall Winter Spring Summer Fall<br />
C. Fast-release fertilizer applied in the spring after<br />
plants Time<br />
C are established is more effective Plant Growth because<br />
Fast-release<br />
plants are rapidly growing and can take up nutrients.<br />
There are fewer storms in the spring to leach<br />
nutrients from the soil.<br />
N Availability<br />
N Availability<br />
N Availability<br />
A<br />
Plant Growth<br />
Fall Winter Spring Summer Fall<br />
Time<br />
Sowing<br />
Germination<br />
E<br />
Plant Growth<br />
Fast-release<br />
Slow-release<br />
Fall Winter Spring Summer Fall<br />
Time<br />
E. Once vegetation has become established, plant<br />
growth C will take place in the fall. Fertilizers Plant Growth applied<br />
at this Fall time will Winter be taken Spring up by growing Summer Fast-release vegetation. Fall<br />
Since slow-release fertilizers Time might not be immediately<br />
available, small amounts of fast-release<br />
fertilizers can be added to give immediate release<br />
of nutrients.<br />
N Availability<br />
N Availability<br />
Fall Winter Spring Summer Fall<br />
Time<br />
Plant Growth<br />
Fast-release<br />
Slow-release<br />
Fall Winter Spring Summer Fall<br />
N Availability<br />
B<br />
Fall Winter Spring Summer Fall<br />
Time<br />
B. When fast-release fertilizers (dashed line) are<br />
applied<br />
D<br />
in the fall during seeding, Plant fertilizers Growth move<br />
into the soil with fall rains. However, Slow-release there is<br />
no vegetation to take up the nutrients. Mobile<br />
nutrients, such as nitrogen, are leached and<br />
unavailable in the spring when the establishing<br />
plants require them.<br />
N Availability<br />
N Availability N Availability<br />
B<br />
F<br />
Plant Growth<br />
Fast-release<br />
Fall Winter Spring Summer Fall<br />
Time<br />
Plant Growth<br />
Fast-release<br />
Plant Growth<br />
Fast-release<br />
Slow-release<br />
Fall Winter Spring Summer Fall<br />
Time<br />
Fall Winter Spring Summer Fall<br />
D. Slow-release fertilizers (dotted line) release<br />
nutrients Time<br />
D at a much slower rate. Plant When Growth they are<br />
Slow-release<br />
N Availability<br />
N Availability<br />
N Availability<br />
B<br />
Plant Growth<br />
Fall Winter Spring Summer Fast-release Fall<br />
Time<br />
F<br />
Plant Growth<br />
Fast-release<br />
Slow-release<br />
Fall Winter Spring Summer Fall<br />
Time<br />
F. Slow- and fast-release fertilizers can be applied in<br />
the Dearly spring before rapid root and Plant vegetative<br />
Growth<br />
growth. Fall Fast-release Winter Spring fertilizers Summer can Slow-release supplement Fall<br />
slow-release fertilizers Time by supplying immediately<br />
available nutrients.<br />
N Availability<br />
N Availability<br />
applied in the fall, most of the nutrients should<br />
still be available in the following spring.<br />
Fall Winter Spring Summer Fall<br />
Time<br />
Figure 10-6 | Strategies for applying<br />
F slow and fast release Plant fertilizers Growth<br />
Fast-release<br />
Fertilizers should be Slow-release applied during<br />
seasons and at rates and formulations<br />
that release nutrients when native plants<br />
can efficiently draw them from the soil.<br />
Fall The following Winter Spring are strategies Summer for Fall applying<br />
slow and fast Time release fertilizers.<br />
<strong>Roadside</strong> <strong>Revegetation</strong>: An Integrated Approach to Establishing Native Plants and Pollinator Habitat<br />
231
IMPLEMENTATION GUIDES<br />
One strategy is to apply little or no fertilizer during sowing and wait until seeds have germinated<br />
and grown into small seedlings before fertilizers are applied (Figure 10-6C). This strategy assures<br />
that nutrients are available when the seedlings actually need them, not before. Fertilizers<br />
applied as slow-release form are preferred because they have less potential for causing salt<br />
damage when applied over emerging seedlings. Another strategy is to wait until the following<br />
fall (Figure 10-6E) or spring (Figure 10-6F) of the second year to fertilize.<br />
Post-Establishment – Once vegetation is established (one or two years after sowing),<br />
fertilizers can be applied at higher rates with the assurance that nutrients will be taken up by<br />
the plants. Slow- and fast-release fertilizers can be combined to provide short- and long-term<br />
nutrient requirements (Figure 10-6E and F). Spring applications of fast-release fertilizers are<br />
more effective than fall application because of the higher nutrient requirements of growing<br />
plants during that period (Figure 10-6F). Spring applications also have less risk of damaging<br />
vegetation through fertilizer salts because precipitation in the spring is typically frequent<br />
enough to wash fertilizers from the foliage. It is always prudent to check the conductivity of a<br />
fertilizer solution being applied over existing vegetation to avoid salt damage. A conductivity<br />
meter can be used to measure the conductivity of the solution (see Section 5.5.5, pH and<br />
Salts). If rates exceed 3,500 mS/cm, then diluting the solution or applying the fertilizer during<br />
rainy weather is advised. Fall application of fertilizers should be done at lower rates and early<br />
enough for nutrients to be utilized by the growing vegetation. Fertilizer rates can be adjusted<br />
based on plant phenology or dormancy to minimize salt damage. Fertilizing dormant plants<br />
is also a possible way to minimize damage.<br />
Select Fertilizer Application Method<br />
Since nutrients have varying degrees of mobility (nitrogen is highly mobile; phosphorus and<br />
many micronutrients are relatively immobile), how fertilizers are applied will determine how<br />
accessible nutrients are to the root system. If nutrients are highly mobile, the easiest and<br />
least expensive method is to apply fertilizer to the soil surface, or broadcast, to allow rainfall<br />
or snowmelt to release and move nutrients into the soil. A more difficult, yet more effective<br />
application method for immobile nutrients is to incorporate, or mix, fertilizers into the soil<br />
surface so fertilizer granules are uniformly distributed within the soil and accessible by root<br />
systems.<br />
Broadcast Fertilizer Application – For fertilizers with highly mobile nutrients, such as<br />
nitrogen and sulfur, broadcast application on the soil surface is an appropriate practice.<br />
For immobile nutrients, broadcast fertilizer application can be relatively ineffective. These<br />
nutrients often become immobilized at the soil surface and are very slow to move into the<br />
rooting zone where they can be accessed. Depending on soil characteristics, such as pH and<br />
clay content, some immobile nutrients will take years to move only a few inches from the<br />
point of fertilizer placement.<br />
There are a variety of dry fertilizer spreaders available, from hand-operated to tractor-mounted.<br />
Most equipment is limited to moderate slope gradients (less than 1V:2H). With all forms of<br />
spreaders, they must be calibrated before they are used to assure that the correct rates are<br />
being applied.<br />
Hydroseeding equipment can be used to apply fertilizer in the same operation with seeds,<br />
tackifiers, and hydromulch (see Section 10.3.2, Hydroseeding). This equipment can also be<br />
used solely to apply fertilizers, especially after vegetation has become established. A great<br />
advantage to using hydroseeding equipment is that it can uniformly spread fertilizers on<br />
steep slopes and a variety of topographies. In addition, a combination of fertilizers can be<br />
easily mixed in the hydroseed tank and applied at relatively even proportions because they<br />
are in a solution. This is especially useful for applying small quantities of fertilizer, such as<br />
micronutrients, which are difficult to spread evenly over large areas.<br />
<strong>Roadside</strong> <strong>Revegetation</strong>: An Integrated Approach to Establishing Native Plants and Pollinator Habitat<br />
232
IMPLEMENTATION GUIDES<br />
Fertilizer Incorporation – It is important that nutrients that are deficient and have low mobility<br />
be incorporated into the soil prior to sowing or planting. Incorporation is possible on gentle<br />
slopes, but becomes very difficult with increasing slope gradients because of equipment<br />
limitations. On sites where fertilizers containing immobile nutrients cannot be incorporated,<br />
an alternative is to create roughened soil surfaces (see Section 10.1.2, Tillage) prior to fertilizer<br />
application. Broadcast fertilizers will accumulate in the depressions of the surface. As soil<br />
gradually moves into the depressions over time (through water erosion or surface ravel), the<br />
broadcast fertilizers will become covered with soil. When this happens, immobile nutrients<br />
are accessible by roots and nutrient uptake is possible. Surface roughening also reduces the<br />
potential for fertilizers to move off-slope through erosion.<br />
Some agricultural spreaders, called fertilizer banders or injectors, are designed to place fertilizer,<br />
or other soil amendments including mycorrhizae, at varying depths in the soil. Usually this<br />
equipment has a ripping shank or tine that loosens the soil, followed by a tube that drops<br />
the fertilizer, and coulters or rollers that close up the furrow. As the bander is pulled through<br />
the soil, a line, or band, of fertilizer is created. Sowing and banding are often combined in<br />
one piece of equipment and applied at the same time. Fertilizer banders were developed<br />
for agricultural use and are limited by rock content and slope gradients. However, there are<br />
injectors that have been develop for wildland conditions (St. John 1995).<br />
The most common approach to incorporating fertilizer is accomplished in two operations,<br />
broadcasting fertilizer on the soil surface and tilling it into the soil. Hydroseeders and broadcast<br />
fertilizer spreaders, as discussed above, are means of applying the fertilizer evenly over the<br />
site, then the fertilizer is tilled into the soil using equipment outlined in Section 10.1.2, Tillage.<br />
10.1.2 TILLAGE<br />
Introduction<br />
Tillage is defined in this section as any mechanical action applied to the soil for the purposes<br />
of long-term control of soil erosion and reestablishment of native plant communities. Tillage<br />
equipment was developed for agricultural soils and has limited applicability for steep, rocky<br />
sites typically encountered in wildland revegetation. This section will discuss the agricultural<br />
equipment that can be used for wildland revegetation as well as equipment specifically<br />
developed for these extreme conditions.<br />
There are several reasons to use tillage in a revegetation project, including to:<br />
◾◾<br />
Shatter compacted soils<br />
◾◾<br />
Incorporate soil amendments<br />
◾◾<br />
Roughen soil surfaces<br />
These objectives often overlap. For example, incorporating organic matter also loosens<br />
compacted soils and roughens soil surfaces. Identifying the objectives for the project will<br />
lead to selecting and effectively using the appropriate equipment to achieve the desired soil<br />
conditions (Table 10-3).<br />
Shatter Compacted Soils<br />
One of the primary purposes for tilling is to loosen compacted soils. When performed correctly,<br />
tillage can increase porosity in the rooting zone, increase infiltration rates, and increase surface<br />
roughness. For revegetation work associated with road construction and road obliteration,<br />
tillage to break up deep compaction is important for reestablishing plant communities.<br />
Shattering compaction at depths of at least 2 feet is essential for the healthy growth of most<br />
perennial plant species. Without this measure, it will take many decades for deep compaction<br />
<strong>Roadside</strong> <strong>Revegetation</strong>: An Integrated Approach to Establishing Native Plants and Pollinator Habitat<br />
233
IMPLEMENTATION GUIDES<br />
Table 10.3 | Types of tillage and equipment<br />
The appropriate tillage equipment for the project depends on project objectives.<br />
Shattering Mixing Imprinting<br />
Objectives<br />
Rippers & subsoilers<br />
Disks, plows, excavator<br />
attachments<br />
Dixon imprinter, excavator<br />
attachments, trackwalking<br />
Loosen compacted soil Good Good Poor<br />
Incorporate amendments Poor Good Poor<br />
Roughen surface Good Good Good<br />
to recover its original bulk density (Wert and Thomas 1981; Froehlich and others 1983). In a<br />
review of tillage projects on rangeland soils, Gifford (1975) found that deep tillage greatly<br />
reduced runoff, while shallow tillage had little effect.<br />
Tillage alone will not return a soil to its original bulk density or hydrologic function (Figure<br />
10-7), nor will the effects of tillage last indefinitely, especially in non-cohesive soils (Onstad<br />
and others 1984). There are many factors that affect the return to bulk densities and infiltration<br />
rates typical of undisturbed reference sites. These include the type of tillage equipment used,<br />
penetration depth, soil moisture during tillage, soil texture, presence of topsoil, and organic<br />
matter content.<br />
There are two fundamentally different equipment designs for reducing compaction. One<br />
design simply lifts and drops soil in place, shattering compacted soil in the process. This type<br />
of equipment includes rock rippers, subsoilers, and “winged” subsoilers. The second design<br />
churns and mixes the soil. Equipment that falls into this category includes disk harrows, plows,<br />
spaders, and attachments to excavators. This type of equipment can also incorporate soil<br />
Inches per Hour<br />
3<br />
2<br />
1<br />
Granitic<br />
Metasedimentary<br />
1st 2nd 3rd 1st 2nd 3rd<br />
Rainfall Event<br />
Rainfall Event<br />
Ripped & Mulched<br />
Ripped<br />
Prior to Ripping<br />
Permeability rates for<br />
lightly disturbed forest soils<br />
100 year rainfall rate<br />
Snowmelt rate<br />
Figure 10-7 | Benefits of ripping<br />
and mulching vary by soil type<br />
Short-term benefits of ripping (using a winged<br />
subsoiler) and mulching road surfaces vary by soil<br />
type, as shown in rainfall simulation tests on sites in<br />
northern Idaho. Granitic soils responded to ripping<br />
and mulching with increased permeability during<br />
the first storm, but permeability rates returned to<br />
near pre-treatments rates with successive rainfall<br />
events. Metamorphic soils reacted positively to<br />
both treatments and maintained high permeability<br />
rates after three rainfall events. Mulching<br />
improved permeability in both soil types. In fact,<br />
for metamorphic soils, the combination of ripping<br />
and mulching increased permeability to rates<br />
that were typical of lightly disturbed forest soils<br />
(adapted from Luce 1997).<br />
<strong>Roadside</strong> <strong>Revegetation</strong>: An Integrated Approach to Establishing Native Plants and Pollinator Habitat<br />
234
IMPLEMENTATION GUIDES<br />
amendments, like organic matter or fertilizers, in the same operation, and will be discussed<br />
in Section 10.1.2.3, Incorporate Soil Amendments.<br />
The terms subsoiling and ripping are used interchangeably to describe soil shattering operations.<br />
Soil shattering involves pulling one tooth, or a set of teeth, at various depths through<br />
the soil to break up compaction created by equipment traffic. The rock ripper is a common<br />
tool found on most construction sites. When used to break up compaction, one or two large<br />
ripper tines are typically pulled behind a large bulldozer at 1 to 3 ft soil depths. While this<br />
equipment will break up compaction in portions of the soil where the ripper tines have been<br />
dragged, it does not effectively fracture the compacted soil between the ripper tine paths<br />
(Andrus and Froehlich 1983). The effectiveness of rippers can be increased by multiple passes<br />
through the soil or by adding tines to the toolbar. Even on small machines, up to 5 tines can<br />
be added to increase soil shatter.<br />
Rippers have also been adapted to increase soil lift between tine paths by welding wide metal<br />
wings to the bottom of each tine. These wings are angled upwards so the soil between the<br />
tines has greater lift, and therefore greater shatter when the soil drops behind the wing. When<br />
two or more tines are placed together on a toolbar, they work in tandem to more effectively<br />
break up compaction. The resulting equipment is called the “winged” subsoiler (Figure 10-8).<br />
Andrus and Froehlich (1983) found that the winged subsoiler was a far more effective tool<br />
for breaking up compaction. This equipment fractured over 80 percent of the compaction<br />
in several operational tests, as compared to 18 percent to 43 percent for rock rippers and 38<br />
percent for brush rakes. However, winged subsoilers are not practical in all soils, especially<br />
those with high rock fragments, buried wood, or slopes greater than 3H:1V gradients.<br />
Achieving good shatter at deeper soil depths requires that tillage equipment be adjusted for<br />
site-specific soil conditions, especially soil texture, soil moisture, and large rock content. Soils<br />
should not be too moist during ripping because the tines will slice through the soil, causing<br />
very little soil shatter. Subsoiling when soils are extremely dry can bring up large blocks of<br />
soils, especially when the soils are high in clays (cohesive soils).<br />
The winged subsoiler and rock ripper should be adjusted to meet the soil conditions of the<br />
site. Making the proper adjustments can lead to greater shatter and more efficient use of<br />
tractor equipment. These adjustments include:<br />
◾◾<br />
Tine depth<br />
◾◾<br />
Tine spacing<br />
◾◾<br />
Number of tines<br />
◾◾<br />
Wing width and angle (for winged subsoiler)<br />
Photo: Brent Roath.<br />
Figure 10-8 | Winged subsoiler<br />
Soil shattering becomes more effective<br />
when wings are mounted on subsoil<br />
tines. This equipment is called a winged<br />
subsoiler.<br />
Tines should be set above the critical depth for the condition of the soil. If tines are set below<br />
this depth, the tines will not shatter the soil (Figure 10-9B). The critical depth changes for soil<br />
type and tine configuration. Soils high in clays with high soil moisture have shallower critical<br />
depths (Andrus and Froehlich 1983). The closer the spacing of tines, the greater the shattering.<br />
The more tines that are placed on a toolbar, the more area of soil can be shattered. However,<br />
where large rocks or large slash are present, closely spaced tines will drag these materials out<br />
of the ground. Three to five tines are typically used for most soil types. Wing size, angle, and<br />
shape of the tines all play a role in breaking up compaction (see Inset 10-2 for specifications<br />
for winged subsoiler).<br />
<strong>Roadside</strong> <strong>Revegetation</strong>: An Integrated Approach to Establishing Native Plants and Pollinator Habitat<br />
235
IMPLEMENTATION GUIDES<br />
Inset 10-2 | Contract specifications for a winged subsoiler<br />
A winged subsoiler consists of a self-drafting, winged subsoiler on a dolly mount, sized for<br />
use with a D-7 tractor. The unit consists of three winged ripper tines capable of extending<br />
12 to 34 inches below the draw bar. Wings shall be at least 20 inches wide with a 2 inch<br />
lift of the wings from horizontal. Tines shall have an individual tripping mechanism<br />
that automatically resets; tine spacing must be adjustable and individual tines must be<br />
removable. Various wing patterns must be available and easily interchangeable. Implement<br />
must be capable of achieving maximum fracture of compacted soils (minimum 24 inches)<br />
in one pass (Adapted from Wenatchee National Forest contract specifications).<br />
A. Single tine<br />
0<br />
1’<br />
2’<br />
C. Three tines<br />
0<br />
1’<br />
2’<br />
B. Single tine—too deep<br />
Critical<br />
Depth<br />
Typical settings for rock ripper and winged subsoiler equipment configurations are shown in<br />
Table 10-4. These are suggested settings and should not be applied without first monitoring<br />
the results of the equipment on the project soils. The most direct method for monitoring soil<br />
shatter is to measure the depth to the compacted soil with a soil penetrometer or shovel (see<br />
Section 5.3.1.1, Soil Structure – How to Assess). Immediately after a pass is made with the tillage<br />
equipment, the penetrometer is pushed into the soil and the depth to the compacted layer is<br />
recorded. Measurements are taken every 6 inches across a small transect perpendicular to the<br />
direction of the tractor and spanning the width of the tillage disturbance. Plotting the depths<br />
to compaction on graph paper gives a cross-section of the shattering pattern (Figure 10-9 is<br />
an example of plotting soilshatter). If the shattering pattern is inadequate, adjustments can<br />
be made to the tine depth, tine spacing, and angle of the wing. If these adjustments fail to<br />
increase soil shatter, a second and even third pass by the ripper or winged subsoiler should<br />
be considered. Successive passes should be made at 45 to 90° angles from the first pass to<br />
achieve the greatest benefit.<br />
Table 10.4 | Recommended design features for some tillage equipment<br />
Item Implement Feature<br />
Recommended Design<br />
Disk<br />
harrow<br />
Brush<br />
blade<br />
Rock<br />
rippers<br />
Wings<br />
of<br />
subsoilers<br />
Disk diameter<br />
Number of disks<br />
Average disk weight<br />
Disk arrangement<br />
Max slope (cross slope travel)<br />
Max slope (down slope travel)<br />
Tine spacing<br />
Tine depth<br />
Max slope (cross slope travel)<br />
Max slope (down slope travel)<br />
Tine spacing<br />
Ripping depth<br />
Number of tines<br />
Max slope (cross slope travel)<br />
Max slope (down slope travel)<br />
Ripping depth<br />
40 - 50 in.<br />
6 -12<br />
>1,800 lbs<br />
Offset gangs, independent disks<br />
IMPLEMENTATION GUIDES<br />
A general rule for tillage work is to operate equipment on the contour to reduce the potential of<br />
water concentrating in the paths of the furrows and creating soil erosion problems. Operating<br />
equipment on the contour (cross slope) is limited to gentler slopes (Table 10-4). To optimize<br />
the use of equipment on steep slopes, down-slope operation of equipment must not create<br />
long, continuous furrows. It is also important to consider that if cuts and fills are left less<br />
compacted, there will be deeper rills and gullies created if concentrated flows of water are<br />
directed onto these slopes. These features are unsightly and can deliver high quantities of<br />
sediment to watercourses. Therefore, on slopes that have been tilled, it is important to redirect<br />
any concentrated flow of water that might enter the top of the cut to areas that are designed<br />
to handle this water. While it is not the job of the revegetation specialist to walk the tops of<br />
cuts and fills to determine whether concentrated water might flow into areas that are not<br />
designed for it, the success of the tillage project might depend on it.<br />
Most soil shattering equipment is attached to a tractor toolbar and is limited to slope gradients<br />
of 3H:1V or less. Subsoilers and rippers are best used for projects that consist of gentle terrain<br />
or obliterated road sections. Newer equipment, such as the subsoiling grapple rake, has been<br />
developed to overcome these limitations. Attached to the arm of an excavator, this equipment<br />
can reach 35 feet up and down slope and specifically rip targeted areas of compacted soil<br />
(Figure 10-10).<br />
Incorporate Soil Amendments<br />
Tilling is used to incorporate fertilizers, organic matter, lime, and other amendments evenly<br />
throughout the soil, while loosening compacted soils. Tilling with these objectives requires<br />
equipment that mixes soil, such as plows, tillers, disks, chisels, and soil spaders. This equipment<br />
is tractor-drawn and limited to gentle slope gradients (5H:1V or greater) and soils low in rock<br />
fragments. These tools are not designed to break up deep compaction. Under most disturbed<br />
soil conditions, the best that can be expected this equipment is tillage to a depth of 8 to 12<br />
inches.<br />
Rippers and subsoilers are not very effective in incorporating materials such as fertilizers or<br />
organic matter into the soil. Nevertheless, spreading mulch on the soil surface prior to ripping<br />
or subsoiling usually incorporates enough organic matter into the soil surface to enhance<br />
infiltration rates (Luce 1997). In the same manner, fertilizers applied to the soil surface, especially<br />
those containing immobile nutrients, will be mixed into the top several inches of soil and<br />
made available to surface roots. On projects where topsoil has been salvaged and reapplied,<br />
subsoilers or rippers are the preferred equipment. Using equipment that mixes soils runs the<br />
risk of incorporating salvaged topsoil with the infertile subsoil.<br />
A more recent set of specialized revegetation tools that mix and incorporate amendments<br />
have been developed for the tracked excavator. The arm of the excavator can reach 35 to<br />
40 feet on steep cut and fill slopes and work soils that were previously inaccessible to most<br />
equipment. The simplest excavator attachment is the bucket which can be used to move<br />
topsoil or organic matter to concentrated locations and creating mounds or planting islands<br />
(see Section 10.1.8, Topographic Enhancements). When islands are created for deep-rooted<br />
species, such as shrubs and trees, soil can be excavated several feet deep with the excavator<br />
bucket and incorporated with organic matter amendments to create a deep rooting profile.<br />
The subsoiler grapple rake (Figure 10-10) adds several design features to the excavator bucket.<br />
In addition to mixing organic amendments into the soil, the subsoiler grapple rake can remove<br />
large rock with the grapples and loosen soils with the winged subsoiling tines.<br />
C<br />
B<br />
Figure 10-10 | Subsoiling<br />
grapple rake<br />
The subsoiling grapple rake is a<br />
quick-mounting attachment to excavating<br />
machinery that combines several<br />
operations in one: (A) subsoiling with<br />
winged tines, (B) soil incorporation with<br />
bucket, and (C) removal of rock and slash<br />
with grapples (Photo courtesy of Mike<br />
Karr, Umpqua National Forest).<br />
A<br />
Roughen Soil Surfaces<br />
Tilling is often done to roughen the soil surface for erosion control and to create a more optimum<br />
seedbed (see Section 5.6.7, Surface Roughness).Surface Roughness). The micro-topography<br />
of a roughened surface consists of discontinuous ridges and valleys. The valleys become the<br />
<strong>Roadside</strong> <strong>Revegetation</strong>: An Integrated Approach to Establishing Native Plants and Pollinator Habitat<br />
237
IMPLEMENTATION GUIDES<br />
catch basins for seeds and surface runoff. Seeds have greater opportunities to germinate and<br />
become established in the micro- valleys because of increased moisture, higher humidity,<br />
protection from the wind, and shelter from the sun. Surface roughening is a side benefit of<br />
the mixing and shattering operations discussed above in Section 10.1.2.2, Shatter Compacted<br />
Soils, and Section 10.1.2.3, Incorporate Soil Amendments. Roughening is also accomplished<br />
by either scarifying or imprinting operations.<br />
Scarification is the shallow loosening of the soil surface using brush blades, harrows, chains,<br />
disks, and chisels. Because it only loosens the soil surface several inches, the benefits for<br />
revegetation are only seen during seed germination and early seedling establishment. Once<br />
root systems hit the hard compacted layer several inches below the loosened surface, plant<br />
growth is curtailed.<br />
Imprinting is a form of surface tillage that leaves the soil with a pattern of ridges and valleys.<br />
The equipment applies a downward compressive force to a metal mold, leaving an impression<br />
on the soil surface. The most basic type of imprinting is trackwalking (Figure 10-11). In this<br />
operation, tracked equipment are “walked” up and down cut and fill slopes, leaving a pattern<br />
of tractor cleat imprints on the soil surface no deeper than an inch or two deep. Imprinting<br />
methods that are tractor-based are restricted by slope gradients. Since heavy equipment is<br />
used, trackwalking can compact soils. Compaction is not often considered when selecting<br />
trackwalking practices because soils of most construction sites are already very compacted,<br />
and trackwalking is unlikely to significantly increase compaction. This is one reason why<br />
trackwalking has been considered beneficial for erosion control and revegetation because<br />
it does create a somewhat better “short-term” growing environment and reduces surface<br />
erosion and sedimentation on a very poor site.<br />
An alternative to trackwalking is the use of the bucket of an excavator to pack and imprint<br />
the soil surface. Different patterns of steel “teeth” can be welded on the face of the bucket to<br />
achieve the desired surface micro-relief. Figure 10-12 shows a makeshift imprinter, which is<br />
simply 4 strips of angle iron welded to a bucket to create a pattern of 3-inch deep impressions.<br />
The excavator in this example can move topsoil in place, shape the cut and fill slopes, and<br />
imprint the surface, all with one operation.<br />
If the last operation on a construction site is to subsoil or rip soils 1.5 to 2 ft deep and leave<br />
the soil surface in a roughened condition prior to revegetation, trackwalking would be<br />
more detrimental than beneficial on most soils. The tractor used to create imprints would<br />
compact the tilled soil leaving the surface smoother (less rough) than if left alone. If one of<br />
the construction objectives is to leave the construction soils in non-compacted condition,<br />
the use of trackwalking should be seriously weighed against the long-term impacts to plant<br />
establishment and growth. Compaction will affect surface infiltration and runoff, therefore,<br />
trackwalking should be critically evaluated for its potential increase in soil erosion. Rainfall<br />
simulation tests can be run on sites near the construction project that have been trackwalked<br />
and compared with those that have been left in an uncompacted state to determine the effects<br />
on runoff and soil erosion (Hogan and others 2007).<br />
Specialized imprinters have been developed for rangeland restoration. For example, the<br />
“Dixon” imprinter was developed to restore perennial grasses for rangelands in Arizona and<br />
other arid states. It consists of a roller with large conical metal “teeth” that is pulled behind a<br />
tractor. The imprinter creates a pattern of V-shaped troughs, 4 to 7 inches deep, encompassing<br />
approximately 1 ft2 area (Dixon and Carr 2001a, 2001b). These imprints are substantially larger<br />
and deeper than those created by trackwalking, with greater longevity. This equipment also<br />
has a set of ripping shanks attached to the tractor that shatters deeper compaction before<br />
imprinting.<br />
Figure 10-11 | Trackwalking<br />
compacts soils<br />
Trackwalking creates imprints on the soil<br />
surface, but will also compact surface<br />
and subsurface soils<br />
Figure 10-12 | Soil imprinting<br />
with modified excavator bucket<br />
An alternative form of imprinting road<br />
cuts and fills that does not compact soils<br />
is welding angle iron onto the bucket of<br />
an excavator. As the excavator pulls topsoil<br />
into place and contours the slope, it<br />
presses the face of the bucket into the<br />
soil surface to form surface imprints.<br />
<strong>Roadside</strong> <strong>Revegetation</strong>: An Integrated Approach to Establishing Native Plants and Pollinator Habitat<br />
238
IMPLEMENTATION GUIDES<br />
10.1.3 MULCHES<br />
Introduction<br />
Mulch is defined as a protective material placed on the soil surface to prevent evaporation,<br />
moderate surface temperatures, prevent weed establishment, enrich the soil, and reduce<br />
erosion. Mulches therefore have many functions or roles in the recovery of native vegetation<br />
to a disturbed site. But confusion often arises around the use of mulches on revegetation<br />
projects unless the reasons for using them in a project are clearly defined. In this discussion,<br />
we have grouped mulches into four uses based on revegetation objectives:<br />
◾◾<br />
Seed Covering<br />
◾◾<br />
Seedling Mulch<br />
◾◾<br />
Soil Improvement<br />
◾◾<br />
Seed Supply<br />
For most projects, mulches are used to meet more than one objective. Problems arise when<br />
the methods for applying overlapping objectives are not compatible. For example, erosion<br />
control objectives and seed covering objectives go hand-in-hand because the soil surface<br />
needs to be stable for seeds to germinate and grow into young seedlings. In turn, the surface<br />
ultimately becomes stable through the establishment of young plants. Yet erosion control<br />
products and practices that are effective for controlling surface erosion are not always optimal<br />
for establishing vegetation. For this reason, it is important to understand the objectives for<br />
mulching and to integrate them into a comprehensive strategy when selecting mulch types<br />
and application methods.<br />
This section discusses the objectives for applying mulches and the potential mulch sources.<br />
We have left the discussion of the effectiveness of mulches for erosion control and surface<br />
stabilization to the many publications and research devoted to this topic and focus primarily<br />
on the characteristics of mulches for plant establishment.<br />
Seed Covering<br />
One of the principal reasons for applying mulch is to enhance seed germination and early<br />
seedling establishment. During this critical period, desirable mulches will:<br />
◾◾<br />
Protect seeds and young seedlings from soil splash, sheet erosion, and freeze-thaw<br />
◾◾<br />
Keep seeds moist during germination<br />
◾◾<br />
Moderate surface temperatures during germination<br />
◾◾<br />
Keep young seedlings from drying out<br />
◾◾<br />
Prevent salts from wicking to the surface and harming newly germinating seedlings<br />
The characteristics of mulch materials that make ideal seed coverings are those that protect<br />
seeds from drying winds, solar radiation, high evapotranspiration rates, and surface erosion<br />
while still allowing seeds to germinate and grow through the mulch into healthy seedlings.<br />
Long-fibered mulches, such as straw, wood strands, pine needles, and ground or chipped<br />
wood, placed at the appropriate thickness, usually meet these characteristics. When applied<br />
correctly, the strands of long-fibered mulch loosely bridge on top of each other, much like<br />
“pick- up-sticks,” forming large air spaces or pores (Figure 10-13). Large pores function much<br />
like the air spaces in building insulation by moderating extreme temperatures.<br />
Compared to short-fibered mulches, such as hydromulch, long-fibered mulches can be applied<br />
at greater thicknesses, which help maintain surface soil moisture and higher humidity around<br />
germinating seeds and emerging seedlings. In addition, long-fibered mulches can mitigate<br />
Figure 10-13 | Long-fibered mulches<br />
Long-fibered mulches, like wood strands<br />
shown below, create a good growing<br />
environment because seeds and seedlings<br />
are protected from excessive<br />
drying during germination and early<br />
seedling establishment. On sites where<br />
freeze-thaw is prevalent, long-fibered<br />
mulches can insulate the soil and protect<br />
emerging seedlings.<br />
<strong>Roadside</strong> <strong>Revegetation</strong>: An Integrated Approach to Establishing Native Plants and Pollinator Habitat<br />
239
IMPLEMENTATION GUIDES<br />
the effects of frost heaving at the soil surface (Kay 1978), significantly reduce high surface<br />
temperatures (Slick and Curtis 1985), and allow sunlight penetration, which enhances seed<br />
germination and seedling establishment. Large pores created by long-fibered mulches also<br />
allow better gas exchange between the soil and atmosphere (Borland 1990).<br />
Short-fibered mulches, on the other hand, have smaller pores and form denser seed covers.<br />
These materials are typically applied thinly (Figure 10-14), so they offer less insulation than<br />
long- fibered mulches and therefore have less value as a seed covering. Some researchers<br />
suggest that very fine textured mulches can actually increase surface evaporation by wicking<br />
moisture from the soil to the surface of the mulch (Slick and Curtis 1985; Borland 1990; Bainbridge<br />
and others 2001). Short-fibered mulches are effective as an erosion control cover, but are<br />
considered inferior to long-fibered mulches for germination and early seedling establishment<br />
(Kill and Foote 1971; Meyer and others 1971; Kay 1974, 1978, 1983; Racey and Raitanen 1983;<br />
Dyer 1984; Wolf and others 1984; Norland 2000)<br />
Erosion mats can perform well as seed covers (see Section 10.1.3.8, Erosion Mats). These materials<br />
come in rolls or sheets, which are laid out on disturbed soils and anchored in place after seeds<br />
have been sown. They are composed of such materials as polypropylene, straw, coconut, hay,<br />
wood excelsior, and jute. Good characteristics of erosion mats for seed germination and early<br />
seedling growth are those with enough loft, or porosity. Matting with polypropylene (plastic)<br />
netting enclosing the fiber roving should not be used as small animals can become ensnared in<br />
that netting. Erosion mats create a micro-environment for seed germination while protecting<br />
the soil and allowing some sunlight to penetrate to the surface of the soil (Figure 10-15).<br />
On sites where vegetation is expected to take several years to establish (e.g., arid, high elevation<br />
sites), it is important to apply a mulch with a longevity of more than one year. Materials with<br />
greatest longevity are most long-fibered wood mulches, as well as erosion mats made from<br />
coconut fiber, however, they also can create long term maintenance problems. Straw, hay, and<br />
short-fibered wood products are less likely to be present after the first year.<br />
Mulching for seed covering is critical on sites that have (1) high evapotranspiration rates during<br />
germination, (2) unstable soil surfaces, (3) susceptibility to freeze-thaw, and (4) high soil pH.<br />
It is less important on sites where soil surfaces do not dry out during seed germination or on<br />
projects where seeds have been covered by soil.<br />
Figure 10-14 | Hydromulch<br />
Hydromulch with tackifier can stabilize<br />
the soil surface for up to a year, but<br />
does not necessarily create an optimum<br />
environment for germinating seeds. The<br />
short-fibered textures typically form a<br />
covering that is too thin to maintain<br />
moisture around the seeds during<br />
germination when the weather is dry.<br />
The hydromulch (dyed with a green<br />
tracer) shown in this picture is applied<br />
at approximately 1,500 lb/ac.<br />
Seedling Mulch<br />
Mulch is placed around newly planted or established plants to improve survival and growing<br />
conditions by:<br />
◾◾<br />
Reducing surface evaporation<br />
◾◾<br />
Preventing the establishment of competing vegetation<br />
◾◾<br />
Moderating surface temperatures<br />
◾◾<br />
Allowing water infiltration<br />
Studies have shown that survival and growth of young trees are significantly increased by<br />
applying mulches around seedlings at the time of planting (DeByle 1969; Lowenstein and<br />
Ptikin 1970; Davies 1988a, 1988b). Mulching around seedlings results in the greatest benefit<br />
on hot and dry sites (typically south and west aspects) and sites with aggressive competing<br />
vegetation. It is less important to mulch around seedlings on sites that have a low potential<br />
for establishing competing vegetation the first several years after planting. Mulching is also<br />
less critical on sites that have low evapotranspiration rates or high summer rainfall.<br />
Seedling mulches are applied either as an organic aggregate or as sheets. Organic aggregate<br />
mulches consist of shredded or chipped wood derived from bark, wood, branches, sawdust,<br />
or lawn clippings applied deeply around seedlings. Sheet mulches are large pieces of non-<br />
Figure 10-15 | Erosion mat<br />
Erosion mats can be good seed covers.<br />
Mats with the highest loft create the best<br />
microenvironment for seed germination<br />
while allowing some sunlight to penetrate<br />
to the surface of the soil.<br />
<strong>Roadside</strong> <strong>Revegetation</strong>: An Integrated Approach to Establishing Native Plants and Pollinator Habitat<br />
240
IMPLEMENTATION GUIDES<br />
permeable or slightly permeable materials made from translucent plastic, newspaper, or<br />
geotextiles (woven fabrics) that are anchored around planted seedlings (Figure 10-16).<br />
Sheet Mulches – A variety of sheet mulches are available commercially. These mulches are<br />
popular because of the relative ease of transport and installation. The effectiveness of sheet<br />
mulches increases with the size of the sheets. For most hot, dry sites, a 2.5 by 2.5 ft sheet is<br />
considered to be the minimum dimension (Cleary and others 1988). On harsher sites, 3 by 3<br />
ft or even 4 by 4 ft sheets are necessary to control competing vegetation. When purchasing<br />
and installing sheet mulches, the following should be considered (after Davies 1988a, 1988b):<br />
◾◾<br />
Select the right size. The size of the mulch should be based on site conditions and the<br />
type and amount of competing vegetation. A hot, south-facing site with full cover of<br />
competing grasses will need a large sheet mulch; a north-facing slope with scattered<br />
forbs and grasses will suffice with the smallest size.<br />
◾◾<br />
Order only opaque materials. Translucent materials should not be used as sheet<br />
mulches because weed seeds can germinate and grow under these materials. During the<br />
summer, surface temperatures under translucent materials can be lethal to seedling roots.<br />
◾◾<br />
Use sheet mulches with long life spans. The durability of sheet mulch should be at<br />
least 3 years. It often takes 3 to 5 years for seedlings to become established on hot, dry<br />
sites (Cleary and others 1988).<br />
◾◾<br />
Weed or scalp around seedlings prior to installation. Sheet mulch cannot be installed<br />
properly without competing vegetation being completely removed.<br />
◾◾<br />
Mulch immediately after planting. Waiting until later in the spring to mulch runs the<br />
risk that competing vegetation will have depleted soil moisture, thereby making the<br />
mulch ineffective during the first growing season.<br />
◾◾<br />
Securely stake or anchor all corners of the mulch. The sides of the mulch sheets<br />
can pull out easily by wind, animals, or competing vegetation growing under the<br />
mulch sheets. It is important that, at a minimum, the corners are staked. For greatest<br />
effectiveness, bury all edges of the sheets with soil.<br />
◾◾<br />
Consider visibility. Sheet mulches can be very apparent in high visibility areas. Measures<br />
to reduce unsightliness of sheet mulches include covering with aggregate mulches such<br />
as hay, straw, or wood mulch, or selecting sheet mulch colors that blend into the area.<br />
Organic Aggregate Mulch – Organic aggregates are another group of materials that, when<br />
placed thickly around installed plants, will control the establishment of competing vegetation<br />
and reduce surface evaporation (Figure 10-17). These aggregates include hay, straw, or<br />
chipped and shredded wood materials. Organic aggregates are often used in highly visible<br />
areas because they are more esthetic in appearance than sheet mulches. They are also used<br />
in planting islands for long-term control of competing vegetation.<br />
The effectiveness of organic aggregate mulches on seedling survival and growth depends<br />
on the depth, total area covered, the control of seed germination of competing vegetation,<br />
and its longevity.<br />
The longevity of organic aggregate mulches is a function of (1) C:N, (2) texture, and (3) depth.<br />
High C:N materials, such as uncomposted, shredded wood, bark, or sawdust, will last longer<br />
than low C:N materials, such as composted yard materials, because these materials are in the<br />
initial stages of the decomposition cycle. Coarse-textured materials (Figure 10-18) have greater<br />
longevity than finer-textured materials because coarser materials have less surface area for<br />
microbial break down (Slick and Curtis 1985). Coarse-textured materials also tend to hold less<br />
moisture, which slows decomposition rates. The longevity of an organic aggregate mulch also<br />
depends on the application thickness – the thicker the layer of mulch, the longer it will last.<br />
The same factors that affect longevity (e.g., texture, C:N, depth) also determine the effectiveness<br />
of aggregate mulches in deterring seed germination of unwanted vegetation around the<br />
Figure 10-16 | Sheet mulch<br />
Sheet mulches come in a variety of<br />
materials, such as the paper/ cardboard<br />
product shown in this picture. The size of<br />
the sheet mulch must be large enough<br />
to keep competing vegetation away<br />
from the seedling. The 3 by 3 ft sheet<br />
mulch shown around this Pacific madrone<br />
(Arbutus menziesii) seedling is<br />
the minimum size for this site.<br />
Figure 10-17 | Mulch conserves<br />
soil moisture and inhibits<br />
weed establishment<br />
This photograph was taken in late<br />
summer, months after adjacent soils<br />
had dried out. The lack of competing<br />
vegetation and the low surface evaporation<br />
resulting from the placement of<br />
3 to 4 inches of coarse sawdust resulted<br />
in very high soil moisture. The high C:N<br />
of the sawdust was believed to be a<br />
factor in inhibiting the establishment<br />
of weedy annuals.<br />
<strong>Roadside</strong> <strong>Revegetation</strong>: An Integrated Approach to Establishing Native Plants and Pollinator Habitat<br />
241
IMPLEMENTATION GUIDES<br />
seedling. Coarse-textured mulches are excellent mulches because<br />
they hold very little moisture at the mulch surface, and are therefore<br />
poor environments for seed germination of unwanted vegetation.<br />
Fine-textured mulches, on the other hand, create a more favorable<br />
environment for seed germination because they hold more moisture<br />
and are in closer contact with seeds. For this reason, many fine-textured<br />
materials, such as composts, are actually excellent growing media for<br />
weed seed germination and establishment. As discussed in Section<br />
5.8.1.2, Weed Sources – How to Limit, mulch materials with high C:N<br />
discourage growth of weedy annuals because high C:N materials<br />
remove available nitrogen that would otherwise give these species a<br />
competitive advantage. The effectiveness of a mulch in discouraging<br />
the establishment of competing vegetation generally increases with<br />
the thickness it is placed on the soil surface (Baskin and Baskin 1989).<br />
The most effective mulch thicknesses are between 3 to 4 inches (Pellett<br />
and Heleba 1995; Ozores-Hampton 1998), but thicknesses as low as 1.5<br />
inches have been found to be effective for some small-seeded weed<br />
species that need sunlight for germination (Penny and Neal 2003).<br />
Organic aggregate mulches have several advantages over sheet<br />
mulches. First, organic mulches can be applied over a much larger area<br />
than sheet mulches. Some projects have organic mulches covering<br />
the entire site, while other projects concentrate it in strategic areas,<br />
such as planting islands. Second, organic aggregate mulches moderate<br />
surface soil temperatures, whereas sheet mulches can actually increase<br />
surface temperatures. Mulch thicknesses of 3 inches have been found<br />
to reduce soil temperatures below mulch layers by 8 to 10 degrees F<br />
(Slick and Curtis 1985; Steinfeld 2004), which can benefit the growth<br />
of seedlings on very hot sites. The insulative quality of mulches also<br />
affects the seasonal heating and cooling patterns in the soil. Soils<br />
under thick mulches take longer to warm in the spring, but in the fall, take longer to cool<br />
down. Depending on the temperature and rainfall patterns of a site, this could influence<br />
seedling establishment.<br />
Mulch can create problems to planted seedlings if it is placed in contact with the plant stem.<br />
The high moisture around the stem can be conducive to pathogenic injury. On southern<br />
exposures, heat will build up at the surface of, and directly above, the mulch, creating extremely<br />
high temperatures on warm summer days. The high temperatures can cause heat damage to<br />
stems of young seedlings. It is important, therefore, to keep mulch several inches away from<br />
the stem of planted seedlings.<br />
Soil Improvement<br />
Mulches are sometimes used specifically to increase the nutrient and organic matter status<br />
of a soil. Composted organic materials are used for these purposes and are characterized by<br />
having low C:N, high nutrient levels, fine textures, and dark colors. While these materials are<br />
typically more effective when incorporated into the soil, they are sometimes applied to the<br />
surface of the soil where tillage is not feasible (steep and rocky) or tillage costs are unaffordable.<br />
Where composted organic materials are applied on the soil surface, the nutrient release rates<br />
will be much slower. See Section 10.1.5, Organic Matter Amendments, for more information<br />
on composts.<br />
Seed Supply<br />
The objectives for applying mulch on some projects are to spread materials that contain<br />
native seeds. There are several mulch materials that carry native seeds, including duff, litter,<br />
A<br />
0” 1” 2” 3” 0” 1” 2” 3”<br />
C<br />
0” 1” 2” 3” 0” 1” 2” 3”<br />
E<br />
0” 1” 2” 3” 0” 1” 2” 3”<br />
B<br />
D<br />
F<br />
Figure 10-18 | Different types<br />
and textures of mulches<br />
(A) freshly ground coarse wood passing<br />
a 3 inch screen; (B) freshly ground<br />
coarse wood passing a 1.5 inch screen;<br />
(C) freshly chipped wood; (D) composted<br />
mixtures of ground wood, biosolids, and<br />
yard wastes passing a 1.5 inch screen;<br />
(E) weathered straw; (F) ponderosa pine<br />
needles.<br />
<strong>Roadside</strong> <strong>Revegetation</strong>: An Integrated Approach to Establishing Native Plants and Pollinator Habitat<br />
242
IMPLEMENTATION GUIDES<br />
and straw from native seed production fields. When these materials are applied to the soil<br />
surface, seeds will germinate given favorable environmental conditions.<br />
Duff and Litter – Duff and litter layers are organic mats that form under tree and shrub plant<br />
communities. These layers are accumulations of years of leaves and needles at varying degrees<br />
of decomposition. Included in these layers are dormant seeds, many of which are still viable.<br />
When the duff, litter, and seed bank is collected and spread on disturbed sites the environmental<br />
conditions for breaking seed dormancy of some species may be met and seeds will germinate.<br />
Duff and litter can be collected from adjacent forest- or shrub-dominated sites or salvaged<br />
prior to construction. Reapplying them to disturbed sites completes several operations at<br />
once: (1) adds seeds, (2) covers seeds, and (3) adds a supply of long-term nutrients. Although<br />
this practice might seem expensive or impractical, when compared with purchasing and<br />
applying seeds, fertilizer, and mulch separately, the costs might be comparable. See Section<br />
10.1.3.11, Litter and Duff, for more information on litter and duff.<br />
Native Hay From Seed Production Fields – One of the byproducts of native grass seed<br />
production is the stubble that remains in the fields after seed harvest. This stubble contains<br />
varying quantities of unharvested seeds, which eventually end up in bales. If bales are stored<br />
in dry conditions, seeds can remain viable for several years. When hay bales containing the<br />
native seeds are spread as a mulch on disturbed sites, seeds come into contact with soil and<br />
eventually germinate. See Section 10.1.3.9, Straw and Hay, for more information on straw and hay.<br />
Selecting the Appropriate Mulch Materials<br />
There are a variety of materials that can be used as mulches:<br />
◾◾<br />
Wood fiber<br />
◾◾<br />
Erosion mats<br />
◾◾<br />
Hay and straw<br />
◾◾<br />
Manufactured wood strands<br />
◾◾<br />
Duff and Litter<br />
◾◾<br />
Composts (see Section 10.1.5, Organic Matter Amendments)<br />
◾◾<br />
Hydromulch (see Section 10.3.2, Hydroseeding)<br />
The following sections describe these materials and how they are used in revegetation projects.<br />
Figure 10-18 gives examples of some of these mulches.<br />
Wood Fiber<br />
Mulches produced from woody materials are used primarily for seed covering and seedling<br />
mulching. There is usually a readily-available source of wood material from project sites situated<br />
in forested environments. Branches, stems, bark, and root wads are typical waste products<br />
Figure 10-19 | Large mulching operation<br />
Large mulching operations require access<br />
and working space. The operation shown<br />
in this photograph shows the wood waste<br />
material being dropped into a grinder with an<br />
excavator (left), and conveyed as mulch to the<br />
bucket of a front end loader (right).<br />
<strong>Roadside</strong> <strong>Revegetation</strong>: An Integrated Approach to Establishing Native Plants and Pollinator Habitat<br />
243
IMPLEMENTATION GUIDES<br />
from clearing and grubbing that can be chipped or mulched on site to produce various types<br />
of wood mulch (Figure 10-19). In the past, this material has been burned or hauled to waste<br />
areas for disposal. With greater burning restrictions and higher hauling costs, chipping these<br />
materials and returning them to disturbed sites as mulch are practices that are becoming<br />
more common.<br />
Wood Fiber Mulch Production – Creating mulch from right-of-way clearing woody material<br />
requires planning and coordination. First the road contractor piles the woody right-of-way<br />
clearing debris into “slash piles.” These piles include tree boles, bark, branches, and stumps,<br />
but must not contain large rocks or other inert materials that can cause wear or damage<br />
to the equipment. When clearing and piling is completed, a company that specializes in<br />
processing wood waste is contracted (typically by the road contractor). In this operation,<br />
equipment is brought to each slash pile and materials in these piles are processed into mulch.<br />
The resulting wood mulch is either placed in piles adjacent to the slash piles or transported<br />
to designated storage sites. The timing of these operations should consider the possibility of<br />
limited equipment use due to fire restrictions, which typically occurs in the western United<br />
States from mid summer through early fall.<br />
If undesirable plant species are included in the slash piles, spread of these species is likely to<br />
occur when they are processed and applied as a mulch. This can be prevented by identifying<br />
these plant populations on site during the weed assessment (see Section 5.8.1.1, Weed Sources<br />
– How to Assess) and avoiding placing them into slash piles.<br />
It is important to define the desired mulch characteristics prior to processing the piles. For<br />
example, the size and shape of the wood particles will determine their stability and propensity<br />
to move off the slopes, causing clean-up issues. Long strains of wood particles tend to be more<br />
stable than short strains because they knit togher. Obtaining the proper size and dimension<br />
can be difficult since there is a variety of wood waste reduction equipment, producing different<br />
dimensions and fibrosity (the degree that wood fibers are separated). Specifying the particle size<br />
and shape by stating a screen size the material must pass does not always produce the desired<br />
material. Screens only sort for two dimensions, and not for length or fibrousness. Identifying<br />
the type of waste reduction equipment can narrow the type of mulch produced (Table 10-5).<br />
For example, mulch produced by shredders is long and fibrous (Figure 10-18A and B), whereas<br />
mulch produced from chippers has close to equal length sides, with fibers still intact (Figure<br />
10-18C). Visiting with mulch company representatives and viewing the type of products they<br />
produce is a good way to determine the types of products you can expect to receive. If this is<br />
not possible, have them send you samples of different mulch products. Typically, the coarser<br />
the size of the mulch, the cheaper will be production costs since more mulch of coarser size<br />
can be produced in a given time frame than smaller textured mulch. Other factors, such as tree<br />
species, moisture content, and portion of tree processed, will affect the characteristics of the<br />
Table 10.5 | General types of wood waste reduction equipment<br />
General Equipment Types Examples Feedstock Particle Geometry<br />
Chippers Disc Chippers, Drum Chippers whole logs, clean residuals clean edge, two-sided<br />
Hogs<br />
Swing Hammer, Fixed Hammer,<br />
Punch & Die, Mass Rotor<br />
wood waste, stumps, land clearing<br />
debris<br />
coarse, multi-surfaced, fibrous<br />
Shredders<br />
Low Speed-High Torque, High<br />
Speed<br />
wood waste, stumps, land clearing<br />
debris<br />
coarse, multi-surfaced, fibrous<br />
Hybrids Knife Hogs, Pan & Disc wood waste, stumps, land clearing<br />
debris<br />
semi-coarse<br />
<strong>Roadside</strong> <strong>Revegetation</strong>: An Integrated Approach to Establishing Native Plants and Pollinator Habitat<br />
244
IMPLEMENTATION GUIDES<br />
mulch. If the wood is wet during processing, it is more likely to be shredded; if it is dry, it will<br />
be more chip-like. There is also variation in mulches based on species of origin. For example,<br />
ponderosa pine (Pinus ponderosa) and western juniper (Juniperus occidentalis) tend to create<br />
more fibrous mulch than lodgepole pine (Pinus contorta). Processed root wads tend to be<br />
more fibrous than boles of trees.<br />
Purchasing Wood Fiber Mulches – On projects where waste materials are not available for<br />
mulching, the purchase of wood fiber mulches should be considered. Overall costs are much<br />
higher because of the added expenses of transporting these materials to the site. If commercial<br />
mulch sources are nearby, this can be an economically viable option. It is very important to<br />
be sure of the quality of the material. Testing methods and specifications can be developed<br />
that are similar to those given in Section 10.1.5, Organic Matter Amendments.<br />
Applying Wood Fiber Mulch – Wood fiber mulch is typically applied with mulch-blowing<br />
equipment. This equipment has varying transport capacities, ranging from 25 to 100 yards<br />
of material (Figure 10-20). An application hose is positioned where mulch is to be applied<br />
and is pneumatically delivered from the mulch bins to the site. The amount of mulch applied<br />
depends on the objective. For seeding, application rates range from 100 yd3/ac (0.75-inch<br />
thickness) to 135 yd3/ac (1.0-inch thickness). For seedlings, mulch application ranges from<br />
400 yd3/ac (3 inch-thickness) to 540 yd3/ac (4-inch thickness). Note: The higher rates used for<br />
mulching seedlings are only used in close proximity to the plants. The remaining areas are<br />
mulched at a lower rate.<br />
Application rates depend on factors such as length and diameter of hose, blowing equipment,<br />
elevation rise, and dimensions of the area being covered. Rates A of application typically range<br />
from 25 to 35 yd3/hr. If mulch is applied at a 1-inch depth (134 yd3/ac), it would take between 4<br />
to 5 hours to cover an acre. These are optimum rates because they do not account for the time<br />
it takes to travel to the mulch source, load the mulch bin, and travel back to the application site.<br />
The time required to make these trips can sometimes be longer than the actual application<br />
time for mulching. Using larger transport capacities is one way to significantly cut the time<br />
associated with refilling mulch bins.<br />
Mulch blowing equipment can be used on any slope gradient that can be accessed by foot.<br />
By using ropes, slope gradients of up to 1H:1V can be accessed. Hose lengths can be attached<br />
to extend the delivery of mulch up to 400 ft. Since mulch is delivered through hoses, the<br />
system will plug if the size of the wood fibers exceeds the tube size. It is therefore important<br />
that mulch be free of large pieces of wood. Using a mulch blower is an excellent method for<br />
evenly applying wood fiber, but frequent monitoring by inspectors is important to assure that<br />
the specified amount of mulch is being applied.<br />
Where slopes gradients are gentle and free of rock and debris, wood fiber mulch can be evenly<br />
applied with a manure spreader. Mulch can also be moved to the site in tractor buckets and<br />
spread across the soil surface with the blade or bucket of the tractor. Obtaining an even mulch<br />
depth is extremely difficult using this method, and requires many passes of the equipment that<br />
invariably compacts the soil. An alternative is to deliver several yards of mulch to a planting<br />
island in the bucket or shovel of a tractor or excavator. After the seedlings are planted, mulch<br />
can be hand raked at the specified thickness to cover the island.<br />
Mulch Storage – If wood fiber is stored for long periods of time, the materials should not be<br />
placed in piles taller than 10 ft. Fresh piles of wood fiber have the potential to spontaneously<br />
ignite in larger piles, creating a fire hazard and potential loss of material. Consider placing a<br />
plastic covering over the piles to keep moisture out during the winter because wet mulch is<br />
harder to apply through a mulch blower than drier mulch.<br />
Seed Placement During Mulching – Seeds can be sown prior to or during mulch operation.<br />
Sowing that is done before mulching can be accomplished through dryland sowing methods<br />
or through hydroseeding. Applying seeds during the mulching operation is accomplished<br />
by placing seeds in a “seed metering bin” attached to most mulch-blowing equipment. This<br />
equipment meters seeds into the mulch as it is being applied. The rate at which the metering<br />
A<br />
B<br />
C<br />
Figure 10-20 | Blowing equipment is<br />
used to apply mulch on steep slopes<br />
Wood fiber mulch is applied on steeper<br />
slopes with mulch blowing equipment.<br />
Large trucks can hold between 75 and<br />
100 yards of mulch (A) while smaller<br />
trucks can hold up to 25 yards (C). Mulch<br />
is pneumatically delivered to the site<br />
through an application hose which can<br />
reach several hundred feet up steep<br />
slopes (A) with still enough force for<br />
ample delivery of mulch (B).<br />
B<br />
C<br />
<strong>Roadside</strong> <strong>Revegetation</strong>: An Integrated Approach to Establishing Native Plants and Pollinator Habitat<br />
245
IMPLEMENTATION GUIDES<br />
system delivers seeds can be adjusted and must be calibrated prior to mulching to obtain the<br />
desired seed density (see Section 10.3.1, Seeding, for seed calibration methods). Recalibration<br />
should be done when seed rates or mulching rates have been changed.<br />
Fertilizers – It is difficult to evenly apply fertilizers through a mulch blower system. Outside of<br />
mixing fertilizers in the mulch prior to placing it into the mulch bins, fertilizing must be done in a<br />
separate operation, either before or after mulching. Applying fertilizer through a hydroseeding<br />
system after seedling establishment is one strategy for increasing available nutrients on the<br />
site. As discussed in Section 10.1.1, Fertilizers, the delayed timing of fertilization reduces the<br />
risk of nutrient leaching and increases the probability that nutrients will be available at the<br />
levels needed for established plants.<br />
Erosion Mats<br />
Erosion mats are manufactured blankets or mats designed to increase surface stability and<br />
control erosion. They are available in strips or rolls with a minimum thickness of 0.25 inch.<br />
Erosion control revegetative mats or rolled erosion controlled products are applied directly<br />
to the soil surface for control of sheet erosion and to aid the establishment of vegetation. Turf<br />
reinforcement mats are materials that are filled with soil when installed to increase surface<br />
soil strength (Kemp 2006).<br />
There are a multitude of products on the market, with a range in design and costs. Determining<br />
which products will serve your project needs at the right price can be challenging. Several<br />
state departments of transportation periodically evaluate and compare the shear stress, soil<br />
erosion protection, longevity, and other characteristics for these products (Caltrans 2003; Kemp<br />
2006) and these documents are usually available on the internet. Since the installed costs of<br />
erosion mats can be very expensive, it is important that the job is done right. Taking the time<br />
to select the appropriate erosion mats, native species mix, and seed placement techniques is<br />
essential for assuring that revegetation is successful. Small field trials using different species<br />
and erosion mats can help in these decisions (Figure 10-21).<br />
The same characteristics that create an optimum environment for seed germination in other<br />
mulches are also important to consider when selecting erosion mats. Typically, those materials<br />
that protect the seeds from drying out but allow light and space for germinating seeds to grow<br />
into seedlings will perform best for vegetation establishment. The thicker erosion mats with<br />
the most loft should have better conditions for seedling establishment than thinner materials.<br />
The drawbacks to erosion mats are generally not in the product itself, but in how it gets applied<br />
to the site. Poorly applied erosion mats can result in sheet and rill erosion under the fabric.<br />
A B C D<br />
Figure 10-21 | Field trials of species and materials<br />
Small field trials can help select the most appropriate<br />
species and materials for a project. The trial shown in this<br />
picture compared straw mat (A and B) with a polywoven<br />
mat (C and D). It also compared the growth of blue wild rye<br />
(Elymus glaucus) and California fescue (Festuca californica)<br />
(A and C). The first year results indicated that there was<br />
much better establishment of grasses on the polywoven<br />
erosion mat than the straw mat, yet no difference in species<br />
growth. Maintaining the trial for two years showed that<br />
California fescue outperformed blue wild rye. These results<br />
led to using California fescue and polywoven erosion mat<br />
for the project described in Inset 10 3.<br />
<strong>Roadside</strong> <strong>Revegetation</strong>: An Integrated Approach to Establishing Native Plants and Pollinator Habitat<br />
246
IMPLEMENTATION GUIDES<br />
To avoid this problem, several important measures should be taken when installing erosion<br />
mats. First, the surface of the soil must be smoothed to a uniform elevation before the mat is<br />
placed. This will assure that when the mat is pinned to the soil, it is in intimate contact with<br />
the soil surface. Second, the materials must be trenched or keyed into the soil at the upper<br />
reaches of the fabric. This will assure that the material does not move downslope. Third, as<br />
with all slopes being revegetated, concentrated water should be kept off these slopes.<br />
Seeds must be sown on the site prior to installing erosion mats. This can be done using any<br />
type of seeding method (e.g., hydroseed, drill, or hand broadcast). Care must be taken during<br />
and after mat installation to avoid disruption of the seedbed. Unless the seeds are extremely<br />
small, sowing seeds over installed erosion mats is not recommended because larger seeds<br />
will hang up in the fabric. Small seeds can be applied over erosion mats if tackifiers are not<br />
used and if the timing is such that sufficient rain will likely move it through the erosion mat<br />
to the soil surface.<br />
Some manufacturers offer erosion mats that are impregnated with seeds, eliminating the<br />
need for sowing. This method is advantageous on steep slopes or soil-faced gabion walls (see<br />
Inset 10-3) where placing seed prior to mat installation is very difficult. It is important to work<br />
directly with companies that provide these products by supplying them with source-specific<br />
seeds and specifying appropriate sowing rates. For successful germination, seeded erosion<br />
mats must be installed so that the seeds and fabric are in direct contact with the soil and strict<br />
quality control measures taken.<br />
Inset 10-3 | Case Study: Erosion mats with native grasses and forbs<br />
Straw and hay are long-fibered mulches used on many revegetation projects for seed cover and erosion control (Figure 10-18E). The terms<br />
straw and hay are often used interchangeably. However, straw is the stubble left over after seeds have been harvested from commercial seed<br />
or grain crops; hay comes from grass/legume fields usually grown for feed. When hay is harvested, it usually contains seeds from a variety<br />
of pasture species.<br />
Reconstruction of the Agness-Illahe Highway required the construction of long sections of gabion walls. Since this highway is visible from the<br />
Rogue River (a designated “wild and scenic” river in southwestern Oregon) and is heavily traveled for recreational purposes, it was important<br />
that the gabion walls be visually screened using native plants. Gabions were designed to hold 12 inches of compost-amended soil (topsoil was<br />
not available) on the face of the walls by wire mesh frames (Figure A). Placement of seeds at the surface of the gabion wall was problematic.<br />
Several small plots using different erosion mats, seed mixes, seed rates and seed-attaching methods were tested to determine how to best<br />
meet the revegetation objectives (Figure 10-21).<br />
The results from these trials indicated that we could attach native<br />
grass and forb seeds to erosion mats using a tackifier (B). In 2003,<br />
we applied our findings to the construction project. Needing<br />
approximately 33,000 ft2 of gabion wall facing, we prepared<br />
the erosion mats by rolling them out on a road surface, applying<br />
California fescue (Festuca californica), gluing the seeds to the<br />
mat, and re-rolling the erosion mats.<br />
The seeds held tightly to the fabric during transportation and<br />
handling. At the construction site, seeded mats were attached to<br />
the wire mesh at the face of the wall (C) and compost- amended<br />
soil was placed behind the screen and lightly tamped. The gabion<br />
walls were built in the summer of 2003, but the seeds did not<br />
germinate until late fall after several rainstorms. Figure D shows a<br />
close up section of wall with newly germinating seedlings coming<br />
through the erosion mat in late 2003, four months after wall<br />
construction. Figure E shows 20 to 30 ft high walls in July 2006,<br />
three years later, fully vegetated and effectively screening the<br />
walls from the road and river (Photo C courtesy of Scott Blower).<br />
A<br />
D<br />
Compost<br />
Amended<br />
Soil<br />
Wire Mesh<br />
Frame<br />
B<br />
C<br />
E<br />
<strong>Roadside</strong> <strong>Revegetation</strong>: An Integrated Approach to Establishing Native Plants and Pollinator Habitat<br />
247
IMPLEMENTATION GUIDES<br />
Inset 10-16 | Source identified straw bales<br />
A secondary product from the seed production contracts is the straw that remains after<br />
harvest. This material can be used for erosion control or seed covering. It can be used as a<br />
mulch and has the additional advantage of being a source of unharvested viable seed. This<br />
product must be treated similarly to certified straw sources (see Section 10.1.3, Mulches). There<br />
should be no noxious or undesirable weed seed in the bales. A visit to the seed production<br />
fields prior to seed harvest will indicate if there are any unwanted species that will be present<br />
in the hay bales. Bales of each seedlot must be kept separate from other sources to prevent<br />
mixing. If straw bales are stored for any length of time, they must be protected from rain.<br />
Figure 10-22 | Squirreltail seeds<br />
Seeds of some species are baled with straw because<br />
of the difficulty of seed harvesting and<br />
cleaning. The long awns of the squirreltail seeds<br />
(A) show how difficult collecting and handling<br />
these seeds can be. The squirreltail seeds are<br />
germinating from the heads of the seeds that<br />
came in the bales (B).<br />
Straw and Hay<br />
Straw and hay are often used on revegetation projects because they are available, comparatively<br />
inexpensive, and generally successful in establishing grass and forb plants from seeds.<br />
The long stems of these materials create loft, or high porosity, that keeps moisture near the<br />
soil surface where seeds are germinating. This creates a favorable environment for young<br />
seedlings by allowing sunlight to penetrate and protecting the young seedlings during the<br />
early stages of establishment.<br />
Straw is what is left over after the harvest of a grain crop and hay is the whole plant, typically<br />
grasses or legumes, baled for stock feed. Straw is often preferred over hay because it generally<br />
contains fewer undesirable seeds. The seeds that are contained in the straw may not always<br />
be considered inappropriate for use in revegetation projects. For example, straw from some<br />
grain production fields (e.g., rice straw) has seeds of species that are not adapted to wildland<br />
environments and therefore will not become established. Straw produced from native seed<br />
production fields, on the other hand, is desirable if the fields are grown from identified genetic<br />
sources and used for projects within the appropriate seed transfer zones (Inset 10-16). Not only<br />
does source-identified straw act as a mulch, but it also supplies extra native seeds to the site.<br />
Some native grass species grown for seed production are very difficult to harvest and clean.<br />
For these species, the seeds are not harvested, but baled together with the grass stems. The<br />
seeded bales are applied directly to the site through straw blowing equipment, accomplishing<br />
seeding and mulching in one operation (Figure 10-22 and Figure 10-23). This method offers a<br />
practical alternative to species such as bottlebrush squirreltail (Elymus elymoides) or western<br />
needlegrass (Achnatherum occidentale) which can be difficult to harvest and clean.<br />
Purchasing Straw and Hay – The drawbacks to using straw and hay are that these materials<br />
can contain seeds from undesirable species, are susceptible to wind movement, have limited<br />
application distance, and decompose in a relatively short time compared to other mulches.<br />
Introducing seeds of undesirable species from straw and hay sources is an important consideration<br />
when choosing a source. There are many examples where, in the urgency of erosion<br />
Figure 10-23 | Straw blower<br />
Straw blowers range in size from machines<br />
which can apply 30 to 60 bales<br />
per hour (shown here) to very large<br />
straw blowers that can shoot up to 20<br />
tons per hour.<br />
<strong>Roadside</strong> <strong>Revegetation</strong>: An Integrated Approach to Establishing Native Plants and Pollinator Habitat<br />
248
IMPLEMENTATION GUIDES<br />
control, straw or hay from unknown sources was applied, resulting in the introduction of weed<br />
species. The assumption in most of these cases was that short-term control of soil erosion and<br />
sediment production outweighed the long-term introduction of undesirable plant species.<br />
The potential disastrous results from these assumptions need to be understood and agreed<br />
upon prior to applying hay or straw from unknown sources. Good integration of erosion control<br />
and revegetation planning can eliminate the need for last minute purchase and application<br />
of unknown or undesirable hay or straw sources.<br />
A good source of straw is native seed production fields. Seed growers identify straw bales by<br />
genetic source, so it is important to be sure that the source-identified bales are appropriate<br />
for the geographic area of the project site. Because of the potential for introducing weeds<br />
to your project site, you must be very certain of the species present in the hay or straw you<br />
are applying to your site. Many states have certification programs that inspect fields and<br />
certify that the bales are “weed free.” Be clear what “weed free” means when you purchase<br />
these materials. There can be other seeds in the bales that, while not considered weeds by<br />
the certifying state, might nevertheless be unwanted on your site. A conservative approach<br />
for non-certified seeds is to examine the fields that will be producing your bales and observe<br />
which species are present before they are harvested. It must be assumed that if a species of<br />
grass or forb is present in a hay field, seeds from these plants will show up in the bales.<br />
Some species grown for native seed production are difficult to harvest and clean because of<br />
long awns (Figure 10-22). An alternative method of seed harvest for these species is to allow<br />
the seeds to ripen in the fields and bale the seeds and grass stems together. The seed bales<br />
are applied to the site through hay blowing equipment. The seeds are detached from the<br />
stem as it is blown through the equipment, falling to the surface of the soil and covered by the<br />
grass stems. This is an effective means of applying seeds and seed covering in one operation.<br />
Some things to require when purchasing straw or hay are:<br />
◾◾<br />
Source must meet or exceed State Certification Standards for “weed free.” Many states<br />
have straw certification programs. Where no standards programs exist, acceptance<br />
should be based on seed crop inspection reports and/or visual field inspections by<br />
the COTR prior to harvest. Standards may also be set by the Government and listed on<br />
individual task orders.<br />
◾◾<br />
Straw or hay must be baled and secured according to specifications listed on the Task<br />
Order. Generally, bales should be less than 100 lbs.<br />
◾◾<br />
Bales should not be allowed to become wet after harvest or during storage prior to<br />
delivery. Not only is wet material harder to handle and less effective, mold is often<br />
present which can pose respiratory risks to applicators.<br />
The quality of straw and hay varies amoung grass species. Rice straw, for instance, is wiry and<br />
does not readily shatter, which makes it more difficult to apply as compared to wheat, barley,<br />
or oats (Kay 1983; Jackson and others 1988). Native straw is generally longer and stronger<br />
than grain straw (Norland 2000). Yet, some native species have better properties as mulches<br />
than others. Larger stemmed grasses, such as blue wildrye (Elymus glaucus), mountain brome<br />
(Bromus marginatus), and bluebunch wheatgrass (Pseudoroegneria spicata) make good mulches<br />
because of the large leaves and stems.<br />
Application – Straw and hay can be spread by hand or with a straw blower. For large jobs,<br />
using a straw blower is the most practical application method. There are many types of straw<br />
blowers available on the market, ranging from very small systems (Figure 10-23) that deliver<br />
from 30 to 180 bales per hour to large straw blowers that operate at rates up to 20 tons per<br />
hour. The distance that straw or hay can be blown depends on the hay blowing equipment,<br />
wind conditions during application, straw characteristics, and whether the material is being<br />
applied upslope or downslope (cuts or fills). When wind is favorable, straw can be shot up<br />
to 100 ft. However, when wind is blowing against the direction mulch is being applied, the<br />
distance is reduced. Because of the limited application range, this equipment is limited to sites<br />
<strong>Roadside</strong> <strong>Revegetation</strong>: An Integrated Approach to Establishing Native Plants and Pollinator Habitat<br />
249
IMPLEMENTATION GUIDES<br />
adjacent to roads. The upper portions of steep, extensive slopes are typically not reachable<br />
by straw blowers.<br />
When straw is used as a seed mulch, it is important that the application rates are not so deep<br />
that a physical barrier is formed. A minimum depth that has been shown to control evaporation<br />
is one inch (Slick and Curtis 1985). Applying too much straw will restrict sunlight and growing<br />
space for establishing seedlings. A rule of thumb is that some surface soil (15 percent to 20<br />
percent) should be visible through the straw after application (Kay 1972, 1983; Jackson and<br />
others 1988). This equates to 1.5 to 2 tons per acre, depending on the type of straw and its<br />
moisture content.<br />
Straw is susceptible to movement with moderate to high winds. Tackifiers are often applied<br />
over the straw to keep it in place (Kay 1978). Products such as guar and plantago are used with<br />
low quantities of hydromulch to bind straw together (Manufacturers have stated application<br />
rates for this purpose). Straw can also be crimped, rolled, or punched into the soil. These<br />
measures will stabilize the straw by burying portions of the stems into the soil and can increase<br />
erosion protection because of the more intimate contact of straw with the soil surface. The<br />
potential for compaction is increased with these treatments and the tradeoffs of offsetting<br />
surface stability with long-term soil productivity should be weighed.<br />
Wood Strands and Wood Wool<br />
Wood strands and wood wool are commercially available wood products used for mulch. Wood<br />
strands are long, thin pieces of wood produced from wood waste veneer whereas, wood wool,<br />
known as excelsior, is produced from aspen wood. These products are developed as an effective<br />
erosion control alternative to straw and hay (Foltz and Dooley 2003). The advantages of wood<br />
strands over straw are that it is free of seeds, has a longer life, and is more resistant to wind.<br />
Wood strands, like straw, form a stable cover with high porosity or loft, characteristics which<br />
are important for controlling soil moisture and temperature around the germinating seeds.<br />
The large spaces or pores created by the wood strands allow space, light, and protection for<br />
young emerging seedlings (Figure 10-13). Unlike straw, these materials keep their structure<br />
or porosity over time, and do not compress with snow or lose fiber strength through decomposition.<br />
While the performance of this new product as a seed cover has not been tested, it<br />
has all the characteristics of being an excellent seed cover. The application rates for wood<br />
strands are likely to follow the guides for straw – at least 15 percent to 20 percent of the soil<br />
surface should be visible. This is likely to be greater than the recommended rates for erosion<br />
control. Installing small test plots of varying thicknesses of mulch would be a good means<br />
to determine the appropriate thickness for optimum seed germination. Wood strands are<br />
delivered in different size bales and applied by hand or through straw blowing equipment<br />
(Figure 10-23). As with straw, this product is limited by the accessibility of the site by hay<br />
transportation and blowing equipment.<br />
Litter and Duff<br />
Litter is the layer of fresh and partially decomposed needles and leaves that cover the surface<br />
of most forest and shrub plant community soils. Duff is the dark, decomposed layer directly<br />
below the litter layer (leaves and needles are not identifiable in the duff layer) that is high in<br />
nutrients and humus. In addition to providing soil protection and nutrients, litter and duff can<br />
also contain dormant, yet viable, seeds from species that make up the forest or shrub plant<br />
communities. When litter and duff are collected, they should be matched to the appropriate<br />
revegetation site. For example, litter and duff collected from cool, moist sites should not be<br />
applied on hot, dry sites.<br />
The depth that litter and duff accumulates will vary by species composition, age, and productivity<br />
of the plant community. Dense stands of ponderosa pine can produce thick layers of litter.<br />
More open forest stands on dry, less productive sites will have thinner layers of duff and litter<br />
<strong>Roadside</strong> <strong>Revegetation</strong>: An Integrated Approach to Establishing Native Plants and Pollinator Habitat<br />
250
IMPLEMENTATION GUIDES<br />
(often less than an inch deep). The quality of the litter for erosion control and longevity varies<br />
by the dominant forest or shrub species. Pine needles provide the greatest benefit because the<br />
long needles interlock, reducing the potential of movement from rain or wind erosion (Figure<br />
10-18F). Needles from species such as Douglas-fir are shorter and tend to compact, providing<br />
less surface stability. Litter from shrub plant communities provides less protection because the<br />
leaves are less interlocking. Nevertheless, these materials should not be overlooked because<br />
they can be a source of seeds and nutrients (Inset 10-4).<br />
The collection of litter in the western states has typically been done manually by raking.<br />
Mechanizing the collection of litter has been done in the southern United States. The pine<br />
straw industry is well developed in this part of the country. Baling equipment has been<br />
developed for this industry and might be applicable to the western United States. Collection<br />
of needles and duff should be done during the summer and fall, when the litter and duff are<br />
completely dry. If these materials are not used immediately, they should be placed in small<br />
piles and completely covered by plastic to keep the materials dry. Excessive moisture can turn<br />
the piles into compost and possibly affect seed viability.<br />
Litter and duff can be applied manually to disturbed sites. If viable seed rates are high in the<br />
litter and duff, and it does not contain large material, it can be applied in a variety of ways<br />
(e.g., hydroseeder, mulch blowing equipment).<br />
One method for determining the amount of viable seeds in a litter layer is to actually conduct<br />
a germination test at the project site over a several year period by obtaining litter and duff<br />
from several potential collection areas and testing them on nearby sites. Like soil sampling,<br />
samples should be collected by obtaining a composite of subsamples of an area. Collect<br />
samples from each of the plant communities that are considered for litter collection and keep<br />
these samples separate. Establish test plots at sites that are representative of each revegetation<br />
unit (these can be reference sites). Each plot should be well marked (each corner identified<br />
with stakes and permanent labels identifying the litter source) and located where it will not<br />
be disturbed. Plots must be free of vegetation and the top several inches of soil should be<br />
removed to eliminate potential seed sources. A known amount of litter (either by dry weight<br />
or by volume) should be spread across each plot. Visit the plots during the spring and count<br />
the number of seeds that are germinating. During the summer or fall, identify plant species<br />
and count individual plants in the plots. At the end of the assessment, calculate the number<br />
of seedlings per known volume or weight of litter material. These figures can then be used<br />
to determine the rate of litter to be applied.<br />
Inset 10-4 | Pine straw industry<br />
Using forest litter as a mulch is not<br />
a new concept – pine needles have<br />
been a popular landscaping mulch<br />
in the southern United States for<br />
the past 25 years. The “pine straw”<br />
industry, as it is referred to, has been<br />
established to harvest needles in<br />
a sustainable manner from young<br />
plantations of southern pine species<br />
to meet this demand.<br />
10.1.4 TOPSOIL<br />
Introduction<br />
Topsoiling is the salvage, storage, and application of topsoil material to provide a suitable<br />
growing medium for vegetation and to enhance soil infiltration (Rauzi and Tresler 1978;<br />
Woodmansee and others 1978; NRCS 1994). Topsoiling has been found to increase plant cover<br />
and biomass through an increase in nutrient availability, water-holding capacity, and microbial<br />
activity, including mycorrhizae (Claassen and Zasoski 1994).<br />
While topsoiling has many beneficial effects for revegetation, topsoiling cannot recreate the<br />
original undisturbed soil. In the process of removing and reapplying topsoil, soils undergo a loss<br />
of (1) soil aggregation, (2) organic nitrogen, (3) arbuscular mycorrhizal fungi (AMF) inoculum,<br />
and (4) microbial biomass carbon (Visser and others 1984). Minimizing topsoil disturbance is<br />
preferred to topsoiling, especially on sensitive soils, such as those derived from granitic and<br />
serpentine bedrock (Claassen and others 1995).<br />
<strong>Roadside</strong> <strong>Revegetation</strong>: An Integrated Approach to Establishing Native Plants and Pollinator Habitat<br />
251
IMPLEMENTATION GUIDES<br />
Salvaging Topsoil<br />
The removal of topsoil should only be done in areas that will be excavated, severely compacted,<br />
or buried with excavated material, such as fill slopes. These areas are usually identified early in<br />
the planning stages. During the assessment phase of the revegetation plan, a topsoil survey<br />
should be conducted to determine the depth and quality of the topsoil that will be excavated<br />
(see Section 5.5.1, Topsoil). Ideally, only the topsoil is removed in the excavation process. Mixing<br />
topsoil and subsoil together will dilute microbial biomass and mycorrhizal inoculum of the<br />
topsoil, which will decrease their effectiveness in reestablishing nutrient cycling.<br />
Topsoil quality should be determined from laboratory tests and field surveys. Topsoils with<br />
high sodium, high salinity, very high or very low pH, or any other condition that may be toxic<br />
to plant growth should be avoided (Rauzi and Tresler 1978). If weeds are observed during the<br />
field survey, it should be assumed that the seeds of these species are present in the topsoil<br />
and these areas should be avoided or chemically treated. If herbicides are used, then it is<br />
important that a non-persistent herbicide be used so that revegetation is not affected. In<br />
either case, monitoring and treatment of the salvage piles should be conducted to assure<br />
that weeds are kept to a minimum.<br />
During topsoil excavation, the litter and duff layers are usually removed with the topsoil.<br />
These layers are sources of decomposed and partially decomposed organic matter. Under<br />
topsoil storage conditions, this material will undergo some decomposition, releasing nutrients.<br />
Separation of duff and litter from the topsoil prior to topsoil excavation should be considered<br />
when the duff and litter are to be used as a native seed source or soil cover.<br />
It is best to excavate topsoil when soils are relatively dry. Under dry conditions, there is less<br />
potential to compact the soil or destroy soil aggregation. Dry topsoil should also store longer<br />
and maintain better viability than moist topsoil (Visser, Fujikawa, and others 1984). The period<br />
when topsoils are dry is generally limited to the beginning of the summer through the middle<br />
of fall, which may not always lend itself to construction schedules. Restricting topsoil excavation<br />
operations to dry periods should be considered for large topsoil piles or if topsoil will remain<br />
in piles for greater than one year.<br />
Topsoil layers are typically removed with either the blade of a tractor or excavator bucket. Soil<br />
compaction should be minimized prior to removal, which requires keeping large equipment<br />
travel to a minimum. Topsoil is typically placed into berms at the bottom of fill slopes or top<br />
of cut slopes and stored there until it is reapplied. If salvaged in this manner, small piles are<br />
created and soil is minimally handled. Minimum berm dimensions are approximately 6 ft<br />
wide by 3 ft high, which is often not large enough for the amount of topsoil that needs to<br />
be stored. When this is the case, topsoil is trucked offsite to larger storage piles. Because of<br />
the potential for weed invasion, potential offsite topsoil storage areas should have a weed<br />
assessment conducted prior to selection of the site.<br />
Storing Topsoil<br />
The question often raised around storing topsoil is how long it can remain piled before it<br />
loses its viability. Studies have shown that stored topsoil can remain viable from 6 months<br />
(Claassen and Zasoski 1994) to several years (Miller and May 1979; Visser, Fujikawa, and others<br />
1984; Visser, Griffiths, and others 1984,) but will decrease in viability after 5 years (Miller and<br />
May 1979; Ross and Cairns 1981).<br />
Viability of stored topsoil is a function of moisture, temperature, oxygen, nitrogen, and time.<br />
Stockpiled topsoil has been compared to “diffuse composting systems” (Visser, Fujikawa, and<br />
others 1984) because, under optimum conditions, organic material in the topsoil will compost.<br />
Decomposition of organic matter in stored topsoil will reduce microbial biomass essential<br />
for nitrogen cycling (Ross and Cairns 1981) and fine roots that store mycorrhizal inoculum<br />
(Miller and May 1979; Miller and Jastrow 1992). Optimum environments for decomposition<br />
include high moisture, warm temperatures, and available nutrients, all conditions present in<br />
<strong>Roadside</strong> <strong>Revegetation</strong>: An Integrated Approach to Establishing Native Plants and Pollinator Habitat<br />
252
IMPLEMENTATION GUIDES<br />
most topsoil piles. Climates with lower moisture and temperatures can be more favorable to<br />
long- term storage. A study in Alberta, Canada, for instance, revealed that topsoil had very little<br />
respiration or organic decomposition after three years in a stockpile due to the influence of<br />
the cold, dry climate (Visser, Fujikawa, and others 1984). Dry topsoils store longer and maintain<br />
greater populations of viable mycorrhizal fungi (Miller and Jastrow 1992). If a topsoil pile is<br />
to be held over winter in areas of moderate to high rainfall, it should be kept dry by covering<br />
with plastic (which will also keep the piles protected from erosion and weed establishment).<br />
The size of the pile can also affect the viability of the topsoil. The interior of large piles<br />
maintains higher temperatures and are usually anaerobic, which can be detrimental to soil<br />
microorganisms. Microbial biomass levels and mycorrhizal fungi have been found to be very<br />
low in the bottom of large stockpiles (Ross and Cairns 1981; Miller and Jastrow 1992). Most<br />
projects limit topsoil piles to 3 to 6 ft in height. This is not always possible, especially when<br />
topsoil storage space is limited. Under these circumstances, the size of the topsoil pile can be<br />
quite large. To reduce the negative effects associated with very large piles, topsoils should be<br />
salvaged dry and kept dry during storage. Large piles should be stored for as short a time as<br />
possible. In addition to maintaining the viability of the topsoil, minimizing storage time will<br />
reduce the risk of weed infestation.<br />
Standard specifications often call for temporary seeding of topsoil piles. The benefits of this<br />
practice are erosion control and maintenance of mycorrhizae inoculum through the presence<br />
of live roots. This practice should be evaluated for each project to avoid the introduction of<br />
undesirable plant species in the seeding mix if non-native species are used. Alternatives to<br />
this practice include hydromulching without seeds or covering with plastic, however, both<br />
practices loose their effectiveness with time.<br />
Reapplying Topsoil<br />
The depth of topsoil application is generally<br />
based on the amount of topsoil<br />
Total soil nitrogen (or<br />
A other nutrient of interest)<br />
available and the desired productivity<br />
in salvaged topsoil<br />
of the site after application. As a rule,<br />
0.14 %<br />
the deeper topsoil is applied, the higher<br />
the site productivity will be. If the objective<br />
is to restore a site to its original<br />
productivity, the placement of topsoil<br />
should be at a depth equal to or greater<br />
B<br />
C<br />
Soil bulk density<br />
Fine soil fraction<br />
1.1<br />
70<br />
gr/cc<br />
%<br />
than the topsoil horizon of undisturbed<br />
Nitrogen for soil layer<br />
reference sites. Sufficient topsoil quantities<br />
however, are rarely available in the<br />
(A * B * C * 270) =<br />
Minimum or threshold<br />
quantities needed to restore disturbed<br />
N levels<br />
sites to their original topsoil depths.<br />
This often leads to applying topsoil too<br />
Minimum topsoil application:<br />
E/D<br />
thinly across a project site. There may be<br />
* 12 =<br />
a minimum topsoil depth below which<br />
the application of topsoil is not effective.<br />
Research on a northern California road construction site (Claassen and Zasoski 1994) suggests<br />
that a depth of 4 to 8 inches was required for an effective use of topsoil. On sites where the<br />
subsoil is unfavorable for plant establishment (e.g., very high or low pH, high sodium, high<br />
salinity), minimum depths of greater than 12 inches of topsoil should be considered (Bradshaw<br />
and others 1982).<br />
Determining minimum topsoil application depths can be based on the minimum amount<br />
of nitrogen required to establish a self-maintaining plant community. A threshold of<br />
approximately 700 kg/ha (625 lb/ac) of total nitrogen in the topsoil has been suggested for<br />
sustaining a self- maintaining plant community in a temperate climate (Bradshaw and others<br />
From soil test of post construction<br />
soils - reported in gr/l, ppm, mg/kg, ug/g<br />
divide by 10,000 for %<br />
Unless known, use 1.5 for compacted<br />
subsoils, 1.3 for undisturbed soils,<br />
0.9 for light soils such as pumice<br />
100% minus the rock fragment content -<br />
from estimates made from sieved soil<br />
prior to sending to lab<br />
D 2,911 lbs/ac ft Calculated amount of total nitrogen in<br />
1 acre feet of soil<br />
E 1,100 lbs/ac Determined from reference sites or<br />
minimum thresholds from literature<br />
F 4.5 inches The minimum thickness of topsoil to apply<br />
to meet minimum thresholds of nitrogen<br />
Figure 10-24 | Salvaged soil can<br />
be tested for nitrogen content<br />
Soil testing of salvaged topsoil can be<br />
used to calculate the thickness to apply<br />
in order to meet minimum nitrogen<br />
levels.<br />
<strong>Roadside</strong> <strong>Revegetation</strong>: An Integrated Approach to Establishing Native Plants and Pollinator Habitat<br />
253
IMPLEMENTATION GUIDES<br />
1982). Claassen and Hogan (1998) suggest higher rates,<br />
especially on granitic soils, of 1,100 lb/ac total nitrogen.<br />
Using total nitrogen levels from soil tests of topsoil, the<br />
application thickness of topsoil can be determined using<br />
the calculations presented in Figure 10-24.<br />
Once the desired topsoil depth has been established, it<br />
must be determined whether there is enough stored topsoil<br />
available to meet these standards. The quantity of cubic<br />
yards of topsoil required per acre can be determined based<br />
on the depth of topsoil from Figure 10-25. For example, if<br />
an average of 10 inches of topsoil is required on a project,<br />
approximately 1,350 yd3/ac topsoil would be needed. If<br />
there is not enough topsoil to meet this depth, then less<br />
than full coverage of the site should be considered over<br />
reducing the desired thickness of the topsoil.<br />
Where topsoil quantities are limiting, it is important to<br />
develop a strategy that addresses the location the topsoil<br />
will be spread and the depth at which it will be applied. The<br />
strategy might concentrate topsoil in areas such as planting<br />
islands, planting pockets, or in a mosaic pattern that blends<br />
with the natural vegetative community. The non-topsoiled<br />
areas could be treated with other mitigating measures, such<br />
as organic matter incorporation or mulching.<br />
Manufactured Topsoil<br />
The term manufactured topsoil (also termed “engineered topsoil”) is used to define a soil created<br />
to perform like, or develop into, topsoil. It is usually manufactured offsite and transported to<br />
the area where it will be applied. Manufactured topsoil is used in gabion walls, crib walls, or<br />
other bioengineered structures. It can also be used in planting pockets and planting islands.<br />
Selecting the appropriate organic matter, soil texture, and soil amendments for manufactured<br />
topsoil will increase the success of the project. The basic components of a manufactured<br />
topsoil are the loam borrow, compost, and soil amendments.<br />
Loam Borrow – Loam borrow is any material that is composed of mineral particles meeting a<br />
suitable texture class (Figure 10-26). Loam borrow should have low coarse fragment content,<br />
Topsoil to Apply (Cu Yds/Ac)<br />
1,600<br />
1,500<br />
1,400<br />
1,300<br />
1,200<br />
1,100<br />
1,000<br />
900<br />
800<br />
700<br />
600<br />
500<br />
400<br />
300<br />
200<br />
100<br />
0<br />
0 1 2 3 4 5 6 7 8 9 10 11 12<br />
Desired Topsoil Depth (inches)<br />
Figure 10-25 | Soil quantity needed<br />
for a certain depth can be estimated<br />
The quantity of topsoil to apply to<br />
achieve a specified topsoil thickness<br />
can be estimated by finding the desired<br />
depth of topsoil. For example, a 10-inch<br />
depth of topsoil would require 1,350<br />
yd3 of topsoil.<br />
100% 0%<br />
90 10<br />
80<br />
20<br />
70 30<br />
CLAY<br />
60 40<br />
Figure 10-26 | Soil textures<br />
suitable as loam barrow<br />
Soil textures that are suitable as “loam borrow”<br />
are shown in light brown on the USDA textural<br />
triangle.<br />
50<br />
SILTY<br />
CLAY<br />
50<br />
SANDY<br />
40 CLAY<br />
60<br />
CLAY LOAM<br />
SILTY CLAY<br />
LOAM<br />
30 70<br />
SANDY CLAY<br />
LOAM<br />
20 80<br />
LOAM<br />
SILTY<br />
SANDY<br />
LOAM<br />
10 90<br />
LOAMY<br />
LOAM<br />
SILT<br />
SAND<br />
0% SAND<br />
100%<br />
100% 90 80 70 60 50 40 30 20 10 0%<br />
<strong>Roadside</strong> <strong>Revegetation</strong>: An Integrated Approach to Establishing Native Plants and Pollinator Habitat<br />
254
IMPLEMENTATION GUIDES<br />
Table 10.6 | General specification ranges for loam borrow used in manufactured topsoil<br />
These can be modified depending on the soil characteristics of the compost and other soil amendments<br />
(modified after Alexander 2003b; CCREF and USCC 2006).<br />
Test Parameters Test Methods Loam Borrow<br />
Physical Contaminates<br />
(man-made inerts)<br />
Trace Contaminants<br />
Man-made inert removal and classification<br />
(TMECC 03.08-C)<br />
Arsenic, Cadmium, Copper, Mercury, Manganese,<br />
Molybdenum, Nickel, Lead (TMECC 04.06)<br />
IMPLEMENTATION GUIDES<br />
Table 10.7 | General specification ranges for composted materials for manufactured topsoil<br />
These are generalized specifications that can be broadened depending on the soil characteristics of<br />
the loam borrow and site conditions (modified after Alexander 2003b; CCREF and USCC 2006).<br />
Test Parameters Test Methods Composted Material<br />
Physical Contaminates<br />
(man-made inerts)<br />
Trace Contaminants<br />
pH<br />
Soluble Salts<br />
Bioassay<br />
% Moisture Content<br />
Total Organic Matter<br />
Stability<br />
C:N Ratio<br />
Particle Size<br />
Man-made inert removal and classification<br />
(TMECC 03.08-C)<br />
Arsenic, Cadmium, Copper, Mercury, Manganese,<br />
Molybdenum, Nickel, Lead (TMECC 04.06)<br />
1:5 slurry pH (TMECC 04.11-A)<br />
Electrical conductivity using<br />
1:5 Slurry Method (dS/m)<br />
% seedling emergence and relative<br />
seedling vigor (TMECC 05.05-A)<br />
% wet weight (TMECC 03.09-A)<br />
% by dry weight, loss on ignition (TMECC 05.07A)<br />
Respirometry. Carbon dioxide evolution rate -<br />
mg CO 2 -C per g OM per day (TMECC 05.08B)<br />
(TMECC 05.02-A)<br />
% of compost by dry weight passing a<br />
selected mesh size, dry weight<br />
(TMECC 02.12-B)<br />
IMPLEMENTATION GUIDES<br />
10.1.5 ORGANIC MATTER AMENDMENTS<br />
Background<br />
High quality topsoil is not always available in the quantities needed to meet the objectives of<br />
a revegetation project. In such cases, infertile subsoils can be augmented by the incorporation<br />
of organic matter and other soil amendments. This practice can be an important tool to begin<br />
the process of rebuilding a soil and reestablishing native vegetation.<br />
One immediate effect of incorporating organic matter into infertile subsoils is increased<br />
infiltration. Water that would typically run off the soil surface during rainstorms now enters<br />
the soil. Amended subsoils also have greater permeability, and often increased water storage.<br />
Changes in these factors can improve the overall hydrology of the site, making soil less<br />
susceptible to runoff and erosion.<br />
Incorporation of organic matter can often improve plant establishment and growth rates,<br />
especially if composted organic matter is used. Composted organic materials increase soil<br />
nutrients and rooting depth, which can create better growing conditions for native plant<br />
establishment. The use of non-composted organic materials, such as ground wood residues,<br />
can restrict plant establishment for the first several years after incorporation because of the<br />
immobilization of nitrogen. In this section, we will discuss the substitution of non-composted<br />
organic matter when composted materials are not available, are too expensive, or are excessive<br />
distances from the project site. Sources of non-composted organic materials are almost always<br />
available on construction sites as a result of the clearing and grubbing of trees and shrubs,<br />
and can be made available through grinding or chipping operations.<br />
Incorporated organic matter becomes the primary source of energy for soil organisms and,<br />
whether fresh or composted, is the driving force behind soil development. In the process of<br />
decomposition, soil organisms turn cellulose into complex organic compounds, while slowly<br />
releasing nutrients for plant growth. Some of the complex compounds act similarly to glues,<br />
sticking soil particles together into aggregates, which ultimately create soil structure. The<br />
slow decomposition of organic matter delivers a steady supply of nutrients to the establishing<br />
plant community for many years.<br />
The strategy behind many current revegetation projects is to obtain immediate cover with<br />
the use of seeds, fertilizers, and other amendments, without considering what is needed for<br />
long-term site recovery. It is not uncommon to find good establishment of vegetative cover<br />
immediately (within a year) after revegetation work, but several years later find that it was not<br />
sustainable. Life expectancy of many revegetation projects has often been found to be very<br />
short (Claassen and Hogan 1998). Incorporating organic matter takes a different approach.<br />
This strategy puts more emphasis on the development of the soils and less on the quick<br />
establishment of vegetation. It is based on the premise that reestablishing native vegetation<br />
will create healthy, functioning soils on highly disturbed sites over time. This cannot happen<br />
without basic minimum soil components, such as an organic source, nutrients, and good soil<br />
porosity. These components of a soil must be in place if plant communities are to become<br />
sustainable. Incorporating organic matter into the soils of highly disturbed sites is an important<br />
component of meeting long-range revegetation objectives.<br />
Set Objectives<br />
Section 10.1.3, Mulches discussed the use of organic matter as seedbed or seedling mulch.<br />
When used and, with time, breaks down and improves the surface soil properties. Applying<br />
organic matter on the soil surface is far easier and more practical than incorporating it into<br />
the soil. Why, then, incorporate organic matter?<br />
◾◾<br />
Improve soils of “difficult” parent materials<br />
<strong>Roadside</strong> <strong>Revegetation</strong>: An Integrated Approach to Establishing Native Plants and Pollinator Habitat<br />
257
IMPLEMENTATION GUIDES<br />
◾◾<br />
Increase water-holding capacity<br />
◾◾<br />
Improve rooting depth<br />
◾◾<br />
Improve infiltration and drainage<br />
◾◾<br />
Encourage quicker release and availability of nutrients and carbon<br />
Setting objectives clarify why this mitigating measure is being considered and helps define<br />
the appropriate sources and application rates for incorporated organic matter.<br />
“Difficult” Parent Material – The parent material from which soils are derived often plays an<br />
important role in how soils will respond to disturbances. Soils originating from granitic rock<br />
respond poorly to the removal of topsoil. Subsoils from this parent material have very high<br />
bulk densities and low permeability rates. They can “hardset” when dry, restricting root growth<br />
and increasing runoff (Claassen and Zasoski 1998). Any positive effects of deep tillage are often<br />
short-lived on granitic subsoils (Luce 1997) because they quickly return to high bulk densities<br />
and soil strengths. Granitic soils can benefit from the incorporation of organic matter, not only<br />
because of increased nutrients, but because soil physical properties are improved. Organic<br />
amendments lower bulk densities and help to form pathways for water entry, soil drainage,<br />
and root growth. Organic matter can also increase the water-holding capacity of these soils.<br />
Water-Holding Capacity – The incorporation of organic matter can increase water-holding<br />
capacity of soils with less than 9 percent available water capacity (Claassen 2006). These<br />
include soils with sand, loamy sand, and some sandy loam textures, as well as soils high in<br />
Inset 10-5 | How much is soil water-holding capacity increased by incorporating organic matter?<br />
To determine whether there will be an immediate increase in the<br />
water-holding capacity of a soil as a result of organic matter incorporation,<br />
a test can be performed using readily available supplies (Note:<br />
This should be considered a “relative” test for available moisture, since<br />
wilting point is not determined).In the field, collect a large amount of<br />
soil (at least several quart bags). Obtain samples of the organic matter<br />
amendment under consideration. Make 6 or more containers out of<br />
3-inch PVC pipe by cutting them into 4-inch lengths. Secure cheese<br />
cloth with duct tape around the bottom of one tube. Make a flat “end”<br />
piece for the tubes by cutting a plastic sheet (or using an old CD) and<br />
secure it to the bottom as well.<br />
In a bowl, mix several samples of organic matter to sieved soil (a mixing<br />
rate of 4.5 cups soil to 0.5 cups organic matter = 10 percent organic<br />
matter; 4 cups soil to 1 cup organic matter = 20 percent; 3.5 cups soil<br />
to 1.5 cups organic matter = 30 percent). Place each mix in a PVC tube<br />
and fill to the top (the soil should be held in the tube by the cheese<br />
cloth and plastic). Lightly tamp the container against a surface and fill<br />
to the top of the tube. Identify the mix of soil and organic matter. As a<br />
control, or comparison, one tube must have no organic matter in the<br />
sample. Place each container in a 5-gallon bucket or plastic trash can<br />
(which must be taller than the length of the tubes). Fill the bucket with<br />
water just to the tops of the tubes (you might have to fill the bucket<br />
up to the top a few times) and keep them in the bucket for at least<br />
30 minutes, or as long as it takes to see thoroughly moistened soils.<br />
Remove the tubes from the water and let them drain. After several<br />
hours, detach the plastic bottoms (the soil should be held together by<br />
the cheese cloth) and place the ends of the tubes on a large stack of<br />
newspapers or paper towels. The paper will remove the excess water<br />
held at the bottom of the tube. Replace paper towels as they become<br />
saturated (Note: Place the plastic bottoms over the top of the tubes<br />
to prevent the soil at the surface from drying).<br />
After 24 hours, record the weight of each tube. Remove the soil from<br />
the tube and weigh the tube. Dry soil at 221 degrees F (105 degrees<br />
C) in a drying oven. Unless a drying oven is available, purchasing one<br />
can be expensive. An alternative is drying each sample in a crockpot.<br />
These inexpensive appliances can reach temperatures of approximately<br />
200 degrees F and it is possible to dry several samples in a day. When<br />
the sample is dry, weigh the sample. Calculate the percentage of soil<br />
moisture for each soil mix using the following equations (be sure to<br />
subtract the tube weights from the soil):<br />
% soil moisture = (wet soil weight – dry soil weight) / dry soil weight * 100<br />
If there is no increase in percent soil moisture with the additions<br />
of organic matter over the soil with no organic matter additions, it<br />
means that in the short term, applying organic matter will not improve<br />
water-holding capacity. For a more accurate assessment, contact<br />
analytical laboratories that perform soil moisture tests.<br />
Soils derived from serpentine rock have also been identified as difficult<br />
to revegetate because of heavy metals, low water-holding capacity, low<br />
nutrient levels, and low calcium to magnesium ratio. When disturbed,<br />
these sites can take decades to revegetate, producing a continual<br />
output of sediments. In addition to using plant materials collected from<br />
similar serpentines sites, incorporating compost into serpentine soils<br />
can greatly improve revegetation success by increasing water-holding<br />
capacity (Curtis and Claassen 2005).<br />
<strong>Roadside</strong> <strong>Revegetation</strong>: An Integrated Approach to Establishing Native Plants and Pollinator Habitat<br />
258
IMPLEMENTATION GUIDES<br />
rock fragments. Incorporating organic matter to increase water-holding capacity can be<br />
critical on arid or semi- arid sites, or sites with very little summer rainfall. The increase in<br />
moisture-holding capacity depends on the type of organic matter and the degree of decomposition.<br />
Non-decomposed (fresh) organic sources, such as large wood chips and shredded<br />
wood fiber, can actually decrease soil water-holding capacity because these large materials<br />
hold very little water (These materials can act similarly to gravels).A test for determining how<br />
much soil moisture will be increased or decreased by the incorporation of organic matter<br />
is described in Inset 10-5. From these results, the source and quantity of organic matter to<br />
incorporate can be determined.<br />
Rooting Depth – For species that have deep rooting requirements, such as trees and some<br />
shrubs, incorporating organic matter into the subsoil can increase rooting depth. This can be<br />
beneficial for plant establishment and long-term site recovery, especially when applied to<br />
soils derived from “difficult” parent materials. Soils that are compacted can also benefit from<br />
deep incorporation of organic matter. The incorporation of organic matter to deeper levels<br />
is often accomplished by applying a thick layer of organic matter to the surface, and then<br />
incorporating it to the desired depths with an excavator or backhoe. It is important that the<br />
organic matter is thoroughly mixed through the soil profile during incorporation.<br />
Infiltration and Drainage – The hydrology of most disturbed soils is improved with organic<br />
matter incorporation. The degree to which infiltration and permeability is improved depends<br />
on the size and shape of the organic source and application rates (see following sections). Finer<br />
textured soils lacking structure (e.g., clay loams, silty clay loams, and sandy loams) should have<br />
better infiltration and permeability when organic matter is uniformly applied. This objective<br />
is applied in areas where water quality issues are high.<br />
Nutrients and Carbon – Applying organic matter can assure that nutrients and carbon are<br />
available to decomposing soil microorganisms, which are essential for rebuilding a healthy<br />
soil. Typically this objective is applied to soils that are low in nutrients and carbon (e.g., sites<br />
lacking topsoil).<br />
Select Organic Materials<br />
There is a range of organic material sources to consider. Developing a selection criteria based<br />
on the following characteristics can be helpful:<br />
◾◾<br />
Source of organic matter<br />
◾◾<br />
Level of decomposition<br />
◾◾<br />
Carbon-to-nitrogen ratio (C:N)<br />
◾◾<br />
Size and shape of material<br />
Recognizing how these characteristics will help achieve the objectives for incorporating<br />
organic matter should guide the revegetation specialist in making the appropriate decision<br />
for each project.<br />
Organic Sources – Most available organic sources originate from waste byproducts of<br />
agriculture, forestry, and landscape maintenance. They include yard waste (lawn clippings,<br />
leaves), wood residues (sawdust, bark, branches, needles, roots, and boles of trees and shrubs<br />
from landscape maintenance, land clearing, logging operations, or mills), manures (poultry<br />
or cattle), agricultural waste products (fruits and vegetables) and biosolids (treated sewage<br />
sludge meeting EPA regulations). In the composting process, usually more than one source<br />
is used. A compost from one facility might include lawn clippings, leaves, yard waste, poultry<br />
manure, and ground wood fiber, while another facility might use yard waste, ground wood<br />
fiber, and biosolids. When biosolids are used in the composting process, the resulting material<br />
is referred to as co-compost.<br />
<strong>Roadside</strong> <strong>Revegetation</strong>: An Integrated Approach to Establishing Native Plants and Pollinator Habitat<br />
259
IMPLEMENTATION GUIDES<br />
Each organic source has a unique nutrient composition. Green alfalfa,<br />
1.25<br />
for example, has a very different nutrient makeup than organic matter<br />
derived from wood residues of cleared right- of-way. Even within<br />
sources, there are very different nutrient compositions (Figure 10-27). 1.00<br />
For example, most of the nutrients of trees are concentrated in the<br />
foliage and branches, and very little in the bole of the tree. A chipped<br />
0.75<br />
slash pile composed of higher proportions of branches and foliage will<br />
contain far greater nutrients than a pile composed primarily of tree<br />
boles and, as such, would probably be a more preferred organic source. 0.50<br />
As organic sources decompose, they contribute their combination<br />
of nutrients to the fertility of the soil. Knowingthesourcefromwhichtheorganicmatterwasderivedwillgivesomeindication<br />
of the amount<br />
0.25<br />
of nutrients that might be supplied to the soil (Table 10-8). This<br />
information is important to determine whether target long-term 0.00<br />
Foliage<br />
nutrient levels will be achieved. Nutrient analysis reports should be<br />
obtained from facilities supplying the compost. Other sources of<br />
organic matter can be collected and sent to labs specializing in this<br />
type of testing (Inset 10-6).<br />
Knowing the source of the organic matter might also identify contaminants that could<br />
potentially be harmful to plant growth. Additions of materials, such as fly ash, feedlot, and<br />
municipal and factory waste products can potentially decrease the quality of an organic<br />
source. Testing these materials for contaminants, pH, soluble salts, and bioassay (Table 10-9)<br />
will identify potential problems.<br />
Level of Decomposition – Organic matter can be in various stages of decomposition; from<br />
fresh organic matter with minimal decomposition to compost that has undergone extensive<br />
decomposition. The level of decomposition is an important consideration when selecting an<br />
organic amendment. Additions of relatively undecomposed organic matter to the soil can<br />
have negative short-term effects on plant establishment and growth.<br />
Nutrients (%)<br />
Tree Components<br />
Nitrogen<br />
Phosphorus<br />
Potassium<br />
Branches Bark Wood<br />
Figure 10-27 | Nutrients<br />
in forest biomass<br />
Nutrients are held in different portions<br />
of the forest biomass, as shown for old<br />
growth Pacific silver fir. On a percentage<br />
basis, tree foliage is the storehouse for<br />
nutrients. Mulch derived from branches<br />
and foliage will have far greater nutrient<br />
content than mulch from bark and wood<br />
(adapted from Cole and Johnson 1981).<br />
“Fresh” organic matter is recently ground or chipped material that has undergone very little<br />
decomposition. These materials usually have very high C:N and will immobilize soil nitrogen<br />
for months to several years after incorporation, depending on the characteristics of the organic<br />
source. Very slow establishment of plants should be expected when incorporating fresh organic<br />
matter unless a continuous source of supplemental nitrogen is applied (e.g., applications of<br />
slow release fertilizers, growing nitrogen fixing plants). Nevertheless, applying fresh organic<br />
matter to highly disturbed soils can have a positive effect on slope hydrology and surface<br />
erosion. Fresh organic matter can increase infiltration and permeability in poorly structured<br />
soils by creating pathways for water-flow.<br />
Incorporating fresh organic matter is not generally practiced in roadside revegetation projects.<br />
However, considering the expense of purchasing and transporting composted materials to<br />
Inset 10-6 | The Seal of Testing Assurance Program<br />
Just as many products at the local market have seals of approval (e.g., “Approved by the FDA” or “USDA Inspected”), the United States<br />
Composting Council operates an approval system for composting facilities. The Seal of Testing Assurance (STA) is a voluntary program that<br />
requires compost manufacturers to regularly test their composts using an approved third-party testing facility. The procedures for sampling<br />
and testing are outlined in the Test Methods for the Examination of Composting and Compost protocols. The STA program takes the worry out<br />
of purchasing compost because you know that you can be assured that the company is reputable. You can purchase compost from companies<br />
that do not participate in the STA program (when the job site is in the back country you might have to do this), but this leaves the sampling<br />
and testing up to you. This involves traveling to the compost piles, systematically collecting samples from the compost piles, sending them<br />
to a qualified lab to run TMECC tests, and interpreting the results when you get them back. STA laboratories can be found at (after Alexander 2003).<br />
<strong>Roadside</strong> <strong>Revegetation</strong>: An Integrated Approach to Establishing Native Plants and Pollinator Habitat<br />
260
IMPLEMENTATION GUIDES<br />
Table 10.8 | C:N for common sources of organic matter<br />
Materials<br />
Wood - Ponderosa pine and Douglas-fir 1,200:1 to 1,300:1<br />
Bark - Ponderosa pine and Douglas-fir 400:1 to 500:1<br />
Wood - Red alder 377:1<br />
Paper 170:1<br />
Pine needles 110:1<br />
Wheat straw 80:1<br />
Bark - Red alder 71:1<br />
Dry leaves 60:1<br />
Dry hay 40:1<br />
Leaves 40:1 to 80:1<br />
Yard compost 25:1 to 30:1<br />
Oat straw 24:1<br />
Rotted manure 20:1<br />
Alfalfa hay 13:1<br />
Top soil 10:1 to 12:1<br />
C:N Ratio<br />
From Rose and Boyer 1995; Epstein 1997; Claassen and Carey 2004; Claassen 2006<br />
Table 10.9 | General specification ranges for composted materials for manufactured topsoil<br />
Test Parameters Test Methods Composted Material<br />
Physical Contaminates<br />
(man-made inerts)<br />
Man-made inert removal and classification (TMECC 03.08-C)
IMPLEMENTATION GUIDES<br />
remote sites, as well as the availability and abundance of road right-of-way material that<br />
is typically burned for disposal, this is an option that should be considered. If shredded or<br />
chipped road right-of- way material is to be incorporated into the soil, it should be allowed<br />
to age as long as possible in piles. To increase the rate of decomposition, the piles should be<br />
moved several times a year to add oxygen.<br />
Some organic sources have been stored in piles for long periods of time and are partially<br />
decomposed. They are darker in appearance than fresh sources, but the appearance of the<br />
original organic source can still be discerned (e.g., needles or leaves are still identifiable).<br />
These materials are sometimes referred to as “aged.” Because only partial decomposition has<br />
occurred, C:N is lower than fresh organic matter. Nitrogen immobilization, however, should<br />
still be expected for a significant period of time after incorporation. Aged organic sources<br />
have not typically undergone extensive heating, like composts, and they can contain seeds<br />
of undesirable weeds.<br />
Compost results from the controlled biological decomposition of organic material. The<br />
resulting heat generated in the process sanitizes the material. The end product is stabilized<br />
to the point that it is beneficial to plant growth (Alexander 2003a, 2003b). During the early<br />
stages of composting, heat is generated at temperatures that are lethal to weed seeds, insects,<br />
and pathogens (Inset 10-7). Fresh, moist compost piles will usually generate heat in the first<br />
few days of composting, reaching 140 to 160 degrees F, which will kill most pathogens and<br />
weed seeds (Epstein 1997; Daugovish and others 2006). The resulting material is a relatively<br />
stable, sanitized product that is very dark brown to black in color. Composts are very suitable<br />
materials for increasing the water-holding capacity of sandy soils, increasing nutrient supply,<br />
and enhancing soil infiltration and permeability rates.<br />
Inset 10-7 | Compost production<br />
The production and use of compost in the United States has flourished in the last 20<br />
to 30 years as a result of a ban in many of states on yard wastes in landfills. Since 1988,<br />
the number of yard waste composting facilities in the United States has expanded from<br />
less than 1,000 in 1988 to over 3,500 in 1994. With the formation of the Composting<br />
Council in 1989, research in compost manufacturing has increased significantly.<br />
Composting is the biological decomposition of organic matter under controlled<br />
aerobic conditions. To start the composting process, there must be organic matter,<br />
water, microorganisms, and oxygen (A). Heat is also needed, but is created by the<br />
microorganisms as they proliferate. Temperatures exceed levels necessary to kill most<br />
pathogens and weed species (B). With time, in a controlled composting environment,<br />
microorganisms release carbon dioxide and water from the organic matter. The rate<br />
at which these are released, and ultimately the composting time, is a function of the<br />
type of material being composted and the composting method.<br />
A variety of composting methods have been<br />
developed over the years. State- of-the-art<br />
facilities and equipment that control and<br />
monitor oxygen, moisture, CO2, and temperature<br />
levels throughout the composting<br />
process can produce relatively uniform<br />
products. The picture shown in (C) is of a<br />
composting system that pumps oxygen<br />
through a pipe centered in the wrapped<br />
piles of compost. Temperature and carbon<br />
dioxide are controlled through a venting<br />
system (adapted from Epstein 1997).<br />
˚F<br />
160<br />
140<br />
120<br />
100<br />
80<br />
60<br />
40<br />
32<br />
˚C<br />
70<br />
60<br />
50<br />
40<br />
30<br />
20<br />
10<br />
0<br />
Time (One to 12 Months)<br />
Bacteria<br />
Fungi and<br />
Actinomycetes<br />
Insects and<br />
Worms<br />
Pasteurization<br />
Temperature<br />
Compost<br />
Water<br />
25 to 50%<br />
Green Wastes<br />
(Nitrogen)<br />
Microorganisms<br />
1 to 12 Months<br />
Compost<br />
Oxygen<br />
50 to 75%<br />
Brown Wastes<br />
(Carbon)<br />
<strong>Roadside</strong> <strong>Revegetation</strong>: An Integrated Approach to Establishing Native Plants and Pollinator Habitat<br />
262
IMPLEMENTATION GUIDES<br />
Carbon-to-Nitrogen Ratio – The carbon-to-nitrogen ratio (C:N) is one of the most important<br />
characteristics to consider when selecting a source of organic matter. It is an indicator of<br />
whether nitrogen will be limiting or surplus (see Section 5.5.3.1, Carbon to Nitrogen Ratio<br />
(C:N)). The higher the C:N, the greater the likelihood that nitrogen will be unavailable for plant<br />
uptake. When an organic source with high C:N is incorporated into the soil, carbon becomes<br />
available as an energy source for decomposing soil organisms. Soil microorganisms need<br />
available nitrogen to utilize the carbon source. Not only do microorganisms compete with<br />
plants for nitrogen, they store it in their cell walls, making it unavailable for plant growth for<br />
long periods of time. As the carbon sources become depleted, the high populations of soil<br />
microorganisms die and nitrogen is released for plant growth.<br />
When C:N is greater than 15:1, available nitrogen is immobilized. As ratios dip below 15:1,<br />
nitrogen becomes available for plant uptake. Most fresh and aged organic sources have C:N<br />
greater than 15:1 (Table 10-8) and will immobilize nitrogen for some period of time when<br />
incorporated into the soil. When these same materials are composted, C:N approaches or even<br />
falls below 15:1. These materials will then provide a source of nitrogen to the soil. Co-composts,<br />
for instance, can have ratios between 9:1 and 11:1, indicating they are a ready source of available<br />
soil nitrogen. Since these materials provide nitrogen, they are often considered fertilizers<br />
(Ratios below 10:1 are typically labeled as fertilizers).<br />
The period of time that nitrogen remains immobilized in the soil is dependent on several factors:<br />
◾◾<br />
Climate. High moisture and warm temperatures are important for accelerating<br />
decomposition rates. For example, organic matter will decompose faster in the coast<br />
range of Oregon than in the mountains of Idaho.<br />
◾◾<br />
Quantity of incorporated organic matter. The more organic matter that is applied,<br />
the longer the immobilization. A small amount of incorporated sawdust will immobilize<br />
very little nitrogen as compared to several inches of the same material.<br />
◾◾<br />
C:N of organic amended soil. The combined C:N of soil and incorporated organic<br />
matter gives an indication of how the type and rate of incorporated organic matter will<br />
affect the soil C:N. An amended soil with a high C:N will have a longer immobilization<br />
period than a soil with a lower C:N.<br />
◾◾<br />
Size and shape of organic matter. The more surface area of the organic source, the<br />
faster decomposition will take place. A fine compost will decompose faster than a<br />
coarse, screened compost.<br />
◾◾<br />
Nitrogen fertilization or fixation. Nitrogen supplied from fertilizers or nitrogen-fixing<br />
plants will speed up decomposition rates.<br />
It is not easy to predict how long nitrogen will be immobilized in a soil. The variety of available<br />
organic sources, unique soil types, and range of climates of the western United States make<br />
this difficult. For practical purposes, it should be assumed that without supplemental additions<br />
of nitrogen (from fertilizers or nitrogen-fixing plants), the immobilization of nitrogen in soils<br />
with high C:N will be in the order of months, if not years. To give some idea of decomposition<br />
rates, Claassen and Carey (2004) found that partially composted yard waste with a C:N of 18:1<br />
took over a year for nitrogen to become available under aerobic incubation testing conditions.<br />
A high C:N might be beneficial to soil aeration and water movement because it does not<br />
break down as fast as material with lower C:N. For example, the incorporation of alfalfa hay<br />
(C:N =13:1) will decompose quickly, and the effects on soil structure might be short-lived.<br />
On the other hand, wheat straw (C:N = 80:1) or pine needles (C:N = 110:1) can be effective for<br />
several years. High C:N materials are also a longer-term energy source to soil organisms that<br />
help create a stable soil structure.<br />
Nitrogen based fertilizers can be applied to offset higher soil C:N and make soil nitrogen<br />
available for plant growth. Section 10.1.1, Fertilizers, discusses fertilizer strategies for reducing<br />
the effects of high C:N soils.<br />
<strong>Roadside</strong> <strong>Revegetation</strong>: An Integrated Approach to Establishing Native Plants and Pollinator Habitat<br />
263
IMPLEMENTATION GUIDES<br />
Size and Shape – The range in sizes and shapes of organic matter plays a role in how quickly<br />
organic matter breaks down in the soil. Particles with greater surface area to volume ratios<br />
should decompose faster than particles with less surface area to volume. Chipped wood, for<br />
instance, has a low surface area to volume ratio and would take longer to break down than<br />
long strands of ground wood or fine screened sawdust, which have greater surfaces areas.<br />
The particle size and shape of the organic source can also be important in slope hydrology<br />
by increasing infiltration and permeability rates. Long, shredded wood fiber, for example, can<br />
create long passageways for water. If applied at high enough rates, long fibers can overlap,<br />
creating continuous pores that will increase drainage rates. Wood chips applied at the same<br />
rates are less likely to form continuous routes for water drainage because of their shape.<br />
Large undecomposed wood can significantly reduce soil water storage due to low waterholding<br />
capacity of the material. Incorporating large, undecomposed woody organic matter<br />
into soils with low water-holding capacities should be tested first to determine its effect (see<br />
Section 10.1.5.1, Background).<br />
Determine Application Rate<br />
The rates for applying organic matter should<br />
be based on the objectives for organic matter<br />
incorporation. Each objective discussed A<br />
Total nitrogen (or other<br />
nutrient of interest) in compost<br />
in Section 10.1.5.2, Set Objectives, will yield<br />
10 lbs/cu yd<br />
different application rates. For example, a project<br />
objective to increase permeability would<br />
require the addition of 6 inches of compost<br />
mixed into 24 inches of soil. This is a far greater<br />
quantity than if the objective was to increase<br />
nutrient supply, which would require 2 inches<br />
of compost added to the top 12 inches of soil.<br />
Determining rates of organic matter needed to<br />
B<br />
C<br />
D<br />
Nitrogen deficit<br />
Minimum application rates: B/A =<br />
Minimum application depth: C/135 =<br />
769<br />
77<br />
0.6<br />
lbs/ac<br />
cu yd/ac<br />
in<br />
improve nutrient status can follow the process outlined for calculating fertilizer rates in Section<br />
10.1.1.2, Develop Nutrient Thresholds and Determine Deficits. If a nutrient, specifically nitrogen,<br />
is found to be deficient, the amount of organic material to apply must be determined. A nutrient<br />
analysis is necessary to make these determinations. Figure 10-28 gives an example of how to<br />
calculate the amount of organic matter to incorporate to meet minimum levels of nitrogen.<br />
When organic matter is used to increase infiltration and permeability for water quality and<br />
soil erosion, a rate of 25 percent organic matter (by volume) to 75 percent soil (by volume) has<br />
been suggested by several researchers (Claassen 2006). This would require 4 inches of organic<br />
matter be incorporated for every 9 inches of soil. Actual field trials could be installed prior<br />
to construction to measure the effects of soil amendments on infiltration. By incorporating<br />
several rates of organic matter on plots in disturbed reference sites near the project, the<br />
infiltration rates of each treatment could be determined using rainfall simulation equipment.<br />
If the objective for incorporating organic matter is to increase the soil’s available water-holding<br />
capacity, the rate of organic matter application should be based on achieving a total available<br />
water-holding capacity for the desired vegetation of the project area (Setting these targets<br />
is discussed in Section 5.3, Available Water Storage and Accessibility).Inset 10-5 shows one<br />
method of determining relative water-holding capacity of amended soils.<br />
Assure Product Quality<br />
Purchasing compost requires a set of contract specifications that assure product quality. Table<br />
10-9 is a “model specification” developed for the DOT by the Composting Council Research and<br />
Education Foundation (Alexander 1993b) for composts used as soil amendments on roadways.<br />
The tests are based on the TMECC protocols. These are general quality guidelines and can<br />
From laboratory report — most<br />
labs will report out nutrients in<br />
lbs/cu yd of material<br />
Determine from reference sites or<br />
minimum thresholds from literature<br />
(See Figures 10.1 and 10.2)<br />
Volume of compost to apply<br />
to the site to meet minimum thresholds<br />
Thickness of compost to apply to the<br />
site to meet minimum thresholds<br />
Figure 10-27 | Determining<br />
amount of compost to apply<br />
The following calculations can be used<br />
to determine the amount of compost<br />
to apply to a site. They are based on<br />
laboratory test results of the compost<br />
and threshold nitrogen levels obtained<br />
from reference sites.<br />
<strong>Roadside</strong> <strong>Revegetation</strong>: An Integrated Approach to Establishing Native Plants and Pollinator Habitat<br />
264
IMPLEMENTATION GUIDES<br />
be broadened or made more constraining depending on the specifics of the project. When<br />
considering purchasing compost or any other type of organic matter from a manufacturer, it is<br />
important to request the latest lab analysis. An STA facility (Inset 10-6) will have these reports<br />
available while others might not. It is important that these tests be run by STA laboratories. It<br />
is a good practice to visit the location of the organic sources to determine whether there are<br />
undesirable or noxious weeds on or nearby the piles. If these species are present, materials<br />
should not be purchased.<br />
10.1.6 LIME AMENDMENTS<br />
Introduction<br />
Agricultural lime is used when soil pH of a disturbed site needs to be raised to improve plant<br />
survival and establishment (see Section 5.5.5, pH and Salts). Liming low pH soils improves<br />
plant growth by (1) reducing aluminum toxicity, (2) increasing phosphorus and micronutrient<br />
availability, (3) favoring symbiotic and non-symbiotic nitrogen fixation, (4) improving soil<br />
structure, and (5) enhancing nitrification (Havlin and others 1999).<br />
Each plant community has an optimal pH range. Plant communities dominated by conifers, for<br />
instance, function well between pH 5.0 to 6.5, whereas grass-dominated plant communities<br />
in arid climates perform well between pH 6.5 and 8.0. Liming is not an easy operation on<br />
drastically disturbed lands. Liming materials must be incorporated into the soil profile for<br />
maximum effectiveness. This application is very difficult on steep rocky slopes, which are<br />
typical of road construction in mountainous terrain.<br />
Set pH Targets<br />
It is important to set a realistic post-construction target pH when considering liming because<br />
large quantities of lime are needed for even small changes in soil pH. For example, raising an<br />
existing soil pH of 5.5 to pH 6.5 takes nearly twice the amount of lime necessary to raise it to<br />
pH 6.0. A half point pH difference in this case can result in an increase of over 1,000 lb/ac in<br />
application rates.<br />
As discussed in previous sections, it is important to understand the characteristics of the<br />
reference site topsoils and try to recreate these conditions after construction. If the postconstruction<br />
surface soils have a lower pH than the reference site topsoils, then liming can<br />
be used to raise pH. On a project where topsoil is removed and not replaced, the difference<br />
between the pH of the topsoil and the subsoil should be determined. When the pH of the<br />
subsoil is significantly lower than the topsoil, liming to raise soil pH to reference topsoil levels<br />
(target levels) should be considered. Although it might not always be practical to raise pH<br />
of post-construction soils to reference topsoil values, a minimum pH target of 5.5 should be<br />
considered for most sites. This minimum standard would make most soils below pH 5.5 good<br />
candidates for liming.<br />
Select Liming Materials<br />
There are several types of liming materials commercially available (Table 10-10) and selection<br />
should be based on costs, reactivity, effects on seed germination, and composition of the<br />
material. All liming materials will raise soil pH, but not at the same level as pure limestone. To<br />
account for this, all commercially available liming materials are rated against pure limestone<br />
for neutralizing effects. The rating system is called calcium carbonate equivalent (CCE). Burnt<br />
lime (CaO) for instance, might have a CCE of 150, which means that it has a 50 percent greater<br />
neutralizing capacity than pure limestone and much less of this material needs to be applied<br />
to increase pH. A low CCE material, such as slag, might have a CCE of 60, which means that it<br />
has 40 percent less neutralizing capacity. Liming materials with high CCE, like Ca(OH)2 (slaked<br />
<strong>Roadside</strong> <strong>Revegetation</strong>: An Integrated Approach to Establishing Native Plants and Pollinator Habitat<br />
265
IMPLEMENTATION GUIDES<br />
Table 10.10 | Calcium carbonate equivalents<br />
Liming materials are rated by how well they neutralize the soil using pure limestone as the<br />
baseline of 100 percent. The rating system is called calcium carbonate equivalents (CCE). Values<br />
for some commercially available products are shown below<br />
Material Chemical Formula CCE<br />
Slag CaSiO3 60-90<br />
Agricultural limestones CaCO3 70-90<br />
Marl CaCO3 70-90<br />
Pure limestone CaCO3 100<br />
Pure dolomite CaMg(CO3)2 110<br />
Hydrated lime, slaked lime, builders’ lime Ca(OH)2 120-135<br />
Burned lime, unslaked lime, quicklime CaO 150-175<br />
lime, hydrated lime, or builders lime) and CaO (unslaked lime, burned lime, or quicklime), can<br />
be caustic to germinating seeds and, if used, should be applied several months before sowing<br />
(Havlin and others 1999).<br />
The particle size of the liming material determines how quickly the pH of a soil will increase.<br />
The finer the material, the faster soil pH will increase. For instance, a lime material passing a<br />
100-mesh screen reacts faster and takes less quantity than material passing a 50-mesh screen.<br />
Finer lime materials are more expensive to purchase. If very fine lime is to be used in surface<br />
application, it should meet the following size requirements: 100 percent passing a 100-mesh<br />
sieve and 80 percent to 90 percent passing a 200-mesh sieve.<br />
Determine Liming Rates<br />
Determining how much liming material to apply is based on these factors:<br />
◾◾<br />
Soil texture. Soil texture plays an important role in lime requirements because the<br />
higher the clay content, the more lime must be added to the soil. A soil with a clay loam<br />
texture requires over 3 times more lime to raise the pH from 5.0 to 6.0 than a sandy<br />
soil. This is because finer textured soils and organic matter have a higher propensity<br />
to attract and store bases released from liming materials (Inset 10-8).<br />
◾◾<br />
Soil organic matter. Soil organic matter (in humus form) has a high CEC and requires<br />
more lime material to raise the pH.<br />
◾◾<br />
Percentage of rock fragments. Rock fragments have little to no CEC because they are<br />
massive and typically unweathered. Rocky soils will require less lime materials to raise pH.<br />
◾◾<br />
Depth of liming material. Lime materials are relatively insoluble and only change the<br />
pH of the soil around where they were placed. Liming rates are adjusted based on the<br />
soil depth to which the lime material is mixed.<br />
◾◾<br />
Lime material composition. Each liming material is rated by how well it neutralizes<br />
the soil. Less materials with high CCE (see Section 10.1.6.3, Select Liming Materials) are<br />
required as compared to low CCE materials.<br />
◾◾<br />
Fineness of liming material. The fineness of the liming material determines how<br />
quickly the pH will change. Very fine materials change pH quicker than coarse materials.<br />
Inset 10-8 | Cation<br />
exchange capacity (CEC)<br />
The capacity of a soil to hold positive<br />
ions (referred to as bases or cations)<br />
is called the cation exchange capacity<br />
(CEC). A soil with a high CEC holds<br />
a much greater amount of cations,<br />
such as calcium and magnesium,<br />
than a soil with low CEC. For this<br />
reason, a high CEC soil requires<br />
more liming material to raise it to<br />
the same pH level. Cation exchange<br />
capacity is directly related to the<br />
amount of clay and organic matter<br />
present in the soil – the higher the<br />
clay or organic matter content, the<br />
higher the CEC. Rock fragments<br />
have little or no CEC, since they are<br />
massive in structure. Rates of liming<br />
on high coarse fragment soils must<br />
be reduced proportionally.<br />
<strong>Roadside</strong> <strong>Revegetation</strong>: An Integrated Approach to Establishing Native Plants and Pollinator Habitat<br />
266
IMPLEMENTATION GUIDES<br />
Therefore, less quantity of finer grade materials will be<br />
required for immediate pH soil change.<br />
There are two methods for determining liming application<br />
rates: approximation and Shoemaker-McLean-Pratt (SMP)<br />
Buffer methods. For an initial estimate of how much liming<br />
material might be needed to raise soil pH to target levels, the<br />
approximation method can be employed. However, if liming<br />
will actually be done on a revegetation project, the SMP Buffer<br />
method should be used for calculations.<br />
Approximation Method – For a quick approximation of lime<br />
application rates, the calculations shown in Figure 10-29 and<br />
Figure 10-30 are used. In the examples shown in these two<br />
figures, the topsoil was removed, leaving a gravelly, sandy<br />
loam subsoil at the surface. This material had a pH of 5.0. The<br />
target pH, based on the reference site for this area, was 6.0.<br />
The site was on a very steep slope where incorporating the<br />
limestone was not feasible (see Section 10.1.6.5, Apply Liming Materials). It was therefore<br />
decided to place the lime on the surface of the soil through hydroseeding operations. The<br />
surface had been left rough so that, over time, some of the liming materials would naturally<br />
become incorporated into the surface through soil movement. The incorporation depth was<br />
set between 3 to 4 inches (0.3 ft) based on this assumption.<br />
Generalized curves shown in Figure 10-30 were used to determine the amount of limestone to<br />
add to raise the pH. On the baseline of the graph, rates of limestone in lb/ac that correspond<br />
to the surface soil pH (C = 900) and the target pH (D = 2,800) were determined from pH levels<br />
located on the sandy loam curve. The rate of limestone for the surface soil was subtracted<br />
from the target rate to give the quantity of limestone to add to 7 inches of soil (the depth of<br />
incorporation upon which these graphs were based). In this example 1,900 lb/ac of limestone<br />
was needed to achieve the target pH (2,800 less 900). This rate was subsequently reduced<br />
to 639 lb/ac to compensate for the volume of rock fragments and the shallow incorporation<br />
depth (3 inches instead of 7 inches). Since dolomite, which has a higher CCE value, would be<br />
applied, there would be less of this material needed (581 lb/ac).<br />
SMP Buffer Method – For much greater accuracy, lab testing facilities offer the SMP Buffer<br />
Method for determining the lime requirement for a disturbed soil. The results from this test are<br />
reported in a Table that includes the quantity of lime needed to raise the soil sample to pH 7.<br />
A pH of disturbed soil: 5 From pH test of disturbed soils<br />
B Target pH: 6 Target pH of reference site topsoil<br />
C Soil texture: sandy loam From field surveys of disturbed soils<br />
D Rock fragments: 35 % From field surveys of disturbed soils<br />
E Incorporation depth: 0.3 feet<br />
The depth the lime material will be<br />
incorporated<br />
F Limestone equivalent for 900 lbs/ac From Figure 10.30 (C)<br />
disturbed soil pH<br />
G Limestone equivalent 2,800 lbs/ac From Figure 10.30 (D)<br />
H (G - F) * (E /0.58) * (100 - D) / 100 639<br />
lbs/ac<br />
Amount of limestone to raise soil to<br />
target pH<br />
I Type of liming material: dolomite Based on availability and cost of material<br />
J CCE of liming material: 110 From Table 10.10<br />
K H / (J /100) = 581 lbs/ac Total amount of material to apply<br />
Figure 10-29 | Determining how<br />
much liming material to apply<br />
This spreadsheet, along with Figure<br />
10 30, provide the steps necessary for<br />
determining the approximate amount<br />
of liming material to apply.<br />
pH<br />
6.5<br />
6<br />
5.5<br />
5<br />
4.5<br />
0<br />
A<br />
Sand<br />
(CEC=5)<br />
E<br />
Sandy Loam<br />
(CEC=10)<br />
B<br />
Silty Loam<br />
(CEC=15)<br />
Clay Loam<br />
(CEC=25)<br />
C 1,000 2,000 D 3,000 4,000 5,000 6,000<br />
Limestone (lbs/ac)<br />
Figure 10-30 | Approximate liming<br />
rates for disturbed soils<br />
This chart can be used to approximate the<br />
liming application rates for disturbed soils. The<br />
chart is based on measuring pH changes of four<br />
soil textural classes as limestone is incorporated<br />
into the surface 7 inches of soil (chart modified<br />
from Havlin and others 1999). For example, a<br />
sandy loam soil has an existing pH of 5.0 (A)<br />
and a target pH after liming of pH 6.0 (B). The<br />
amount of limestone to apply (E) is 1,900 lb/ac,<br />
which is calculated by subtracting 900 (C) from<br />
2,800 (D). More accurate lab results obtained<br />
from the SMP Buffer method for determining<br />
lime requirements can be substituted for values<br />
obtained in this graph.<br />
<strong>Roadside</strong> <strong>Revegetation</strong>: An Integrated Approach to Establishing Native Plants and Pollinator Habitat<br />
267
IMPLEMENTATION GUIDES<br />
The information can be graphed and used in a similar fashion to the example in Figure 10-30.<br />
The SMP test is well adapted for soils with pH values below 5.8 and containing less than 10<br />
percent organic matter (McLean 1973).<br />
Apply Liming Materials<br />
Limestone materials are commonly applied in powder form through fertilizer spreaders<br />
or hydroseeding equipment. Fine limestone materials can be difficult to apply in dry form<br />
through fertilizer spreaders. Pelletized limestone, which is very finely ground material that<br />
has been processed into shot-sized particles, is easy to handle and can be used in fertilizer<br />
spreaders. Hydroseeding equipment, however, is probably the best method for spreading<br />
liming materials, especially very fine liming materials.<br />
Since liming materials are relatively insoluble in water, surface applications of lime, without<br />
some degree of soil mixing, renders the lime ineffective for immediate correction of subsoil<br />
acidity. Several studies have indicated that it can take more than a decade for surface-applied<br />
lime (not incorporated) to raise soil pH to a depth of 6 inches (Havlin and others 1999). It is<br />
important, therefore, to incorporate liming materials into the soil at the depth where the pH<br />
change is desired.<br />
Incorporation can be accomplished on gentle slope gradients using tillage equipment, such as<br />
disks and harrows (see Section 10.1.2, Tillage). Liming materials can be mixed on steep slopes<br />
using an excavator. However, if equipment is not available for mixing on steep sites, applying<br />
very fine liming materials through hydroseeding equipment is a possible way of raising pH.<br />
This method requires the use of very finely ground limestone (Havlin and others 1999). This<br />
product raises pH faster, and depending on the soil type, can move a short distance into the<br />
soil surface. Nevertheless, with surface-applied limestone, it should be assumed that soil pH<br />
will not change much deeper than 3 inches below the soil surface.<br />
A<br />
10.1.7 BENEFICIAL SOIL MICROORGANISMS<br />
B<br />
Background<br />
Beneficial microorganisms are naturally occurring bacteria, fungi, and other microbes that<br />
play a crucial role in plant productivity and health. Some types of beneficial microorganisms<br />
are called “microsymbionts” because they form a symbiotic (mutually beneficial) relationship<br />
with plants. In natural ecosystems, the root systems of successful plants have several microbial<br />
partnerships that allow them to survive and grow even in harsh conditions (Figure 10-31).<br />
Without their microsymbiont partners, plants become stunted and often die. Frequently,<br />
these failures are attributed to poor nursery stock or fertilization, when the real problem was<br />
the absence of the proper microorganism.<br />
As discussed in Section 5.3.5, Mycorrhizal Fungi, beneficial microorganisms should be considered<br />
as part of an overall strategy to conserve existing ecological resources on the site, including<br />
existing beneficial soil microorganisms. These strategies include:<br />
◾◾<br />
Minimizing soil disturbance<br />
◾◾<br />
Conserving and reapplying topsoil and organic matter<br />
◾◾<br />
Leaving undisturbed islands or pockets on the project site<br />
◾◾<br />
Minimizing use of fast-release fertilizers<br />
On projects where soil disturbance will be minimal, or where healthy topsoil is still present and<br />
contains functional communities of beneficial microorganisms, reintroducing the organisms<br />
will usually not be necessary. However, most road projects involve severe disturbances and<br />
so healthy populations of beneficial microorganisms may be depleted or even absent. Soil<br />
Figure 10-31 | Symbiotic<br />
relationships of plants<br />
Many plants rely on symbiotic relationships<br />
to survive and grow in nature<br />
(A). The mushrooms under this spruce<br />
are the fruiting bodies of a beneficial<br />
fungus that has formed mycorrhizae<br />
on the roots (B).<br />
<strong>Roadside</strong> <strong>Revegetation</strong>: An Integrated Approach to Establishing Native Plants and Pollinator Habitat<br />
268
IMPLEMENTATION GUIDES<br />
compaction and removal of topsoil which is routine during road construction is particularly<br />
detrimental to beneficial soil microorganisms. Also, beneficial bacteria and fungi do not survive<br />
in soil in the absence of their host plants and so are killed during soil removal and stockpiling.<br />
Reintroducing beneficial microorganisms is therefore a key part of roadside revegetation.<br />
Appropriate beneficial microorganism can be reintroduced by “inoculating” seeds as they are<br />
sown in the field or in the nursery, or by introducing the microorganism in the planting hole.<br />
Inoculated plants may establish more quickly with less water, fertilizer, and weed control,<br />
thereby reducing installation costs. Healthy, sustainable plant communities are our ultimate<br />
goal in roadside revegetation; inoculation can help accelerate the process.<br />
The two most important microsymbionts for revegetation projects are mycorrhizal fungi and<br />
nitrogen-fixing bacteria.<br />
A<br />
What are Mycorhizae?<br />
Mycorrhizae are one of the most fascinating symbiotic relationships in nature. “Myco” means<br />
“fungus” and “rhizae” means “root”; the word “mycorrhizae” means “fungus-roots.” The host<br />
plant roots provide a convenient substrate for the fungus, and also supply food in the form<br />
of simple carbohydrates. In exchange for this free “room-and-board”, the mycorrhizal fungus<br />
offers benefits to the host plant:<br />
Increased Water and Nutrient Uptake – Beneficial fungi help plants absorb mineral nutrients,<br />
especially phosphorus and micronutrients such as zinc and copper. Mycorrhizae increase the<br />
root surface area, and the fungal hyphae access water and nutrients beyond the roots (Figure<br />
10-32A).Figure 10-32A). When plants lack mycorrhizae, they become stunted and sometimes<br />
chlorotic (“yellow”) in appearance.<br />
Stress and Disease Protection – Mycorrhizal fungi protect the plant host in several ways.<br />
With some fungi, the mantle completely covers fragile root tips (Figure 10-32A) and acts as a<br />
physical barrier from drying, other pests, and toxic soil contaminants. Other fungal symbionts<br />
produce antibiotics that provide chemical protection.<br />
Increased Vigor and Growth – Plants with mycorrhizal roots survive and grow better after<br />
they are planted out on the project site. This effect is often difficult to demonstrate but can<br />
sometimes be seen in nurseries where soil fumigation has eliminated mycorrhizal fungi from<br />
seedbeds. After emergence, some plants become naturally inoculated by airborne spores<br />
and grow much larger and healthier than those that lack the fungal symbiont (Figure 10-32B).<br />
Mycorrhizal fungi form partnerships with most plant families, and three types of mycorrhizae<br />
are recognized:<br />
◾◾<br />
Ectomycorrhizal fungi (ECM) have relatively narrow host ranges and form partnerships<br />
with many temperate forest plants, especially pines, oaks, beeches, spruces, and firs.<br />
◾◾<br />
Arbuscular mycorrhizal fungi (AMF) are also known as endomycorrhizae or vesiculararbuscular<br />
mycorrhizae. These fungi have wide host ranges and are found on most wild<br />
and cultivated grasses and annual crops, most tropical plants, and some temperate<br />
tree species including cedars, alders, and maples.<br />
◾◾<br />
Ericoid mycorrhizal fungi form partnerships with the Epacridaceae, Empetraceae, and<br />
most of the Ericaceae; plants affected include blueberries, cranberries, crowberries,<br />
huckleberries, azaleas, rhododendrons, and sedges. Because these mycorrhizal<br />
associations involve unique species of fungi, few commercial inoculants are available<br />
and the best option is to use soil from around healthy plants.<br />
B<br />
Figure 10-32 | Mycorrhizal fungi<br />
Mycorrhizal fungi offer many benefits<br />
to the host plant. The fungal hyphae<br />
increase the area of absorption for water<br />
and mineral nutrients, whereas fungal<br />
mantle covers the root and protects it<br />
from desiccation and pathogens (A).<br />
In fumigated nursery soils, inoculated<br />
seedlings are much larger and healthier<br />
than those that lack the fungal partner (B).<br />
For restoration purposes, the important thing to remember is that different plant species<br />
have specific fungal partners. ECM fungi are generally specific to one genus or group of plants<br />
whereas the same AMF fungus can colonize a wide variety of species. In addition, the three<br />
types of mycorrhizal fungi have to be inoculated differently. ECM species have airborne spores<br />
<strong>Roadside</strong> <strong>Revegetation</strong>: An Integrated Approach to Establishing Native Plants and Pollinator Habitat<br />
269
IMPLEMENTATION GUIDES<br />
A<br />
B<br />
Figure 10-33 | Soil inoculum can<br />
be collected in the field<br />
Soil inoculum can be collected from adjacent<br />
plants if done carefully (A). Inoculum can also<br />
be made from the spores of mushrooms (B),<br />
puffballs, or truffles (C) collected from around<br />
the proper host plant.<br />
C<br />
that can reinoculate soils naturally over time, or the spores can be harvested and used to<br />
inoculate nursery stock. On the other hand, the spores of AMF species are large and released<br />
underground and so cannot reinoculate plants very quickly. This makes artificial inoculation<br />
even more critical.<br />
Conserving existing topsoil and organic matter is a key practice to protect existing populations<br />
of beneficial microorganisms. If disturbance will take place, then other interventions will be<br />
necessary to introduce the key microsymbionts for the plants you are trying to establish. Consider<br />
the needs for mycorrhizal inoculants. Are the species to be established endomycorrhizal,<br />
ectomycorrhizal, ericoid or non- mycorrhizal? The selection of the mycorrhizal inoculants must<br />
be based on the target host plants and the site condition. Conifer seedlings, for example, require<br />
very specific ectomycorrhizal fungi for successful inoculation. Endomycorrhizal species, on<br />
the other hand, are broad in range and therefore a general mix of several endomycorrhizal<br />
species can be utilized for a broader range of plants. Knowing which species you are working<br />
with is essential in order to match the plants with their appropriate microsymbiont partners.<br />
Sources and Application of Ectomycorrhizal Fungi<br />
Three common sources of ECM inoculants are soil, spores, or pure culture vegetative inoculum.<br />
Soil – Topsoil, humus or duff from beneath ECM host plants can be used for inoculum if done<br />
properly. Because disturbance and exposure to direct sunlight may kill these beneficial fungi,<br />
soil inoculation must be done as quickly as possible. Soil inoculum can also be collected under<br />
the same plant species adjacent to the project site (Figure 10-33A). Small amounts should be<br />
collected from several different locations and care should be taken not to damage the host<br />
plants. If topsoil and organic matter are not available on the project site, spores or commercial<br />
inoculants can be used instead.<br />
Spores – Spore suspensions are sometimes available from commercial suppliers. However,<br />
the quality of commercial sources can be variable so it is important to verify the quality of the<br />
inoculum. It is possible to make your own inoculum from spores. Collect ripe fruiting bodies of<br />
mushrooms (Figure 10-33B), puffballs, or truffles (Figure 10-33C) from beneath healthy plants.<br />
Then, rinse and pulverize them in a blender for several minutes to make a slurry. Fungal spores<br />
do not have a long shelf-life and should be applied immediately.<br />
<strong>Roadside</strong> <strong>Revegetation</strong>: An Integrated Approach to Establishing Native Plants and Pollinator Habitat<br />
270
IMPLEMENTATION GUIDES<br />
Pure Culture Inoculum – Mycorrhizal fungi are available<br />
commercially as pure cultures, usually in a peat-based carrier<br />
(Figure 10-34). Most commercial sources contain several<br />
different species of ECM. Because this type of inoculum is<br />
made from pure fungal cultures and does not store well, it<br />
is rarely available from suppliers.<br />
Application rates and methods for ectomycorrhizal inoculums<br />
will vary by species. Since these mycorrhizal fungi are<br />
very specific to their host species, it is important to work<br />
closely with company representatives when using ectomycorrhizal<br />
inoculum. Nurseries may inoculate plants; if this<br />
service is desired, it must be stated in the seedling-growing<br />
contract. Some ectomycorrhizal fungi products can be<br />
incorporated into the nursery growing media prior to sowing (Figure 10-34A) or a liquid slurry<br />
of fungal spores can be applied during the growing season. However, there is no guarantee<br />
that the plants will still be colonized when they are planted at the project site.<br />
Other ectomycorrhizal fungal inoculums are applied at the time of planting and here the<br />
objective is to get the inoculum in contact with the plant roots. Some formulations are mixed<br />
with water and the slurry is applied to the roots of nursery stock. Tablets or packets can be<br />
placed in the planting hole (Figure 10-34B). However, the effectiveness of many of these<br />
applications has not been verified by research under roadside revegetation conditions.<br />
Verifying the Effectiveness of ECM Inoculation – Luckily, it is fairly easy to recognize ECM<br />
as the fungi can be seen with the naked eye on the root system. Short feeder roots should be<br />
examined for a cottony-white appearance on the roots or a white or brightly colored mantle<br />
or sheath over the roots (Figure 10-35). Unlike pathogenic fungi, mycorrhizae will never show<br />
signs of root decay and the mycelia around the root will be visible. Sometimes, mushrooms<br />
or other fruiting bodies will occasionally appear alongside their host plants. For verification,<br />
it is recommended that plant samples be sent to a laboratory where they can also provide a<br />
numerical rating of inoculation effectiveness.<br />
A<br />
Figure 10-34 | Ectomycorrhizal<br />
inoculum<br />
Commercial sources of ectomycorrhizal<br />
inoculum are available in several forms:<br />
pure cultures grown on peat moss or<br />
vermiculite (A) are perishable but sporebased<br />
products can be applied as root<br />
dips. Tablets and packets are put in the<br />
hole during planting.<br />
B<br />
Sources and Application of Arbuscular Mycorrhizal Fungi<br />
The two main sources of AMF inoculants include “pot culture,” (also known as “crude” inoculant),<br />
and commercially available pure cultures.<br />
Nursery Pot Culture – This option is only viable in a nursery when plants are being grown for<br />
a specific restoration project, and is unique to AMF fungi because of their wide host range. A<br />
specific AMF is acquired either commercially or from a field site as a starter culture, and then<br />
added to a sterile potting medium. A host plant such as corn, sorghum, clover, or an herbaceous<br />
native plant is then grown in this substrate; as the host grows, the AMF multiply in the growing<br />
medium (Figure 10-36A). The shoots of host plants are removed and the substrate, now rich in<br />
roots, spores, and mycelium, is chopped up (Figure 10-36B). The resultant inoculum can then<br />
be incorporated into growing media or planting beds before seeds or cuttings are sown. This is<br />
a highly effective technique for propagating AMF in the nursery and could also be used on the<br />
planting site. For details refer to Arbuscular Mycorrhizas: Producing and Applying Arbuscular<br />
Mycorrhizal Inoculum (Habte and Osorio 2001).<br />
Commercial Products – Several brands of commercial AMF inoculants are available, and<br />
usually contain a mix of several fungal species. Because AMF spores are so small and fragile,<br />
they are mixed with a carrier such as vermiculite or calcined clay to aid in application. Coarser<br />
textured products (Figure 10-37A) are meant for incorporation into soil or growing media, and<br />
finer-textured products (Figure 10-37B) are applied as wetable powders through sprayers or<br />
injected into irrigation systems. Inoculation effectiveness has been shown to vary considerably<br />
between different products (Figure 10-37C), so it is wise to install tests before purchasing large<br />
Figure 10-35 | Ectomycorrhizae<br />
Ectomycorrhizae are visible on plant root<br />
systems as white or colored structures<br />
with a cottony or felt-like texture.<br />
<strong>Roadside</strong> <strong>Revegetation</strong>: An Integrated Approach to Establishing Native Plants and Pollinator Habitat<br />
271
IMPLEMENTATION GUIDES<br />
A<br />
B<br />
Figure 10-36 | Arbuscular<br />
mycorrhizal fungi<br />
Because of their wide host range, AMF fungi<br />
can be raised on host plants (A) and their roots<br />
chopped-up for inoculum (B).<br />
A<br />
B<br />
Figure 10-37 | Commercial AMF inoculants<br />
C<br />
Mycorrhizal<br />
Responsiveness (%)<br />
100<br />
80<br />
70<br />
60<br />
50<br />
40<br />
30<br />
20<br />
10<br />
a<br />
b<br />
b<br />
c<br />
D<br />
Several commercial AMF inoculums are<br />
available and consist of fungal spores mixed<br />
with an inert carrier to aid in application.<br />
Coarser-textured products (A) can be incorporated<br />
into soil or growing media, whereas<br />
finer-textured products can be sprayed like a<br />
wetTable powder (B). Tests of inoculation effectiveness<br />
have shown significant differences<br />
between products (C). To confirm inoculation,<br />
plant roots must be stained so that the fungal<br />
hyphae are visible under a microscope (D). C<br />
modified from Corkidi and others (2005).<br />
0<br />
1<br />
2 3 Control<br />
Mycorrhizal Inoculants<br />
quantities of a specific product. Laboratories can provide a live spore count which is the best<br />
measure of inoculum quality.<br />
Application of AMF Inoculants – AMF inoculums typically come in a granular form with<br />
different grades of fineness. Coarse grade products (Figure 10-37A) are mixed in the soil prior<br />
to sowing seed. Finer grade inoculums (Figure 10-37B), which are more expensive, may be<br />
mixed with water and applied directly onto seeds or as a root dip. Use of fine-grade inoculum<br />
through hydroseeding equipment is a recent application method that shows promise as a way<br />
to combine AMF with seeds as they are sown. Again, there is little research on AMF inoculation<br />
effectiveness on roadside revegetation sites.<br />
Verifying the Effectiveness of AMF Inoculation – Unlike ECM, AMF are not visible to<br />
the unaided eye. To verify the effectiveness of AMF inoculation, roots must be stained and<br />
examined under a microscope (Figure 10-37D). This verification can often be done easily and<br />
inexpensively in a laboratory.<br />
Management Considerations for Mycorrhizal Fungi<br />
If possible, work with a specialist to help with the following:<br />
◾◾<br />
Selecting appropriate mycorrhizal partners for the species and outplanting sites<br />
◾◾<br />
Determining the best sources of inoculant and evaluating their effectiveness in the<br />
field conditions<br />
<strong>Roadside</strong> <strong>Revegetation</strong>: An Integrated Approach to Establishing Native Plants and Pollinator Habitat<br />
272
IMPLEMENTATION GUIDES<br />
◾◾<br />
Designing outplanting trials to evaluate seedling survival and mycorrhizal performance<br />
in the field, and modifying the inoculant sources if improvements are needed<br />
In addition to learning how to effectively apply mycorrhizal fungi, some soil management<br />
modifications will be required to promote formation of mycorrhizal partnerships in the field.<br />
Fertilization is probably the most significant adjustment. Mycorrhizal fungi extend the plant’s<br />
root system, and extract nutrients and water from the soil. High levels of soluble fertilizers<br />
may inhibit their presence. In some cases, fertilizer applications can be reduced by half or<br />
more due to the increased nutrient uptake by mycorrhizal fungi. Fertilizer type and form is<br />
also important. An excessive amount of phosphorus in the fertilizer inhibits formation of the<br />
partnership; therefore phosphorus should be reduced. If nitrogen is applied, ammonium-N is<br />
better used by the plant than nitrate-N (Landis 1989). Controlled release fertilizers are preferred<br />
because they release small doses of nutrients gradually, compared to the more rapid nutrient<br />
release from traditional products. Applications of certain herbicides, pesticides, insecticides,<br />
fungicides, and nematicides are detrimental to mycorrhizal fungi.<br />
Nitrogen-Fixing Bacteria<br />
Nitrogen-fixing bacteria live in nodules on plant roots and accumulate (“fix”) nitrogen from<br />
the air and share it with their host plants. Unlike mycorrhizal fungi, which are found on<br />
most trees and plants, only certain species of plants can form symbiotic partnerships with<br />
nitrogen- fixing bacteria.<br />
The role of nitrogen-fixing bacteria and their partner plants is crucial to roadside restoration.<br />
Because nitrogen-fixing plants are often “pioneer” species that are the first to colonize<br />
disturbed sites, they are ideal for revegetation or restoration projects. Nitrogen-fixing species<br />
are usually outplanted in order to help restore fertility and organic matter to the project<br />
site. Nitrogen- fixing bacteria form nodules on roots of certain plants (Figure 10-38A) and<br />
accumulate nitrogen from the air (Figure 10-38B). While plants that form this association<br />
are sometimes called “nitrogen-fixing plants”, the plant itself is not able to fix nitrogen from<br />
the air. It is only through the partnership with bacteria that these plants are able to obtain<br />
atmospheric nitrogen. In this symbiotic partnership the bacteria give nitrogen accumulated<br />
from the atmosphere to the plant, and in exchange the bacteria get a site to grow and energy<br />
in the form of carbohydrates from the plant. Without these bacterial partnerships, plants are<br />
not able to make direct use of atmospheric nitrogen.<br />
A<br />
Atmospheric<br />
Nitrogen<br />
N<br />
N<br />
B<br />
Figure 10-38 | Nitrogen fixing bacteria<br />
Nitrogen-fixing plants, such as legumes, have<br />
symbiotic bacteria on their roots (A) which<br />
can chemically “fix” atmospheric nitrogen into<br />
forms that can be used by plants as fertilizer (B).<br />
Rhizobium<br />
Bacteria<br />
Fertilizer<br />
Nitrogen<br />
<strong>Roadside</strong> <strong>Revegetation</strong>: An Integrated Approach to Establishing Native Plants and Pollinator Habitat<br />
273
IMPLEMENTATION GUIDES<br />
Soil on restoration sites, however, may not contain the proper species of bacteria to form a<br />
symbiotic partnership with the plant. This is particularly true for compacted soils and those<br />
that have been removed and stockpiled. Inoculating plants ensures that “nitrogen-fixing”<br />
plants form an effective partnership to fix nitrogen. Therefore, use of nitrogen-fixing plants<br />
can be an important part of accelerating rehabilitation of degraded land.<br />
Two genera of nitrogen-fixing bacteria that are important in revegetation are Rhizobium and<br />
Frankia. Rhizobium grow with some members of the legume family (Figure 10-39A and B),<br />
and plants of the elm family. They form nodules on the roots and fix nitrogen for the plant.<br />
Frankia are a different kind of bacteria. Frankia partner with non-leguminous plants, such as<br />
casuarinas, alders, bitterbrush, and buffaloberry (Figure 10-39C and D), and over 200 different<br />
plant species, distributed over eight families. The species affected by Frankia are called<br />
“actinorhizal” plants (Table 10-11).<br />
A<br />
C<br />
B<br />
D<br />
Figure 10-39 | Nitrogen fixing plants<br />
Nitrogen-fixing bacteria include Rhizobium that<br />
forms relationships with plants in the legume<br />
family including lupines (A), and clovers (B)<br />
and Frankia that forms relationships with other<br />
non-leguminous plants such as snowbrush<br />
ceanothus (C), and mountain-avens (D) . Photos<br />
A, C, & D by Tara Luna.<br />
Inset 10-9 | Example of contract specifications for purchasing mycorrhizal inoculum<br />
Purchase of Mycorrhizal Inoculum<br />
The mycorrhizal inoculum must have a Statement of Claims that certifies<br />
the (1) date inoculum was produced, (2) mycorrhizal fungi species present<br />
in the inoculum, (3) number of propagules per pound of product, and (4)<br />
the type and grade of carrier.<br />
Product Specifications<br />
Date of inoculum application will be within one year of production date.<br />
The storage, transportation and application temperatures of the mycorrhizae<br />
shall not exceed 90 degrees F. Inoculum must consist of at least 5<br />
species of (choose endomycorrhizal, ectomycorrhizal or a combination<br />
of endo and ectomycorrhizal) fungi with no one species making up more<br />
than 25 percent of the propagules.<br />
The inoculum will contain these species: _________________.<br />
The inoculum will contain __________ live propagules per pound<br />
(Typical rates for endomycorrhizal inoculums average around 60,000 to<br />
100,000 propagules per pound and 110,000,000 propagules per pound<br />
in ectomycorrhizal inoculums.)<br />
(For applications to the soil surface only) Live propagules must be smaller<br />
than 0.3mm.<br />
(Optional) A one ounce sample will be collected from each inoculum and<br />
sent to _______ laboratory for analysis using the ______ standardized<br />
test to determine the number of propagules.<br />
Application of Endomycorrhizal Inoculum to Soil Surface<br />
Endomycorrhizal inoculum will be applied at a rate of ______________<br />
live propagules per acre (typical rates range from 1,000,000 to 3,600,00<br />
live propagules per acre).<br />
Inoculum will be applied in the same operational period as seed application.<br />
If inoculum is applied through a hydroseeder, it should be applied within<br />
45 minutes of being mixed in the hydroseeding tank.<br />
Application of Mycorrhizal Fungi to Planting Holes<br />
Mycorrhizal inoculum will be applied at a rate of ______________ live<br />
propagules per seedling.<br />
<strong>Roadside</strong> <strong>Revegetation</strong>: An Integrated Approach to Establishing Native Plants and Pollinator Habitat<br />
274
IMPLEMENTATION GUIDES<br />
Table 10.11 | Nitrogen- fixing bacteria and their plants<br />
Host Plants<br />
Nitrogen-Fixing Bacteria<br />
Family<br />
Subfamily<br />
% Nitrogen Fixing Plants Common Plant Species<br />
Rhizobium spp. Legume Caesalpinioideae 23 Redbud, honeylocust<br />
Legume Mimosoideae 90 Mesquite, acacia<br />
Legume Papilionoideae 97 Lupine, milkvetch, black<br />
locust, clover<br />
Family<br />
Common Plant Species<br />
Frankia spp. Birch Alder, birch<br />
Oleaster<br />
Myrtle<br />
Buckthorn<br />
Rose<br />
Silverberry, buffaloberry<br />
Myrtle<br />
Cascara, snowbrush, deerbrush<br />
Mountain mahogany, cliffrose, bitterbrush<br />
Uses for Nitrogen-Fixing Plants in <strong>Revegetation</strong><br />
Only a fraction of native species are nitrogen-fixing host plants. In the western United States,<br />
the most common are the lupines, vetch, bitterbrush, ceanothus, alder, and wax myrtle (Table<br />
10-11). On nitrogen-poor sites, sowing or planting a higher proportion of these species can<br />
help a site to recover nitrogen fertility and organic matter (Figure 10-40A). The amount of<br />
nitrogen that will be fixed on a site is related to the area of vegetative cover in nitrogen fixing<br />
host plants, the productivity of the plants, and factors such as temperature and moisture. If<br />
percent cover of nitrogen fixing host plants is low, then the amount of nitrogen supplied to<br />
the site will be correspondingly low (Figure 10-40B). Likewise, dry or cold conditions tend to<br />
result in slower accumulation of nitrogen. While many native and introduced nitrogen fixing<br />
plants are attractive to pollinators, they are also attractive forage for large herbivours. This<br />
should be considered during the design of roadside plant communities.<br />
A<br />
Nitrogen Fixed (lbs/ac/yr)<br />
B<br />
20<br />
15<br />
C. velutinus<br />
10<br />
P. tridentata<br />
5<br />
0<br />
0 20 40 60<br />
Canopy Cover (%)<br />
Figure 10-40 | Amount of<br />
nitrogen is related to the cover<br />
of nitrogen-fixing plants<br />
The accumulation of nitrogen by N-fixating<br />
bacteria is directly related to the cover of<br />
nitrogen-fixing host plants on a site. The<br />
large plants shown in this photograph are<br />
lupines, which are nitrogen-fixing (A). The<br />
nitrogen-fixing potential of 15-year-old stands<br />
of Ceanothus velutinus and Purshia tridentata<br />
was directly proportional to plant cover (B)<br />
(adapted after Busse 2000).<br />
<strong>Roadside</strong> <strong>Revegetation</strong>: An Integrated Approach to Establishing Native Plants and Pollinator Habitat<br />
275
IMPLEMENTATION GUIDES<br />
To determine how nitrogen-fixing plants should be used in revegetation project, assess which<br />
nitrogen-fixing host species are native to the area and consider the nitrogen fixation rates<br />
that can be expected. A plant survey of reference sites will reveal which nitrogen fixing plant<br />
host species are native to the area. Finding host plants on recovered reference sites can give<br />
an indication of whether they grow on disturbances, and consequently how much nitrogen<br />
will be fixed on the site. Observing the abundance of root nodules on these plants can give<br />
some indication whether they are fixing nitrogen.<br />
Inoculating with Nitrogen-Fixing Bacteria<br />
Nitrogen-fixing nursery stock with nodulated root systems have exhibited faster early growth<br />
than seedlings that were not inoculated. Nursery inoculation can reduce costs in establishment<br />
and maintenance; a few dollars worth of inoculant applied in the nursery can replace a lot of<br />
purchased nitrogen fertilizer over the life of the nitrogen-fixing plant. Faster growth early can<br />
also lead to faster canopy closure, which shades the soil and reduces weed establishment and<br />
growth. When the nitrogen-fixing plant sheds leaves or dies, the nitrogen stored in the plant’s<br />
tissues is cycled to adjacent plants. Early establishment of nitrogen-fixing plants accelerates<br />
natural nutrient cycling on the project sites and promotes the establishment of sustainable<br />
plant communities.<br />
It should be noted that in many cases, uninoculated seedlings may eventually form a partnership<br />
with some kind of Frankia or Rhizobium strain after they are outplanted. These may not be<br />
with optimal or highly productive bacterial partners, and it may take months or even years<br />
on highly disturbed sites. Until they become naturally inoculated, plants are dependent on<br />
nitrogen fertilizers and may become out-competed by weeds. Inoculating in the nursery<br />
ensures that plants form effective, productive partnerships in a timely fashion.<br />
Acquiring Nitrogen-Fixing Bacterial Inoculants – Nitrogen-fixing bacteria are very specific; in<br />
other words, one inoculant cannot be used for all plants. On the contrary, a different inoculant<br />
strain for each nitrogen-fixing species is usually necessary. Superior strains can yield significant<br />
differences in productivity and growth rate of the host plant; in some cases over 40 percent<br />
better growth (Schmit, 2003).<br />
Inoculants are live nitrogen-fixing bacteria cultures that are applied to seeds or young plants.<br />
Two forms of inoculant can be used: pure culture inoculant, and homemade (often called<br />
“crude”) inoculant. Cultured inoculant is purchased from commercial suppliers, seed banks,<br />
or sometimes, universities. Crude inoculant is made from nodules collected from roots of<br />
nitrogen- fixing plants of the same species to be inoculated. Whichever form is used, care<br />
should be taken when handling nitrogen-fixing bacteria inoculants because they are very<br />
perishable. These soil bacteria live underground in moist, dark conditions with relatively<br />
stable, cool temperatures. Similar conditions should be maintained to ensure the viability of<br />
inoculants during storage, handling, and application.<br />
Pure culture inoculants of nitrogen-fixing bacteria usually come in small packets of finely ground<br />
peat moss (Figure 10-41A). Some manufactured inoculants contain select strains, tested for<br />
forming optimally productive partnerships with their host species. Select inoculant should be<br />
used if it can be obtained; these contain optimal partners for the species they were matched<br />
for, providing a good supply of nitrogen at a low cost to the plant. Manufactured products<br />
usually come with application instructions; these should be followed. In general, about 100<br />
grams of cultured inoculant is usually sufficient to inoculate up to 3,000 seedlings in nursery<br />
conditions. Because they contain living cultures of bacteria, these inoculants are perishable<br />
and should be kept in cool, dark conditions, such as inside a refrigerator.<br />
Peat-based inoculants are added to chlorine-free water to create a liquid slurry (Allowing a<br />
bucket of tap water to stand uncovered for 24 hours is a good way to let chlorine evaporate).<br />
If a blender is available, using it to blend some inoculant in water is a very good practice to<br />
ensure the bacteria will be evenly mixed in the solution. If a blender is not available, a mortar<br />
A<br />
B<br />
Figure 10-41 | Nitrogen-fixing<br />
bacteria are commercially available<br />
Nitrogen-fixing bacteria are commercially<br />
available as pure culture inoculant,<br />
often in a carrier (A), or can be prepared<br />
by collecting nodules off of plants from<br />
the wild (B). Photos by Tara Luna.<br />
<strong>Roadside</strong> <strong>Revegetation</strong>: An Integrated Approach to Establishing Native Plants and Pollinator Habitat<br />
276
IMPLEMENTATION GUIDES<br />
can be used. Five to ten grams (about 0.2–0.4 ounce) of manufactured inoculant can inoculate<br />
about 500 seedlings, usually exceeding the recommended 100,000 bacteria per seedling. Once<br />
seedlings begin to nodulate, nodules from their roots can serve as the basis for making crude<br />
inoculant as described below. This way, inoculant need only be purchased once for each plant<br />
species grown, and thereafter, crude inoculant can be made from nodules.<br />
Preparing Crude Inoculant – Crude inoculant is made using nodules, the small root structures<br />
that house the bacteria. Each one of the nodules can house millions of bacteria. For Rhizobium,<br />
a brown, pink, or red color inside is usually a good indicator that the millions of bacteria in<br />
the nodule are actively fixing nitrogen. For Frankia, desirable nodules will be white or yellow<br />
inside. Grey or green nodules should be avoided, as they are likely inactive.<br />
To make your own crude inoculant, select healthy, vigorous plants of the same species as the<br />
plants to be inoculated. Expose some of the root system of a nodulating plant in the nursery<br />
or field (Figure 10-41B). If available, choose seedlings that were inoculated with select bacteria.<br />
Young roots often contain the most active nodules. Search for nodules with the proper color<br />
and pick them off cleanly. If possible, collect nodules from several plants. Put nodules in a<br />
plastic bag or container and place them in a cooler for protection from direct sunlight and<br />
heat. As soon as possible after collection (within a few hours), put the nodules in a blender<br />
with clean, chlorine-free water. About 50-100 nodules blended in a liter of water is enough to<br />
inoculate about 500 seedlings. This solution is a homemade liquid inoculant, ready to apply<br />
in the same method as cultured inoculant as described below.<br />
Applying Inoculant – Inoculant must be applied in a timely fashion, when seedlings are just<br />
emerging, usually within 2 weeks of sowing. This helps ensure successful nodulation and<br />
maximizes the benefits of using inoculants. Therefore inoculant must be introduced in the<br />
nursery for nursery-grown plant materials, or introduced at the time of sowing for seeds that<br />
are sown directly at the field site. One liter of liquefied inoculant made from either nodules<br />
or cultured inoculant as per the instructions above is diluted in more chlorine-free water.<br />
For 500 seedlings, about 5 liters of water is used. This solution is then watered into the root<br />
system of each seedling using a watering can. In the field, for direct seeding applications, the<br />
slurry of commercial or crude inoculant can be added to the hydroseeder tank and mixed in<br />
with seed mixes.<br />
Management Considerations for Nitrogen-Fixing Inoculations<br />
Verifying the Nitrogen-Fixing Partnership – Allow two to six weeks for noticeable signs<br />
that the plant has formed a symbiotic partnership with nitrogen-fixing bacteria. Signs include:<br />
◾◾<br />
Seedlings begin to grow well and are deep green despite the absence of added<br />
nitrogen fertilizer<br />
◾◾<br />
The root systems give off a faint but distinctive ammonia-like scent<br />
◾◾<br />
Nodules are usually visible on the root system after about four to six weeks (Figure 10-42),<br />
and nodules are pink, red, or brown (for Rhizobium), or yellow or white (for Frankia)<br />
Post-Planting Care – Several factors are of primary concern when using inoculants for<br />
nitrogen- fixing bacteria:<br />
◾◾<br />
Fertilization. The use of nitrogen-fixing bacterial inoculant requires some adjustments<br />
in fertilization. Excessive nitrogen fertilizer will inhibit formation of the partnership.<br />
◾◾<br />
Water quality. Excessive chlorine in water is detrimental to Rhizobium and Frankia. The<br />
water source may need to be tested and a chlorine filter used if excessive chlorine is<br />
a problem.<br />
◾◾<br />
Micronutrients and soil quality. Some nutrients are necessary to facilitate nodulation,<br />
including calcium, potassium, molybdenum, and iron. Excessively compacted soils,<br />
extremes of pH or temperature also inhibit nodulation.<br />
Photo: Tara Luna<br />
Figure 10-42 | Nitrogen-fixing<br />
bacteria will multiply as<br />
inoculated plants grow<br />
After successful inoculation, nitrogen-fixing<br />
bacteria will multiply on the<br />
root system as plants grow. The arrow<br />
points to a visible Frankia nodule on an<br />
alnus seedling.<br />
<strong>Roadside</strong> <strong>Revegetation</strong>: An Integrated Approach to Establishing Native Plants and Pollinator Habitat<br />
277
IMPLEMENTATION GUIDES<br />
Inset 10-10 | How does biological nitrogen fixation work?<br />
The symbiotic partnership between plants and their nitrogen-fixing microsymbionts<br />
works this way: The bacteria live in nodules on roots of the plant. Each nodule<br />
contains millions of the bacteria that accumulate atmospheric nitrogen and share<br />
this nitrogen with the plant. In exchange, the plant provides energy in the form of<br />
carbohydrates to the bacteria.<br />
The bacteria must come in contact with the root systems early in the plant’s life, ideally<br />
within the first 2 to 6 weeks of growth. For nursery-grown materials, nitrogen-fixing<br />
bacteria must be introduced in the nursery. For direct field sowing of seed, inoculants<br />
should be applied as the seeds are being sown.<br />
When the “nitrogen-fixing” plant sheds its leaves, dies, or dies back, the nitrogen<br />
stored in the plant’s tissues is cycled to other plants and through the ecosystem.<br />
This process, part of the nitrogen cycle, is the major source of nitrogen fertility in<br />
most natural ecosystems.<br />
Other Beneficial Microorganisms<br />
In nature, communities of bacteria, fungi, algae, protozoa, and other microorganisms in the soil<br />
make nutrients available to plants, create channels for water and air, maintain soil structure,<br />
and cycle nutrients and organic matter. A healthy population of soil microorganisms can also<br />
maintain ecological balance, preventing the onset of major problems from viruses or other<br />
pathogens that reside in the soil. The practice of protecting and re-establishing beneficial<br />
microorganisms is a key one for revegetation. As a science, however, the use of beneficial<br />
microorganisms is in its infancy. Although thousands of species of microorganisms have<br />
been recognized and named, the number of unknown species is estimated to be in the<br />
millions. Almost every time microbiologists examine a soil sample, they discover a previously<br />
unknown species (Margulis and others, 1997). <strong>Revegetation</strong> specialists should keep an eye<br />
on developments in this field and see how their plants can benefit from new insights into the<br />
roles of microorganisms. Conserving and utilizing healthy topsoil will also help to sustain the<br />
natural populations of beneficial microorganisms.<br />
10.1.8 TOPOGRAPHIC ENHANCEMENTS<br />
Introduction<br />
Topographic enhancements are alterations to the roadside landscape designed to improve<br />
the growing environment for plants. Topographic enhancements should be considered when<br />
site resources such as topsoil, organic matter, and water are limited (see Section 5.11, Inventory<br />
Site Resources). It is often better to concentrate limited resources in key areas where resources<br />
can be most effective, rather than spread them across the larger project area and dilute them<br />
to the point of having little benefit to reestablishing native vegetation.<br />
Topographic enhancement integrates three components into the roadside design – soil<br />
improvement, site stability, and water harvesting (Figure 10-43). Soil improvement can occur<br />
when limited topsoil and organic matter are strategically used to create growing areas with<br />
optimum rooting depth (see Section 5.3, Available Water Storage and Accessibility, and Section<br />
5.5, Nutrient Cycling). Stable landforms are created that reduce surface erosion and increase slope<br />
stability (see Section 5.6, Surface Stability, and Section 5.7, Slope Stability). Water harvesting<br />
can result when local topography is modified to capture runoff water and concentrate it in<br />
areas where it can be used by plants (see Section 5.2, Water Input) (For background on water<br />
<strong>Roadside</strong> <strong>Revegetation</strong>: An Integrated Approach to Establishing Native Plants and Pollinator Habitat<br />
278
IMPLEMENTATION GUIDES<br />
harvesting, see Fidelibus and Bainbridge 2006). The integration of these three<br />
components will determine the success of a topographic enhancement design.<br />
Topographic enhancement strategies must be considered during the initial<br />
planning stages of road design. These structures will require the input of<br />
the design engineer and cooperation of the project engineer, and must be<br />
built during the construction phase of the project. Structural changes to the<br />
topography following construction are not usually an option for revegetation<br />
purposes.<br />
There are many options for topographic enhancement. This discussion is by no<br />
means exhaustive, but intended to introduce the reader to a variety of structures<br />
that can be installed during road construction to enhance the establishment<br />
of native plants.<br />
Contour Bench Terraces, Planting Pockets, and Microcatchments<br />
Optimum<br />
Vegetation<br />
Establishment<br />
Topographic Enhancement<br />
Soil<br />
Improvement<br />
Water<br />
Enhancement<br />
Site<br />
Stability<br />
Contour bench terraces are structures carved out of cut or fill slopes that capture<br />
and store runoff water and sediments from road surfaces, road shoulders, and the slopes<br />
above. If infiltration rates of soils above the terraces are low, runoff will occur, even from low<br />
intensity rainfall. Contour bench terraces are designed to collect enough water to recharge<br />
soils and provide sufficient water for plant growth during the summer, but also be protected<br />
from erosion during peak rainstorm events. Design criteria for determining the distance<br />
between terraces include slope gradient, rainfall intensities, and infiltration rates. Observing<br />
erosional patterns on unvegetated road cuts near the project site can give an indication of<br />
approximate spacing for benches (see Section 5.6.8, Slope Length).<br />
Contour bench terraces can be long and contiguous or separate and discrete. For long and<br />
contiguous terraces, concentrated water from high runoff events can flow down the terraces<br />
(assuming they are not completely level), potentially causing gullies. Placing berms or “plugs”<br />
in the terraces at frequent intervals can reduce this potential.<br />
When terraces are filled with growing media (topsoil or amended subsoil) and planted, they<br />
are referred to as planting pockets (Figure 10-44). Planting pockets must have adequate soil<br />
depth to store intercepted water and support establishment of planted seedlings. The surface<br />
of the planting pocket should be insloped to capture water and sediment, and the face of the<br />
pocket should be protected from surface erosion.<br />
Fill slope microcatchments are structures that capture runoff from outsloped road surfaces and<br />
compacted shoulders into terraces and berms where it can be used for plant growth (Figure<br />
Figure 10-43 | Topographic<br />
enhancement strategies<br />
Topographic enhancement strategies<br />
must be considered early in project<br />
design. When incorporated, structures<br />
such as planting pockets can enhance<br />
vegetation establishment.<br />
A<br />
B<br />
C<br />
D<br />
Figure 10-44 | Planting pockets are<br />
effective at capturing runoff water<br />
Planting pockets collect and store runoff<br />
water from areas directly upslope during<br />
rainstorms (A). Water and sediments collect<br />
in the back slope of the pocket (B). Moisture<br />
fills the soil and moves into fractured bedrock<br />
(C) where roots have penetrated. The face of<br />
the planting pocket is protected by mulch<br />
or erosion cloth (D). The photograph on the<br />
right was taken looking down on a planting<br />
pocket after a rainstorm. The back slope has<br />
ponded water and collected sediments from<br />
the surface above.<br />
<strong>Roadside</strong> <strong>Revegetation</strong>: An Integrated Approach to Establishing Native Plants and Pollinator Habitat<br />
279
IMPLEMENTATION GUIDES<br />
10-45). Microcatchments include a storage basin and berm. Berms are typically<br />
4- to 8-inch high obstacles placed on the contour. They are formed from soil or<br />
woody debris (logs), or manufactured products such as straw waddles (Figure<br />
10-45) or compost berms. Manufactured products and woody debris are “keyed”<br />
(partially buried) into the soil surface to prevent water from eroding under the<br />
structure. Compost berms are continuous mounds of compost that can slow water<br />
and filter sediments. Seedlings can be planted on, or immediately above, berms or<br />
obstacles to access captured water. Unless species that propagate vegetatively are<br />
used in these structures (see Section 10.2.2, Collecting Wild Cuttings), care must<br />
be taken to avoid planting where sediment will bury the seedling. The storage<br />
basin, created by terraces or berms, can be improved for plant growth with soil<br />
tillage and incorporation of soil amendments.<br />
Runoff Strips and Constructed Wetlands<br />
A<br />
B<br />
Runoff strips are catchment structures constructed in areas where intermittent<br />
concentrated road drainage occurs. These are typically at the outlets of culverts<br />
or in road drainage dips. Runoff strips capture concentrated runoff into small<br />
ponds or catchment basins. These areas can be planted with riparian species, such as willows<br />
(Salix spp.) and cottonwoods (Populus spp.), or wetland species, such as rushes (Juncus spp.)<br />
and sedges (Carex spp.). Runoff strips are placed in draws or concave topography and are<br />
composed of engineered impoundment barriers, using riprap, logs, or gabion baskets, which<br />
store water from runoff events. The barrier must have a spillway (a low point in the structure)<br />
and be keyed into the sides to assure that concentrated water does not erode around its<br />
sides. Where runoff strips are on gentle gradients, constructed wetlands may possibly be<br />
developed (Figure 10-46).<br />
Planting Islands<br />
Planting islands are used where deep-rooted tree and shrub species are desired, but topsoil,<br />
soil amendments, or soil depth are limiting. They are designed into such revegetation projects<br />
as obliterated roads, view corridors, waste areas, and other highly disturbed sites. The strategy<br />
behind planting islands is to create an ideal growing environment for tree and shrub seedlings<br />
that replicates the natural patterns or features observed in the surrounding landscape and<br />
plant communities (Figure 10-47).<br />
Islands can be created by excavating an appropriate area to a depth of several feet and backfilling<br />
with either topsoil or compost-amended material (Figure 10-48). Alternatively, compost and other<br />
soil amendments (including lime and fertilizers) can be spread over planting islands at the depth<br />
needed to amend the soil profile and mixed thoroughly through the islands with an excavator<br />
or backhoe. Soil compaction must be avoided in these operations or during any subsequent<br />
operation. After planting, mulch can be applied across the surface of the entire island.<br />
Figure 10-45 | Microcatchments are<br />
effective at capturing runoff water<br />
Fill slope microcatchments take advantage<br />
of the low infiltration rates of compacted<br />
fill slopes (A) by capturing the<br />
runoff from road drainage at the bottom<br />
of the fill into topsoil or amended subsoil<br />
favorable for plant growth (B). The extra<br />
water from these surfaces can support<br />
trees and shrubs. Straw waddles, as<br />
shown in the picture on the right, can<br />
be used in fill slope microcatchments to<br />
collect water and sediment. Straw waddles<br />
must be installed on the contour<br />
and keyed into the soil to be effective.<br />
Figure 10-46 | Constructed<br />
wetlands are effective at<br />
capturing runoff water<br />
Constructed wetlands capture water<br />
from roadside runoff and filter sediments<br />
before water enters perennial<br />
streams. Constructed wetlands can<br />
create favorable habitat for unique flora<br />
and fauna.<br />
Figure 10-47 | Planting islands<br />
mimic natural surroundings<br />
Most planting islands are designed to<br />
mimic the natural surrounding environment<br />
of the project site. In this<br />
photograph, seedlings were planted<br />
in clumps to mimic the small islands of<br />
trees that grew in this geographic area.<br />
The inter-island areas were planted with<br />
lower growing grasses, forbs, and shrubs.<br />
<strong>Roadside</strong> <strong>Revegetation</strong>: An Integrated Approach to Establishing Native Plants and Pollinator Habitat<br />
280
IMPLEMENTATION GUIDES<br />
In Figure 10-48, compost is mixed to a depth<br />
of 3 feet by an excavator in irregular shaped<br />
planting islands. The islands are planted<br />
with conifers and 3 inches of mulch are<br />
applied to entire islands to keep them free<br />
of competing vegetation. The layout of<br />
planting islands should be designed with<br />
a vision of how the vegetation will appear<br />
once established, and should be based on<br />
recovered and undisturbed reference sites.<br />
Planting islands will generally occupy less<br />
than a quarter to a third of the entire site,<br />
leaving the remainder as “inter-island.”<br />
Inter-Island<br />
Unamended Fill<br />
Planting Island<br />
Compost Amended<br />
The inter-islands will be much less productive than the planting islands. Grass and forb plant<br />
communities are therefore more suited to these areas.<br />
Biotechnical Engineering Structures<br />
Topographic enhancement also includes many biotechnical engineering structures, such as<br />
vegetated retaining walls, brush layers, and live pole drains. Incorporating soil improvement<br />
strategies into these structures will stabilize the soil and capture runoff water, making them<br />
very suitable to the establishment of a range of native vegetation (see Section 10.3.3, Installing<br />
Cuttings, and Section 10.3.4, Installing Plants).<br />
Mulch<br />
Inter-Island<br />
Unamended Fill<br />
Figure 10-48 | Planting<br />
island cross section<br />
Illustration of a typical cross-section<br />
of a planting island where soil depth<br />
is enhanced for tree establishment.<br />
Inter-island areas are planted to shrubs<br />
and grasses.<br />
10.2 OBTAINING PLANT MATERIALS<br />
Obtaining the appropriate species and stocktype for a revegetation project takes good planning<br />
and lead time. To obtain genetically adapted materials often requires the collection of plant<br />
materials near or in the general geographic area of the project site. This requires collecting plant<br />
materials several years in advance of project implementation. The group of implementation<br />
guides in the following section focuses on three types of plant materials – seeds, cuttings,<br />
and plants. Section 10.2.1, Collecting Wild Seeds, covers how to determine the amount of wild<br />
seed to collect, wild seed collection methods, cleaning techniques, storage conditions, and<br />
quality testing. Methods for collecting the stems of willows and cottonwoods in the wild (as<br />
well as several other native species that propagate vegetatively) are discussed in Section 10.2.2,<br />
Collecting Wild Cuttings. Salvaging plants from the wild and replanting them on project sites<br />
is discussed in Section 10.2.3, Collecting Wild Plants.<br />
For most projects, the collection of wild seeds, cuttings, or plants is not sufficient to meet<br />
project objectives. To increase plant materials, wild collections must be sent to native plant<br />
nurseries for propagation. Section 10.2.4, Nursery Seed Production, outlines the basic steps<br />
necessary to work with nurseries in establishing seed production beds for increasing seed<br />
banks. Producing large quantities of cutting material of willow and cottonwood species can be<br />
accomplished by establishing stooling beds from wild collections at nurseries. This is covered<br />
in Section 10.2.5, Nursery Cutting Production. Section 10.2.6, Nursery Plant Production, covers<br />
how to work with seedling nurseries to obtain high quality plants.<br />
10.2.1 COLLECTING WILD SEEDS<br />
Introduction<br />
Wild seeds are collected from native stands of grasses, forbs, shrubs, trees, and wetland plants<br />
found in or near project sites. The primary objective for wild seed collection is to obtain<br />
source- identified seeds for starting nursery grown plants (see Section 10.2.6, Nursery Plant<br />
<strong>Roadside</strong> <strong>Revegetation</strong>: An Integrated Approach to Establishing Native Plants and Pollinator Habitat<br />
281
IMPLEMENTATION GUIDES<br />
Production), nursery grown seeds (see Section 10.2.4, Nursery Seed<br />
Production), and/or occasionally to sow directly on a disturbed site.<br />
Since seed and seedling propagation hinges on availability of wild<br />
seeds, collection is one of the first major tasks of a revegetation<br />
plan. Depending on the purpose, the lead-time for collecting wild<br />
seeds might be up to 3 to 4 years before sowing or planting the<br />
project site (Figure 10-49).<br />
Tasks<br />
Determine seed needs<br />
Locate collection sites<br />
Seed Production<br />
Wild Seed Collection<br />
Road Construction<br />
Sow<br />
Develop & award contract<br />
Grass and forb species are usually seeded directly onto disturbed<br />
sites. In order to obtain enough seeds for direct seeding, wild<br />
Pick seed<br />
seed collections are usually “increased” in nursery production (see<br />
Section 10.2.4, Nursery Seed Production). Trees and shrubs, on the<br />
Clean seed<br />
other hand, are not typically seeded across disturbed sites. Wild<br />
seed collections for these species are sent to nurseries for seedling<br />
Test<br />
propagation, then outplanted. Seeds from wetland genera, such<br />
as sedges (Carex spp.) and rushes (Juncus spp.) are often collected<br />
for both seed and seedling production purposes.<br />
<strong>Revegetation</strong> plans are seldom finalized before wild seeds are collected.<br />
At a minimum, planning should have identified revegetation<br />
units, described reference areas, determined species to propagate,<br />
and completed a survey of the construction site to determine the amount of area to be<br />
revegetated. The quantity and location of wild seed collection is based on these early surveys.<br />
Collecting wild seeds can be expensive. Multiple collection trips are often needed to monitor<br />
and collect each species. Each species has a small ripening window, and most species do<br />
not ripen at the same time. In addition, many species do not consistently produce seeds<br />
from year to year, requiring multiple year collections. Working around these complexities<br />
to obtain adequate supplies of wild seeds requires excellent planning and administration of<br />
seed collection and cleaning contracts.<br />
Before collecting wild seeds or setting up collection contracts, it is worth the effort to contact<br />
Forest Service district or Bureau of Land Management (BLM) area offices first to see if seeds<br />
are already available for your project. Often these local agencies will have seeds in storage for<br />
many of the species growing near the project area, especially species used for reforestation.<br />
-4 -3 -2 -1 0<br />
Year<br />
Figure 10-49 | Early planning is<br />
essential when collecting wild seeds<br />
Wild seed collection is one of the first<br />
contracts developed during planning.<br />
Seeds are needed to implement seed<br />
and seedling propagation contracts.<br />
A lead-time of 2 to 4 years is typically<br />
needed for wild seed collection.<br />
Develop Timeline<br />
Wild seed collection should be one of the first tasks to consider when beginning revegetation<br />
planning because other tasks, such as seed and seedling propagation contracts, cannot be<br />
conducted without this plant material. Up to 3 or 4 years are often necessary in order to locate,<br />
collect, clean, and test wild seeds, and still allow the nursery or seed producer enough lead<br />
time for plant and seed production (Figure 10-49).<br />
The seed collection contract is awarded early in the spring to give the contractor enough time<br />
to locate and assess the collection areas. Seeds are monitored from June through August and<br />
collected when ripe. Wild seed harvests are cleaned from September through October and<br />
then tested. Results from seed testing facilities are returned by December. Seeds designated<br />
for seedling propagation must be sent immediately to the nursery for preparation for sowing in<br />
early winter. If seed propagation is the objective, seeds are stored until the following summer<br />
and sent to seed producers for a late summer sowing.<br />
Determine Wild Seed Needs for Seed Production<br />
Wild seed collection and the nursery seed increase contracts are often developed simultaneously<br />
because the information needed for wild seed collection is based on the expected seed yields<br />
<strong>Roadside</strong> <strong>Revegetation</strong>: An Integrated Approach to Establishing Native Plants and Pollinator Habitat<br />
282
IMPLEMENTATION GUIDES<br />
of the seed increase contract. This section describes<br />
how to calculate the amount of wild seeds to collect<br />
based on the amount of seeds expected from a<br />
nursery seed producer.<br />
The amount of uncleaned wild seeds to collect for<br />
seed propagation contracts requires the following<br />
information (used in calculations in Figure 10-50):<br />
◾◾<br />
Seed needs<br />
◾◾<br />
Years in seed production<br />
◾◾<br />
Sowing rates<br />
◾◾<br />
Annual seed yields<br />
◾ ◾ “Cleaned-to-rough cleaned” seed ratio<br />
Seed Needs – The total seeds needed for each<br />
species on a revegetation project is based on the<br />
total planned revegetation acreage, seedlot characteristics<br />
(germination, purity, seeds per pound), site<br />
limitations (how well seeds will survive), and the desired seedling densities after seeds have<br />
germinated. The reader is referred to Section 10.2.4.3, Determine Seed Needs, for methods to<br />
calculate how many seeds are needed for each species in a revegetation project.<br />
Years in Seed Production – Every species has its own seed production characteristics. For<br />
instance, species such as blue wildrye (Elymus glaucus) and California brome (Bromus carinatus)<br />
produce high seed quantities the first and second year, then level off or decline in years three<br />
and four. Species such as fescues (Festuca spp.) and Junegrass (Koeleria spp.) yield few seeds<br />
in the first year, but seed harvest levels increase to full production in the second or third year.<br />
For these species, a minimum of two years must be scheduled for seed production. Section<br />
10.2.4.3, Determine Seed Needs, shows first- and second-year yields for some commonly<br />
produced species.<br />
Since seeds can be stored for many years, seed production does not have to occur all in one<br />
year. For projects that have several years lead time, maintaining production fields gives the<br />
revegetation specialist more flexibility. By spreading the seed production over several years,<br />
the acreage in production and the amount of wild seed to collect can be cut in half. For<br />
example, if 800 lb California brome (Bromus carinatus) seeds for a revegetation project are<br />
needed and there are two production years to produce it in, the amount of seeds to produce<br />
per year would be 400 lb. Since half the acreage would be sown, the amount of wild seed to<br />
collect would be cut in half, from 10 pounds to 5 pounds.<br />
Sowing Rates – All growers require a minimum amount of clean, wild seeds to produce a<br />
given quantity of nursery-grown seeds. While these rates differ somewhat between seed<br />
producers, general sowing rates for commonly propagated species are shown in Table 10-14<br />
in Section 10.2.4, Nursery Seed Production.<br />
Annual Seed Production Yields – The amount of seeds that are produced annually varies<br />
by species, geographic location of the fields, weather conditions, and experience of the seed<br />
producer. Knowing what yields can be expected from seed producers will determine how<br />
many acres will be under production and the amount of wild seeds needed to start the crop.<br />
Average seed yields for some species are presented in Table 10-14 in Section 10.2.4, Nursery<br />
Seed Production.<br />
Cleaned-to-Rough Cleaned Seed Ratio – Seed collection from the wild will include stems,<br />
chaff, and flower parts (Figure 10-51). This material should be cleaned as much as possible by<br />
the seed collectors before it is sent to the seed extractory for final cleaning. The amount of<br />
non- seed collected can be a substantial part of the wild seed collection weight. “Cleaned to<br />
A Seed production needs 22 lbs From seed needs plan (See Section 10.2.4.3)<br />
B Years in production 2 yrs<br />
C Sowing rates 1 lbs/ac<br />
D Annual seed yields 50 lbs/ac/yr<br />
E (A/B) / D 0.22 ac Area seed producer needs to sow<br />
F E * C = 0.22 lbs<br />
“Cleaned to rough cleaned”<br />
G<br />
seed ratio<br />
33 % Estimated<br />
Seed production can span several years<br />
depending on lead time of project.<br />
See Table 10.14 in Section 10.2.4 or<br />
discuss with seed producer<br />
See Table 10.14 in Section 10.2.4.<br />
If spanning more than one year, average<br />
the expected first and second year yields<br />
Cleaned wild seeds that seed producer<br />
needs to sow<br />
H (100 / G) * F 0.67 lbs Rough weight of seeds to collect<br />
Figure 10-50 | Determining<br />
wild seed needs<br />
The quantity of wild seeds to collect can<br />
be determined from this spreadsheet.<br />
Pearly everlasting (Anaphalis margaritacea)<br />
is used in this example.<br />
<strong>Roadside</strong> <strong>Revegetation</strong>: An Integrated Approach to Establishing Native Plants and Pollinator Habitat<br />
283
IMPLEMENTATION GUIDES<br />
rough cleaned” seed ratios (Table 10-12) can help calculate the extra weight of seeds to collect<br />
in the wild to compensate for seed cleaning. Dividing the desired amount of cleaned seeds<br />
by this ratio will yield the amount of wild seed that needs to be collected.<br />
Determine Seed Needs for Seedling Production<br />
The quantity of wild seeds to collect for propagating seedlings at plant nurseries will be based<br />
on an estimate of (1) quantity of seedlings needed, (2) percent seed germination, (3) percent<br />
seed purity, (4) seeds per pound, and (5) nursery factor. An estimate of germination, purity,<br />
and seeds per pound can be obtained through published sources, seed inventories, or from<br />
seed extractory managers. The nursery factor is a prediction of the percentage of viable seeds<br />
that will actually become “shippable” seedlings. Each nursery has developed a set of factors<br />
based on culturing experience and practices. Nursery managers should supply nursery factors<br />
for each species or information on the amount of seeds to collect to meet the seedling order.<br />
Nursery factors are often less than 50 percent.<br />
Using the following equation, the amount of wild seed to collect can be estimated:<br />
Wild seed to collect =<br />
quantity of seedlings needed<br />
(% germ/100 * % purity/100 * seeds/pound * nursery factor/100)<br />
Locate Plants in the Wild<br />
Figure 10-51 | Wild collected<br />
seed needs to be cleaned<br />
Field collected seeds include stems,<br />
chaff, flower parts, and seed attachments.<br />
Species such as cutleaf silverpuffs<br />
(Microseris laciniata) have a low “cleanto-rough”<br />
seed ratio and must be sent<br />
to a seed extractory for cleaning prior<br />
to sending to seed producers.<br />
Collection areas are located in the field during the vegetation analysis phase (see Section<br />
6.2, Select Species for Propagation). General collection locations can be established by the<br />
revegetation specialist under the direction of a botanist familiar with the local vegetation.<br />
Contracts often require seed collectors to identify individual collection areas for approval<br />
prior to collection. Since seed collection can start in late spring for some species, collection<br />
site location must be completed by this time.<br />
Collection areas for each species should not occur in one location, but represent a crosssection<br />
of populations in the general area of the project. A minimum of five collection areas,<br />
at least a mile apart, should be identified for each species. This ensures that a range of genetic<br />
characteristics is represented in each seedlot. While some populations will be located in<br />
the project area, most areas will have to be found in adjacent areas. When seed collection<br />
Table 10.12 | Typical ranges of “cleaned-to-rough cleaned” seed ratios<br />
To obtain the amounts of “rough” seeds to collect, divide the amount of cleaned seeds needed by the “cleaned-to-rough cleaned” ratio. For<br />
example, if 5 lb cleaned seeds of prairie Junegrass (Koeleria macrantha) are needed, a minimum of 12.5 lb rough cleaned seeds must be collected<br />
(5/40*100=12.5) (Chart based on R6 Forest Service seed collections data.)<br />
Common Name Scientific name Cleaned-to-Rough Cleaned Ratio<br />
Bluebunch Wheatgrass Pseudoroegneria spicata 25 to 33<br />
Idaho Fescue Festuca idahoensis 33 to 50<br />
Prairie Junegrass Koelaria macrantha 20 to 40<br />
Squirreltail Elymus elymoides 20 to 25<br />
Yarrow Achillea spp. 20 to 25<br />
Sandberg Bluegrass Poa secunda 33 to 40<br />
Blue Wildrye Elymus glaucus 50 to 65<br />
<strong>Roadside</strong> <strong>Revegetation</strong>: An Integrated Approach to Establishing Native Plants and Pollinator Habitat<br />
284
IMPLEMENTATION GUIDES<br />
is conducted outside of the project area or agency administered lands, permission must be<br />
obtained from the landowner or manager.<br />
Collection sites must be free of any plants listed as noxious weeds by the Oregon Department<br />
of Agriculture (“A and B” weed lists) because of the potential of seed contamination. Once<br />
located, the collection sites should be marked with flagging at a point easily visible from the<br />
road used to access the site. The flagging should have a written description that includes the<br />
GPS location (including elevation and Universal Transverse Mercator coordinates) or a compass<br />
bearing and approximate distance in feet from the access road to the collection site. Each<br />
site should be approved by the revegetation specialist/botanist. Locations will be numbered<br />
sequentially and the location placed on 7.5° topographic maps and each collection site must<br />
be described and documented in the field notes.<br />
Collect Seeds<br />
Only viable seeds that are visually sound and sufficiently mature should be collected. Seeds<br />
are considered sound when the embryo is developing normally and there is no evidence of<br />
insect, disease, climatic, or other types of damage. Seed maturity in plants with fleshy fruits<br />
(many shrub and some tree species) often corresponds with changes in color (e.g., color<br />
changes from green to red, blue, purple, or white), taste (higher in sugars when mature), or<br />
hardness (fruit softens with maturity). Wind-dispersed seeds (which include many of the conifer<br />
species) usually change from green to brown when ripe. For grass species, seed maturity can<br />
be determined by how seeds respond to being squeezed (Inset 10-11). Since seed ripeness is<br />
influenced by the local weather and microclimate, determining seed ripeness often requires<br />
several monitoring trips to the field prior to collection.<br />
Seed collection techniques are tailored to the species being collected. Grass and forb species,<br />
for instance, can be hand-harvested by stripping or clipping stems just below the seed heads<br />
and placing them in collection bags or containers. Collection bags should be made of materials<br />
that allow airflow, such as paper or fine mesh. Plastic bags or plastic containers should not be<br />
used. Other methods of collecting grass and forb seeds include mechanical flails and vacuums.<br />
While these methods can increase seed harvesting rates significantly, they must be done on<br />
nearly pure stands of a single species to avoid contaminating the seedlot with more than one<br />
species. Some forbs, such as lupine (Lupinus spp.), have indeterminate inflorescence, which<br />
means they continuously bloom, starting from the bottom of the flower head and progressing<br />
to the top (Figure 10-52). These species present a problem in seed collection because seeds<br />
Inset 10-11 | Stages of grass seed maturity<br />
For grasses, the stages of seed ripening can be determined by squeezing a seed between<br />
the thumb and forefinger. The stage of seed maturity is broadly defined by the following<br />
response:<br />
Milk stage. A milky substance is secreted, indicating an immature seed lacking viability.<br />
Soft-dough stage. Seed has a doughy texture, indicating it will have low germination<br />
and viability if collected.<br />
Hard-dough stage. No excretion of dough or milky substance when squeezed. Seeds<br />
are collected at this stage. Seeds can be collected at the transition between soft-dough<br />
and hard-dough stages. If collection occurs between these stages, seeds should not be<br />
stripped from the plant. Instead, seed heads should be cut and placed in collection bags<br />
where seeds will continue to mature.<br />
Mature. Seeds in this stage are usually too hard to bite. Collection should begin immediately<br />
because seeds can dislodge from the stem at any time.<br />
Figure 10-52 | Seed ripens<br />
throughout the season for<br />
some plant species<br />
Species such as lupine (Lupinus spp.)<br />
have indeterminate inflorescence bloom<br />
and set seeds all summer. Seeds ripen<br />
first at the bottom of the stem and<br />
continue to ripen up the stalk as the<br />
season progresses.<br />
<strong>Roadside</strong> <strong>Revegetation</strong>: An Integrated Approach to Establishing Native Plants and Pollinator Habitat<br />
285
IMPLEMENTATION GUIDES<br />
ripen continuously through the growing season. Seeds from these species are often obtained<br />
by making multiple trips to the field and collecting seeds from the lower portions of the stem<br />
without disturbing the flowers or immature seeds above.<br />
Seeds of many shrub species are often collected by holding a bag or tray under the plant<br />
and shaking the plant or flailing the branches with a stick or tennis racket. While the seeds<br />
of some shrub species ripen and remain on the seed head, others, such as Ceanothus spp.,<br />
shatter when they ripen and must be collected as soon as they ripen. Since multiple collection<br />
trips can be expensive, an alternative approach is to enclose the seed head of each plant in a<br />
mesh or paper bag before the seeds have begun to ripen. At the end of the season, ripened<br />
seeds will have dispersed into the bags, which can be easily collected. The seed collection<br />
contractor should specify the methods that will be used for collection.<br />
Seeds should be collected in approximately equal quantities from approved collection areas<br />
(see Section 10.2.1.5, Locate Plants in the Wild). To ensure adequate genetic representation,<br />
collect from a large number of widely spaced or unrelated parent plants per area (over 50 is<br />
optimal). To preserve populations, no more than 50 percent of the seed crop at each site should<br />
be collected in a year. Seeds or seed bearing fruits should not be collected from the ground.<br />
Each seed collection bag or container must be clearly identified in the field with the following<br />
information:<br />
◾◾<br />
Species (scientific name)<br />
◾◾<br />
Forest or BLM district<br />
◾◾<br />
District or BLM resource area<br />
◾◾<br />
Legal description<br />
◾◾<br />
Date of collection<br />
◾◾<br />
Name of collector<br />
◾◾<br />
Number of populations collected<br />
◾◾<br />
Elevation<br />
◾◾<br />
Road project name<br />
1) Identification Code:<br />
The Forest Reproductive Material Identification Tag is an excellent way to capture this<br />
information (Figure 10-53). These are often available at Forest Service district offices or seed<br />
extractories. To assure the identity of the seedlot in case the tag is accidentally removed during<br />
handling or shipping, it is a good idea to duplicate the tag and place it into the collection bag.<br />
Field collections must be grouped into seedlots prior to sending these collections to the seed<br />
extractory for cleaning. Individual collections within a species are only maintained as separate<br />
seedlots if the objective is genetic testing or research. The expense of cleaning, packaging,<br />
and keepingrecordsofamultitudeofcollectionsoutweighsthenecessityofstoringthemseparately.<br />
The information displayed on the seed tag can be used to identify or name a seedlot. Each<br />
seedlot is identified by a seedlot identification code constructed in the following manner:<br />
Species - Forest - Seed Zone - Elevation - Project Name - Collection Year<br />
Species – The species short code can be obtained from the Plants Database on the National<br />
Resource Conservation Service website (http://plants.usda.gov/index.html).<br />
Forest or BLM District Office – This is a numerical number assigned to each forest or BLM<br />
district office.<br />
Seed Zone or Breeding Zone – For conifer and many native species, seed zones and breeding<br />
zones are geographic areas that have been identified by geneticists. Consult with the local<br />
reforestation, botanist, or area geneticist for seed zone and breeding zone maps.<br />
Elevation – Elevation is generally listed as a range and abbreviated for conifer and many<br />
native species (For example, a 4,000 to 5,000 elevation band is listed as 4,050).<br />
FOREST REPRODUCTIVE MATERIAL<br />
IDENTIFICATION TAG<br />
U.S.D.A. FOREST SERVICE<br />
/<br />
Species Forest BZ/Seed Zone Type Coll. Elev. Band Year Cert.<br />
2) Number of Trees 3) Ranger District 4) Elevation<br />
(Feet above sea level)<br />
4) Tree Numbers:<br />
6) Area of Collection<br />
T. R. S.<br />
7) Accession No. 8) Plant Association<br />
(TI Collections: affix bar code tag<br />
if available)<br />
9) Alpha Code<br />
10) Collection Date / /<br />
11) Signature<br />
(Person filling out tag)<br />
Figure 10-53 | Recording seed<br />
collection information is imperative<br />
A Forest Reproductive Materials Identification<br />
Tag should be completed and<br />
attached to each collection bag sent to<br />
the seed extractory. A copy should also<br />
be placed inside the bag.<br />
<strong>Roadside</strong> <strong>Revegetation</strong>: An Integrated Approach to Establishing Native Plants and Pollinator Habitat<br />
286
IMPLEMENTATION GUIDES<br />
Project Name – The highway or revegetation project name is usually abbreviated.<br />
Collection Year – The year in which the seeds were collected is abbreviated.<br />
Certification – Certification codes apply to conifer tree species and are used to differentiate<br />
what is known about the parentage of the seeds. For example, codes pertain to whether the<br />
seeds were collected from the wild, seed collection areas, seed orchards, or if seeds are from<br />
tested material.<br />
For example, the seedlot code, ARNE-10-502-2030-Elk-04, identifies a pinemat manzanita<br />
(Arctostaphylos nevadensis) seed source, collected on the Rogue River National Forest in seed<br />
zone 502 in an elevation range of 2,000 to 3,000 ft. Seeds were collected for the Elk Creek<br />
Road project in 2004.<br />
Clean and Test Seeds<br />
Wild seed collections must be cleaned to a standard that can be uniformly applied through<br />
seed sowing equipment for seedling production or seed increase. Seed extractories have<br />
the experience and equipment to clean wild seeds of most species. Seed cleaning is typically<br />
completed in two to three steps: (1) removing seeds from cones or seedpods (conifer species<br />
and some hardwood tree and shrub species), (2) detaching structures from seeds, and (3)<br />
removing all non-seed materials from collections. Removing seeds from most conifer cones<br />
involves using tumbling equipment to allow seeds to separate from scales. Some conifer<br />
species and many shrub and hardwood species require specialized equipment to break open<br />
the seedpod without damaging the seeds. Detaching seed structures involves the mechanical<br />
removal of awns (grasses), wings (conifers), and fleshy structures (shrubs). Once seed structures<br />
are detached, all non-seed materials, including stems and chaff, can be removed from the<br />
collections, leaving only pure seeds. Seed extractories will dry, package, and store seeds, as well<br />
as test seeds on- site or send seeds to a testing facility. It must be noted that seed extractories<br />
cannot improve a poorly collected seedlot. For example, seed extractories cannot remove weed<br />
seeds, damaged seeds, or immature seeds from a collection, nor separate seeds from different<br />
crop species mixed in a seedlot. Prior to collecting wild seeds, it is important to contact the<br />
seed extractory manager to discuss which species will be cleaned. Seed extractory managers<br />
are great sources of information on collection and care of a variety of native species seeds.<br />
Cleaned seeds should be tested for germination, purity, seeds per pound, and presence of<br />
noxious weeds (Inset 10-12) by an approved seed testing laboratory (Inset 10-13). Testing<br />
requires representative samples be collected from each seedlot. Seeds are usually stored in<br />
Inset 10-12 | Seed tests<br />
(modified from Tanaka 1984)<br />
Seed testing is used to evaluate seedlot quality and provide information<br />
for determining sowing rates for seed and seedling production.<br />
Methods used for seed testing are based on rules of the Association<br />
of Official Seed Analysts (AOSA). A number of tests are normally<br />
conducted on each seedlot to evaluate physical and biological seed<br />
characteristics.<br />
Physical Characteristics<br />
Purity. Purity tests are used to determine the percentage by weight<br />
of four components: (1) pure seeds of the desired species, (2) seeds<br />
of other species, (3) weed seeds, and (4) inert matter, such as stems,<br />
chaff, scales, and small stones. Graminoid seeds with more than 10<br />
percent to 15 percent inert matter will be difficult to apply through a<br />
rotary seeder or rangeland drill. Purity tests should verify the seedlot<br />
contains no “prohibited” noxious weed seeds and meets or exceeds<br />
standards for “restricted” or “other weed seeds” according to state<br />
standards for Certified Seed. Because each state has different lists of<br />
prohibited and restricted noxious weeds, it is important to request an<br />
“All-States Noxious Weed Exam.” While not prohibited or restricted by<br />
the State, some aggressive non-natives found through seed testing<br />
may still pose a threat to native plant communities.<br />
Moisture content. Seed moisture content for most species is determined<br />
by oven-drying. Seed samples are weighed and heated<br />
at 105 degrees C (221 degrees F) for 16 hours, then weighed again.<br />
Seed moisture is expressed as the percentage of the weight of the<br />
water lost over oven-dry weight. Electronic moisture meters are also<br />
frequently used, but are not as accurate as the oven-drying method.<br />
<strong>Roadside</strong> <strong>Revegetation</strong>: An Integrated Approach to Establishing Native Plants and Pollinator Habitat<br />
287
IMPLEMENTATION GUIDES<br />
They give rapid measurements when checking moisture in a large<br />
number of seedlots.<br />
Moisture tests are important for determining the storability of seeds.<br />
Typically, seed moistures for long-term storage should be less than<br />
10 percent.<br />
Seeds per pound. Seeds per pound is the weight of a given number<br />
of seeds of the desired species, and does not include seeds of other<br />
species or weed seeds. The method weighs 100 seeds of ten random<br />
samples and converts the values to number of seeds per pound.<br />
Biological Characteristics<br />
Germination. A germination test conducted in a controlled environment<br />
is the most reliable method for testing seeds. At least 400 seeds<br />
from the pure-seed component of the purity test are used in the test.<br />
Depending on the species, the seeds are usually divided into four<br />
replicates of 100 seeds each and chilled (stratified) for a pre-determined<br />
period and placed on trays in controlled germination chambers. At<br />
7-day intervals, the number of seeds that have germinated (when all<br />
essential structures appear normal) are counted (AOSA 2002).<br />
Tetrazolium staining. Although controlled-environment germination<br />
tests are reliable, they are also time-consuming, particularly for those<br />
species requiring chilling. A rapid method of estimating viability is<br />
tetrazolium (TZ) staining. This test is preferred if results are needed<br />
immediately, or if species to be tested have unknown chilling or<br />
germination requirements, which is often typical of many native<br />
species (Rauch 2006). The TZ test requires seeds to be immersed<br />
in 2,3,5-triphenyl tetrazolium chloride. Living cells stain red as the<br />
chemical is reduced by dehydrogenase enzymes to form a stable red<br />
triphenyl formazan, which is insoluble in water. Seeds are cut and the<br />
embryos are that are red-stained are counted as viable seeds. This test<br />
is very useful for native species that produce seeds that are dormant<br />
and will not germinate without after-ripening (that is, seeds placed in<br />
an environment where they will continue to ripen) or without special<br />
germination enhancement treatments (stratification, scarification,<br />
gibberellic acid, and so on). In these cases, germination tests usually<br />
report out lower viability rates than actually exist. Because TZ tests<br />
measure the percentage of live embryos, they typically give a better<br />
indication of potential germination rates.<br />
X-ray. At least 400 seeds, divided into four replicates of 100, are x-rayed<br />
and evaluated for presence of mature embryos, insect damage, filled<br />
seeds, damaged seeds, and other seed characteristics that might<br />
affect germination. X-raying is a quick test, but not as accurate as<br />
germination or TZ tests.<br />
large sealed drums or bags. Seeds should be sampled with probes that reach to all parts of the<br />
storage container. If there are multiple containers per seedlot, samples from each container<br />
should be drawn in proportion to the size of the container. Since the amount of seeds needed<br />
for testing may vary by species and laboratory, seed testing facilities should be contacted prior<br />
to submitting samples for special instructions.<br />
Seed viability usually decreases with time in storage. Seed testing should be conducted every<br />
few years, or at least the year before it is sown, to obtain the most accurate germination rates.<br />
Copies of seed tests should be retained in contract files and on seed inventories.<br />
10.2.2 COLLECTING WILD CUTTINGS<br />
Introduction<br />
Using cuttings can be a viable alternative to planting seedlings or sowing seeds to reestablish<br />
native vegetation. Vegetative material is collected from stems, roots, or other parts of donor<br />
plants and directly planted on the project site or sent to a nursery to produce rooted cuttings.<br />
The potential to produce roots from vegetative cuttings varies by species – from easy to<br />
propagate to extremely difficult. The most common species propagated from vegetative<br />
cuttings are shrubs and some trees. Many deciduous species that grow well in riparian settings,<br />
such as willows (Salix spp.) and cottonwoods (Populus spp.), have a high success rate when<br />
propagated from cuttings. Most temperate evergreen trees and shrubs, however, only root<br />
under very controlled environments with specialized propagation techniques.<br />
The intent of this section is to provide the reader with a greater understanding of how to select<br />
and collect cuttings in the wild. The primary focus will be on the species in the genera Salix<br />
and Populus, because these are these are most frequently used for direct sticking. Most other<br />
temperate tree and shrub species must be sent to the nursery for the production of rooted<br />
cuttings before they are installed on project sites (In tropical and subtropical areas, a wider<br />
Inset 10-13 | State certified<br />
seed testing laboratories<br />
Oregon State University<br />
Seed Laboratory<br />
Corvallis, OR 97331-3801<br />
Telephone: 541.737.4464<br />
Washington State Department<br />
of Agriculture<br />
21 North 1st Avenue, Suite 203<br />
Yakima, WA 98902<br />
Telephone: 509.225.2630<br />
Idaho State Department of<br />
Agriculture<br />
3340 Kellogg Lane<br />
Boise, ID 83712<br />
Telephone: 208.332.8630<br />
<strong>Roadside</strong> <strong>Revegetation</strong>: An Integrated Approach to Establishing Native Plants and Pollinator Habitat<br />
288
IMPLEMENTATION GUIDES<br />
variety of species can be collected as wild cuttings).If temperate species other than willow<br />
and cottonwood are considered for propagation, nurseries should be contacted to determine<br />
the best methods for selecting, cutting, and handling the material.<br />
Cuttings can be obtained from wild collections or from cultivated stands of donor plants, called<br />
stooling beds. Stooling beds are established at nurseries or other agricultural facilities from<br />
wild collections. In this section, we will focus on how to obtain cuttings from wild locations<br />
and leave the discussion of producing cuttings from stooling beds to Section 10.2.5, Nursery<br />
Cutting Production.<br />
Wild cuttings are used in revegetation projects when (1) seeds or seedlings are difficult to<br />
obtain, (2) seeds germinate poorly in the nursery, or (3) cuttings are needed for biotechnical<br />
engineering objectives. Seed yields can be low for many species due to a variety of reasons,<br />
including poor pollination, disease, and insect damage. Some species, such as pinemat<br />
manzanita (Arctostaphylos nevadensis) and Pacific yew (Taxus brevifolia), produce seeds which<br />
can be very difficult to germinate in nursery environments. Other species, which include many<br />
tree species, produce seeds on an irregular basis; there may be many years between seed<br />
crops. Some seeds are difficult to collect either because they are inaccessible (in the upper<br />
portions of trees) or the window of seed collection is very narrow (e.g., Ceanothus spp.). For<br />
these species, starting plants in the nursery from rooted cuttings may be the only viable and<br />
economical alternative (see Section 10.2.6, Nursery Plant Production). Another important<br />
use of cuttings is in biotechnical engineering projects. These projects combine the physical<br />
strength of cuttings with root strength of establishing plants to increase surface and slope<br />
stability (see Section 10.3.3, Installing Cuttings).<br />
When considering the use of cuttings over seeds or seedlings, the benefits must outweigh<br />
the potential limitations. Some factors that can limit the successful establishment of cutting<br />
material are the accessibility and availability of donor plants, how well the material roots<br />
(rooting potential), and how well the material survives once it has rooted. A common oversight<br />
when working with cuttings is forgetting that this material<br />
is alive and subsequently handling the material poorly.<br />
Another oversight is collecting cuttings outside of dormancy,<br />
Wild Cutting Collection Timeline<br />
when plants are actively growing. Neglecting either of<br />
these facts often leads to failed revegetation projects. This<br />
Tasks<br />
implementation guide covers the major factors that are<br />
Determine cutting needs<br />
important to consider when working with wild cuttings.<br />
Locate cutting areas<br />
Test materials<br />
Develop Timeline<br />
Collect for propagation<br />
Locating cutting areas in the field might seem like a simple<br />
Establish stooling beds<br />
task, but it can be quite difficult when you are faced with<br />
Propagate rooted cuttings<br />
such realities as land ownership, accessibility of the cutting<br />
Collect for direct installation<br />
areas to roads, winter weather conditions, and poor quality of<br />
plant materials. For these reasons, a lead-time of several years<br />
Install cuttings or rooted cuttings<br />
should be considered for projects requiring large quantities<br />
of wild cuttings (Figure 10-54). On large projects, sufficient<br />
lead-time allows for the location of potential collection sites<br />
and testing of the rooting potential of cutting material. If<br />
cuttings are used to propagate stooling beds (see Section<br />
10.2.5, Nursery Cutting Production), which are recommended for large projects, cuttings<br />
need to be collected at least 2 years or more before cuttings are installed on a project site.<br />
If the material is to be used to produce rooted cuttings at a nursery, the material should be<br />
collected at least a year prior to installation. When the materials are cut for direct installation<br />
on a project site, the cuttings will be made in the fall through winter prior to planting.<br />
Year<br />
Road Construction<br />
-3 -2 -1 0 1<br />
Figure 10-54 | Wild cutting<br />
collection timeline<br />
Collecting wild cuttings requires a leadtime<br />
of several years depending on<br />
whether it is used to propagate stooling<br />
beds, rooted cuttings, or direction<br />
installation.<br />
<strong>Roadside</strong> <strong>Revegetation</strong>: An Integrated Approach to Establishing Native Plants and Pollinator Habitat<br />
289
IMPLEMENTATION GUIDES<br />
Locate Cutting Areas<br />
The vegetation assessment during the planning phase (see Chapter 6) is an opportunity to<br />
locate potential sources of cuttings. During this field survey, cutting sites are mapped and<br />
assessed for the following characteristics:<br />
Proximity and Accessibility– Good sources for cuttings are not always found within the<br />
project site, so it is necessary to survey large areas. Sometimes good collection sites are<br />
miles away from the project, which can substantially increase costs. However, the benefits of<br />
collecting quality plant materials far outweigh the additional transportation costs. The large<br />
size and weight of cutting materials often limits collections to areas adjacent to and accessible<br />
by roads. Poor road conditions during the winter months, when cuttings are most likely to be<br />
collected, should be considered in site selection, because of the potential of being closed by<br />
snow or winter road damage. It is often possible to collect quality cutting material within the<br />
right-of- way clearance, which is identified during the vegetation assessment.<br />
Ownership – Some of the best collection sites may be on private lands. Always obtain permission<br />
from the landowner prior to collecting. Cutting from areas located on federal, state, and local<br />
government managed lands must be coordinated through these agencies. Observe collection<br />
standards for size and quantity dictated by the landowners.<br />
Viability – The quality of the cutting material is an important criteria for determining the<br />
suitability of a collection site. Determining the viability of the collection material should be<br />
completed prior to selecting the collection site (see Section 10.2.2.4, Determine Rooting<br />
Potential).<br />
Genetic Considerations – It is important to determine if the species to be collected is<br />
monoecious (male and female reproductive parts on the same plant) or dioecious (male and<br />
female reproductive parts on different plants). If the species is dioecious (Inset 10-14), such as<br />
willow or cottonwood, an attempt to collect cuttings from both male and female plants in equal<br />
amounts should be made. If one of the objectives for using dioecious species is to promote<br />
or restore a species, donor plants must be located during periods of identifiable phenology,<br />
which is typically spring through summer. This might add an additional year to the timeline.<br />
To help preserve genetic integrity, it is recommended to collect from a minimum of 50 donor<br />
individuals within a watershed (see Chapter 6 for genetic transfer guidelines). Differentiating<br />
between individual plants within an area can be difficult with clonal species, such as willows<br />
and cottonwoods, because what often appear as a group of individual plants are actually<br />
offshoots from a single parent plant.<br />
Diameter Size – The project objectives will determine which stem diameters must be collected<br />
(NRCS 1997). This must be assessed when a collection site is evaluated.<br />
Small diameter. Small diameter materials, called branched cuttings, average less than 1.0<br />
inch in diameter and are derived from the fine branches of vigorously growing donor plants.<br />
This material is tied into long bundles to form live fascines (see Section 10.3.3.4, Live Fascines)<br />
or laid on the surface of the soil to form brush mattresses. Live fascines are placed in shallow<br />
trenches on slope contours to function like small water and sediment collection dams, or they<br />
are placed at an angle to the slope to facilitate slope drainage (see Section 10.3.3.3, Live Brush<br />
Layers). Small diameter materials are also used for branch packing and to vegetate geogrids<br />
and rock gabions. Additionally, small diameter materials are used for rooted cutting production<br />
at nurseries. The typical diameter size preferred by most nurseries ranges from 3/8 to 1/2 inch.<br />
Medium diameter. Medium diameter cutting materials are used to make live stakes (see Section<br />
10.3.3.2, Live Stakes), which range in size from 1.0 to 3.0 inches in diameter. Stakes are tamped<br />
into the ground at right angles to the soil surface to secure small slumps, live fascines, and<br />
erosion control materials. Joint plantings are stakes that are driven between rocks or riprap,<br />
and must be greater than 1.5 inches in diameter and several feet long. Materials ranging from<br />
to 2.5 inches are used to revegetate live crib walls. Crib wall cuttings must be long enough to<br />
reach 4 to 6 feet back to the end of the wall.<br />
<strong>Roadside</strong> <strong>Revegetation</strong>: An Integrated Approach to Establishing Native Plants and Pollinator Habitat<br />
290
IMPLEMENTATION GUIDES<br />
Inset 10-14 | How to tell the difference between male and female willows and cottonwoods<br />
Identifying the sex of dioecious plants is easiest when they are flowering or fruiting. Willow (Salix spp.) catkins may appear before, during,<br />
or after new leaves appear in spring. Identifying anthers in male catkins (photo A) and pistils in female catkins (photo B) with a hand lens is<br />
relatively easy, especially with a little practice. Female plants can easily be identified when the cottony seeds are mature (photo C). During<br />
the winter dormant season, it is possible to identify the sex of dormant cottonwoods by dissecting floral buds, although this is more difficult<br />
with willows. Detailed instructions on how to sex willows and cottonwoods can be found in Landis and others (2003).<br />
A B C<br />
Large diameter. Larger diameter materials are used as dormant post plantings to stabilize<br />
streambanks. The diameter of these poles range from 3 to 5 inches and are 7 to 9 feet long.<br />
Large posts are not always easy to obtain in the wild, but can be produced from nursery<br />
stooling beds.<br />
Cutting Footage – The total length of cuttings available for harvest should be estimated for<br />
each potential cutting area. This can be roughly calculated by evaluating 10 to 20 donor plants<br />
and estimating the average length and number of usable stems (by diameter size categories)<br />
that could be obtained from each. The average length is then multiplied by the estimated<br />
number of plants in the cutting area to obtain a total estimated cutting footage. This will be<br />
the high end of an estimate, since most landowners are likely to place a restriction on the<br />
amount of cuttings that can be harvested at one time. For example, a landowner might limit<br />
the amount of cuttings that can be taken from an area to 25 percent in a riparian area. The<br />
cutting footage would be 25 percent of the total length of the cuttings.<br />
Determine Rooting Potential<br />
Not all cuttings will root and become established plants when installed on a project site. The<br />
success rate of those that actually do become plants is dependent on (1) the percentage of<br />
cuttings that form roots when placed in an ideal growing environment, or the rooting potential<br />
and (2) the percentage of viable cuttings (those that root) that become established after a<br />
growing season, or the survival potential.<br />
Rooting potential is analogous to germination rates obtained from seed testing. Seed tests<br />
are performed under uniform, ideal growing conditions, and are a measure of the potential<br />
of seeds to germinate (see Section 10.2.1, Collecting Wild Seeds, Section 10.2.4, Nursery Seed<br />
Production, and Section 10.3.1, Seeding). Rooting potential is similar to germination in that it<br />
assesses the potential of cutting materials to produce roots under an ideal rooting environment.<br />
The potential of cutting materials to initiate roots is the basis for determining how many<br />
cuttings to collect and the density to plant. For example, if the rooting potential of a specific<br />
collection is low, more cuttings will need to be planted at closer spacing to compensate for<br />
those cuttings that do not root.<br />
Root potential tests have been developed for measuring the viability of nursery-produced<br />
plants (Ritchie 1985), but there are no standardized tests for determining the rooting potential of<br />
cuttings. Labs that offer seedling quality tests might, on request, use or adapt the root growth<br />
<strong>Roadside</strong> <strong>Revegetation</strong>: An Integrated Approach to Establishing Native Plants and Pollinator Habitat<br />
291
IMPLEMENTATION GUIDES<br />
potential (RGP) tests developed for seedlings to assess the rooting potential of vegetative<br />
materials. Inset 10-15 gives one possible method for assessing rooting potential.<br />
Rooting potential is affected by several plant factors, the most important of which are (1)<br />
species, (2) genotype, (3) date of collection, (4) portion of plant collected, (5) age of material,<br />
(6) condition of material, and (7) preparation techniques.<br />
Species – A small percentage of species in the western United States root consistently from<br />
cuttings. Those that root well can be cut and used directly on revegetation projects. Other<br />
species initiate roots only under controlled nursery environments, and must be grown into<br />
rooted cuttings before they can be planted on a project site. A list of commonly used native<br />
species that root from cuttings are shown in Table 10-13.<br />
Inset 10 -15 | Testing method for determining rooting potential for willow and cottonwood species<br />
Testing the viability of willow and cottonwood cuttings takes much<br />
of the guesswork out of establishing plants through this method of<br />
propagation. While is not a common practice in revegetation work,<br />
testing the viability of cuttings should be considered for similar<br />
reasons as seed testing. Most revegetation specialists would not think<br />
of applying seeds on a project without first testing for germination,<br />
purity, and seeds per pound, yet not think twice about using cuttings<br />
without having tested them first. This oversight can lead to higher<br />
costs, as well as low establishment rates.<br />
There are no established testing procedures for assessing rooting<br />
potential of cutting materials. Until these tests are established, we<br />
present a means of root assessment that can be used to compare<br />
results from year to year. Ideally, a controlled environment, such as<br />
a greenhouse, is the best place to conduct a rooting potential test.<br />
Temperatures should range between 65 and 75 ° F degrees. Using<br />
bottom heat or rooting hormones is not necessary; in fact, for some<br />
species, it can be detrimental for rooting (Darris and Williams 2001).<br />
Where a greenhouse is not available, use an indoor space where<br />
relatively constant temperatures can be maintained. Grow lights<br />
should provide at least 12 hours of light per day.<br />
Fifteen samples, at a minimum, should be randomly collected from<br />
different donor plants at each collection area. They should be of the<br />
same size and treated in a manner similar to what would be expected<br />
under normal operations. For example, if stakes with diameters<br />
between 2 and 3 inches are to be collected in August and soaked for 10<br />
days before planting, then the cuttings used for the tests would be of<br />
similar size, collected in August, and soaked in the same manner, and<br />
planted. Prepare each sample by cutting them into 12-inch lengths.<br />
Stick them 3 inches apart in pots that are at least 16 inches deep, filled<br />
with 1 part peat to 4 parts perlite. Cuttings should be stuck so that<br />
two buds are exposed above the media.<br />
After sticking, water the pots and set them in their testing location.<br />
At weekly intervals, observe the cuttings and note the status of the<br />
leaves developing from the buds. At 28 days, record how many cuttings<br />
have developed new leaves, gently remove the media from around<br />
the cuttings, and lightly wash the stems. Viable cuttings should have<br />
developed roots during this period. Record how many cuttings did<br />
not initiate roots (see cutting on the left in picture below). For those<br />
cuttings that did establish roots, a quantitative estimate of root<br />
initiation can be measured by removing the roots from the stem<br />
and weighing the new roots or counting the number of new roots<br />
for each cutting.<br />
To interpret this data, you will have to assume that any cutting that<br />
did not initiate roots or develop foliage during 28 days, probably will<br />
not immediately initiate roots in the field. A comparison of average<br />
root weights or number of roots between testing samples can indicate<br />
which collection sites or treatment methods will produce the best<br />
rooting materials. Those test samples with high average root weights<br />
should perform better than those with lower weights.<br />
<strong>Roadside</strong> <strong>Revegetation</strong>: An Integrated Approach to Establishing Native Plants and Pollinator Habitat<br />
292
IMPLEMENTATION GUIDES<br />
Table 10.13 | Some common species that can be propagated from vegetative material<br />
Rooting Potential<br />
Species Vegetative Material In Field In Greenhouse<br />
Willows (Salix spp.) Stems Easy Easy<br />
Cottonwoods (Populus spp.) Stems Easy Easy<br />
Snowberry (Symphoricarpos albus) Stems Easy to Moderate1 Easy to Moderate1<br />
Pacific ninebark (Physocarpus<br />
capitatus)<br />
Black twinberry (Lonicera involucrata)<br />
Stems Easy to Moderate1 Easy to Moderate1<br />
Stems Easy to Moderate1 Easy to Moderate1<br />
Douglas spirea (Spiraea douglasii) Stems Moderate1 Moderate1<br />
Salmonberry (Rubus spectabilis) Stems Moderate1 Moderate1<br />
Quaking aspen<br />
(Populus tremuloides)<br />
Roots Poor Moderate<br />
Redosier dogwood (Cornus sericea) Stems Moderate2 Moderate<br />
Chokecherry (Prunus virginiana) Roots Moderate2 Moderate<br />
Golden currant (Ribes aureum) Stems Poor Moderate2<br />
Woods’ rose (Rosa woodsii) Stems Poor Moderate2<br />
Manzanita (Arctostaphylos spp.) Stems Poor Moderate<br />
1 From Darris and Williams 2001<br />
2 From Bentrup and Hoag 1998<br />
Genotypes – Within each species, there is variability in rooting potential. Some donor plants<br />
(genotypes) will have greater rooting potential than other plants. Unless tests are run, it is<br />
hard to know which donor plants are optimal rooters.<br />
Date of Collection – The optimal time to collect cutting material is during plant dormancy.<br />
For most willow and cottonwood species, this period extends from mid-fall, after the donor<br />
plant drops its leaves, to bud swell in late winter to early spring. It is safe to assume that if<br />
donor plants have lost their leaves, cuttings will be at their highest rooting potential.<br />
Planting unrooted cuttings within the dormancy period is not always possible because most<br />
construction work is curtailed during winter months. If unrooted cuttings must be planted<br />
outside the dormancy period, establishment rates will significantly decrease. There are several<br />
alternative measures that can be taken: (1) collect cuttings during dormancy and keep in cold<br />
storage until they can be installed (see Section 10.2.2.7, Long-Term Storage), (2) collect cuttings<br />
outside the dormancy period and plant more cuttings to compensate for the anticipated<br />
downfall (see Section 10.2.2.5, Determine Survival Potential), or (3) use rooted cuttings in lieu<br />
of unrooted cuttings (see Section 10.2.2.4, Determine Rooting Potential).<br />
Collecting plant materials outside the dormancy period has been tried in biotechnical<br />
engineering projects with varying degrees of success (Figure 10-55). Species that root easily,<br />
such as willows (Salix spp.) and cottonwoods (Populus spp.), will root from cuttings collected<br />
outside dormancy, albeit at very low rates (Steinfeld 2002; Steinfeld 2005). In some instances<br />
however, this may be the only option available to the revegetation specialist. When these are the<br />
circumstances, collecting outside the dormancy period should be done with an understanding<br />
of how establishment rates will be affected and whether the overall project objectives will be<br />
<strong>Roadside</strong> <strong>Revegetation</strong>: An Integrated Approach to Establishing Native Plants and Pollinator Habitat<br />
293
IMPLEMENTATION GUIDES<br />
met. For large projects, it is important to conduct rooting and survival potential tests (Inset<br />
10-15) several years before cuttings are installed so that the appropriate amount of cuttings<br />
can be collected and planting densities can be determined (see Section 10.2.2.5, Determine<br />
Survival Potential). An alternative to dealing with low survival potential of wild cuttings is to<br />
establish stooling beds (see Section 10.2.5, Nursery Cutting Production).<br />
Portion of Plant – Most cuttings are taken from stems and branches. However, the rooting<br />
potential for some species is greatest when cuttings are taken from roots (Table 10-13).<br />
Age of Material – The rooting potential changes with the age of the donor plant. Many species<br />
have greater rooting potential from new growth, while others perform better when materials<br />
are collected from older branches or stems. Species having a higher rooting potential in the<br />
older portions of the plant make excellent live stakes because the size of the material is often<br />
large enough to withstand being driven into the ground (Darris and Williams 2001).<br />
Condition of Material – Vegetative material from donor plants can be affected by insects<br />
and disease which can severely reduce rooting potential (see Section 10.2.5, Nursery Cutting<br />
Production, for more discussion).<br />
Preparation Techniques – Several practices can potentially enhance rooting potential. One<br />
method involves soaking dormant cuttings in water prior to planting. Schaff and others (2002)<br />
found that soaking black willow (Salix nigra) for up to 10 days in water doubled the survival<br />
rates of large diameter, dormant cuttings over unsoaked cuttings. Some revegetation specialists<br />
have reported an increase in rooting potential of cuttings collected outside the dormancy<br />
period by stripping leaves from stems, while others have found this ineffective (Steinfeld 2002).<br />
Soaking cuttings in hormones can increase rooting in some species (Shaw 2004), while it can<br />
be detrimental to others (Darris and Williams 2001). Testing rooting treatments on a small<br />
scale through rooting potential tests should be conducted prior to applying these methods<br />
on a larger scale.<br />
Determine Survival Potential<br />
Figure 10-55 | Designers<br />
should avoid harvesting<br />
actively growing material<br />
Collecting cuttings outside of plant<br />
dormancy as was done for the project<br />
shown in this photograph, can lead to<br />
extremely poor results. If this practice<br />
is considered, rooting potential tests<br />
should be performed first.<br />
Not all cuttings that initiate roots under ideal testing conditions will establish into plants<br />
when outplanted on a project site. The percentage of viable cuttings that root and survive<br />
one year after planting is called the survival potential. The survival potential is controlled by<br />
(1) climate, (2) soils, (3) planting methods, and (4) maintenance practices for each project. It<br />
can be determined though field testing conducted prior to installing cuttings, or estimated<br />
from previous field experience on similar sites using unrooted cuttings, rooted cuttings, or<br />
planted seedlings.<br />
Climate – Survival potential is strongly influenced by the water loss potential of the site (see<br />
Section 5.4, Water Loss). Sites with low moisture stress during root initiation (typically spring<br />
through early summer) will have high survival potentials. The longer cuttings can initiate and<br />
grow roots without being under moisture stress, the greater the potential for survival. Climates<br />
with high humidity during root initiation occur in riparian areas.<br />
Within a project area, survival potential often changes with aspect. Cuttings subjected to<br />
hot, dry conditions of south aspects typically will have a lower survival potential than north<br />
aspects. Survival potential also increases in areas that have occasional summer rainstorms<br />
that wet the soil profile.<br />
Soils – Survival potential is affected by soil water storage and accessibility (see Section 5.3,<br />
Available Water Storage and Accessibility). Soils with low water-holding capacity will have<br />
lower survival potentials than those with high water-holding capacity. Installation of cuttings<br />
on compacted soils will result in lower survival than loose or tilled soils. Areas that have high<br />
water tables during the growing season, such as slumps, seeps, and springs, will have higher<br />
survival potentials for riparian species.<br />
<strong>Roadside</strong> <strong>Revegetation</strong>: An Integrated Approach to Establishing Native Plants and Pollinator Habitat<br />
294
IMPLEMENTATION GUIDES<br />
Installation Methods – Compensations can be made for sites with poor soils or dry climates.<br />
One option is to install longer cuttings. Studies have shown that higher survival rates and<br />
greater vegetative growth can be achieved with longer cuttings (Rossi 1999). This is especially<br />
important on drier sites, since longer cuttings access deeper soil moisture. Cuttings up to 2 feet<br />
in length have been shown to produce better survival and growth on harsher sites (McElroy<br />
and Dawson 1986; Rossi 1999). In areas where freeze-thaw potential is high (see Section 5.6.2,<br />
Freeze-Thaw), shorter cuttings have a greater likelihood of being pushed out of the ground<br />
before they can form roots to anchor them in place. Survival rates are also affected by the<br />
quality of planting methods. For instance there can be a significant decrease in survival when<br />
cuttings are planted without good soil–to-stem contact and many large air pockets. Section<br />
10.3.3, Installing Cuttings, covers the different methods of installing cuttings.<br />
Plant Maintenance– Survival potential can also be increased if the plants are maintained during<br />
the first year after planting, including the control of competing vegetation and protection<br />
from animal browse (see Section 10.4, Post Installation Care of Plant Materials).<br />
Determine Cutting Needs<br />
Once the survival and rooting potentials have been determined, the quantity of cuttings to<br />
collect can be calculated. The information needed for determining cutting quantities and<br />
cutting spacing (density) is:<br />
◾◾<br />
Rooting potential<br />
◾◾<br />
Survival potential<br />
◾◾<br />
Target plant density<br />
◾◾<br />
Area to plant<br />
◾◾<br />
Desired established plant densities<br />
◾◾<br />
Length of cuttings<br />
An example of how to calculate cutting quantities<br />
and planting spacing is shown in Figure 10-56. In this<br />
example, the project objective is to stabilize the slope by<br />
installing willow stakes. In the short term, this practice<br />
will increase slope stability by physically “pinning”<br />
the surface soil. The primary benefit to slope stability,<br />
however, will develop over time as the roots of the establishing<br />
willows begin to tie the soil particles together<br />
and increase soil strength. The desired spacing between<br />
established plants is 6 ft. When inventories are taken<br />
one year after planting, they should find an established<br />
plant approximately every 6 feet (D), or approximately<br />
303 established plants for the entire planting site (E).<br />
To achieve the desired density of established plants, we must determine how many cuttings<br />
to plant and the average spacing between installed cuttings. This determination is based<br />
primarily on the rooting and survival potentials (see Section 10.2.2.4, Determine Rooting<br />
Potential, and Section 10.2.2.5, Determine Survival Potential). In this example, the rooting<br />
potential was 68 percent based on rooting potential tests. The survival factor was estimated<br />
to be around 35 percent from previous experiences on similar sites. These factors are used in<br />
the equation shown in Line F, to calculate the number of cuttings needed to install. To obtain<br />
303 established plants, it would be necessary to install approximately 1,271 cuttings. This is<br />
approximately four times the number of established plants. It is necessary to install this many<br />
to compensate for the number of cuttings that either do not root, or root and do not survive<br />
the summer. The planting spacing is calculated using the equation in Line I. Cuttings must be<br />
installed at half the distance of the desired established plant spacing. Since the site conditions<br />
A Area to plant: 0.25 acres Area that will be planted with cuttings<br />
B Rooting potential: 68 % Percent of cuttings that root under<br />
ideal rooting environment<br />
C Survival potential: 35 % Percent of cuttings that root which are<br />
established one year after planting<br />
D Target plant spacing (1st year): 6.0 feet Desired distance between established<br />
plants after one year<br />
E (43,560 / (D * D)) * A = 303 plants Desired number of established plants<br />
after one growing season<br />
F E * (100/B) * (100/C) = 1,271 cuttings Number of cuttings that need to<br />
be planted<br />
G Cutting Length: 2.5 feet Approximate length of cuttings<br />
H F * G = 3,178 feet Total footage of cuttings to collect for site<br />
I SQRT ((43,560 * A) / F) = 2.9 feet Distance that cuttings must be planted<br />
from each other<br />
Figure 10-56 | Determining the<br />
needed amount of cuttings<br />
This spreadsheet can be used to calculate<br />
the number of cuttings to collect<br />
and how close to plant them on the<br />
project site.<br />
<strong>Roadside</strong> <strong>Revegetation</strong>: An Integrated Approach to Establishing Native Plants and Pollinator Habitat<br />
295
IMPLEMENTATION GUIDES<br />
in this example are harsh, the cuttings will need to be planted deeply to access soil moisture.<br />
For this reason, the cutting lengths are approximately 2.5 ft. Multiplying 2.5 ft by the number<br />
of cuttings needed (F) gives the total length of cuttings that must be collected (H). Knowing<br />
that 3,178 ft of cuttings are needed, the number and location of cutting areas can be selected<br />
from a cutting area map, and a contract can be developed.<br />
Long-Term Storage<br />
If cuttings are not installed immediately, long-term storage will be required. Cuttings collected<br />
in the fall or winter and stored until the following spring or summer must be held in refrigerated<br />
units. The optimum temperatures for long-term storage range between 28 to 31 degrees F.<br />
Freezing temperatures prevent disease and curtail respiration, thereby increasing cutting<br />
viability. If freezing is not possible, then storing cuttings at temperatures between 33 and 35<br />
degrees F should maintain cutting viability for several months.<br />
For long-term storage, cuttings should be relatively free of leaves and other material that<br />
might mold in storage. They must be packaged in plastic or storage bags so they will not dry<br />
out. Cuttings should not be wrapped in moist burlap or placed in plastic bags, especially if<br />
cuttings are not frozen. Diseases could potentially develop that will rot the stems.<br />
Develop and Administer Contracts<br />
A good plan that includes the location of cutting sites and how the cuttings will be treated,<br />
transported, and stored will be the basis for the development of a collection contract. The<br />
contract must specify:<br />
Cutting Locations – A map or GPS locations must identify cutting areas and specify an estimated<br />
range of cutting quantities (see Section 10.2.2.3, Locate Cutting Areas). If the contractor<br />
elects to collect from other areas, then these areas must be approved prior to cutting. For<br />
each cutting area, the percentage of the donor population that can be collected should be<br />
specified. Typically this is no greater than 25 percent of the population.<br />
Dates of Collection – The contract must specify a period of time that cuttings must be collected<br />
(see Section 10.2.2.4, Determine Rooting Potential). Collecting outside this time period must be<br />
discussed in advance with the revegetation specialist.<br />
Collection Size, Lengths, and Quantities – Quantities<br />
must be specified for each size category. For example,<br />
if material is to be used for stakes, then a specification<br />
1) Identification Code:<br />
might require 200 stakes, 18 inches long, with a range<br />
of diameters between 1.0 inch to 3.0 inches.<br />
Collection Methods – The contract should identify<br />
how the contractor will collect the cuttings. For example,<br />
it should state how the contractor will identify<br />
which end of a stake is basal and which is terminal. This<br />
is typically done by cutting the basal end of each stake<br />
at an angle. The contract should also specify how the<br />
cuttings will be packaged or bundled. Contracts often<br />
call for all stakes to be aligned with basal ends of the<br />
cuttings in the same direction. Bundle sizes or weights must be specified. The bundles must<br />
be light enough to transport by one person (45 lb or less). The contract must also state that<br />
the bundles must be securely tied or bundled together for hand transportation.<br />
Source Identification – Each bundle must be identified with a Forest Reproductive Materials<br />
Identification Tag (Figure 10-57), which specifies the species, collection location, elevation,<br />
and date of collection.<br />
FOREST REPRODUCTIVE MATERIAL<br />
IDENTIFICATION TAG<br />
U.S.D.A. FOREST SERVICE<br />
/<br />
Species Forest BZ/Seed Zone Type Coll. Elev. Band Year Cert.<br />
2) Number of Trees 3) Ranger District 4) Elevation<br />
(Feet above sea level)<br />
4) Tree Numbers:<br />
6) Area of Collection<br />
T. R. S.<br />
7) Accession No. 8) Plant Association<br />
(TI Collections: affix bar code tag<br />
if available)<br />
9) Alpha Code<br />
10) Collection Date / /<br />
11) Signature<br />
(Person filling out tag)<br />
Figure 10-57 | As with seeds,<br />
collection information for<br />
cuttings is essential<br />
A forest reproductive material identification<br />
tag should be filled out and<br />
attached to each bundle of cutting<br />
material.<br />
<strong>Roadside</strong> <strong>Revegetation</strong>: An Integrated Approach to Establishing Native Plants and Pollinator Habitat<br />
296
IMPLEMENTATION GUIDES<br />
Special Treatments – Special measures such as soaking must be stated in the contract. If<br />
soaking is required, then the location of the soaking area must be identified on a map (see<br />
Section 10.2.2.4, Determine Rooting Potential).<br />
Temporary Storage and Transportation – The contractor must address how cuttings will<br />
be temporarily stored when the weather is warm or dry. Cuttings must not be allowed to dry<br />
out once they are collected. Temporarily storing in shaded areas covered by plastic sheets or<br />
wet burlap are acceptable methods. Delivery of cuttings must be done in a manner that does<br />
not allow the cuttings to dry. Closed transportation or covering with plastic for long distances<br />
should be considered.<br />
10.2.3 COLLECTING WILD PLANTS<br />
Introduction<br />
Wild seedlings, commonly referred to as wildlings, are indigenous plants growing in their<br />
native habitat (Therrell and others 2006). They are naturally reproduced outside of a nursery<br />
situation, but can be transplanted directly into a restoration site or into a nursery for culturing<br />
and future use.<br />
The collection and use of wildlings in native plant restoration can be a viable alternative to<br />
direct seeding, nursery seedlings, or rooted cuttings. As with wild cutting collections (see<br />
Section 10.2.2, Collecting Wild Cuttings), wildlings can be used in situations where it is difficult<br />
or impossible to collect or use seeds for plant production because (1) the plant either does not<br />
produce seeds or produces seeds very infrequently; (2) seeds are often unfilled or non-viable; (3)<br />
seeds have a very narrow collection window; (4) seeds have already dispersed prior to collection<br />
planning; and (5) insects or animals are a problem with collection (Priadjati and others 2001;<br />
St John and others 2003). Unlike cuttings, they can be available immediately with little to no<br />
transport costs, and no direct nursery costs, if used within the same time frame of collection.<br />
There are several advantages to using wildlings in restoration plantings. Large wildlings provide<br />
“vertical relief” (visual prominence) more quickly to a site than other methods, and, depending<br />
on the species and environment, will establish and spread quickly (Hoag 2003). Use of wildlings<br />
reduces the risk of introducing non-native organisms such as weeds and pathogens (Therrell<br />
and others 2006). If reproduction of the plant is more successful via rhizomes (e.g., sedges),<br />
transplanting wildlings may be the most efficient and effective method for reestablishing<br />
these species (Steed and DeWald 2003). In addition, if plant propagation is difficult from seeds<br />
or rooted cuttings, use of whole plants may be the only alternative for a particular species.<br />
Transplanting of wildling plants, however, can be unsuccessful for a number of reasons.<br />
Wildlings are often growing in stressful conditions, and do not recover from transplanting<br />
shock as quickly as cultivated seedlings. Wildlings often have smaller, coarser root systems than<br />
cultivated seedlings, or heavier taproots which are not easily removed from soil in their entirety<br />
(St John and others 2003). Successful transplanting requires experience, skill, proper handling,<br />
ideal temporary storage, and proper care of the plant both before and after transplanting.<br />
Develop Timeline<br />
Although wildling plants may provide an opportunity for quick establishment of larger plants<br />
on restoration sites, several factors must be considered in the planning process which could<br />
impact their availability. Suitable locations that can provide the number of plants required<br />
must be determined. If large quantities of plants are necessary, several years may be required<br />
to identify these locations. Once sites are identified, 1 or 2 seasons of plant preparation prior<br />
to removal, transport, and transplanting may be required (see Section 10.2.3.5, Collection<br />
and Handling).<br />
<strong>Roadside</strong> <strong>Revegetation</strong>: An Integrated Approach to Establishing Native Plants and Pollinator Habitat<br />
297
IMPLEMENTATION GUIDES<br />
Wildling plants may be removed from their native site and either transplanted immediately or<br />
transported to a nursery, potted, and cultured for future outplanting. Transplanting following<br />
removal may occur if the plant source is undisturbed areas outside the restoration site. If plants<br />
are removed prior to site disturbance, or if additional time is needed for production of sturdy<br />
plants, culturing in a nursery for some specified period of time may be necessary. Lead time<br />
of 1 to 2 years may be necessary for nursery-assisted wildlings, depending on the situation.<br />
This lead time may include contract procurement and administration for both collection and<br />
nursery culturing.<br />
Locate Wildling Collection Areas<br />
Potential sources for wildling plants can be identified through field surveys during the vegetative<br />
assessment phase (see Chapter 6). Sites should be located on maps and both plants and sites<br />
should be assessed for the following traits:<br />
Accessibility – Handling of wildling plants during removal and transport is a critical factor in<br />
ensuring survival. Roots may require protection if the rootball is not totally contained in soil;<br />
or plants may be heavy if the rootball is intact. Therefore, it is necessary that collection sites be<br />
accessible by roads. Since most collections will be taken in fall or early spring, it is also necessary<br />
to determine whether or not road conditions at these times of year will preclude collection.<br />
The best collection areas may not always be found within the project site, so large areas<br />
surrounding the project may need to be surveyed for plants. Costs will increase substantially<br />
if it is necessary to transport plants for long distances.<br />
Land Ownership – Permission to remove plants must always be obtained from either the private<br />
landowner or public land management agency. In addition, any required permits should be<br />
obtained from state or federal agencies to ensure compliance with regulations (Hoag 2003).<br />
Viability – If possible, areas of healthy forest or rangeland areas should be designated as<br />
collection sites (Priadjati and others 2001). Sites should contain healthy, vigorous, and adequately<br />
sized material with a minimum number of unhealthy plants (St John and others 2003). Stunted<br />
needles, off-color foliage, and poor annual growth are indications of stress plants that should<br />
not be collected. Plants should only be removed from sites that show good regeneration over<br />
the area (Hoag 2003). Determining the viability of the collection material and timing of use (see<br />
Section 10.2.3.4, Determine Transplanting Versus Nursery Culture) should be completed prior<br />
to selection of the collection site. It is important to transplant wildlings into similar growing<br />
environments. For instance plants growing under shade should be placed back into a shaded<br />
environment to achieve optimum viability.<br />
Genetics – One of the disadvantages or limitations of using wildlings, or any form of asexual<br />
propagation, in restoration is the potential to restrict the genetic diversity of the plant<br />
population. As adequate population sampling is important to maintain this diversity, it may<br />
be advisable to identify several sites over a large area from which to collect (St John 2003).<br />
Collecting many plants over a large area will help capture both inherited and environmental<br />
variation. However, sites must be chosen carefully so that they are reasonably similar.<br />
Prior to collection, it is necessary to determine whether species are monoecious (male and<br />
female reproductive structures on the same plant) or dioecious (male and female reproductive<br />
structures on different plants). If the species of interest is dioecious, both male and female<br />
plants will need to be collected in somewhat equal proportions. If one of the objectives for<br />
using dioecious species is to promote, restore, or increase species, then target plants must<br />
be located during a period when reproductive phenology is evident, which is typically spring<br />
through summer.<br />
<strong>Roadside</strong> <strong>Revegetation</strong>: An Integrated Approach to Establishing Native Plants and Pollinator Habitat<br />
298
IMPLEMENTATION GUIDES<br />
Determine Transplanting Versus Nursery Culture<br />
Although cost may be the biggest deciding factor in whether wildlings are collected for<br />
immediate transplant or growing in a nursery, other factors should enter into the decision in<br />
the restoration plan.<br />
Timing – Wildling plants should be transplanted into their new location as quickly as possible.<br />
If plants are to be collected from sites outside the disturbed area, these can potentially be<br />
removed and transplanted to the restoration site within the same time frame. However, if plant<br />
removal is part of a salvage operation, where plants are located within the area of disturbance,<br />
then plants could be transported to a nursery or similar growing situation. Plants should be<br />
transplanted into pots and maintained until the appropriate outplanting season.<br />
Species – Some plant species may be more successful than others for direct transplanting<br />
from one site to another. Plants that spread underground or with stolons will perform well,<br />
although dry, compacted sites will slow the rate of spread significantly (Therrell 2006). Species<br />
that recover quickly from root damage, such as willows (Salix spp.) and cottonwoods (Populus<br />
spp.), will also perform well when large plants are needed quickly. These types of plants may<br />
lend themselves easily to transplanting within the same time frame as removal.<br />
Plants with taproots, such as conifers and many shrubs, and plants with long, brittle horizontal<br />
roots, such as heather or vine maple, are difficult to transplant. Special care must be taken<br />
during removal to extract as much of the roots as possible. To ensure a higher success rate,<br />
further culturing in an optimal environment following removal may provide a healthier, more<br />
viable plant for outplanting.<br />
Size and Availability – If wildling plants of the target species are plentiful and appropriately<br />
sized on undisturbed sites, immediate transplant during the appropriate season is feasible.<br />
However, if available wildlings are smaller than desired, an additional 1 or 2 years of nursery<br />
culture may provide a better plant for colonization of the site.<br />
Certain plants have the ability to root by layering, such as pinemat manzanita (Arctostaphylos<br />
nevadensis). If entire plants are not plentiful, portions of individual plants can be removed<br />
and cultured in a nursery situation for outplanting the following year.<br />
Collection and Handling<br />
Date of Collection and Timing of Transplanting – The season during which collection and<br />
transplanting occur has been shown to dramatically affect the survival and growth of wildling<br />
plants (Yetka and Galatowitsch 1999). Plants allocate carbohydrates and nutrients during various<br />
phases of phenological development. Different levels of tolerance to transplanting stress<br />
during the year are the result of physiological needs shifting among shoot and root growth,<br />
flowering and seed production, and storage. In addition, seasonal variation in environmental<br />
factors, such as soil moisture and temperature, can affect planting establishment (Steed and<br />
DeWald 2003).<br />
Timing of collection will depend on whether the wildlings are to be transplanted in the same<br />
time frame or cultured in a nursery. If wildlings are to be transplanted into the restoration<br />
site following collection, the chances for survival will increase for most species if operations<br />
occur in winter to early spring. The seedlings are dormant during this period and can handle<br />
the stresses associated with transplanting. There is also less chance of damaging new roots<br />
that occur during the spring and fall. In addition, planting early extends the period for root<br />
growth prior to soil-drying in summer.<br />
Collection could occur in either fall or spring if wildlings are to be cultured in a nursery. However,<br />
if plants are collected in the fall, care must be taken to avoid excessive root damage, since plants<br />
will not be dormant. Due to the perishable nature of wildlings, the timing of collection must<br />
be coordinated with the nursery to assure that the facilities, supplies, equipment, and labor<br />
<strong>Roadside</strong> <strong>Revegetation</strong>: An Integrated Approach to Establishing Native Plants and Pollinator Habitat<br />
299
IMPLEMENTATION GUIDES<br />
A<br />
B<br />
Figure 10-58 | Salvaged wetland plants<br />
Wetland plants are often salvaged from areas<br />
that are planned for disturbance. Removing<br />
plants from wetland settings can be difficult<br />
due to wet soils and massive root systems<br />
of many species. The heavy weight of these<br />
plants makes transportation and handling difficult.<br />
Tubs (A) are used for hand-transporting<br />
to planting sites while pallets (B) have been<br />
used for large quantities.<br />
are available following harvest (Figure 10-58, St John 2003). Once collected, plants should be<br />
transplanted immediately into containers.<br />
Genetics – Collection of wildlings can consist of a single plant, a clump, or several pieces of a<br />
plant that have rooted through layering (NRCS 1997). A collection of individual plants should<br />
be large enough to assure adequate population sampling. A minimum of 50 plants within at<br />
least a range of 1 mile from the restoration site is recommended when possible.<br />
Source Identification – Every collection must be identified with a Forest Reproductive<br />
Materials Identification Tag, which specifies the species, collection location, elevation, and<br />
date of collection (see Figure 10-53 or Figure 10-57).<br />
Quality and Size – Only healthy, turgid, moderately vigorous, and adequately sized wildlings<br />
should be collected for either transplanting or nursery culturing. Unhealthy or stressed plants<br />
should be avoided.<br />
Although species dependent, successful transplanting typically increases as plant size<br />
decreases (St John 2003). Transplanting of large shrubs and trees is usually unsuccessful.<br />
Their root-to-shoot ratio is unbalanced, and these plants often do not recover from or survive<br />
transplanting shock. Transplanting of larger willows, sedges, or herbaceous material into<br />
riparian zones, however, may be appropriate depending on the vegetative competition and<br />
other establishment conditions (Hoag 2003; Steed and DeWald 2003).<br />
Handling, Transport, and Storage – Collection of wildling plants will be most successful<br />
if the soil is moist during plant removal. If precipitation has not occurred, irrigation prior to<br />
lifting would be desirable. Removal and transplanting should only occur in the mornings on<br />
cool, cloudy days, when the plant is fully turgid.<br />
A tile spade or similar flat-bladed shovel is the best tool for small to medium plant removal.<br />
Using the “dripline” of the plant as a guide, make shovel cuts with the blade as perpendicular<br />
A<br />
B<br />
Figure 10-59 | Included soil<br />
with salvaged plants<br />
Be sure to select small plants with a protective<br />
ball of soil around the roots (A). Do not attempt<br />
to transplant plants if the soil falls off the root<br />
system (B).<br />
<strong>Roadside</strong> <strong>Revegetation</strong>: An Integrated Approach to Establishing Native Plants and Pollinator Habitat<br />
300
IMPLEMENTATION GUIDES<br />
to the surface of the ground as possible, since maintaining an intact ball of soil around the<br />
roots is important (Figure 10-59, Figure 10-60). Root morphology should also be considered in<br />
this process. Roots growing in deep soils or arid soils will tend to grow down rather than out.<br />
Roots growing in shallow soils will tend to spread, requiring a much larger area of disturbance<br />
(Therrell 2006).<br />
The shovel, as well as hands, can be used to lift the root ball gently out of the hole while<br />
attempting to keep the root ball intact. Hand pruners can be used to cut away woody roots<br />
that do not come free with the shovel. The root ball can then be transferred to a suitable<br />
container (large bucket, pot, burlap, or plastic bag) for transport to the transplanting site<br />
(Therrell 2006). If wildlings are to be transported to a nursery, plants should be placed in<br />
plastic bags in coolers. Plastic bags should also contain moistened towels or similar material<br />
if roots are not covered with soil.<br />
A tree spade can be used if larger plants are to be excavated and transplanted (Figure 10-61).<br />
The factors important for using a tree spade are (1) the terrain is accessible to the tree spade<br />
equipment (slope gradients no greater than 20 percent), (2) soils are relatively free of cobble<br />
size rock fragment, and (3) soils are moist. In this operation, planting holes are created first, then<br />
plants are excavated, moved, and replanted. The size of the plant to be transplanted depends<br />
on the soil volume that can be removed by the tree spade. Typically plants up to 6 feet tall can<br />
be transplanted with success. Taller trees should be irrigated into the soil to improve survival.<br />
Using a backhoe has also been successful in transplanting large willow clumps (Hoag 2003).<br />
Wildlings should be transplanted into their new location as quickly as possible, with minimal<br />
to no storage time. All vegetative material must be kept cool and moist during the process. If<br />
wildlings are transported to a nursery, the plants should be kept in a cooler and transplanted<br />
into pots within 1 to 2 days of collection.<br />
Survival Potential<br />
As with rooted cuttings (see Section 10.2.2.5, Determine Survival Potential), not all wildlings<br />
will become established and thrive following transplanting. Survival is controlled by climate,<br />
soils, planting methods, and maintenance practices on the project.<br />
Climate – Water loss potential (see Section 5.4, Water Loss) is probably the main determining<br />
factor for survival on many sites in the western United States. Sites with low moisture stress<br />
during root initiation (spring through early summer), and sites that have the potential for<br />
longer root initiation periods, will have higher survival.<br />
Within a project area, aspect can also affect root initiation and survival. Transplanted wildlings<br />
subjected to hot, dry conditions on southern aspects have a lower potential for survival than<br />
those on cooler northern aspects.<br />
Figure 10-60 | Salvage as much<br />
of the root ball as possible<br />
Plants can be excavated from the soil<br />
using the drip line (dashed lines) as a<br />
guide.<br />
A<br />
B<br />
Figure 10-60 | Mechanical tree spade<br />
Mechanical tree spades (A) can extract large<br />
plants quickly. A planting hole must be excavated<br />
prior to transplanting (B) and this can be<br />
accomplished with a tree spade. Photo credit:<br />
Chris Jensen, USFS.<br />
<strong>Roadside</strong> <strong>Revegetation</strong>: An Integrated Approach to Establishing Native Plants and Pollinator Habitat<br />
301
IMPLEMENTATION GUIDES<br />
Soils – Survival of wildlings is affected by soil water storage and accessibility (see Section 5.3,<br />
Available Water Storage and Accessibility). Soils with low water-holding capacity or compacted<br />
soils will have lower survival than those with high water-holding capacity and greater porosity.<br />
Planting Methods – Good transplanting techniques will improve the survival rates of wildlings<br />
significantly (Figure 10-62). Planting methods are the same for wildlings and nursery-grown<br />
seedlings. Common mistakes include planting too shallow or too deep, planting too loosely,<br />
damaging roots by exposing them to air, or failing to place root systems properly (Therrell 2006).<br />
Ideally, transplanting should occur on a cool, cloudy day. Planting holes should not be allowed<br />
to stand empty for an extended period of time, as soil will dry rapidly. When possible, microsites<br />
should be used (rocks, logs, depressions, and so on) to provide protection from the sun or wind.<br />
Plant Maintenance – Survival potential can also be increased if the plants are maintained<br />
during the first year after planting. Practices including the control of competing vegetation<br />
and protection from animal browse. For large wildlings, irrigation during the summer will<br />
improve survival. Also large wildlings might need additional support depending on such site<br />
conditions as wind and snow.<br />
Develop and Administer Contracts<br />
A plan that includes the location of collection sites, and how the wildlings will be handled,<br />
transported, transplanted, and stored (for short periods of time) will be the basis for the<br />
development of a collection contract. The contract must specify:<br />
◾◾<br />
Collection Locations. A map or GPS locations must identify wildling collection areas and<br />
specify a range of quantities that can be expected. If the contractor elects to collect from<br />
other areas, then these areas must be approved prior to collection. For each collection<br />
area, it should be specified what percentage of the natural population can be collected.<br />
◾◾<br />
Dates of Collection. The contract must specify a period of time that the collections can<br />
be made (see Section 10.2.3.5, Collection and Handling). Collecting outside of this time<br />
period must be discussed in advance with the revegetation specialist.<br />
◾◾<br />
Collection Quality and Size. Minimum and maximum plant sizes should be specified<br />
in the contract. In addition, specifications for health and vigor should be included.<br />
◾◾<br />
Collection, Handling, and Storage Methods. The contract should identify how the<br />
collections will be made, how the wildlings will be handled and processed following<br />
removal, and how wildlings will be temporarily stored prior to transplant or transport<br />
to the nursery.<br />
Figure 10-62 | Transplant wildlings<br />
immediately after collection<br />
Transplant wildlings immediately following<br />
collection to minimize moisture<br />
stress.<br />
The contractor must address how plants will be temporarily stored when the weather is warm<br />
or dry. Wildlings must not be allow to dry out once they are collected. See Section 10.2.3.5,<br />
Collection and Handling, for proper handling and storage methods.<br />
10.2.4 NURSERY SEED PRODUCTION<br />
Introduction<br />
Most revegetation projects require large quantities of source-identified seed. The most<br />
common approach to obtaining such quantities is to issue seed increase contracts. In these<br />
contracts stands of grasses and forbs are established from source-identified seed (typically<br />
wild seed collections) and cultured specifically to produce seed (Figure 10-63). Usually the<br />
seeds are produced by the end of the first or second year of production.<br />
Considering the costs and amounts of seeds that can be obtained from wild seed collection,<br />
propagating grass and forb seed is very efficient. For example, mountain brome (Bromus<br />
carinatus) requires 8 pounds of wild seed to sow an acre of seed fields. At the end of the first<br />
Figure 10-63 | Commercially grown<br />
native seed growout fields<br />
A variety of species can be propagated<br />
for seed. In this photograph small<br />
seedlots of forbs are being propagated.<br />
The beds in the upper left are western<br />
buttercup (Ranunculus occidentalis);<br />
lower left is fragrant popcornflower<br />
(Plagiobothrys figuratus), and the bed<br />
on the right is elegant calicoflower<br />
(Downingia elegans).<br />
<strong>Roadside</strong> <strong>Revegetation</strong>: An Integrated Approach to Establishing Native Plants and Pollinator Habitat<br />
302
IMPLEMENTATION GUIDES<br />
year, the seed collected from the field will average 800 pounds, a hundred-fold<br />
increase. For most species grown in production beds for two years, the return<br />
is at least 50 pounds of seed produced for every pound of wild seed collected<br />
and sown. In some cases 100 pounds are collected per pound of wild seed sown.<br />
This section will outline the steps required for developing and administering<br />
seed increase contracts.<br />
Develop Timeline<br />
Seed production varies by species but typically it takes three years to obtain<br />
seed. This involves one year to obtain seed from wild collections, and at least<br />
two years for seed production (Figure 10-64). There are a series of steps or tasks<br />
that are required to obtain seed that will be discussed in detail in this section:<br />
Tasks<br />
Determine seed needs<br />
Obtain “starter” seed<br />
Develop & award contract<br />
Work with growers<br />
Store seed<br />
Develop sowing plan<br />
Seed Production<br />
Road Construction<br />
Sow<br />
◾◾<br />
Determine seed needs<br />
◾◾<br />
Obtain starter seed<br />
◾◾<br />
Develop and award contract<br />
◾◾<br />
Administer contract<br />
◾◾<br />
Store seed<br />
Early in the planning phase a rough approximation of the quantity of needed seed for each<br />
species must be determined. Seed quantities will be refined as planning progresses, but<br />
because of the amount of time that is takes for wild seed collection and seed production, it is<br />
important to make an estimate early in the planning stages. Developing and awarding wild<br />
seed collection contracts is the first task and this can take several months (see Section 10.2.4,<br />
Nursery Seed Production). To avoid missing the seed collection window, these contracts must<br />
be awarded by early spring, otherwise an additional year will be needed for wild seed collection.<br />
Seed production contracts should be awarded by mid-July for fall sowing and late January for<br />
spring sowing. It is important to prepare and award seed increase contracts well in advance of<br />
sowing to allow the contractor enough time to prepare and sow their fields. Specific sowing<br />
dates will differ for each seed producer because of differences in geographic location, climate,<br />
or experience. Some growers may want to certify the seed, so this may require additional<br />
preparation time as well. It is beneficial to contact the potential growers prior to award of<br />
contracts to find out when sowing and first harvests are expected. Once wild seed has been<br />
collected, cleaned, and tested, it is delivered to the seed producers.<br />
Seed increase contracts should cover a span of at least two years, to account for the possibility<br />
of a low first year harvest. Seed harvests take place during the summer and seed cleaning in<br />
the fall of each year. Once seed has been cleaned, the grower submits a sample from each<br />
seedlot to a seed laboratory for testing. Seed testing typically takes place in the fall and is<br />
completed in several months. Seed is placed into seed storage until it is needed. For many<br />
revegetation projects, the seed that is harvested in the summer is needed for immediate fall<br />
sowing. This can be accomplished if those seedlots are put on a “fast track” for seed cleaning<br />
and testing. The seed production contract should state those seedlots that need to be ready<br />
for early fall sowing.<br />
-3 -2<br />
-1 0 1<br />
Year<br />
Figure 10-64 | Plan early<br />
for seed production<br />
Up to three years should be allowed<br />
when obtaining nursery grown seed<br />
because of the time it takes to obtain<br />
wild collected seed and obtaining seed<br />
from seed producers.<br />
Determine Seed Needs<br />
Determining total seed quantities for a revegetation project must be done as soon in the<br />
planning process as is feasible since wild seed collection contracts and seed propagation<br />
contracts are based on these figures. At this point, only a rough approximation of seed needs<br />
is required.<br />
Calculating the needed quantities of seed is performed for every species that will be used on a<br />
revegetation project. Each species requires a set of data which must be estimated since specific<br />
<strong>Roadside</strong> <strong>Revegetation</strong>: An Integrated Approach to Establishing Native Plants and Pollinator Habitat<br />
303
IMPLEMENTATION GUIDES<br />
seed data is unavailable at this point in planning. The information that<br />
is needed includes an estimate of the following factors:<br />
◾◾<br />
Pure live seeds per pound<br />
◾◾<br />
Field survival<br />
◾◾<br />
Target seedling density<br />
◾◾<br />
Target species composition<br />
◾◾<br />
Area to seed<br />
Bulk<br />
Seed<br />
Purity<br />
Test<br />
Germination<br />
Test<br />
12 seeds 5% debris<br />
2 dead<br />
79% PLS<br />
95% Purity 83% Germination<br />
Pure Live<br />
Seed<br />
Pure Live Seeds Per Pound (PLS/lb) – The quality of seedlots can<br />
vary greatly. One method to assess seed quality is to calculate percent<br />
pure live seed (PLS). This value represents the percent of the gross seed<br />
weight composed of viable seeds. For example, if a seed producer<br />
did not clean the harvested seed of a seedlot very thoroughly, the<br />
PLS would be low because there would be a lot of additional weight<br />
associated with non-seed debris. Seedlots that were cleaned well, on the other hand, would<br />
have a higher PLS because the debris weight would have been removed. Seedlots that have<br />
higher germination rates also have higher PLS. These two factors, percent purity and percent<br />
germination, when multiplied together and divided by 100, give the PLS of a seedlot. The<br />
concept of PLS is illustrated in Figure 10-65. In this example, purity of a grass seedlot is 95<br />
percent and germination is 83 percent which results in a PLS of 79 percent.<br />
Another example of calculating PLS/lb is shown in Figure 10-66 for western pearly everlasting<br />
(Anaphalis margaritacea). For this seedlot the estimated purity is 60 percent which indicates<br />
that over half of the gross weight of seed is actually viable seed and the remaining part is either<br />
debris or non-viable seed. Multiplying this value by the percent of seeds per pound and by<br />
the percent of germination will yield the number of viable seeds per pound. In this example,<br />
the number of seeds in a pound of a western pearly everlasting seedlot is tested at 8,000,000.<br />
Multiplied by 60 percent purity and 85 percent germination gives a value of approximately<br />
4,080,000 PLS per pound of bulk seed. This value can be used in sowing calculations as shown<br />
in the example. Keep in mind that for each additional seedlot in a mix, similar calculations will<br />
have to be made. Estimates for purity, germination, and seeds per pound can be obtained<br />
from Table 10-14, seed inventories, or seed extractory managers.<br />
Figure 10-65 | Pure live seed<br />
Pure live seed (PLS) is the percent of the<br />
bulk seed weight that is composed of<br />
viable seed. In this example 95 percent<br />
of the bulk weight is composed of seed<br />
and of this seed 83 percent was found to<br />
germinate from seed tests. Multiplying<br />
percent purity by percent germination<br />
gives percent pure live seed.<br />
A Number of seeds/lb: 8,000,000 seeds/lb From Table 10.14 or other sources<br />
B Purity: 60 % From Table 10.14 or other sources<br />
C Germination: 85 % From Table 10.14 or other sources<br />
D A * B / 100 * C /100 = 4,080,000 PLS/lb Pure Live Seeds (PLS) per bulk pound of seed<br />
E Field survival: 3 %<br />
Estimate of the pure live seeds that become<br />
seedlings (as low as 3% for harsh sites and<br />
up to 25% for excellent sites)<br />
F 25 seedlings/ft 2 Target seedling density:<br />
foot — all species (10 to 30 for grasses<br />
Desired number of seedlings per square<br />
and forbs)<br />
G Target composition 10 % Percent of total plants composed of ANMA<br />
H (F / E) * G = 83 PLS/ft 2 PLS of ANMA to sow per ft 2<br />
Figure 10-66 | Determine<br />
amount of seed needed<br />
Determining the quantity of seed that will<br />
be needed for a revegetation project can<br />
be made by completing this spreadsheet for<br />
each species. The estimated pounds of seed<br />
determined for each species can be the basis<br />
for ordering seed through a seed increase<br />
contract. This example calculates the quantity<br />
of western pearly everlasting (Anaphalis margaritacea<br />
[ANMA]) seeds needed for a project.<br />
I 43,560 * H / D 0.9 lbs/acre Pounds of ANMA to sow on a per acre basis<br />
J Area to seed: 25 acres Total area for seed mix<br />
K I * J = 22 lbs Total ANMA needed<br />
<strong>Roadside</strong> <strong>Revegetation</strong>: An Integrated Approach to Establishing Native Plants and Pollinator Habitat<br />
304
IMPLEMENTATION GUIDES<br />
Table 10.14 | Seed increase reference table<br />
A seed increase reference Table showing the approximate maximum cleaned seed needed for a seed<br />
producer to produce a 1-acre production field. It also shows average first and second year yields and<br />
germination and purity standards for commonly produced species.<br />
Species<br />
Bluebunch Wheatgrass<br />
(Pseudoroegneria<br />
spicata)<br />
Blue Wildrye (Elymus<br />
glaucus)<br />
Bottlebrush Squirreltail<br />
(Elymus elymoides)<br />
California Oatgrass<br />
(Danthonia californica)<br />
Basin Wildrye (Leymus<br />
cinereus)<br />
Idaho Fescue (Festuca<br />
idahoensis)<br />
Indian Ricegrass (Oryzopsis<br />
hymenoides)<br />
Lemmon’s Needlegrass<br />
(Achnatherum<br />
lemmonii)<br />
Mountain Brome<br />
(Bromus carinatus)<br />
Needle and Thread<br />
(Hesperostipa comata)<br />
Pinegrass (Calamagrostis<br />
rubescens)<br />
Prairie Junegrass<br />
(Koeleria macrantha)<br />
Sandberg Bluegrass<br />
(Poa secunda)<br />
Slender Hairgrass (Deschampsia<br />
elongata)<br />
Thurber’s Needlegrass<br />
(Achnatherum<br />
thurberianum )<br />
Tufted Hairgrass (Deschampsia<br />
caespitosa)<br />
Western Needlegrass<br />
(Achnatherum<br />
occidentale)<br />
Common Yarrow<br />
(Achillea millefolium)<br />
Western Pearly<br />
Everlasting (Anaphalis<br />
margaritacea)<br />
Sowing Rates<br />
(lbs of clean seed to<br />
sow per acre)<br />
Average first year<br />
yields (lbs/ac)<br />
Average second year<br />
yields (lbs/ac)<br />
Average seeds per<br />
pound<br />
Average germination/<br />
purity of<br />
harvested seeds<br />
8 200 300 140,000 75/95<br />
6 450 200 110,000 65/96<br />
6 0 125 110,000 75/90<br />
8 25 250 125,000 75/90<br />
8 25 160 130,000 75/95<br />
4 50 400 450,000 75/90<br />
6 0 200 120,000 80/85<br />
8 150 750 150,000 50/95<br />
10 800 600 70,000 85/90<br />
6 0 150 100,000 50/95<br />
2 0 130 2,500,000 75/75<br />
2 150 500 2,315,000 80/97<br />
3 300 600 1,314,000 75/97<br />
3 600 350 2,000,000 80/95<br />
5 0 150 225,000 50/95<br />
2 110 510 2,500,000 75/90<br />
5 100 190 275,000 50/95<br />
2 165 165 3,000,000 85/98<br />
1 50 50 8,000,000 60/85<br />
<strong>Roadside</strong> <strong>Revegetation</strong>: An Integrated Approach to Establishing Native Plants and Pollinator Habitat<br />
305
IMPLEMENTATION GUIDES<br />
Field Survival – Field survival factors account for the viable seeds that, for one reason or<br />
another, do not grow into plants within the year after seeding. It accounts for viable seeds<br />
that did not germinate because of the harsh site conditions, or did germinate but could not<br />
survive the site. The field survival factor reflects the harshness of the site. For example, seeds<br />
that are sown under mulch on a moist, cool site will survive better than seeds sown on hot, dry<br />
sites without mulch, in which case the survival factor would be much lower. Only an estimate<br />
of field survival can be made at this time, based on general understanding of the site (see<br />
Section 10.3.1.5, Determine Sowing Rates, for more discussion on estimating survival). Choosing<br />
a survival factor between 3 percent (poor site conditions and poor seeding practices) and 25<br />
percent (good site conditions and practices) should be sufficient for this estimate. In Figure<br />
10-66, the field survival was set very low because of the harshness of the site.<br />
Target Seedling Density – The target first year density indicates the number of plants/square<br />
foot that is desired one year after sowing. This is the target number of seedlings, for all species<br />
sown, in a one square foot area. Seedling densities range from a target of less than one plant<br />
per square foot for shrub and tree species to 10 and 25 seedlings per square foot for grasses<br />
and forbs (see Section 10.3.1.5, Determine Sowing Rates).<br />
Target Species Composition – The target composition defines the percent of established<br />
plants that are made up of each sown species. For example, if three species are sown, the<br />
target composition of plants might be 50 percent species A, 35 percent species B and 15<br />
percent species C. The target species composition is developed from reviewing field surveys<br />
of disturbed and undisturbed reference sites. In the example shown in Figure 10-66, only 10<br />
percent of the composition of plants is targeted to be pearly everlasting.<br />
Area to Seed – This is the total area that is planned to be revegetated from seed based on<br />
the estimated acres presented in the preliminary road plans.<br />
In the example shown in Figure 10-66, the seed needs for pearly everlasting is calculated to be<br />
approximately 22 pounds for the entire 25 acre project. This might seem like a very low amount<br />
of seed for a project of this size, but it reflects the high live seeds per pound for this species.<br />
Obtain Starter Seed<br />
Once the seed needs for a project are determined then the next step is to obtain starter seed<br />
to supply to the seed producer. Seed furnished to the seed producer must be of high quality<br />
and tested for purity, germination (or TZ), seeds per pound, and noxious weed content (see<br />
Section 10.2.1.7, Clean and Test Seeds, for seed testing). Seedlots with high weed content will<br />
produce weedy fields. It is very expensive to weed non-target species out of seed production<br />
fields or clean non-target seeds from harvested seedlots, so it is important to give seed<br />
producers only the highest quality seed. It is worth the investment of sending all wild seed<br />
collections to a seed extractory to be cleaned prior to sending to the seed producer. Section<br />
10.2.1.3, Determine Wild Seed Needs for Seed Production, discusses how to determine how<br />
much wild seed to collect for starting seed production crops.<br />
There will be some projects where not enough wild seed is collected to establish a seed crop<br />
through seed sowing. In these cases, small collections of seed can still be used by first sowing<br />
seed in small plugs (1 to 2 cubic inch size) at a nursery, then transplanting the plugs into a seed<br />
production field at low densities (
IMPLEMENTATION GUIDES<br />
◾◾<br />
Minimum annual seed yields for each seedlot<br />
◾◾<br />
Minimum purity and germination rates<br />
Minimum annual seed yields and average germination and purity rates can be obtained from<br />
Table 10-14. The years that a seedlot will be in production will vary by species and lead-time<br />
(see Section 10.2.1.2, Develop Timeline, for further discussion).<br />
In addition, the seed production contract must address what is required or expected of the<br />
contractor in respect to the following criteria:<br />
◾◾<br />
Seed production experience<br />
◾◾<br />
Timelines<br />
◾◾<br />
History of production fields<br />
◾◾<br />
Location of other seed crops<br />
◾◾<br />
Irrigation system<br />
◾◾<br />
Culturing practices<br />
◾◾<br />
Control measures for non-target species<br />
◾◾<br />
Seed harvest methods<br />
◾◾<br />
Seed cleaning, packaging, and labeling<br />
◾◾<br />
Seed testing<br />
The response to these criteria becomes the basis for selection of contractors.<br />
Seed Production Experience – Seed production is a specialized form of agriculture requiring<br />
different growing strategies and equipment. While many seed producers have transitioned<br />
in seed production easily, it still requires several years of experience to understand how to<br />
efficiently grow native seed. Many seed producers who have moved into growing native seed<br />
have previous experience growing vegetable or commercial grass seed. These seed producers<br />
bring great experience and perspective to the native seed industry. Seed producers who have<br />
had little experience growing seed, often start small with “easier” species (i.e., work horse<br />
species) to gain experience. It is important to know the capability of each seed producer,<br />
and make frequent site visits. Those with a long history of good seed production can be<br />
contracted for species that are more difficult or have not been grown before. It is good to<br />
request production records, as well as seed tests, to include species, seed yields, seed quality,<br />
and clients served by the producer.<br />
Seed Production Timelines – Seed producers are located in many parts of the western United<br />
States, covering a range of climates affecting when seeds are sown and harvested. It is important<br />
to know the general growing schedule of each seed producer to determine when you will<br />
need to supply starter seed to the seed producer and when the first shipment of harvested<br />
seed can be expected. Seed producers from east of the Cascade Mountains might need starter<br />
seed in the middle of the summer for an August sow, while those west of the Cascades might<br />
not need it until early fall. Some seed producers wait until the spring to sow seed crops, in<br />
which case the seed harvest in the first year may be significantly reduced. Depending on the<br />
climate, seed harvests occur as early as May to as late as August. It is important to specify a<br />
date in the contract when seed will be delivered, especially if you plan on using the seed in<br />
the same year it is harvested.<br />
History of Production Fields – Every field will have some amount of residue seeds from<br />
previous crops which will germinate along with the starter seed. Knowing the history of<br />
the fields during the planning stages helps determine whether these non-crop plants pose<br />
a problem for the seed production. Noxious weeds or undesirable non-native species are<br />
obviously a real concern, but many of these species can be roughed out of the seed beds prior<br />
to harvesting. Of more concern are fields where the same native species, but from a different<br />
<strong>Roadside</strong> <strong>Revegetation</strong>: An Integrated Approach to Establishing Native Plants and Pollinator Habitat<br />
307
IMPLEMENTATION GUIDES<br />
seed source, were grown. For example, a field is being prepared for sowing California fescue<br />
(Festuca californica) from a seed source in the Blue Mountains of northeastern Oregon. The<br />
field had previously grown California fescue from a seedlot collected west of the Cascades.<br />
Since seed from the previous fescue crop would germinate in the same bed, the resulting<br />
crop would include both seedlots. Since the plants from these seedlots would appear almost<br />
identical, it would be impossible to weed out the plants that came from the previous crop.<br />
Even species in the same genera are difficult to distinguish by untrained weeders and cannot<br />
be weeded out of beds.<br />
Fields that previously produced seed from the same or similar appearing species should be<br />
evaluated for the risk of seed contamination from previous seed crops. There are measures<br />
seed producers can take to reduce contamination risks. These include growing non-seed crops<br />
for several years between seed crops, rotating between grass and forb seed production (forb<br />
seed is easy to discern from grass seed), and fumigating between seed crops. These strategies<br />
must be discussed with the seed producers.<br />
Location of Other Seedlots – Equally important to the history of seed production fields, is<br />
the location of adjacent seed crops of the same species. If seedlots of the same species are<br />
being grown close by, the risk of cross-pollination between crops increases and the genetic<br />
integrity of the proposed seed crop would potentially be compromised. There can even<br />
be cross- pollination between similar species. For example, blue wildrye (Elymus glaucus),<br />
bottlebrush squirreltail (Elymus elymoides), and bluebunch wheatgrass (Pseudoroegneria<br />
spicata) are known to cross-pollinate. Talk to a local botanist or geneticist about which species<br />
can potentially cross breed. Seed crops that can cross-pollinate should also be separated by a<br />
minimum isolation distance. Under most circumstances, the isolation distances should be in<br />
accordance with State Certification Standards (certified class). These standards can be found<br />
at the departments of agriculture for each state.<br />
Irrigation System – Many native species must be grown under irrigation to meet the quantities<br />
of seed specified in the contract. Seed producers that have minimal or no irrigation capacity<br />
are often unlikely to meet seed production requirements and time frames. Only those species<br />
that do not require irrigation should be offered to growers lacking irrigation systems.<br />
Culturing Practices – A review of the culturing practices, which include irrigation, fertilization,<br />
disease, and insect control, should be done to determine whether they are appropriate for the<br />
production of the species being grown. Culturing practices are often written up in propagation<br />
protocols that can be found at http://www.nativeplantnetwork.org.<br />
Control Measures for Non-Target Species – Specific attention must be given to how weeds<br />
and other non-crop species will be controlled. Typical measures include (1) the use of herbicides<br />
prior to sowing and after the crop has been established and (2) hand weeding of non-target<br />
species. The most important period of weed control is just prior to seed harvest because of<br />
the importance of eliminating potential non-target seed before seed harvest.<br />
Seed Harvest Methods – Most seed harvests are carried out with specialized equipment<br />
that detaches seed from the stock, separates it from plant and soil debris, and collects it into<br />
storage containers (Figure 10-67). It is important to know the seed harvesting equipment that<br />
will be used for each species and how it will be cleaned between seedlot crops to prevent the<br />
possibility of seed contamination.<br />
Species with indeterminate inflorescences (seeds that ripen on the seed stock all summer<br />
long) must be hand collected more than once in the summer. Periodic seed harvests of these<br />
species must be planned so that the full range of seed can be collected. The seed producer<br />
should address how these species will be harvested to obtain the maximum seed yield.<br />
Seed Cleaning, Packaging, and Labeling – After seed is harvested, it must be dried and<br />
further cleaned. Seeds are air dried (Figure 10-68) or placed in a forced air drying system. Seeds<br />
are then extracted and cleaned. Awns and flower parts are removed and dirt, stems, and other<br />
Figure 10-67 | Seed<br />
harvesting equipment<br />
Seed harvesting equipment varies by<br />
seed producers and species being harvested.<br />
Discuss with the seed producer<br />
how each species will be harvested and<br />
see that equipment is cleaned between<br />
seedlots.<br />
<strong>Roadside</strong> <strong>Revegetation</strong>: An Integrated Approach to Establishing Native Plants and Pollinator Habitat<br />
308
IMPLEMENTATION GUIDES<br />
debris are separated from the bulk seed. Understanding the cleaning operation is important<br />
because viable seeds can be damaged or discarded during this process.<br />
Dry cleaned seed should be packaged in “breathable” woven poly bags at uniform weights.<br />
Industry standards are 25 or 50 lb bags. Bags of seed must be clearly identified (labeled by<br />
stencil or permanent marking pens, with characters at least 1 inch in size) with the Government’s<br />
source seedlot identification. In addition, all bags should have an affixed tag stating the<br />
species name (scientific and common), seedlot identification, percent germination, percent<br />
purity (including other crop seed, weed seed, and noxious weeds), date of seed test, and seed<br />
producer’s name. Additional labeling information may be requested, such as project name,<br />
National Forest or BLM office, or seed owner name.<br />
Seed Testing and Acceptance – The contract must state the minimum acceptable standards<br />
for each species and seedlot. Acceptance and payment should be based on meeting the<br />
standards set for:<br />
◾◾<br />
Germination<br />
◾◾<br />
Purity<br />
◾◾<br />
Weeds<br />
◾◾<br />
Moisture content<br />
Figure 10-68 | Seed<br />
harvesting and drying<br />
Seed is harvested and dried prior to<br />
cleaning and storage. This photograph<br />
shows a recently harvested seedlot<br />
in drying trays prior to being set on a<br />
forced air drier. Seed ID tags are attached<br />
to the side of each seed drying bin.<br />
Seed testing is typically the responsibility of the contractor. Seed samples used for testing and<br />
contract performance must be taken by a certification agency representative or the contract<br />
inspector. Samples must be tested by a state certified seed laboratory (see Section 10.2.1.7,<br />
Clean and Test Seeds). Seed test results must be identified by the seed source identification<br />
and task order number. Test results must be satisfactory to the Government before final<br />
acceptance of the seed is made.<br />
Establishing minimum germination and purity rates can be based on averages obtained from<br />
commonly produced species shown in Table 10-14 or through discussion with seed extractory<br />
managers. The contract should address what actions the contractor can take to increase<br />
either germination or purity, if these rates fall below the standards. Lower purity rates can be<br />
accepted if seed will be used in a hydroseeder (see Section 10.3.2, Hydroseeding). A TZ test may<br />
be made in lieu of a germination test for a seed viability test depending on time constraints<br />
and species involved. All-State Noxious Weed examinations are required and if any of these<br />
species are present, then the seedlot is either rejected or recleaned. Seed moisture test must<br />
also be conducted and seed must not exceed 10 percent moisture.<br />
Administer Contract<br />
Seed producers are required to maintain adequate records to allow the Government to<br />
monitor contract progress. Records should include information and dates of field preparation,<br />
seed sowing, field treatments, fertilization, seed harvest, cleaning, storage, seed yields, and<br />
any other activity relating to seed production. It is a good practice to make contact either by<br />
phone or by visiting the seed producers two to three times a year to go over the progress of<br />
the contract. The best time of year for field visits is just prior to or during seed harvest. A visit<br />
or phone contact in fall is important to discuss the potential of keeping seedlots additional<br />
years. Unless it is stated in the contract, seedlots are likely to be plowed under once the seed<br />
orders have been met. Visiting in the late summer or fall is also a good time to observe the<br />
seed extraction and cleaning processes.<br />
During these visits, it is important to note the condition of the seedlots and how they are being<br />
identified throughout the process; are there clear labels stating the seedlot identification in<br />
the field, during drying, extraction, and storage? Are seed harvest and extraction equipment<br />
being thoroughly cleaned between seedlots or are there remnant seeds remaining in the<br />
equipment that can contaminate the next seedlot being processed? Note the condition of<br />
Figure 10-69 | Visit seed producers<br />
to assess crop quality<br />
It is important to visit seed producers<br />
to assess isolation distances, noxious<br />
weeds, culturing practices (e.g., irrigation,<br />
fertilization), and expected seed<br />
yields. The best period to visit is during<br />
seed ripening and seed harvest.<br />
<strong>Roadside</strong> <strong>Revegetation</strong>: An Integrated Approach to Establishing Native Plants and Pollinator Habitat<br />
309
IMPLEMENTATION GUIDES<br />
the fields prior to seed harvest; are the fields weedy and will there be a final<br />
weeding before harvest? Are seeds being handled with care or are they<br />
roughly handled?<br />
A good working relationship with the seed producer is essential in meeting<br />
the overall seed increase objectives (Figure 10-69). It should be realized that<br />
some factors, such as weather, are beyond the control of seed producers,<br />
and on some years seed harvests will fall short of the minimum amounts<br />
stated in the contract. Good communications with the seed producer will<br />
alert you to crop failures or fall down in orders as soon as they occur so that<br />
alternative measures can be taken. An inventory of the number of acres<br />
in each seedlot and the condition of the crop should be supplied by the<br />
contractor upon request.<br />
Store Seed<br />
Seeds can remain viable in storage for many years after harvest. How well seeds keep depends<br />
on the moisture content of the seed, the quality of the seed being stored, and the storage<br />
conditions (temperature and humidity). Riley (2006) found that there was minimal reduction<br />
of seed viability in granary storage after three years for mountain brome (Bromus marginatus)<br />
and Idaho fescue (Festuca idahoensis) (Figure 10-70). Seeds typically store poorly when seed<br />
quality is low or seed moisture content is above 10 percent. If seedlots are stored for more<br />
than a couple of years, it is important to periodically test the seed for germination.<br />
Granary Storage – Most seedlots are stored for short periods of time before they are used<br />
on projects (usually less than five years). For this reason, granary storage is the most common<br />
and economical form of seed storage. Granary storage unit are enclosed rooms sheltered from<br />
rainfall and temperature extremes. They are typically insulated and protected from rodent<br />
and insects. Many granary storage units are tree coolers that have been reconfigured for this<br />
use. While seedlots can store for long periods, low quality seed should be used first because<br />
it is more likely that this seed will loose viability in storage, than high quality seed.<br />
Freezer Storage – Freezer storage is usually reserved for seedlots that will be stored for many<br />
years. Conifer and shrub seeds as well as forb and grass wild seed collections are usually stored<br />
under these conditions, whereas bulk grass and forb seeds typically are not.<br />
% Viable Seeds (TZ Test)<br />
100<br />
80<br />
60<br />
40<br />
20<br />
0<br />
2002<br />
2005<br />
Mountain Brome<br />
2002 2005<br />
Idaho Fescue<br />
Figure 10-70 | Proper storage is<br />
essential to ensure seed viability<br />
Properly cleaned, packaged, and dried<br />
seed can remain viable for many years<br />
under accepTable granary storage<br />
conditions. Seed germination for two<br />
Umatilla National Forest seedlots did<br />
not significantly decrease in storage<br />
after three years as shown in this graph<br />
(Riley 2006).<br />
10.2.5 NURSERY CUTTING PRODUCTION<br />
Introduction<br />
Obtaining cutting materials in the wild for restoration and bioengineering applications can<br />
be difficult and expensive task, especially if populations of parent material are small or access<br />
is limited. Native plant nurseries can be an alternative source of a variety of woody cuttings.<br />
Understanding how nurseries establish and manage “stooling beds” can be a great help to<br />
revegetation specialists and project engineers.<br />
What are Stooling Beds?<br />
“Mother plants” are established in nurseries for the sole purpose of providing a ready source of<br />
cuttings. Stooling beds are hedge-like rows of mother plants that are established in bareroot<br />
nurseries or in vacant fields adjacent to container nurseries (Figure 10-71A).<br />
Stooling beds take advantage of the ability of many broadleaved woody plants to sprout<br />
profusely from the base after being cut off just above the root crown. Plants remain in the juvenile<br />
state, which means they have a higher tendency to sprout and produce roots. Once stooling<br />
beds are established, annual cutting ensures that juvenility can be prolonged indefinitely.<br />
<strong>Roadside</strong> <strong>Revegetation</strong>: An Integrated Approach to Establishing Native Plants and Pollinator Habitat<br />
310
IMPLEMENTATION GUIDES<br />
A<br />
B<br />
Figure 10-71 | Stooling beds<br />
produce cuttings<br />
Stooling beds (A) are an efficient way of<br />
ensuring that a ready supply of hardwood<br />
cuttings of the proper species and source are<br />
available (B).<br />
Stooling beds allow the efficient collection of dormant hardwood cuttings during the winter<br />
when it may be difficult or impossible to make field collections (Figure 10-71B). Because they<br />
are located at nurseries, the beds can be irrigated and cultured; processing and storing the<br />
cuttings is also much more efficient and cost-effective. Stooling beds have several advantages<br />
over wild collected cuttings.<br />
Maintaining Genetic and Sexual Diversity – It is much easier to correctly identify different<br />
plant species and ecotypes from labeled stooling beds as compared to wild collections. For<br />
example, willows often grow together along streams and can be difficult to identify during the<br />
winter dormant season. Stooling beds offer the ability to produce a large number of cuttings<br />
of unique species or ecotypes quickly and easily.<br />
Many government nurseries have established stooling beds of the species and ecotypes<br />
that are adapted to their local area and can thus be a potential source of cutting material for<br />
private growers or revegetation specialists. Private native plant nurseries are also establishing<br />
stooling beds of desirable species for their local areas, and several are specializing in riparian<br />
and wetland species. For specific revegetation projects, however, the odds of a nursery having<br />
existing stooling beds of the proper species and local ecotype are low. Therefore, collecting<br />
cuttings and establishing stooling beds should be done early in the planning process so a<br />
good supply of cuttings will be available when needed.<br />
Some plants, such as willows and cottonwoods, are either male or female, which can create<br />
a serious problem in restoration (Landis and others 2003). If a balanced mixture of male and<br />
female plants is not collected from the project site, the resultant stooling beds will not produce<br />
both male and female cuttings. When working with dioecious plants, the sexual identity of<br />
potential mother plants must be determined prior to collection (see Section 10.2.2, Collecting<br />
Wild Cuttings).<br />
Producing Healthy and Vigorous Cuttings – One of the most practical advantages of<br />
establishing stooling beds in nurseries is that the cuttings are often healthier and more<br />
vigorous than those collected from the project site. Willows are host to many insects and<br />
fungal pests, such as galls and cankers (Figure 10-72). They are also subject to animal browsing.<br />
These factors can significantly lower the quality of wild-collected cuttings. For example, on<br />
a riparian restoration project in Idaho, cuttings were collected from heavily browsed willows<br />
on the project site and then planted in nursery beds to produce rooted cuttings. The yield of<br />
shippable plants was low and these wild-collected cuttings rooted poorly (
IMPLEMENTATION GUIDES<br />
A<br />
B<br />
Figure 10-72 | Stoolings baeds are<br />
managed production facilities<br />
Stooling beds can be cultured to prevent<br />
the occurrence of insect galls (A) and fungus<br />
cankers, such as Cytospora spp (B).<br />
Reducing Costs – It might seem that collecting cuttings in the wild would be the least<br />
expensive means of obtaining cutting materials. This is not necessarily the case. Inefficiencies<br />
of driving to remote locations, pulling cutting materials to road ways, using make-shift cutting<br />
practices, and working under severe winter conditions all add up to high costs per cutting.<br />
Select Species Suitable for Stooling Beds<br />
Poplars, cottonwoods, and willows are the species most often used in stooling beds. It should<br />
not be assumed, however, that all species of the willow family are good candidates for stooling<br />
beds. Some species have growth characteristics that reduce their potential. For example,<br />
trials at the Colorado State Forest Service Nursery in Fort Collins have shown that narrowleaf<br />
cottonwood (Populus angustifolia) and narrowleaf willow (Salix exigua) do not “stool” well<br />
and must be propagated by other methods (Grubb 2007).<br />
There is great potential for using other woody species that have the propensity to sprout<br />
and form roots easily. For example, redosier dogwood (Cornus sericea) is commonly grown<br />
in stooling blocks and used as a source of cuttings for restoration sites. Outplanting success is<br />
higher than with wild cuttings collected on the project site, and has ranged from 50 percent to<br />
90 percent (Hoag 2007). In North Dakota, twinberry honeysuckle (Lonicera involucrata) is being<br />
investigated (Morgenson 2007). Native species that root easily from hardwood cuttings have<br />
the potential to be grown in stooling beds to generate cuttings. Species that have inherent<br />
deep seed dormancy characteristics, such as snowberry, honeysuckle, elderberry, and some<br />
species of currants, could be more easily propagated in the nursery using stooling beds than<br />
sowing seeds to produce seedlings. Species that have consistently low seed viability, such as<br />
mock orange and ninebark (Physocarpus spp.), may also be produced more economically in<br />
stooling beds.<br />
The Plant Materials Centers of the USDA Natural Resources Conservation Service identified<br />
the potential of a wide variety of woody native plants that would be suitable for stooling<br />
beds (Table 10-15). For example, Crowder and Darris (1999) discuss which plants are suitable<br />
in the Pacific Northwest and provide a wealth of information on the installation and culture<br />
of stooling beds.<br />
<strong>Roadside</strong> <strong>Revegetation</strong>: An Integrated Approach to Establishing Native Plants and Pollinator Habitat<br />
312
IMPLEMENTATION GUIDES<br />
Table 10.15 | Native woody plants of the Pacific Northwest with potential for propagation in stooling beds<br />
Plant Species<br />
Scientific Name<br />
Common Name<br />
Rooting Ability Growth Rate Establishment Success<br />
Baccharis pilularis Coyotebrush Fair to Good Moderate 3<br />
Cornus sericea Redosier dogwood Good Fast 3<br />
Oemleria cerasiformis Indian plum Poor to Good Moderate 1<br />
Physocarpus capitatus Pacific ninebark Good to Very Good Moderate to Fast 4<br />
Philadelphus lewisii Lewis’ mock orange Fair Moderate 1<br />
Populus trichocarpa Black cottonwood Fair to Very Good Very Fast 3<br />
Rosa woodsii Woods’ rose Poor to Fair Moderate to Fast 1<br />
Salix amygdaloides Peachleaf willow Excellent Very fast 5<br />
Salix exigua Narrowleaf willow Very Good Fast 4<br />
Salix lasiolepis Arroyo willow Excellent Very Fast 5<br />
Salix scouleriana Scouler’s willow Good to Very Good Very Fast 4<br />
Spiraea douglasii Rose spirea Very Good Fast 4<br />
Symphoricarpos albus Common snowberry Very Good Fast 4<br />
* = modified from Crowder and Darris (1999)<br />
Darris (2002) performed extensive greenhouse and field trials to test the potential of several<br />
woody plants for live stake applications. Common snowberry (Symphoricarpos albus), salmonberry<br />
(Rubus spectabilis), Pacific ninebark (Physocarpus capitatus), and twinberry honeysuckle<br />
(Lonicera involucrata) have proven to be effective as live stakes for soil bioengineering in the<br />
Pacific Northwest. Notably, several have proven to be superior to willow on some sites, such<br />
as salmonberry in wet, shaded environments and snowberry on drier, exposed locations.<br />
Select the Type of Cutting Material<br />
Several different types of cutting materials can be collected from stooling beds. Nurseries use<br />
small propagation cuttings to start their own bareroot or container plants. Stooling beds can<br />
also provide several types of unrooted cuttings used in restoration (Figure 10-73).<br />
Live Stakes – Live stakes are so named because, in addition to providing stability on restoration<br />
sites, they are expected to root and sprout after installation (see Section 10.3.3.2, Live Stakes).<br />
Because they are often pounded into the ground, live stakes are cut from relatively straight<br />
sections of second- or third-year wood. Live stakes are typically 18 to 24 inches in length and<br />
from 1 to 3 inches in diameter (Figure 10-73A). Depending on the plant species, it can take 2<br />
to 4 years for a stooling bed to produce large enough branches for live stakes. Some of the<br />
smaller willow species will never grow large enough.<br />
Branched Cuttings – Bioengineering practices, such as live fascines, vertical bundles, brush<br />
layers, and pole drains (see Section 10.3.3.3, Live Brush Layers and Section 10.3.3.4, Live<br />
Fascines) require a large number of branched hardwood cuttings (Hoag and Landis 2001). The<br />
size of this material ranges from 0.5 to 2 inches in stem diameter and 4 to 15 feet in length<br />
(Figure 10-73B). Stooling beds may take 2 or more years to produce significant numbers of<br />
harvestable branched cuttings.<br />
<strong>Roadside</strong> <strong>Revegetation</strong>: An Integrated Approach to Establishing Native Plants and Pollinator Habitat<br />
313
IMPLEMENTATION GUIDES<br />
Pole Cuttings – Pole cuttings (Figure 10-73C) are large diameter (3- to 6-inch)<br />
main stems that have all side branches with the top 1 to 2 feet of stem removed.<br />
They are used in restoration projects where stability is a main concern. Because<br />
of the large size of the plant material necessary for pole cuttings, nursery<br />
stooling beds are ideal. Larger trees, such as cottonwoods and tree-sized<br />
willows (e.g., Goodding’s willow [Salix goodding]), have primarily been used<br />
for pole cuttings. Other large woody plants with the potential to sprout may<br />
also prove to be viable material (Dreesen and Harrington 1997).<br />
A – Live Stake<br />
1 to 3 inches<br />
B – Branched Cutting<br />
0.5 to 2 inches<br />
4 to 15 feet<br />
C – Pole Cutting<br />
3 to 6 inches<br />
Develop Timeline<br />
Obtaining cutting materials from established stooling beds takes between<br />
1 and 5 years, depending on the type of material. A minimum of one year is<br />
necessary to produce branched cuttings; 2 to 4 years to produce live stakes;<br />
and pole cutting may require over 4 years (Figure 10-74). In the planning<br />
stages of the revegetation project, the number, type, and species of cuttings<br />
needed for the project must be determined. Procedures for making these<br />
calculations are outlined in Section 10.2.2.6, Determine Cutting Needs.<br />
Nurseries or government facilities that specialize in stooling bed production<br />
must be contacted to see if they will establish stooling beds for your project.<br />
The managers of these facilities will inform you of costs and the time frame<br />
for meeting your orders. While there will be some cutting materials produced<br />
in the first year, full production of stooling beds does not happen until several<br />
years after installation.<br />
Most stooling beds are started from cuttings taken from the wild. The sources<br />
of starter material must be located in the field during the summer or fall prior<br />
to installation of the beds. The sexual identity of dioecious plants must be<br />
determined during the appropriate season prior to collection. Section 10.2.2.3,<br />
Locate Cutting Areas, gives an outline of the steps necessary to obtain starter material. The<br />
nursery managers will tell you the number of feet of starter material, the quality of the wild<br />
collections (age, size, condition), and packaging and shipping methods necessary to meet<br />
the order. Wild cuttings are collected when the leaves are off the plants. Depending on the<br />
climate of the site, collections can begin in mid to late fall and end from late winter to mid<br />
spring. Wild cuttings are usually sent immediately to the nursery where they are prepared for<br />
installing in stooling beds. Most stooling beds are started directly from cuttings that are stuck<br />
in the spring. Cuttings root quickly in the spring and, with irrigation and fertilization, grow into<br />
large plants by the end of the summer. The following winter, the beds are ready for harvest.<br />
Since stooling beds are relatively uniform, the material can be harvested and processed in a<br />
18 to 24 inches<br />
6 to 8 feet<br />
Figure 10-73 | Different<br />
cutting types serve unique<br />
purposes in revegetation<br />
Several types of hardwood cuttings<br />
can be obtained from stooling beds,<br />
including cuttings for propagation at<br />
the nursery or live stakes and branched<br />
cuttings for restoration projects. Note<br />
that larger plant materials require extra<br />
time to produce.<br />
Tasks<br />
Determine cutting needs<br />
Obtain “starter” material<br />
Develop & award contract<br />
Work with growers<br />
Store and install cuttings<br />
Cutting Production<br />
Road Construction<br />
Install Cuttings<br />
-3 -2 -1 0 1<br />
Year<br />
Figure 10-74 | Plan early to ensure<br />
cuttings are ready for a project<br />
Obtaining cutting materials from stooling beds can take up<br />
to four years, depending on the type of material requested.<br />
Branched cuttings can be obtained from stooling beds<br />
after the first growing season, while live stakes can take<br />
from 2 to 4 years. Pole cuttings can take even longer. The<br />
following is a timeline for producing branched cuttings and<br />
some smaller live stakes. Add several years for large stakes<br />
and some poles.<br />
<strong>Roadside</strong> <strong>Revegetation</strong>: An Integrated Approach to Establishing Native Plants and Pollinator Habitat<br />
314
IMPLEMENTATION GUIDES<br />
production-oriented manner. Cutting materials are cut to your specifications and stored in<br />
either freezer or cold storage facilities until you request delivery.<br />
Developing stooling beds is a long-term investment. While they often take several years to<br />
fully establish, stooling beds can remain productive for many years depending on species,<br />
ecotype, nursery cultural practices, and pest management. For cottonwoods, stooling beds<br />
typically remain productive for 4 to 8 years, after which vigor and productivity start to decline.<br />
However, other nurseries have maintained stooling beds of willow and cottonwood for 12 to<br />
15 years without decreases in vigor. Cytospora canker, caused by fungi of the genus Cytospora<br />
spp. (Figure 10-72B), is a particularly serious pest of all Salicaceae and, because it is transmitted<br />
and thrives in wounded stem tissue, can ruin a productive stooling bed. The productivity and<br />
longevity of a stooling bed is a direct function of the amount of care given them. Since stooling<br />
beds are an investment with long-term payoffs, finding local partners (watershed councils,<br />
Forest Service, BLM, state and county land managers), who can utilize these beds after the<br />
needs of your project have been met can be a service to the local community.<br />
10.2.6 NURSERY PLANT PRODUCTION<br />
Introduction<br />
Woody plants are critically important because they quickly provide vertical structure and<br />
aesthetic relief on roadside revegetation projects. When planted within areas seeded with<br />
grasses and forbs, trees and shrubs provide the essential matrix of a successful revegetation<br />
project. Direct seeding is rarely used to establish woody plants on restoration projects because<br />
they are often slow to germinate and take several years to become established. Depending on<br />
site characteristics, many sizes of nursery stock can be used, but large plants are favored by<br />
revegetation specialists because they establish quickly and dominate the site. Their physical<br />
size and deep roots allow them to quickly access deep soil moisture, and their expansive<br />
root systems help stabilize soils. In addition to providing wind protection and shade to lower<br />
growing vegetation, trees and large shrubs provide habitat for insects, birds, and other animals<br />
and can greatly accelerate the development of a sustainable plant community.<br />
Grasses and forbs establish quickly and easily from seeds, so they are not commonly grown<br />
in nurseries. However, nursery stock is warranted under certain circumstances:<br />
◾◾<br />
Sufficient quantities of grass and forb seeds are rare or hard to collect.<br />
◾◾<br />
Increasing grass and forb seeds by seed growers is difficult or excessively expensive.<br />
◾◾<br />
Establishing grasses and forbs is difficult on some sites.<br />
◾◾<br />
Restoring threatened or sensitive species is a high priority.<br />
◾◾<br />
Nursery stock is more effective in restoring wetlands.<br />
◾◾<br />
Installing nursery stock is the best and fastest way to achieve a desired plant composition.<br />
◾◾<br />
Aggressive weeds are a serious problem.<br />
This guide outlines the steps needed to obtain quality seedlings, transplants, or rooted cuttings<br />
from native plant nurseries. Typically, it takes one to two years to grow nursery plants, so the<br />
revegetation specialist must develop growing contracts and establish timelines several years<br />
in advance.<br />
Target Plant Approach<br />
The target plant concept (Figure 10-75) is one method to optimize the use of native plant<br />
materials to ensure successful revegetation of the site. The first two steps in the process were<br />
covered during planning (see Section 6.4, Next Steps). Consideration of the plant material that<br />
<strong>Roadside</strong> <strong>Revegetation</strong>: An Integrated Approach to Establishing Native Plants and Pollinator Habitat<br />
315
క<br />
క<br />
క<br />
IMPLEMENTATION GUIDES<br />
would best meet the project objectives for a given site may lead to the decision to use<br />
nursery stock. Nursery stocktype, genetic considerations, and site factors limiting to<br />
plant establishment must then be discussed prior to ordering nursery plant materials.<br />
These 3 topics will be covered in detail in the following sections. Outplanting windows<br />
and outplanting techniques will be discussed in Section 10.3.4, Installing Plants.<br />
Stocktype – The term “stocktype” refers to the various products that a native plant<br />
nursery can provide (Inset 10-17). In a broad sense, it includes seeds, which are discussed<br />
in Section 10.2.4, Nursery Seed Production. The oldest nursery stocktypes are bareroot<br />
seedlings and transplants. However, container plants are usually most suitable for<br />
roadside revegetation projects. Container nurseries are currently producing a wide<br />
variety of stocktypes that include seedlings, transplants, and rooted cuttings. Although<br />
project objectives and planting site characteristics should be primary considerations,<br />
the choice of container stocktype is more often defined by price. The price of container stock<br />
is based on the cost of materials and, more important, nursery production space and time.<br />
A unit area of greenhouse bench space or outdoor growing compound is a fixed cost, but<br />
the number of months or years to grow the plants to shippable size add to the stock price.<br />
Although selling prices for each container stocktype are set by tradition and market factors,<br />
older and larger plants will cost more.<br />
Genetic Considerations – Genetics are a key factor in the target plant concept (Figure 10-75),<br />
and two factors must be considered: local adaptation, and genetic and sexual diversity.<br />
“Seed source” is an idea familiar to all foresters and restoration specialists. Plants are adapted<br />
to local conditions. If native species can be propagated from seeds, these seeds should always<br />
be collected within the local “seed zone.” The seed zone is a three-dimensional geographic<br />
area that is relatively similar in climate and soil type.<br />
Seed source affects plant establishment through growth rate and cold tolerance. In general,<br />
plants grown from seeds collected from higher latitudes or elevations will grow slower but tend<br />
to be more cold hardy during the winter than those grown from seeds from lower elevations<br />
or more southern latitudes (St Clair and Johnson 2003). The majority of seed zone research<br />
has focused on conifers in the Pacific Northwest. The same concepts can apply to other native<br />
species. Nurseries sow and culture plants according to seed zones. It would therefore be<br />
prudent to use nursery seedlings or cuttings from the same geographic zone and elevation<br />
in which it will be outplanted.<br />
Target plants should also represent the genetic and sexual diversity present on the outplanting<br />
site. To maximize genetic diversity in the nursery plants, seeds and cuttings should be collected<br />
from as many different plants as possible. Cuttings must be collected near the outplanting site to<br />
assure they are properly adapted. Additional considerations are necessary for dioecious plants,<br />
such as Salix spp. and Populus spp., because all progeny produced by vegetative propagation<br />
will have the same sex as the source plant. Therefore, when collecting cuttings at the project<br />
site, care must be taken to ensure that male and female plants are equally represented.<br />
Of course, collecting costs must be kept within reason, so the number of seeds or cuttings<br />
collected must be a compromise. Guinon (1993) provides an excellent discussion of all factors<br />
in preserving biodiversity when collecting seeds or cuttings, and suggests a general guideline<br />
of 50 to 100 donor plants.<br />
Site Limiting Factors – The fourth aspect of the target plant concept (Figure 10-75) is based<br />
on the ecological “principle of limiting factors,” which states that any biological process will<br />
be limited by that factor present in the least amount. Each planting site must be evaluated to<br />
identify the environmental factors most limiting to plant survival and growth (see Chapter<br />
5) as this information is critical to deciding on the proper nursery stocktype. Large container<br />
trees with a deep root system typically survive better and establish faster, but woody shrubs<br />
and other plants in smaller containers can fill other needs.<br />
1. Objectives of Outplanting Project<br />
2. Type of Plant Material<br />
3. Genetic Considerations<br />
4. Limiting Factors on<br />
Outplanting Site<br />
5. Timing of Outplanting Window<br />
6. Outplanting Tools and Techniques<br />
Figure 10-75 | Target Plant<br />
Concept revisited<br />
Steps 2 through 4 of the Target Plant<br />
Concept are very useful when ordering<br />
nursery stock (adapted from Landis<br />
2009).<br />
Inset 10-17 | Native plant<br />
nurseries produce two<br />
main stocktypes<br />
Bareroot stock is grown in native soil<br />
in open fields and harvested without<br />
soil around the roots. Because of the<br />
added care needed and increased<br />
potential for transplant shock on<br />
highly disturbed sites, bareroot<br />
plants are not usually recommended<br />
for roadside revegetation.<br />
Container stock is grown in artificial<br />
growing media in a controlled environment,<br />
such as a greenhouse, and<br />
their root systems form cohesive<br />
plugs when harvested.<br />
Nursery-grown plants are grown as:<br />
Seedlings are plants started<br />
from seeds.<br />
Rooted cuttings are plants<br />
grown from vegetative cuttings.<br />
Transplants have been physically<br />
removed from the seedbed<br />
or container and replanted<br />
in a transplant bed or larger<br />
container for additional growth.<br />
<strong>Roadside</strong> <strong>Revegetation</strong>: An Integrated Approach to Establishing Native Plants and Pollinator Habitat<br />
316
IMPLEMENTATION GUIDES<br />
Restoration sites pose interesting challenges when evaluating limiting<br />
factors. Road construction or decommission typically creates compacted<br />
soils that have been severely altered in texture, stability, nutrient status,<br />
and so on from their natural state.<br />
Tasks<br />
Determine plant needs<br />
Plant Production<br />
Road Construction<br />
Plant<br />
In addition to challenging physical soil characteristics, the biological<br />
component of roadside planting sites has been severely altered or even<br />
destroyed. A variety of mitigating measures may be necessary prior to<br />
outplanting. Beneficial soil microorganisms, such as mycorrhizal fungi<br />
and nitrogen-fixing bacteria, provide their host plants with many benefits<br />
including better water and mineral nutrient uptake. Plants destined for<br />
these sites should be inoculated with the appropriate symbiont before<br />
outplanting (see Section 10.1.7, Beneficial Soil Microorganisms, for a<br />
complete discussion).<br />
Develop Timelines<br />
Obtain “starter” plant materials<br />
Develop and award contract<br />
Work with nursery<br />
Develop planting plan<br />
Store plants<br />
Transport plants to site<br />
Obtaining some nursery stocktypes can take a considerable amount of<br />
lead time and planning. Although most native plant nurseries carry a wide<br />
variety of species, it is unlikely they would have plants that are genetically suitable for a specific<br />
project. Therefore, “source-identified” native plants must usually be grown by contract. The<br />
large nursery stocktypes that will survive and grow on challenging restoration sites typically<br />
require several years (Figure 10-76). It is therefore necessary to develop contracts that will<br />
assure that the correct genetic material is being propagated and that the resulting plants<br />
are of the highest quality that will survive and grow when planted on the revegetation site.<br />
Project plant needs are determined early in the revegetation planning stages, including the<br />
number of plants, types of species, and size of plants. From the list of species, seed sources<br />
or “starter” plant material sources are located from suppliers or collected in the wild. This can<br />
typically take at least a year. Several years before the construction site is ready for planting, a<br />
contract for growing plants is developed and awarded. Once awarded, seeds and “starter” plant<br />
materials are sent to the nursery so that sowing, transplanting, or sticking can begin promptly.<br />
The growing time for large container stock can extend from 1 to 2 years, depending on the<br />
species. The nursery will take a final seedling inventory during the middle of the final growing<br />
season. At this time, a planting plan can be developed. Road construction will be moving into<br />
its final stage and the planting plan can be tailored to specific on-site conditions. Including<br />
lifting, storage, and transporting plant materials, the whole process, from start to finish, takes<br />
two to three years.<br />
-3 -2 -1 0 1<br />
Year<br />
Figure 10-76 | Engage nurseries<br />
early for plant materials<br />
Obtaining nursery-grown plants often<br />
requires two to three years of advance<br />
planning. This timeline can be shorted<br />
by up to a year if “starter” plant materials,<br />
like willow cuttings or seedlings for<br />
transplanting, are available. Certain<br />
woody plants require long seed treatments<br />
or grow slowly so timetables must<br />
be adjusted accordingly.<br />
Determine Plant Needs<br />
Early in the planning stages, a general idea of plant needs is developed based on the desired<br />
future condition for each revegetation unit. The information required to determine the<br />
quantities for each revegetation unit includes:<br />
◾◾<br />
Area to plant<br />
◾◾<br />
Plant spacing (density)<br />
◾◾<br />
Survival potential<br />
◾◾<br />
Species mix<br />
Using calculations similar to those presented in Figure 10-77, an estimate of the number of<br />
seedlings to order from nurseries can be determined. Calculations should be performed for<br />
each revegetation unit, since species mix, plant spacing, and survival will change considerably<br />
between units.<br />
<strong>Roadside</strong> <strong>Revegetation</strong>: An Integrated Approach to Establishing Native Plants and Pollinator Habitat<br />
317
IMPLEMENTATION GUIDES<br />
Planting Area – Summarize the acreage of all planting<br />
areas within each revegetation unit.<br />
Target Plant Spacing – The target plant spacing is the<br />
desired distance between established plants. The spacing<br />
or density of established plants is an estimate that should<br />
be based on the site productivity and project objectives. A<br />
review of the reference sites can be a guide to determining<br />
the densities and species mix a site will support. Be sure to<br />
note how the different plant species are naturally spaced<br />
on each reference site. Some grasses and forbs exhibit<br />
uniform spacing but many woody plants have a more<br />
random or clumped pattern.<br />
For example, an undisturbed reference site description<br />
shows that an average density for an established stand<br />
of trees is 500 trees/ac, with a species mix of 80 percent<br />
ponderosa pine and 20 percent quaking aspen (Density<br />
can be converted to plant spacing by taking the square<br />
root of 43,560 divided by plants per acre).The selection of species often determines the<br />
planting densities.<br />
Shrubs, for instance, grow at much closer spacing than trees, and this should be taken into<br />
consideration when species mixes are determined for a revegetation unit.<br />
<strong>Revegetation</strong> unit objectives often require higher plant densities than typically occur on<br />
reference sites. Quick visual screening as the overriding objective will require high-density<br />
planting. Selecting a higher plant density than typically occurs in the project area should be<br />
done with some projection of how the area will appear many years later. High-density planting<br />
can create overstocked stands of trees within ten or twenty years of planting (Figure 10-78).<br />
Overly dense stands often lead to stressed trees and high fire hazard conditions, and might<br />
require some thinning at a later in time.<br />
Survival Potential – The survival potential is an estimate of the percentage of planted seedlings<br />
that will survive and become established. There are many factors that determine how well<br />
nursery-grown plants will survive after outplanting. Factors that you can control include:<br />
◾◾<br />
Selection of appropriate species and seed source for the site<br />
◾◾<br />
Quality of nursery plants<br />
A Planting area: 0.75 acre Area that will be planted<br />
B Target plant spacing: 8 feet Desired distance between established plants<br />
C Avg. survival potential: 75 %<br />
Percent of seedlings that survive after one<br />
growing season<br />
D (A 510 plants<br />
Desired number of established plants after one<br />
* 43,560) / (B * B) =<br />
growing season<br />
E D * (100 / C) = 681 plants Number of nursery plants that need to be planted<br />
Species Mix<br />
F Ponderosa pine (PIPO) 50 % Percent of total established plants composed of PIPO<br />
G Quaking aspen (POTR5) 30 %<br />
H Serviceberry (AMAL2) 20 % Percent of total established plants composed of AMAL2<br />
I E * F / 100 = 340 plants Number of PIPO to order<br />
J E * G / 100 = 204 plants Number of POTR5 to order<br />
K E * H / 100 = 136 plants Number of AMAL2 to order<br />
Percent of total established plants composed of POTR5<br />
Figure 10-77 | Determining<br />
planting needs<br />
A spreadsheet can be used to determine<br />
how many plants must be ordered for<br />
each species. Each revegetation unit<br />
should have separate calculations, since<br />
the units will have different survival<br />
rates, species mixes, and plant spacing.<br />
A<br />
B<br />
Figure 10-78 | Determining plant spacing<br />
Determining plant spacing should be based<br />
on short- and long-term objectives. Where the<br />
short-term objective is quick visual screening<br />
and site stabilization, high density plantings of<br />
1,500 trees/ac (A) will produce the short-term<br />
desired outcome. These trees may need to<br />
be thinned to reduce competition to avoid<br />
creating an unhealthy stand of trees with a<br />
high fire risk. Reducing tree densities to 250<br />
trees per acre will produce a mature stand<br />
of trees similar to (B). Planting at these lower<br />
densities will reduce the need for thinning, but<br />
tree cover will take longer to dominate the site.<br />
<strong>Roadside</strong> <strong>Revegetation</strong>: An Integrated Approach to Establishing Native Plants and Pollinator Habitat<br />
318
IMPLEMENTATION GUIDES<br />
◾◾<br />
Appropriate storage and transportation conditions<br />
◾◾<br />
Care in stock handling and planting<br />
High rates of plant mortality are usually due to an oversight or neglect of one or more of these<br />
factors. Projects with high plant mortality are an indication of poor planning or implementation;<br />
in other words, you have missed the mark on one of these factors. However, aiming for 100<br />
percent survival is often unreasonable because of the high associated costs. Most projects<br />
should aim for a plant establishment rate of 85 percent to 90 percent, but plan for 75 percent.<br />
Species Mix – Good survival and establishment of plants fundamentally rests on selecting<br />
the most appropriate species from locally adapted seed sources. Selecting the species mix<br />
for each revegetation unit should be based on an evaluation of disturbed and undisturbed<br />
reference site descriptions, which includes an understanding of the site limiting factors that<br />
will affect plant survival.<br />
Select Stocktypes<br />
Plants are grown, or cultured, in a variety of ways – indoors or outdoors, in native soil or<br />
artificial media, for several months or up to several years. The nursery industry defines how<br />
a plant is grown and its size, or morphology, in groups called “stocktypes.” Although there is<br />
no standard terminology for describing the variety of possible stocktypes (Landis and others<br />
1993), individual stocktypes can be defined by:<br />
◾◾<br />
Propagation environment (bareroot or container)<br />
◾◾<br />
Years in the nursery<br />
◾◾<br />
Size or shape of the container for container stock<br />
Propagation Environment – Plants are grown either in containers<br />
(container) or in native soil in open fields (bareroot). Bareroot stocktypes<br />
are harvested and packaged without soil around the roots, whereas<br />
the root systems of container plants are held together in a plug of<br />
rooting media. In many cases, container seedlings can be planted<br />
at any time of the year if appropriate planting methods are used.<br />
Bareroot seedlings, on the other hand, are typically lifted in the winter<br />
months and held in storage for several months, limiting the planting<br />
window from early winter through later spring. Container plants can<br />
be grown in large pots for more than two years to very large sizes.<br />
Bareroot plants are limited to the depth of the growing beds, which<br />
is typically less than 12 inches. Depending on the species, bareroot<br />
plants can usually be held in beds for only 1 to 2 years. While container<br />
plants have many advantages over bareroots, bareroot seedlings are<br />
often much less expensive to purchase and plant. However, for most<br />
roadside revegetation sites, we recommend container stock.<br />
Container<br />
Sizes<br />
Cubic<br />
Inch Gallon<br />
10-20<br />
925 4<br />
Container Size – The size and age of a nursery-grown plant is controlled<br />
by the size of the container. Typically, the larger the container, the larger<br />
the plant and the longer it takes for roots to fill the container. In Figure<br />
10-79, plants are grouped into broad categories based on how fast they typically fill out various<br />
container sizes. Many deciduous tree species, which include willows, cottonwood, maples,<br />
alders, and ash, tend to be very fast growing species and can fill out a range of container sizes<br />
in just one growing season. Conifer species (firs, pines, cedars, and hemlocks) will fill smaller<br />
containers the first year and can be transplanted into larger containers for another one or two<br />
growing seasons. Faster-growing shrub species (ceanothus, bitterbrush, mountain mahogany)<br />
are often grown in small containers in the spring and transplanted into larger containers<br />
several months later. They will fill a 1/8 to 1/2 gallon in one growing season. Slower growing<br />
shrub species must remain in the smaller cells for a full growing season before transplanting.<br />
30<br />
60<br />
115<br />
230<br />
460<br />
1/8<br />
1/4<br />
1/2<br />
1<br />
2<br />
Evergreen Trees<br />
Deciduous Trees<br />
Years in Containers<br />
1 2 3<br />
Shrubs – fast growing<br />
Shrubs – slow growing<br />
Evergreen Trees<br />
Deciduous Trees<br />
Shrubs – fast growing<br />
Shrubs – slow growing<br />
Evergreen Trees<br />
Shrubs – slow growing<br />
Figure 10-79 | Carefully<br />
consider container size<br />
Native plants have differing growth<br />
habits and rates, so it is important<br />
to match container size with species<br />
growth characteristics. Shaded blocks<br />
represent recommended container sizes<br />
for each species type in years 1, 2, and 3.<br />
<strong>Roadside</strong> <strong>Revegetation</strong>: An Integrated Approach to Establishing Native Plants and Pollinator Habitat<br />
319
IMPLEMENTATION GUIDES<br />
Container Design – Container shape is also an important consideration in stocktype selection<br />
because it determines how easily the root plug is extracted from a container, the degree of root<br />
spiraling, what planting methods are used, and ease of handling. The depth and taper of the<br />
container walls govern how easily a root plug can be extracted from its container. Generally,<br />
the greater the taper, the easier a root plug can be extracted from its container. Taper becomes<br />
more critical as container walls become longer with respect to the diameter of the opening.<br />
Straight- walled “tall pots,” made from PVC pipe, are very long in comparison to the diameter<br />
of the opening. Root plugs from this container are difficult to extract without the placement<br />
of Vexar tubing inside the container. Pulling the Vexar tubing during extraction brings out<br />
the entire root plug without undue stress to the stem or root system. Other nurseries offer<br />
tall pots with the PVC pipe cut in half lengthwise and held together with electrical ties. Before<br />
planting, the ties are cut, which allows easy access to the root system.<br />
Several container design features affect root development and plant quality. When plant roots<br />
grow out and hit the sides of the container, they often grow downward in a spiral pattern.<br />
When roots reach the bottom holes, they should “air prune.” In poorly designed containers,<br />
the circling roots will eventually form a tight mesh which, after outplanting, can continue to<br />
circle and “strangle” the plant. Most containers have vertical ribs that guide roots down the<br />
sides of the container walls to prevent root spiraling. Some smaller containers feature copper<br />
coating on their walls to chemically prune the roots as they grow. Other container walls have<br />
vertical air slits which air prune the roots. When container roots are so cultured, the root system<br />
is more fibrous with more root tips.<br />
Root condition is a critical factor to discuss at the time that growing contracts are being<br />
developed. Roots that have excessive spiral growth must be pruned before they are planted.<br />
This is most easily done at the nursery during harvesting. This extra processing step must be<br />
stipulated in the growing contract.<br />
Matching Nursery Plants to Outplanting Site – A wide variety of nursery stocktypes are<br />
available (Figure 10-80). Site factors should be considered before placing an order. The depth<br />
and width of containers are very important for seedling survival and growth. Sites with low<br />
precipitation during spring, summer, and fall should be planted with larger container sizes.<br />
Where soil moisture-holding capacities are low or vegetative competition for soil moisture is<br />
high, long containers should be considered. Where rock content is high and it is hard to excavate<br />
a planting hole, shorter container stocktypes should be used. Additional post- planting care<br />
must be implemented to compensate for shorter roots (see Section 10.3.4, Installing Plants).<br />
The planting method dictates the size of the root plug. For instance, the expandable stinger<br />
and power augers require plug diameters no greater less than 4 inches. Large seedling stems<br />
and tops are required where animal damage is expected.<br />
Stocktype selection often determines seedling survival rates and how fast they grow in the first<br />
years after planting. Typically the larger the root system, the better the survival and growth.<br />
Larger stocktypes cost more, so it is important to target the stocktype to the needs of the<br />
site and revegetation objectives. For instance, if quick establishment of vegetation for visual<br />
screening is an important objective, then a large stocktype would be ordered. On the other<br />
hand, if a revegetation unit is relatively unseen and the site has few limitations to plant survival,<br />
a small, less expensive stocktype would be ordered. While larger stocktypes are generally<br />
more expensive than smaller stocktypes, the total costs of establishing seedlings should be<br />
considered before settling on a smaller plant. Costs for replanting a site where smaller seedlings<br />
died in the first year can be far more expensive than planting larger plants in the first place.<br />
Years in the Nursery – Bareroot stocktypes are often defined by the years they are grown at<br />
the nursery, whereas container plants are typically described by the size of the container. This<br />
is important when ordering plants because many species take longer than one year to grow<br />
to the desired plant size. If plants are needed for a project within one year, the revegetation<br />
specialist will need to order smaller size containers to assure that the roots can fill the plug.<br />
RL Supercell<br />
D16 Deepot<br />
Short One Treepot<br />
Tall One Treepot<br />
2 Gallon Treepot<br />
PVC Tallpot<br />
Ball-and-Burlap<br />
Figure 10-80 | Match stocktype to<br />
site conditions and planting method<br />
Nurseries can produce plants in all<br />
shapes and sizes. The best stocktype<br />
for your project will depend on site<br />
conditions and time and method of<br />
planting.<br />
<strong>Roadside</strong> <strong>Revegetation</strong>: An Integrated Approach to Establishing Native Plants and Pollinator Habitat<br />
320
IMPLEMENTATION GUIDES<br />
Unbalanced or Holdover Stock – A common mistake is growing container plants with tops<br />
larger than the root system can support. This is often the result of poor planning, delay of<br />
projects, or poor selection of stocktype. For example, road projects are frequently delayed for<br />
a year, leaving the revegetation specialist with the problem of what to do about the seedlings<br />
that are being grown. Typically under these circumstances the nursery manager is asked to<br />
hold the seedlings in the same containers an extra year. While most will comply, they will do<br />
it reluctantly. The result is plants that are “top heavy” – the shoots are too large for the root<br />
system to support (Figure 10-81A). The results are often deceiving. The plants have not shown<br />
stress because they have been pampered under greenhouse conditions and care. Yet, once<br />
seedlings are outplanted on a typical harsh site, it will be a struggle to grow enough roots<br />
to keep the tops healthy and alive. Plants respond to the lack of moisture in what is referred<br />
to as “transplant shock” (Figure 10-81B) by shutting down growth and often turning yellow<br />
or “chlorotic.” <strong>Roadside</strong>s are stressful sites that require the very best quality plant material. A<br />
good example of the difference between well-balanced and poorly-balanced nursery stock<br />
is shown in Figure 10-82.<br />
Delays are common in roadside projects, so two viable options can be considered: (1) transplant<br />
the stock into larger containers or (2) reject the plants and place a new order. Option<br />
one is appropriate if the plants are being grown in small containers and a larger container is<br />
available for transplanting. If you are growing plants in a large container, it makes little sense<br />
to transplant into a still larger one. This option is often more costly than option two, which<br />
is simply starting over with the order. But starting over assumes available seeds and other<br />
starter plant materials, and enough time to reorder. And what can be done with the plants<br />
that are not being used? You or the nursery manager can contact land managing agencies<br />
and landowners in the general geographic area to see if they are interested in these plants.<br />
A<br />
B<br />
Figure 10-81 | Well-balanced nursery stock<br />
The shoots of these pine seedlings have grown<br />
too large for the size of the root system which<br />
increases moisture stress after planting. In<br />
addition, the buds have broken dormancy,<br />
which means the plants will not tolerate rough<br />
handling (A). Poorly balanced or conditioned<br />
nursery stock will struggle to survive and grow<br />
after planting and exhibit signs of “transplant<br />
shock” (B).<br />
A<br />
B<br />
Figure 10-82 | Effects of transplant shock can last years<br />
The ponderosa pine seedling in the photograph (A) was grown for four or five years<br />
at a nursery and outplanted on a semi-arid site. The photograph was taken one<br />
year after outplanting and shows the seedling has undergone transplant shock<br />
due to the imbalance, or high shoot to root ratio, of the seedling when it was<br />
planted. The seedling was root-bound when it was planted. The tree responded<br />
by dropping most of its nursery needles and grew very little in height in the<br />
first year. Photograph B shows a ponderosa pine seedling that was grown in a<br />
one- gallon container for one year, then outplanted. Because this seedling had<br />
good balance and was not root-bound, it did not undergo transplant shock after<br />
it was outplanted. After two years, this seedling is well established. The brackets<br />
in both A and B show the current year leader growth.<br />
<strong>Roadside</strong> <strong>Revegetation</strong>: An Integrated Approach to Establishing Native Plants and Pollinator Habitat<br />
321
IMPLEMENTATION GUIDES<br />
If they are not, there are often watershed councils or environmental<br />
groups that would appreciate the donation for their projects.<br />
Obtain Seeds or Other Starter Plant Materials<br />
Nursery-grown plants begin from source-identified seeds or other<br />
“starter” plant materials (cuttings, smaller seedlings for transplants) that<br />
must be supplied at the beginning of the contract (Figure 10-83). Since<br />
starter plant materials can take a year or more to obtain, it is important<br />
that these needs are identified early in planning, and collection contracts<br />
are put into place as soon as possible. Locally adapted seeds of some<br />
trees can take years to obtain because some species do not produce<br />
a crop every year. The benefits and drawbacks of each type of starter<br />
plant material are discussed below.<br />
Type of Propagule<br />
Wild Seeds<br />
Field-Grown Seeds<br />
Wild Plants<br />
Nursery-Grown Plants<br />
Wild Cuttings<br />
Nursery-Grown Cuttings<br />
Nursery-Grown<br />
Plants<br />
Seeds – Starting plants from seeds is usually the least expensive<br />
method of plant propagation and offers the greatest genetic diversity. The downside is that,<br />
for most species, seed propagation is slower than growing from cuttings or transplants. Crop<br />
production times will vary with species and nursery practices. Most woody plants take two to<br />
three years to grow into large plants from seeds and must be transplanted at least once. Other<br />
faster-growing species can reach shippable size in one growing season with good culture.<br />
Seeds are either collected in the wild by seed collectors, or field-grown in an agricultural<br />
setting from tree and shrub seed orchards or from grass and forb seedbeds (see Section 10.2.4,<br />
Nursery Seed Production). Both wild-collected and field-grown seeds are sometimes available<br />
from federal seed extractories, federal nurseries, Forest Service district offices, or BLM resource<br />
areas. These agencies usually have tree seeds for most seed zones that cover federal lands, and<br />
often some selection of shrub, grass, and forb seeds are available. It is worth checking to see<br />
if these sources are available before you decide to collect seeds from the wild. Seed dealers<br />
do carry inventories, so be sure to inquire as to species and collection source. The single best<br />
resource for seeds or nursery stock is the Plant Materials Directory, which is published yearly<br />
as a special issue of the Native Plants Journal:<br />
Figure 10-83 | Nursery plants<br />
are grown from a variety<br />
of source materials<br />
Nursery grown plants are propagated<br />
from source-identified seeds or other<br />
starter plant materials. Usually, seeds<br />
or starter materials must be secured<br />
prior to the award of a plant production<br />
contract.<br />
THE UNIVERSITY OF WISCONSIN PRESS 1930 MONROE STREET, 3RD FLOOR<br />
MADISON, WI 53711-2059<br />
TEL: 608.263.1110<br />
WEBSITE: HTTP://WWW.NATIVEPLANTNETWORK.ORG<br />
Seeds obtained through federal facilities or seed dealers must report (1) seed source – location<br />
of collection or seed zone; (2) year of collection; (3) seeds per pound; (4) percent purity; (5)<br />
percent germination, or TZ tests, from recent testing facilities; and (6) amount of noxious<br />
weed or other non-crop seeds. If seeds are not available through either of these sources, wild<br />
seed collection will be necessary. This can be done under the direction of district or forest<br />
botanist or by contract.<br />
Once a plant production contract is awarded, nurseries will request information on each of<br />
the seedlots they will be sowing, including the latest purity and germination test results to<br />
determine the amount of pure live seeds. In addition, they will require the number of seeds<br />
per pound to calculate how many pounds of seeds from each seedlot will be needed to meet<br />
your order. They will also factor in the difficulty of growing each species, called the nursery<br />
factor, which will be different for each species, stocktype, and nursery. The nursery factor<br />
is a prediction of what percentage of seeds sown will become “shippable” seedlings, and<br />
considers losses during the growing season as well as those plants which are “culled” during<br />
harvesting. Nursery factors typically range from 30 percent to 50 percent, which means that<br />
they will need to sow 2 to 3 viable seeds for each plant they produce.<br />
<strong>Roadside</strong> <strong>Revegetation</strong>: An Integrated Approach to Establishing Native Plants and Pollinator Habitat<br />
322
IMPLEMENTATION GUIDES<br />
You can get a rough idea of how many seeds should be acquired by using the seed tests<br />
and a nursery factor of 30 percent. If the nursery requests significantly more seeds, then it is<br />
appropriate to inquire why more seeds are needed.<br />
Starter Plants – Most large container stocktypes are started by moving smaller plants into<br />
larger containers or into bareroot growing beds. This practice is called transplanting, and it<br />
produces quality plants with large, fibrous, healthy root systems and large stems. Starter plants<br />
are typically grown from seeds or cuttings into small plants and then transplanted. In some<br />
cases, wildlings can be salvaged from the construction site and brought back to the nursery<br />
for transplanting. When ordering large containers, it should be specified that there will be at<br />
least one, and sometimes two, transplanting operations. Growing starter plants large enough<br />
for transplanting usually takes a year. They are then transplanted, usually in the spring or fall,<br />
and grown for another year or two. If seedlings or rooted cuttings are available from other<br />
sources, these can be sent directly to the nursery for transplanting, which would decrease<br />
production time by a year.<br />
Rooted Cuttings – Rooted cuttings (Figure 10-84) can be shipped directly from the nursery<br />
for outplanting or serve as starter plant material for transplanting into larger containers. One<br />
big advantage of this stocktype is that cuttings can be collected each year, whereas seeds<br />
may be more difficult to procure. While cuttings of most species are derived from stems or<br />
branches, some species like, quaking aspen (Populus tremuloides) must be started from roots.<br />
Rooted cutting production is discussed in detail in Section 10.2.5, Nursery Cutting Production.<br />
Develop Growing Contract<br />
All nurseries experience weather extremes, insect or disease losses, equipment failures, and<br />
other production problems that can severely decrease the quantity and quality of the stock.<br />
Therefore, it is a good strategy to reduce these inherent risks by growing plants at more than<br />
one nursery. In doing this, you will begin to see the strengths and weaknesses of each nursery.<br />
Future ordering can use this information to decide where to grow each species.<br />
Nursery Selection – The western United States has an abundance of nurseries that grow native<br />
plants, but few will offer plants from source identified plant materials specific to your project.<br />
Obtaining genetically appropriate plants will require finding nurseries willing to grow seedlings<br />
from specified genetic material. A current list of native plant nurseries can be found in the<br />
Plant Materials Directory (see Section 10.2.6.6, Obtain Seeds or Other Starter Plant Materials).<br />
When considering a nursery for plant production, there are some basic factors to consider:<br />
◾◾<br />
Proximity. Is the nursery close enough to visit occasionally?<br />
◾◾<br />
Service. Is the staff easy to contact? Do they promptly return phone calls or e-mails?<br />
Are they friendly and helpful?<br />
◾◾<br />
Expertise. Are they knowledgeable in restoration and revegetation?<br />
◾◾<br />
Years in business. Has the nursery been in business for at least 3 years?<br />
◾◾<br />
Seedling quality. Is the overall seedling quality high?<br />
◾◾<br />
Seedling quantities. Are the orders regularly met or do they consistently run short?<br />
◾◾<br />
Price. Are prices competitive?<br />
◾◾<br />
Willingness. Will the nursery try new things?<br />
Figure 10-84 | Rooted cuttings<br />
Rooted cuttings are the quickest and<br />
easiest way to produce some woody<br />
plants, such as cottonwoods and willows.<br />
If there are doubts about one or more of these factors, you might consider growing at another<br />
nursery. Ultimately, the selection comes down to personal experience with nurseries and<br />
word- of-mouth from other revegetation specialists.<br />
Seedling Orders– A plant production contract must detail the information you have developed<br />
in previous sections of this chapter:<br />
<strong>Roadside</strong> <strong>Revegetation</strong>: An Integrated Approach to Establishing Native Plants and Pollinator Habitat<br />
323
IMPLEMENTATION GUIDES<br />
◾◾<br />
Species<br />
◾◾<br />
Genetic source<br />
◾◾<br />
Starter plant material<br />
◾◾<br />
Stocktype<br />
◾◾<br />
Net amount of plants<br />
◾◾<br />
Month and year for plant delivery<br />
◾◾<br />
Minimum seedling specifications<br />
◾◾<br />
How they will be processed and stored<br />
A few phone calls to nurseries will give you some idea which ones will grow the species,<br />
stocktype, and quantities necessary for your project. Nurseries can still be utilized if they can<br />
only meet a portion of the order. Other nurseries can produce the remainder because there<br />
is less risk by sending plant orders to several nurseries. Contracts can be developed once you<br />
have some idea of what portions of an order a nursery can produce.<br />
Plant Processing and Storage – Once seedlings have reached the target size and age at the<br />
nursery, they are harvested, stored, and processed for shipping. If the plants are bareroot<br />
seedlings, they are lifted from the soil, graded, and packaged. Container seedlings can be<br />
extracted from the containers, graded, and packaged, or sent to the planting site in containers<br />
and extracted immediately before planting. Either way, most stocktypes will be<br />
held at the nursery for one to six months, depending on when they are needed<br />
for planting. “Planting windows” are discussed in more detail in Section 10.3.4,<br />
Installing Plants.<br />
Storage times are longest for seedlings planted in the late winter and spring. For<br />
these orders, plants are extracted from their containers or lifted from the soil in<br />
the winter when they are least susceptible to the stress or damage associated<br />
with extraction, handling, and packaging. Plants in this condition are dormant.<br />
The onset of plant dormancy for deciduous plants is often around the time<br />
when plants have lost their leaves in late fall; the end of dormancy begins just<br />
before the buds begin to swell in the late winter to spring. The dormancy period<br />
for conifer species is not visibly discernible, but typically follows a similar time<br />
frame as deciduous species. Seedling dormancy in the western United States<br />
typically extends from December through February, but the dates will vary by<br />
nursery. If plants are to be extracted and held in cold storage for long periods, it<br />
is important to known when the nursery is extracting and handling the seedlings<br />
to be sure these operations are done when seedlings are dormant. Seedlings that<br />
are extracted or lifted outside the seedling dormancy period and stored for any<br />
length of time will survive and perform poorly.<br />
When plants are lifted from bareroot beds or extracted from containers, they<br />
are also being graded for size and appearance. Unless otherwise agreed, the size<br />
specifications stated in the contract will be the grading criteria (Figure 10-85). It is good to be<br />
at the nursery during lifting/ extraction and grading to see which seedlings are being thrown<br />
away and which seedlings are considered shippable. Bareroot and smaller container plants are<br />
graded and boxed for refrigerated or freezer storage. Storage containers will have important<br />
information about the plants, such as seedlot, date packed, client name, and the number of<br />
seedlings in the container. Plants are typically held in cooler storage (32 to 35 degrees F) from<br />
a few weeks to two months. If longer storage is required, freezer storage (28 to 31 degrees<br />
F) is recommended to maintain seedling quality and reduce the chance for storage molds.<br />
Terminal bud<br />
or swollen<br />
meristem<br />
Stem diameter<br />
at root collar<br />
(caliper)<br />
Shoot height<br />
Root plug volume<br />
and integrity<br />
Figure 10-85 | Seedling<br />
grading criteria<br />
Grading criteria for seedlings are based<br />
primarily on stem diameter, height,<br />
terminal bud, root volume, and integrity.<br />
<strong>Roadside</strong> <strong>Revegetation</strong>: An Integrated Approach to Establishing Native Plants and Pollinator Habitat<br />
324
IMPLEMENTATION GUIDES<br />
Inset 10-18 | Assessing poor quality nursery stock<br />
Poor quality planting stock can be caused by biotic (e.g., diseases,<br />
insects) or abiotic factors (e.g., imbalance of soil moisture, temperature,<br />
nutrients, and pesticides) in the nursery resulting in detrimental, and<br />
sometimes devastating, effects on seedling survival and growth when<br />
outplanted. Infection with various pathogens, or biotic causes, may<br />
not necessarily be manifested in a nursery, but may cause stunting<br />
or mortality once seedlings are under stress following outplanting.<br />
<strong>Revegetation</strong> specialists should be aware of the possible nursery<br />
diseases in order to either recognize or discuss with nursery personnel<br />
during visits to inspect their seedlings.<br />
Diseases caused by fungi, water molds, bacteria, and viruses can often<br />
be difficult to distinguish from damage caused by abiotic events or<br />
factors. If damage or chlorosis of seedlings is noted, it is recommended<br />
to check with the nursery manager to determine the history of the<br />
seedlings, what pathogens are traditionally a problem at the nursery,<br />
and what, if any, have occurred during the current growing season.<br />
Hamm and others (1990) and Landis and others (1990) provide more<br />
detailed information on nursery pests.<br />
Shoot and foliage diseases can be caused by a variety of organisms,<br />
with various levels of impact on seedlings. Fusarium hypocotyl rot<br />
(caused by Fusarium oxysporum) can cause large losses in the nursery<br />
from July through October. Gray mold (caused by Botrytis cinerea) can<br />
cause significant damage to densely grown bareroot and container<br />
seedlings, as well as nursery stock stored in less than optimal conditions<br />
(Hamm and others 1990). The mycelium and gray spore clusters are<br />
often easily visible to the naked eye. Botrytis can girdle infected<br />
seedlings, increasing mortality rates following outplanting. Minor<br />
shoot and foliage diseases, such as shoot blight (caused a number of<br />
organisms including Sirococcus spp., Phomopsis spp., and Phoma spp.)<br />
and needle-casts and other foliage diseases tend to deform or stunt<br />
seedlings, but do not result in significant mortality in the nursery or<br />
in an outplanting situation.<br />
Root diseases may be the most insidious of nursery seedling diseases.<br />
Since seedlings are cultured under optimum conditions for growth,<br />
symptoms are often masked throughout the growing season, manifested<br />
only during outplanting stress or drought stress in succeeding<br />
years. Most conifers, and many native species, are susceptible to root<br />
diseases and root rots caused by Phytophthora spp., Fusarium spp.,<br />
and Cylindrocarpon spp. These diseases will be manifested in the<br />
nursery in pockets of symptomatic seedlings or mortality, particularly<br />
in areas of poor drainage or previous infestation. Outplanting seedlings<br />
infected with these pathogens will result in reduced survival. In<br />
addition, transfer of these organisms to outplanting sites may result<br />
in infection of the planting area. This specifically is a problem with<br />
the root disease, Phytophthora lateralis. The spread of this disease<br />
from infected seedlings can devastate populations of established<br />
Port Orford cedar.<br />
Not all seedling quality problems are caused by biotic factors – many<br />
are one-time damaging events that occur during a short time span with<br />
a regular distribution throughout the field or greenhouse (Mallams<br />
2006). If foliage discoloration, foliage or stem wilting or die-back,<br />
seedling stunting, or mortality occur in large patches or over large areas<br />
in the nursery, the causes are often abiotic. Outplanting seedlings that<br />
have been stunted or damaged in the nursery can reduce seedling<br />
growth and survival, as well as increase the time required for site<br />
recovery. However, the symptoms of abiotic damage are often more<br />
apparent, and the consequences more easily predictable, than damage<br />
caused by pathogens.<br />
Although restoration personnel have little to do with nursery cultural<br />
practices and disease mitigation in the nursery, several options exist<br />
to prevent or control disease problems on restoration sites. Disease<br />
mitigating measures are similar to insect mitigating measures: (1)<br />
only plant healthy stock because weakened or stressed seedlings<br />
are more susceptible to diseases both in the nursery and on the<br />
outplanting site, (2) plant a variety of species to avoid outplanting<br />
failure due to infestation of any single disease, (3) create a healthy<br />
soil environment – seedlings grown on poor sites or on sites outside<br />
of the species environmental ranges will be placed under stress and<br />
more susceptible to disease infection.<br />
Large container stocktypes (typically those equivalent to a half gallon or larger) are stored and<br />
transported in the containers in which they are grown. They are typically stored in shadehouses<br />
or other sheltered storage. In cold climates, the roots should be insulated to protect against<br />
cold injury. During unseasonably warm periods during the late winter or early spring, large<br />
container stock should be monitored for drying and irrigated if necessary.<br />
Grading Specifications – There are no nursery-wide minimum nursery standards for the size<br />
and appearance of nursery grown plants because of the wide variety of ages, stocktypes, and<br />
growth patterns of native species. Nevertheless, you must establish some criteria for accepting<br />
or rejecting plants or you might be receiving marginal plants. Being present at the time of<br />
packing is the most effective way to negotiate grading standards with the nursery and assure<br />
that you receive quality plants.<br />
<strong>Roadside</strong> <strong>Revegetation</strong>: An Integrated Approach to Establishing Native Plants and Pollinator Habitat<br />
325
IMPLEMENTATION GUIDES<br />
Typical grading standards fall into the following categories (Figure 10-85):<br />
◾◾<br />
Stem diameter at root collar(“caliper”) – Stem caliper is the single most important<br />
morphological measure of nursery plant quality and has been consistently correlated<br />
with outplanting survival and growth. Diameter is not necessarily a good measurement<br />
for rooted cuttings since the size of the stem is dependent on the original diameter of<br />
the cutting. A typical grading specification for many bareroot and container stocktypes<br />
is a minimum diameter of 3.5 to 4.0 mm for one- year-old seedlings, and greater than<br />
4.0 mm for plants grown for two years. Discuss these specifications with the nursery,<br />
since not all species will grow to these sizes in this time frame.<br />
◾◾<br />
Shoot height – The height of the plant is measured from the root collar, or original<br />
ground line, to the top of the terminal bud. Some species do not form a terminal bud,<br />
so the swollen meristem tip or even the average top of the crown is used.<br />
◾◾<br />
Root system – The root system of the plant should be examined carefully. For bareroot<br />
stock, the roots should be well developed and fibrous and approximately the same area<br />
as the crown. For container stock, the root “plug” must be firm but not too root-bound.<br />
If the roots have spiraled and formed a tight mass at the bottom of the plugs, they<br />
should be trimmed during harvesting.<br />
◾◾<br />
Seedling Balance – Nursery stock should have a good ratio between the amount of<br />
foliage and the root system. This is traditionally expressed as a shoot-to-root ratio (S:R),<br />
and typically ranges from one or two part shoots to one part roots (an S:R from 1:1 to<br />
2:1). This grading standard is a qualitative determination to whether the root system is<br />
large enough to support the above- ground portion of the plant.<br />
◾◾<br />
General plant health – During grading, nursery stock should be inspected for physical<br />
injury or disease. Root disease is a particular hazard of container stock, and soft or moldy<br />
roots should be suspect (see inset 10-18). Scraping the roots with the blade of a knife<br />
should reveal white healthy tissue.<br />
Administer Contract<br />
The nursery manager should be required to maintain records on how the plants were cultured.<br />
The basic information should include: date plants were started; the type, rates, and timing<br />
of fertilizer applications; irrigation schedules; greenhouse settings (temperature, lighting,<br />
humidity); pesticide applications; and any significant problems that might have occurred<br />
with the seedlot. The nursery is also required to give an accounting, or inventory, of your<br />
plant orders by late summer.<br />
It is important to visit nurseries at least once a year, but more often is better. These visits will<br />
give you an indication of the quality of the stock you will be receiving and whether the number<br />
of seedlings you ordered is being met. It also helps strengthen the relationship between you<br />
and the nursery manager, which often leads to more attention being given to your orders.<br />
One of the best times to visit is during the initial plant establishment phase, which is during<br />
the late spring or early summer after seeds have germinated or seedlings and cuttings have<br />
been planted. If there are stock problems, they are most likely to be observed at this time. If<br />
for some reason there is a fall-down in the inventory or the seedlings look unhealthy at this<br />
time, you have an opportunity to discuss it with the nursery manager. If caught early enough,<br />
there can be time to start more plants. At the minimum, identifying problems early will give<br />
you time to adjust your planting plans as well as adjust other contracts that depend on the<br />
plant inventory.<br />
Another good time to visit is during the processing of plants for storage or shipment. Your<br />
presence at this time helps the nursery manager with questions that might arise about grading<br />
specifications, packaging materials, pruning, and other operations that occur at this time. It<br />
gives you a good picture of what type of stock you will be receiving when it is shipped to<br />
the planting areas. It is never an enjoyable experience to open up a box of seedlings, with<br />
<strong>Roadside</strong> <strong>Revegetation</strong>: An Integrated Approach to Establishing Native Plants and Pollinator Habitat<br />
326
IMPLEMENTATION GUIDES<br />
planters standing around, and be surprised to find that the seedlings are not at all what you<br />
were expecting.<br />
10.3 INSTALLING PLANT MATERIALS<br />
Once the project site has been prepared (see Section 10.1, Soil and Site Treatments) and<br />
the plant materials have been obtained (see Section 10.2, Obtaining Plant Materials), the<br />
vegetation can be installed on the project site. The following implementation guides cover<br />
the methods for installing seeds, cuttings, and plants. Section 10.3.1, Seeding, discusses the<br />
different methods of seeding, how to formulate seed mixes, determining seeding rates, and<br />
assuring quality. A specialized form of seeding, hydroseeding, is discussed in Section 10.3.2,<br />
Hydroseeding. Section 10.3.3, Installing Cuttings, outlines cutting installation techniques<br />
most commonly used in biotechnical engineering designs. Section 10.3.4, Installing Plants,<br />
discusses techniques for planting bareroot and container plants. It also discusses seedlings,<br />
plant handling, storage, and quality control measures.<br />
10.3.1 SEEDING<br />
Introduction<br />
Seeding is the distribution of seeds for the purpose of establishing seedlings at a desired<br />
density and species composition. Optimal seeding operations must take into consideration<br />
(1) how seeds are uniformly distributed over an area, (2) where seeds are placed vertically<br />
(that is, in, on, or under the soil surface), (3) species composition in the seed mix, and (4) when<br />
seeding takes place. These factors must be adapted to each revegetation unit to account for<br />
the unique climate, soils, and species requirements of each site.<br />
Seeding is often coupled with other operations, such as fertilization, soil amendment applications,<br />
and soil stabilization treatments. While accomplishing these objectives at the same<br />
time as seeding often makes practical sense from an economic and scheduling standpoint, it<br />
might not always be best for the short-term establishment of native vegetation. It is important<br />
to consider the effects of combining too many operations into the actual sowing operation. It<br />
may be necessary to plan some of these operations at different times. For example, fertilizing,<br />
which is often done during the seeding operation, might best meet objectives if applied<br />
separately from seeding (see Section 10.1.1, Fertilizers).<br />
This section will cover the different steps in developing a seeding plan: (1) identifying seeding<br />
areas, (2) determining seed application methods, (3) developing seed mixes, (4) determining<br />
sowing rates, (5) preparing seed mixes, (6) selecting sowing dates, and (7) applying seed and<br />
assuring quality.<br />
Identify Seeding Areas<br />
It is important to visit the project site as soon after road construction as possible and specifically<br />
identify seeding areas on the ground. If road construction is a multi-year project, finished slopes<br />
should be assessed for seeding while the remaining construction continues. While most of the<br />
seeding areas will conform to the revegetation units developed during planning, sites always<br />
look different after construction. A field review should note where topsoil has been placed,<br />
presence of surface rock, surface roughness, accessibility by equipment, microclimate, soil<br />
compaction and other site factors. These factors will be used to develop (1) seeding methods,<br />
(2) sowing dates, (3) seed mixes, and (4) seeding rates for each of the seeding areas.<br />
Seeding areas are located on a map and by road station. For each seeding area, acreage can<br />
be calculated using methods described in Figure 9.2 in Chapter 9. These calculations must<br />
consider the areas where seeding will actually take place. For instance, seeds should not be<br />
<strong>Roadside</strong> <strong>Revegetation</strong>: An Integrated Approach to Establishing Native Plants and Pollinator Habitat<br />
327
IMPLEMENTATION GUIDES<br />
applied in areas where herbicides will be used for maintenance. At the end of the field survey,<br />
total acreage for each seeding area will be summarized and this information will be used in<br />
developing seed mixes for each seeding area (see Section 10.3.1.6, Selecting the Appropriate<br />
Mulch Materials, and Section 10.3.1.7, Wood Fiber).<br />
Determine Seeding Methods<br />
There are a variety of methods for applying seeds available to the revegetation specialist.<br />
The challenge is matching these methods to the sites encountered in mountainous terrain.<br />
Typically, the site characteristics of each seeding area will dictate the type of seeding method<br />
used. For example, a road project has three revegetation units – a steep, north-facing slope;<br />
an obliterated road; and a rocky south slope. Hydroseeding could be planned for the steep,<br />
north- facing slope where other equipment cannot reach. On the obliterated road, several<br />
ground based seeding methods could be used, including mixing seeds into the soil, or<br />
broadcasting on the surface and covering with a mulch. The south-facing slopes could be<br />
hand-seeded or hydroseeded, then covered by a mulch to keep the seeds from drying out<br />
during germination. Each project needs to approach seeding with a strategy that is the most<br />
efficient and will provide optimal conditions for seed germination.<br />
Each species has a unique seed covering requirement. While seeds of most species must<br />
be buried in the soil or covered by mulch to germinate, some species actually require some<br />
exposure to light to germinate and must not be covered very deeply. A general rule for seed<br />
covering is to bury seeds at depths from twice (Munshower 1994) to three times (Monsen<br />
and Stevens 2004) the seed diameter. The deeper the seeds are covered, the less likely they<br />
will dry out during germination. The tradeoff, however, is that seedlings will have to expend<br />
more energy to emerge from deeply buried seeds. This can ultimately affect early seedling<br />
establishment.<br />
The ideal seedbed, as defined by Monsen and Stevens (2004), is “one in which the seed is<br />
firmly enclosed within soil particles to provide hydraulic conductivity of moisture to the seed.<br />
Seeds should be placed deep enough to prevent rapid drying but shallow enough to allow<br />
natural emergence.” Creating an ideal seed environment is an important practice, especially in<br />
nurseries, farms, or gardens where the objective is to create a uniform plant crop. All operations<br />
in these settings must be standardized and uniform (e.g., correct seed depth, optimum lighting,<br />
uniform irrigation, uniform seed densities, etc.). While uniformity and standardization can be<br />
applied to wildland revegetation, an alternative strategy might be considered. This strategy<br />
starts from the premise that we really cannot know much about the specific germination and<br />
early seedling growth requirements of different native species at each seeding site. For this<br />
reason, we should be creating a variety of environments, or “regeneration niches” (Grubb<br />
1977), where seeds might find the right conditions for germination (Figure 10-86). Further, we<br />
should apply a range of native species to fill these environments. With wildland revegetation,<br />
A<br />
B<br />
mulch<br />
Figure 10-86 | Seed mix on<br />
variable substrate<br />
When a seed mix, ranging from small to large<br />
seeds, is applied to an uneven surface (A) and<br />
covered by a long-fibered mulch (B), a range<br />
of germination environments are created.<br />
Optimum germination environments for large<br />
seeds occur in depressions where deeper<br />
seed cover occurs; optimum germination<br />
environments for small seeds, needing less<br />
cover, occur on the ridges where mulch is<br />
not as thick.<br />
large<br />
small<br />
medium<br />
<strong>Roadside</strong> <strong>Revegetation</strong>: An Integrated Approach to Establishing Native Plants and Pollinator Habitat<br />
328
IMPLEMENTATION GUIDES<br />
uniformity is not the objective. In fact, non-uniformity will most likely fit with the surrounding<br />
plant communities.<br />
Vertical seed placement, where seeds are vertically distributed in soil or mulch layers, can be<br />
grouped into the following categories:<br />
◾◾<br />
Broadcast onto the surface<br />
◾◾<br />
Pressed into the soil surface<br />
◾◾<br />
Mixed under the soil surface<br />
◾◾<br />
Drilled under the soil surface<br />
◾◾<br />
Covered with long-fiber mulch<br />
◾◾<br />
Mixed into long-fiber mulch<br />
◾◾<br />
Mixed into hydromulch<br />
Vertical seed placement methods will be discussed in the following sections in the context<br />
of how they affect germination and seedling establishment.<br />
Seeds Sown on the Soil Surface – One of the most common forms of seeding is broadcast<br />
seeding, which is casting seeds on the surface of the soil with a rotary spreader or by hand.<br />
Broadcast seeding is almost always the least expensive form of seeding. Rotary spreaders can<br />
be attached to most types of vehicles, including all-terrain vehicles and pickups, and used<br />
where vehicle accessibility is good. Where slope gradient or accessibility limits mechanical<br />
seeding, using a hand-held broadcast seeder is an option. While manual broadcast seeding<br />
might be considered a very low-tech method, it still has an important place in revegetation.<br />
Manual broadcast seeding offers the opportunity to spot-seed microsites at different seed<br />
rates and seed mixes. For example, two people could hand seed a steep cut slope requiring<br />
two different seed mixes – the lower portion of the slope sown with a grass and forb seed mix<br />
and the upper portion with a shrub and seed mix. In another instance, a fill slope composed<br />
of rocky outcrops interspersed among deep soils has two distinct microsites that could be<br />
seeded separately with different seed mixes. With knowledge of the road objectives, several<br />
hand seeders can apply seeds across a project area that mimics the vegetative patterns of<br />
the landscape. Spot-seeding can also be a method of applying valuable seeds or “unique”<br />
species to strategic locations. For instance, showy forbs that are expensive to obtain or require<br />
a specific habitat can be spot-seeded in those locations.<br />
The disadvantage of broadcast seeding is that seeds are not covered by soil or mulch (Figure<br />
10-87). Since seeds need intimate contact with the soil to germinate, broadcast seeding typically<br />
leads to low establishment of seedlings. If greater quantities of seeds are sown; however, some<br />
seeds will find microsites with high humidity (between surface gravels or rock) or will be covered<br />
by soil particles that have been moved through erosion processes. Estimates of 50 percent to<br />
75 percent more seeds must be sown to compensate for the inability of seeds to germinate<br />
or the loss of seeds to rodents (Monsen and Stevens 2004). Survival factors must be adjusted<br />
downward when calculating sowing rates for seed mixes (see Section 10.3.1.6, Prepare Seed<br />
Mixes). Broadcast seeding on roughened surfaces can potentially increase germination rates,<br />
especially if seeds are sown in the fall. The probability that seeds will be covered by sloughing<br />
soil over time is increased (Stevens and Monsen 2004), so it is important that the soil surface<br />
be left as rough as possible where broadcast seeding will be used.<br />
Seeds Pressed into the Soil Surface – Seed that is sown on the surface and pressed into the<br />
soil increases germination rates over broadcast sowing. Seeds are in firm, intimate contact<br />
with the soil, which increases available water to the seeds (Stevens and Van Epps 1984) (Figure<br />
10-88). Imprinting produces a variety of microsites which may benefit the germination of a mix<br />
of species (Stevens and Monsen 2004). This type of seeding is accomplished with imprinting<br />
equipment (see Section 10.1.2.4, Roughen Soil Surfaces). In this operation, seeds are dropped<br />
from a seeder mounted in front of the imprinter and then pressed into the soil. Imprinting works<br />
Figure 10-87 | Broadcast seeding<br />
Broadcast seeding leaves seeds exposed<br />
on the soil surface where they are not<br />
in contact with the soil.<br />
<strong>Roadside</strong> <strong>Revegetation</strong>: An Integrated Approach to Establishing Native Plants and Pollinator Habitat<br />
329
IMPLEMENTATION GUIDES<br />
well for small to medium sized seeds; seeds are in firm contact with the soil but not buried<br />
too deeply to affect seedling emergence. In some cases, imprinting small- and medium-sized<br />
seeds can result in germination as good as, or better, than drilling seed (Haferkamp and others<br />
1985). Larger seeds must be covered by soil or mulch for adequate germination. Imprinting<br />
seeds cannot occur on steep slope gradients or slopes with high rock content. Sites that are<br />
too steep for tractor access are too steep for current imprinting equipment.<br />
Seeds Mixed Under the Soil Surface – Mixing seeds into the surface of the soil is one of the best<br />
ways to achieve optimum germination (Figure 10-89). Mixing is done in two stages – seeds are<br />
applied on the soil surface by either broadcast seeders or by using a seedbox and drop tubes;<br />
seeds are then incorporated into the soil by dragging anchor chains, disk chains, cables, pipe<br />
harrows, or other implements behind a tractor. Equipment has been developed for wildland<br />
conditions that will seed and incorporate in one operation. The “ripper-seeder-harrow” (Figure<br />
10-90) is a specialized seeder that subsoils, broadcasts seeds, and mixes in one operation. Use<br />
of this equipment is limited to slope gradients of 3H:1V or less and non-rocky soil surfaces.<br />
When mixing seeds into the soil on steeper slopes, any method that scarifies the soil surface<br />
after seeds have been broadcast will mix the seeds into the surface (Figure 10-91). Using a<br />
hand rake to incorporate broadcast seeds into the surface works well, and can be used in areas<br />
where expensive or valuable seeds have been applied. This type of seed placement requires<br />
that the seed depth be monitored to assure that it is not buried too deeply. Seeds should not<br />
be mixed deeper than one inch.<br />
These application methods allow seeds to be mixed evenly through the soil and not concentrated<br />
in rows, as they are with drilling (see below). However, soil is left loose around the seeds,<br />
which decreases water-holding capacity. If seeds are sown in the fall and do not germinate<br />
until the following spring, natural packing of soil around the seeds will occur.<br />
Seeds Drilled Under the Soil Surface – Using a seed drill is another method for covering<br />
seeds with soil. Seeds are not actually drilled into the soil, as the name implies, but sown just<br />
under the surface in rows. Seed drills (1) open the surface of the soil with a disk or tine; (2)<br />
drop seeds from a seedbox, through tubes, into the open furrows; (3) close the furrows with<br />
a disk; and (4) pack the soil firmly around seeds with a press wheel. Cropland drills have been<br />
developed for the agricultural industry. However, this equipment has limited applicability on<br />
highly disturbed sites because rocky soils and uneven soil surfaces create difficulties in placing<br />
seeds at proper soil depths. Several drills have been developed for rangeland restoration that<br />
compensate for these limitations. The Rangeland and Truax® drills were specifically developed<br />
for seeding rocky, uneven surfaces. The Truax® drill was an improvement on the Rangeland<br />
drill, and includes three seed boxes that can independently distribute seeds at different depths<br />
corresponding to the size and shape of the seeds (Stevens and Monsen 2004).<br />
Figure 10-88 | Seeds<br />
pressed into soil surface<br />
Pressing seeds into the soil surface<br />
improves germination by increasing<br />
soil contact.<br />
Figure 10-89 | Seeds mixed<br />
under soil surface<br />
Seeds mixed under the soil surface puts<br />
them in direct contact with the soil,<br />
greatly improving germination.<br />
Figure 10-90 | Ripper-seeder-harrow equipment<br />
The “ripper-seeder-harrow” equipment was developed by the<br />
Umatilla National Forest. This equipment prepares the soil<br />
surface and mixes the seeds into the surface in one operation.<br />
Soils are loosened using subsoil tines, leaving a roughened<br />
soil surface (A). Seeds are metered from a seedbox through<br />
drop tubes onto the soil (B), where seeds are mixed into the<br />
soil using a chain harrow (C). Blueprints for this equipment<br />
can be obtained from the USDA Forest Service, Missoula<br />
Technology Development Center (MTDC).<br />
<strong>Roadside</strong> <strong>Revegetation</strong>: An Integrated Approach to Establishing Native Plants and Pollinator Habitat<br />
330
IMPLEMENTATION GUIDES<br />
Seed drills concentrate seed into rows (Figure 10-92), creating a greater potential for competition<br />
between emerging seeds within rows than if seeds were broadcast. For example, a seed mix<br />
with an aggressive species will emerge and dominate the row of seeds at the expensive of less<br />
aggressive species. The three seedboxes on the Truax® seed drill can be used to compensate<br />
for this potential problem. The less aggressive species are placed in separate seedboxes and<br />
sown in separate rows. If more than one seedbox is used, separate sowing rates must be<br />
calculated for each box. Typically, lower seed rates are used in drilling operations because the<br />
seeds are concentrated in rows and closer together. Where rodents are present, drilled seeds<br />
are more prone to being excavated by rodents that simply follow a row of seeds (Stevens and<br />
Monsen 2004).<br />
Seeds Covered With Long-Fibered Mulch – Optimum seed germination is obtained under<br />
long-fibered mulch. The mulch provides a moisture barrier that protects seeds and keeps soil<br />
from drying (Figure 10-93). Soil moisture is maintained longer around seeds than if they were<br />
strictly covered by soil. This is a two-stage operation in which seeds are broadcast on the soil<br />
surface and then covered by mulch. The thickness at which the mulch is applied depends on<br />
the seed size and the type of mulch. Small seeds will require less cover than large seeds. The<br />
rate at which mulch can be applied varies by the characteristics of each type of mulch. Wood<br />
strands and straw, for instance, can be applied at higher rates (thicker layers) than composts<br />
or chips because more light is able to penetrate these mulches, allowing seed germination<br />
and seedling establishment. See Section 10.1.3, Mulches, for further discussion of mulches.<br />
Sowing seed mixes that contain a variety of seed sizes will require that the mulch not be<br />
uniformly applied. One strategy is to begin with a roughened seedbed as shown in Figure<br />
10-86. Because the surface is not even, mulch will settle in depressions and be thicker than<br />
on the ridges. Monitoring the application rates is important to assure that seeds are covered<br />
with the proper mulch thickness. While covering seeds with long-fibered mulch is the most<br />
favorable method for optimum seed germination, it is also the most expensive.<br />
Seeds Mixed into Long-Fibered Mulch – Seeding and mulching are often combined into one<br />
operation (Figure 10-94). Most mulch blowers have seed metering systems which distribute<br />
seeds with the mulch as it is being applied to the soil surface. Seeds in this operation are<br />
distributed within the mulch, as opposed to being placed between the soil surface and mulch<br />
layer. Although one operation is more efficient, seed germination and seedling emergence<br />
rates are typically lower than when seeds are broadcast on the surface and covered with<br />
mulch. Seeds are not in contact with the soil when mulch and seed are mixed. Unless the<br />
mulch has a high water-holding capacity, moisture around the seeds will be limiting during<br />
germination and seedling emergence. It is important to know how much moisture a mulch<br />
can hold when deciding whether seeds will be mixed with the mulch or broadcast applied<br />
first then covered with mulch (see Section 5.2.2.1, Rainfall Interception – How to Assess, for<br />
determining moisture holding capacities of mulches). Composts, for instance, have high<br />
water-holding capacities, and seeds will germinate well in this material; ground or shredded<br />
wood mulch and wood strands have very little water-holding capacity and seed germination<br />
will be poor. Seed rates should increase relative to how much moisture the mulch is expected<br />
to hold. For low water-holding capacity mulches, seeds in the upper portions of the mulch will<br />
not germinate or will germinate poorly. Seed rates in this type of mulch should be increased<br />
by 25 percent to 50 percent.<br />
Seeds Applied in Hydromulch – When seeds are applied through a hydroseeder (see<br />
Section 10.3.2, Hydroseeding), they will lay on the soil surface surrounded by a thin covering<br />
of fine-textured wood fibers (Figure 10-95). At rates of 1,000 lb/ac hydromulch, seeds will be<br />
covered with less than 0.25 inch of mulch, with some seeds not covered. As rates approach 3,000<br />
lb/ac, mulch thickness increases to over 0.25 inch, with most seeds being covered. Hydromulch<br />
has a high water-holding capacity, maintaining up to two and a half times its dry weight in<br />
water. This can be beneficial to seeds during germination. However, unless very high rates of<br />
hydromulch are applied, many seeds in the slurry are not covered by the hydromulch. Some<br />
hydroseeding operations try to compensate for this by applying a slurry containing seeds first,<br />
Figure 10-91 | Seed sowing<br />
and mixing equipment<br />
Seed sowing and mixing equipment can<br />
be attached to most types of ground<br />
based equipment, including all-terrain<br />
vehicles. A seed spreader attached to the<br />
back of an all-terrain vehicle broadcasts<br />
seeds on the soil surface and a chain<br />
harrow mixes seeds into the soil.<br />
Figure 10-92 | Seeds drilled<br />
under soil surface<br />
Seed drills place seeds in rows under the<br />
surface where they are in direct contact<br />
with the soil.<br />
Figure 10-93 | Seeds covered<br />
with long-fibered mulch<br />
Covering broadcast seeds with longfibered<br />
mulch is very effective in conserving<br />
moisture around the seeds.<br />
<strong>Roadside</strong> <strong>Revegetation</strong>: An Integrated Approach to Establishing Native Plants and Pollinator Habitat<br />
331
IMPLEMENTATION GUIDES<br />
and covering the seeds with hydromulch with a second pass. The thin seed cover is favorable<br />
for only small seeded species. Seeds can be damaged in the hydroseeding operations through<br />
the pumps and agitators, or by hitting the ground at very high speeds during application.<br />
Even with these limitations, hydroseeding is still one of the most common methods of<br />
applying seeds to road construction disturbances. It is often the only way to place seeds on<br />
steep, rough terrain encountered in mountainous regions. Compensation for these limitations<br />
has had varying degrees of success. Possible variations include (1) increasing the amount of<br />
seeds, (2) applying seeds in the first pass, then covering with hydromulch in the second pass,<br />
and (3) applying higher rates of mulch. Fall hydroseeding also increases establishment rates.<br />
Over- wintered seeds are ready to germinate on the first warm days of late winter or early<br />
spring when humidity levels are high. In addition, hydraulic mulches are more likely to stay<br />
moist for longer periods of time. Hydroseeding is simpler than dry seeding because there is<br />
no seed metering system; seed mixes are simply mixed into the hydroseeder tank and applied.<br />
See Section 10.3.2, Hydroseeding, for more discussion on hydroseeding.<br />
Figure 10-94 | Seeds mixed<br />
into long-fibered mulch<br />
Seeds mixed into long- fibered mulch<br />
have less contact with soil, which can<br />
reduce germination.<br />
Formulate Seed Mixes<br />
The seed mix refers to the species composition being applied over a seeding area. It is<br />
important to avoid applying a single species to a site. Since highly disturbed sites typically are<br />
extremely variable in soil temperatures, fertility, soil moisture, solar radiation, and other site<br />
factors, it is important to apply a number of species in a seed mix to assure that all possible<br />
microsites are populated (Monsen and Stevens 2004). Microsites that are unfavorable to one<br />
species might be favorable to others. Applying a mix of species also assures that if there is a<br />
problem with the germination of one species, the other species will fill in. The composition<br />
of seed mixes and sowing rates should be based on the growth habits of each species and<br />
the soils and climate of the site.<br />
It is preferable to avoid mixing slow-growing species with fast growers, because the fast<br />
growers will out-compete the slow growers for space and resources (Monsen and Stevens<br />
2004). Separating slow growers from fast growers is not always possible. The seed quantities<br />
must therefore reflect higher ratios of slow growers to fast growers to achieve some degree of<br />
success. Shrubs and trees are typically less aggressive than grasses during the establishment<br />
phase, and should be applied in a separate mix or planted as seedlings. Grasses tend to be<br />
more aggressive than forbs. However, if the Truax® seed drill is used, they could be applied in<br />
the same area but in different rows using the separate seed boxes. Some species take several<br />
years to develop. A mixture of fast-growing annuals and slow-growing perennials will assure<br />
that there is cover the first year, yielding to more robust perennials in the succeeding years.<br />
Disturbed reference sites can be good indicators of species that are adapted to the climate and<br />
soils of the project area. Vegetative surveys conducted during the planning stages should show<br />
the proportions of species that can be expected, and these findings should become the basis<br />
for developing species composition and ratios of each species. Prior to determining sowing<br />
rates, the proportion of each species within each seed mix should be set. This information<br />
will be used to determine seeding rates for each species.<br />
Figure 10-95 | Seeds<br />
applied in hydromulch<br />
Applying seeds in a hydromulch places a<br />
portion of seeds on the soil surface and<br />
some suspended in the hydroseeding<br />
matrix above the surface.<br />
Determine Sowing Rates<br />
The sowing rate is the amount of seeds of each species in a seed mix that are applied in a<br />
given area. Sowing rates are calculated for each species that compose a seed mix. These<br />
calculations are performed twice – once during the development of seed increase contracts<br />
to obtain an approximate quantity of seeds to propagate for the entire project, and several<br />
months prior to actual seeding when seed inventories are known and exact seeding areas<br />
are located. The calculations made prior to seeding will be used to assemble the seed mixes<br />
for each seeding area.<br />
<strong>Roadside</strong> <strong>Revegetation</strong>: An Integrated Approach to Establishing Native Plants and Pollinator Habitat<br />
332
IMPLEMENTATION GUIDES<br />
Each species requires a set of data to calculate the<br />
total pounds of seeds needed in a seed mix which<br />
includes:<br />
◾◾<br />
Pure live seeds per pound of bulk seeds<br />
◾◾<br />
Estimated first year survival<br />
◾◾<br />
Target first year seedling density for all seeded<br />
species<br />
◾◾<br />
Percentage of density composed of each<br />
species<br />
◾◾<br />
Area that will be seeded with seed mix<br />
Figure 10-96 shows one method for calculating the<br />
amount of seeds needed of each species in a seed<br />
mix. Since a seed mix is made up of several species,<br />
calculations must be performed on each species. In<br />
this example, blue wildrye (Elymus glaucus) is one<br />
of several species included in a seed mix. The end<br />
result of these calculations is the number of pounds<br />
of blue wild rye seeds that must be added to each<br />
seed mix bag.<br />
A Number of seeds/lb: 128,000 seeds/lb From seed tests<br />
B Purity: 92 % From seed tests<br />
C Germination: 89 % From seed tests<br />
Pure Live Seeds Per Pound(PLS/lb) – When purity and germination are multiplied together<br />
and divided by 100, the resulting value is the percent PLS. It represents the percentage of<br />
the gross seed weight that is composed of viable seeds (see Figure 10-65). For example, if<br />
germination is 89 percent and purity is 92 percent, the PLS would be 82 percent. When PLS<br />
is multiplied by the number of seeds per pound, the result is the pure live seeds per pound<br />
of gross seeds (PLS/lb). This value is often used in seed and sowing calculations, and it states<br />
the approximate number of seeds that will germinate in a pound of gross seeds under ideal<br />
(test) environments. For example, the PLS in Figure 10-96 is 82 percent, and the number of<br />
seeds per pound is 128,000. The total PLS/lb is (82/100) * 128,000 = 104,806 (Line D in 10.96).<br />
Tests for purity, germination, and seeds per pound are run by State Certified Seed Testing<br />
Laboratories and obtained from the seed producer or supplier.<br />
First Year Survival – Not all viable seeds develop into established seedlings after being<br />
sown on a disturbed site. The conditions encountered on revegetation sites are generally<br />
unfavorable for germination and plant establishment. The first year survival factor reflects<br />
the effect of the harshness of the site on plant establishment (Line E of Figure 10-96). It is a<br />
prediction of the percentage of PLS that germinate and become established plants after the<br />
first growing season. A favorable site, for instance, will have a high survival factor because a<br />
high percentage of live seeds will germinate and establish into plants; a harsh site will have a<br />
low first year survival factor because seeds will germinate poorly, resulting in plants less likely<br />
to survive over the dry summer months. Unfortunately, there are currently no established field<br />
survival factors for the western United States. Therefore, the revegetation specialist will have<br />
to make estimates based on experience and an understanding of site factors, seed handling,<br />
and sowing methods.<br />
How much fall down actually occurs? Even under very controlled growing environments, such<br />
as those found in seedling nurseries, survival factors are much lower than most would think. It<br />
is not uncommon for bareroot seedling nurseries to set first year survival values between 65<br />
percent and 75 percent (USFS 1991). Compare the highly controlled environment of a nursery to<br />
seeding in the wild, where precipitation is intermittent and soils are depauperate. It should be<br />
no surprise to find that only 10 percent to 20 percent of the live seeds sown in the wild actually<br />
turn into live plants the first year after seeding (Monsen and Stevens 2004; Steinfeld 2005).<br />
D A * B / 100 * C / 100 = 104,806 PLS/lb Number of PLS per pound of bulk seed<br />
E First year survival: 20 %<br />
F<br />
Target 1st year<br />
seedling density:<br />
G Target composition: 35 %<br />
The estimate of PLS of ELGL that<br />
become seedlings<br />
20 seedlings/ft 2 Desired number of seedlings (per ft 2 )<br />
of all species in seed mix after 1 year<br />
Target percent of total 1st year plants<br />
composed of ELGL<br />
H (F / E) * G = 35 PLS/ft 2 PLS of ELGL to sow per ft 2<br />
I 43,560 * H / D = 14.5 pounds/acre Pounds of ELGL to sow on a per acre basis<br />
J Area to seed: 5.5 acres Total area for seed mix<br />
K I * J = 80 lbs Total ELGL needed for seed mix<br />
L<br />
Quantity of<br />
containers:<br />
4 bags/acre For handling<br />
M I / L = 3.6 pounds/bag<br />
Total weight ELGL to put into each<br />
seed mix bag<br />
Figure 10-96 | Seed mix<br />
sowing calculations<br />
Assembling a seed mix requires sowing<br />
calculations for each species in the mix.<br />
This figure shows one way to calculate<br />
the quantity of seeds for one species<br />
(e.g. Elymus glaucus [ELGL]) in a mix.<br />
These calculations must be made for<br />
each of the remaining species in the mix.<br />
<strong>Roadside</strong> <strong>Revegetation</strong>: An Integrated Approach to Establishing Native Plants and Pollinator Habitat<br />
333
IMPLEMENTATION GUIDES<br />
Table 10.16 |<br />
First year seedling survival is dependent on the quality of the germination environment. This<br />
Table is a guide to setting first-year survival rates based on factors that influence germination.<br />
High first-year survival rates might be closer to 20 percent: low survival is often less than 5 percent.<br />
Seed cover<br />
Estimated Field Survival<br />
Low<br />
High<br />
none mulch<br />
Spring rainfall low high<br />
Humidity low high<br />
Water-holding capacity low high<br />
Sowing method poor good<br />
Season sown fall spring<br />
Seed treatments poor good<br />
Freeze thaw high low<br />
Surface erosion high low<br />
Aspect south north<br />
Fertility low high<br />
Estimating the first year survival is always a guess. It is interesting that very exact data from seed<br />
tests are used for a portion of the sowing calculations, followed by a broad approximation of<br />
how well viable seeds will actually germinate and become established in the field. Unfortunately,<br />
this information is hard to obtain. Monitoring data collected in the spring and fall, after the<br />
completion of each seeding project, can be used to develop a basic understanding of how<br />
seeds perform in the field under various soils, climates, and mitigating treatments. First-year<br />
monitoring that measures seedling density is useful in this regard. The number of seedlings<br />
can be counted in a series of photoplots, and the average number of seedlings per square<br />
foot can be calculated. The average seedling density, divided by the average number of PLS<br />
sown per square foot (line H of Figure 10-96), gives the survival factor for that project area.<br />
Steinfeld (2005) performed this type of monitoring for several seeding projects six months<br />
after sowing on southwest Oregon sites and found the results to be very low (15 percent<br />
of viable seeds became established plants). If this type of assessment is conducted over a<br />
range of seeding projects, survival factors could be developed for a range of soil and climate<br />
conditions. It would be good to understand how survival factors change with different types<br />
of seed covering methods.<br />
Factors to consider when estimating survival factors are shown in Table 10-16. Chapter 5<br />
discussed how these factors affect plant growth. Sites with low first year survival would have<br />
a large number of limiting factors. Very poor sites can have survival factors below 5 percent,<br />
whereas favorable sites can have factors as high as 20 percent.<br />
Target First Year Seedling Density – The target first year density is the number of plants/ft2<br />
desired the first year after sowing (Line F of Figure 10-96). Establishing target density factors is<br />
often based on the objectives of the project. For example, projects where the objective is fast<br />
plant establishment for either erosion control or weed prevention would usually require the<br />
target first year densities to be relatively high. Target densities are also based on the growth<br />
habits of the species to be sown. Fast-growing species with large spreading growth habits<br />
<strong>Roadside</strong> <strong>Revegetation</strong>: An Integrated Approach to Establishing Native Plants and Pollinator Habitat<br />
334
IMPLEMENTATION GUIDES<br />
would have low target densities. Shrubs and trees would have target first year densities of<br />
less than 1 plant/ft2, whereas grasses might have densities up to 25 seedlings/ft2. Monitoring<br />
sites after one year can give a good indication of what densities can be expected from each<br />
species and what densities are most appropriate for meeting project objectives.<br />
It should be recognized that there is a point of diminishing returns, where applying more<br />
seeds does not necessarily produce more seedlings. There is a limit to how many seedlings<br />
can survive on a site, and no amount of seeds applied will change this fact. While applying<br />
excess seed errs on the conservative side, it can be wasteful and costly. It can also favor the<br />
aggressive species over the less aggressive species (Monsen and Stevens 2004). When using<br />
high seeding rates, it is important to reduce the ratio of aggressive species to non-aggressive<br />
species in order to assure that non-aggressive species can become established.<br />
Target Composition – The target composition is the proportion of each species that will<br />
comprise the seedlings found in a given area (Line G of Figure 10-96). An example of a target<br />
seed mix composition is one that would produce a stand of grass and forb seedlings made up<br />
of 35 percent blue wildrye (Elymus glaucus), 35 percent California fescue (Festuca californica),<br />
and 30 percent common yarrow (Achillea millefolium). See Section 10.3.1.4, Formulate Seed<br />
Mixes, for further discussion.<br />
Area to Seed – The area to seed is the total acreage of a seeding area to which a seed mix<br />
will be applied (see Section 10.3.1.2, Identify Seeding Areas, for a discussion on how seeding<br />
areas are determined).<br />
Prepare Seed Mixes<br />
Once sowing calculations are completed for each species, seed mixing operations can begin.<br />
The objective of these operations is put together seed mixes in packages that are organized,<br />
easy to handle, and ready to use. This is an important step, because there can be no room<br />
for confusion in seeding operations or time for reorganizing seed mixes. The seed mixing<br />
operation involves weighing seeds from each species or seedlot, mixing seedlots, placing<br />
seeds in bags, and labeling.<br />
The seed bag is the basic handling unit used in seeding. Before mixing begins, you must<br />
determine how much area a bag of seed mix will cover. This will depend on the seeding<br />
method. For hydroseeding contracts, the seed bags can be no larger than the area a slurry<br />
unit will cover (see Section 10.3.2, Hydroseeding). For example, if a 1,000 gallon hydroseeder<br />
Inset 10-19 | Seed metering and delivery systems<br />
The seed metering system is key to uniform application of dry seed<br />
mixes. Seed boxes should contain a mechanical seed agitator (as<br />
shown in picture) that constantly mixes the seeds to prevent seed<br />
bridging. The rate of seed flow must also be easy to adjust to allow<br />
for changes in sowing rates. Some systems, such as those found on<br />
mulch blowers, have remote controls that allow the applicator to turn<br />
the metering system on and off.<br />
There are several types of seed delivery systems available, and the<br />
choice of the system will depend on project objectives. Some systems<br />
have more than one seed box to keep several species separate. This<br />
might be necessary when working with seed mixes that include chaffy<br />
or fluffy seeds. Specialized seed boxes that are manufactured with a<br />
semicircular seedbox, auger agitator, and pickerwheel, as developed<br />
by the Texas Agricultural Experiment Station (USDA/ USDI 2005), can<br />
be used for these types of seeds.<br />
Drilling different sized seeds may also require two or more seed boxes.<br />
The Truax® seed drill has three seedboxes that are adjusted to sow<br />
various seed sizes and shapes.<br />
<strong>Roadside</strong> <strong>Revegetation</strong>: An Integrated Approach to Establishing Native Plants and Pollinator Habitat<br />
335
IMPLEMENTATION GUIDES<br />
tank covers a quarter acre, then the bags of seed mix would have enough seeds to cover a<br />
quarter acre. In this example, the seed mix is divided into four bags per acre (Line L of Figure<br />
10-96). The most typical seed bag coverage is a quarter of an acre because of the increased<br />
flexibility, reduced weight, and ease of handling.<br />
The sowing method is an important factor in assembling the seed mix. If the mix is to be used<br />
in a seed metering system (Inset 10-19), each seedlot must be thoroughly mixed together to<br />
ensure a uniform distribution of seeds of each species on the site. On the other hand, if the<br />
seed mix is placed in a hydroseeder, it is not necessary to mix the seeds since all seeds will<br />
eventually be mixed in the hydroseeder before application. Other packaging will be required<br />
if more than one seedbox is used (e.g., the Truax® seed drill).<br />
Other materials can also be included in the assembly of the seed mix. Mycorrhizal inoculum can<br />
be mixed with the seeds, as well as dyes to make seeds easier to see after seeding. Mycorrhizal<br />
inoculum and dye will change the rates that seeds will flow. Seed metering systems will have<br />
to be calibrated for these materials. Very small- seeded species may need to be sown with<br />
carriers, such as rice hulls (Stevens and Munson 2004). For small, fluffy seeds, wheat bran can<br />
be added to help prevent them from migrating upward in the seed mix (Dixon and Carr 2001b).<br />
When calibrating seeds for mulch blowing operations, it will be necessary to create more small<br />
seed bags that represent smaller calibration areas (Inset 10-20).<br />
Determine Seeding Date<br />
The best date to sow varies by site, but typically it is in the fall. On cool, arid sites, seeding later<br />
in the fall is better to prevent premature germination prior to the onset of the winter (Monsen<br />
and Stevens 2004). On warm, moist sites (e.g., the west side of the Cascade Mountains), sowing<br />
can take place in the late summer and early fall, anticipating that seeds will germinate with<br />
early fall rains and become established prior to winter. If seeds are sown in the spring or early<br />
summer, seed mixes should be composed of species that germinate quickly and do not require<br />
a long natural stratification period.<br />
Assure Quality<br />
There are several factors to monitor during seeding to assure operations are administered<br />
correctly. Depth of seed placement, uniformity in application, target seed densities, and seed<br />
handling must be monitored throughout the process. It is important to periodically measure<br />
seed depths, especially at the beginning of the operation or when any new site being seeded.<br />
Seed dyes are sometimes applied to make seeds more visible. However, these are not useful<br />
when seeds are applied through hydraulic seeders or mulch blowers. Uniformity of seed<br />
application can be monitored as seeds are being distributed through seed metering or delivery<br />
systems. Sometimes seed systems plug or malfunction, resulting in sporadic application of<br />
Inset 10-20 | Calibrating seed densities for mulch blowing<br />
Calibrating seed metering systems on mulch blowers to obtain the target seed density can be accomplished by laying out several plots of<br />
identical area (e.g., 1,000 square feet) with flagging. The seed required for each plot is determined and measured:<br />
seed weight = plot area (sq ft) * (target pounds of seed mix/acre) / 43,560.<br />
For example if the seed mix application rate is calculated at 30 lb/ac and the plot size is 1,000 ft 2 , the weight of seed to apply per plot is<br />
1,000*30/43,560, or 0.69 lb. Make at least 6 seed calibration bags. Prior to applying mulch, place the seeds from the calibration bag into the<br />
seed metering bin. Apply the mulch to the plot at the target depth while one person monitors the seeds being metered out. When all seeds are<br />
dispensed, stop the application and estimate the area covered by mulch. If the mulched area was approximately half of the 1,000 ft2 plot (500<br />
ft2), the seed densities would have been doubled. Adjustments to the seed metering controls would need to be made to deliver 50 percent of<br />
the seeds. After these changes are made, mulch would be applied to another plot to determine if seeding rates were closer to the target rates.<br />
<strong>Roadside</strong> <strong>Revegetation</strong>: An Integrated Approach to Establishing Native Plants and Pollinator Habitat<br />
336
IMPLEMENTATION GUIDES<br />
seeds. Poorly applied seeds, where the applicator either misses spots or applies over seeded<br />
areas, will also results in an uneven application.<br />
Seed densities can be monitored indirectly by measuring the area where a known weight<br />
of seed has been applied and matching it to the estimated acreage it was targeted to cover.<br />
For example, on a project where a seed mix is split into a quarter-acre bags, the area seeded<br />
with one bag of seed mix would be measured. If a quarter-acre bag covered only 0.2 acres,<br />
the seed was sown more thickly and the density was increased by 25 percent (0.5/0.2). If the<br />
seed bag had been applied over 0.30 acre, the seeds would have been spread across more<br />
area and the seed density would have decreased by 17 percent (0.5/0.3). These measurements<br />
should be done as each seed mix is being applied. If there is a significant change in density,<br />
adjustments to the seeding operations can be made.<br />
Measuring a seeding area unit is important not only for determining if seeding rates are<br />
being applied correctly, but also for accurately paying the seeding contractors. Contract<br />
administrators should be measuring the area that each seed bag or known seed quantity is<br />
being sown during, or immediately after, seed application. Figure 9.2 in Chapter 9 describes<br />
a method to measure area by measuring the slope length that has been seeded at each road<br />
station marker and multiplying it by the distance between markers.<br />
Proper seed handling should also be monitored. Seed bags should stored in suiTable conditions<br />
and always handled with care. Seed bags should not be thrown or dropped or left in<br />
unsuitable conditions.<br />
10.3.2 HYDROSEEDING<br />
Introduction<br />
Hydroseeding is a method of hydraulically applying seeds, stabilizers, and soil amendments<br />
to the surface of the soil for the primary objective of revegetation. The term hydromulching<br />
is often used interchangeably with hydroseeding, there is an important distinction; hydromulching<br />
is the application of hydraulic mulch and surface stabilizers for the primary purpose<br />
of erosion control. Hydromulching is typically conducted on multi-year construction projects,<br />
when surface soils need to be temporarily stabilized for soil erosion or dust abatement. While<br />
hydromulching and hydroseeding operations both must stabilize the soil surface, hydroseeding<br />
has the additional and overriding goal of placing viable seeds in a surface environment to<br />
germinate and grow into healthy plants. Meeting the dual objectives of erosion control and<br />
plant establishment in one operation is often a balancing act. The best methods for soil<br />
stabilization are not always optimal for seed germination and plant growth. In this section,<br />
we will focus on hydroseeding, not hydromulching. We will discuss how to best meet the<br />
needs of early plant establishment using hydraulic sowing methods and leave the discussion<br />
of stabilizing the surface through hydromulching to the many articles on this subject and to<br />
the manufacturers of these products.<br />
Hydroseeding equipment is composed of (1) a tank that holds a slurry of water, seeds, soil<br />
amendments, and stabilizing products; (2) paddles or agitation jets in the tank to mix the<br />
slurry; (3) a high pressure pumping system; and (4) a hose and nozzle (Figure 10-97).<br />
Tanks come in a variety of sizes, from a few hundred to over 3,000 gallons. As the size of the<br />
tank increases, the speed and efficiency of the operation improves. Because the travel time is<br />
the same for any size hydroseeding unit, the farther the water source is from the project site,<br />
the more efficient larger tanks become.<br />
The hydroseeding tank is analogous to a large mixing bowl filled with various ingredients<br />
and blended together with water to make a slurry. Typical hydroseeding ingredients fall into<br />
these categories:<br />
Figure 10-97 | Hydraulic seeder<br />
The hydraulic seeder is composed of a<br />
tank that holds and mixes a slurry, and<br />
a pump system that moves the slurry<br />
through a nozzle for application to the<br />
soil surface.<br />
<strong>Roadside</strong> <strong>Revegetation</strong>: An Integrated Approach to Establishing Native Plants and Pollinator Habitat<br />
337
IMPLEMENTATION GUIDES<br />
◾◾<br />
Seed<br />
◾◾<br />
Hydraulic mulch<br />
◾◾<br />
Tackifier<br />
◾◾<br />
Fertilizer<br />
◾◾<br />
Soil amendments<br />
◾◾<br />
Dye (typically in the hydraulic mulch)<br />
The mixture of ingredients is called a slurry. When a slurry is applied to an acre, it is referred<br />
to as a slurry unit. The quantity of each material added to a slurry tank is only limited by the<br />
ability of the mixture to be pumped through a hose and shot through a small nozzle without<br />
clogging. The tank can only hold so much material before the mixture becomes too thick<br />
to pump. Finding the right mix and rates of ingredients is important for efficient use of the<br />
equipment. The applicators and manufacturers of these products can recommend optimum<br />
product rates.<br />
Hydroseeding ingredients must be thoroughly blended prior to application to achieve uniform<br />
seed coverage. There are two types of hydroseeding mixing systems – those that mechanically<br />
stir and those that mix using a hydraulic jet. The first system employs rotating paddles to blend<br />
the slurry in the tank and a centrifugal pump or positive displacement gear pump for slurry<br />
delivery. The second system uses a centrifugal pump to both agitate the slurry and deliver<br />
the slurry to the site.<br />
During application, the slurry is pumped to the nozzle for application. The applicator has a<br />
choice of nozzles, use of which depends on the site and slurry conditions. Slurry application<br />
can be from a “gun” mounted on the top of the hydroseeding unit or from a hose pulled<br />
manually to the application site. Stationary application (using a hydroseeding<br />
gun) is accomplished where the hydroseeding equipment can easily access<br />
5<br />
the site. These areas are typically cut slopes and fill slopes. Depending on the<br />
Tank Size<br />
consistence of the slurry, the pumping system, and wind conditions, slurry can<br />
4<br />
be shot 200 feet or more. Hoses are laid out for sites that cannot be reached<br />
this way. Depending on the diameter of the hose and the pumping system,<br />
3<br />
hoses can reach sites over 300 feet from the hydroseeding unit.<br />
Hydroseeding is used when other seeding methods are impractical (see Section<br />
2<br />
10.3.1, Seeding). Typically, these are steeper sites where ground based seeders<br />
1<br />
are limited. Hydroseeding has the advantage over other seeding methods of<br />
applying soil amendments, fertilizers, soil stabilizers, and seeds together in one<br />
0<br />
operation, making this a one pass operation. In addition, seeds that are used in<br />
1,200<br />
hydroseeding operations do not have to be as clean (that is, free of straw, awns,<br />
chaff) as for other seeding methods. This can reduce costs and time associated<br />
with seed cleaning operations.<br />
The time it takes to hydroseed is a function of the size of the mixing tank and<br />
the amount of hydraulic mulch that is applied on a per acre basis (Figure 10-98). The greater<br />
the amount of hydraulic mulch applied per acre, the longer it will take. For example, it takes<br />
almost twice as long to apply 2,000 lb/ac of hydraulic mulch through hydroseeding equipment<br />
as it does to apply 1,200 lb/ac. For this reason, determining the appropriate amount of hydraulic<br />
mulch is important from a cost standpoint. Cost includes not only the costs of purchasing<br />
the product, but also the time to apply it. Tank size is also an important factor in application<br />
rates; the larger the tank size, the less application time it takes. A 3,000 gallon mixing tank for<br />
example, takes less than half the time to cover an acre than a 1,000 gallon tank.<br />
Hydroseeding in wildland revegetation has a number of limitations (Stevens and Monsen 2004):<br />
◾◾<br />
Seeds are not placed in the soil<br />
◾◾<br />
Seeds and seedlings can dry out<br />
Hours per Acre<br />
1,000<br />
3,000<br />
1,600 2,000<br />
Mulch Rates (lb/ac)<br />
Figure 10-98 | Hydromulch<br />
application time estimate<br />
Hydromulch application time can be<br />
roughly calculated from the size of the<br />
mixing tank and the application rate.<br />
Cycle time (the time it takes to drive<br />
from the water source to the spray area,<br />
discharge the slurry, and return) used<br />
in this analysis was 60 minutes for a<br />
3,000 gallon tank and 45 minutes for a<br />
1,000 gallon tank (figure modified after<br />
Trotti 2000).<br />
<strong>Roadside</strong> <strong>Revegetation</strong>: An Integrated Approach to Establishing Native Plants and Pollinator Habitat<br />
338
IMPLEMENTATION GUIDES<br />
◾◾<br />
Some seedlings cannot grow through the hydraulic mulch<br />
◾◾<br />
Seeds can be damaged by agitators and pumps<br />
◾◾<br />
Precocious germination can occur as a result of moisture in the hydraulic mulch<br />
◾◾<br />
Hydroseeding requires large quantities of water<br />
With good planning, implementation, and monitoring, many of these limitations can be<br />
managed, resulting in successful revegetation. Ultimately, the success of any hydroseeding<br />
project comes down to the availability of water during germination and seedling establishment.<br />
Hydroseeding is successful in the landscaping business because seeds are irrigated after<br />
hydroseeding until a stand of grass has become established. As one applicator stated, “what<br />
people don’t understand is you can do the best hydroseeding job in the world but if they don’t<br />
water it, it’s not going to grow” (Brzozowski 2004). The challenge in wildland revegetation is<br />
that, for most projects, irrigation is not available. To make hydroseeding successful, strategies<br />
must be developed that maintain moisture around the seeds and in the soil during early plant<br />
establishment.<br />
Integrate Hydroseeding into <strong>Revegetation</strong> Strategy<br />
From a revegetation standpoint, hydroseeding serves as (1) a method of seed placement, (2) a<br />
means of stabilizing the soil surface for controlling erosion and to allow seedlings to become<br />
established, and (3) a way to apply fertilizers and other soil amendments. These objectives<br />
cannot always be met in one hydroseeding operation. It often requires that each objective be<br />
considered independently, and then integrated into an overall strategy. Clarifying objectives,<br />
based on the site specific conditions of the project, and determining the best way to achieve<br />
them using hydroseeding equipment as part of the approach, will lead to the best revegetation<br />
results. For example, seed placement and fertilizing are different objectives, yet meeting<br />
both objectives is often accomplished in one hydroseeding operation out of convenience.<br />
However, the best time to apply fertilizers on many projects is after the seeds have germinated<br />
(see Section 10.1.1, Fertilizers). Instead of meeting fertilizer and seeding objectives in one<br />
hydroseeding operation, separating them into two different applications would be a better<br />
strategy for meeting overall project objectives.<br />
On a site with high surface rock, for example, the main objective would be seed placement.<br />
Little importance would be placed on surface stabilization since the rock has already created<br />
a stable surface. The best potential sites for seedling germination on this harsh surface would<br />
be between the surface coarse fragments, where seeds are protected and moisture collects.<br />
Yet a common mistake that occurs in many hydroseeding projects is to include the same rates<br />
of tackifiers as would be used on a soil surface. Under these circumstances, tackifiers adhere<br />
seeds to the rock surface, preventing the seeds from washing between the gravel and cobbles<br />
that cover the surface. The objective of stabilizing the surface is not only unnecessary in this<br />
example, it would negatively affect placement of seeds.<br />
Hydroseeding should always be accomplished within a strategy of creating an optimum seed<br />
environment. The hydroseeding operation places seeds on the surface of the soil which is<br />
often a poor environment for germination. Hydraulic mulch is inferior to long-fiber mulches in<br />
reducing surface temperatures, maintaining soil moisture, and moderating surface temperatures<br />
(see Section 10.1.3, Mulches). The term “hydraulic mulch” is misleading because most<br />
materials that fall into this category lack many of the important properties associated with<br />
mulches (see Section 10.3.2.5, Select Hydraulic Mulch and Determine Rates). By their nature,<br />
hydraulic mulches are more like a growing medium than mulches because of their capacity to<br />
absorb water (Most hydraulic mulches hold greater than 1,000 times their weight in water).As<br />
a growing medium, hydraulic mulch maintains high moisture around the germinating seeds.<br />
But once the hydraulic mulch dries out, which is often very quickly on dry sites, it no longer<br />
protects the seeds from drying as a mulch would and germination rates are compromised.<br />
<strong>Roadside</strong> <strong>Revegetation</strong>: An Integrated Approach to Establishing Native Plants and Pollinator Habitat<br />
339
IMPLEMENTATION GUIDES<br />
The literature is scant and inconclusive on the benefits of hydraulic mulch to seed germination<br />
and seedling establishment in wildland conditions. Carr and Ballard (1980) found no difference<br />
in plant establishment when seeds were applied with and without hydraulic mulches, but only<br />
low rates of hydromulches were compared. One approach to increasing seed germination<br />
that is often used in drying climates is a two pass application system, where seeds and a<br />
minimum amount of hydraulic mulch are applied in the first pass, then covered by a thick<br />
application of hydraulic mulch in a second pass. While this application method appears to<br />
have some advantage over a one pass operation because the seeds are covered with a greater<br />
thickness of hydraulic mulch, it is not known what the difference in germination and seedling<br />
establishment rates might be. The benefits from a germination standpoint are probably not<br />
seen until the hydromulch rates are high (3,000 lb/ac or greater). Even then, on arid sites<br />
receiving less than 6 inches precipitation, higher hydraulic mulch rates can intercept the low<br />
amount of precipitation that is received, preventing moisture from reaching the seeds (see<br />
Section 5.2.2, Rainfall Interception). Since it is uncertain whether hydraulic mulches improve<br />
germination, it is better to base mulch rates on surface stability objectives than on seeding<br />
objectives and use other methods to improve seed germination. For example, it might be<br />
more effective to reduce the amount of hydraulic mulch to the minimum amount necessary<br />
to apply seeds and, with the costs savings, apply a long- fibered mulch in a second operation.<br />
Identify Hydroseeding Areas<br />
Hydroseeding should take place after the final slope shaping and topsoil placement have been<br />
completed. Several months before hydroseeding is to take place, the site must be visited to<br />
finalize an implementation plan that includes the locations of where the plants or cuttings are<br />
to be installed and where seeding will take place. While most of the hydroseeding areas will<br />
conform to the revegetation units developed during planning, things always look different<br />
after construction. In this field review, the exact locations of the areas that will be hydroseeded<br />
are drawn on a road map and areas are identified where different seed mixes, fertilizer types/<br />
rates, or hydraulic mulch rates will be applied.<br />
The acreage for each hydroseeding area is calculated using methods described in Figure 9.2<br />
in Chapter 9. This method partitions the cuts lopes and fill slopes into rectilinear units by road<br />
stations and calculates acreage between each unit. This information is then summarized and<br />
used to develop task orders. It can also be used in the field for keeping record of acreages<br />
and location of hydroseeding operations.<br />
The proximity to streams must be considered when locating hydroseeding areas. If hydroseeding<br />
areas are adjacent to ditches or waterways that drain into live streams, a buffer<br />
should be included around these features to avoid entry of fertilizers into the stream system.<br />
Fertilizers applied to these sites have the potential of entering the ditches during rainstorms<br />
and eventually reach a stream course as nutrient pollution. Road runoff can be a significant<br />
contributor of nutrients to water systems (Reuter and others 1998).<br />
Determine Seeding Rates<br />
Sowing rates for hydroseeding are calculated using the same method outlined in Figure 10-96<br />
in Section 10.3.1, Seeding. The reader is referred to this section for determining seeding rates<br />
for any type of sowing method. These sowing calculations assume that the method of sowing<br />
does not cause damage to seeds. This might not be a good assumption with hydroseeding,<br />
which has been shown to increase the risk of seed breakage in the hydraulic seeder tank<br />
during mixing (Kay and others 1977; Wolf and others 1984; Pill and Nesnow 1999). Additions<br />
of fertilizers further increase the risk by exposing seeds to high salt levels when seeds are<br />
in the slurry tank and also after they are applied to the soil surface (Brooks and Blaser 1964;<br />
Carr and Ballard 1979; Brown and others 1983). Taking precautions to reduce the risk of seed<br />
damage during hydroseeding will increase the seed germination rates and reduce the amount<br />
of seed needed for the project.<br />
<strong>Roadside</strong> <strong>Revegetation</strong>: An Integrated Approach to Establishing Native Plants and Pollinator Habitat<br />
340
IMPLEMENTATION GUIDES<br />
Considerations that can reduce the risk of damaging seeds include:<br />
◾◾<br />
Type of hydraulic seeder<br />
Awn<br />
◾◾<br />
Seed condition<br />
◾◾<br />
Duration in slurry<br />
◾◾<br />
Seed moisture<br />
Palea<br />
◾◾<br />
Hydraulic mulch<br />
◾◾<br />
Nozzle and nozzle position<br />
◾◾<br />
Fertilizers<br />
Hydraulic Seeders – Hydraulic seeders that use centrifugal pumps for agitation and delivery<br />
can have a higher potential to damage seeds than systems with paddles and rubber-coated<br />
gear pumps (Kay 1972a; Kay and others 1977). Kay (1972a) found that germination of intermediate<br />
wheatgrass (Agropyron trichophorum [Link Richt.]) seeds was reduced from 80 percent<br />
(control) to 10 percent germination after one hour in a centrifugal agitation system; after two<br />
hours, germination was reduced to 1 percent. There was no reduction in germination after<br />
one hour using paddle agitation, but germination declined to 59 percent after two hours. Pill<br />
and Nesnow (1999), however, found that centrifugal pumps did not reduce germination rates<br />
of Kentucky bluegrass (Poa pratensis) and perennial ryegrass (Lolium perenne) after mixing<br />
for an hour in a slurry tank.<br />
Seed Condition – Grass seeds are enclosed by sets of bracts, called the lemma and palea.<br />
These structures provide a protective covering (Figure 10-99) and are believed to reduce<br />
seed breakage during hydroseeding agitation and application. In the aforementioned study,<br />
Pill and Nesnow (1999) believed that one of the primary reasons there was no decline in<br />
germination after an hour of mixing in a slurry tank was because the lemmas and paleas were<br />
still intact around the seeds. The association between presence of these seed structures and<br />
protection from seed breakage during hydroseeding should be considered when cleaning<br />
seeds for hydroseeding. Seed cleaning is necessary for storage and seeding (see Section<br />
10.2.1, Collecting Wild Seeds, and Section 10.2.4, Nursery Seed Production). However, seeds<br />
for use in hydroseeding operations do not have to be as clean as seeds used in other seeding<br />
methods. Each species has different cleaning requirements for hydroseeding. Some require<br />
thorough cleaning, while others might require very little cleaning. It would be beneficial to<br />
discuss the level of seed cleaning for hydroseeding with your seed extractory personnel and<br />
seed increase contractors.<br />
Lemma<br />
Figure 10-99 | Grass<br />
seed morphology<br />
Grass seeds are protected by sets of<br />
bracts called the lemma and the palea<br />
(the lemma is the larger, outer covering,<br />
and the palea is the shorter, interior<br />
sheath). The awn is a fibrous bristle<br />
that extends from the midrib of the<br />
lemma. The awns for most grass species<br />
are removed during cleaning for easy<br />
sowing. The lemma and palea should be<br />
kept on the seeds to protect them from<br />
seed damage during sowing, especially<br />
in hydroseeding operations.<br />
100<br />
90<br />
80<br />
1.5 Day Soak<br />
Figure 10-100 | Duration inside hydroseeder<br />
can reduce germination of seed<br />
Using a centrifugal hydroseeding pump system, Kay and<br />
others (1977) found a reduction in germination of Bermudagrass<br />
(Cynodon dactylon) seeds after 20 minutes<br />
in the slurry tank. Seed germination improved when the<br />
seeds were soaked in water for 1.5 days prior to placing in<br />
a hydraulic seeder tank. However, soaking for longer than<br />
1.5 days reduced germination more than if the seeds were<br />
not soaked (modified from Kay and others 1977).<br />
% Germination<br />
70<br />
60<br />
50<br />
40<br />
30<br />
20<br />
No Soak<br />
4Day Soak<br />
10<br />
0<br />
0 10 20 30 40 50 60<br />
Minutes in hydroseeder<br />
<strong>Roadside</strong> <strong>Revegetation</strong>: An Integrated Approach to Establishing Native Plants and Pollinator Habitat<br />
341
IMPLEMENTATION GUIDES<br />
Duration in Slurry – The longer seeds are mixed in the slurry tank, the greater the potential<br />
for breakage. Kay and others (1977) found that after 20 minutes of agitation, seed germination<br />
decreased significantly (Figure 10-100). For this reason, it is important to add seeds immediately<br />
before application.<br />
Seed Moisture – As a general rule, moistened seeds have less potential for breakage than<br />
dry seeds because they are more flexible when impacted. Kay and others (1977) found that<br />
soaking seeds for 1.5 days prior to application significantly increased germination over dry<br />
seeds (Figure 10-100). Longer soaking periods (4 days) had negative effects on germination<br />
because radicles were emerging and were damaged with mixing.<br />
Soaking seeds prior to hydroseeding will unfortunately initiate seed germination, which is not<br />
usually desirable for hydroseeding projects. Pill and Nesnow (1999) suggest seed priming as<br />
an alternative to soaking. Priming is a seed treatment that partially moistens seeds without<br />
initiating seed germination (Pill and others 1997). Seed is mixed at one part seed to 10 parts<br />
moist vermiculite (although peat could be used as a substitute) and stored at cool temperatures<br />
for up to 10 days prior to hydroseeding.<br />
Hydraulic Mulch – Hydroseeding without hydraulic mulch can increase seed damage (Kay<br />
1972a, 1978). Using a minimum rate of 500 lb/ac hydraulic mulch is suggested for protecting<br />
seeds (Kay 1978).<br />
Nozzle Type and Nozzle Position – Shooting slurry straight at the soil in close range can<br />
damage seeds. The impact at high speeds can cause seed coats to break. As one hydroseeding<br />
operator describes the action, “we just shove that seed right smack in the ground with a lot<br />
of force...the gun was slamming straight to it” (Brzozowski 2003). Describing this action to a<br />
Forest Service seed extractory specialist, his reaction was, “that can’t be good for the seed”<br />
(Barnar 2007). In the seed production and seed extraction businesses, handling seeds carefully<br />
is a high priority. This attitude and practice should not stop with the seed producers, but<br />
follow through to the application of seeds. One application practice that could reduce seed<br />
damage is to aim nozzles so the slurry is not hitting the soil surface with full force at close<br />
range. Arching the slurry stream so the spray hits with lower force is more desirable. Using<br />
less pressure or lower pressure nozzles, such as fan nozzles, can also reduce seed damage<br />
(Figure 10-101). Some soils are very loose or powdery after construction, which can cushion<br />
the seeds, as opposed to very compacted surfaces. Seeds applied to these surfaces can be<br />
buried under the loose soil when the slurry is shot straight at the surface, offsetting the effects<br />
of seed breakage and increasing germination potential (Mast 2007).<br />
Fertilizers – Adding fertilizer to the slurry can reduce germination of certain species due to<br />
the effects of fertilizer salts on seed imbibition, or uptake of water (Brooks and Blaser 1964;<br />
Carr and Ballard 1979; Brown and others 1983). This is not just a problem when seeds and<br />
fertilizers are mixed together in the slurry tank; it can also negatively impact the seeds after<br />
they are applied to the soil surface and before the first rains dilute the surrounding salts.<br />
Effects of fertilizer salts will be more detrimental on sites with low rainfall. Carr and Ballard<br />
A<br />
B<br />
Figure 10-101 | Hydraulic seeder nozzles<br />
Hydraulic seeders are equipped with several<br />
types of nozzles. The nozzle shown in photograph<br />
(A) shoots long, high pressure, streams<br />
while the fan nozzle shown in (B) spreads the<br />
slurry out for closer applications<br />
<strong>Roadside</strong> <strong>Revegetation</strong>: An Integrated Approach to Establishing Native Plants and Pollinator Habitat<br />
342
IMPLEMENTATION GUIDES<br />
(1979) found white clover (Trifolium repens) and, to a lesser degree, Festuca<br />
spp. had the greatest reduction in germination. They suggest white clover<br />
should be applied by hand, separate from the hydroseeding operation.<br />
Assuming that most native seeds, especially legume species, are affected<br />
by fertilizer salts, it is important to understand what the effects of different<br />
types and rates of fertilizers will have on the salt concentrations in the slurry.<br />
Brooks and Blaser (1964), Carr and Ballard (1979) and Brown and others (1983)<br />
used inorganic, fast release fertilizers, which dissolve quickly in solution<br />
(see Section 10.1.1, Fertilizers). Organic and control release fertilizers, on the<br />
other hand, dissolve slowly and therefore should have lower salt levels in<br />
solution. Whichever fertilizers or rates are used, testing the slurry for soluble<br />
salts should be conducted to assure that concentrations are not lethal (see<br />
Section 5.5.5, pH and Salts).<br />
The effect of hydroseeding operations on seed viability is an important<br />
issue and deserves more research attention (Figure 10-102). Monitoring<br />
information can be used to broaden our understanding on how to properly<br />
use this important tool.<br />
Select Hydraulic Mulch and Determine Rates<br />
Hydraulic mulch is a low bulk density material applied through a hydraulic seeder to increase<br />
surface soil strength and reduce erosion. At high application rates, seeds are covered, thereby<br />
increasing the potential for increased seed germination. Commercial hydraulic mulches are<br />
derived from wood fiber, recycled paper (wood cellulose), sterilized grass straw, or a combination<br />
of the three. Wood fiber mulches are manufactured from wood chips thermally treated by a<br />
steam and high pressure shredding process; wood cellulose mulches are made from waste<br />
paper materials such as recycled newspaper and cardboard (Trotti 2000). Hydraulic mulches<br />
typically have very high water-holding capacities (over a 1,000 times their weight in water).<br />
A pound of wood fiber mulch, for instance, absorbs between 1.5 to 2.5 gallons of water and,<br />
inversely, a gallon of water holds between 0.40 and 0.66 lb hydraulic mulch. This is important<br />
information to know when determining how much hydraulic mulch to add to a slurry tank.<br />
Most operators will not exceed a ratio of 0.4 to assure they do not clog their system with a<br />
slurry that is too thick. At this proportion, a 1,000 gallon tank would hold 400 pounds of wood<br />
fiber mulch. Product specification sheets should indicate the ratio of hydraulic mulch to water<br />
for hydroseeding equipment.<br />
The depth and cover of hydraulic mulch depends primarily on the quantity and properties of<br />
the mulch placed in the tank. Typical hydroseeding projects range in application rates from<br />
500 to 3,000 lb/ac. At low application rates (3,000 lb/ac) the soil surface and seeds are usually completely covered (Figure 10-103). With<br />
the appropriate mix of tackifiers, hydraulic mulch rates above 3,000 lb/ac can bond together<br />
to form a continuous sheet, called a bonded fiber matrix, or BFM. A bonded fiber matrix will<br />
stabilize seeds and control surface erosion up to a year after application.<br />
The length of the wood or cellulose fibers is an important characteristic in creating a soil cover<br />
mulch that does not restrict seed germination or plant growth. Cellulose mulches have shorter<br />
fibers than wood fiber mulches and, because of this, these materials compact much easier<br />
when they are applied. Applying too much cellulose mulch can result in a soil surface that<br />
has the consistency of “paper mache.” At application rates greater than 1,500 lb/ac cellulose<br />
mulch, there is a reduction in infiltration and air exchange, and seed germination and seedling<br />
establishment are decreased (Gassman 2001). Some manufacturers have overcome this<br />
problem by mixing straw, a long-fibered material, with paper mulch. Typically, cellulose mulch<br />
requires 20 percent to 40 percent more material to achieve the same uniformity of coverage<br />
as wood fibermulch (Trotti 2000) (Figure 10-104). While recycled paper mulches are typically<br />
% Germination<br />
100<br />
90<br />
80<br />
70<br />
60<br />
50<br />
40<br />
30<br />
Trifolium<br />
repens<br />
Without Fertilizer<br />
Festuca<br />
arundinacea<br />
With Fertilizer<br />
Festuca<br />
rubra<br />
Lolium<br />
perenne<br />
Figure 10-102 | Fertilizer<br />
in hydroseeder mix<br />
Incorporating 10-30-10 fertilizer into<br />
hydroseed slurries can reduce the<br />
germination of some species (Carr and<br />
Ballard 1979).<br />
Figure 10-103 | Hydromulch<br />
as a bonded fiber matrix<br />
Hydraulic mulch applied at high rates<br />
and with specialized tackifiers will hold<br />
together as a sheet and is referred to<br />
as a “bonded fiber matrix,” or BFM. The<br />
application rate of wood fiber mulch in<br />
this picture was 3,000 lb/ac.<br />
<strong>Roadside</strong> <strong>Revegetation</strong>: An Integrated Approach to Establishing Native Plants and Pollinator Habitat<br />
343
IMPLEMENTATION GUIDES<br />
Pounds per Slurry Tank<br />
1,600<br />
B<br />
1,400<br />
1,200<br />
1,000<br />
800<br />
600<br />
400<br />
200<br />
Paper<br />
Virgin Wood Fiber:<br />
manufacturing rates<br />
Virgin Wood Fiber:<br />
operational rates<br />
Guar Tackifier<br />
C<br />
Figure 10-104 | Slurry tank size and slurry composition<br />
The slurry tank can hold only so much material before the slurry<br />
becomes too thick to pump through the system. This graph gives<br />
a general relationship between the size of the slurry tank and the<br />
maximum amount of hydraulic mulch it can hold (modified from http://<br />
www.bowieindustries.com). Since virgin wood fiber mulch holds more<br />
moisture than paper mulch, less virgin wood fiber mulch can be added<br />
to a slurry tank. For a project utilizing a 3,200 gallon slurry tank (A), a<br />
maximum of 1,500 lb virgin wood fiber mulch (B) can be placed in the<br />
tank with 150 lb guar tackifier (C). Guar tackifier rates are based on a<br />
ratio of 1:10 guar to wood fiber mulch. At a prescribed rate of 1,000<br />
lb/ac of wood fiber mulch, this slurry tank will cover approximately<br />
1.5 ac. If the application rate is 3,000 lb/ac virgin wood fiber mulch, it<br />
will take 2 tanks.<br />
0<br />
0 500 1,000 1,500 2,000 2,500 3,000 3,500<br />
Slurry Tank Size (gallons)<br />
A<br />
less expensive than wood fiber, the cost savings are partially offset by the increased amount<br />
of paper mulch used. Blended mulches (those with equal portions of wood fiber with recycled<br />
paper) are an effort to improve the characteristics of recycled paper by adding wood fiber.<br />
The use of hydraulic mulch for seed germination becomes less important on wetter sites,<br />
especially in climates where there is little soil drying during germination (Carr and Ballard<br />
1980). These conditions are found from fall through early spring on many sites in the Coast<br />
Range and Cascade Mountains, and microsites that include north aspects and sites shaded<br />
by vegetation. On these sites, 1,000 lb/ac or less might be sufficient for seed germination. In<br />
areas with high rainfall and erosive soils, higher hydraulic mulch rates or even a bonded fiber<br />
matrix might be needed to keep seeds and soil in place until seeds have germinated and<br />
grown into established seedlings.<br />
Select Tackifier<br />
Tackifiers are sticking agents that bind soil particles together and protect the surface from wind<br />
and water erosion. When applied with hydraulic mulch, tackifiers increase the effectiveness of<br />
the mulch as a soil cover by binding the hydraulic mulch fibers and the surface soil particles<br />
together. Tackifiers create water-stable surfaces, which means they are capable of repeated<br />
wetting and drying and do not lose strength after a series of rainstorms. Hydraulic mulch and<br />
tackifiers can remain effective even through a winter with high precipitation (Figure 10-105).<br />
Selecting a tackifier can be difficult. There are numerous commercially available products on<br />
the market from which to choose. Unless you have used these products side by side in the field,<br />
it is difficult to know the difference. A hydraulic seeder operator can offer advice on tackifiers<br />
and other hydraulic seeding products, since they have tried a variety of products and would<br />
usually have a good idea of effectiveness.<br />
There are two general types of tackifiers commonly used in hydroseeding – organic and<br />
synthetic. Organic tackifiers are derived from plant materials which include guar, plantago,<br />
and other plant starches. Synthetic tackifiers are manufactured polymers and copolymers<br />
that include polyacrylamides (PAM), acrylic polymers and copolymers, methacrylates and<br />
acrylates, and hydro-colloid polymers. Organic tackifiers break down biologically and are<br />
typically effective for at least three months, depending on site conditions and product type.<br />
Synthetic tackifiers are photo and chemically degradable and have somewhat greater longevity<br />
than organic tackifiers, lasting up to a year on many sites (CASQA 2003b).<br />
Figure 10-105 | Hydraulic<br />
mulch and tackifiers<br />
Hydraulic mulch with tackifiers remain<br />
effective for up to a year. This hydraulic<br />
mulch and tackifier slurry was applied<br />
nine months prior to this picture, and<br />
was still partially effective.<br />
<strong>Roadside</strong> <strong>Revegetation</strong>: An Integrated Approach to Establishing Native Plants and Pollinator Habitat<br />
344
IMPLEMENTATION GUIDES<br />
<strong>Revegetation</strong> specialists and operators usually develop a preference for tackifier products<br />
based on (1) ease of handling and storage, (2) ease of application, (3) toxicity to plants, (4)<br />
environmental concerns, (5) weather restrictions, and (6) application rates.<br />
Handling and Storage – Tackifiers are available as dry powder or liquid formulations. Most<br />
organic and some synthetic tackifiers are packaged as dry powders. These products are easy<br />
to handle and store because they weigh less and have less bulk than liquid containers. Liquid<br />
tackifiers must be stored in areas that will not freeze if stored over the winter. Handling and<br />
disposal of plastic containers is also a consideration when using liquid tackifiers.<br />
Ease of Application – An important property of tackifiers is viscosity. Viscosity is the measure<br />
of the “stickiness” of a tackifier, or the propensity of the tackifier to hold a slurry together<br />
when it is applied. Tackifiers with high viscosity, such as guar based tackifiers, will hold the<br />
slurry together as a fine stream when pumped from the nozzle (Figure 10-106A), and the<br />
stream of slurry will shoot farther. When a slurry with high viscosity hits the soil surface, it<br />
sticks and does not easily run off. A slurry with low viscosity, on the other hand, will separate<br />
as it is comes out of the nozzle and drift, especially if there is a breeze, resulting in uneven<br />
application (Figure 10-106B). If low viscosity slurries are applied at rates that are greater than<br />
the soil infiltration rates, the slurry will run off the surface. Not only will seeds be lost, but<br />
other materials in the slurry (including fertilizers) have the possibility of moving into surface<br />
drainage systems (Figure 10-106C).<br />
Tackifiers act as lubricants and create less friction through the hydraulic equipment. With high<br />
viscosity tackifiers, equipment runs smoother and nozzles do not plug as frequently. This will<br />
enhance the overall performance and longevity of the equipment.<br />
Toxicity to Plants – One reason organic tackifiers are sometimes preferred over synthetic<br />
tackifiers is the belief that these materials are better for seed germination and seedling<br />
establishment. They are organic substances that break down into non-toxic compounds. While<br />
organic tackifiers are sometimes advertised as being better for plant health, there is nothing<br />
in the scientific literature to indicate that synthetic tackifiers are any more harmful or toxic to<br />
plant establishment than organic tackifiers.<br />
Environmental Concerns – There have been concerns about the use of polyacrylamides<br />
(PAM) on human health and the environment. Acrylamide, a known neurotoxin to humans,<br />
is the main ingredient of this polymer. Polyacrylamides alone have low toxicity – LD50 of<br />
5,000/kg oral dosage (Peterson 2002). However, in the manufacturing of the polymer, some<br />
acrylamide is formed. The US Food and Drug Administration has set a maximum allowable<br />
acrylamide content in PAM of 0.05 percent. While PAM does not appear to break down in<br />
the environment to acrylamide, if released during decomposition, it is thought to be quickly<br />
decomposed by soil microbes (Peterson 2002). Furthermore, since PAM degrades slowly in<br />
the environment, there should not be an accumulation of acrylamide in the soil (Claassen and<br />
Hogan 1998). Evans (2006) cites reviews by Barvenic (1994) on health hazards and Goodrich<br />
and others (1991) on aquatic macrofauna, edaphic microorganisms, or crop species. When<br />
polyacrylamides were applied at recommended rates, the materials were found to be safe<br />
for the environment. The reader is referred to Barvenik (1994) for a comprehensive discussion<br />
of PAM in the environment.<br />
As with all products used in revegetation, a material safety data sheet should be requested<br />
from the manufacturer of the product and reviewed for possible human effects and effects to<br />
the environment. Some states have regulations on the use synthetic polymers in landscaping.<br />
It is important to be abreast of the latest environmental regulations (Peterson 2002).<br />
Weather Conditions – Tackifiers have limitations and conditions for proper application,<br />
including: soils must be moistened prior to application; there must be a 1- to 3-day drying<br />
period after application; the site cannot freeze during or immediately after application; or they<br />
must be applied between a certain temperature range. It is important to understand which<br />
environmental restrictions apply to the tackifier you are using and how it might affect the<br />
A<br />
B<br />
C<br />
Figure 10-106 | High<br />
viscosity tackifiers<br />
High viscosity tackifiers, mixed at manufacturer<br />
recommended rates, keep the<br />
slurry together during application using<br />
a “stream” nozzle (A). Low viscosity tackifiers,<br />
or slurries with low concentrations<br />
of tackifiers, do not hold together when<br />
applied and will drift with wind (B) or<br />
run off slopes (C).<br />
<strong>Roadside</strong> <strong>Revegetation</strong>: An Integrated Approach to Establishing Native Plants and Pollinator Habitat<br />
345
IMPLEMENTATION GUIDES<br />
hydroseeding operations. A site that is expected to be wet in the fall, for instance, will require<br />
a tackifier that needs a minimal curing period.<br />
Tackifier Rates – When tackifiers are used with hydraulic mulches, tackifiers are applied at<br />
rates at 5 percent to 10 percent of the weight of the hydraulic mulch (CASQA 2003a). Refer to<br />
manufacturer labels for specific rates.<br />
Select Other Slurry Components<br />
The remaining components of the hydroseeding slurry can include dyes, fertilizers, biostimulants,<br />
and mycorrhizae.<br />
Dyes – Dyes are used as markers for the applicator to indicate where the slurry has been<br />
applied. Most hydraulic mulches include dyes, so it is not usually necessary to include dyes in<br />
the slurry when using these mulches.<br />
Fertilizers – Fertilizers are often applied through hydroseeders. Determining the type and<br />
amount of fertilizers to use is discussed in Section 10.1.1, Fertilizers.<br />
Biostimulants – Biostimulants are sometimes applied to the slurry.<br />
Mycorrhizae – Mycorrhizae are often included in the slurry (see Section 10.1.7, Beneficial Soil<br />
Microorganisms).<br />
Locate Water Source<br />
It should go without saying that you cannot hydroseed without a water source, yet a common<br />
mistake is to wait until the last minute to locate a source. For many parts of the western United<br />
States, water sources can be long distances from the project site. It is important to establish<br />
early where water will be obtained for hydroseeding early in the planning process.<br />
Considerations when selecting a water source include:<br />
◾◾<br />
Distance – On projects where the water source is a long distance from the hydroseeding<br />
site, large slurry tanks will increase the efficiency of the operation. Conservation of water<br />
should be a priority in these circumstances. Covering more area with each slurry tank<br />
is one way to reduce water needs. This can be accomplished by applying lower rates<br />
of hydraulic mulch and tackifier per acre.<br />
◾◾<br />
Water Quality – The quality of the water for hydroseeding must be low in salts and<br />
other potentially toxic compounds. If in doubt, send a sample to a water quality lab for<br />
testing or, at minimum, run pH and conductivity measurements on a sample.<br />
◾◾<br />
Water Use Permits – Always check with the agency or landowner for permits to use<br />
their water.<br />
Develop Hydroseeding Contract<br />
Once a basic hydroseeding plan is developed, a contract is developed. The contract usually<br />
contains most of the following elements:<br />
◾◾<br />
Site Location and Description – A general description of the site, slope gradients,<br />
location, and time of year the hydroseeding will occur should be addressed.<br />
◾◾<br />
Products and Rates – The hydroseeding products or equivalent products (hydraulic<br />
mulch, tackifiers, fertilizers, and so on) are identified, and the rates per acre for each<br />
product are stated for each hydroseeding mix or mixes. The total number of acres for<br />
each hydroseeding mix must be tabulated.<br />
◾ ◾ Water Source – The location and distance to each water source are described. The<br />
contract should indicate whether it is the responsibility of the contractor to obtain<br />
agreements from owners for use or any required water permits.<br />
<strong>Roadside</strong> <strong>Revegetation</strong>: An Integrated Approach to Establishing Native Plants and Pollinator Habitat<br />
346
IMPLEMENTATION GUIDES<br />
◾◾<br />
Storage Area – The contractor will want a site to store hydraulic mulches, tackifiers,<br />
fertilizers, and other materials associated with the hydroseeding operation. The site<br />
should be in close proximity to the hydroseeding areas and relatively safe from vandalism.<br />
◾◾<br />
Equipment – If specific types of hydraulic seeders are required for the job, they should<br />
be specified in the contract. Using hoses to access portions of the project site will often<br />
be necessary. The contract should specify how many feet of hose are needed and what<br />
percentage of the project will be applied by hose.<br />
◾◾<br />
Cleaning Equipment – The contract must state that the tank and hoses will be cleaned<br />
from all previous hydroseeding or hydromulching projects. The equipment will be<br />
inspected and, if it does not pass inspection, the contractor will be required to clean<br />
equipment at an approved offsite location.<br />
◾◾<br />
Weather Conditions – The weather conditions, based on manufacturer specifications,<br />
should be stated. The contract should specify acceptable temperature ranges and wind<br />
velocities. It should also state whether rain or freezing temperatures can occur within<br />
a specified period after application. A provision should be stated that applications will<br />
not occur on frozen ground. Some tackifiers also require that the soils be moistened<br />
before application.<br />
◾◾<br />
Mixing – The contract should state that the seeds be mixed into the slurry immediately<br />
before application. It should further state that the slurry must be applied within 30<br />
minutes after the seeds have been placed in the tank. When the seeds are in the slurry,<br />
it should be moderately agitated only enough to mix the seeds and keep the slurry<br />
from separating.<br />
◾◾<br />
Application – The slurry should be applied at a rate that covers 85 percent of the<br />
soil surface. Slurry should not run off the soil. If it does, adjustments to application<br />
speeds or nozzles must be made. Figure 10-101 shows the spray pattern of two types<br />
of nozzles. Avoid applying slurry at a range that causes slurry to splash off the surface<br />
and soil to dislodge. A two pass method is preferred to obtain good seed coverage. In<br />
the first pass, 50 percent or less of the slurry is applied, followed by the second pass<br />
that applies the remainder of the material. Each pass is applied in a different direction<br />
(bidirectionally), which reduces the “shadow effect” created by just one pass and may<br />
serve to better lock the matrix together (Bill Mast personal communication).<br />
◾◾<br />
Traffic Control – The contract must state how traffic safety will be ensured during<br />
application. Will the contractor be required to supply signs, warning lights, or flaggers?<br />
Keep Good Records<br />
Hydroseeding is a complex task. Not only are several products being applied at different rates<br />
at one time, but they must be evenly applied over large complex areas. A skilled hydroseeding<br />
operator must be at the helm, and you must keep track of what is being applied and the acres<br />
on which it is being applied. This will assure that you are getting the target amount and enable<br />
accurate payment to the contractor.<br />
The records begin with the original hydroseeding prescription. These are the planned application<br />
rates of each hydroseeding material. It is not enough to know what you want as a finished<br />
product on the site; you must understand how it will be accomplished. This means that you<br />
must translate the prescribed product quantities per acre into how it will actually be applied.<br />
These calculations can be challenging, especially when the hydroseeding operation is in full<br />
swing. It is better to have some idea how this will work before you arrive in the field. Inset<br />
10-21 is a guide through a process of determining how much of each hydroseeding material<br />
must go into a slurry tank. These calculations, along with the contract specification, become<br />
the operation plans.<br />
<strong>Roadside</strong> <strong>Revegetation</strong>: An Integrated Approach to Establishing Native Plants and Pollinator Habitat<br />
347
1<br />
A2, B1<br />
A<br />
2.0<br />
4<br />
100<br />
1,000<br />
10<br />
1,000<br />
2<br />
B1<br />
A<br />
5.0<br />
4<br />
200<br />
2,000<br />
10<br />
1,000<br />
IMPLEMENTATION GUIDES<br />
3<br />
D1, D2<br />
B<br />
3.5<br />
4<br />
Total Quantities:<br />
200 3,000 10<br />
1,900 22,500 105<br />
1,000<br />
10,500<br />
Inset 10-21 | Keeping track of the numbers<br />
Hydroseeding might look easy, but keeping track of the numbers is<br />
not. Most hydroseeding operators have learned to do calculations in<br />
their heads on the run. However, unless you do this kind of work all the<br />
time, you probably will not be able to manage this along with the other<br />
requirements of being a contract inspector. As fast as this operation<br />
goes in the field, you cannot afford not to have a good record-keeping<br />
system. After all, it is your responsibility to make sure that the contract<br />
is being fulfilled.<br />
Planned Application Rates. A hydroseeding plan is developed during<br />
the preparation of the contract that locates hydroseeding areas and<br />
defines general rates of materials to be applied. The Table 1 shows how<br />
planning information for hydroseeding can be displayed. In this example,<br />
3 hydroseeding mixes are defined by different rates of tackifier, mulch,<br />
and seed mixes in a slurry unit. Hydro mix 1 will be applied on gentle<br />
slopes requiring only a light covering of mulch (MulchRite) at 1,000 lb/<br />
ac. Hydro mix 2 is for steeper slopes and requires 2,000 lb/ac mulch<br />
and more tackifier. Hydro mix 3 is for very erosive slopes and requires<br />
3,000 lb/ac mulch and a different seed mix. The hydro mix locations<br />
are designated on a road map. From this table, a total quantities list of<br />
materials for the project can be made by multiplying the per acre rates<br />
by the acres for each hydro mix.<br />
Table 1<br />
Hydro<br />
Mix<br />
1<br />
2<br />
3<br />
Reveg<br />
Units<br />
A2, B1<br />
B1<br />
D1, D2<br />
Conversions Table 2 to Product Units. When you are in the field, you do not<br />
1 A2, B1 SlowGro A 2.0<br />
4<br />
100<br />
think in terms<br />
MajiTack<br />
of pounds<br />
MulchRite MycoAlive<br />
per acre Fertilizer because every product comes in<br />
packages. Pounds per For 50example, 45 2 MulchRite 10 B1 is 50packaged A 5.0in 45 pound 4 bales. 200To<br />
make Product it Unit: a simple, Bucket all rates Bale 3 must D1, BagD2<br />
be converted Bags B from 3.5 pounds 4 per acre 200to<br />
product units (Table 2).<br />
Table 3<br />
Hydro<br />
Mix<br />
1<br />
2<br />
3<br />
Tank Size Ac/Tank Seedmix<br />
Pounds per<br />
3,300 1.5 A<br />
Product Unit:<br />
3,300 0.75 A<br />
3,300 0.5 B<br />
Operational Plans. Table Table 3 3 converts the planned application rates to<br />
operational loading rates by (1) converting “pounds per acre” to “product<br />
units per acre” and (2) converting “product units per acre” Seedto “product MajiTack<br />
units per slurry tank.” The key to these calculations is knowing approximately<br />
how many acres each Tank slurry Size Ac/Tank tank will Seedmix<br />
Hydro<br />
Mix<br />
cover. This is a function of<br />
the size of the slurry tank<br />
1<br />
and<br />
3,300<br />
the amount<br />
1.5<br />
and type<br />
A<br />
of mulch<br />
6<br />
and other<br />
3<br />
materials being mixed in each tank (see Figure 10 104 for calculating<br />
2 3,300 0.75 A<br />
3<br />
3<br />
acres per slurry tank). In this example, it was estimated that hydro mix<br />
1 would cover approximately<br />
3 3,300<br />
1.5 acres.<br />
0.5<br />
Hydro<br />
Bmix 2 would<br />
2<br />
cover<br />
2.0<br />
half<br />
the area (0.75 ac) because twice the hydromulch is being applied. Hydro<br />
mix 3 would cover one third of the area as hydro mix 1. The math, using<br />
the tackifier MajiTack in hydro mix 1 as an example, is 100 (shaded cell<br />
in Table 1) /50 (shaded cell in Table 2) * 1.5 (shaded cell in Table 3) = 3<br />
Table 2<br />
MajiTack<br />
MulchRite<br />
MycoAlive<br />
SlowGro<br />
Fertilizer<br />
Pounds per 50 45 10 50<br />
(circled cell in Table 3) buckets per slurry tank. Notice the difference in<br />
Product Unit: Bucket Bale Bag Bags<br />
some of the product unit rates, such as the “SlowGro Fertilizer.”<br />
Table 3<br />
Hydro<br />
Mix<br />
1<br />
2<br />
3<br />
Tank Size<br />
3,300<br />
3,300<br />
3,300<br />
Ac/Tank<br />
1.5<br />
0.75<br />
0.5<br />
Seedmix<br />
A<br />
A<br />
B<br />
Seed<br />
MajiTack<br />
Per Slurry Tank<br />
MulchRite<br />
MycoAlive<br />
SlowGro<br />
Fertilizer<br />
Bags Buckets Bales Bags Bags<br />
6<br />
3<br />
2<br />
3<br />
3<br />
2.0<br />
33<br />
33<br />
33<br />
1.5<br />
0.8<br />
0.5<br />
30<br />
15<br />
10<br />
Operations Diary. Table 4 covers the minimum amount of information<br />
that must be collected during hydroseeding operations. It captures date,<br />
time, and quantity of product units placed in the slurry tank. It is also a<br />
record of the acres that were covered by each slurry tank (see Figure 10<br />
107 for a quick way of determining acreage). Notice that the application<br />
rates in this example (ac/tank) were variable, especially for Tank 2. This<br />
is not uncommon for hydroseeding projects. At the end of each day,<br />
Table 4 is used to summarize the amount of materials used each day<br />
and to track inventory. This Table is the basis for contract payment.<br />
Table 4<br />
Products<br />
SlowGro<br />
Seed MajiTack MulchRite MycoAlive<br />
Fertilizer<br />
Tank<br />
Map<br />
Date Start Finish<br />
Ac/ Water Seed Bags/<br />
Slurry Unit (per Acre Rates)<br />
Unit<br />
Tank (gal) Mix ac<br />
Buckets/ac Bales/ac Bags/ac Bags/ac<br />
Seed MajiTack MulchRite MycoAlive<br />
SlowGro<br />
Fertilizer<br />
1 A2 10/18/07 9:15 9:50 1.20 3,300 Mix 1 6 2.0 33 1.5 30.0<br />
Seedmix Acres Bags/ac Buckets/ac Bales/ac Bags/ac Bags/ac<br />
2 A2 10/18/07 10:10 10:50 1.80 3,300 Mix 1 6 2.0 33 1.5 30.0<br />
Table A 1 2.0<br />
4<br />
100 1,000 10 1,000<br />
3 B1 10/18/07 11:20 11:55 0.70 3,300 Mix 1 3 5.0 33 1.0 15.0<br />
A 5.0<br />
4<br />
200 2,000 10<br />
Slurry Unit (per Acre Rates)<br />
1,000<br />
4 B1 10/18/07 13:00 13:35 0.95 3,300 Mix 1 3 5.0 33 1.0 15.0<br />
B 3.5<br />
4<br />
200 3,000 Seed 10 1,000 MajiTack MulchRite MycoAlive<br />
SlowGro<br />
5 B1 10/19/07 14:15Fertilizer<br />
15:15 0.80<br />
Table 4<br />
3,300 Mix 1 3 5.0 33 1.0 15.0<br />
Total Quantities: 1,900 22,500 105 10,500<br />
Hydro Reveg<br />
Toal Quantities: 21 19 165<br />
Products<br />
Seedmix Acres<br />
6 105<br />
Mix Units<br />
Bags/ac Buckets/ac Bales/ac Bags/ac Bags/ac<br />
SlowGro<br />
Table 5<br />
Seed MajiTack MulchRite MycoAlive<br />
Fertilizer<br />
Table 2<br />
Total Quantities:<br />
Actual 1,000 Applied 10 Rates. 1,000 Tables 5 and 6 convert what was actually applied<br />
SlowGro<br />
Tank<br />
Map MajiTack Date Start MulchRite Finish MycoAlive Ac/ Water Seed Bags/<br />
back to Unit pounds per acre to Tank compare (gal) Fertilizer Mixwhat ac<br />
Buckets/ac Bales/ac Bags/ac Bags/ac<br />
2,000 10 1,000<br />
was originally planned from<br />
Pounds per 50 45 10 50<br />
Table 1 1. A2For 10/18/07 example, 9:15 33 9:50bales 1.20 of 3,300 MulchRite Mix 1 6 was 2.0 applied 33in Tank 1.54 (shaded 30.0<br />
3,000 10 1,000<br />
cell<br />
Product<br />
in Table<br />
Unit: Bucket Bale Bag Bags<br />
2 A2 10/18/07<br />
4). It<br />
10:10<br />
is converted<br />
10:50 1.80 3,300<br />
to actual<br />
Mix 1<br />
pounds<br />
6 2.0<br />
per acre<br />
33<br />
as<br />
1.5<br />
follows:<br />
30.0<br />
33<br />
* 45 (shaded cell in Table<br />
10,5005) * 0.95 (shaded cell in Table 6) = 1,563 lbs/ac<br />
Table 3 6 B1 10/18/07 11:20 11:55 0.70 3,300 Mix 1 3 5.0 33 1.0 15.0<br />
(circled cell in Table 6). Compared to the original plan, Products this was three<br />
4 B1 10/18/07 13:00 13:35 0.95 3,300 Mix 1 3 5.0 33 1.0<br />
quarters of the planned rates because the slurry tank was applied SlowGro 15.0<br />
Seed MajiTack MulchRite MycoAlive over<br />
Fertilizer<br />
a greater 5 B1<br />
Maparea 10/19/07 than 14:15 originally 15:15 0.80<br />
Ac/ planned. 3,300 Mix 1<br />
Water Seed For 3 seed 5.0 rates, 33this means 1.0 that 15.0 a<br />
Tank<br />
Date Start Finish<br />
Bags<br />
Unit<br />
Tank (gal) Mix /ac<br />
Buckets/ac Bales/ac Bags/ac Bags/ac<br />
quarter fewer seeds were applied.<br />
1,900 22,500 105<br />
Per Slurry Tank<br />
Seed MajiTack MulchRite MycoAlive<br />
SlowGro<br />
MajiTack MulchRite MycoAlive<br />
SlowGro Fertilizer<br />
Fertilizer<br />
Bags Buckets Bales Bags Bags<br />
50 45 10 50<br />
Toal Quantities: 21 19 165 6 105<br />
6<br />
3<br />
33<br />
1.5<br />
30<br />
1 A2 10/18/07 9:15 9:50 1.20 3,300 Mix 1 5.0 83 1,238 12.5 1,250<br />
Bucket Bale Bag Bags<br />
Table 5<br />
3<br />
3<br />
33<br />
0.8<br />
15<br />
2 A2 10/18/07 10:10 10:50 1.80 3,300 Mix 1 3.3 56 825 8.3 833<br />
MajiTack MulchRite MycoAlive<br />
SlowGro<br />
2<br />
2.0<br />
33<br />
0.5<br />
10<br />
Fertilizer<br />
Pounds<br />
3 B1<br />
per<br />
10/18/07 50 11:204511:55<br />
0.70 10 3,300 50 Mix 1 4.3 357 2,121 14.3 1,071<br />
Per Slurry Product 4 Tank Unit: B1 10/18/07 Bucket 13:00Bale 13:35 0.95 Bag 3,300 Bags Mix 1 3.2 263 1,563 10.5 789<br />
5 B1 10/19/07 14:15 15:15 0.80 3,300 Mix 1 3.8 313 1,856 12.5 938<br />
MulchRite<br />
Table 6 MycoAlive<br />
SlowGro<br />
Fertilizer<br />
Products<br />
Bags Buckets Bales Bags Bags<br />
Seed MajiTack MulchRite MycoAlive<br />
SlowGro<br />
Fertilizer<br />
Tank 33 Map<br />
Unit<br />
33 1 A2<br />
33 2 A2<br />
3<br />
Date 1.5<br />
10/18/07 0.8<br />
10/18/07 0.5<br />
Start Finish 30 Ac/<br />
Tank<br />
Water Seed<br />
(gal) Mix<br />
9:15 9:50 15 1.20 3,300 Mix 1<br />
10:10 10:50 10 1.80 3,300 Mix 1<br />
B1 10/18/07 11:20 11:55 0.70 3,300<br />
Mix 1<br />
Bags<br />
/ac<br />
5.0<br />
3.3<br />
4.3<br />
Buckets/ac Bales/ac Bags/ac Bags/ac<br />
83<br />
56<br />
357<br />
1,238<br />
825<br />
2,121<br />
12.5<br />
8.3<br />
14.3<br />
1,250<br />
833<br />
1,071<br />
4 B1 10/18/07 13:00 13:35 0.95 3,300 Mix 1 3.2 263 1,563 10.5 789<br />
5 B1 10/19/07 14:15<br />
15:15 0.80 3,300 Mix 1 3.8 313 1,856 12.5 938<br />
<strong>Roadside</strong> <strong>Revegetation</strong>: An Integrated Approach to Establishing Native Plants and Pollinator Habitat<br />
348
IMPLEMENTATION GUIDES<br />
During the hydroseeding operations, the contract inspector must<br />
keep track of each slurry tank that is applied. This includes the<br />
time, amount of water, quantities of products, location, acreage,<br />
and weather conditions. Calculating the acreage of each slurry<br />
tank is important in the field to assure that the rates of materials<br />
are being applied as prescribed. This can be accomplished using<br />
a method shown in Inset 10-21, Table 4. When this information<br />
is collected, the actual applied rates of materials per acre can<br />
be made using methods shown in Inset 10-21, Table 6. This<br />
will tell you how close each slurry tank came to the prescribed<br />
rates. This is important feedback for the hydroseeder operator.<br />
If the application rates were off significantly, adjustments can<br />
be made quickly. These records can be summarized at the end<br />
of the project to determine total quantity of materials used and<br />
the number of acres covered. This information can be the basis<br />
for contract payment.<br />
A B C D E F G<br />
Tank % Covered Station<br />
Slope<br />
Length<br />
(m)<br />
Distance<br />
between<br />
stations<br />
(m) Area (m 2 ) Acres<br />
4 100 20+1000 27 20 540 0.133<br />
4 100 20+1020 24 20 480 0.119<br />
4 100 20+1040 25 20 500 0.124<br />
4 100 20+1060 24 20 480 0.119<br />
4 100 20+1080 25 20 500 0.124<br />
4 100 20+1100 27 20 540 0.133<br />
4 100 20+1120 26 20 520 0.128<br />
4 50 20+1140 28 20 560 0.138<br />
20+1160 23 20 460 0.114<br />
20+1180 21 20 420 0.104<br />
20+1200 26 20 520 0.128<br />
20+1220 22 20 440 0.109<br />
0.069<br />
Acres covered by<br />
Tank 4 = 0.95<br />
10.3.3 INSTALLING CUTTINGS<br />
Introduction<br />
Live cuttings have a variety of uses in revegetation projects, from stream restoration to roadside<br />
stabilization. When live cuttings are used as slope reinforcement, barriers to soil movement,<br />
or integrated into retaining structures such as rock gabions, crib walls, or rock walls, they<br />
form the living component of a soil biotechnical engineering system (Sotir and Gray 1992).<br />
In slope reinforcement, live cuttings initially play a structural role by increasing soil strength<br />
and preventing surface erosion. As cuttings establish into plants, soils are stabilized through<br />
a dense network of interlocking root systems. Soils are further stabilized during the growing<br />
season as soils dry due to increased evapotranspiration and rainfall interception.<br />
Soil biotechnical engineering techniques are well documented. Gray and Leister (1982), Sotir<br />
and Gray (1992), and Lewis (2000) are excellent sources on road and slope stabilization, and<br />
the reader should refer to Bentrup and Hoag (1998) for streamside stabilization. Section<br />
10.2.2, Collecting Wild Cuttings, discussed how to collect and evaluate live cutting quality;<br />
this section will focus on the care and installation of live cuttings to optimize the success of<br />
biotechnical engineering and other roadside revegetation projects. For simplicity, live cuttings<br />
are grouped by general application in biotechnical engineering projects: (1) live stakes, (2)<br />
live brush layers, and (3) live fascines.<br />
Live Stakes<br />
Figure 10-107 | Calculating<br />
slurry coverage per tank<br />
Prior to hydroseeding, review the areas<br />
to be hydroseeded in the field. For each<br />
road station (column C), the length of<br />
the slope (column D) that will be hydroseeded<br />
is measured (or estimated) and<br />
recorded. This information is placed in<br />
a spreadsheet as shown in this figure<br />
and acreage for each station is made<br />
by multiplying slope length by distance<br />
between stations (column E) and converting<br />
to area units (columns F and G)<br />
(e.g., acres). During hydroseeding, the<br />
stations and percentage of area to be<br />
covered (column B) within the station are<br />
recorded for each slurry tank (column A).<br />
Partial station coverage is estimated and<br />
acreages adjusted, as shown in the last<br />
entry in this example. When the slurry is<br />
completed, the total acres for that slurry<br />
tank are summed.<br />
Live stakes are individual cuttings that are inserted into the slope to physically stabilize the<br />
soil and, with time, grow into individual plants with dense, interconnecting roots that further<br />
increase soil stability. Live stakes are used to repair small earth slips and slumps (Sotir and Gray<br />
1992) and as pole plantings for stabilizing streambanks (Bentrup and Hoag 1998). Joint planting<br />
refers to live stakes inserted into voids or openings between large rocks. The live stakes can<br />
take root and revegetate rock riprap sites or portions of fractured bedrock (Sotir and Gray<br />
1992). Live stakes are also used in live fascine installations and to anchor erosion mats to the<br />
soil (Lewis 2000). In gullies, draws, or intermittent streams, live stakes are placed in rows as<br />
live silt fences (Polster 1997) to slow water velocities and catch sediments and other debris. In<br />
saturated soil conditions, where excavation for brush layering or fascines is not feasible, live<br />
stakes can be densely stuck by hand.<br />
<strong>Roadside</strong> <strong>Revegetation</strong>: An Integrated Approach to Establishing Native Plants and Pollinator Habitat<br />
349
IMPLEMENTATION GUIDES<br />
Collection – Live stakes are collected from the main stems of donor plants located in the wild<br />
(see Section 10.2.2, Collecting Wild Cuttings) or from stooling beds in nurseries (see Section<br />
10.2.5, Nursery Cutting Production). The optimum period to collect cuttings is during the<br />
dormant period, after the plants have lost their leaves. If cuttings are collected outside this<br />
period, testing the viability of the cutting material is essential (see Section 10.2.2.4, Determine<br />
Rooting Potential). It is important to collect cuttings with several dormant buds because this<br />
is where shoots will originate (Figure 10-108).<br />
When preparing stakes, all side branches are removed, leaving just the stem. Only stems with<br />
diameters between 1 and 3 inches are used. Stems are cut into lengths of 1 to 3 feet, depending<br />
on how the materials will be used. It is important to select the appropriate cutting length.<br />
Stems that are too short will affect the success of the project, and cuttings that are too long<br />
will increase the costs of the project. During collection, basal ends of the cuttings are always<br />
oriented in the same direction to assure that the buds will be aligned. This will help avoid<br />
confusion later when the stakes are being installed. Finding the orientation of the buds is often<br />
difficult (Figure 10-108) and having to reorient in the field takes time. As individual stakes are<br />
made, the top of the stake is cut flat, while the basal end is cut at an angle (Figure 10-109).<br />
This makes the stake easier to insert into the soil and orients the live stake so the buds are<br />
facing up and away from the soil surface. If buds are facing down, the live stake will not root.<br />
During collection, live stakes are wrapped in small bundles with twine. The size of the bundle<br />
must be light enough to be easily carried. Once the bundle size has been determined, the<br />
numbers should not vary in order to track cutting quantities. Stakes should be cut from healthy<br />
donor plants. Stems that have obvious insect or disease damage should not be used. It is<br />
often easy to forget that live cuttings are plant materials, like seeds and seedlings, and must<br />
be handled and stored with care.<br />
Storage – It is recommended that live, dormant stakes be collected and installed the same day<br />
(Sotir and Gray 1992; Lewis 2000). This is not always possible in a road construction project. When<br />
it is not, temporary storage in Forest Service district tree coolers is an option. Temperatures in<br />
these facilities should be set below 40° F and, if humidifying equipment is available, it should<br />
be kept on high. For longer-term storage (over two weeks), cuttings should be wrapped in<br />
plastic or moist burlap to prevent the vegetative material from drying out and temperatures<br />
should be set just below freezing. Lower temperatures can result in damage and even death<br />
(Wearstler 2004). As a last resort, cuttings can be temporarily stored outside, provided (1)<br />
daily temperatures are low (
IMPLEMENTATION GUIDES<br />
(Pezeshki and others 2005; Pezeshki and Shields 2006). Species native to the western United<br />
States might respond similarly to the black willow. The effects of soaking can be tested in other<br />
willow species using a method outlined in Section 10.2.2.4, Determine Rooting Potential. If<br />
live stakes are soaked in streams, it is important to be sure they are sufficiently protected from<br />
being swept downstream during high precipitation or snowmelt.<br />
Installation – For most applications, live stakes are installed perpendicular to the soil surface.<br />
When installed, no more than one quarter to one fifth of the cutting is exposed (Sotir and Gray<br />
1992; Darris and Williams 2001). Buds are always pointing up and away from the soil surface<br />
with at least two healthy buds above the soil surface. It is essential that soil be firmly packed<br />
around live stakes so there are no large air spaces surrounding the cutting. Live stakes can be<br />
installed using techniques described in Section 10.3.4, Installing Plants. These include a shovel,<br />
auger, or expandable stinger. In addition to these methods, several techniques are available<br />
specifically for live stake installation, which include a hammer, stinger, or waterjet stinger.<br />
Hammer or Mallet. Live stakes can be pounded into the ground using a hammer or mallet. The<br />
angled basal end of the stake is placed on the soil surface and the top of the cutting is struck.<br />
A small two by four wood block can be placed on the top to absorb the impacts and reduce<br />
the risk of splintering the stake. If splintering does occur, the splintered ends should be cut<br />
(Lewis 2000). After cutting, there must still be several viable buds above the soil surface. Using<br />
a hammer or mallet works best when soils are loose and low in rock fragments. It becomes<br />
more and more difficult as rock content or compaction increases. Smaller stem diameters are<br />
often not sturdy enough for this installation method.<br />
Stinger. The stinger is a good method for installing live stakes on rocky or compacted soils. A<br />
pilot hole is created by mechanically pushing a metal rod into the soil. A live stake is inserted<br />
into the hole and tamped to the bottom using a hammer or mallet, as discussed above. Some<br />
operators will create the hole with the stinger and, after placement of the stake, use the face<br />
of the excavator or backhoe bucket to push the stake further into the soil. The hole created<br />
by the stinger is often larger than the diameter of the stake, and the soil must be tamped in<br />
around the cutting to reduce air space and create good soil contact. A stinger can be made by<br />
welding a long piece of rebar to the bucket of an excavator or backhoe. The stinger is limited<br />
by slope gradient and terrain accessibility.<br />
Waterjet Stinger. The Waterjet Stinger hydraulically creates a hole for installing live stakes.<br />
A pump draws water from a stream, lake, or water truck for delivery through a hose to the<br />
stinger nozzle. As the tip of the nozzle is pushed into the ground, high-pressure water is<br />
injected into the soil, creating a slurry (Figure 10-110). When the Waterjet Stinger is removed,<br />
a stake is quickly pushed into the resulting slurry at the desired depth. As water drains from<br />
the slurry, soil settles around the cutting, resulting in good soil contact.<br />
The advantages of using the Waterjet Stinger are (1) it is simple to operate and transport; (2)<br />
little training is necessary; (3) production rates are high; (4) holes are deep, assuring that cuttings<br />
are planted directly into a wet environment; (5) soils are saturated around the cutting for a<br />
A<br />
B<br />
Figure 10-110 | Waterjet stinger<br />
The Waterjet Stinger (A) injects high-pressure<br />
water into the soil, turning it to a slurry (B) into<br />
which a live stake can be inserted (Photos<br />
courtesy of Chris Hoag)<br />
<strong>Roadside</strong> <strong>Revegetation</strong>: An Integrated Approach to Establishing Native Plants and Pollinator Habitat<br />
351
IMPLEMENTATION GUIDES<br />
long period of time; and (6) the soil slurry settles around the cutting, eliminating air pockets<br />
in the rooting zone (Hoag and others 2001). The disadvantage of the Waterjet Stinger is that it<br />
requires a source of water. If the project is not near a body of water, it can be brought in using<br />
a water truck or large water storage containers placed in the back of a truck (Figure 10-111). The<br />
Waterjet Stinger is also limited by the amount of rock present in the soil. This equipment does<br />
not work well in soils containing gravels, cobbles, and boulders that obstruct the downward<br />
movement of the probe (Hoag 2007). Sandy soils drain quickly, so installation of cuttings with<br />
the Waterjet Stinger must be done quickly and with a little more effort. Steep slope gradients<br />
and rough terrain also limit equipment and the transportation of water. For more information<br />
on the Waterjet Stinger refer to Hoag and others (2001).<br />
Expandable Stinger. The expandable stinger can install live stakes into all soil types and<br />
soil conditions, from rocky to compacted. It can plant long cuttings (> 4 ft), and stems of<br />
most diameters (including very small diameters). The stake is placed into the stinger, which is<br />
inserted into the soil and released, leaving the cutting at the desired depth (see Section 10.3.4.3,<br />
Select Planting Tools and Methods). This installation method can leave large air spaces around<br />
cuttings. It is therefore recommended that soils be tamped around the cutting after placement.<br />
Hand-Sticking. Hand-sticking is appropriate in areas where soils are mucky or saturated,<br />
including recent landslides and wetlands, and cuttings can easily be inserted into the soil.<br />
Because this installation method can be done quickly, areas can be planted at very high<br />
densities (Figure 10-112).<br />
Figure 10-111 | Water<br />
tank with pump<br />
A 250-gallon water tank with pump can<br />
be installed in the bed of a pickup truck<br />
to supply water for Waterjet Stinger<br />
sticking.<br />
Live Brush Layers<br />
Live brush layers are cuttings that are spread on excavated benches and covered by soil<br />
(Figure 10-113). This practice is used in several biotechnical engineering applications, including<br />
brush layers and modified brush layers. Constructing brush layers is a three-step process in<br />
which contour benches are excavated, live branches are spread across the bench surface,<br />
and branches are covered with soil from constructed benches directly upslope. The process<br />
begins at the bottom of the slope and is repeated until the entire slope is installed with brush<br />
layers. In a modified brush layer system, the brush layers are resting on, and supported by,<br />
logs or live fascines (Sloan 2001).<br />
Brush layers and modified brush layers increase slope stability and reduce erosion by breaking<br />
slope length, reinforcing soil, trapping sediment, increasing infiltration, acting as horizontal<br />
drains, and reinforcing soil as cuttings develop roots (Sotir and Gray 1992). Live brush layers<br />
can also be used to vegetate crib walls, rock gabions, and rock walls. In this application, live<br />
branches are placed on benches that are created as these structures are built. For crib walls<br />
(Inset 10-22), live layers are placed on the bench created behind each layer of logs; in rock<br />
gabions, live layers are placed on each layer of gabion baskets.<br />
Figure 10-112 | Hand-stuck cuttings<br />
Hand-sticking cuttings at high densities<br />
is an option for saturated soils where<br />
the soils are too wet for installation of<br />
fascines or brush layers. This photograph<br />
shows leaves forming on cuttings several<br />
months after installation.<br />
A<br />
B<br />
Figure 10-113 | Live brush layers<br />
Live brush layers are cuttings that are placed<br />
on benches and covered with soil (A). The<br />
basal end of the cuttings should extend back<br />
to the base of the bench, and the growing tip<br />
should just show out of the soil. When placed<br />
on the contour and at regular intervals, live<br />
brush layers form a network of roots and<br />
vegetation that tie the slope together in a<br />
series of strips, increasing slope stability and<br />
reducing erosion.<br />
<strong>Roadside</strong> <strong>Revegetation</strong>: An Integrated Approach to Establishing Native Plants and Pollinator Habitat<br />
352
IMPLEMENTATION GUIDES<br />
Inset 10-22 | When should seedlings or rooted cuttings be substituted for live cuttings?<br />
Live cuttings are widely used in biotechnical engineering projects.<br />
Sometimes, however, it is more practical to substitute rooted cuttings<br />
or seedlings in place of live cuttings. This is especially the case when<br />
the road project calls for cuttings to be planted in the summer or fall,<br />
when dormant, live cuttings are not available, or when live cutting<br />
material is not available in large enough quantities.<br />
For example, a road near a wild and scenic river is being widened.<br />
Biotechnical engineering techniques using live willow cuttings are<br />
being planned for retaining walls to increase slope stability in areas<br />
adjacent to the river. The design looks good on paper (A). However<br />
when discussing the details with a revegetation specialist, question<br />
arises: where will the cuttings be collected and what time of year will<br />
the willows be installed? Upon inventorying the willow stands on<br />
the district, they learn there is not a supply of willows great enough<br />
to meet the needs of the project. To obtain this volume and size of<br />
cuttings would require the establishment of stooling beds at a nursery<br />
(see Section 10.2.5, Nursery Cutting Production), which would take at<br />
least two years prior to project implementation. More disturbing, they<br />
learn that the contract can only be implemented in the summer due<br />
to water quality and wildlife restrictions. While some cuttings installed<br />
in the summer would sprout, most would not, as was determined<br />
through rooting potential testing (see Section 10.2.2.4, Determine<br />
Rooting Potential). Referring back to the project objective, the design<br />
engineer and the revegetation specialist realize that going ahead<br />
with the project, as designed, would compromise revegetating the<br />
retaining wall. The decision was made to adopt an alternative design<br />
to install rooted cuttings grown in long tubes (at a nursery) instead of<br />
unrooted cuttings. The rooted cuttings would be planted at very high<br />
densities where the brush layers were to be installed (Figure B). Since<br />
only a small amount of cuttings would be necessary to start rooted<br />
cuttings in containers at the nursery, there was no need to develop<br />
stooling beds, eliminating the extra time and costs to produce these<br />
plant materials.<br />
The stems of the long-tube rooted cuttings can be set back several<br />
feet into the soil (see circle in Figure B) as long as a portion of the<br />
foliage is above ground. This will add length to the rooting area and<br />
the stems will initiate roots (C).<br />
A B C<br />
Collection – Materials for live layering are obtained from branched cuttings collected in the<br />
wild or from stooling beds. Stems up to 2 inches in diameter can be used (Sotir and Gray 1992).<br />
The basal end of the cuttings are always oriented in the same direction during collection<br />
and bundling. Cuttings for brush layers should be long enough that the growing tips are just<br />
exposed at the soil surface, while the basal portion of the cuttings reach to the back of the<br />
bench (Sotir and Gray 1992). For rock gabions, rock walls, and crib walls, cuttings should be<br />
long enough to extend into soil or backfill behind the structures. During collection, cuttings<br />
are placed in bundles and secured with twine. Bundles should be light enough to carry. The<br />
optimum period to collect cuttings is during the dormant period, when the plants have lost<br />
their leaves. If cuttings are collected outside of this period, then testing the viability of the<br />
cutting material is essential (see Section 10.2.2.4, Determine Rooting Potential). Fine branches<br />
dry out quickly if exposed to warm dry temperatures. Cuttings must be protected during<br />
transportation, storage, and handling to avoid drying.<br />
Storage – See discussion under Live Stakes, Section 10.3.3.2, Live Stakes.<br />
Installation – Branched cuttings are laid out on benches so the basal end of the cutting reaches<br />
to the back of the bench and the growing tips extend just beyond the front. Soil is placed<br />
over the cuttings and tamped to assure there are no large air spaces. Excessive compaction is<br />
unnecessary for plant establishment and is often detrimental for long-term plant growth (see<br />
Section 5.3.3, Soil Structure). The material used to cover live branches in or behind crib walls,<br />
rock gabions, and rock walls is often low in water-holding capacity, nutrients, and organic<br />
<strong>Roadside</strong> <strong>Revegetation</strong>: An Integrated Approach to Establishing Native Plants and Pollinator Habitat<br />
353
IMPLEMENTATION GUIDES<br />
A<br />
B<br />
Figure 10-114 | Live fascines<br />
Live fascines are long bundles of cuttings<br />
placed in trenches constructed perpendicular<br />
to the slope. The bundles are placed in contact<br />
with the soil, with the upper portion of the<br />
fascine covered by a thin layer of soil (A).<br />
Fascines initiate shoots and roots in the spring,<br />
and are established by early summer (B).<br />
matter. Soil amendments, such as compost, can be incorporated into backfill material to<br />
improve water-holding capacity and to serve as a long-term source of nutrients and organic<br />
matter. These amendments can increase establishment and improve plant growth (see Section<br />
10.1.5, Organic Matter Amendments). Waiting until after the construction of crib walls, rock<br />
gabions, and rock walls to amend the soil is not practical or feasible.<br />
Live Fascines<br />
Live fascines are cuttings bound together to form a long continuous bundle (Figure 10-114).<br />
When installed on the contour, live fascines slow runoff, increase infiltration rate, capture<br />
sediments, reduce slope length, and revegetate the site (Sotir and Gray 1992). Live fascines<br />
have a good potential for quick establishment because of the high density of buds near the<br />
surface of the soil. Live fascines can quickly send out shoots and roots early in the growing<br />
season and become established before summer (Figure 10-114).<br />
Fascines are used in the construction of live pole drains to drain saturated slopes, small slumps,<br />
or gullies (Polster 1997). Live pole drains are designed to intercept surface water from unstable<br />
slopes or seepage areas, and transmit it through a system of interconnecting bundles to<br />
more stable areas (see Section 5.7.3, Water Input). The constant supply of intercepted water<br />
encourages vigorous growth of the cutting material into a continuous stand of vegetation.<br />
Fascines are also used as the base or support in the construction of modified brush layers.<br />
Live fascines have great potential for establishment because of the high density of buds just<br />
under the surface of the soil. These buds can emerge quickly in late winter and early spring.<br />
Because they are installed at the soil surface, live fascines are more prone to drying out than<br />
live brush layers or live stakes. For this reason, live fascines are more successful on moist sites<br />
or in conjunction with live brush layering or live staking.<br />
Collection – Branches and stems up to 2 inches in diameter are collected from the wild or<br />
from stooling beds and gathered to form a long continuous bundle. Fascines vary in length<br />
from 5 to 30 ft, and from 6 to 8 inches in diameter. For large projects, constructing a series of<br />
sawhorse-type structures makes this operation easier and more efficient (Sotir and Gray 1992).<br />
At frequent intervals, bundles are secured with twine to hold the fascines together. Cuttings<br />
should be collected during the dormant season, when the plants have lost their leaves. Fine<br />
branches dry out quickly if exposed to warm dry temperatures and must be protected during<br />
transportation, storage, and handling<br />
Storage – See discussion under Live Stakes, Section 10.3.3.2, Live Stakes.<br />
Installation – Prior to installation, trenches should be created at the proper depth so the top of<br />
the fascine is flush to the surface of the slope when installed. The shape of the trench should<br />
allow soil contact with all portions of the bundle. Soil is tamped down around the sides of the<br />
bundles to assure soil contact, and the upper fifth of the bundle is covered by a thin layer (
IMPLEMENTATION GUIDES<br />
inch) of soil. A very small portion of the fascine should be exposed, but not enough to dry the<br />
stems. If the fascine is buried too deeply, vegetative growth will be restricted.<br />
10.3.4 INSTALLING PLANTS<br />
Introduction<br />
Although a wealth of information exists about planting for reforestation, very<br />
little information has been published about planting nursery stock on roadsides.<br />
Several references can be found discussing harsh site reclamation. Ashby<br />
and Vogel (1993) is an excellent source for planting on restored minelands.<br />
Before beginning a planting project, the revegetation plan and plant production<br />
contract should be reviewed carefully, as should the Target Seedling<br />
Concept (Figure 10-115) which was considered during the planning process<br />
(see Section 6.4, Next Steps). The first four steps were covered when plants<br />
were ordered during the planning process. The timing of the outplanting<br />
window and planting tools must be considered at this time.<br />
Timing of the Outplanting Window – The outplanting window is the<br />
period of time in which environmental conditions on the outplanting site are<br />
most favorable for survival and growth of nursery stock (Figure 10-116). The<br />
outplanting window is usually defined by limiting factors, and soil moisture and temperature<br />
are the usual constraints. In most of the continental United States, nursery stock is outplanted<br />
during the rains of winter or early spring when soil moisture is high and evapotranspirational<br />
losses are low. Fall outplanting is another option on some projects, especially when dormant<br />
and hardy plants can be installed just before the normal rainy season begins. Planting during<br />
the summer is usually discouraged because the nursery stock is not dormant and will experience<br />
severe transplant shock. If nursery stock is carefully handled and plants can be irrigated, then<br />
summer plantings are possible.<br />
Planting Tools and Techniques – Nursery stocktype and the conditions<br />
on each outplanting site must be considered before planting begins. All too<br />
often, planters develop a preference for a particular planting implement<br />
because it has worked well in the past. However, no one tool will work for all<br />
types of nursery plants and under all site conditions. Size of nursery stock, in<br />
particular the depth and width of the root plug, is the critical consideration.<br />
Tall pots, for example, have an unusually deep root plug, which makes them<br />
difficult to plant properly with standard tools. For some types of plants and<br />
especially for large planting projects, it may be necessary to buy or rent<br />
specialized equipment, which must be secured in advance. The planting tools<br />
recommended for roadside revegetation projects are discussed in Section<br />
10.3.4.3, Select Planting Tools and Methods.<br />
Define Planting Areas<br />
When construction is completed, the project site is assessed for planting. A detailed map<br />
showing the exact planting locations and conditions is developed by reviewing each location<br />
on the ground. Each area should be identified on a map and described in a spreadsheet by:<br />
◾◾<br />
Planting area acreage<br />
◾◾<br />
Planting patterns<br />
◾◾<br />
Plant spacing (density)<br />
◾◾<br />
Survival potential<br />
◾◾<br />
Species and stocktype mix<br />
1. Objectives of Outplanting Project<br />
2. Type of Plant Material<br />
3. Genetic Considerations<br />
4. Limiting Factors on<br />
Outplanting Site<br />
5. Timing of Outplanting Window<br />
6. Outplanting Tools and Techniques<br />
Outplanting Performance (%)<br />
Figure 10-115 | The Target<br />
Plant Concept<br />
The final two steps of the Target Seedling<br />
Concept, the Outplanting Window<br />
and Planting Tools and Techniques, must<br />
be considered before initiating planting<br />
projects (adapted from Landis 2009).<br />
Outplanting Window<br />
Survival<br />
Growth<br />
Dec Jan Feb Mar Apr<br />
Planting Month<br />
Figure 10-115 | Outplanting window<br />
The best time to plant your project site<br />
(the “outplanting window”) will depend<br />
on local weather and soil moisture conditions.<br />
In the Pacific Northwest, this<br />
is typically during late winter or early<br />
spring, when soil water content is high<br />
and atmospheric drying potential is low<br />
(modified from South and Mexal 1984).<br />
<strong>Roadside</strong> <strong>Revegetation</strong>: An Integrated Approach to Establishing Native Plants and Pollinator Habitat<br />
355
C - CLUMPED<br />
IMPLEMENTATION GUIDES<br />
A<br />
B<br />
C<br />
D<br />
E<br />
<strong>Revegetation</strong> Unit<br />
2<br />
Planting area:<br />
Target plant spacing:<br />
Ave. survival potential:<br />
(43,560 * A) / (B * B) =<br />
D * (100 / C) =<br />
Plant Species<br />
PIPO POTR5 AMAL2 Units<br />
0.75 acres<br />
9 14 20 feet<br />
95 70 70 %<br />
403 167 82 plants<br />
425 238 117 plants<br />
Definition<br />
Area that will be planted<br />
Desired distance between established plants<br />
Percent of seedlings that survive after<br />
one growing season<br />
Desired number of established plants after<br />
one growing season<br />
Number of nursery plants that need to<br />
be planted<br />
Figure 10-117 | Calculating<br />
number of plants needed<br />
This type of spreadsheet helps calculate how<br />
many plants of each species are needed and<br />
should be developed for each planting area.<br />
This example includes quaking aspen (POTR5),<br />
ponderosa pine (PIPO), and Saskatoon serviceberry<br />
(AMAL2), but can be extended to<br />
accommodate more species.<br />
With this information, a planting strategy can be developed for each planting<br />
A<br />
area using calculations similar to those shown in Figure 10-117.<br />
Size of Planting Areas – The first step is to measure the area of each planting<br />
unit. Although they could be calculated from blueprints, the true planting areas 1<br />
should be measured on-site. A practical method is described in Figure 10-118. 2<br />
Planting Patterns – The pattern at which nursery stock is planted is critical 3<br />
for creating a more natural and visually pleasing roadside experience. Most 4<br />
planters have learned to install plants at uniform spacing and in rows (Figure 5<br />
10-119A). Although uniform patterns ensure that all plants have equal growing 6<br />
space, it is not natural. Planting seedlings in groups (Figure 10-119B) or clumps<br />
(Figure 10-119C) is more visually appealing and more ecologically functional.<br />
8<br />
More specific considerations about planting patterns are based on project 9<br />
objectives and site characteristics of the area. A typical example would be using 10<br />
plants to screen potentially dangerous or visually sensitive areas, such as large 11<br />
cuts and fills or obliterated roads. Determining where trees or shrubs are to<br />
12<br />
be planted to meet these objectives can only be accomplished by driving the<br />
newly constructed road and making these decisions in person.<br />
Plant Spacing – The planting spacing or density (see Section 10.2.6.4, Determine Plant Needs)<br />
will determine how quickly an area will be screened by vegetation. The higher the density, the<br />
more plants are required. Selecting the appropriate density must be based on the existing<br />
vegetation density recorded at reference sites, as well as both short- and long-term A - UNIFORMproject<br />
objectives. It must also be based on the expected survival rates of the planted stock, since<br />
not all planted stock will survive.<br />
Survival Potential – Each planting area must be assessed for its unique site characteristics,<br />
such as rock content, soil depth, accessibility, steep slopes, and poor accessibility. These will<br />
Station<br />
2 + 1000<br />
2 + 1020<br />
Slope<br />
Length<br />
(m)<br />
3<br />
4<br />
Distance<br />
Between<br />
Stations<br />
(m)<br />
20<br />
20<br />
Area<br />
(m 2 )<br />
60<br />
80<br />
2 + 1040<br />
2 + 1060<br />
2 + 1080<br />
6<br />
7<br />
6<br />
20<br />
20<br />
20<br />
120<br />
140<br />
120<br />
7 2 + 1100 4 20 80<br />
2 + 1120 2 20 40<br />
B<br />
C<br />
D<br />
m 2 640<br />
Totals ft 2 6,888.90<br />
Acres 0.16<br />
Area<br />
(m 2 )<br />
= B2 * C2<br />
= B3 * C3<br />
= B4 * C4<br />
= B5 * C5<br />
= B6 * C6<br />
= B7 * C7<br />
= B8 * C8<br />
= SUM(D2:D8)<br />
= D10 * 10.76391<br />
= D11 / 43,560<br />
Figure 10-118 | Calculating<br />
the planting unit area<br />
This spreadsheet is a practical way to<br />
calculate the area of each planting unit.<br />
D<br />
A - UNIFORM<br />
B - RANDOM<br />
Figure 10-119 | Planting patterns<br />
are based on project objectives<br />
A - UNIFORM<br />
B - RANDOM<br />
C - CLUMPED<br />
(but groups are random)<br />
The objectives of the outplanting project and desired<br />
appearance affect planting patterns. If the<br />
objective is rapid growth and quick site coverage,<br />
the plants can be regularly spaced (A). However,<br />
plants spaced in a more random pattern mimic<br />
natural conditions (B), and a random clumped<br />
pattern where different species are planted in<br />
groups is often the most natural appearing (C)<br />
(adapted from Landis and Dumroese 2006).<br />
<strong>Roadside</strong> <strong>Revegetation</strong>: An Integrated Approach to Establishing Native Plants and Pollinator Habitat<br />
356
IMPLEMENTATION GUIDES<br />
determine the stocktype and species selection, method of planting, and the difficulty of<br />
transporting large plants to the site. The identified site limitations will determine the expected<br />
survival rates; target survival rates should be at least 70 percent to minimize the costs of site<br />
preparation and anticipated replanting.<br />
Species Mix and Stocktype – Each planting area will have a different mix of species and<br />
stocktypes based on the site characteristics and project objectives defined during the<br />
planning stages. This is a refinement of those plans, based on site specific evaluation of the<br />
area. Trees and other large woody plants are considered “keystone species” because of their<br />
sheer size and longevity. These structurally and functionally dominant plants play a pivotal<br />
role in restoration plantings because they generate physical structure and create ecological<br />
niches for many other species. This fosters the in-seeding of other plants, resulting in a more<br />
natural and visually appealing landscape.<br />
A<br />
Select Planting Tools and Methods<br />
One planting method will rarely work for all planting areas in a revegetation project. <strong>Roadside</strong><br />
sites offer some serious challenges to planting nursery stock, most notably highly compacted<br />
soils and often a high percentage of rock. Road projects create the opportunity for unique<br />
situations such as planting islands.<br />
The most common type of planting method is manual planting using a shovel. Recent<br />
developments in mechanized planting equipment have increased tools available. The most<br />
common types of planting tools for roadside revegetation sites are described below.<br />
Shovel – The versatile “tile spade” shovel (Figure 10-120A) is the first choice for compacted soils<br />
and stocktypes used in roadside revegetation. Forestry supply companies sell a specialized<br />
planting shovel with a 14 by 5 inch blade, a welded reinforcement plate on the back of the<br />
blade (Figure 10-120B), and rubber padded footplates (Figure 10-120C). Shovels work well when<br />
planting both bareroot and container stock, as well as bulbs and other plant materials that<br />
do not require holes deeper than one foot. Working the shovel blade back and forth breaks<br />
up compacted soil and can create a planting hole for large container stock (Figure 10-120D).<br />
Sites must be accessible for hand planters, and the soils not too rocky or shallow. Very steep<br />
slopes (1:1 or greater) make shovel planting very slow and difficult.<br />
Power Auger – Power augers can be an excellent and efficient way to excavate holes for<br />
planting (Figure 10-121A). Many types of augers are available: 1-person operated, 2-person<br />
operated, and a chain saw modification. A wide variety of auger sizes means that this one<br />
implement can work for many stocktypes. Augers are particularly good for large container<br />
stock. For example, a four-inch auger bit will create planting holes that will just fit the root<br />
plug of a “Tall Pot” container plant, ensuring good root-to-soil contact (Figure 10-121B). In a<br />
comprehensive review of planting tools, Kloetzel (2004) concluded that, when container size<br />
is larger than 336 ml (20 in3), power augers will boost production under most soil conditions. It<br />
is most efficient to have one person operating the auger, with several people planting behind<br />
him/her. Auger planting is effective on restoration sites because one person determines<br />
the location and pattern of the planting holes. Production rates are reduced with rocky or<br />
compacted soils, but a drill auger with a special bit has been developed for planting large<br />
container stock in rocky soils (St. Amour 1998).<br />
Expandable Stinger – Specialized planting equipment is needed for the rocky and steep slopes<br />
that are often found along forest roads. The original stinger was a pointed metal bar that was<br />
hydraulically forced into the soil to plant willow and cottonwood cuttings. The expandable<br />
stinger is a recently developed planting device attached to the arm of an excavator (Figure<br />
10-122) that creates a hole and plants the seedling all in one operation. The planting head<br />
is composed of two parallel steel shafts, which are hinged in the middle to open and close<br />
in a scissor-like manner. Each shaft is constructed to create a long hollow chamber between<br />
them when closed. The opening and closing of the shafts are hydraulically driven. When the<br />
B<br />
C<br />
Figure 10-120 | Tile spade shovels<br />
Specialized “tile spade” shovels are ideal<br />
for planting a wide variety of nursery<br />
stock on restoration sites (A). Commercial<br />
planting shovels feature a reinforced<br />
blade (B) and rubber-padded footplates<br />
(C). Working the long shovel blade back<br />
and forth breaks up compacted soil and<br />
creates planting holes deep enough for<br />
large container stock (D).<br />
D<br />
<strong>Roadside</strong> <strong>Revegetation</strong>: An Integrated Approach to Establishing Native Plants and Pollinator Habitat<br />
357
IMPLEMENTATION GUIDES<br />
shafts are closed, the stinger comes to a point and is pushed into the soil by the force of the<br />
excavator arm. A long hardwood cutting or container plant is placed into the chamber. The<br />
expandable stinger is maneuvered to the planting spot, where the beak is inserted into the<br />
soil. When the beak opens, the seedling drops to the bottom of the hole leaving, the seedling<br />
in place (Figure 10-122B through D).<br />
Two expandable stinger models are currently in use. The single-shot model inserts plants one<br />
at a time and averages between 50 to 80 seedlings per hour. The 50-shot model contains a<br />
rotary magazine that can hold fifty plants of up to three different species and can double the<br />
planting rate of the single-shot model (Kloetzel 2004).<br />
The advantage of this equipment is that it can reach very steep cut and fill slopes, sites that<br />
are inaccessible by other planting methods. Smaller excavators can reach 25 feet, while larger<br />
machines extend planting up to a 50 foot radius, which is adequate for most cut and fill slopes.<br />
This equipment can also plant in very rocky soil conditions, including rip-rap and gabions, and<br />
can insert plants up to 6 feet. With the typically compacted soils on roadside sites, the action<br />
of the beak of the expandable stinger breaks up the compaction around the planting hole.<br />
While soil typically falls back around the root plug after the expandable stinger has planted<br />
the seedling, it is still important to determine whether additional soil needs to be filled and<br />
tamped around the plant. Poor soil contact with the root system can reduce survival and<br />
growth during establishment.<br />
The major drawback to the expandable stinger is the expense. Because of the high hourly rate<br />
of an operator and equipment, the expandable stinger must be working at full capacity at<br />
all times. Good planning is essential. This means that all the planting sites are laid out before<br />
the equipment arrives, there is a clear understanding of species mix and planting for each<br />
planting area, seedlings are on the site and ready for loading into the equipment, and there is<br />
enough personnel to keep the equipment going. In a well-planned operation, the expandable<br />
stinger can plant up to 200 seedlings in an hour. In addition to the hourly operating costs,<br />
the mobilization costs can be very high, especially if the excavator and expandable stinger<br />
must be transported across several states. These costs must be spread across all seedlings<br />
being planted for a true cost. The more seedlings that are planted by the expandable stinger<br />
at one construction site, the less it will cost per planted seedling. Larger planting projects<br />
(>1,500 seedlings) spread these costs over more seedlings and make expandable stinger<br />
projects economical.<br />
Pot Planter – The pot planter is a modification of the waterjet stinger (see Section 10.3.3,<br />
Installing Cuttings) that creates planting holes large enough for container plants. Like the<br />
waterjet stinger, it draws water from a water source (e.g., a lake, stream, water truck) and<br />
hydraulically creates a planting hole as the tip of the high pressure nozzle is pushed into the<br />
A<br />
B<br />
Figure 10-121 | Power auger<br />
Power augers are effective because one<br />
trained operator determines the depth<br />
and spacing of the planting holes (A).<br />
Auger bits come in a variety of sizes<br />
to accommodate the large stocktypes<br />
favored in restoration plantings (B).<br />
A<br />
Figure 10-122 | Expandable stinger<br />
The expandable stinger is operated by placing<br />
a long container or hardwood cutting into<br />
the chamber (A). The arm of the excavator<br />
pushes the point of the stinger into the soil<br />
to the appropriate planting depth for the root<br />
system (B) and the beak opens, shattering the<br />
soil (if it is compacted) and creating a hole (C).<br />
The stinger is removed and the plant remains<br />
in place as soil collapses around the sides of<br />
the plug (D).<br />
B C D<br />
<strong>Roadside</strong> <strong>Revegetation</strong>: An Integrated Approach to Establishing Native Plants and Pollinator Habitat<br />
358
IMPLEMENTATION GUIDES<br />
A<br />
B<br />
Figure 10-123 | Pot planter<br />
The pot planter creates a planting hole by<br />
injecting high pressure water into the soil<br />
(A). Once the soil is liquefied, the container<br />
is pushed into the soil to the appropriate<br />
depth (B).<br />
soil (Figure 10-123A). The pot planter has 3-inch vanes attached to the sides of the nozzle,<br />
which create holes large enough for containers up to one gallon (Figure 10-123B). The hole<br />
that is created by the pot planter is actually a soil slurry that is displaced when the root plug<br />
is pushed into it at the desired planting depth. Once the water drains from the slurry into the<br />
surrounding soil, the soil settles in around the root plug, assuring good soil-to-root contact.<br />
The advantages of using a pot planter include (1) container plugs are thoroughly moistened<br />
at outplanting, (2) there are fewer air pockets in the soil and better root-to-soil contact, and (3)<br />
soil around the planting hole is moistened, allowing roots more time to move out of the plug<br />
and into the native soil. These advantages create the opportunity for earlier fall planting dates,<br />
even as early as late August to early September in some areas. The earlier the fall planting, the<br />
greater the chance for rooting to occur before winter sets in. This rooting will be in addition<br />
to the root growth that occurs the following spring and can make the difference in whether<br />
a seedling survives the first growing season. Large containers can be planted quickly at a rate<br />
of approximately one plant per minute (Hoag 2006). The pot planter is limited by the same<br />
factors as the waterjet stinger, which include steep slope gradients, inaccessibility, high soil<br />
rock content, and poor water source availability.<br />
Planting into Engineered Structures – There are occasions when seedlings will be planted<br />
as engineered structures are being built. These structures include vegetated gabion walls,<br />
riprap, and retaining walls (see Inset 10-22). Planting must be well planned and integrated into<br />
the construction schedule. Since road construction often takes place in the summer when<br />
plants are in full growth, special handling methods and irrigation must be implemented<br />
during installation to assure optimum seedling establishment (Figure 10-124). Installing plants<br />
into riprap, for example, requires good planning and integration into construction activities.<br />
Drawings and a set of planting instructions are essential. Seedlings are partially planted in the<br />
existing soil and partially in riprap. Riprap and soil is hand placed around the seedling plug to<br />
assure good root–to-soil contact and that the seedlings are handled with care. The remainder<br />
of the riprap is placed and the seedlings are irrigated. Each vegetated engineered structure<br />
will require different sets of instructions and drawings that are specific to the objectives and<br />
environmental conditions of the site.<br />
Figure 10-124 | Plants integrated<br />
with engineered structures<br />
Engineered structures of gabions and<br />
riprap require tall nursery stock and<br />
special installation techniques. When<br />
properly done, however, plants survive<br />
and grow well and greatly increase the<br />
visual appearance of the structure.<br />
<strong>Roadside</strong> <strong>Revegetation</strong>: An Integrated Approach to Establishing Native Plants and Pollinator Habitat<br />
359
IMPLEMENTATION GUIDES<br />
Assess Plant Inventories<br />
Depending on the size and scope of the project, there may be many combinations of species,<br />
seedlots, and stocktypes being grown at one or more nurseries. Seedling inventories from all<br />
nurseries where your stock is being grown must be consolidated into one list. Each nursery will<br />
supply a list of the quantity of seedlings in each seedlot that meet the contract specifications.<br />
Do not be surprised if this list does not exactly meet your original order. It is rare that the<br />
original seedling order ever gets filled exactly as requested. Some seedlots grow well, while<br />
others grow poorly, and this is reflected in the seedling inventory. You will find there are more<br />
seedlings in one seedlot and less in another.<br />
Plant inventories do not always give the full story about seedlots. Prior to putting together<br />
a planting plan, a visit to the nurseries will give a full picture of the status of each seedlot.<br />
Stressed seedlings, poor roots, root-bound seedlings, disease, and other problems can only be<br />
realized by visiting the nursery months before plants are received. The visit to the nursery is<br />
not always a negative fact finding mission. It should be approached as a problem-solving trip.<br />
For example, an inventory might indicate that certain seedlots do not meet size specifications.<br />
A closer review at the nursery may show that many of the seedlings that do not meet size<br />
specifications would be suitable in certain planting areas. If inventories are low, discussions<br />
with the nursery manager might bring up the possibilities of substituting surplus seedlots<br />
from other clients for the downfall in your inventory.<br />
Match Inventories to Planting Area<br />
At this point, the information developed during the location of planting units,<br />
including seedling density, species, and stocktype, must be reevaluated in light of<br />
the newest seedling inventory. In other words, the seedlings from the inventory<br />
must now be divided between planting areas in a manner that still meets the<br />
project objectives.<br />
Using the spreadsheet in Figure 10-125 is a simple way to reconcile the differences<br />
between the plants needed at each planting area and the plant inventory. In this<br />
example, three planting areas are defined (A1, A2, and B). For each planting area<br />
the number of plants of each species/ stocktype are listed. The planned needs<br />
are summarized in Line A. When the seedling inventory (Line B) is received, it<br />
is discovered that there will not be enough ponderosa pine (PIPO) or quaking<br />
aspen (POTR5) to meet the planned needs. The deficits are circled in Line C. In this<br />
example seedlings can either be obtained from other sources, or the plant needs<br />
can be adjusted downward. In this example, the PIPO and POTR5 were adjusted<br />
downward because no substitute trees could be found to make up the difference.<br />
AMAL2 (Saskatoon serviceberry) was adjusted upward as a partial substitution<br />
for the shortfall of tree seedlings. Planting spacing was recalculated from Figure<br />
10-117 with a resulting increase of approximately 1 ft for both PIPO and POTR5.<br />
The extra PUTR2 (antelope bitterbrush) and PREM (bitter cherry) were not planted<br />
(Line F), but surplused to a local landowner. Many more rows and columns can<br />
be added to this spread sheet to accommodate more species and planting areas.<br />
Transport Plants<br />
Planned Seedling Needs<br />
Species & Stocktype<br />
PIPO POTR5 AMAL2 PUTR2 PREM<br />
Planting Areas 2 Gal 1T18 1T12 1STP 1STP<br />
A1<br />
425 238 117<br />
A2<br />
75 25 35 100<br />
B<br />
275<br />
50<br />
A Planned Needs 500 538 152 100 50<br />
B Seedling Inventory 400 435 200 125 75<br />
C<br />
Difference -100 -103 48 25 25<br />
Adjusted Seedling Needs<br />
Species & Stocktype<br />
PIPO POTR5 AMAL2 PUTR2 PREM<br />
Planting Areas 1 Gal 1T18 1T12 STP STP<br />
A1<br />
350 200 155<br />
A2<br />
50 10 45 100<br />
D<br />
E<br />
F<br />
B<br />
Adjusted Needs<br />
Seedling Inventory<br />
Difference<br />
400<br />
400<br />
0<br />
225<br />
435<br />
435<br />
0<br />
200<br />
200<br />
0<br />
100<br />
125<br />
25<br />
50<br />
50<br />
75<br />
25<br />
The delivery of seedlings to the planting site is not generally the responsibility of<br />
the nursery. It can be an item in the seedling production contract, a separate transportation<br />
contract, or you can transport them yourself. Whichever way you decide, remember that<br />
seedlings can be easily damaged during transportation by poor handling, hot temperatures,<br />
or drying conditions. Plants that have been packed in bags or boxes are protected from drying<br />
conditions and can be transported in most vehicles. If containers are transported in open pickups,<br />
they should be covered with a space blanket or special tarps to moderate temperatures and<br />
Figure 10-125 | Managing<br />
plant inventories<br />
Spreadsheets are a handy way to keep<br />
track of nursery orders and adjust plant<br />
inventories to planning needs.<br />
<strong>Roadside</strong> <strong>Revegetation</strong>: An Integrated Approach to Establishing Native Plants and Pollinator Habitat<br />
360
IMPLEMENTATION GUIDES<br />
minimize the potential for desiccation (Figure 10-126). Specially-constructed<br />
Mylar® tarps can be purchased from forestry or restoration supply companies.<br />
Plants that have been kept in freezer storage should be thawed prior to<br />
transportation and planting. While small container stock has been shown<br />
to have satisfactory survival when planted frozen, there is no indication that<br />
large stock will perform the same. Once frozen seedlings have been thawed or<br />
cooler-stored seedlings have been allowed to warm, they should be planted<br />
immediately. Seedling viability will decrease if they are placed back into cold<br />
storage for more than a few days.<br />
Plants that have not been packed in storage containers must be transported<br />
in enclosed units. Transporting plants in open vehicles, such as pickups,<br />
exposes foliage to strong, drying winds which can unduly stress the plants.<br />
Large container plants typically stand 2 to 4 feet tall (including the container)<br />
and require transportation with enough space to accommodate the size.<br />
Develop Planting Contract<br />
The following discussion outlines some of the basic components that should<br />
be addressed in a planting contract.<br />
50<br />
Location – A map of the planting areas should be included in the contract.<br />
40<br />
Planting Quantities – The quantity of species, by stocktype, must be presented<br />
for each planting area.<br />
30<br />
Planting Method – There might be several planting methods which should<br />
be indicated for each stocktype and planting area.<br />
Plant Spacing Requirements – For each planting area, describe or define the<br />
plant spacing at which each species will be planted. Calculations to determine<br />
the proper spacing between plants was presented in Figure 10-117. Approximate distance<br />
between plants can be determined graphically by knowing the target plants per acre, and, in<br />
reverse, the plants per acre can be determined by knowing the target spacing between plants<br />
(Figure 10-127). For example, if the plan calls for a density of 600 seedlings to be planted per<br />
acre, the spacing between plants would be around 8.5 feet (Figure 10-127A). If the plan calls<br />
600 seedlings to be planted in planting pockets of three plants per pocket, there would be 200<br />
planting pockets spaced approximately 15 feet apart (Figure 10-127B). In another example, if<br />
you want to know the number of seedlings to order for a given area with a target spacing of<br />
6 feet, the number of plants required would be just under 1,100 seedlings (Figure 10-127C).<br />
Temperature (˚F)<br />
110<br />
100<br />
90<br />
80<br />
70<br />
60<br />
A<br />
B<br />
9 10 11 12 1 2 3 4<br />
Time of Day<br />
Dark-Green Canvas<br />
Bagged Seedlings - Sun<br />
White Cloth Sheet<br />
Air Temperature - Sun<br />
Mylar ® Silver Surface<br />
Mylar ® White Surface<br />
Bagged Seedlings - Shade<br />
Figure 10-126 | Protect nursery<br />
stock during transportation<br />
During transportation and onsite storage,<br />
nursery stock should be covered<br />
with special reflective tarps (A) which<br />
have been proven to reduce temperature<br />
buildup (B).<br />
Spacing Between Plants<br />
24<br />
22<br />
20<br />
18<br />
16 B<br />
15<br />
12<br />
10<br />
A<br />
8<br />
6<br />
Figure 10-127 | Estimating<br />
spacing between plants<br />
Approximate distance between plants can<br />
be determined from this graph by knowing<br />
the target plants per acre, and, in reverse, the<br />
plants per acre can be determined by knowing<br />
the target spacing between plants.<br />
4<br />
2<br />
0<br />
100 200 400 600 800<br />
C<br />
1,000 1,200 1,400 1,600 1,800 2,000<br />
Plants per Acre<br />
<strong>Roadside</strong> <strong>Revegetation</strong>: An Integrated Approach to Establishing Native Plants and Pollinator Habitat<br />
361
IMPLEMENTATION GUIDES<br />
A<br />
B<br />
Figure 10-128 | Healthy root<br />
structure is important<br />
Roots will circle and accumulate at the bottom<br />
of some container types (A), especially if the<br />
stock has been held too long. Pruning these<br />
roots at planting will ensure that new roots<br />
will promptly grow out into the surrounding<br />
soil (B).<br />
These spacing requirements are an average. Depending on the plantability of a site, the<br />
specified average spacing may vary up to 25 percent in any direction to find a suiTable planting<br />
spot. Where an unplanTable spot is encountered, the planter will plant in the closest planTable<br />
spot. Whenever possible, plants should be installed next to stumps, logs, or other obstacles<br />
that provide partial protection from sun, wind, and animals. If planting islands are designed<br />
into the planting areas, each island should be marked within the planting area by the contract<br />
inspector and the species mix should be stated in the contract.<br />
Handling Care – Plants must be handled with care to prevent damage to roots and foliage.<br />
Seedlings must not be thrown, dropped, hit, or otherwise mechanically impacted. Extracting<br />
the root plug from the container must be done gently, avoiding excessive force when pulling<br />
the seedling from the container. Seedlings should not be removed from containers until the<br />
hole is excavated. The container is then removed, and the seedling is quickly planted. Excessive<br />
exposure of the root system to the air will decrease seedling survival and growth (Greaves<br />
and Hermann 1978).<br />
Root Pruning – The bottoms of some containers are poorly designed, causing roots to circle<br />
or build up at the bottom of the pot (Figure 10-128A). These damaged roots must be cut prior<br />
to planting to prevent potential root strangling, especially for tap-rooted woody species<br />
(Figure 10-128B). Root pruning is best accomplished at the nursery, but must be stated in<br />
the growing contract to cover the added expense. Pruning in the field is not recommended<br />
because of the increased root exposure. However, it may be necessary when nursery stock<br />
arrives with constricted roots.<br />
Container Moisture – Root plugs that are dry must be thoroughly moistened prior to planting.<br />
Irrigating seedlings at the nursery several days before shipping and again on the day of<br />
shipping assures that root plugs are completely wet. These instructions must be conveyed to<br />
the nursery manager prior to picking up the seedlings. Provisions should be in the contract<br />
that addresses the need for wetting root systems should they be dry at the time of planting.<br />
Wetting rootplugs can be accomplished by dipping seedling containers into a large water<br />
container, such as a cattle trough or trash can, prior to planting. Planting seedlings using the<br />
pot planter assures that the root plugs are wet at planting.<br />
Temporary Storage – If container plants cannot be planted in one day, they can be stored<br />
in the field in a well-sheltered area protected from the sun and animals. Reflective tarps<br />
are recommended to keep plants cool and moist during on-site storage (Figure 10-126). If<br />
container plants are left out for several days, the root plug should not be allowed dry out.<br />
If they do lose moisture, the containers must be irrigated prior to planting. Plants that have<br />
been extracted and placed in storage boxes or bags should not be left on–site, but returned<br />
to a local cooler for storage.<br />
<strong>Roadside</strong> <strong>Revegetation</strong>: An Integrated Approach to Establishing Native Plants and Pollinator Habitat<br />
362
IMPLEMENTATION GUIDES<br />
Planting – Prior to preparing the planting hole, the planters must clear the surface<br />
of the planting spot of all limbs, logs, snow, duff, litter, rocks, and other loose debris.<br />
If sod, crowns of living plants, and roots are present, they must be scalped down<br />
to moist mineral soils. Clearing and scalping dimensions must be stated in the<br />
contract. Planting holes shall be located near the center of the prepared planting<br />
spot and they should be dug vertically rather than perpendicular to the ground<br />
surface. The planting hole should be three to four inches deeper than the total<br />
length of the root system or root plug, and wide enough to fully accommodate<br />
the width of the root system. Seedlings should be placed in the hole so that the<br />
cotyledon scar (the bump or constricted area on the seedling stem that is the<br />
transition from the root system to the stem) is one inch below the ground line.<br />
Species that can be rooted from cuttings can be planted deeper, since portions<br />
of the stem will root when buried. The root plugs should not be forced into the<br />
planting hole, distorted, or broken during planting. After placing the plant in the<br />
hole, excavated soil is placed firmly around the root system so there is no loose<br />
soil or air pockets around the root plug. The root system must not be damaged<br />
during this operation. A small circular water-holding basin can be created around<br />
each seedling after planting to capture water or store irrigation water.<br />
Administer Contract<br />
The planting contract inspector must (1) schedule the shipment of seedlings from the nursery,<br />
(2) be certain that root plugs are moist and ready for planting, (3) have the right quantities<br />
of plants at each planting area, and (4) inspect the contract. In addition, if there are special<br />
planting patterns designed for the planting area, these may need to be marked on the site<br />
prior to planting.<br />
The planting inspector must determine if the conditions are favorable for planting. Seedlings<br />
should not be planted into dry soil unless the planting spot is irrigated immediately after<br />
planting or the pot planter method is being used. Under certain circumstances, high moisture<br />
soils follow geomorphic features, such as creek or river terraces where high ground water<br />
brings moisture to the soil surface. These sites should be identified on the ground at the time<br />
of planting.<br />
Figure 10-129 | Monitoring<br />
outplanting results informs<br />
future decisions<br />
Monitoring the survival and growth<br />
of nursery stock for several years after<br />
planting provides valuable information<br />
for future projects.<br />
Planting Success<br />
Valuable information can be gained by monitoring nursery stock for several years after planting.<br />
The first few months are critical because nursery plants that die immediately after outplanting<br />
indicate a problem with nursery stock quality. Plants that survive initially, but gradually lose<br />
vigor, indicate poor planting or drought conditions. Therefore, plots must be monitored during<br />
and at the end of the first year for initial survival. Subsequent checks after 3 years will give a<br />
good indication of plant growth potential (Figure 10-129). This performance information is<br />
then used to give valuable feedback to the nursery manager, who can fine-tune the target<br />
specifications for the next crop.<br />
10.4 POST INSTALLATION CARE OF PLANT MATERIALS<br />
The first year after plant materials are installed on a project site is typically the most critical<br />
period in a revegetation project because this is when plants become established. Applying the<br />
appropriate mitigation measures to improve the site and soil conditions prior to installation of<br />
plant materials greatly increases the chances of plant establishment. Sometimes even these<br />
measures are not enough to overcome limiting site factors. The implementation guides in this<br />
section cover several post installation measures that can be done to increase the potential<br />
of plant establishment.<br />
<strong>Roadside</strong> <strong>Revegetation</strong>: An Integrated Approach to Establishing Native Plants and Pollinator Habitat<br />
363
IMPLEMENTATION GUIDES<br />
Establishing plants from nursery stock is often limited by animal browsing. Section 10.4.2,<br />
Animal Protection, covers the methods available for protecting plants from different forms<br />
of animal damage. On hot, dry sites, plants need to be shaded from mid to late afternoon<br />
solar radiation. The application of shade cards (Section 10.4.3, Shade Cards) is one method<br />
for protecting young plants from heat stresses. Moderating the climate around plants from<br />
extreme temperatures and high evapotranspiration rates is sometimes accomplished through<br />
the use of tree shelters. Section 10.4.4, Tree Shelters, outlines when these structures are used,<br />
product types, and how they are applied. Some projects require supplemental irrigation for<br />
establishing seedlings on extremely dry sites. Section 10.4.5, Irrigation, discusses two types<br />
of irrigation used in revegetation projects – deep pot irrigation and drip irrigation.<br />
10.4.1 INTRODUCTION<br />
The first several years after the installation of seedlings are critical for the survival of healthy<br />
nursery plants. In the western United States, nursery plants die because of animal damage,<br />
high surface temperatures, high evapotranspiration rates, lack of soil moisture, and vegetative<br />
competition. In this section, we will discuss certain steps to reduce these impacts. Where<br />
animal browsing is high, fencing, netting, and animal repellants are important to consider<br />
(see Section 10.4.2, Animal Protection). For high surface soil temperatures shade cards can<br />
be used to protect seedlings (see Section 10.4.3, Shade Cards). Reducing evapotranspiration<br />
rates is achieved using tree shelters (see Section 10.4.4, Tree Shelters) and shade cards. Some<br />
high visibility projects require fast growth rates and low risk in plant establishment, in which<br />
case irrigation can be considered (see Section 10.4.5, Irrigation). Additional measures that<br />
benefit seedling survival are covered in other sections. These include applying mulch around<br />
seedlings to conserve soil moisture and reduce vegetative competition (see Section 10.1.3,<br />
Mulches), spot fertilizing (see Section 10.1.1, Fertilizers), and applying mycorrhizal inoculum<br />
(see Section 10.1.7, Beneficial Soil Microorganisms).<br />
10.4.2 ANIMAL PROTECTION<br />
Planted seedlings can be damaged by a variety of animals, including cattle, deer, elk, gophers,<br />
and voles. While some damage by animals can be expected, excessive damage should be<br />
prevented. There are a variety of methods to protect seedlings which include rigid and nonrigid<br />
netting, fencing, and animal repellents.<br />
Netting<br />
A common practice for protecting seedlings from browsing animals is to install a plastic netting<br />
over each seedling. The netting acts as a barrier to foraging of foliage, stems, and even root<br />
systems, without impeding plant growth. It has been used to protect seedlings from deer,<br />
elk, gophers, and other ground burrowing animals.<br />
There are two general types of netting – rigid and non-rigid. Non-rigid netting is a soft, finemesh<br />
plastic material. When installed on a seedling, it fits snuggly around the foliage like a sock.<br />
The rigid netting (Figure 10-130) has larger mesh openings and holds its form when installed.<br />
Rigid netting, while typically more expensive, is usually preferred over non-rigid because it is<br />
easier to install and seedling growth inside the netting is less restricted.<br />
Netting must be installed as soon after planting as possible to ensure immediate protection.<br />
If installation occurs after bud break, care must be taken not to break or damage the terminal<br />
leaders or buds. Rigid netting is held in place with one or two bamboo stakes woven through<br />
the netting at three places and driven into the soil at a minimum depth of 8 inches. For deer<br />
and elk protection, netting is placed so the height of the netting is several inches or more<br />
above the terminal bud. Non-rigid netting is simply placed over the foliage like a sock and<br />
Figure 10-130 | Rigid netting<br />
Rigid netting can protect seedlings<br />
from deer, elk, and gopher damage. The<br />
netting in this picture was installed 3<br />
inches below the ground line to protect<br />
the seedling from gophers while the<br />
foliage and terminal leader is protected<br />
from deer and elk browsing.<br />
<strong>Roadside</strong> <strong>Revegetation</strong>: An Integrated Approach to Establishing Native Plants and Pollinator Habitat<br />
364
IMPLEMENTATION GUIDES<br />
not secured with stakes. Rigid netting can offer some protection from gopher damage if the<br />
netting is installed more than several inches below the surface of the soil (Figure 10-130).<br />
The effectiveness of the netting decreases as the terminal leader grows out of the rigid netting<br />
and become susceptible to browsing. At this point, the netting can be repositioned upward to<br />
protect the terminal leader, which requires annual maintenance. At some point, netting must<br />
be removed entirely to avoid restricting seedling growth and ultimately killing the seedling.<br />
Some netting has been manufactured with photodegradable material which will break down<br />
within several years, eliminating the need for removal. Nevertheless, sites that have had any<br />
type of plastic netting installed on seedlings should be visited several years after planting to<br />
determine whether the plastic netting is decomposing or needs to be removed.<br />
Fencing<br />
Fencing is often used to protect planted or seeded areas from wild ungulate and livestock<br />
grazing or trampling. Each group of animals requires different fencing specifications. Fence<br />
height for wild ungulates require 8 to 12 ft (Helgerson and others 1992) while fence height for<br />
livestock is 4 to 5 ft. Fences must be installed prior to seeding or planting to ensure optimal<br />
plant establishment.<br />
Fencing entire planting or seeding areas is expensive to install and maintain. Maintenance must<br />
be given high priority because one break or opening in the fence will place the entire project<br />
at risk. It has been recommended that fences be monitored and maintained at least once a<br />
week and up to three times per week during peak browse season (Greaves and others 1978).<br />
An alternative to fencing entire planting areas is to fence strategically located areas, such as<br />
planting islands. Fenced areas, called exclosures, range in diameter from 6 to 15 ft and are<br />
typically constructed with a 14 gauge, galvanized welded wire mesh (2- by 4-inch openings).<br />
Fence heights can be reduced around small diameter exclosures because wild ungulates<br />
are less likely to jump into small areas (Gobar 2006). Fence heights as low as 5 ft have been<br />
installed with good results (Riley 1999). In this strategy, the smaller size and greater number<br />
of exclosures reduces the risk of a failed project. After seedlings have grown high enough to<br />
withstand grazing and browsing pressures, small enclosures should be removed.<br />
Animal Repellent<br />
Browsing by deer and elk can be temporarily controlled by applying animal repellents to the<br />
foliage of seedlings. There are a variety of repellents on the market with varying degrees of<br />
effectiveness. Trent and others (2001) tested 20 products for effectiveness in reducing deer<br />
browse on western red cedar (Thuja plicata) seedlings and found that products emitting<br />
sulfurous odors were the most effective. These products contain active ingredients such as<br />
“putrescent whole egg solids” or “meat meal.” Less effective products were those causing pain<br />
or irritation, containing active ingredients such as capsaicin, garlic, d-limonene, and thiram. Of<br />
the products tested, the least effective repellents protected seedlings for a few weeks, while<br />
the most effective protected seedlings for up to three months. Since seedlings are generally<br />
more palaTable after winter dormancy, deer repellents should be applied just before bud break<br />
(Helgerson and others 1992) and at several month intervals during the active growing period as<br />
needed. Animal repellents in a hydrophilic powder formulation are reported to adhere better<br />
and last longer in climates with high rainfall than liquid forms (Helgerson and others 1992).<br />
10.4.3 SHADE CARDS<br />
Since high soil surface temperatures can limit seedling survival and growth, it is important<br />
that the stem of the seedling (where heat buildup occurs and causes the most damage) is<br />
shaded from the sun (Childs and Flint 1987). Seedlings can be planted next to obstructions,<br />
such as logs, to utilize the shade these structures provide. Unless the placement of obstacles<br />
<strong>Roadside</strong> <strong>Revegetation</strong>: An Integrated Approach to Establishing Native Plants and Pollinator Habitat<br />
365
IMPLEMENTATION GUIDES<br />
is planned into the project, construction sites will usually be free of material large enough<br />
to cast shadows. An alternative, but less effective, method of creating shade is using shade<br />
cards. Shade cards are small, easy-to-install structures that shade the lower portions of the<br />
seedling from high surface soil temperatures (Figure 10-131). Tesch and Helms (1992) reviewed<br />
numerous studies that evaluated the effects of shade cards on planted seedlings and found<br />
that, while the use of shade cards can significantly improve seedling survival, they should<br />
only be considered on sites where several revegetation conditions are suboptimal, including<br />
south-facing aspects, sites with high winds, or when planting small, poor quality stock.<br />
To be effective, shade cards should be installed in the spring after planting and before hot<br />
weather sets in. It is important to know where the shadow of the installed shade card will be<br />
cast in order to know where to place the card. The shadow must cast shade on the stem and<br />
lower portions of the seedling to protect these areas from high surface temperatures during<br />
the hottest portion of the day (Childs and Flint 1987). The length of the shadow is dependent<br />
on the longitude, date, time of day, slope angle, and height of the shade card. Improper<br />
installation of shade cards is a common mistake which typically occurs when cards are placed<br />
on the wrong side of the seedling. Card installers must be aware of the cardinal directions at<br />
all times during the day, which can be difficult on cloudy days. For this reason, contractors<br />
and inspectors should use a compass when installing cards and inspecting contracts. Another<br />
common mistake is not placing the shade card close enough to shade the base of the seedling<br />
during the hottest time of the day. Shade cards are also used to protect seedlings from strong,<br />
drying winds that create high moisture stress for establishing seedlings. Typically, shade cards<br />
are placed on the windward side of the seedling to deflect the wind. It is important to know<br />
the direction of the strongest or hottest wind in order to properly install the shade cards. For<br />
example, on a site with strong, drying winds coming up-valley in the afternoon, two shade cards<br />
would be installed at 90° angle to each other on the down-valley side to enclose the seedling.<br />
Shade cards are made from shingles, cardboard, tarpaper, and polypropylene mesh. Selecting<br />
the appropriate shade card for your site should be based on how easy the shade card is to<br />
install, the weight, dimensions, life span, and costs. The drawbacks to the use of shade cards<br />
are the visual impact on the site and the fact that they must be removed after several years.<br />
Figure 10-131 | Shade cards<br />
Shade cards are placed on the south side<br />
of the seedling so the shadow cast by<br />
the shelter protects the lower portion<br />
of the seedling. This photo was taken<br />
two years after shade card placement.<br />
10.4.4 TREE SHELTERS<br />
Tree shelters are translucent plastic tubes that are placed around seedlings after planting (Figure<br />
10-132). They benefit seedling establishment by creating a favorable growing environment<br />
while shielding the seedling against animal damage. Tree shelters enhance plant growth<br />
by creating a microclimate similar to a mini-greenhouse, which has lower light intensities,<br />
higher temperatures, and higher relative humidities (Applegate and Bragg 1989; Jacobs and<br />
Steinbeck 2001). On high elevation sites, tree shelters increase above-ground temperatures<br />
and extend the growing season (Jacobs and Steinbeck 2001). Seedling survival and growth is<br />
enhanced by tree shelters on some sites because increased condensation on the inner shelter<br />
walls during the evening, drips into the soil and increases soil moisture (Bergez and Cupraz<br />
1997). On windy sites, tree shelters protect seedlings from wind damage and blowing sands<br />
(Bainbridge 1994). In addition, tree shelters protect seedlings from large game, gophers, rabbits,<br />
voles, and grasshoppers (Tuley 1985; McCreary and Tecklin 1997; Jacobs and Steinbeck 2001).<br />
Where to Use: Tree shelters should be considered for sites where the potential for animal<br />
damage is extreme and seedling survival and rapid seedling growth are essential. These sites<br />
include but are not limited to sites with the following characteristics:<br />
◾◾<br />
Gopher or vole damage<br />
◾◾<br />
High elevation<br />
◾◾<br />
High winds<br />
◾◾<br />
Hot and dry<br />
Figure 10-132 | Corrugated<br />
plastic tree shelter<br />
Corrugated plastic tree shelters create<br />
a microclimate around seedlings to<br />
enhance moisture and temperatures<br />
for seedling growth. In addition, they<br />
protect plants from animal browsing.<br />
<strong>Roadside</strong> <strong>Revegetation</strong>: An Integrated Approach to Establishing Native Plants and Pollinator Habitat<br />
366
IMPLEMENTATION GUIDES<br />
◾◾<br />
High solar intensity<br />
◾◾<br />
Low water-holding capacity soils<br />
◾ ◾ “One-shot” planting<br />
Drawbacks: Tree shelters are not intended for all species or site conditions. Several studies<br />
have shown that, under certain climates, seedlings grown in tree shelters are more susceptible<br />
to low temperature extremes than those grown in the open (Svihra and others 1993; Kjelgren<br />
and others 1997). These conditions occur in the late winter and early spring on some sites when<br />
warmer daily temperatures in tree shelters induce earlier bud break and stem dehardening,<br />
leaving seedlings more susceptible to cold temperatures. Air temperatures can also be colder<br />
at night in tree shelters on some sites because tree shelters can potentially trap cold air near<br />
the ground surface (Swistock and others 1999). On the opposite extreme, extremely high<br />
temperatures in the summer can be reached inside the shelters during mid-day, which might<br />
be detrimental to seedling growth. For these reasons, installing tree shelters should be done<br />
with some understanding of the effects that the shelters will have on each species to be planted<br />
and the climate of the site. Small trials, prior to installation, can point out potential problems.<br />
In visually sensitive areas, tree shelters do not blend well with natural backgrounds. Depending<br />
on the species and the site, tree shelters might have to remain around plants for up to five<br />
years. In addition, long range planning for shelter removal is critical; without removal, the<br />
stem of the plant can be restricted.<br />
Installation: Installing tree shelters may be done during or immediately after planting to<br />
protect seedlings from animal damage. Tree shelters are usually delivered in stacks of plastic<br />
sheets. They are assembled on site into cylinders that are placed over the seedling and held<br />
upright with a stake (Figure 10-132). The stake is driven into the soil so that the bottom of each<br />
cylinder is in direct contact with the soil surface. If burrowing animals are a problem, shelters<br />
can be installed several inches below the soil surface. This is an effective control of gophers<br />
and voles (McCreary and Tecklin 1997; Jacobs and Steinbeck 2001). Netting<br />
is sometimes placed over the opening of the shelter to prevent birds and<br />
lizards from becoming trapped (Bainbridge 1994). Rigid tubing can be<br />
placed over the top of the tree shelter to protect the emerging foliage<br />
3.0<br />
from deer and elk browse (Figure 10-133). Tall tree shelters will require very<br />
strong stakes anchored firmly in the soil to withstand strong winds. As the<br />
2.5<br />
shelters are installed, care must be taken to avoid skinned bark, damaged<br />
2.0<br />
buds, or broken leaders. Where moisture is a limiting factor, weeding the<br />
vegetation from around the shelters is essential. Seedlings competing with<br />
1.5<br />
weeds are unlikely to take advantage of the water saved by a tree shelter<br />
(Bainbridge 1994; McCreary and Tecklin 1997).<br />
1.0<br />
Maintenance and Removal: Installed properly, tree shelters require little<br />
0.5<br />
maintenance. Nevertheless, sites where tree shelters are installed should<br />
be inspected annually to assess seedling conditions in the tree shelter and<br />
0<br />
determine if any maintenance is needed. Since yellow jackets and other<br />
animals create homes inside tree shelters, it is wise to be cautious when<br />
conducting inspections.<br />
Tree shelters create growing conditions that favor seedling height growth<br />
over stem diameter growth (Figure 10-134). Since tree shelters physically support the seedlings<br />
while they are growing, the seedling directs more of its energy into growing up to the light<br />
and less into the stem. Tree shelters must not be removed until a portion of the seedling crown<br />
has grown out of the shelter. If the tree shelter is removed while it is still growing inside the<br />
shelter, the seedling will not be capable of supporting itself. Once the seedling has emerged<br />
from the shelter, stem diameters will continue to increase as the foliage acclimates.<br />
Available Products: Tree shelters are available in a variety of shapes, sizes, colors, and styles<br />
from companies that specialize in reforestation, restoration products, or grape growing.<br />
First Year Seedling Height (m)<br />
Height<br />
Stem Diameter<br />
Figure 10-133 | Rigid<br />
tubing tree shelter<br />
Rigid tubing can be installed over the<br />
top of the tree shelter to protect seedlings<br />
from larger browsing animals.<br />
1 2 3 4<br />
Height of Shelter (m)<br />
Figure 10-134 | Effects of tree shelters<br />
A study conducted with Australian red<br />
cedar (Toona australis) on a warm, moist<br />
site in North Queensland showed that,<br />
as taller tree shelters are used, first year<br />
shoot growth increases. Stem diameters,<br />
however, do not change (Applegate and<br />
Bragg 1989).<br />
12<br />
10<br />
8<br />
6<br />
4<br />
2<br />
0<br />
First Year Stem Diameter (cm)<br />
<strong>Roadside</strong> <strong>Revegetation</strong>: An Integrated Approach to Establishing Native Plants and Pollinator Habitat<br />
367
IMPLEMENTATION GUIDES<br />
Color. Color and translucency of the plastic are important characteristics for selecting a tree<br />
shelter. Brown-colored tree shelters greatly reduce solar radiation and, in one study on a high<br />
elevation site, was shown to drastically decrease seedling survival of Engelmann spruce (Picea<br />
engelmannii) (Jacobs and Steinbeck 2001). But on hot, dry sites, reduced radiation might<br />
benefit seedlings. Oak seedlings (Quercus spp.) planted in a semi-arid environment actually<br />
performed best in short, brown-colored shelters because of reduced daily temperatures<br />
(Bellot and others 2002).<br />
Lighter colored tree shelters allow greater solar radiation to reach the seedling, but can also<br />
heat up when they are exposed to direct sunlight. Highly translucent tree shelters should<br />
be considered where light is limiting. On the other hand, low translucent shelters might be<br />
more appropriate for sites where solar radiation and mid-day temperatures are high in order<br />
to reduce the potential for overheating.<br />
Material. Tree shelters are made from translucent plastic for light transmission built with<br />
different degrees of sturdiness. Corrugated tree shelters are the sturdiest and are used on<br />
sites with strong winds. Corrugated materials are also used in the taller tree shelters for added<br />
support (Figure 10-132), while thin plastic can be used in shorter shelters. Tree shelters are<br />
typically designed to degrade in five years, but in many cases they do not. Many shelters can<br />
therefore be reused, which will reduce project costs.<br />
Ventilation. Without ventilation, tree shelters will build up heat on warm days, especially if<br />
they are in direct solar radiation. Maximum daily summer temperature in shelters can be 8<br />
to 16° C (15 to 30 degrees F) higher than ambient air temperatures (Steinfeld 2005). Extreme<br />
temperatures can be reached on days where ambient air temperatures exceed 38° C (100°<br />
F). For these sites, shelters with some form of ventilation, such as holes, should be used.<br />
Ventilated tree shelters have been shown to reduce maximum daily shelter temperatures by<br />
3° C (5° F) (Swistock and others 1999). Where ventilation is needed, taller shelters will require<br />
more ventilation than shorter shelters.<br />
A ventilated tree shelter may restrict CO2 in the area around the seedlings, which would be a<br />
further consideration for ventilation. Some studies have shown that CO2 is very low in shelters<br />
(Dupraz and Bergez 1997). However, other studies that have shown higher levels of CO2 within<br />
shelters than outside (Frearson and Weiss 1987).<br />
Size. Selecting the size of the shelter should be based on the anticipated growth rates of the<br />
species planted and the anticipated animal damage. Shelter heights range from 1 to 9 ft, and<br />
diameters up to 6 inches. To obtain the greatest benefit from tree shelters, the shelter height<br />
should not exceed the maximum seedling growth in the first year. Fast-growing species should<br />
have tall shelters; shorter shelters should be used for slow-growing species. Ideally, the shelter<br />
height should be greater than the browsing level of the foraging animal. For instance, tree<br />
shelter heights in deer browse areas should be at least 4 ft tall so that new seedling growth<br />
from the top of the tube is not severely browsed back. Extending the protection of the tree<br />
shelter can be done by using a rigid netting placed over the top of the shelter. Large shelters<br />
can be cut into any height or diameter needed for the project. Very small shelters (less than<br />
6 inches tall) can be used around germinating seeds to protect them from small animals and<br />
create a micro-climate for germination (Figure 10-135).<br />
Costs: Tree shelters can be an expensive addition to the revegetation project. The high costs<br />
to purchase, assemble, install, maintain, and remove shelters should be considered against the<br />
benefit of increase survival and growth. On projects where smaller, less expensive seedlings are<br />
being planted, the cost savings from not planting larger stock can offset the installation of tree<br />
shelters. Assuming that tree shelters increase seedling survival, fewer seedlings would need<br />
to be planted, and these savings could offset the costs of installing tree shelters. Where quick<br />
establishment of vegetation is the objective, the use of tree shelters should be considered.<br />
Figure 10-134 | Tree shelters<br />
and germinating seeds<br />
Small tree shelters can be placed around<br />
germinating seeds to enhance germination<br />
and early seedling establishment, as<br />
shown in this picture of an establishing<br />
California black oak (Quercus kelloggii)<br />
seedling in a tree shelter made out of<br />
x-ray film.<br />
<strong>Roadside</strong> <strong>Revegetation</strong>: An Integrated Approach to Establishing Native Plants and Pollinator Habitat<br />
368
IMPLEMENTATION GUIDES<br />
10.4.5 IRRIGATION<br />
There is a wide range of irrigation methods and techniques available to the revegetation<br />
specialist, ranging from simple to elaborate, and modestly priced to costly. Since irrigation is<br />
often a very expensive revegetation strategy for most projects, the decision to irrigate, and<br />
subsequently the selection and design, must be integrated into the objectives of the road<br />
project during the planning stages. The most common reason for irrigating in the western<br />
United States is to aid in seedling survival during the first several growing seasons. Those sites<br />
that have low soil water-holding capacities, high evapotranspiration rates, or low summer<br />
rainfall meet these criteria. Irrigation is also used when the project objectives call for a quick<br />
establishment of vegetation for visual screening, erosion control, or slope stabilization.<br />
Wildland irrigation is almost always a temporary measure, spanning a maximum of three years.<br />
Therefore, elaborate or expensive irrigation systems are not often the best choice for these<br />
situations. Low-tech systems, requiring minimal maintenance, tend to be more appropriate<br />
for wildland restoration.<br />
The challenge in wildland irrigation is the timing and placement of water in the soil. An<br />
irrigation system that delivers water when the plant is less likely to need it is wasteful and can<br />
be detrimental to the seedling. A system or schedule that applies water when the plant requires<br />
it for survival or growth is most cost effective and beneficial for seedling survival and growth.<br />
Developing irrigation schedules based on plant needs is an essential part of using irrigation<br />
for establishing plants, and those needs change based on the species being established,<br />
nursery stocktype, soils, and climate.<br />
Placing the water in the soil profile where it can be directly accessed by much of the root system<br />
is critical for efficient use of an irrigation system. Some irrigation systems moisten more of the<br />
soil profile than will be accessible by the establishing root system, and water is consequently<br />
wasted. Other ineffective systems barely wet the soil surface, leaving the applicator satisfied,<br />
but the roots without water. The objective of an efficient and effective irrigation system in<br />
wildland settings is to deliver only the amount of water needed, when and where it is needed<br />
for seedling survival and growth.<br />
Tree and shrub seedlings survive by growing roots down into the soil profile, accessing moisture<br />
at deeper portions of the soil profile than annual grasses and forbs. Deep placement of water<br />
for these species is far more important than surface soil moisture. Yet many irrigation systems,<br />
such as drip, basin, and overhead sprinklers, deliver water through the surface, wetting soil<br />
where it is not needed, and encouraging weeds and other competitive plants to establish<br />
and thrive. Furthermore, surface irrigation does not always assure moisture will be evenly<br />
delivered to the deeper portions of the soil where the roots of trees and shrubs are growing.<br />
Soil structure and texture affect the wetting-front patterns of surface-applied irrigation water.<br />
If the soil is compacted, the amount of water that is delivered to the lower rooting zone can be<br />
reduced. A better method of water delivery to the root zone of trees and shrubs is to bypass<br />
the surface of the soil completely.<br />
Deep Pot Irrigation<br />
There are several irrigation methods developed for arid land revegetation that bypass the soil<br />
surface and deliver water directly to the root zone. These systems include deep pot, porous<br />
hose, and wick irrigation methods (Bainbridge 2006a). Because these systems deliver water<br />
directly to the soil profile where roots are actively growing, far less water is required. Deep pot<br />
irrigation (Figure 10-136) appears to be the most effective and practical method for irrigating<br />
planted seedlings in arid environments (Bainbridge 2006b). This system has been found to<br />
be three times more effective at increasing seedling survival than surface irrigation using the<br />
same amount of water (Bainbridge and others 2001).<br />
Screen<br />
PVC pipe<br />
Wetting<br />
front<br />
Figure 10-135 | Deep pot irrigation<br />
Deep pot irrigation uses an open ended<br />
PVC pipe placed next to a planted<br />
seedling. Small holes (1 mm) are drilled<br />
2 to 3 inches down the pipe and positioned<br />
toward the root system. A screen<br />
is placed over the top of the pipe to<br />
keep animals out. The size of the pipe<br />
and placement is designed to deliver<br />
the appropriate amount of water to<br />
actively growing roots (modified after<br />
Bainbridge 2006b).<br />
<strong>Roadside</strong> <strong>Revegetation</strong>: An Integrated Approach to Establishing Native Plants and Pollinator Habitat<br />
369
IMPLEMENTATION GUIDES<br />
Deep pot irrigation delivers water to the root system through a pipe positioned<br />
next to the seedling (Figure 10-136). The pipe is either filled periodically by<br />
hand or through an installed drip irrigation system. The soil is moistened as<br />
water drains through both the bottom of the PVC pipe and the holes drilled in<br />
the sides. The amount of water delivered to the soil depends on the size of the<br />
pipe and how much water is applied. Deep pot irrigation pipes are typically<br />
made from PVC pipes, though most pipe or tubing material can be used. Pipe<br />
diameters range from 0.5 to 3 inches. Pipe lengths range from 8 to 18 inches,<br />
depending on the stocktype and water volume to be delivered. A seedling<br />
with a short root plug will require a shorter pipe, whereas a longer root plug<br />
will require a longer pipe. The bottom of the pipe should be positioned no<br />
deeper than the length of the root plug so the wetting front moves around<br />
the bottom and lower portions of the plug where it can be accessed by new,<br />
advancing roots. The top of the pipe is screened to prevent animal entry and<br />
is placed several inches above the level of the soil.<br />
The diameter of the pipe will determine the quantity of water that can be delivered at any one<br />
irrigation (Figure 10-137). Given the same pipe lengths, a 2 inch diameter pipe holds 4 times<br />
the amount of water as a 1 inch pipe, and a 3 inch diameter pipe holds 8 times the amount<br />
of water. Since filling pipes is expensive, determining the proper diameter is important.<br />
Oversized pipes will deliver a wetting front that extends beyond where it can be accessed<br />
by the root system, and water will be wasted. Pipes that are too small will not fully wet the<br />
area around the advancing rooting zone, requiring more frequent irrigations. Pipe size and<br />
irrigation frequencies depend on:<br />
Soil Type – Sandy or rocky soils have low water-holding capacities, causing wetting fronts to<br />
travel deeper and in a narrower band. Less water but more frequent irrigations are needed in<br />
these soils. Pipes must be placed closer to the root plug to ensure the wetting front reaches<br />
the root system. Finer textured soils, such as loams and clays, have a higher water-holding<br />
capacity and wider wetting fronts. More water can be applied in these soil types and at less<br />
frequent intervals than sandy soils.<br />
Stocktype – Large stocktypes have greater root volumes and greater above-ground vegetation<br />
to support than smaller stocktypes, and therefore require more irrigation water. However,<br />
smaller stocktypes might require more frequent irrigation.<br />
Seedling Quality – Healthy seedlings grow new roots quickly and can access deeper soil<br />
moisture. Poor quality seedlings are slow to initiate roots and therefore must be irrigated<br />
more frequently.<br />
Competing Vegetation – Where undesirable vegetation is growing near planted seedlings,<br />
soil moisture is depleted sooner, requiring more frequent irrigations than if seedlings were<br />
free from competing vegetation.<br />
Species – Every species has unique rooting patterns, growth rates, and water needs. Those<br />
that grow roots quickly and have a higher rate of water withdrawal require larger, deeper<br />
pipes and more frequent irrigations. These species include many of the fast growing riparian<br />
species such as cottonwoods, willows, and maples. For more information, contact the nursery<br />
manager growing the species of interest. They are very familiar with root growth and water<br />
needs by species.<br />
The volume of the pipes and frequency of irrigations will determine the type of water delivery<br />
system to use. Sites that need frequent irrigations and high volumes of water per plant might<br />
require water delivery through a drip system (see Section 10.4.5.2, Drip Irrigation). For most<br />
projects, however, pipes can be economically watered by hand using backpack spray equipment<br />
or fire bladder bags. Bladder bags hold approximately 5 gallons of water and can be filled from<br />
water trucks or large water containers positioned in pickup beds. Assuming that an irrigator<br />
can carry 20 quarts of water at a time (5 gallons) and each plant in the project requires a quart<br />
Water Delivery (quarts)<br />
2.5<br />
2.0<br />
1.5<br />
1.0<br />
0.5<br />
0.0<br />
8<br />
3 inch Diameter<br />
2 inch Diameter<br />
1 inch Diameter<br />
10 12 14 16 18<br />
Pipe Length (inches)<br />
Figure 10-137 | Water delivery<br />
The maximum amount of water that can<br />
be delivered to a root system in a single<br />
irrigation (y axis) is determined by the<br />
pipe length (x axis) and the diameter<br />
of the deep pot (lines). For example,<br />
a 14-inch pipe with a 1-inch diameter<br />
will hold approximately 0.15 quarts of<br />
water; a 2-inch diameter pipe will hold<br />
0.75 quarts; a 3-inch diameter pipe will<br />
hold 1.7 quarts of water.<br />
<strong>Roadside</strong> <strong>Revegetation</strong>: An Integrated Approach to Establishing Native Plants and Pollinator Habitat<br />
370
IMPLEMENTATION GUIDES<br />
of water, the applicator could irrigate 20 seedlings before returning for more water. If less water<br />
is required, more plants could be irrigated before refilling is necessary.<br />
Deep pot irrigation allows for the introduction of soluble fertilizers (see Section 10.1.1, Fertilizers)<br />
and mycorrhizal fungi inoculum (see Section 10.1.7, Beneficial Soil Microorganisms) if seedlings<br />
require these treatments. Since soluble fertilizers are delivered directly to the roots, bypassing<br />
the soil surface, weeds are not encouraged to grow. Care must be taken when determining<br />
fertilizer rates to avoid increasing soluble salts above levels that are toxic for root growth. Salt<br />
levels and pH of the irrigation water must be monitored to assure that salts do not exceed<br />
toxicity levels for plant growth (see Section 5.5.5, pH and Salts).<br />
Determining when to irrigate can be based on the moisture stress status of the plant. An accurate<br />
method for determining PMS is using a pressure chamber (Inset 10-23). This equipment reads<br />
plant stress (in negative bars) at the time of the readings. PMS readings should be made in<br />
the early morning, prior to sunrise, when diurnal PMS is at its lowest. Five seedlings should be<br />
collected in one area and averaged per site. If pre-dawn PMS readings are less than -15 bars,<br />
seedlings are under high moisture stress and must be irrigated soon to keep the seedlings<br />
from dying. If the objective of irrigation is for fast seedling growth, then PMS during the plant<br />
growth (spring and fall) must be kept above -5 bars. PMS equipment is expensive to purchase.<br />
However, many Forest Service district offices use and maintain this equipment.<br />
Drip Irrigation<br />
Drip (or low pressure) irrigation is generally a temporary measure to help establish roadside<br />
plantings. It is typically used for one or two seasons to establish nursery-grown plants and<br />
then removed. Setting up drip irrigation might be considered extravagant. For projects where<br />
there is no tolerance for seedling failure, this can be a viable, economical alternative (Bean<br />
and others 2004).<br />
Inset 10-23 | Measuring plant moisture stress<br />
(modified from McDonald 1984)<br />
Measuring plant moisture stress (PMS) is an accurate method to help<br />
determine the water needs and status of a plant. When a seedling<br />
Water Column in Tension<br />
is under moisture stress, it is pulling water from the soil through the<br />
stem. The water in the stem is under tension, much like a rubber band<br />
that is being stretched (B). When a small branch is cut, the tension in<br />
the stem is released and the water shrinks back from the cut surface<br />
(C). The further back the water shrinks, the more moisture stress the<br />
plant is under. The cut end of the stem is placed through a small hole<br />
in a stopper, with the end protruding from the lid (D). The foliage<br />
is placed in the steel chamber and tightened so it is airtight (E).<br />
Nitrogen gas is slowly applied into the chamber, exerting pressure<br />
Safety<br />
through the stomata and pushing water through the stem toward<br />
Valve<br />
PMS<br />
(bars)<br />
the cut end. When the water just begins to emerge from the cut end,<br />
Nitrogen<br />
Gas<br />
a pressure reading is made. This is the amount of suction or stress<br />
Outlet<br />
Valve<br />
that the seedling is under at the time the sample was collected. Since<br />
Overpressure<br />
Valve<br />
PMS varies throughout a 24-hour period, seedling samples must be<br />
taken in the pre-dawn for consistency and comparison purposes.<br />
PMS readings can be used to determine when to irrigate seedlings. If pre-dawn PMS readings are greater than -15 bars, seedlings are under<br />
high moisture stress and must be irrigated soon to keep the seedlings healthy. If the objective of irrigation is for fast seedling growth, then<br />
PMS during the plant growth (spring and fall) must be kept below -5 bars. PMS equipment is expensive to purchase; however, many Forest<br />
Service district offices use and maintain this equipment.<br />
<strong>Roadside</strong> <strong>Revegetation</strong>: An Integrated Approach to Establishing Native Plants and Pollinator Habitat<br />
371
IMPLEMENTATION GUIDES<br />
Some advantages of using drip systems for roadsides are water efficiency, system flexibility,<br />
portability, and ease of application of soluble fertilizers. The main disadvantage is the high<br />
maintenance required to keep the system operational. Drip systems are composed of numerous<br />
points where failures can occur: storage tanks, burst end clamps, connectors, emitters, hundreds<br />
of feet of pipe and drip irrigation tubing. For this reason, the system must be inspected<br />
and maintained regularly during the summer to assure that all seedlings are being properly<br />
irrigated. This involves inspecting all emitters, pipes, tubing, and tanks. Emitters clog with<br />
sediment and insects (Bainbridge 2006c); animals gnaw through tubing when it is above<br />
ground; and plastic water tanks make great shooting targets. These damages to the system<br />
must be repaired before each irrigation cycle. Another disadvantage is that, on hilly sites, the<br />
system must be designed to maintain the correct pressure to each emitter.<br />
In its simplest form, the drip irrigation system consists of (1) a water source, (2) mainline and side<br />
lateral pipes, and (3) drip pipes and emitters. The system is under pressure during irrigation,<br />
which moves water from the water source, through the mainline and side laterals, to the<br />
emitters where seedlings are watered. The objective is to deliver equal amounts of water to<br />
each seedling. This is not a problem when the system is laid out on flat ground and pressures<br />
at any point in the system are equal, but flat terrain is seldom found on highway projects.<br />
On projects that have any slope gradients, there will be changes in pressure depending on<br />
the elevation of the emitters. The pressure change occurs at a rate of 1 lb/in2 (PSI) per 2.31 ft<br />
elevation drop. This means that an emitter at an elevation that is 46 ft lower than the water<br />
source will have a PSI of 20 (46/2.31 = 20), while an emitter at 92 ft lower than the water source<br />
will have a PSI of 40 (92/2.31 = 40). Unless pressure-regulating techniques are used to reduce<br />
the pressure to the lower elevation emitters, the amount of water delivered to those emitters<br />
will be approximately twice that of the upper elevation emitters. Compensating for pressure<br />
changes is critical for delivering equal amounts of water to each seedling. Systems that do<br />
not compensate will have seedlings that receive too much water, while others will not receive<br />
enough during an irrigation cycle.<br />
Water Source – The water source constitutes the beginning point of the drip system. It is<br />
typically the most uphill point because it must feed every emitter below. Water is typically<br />
trucked to the site and pumped directly into the mainline, or stored in temporary, porTable<br />
storage tanks (Figure 10-138). Water trucks range in capacity from 1,000 to 2,500 gallons. If<br />
there is a location for a porTable water storage tank above the planting area, gravity feed can<br />
be used to pressurize the system. Operational water pressure for a drip system ranges from<br />
20 to 40 PSI. To achieve a minimum pressure of 20 PSI with a gravity feed system requires a<br />
46 ft elevation drop from the storage tank to the first line of emitters (20 * 2.31 = 46). If this<br />
drop does not exist, then a pump will be needed to augment the pressure.<br />
Components of a temporary water tank system include filters, on-off valve, backflow, and a<br />
pressure-reducing valve (if the water source pressure is greater than 40 PSI) (Stryker 2001).<br />
When planning water storage, ease of access is an important consideration. Sometimes<br />
water will need to be pumped a substantial distance to a water storage tank. In other cases,<br />
more than one tank will be required to reach all planting areas in complex terrain. Water<br />
from unknown sources should be sent to a qualified lab and analyzed for contaminants and<br />
impurities (Zoldoske 1998). Chances are that most water sources will have impurities that will<br />
clog very small drip emitter openings. Installing a 100 (150 micron) to 150 (100 micron) mesh<br />
filter is recommended (Stryker 2001).<br />
Mainline and Laterals – The mainline delivers water from the water source to the lateral<br />
pipes. The layout of the mainline and laterals can compensate for pressure changes associated<br />
with hilly terrain. A series of parallel lateral lines can be laid out perpendicular to the slope<br />
gradient. Since each line is on the contour, there is no pressure difference between emitters<br />
within a line. Between lateral lines, however, there is change in pressure based on 1 PSI per<br />
2.31 ft elevation drop.<br />
A<br />
B<br />
C<br />
Figure 10-138 | Large<br />
water holding tanks<br />
Large holding tanks are used for temporary<br />
drip irrigation systems (A). A<br />
simple on/ off valve controls water to<br />
the gravity-feed system (B). Pressure<br />
release valves (C) are used to control<br />
water pressure on hilly sites.<br />
<strong>Roadside</strong> <strong>Revegetation</strong>: An Integrated Approach to Establishing Native Plants and Pollinator Habitat<br />
372
IMPLEMENTATION GUIDES<br />
Placing a pressure regulator at the connection between the mainline and each lateral line can<br />
compensate for the pressure increase with elevation drop.<br />
The drip tubing diameter determines the volume of water that can be carried in the lateral<br />
lines and the rate it will be delivered based on friction losses. A two inch pipe, for instance,<br />
carries four times as much water as a one inch pipe, but the costs are correspondingly much<br />
higher. For long stretches, increased frictional losses inside narrow diameter pipes can cause<br />
inadequate water coverage. Increasing water pressures or increasing pipe diameters can<br />
compensate for this.<br />
The carrying capacity is the amount of water that specific tubing can deliver under a specific<br />
line pressure. For example, 0.75-inch tubing has a carrying capacity of approximately 160<br />
gallons per hour at a line pressure of 20 PSI, whereas 1-inch pipe has a carrying capacity of<br />
370 gallons per hour at the same pressure. Charts are available that compare various tubing<br />
diameters, emitter outputs, and system pressures for determining the length of tubing. These<br />
charts must be referenced when designing an efficient drip system.<br />
Emitters – From the laterals, water flows through a smaller diameter pipe to the emitter,<br />
which meters out water directly to the base of each plant. Emitters apply water to the soil<br />
surface without wasting water on the surrounding area, thus discouraging non-target species.<br />
When emitters are placed in a deep pot irrigation system, water efficiency is increased further<br />
because water is delivered directly to the roots. There are many types of emitters, but pressure<br />
compensating emitters work well on hilly topography because they are designed to discharge<br />
water at uniform rates under a range of water pressures. With pressure compensating emitters,<br />
a system at 15 PSI would have the same emitter flow rate as a system at 45 PSI (Stryker 2001).<br />
These emitters are two to three times more expensive than non-compensating emitters. Emitters<br />
come in a range of flow rates, with the most common rates of 2 liters/hour and 4 liters/hour.<br />
Choosing the flow rate for the emitters should be based on soil texture, water requirements<br />
of the plants, water delivery capabilities of a system, and budget. Most designers agree that<br />
placing two emitters at each plant is better than one emitter with twice the output, because<br />
the water distribution area will more closely match the rooting profile of the plant. Two emitters<br />
also offer backup should one of the emitters become clogged.<br />
A good grasp of the soil drainage and water storage characteristics is necessary in choosing<br />
emitter capacity and duration of irrigations. Well-drained soils (e.g., sandy texture or high<br />
coarse fragments) require emitters with higher flow rates, but shorter irrigation time. On the<br />
other hand, poorly drained soils (higher in clays, or compacted) require lower output emitters<br />
and longer irrigations. Size of planting stock will influence the number of emitters and flow<br />
rates; the larger the planting stock, the longer the irrigation cycles and more output emitters<br />
are needed.<br />
There are a limited number of emitters that can be installed on any one lateral line. For example,<br />
0.75-inch pipe or tubing delivers approximately 160 gallons per hour, the number of emitters<br />
that can be installed on the line will vary by emitter output rates. Installing 0.5 gallon/hour<br />
emitters allows approximately 300 emitters (600/2 = 300) on the line. If two emitters were<br />
placed by each plant, 150 plants could be watered on a line. If the emitters were rated at 1.0<br />
gallon/hour, then 75 plants could be watered.<br />
Installation – The installation of a drip system involves placing pipe and inserting emitters.<br />
Tubing comes in rolls and is easiest to lay out like a wheel to keep kinks from developing in<br />
the line. Lateral tubing should be placed upslope from the plant, which will act like a stake<br />
should the tubing move downslope. Tubing migrates until it has been used for a while and<br />
may require periodic staking. When the main line and laterals are in their general locations,<br />
the system is filled with water to flush the pipes clean. The ends are clamped or plugged and<br />
then filled again. This will reveal whether there are any leaks or problems to fix before installing<br />
the tubing to the emitters. A pressure gauge should be used at this time to take readings<br />
across long runs within or between lateral lines to check consistency of pressures. If there are<br />
problems, they should be corrected at this time. Puncturing tubing for emitters can be done<br />
<strong>Roadside</strong> <strong>Revegetation</strong>: An Integrated Approach to Establishing Native Plants and Pollinator Habitat<br />
373
IMPLEMENTATION GUIDES<br />
when the system is charged with water, so that adequate emitter flows and problems are<br />
seen immediately. Some designers choose to bury emitters below the soil surface to reduce<br />
surface evaporation. Losing visual inspection, however, usually outweighs the benefits of this<br />
strategy (Zoldoske 1998).<br />
Operation – Prior to operating the drip system, filters must be cleaned. Check salt levels and<br />
pH of the irrigation water using a pH/conductivity meter to assure that salts do not exceed<br />
toxicity levels for plant growth (see Section 5.5.5, pH and Salts). Once these measures have been<br />
taken, the system can be opened and lines and emitters inspected. If emitters need cleaning,<br />
repair, or repositioning, it is done at this time. Tools and spare parts for the system are brought<br />
along and used where needed. Determining when to irrigate should be determined through<br />
PMS monitoring (Inset 10-23). Determining the duration of the irrigation cycle can be done<br />
once or twice during the growing season through a visual inspection soil profiles dug below<br />
several emitters. Observing the wetting front should be done several hours after the system<br />
has been shut off because the wetting front will have stabilized at that time.<br />
<strong>Roadside</strong> <strong>Revegetation</strong>: An Integrated Approach to Establishing Native Plants and Pollinator Habitat<br />
374
INTRODUCTION<br />
MONITORING AND MANAGEMENT<br />
11— Monitoring and<br />
Management<br />
Procedures<br />
11.1 Introduction<br />
11.2 Revisit Project Objectives and DFCs<br />
11.3 Develop Monitoring Strategy and Protocol(s)<br />
11.4 Record Data and Observations<br />
11.5 Evaluate Data and Apply Any Corrective Measures<br />
11.6 Organize, File and Report Project Results<br />
11.7 Share Lessons Learned<br />
11.8 <strong>Roadside</strong> Maintenance and Management<br />
11.9 Conclusion<br />
<strong>Roadside</strong> An Integrated <strong>Revegetation</strong>: Approach An for Integrated Native Pollinator Approach Habitat to Establishing in <strong>Roadside</strong> Native <strong>Revegetation</strong> Plants and Pollinator Habitat<br />
375 24
MONITORING AND MANAGEMENT<br />
11.1 INTRODUCTION<br />
The goal of roadside revegetation is to establish healthy, functional communities of native<br />
plants along roadsides and on road-related disturbances. However, projects to establish native<br />
plants on disturbed sites rarely turn out exactly the way they were planned. Therefore, regular<br />
visits to the project to evaluate progress, and to intervene if necessary, are essential parts of<br />
the revegetation process.<br />
Monitoring is carried out for two reasons: (1) to correct, manage, and maintain the project<br />
effectively and (2) to learn lessons for future projects. Monitoring provides the answers to<br />
the following questions:<br />
◾◾<br />
Is native vegetation establishing well, or is some corrective action needed?<br />
◾◾<br />
Were regulatory standards or revegetation commitments met?<br />
◾◾<br />
Were there differences in plant responses between different revegetation treatments?<br />
These questions may be answered simply through general observations during routine field<br />
visits, through formal photo point monitoring, or through statistical methods. Monitoring<br />
begins during the implementation phase and continues after the project has been installed. A<br />
general monitoring procedure that can be applied to all revegetation projects does not exist.<br />
Instead, monitoring should be tailored to the objectives of each project and to the uniqueness<br />
of the site. It is important to determine in advance whether formal data collection and statistical<br />
analysis is necessary for the project. Simple field visits or photo point monitoring may provide<br />
sufficient information to determine whether objectives have been met. This chapter discusses<br />
general monitoring and management steps. If statistical methods will be necessary, Chapter<br />
12 outlines some statistical monitoring procedures that cover the most common roadside<br />
revegetation objectives and conditions.<br />
Information collected during monitoring will guide management and maintenance activities<br />
for the current project. This information can also be used to improve revegetation techniques<br />
for future projects. Monitoring completes the project cycle by providing feedback regarding<br />
the success or failure of a revegetation project. This information is used to adapt and improve<br />
other projects that are in the initiation, planning, or even implementation phases of the other<br />
project cycles (Figure 11-1).<br />
Figure 11-1 | The Project Cycle<br />
Monitoring/<br />
Management<br />
Implementation<br />
The<br />
Project<br />
Cycle<br />
Planning<br />
Monitoring and Management are the final components<br />
of the project cycle. Monitoring guides<br />
management actions for the current project,<br />
and provides valuable information to improve<br />
future projects. Management actions can correct<br />
shortcomings in results.<br />
Initiation<br />
Adapt<br />
and<br />
Improve<br />
Initiation<br />
of<br />
Future Projects<br />
<strong>Roadside</strong> <strong>Revegetation</strong>: An Integrated Approach to Establishing Native Plants and Pollinator Habitat<br />
376
MONITORING AND MANAGEMENT<br />
Monitoring can also play an important role in advancing the knowledge and understanding of<br />
establishing native plants on highly disturbed sites. This relatively new field of study lacks basic<br />
field-tested techniques. With well-designed monitoring projects, the revegetation specialist<br />
can provide valuable information for the use of native plants in revegetating harsh sites.<br />
The monitoring and management phase of the project involves several steps:<br />
◾◾<br />
Revisit project objectives and DFCs<br />
◾◾<br />
Develop monitoring strategy and procedure(s)<br />
◾◾<br />
Record data and observations<br />
◾◾<br />
Evaluate data and apply any corrective measures<br />
◾◾<br />
Organize and file project results<br />
◾◾<br />
Share lessons learned<br />
Monitoring information is utilized to evaluate progress and to inform any management activities<br />
needed to correct the results. Long-term road maintenance and management is usually the<br />
responsibility of the road-owning agency. However, monitoring information can facilitate<br />
long-term results and help inform management even after the revegetation specialist’s role<br />
is completed.<br />
11.2 REVISIT PROJECT OBJECTIVES AND DFCS<br />
A common pitfall in many monitoring projects is the lack of clearly stated objectives or<br />
reasoning behind data collection. A good monitoring project is not defined by the amount<br />
of data collected, but by whether the data adequately and efficiently determines whether the<br />
objectives of the revegetation project were met. This question can only be addressed when<br />
the objectives for monitoring are clearly stated. Monitoring efforts must not only link back<br />
to the original project objectives, but also to the specific DFCs developed in the planning<br />
phase (see Chapter 4). Objectives and DFCs set the standards (sometimes called “performance<br />
standards,” “thresholds,” or “indicators”) against which the project is evaluated (Clewell 2004).<br />
DFCs are often stated in quantitative language. For example, the DFC for a cut slope three years<br />
after construction is stated in the revegetation plan as “less than 25% bare soil will be exposed”<br />
and “vegetative cover will be composed of greater than 70% native species.” These DFCs are<br />
very specific and can be used as target values, or thresholds, for determining whether or not<br />
the project was successful. Monitoring methods, or procedures, are developed specifically<br />
around each of these targets or thresholds. When monitoring is approached in this manner,<br />
only the information needed to determine whether targets were met is collected. Expensive,<br />
superfluous data collection is avoided because the DFCs were clearly defined.<br />
11.3 DEVELOP MONITORING STRATEGY AND PROCEDURES<br />
The DFCs identify what will be monitored and defines the minimum acceptable thresholds.<br />
The monitoring strategy defines how those zcriteria will be measured and evaluated. This<br />
involves issues of scope (what level of detail or certainty is needed?), methods (what is the<br />
best way to obtain the necessary information?), and location, timing, and frequency (where,<br />
when, and how often should monitoring take place?). After the information is collected, the<br />
DFC threshold values will be used to evaluate success or failure, in order to determine if results<br />
are acceptable or if corrective action is required.<br />
A monitoring procedure is a specific set of directions that outlines, step by step, how the<br />
monitoring will actually take place in the field. Sometimes several different procedures will<br />
be utilized on one project. The monitoring strategy sums up the monitoring procedures and<br />
creates a comprehensive map, schedule, and budget for monitoring activities for the project.<br />
<strong>Roadside</strong> <strong>Revegetation</strong>: An Integrated Approach to Establishing Native Plants and Pollinator Habitat<br />
377
MONITORING AND MANAGEMENT<br />
11.3.1 DEFINE SCOPE<br />
Scope defines the level of monitoring detail. Some portions of the revegetation project might<br />
require only a project diary and a series of photographs while other areas within the project<br />
will require a statistically designed monitoring procedure. At a minimum, most projects require<br />
annual visits and recorded observations or qualitative assessments. Portions of revegetation<br />
projects may require statistically-based monitoring to ensure regulatory compliance and<br />
accountability. For example, if water quality standards dictate that road sections near a<br />
high-value fishery have no greater than 20% bare soil the first year after construction for<br />
sediment control, the importance of this project to fisheries and water quality will require high<br />
confidence in the accuracy of the data. This might require more intensive data collection and<br />
statistical analysis to ensure a higher level of certainty. On the other hand, road sections that<br />
do not affect the stream system would have less need to collect data for statistical analysis of<br />
this intensity. In such cases, qualitative assessments such as photo point monitoring or fewer<br />
sampling points may suffice (Inset 11-1). In general, the scope of monitoring should reflect<br />
the importance of the revegetation objective and the ecological sensitivity of the project site<br />
and surrounding areas (see Chapter 12).<br />
Inset 11-1 | Photo point monitoring<br />
(Adapted from Hall 2002a, 2002b)<br />
Photo point monitoring is a method of displaying landscape changes in vegetation over<br />
time. If a picture is worth a thousand words, photo point monitoring is often a useful way<br />
to show the success or failure of a revegetation project. Landscape images from photo<br />
point monitoring, in conjunction with data collected from other monitoring methods,<br />
can be very effective in describing the results of revegetation efforts. Hall‘s Photo Point<br />
Monitoring Handbook (2002a, 2002b) provide more thorough coverage of the subject.<br />
Locating photo points. The first step in photo point monitoring is to establish where<br />
the photo will be taken. The locations of the photo point should be based on the<br />
objectives of the revegetation project. These should include the important aspects of<br />
revegetation to document over time. For example, if the objectives for revegetation are<br />
visual enhancement, photo points should be located in the best places for showing these<br />
changes over time. The effects that vegetative growth will have on the line-of-site as<br />
vegetation matures should also be considered. Small shrub and tree seedlings planted<br />
along roadsides will, with time, fill in the entire picture frame, obscuring any long-distance<br />
views. To avoid this, the location and direction of the camera should place the road corridor<br />
in the foreground, since the road corridor will always be free of vegetation.<br />
Photo point locations should be described in detail to be easily located years later by<br />
personnel other than the person who took the original photograph. Permanent structures<br />
that can be easily described and located by others make good reference points for photo<br />
locations. These include culvert inlets and outlets, guardrail posts, mile post markers,<br />
road signs, road intersections, telephone poles, and other types of permanent utility<br />
structures. Since these features are not always permanent, it is important to locate more<br />
than one structure in the field.<br />
The photograph is either taken from the permanent structure or from a measured<br />
distance. For example, a photographer might decide to take a picture on the fog line<br />
directly above a culvert outlet. This spot would be easily described and locatable in the<br />
field by another person several years later. A photographer might also locate a site at<br />
a permanent sign post or by counting the number of posts in a guardrail back from a<br />
known spot. An azimuth reading and measured distance from the structure should be<br />
recorded in the notes.<br />
<strong>Roadside</strong> <strong>Revegetation</strong>: An Integrated Approach to Establishing Native Plants and Pollinator Habitat<br />
378
క<br />
క<br />
క<br />
క<br />
క<br />
క<br />
క<br />
క<br />
క<br />
క<br />
క<br />
క<br />
క<br />
MONITORING AND MANAGEMENT<br />
A common method for locating a photo point is to drive a stake (rebar) at the spot. This<br />
method works but has some drawbacks: the stake must be set back far enough so that it<br />
does not interfere with maintenance activities or traffic safety; the stake must be driven<br />
several feet into the soil, which is limiting on most cut slopes and some fill slopes; and the<br />
stake must be identified with a tag that is readable over time. One problem associated<br />
with poorly placed stakes is that they are often displaced through active soil movement,<br />
animal traffic, vandalism, or road maintenance activities. Utilizing a permanent feature of<br />
the roadside, such as a guardrail or signpost, is generally a better alternative. GPS points<br />
can also help locate photo points.<br />
The camera. Digital and fi lm cameras are both acceptable for photo point monitoring.<br />
For digital cameras, a dpi setting of 2280 by 1800 (4.1-megapixel or higher) should be<br />
used to obtain adequate resolution. For fi lm cameras, a ISO rating of 100 should be used.<br />
Using cameras with good lens quality is also essential for optimum photographs. Avoid<br />
using the zoom lens because this feature can pose problems in reproducing the original<br />
photograph (Hall 2002b).<br />
Taking the first picture. The camera is set on a tripod over the identified photo point<br />
location and image is previewed on the LCD screen or through the lens. With a compass<br />
aligned to the side of the camera, an azimuth reading is taken. (Be sure that the declination<br />
of the compass is defined in the notes.) Using a clinometer on the top of the camera, the<br />
degrees from horizontal are recorded.<br />
Keep a log or electronic document that includes the following information about the<br />
photograph being taken:<br />
Photograph name<br />
Project name<br />
Date<br />
Time<br />
Photographer<br />
Location on plan map<br />
Location description<br />
Azimuth of camera<br />
Angle of camera<br />
Manufacturer and model of camera<br />
Focal length<br />
Brand, type of film, and ISO rating (for film cameras)<br />
Large imported jpeg image of photograph<br />
Photo data bases, where this information is tied directly to the image, are great storage<br />
systems for electronic photographs. Digital images can also be filed with the hard copies.<br />
Taking subsequent photographs. At later dates, the photo point is relocated using the<br />
map, photo, GPS point, and/or and location description. The camera azimuth and vertical<br />
angle is set, and the image is viewed through the LCD screen or lens and compared to the<br />
print of the original photograph. If the original spot cannot be located, then relocating<br />
the photo point can be attempted using the procedures outlined in Figure 11-2.<br />
A<br />
B<br />
3<br />
Figure 3 11-2 | Photo points<br />
If no records exist for the original photo<br />
locations, then a close approximation<br />
can be determined (after Hall 2002a).<br />
1<br />
If the photographs were taken along a<br />
roadside, it is often possible to relocate<br />
the approximate point the photograph<br />
was taken by locating permanent structures<br />
(such as guardrails and culverts).<br />
To relocate the photo point in the<br />
historic photograph (A), a large print<br />
was made and taken to the general<br />
location in the field. Since the original<br />
photograph was obviously taken from<br />
the paved road surface on the inside of<br />
the guardrail, there was little doubt that<br />
the elevation of the second photograph<br />
(B) would be approximately the same.<br />
Locating the original photo point along<br />
the guardrail was accomplished by establishing<br />
a relatively vertical centerline<br />
connecting two identifiable points on<br />
both the original photograph (A) and the<br />
photograph to be taken (B). In this example,<br />
the centerline is drawn from the left<br />
side of the culvert (1) to the 12th post of<br />
the guardrail (2) from the reflector stake<br />
(3). Picture B is a close approximation<br />
to the photo point location of photo<br />
A, but notice that the centerline is not<br />
quite in the same direction as in photo<br />
A. To find the more exact location, the<br />
photographer should move to the right<br />
along the inside of the guardrail until the<br />
centerline lines up in the same direction<br />
as in photograph A.<br />
1<br />
2<br />
2<br />
<strong>Roadside</strong> <strong>Revegetation</strong>: An Integrated Approach to Establishing Native Plants and Pollinator Habitat<br />
379
MONITORING AND MANAGEMENT<br />
11.3.2 DETERMINE LOCATION, TIMING, AND FREQUENCY<br />
Choosing appropriate sampling areas to assess whether project objectives were met is a<br />
foundation of a good monitoring strategy. Some revegetation projects can be complex and<br />
cover many acres. For these projects, it is important to identify specific monitoring areas.<br />
However, not every area needs to be monitored. The revegetation unit is usually the basic<br />
unit of sampling. There should be little reason to split out the revegetation units in order<br />
to determine whether standards or thresholds were met. Finer delineation of areas within<br />
revegetation units for monitoring should only be done if there are specific questions to answer<br />
about treatment effectiveness or differences.<br />
Determining the most appropriate time of the year and frequency for monitoring is a key part<br />
of developing a monitoring strategy. Some portions of a revegetation project may require only<br />
one monitoring visit, which may simply be carried out as part of quality control during the<br />
implementation phase (see Chapter 9). For example, if a two-inch application of composted<br />
mulch is a stated objective in the revegetation plan, then one visit to the site, preferably during<br />
mulch application, will suffice to confirm whether this occurred or not. For other objectives, a<br />
series of observations over time will be necessary. For example, a planting contract requires<br />
400 live trees to be established the first year after planting and 300 live trees by the third year.<br />
This project would need to be monitored twice, once at the end of the first year and once in<br />
the fall of the third year.<br />
It is important to define the season that monitoring will take place because vegetation changes<br />
from season to season. This will affect the results of the data being collected. For instance, if<br />
the monitoring objective is to determine the species cover after seeding native grasses and<br />
forbs, monitoring should take place in the early summer when plants are flowering and species<br />
are easily identifiable. Collecting soil cover data, on the other hand, is often done in the fall<br />
prior to winter rainstorms, since the revegetation specialist will want to know the amount<br />
of ground cover that will be protecting the soil during these events. Monitoring first year<br />
seedling survival should be done in fall and not in spring or summer. Taking data in spring or<br />
summer will show higher survival; by fall, most of the seedling mortality will have occurred.<br />
11.3.3 DEVELOP SAMPLING METHODS<br />
Sampling methods define what parameters will be measured and how the data will be collected.<br />
Parameters may be biotic or abiotic, and are determined by the revegetation objectives. For<br />
example, vegetative cover can be measured as basal cover or aerial cover. If the objective is<br />
erosion control, then basal area is usually measured. If the revegetation objective is visual<br />
aesthetics, then aerial cover would be selected. In another example, if a revegetation objective<br />
is to reestablish a working group of species, then measuring for species presence would be<br />
conducted. If this is the case, the interest is only in working group species, so only these species<br />
need to be monitored. Any other species can be grouped into broader categories, such as<br />
grasses and forbs, for measurement. This strategy reduces the need to identify all species<br />
present in a sampling unit, and instead focuses data collection on the key species or groups<br />
of species that are relevant for meeting project objectives.<br />
11.3.4 SUMMARIZE MONITORING STRATEGY<br />
The monitoring procedure(s) to be utilized to evaluate the progress should be summarized<br />
into an overall monitoring strategy (Table 11-1). The monitoring strategy should have these<br />
components (Elzinga and others 1998):<br />
◾ ◾ Summary of objectives. The purpose for monitoring, the project objectives and DFCs<br />
to be met, DFC “threshold values” for success or failure on each revegetation unit.<br />
<strong>Roadside</strong> <strong>Revegetation</strong>: An Integrated Approach to Establishing Native Plants and Pollinator Habitat<br />
380
MONITORING AND MANAGEMENT<br />
◾◾<br />
Monitoring area map. The monitoring area map locates and identifies all monitoring<br />
areas in the road project area. For example, the monitoring areas identified in Table<br />
11-1 would each be located on a road map.<br />
◾◾<br />
Summary of monitoring procedures. The strategy summarizes the general type of<br />
monitoring, including scope, location, timing, frequency, and sampling methods for<br />
monitoring each revegetation unit (Table 11-1).<br />
◾◾<br />
Consolidated timelines. A comprehensive timeline should be developed for the<br />
entire project, detail the schedule for how each revegetation area will be monitored,<br />
and include the due date for the Final Monitoring Report.<br />
◾◾<br />
Expertise. Some monitoring procedures will require specific expertise in botany, soils,<br />
or other natural resource disciplines. This should be addressed in the strategy to make<br />
sure these resources are available.<br />
◾◾<br />
Costs. A general estimation of costs can be made once the monitoring procedures<br />
have been selected. It is important to take stock of the budget at this point since this<br />
is the final phase of the revegetation project and there must be enough funding to<br />
implement the monitoring.<br />
◾◾<br />
Monitoring oversight. One person must have oversight of all monitoring activities; it is<br />
the responsibility of this person to ensure that the procedures are being implemented<br />
within the timelines that were developed. This person completes the final monitoring<br />
report and summarizes important findings.<br />
Table 11-1 | Example of a basic monitoring summary<br />
This table, accompanied by a map of the revegetation project, are the basic elements of a<br />
monitoring strategy.<br />
<strong>Revegetation</strong> Unit DFCs or Objective Monitoring Procedure Year Expertise Required<br />
1<br />
Steep Cut Slope<br />
2<br />
Obliterated Road<br />
3<br />
Wetland<br />
- Photo point 0, 1, 3, 5 -<br />
70% soil cover Soil cover 1 -<br />
90% soil cover Soil cover 3 -<br />
60% native vegetation Species presence 3 Botany<br />
- Photo point -<br />
400 live trees per acre Plant survival 1 -<br />
300 live trees per acre Plant survival 3 -<br />
4 foot average tree height Plant growth 1, 3 -<br />
- Photo point 0, 1, 3, 5 -<br />
400 live trees per acre Plant survival 1, 3 -<br />
300 live trees per acre Species cover 3 Botany<br />
4 foot average tree height Invasive plant survey 1, 3 Botany<br />
11.4 RECORD DATA AND OBSERVATIONS<br />
With the monitoring procedures defined and the overall strategy in place, data and observations<br />
can be recorded as schedules. Methods of data collection can be qualitative or quantitative,<br />
complex or simple. No matter what methods are to be utilized, clear written instructions in<br />
the procedures will outline exactly how data is to be collected. Chapter 12 illustrates the most<br />
<strong>Roadside</strong> <strong>Revegetation</strong>: An Integrated Approach to Establishing Native Plants and Pollinator Habitat<br />
381
MONITORING AND MANAGEMENT<br />
common statistically-based monitoring procedures needed to meet most roadside monitoring<br />
objectives. The procedures must still be used in the context of the unique environmental and<br />
operational characteristics of the revegetation unit. For example, accessibility to a cut slope<br />
for monitoring soil cover might be limited due to very steep slope gradients. Although the soil<br />
cover monitoring procedure would be selected, modifications would be necessary to assure<br />
personnel safety. The modified procedure would not be the same as one developed for areas<br />
where slope gradients are gentle. Keep good records of the information that is collected. A<br />
field monitoring form (such as the example provided in Table 11-2) is a useful tool to keep<br />
information organized and consistent as measurements are taken over time.<br />
Table 11-2 | Example Field Monitoring Form<br />
Definition<br />
Project name:<br />
Dates of data collection:<br />
Personnel:<br />
Location of monitoring (attach map and GPS coordinates):<br />
<strong>Revegetation</strong> unit:<br />
<strong>Revegetation</strong> treatments:<br />
Desired future conditions (DFCs):<br />
Sampling objectives:<br />
Monitoring procedure (soil cover, species presence, species cover, etc.):<br />
Sampling design (size and shape of sampling unit):<br />
Number of transects or quadrats:<br />
Type of data analysis:<br />
Description of codes (on map or in notes):<br />
Notes and location of accompanying map and data files:<br />
Adapted from Elzinga and others 1998<br />
11.5 EVALUATE DATA AND APPLY ANY CORRECTIVE<br />
MEASURES<br />
There is no purpose in monitoring if the information will not be appropriately analyzed. The<br />
primary reasons monitoring data is not analyzed may include: (1) the monitoring plan was too<br />
complicated (massive amounts of data were generated); (2) insufficient thought was given<br />
to analytic methods; (3) monitoring was not designed in a meaningful or statistical manner;<br />
or (4) the monitoring objectives were poorly stated. Chapter 12 addresses these issues and<br />
presents strategies to streamline monitoring so that only essential information is collected<br />
and data can be quickly and easily analyzed.<br />
<strong>Roadside</strong> <strong>Revegetation</strong>: An Integrated Approach to Establishing Native Plants and Pollinator Habitat<br />
382
MONITORING AND MANAGEMENT<br />
Analysis of the monitoring data provides the feedback needed to identify and correct problems<br />
as they arise (Figure 11-1). There are many reasons corrective actions may be necessary as<br />
the project develops. This may include unanticipated events, such as unforeseen invasion/<br />
infestation of weeds or other pests, theft or human impacts, or unforeseen weather events,<br />
such as drought or early frost. In addition, there may have been some erroneous assumptions<br />
during the planning phase about either the appropriate future conditions for the site, or<br />
about the appropriate method to achieve the desired conditions. The sooner issues can be<br />
identified through data collection and analysis, the sooner (and more economically) they can<br />
be corrected. This is the basis of good management.<br />
11.6 ORGANIZE, FILE AND REPORT PROJECT RESULTS<br />
Monitoring is a long-term effort that can span many years. It is important to document, organize,<br />
and file monitoring information in a manner that will be understandable to others years later.<br />
The cover sheet illustrated in Table 11-2 is useful to attach to the front of a monitoring data set<br />
when filing. It details the date, location, and methods of monitoring. Be sure that the project<br />
records include:<br />
◾◾<br />
The diary or log kept during the project<br />
◾◾<br />
Copies of all maps and plans<br />
◾◾<br />
Copies of all budgets and task orders<br />
◾◾<br />
Photos and data<br />
◾◾<br />
Reports and evaluations<br />
Depending on the complexity of the project and the agencies involved, some reporting of<br />
monitoring results will be necessary. Reports are an excellent opportunity to summarize the<br />
information collected and describe any management actions taken to correct shortcomings.<br />
Timing varies, but typically, a Final Monitoring Report is submitted after the third monitoring<br />
season. This report summarizes whether the revegetation project met standards and commitments<br />
made during the planning stages. It is important to review the original revegetation<br />
plan to address whether the desired future condition was fulfilled as stated. The report should<br />
address this in the context of successes or failures in each revegetation unit.<br />
11.7 SHARE LESSONS LEARNED<br />
Revegetating highly disturbed sites with native plants is a relatively new field of study. Well-designed<br />
and analyzed monitoring projects can provide good information to a wider audience<br />
of practitioners and scientists working in this field. By taking the time to share monitoring<br />
results, the science and practice of revegetating highly disturbed sites can be advanced.<br />
Conferences, societies, newsletters, internet sites, and trade publications are some venues to<br />
share knowledge. The small-scale trials that were carried out to test, for example, different rates<br />
of fertilizer, tackifier, seeds, or hydromulch should also be of great interest. Case histories or<br />
trials can be shared on websites, in journals, or in posters and presentations at conferences (SER<br />
2005). Evaluations of the overall approach taken and the lessons learned will be an important<br />
contribution to future projects.<br />
11.8 ROADSIDE MAINTENANCE AND MANAGEMENT<br />
Following road construction, maintenance of roadside revegetation is usually administered<br />
by local agencies. Once the final revegetation report is submitted and the reimbursable<br />
agreement is closed, maintenance and monitoring of vegetation is no longer the responsibility<br />
of the revegetation specialist. However, coordination with the road maintenance agency is<br />
<strong>Roadside</strong> <strong>Revegetation</strong>: An Integrated Approach to Establishing Native Plants and Pollinator Habitat<br />
383
MONITORING AND MANAGEMENT<br />
vital to ensure the long-term success of the project. Monitoring information can help guide<br />
effective decision-making for the life of the project site. While specific maintenance strategies<br />
are beyond the scope of this manual, many resources exist to protect and enhance native<br />
vegetation on roadsides and to reduce the spread of invasive species. For example, on a national<br />
level, guidelines have been developed IRVM to maintain healthy populations of native plant<br />
communities to exclude invasive species (Berger 2005). Many road-owning agencies have their<br />
own procedures for monitoring and managing roadsides. Readers are encouraged to explore<br />
these resources in order to support the goal of healthy native plant communities on roadsides.<br />
11.9 CONCLUSION<br />
<strong>Roadside</strong> revegetation is an integrative process that involves careful planning, implementation,<br />
and monitoring. It is important to select monitoring strategies that generate useful information<br />
targeted to project objectives and DFCs. Analyzing and sharing results is a key practice to<br />
guide effective management of the project, as well as to improve results on future projects.<br />
<strong>Roadside</strong> <strong>Revegetation</strong>: An Integrated Approach to Establishing Native Plants and Pollinator Habitat<br />
384
INTRODUCTION<br />
MONITORING PROCEDURES<br />
12— Monitoring<br />
Procedures<br />
12— Monitoring<br />
Procedures<br />
12.1 Introduction<br />
12.2 Soil Cover Protocol<br />
12.3 Species Cover Protocol<br />
12.4 Species Presence Protocol<br />
12.5 Plant Density Protocol<br />
12.6 Plant Attributes Protocol<br />
12.7 Sampling Area Design<br />
12.8 Sample Size Determination<br />
12.9 Statistical Analysis Using Confidence Intervals<br />
12.10 Pollinator Procedures<br />
12.10 Summary<br />
<strong>Roadside</strong> An Integrated <strong>Revegetation</strong>: Approach An for Integrated Native Pollinator Approach Habitat to Establishing in <strong>Roadside</strong> Native <strong>Revegetation</strong> Plants and Pollinator Habitat<br />
385 25
MONITORING PROCEDURES<br />
12.1 INTRODUCTION<br />
This chapter describes statistical sampling design, data collection techniques, and analysis<br />
methods for quantifiable parameters to determine the success of roadside revegetation projects.<br />
It is written specifically for field personnel as a quick guide to monitoring roadsides. It is not<br />
intended to teach statistics or explain the statistical basis behind the procedures addressed in<br />
this section. There are many approaches to statistically monitoring roadside vegetation. This<br />
report takes the approach that if monitoring is not simple, inexpensive, and objective-based,<br />
it will not be done well, or done at all.<br />
Three questions must be answered before monitoring begins:<br />
◾◾<br />
What is being monitored?<br />
◾◾<br />
What is the shape of the sampling area?<br />
◾◾<br />
What is the objective behind monitoring?<br />
The answers to these questions will lead the designer to different parts of the chapter (Figure<br />
12-1). This chapter presents methods to record, summarize, and analyze data using the Microsoft<br />
Excel® spreadsheet program. Designers can create their own spreadsheet, or obtain a monitoring<br />
Excel® workbook that contains the spreadsheets shown in the chapter, by visiting the resource<br />
library at the following website: www.nativeregetation.org. Before using the spreadsheets,<br />
the designer is advised to determine whether the Analysis ToolPak is installed. If not, many<br />
of the spreadsheets will not function properly. To install, go to the toolbar and select “Tools,<br />
Add-Ins,” then make sure that the box next to “Analysis ToolPak” is checked.<br />
12.1.1 WHAT IS BEING MONITORED?<br />
Many revegetation parameters can be monitored. In this chapter, parameters are grouped<br />
into five categories based on the following revegetation objectives:<br />
◾◾<br />
Soil cover – To determine whether treatments increased soil cover for erosion control.<br />
◾◾<br />
Species cover – To determine whether treatments increased native grass and forb cover.<br />
◾◾<br />
Species presence – To determine whether the number of seeded native grass and<br />
forb species increased.<br />
◾◾<br />
Plant density – To determine how many seedlings or cuttings became established<br />
after planting to assess whether stocking is adequate or the site needs replanting. Plant<br />
survival can also be determined from this procedure.<br />
◾◾<br />
Plant attributes – To determine how fast planted shrubs and trees are growing.<br />
◾◾<br />
Pollinator presence/abundance – To determine if pollinator species are utilizing the<br />
installed vegetation.<br />
Note: This chapter uses abbreviated scientific names, or plant symbols, from the PLANTS Database (http://www.<br />
plants.usda.gov) to conserve space in spreadsheets. The PLANTS Database includes scientific names, plant symbols,<br />
common names, distribution data, images, and species characteristics for vascular plants of the United States.<br />
The procedures for monitoring each of these parameters are described in Section 12.2 through<br />
Section 12.10. Each procedure discusses how transects and quadrats (or plots) are located, the<br />
methods for collecting data at each plot, and how data is summarized for statistical analysis.<br />
What are you monitoring?<br />
Read<br />
Soil Cover 12.2<br />
Species Cover<br />
12.3<br />
Species<br />
12.4<br />
Plant<br />
12.5<br />
Plant Attributes<br />
12.6<br />
Pollinators<br />
12.10<br />
What is the shape of the sampling area?<br />
Linear<br />
12.7.1<br />
Rectilinear<br />
12.7.2<br />
Dispersed<br />
12.7.3<br />
What is the objective for monitoring?<br />
Compliance<br />
12.9.1<br />
Treatment<br />
12.9.2<br />
12.1.2 WHAT IS THE SHAPE OF THE SAMPLING AREA?<br />
<strong>Revegetation</strong> projects associated with road construction can be classified into three broad<br />
sampling design categories based on the spatial features of the sampling unit:<br />
◾◾<br />
Linear areas – Associated with cut slopes, fill slopes, and abandoned roads<br />
Trends<br />
Figure 12-1 | Quick guide<br />
to monitoring chapter<br />
12.9.3<br />
<strong>Roadside</strong> <strong>Revegetation</strong>: An Integrated Approach to Establishing Native Plants and Pollinator Habitat<br />
386
MONITORING PROCEDURES<br />
◾◾<br />
Rectilinear areas – Associated with staging areas and material stockpiles<br />
◾◾<br />
Dispersed areas – Associated with planting islands, planting pockets, and clump<br />
plantings<br />
Each of these sampling designs has a set of procedures defining how transects and quadrats<br />
will be laid out. Section 12.8, Sample Size Determination, guides the designer through the<br />
methods for determining how many transects and quadrats to establish.<br />
12.1.3 WHAT IS THE OBJECTIVE BEHIND MONITORING?<br />
There are three basic reasons for statistical monitoring:<br />
◾◾<br />
Compliance – Were regulatory standards or project objectives met?<br />
◾◾<br />
Treatment differences – Are there differences between revegetation treatments?<br />
◾◾<br />
Trends – What degree of change is occurring over time?<br />
Monitoring for most projects will be conducted to determine whether standards were met<br />
(compliance) because this will be of most interest to the reviewing officials. There will be<br />
occasions, however, when it will be helpful to know if different revegetation treatments applied<br />
to the same area resulted in a different vegetative response. There might also be times when<br />
it will be important to know to what degree things have changed over time. It is important to<br />
discern which of these three objectives meet the intent of the monitoring.<br />
This chapter will provide a set of instructions that establish the following:<br />
◾◾<br />
Quadrat locations (see Section 12.7, Sampling Area Design)<br />
◾◾<br />
Quantity of quadrats to take (see Section 12.8, Sample Size Determination)<br />
◾◾<br />
Type of data collection at each quadrat (see Section 12.2, Soil Cover Procedure, Section<br />
12.3, Species Cover Procedure, Section 12.4, Species Presence Procedure, Section 12.5,<br />
Plant Density Procedure, and Section 12.6, Plant Attributes Procedure)<br />
◾◾<br />
Type of data analysis to perform (see Section 12.9, Statistical Analysis Using Confidence<br />
Intervals)<br />
12.2 SOIL COVER PROCEDURE<br />
Reestablishing grasses and forbs on disturbed sites is essential for erosion control. In general,<br />
erosion and sediment transport is a function of live or dead cover in contact with the soil<br />
surface. The following soil cover procedures can be used to determine the amount and type<br />
of cover existing on the surface after construction.<br />
The quadrat is the unit of area that is monitored for soil cover. Exact measurements are<br />
based on recording the surface soil attributes at 20 data points within each quadrat. In this<br />
assessment, a grid of 20 data points is placed on the surface of the soil; where each point hits<br />
the surface is where the soil cover attribute is recorded. For instance, the data recorded at<br />
the first quadrat shows that 5 points were rock, 10 points were live plant cover, and 5 points<br />
were soil. The results for that quadrat would be 25 percent rock, 50 percent live plant cover,<br />
and 25 percent bare soil.<br />
Quadrats are read in the field using a fixed frame (see Section 12.2.1, Sampling by Fixed<br />
Frame) or read later in the office from digital pictures of quadrats. A system for taking digital<br />
photographs of the surface, where the photograph itself becomes the quadrat, is described<br />
in Section 12.2.2, Sampling by Digital Camera.<br />
The sampling design for laying out transects and quadrats depends on the shape of the sampling<br />
unit (see Section 12.7, Sampling Area Design). The number of transects and quadrats depends<br />
<strong>Roadside</strong> <strong>Revegetation</strong>: An Integrated Approach to Establishing Native Plants and Pollinator Habitat<br />
387
MONITORING PROCEDURES<br />
on the variability of the parameter of interest (see Section 12.8, Sample Size Determination).<br />
How the data will be analyzed will be based on the objectives for monitoring (see Section<br />
12.9, Statistical Analysis Using Confidence Intervals). These sections should be reviewed before<br />
this procedure is used.<br />
12.2.1 SAMPLING BY FIXED FRAME<br />
Figure 12-2 | Fixed frame<br />
for transect sampling<br />
A fixed frame can be adapted to allow for the<br />
positioning of a laser pointer at 20 points in<br />
the frame. Soil cover or plant cover attributes<br />
are recorded at each laser point. The frame in<br />
this example is 8 inches by 20 inches, with 2<br />
inch spacing within rows and 4 inch spacing<br />
between rows. The laser is a Class IIIa red laser<br />
diode module that produces a 1mm dot.<br />
Soil cover is quantified at each quadrat based on readings from a 20-point fixed frame. Several<br />
types of frames have been developed. The most appropriate frames are lightweight and<br />
portable, stable, and make it easy to assess data points on the ground surface. One frame that<br />
meets these criteria uses a laser pointer to identify data points. The frame shown in Figure<br />
12-2 has 20 slots to position a laser pointer. During monitoring, the laser pointer is moved to<br />
each of the 20 slots. Soil cover attributes are recorded where the laser hits the ground surface.<br />
Contact the authors of this report for more information on this frame.<br />
The fixed frame must be located along the tape in a consistent manner throughout the sampling<br />
of a unit (Figure 12-3). For instance, the frame might be placed on the right side of the tape<br />
with the lower corner of the frame at the predetermined distance on the tape. This procedure<br />
would be applied across the entire sampling area. The legs of the frame are positioned so that<br />
the surface of the frame is on the same plane as the ground surface.<br />
Each data point is characterized from a set of predetermined label descriptors that include,<br />
but are not limited to, the following:<br />
◾◾<br />
Soil<br />
◾◾<br />
Gravel (2mm to 3 inches)<br />
◾◾<br />
Rock (> 3 inches)<br />
◾◾<br />
Applied mulch<br />
◾◾<br />
Live vegetation (grasses, forbs, lichens, mosses)<br />
◾◾<br />
Dead vegetation<br />
Figure 12-3 | Fixed frame for<br />
measuring soil cover<br />
A fixed frame for measuring soil cover is<br />
placed at predetermined distances on a<br />
transect.<br />
<strong>Roadside</strong> <strong>Revegetation</strong>: An Integrated Approach to Establishing Native Plants and Pollinator Habitat<br />
388
MONITORING PROCEDURES<br />
1<br />
2<br />
3<br />
4<br />
5<br />
6<br />
7<br />
8<br />
9<br />
A2<br />
fx Transect<br />
A B C D E F G H I J K L M<br />
Sampling Area:<br />
Number of Points<br />
% of Points<br />
Transect<br />
1<br />
1<br />
1<br />
1<br />
2<br />
2<br />
Quadrat<br />
1<br />
2<br />
3<br />
4<br />
1<br />
2<br />
Soil<br />
3<br />
4<br />
0<br />
1<br />
3<br />
0<br />
H<br />
Gravel<br />
5<br />
7<br />
1<br />
2<br />
5<br />
1<br />
Mulch<br />
6<br />
8<br />
12<br />
8<br />
12<br />
10<br />
Live Veg<br />
3<br />
1<br />
3<br />
3<br />
0<br />
6<br />
Dead Veg<br />
3<br />
0<br />
4<br />
6<br />
0<br />
3<br />
Ideally, one would quantify only cover in contact with the soil surface. However, differentiating<br />
between plant leaves and stems that are in direct contact with the soil as opposed to simply in<br />
close proximity to the soil surface can be difficult and is not always feasible. In this procedure,<br />
the assumption is that if live or dead vegetation is within 1 inch of the soil surface, it will be<br />
recorded as soil cover.<br />
Different levels of vegetative cover will block the view of the soil surface. To circumvent this<br />
problem, the quadrat will be clipped of standing vegetation (dead or alive) at a 1-inch height<br />
above the ground surface prior to taking the readings. The clipped vegetation is removed<br />
from the plot before the reading is made. This method errs on the side of lower ground cover<br />
readings because the standing vegetative material that is clipped and removed would have<br />
eventually become ground cover.<br />
Data can be recorded on a field-going computer or on paper. Recording data on paper bypasses<br />
the need for electronic equipment in the field. However, it requires that data be entered into<br />
a computer at a later time. The development of a paper form should consider how data will<br />
be entered and statistically analyzed. Figure 12-4 shows a spreadsheet for collecting data that<br />
also will summarize the data by percent of surface in a cover attribute.<br />
Total Points<br />
20<br />
20<br />
20<br />
20<br />
20<br />
20<br />
Soil<br />
15<br />
20<br />
0<br />
5<br />
15<br />
0<br />
Gravel<br />
25<br />
35<br />
5<br />
10<br />
25<br />
5<br />
Mulch<br />
30<br />
40<br />
60<br />
40<br />
60<br />
50<br />
I J K L<br />
% of Points<br />
Total Points =C3 =D3 =E3 =F3 =G3<br />
=SUM (C4:G4) =C4/20*100 =D4/20*100 =E4/20*100 =F4/20*100 =G4/20*100<br />
=SUM (C5:G5) =C5/20*100 =D5/20*100 =E5/20*100 =F5/20*100 =G5/20*100<br />
Live Veg<br />
15<br />
5<br />
15<br />
15<br />
0<br />
30<br />
M<br />
Dead Veg<br />
15<br />
0<br />
20<br />
30<br />
0<br />
15<br />
Figure 12-4 | Soil cover procedure<br />
A data collection and summary form can<br />
be developed similar to the first seven<br />
columns in this spreadsheet. The field<br />
recorder fills in the transect and quadrat<br />
number at each plot (columns A and<br />
B). The names of the attributes being<br />
sampled are written in cells C3 through<br />
G3. The columns below each attribute<br />
(columns C through G) are filled in with<br />
the number of points out of 20 that fall<br />
into each category. These points are<br />
converted into percent of total points<br />
by copying the equations from columns<br />
H through M. Filling in the equations<br />
can be done simply and accurately by<br />
filling out the first row (cells H4 through<br />
M4) exactly as it is shown in the figure,<br />
then highlighting the first row of cells<br />
and moving the cursor to the lower<br />
right-hand corner of the last cell. When<br />
the cursor turns into a small cross, click<br />
and drag the cells down. The equations<br />
will fill in as the curser is dragged down<br />
the page. Note: Rectilinear study areas will<br />
not use the transect column.<br />
12.2.2 SAMPLING BY DIGITAL CAMERA<br />
Digital cameras are being used more frequently for monitoring plants and animal life. This<br />
technology allows the data collector to spend most of the field time laying out transects<br />
and taking pictures of quadrats, reducing field time significantly. With recent developments<br />
in photo-imaging software, photos can be assessed quickly in the office. Because these are<br />
permanently stored records, digital photographs have several advantages: photographs can<br />
be reviewed during the “off” season or “down time,” they are historical records that can be<br />
referenced years later, and they can be reviewed by supervisors for quality control. In addition,<br />
taking digital photographs of ground cover can be accomplished by one person, not two as is<br />
often required of fixed frame monitoring. On steeper slopes, using a digital camera to record<br />
quadrats is much quicker and simpler than reading attributes from a fixed frame, which is<br />
often very difficult (Figure 12-5).<br />
Sampling by camera requires the same statistical design and plot layout as the fixed frame<br />
method. The difference is that a picture is taken at the quadrat location instead of on-site<br />
measurements. In the office, digital photographs are catalogued electronically and a 20-point<br />
Figure 12-5 | Sampling on a road cut<br />
Road cuts are often too steep for sampling<br />
without the aid of ladders or ropes.<br />
A hazard analysis must be conducted<br />
prior to implementing such measures.<br />
For the monitoring shown in this picture,<br />
a camera was used for the soil cover<br />
procedure which cut down the amount<br />
of time spent on the ladder<br />
Photo: Greg Carey<br />
<strong>Roadside</strong> <strong>Revegetation</strong>: An Integrated Approach to Establishing Native Plants and Pollinator Habitat<br />
389
MONITORING PROCEDURES<br />
overlay is placed on the image that identifies the data points to be described (Figure 12-6).<br />
The data points are described in the same manner as the fixed frame method.<br />
Prior to photo monitoring, the resolution of the images must be determined. Setting the<br />
camera at the highest resolution is fine provided the camera has the memory capacity to<br />
store large images. It is possible that over a hundred digital images will be recorded for each<br />
sampling area. When memory is limiting, it is important to select the minimum resolution<br />
that will allow fine surface details to be observed. Resolution should be determined for each<br />
camera by taking photos of a soil surface at several camera settings (see the camera manual)<br />
and viewing them on a computer screen to determine whether photos are detailed enough<br />
for accurate measurement of the soil cover attributes. It is important to have enough memory<br />
to store the number of pictures required. Carrying extra memory (as well as an extra battery)<br />
is always a good idea.<br />
The camera should be secured to a tripod at a fixed height between 3 to 5 feet above the<br />
ground surface. The camera height should be adjusted so it is comfortable for the person<br />
sampling while still capable of capturing the image within a photo frame. A photo frame<br />
defines the area within which the photograph will be taken. The frame can be easily made from<br />
PVC pipe joined together with pipe connectors. There is not a standard frame size; however,<br />
an 11-inch by 14-inch frame works well. Prior to each photograph, the transect/quadrat must<br />
be recorded within each frame so that each image can be accurately identified later. This can<br />
be done by writing the number on small tags or paper and including them in a corner of the<br />
frame. Quadrat identifiers are an abbreviation of the transect and quadrat numbers (e.g., “4-2”<br />
represents the fourth transect/second quadrat).<br />
When the photo frame is in place and the quadrat has been identified, vegetation more<br />
than 1 inch from the surface of the soil is cut to a height of 1 inch and removed. The tripod<br />
is positioned over the photo frame so the camera is approximately on the same plane as the<br />
ground surface. The camera lens should be adjusted so the photo image in the view screen<br />
is just inside the quadrat frame. The picture should be taken so shadows from the tripod<br />
or the photographer are not in the frame. Cloudy days are often ideal due to the lack of<br />
shadows. Clear days, especially when the plots are in direct sunlight, can be difficult because<br />
of the extreme shadows. The camera flash can be used under these conditions to reduce the<br />
contrasts within the images.<br />
The FHWA and USDA Forest Service have developed a method for evaluating digital photographs<br />
by adapting a software program for monitoring underwater coral cover. The program is called<br />
“Monitoring soil cover using CPCe digital photo assessment method” and it automates the<br />
configuration of a large group of digital photographs so that they are easy to evaluate and<br />
record. The program navigates the user to the 20 points on each digitally photographed<br />
quadrat at the click of a mouse. At each point the user records the observed soil cover attribute.<br />
The data is summarized and can be taken directly into spreadsheets for statistical analysis.<br />
Figure 12-6 | 20-point grid in<br />
soil cover monitoring plot<br />
For the soil cover procedure, a 20-point<br />
grid is randomly positioned on a digital<br />
photograph of the plot. Soil cover attributes<br />
are identified where the point hits.<br />
In this example, there are 8 “soil” points<br />
(40%), 3 “grass” (15%), 7 “dead vegetation”<br />
(35%), and 2 “straw mulch” (10°).<br />
12.3 SPECIES COVER PROCEDURE<br />
The species cover procedure is used to assess the above-ground dominance of seeded species.<br />
This procedure is used when revegetation standards require that a certain percentage of<br />
vegetative cover be composed of native species. For example, revegetation objectives that<br />
were agreed upon during the planning phase state that over 50 percent of the vegetative<br />
cover existing on the site two years after construction will be composed of native species that<br />
were seeded. Monitoring the vegetative cover through this procedure will assess whether<br />
this was accomplished. Because grass and forb cover changes during the season, the timing<br />
of species cover monitoring is important. The best time to monitor is when the plants are in<br />
flower, typically from mid-May through July, because the species are identifiable during this<br />
period. Moreover, the practitioner can monitor for pollinator presence and abundance while<br />
monitoring species cover (see Section 12.10, Pollinator Monitoring Procedures).<br />
<strong>Roadside</strong> <strong>Revegetation</strong>: An Integrated Approach to Establishing Native Plants and Pollinator Habitat<br />
390
MONITORING PROCEDURES<br />
Use of a digital camera is not usually applicable to species cover monitoring because identifying<br />
species is not always possible in digital photographs. Sampling is therefore accomplished with<br />
a fixed frame. This sampling procedure typically requires a botanist to identify species and<br />
another person to help lay out the plots and record data.<br />
Species cover is quantified at each quadrat based on readings from a 20-point fixed frame<br />
(see Section 12.2.1, Sampling by Fixed Frame). At each point, the species is recorded on a<br />
spreadsheet similar to Figure 12-7. More columns can be inserted on the spreadsheet to account<br />
for a larger number of species. The tendency can be to record all species encountered in a<br />
sampling area; however, this is not recommended. Instead, it is recommend to group species<br />
into such categories as “non-native grasses” or “non-seeded native forbs,” which can be useful<br />
for later analysis and reporting.<br />
Figure 12-7 | Species<br />
cover procedure<br />
This spreadsheet can be used to summarize<br />
species cover data and is similar<br />
to Figure 12-4. Fill in the names of the<br />
seeded species in cells C3 through G3.<br />
Beneath each species, report the number<br />
of points that were encountered<br />
for each species. The corresponding<br />
percent cover for each species will show<br />
up in the formula cells. Insert additional<br />
rows and columns if more are needed.<br />
Note: Rectilinear study areas will not<br />
have the transect column filled in.<br />
1<br />
2<br />
3<br />
4<br />
5<br />
6<br />
7<br />
8<br />
9<br />
P4<br />
A<br />
Transect /<br />
Dispersed<br />
Unit<br />
1<br />
1<br />
1<br />
1<br />
2<br />
2<br />
fx<br />
B C D E F G H I J K L M N<br />
Quadrat<br />
1<br />
2<br />
3<br />
4<br />
1<br />
2<br />
ELGL<br />
3<br />
4<br />
0<br />
1<br />
3<br />
0<br />
BRCA5<br />
5<br />
7<br />
1<br />
2<br />
5<br />
1<br />
Number of Points<br />
FECA<br />
2<br />
4<br />
6<br />
4<br />
5<br />
3<br />
ERLA<br />
3<br />
1<br />
3<br />
3<br />
0<br />
6<br />
ERUM<br />
3<br />
0<br />
4<br />
2<br />
0<br />
3<br />
Total Points<br />
20<br />
20<br />
20<br />
20<br />
20<br />
20<br />
I J K L<br />
% of Points<br />
=C3 =D3 =E3 =F3 =G3<br />
ELGL<br />
15<br />
20<br />
0<br />
5<br />
15<br />
0<br />
BRCA5<br />
25<br />
35<br />
5<br />
10<br />
25<br />
5<br />
M<br />
% of Points<br />
FECA<br />
10<br />
20<br />
30<br />
20<br />
25<br />
15<br />
ERLA<br />
15<br />
5<br />
15<br />
15<br />
0<br />
30<br />
ERUM<br />
15<br />
0<br />
20<br />
10<br />
0<br />
15<br />
N<br />
% Cover by<br />
Seeded<br />
Species<br />
80<br />
80<br />
70<br />
60<br />
65<br />
65<br />
% Cover by<br />
Seeded Species<br />
=C4/20*100 =D4/20*100 =E4/20*100 =F4/20*100 =G4/20*100<br />
=SUM(C4:G4)/H4*100<br />
=C5/20*100 =D5/20*100 =E5/20*100 =F5/20*100 =G5/20*100<br />
=SUM(C5:G5)/H5*100<br />
As with all procedures, the sampling design for laying out transects and quadrats depends on<br />
the shape of the sampling unit (see Section 12.7, Sampling Area Design), and the number of<br />
quadrats to sample depends on the variability of the parameter of interest (see Section 12.8,<br />
Sample Size Determination). How the data will be analyzed will be based on the objectives for<br />
monitoring (see Section 12.9, Statistical Analysis Using Confidence Intervals). These sections<br />
should be reviewed before this procedure is used.<br />
12.4 SPECIES PRESENCE PROCEDURE<br />
Determining species cover, as outlined in the previous section, can be time-consuming and<br />
expensive. The species presence procedure is an alternative method of determining whether<br />
species that were seeded are present on the site. While this method still requires a botanist<br />
in the field, it takes far less time per plot because only the presence or absence of a species<br />
is recorded.<br />
In this method, a fixed frame is placed on the surface of the soil at each quadrat. The size<br />
of the fixed frame should be based on what is considered a measurement of success. For<br />
instance, for shrub or tree species, having one plant established every 10 ft2 (equivalent to<br />
4,356 plants/acre) would be very successful. However one grass plant every 10 ft2 might not<br />
be considered successful. For monitoring most species, it is recommended to use a frame size<br />
of 4 ft2 (2 feet on each side) using a PVC pipe with connectors. This size frame is easy to carry<br />
and read. Whatever size is used, it is recommended that the frame dimension stay the same<br />
throughout the monitoring project. Prior to sampling, the species of interest (typically just the<br />
<strong>Roadside</strong> <strong>Revegetation</strong>: An Integrated Approach to Establishing Native Plants and Pollinator Habitat<br />
391
MONITORING PROCEDURES<br />
seeded species) are identified and recorded on the data form (Figure 12-8). These will be the<br />
only species recorded at each quadrat. At each quadrat, the species of interest are evaluated<br />
for presence or absence. If the species is present, it is given a “1,” and if it is not present, it is<br />
given a “0.” The data is summarized by the percentage of the species present on the quadrat<br />
out of the total number of seeded species.<br />
Figure 12-8 | Species<br />
presence procedure<br />
Species of interest (seeded species) are<br />
placed as headings in this spreadsheet<br />
(cells C3 through G3). In the columns<br />
below each species, the presence or<br />
absence of the species is recorded as a<br />
“1” for present or “0” for absent. Fill in<br />
cells H4 and I4 with equations shown in<br />
inset. Copy the remainder of the cells<br />
with equations by highlighting cells H4<br />
and I4, then, while they are highlighted<br />
move the cursor to the lower right-hand<br />
corner of cell I4. When the curser turns<br />
into a cross, left click the mouse and<br />
drag the equations down the page. After<br />
the spreadsheet is completed, do a test<br />
run with the data shown in columns<br />
A through G to see if the equations<br />
in column H and I are correct. Note:<br />
Rectilinear study areas will not have the<br />
transect column filled in.<br />
1<br />
2<br />
3<br />
4<br />
5<br />
6<br />
7<br />
8<br />
9<br />
I17<br />
A<br />
Transect /<br />
Dispersed<br />
Unit<br />
1<br />
1<br />
1<br />
1<br />
2<br />
2<br />
fx SUM(C17:G17)/H17*100<br />
B C D E F G H<br />
I<br />
Quadrat<br />
1<br />
2<br />
3<br />
4<br />
1<br />
2<br />
Presence of Plants (1=presence, 0=not present)<br />
ELGL<br />
1<br />
1<br />
0<br />
1<br />
0<br />
0<br />
BRCA5<br />
0<br />
1<br />
1<br />
0<br />
1<br />
1<br />
FECA<br />
0<br />
0<br />
1<br />
1<br />
1<br />
1<br />
ERLA<br />
1<br />
0<br />
1<br />
1<br />
0<br />
1<br />
H<br />
ERUM<br />
Total Number<br />
Species Sown<br />
=COUNT(C4:G4)<br />
1<br />
0<br />
1<br />
1<br />
0<br />
1<br />
Total<br />
Number<br />
Species<br />
Sown<br />
5<br />
5<br />
5<br />
5<br />
5<br />
5<br />
60<br />
40<br />
80<br />
80<br />
40<br />
80<br />
Percent Seeded<br />
Species Present<br />
in Plot<br />
=SUM(C4:G4)/H4*100<br />
I<br />
% Seeded<br />
Species<br />
Present<br />
in Plot<br />
=COUNT(C5:G5)<br />
=SUM(C5:G5)/H5*100<br />
As with all procedures, the sampling design for laying out transects and quadrats depends on<br />
the shape of the sampling unit (see Section 12.7, Sampling Area Design), and the number of<br />
quadrats to sample depends on the variability of the parameter of interest (see Section 12.8,<br />
Sample Size Determination). How the data will be analyzed will be based on the objectives for<br />
monitoring (see Section 12.9, Statistical Analysis Using Confidence Intervals). These sections<br />
should be reviewed before this procedure is used.<br />
12.5 PLANT DENSITY PROCEDURE<br />
Trees and shrubs are typically established from plants (see Section 10.2.6, Nursery Plant<br />
Production, and Section 10.2.3, Collecting Wild Plants) or cuttings (see Section 10.2.2, Collecting<br />
Wild Cuttings, and Section 10.2.5, Nursery Cutting Production). Many constructed wetlands<br />
are also planted from nursery grown or wild collected seedlings. Monitoring the density of<br />
live plants following the first and third year after they are planted is important in order to<br />
determine if they have survived and whether the site will need to be replanted. In the case of<br />
constructed wetlands, plant density monitoring is conducted to determine whether regulatory<br />
requirements were met.<br />
The quadrat in this procedure is a circular plot with a specified radius. It is recommended to<br />
use a 1/100 acre plot, which has an 11.7-foot radius and covers 436 ft2. A staff is placed at plot<br />
center and a tape or rope is stretched 11.7 feet. While one person holds the staff, the other<br />
walks the circumference of the plot and counts the number of plants within the quadrat. This<br />
<strong>Roadside</strong> <strong>Revegetation</strong>: An Integrated Approach to Establishing Native Plants and Pollinator Habitat<br />
392
MONITORING PROCEDURES<br />
1<br />
2<br />
3<br />
4<br />
5<br />
6<br />
7<br />
8<br />
9<br />
H20<br />
A<br />
Transect /<br />
Dispersed<br />
Unit<br />
1<br />
2<br />
3<br />
4<br />
5<br />
6<br />
fx<br />
B C D E F G H<br />
I J K L M N<br />
Quadrat<br />
1<br />
2<br />
3<br />
4<br />
5<br />
6<br />
PIPO<br />
3<br />
4<br />
4<br />
1<br />
3<br />
0<br />
Number of Plants per Quadrat<br />
PSME<br />
1<br />
3<br />
1<br />
2<br />
1<br />
1<br />
LIDE<br />
0<br />
2<br />
1<br />
0<br />
0<br />
1<br />
ARME<br />
1<br />
0<br />
3<br />
3<br />
0<br />
2<br />
ARPA<br />
0<br />
1<br />
4<br />
2<br />
2<br />
1<br />
Size of<br />
Quadrat<br />
(sq ft)<br />
436<br />
436<br />
436<br />
436<br />
436<br />
436<br />
PIPO<br />
300<br />
400<br />
400<br />
100<br />
300<br />
0<br />
I J K L<br />
PSME<br />
100<br />
300<br />
100<br />
200<br />
100<br />
100<br />
Plants per Acre<br />
LIDE<br />
0<br />
200<br />
100<br />
0<br />
0<br />
100<br />
Plants per Acre<br />
=C3 =D3 =E3 =F3 =G3<br />
=C4*43560/H4 =D4*43560/H4 =E4*43560/H4 =F4*43560/H4 =G4*43560/H4<br />
=C5*43560/H5 =D5*43560/H5 =E5*43560/H5 =F5*43560/H5 =G5*43560/H5<br />
M<br />
ARME<br />
100<br />
0<br />
300<br />
300<br />
0<br />
200<br />
ARPA<br />
0<br />
100<br />
400<br />
200<br />
200<br />
100<br />
N<br />
=SUM(I4:M4)<br />
=SUM(I5:M5)<br />
Total<br />
Plants<br />
per Acre<br />
500<br />
999<br />
1,299<br />
799<br />
599<br />
500<br />
Total Plants<br />
per Acre<br />
Figure 12-9 | Plant density procedure<br />
Prior to monitoring, a list of planted<br />
species are identified in cells C3 through<br />
G3. At each plot, the number of plants<br />
of each species is recorded in columns<br />
C through G. The size of the quadrat<br />
is recorded in Column H (a 1/100 acre<br />
plot is 436 ft2). Using the equations<br />
shown in the inset for Columns I through<br />
N, the number of plants per species<br />
per acre is calculated. Column N sums<br />
the total number of plants per acre as<br />
represented in each plot. Fill in cells I4<br />
through N4 with the equations, then<br />
copy to the remaining cells. Note: There<br />
is only one quadrat per transect.<br />
information is recorded on a spreadsheet similar to Figure 12-9. This spreadsheet reports the<br />
number of plants per acre by species. It also summarizes total plants per acre.<br />
From this spreadsheet plant density can be estimated and an approximate survival rate can be<br />
determined by dividing the estimated density (average of column N) by the original planting<br />
density (per acre basis from planting records). Plant density monitoring used to determine<br />
survival rates are called survival surveys and these are usually conducted in the fall or winter.<br />
If the site is planted in the fall or spring and monitoring occurs the following fall, the results<br />
are referred to as the “first year survival.” Plant density monitoring thereafter is referred to as<br />
the years after planting (e.g., third year sampling is “third year survival”).<br />
The sampling design for laying out transects and quadrats depends on the shape of the<br />
sampling unit (see Section 12.7, Sampling Area Design), and the number of quadrats to collect<br />
from depends on the variability of the parameter of interest, as discussed in Section 12.8,<br />
Sample Size Determination. (Note that for linear sampling designs, there is only one randomly<br />
placed quadrat per transect.) How the data will be analyzed will be based on the objectives for<br />
monitoring (see Section 12.9, Statistical Analysis Using Confidence Intervals). These sections<br />
should be reviewed before this procedure is used.<br />
12.6 PLANT ATTRIBUTES PROCEDURE<br />
This procedure can be used to assess growth responses between revegetation treatments or<br />
revegetation units, and to determine whether standards pertaining to growth requirements<br />
were met. Typically only sensitive areas, such as visual corridors or wetlands, have stated<br />
growth requirements that must be monitored. This procedure might have limited applicability<br />
to most revegetation projects.<br />
Any part of a plant can be measured, and the selection of an attribute is dependent on the<br />
species being sampled. Common attributes include the following:<br />
◾◾<br />
Total height – trees and most shrubs<br />
◾◾<br />
Last season’s leader length – most trees<br />
◾◾<br />
Stem diameter – shrubs and trees<br />
◾◾<br />
Crown cover – shrubs, forbs, and grasses<br />
◾◾<br />
Weight – grasses and forbs<br />
<strong>Roadside</strong> <strong>Revegetation</strong>: An Integrated Approach to Establishing Native Plants and Pollinator Habitat<br />
393
MONITORING PROCEDURES<br />
Total height is typically measured from the ground surface to the top of the bud. If the plant<br />
has several leaders (or tops), the most dominant leader is used for measurement. Last season’s<br />
leader growth can be observed in most tree species. For conifers, leader growth is measured<br />
from the last whirl of branches to the base of the bud. Comparing leader growth from year to<br />
year can indicate whether plants are healthy and actively growing. Stem diameter can be used<br />
to measure most trees and shrubs; in this method, the basal portion of the plant is measured<br />
with calipers at the ground surface. Crown cover is more conducive to spreading plants, such<br />
as shrubs, grasses, and forbs. This measurement requires the use of a large frame with grids<br />
or points that can be placed over the plant to obtain an aerial coverage. Weight of the plant is<br />
typically used for grasses and forbs. Foliage is clipped at the base and weighed immediately<br />
for fresh weight, or dry weight after the sample has been oven-dried.<br />
Sampling plant attributes should be narrowed to a species of interest. It is probably not necessary<br />
to measure all species on a site. Those species that are easy to measure and will dominate the<br />
site are the best to sample (typically trees and shrubs). It is not necessary to sample all plants<br />
in a quadrat. A minimum sample of five plants from each species is suggested. An unbiased<br />
way to select which plants of each species to monitor is to sample those plants closest to the<br />
plot center. If there are not enough plants in the quadrat to sample, then the nearest plants<br />
outside of the quadrat should be sampled.<br />
The measurement for each plant is recorded in a data sheet similar to Figure 12-10. The species<br />
and the attribute being measured must be identified on each sheet (cell B2). The number of<br />
quadrats to establish depends on the variability of the plant attribute, which is discussed<br />
in Section 12.8, Sample Size Determination. How the data will be analyzed is based on the<br />
objectives for monitoring (see Section 12.9, Statistical Analysis Using Confidence Intervals).<br />
These sections should be reviewed before this procedure is used.<br />
Figure 12-10 | Plant<br />
attributes procedure<br />
A spreadsheet is shown here for recording<br />
one species and one attribute. This<br />
spreadsheet can be developed to record<br />
several attributes or several species.<br />
1<br />
2<br />
3<br />
4<br />
5<br />
K4<br />
fx<br />
A B C D E F G<br />
Species: PIPO<br />
Attribute: Plant Height (in)<br />
Quadrat<br />
Plant 1<br />
Plant 2<br />
Plant 3<br />
Plant 4<br />
Plant 5<br />
Average<br />
1 32 41 34 33 27 33<br />
2 36 29 25 32 25 29<br />
G<br />
Average<br />
6<br />
3<br />
35<br />
33<br />
33<br />
36<br />
31<br />
34<br />
=AVERAGE(B4:F4)<br />
7<br />
4<br />
30<br />
34<br />
32<br />
39<br />
39<br />
35<br />
=AVERAGE(B5:F5)<br />
8<br />
5<br />
27<br />
25<br />
33<br />
41<br />
25<br />
30<br />
12.7 SAMPLING AREA DESIGN<br />
Three basic sampling designs are used to monitor revegetation units depending on the shape<br />
or geometry of the sampling areas. The primary objective of these designs is to provide even<br />
spatial coverage of sampling locations within revegetation units that results in unbiased data<br />
collection. The three types of designs that will be covered are as follows:<br />
◾◾<br />
Linear (see Section 12.7.1, Linear Sampling Areas). Long and narrow sampling areas, such<br />
as road cut and fill slopes, are sampled using a systematic series of transects, oriented<br />
perpendicular to the road, along which are located a set of quadrats. Each transect is<br />
treated as the primary experimental unit for statistical analysis.<br />
<strong>Roadside</strong> <strong>Revegetation</strong>: An Integrated Approach to Establishing Native Plants and Pollinator Habitat<br />
394
MONITORING PROCEDURES<br />
◾◾<br />
Rectilinear (see Section 12.7.2, Rectilinear Sampling Areas). For more rectilinear<br />
sampling areas, a systematic grid (that is, a checkerboard) of quadrats is sampled, and<br />
each quadrat is treated as the primary experimental unit for statistical analysis.<br />
◾◾<br />
Dispersed (see Section 12.7.3, Dispersed Area Sampling). When a series of discrete areas<br />
(e.g., planting pockets, planting islands) are encountered, a systematic or grid sample<br />
design of dispersed areas is identified for sampling. Depending on the geometry and<br />
size of these areas, either complete enumeration (measuring all plants) or subsampling<br />
using transects or grids within selected areas.<br />
12.7.1 LINEAR SAMPLING AREAS<br />
Linear areas, such as cut and fill slopes and abandoned roads, are sampled using a systematic<br />
series of equally spaced transects. Each transect has varying numbers of quadrats, depending<br />
on the length of the transect. When the revegetation unit is fairly uniform in width, each transect<br />
will have approximately an equal number of quadrats; when the width of the revegetation<br />
unit is highly variable, there will be unequal numbers of quadrats per transect. In either case,<br />
each transect is treated as the primary experimental unit.<br />
Figure 12-11 shows a typical sampling design for a linear area. In this example, the sampling area<br />
included only those portions of the cut slope that were seeded; it did not include road shoulders<br />
or ditch line. For statistical analysis, the number of transects (n) to collect was estimated to be<br />
20 based on pre-monitoring data (see Section 12.8, Sample Size Determination). Spacing the<br />
20 transects equally along the sampling area was calculated by dividing the total length of<br />
Figure 12-11 | Linear sampling areas<br />
T1<br />
A<br />
T2<br />
Sampling Area<br />
Width<br />
T5<br />
T6<br />
T4<br />
T6<br />
T3<br />
C = 155’<br />
D = 23’<br />
T7<br />
20’<br />
Not a Transect<br />
T8<br />
E<br />
Transect length is:<br />
>100 ft<br />
T9 T10 T11<br />
T12<br />
T13<br />
T14<br />
T10<br />
T15<br />
10’<br />
F<br />
Transect length is:<br />
>20 ft but 20 ft<br />
T17<br />
T18<br />
T19<br />
T20<br />
B<br />
Linear sampling areas are typically long<br />
units with varying widths. Road cuts, fills,<br />
and abandoned roads typically fit this<br />
sampling design. The design of linear<br />
sampling areas uses a series of transects<br />
with uniformly spaced quadrats within<br />
each transect. The distance between<br />
quadrats varies by the length of the transect.<br />
Transects longer than 100 feet have<br />
20 feet of spacing between quadrats (T4<br />
through T6), transects between 20 and<br />
100 feet have 10 feet between quadrats<br />
(T9 through T14), and transects less than<br />
20 feet long have two randomly placed<br />
quadrats (T15 through T20).<br />
<strong>Revegetation</strong> Unit<br />
Road Shoulder – Not Sampled<br />
Road<br />
Transect and Quadrat<br />
A = Starting point<br />
B = Ending point<br />
A to B = Length (L) of sampling area (3,100 ft)<br />
n = Number of transects (20) calculated from pre-monitoring data (Section 12.8)<br />
C = Distance between transects = length (L) / number (n) of transects = 3,100/20 = 155 ft<br />
D = Distance to first transect = random number within the distance between transects (between 1 and 155 ft)<br />
E = For >100 ft transect, a random number between 1 and 20<br />
F = For >20 ft but
MONITORING PROCEDURES<br />
the sampling area by the number of transects to<br />
obtain the distance between transects (3,100/20<br />
= 155 feet). Locating the first transect was done in<br />
an unbiased way by generating a random number<br />
between 1 and 155 using the random number<br />
spreadsheet function shown in Figure 12-12.<br />
Transects are laid out by establishing a line perpendicular<br />
to the edge of the road. The transect begins<br />
at the edge of where seeding or other treatments<br />
were completed, which is typically beyond the<br />
road shoulder and ditch. Each transect contains<br />
a group of evenly spaced quadrats.<br />
The spacing between quadrats varies by the length<br />
of the transect:<br />
◾ ◾ 20 and 100-foot transect lengths. These long transects have 20 feet between quadrats. The<br />
distance to the first quadrat will be based on a random number between 1 and 20 feet.<br />
For the Plant Density and Plant Attribute procedures, only one quadrat is randomly located<br />
within each transect. The location is determined by assigning the RANDBETWEEN random<br />
number function to the length of each transect (Figure 12-12).<br />
1<br />
2<br />
3<br />
4<br />
5<br />
6<br />
7<br />
8<br />
9<br />
10<br />
11<br />
12<br />
13<br />
14<br />
15<br />
16<br />
SUM P10<br />
fx<br />
A B<br />
C D<br />
Transect ID Random Start<br />
T1<br />
T2<br />
T3<br />
T4<br />
T5<br />
T6<br />
T7<br />
T8<br />
T9<br />
T10<br />
T11<br />
=RANDBETWEEN (0,52)<br />
Sheet 1<br />
32<br />
43<br />
24<br />
28<br />
17<br />
2<br />
38<br />
40<br />
44<br />
18<br />
Figure 12-12 | Random<br />
assignment of quadrats<br />
The locations for the first quadrat for<br />
each transect are based on randomly<br />
assigned numbers that can be obtained<br />
prior to going to the field using the<br />
RANDBETWEEN function. This tool<br />
provides uniformly distributed random<br />
numbers within a specified range. For<br />
example, if the distance between quadrats<br />
has been calculated to be 52 feet,<br />
then random numbers between 0 and<br />
52 feet can be calculated by providing<br />
the following equation for each transect:<br />
“=RANDBETWEEN(0,52).” The number<br />
given for each transect is the distance<br />
from the edge of the revegetation unit<br />
to the first quadrat.<br />
12.7.2 RECTILINEAR SAMPLING AREAS<br />
When sampling areas are more elliptical or rectangular in shape, or composed of several<br />
large irregular polygons, the sampling design will be based on a rectangular grid of quadrats<br />
systematically located with a random starting point. Figure 12-13 shows an example of such<br />
a sampling design. Notice that this design is different from the linear sampling design in that<br />
there are no transects. The quadrat in this sampling design is the primary experimental unit,<br />
not the transect.<br />
To determine the grid spacing (E) for the quadrat locations, the area of the sampling unit must<br />
be obtained from maps, and the number of quadrats to be sampled (n) must be determined<br />
from pre-monitoring data (see Section 12.8.2, Comparing Means with Standards – Rectilinear<br />
Sample Size Determination). The following equation gives the length of each side of a square<br />
grid (E):<br />
E =<br />
Area<br />
n<br />
For example, the sampling area in Figure 12-13 covers 4,262 ft2 and it has been determined<br />
from pre-monitoring data that approximately 20 quadrats are necessary to attain the statistical<br />
sampling requirements for this sampling area. The formula indicates that each side (E) of the<br />
grid should be 14.6 feet:<br />
E = 4,262 / 20 = 14.6 ft<br />
<strong>Roadside</strong> <strong>Revegetation</strong>: An Integrated Approach to Establishing Native Plants and Pollinator Habitat<br />
396
MONITORING PROCEDURES<br />
N<br />
w e<br />
E<br />
14.6 ft<br />
First Quadrat<br />
E<br />
Figure 12-13 | Rectilinear<br />
sampling areas<br />
For rectangular or elliptical sampling<br />
areas, a grid composed of quadrats is<br />
used. The length of the grid cells (E) is<br />
calculated, which becomes the standard<br />
distance between quadrats for<br />
this sampling area. To avoid bias, the x<br />
and y axis of the grid is randomly offset.<br />
The monitoring team follows compass<br />
bearing and uses a measuring tape in a<br />
systematic matter to locate all quadrats.<br />
39.8 ft<br />
Random Shift in<br />
Y Direction (4 ft)<br />
A<br />
Random Shift in<br />
X Direction (11 ft)<br />
Sampling Area<br />
Starting Point<br />
Grid Corner<br />
Quadrant Location<br />
Direction of Travel<br />
A starting point of the grid is arbitrarily located in any corner of the study area. To avoid biasing<br />
the placement of the quadrats, the corner of the grid must be shifted by assigning random<br />
numbers to the x and the y coordinates, as shown in Figure 12-13. This is called a systematic<br />
design with a random start. It provides equal likelihood that any point in the study area is<br />
included in the sample unless there are obvious systematic patterns in the site such as planting<br />
rows. In this case, the random number shifts were 11 feet in the horizontal direction and 4<br />
feet in the vertical direction.<br />
In this example, the monitoring team would locate the starting point in the field. Taking a<br />
true north bearing, the team would measure 39.8 feet (10.6+14.6+14.6 = 39.8) to take the first<br />
plot. They would measure 14.6 feet on that bearing to locate the next quadrat. After they<br />
collected data from the last quadrat in that line, they would take a due east bearing and walk<br />
14.6 feet to locate the next plot. This system of sampling would continue until the entire area<br />
has been sampled.<br />
12.7.3 DISPERSED AREA SAMPLING<br />
When sampling areas occur as small, distinct areas, a two-stage sampling design is recommended.<br />
The first stage is to determine which dispersed areas to sample and the second stage is to<br />
determine how to sample within each selected area. For the first sampling stage it is suggested<br />
that a minimum of 20 dispersed areas be monitored within each revegetation unit. If there<br />
are 20 dispersed areas or fewer, then all dispersed areas would be sampled. If there are more<br />
areas than 20, then they must be sampled using one of two sampling designs. For dispersed<br />
areas that range in sizes from small to large and are mapped, the systematic sampling design<br />
<strong>Roadside</strong> <strong>Revegetation</strong>: An Integrated Approach to Establishing Native Plants and Pollinator Habitat<br />
397
MONITORING PROCEDURES<br />
is used (see Section 12.7.3.1, Systematic Sampling of Dispersed Areas). If the dispersed areas are<br />
small or are not mapped, then a grid sampling design is used (see Section 12.7.3.2, Sampling<br />
of Dispersed Areas). In most cases, the grid sampling method is recommended.<br />
Systematic Sampling of Dispersed Areas<br />
First Stage<br />
The systematic sampling method of dispersed areas assumes that the<br />
dispersed areas have been mapped and identified. The dispersed area<br />
in this method is the experimental unit. In this approach, the dispersed<br />
areas are numbered sequentially by progressing from one dispersed<br />
area to the next closest dispersed area. Determining how to calculate<br />
the number (n) of dispersed areas to sample is presented in Section<br />
12.8.3, Comparing Means with Standards – Dispersed Area Sample Size<br />
Determination. Odd- or even-numbered dispersed areas are selected<br />
based on a random number using the RANDBETWEEN function. For<br />
example, if there were 40 dispersed areas (N) but only 20 dispersed<br />
areas needed to be sampled (n), then 50 percent of the dispersed areas<br />
would be sampled (n/N). A random number using RANDBETWEEN(1,2)<br />
is used. If the function returns a “1,” the odd numbered dispersed areas<br />
are selected; if 2, then even numbered areas are selected. Figure 12-14<br />
provides a schematic depiction of such a design.<br />
PS5<br />
PS4<br />
PS3<br />
PS2<br />
Units to Sample<br />
Direction of Travel<br />
PS1<br />
PS1 Layout<br />
PS6<br />
N<br />
w e<br />
PS7<br />
PS8<br />
PS9<br />
PS10<br />
E<br />
E<br />
Second Stage<br />
Once the dispersed areas have been selected, the layout of quadrats<br />
within each dispersed area is determined. A grid-based sampling design,<br />
as described in Section 12.7.2, Rectilinear Sampling Areas , can be used.<br />
To determine the grid spacing (E) for the quadrat locations, determine<br />
whether the size of the dispersed area is >1,600 ft2 or
MONITORING PROCEDURES<br />
Sampling of Dispersed Areas<br />
First Stage<br />
A grid sampling design is used on projects where dispersed areas have<br />
not been mapped and there are more than 30 areas. This sampling<br />
design is typically used on projects where dispersed areas are numerous<br />
and the sizes of the areas are small. In this sampling design a grid is<br />
placed over the revegetation unit, as shown in Figure 12-15, and the<br />
dispersed area nearest to the grid center is selected for monitoring. One<br />
quadrat is randomly placed in each dispersed area and this becomes<br />
the experimental unit.<br />
Determining the grid cell dimensions (E) is accomplished by using the<br />
following equation:<br />
N<br />
w e<br />
Random Shift in<br />
Y Direction<br />
E<br />
E<br />
E =<br />
Area<br />
n<br />
Random Shift in<br />
X Direction<br />
where the area is the total area of the revegetation unit and n is the<br />
number of quadrats to locate (see Section 12.8.3, Comparing Means with<br />
Standards – Dispersed Area Sample Size Determination, for determining<br />
number of quadrats to sample).<br />
The grid is laid out unbiasedly by locating a starting point just outside<br />
the revegetation unit and assigning random numbers to the x and the y coordinates. The<br />
corner of the grid is placed at the x and y offset point and oriented north. In the field, the<br />
grid centers are located using a compass and measuring tape. At each grid center, the closest<br />
dispersed area is selected for monitoring. If there are no dispersed areas found within half<br />
the distance between grid centers (E/2), then the monitoring team moves on to the next grid<br />
center. For revegetation units that have dispersed areas somewhat clustered, grid centers will<br />
sometimes be located where there will be no dispersed areas to sample. For this reason, when<br />
calculating the grid cell dimension (E) from the equation above, the number of quadrats (n)<br />
should be increased 10 to 20 percent to compensate for grid centers where dispersed areas<br />
are not in close proximity.<br />
Second Stage<br />
For seedling density and seedling attribute procedures, dispersed units that are selected for<br />
sampling may be small enough that plant measurements can be exhaustive (e.g., all plants<br />
are measured). These situations usually arise when seedlings are planted in planting islands,<br />
benches, or pockets. When this is not possible, or other procedures, such as soil cover, species<br />
cover, or species presence procedures are being used, one quadrat is located randomly by<br />
facing away from the dispersed area and throwing a rock, hammer, or something heavy and<br />
selecting the quadrat location where it lands.<br />
<strong>Revegetation</strong> Unit<br />
Starting Point<br />
Grid Center Point<br />
Dispersed Unit<br />
Dispersed unit closest to grid<br />
center point to sample<br />
Figure 12-15 | Sampling dispersed<br />
areas with an offset grid<br />
Small dispersed areas can be randomly<br />
sampled using a grid that is offset in the<br />
x and y axis. The grid dimensions (E) are<br />
calculated based on the number of grid<br />
centers (n) needed and the size of the<br />
revegetation unit. Once grid centers are<br />
located, the nearest dispersed unit is found<br />
(closest dispersed unit is shown in circle).<br />
If there are no dispersed units within half<br />
the distance between grid centers (E/2),<br />
then the monitoring team moves to the<br />
next grid center.<br />
12.8 SAMPLE SIZE DETERMINATION<br />
The number of experimental units needed to statistically sample a revegetation area is based<br />
on the variability of the attributes being sampled. By pre-sampling representative areas prior<br />
to monitoring, an approximate number of quadrats and transects can be determined. Using<br />
pre-monitoring data, however, does not always guarantee enough samples will be taken. There<br />
will be projects where pre-monitoring data will not predict the variability and more samples<br />
will be needed. This is usually discovered after reviewing the data back at the office. At that<br />
time, the monitoring leader has to decide whether to return to the site and collect more data.<br />
To avoid this expensive scenario, it is recommended that each revegetation unit be composed<br />
<strong>Roadside</strong> <strong>Revegetation</strong>: An Integrated Approach to Establishing Native Plants and Pollinator Habitat<br />
399
MONITORING PROCEDURES<br />
of at least 20 primary experimental units (20 transects for linear sampling design, 20 quadrats<br />
for rectilinear, or 20 dispersed areas for dispersed area sampling design).<br />
Taking a minimum of 20 samples should help prevent the possibility of having to return to the<br />
site to collect more data. The cost of collecting a small amount of extra data from quadrats or<br />
transects during initial monitoring is typically low relative to the cost of personnel, equipment,<br />
and travel to and from the project area. Taking a minimum of 20 samples is considered a prudent<br />
precaution. While 20 samples should be enough for most projects, sample size calculations<br />
should nevertheless be conducted to determine whether additional primary experimental<br />
units may be needed to achieve the precision requirements of the monitoring plan.<br />
Sample size determination methods must be tailored to the monitoring objectives and<br />
sampling area design. For compliance objectives for linear area sampling design, see Section<br />
12.8.1, Comparing Means with Standards – Linear Sample Size Determination; for rectilinear<br />
sampling area design, see Section 12.8.2, Comparing Means with Standards – Rectilinear<br />
Sample Size Determination; and for dispersed areas, see Section 12.8.3, Comparing Means<br />
with Standards – Dispersed Area Sample Size Determination. For determining sample size for<br />
comparing treatments areas, see Section 12.8.4, Sample Size for Comparing Means among<br />
Treatment Groups.<br />
12.8.1 COMPARING MEANS WITH STANDARDS – LINEAR SAMPLE SIZE<br />
DETERMINATION<br />
To calculate the minimum sample size for linear sampling areas (see Section 12.7.1, Linear<br />
Sampling Areas), it is necessary to approximate the expected sample mean and the range<br />
in values. A visual estimate of the mean and the range of values may be adequate. However,<br />
for more precise estimates, four transects can be sampled to establish estimates of the mean<br />
and range of values.<br />
The following is a quick method of determining the number of transects to sample based on<br />
pre-monitoring data collection:<br />
◾◾<br />
Drive the entire revegetation unit and note the different extremes of revegetation success<br />
◾◾<br />
Find four areas that represent the extremes and lay out a transect in each area<br />
◾◾<br />
Randomly place two quadrats within each transect to collect data on the attribute of<br />
interest (e.g., percent ground cover).<br />
◾◾<br />
For each transect, average the quadrat values (four averages)<br />
◾◾<br />
Calculate the average of the four transect averages and calculate the range (difference<br />
between highest and lowest values of the four averages)<br />
◾◾<br />
Apply the range and the average to the following equation to obtain the minimum<br />
number of transects needed to monitor the revegetation unit (equation based on a<br />
sample size of 20 percent of the true population value with 90 percent confidence):<br />
n = (0.838 * Range) 2 / (0.2 * x̅ ) 2<br />
The number of transects (n) obtained from this quick assessment is used to determine the<br />
layout of the monitoring design, as discussed in Section 12.7, Sampling Area Design.<br />
Example: Suppose that monitoring is to be conducted along a road cut to determine the<br />
percentage of soil cover. The monitoring objective is to estimate mean percent cover to within 20<br />
percent of the true population value with 90 percent confidence. Four transects that represent<br />
a range in conditions are laid out within the revegetation unit. These transects do not need to<br />
be located randomly but rather should be sited to capture the range of values observed in the<br />
sampling area. It is better to over-estimate the range of values, as this will tend to result in a<br />
conservative estimate of the sample size. The data set and equation is shown in Figure 12-16.<br />
<strong>Roadside</strong> <strong>Revegetation</strong>: An Integrated Approach to Establishing Native Plants and Pollinator Habitat<br />
400
MONITORING PROCEDURES<br />
Using the equation presented above, an estimated 13 transects were calculated for a minimum<br />
sample size. Although the minimum sample size is estimated at 13, it is still recommended<br />
that at least 20 transects be sampled because the cost of additional transects (should the<br />
actual monitoring data be more variable than the pre-monitoring data) is minor relative to<br />
the expense of returning to the site and collecting more data.<br />
12.8.2 COMPARING MEANS WITH STANDARDS – RECTILINEAR SAMPLE SIZE<br />
DETERMINATION<br />
When a grid of quadrats is to be implemented (see Section 12.7.2, Rectilinear Sampling Areas),<br />
the sample size calculations use quadrat measurements as opposed to the transect averages<br />
that were used in linear sampling areas. The steps involved in calculating the number (n) of<br />
quadrats are as follows:<br />
◾◾<br />
Visit the entire revegetation unit and notice the different extremes of revegetation<br />
success<br />
◾◾<br />
Find four areas that represent these extremes and lay out a transect in each area<br />
◾◾<br />
Randomly place two to three quadrats within each transect to collect data on the<br />
variable of interest (e.g., percent ground cover)<br />
◾◾<br />
Average the quadrat values (eight quadrat values to average)<br />
◾◾<br />
Calculate the range of all eight samples (difference between highest and lowest values)<br />
◾◾<br />
Apply the range and the average to the following equation to obtain the minimum<br />
number (n) of transects needed to monitor the revegetation unit:<br />
Quadrat<br />
Transect Q1 Q2 Averages<br />
T1 10 15 12.5<br />
T2 12 22 17<br />
T3 18 6 12<br />
T4 32 21 26.5<br />
Estimated Mean = 17<br />
Range (26.5 - 12.5) = 14.5<br />
n = (0.838 * 14.5) 2 / (0.2 * 17.0) 2 = 12.8 transects<br />
Figure 12-16 | Determining<br />
the number of transects<br />
Example of how to calculate the number<br />
of transects needed to be established from<br />
pre-monitoring data set.<br />
n = (0.838 * Range) 2 / (0.2 * x̅ ) 2<br />
Using the data from the previous example (Figure 12-16), the eight quadrats would be averaged.<br />
While the mean in this example would still remain at 17, the range has spread to 26 (maximum<br />
32 minus the minimum 6). The number of quadrats to sample would be 41:<br />
n = (0.838 * 26) 2 / (0.2 * 17.0)² = 41.1<br />
12.8.3 COMPARING MEANS WITH STANDARDS – DISPERSED AREA SAMPLE SIZE<br />
DETERMINATION<br />
Systematic Sampling Method: The systematic sampling method is used when the dispersed<br />
areas are mapped. The experimental unit in this design is the dispersed area.<br />
◾◾<br />
Find four dispersed areas that represent the extremes of the attribute of interest and<br />
lay out<br />
◾◾<br />
Randomly place two quadrats within each dispersed area to collect data on the attribute<br />
of interest (e.g., percent ground cover)<br />
◾◾<br />
For each dispersed area, calculate the average of the four dispersed areas’ averages<br />
and the range<br />
◾◾<br />
Apply the range and the average to the following equation to obtain the minimum<br />
number of dispersed areas needed to monitor in a revegetation unit (equation based<br />
on a sample size of 20 percent of the true population value with 90 percent confidence):<br />
n = (0.838 * Range) 2 / (0.2 * x̅ ) 2<br />
Grid Sampling Method: The grid sampling method is used for revegetation units that have<br />
small dispersed areas that have not been mapped (see Section 12.7.3.2, Sampling of Dispersed<br />
Areas). Since only one quadrat is located in a dispersed area, the quadrat becomes the<br />
experimental unit. The number of quadrats to sample is estimated by following these steps:<br />
<strong>Roadside</strong> <strong>Revegetation</strong>: An Integrated Approach to Establishing Native Plants and Pollinator Habitat<br />
401
MONITORING PROCEDURES<br />
◾◾<br />
Visit a range of dispersed areas and select four dispersed areas that represent these<br />
extremes of site conditions<br />
◾◾<br />
Randomly place one quadrat in each of the four dispersed areas and collect data on<br />
the parameter of interest (e.g., percent ground cover)<br />
◾◾<br />
Calculate the average and range in values<br />
◾◾<br />
Apply the range and the average to the following equation to obtain the minimum<br />
number (n) of dispersed areas to sample:<br />
n = (0.838 * Range) 2 / (0.2 * x̅ ) 2<br />
12.8.4 SAMPLE SIZE FOR COMPARING MEANS AMONG TREATMENT GROUPS<br />
When determining the sample size for comparing treatment differences (see Section 12.9.2,<br />
Determine Treatment Differences), it is not necessary to differentiate between linear, rectilinear,<br />
or dispersed sampling designs. Sample size determinations can be made by following these<br />
steps:<br />
◾◾<br />
Review each treatment area to be compared. These can be different revegetation units<br />
or different types of revegetation treatments.<br />
◾◾<br />
From each treatment area, collect data from two transects composed of two quadrats.<br />
These should represent a range of extremes for a total of four transects.<br />
◾◾<br />
Determine the range.<br />
◾◾<br />
Determine delta. Delta defines the level of significance that is needed for monitoring, or<br />
the meaningful difference in measurement output. For example, calculating bare soil at<br />
1 percent differences in means would be unimportant, that is, the difference between<br />
8 and 9 percent bare soil is too fine a distinction to make. A 5 percent difference might<br />
be important if the amount of data that is needed to be collected was not great. More<br />
than likely, a 10 percent difference (e.g., the difference between 10 and 20 percent bare<br />
soil) would be an acceptable delta value for bare soil cover. It is important to note that<br />
the smaller the delta value, the more samples that need to be collected.<br />
The number of transects (n) can be calculated using a simplified equation:<br />
n = 15.68 / ( ∆* 2.059 / Range)2<br />
The number of transects determined from these calculations are applied equally to the two<br />
(or more) areas being compared. This equation assumes that tests will be conducted at the<br />
delta level of significance and that there will be a difference detected at or greater than an<br />
80 percent probability.<br />
Example: It is desired to find out whether a commercial product actually increases plant cover<br />
by at least 10 percent after the first year as advertised. Similar areas are set up, one where the<br />
product was applied and one where it was not. A year later it can be determined whether<br />
there is a difference in the percentage of vegetative ground cover. To determine the number of<br />
transects to install in each area, set out four transects, two in each area. From this information,<br />
find a range in percent vegetative ground cover values of 22. Assume that tests will be conducted<br />
at the delta level of significance of 10 percent (important to be able to detect a difference in<br />
10 percent cover with at least 80 percent probability). Using the simplified equation stated<br />
above, the following number of transects are required for each treatment area:<br />
n = 15.68 / (10* 2.059 / 22)2 = 17.9 transects<br />
In general, using the simple equation provided here, and possibly adding 10 to 20 percent<br />
additional samples as a level of conservatism, is a reasonable approach.<br />
<strong>Roadside</strong> <strong>Revegetation</strong>: An Integrated Approach to Establishing Native Plants and Pollinator Habitat<br />
402
MONITORING PROCEDURES<br />
12.9 STATISTICAL ANALYSIS USING CONFIDENCE INTERVALS<br />
This section provides statistical methods for analyzing data collected for all monitoring<br />
procedures covered in this chapter. There are three types of analysis based on these monitoring<br />
objectives:<br />
◾◾<br />
Compliance – Determine whether standards were met (see Section 12.9.1, Determine<br />
Standards Compliance)<br />
◾◾<br />
Treatment differences – Determine whether there is a difference between treatments<br />
or changes between years (see Section 12.9.2, Determine Treatment Differences)<br />
◾◾<br />
Trends – Determine the degree of vegetation or soil cover change over time (see<br />
Section 12.9.3, Determine Trends)<br />
The analysis for these objectives uses the concept of confidence intervals to determine the<br />
statistical significance of the monitoring data set.<br />
12.9.1 DETERMINE STANDARDS COMPLIANCE<br />
The objective behind most monitoring is to answer these two questions:<br />
◾◾<br />
Were regulatory standards met?<br />
◾◾<br />
Were the commitments described in reports and made to the community met in terms<br />
of protecting soil and reestablishing native vegetation?<br />
To answer these questions, the means of the attribute data collected (e.g., bare soil, species<br />
presence) must be compared with the set standard or stated threshold. For example, a project<br />
has a standard of at least 70 percent soil cover on a road cut near a live stream one year after<br />
road construction. Using the soil cover procedure, data is collected on 20 transects and a<br />
mean of 81 percent soil cover is determined by averaging the quadrat means. At this point,<br />
the designer might conclude that the standards were met. From a statistician’s point of view,<br />
however, the data displayed in this context is inconclusive because the variability of the soil<br />
cover in the sampling area is not known or cannot be accounted for. In other words, how good<br />
is the number? Is it really depicting what is happening on the site? If another person were to<br />
use the soil cover procedure in the same sampling area, but at a different spot, would the soil<br />
cover be exactly 81 percent? This is highly unlikely because of the high variability of soil cover.<br />
Confidence intervals provide a means of predicting, at a chosen level of certainty, that the soil<br />
cover value collected anywhere in the sampling area will be within a stated range. Confidence<br />
intervals are an alternative to saying, “We think the soil cover at any point in the sampling area<br />
will be around 81 percent.” Using confidence intervals, it can be said instead that, “We are 90<br />
percent confident that if the study were repeated at this site 10 times, 9 out of 10 times the<br />
average soil cover estimate would be within our confidence limits.” If a higher confidence level<br />
is desired (most scientists working in health fields want to be very certain), confidence intervals<br />
can be based on 95 percent or even 99 percent certainty. If this is the case, the confidence<br />
interval would be much wider.<br />
The data sets from very different revegetation units are shown in Figure 12-17 to convey the<br />
concept of confidence intervals. While both data sets have the same mean of 81 percent soil<br />
cover, the confidence intervals are very different. Data set A was taken at a site with very<br />
uniform soil cover, while data set B had much more variability. For both data sets, a 90 percent<br />
confidence interval is desired. Notice that the confidence interval for data set B is much wider<br />
than data set A since it has greater variability.<br />
With confidence intervals, it can be said with greater certainty whether the standard of 70<br />
percent soil cover was met. It can be stated with 90 percent confidence that data set A met<br />
100%<br />
90%<br />
80%<br />
70%<br />
60%<br />
UCL<br />
LCL<br />
89%<br />
x = 81%<br />
73%<br />
UCL = 96%<br />
Threshold<br />
A<br />
LCL = 66%<br />
Acceptable<br />
Unacceptable<br />
B<br />
Upper Confidence Limit<br />
Lower Confidence Limit<br />
Figure 12-17 | Example<br />
data analysis results<br />
Data set A has an upper confidence limit<br />
of 89 percent and a lower confidence<br />
limit of 73 percent. Since the lower confidence<br />
limit is above the standard of 70<br />
percent, it can be stated with 90 percent<br />
confidence that the standards were<br />
met. Data set B has a wider confidence<br />
interval and a lower confidence limit of<br />
66 percent, which is below the standard.<br />
In this case, there is uncertainty at the<br />
90 percent confidence limit that the<br />
standards were met.<br />
<strong>Roadside</strong> <strong>Revegetation</strong>: An Integrated Approach to Establishing Native Plants and Pollinator Habitat<br />
403
MONITORING PROCEDURES<br />
the standards because the lower confidence limit (73 percent) is above the stated standard of<br />
70 percent. Alternatively, data set B poses some problems. It cannot be said with 90 percent<br />
confidence that the unit average is above the standard of 70 percent. The lower confidence<br />
limit of data set B is 66 percent, or 4 percent below the standard. The designer might argue<br />
that, because the mean is above the standard, the standards were met. To statisticians,<br />
however, the fact that the lower confidence interval is below the stated standards indicates<br />
a fair amount of uncertainty. Statisticians would state that that statement cannot be made<br />
without obtaining more data or changing how confident the prediction is.<br />
One of the main purposes for monitoring roadside vegetation is to document successful<br />
project completion. Statistically based sampling designs and analysis provide an objective<br />
way to describe revegetation performance. An understanding of confidence limits and their<br />
interpretation are critical to documenting that standards have been met. The following section<br />
outlines how confidence intervals are calculated and compared with standards. It is organized<br />
by sampling design: linear, rectilinear, and dispersed.<br />
Calculating Confidence Intervals for Linear Sampling Design<br />
Figure 12-18 and Figure 12-19 provide examples of how to calculate confidence intervals from<br />
a data set for a linear sampling area (see Section 12.7.1, Linear Sampling Areas). Figure 12-18<br />
shows how to set up the spreadsheet, and Figure 12-19 shows what a typical data set might<br />
look like. Once the spreadsheet is set up exactly as it is shown in Figure 12-18, it needs to be<br />
tested by entering the data shown in Figure 12-19. If the confidence intervals in the spreadsheet<br />
do not match those of Figure 12-19, then the spreadsheet will need to be reviewed for errors<br />
1<br />
2<br />
3<br />
4<br />
5<br />
6<br />
7<br />
8<br />
9<br />
10<br />
11<br />
12<br />
13<br />
14<br />
15<br />
16<br />
17<br />
18<br />
19<br />
20<br />
21<br />
22<br />
23<br />
24<br />
25<br />
26<br />
27<br />
28<br />
29<br />
30<br />
31<br />
32<br />
33<br />
34<br />
35<br />
36<br />
37<br />
38<br />
A1<br />
fx<br />
A B C D E F G H<br />
I J K<br />
Transect<br />
ID<br />
T1<br />
T2<br />
T3<br />
T4<br />
T5<br />
T6<br />
T7<br />
T8<br />
T9<br />
T10<br />
T11<br />
T12<br />
T13<br />
T14<br />
T15<br />
T16<br />
T17<br />
T18<br />
T19<br />
T20<br />
Transect<br />
Length<br />
Parameter:<br />
Q1 Q2 Q3 Q4 Q5 Q6 Average<br />
Field Data<br />
Equations<br />
= SUM(B4:B23)<br />
Mean = J24/E27<br />
Between Transect Variance = VAR(I4:I23)<br />
Variance of Mean = K24/E27/E27*VAR(I4:I23)<br />
Standard Error = SQRT(E30)<br />
Degrees of Freedom = COUNT(I4:I23)-1<br />
T = TINV(0.1,E32)<br />
90% Lower Con dence Limit: = E28-E33*E31<br />
90% Upper Con dence Limit: = E28+E33*E31<br />
= AVERAGE(C4:H4)<br />
= AVERAGE(C5:H5)<br />
= AVERAGE(C6:H6)<br />
= AVERAGE(C7:H7)<br />
= AVERAGE(C8:H8)<br />
= AVERAGE(C9:H9)<br />
= AVERAGE(C10:H10)<br />
= AVERAGE(C11:H11)<br />
= AVERAGE(C12:H12)<br />
= AVERAGE(C13:H13)<br />
= AVERAGE(C14:H14)<br />
= AVERAGE(C15:H15)<br />
= AVERAGE(C16:H16)<br />
= AVERAGE(C17:H17)<br />
= AVERAGE(C18:H18)<br />
= AVERAGE(C19:H19)<br />
= AVERAGE(C20:H20)<br />
= AVERAGE(C21:H21)<br />
= AVERAGE(C22:H22)<br />
= AVERAGE(C23:H23)<br />
Calculations<br />
L1 x x1 L1 2<br />
= B4*14<br />
= B4^2<br />
= B5*15<br />
= B5^2<br />
= B6*16<br />
= B6^2<br />
= B7*17<br />
= B7^2<br />
= B8*18<br />
= B8^2<br />
= B9*19<br />
= B9^2<br />
= B10*110 = B10^2<br />
= B11*111 = B11^2<br />
= B12*112 = B12^2<br />
= B13*113 = B13^2<br />
= B14*114 = B14^2<br />
= B15*115 = B15^2<br />
= B16*116 = B16^2<br />
= B17*117 = B17^2<br />
= B18*118 = B18^2<br />
= B19*119 = B19^2<br />
= B20*120 = B20^2<br />
= B21*121 = B21^2<br />
= B22*122 = B22^2<br />
= B23*123 = B23^2<br />
= Sum (J4:J23) = Sum (K4:K23)<br />
Figure 12-18 | Confidence intervals<br />
for linear sampling designs<br />
Confidence intervals for linear sampling<br />
designs can be easily obtained by copying<br />
equations and format of this spreadsheet.<br />
<strong>Roadside</strong> <strong>Revegetation</strong>: An Integrated Approach to Establishing Native Plants and Pollinator Habitat<br />
404
MONITORING PROCEDURES<br />
1<br />
2<br />
3<br />
4<br />
5<br />
6<br />
7<br />
8<br />
9<br />
10<br />
11<br />
12<br />
13<br />
14<br />
15<br />
16<br />
17<br />
18<br />
19<br />
20<br />
21<br />
22<br />
23<br />
24<br />
25<br />
26<br />
27<br />
28<br />
29<br />
30<br />
31<br />
32<br />
33<br />
34<br />
35<br />
36<br />
37<br />
38<br />
P10<br />
fx<br />
A B C D E F G H<br />
I J K<br />
Transect Transect Parameter: % bare soil<br />
ID Length Q1 Q2 Q3 Q4 Q5 Q6 Average<br />
T1 38 25.0<br />
25.0<br />
T2<br />
T3<br />
98<br />
261<br />
30.0<br />
20.0<br />
40.0<br />
10.0 40.0 50.0 20.0<br />
35.0<br />
28.0<br />
T4<br />
T5<br />
T6<br />
100<br />
207<br />
207<br />
30.0<br />
10.0<br />
50.0<br />
20.0<br />
30.0<br />
22.0<br />
10.0<br />
40.0<br />
15.0<br />
35.0<br />
25.0<br />
16.3<br />
36.8<br />
T7<br />
T8<br />
150<br />
154<br />
21.0<br />
40.0<br />
54.0<br />
30.0<br />
11.0<br />
10.0<br />
28.7<br />
26.7<br />
T9<br />
T10<br />
131<br />
131<br />
10.0<br />
20.0<br />
30.0<br />
40.0<br />
20.0<br />
30.0<br />
T11 84 30.0<br />
30.0<br />
T12<br />
T13<br />
T14<br />
T15<br />
T16<br />
T17<br />
T18<br />
T19<br />
T20<br />
Equations<br />
= 1561<br />
Mean = 27.31<br />
Between Transect Variance = 35.18068182<br />
Variance of Mean = 3.7893<br />
Standard Error = 1.9466<br />
Degrees of Freedom = 10<br />
T = 1.8125<br />
90% Lower Con dence Limit = 23.8<br />
90% Upper Con dence Limit = 30.8<br />
Calculations<br />
L1 x x1 L1 2<br />
950.00<br />
1444<br />
3430.00<br />
9604<br />
7308.00<br />
68121<br />
2500.00<br />
10000<br />
3363.75<br />
42849<br />
7607.25<br />
42849<br />
4300.00<br />
22500<br />
4106.67<br />
23716<br />
2620.00<br />
17161<br />
3930.00<br />
17161<br />
2520.00<br />
7056<br />
0<br />
0<br />
Erase these formulas<br />
if transects<br />
were not taken<br />
0<br />
0<br />
0<br />
0<br />
0<br />
0<br />
0<br />
42635.67 262461<br />
Figure 12-19 | Example data<br />
to confirm accuracy<br />
The spreadsheet developed from Figure 12-18 can<br />
be checked for accuracy by entering the data in<br />
this spreadsheet.<br />
in copying. Make sure that the equations are in the same cells as shown in Figure 12-18. To<br />
obtain a number for “T” (cell E31), the Excel ToolPak must be installed. To do this, go to the<br />
toolbar and select “Tools, Add-Ins,” and check the box next to “Analysis ToolPak.”<br />
The essential data needed to complete the spreadsheet in Figure 12-18 is as follows:<br />
◾◾<br />
Transect Length (Column B) – This is the total length of the transect recorded in the<br />
field at the time the transect is laid out.<br />
◾◾<br />
Parameters (Cell C2) – Several parameters may be collected at each quadrat. The<br />
parameter (or attribute) to be evaluated should be stated at the top of the quadrat<br />
columns. For instance, in Figure 12-19, the attribute to be analyzed is “percent bare<br />
soil,” which was obtained using the Soil Cover Procedure spreadsheet (Figure 12-4).<br />
Only one attribute can be measured on a spreadsheet. Gravel, rock, and live and dead<br />
vegetation, for instance, are often collected in the soil cover procedure. If a statistical<br />
analysis of these attributes is needed, a spreadsheet must be developed for each<br />
attribute. While not all attributes need to be statistically analyzed, it is important to<br />
analyze those attributes that have been identified for measurements of success (e.g.,<br />
percent bare soil or percent soil cover).<br />
◾◾<br />
Field Data (Columns C through H) – The data collected at each transect and quadrat<br />
for the parameter of interest is typed into these cells. This information comes from the<br />
spreadsheets developed for each procedure (Figure 12-4 Soil cover procedure, Figure<br />
12-7 Species cover procedure, Figure 12-8 Species presence procedure, Figure 12-9<br />
Plant density procedure, and Figure 12-10 Plant attributes procedure) and it is entered<br />
and summarized by transect.<br />
<strong>Roadside</strong> <strong>Revegetation</strong>: An Integrated Approach to Establishing Native Plants and Pollinator Habitat<br />
405
MONITORING PROCEDURES<br />
◾◾<br />
Columns I and J – If fewer than 20 transects were taken, the equations in the cells of<br />
column I and J that do not have data must be cleared for the spreadsheet to work (see<br />
highlighted cells in Figure 12-19).<br />
Calculating Confidence Intervals for Rectilinear Sampling Designs<br />
Figure 12-20 shows how to calculate confidence intervals for rectilinear sampling areas (see<br />
Section 12.7.2, Rectilinear Sampling Areas). Copy the equations exactly as they are shown<br />
in Figure 12-20 into the spreadsheet. Once the spreadsheet has been created, check the<br />
confidence limits in the spreadsheet. They should match those shown in Figure 12-20. If they<br />
do not, then review the spreadsheet for errors. To obtain a number for “T” (cell C28), the Excel<br />
ToolPak must be installed. To do this, go to the toolbar and select “Tools, Add-Ins,” and check<br />
the box next to “Analysis ToolPak.”<br />
The essential data needed to complete the spreadsheet is as follows:<br />
◾◾<br />
Parameters (Cell C2) – The parameter to be evaluated should be stated at the top<br />
of the quadrat columns. In this example, total cover for “seeded” native species was<br />
obtained from Figure 12-7, but any number of site attributes can be analyzed. Copying<br />
column C and pasting it in the columns to the right allows for multiple attributes to be<br />
analyzed in one spreadsheet.<br />
◾◾<br />
Field Data (Columns C through H) – The data collected at each quadrat for the parameter<br />
of interest is typed into these cells. This information comes from the spreadsheets<br />
developed for each procedure (Figure 12-4 Soil cover procedure, Figure 12-7 Species<br />
cover procedure, Figure 12-8 Species presence procedure, Figure 12-9 Plant density<br />
procedure, and Figure 12-10 Plant attributes procedure).<br />
1<br />
2<br />
B34<br />
A<br />
fx<br />
B<br />
Quadrat<br />
C<br />
Parameter:<br />
1<br />
2<br />
F16<br />
A<br />
fx<br />
B<br />
Quadrat<br />
C<br />
Parameter:<br />
Native Species Cover<br />
Figure 12-20 | Confidence intervals<br />
for rectilinear sampling designs<br />
3<br />
4<br />
5<br />
6<br />
7<br />
8<br />
9<br />
10<br />
11<br />
12<br />
13<br />
14<br />
15<br />
16<br />
17<br />
18<br />
19<br />
20<br />
21<br />
22<br />
Field Data<br />
3<br />
4<br />
5<br />
6<br />
7<br />
8<br />
9<br />
10<br />
11<br />
12<br />
13<br />
14<br />
15<br />
16<br />
17<br />
18<br />
19<br />
20<br />
21<br />
22<br />
T1<br />
T2<br />
T3<br />
T4<br />
T5<br />
T6<br />
T7<br />
T8<br />
T9<br />
T10<br />
T11<br />
T12<br />
T13<br />
T14<br />
T15<br />
T16<br />
T17<br />
T18<br />
T19<br />
T20<br />
80<br />
90<br />
75<br />
60<br />
45<br />
32<br />
67<br />
50<br />
80<br />
50<br />
30<br />
50<br />
70<br />
90<br />
100<br />
80<br />
70<br />
65<br />
75<br />
25<br />
This figure shows how confidence intervals<br />
are obtained from a spreadsheet developed<br />
for rectilinear sampling designs.<br />
23<br />
24<br />
25<br />
26<br />
27<br />
28<br />
29<br />
30<br />
Mean<br />
Variance<br />
Standard Error<br />
Degrees of Freedom<br />
90% Lower Confidence Limit:<br />
90% Upper Confidence Limit:<br />
T<br />
= AVERAGE (C3:C22)<br />
= VAR(C3:C22)<br />
= SQRT(C25/COUNT(C3:C22))<br />
= COUNT(C3:C22)-1<br />
= TINV(0.1,C27)<br />
= C24-C28*C26<br />
= C24+C26*N28<br />
23<br />
24<br />
25<br />
26<br />
27<br />
28<br />
29<br />
30<br />
Mean<br />
Variance<br />
Standard Error<br />
Degrees of Freedom<br />
T<br />
90% Lower Confidence Limit:<br />
90% Upper Confidence Limit:<br />
= 64.2<br />
= 442.4<br />
= 4.7<br />
= 19<br />
= 1.7<br />
= 56.1<br />
= 64.2<br />
31<br />
31<br />
<strong>Roadside</strong> <strong>Revegetation</strong>: An Integrated Approach to Establishing Native Plants and Pollinator Habitat<br />
406
MONITORING PROCEDURES<br />
Calculating Confidence Intervals for Dispersed Sampling Design<br />
The two methods for determining confidence intervals for dispersed sampling design are the<br />
systematic sampling design (see Section 12.7.3.1, Systematic Sampling of Dispersed Areas)<br />
and the grid sampling design (see Section 12.7.3.2, Sampling of Dispersed Areas). Confidence<br />
intervals for the grid sampling design are obtained by using the spreadsheet shown in Figure<br />
12-20. For the systematic sampling design, Figure 12-21 is used. The essential data needed to<br />
complete the spreadsheet is as follows:<br />
◾◾<br />
Dispersed Area ID – For some projects, not all dispersed areas will be sampled. Identify<br />
in Column A which areas were sampled.<br />
◾◾<br />
Number of Quadrats (Column B) – Specify the number of quadrats that were sampled<br />
for each dispersed area.<br />
◾◾<br />
Parameters (Cell C2) – Several parameters may be collected at each quadrat. The<br />
parameter to be evaluated should be stated at the top of the quadrat columns. Only one<br />
attribute can be analyzed on a spreadsheet. Gravel, rock, and live and dead vegetation,<br />
for instance, are often collected in the soil cover procedure. If a statistical analysis of<br />
these attributes is needed, a spreadsheet must be developed for each attribute. While<br />
not all attributes need to be statistically analyzed, it is important to analyze those<br />
attributes that have been identified for measurements of success (e.g., percent bare<br />
soil or percent soil cover).<br />
◾◾<br />
Field Data (Columns C through H) – The data collected at quadrats for each dispersed<br />
area for the parameter of interest is typed into these cells. This information comes from<br />
the spreadsheets developed for each procedure (Figure 12-4 Soil cover procedure,<br />
Figure 12-7 Species cover procedure, Figure 12-8 Species presence procedure, Figure<br />
1<br />
2<br />
3<br />
4<br />
5<br />
6<br />
7<br />
8<br />
9<br />
10<br />
11<br />
12<br />
13<br />
14<br />
15<br />
16<br />
17<br />
18<br />
19<br />
20<br />
21<br />
22<br />
23<br />
24<br />
25<br />
26<br />
27<br />
28<br />
29<br />
30<br />
31<br />
32<br />
33<br />
34<br />
35<br />
36<br />
37<br />
38<br />
N36<br />
fx<br />
A B C D E F G H<br />
I J K<br />
Transect<br />
ID<br />
D1<br />
D2<br />
D3<br />
D4<br />
D5<br />
D6<br />
D7<br />
D8<br />
D9<br />
D10<br />
D11<br />
D12<br />
D13<br />
D14<br />
D15<br />
D16<br />
D17<br />
D18<br />
D19<br />
D20<br />
Transect<br />
Length<br />
Parameter:<br />
Q1 Q2 Q3 Q4 Q5 Q6 Average<br />
Field Data<br />
Equations<br />
= SUM(B4:B23)<br />
x w = J24/E27<br />
s 2 (xi ) = VAR(I4:I23)<br />
s 2 (x w ) = K24/E27/E27*VAR(I4:I23)<br />
SE(x w ) = SQRT(E30)<br />
Degrees of Freedom (n-1) = COUNT(C4:C23)-1<br />
T n-1, 0.95 = TINV(0.1,E32)<br />
90% Lower Confidence Limit = E28-E33*E31<br />
90% Upper Confidence Limit = E28+E33*E31<br />
= AVERAGE(C4:H4)<br />
= AVERAGE(C5:H5)<br />
= AVERAGE(C6:H6)<br />
= AVERAGE(C7:H7)<br />
= AVERAGE(C8:H8)<br />
= AVERAGE(C9:H9)<br />
= AVERAGE(C10:H10)<br />
= AVERAGE(C11:H11)<br />
= AVERAGE(C12:H12)<br />
= AVERAGE(C13:H13)<br />
= AVERAGE(C14:H14)<br />
= AVERAGE(C15:H15)<br />
= AVERAGE(C16:H16)<br />
= AVERAGE(C17:H17)<br />
= AVERAGE(C18:H18)<br />
= AVERAGE(C19:H19)<br />
= AVERAGE(C20:H20)<br />
= AVERAGE(C21:H21)<br />
= AVERAGE(C22:H22)<br />
= AVERAGE(C23:H23)<br />
Calculations<br />
L1 x x1 L1 2<br />
= B4*14<br />
= B4^2<br />
= B5*15<br />
= B5^2<br />
= B6*16<br />
= B6^2<br />
= B7*17<br />
= B7^2<br />
= B8*18<br />
= B8^2<br />
= B9*19<br />
= B9^2<br />
= B10*110 = B10^2<br />
= B11*111 = B11^2<br />
= B12*112 = B12^2<br />
= B13*113 = B13^2<br />
= B14*114 = B14^2<br />
= B15*115 = B15^2<br />
= B16*116 = B16^2<br />
= B17*117 = B17^2<br />
= B18*118 = B18^2<br />
= B19*119 = B19^2<br />
= B20*120 = B20^2<br />
= B21*121 = B21^2<br />
= B22*122 = B22^2<br />
= B23*123 = B23^2<br />
= Sum (J4:J23) = Sum (K4:K23)<br />
Figure 12-21 | Confidence intervals<br />
for sampling dispersed areas<br />
Confidence intervals for dispersed areas using the<br />
systematic sampling design can be obtained by<br />
using the equations shown in this spreadsheet.<br />
<strong>Roadside</strong> <strong>Revegetation</strong>: An Integrated Approach to Establishing Native Plants and Pollinator Habitat<br />
407
MONITORING PROCEDURES<br />
12-9 Plant density procedure, and Figure 12-10 Plant attributes procedure) and it is<br />
entered and summarized by dispersed area.<br />
◾◾<br />
Columns I and J – If fewer than 20 dispersed areas were taken, the equations in the<br />
cells of column I and J that do not have data must be cleared for the spreadsheet to<br />
work (see highlighted cells in Figure 12-19).<br />
Interpreting Confidence Intervals for Compliance<br />
Confidence intervals, as stated previously, are used to evaluate the success of a revegetation<br />
project relative to specified standards or stated goals, for example, one of the objectives of<br />
the revegetation plan was to establish at least 65 percent total cover over the soil to protect<br />
against surface erosion. Or stated another way, the objective is no more than 35 percent bare<br />
soil exposed one year after revegetation treatments were applied. In the example shown in<br />
Figure 12-19 (cells E34 and E35), the confidence interval was below 35 percent. It can be said<br />
with a 90 percent level of confidence that the objectives were met. But what if the confidence<br />
interval was either above the standard or straddled the standard?<br />
Figure 12-22 shows four possible scenarios for<br />
confidence intervals that the designer may encounter.<br />
Scenario A is a case where the data supports<br />
50%<br />
50% UCL<br />
LCL<br />
the conclusion at 90 percent confidence that the 40%<br />
40%<br />
project met the standard. Scenario B did not meet<br />
UCL<br />
the standard because the lower confidence limit 30%<br />
30%<br />
A<br />
was above 35 percent bare soil.<br />
LCL<br />
Scenario C is a case where the mean meets the 20%<br />
20%<br />
standard, but the upper confidence limit is above<br />
the standard. It cannot be said with 90 percent 10%<br />
10%<br />
confidence that the standards were met. At this<br />
point it might be asked how important it is to<br />
0%<br />
0%<br />
know whether the standards were met. If the site<br />
directly influences a live stream, it might be very<br />
Unacceptable<br />
important. However, if there are no streams nearby,<br />
Acceptable<br />
it might suffice to report that the there was some<br />
uncertainty whether the standards were met. If it is<br />
determined that more certainty is needed about the results, more data will need to be collected.<br />
Scenario D is a case where the mean does not meet the standard, but the lower confidence<br />
limit is below the standard of 35 percent bare soil. One might state that this project did not<br />
meet the standards, but this still could not be stated with 90 percent confidence. In this<br />
scenario, more transects could be taken to narrow the confidence interval and hope that the<br />
results do not straddle the standard. Another option might be to take measures that would<br />
decrease the amount of bare soil to meet the standards. This could include more seeding or<br />
mulch application. A resampling of the site later would reveal whether the standards were met.<br />
12.9.2 DETERMINE TREATMENT DIFFERENCES<br />
There will be opportunities to compare the effects of different revegetation products or methods<br />
on plant establishment and growth using monitoring data. Some of these opportunities will be<br />
planned (e.g., trying a new product), and some will be mistakes (e.g., inadvertently doubling<br />
the rate of mulch). Planned or unplanned, when different revegetation activities have occurred<br />
within a revegetation unit, monitoring can be designed to assess whether there is a different<br />
vegetative response between those activities or treatments. Note: The monitoring design<br />
outlined in this section will not replace a well-designed study or experiment; it is suggested<br />
B<br />
UCL<br />
LCL<br />
50%<br />
40%<br />
30%<br />
20%<br />
10%<br />
0%<br />
UCL<br />
LCL<br />
C<br />
50%<br />
40%<br />
30%<br />
20%<br />
10%<br />
0%<br />
Upper Confidence Limit<br />
Lower Confidence Limit<br />
UCL<br />
LCL<br />
Figure 12-22 | Possible scenarios<br />
when comparing standards<br />
to confidence intervals<br />
Four possible scenarios that can be encountered<br />
when comparing standards<br />
to confidence intervals. Confidence<br />
interval A is clearly acceptable, whereas<br />
confidence interval B is clearly unacceptable.<br />
Uncertainty arises when the lower<br />
confidence limit is acceptable but the<br />
upper confidence limit is unacceptable.<br />
This is shown in cases where the mean<br />
is in the acceptable range (C) and in the<br />
unacceptable range (D).<br />
D<br />
<strong>Roadside</strong> <strong>Revegetation</strong>: An Integrated Approach to Establishing Native Plants and Pollinator Habitat<br />
408
MONITORING PROCEDURES<br />
that if more conclusive results of treatment differences are required, a study should be designed<br />
with statistical oversight.<br />
The confidence interval concept is applied in this section to determine differences between<br />
new revegetation treatments (new treatments) and routine revegetation methods (standard<br />
treatments). Three possible outcomes are possible when new treatments are compared to<br />
standard methods: (1) the new treatment results in a favorable increase in the measured<br />
parameters over the standard treatment (positive difference), (2) the new treatment results in a<br />
decrease (negative difference), or (3) there is no positive or negative difference (no difference).<br />
Using confidence intervals, it is possible to determine which of these outcomes is statistically<br />
supported for any monitoring data set. In this method, the means and variance of means are<br />
calculated for both the new treatment and standard treatment and a confidence interval is<br />
calculated for the certainty of the treatment differences.<br />
The following example demonstrates how a confidence interval is determined and how it can<br />
be used to interpret two data sets. During a hydroseeding operation, it is discovered that the<br />
rate of fertilizer application was mistakenly applied at twice the normal rate in one area. This<br />
area was staked in the field and visited by the project team a year later. Some on the team<br />
believed that there was more vegetative ground cover where fertilizer was doubled; others<br />
felt that there was actually less. One or two on the team did not believe they could make either<br />
call. Since monitoring was going to take place a few weeks later, they decided to design a<br />
monitoring procedure to answer the question, “Was there a positive, negative, or no response<br />
of vegetative ground cover to the application of additional fertilizer?”<br />
Within the framework of monitoring that was already scheduled for this revegetation unit, a<br />
monitoring strategy was developed. The soil cover procedure was used (see Section 12.2, Soil<br />
Cover Procedure) along with the linear sampling design since this was a road cut (see Section<br />
12.7.1, Linear Sampling Areas). Each treatment area was considered a separate sampling unit,<br />
and monitoring took place independently of each other. The data from each treatment area<br />
was summarized from Figure 12-4 into percent vegetative ground cover and entered into<br />
Figure 12-18 to obtain means and variance of means. The number of transects, means, and<br />
variance of means for each treatment were then entered into Figure 12-23 (cells B4–B6 for<br />
the new treatment and B9-B11 for the standard treatment), producing a confidence interval<br />
(cells B24 and B25) for comparison.<br />
B27<br />
fx<br />
A<br />
B<br />
1<br />
Parameter<br />
Veg Ground<br />
2<br />
Cover<br />
3 Treatment: 2X Additional Fertilizer<br />
4<br />
Number of Transects: 10<br />
5<br />
Mean: 62<br />
6<br />
Variance of the Mean: 47<br />
7<br />
8<br />
9<br />
10<br />
11<br />
12<br />
13<br />
14<br />
15<br />
16<br />
17<br />
18<br />
19<br />
20<br />
21<br />
22<br />
23<br />
24<br />
25<br />
Treatment: Standard Fertilizer Rates<br />
Number of Transects:<br />
Mean:<br />
Variance of the Mean:<br />
Two Sample T-Test<br />
Degrees of Freedom (df):<br />
T Statistic:<br />
Statistical Significance:<br />
12.000000<br />
3.907370<br />
0.002082<br />
Confidence Interval for Difference in Means<br />
Difference:<br />
Variance of Difference:<br />
Standard Error of Difference:<br />
Degrees of Freedom (df):<br />
T Statistic (90% Critical Value):<br />
Lower 90% Confidence Limit:<br />
Upper 90% Confidence Limit:<br />
10<br />
33<br />
10<br />
29.5000<br />
57.0000<br />
7.5498<br />
12<br />
1.7823<br />
16.0440<br />
42.9560<br />
C<br />
Native Species<br />
Cover<br />
10<br />
45<br />
23<br />
10<br />
90<br />
40<br />
17.000000<br />
-5.669467<br />
0.000028<br />
-45.0000<br />
63.0000<br />
7.9373<br />
17<br />
1.7396<br />
-58.8077<br />
-31.1923<br />
B<br />
Parameter<br />
From Spreadsheets 12.18, 12.20, or 12.21<br />
From Spreadsheets 12.18, 12.20, or 12.21<br />
From Spreadsheets 12.18, 12.20, or 12.21<br />
From Spreadsheets 12.18, 12.20, or 12.21<br />
From Spreadsheets 12.18, 12.20, or 12.21<br />
From Spreadsheets 12.18, 12.20, or 12.21<br />
=ROUND((B6/B4+B11/B9)^2/(B6^2/B4^3+B11^2/B9^3)-2,0)<br />
=(B5-B10)/SQRT(B6+B11)<br />
=TDIST(B15,B14,2)<br />
=B5-B10<br />
=B6+B11<br />
=SQRT (B20)<br />
=ROUND((B6/B4+B11/B9)^2/(B6^2/B4^3+B11^2/B9^3)-2,0)<br />
=TINV(0.1,B22)<br />
=B19-B23*B21<br />
=B19+B23*B21<br />
Figure 12-23 | Comparing<br />
treatment differences<br />
Treatment differences can be determined<br />
using the following spreadsheet.<br />
Copy each equation exactly as presented.<br />
Fill in cell B2 with the parameters<br />
being compared. In this example,<br />
vegetative ground cover (cell B2) and<br />
native species cover (cell C2) are being<br />
compared. From the two data sets that<br />
were summarized from spreadsheets<br />
in Figure 12-18, Figure 12-20, and Figure<br />
12-21, the number of transects, means,<br />
and variance of the mean from each<br />
can be obtained. From this information,<br />
the spreadsheet calculates the lower<br />
and upper confidence limits for each<br />
attribute at 90 percent confidence.<br />
<strong>Roadside</strong> <strong>Revegetation</strong>: An Integrated Approach to Establishing Native Plants and Pollinator Habitat<br />
409
MONITORING PROCEDURES<br />
The results of this analysis showed that the<br />
standard rates of fertilizer had an average<br />
vegetative ground cover of 33 percent (cell<br />
B10) as compared to 62 percent (B5) for double<br />
the fertilizer rate. While this looks like an<br />
obvious difference, how certain could the<br />
team be? A confidence interval was derived<br />
to answer that question. In this example, the<br />
confidence interval (at 90 percent confidence)<br />
showed that additional fertilizer significantly<br />
increased vegetative ground cover. This can<br />
be shown graphically in Figure 12-24. The 2X<br />
fertilizer treatment increased ground cover<br />
a minimum of 16 percent over the standard<br />
treatment (lower confidence limit) to as high<br />
as 42 percent ground cover (upper confidence<br />
limit).<br />
The team accepted these results and commented<br />
that fertilizer rates should be increased<br />
for future projects. One member<br />
posed the question, “We might have achieved<br />
better cover on this site during the first year,<br />
but is it the vegetative cover we really want?” Since the monitoring team was still on the<br />
project site, they resampled the two areas using the species cover procedure (see Section 12.3,<br />
Species Cover Procedure). In this procedure, native and non-native annuals and perennials were<br />
recorded at each quadrat. Confidence intervals were determined for each treatment for native<br />
perennial cover (Figure 12-23, cells C24 and C25). They learned, in this case, that additional<br />
fertilizer had a negative effect on the establishment of native perennial cover (Figure 12-24).<br />
But what if the upper confidence interval in this example had been positive and the lower<br />
confidence interval had been negative? In this case, it would have to be concluded that there<br />
was no difference between treatments at 90 percent confidence.<br />
80%<br />
60%<br />
40%<br />
20%<br />
0%<br />
-20%<br />
-40%<br />
-60%<br />
-80%<br />
UCL<br />
LCL<br />
UCL = 42%<br />
LCL = 16%<br />
UCL = -31%<br />
LCL = -59%<br />
Positive Difference<br />
(increase in cover)<br />
Negative Difference<br />
(decrease in cover)<br />
Vegetative<br />
Ground<br />
Cover<br />
Native<br />
Species<br />
Cover<br />
Upper Confidence Limit<br />
Lower Confidence Limit<br />
Figure 12-24 | Interpreting results<br />
with confidence intervals<br />
In the example presented in the text<br />
and Figure 12-23, confidence intervals<br />
are used to answer: (1) how vegetative<br />
ground cover responds to 2X the fertilizer<br />
rate, and (2) how native species<br />
cover responds to 2X fertilizer rates. The<br />
confidence interval collected for the<br />
first question was found to be positive,<br />
indicating that vegetative ground cover<br />
responds positively to twice the fertilizer.<br />
The confidence interval for the data<br />
set collected for the second question<br />
was negative, indicating that native<br />
species cover responded negatively to<br />
more fertilizer.<br />
12.9.3 DETERMINE TRENDS<br />
The last of the three objectives for roadside monitoring is assessing trend, or the degree of<br />
vegetative or soil cover over time. The reason to perform this type of monitoring is usually<br />
based on the need to understand how growth patterns of certain species or soil cover changes<br />
over the years. Many monitoring procedures employ permanent monitoring plots or transects<br />
that can be repeatedly and accurately revisited for sampling. The approach taken here is that<br />
collecting data in the same location over time is not feasible for roadside monitoring because<br />
of the hazards to road maintenance personnel and to the public of placing permanent stakes<br />
in road corridors. In addition, permanent markers are often hard to relocate years later or can<br />
move due to the instability of steep cut and fill slopes. In this section a statistical analysis that<br />
does not require locating and resurveying of exact quadrats is offered.<br />
The confidence interval concept is applied in this section to determine if there are differences<br />
in attributes from one sampling date to another. Three outcomes are possible when comparing<br />
data from one sampling date to the next: (1) plant or soil cover attributes have increased since<br />
the last sampling period (positive difference), (2) plant or soil cover attributes have decreased<br />
since the last sampling period (negative difference), or (3) either there was no change in plant<br />
or soil cover attributes or the number of samples was inadequate to detect the amount of<br />
change that occurred. Using confidence intervals, it is possible to make statistically valid<br />
statements regarding the observed outcomes.<br />
<strong>Roadside</strong> <strong>Revegetation</strong>: An Integrated Approach to Establishing Native Plants and Pollinator Habitat<br />
410
MONITORING PROCEDURES<br />
1<br />
2<br />
3<br />
4<br />
5<br />
6<br />
7<br />
8<br />
9<br />
10<br />
11<br />
12<br />
13<br />
14<br />
15<br />
16<br />
17<br />
18<br />
19<br />
20<br />
21<br />
22<br />
23<br />
24<br />
25<br />
G10<br />
A<br />
fx<br />
Sampling Year: 2006<br />
Number of Transects:<br />
Mean:<br />
Variance of the Mean:<br />
Sampling Year: 2001<br />
Number of Transects:<br />
Mean:<br />
Variance of the Mean:<br />
Two Sample T-Test<br />
Degrees of Freedom (df):<br />
T Statistic:<br />
Statistical Significance:<br />
Difference in Means<br />
Difference:<br />
Variance of Difference:<br />
Standard Error of Difference:<br />
Degrees of Freedom (df):<br />
T Statistic (90% Critical Value):<br />
Lower 90% Confidence Limit:<br />
Upper 90% Confidence Limit:<br />
B<br />
C<br />
Parameter: % Crown Cover<br />
BRCA5<br />
FEID<br />
20<br />
27<br />
19<br />
The following example demonstrates how a confidence interval is determined and how it is<br />
used to interpret data taken at different sampling dates. Members of the revegetation team<br />
believed that California brome (Bromus carinatus) was a short-lived species; that it established<br />
well after seeding but by the fifth year it had very little presence on most sites. They also<br />
believed that Idaho fescue started out slowly but gained dominance over time. The team felt<br />
that by understanding these trends they might develop a better seed mix for sites similar to<br />
the ones they were monitoring. The question they posed was: “Is there a positive, negative,<br />
or no difference in the cover of California brome and Idaho fescue from the first year to the<br />
fifth year after seeding?”<br />
This question required the use of the species cover procedure (see Section 12.3, Species Cover<br />
Procedure) since dominance was being expressed as percent crown cover for each species.<br />
Linear Sampling Design was used for both monitoring dates because the sampling area was<br />
a long cut slope. The data from each sampling date<br />
was summarized into percent cover for California<br />
brome (BRCA5) and entered into Figure 12-18 to 40%<br />
UCL = 36%<br />
obtain means and variance of means. The number<br />
30%<br />
of transects, means, and variance of means for each<br />
FEID<br />
treatment were then entered into Figure 12-25 (cells 20%<br />
LCL = 19%<br />
B9–B11 for earliest sampling date and B4 through B6<br />
10%<br />
for latest sampling date), producing a confidence<br />
UCL = 3%<br />
interval (cells B24 and B25) for comparison. Data entry 0%<br />
was also done in the same manner for Idaho fescue.<br />
-10%<br />
BRCA5<br />
The results of this analysis showed that California<br />
brome had an average crown cover of 35 percent (cell<br />
B10) in 2001 but decreased to 27 percent (cell B5) in<br />
2006, five years later. Was this a statistically significantly<br />
difference? Using confidence intervals, they found<br />
that the means were not statistically different at 90<br />
percent confidence. This can be shown graphically<br />
in Figure 12-26. Because the upper confidence limit<br />
was positive (cell B25) and the lower was negative<br />
(cell B24), the team could be 90 percent confident<br />
that crown cover did not increase from 2001 to 2006.<br />
20<br />
35<br />
22<br />
38.000000<br />
-1.249390<br />
0.219164<br />
-8.0000<br />
41.0000<br />
6.4031<br />
38<br />
1.6860<br />
-18.7954<br />
2.7954<br />
20<br />
33<br />
15<br />
20<br />
5<br />
10<br />
36.000000<br />
5.600000<br />
0.000002<br />
28.0000<br />
25.0000<br />
5.0000<br />
36<br />
1.6883<br />
19.5585<br />
36.4415<br />
B<br />
Parameter<br />
From Spreadsheets 12.18, 12.20, or 12.21<br />
From Spreadsheets 12.18, 12.20, or 12.21<br />
From Spreadsheets 12.18, 12.20, or 12.21<br />
From Spreadsheets 12.18, 12.20, or 12.21<br />
From Spreadsheets 12.18, 12.20, or 12.21<br />
From Spreadsheets 12.18, 12.20, or 12.21<br />
=ROUND((B6/B4+B11/B9)^2/(B6^2/B4^3+B11^2/B9^3)-2,0)<br />
=(B5-B10)/SQRT(B6+B11)<br />
=TDIST(B15,B14,2)<br />
=B5-B10<br />
=B6+B11<br />
=SQRT (B20)<br />
=ROUND((B6/B4+B11/B9)^2/(B6^2/B4^3+B11^2/B9^3)-2,0)<br />
=TINV(0.1,B22)<br />
=B19-B23*B21<br />
=B19+B23*B21<br />
-20%<br />
-30%<br />
-40%<br />
UCL<br />
LCL<br />
LCL = -19%<br />
Positive Difference<br />
(increase in cover)<br />
Negative Difference<br />
(decrease in cover)<br />
Upper Confidence Limit<br />
Lower Confidence Limit<br />
Figure 12-25 | Analysing changes<br />
in attributes over time<br />
Changes in attributes over time can be<br />
determined using the following spreadsheet.<br />
The equations shown in the right<br />
column (B14 through B25) correspond<br />
to the cells located in column B (left<br />
side spreadsheet). Copy each equation<br />
exactly as they appear. Fill in cell B2 with<br />
the attribute of interest. In this example,<br />
the attribute of interest is the crown<br />
cover of California brome and Idaho<br />
fescue (cell C4). From the data sets (see<br />
Figure 12-18, Figure 12-20, and Figure<br />
12-21) obtained on the two sampling<br />
dates (2001 and 2006), the number of<br />
transects, means, and variance of the<br />
mean are obtained and copied into<br />
rows 4, 5, and 6 for the latest sampling<br />
date and in rows 9, 10, and 11 for the<br />
earlier date. From this information, the<br />
spreadsheet calculates the lower and<br />
upper confidence limit at 90 percent<br />
confidence.<br />
Figure 12-26 | Example results<br />
with confidence intervals<br />
In the example presented in the text<br />
and Figure 12-25, confidence intervals<br />
are used to answer whether California<br />
brome and Idaho fescue increased, decreased,<br />
or stayed the same from 2001<br />
to 2006. The percent crown cover of<br />
California brome was found not to have<br />
changed during this period because the<br />
lower confidence limit was negative and<br />
the upper confidence limit was positive.<br />
The confidence interval for the Idaho<br />
fescue showed a positive difference between<br />
2001 and 2006 (cells C24 and C25).<br />
Since the upper and lower confidence<br />
limits were positive, the differences in<br />
the means between sampling dates was<br />
significant at 90 percent confidence.<br />
<strong>Roadside</strong> <strong>Revegetation</strong>: An Integrated Approach to Establishing Native Plants and Pollinator Habitat<br />
411
MONITORING PROCEDURES<br />
Alternatively, Idaho fescue did show an increase in mean crown cover from 2001 (cell C10) to<br />
2006 (cell C5). This increase was found to be significantly significant because both the upper<br />
and lower confidence limits were positive. The team could be 90 percent confident that there<br />
was a true increase in crown cover.<br />
12.10 POLLINATOR MONITORING PROCEDURES<br />
This standardized monitoring procedure provides instructions for monitoring native bees,<br />
honey bees, and monarch butterflies to assess the quality of revegetated roadsides as<br />
pollinator habitat. The data collected from these procedures will allow the project designer<br />
to determine if the revegetation project successfully addressed pollinator-specific DFCs. The<br />
procedure can be used to assess roadside vegetation in three ways: (1) to indicate whether<br />
revegetation efforts have increased pollinator diversity and abundance (by including nearby<br />
non-revegetated roadsides in samples as reference sites), (2) to determine if pollinator diversity<br />
and abundance change over time, and (3) to compare the effects of different management<br />
strategies or seed mixes on pollinators. This straightforward pollinator sampling procedure<br />
can be conducted with minimal training and time, yet provides a quantitative measure of bee<br />
diversity. This procedure only requires that the user be able to differentiate native bees from<br />
other insects visiting flowers and recognize honey bees and monarch butterflies during two<br />
half-hour visits per location per year.<br />
It is important to note that counting individuals of European honey bees alone cannot provide<br />
a measure for the value of habitat for native bees or other pollinators because the number<br />
of individual honey bees visiting habitat is primarily determined by the number of managed<br />
hives in the vicinity. Although the presence of honey bees does indicate that the vegetation<br />
supports bees, it does not demonstrate how well the vegetation increases abundance and<br />
diversity of other species of bees or pollinators.<br />
To evaluate a particular site, two separate visits need to be made per growing season to conduct<br />
a timed assessment to observe and count bees on flowers along two transects. Samples should<br />
be made in the middle of the growing season. In California, for example, May through July<br />
is the ideal sampling window, while in the Upper Midwest or Northeast July through August<br />
is preferred. Samples should also be made only when weather conditions are warm, sunny,<br />
and calm, with air temperatures over 60° F, wind speeds less than 10 miles per hour, and skies<br />
mostly clear. Pollinators are most active between 8 a.m. and 4 p.m.<br />
Two linear transects of 100 feet each should be established per site, ideally in full sun because<br />
bee activity declines in shade. To begin sampling, walk the transect for 7.5 minutes and<br />
count bees on flowers within a 3-foot-wide strip of the transect. Walk so that your shadow is<br />
behind you rather than in front, and watch all the open flowers within 3 feet to one side of<br />
the transect. Record each bee that lands on the reproductive structures of the flower for more<br />
than 0.5 second. Use a timer and pause it as needed to record an insect before restarting it<br />
when ready to resume observations. Set a careful pace so that the whole 100-foot transect is<br />
covered within 7.5 minutes. While moving through the transect, keep a tally of the number<br />
of native bees, honey bees, and monarch butterflies observed. The same bee or butterfly<br />
should not be counted twice even if it visits multiple flowers because the overall goal is to<br />
count the number of individuals using the site rather than the rate of floral visitation. Records<br />
of samples should also include the site name, date, name of the sampler, weather conditions,<br />
time of visit to the site, and any pertinent notes about the site and the vegetation present,<br />
such as which flowers in bloom seem to be attracting the most pollinators. An example of a<br />
data sheet is included in the appendix.<br />
The number of native bees counted through this survey procedure correlates positively with<br />
the overall diversity of native bees at a site; therefore, if a large abundance of individuals is<br />
present, that indicates higher diversity. If multiple roadside sites are surveyed, the differences<br />
observed in native bee abundance will reflect differences in habitat quality among sites. Native<br />
<strong>Roadside</strong> <strong>Revegetation</strong>: An Integrated Approach to Establishing Native Plants and Pollinator Habitat<br />
412
MONITORING PROCEDURES<br />
bee counts can be used to rank the quality of sites or the quality of seed mixes, or be used<br />
over time to assess changes at a site.<br />
For guidance on basic bee and pollinator recognition, refer to national and regional pollinator<br />
monitoring tools developed by the Xerces Society and partners at http://www.xerces.org/<br />
xerces-bee-monitoring-tools/. This procedure was adapted from a procedure developed<br />
by researchers with the University of California, Davis, Rutgers University, Michigan State<br />
University, and The Xerces Society. Using three years of field data at multiple locations across<br />
the country to compare bee diversity and abundance with various sampling intensities, the<br />
researchers found that observing and recording the abundance of native bees on flowers<br />
during two site visits provide reliable estimates of both abundance and diversity of bees at a<br />
particular site (Ward and others 2014).<br />
<strong>Roadside</strong> <strong>Revegetation</strong>: An Integrated Approach to Establishing Native Plants and Pollinator Habitat<br />
413
POLLINATOR-SPECIFIC CASE STUDIES<br />
13— Pollinator-Specific<br />
Case Studies<br />
13.1 I-35 Corridor (aka “The Monarch Highway”) Case Studies<br />
13.2 A Case Study from the Southeast U.S.<br />
<strong>Roadside</strong> <strong>Revegetation</strong>: An Integrated Approach to Establishing Native Plants and Pollinator Habitat<br />
414
POLLINATOR-SPECIFIC CASE STUDIES<br />
Chapter 13 provides three case studies to highlight successful pollinator-friendly practices and<br />
strategies in various roadside projects from multiple parts of the country. The case studies<br />
included here are a subset of those found in Hopwood and others 2016.<br />
13.1 I-35 CORRIDOR (AKA “THE MONARCH HIGHWAY”) CASE<br />
STUDIES<br />
In 2014, President Obama released a Presidential Memorandum that tasked federal agencies with<br />
identifying strategies to promote the health of pollinators in order to reverse pollinator declines.<br />
The 2015 “National Strategy to Promote the Health of Honey Bees and Other Pollinators” was<br />
a direct outcome of the memorandum, and that strategy called for a multi-state partnership<br />
called the “Monarch Highway” along the I-35 corridor. Running through Minnesota, Iowa,<br />
Missouri, Kansas, Oklahoma, and Texas, the I-35 highway spans the central flyway monarch<br />
butterflies take during their annual migration. The “Monarch Highway” effort hopes to serve<br />
as a national model of cooperation to enhance pollinator habitat along transportation rightsof-way.<br />
The six states involved in the strategy have agreed to coordinate efforts to establish<br />
best practices and promote monarch butterfly and pollinator conservation.<br />
The two following case studies highlight successful projects from Iowa, one of the six states<br />
that comprise the I-35 corridor where agencies are focused on restoring habitat to support<br />
the imperiled Monarch butterfly and other pollinators.<br />
13.1.1 BRINGING PRAIRIE BACK TO IOWA: IOWA’S INTEGRATED ROADSIDE<br />
VEGETATION MANAGEMENT PROGRAM AND LIVING ROADWAY TRUST FUND<br />
Prairie once dominated Iowa’s landscape, covering<br />
more than 85 percent of the state. With less<br />
than 0.1 percent of virgin prairie remaining, and<br />
more than 95 percent of Iowa’s original wetlands<br />
destroyed, Iowa has the nation’s most altered<br />
landscape. Prior to the mid-1980s, roadside<br />
weed control in Iowa relied heavily on blanket<br />
spraying, putting large amounts of herbicide<br />
into the environment with undesirable consequences.<br />
Recognizing Iowa’s lost heritage and<br />
the need to protect groundwater and surface<br />
waters, Iowa roadside managers began making<br />
some changes. For example, they began using<br />
native prairie grasses and wildflowers for erosion<br />
control and reintroduced “a little wildness,”<br />
according to Kirk Henderson, retired State IRVM<br />
Specialist from the Native <strong>Roadside</strong> Vegetation<br />
Center at the University of Northern Iowa.<br />
In 1989, the Iowa legislature passed IRVM legislation<br />
to promote an ecologically integrated<br />
approach to roadside management while maintaining<br />
a safe travel environment (Code of Iowa, Section 314). The legislation emphasized the<br />
establishment and protection of native vegetation as well as judicious use of herbicides, mowing,<br />
prescribed burning, and other management tools. Iowa is widely seen as a leader in IRVM, in<br />
large part because of this legislation. The bill also established the Living Roadway Trust Fund,<br />
an annual competitive grant program administered by the Iowa DOT that provides funding<br />
for school, city, county, and state projects, as well as research projects involving IRVM. Iowa’s<br />
road use tax, along with several other sources, funds the Living Roadway Trust Fund. <strong>Roadside</strong><br />
Photo: Advisory Committee<br />
<strong>Roadside</strong> <strong>Revegetation</strong>: An Integrated Approach to Establishing Native Plants and Pollinator Habitat<br />
415
POLLINATOR-SPECIFIC CASE STUDIES<br />
Photo: Carl Kurtz<br />
managers can submit applications to obtain resources to help implement IRVM, including<br />
vegetation inventories, purchasing native seed, equipment for burns or plant establishment,<br />
GPS units, signage, workshops, and more. <strong>Roadside</strong>s are seeded with mixes of species that are<br />
appropriate for a particular site, including many wildflowers that are attractive to pollinators.<br />
Seed mixes also contain species that bloom at different times throughout the growing season,<br />
which helps support pollinators all season long. The targeted vegetation management practiced<br />
by Iowa’s roadside managers also benefits pollinators (Ries and others 2001).<br />
Research projects have also been supported by the Living Roadway Trust Fund, including studies<br />
of restoration techniques, as well as studies of the impact of roadside habitat on butterflies<br />
(Ries and others 2001) and bees (Hopwood and others 2010). Since the bill, more than 100,000<br />
acres of Iowa’s nearly 600,000 acres of state and county roadsides have been planted to native<br />
vegetation (Brandt and others 2015). In the process, Iowa has fostered the development of<br />
experienced roadside managers who are equipped to collaborate with other land managers<br />
around the state and bring habitat and wildlife, such as pollinators, back to Iowa’s landscape.<br />
13.1.2 IOWA’S NATURAL SELECTIONS PROGRAM INCREASES IOWA NATIVE SEED<br />
The Natural Selections program was formed to build the native seed industry in Iowa to meet<br />
the demands for high quality, regionally adapted, and genetically diverse sources of native<br />
seed for prairie restorations, including roadside restorations. For native regional seed to be<br />
priced to compete with cultivars, it has to be produced in commercial quantities. The Natural<br />
Selections program is a collaboration between state and federal agencies, as well as private<br />
corporations. Past or present partners include the Iowa Crop Improvement Association, the<br />
Living Roadway Trust Fund administered by Iowa DOT, USDA Natural Resources Conservation<br />
Service Elsberry Plant Materials Center, the University of Northern Iowa, and independent seed<br />
producers. Seed is collected by hand from remnant populations by the project manager and<br />
by volunteers throughout the state. Seed is collected from remnant roadsides, natural areas,<br />
and private land in three regional zones within Iowa. Iowa’s Natural Selections program uses<br />
provenance zones large enough to support a market but narrow enough to retain regional<br />
distinctiveness. Collectors do not collect seed to intentionally select for certain traits. Foundation<br />
seed plots at the University of Northern Iowa amplify the seed, which is then further<br />
increased. Once seed has been increased, it is released to qualified native seed growers with<br />
Photos: Kirk Henderson<br />
<strong>Roadside</strong> <strong>Revegetation</strong>: An Integrated Approach to Establishing Native Plants and Pollinator Habitat<br />
416
POLLINATOR-SPECIFIC CASE STUDIES<br />
production certified by the Iowa Crop Improvement Association. About 6 to 8 years after the<br />
initial collection, enough seed is available to sell to the public.<br />
Successes of the project include increasing seed of 70 species, with nearly 120 ecotypes of<br />
60 species released for commercial production and 180,000 to 200,000 pounds of ecotype<br />
source-identified seed produced annually. More information can be found at www.tallgrassprairiecenter.org/natural-selections.<br />
Photos: Maria Urice<br />
13.2 A CASE STUDY FROM THE SOUTHEAST U.S.<br />
The following case study from Florida highlights a unique citizen-based effort to protect<br />
pollinator habitat through county policy resolutions that were subsequently supported by<br />
pollinator-friendly management plans.<br />
13.2.1 FLORIDA RESOLVES TO PROTECT WILDFLOWERS ON ROADSIDES<br />
Florida, home to a great diversity of plants and animals, was once dubbed the “land of flowers”<br />
by a Spanish explorer in 1513. Many of these wildflowers can be found on Florida’s 200,000<br />
acres of roadsides. However, wildflower proliferation along roadsides<br />
can be limited by the frequency of mowing. <strong>Roadside</strong> mowing can<br />
be very intensive in some parts of Florida, particularly in urban areas.<br />
When showy stands of wildflowers were mowed during bloom when<br />
pollinators were present, concerned citizens contacted Florida DOT.<br />
Jeff Caster, State Transportation Landscape Architect with Florida<br />
DOT, describes the situation: “There would be butterflies on the side<br />
of the road feasting on the native vegetation and we would come in<br />
and mow it all down and we would get people naturally upset with<br />
us. Environmentally conscious citizens called us to complain that we<br />
were mowing down wildflowers and butterfly habitat.”<br />
Florida DOT isn’t able to alter their management plans based on<br />
direct requests from a garden club or an individual that wants less<br />
roadside mowing. But citizens in Wakulla County found another way.<br />
They worked with their county commissioners to draft a resolution<br />
that made it county policy to preserve existing stands of roadside<br />
wildflowers. Then, county staff worked with Florida DOT to develop<br />
<strong>Roadside</strong> <strong>Revegetation</strong>: An Integrated Approach to Establishing Native Plants and Pollinator Habitat<br />
417
POLLINATOR-SPECIFIC CASE STUDIES<br />
a roadside management plan to accommodate<br />
the resolution.<br />
Recognizing the cultural, historical, and environmental<br />
significance of native wildflowers, 27<br />
out of Florida’s 67 counties have moved to adopt<br />
similar wildflower resolutions. These counties<br />
“make a commitment to saying they want to<br />
enjoy the visibility of wildflowers for whatever<br />
reason, some do it to attract nature-based<br />
tourism, some doing it to help their farms,”<br />
Caster says. A model resolution can be found<br />
on the Florida Wildflower Foundation’s website<br />
(http://flawildflowers.org/resolution.php).<br />
Florida’s unique grassroots approach to protecting<br />
wildflowers at the county level has great<br />
potential for pollinator conservation.<br />
Photo: Jaret Daniels<br />
<strong>Roadside</strong> <strong>Revegetation</strong>: An Integrated Approach to Establishing Native Plants and Pollinator Habitat<br />
418
BIBLIOGRAPHY<br />
Alexander R. 2003a. A composting update: the way we were, and where we’re going. Municipal<br />
Stormwater Management 13(1). 7 p.<br />
Alexander R. 2003b. Developing and implementing national erosion/sediment control<br />
specifications for composted products. Durham (NH): Recycled Materials Resource Center.<br />
URL: http://www.rmrc.unh.edu/Research/Rprojects/Project21/Project21.asp (accessed 26<br />
Feb 2007).<br />
Allen EB, Espejel C, Sigüenza C. 1997. Role of mycorrhizae in restoration of marginal and<br />
derelict land and ecosystem sustainability. In: Palm ME, Capela IH, editors. Mycology in<br />
sustainable development: expanding concepts, vanishing borders. Boone (NC): Parkway<br />
Publishers Inc. p 147-159.<br />
Amaranthus M, Steinfeld D. 2003. A symbiotic relationship [online]. Erosion Control, Sept/<br />
Oct. 4 p.<br />
Amaranthus M, Steinfeld D. 2005. Arbuscular mycorrhizal inoculation following biocide<br />
treatment improves Calocedrus decurrens survival and growth in nursery and outplanting<br />
sites. In: Riley LE, Dumroese RK, Landis TD, technical coordinators. National proceedings:<br />
forest and conservation nursery associations–2004. Fort Collins (CO): USDA Forest Service,<br />
Rocky Mountain Research Station. RMRS-P-35. p 103-108.<br />
Amaranthus MP, Perry DA. 1987. The effect of soil transfer on ectomycorrhiza formation and<br />
the survival and growth of conifer seedlings on old, nonreforested clearcuts. Canadian<br />
Journal of Forest Research 17:944–950.<br />
Amaranthus MP, Steinfeld DE. 1997. Soil compaction after yarding of small-diameter<br />
Douglas-fir with a small tractor in southwest Oregon. Portland (OR): USDA Forest Service,<br />
Pacific Northwest Research Station. Research Paper PNW-RP-504. 7 p.<br />
Amaranthus MP. 2002. Declaration of interdependence: mycorrhizal fungi are the ‘tiny little<br />
secrets’ for planting success. Oregon Association of Nurserymen Digger 46(4):48-53.<br />
Ament R, Powell S, Stoy P, Begley J. 2013. <strong>Roadside</strong> vegetation and soils on Federal Lands<br />
– evaluation of the potential for increasing carbon capture and storage and decreasing<br />
carbon emissions. Report to FHWA.<br />
Anderson HW, Baumgartner DM, editors. Forest soils of the Douglas-fir region. Pullman<br />
(WA): Washington State University Cooperative Extension Service. p. 113-120.<br />
Andrus CW, Froehlich HA. 1983. An evaluation of four implements used to till compacted<br />
forest soils in the Pacific Northwest. Corvallis (OR): Forest Research Laboratory. Research<br />
Bulletin 45. 12 p.<br />
Anonymous. [nd]. Mycorrhizae and revegetation of disturbed lands. Bozeman (MT): Montana<br />
State University. URL: http://ecorestoration.montana.edu/mineland/guide/monitoring/<br />
epa_ fact_sheet_1.doc (accessed 19 June 2007).<br />
Applegate GB, Bragg AL. 1989. Improved growth rates of red cedar (Toona australis (F.<br />
Muell.) Harms) seedlings in grow tubes in north Queensland. Australian Forestry Journal<br />
52(4):293-297.<br />
Ashby WC, Vogel WG. 1993. Tree planting on mined lands in the Midwest: a handbook.<br />
Carbondale (IL): Southern Illinois University, Coal Research Center. 115 p. URL: http://www.<br />
mcrcc.osmre.gov/Reforestation/PDF/Handbook/Midwest.pdf<br />
Association of Official Seed Analysts [AOSA]. 2002. Rules for testing seeds. Stillwater (OK):<br />
Association of Official Seed Analysts. 166 p.<br />
Aubry C, Shoal R, Erickson V. 2005. Grass cultivars: their origins, development, and use<br />
on national forests and grasslands in the Pacific Northwest. Portland (OR): USDA Forest<br />
Service. 41 p.<br />
<strong>Roadside</strong> <strong>Revegetation</strong>: An Integrated Approach to Establishing Native Plants and Pollinator Habitat<br />
419
BIBLIOGRAPHY<br />
Bailey B. 2006. Flowery Trail Road revegetation monitoring–Report for the FHWA [Colville<br />
National Forest internal report]. Located at: Colville National Forest, Colville, WA. 41p.<br />
Bainbridge D, Tisler J, MacAller R, Allen MF. 2001. Irrigation and mulch effects on desert<br />
shrub transplant establishment. Native Plants Journal 2(1):25-29.<br />
Bainbridge DA. 1994. Tree shelters improve establishment on dry sites. Tree Planters’ Notes<br />
45(1):13-16.<br />
Bainbridge DA. 2006a. Beyond drip irrigation–hyper-efficient irrigation. In: American Society<br />
of Agricultural and Biological Engineers Annual International Meeting; 2006 July 9-12;<br />
Portland, OR. St Joseph (MI): American Society of Agricultural and Biological Engineers.<br />
Paper 062071. 10 p.<br />
Bainbridge DA. 2006b. Deep pipe irrigation. Holualoa (HI): Agroforestry Net Inc. 8p. URL:<br />
http:// www.agroforestry.net/pubs/index.html (accessed 15 May 2007).<br />
Bainbridge DA. 2006c. Irrigation for remote sites. San Diego (CA): San Diego State University,<br />
Soil Ecology and Restoration Group. Restoration Bulletin 6. 20 p.<br />
Ballard TM. 1981. Physical properties and physical behavior of forest soils. In: Heilman PE,<br />
Barnar J. 2007. Personal communication. Bend (OR): USDA Forest Service, Bend Seed Extractory.<br />
Manager.<br />
Barvenik FW. 1994. Polyacrylamide characteristics related to soil applications. Soil Science<br />
158(4): 235-243.<br />
Basey AC, Fant JB, Kramer AT. 2015. Producing native plant materials for restoration: 10 rules<br />
to collect and maintain genetic diversity. Native Plants Journal 16(1) 37-52.<br />
Baskin JM, Baskin CC. 1989. Seasonal changes in the germination responses of buried seeds<br />
of Barbarea vulgaris. Canadian Journal of Botany 67:2131-2134.<br />
Bean TM, Smith SE, Karpiscak MM. 2004. Intensive revegetation in Arizona’s hot desert–the<br />
advantages of container stock. Native Plants Journal 5(2):173-180.<br />
Bedrossian TL. 1983. Watershed mapping in northern California. Californian Geology 36:140 147.<br />
Bellot J, Ortiz De Urbina JM, Bonet A, Sanchez JR. 2002. The effects of treeshelters on the<br />
growth of Quercus coccifera L. seedlings in a semiarid environment. Forestry 75(1):89-106.<br />
Bentrup G, Hoag JC. 1998. The practical streambank bioengineering guide. Aberdeen (ID):<br />
USDA Natural Resources Conservation Service, Plant Materials Center. 150 p. URL: http://<br />
plant- materials.nrcs.usda.gov/pubs/idpmcpustguid.pdf (accessed 10 May 2007).<br />
Berger RL. 2005. Integrated roadside vegetation management. Washington (DC): Transportation<br />
Research Board. 80 p.<br />
Bergez JE, Cupraz C. 1997. Transpiration rate of Prunus avium L. seedlings inside an unventilated<br />
treeshelter. Forest Ecology and Management 97:255-264.<br />
Black SH, Shepherd M, and Vaughan M. 2011. Rangeland management for pollinators.<br />
Rangelands 33(3):9-13.<br />
Bloomfield HE, Handley JF, Bradshaw AD. 1982. Nutrient deficiencies and the aftercare of<br />
reclaimed derelict land. Journal of Applied Ecology 19:151-158.<br />
Bollen WB. 1974. Soil microbes. In: Cramer O, editor. Environmental effects of forest residues<br />
management in the Pacific Northwest. Portland (OR): USDA Forest Service, Pacific Northwest<br />
Forest and Range Experiment Station. General Technical Report PNW-24. p B1-B41.<br />
Bonar R. 1995. The northern pocket gopher–most of what you thought you might want<br />
to know, but hesitated to look up. Missoula (MT): USDA Forest Service, Technology and<br />
Development Program. Technical Services, Reforestation TE02E11. 61 p.<br />
Borland J. 1990. Mulch–examining the facts and fallacies behind the uses and benefits of<br />
mulch. American Nurseryman 172(4):132-141.<br />
<strong>Roadside</strong> <strong>Revegetation</strong>: An Integrated Approach to Establishing Native Plants and Pollinator Habitat<br />
420
BIBLIOGRAPHY<br />
Bower AD, St. Clair JB, and Erickson V. 2014. Generalized provisional seed zones for native<br />
plants. Ecological Applications, 24(5), pp 913-919.<br />
Bradshaw AD, Marrs RH, Roberts RD, Skeffington RA. 1982. The creation of nitrogen<br />
cycles in derelict land. Philosophical Transactions of the Royal Society of London. Series<br />
B, Biological 296:557-561.<br />
Bradshaw AD. 1992. The reclamation of derelict land and the ecology of ecosystems. In: Jordan<br />
WR, Gilpin ME, Aber JD, editors. Restoration ecology: a synthetic approach to ecological<br />
restoration. Cambridge (England): Cambridge University Press. p. 53-74.<br />
Brant J, Henderson K, and Uthe J. 2015. Integrated roadside vegetation management -<br />
technical manual. USDA Natural Resource Conservation Service and Iowa DOT’s Living<br />
Roadway Trust Fund. 105p. URL: http://www.tallgrassprairiecenter.org/sites/default/files/<br />
irvm-technical-manual-2015-2_0_0.pdf (accessed 10 July, 2016).<br />
Brejda JJ, Yocom DH, Moser LE, Waller SS. 1993. Dependence of 3 Nebraska Sandhills<br />
warm-season grasses on vesicular-arbuscular mycorrhizae. Journal of Range Management<br />
46(1):14-20.<br />
Brock TD. 2016. The Bradley method for control of invasive plants. URL: http://courses.<br />
washington.edu/ehuf462/462_mats/bradley_method.pdf (accessed 11 July, 2016)<br />
Brooks CR, Blaser RE. 1964. Effect of fertilizer slurries used with hydroseeding on seed<br />
viability. Washington (DC): Highway Research Board. Highway Research Record 53:30-34.<br />
Brown JE, Maddox JB, Splittstoesser WE. 1983. The effect of fertilizer and strip mine spoil on<br />
germination and growth of legumes. In: Graves DH, editor. Proceedings 1983 symposium<br />
on surface mining, hydrology, sedimentology and reclamation. Lexington (KY): University<br />
of Kentucky. p 419-422.<br />
Brown MB, Wolf DD, Morse RD, Neal JL. 1982. Survival of rhizobium inoculum in hydroseeding<br />
slurries. In: Graves DH, editor. Proceedings 1982 symposium on surface mining, hydrology,<br />
sedimentology and reclamation. Lexington (KY): University of Kentucky. p. 681-685.<br />
Brown R, Amacher M. 1999. Selecting plant species for ecological restoration: a perspective<br />
for land managers. In: Holzworth LK, Brown R, compilers. <strong>Revegetation</strong> with native species:<br />
Proceedings, 1997 Society for Ecological Restoration annual meeting; 1997 November 12- 15;<br />
Ft Lauderdale, FL. Ogden (UT): USDA Forest Service, Rocky Mountain Research Station.<br />
Proceedings RMRS-P-8. p. 1-16.<br />
Brunsden D, Prior DB. 1984. Slope instability. Chichester (UK): John Wiley and Sons Ltd. 620 p.<br />
Brzozowski C. 2003. Carpets of grass [online]. Santa Barbara (CA): Forester Communications<br />
Inc, Erosion Control. URL: http://www.forester.net/ecm_0301_carpets.html (accessed 18<br />
Aug 2004).<br />
Brzozowski C. 2004. Hydroseeding: a versatile alternative [online]. Santa Barbara (CA): Forester<br />
Communications Inc, Erosion Control. URL: http://www.forester.net/ecm_0401_hydroseeding.html<br />
(accessed 18 Aug 2004).<br />
Burroughs Jr ER, King JG. 1989. Reduction of soil erosion on forest roads. Ogden (UT): USDA<br />
Forest Service, Intermountain Research Station. General Technical Report INT-264. 22 p.<br />
Busse M. 2000. Ecological significance of nitrogen fixation by actinorrhizal shrubs in interior<br />
forests of California and Oregon. In: Powers RF, Hauxwell DL, Nakamura GM, technical<br />
coordinators. Proceedings of the California Forest Soils Council conference on forest soils<br />
biology and forest management. Albany (CA): USDA Forest Service, Pacific Southwest<br />
Research Station. General Technical Report GTR-PSW-178. p. 23-41.<br />
Calderone NW. 2012. Insect pollinated crops, insect pollinators and US agriculture: trend<br />
analysis of aggregate data for the period 1992-2009. PLoS ONE 7(5) e37235.<br />
<strong>Roadside</strong> <strong>Revegetation</strong>: An Integrated Approach to Establishing Native Plants and Pollinator Habitat<br />
421
BIBLIOGRAPHY<br />
California Department of Transportation [Caltrans]. 2003. Caltrans erosion control new<br />
technology report. Sacramento (CA): California Department of Transportation. CTSW-<br />
RT-03-049. 463 p.<br />
California Stormwater Quality Association [CASQA]. 2003a. EC-3 Hydraulic mulch. In:<br />
Construction Handbook [online]. Menlo Park (CA): California Stormwater Quality Association.<br />
3 p. URL: http://www.cabmphandbooks.com (accessed 20 Jan 2006).<br />
California Stormwater Quality Association [CASQA]. 2003b. EC-5 Soil binders. In: Construction<br />
Handbook [online]. Menlo Park (CA): California Stormwater Quality Association. 7 p. URL:<br />
http:// www.cabmphandbooks.com (accessed 20 Jan 2006).<br />
Campbell KB, Helgested E, Shaw EJ, Hawkes GR. 1980. Western fertilizer handbook.<br />
Sacramento (CA): California Fertilizer Association. 269 p.<br />
Campbell RK. 1986. Mapped genetic variation of Douglas fir to guide seed transfer in<br />
southwest Oregon. Silvae Genetica 35:85-96.Carr WW, Ballard TM. 1979. Effects of fertilizer<br />
salt concentration on viability of seed and Rhizobium used for hydroseeding. Canadian<br />
Journal of Botany 57(7):701-704.<br />
Carr WW, Ballard TM. 1980. Hydroseeding forest roadsides in British Columbia for erosion<br />
control. Journal of Soil and Water Conservation 35(1):33-35.<br />
Carson MA, Kirkby MJ. 1972. Hillslope form and process. London (UK): Cambridge University<br />
Press. 475 p.<br />
Carvell C. 2002. Habitat use and conservation of bumble bees (Bombus spp.) under different<br />
grassland management regimes. Biological Conservation 103:33–49.<br />
Center for Invasive Plant Management [CIPM]. nd. Chapter 8: Invasive plant prevention.<br />
In: Invasive plant management: CIPM online textbook. Bozeman (MT): Montana State<br />
University, Department of Land Resources and Environmental Sciences, Center for Invasive<br />
Plant Management. www.weedcenter.org/textbook/8_prevention.html<br />
Chaplin-Kramer R, Tuxen-Bettman K, Kremen C. 2011. Value of wildland habitat for supplying<br />
pollination services to Californian agriculture. Rangelands 33(3) 33-41.<br />
Charvat I, Tallaksen J, White J, Agwa H, Raley M, Slack S, Hebberger J, Gould E. 2000.<br />
Mycorrhizal/ plant factors involved in roadside reclamation. St Paul (MN): Minnesota<br />
Department of Transportation. Final Report - MN/RC-2000-30. 131 p.<br />
Childs SW, Flint LE. 1987. Effect of shadecards, shelterwoods, and clearcuts on temperature<br />
and moisture environments. Forest Ecology and Management 18:205-217.<br />
Claassen VP, Carey JL. 2004. Regeneration of nitrogen fertility in disturbed soils using<br />
composts. Compost Science and Utilization 12(2):145-152.<br />
Claassen VP, Hogan MP. 1998. Generation of water-stable soil aggregates for improved<br />
erosion control and revegetation success. Sacramento (CA): California Department of<br />
Transportation. Research Technical Agreement 53X461. 111 p.<br />
Claassen VP, Hogan MP. 2002. Soil nitrogen pools associated with revegetation of disturbed<br />
sites in the Lake Tahoe area. Restoration Ecology 10(2):195-203.<br />
Claassen VP, Marler MM. 1998. Annual and perennial grass growth on nitrogen-depleted<br />
decomposed granite. Restoration Ecology 6(2):175-180.<br />
Claassen VP, Zasoski RJ, Southard RJ. 1995. Soil conditions and mycorrhizal infection<br />
associated with revegetation of decomposed granite slopes. Sacramento (CA): California<br />
Department of Transportation. Technical Report FHWA-CA-TL 96/1. 151 p.<br />
Claassen VP, Zasoski RJ. 1994. The effects of topsoil reapplication on vegetation reestablishment.<br />
Sacramento (CA): California Department of Transportation. Technical Report<br />
FHWA-CA-TL- 94/18. 52 p.<br />
<strong>Roadside</strong> <strong>Revegetation</strong>: An Integrated Approach to Establishing Native Plants and Pollinator Habitat<br />
422
BIBLIOGRAPHY<br />
Claassen VP, Zasoski RJ. 1998. A comparison of plant available nutrients on decomposed<br />
granite cut slopes and adjacent natural soils. Land Degradation and Development 9:35-46.<br />
Claassen VP. 2006. Soil resource evaluation. Sacramento (CA): California Department of<br />
Transportation. URL: http://www.dot.ca.gov/hq/LandArch/research/es_site_0522/htmls/<br />
soils_ base.html (accessed 3 Aug 2006).<br />
Clark TW, Stevenson M, Ziegelmayer K, Rutherford M, editors. 2001. Species and ecosystem<br />
conservation: an interdisciplinary approach. New Haven (CT): Yale University Press.<br />
Cleary BD, Greaves RD, Hermann RK, editors. 1988. Regenerating Oregon forests, a guide<br />
for the regeneration forester. 5th printing. Corvallis (OR): Oregon State University Extension<br />
Service. 287 p.<br />
Clewell A, Rieger J, Munro J. 2005. Guidelines for developing and managing ecological<br />
restoration projects. 2nd ed. Tuscon (AZ): Society for Ecologicial Restoration International.<br />
URL: http://www.ser.org (accessed 20 Aug 2006).<br />
Cole DW, Johnson D. 1981. The cycling of elements within forests. In: Heilman PE, Anderson HW,<br />
Baumgartner DM, editors. Forest soils of the Douglas-fir region. Pullman (WA): Washington<br />
State University Cooperative Extension Service. p. 185-198.<br />
Composting Council Research and Education Foundation, United States Composting<br />
Council [CCREF and USCC]. 2006. Compost use on state highway applications. Harrisburg<br />
(PA): Composting Council Research and Education Foundation, United States Composting<br />
Council. 15 p. URL: http://www.filtrexx.com/downloads/USCC_Report.pdf (accessed 26<br />
Mar 2006).<br />
Cook DF, Nelson SD. 1986. Effect of polyacrylamide on seedling emergence in crust-forming<br />
soil. Soil Science 141:328-333.<br />
Corkiki L, Allen EB, Merhaut D, Allen MF, Downer J, Bohn J, Evans M. 2005. Effectiveness<br />
of commercial mycorrhizal inoculants on the growth of Liquidambar styraciflua in plant<br />
nursery conditions. Journal of Environmental Horticulture 23(2):72-96.<br />
Crémieux, L, Bischoff A, Müller-Schärer H, Steinger T. 2010. Gene flow from foreign<br />
provenances into local plant populations: fitness consequences and implications for<br />
biodiversity restoration. American Journal of Botany. 97(1): 94–100.Crowder W, Darris D.<br />
1999. Producing Pacific Northwest native trees and shrubs in hardwood cutting blocks<br />
or stooling beds. Portland (OR): USDA Natural Resources Conservation Service. Technical<br />
Notes–Plant Materials No 24. 13 p.<br />
Curtis MJ, Claassen VP. 2005. Compost incorporation increases plant available water in a<br />
drastically disturbed serpentine soil. Soil Science 170(12):13.<br />
Dancer WS, Handley JF, Bradshaw AD. 1977. Nitrogen accumulation in kaolin mining wastes<br />
in Cornwall. I. Natural communities. Plant and Soil 48:153-167.<br />
Dancer WS. 1975. Leaching losses of ammonium and nitrate in the reclamation of sand spoils<br />
in Cornwall. Journal of Environmental Quality 4(4):499-504.<br />
Darboux F, Huang C. 2005. Does soil roughness increase or decrease water and particle<br />
transfer? Soil Science Society of America Journal 69:748-756.<br />
Darris DC, Williams D. 2001. Native shrubs as a supplement to the use of willows as live<br />
stakes and facines in western Oregon and western Washington. In: Haase DL, Rose R,<br />
editors. Proceedings of the conference: native plant propagation and restoration strategies;<br />
2001 Dec 12-13; Eugene, OR. Corvallis (OR): Oregon State University, Nursery Technology<br />
Cooperative. p. 112-120.<br />
Darris DC. 2002. Native shrubs as a supplement to the use of willows as live stakes and facines<br />
in western Oregon and western Washington. Portland (OR): USDA Natural Resources<br />
Conservation Service. Technical Notes–Plant Materials No 31. 10 p.<br />
<strong>Roadside</strong> <strong>Revegetation</strong>: An Integrated Approach to Establishing Native Plants and Pollinator Habitat<br />
423
BIBLIOGRAPHY<br />
Daugovish O, Downer J, Faber B, McGiffen M. 2006. Weed survival in yard waste mulch.<br />
Weed Technology 21(1):59-65.<br />
Davies RJ. 1988a. Sheet mulching as an aid to broadleaved tree establishment. I. The effectiveness<br />
of various synthetic sheets compared. Forestry 61(2):89-105.<br />
Davies RJ. 1988b. Sheet mulching as an aid to broadleaved tree establishment II. Comparison of<br />
various sizes of black polythene mulches and herbicide treated spot. Forestry 61(2):107-124.<br />
DeByle NV. 1969. Black polyethylene mulch increases survival and growth of a Jeffrey pine<br />
plantation. Tree Planters’ Notes 19(4):7-11.<br />
Deere DU, Deere DW. 1988. The rock quality designation (RQD) index in practice. In: Kirkaldie<br />
L, editor. Rock classification systems for engineering purposes. Philadelphia (PA): American<br />
Society of Testing Materials. ASTM Special Publication 984. p. 91-101.<br />
Denning C, Prellwitz R, Reneria R, Rose E. 1994. Parameters for stability analysis. In: Hall<br />
DE, Long MT, Remboldt MD, editors. Slope stability reference guide for national forests in<br />
the United States. Volume II. Washington (DC): USDA Forest Service, Engineering Staff. EM<br />
7170-13. p. 327-721.<br />
DePuit EJ, Coenenberg JG. 1979. Responses of revegetated coal strip mine spoils to variable<br />
fertilization rates, longevity of fertilization program, and season of seeding. Bozeman (MT):<br />
Montana State University, Montana Agricultural Experiment Station. Research Report 150.<br />
81 p.<br />
Dirig R, Cryan JF. 1991. The status of silvery blue subspecies (Glaucopsyche lygdamus lygdamus<br />
and G. l. couperi: Lycaenidae) in New York. Journal of the Lepidopterists’ Society 45(4):272-290.<br />
Dixon RM, Carr AB. 2001a. Land imprinting specifications for ecological restoration and<br />
sustainable agriculture. In: Ascough JC II, Flanagan DC, editors. Soil erosion research for<br />
the 21st Century, proceedings of an international symposium; 2001 Jan 3-5; Honolulu, HI.<br />
St Joseph (MI): American Society of Agricultural Engineers. ASAE.701P0007. p. 195-197.<br />
Dixon RM, Carr AB. 2001b. Preferential flow control: key to sustainable land management. In:<br />
Bosch D, King K, editors. Preferential flow water: movement and chemical transport in the<br />
environment, proceedings of the 2nd international symposium; 2001 Jan 3-5; Honolulu,<br />
HI. St Joseph (MI): American Society of Agricultural Engineers. ASAE.701P0006. p. 287-289.<br />
Dorner J. 2002. An introduction to using native plants in restoration projects. Seattle (WA):<br />
Plant Conservation Alliance and Environmental Protection Agency. 66 p.<br />
Dreesen DR, Harrington JT. 1997. Propagation of native plants for restoration projects in<br />
the southwestern US–preliminary investigations. In: Landis TD, Thompson JR, technical<br />
coordinators. National proceedings, forest and conservation nursery associations. Portland<br />
(OR): USDA Forest Service, Pacific Northwest Research Station. General Technical Report<br />
PNW- GTR-419. p. 77-88.<br />
Dumroese RK, Jacobs DF, Landis TD. 2005. Successful stock production for forest regeneration:<br />
what foresters should ask nursery managers about their crops (and vice versa). In: Colombo SJ,<br />
editor. The thin green line: a symposium on the state-of-the-art in reforestation, proceedings;<br />
2005 July 26-28; Thunder Bay, Ontario. Sault Ste Marie (Ontario): Ontario Ministry of Natural<br />
Resources, Forest Research Information Paper 160: 14-20.<br />
Dumroese RK, Stumph T, Wenny DL. 1998. Revetating Idaho’s Henry’s Fork: a case study. In:<br />
Rose R, Haase DL, editors. Native plants: propagation and planting; 1998 Dec 9-10; Corvallis,<br />
OR. Corvallis (OR): Oregon State University, Nursery Technology Cooperative. p. 108-112.<br />
Dumroese RK. 2006. Personal communication. Moscow (ID): USDA Forest Service, Southern<br />
Research Station. Research Plant Physiologist.<br />
Dupraz C, Bergez JE. 1997. Carbon dioxide limitation of the photosynthesis of Prunus avium L.<br />
seedlings inside an unventilated treeshelter. Forest Ecology and Management 119(1):89-97.<br />
<strong>Roadside</strong> <strong>Revegetation</strong>: An Integrated Approach to Establishing Native Plants and Pollinator Habitat<br />
424
BIBLIOGRAPHY<br />
Dyer K, Curtis L, Willie R, Crews JT. 1984. Response of vegetation to various mulches used<br />
in surface mine reclamation in Alabama and Kentucky–7-year case history. Broomhall (PA):<br />
USDA Forest Service, Northeastern Forest Experiment Station. General Technical Report<br />
NE-93. 11 p.<br />
Eilers EJ, Kremen C, Greenleaf SS, Garber AK, Klein AM. 2011. Contribution of pollinator-mediated<br />
crops to nutrients in the human food supply. PLoS one 6(6)e21363.<br />
Elzinga, CL, Salzer DW, Willoughby JW. 1998. Measuring and monitoring plant populations.<br />
Denver (CO): USDI Bureau of Land Management. BLM Technical Reference 1730-1. 492 p.<br />
Environmental Protection Agency [EPA]. 2006. Environmental Protection Agency (EPA)<br />
National Pollutant Discharge Elimination System (NPDES) Glossary Terms: “Final Stabilization.”<br />
Washington (DC): US EPA, Office of Wastewater Management. URL: http://cfpub.epa.gov/<br />
npdes/index.cfm (accessed 22 August 2006).<br />
Epstein E. 1997. The science of composting. Boca Raton (FL): CRC Press LLC. 487 p.<br />
Epstein E. 2002. Land application of sewage sludge and biosolids. Boca Raton (FL): CRC Press<br />
LLC. 201 p.<br />
Erickson VJ, Mandel NL, Sorensen FC. 2004. Landscape pattern of phenotypic variation and<br />
population structuring in a selfing grass, Elymus glaucus (blue wildrye). Canadian Journal<br />
of Botany 82:1776-1789.<br />
Erickson VJ, Wood J, Riley SA. 2003. Guidelines for revegetation of invasive weed sites and<br />
other disturbed areas on national forests and grasslands in the Pacific Northwest. Portland<br />
(OR): USDA Forest Service, Pacific Northwest Region. 80 p.<br />
Erickson VJ. 2008. Developing native plant germplasm for national forests and grasslands<br />
in the Pacific Northwest. Native Plants Journal 9:255–266.Evans RG. 2006. Review of the<br />
application of polyacrylamides for soil erosion reduction through sprinklers. Sidney (MT):<br />
USDA Agricultural Research Service. 4 p. URL: http://www.sidney. ars.usda.gov/Site_Publisher_Site/pdfs/personnel/Review%20of%20the%20App%20of%20<br />
Polyacrylamides%20<br />
for%20Soil%20Erosion.pdf (accessed 25 Jan 2007).<br />
Federal Highway Administration [FHWA]. 2005. Project development and design manual<br />
(PDDM). Washington (DC): US Department of Transportation, Federal Highway Administration.<br />
Publication Number FHWA-DF-88-003.<br />
Federal Highway Administration [FHWA]. 2008. 2008 Status of the Nation’s highways, bridges,<br />
and transit: conditions and performance. FHWA, Washington DC. URL: http://www.fhwa.<br />
dot.gov/policy/2008cpr/pdfs/cp2008.pdf (accessed 22 June 2016)<br />
Federal Register [FR]. 2006. Rules and regulations. Federal Register 71(102). 2 p.<br />
Ferrick MG, Gatto LW. 2004. Quantifying the effect of a freeze-thaw cycle on soil erosion:<br />
laboratory experiments. Hanover (NH): US Army Corps of Engineers, Engineer Research and<br />
Development Center, Cold Regions Research and Engineering Laboratory. Letter Report<br />
A670134. 47 p.<br />
Fidelibus MW, Bainbridge DA. 2006. Microcatchment water harvesting for desert revegetation<br />
[online]. San Diego (CA): San Diego State University, Soil Ecology and Restoration Group.<br />
Restoration Bulletin 5. 12 p. URL: http://www.sci.sdsu.edu/SERG/techniques/microcatch.<br />
pdf (accessed 5 Dec 2006).<br />
Flint AL. 1983. Soil physical properties and available water capacity of southwest Oregon<br />
forest soils [MS thesis]. Corvallis (OR): Oregon State University. 61p.<br />
Flint LE, Childs SW. 1984. Seedling responses to heat and moisture environments in clearcuts<br />
and shelterwoods. Forestry Intensified Research Report 6(2):3-4<br />
Foltz RB, Dooley JH. 2003. Comparison of erosion reduction between wood strands and agricultural<br />
straw. Transactions of the American Society of Agricultural Engineers 46(5):1389-1396.<br />
<strong>Roadside</strong> <strong>Revegetation</strong>: An Integrated Approach to Establishing Native Plants and Pollinator Habitat<br />
425
BIBLIOGRAPHY<br />
Forman RTT, Alexander LE. 1998. Roads and their major ecological effects. Annual Review<br />
of Ecology and Systematics 29: 207-231.<br />
Forman RTT, editor. 2003. Road ecology: science and solutions. Washington (DC): Island<br />
Press. 481 p.<br />
Frearson K, Weiss ND. 1987. Improved growth rates within tree shelters. Quarterly Journal<br />
of Forestry 81:184-187.<br />
Fredricksen RL, Harr RD. 1981. Soil, vegetation, and watershed management. In: Heilman<br />
PE, Anderson HW, Baumgartner DM, editors. Forest soils of the Douglas-fir region. Pullman<br />
(WA): Washington State University Cooperative Extension Service. p. 231-260.<br />
Froehlich HA, McNabb D. 1984. Minimizing soil compaction in the Pacific Northwest forests.<br />
In: Stone EL, editor. Forest soils and treatment impacts. Proceedings of the 6th North<br />
American Forest Soil Conference; 1983 June 19-23; Knoxville, TN. Knoxville (TN): University<br />
of Tennessee, Department of Forestry. p. 159-192.<br />
Froehlich HA, Miles DWR. 1984. Winged subsoiler tills compacted forest soil. Forest Industries<br />
111(2):42-43.<br />
Froehlich HA, Robbins RW, Miles DWR, Lyons JK. 1983. Monitoring recovery of compacted<br />
skid trails in central Idaho. Contract 43-0256-2-543 [Special report for Payette National<br />
Forest]. Located at: Payette National Forest, McCall, ID.<br />
Froese JC, Cruse RM, Ghaffarzadeh M. 1999. Erosion mechanics of soils with an impermeable<br />
subsurface layer. Soil Science Society of America Journal 63:1836-1841.<br />
Gallai N, Salles J-M, Settele J, Vaissière BE. 2009. Economic valuation of the vulnerability<br />
of world agriculture confronted with pollinator decline. Ecological Economics 68 810-821.<br />
Gassman S. 2001. Hydraulic seeding: it’s all in the slurry. Overland Park (KS): Grounds<br />
Maintenance. URL: http://www.grounds-mag.com/mag/grounds_maintenance_hydraulic_seeding_slurry/<br />
(accessed 4 Jan 2005).<br />
Gatto LW, Ferrick MG, White KD. 2004. Inclusion of freeze-thaw-induced soil and bank erosion<br />
in CoE planning, engineering, O&M, and model development. Hanover (NH): US Army<br />
Corps of Engineers, Engineer Research and Development Center, Cold Regions Research<br />
and Engineering Laboratory. Technical Note 04-2. 5 p.<br />
Gedney DS, Weber WG. 1978. Design and construction of soil slopes. In: Schuster RL, Krizek<br />
R, editors. Landslides, analysis and control. Washington (DC): National Research Council,<br />
Transportation Research Board Commission on Sociotechnical Systems. Special Report<br />
176. p. 172-191.<br />
Gifford GF. 1975. Beneficial and detrimental effects on range improvement practices on runoff<br />
and erosion. In: Watershed management, proceedings of a symposium conducted by the<br />
irrigation and drainage division of the American Society of Civil Engineers; 11-13 Aug 1975;<br />
Logan, UT. Reston (VA): American Society of Civil Engineers. p. 216-248.<br />
Gobar C. 2006. Personal communication. Albuquerque (NM): USDA Forest Service. Forest<br />
Wildlife Biologist.<br />
Goheen D. 2005. Personal communication. Medford (OR): USDA Forest Service. Zone Pathologist.<br />
Goodrich, MS, Dulak LH, Freidman MA, Lech JJ. 1991. Acute and long-term toxicity of watersoluble<br />
cationic polymers to rainbow trout (Oncorhynchus mykus) and the modification of<br />
toxicity by humic acid. Environmental Toxicology and Chemistry 10:509-551.<br />
Gray DH, Leiser AT. 1982. Biotechnical slope protection and erosion control. Malabar (FL):<br />
Robert E Krieger Publishing Co. 271 p.<br />
Greaves RD, Black HC, Hooven EF, Hansen EM. 1978. Plantation maintenance. In: Cleary BD,<br />
Greaves RD, Hermann RK, editors. Regenerating Oregon forests, a guide for the regeneration<br />
forester. 5th printing. Corvallis (OR): Oregon State University Extension Service. p. 187-203.<br />
<strong>Roadside</strong> <strong>Revegetation</strong>: An Integrated Approach to Establishing Native Plants and Pollinator Habitat<br />
426
BIBLIOGRAPHY<br />
Greaves RD, Hermann RK. 1978. Planting and seeding. In: Cleary BD, Greaves RD, Hermann<br />
RK, editors. Regenerating Oregon forests, a guide for the regeneration forester. 5th printing.<br />
Corvallis (OR): Oregon State University Extension Service. p. 131-161.<br />
Grismer ME, Hogan MP. 2004. Simulated rainfall evaluation of revegetation/mulch erosion<br />
control in the Lake Tahoe Basin - 1: method assessment. Land Degradation Development<br />
15:1-16.<br />
Grismer ME, Hogan MP. 2007. Simulated rainfall evaluation at Sunriver and Mt Bachelor<br />
Highways, Oregon. Report to WFHLD. 8 p.<br />
Grubb B. 2007. Personal communication. Fort Collins (CO): Colorado State Forest Service<br />
Nursery. Nursery Grower.<br />
Grubb PJ. 1977. The maintenance of species richness in plant communities and the importance<br />
of the regeneration niche. Biological Reviews 52:107-145.<br />
Guinon M. 1993. Promoting gene conservation through seed and plant procurement. In:<br />
Landis TD, editor. Proceedings, Western Forest Nursery Association; 1992 Sept 14-18; Fallen<br />
Leaf Lake, CA. Fort Collins (CO): USDA Forest Service, Rocky Mountain Forest and Range<br />
Experiment Station. General Technical Report RM-221. p. 38-46.<br />
Gustafson DJ, Gibson DJ, Nickrent DL. 2005. Using local seeds in prairie restoration – data<br />
support the paradigm. Native Plant Journal 6(1):25-28. Habte M, Osorio NW. 2001. Arbuscular<br />
mycorrhizas: producing and applying arbuscular mycorrhizal inoculum. Honolulu (HI):<br />
University of Hawaii, College of Tropical Agriculture and Human Resources. 48 p.<br />
Haferkamp MR, Miller RF, Sneva FA. 1985. Seeding rangelands with a land imprinter and<br />
rangeland drill in the Palouse vegetative prairie and sagebrush-bunchgrass zone. In: 39th<br />
annual report, vegetative rehabilitation and equipment workshop; 1985 February 10-11;<br />
Salt Lake City, UT. Missoula (MT): USDA Forest Service, Missoula Equipment Development<br />
Center. p. 19-22.<br />
Hall DE, Long MT, Remboldt MD, editors. 1994. Slope stability reference guide for National<br />
Forests in the United States, Volume II. Moscow (ID): USDA Forest Service, Rocky Mountain<br />
Research Station. EM-7170-13.<br />
Hall FC. 2002a. Photo point monitoring handbook: part A - field procedures. Portland (OR):<br />
USDA Forest Service, Pacific Northwest Research Station. General Technical Report PNW-<br />
GTR- 526. p. 1-48.<br />
Hall FC. 2002b. Photo point monitoring handbook: part B - concepts and analysis. Portland<br />
(OR): USDA Forest Service, Pacific Northwest Research Station. General Technical Report<br />
PNW-GTR- 526. p. 49-134.<br />
Hamm PB, Campbell SJ, Hansen EM, editors. 1990. Growing healthy seedlings: identification<br />
and management of pests in northwest forest nurseries. Corvallis (OR): Oregon State<br />
University, Forest Research Laboratory. Special Publication 19. 110 p.<br />
Harper-Lore BL, Johnson M, and Ostrum WF. 2013. Vegetation Management: An Ecoregional<br />
approach. U.S. Department of Transportation Federal Highway Administration. URL: https://<br />
www.environment.fhwa.dot.gov/ecosystems/veg_mgmt_rpt/vegmgmt_ecoregional_approach.asp<br />
(accessed 12 July, 2016).<br />
Harper-Lore BL, Wilson M, editors. 2000. <strong>Roadside</strong> use of native plants. Washington (DC):<br />
Island Press. 665 p.<br />
Hatchett B, Hogan M, Grismer M. 2006. Mechanical mastication thins Lake Tahoe forest with<br />
few adverse impacts. California Agriculture 60(2):77-82.<br />
Hatfield RG and LeBuhn G. 2007. Patch and landscape factors shape community assemblage<br />
of bumble bees, Bombus spp. (Hymenoptera: Apidae), in montane meadows. Biological<br />
Conservation 139:150–158.<br />
<strong>Roadside</strong> <strong>Revegetation</strong>: An Integrated Approach to Establishing Native Plants and Pollinator Habitat<br />
427
BIBLIOGRAPHY<br />
Hatfield RG, Colla SR, Jepsen S, Richardson LL, Thorp RW. 2015. International Union for<br />
the Conservation of Nature (IUCN) Assessments for North American Bombus spp. for the<br />
North American IUCN Bumble Bee Specialist Group. The Xerces Society for Invertebrate<br />
Conservation, Portland, OR.<br />
Havlin JL, Beaton JD, Tisdale SL, Nelson WL. 1999. Soil fertility and fertilizers, an introduction<br />
to nutrient management. 6th edition. Upper Saddle River (NJ): Prentice-Hall Inc. 499 p.<br />
Heilman P. 1981. Minerals, chemical properties, and fertility of forest soils. In: Heilman PE,<br />
Anderson HW, Baumgartner DM, editors. Forest soils of the Douglas-fir region. Pullman<br />
(WA): Washington State University Cooperative Extension Service. p. 121-136.<br />
Helgerson OT, Newton M, deCalesta D, Schowalter T, Hansen E. 1992. Protecting young<br />
regeneration. In: Hobbs SD, Tesch SD, Owston PW, Stewart RE, Tappener II JC, Wells GE,<br />
editors. Reforestation practices in southwestern Oregon and northern California. Corvallis<br />
(OR): Oregon State University, Forest Research Laboratory. p. 384-420.<br />
Helgerson OT. 1990. Heat damage in tree seedlings and its prevention. New Forests 3:17-42.<br />
Henderson K. 2000. Integrating all the management tools: integrated roadside vegetation<br />
management. In: Harper-Lore BL, Wilson M, editors. <strong>Roadside</strong> use of native plants. Washington<br />
(DC): Island Press. p. 30-31.<br />
Herrick JE, Van Zee JW, Havstad KM, Burkett LM, Whitford WG. 2005a. Monitoring manual<br />
for grassland, shrubland and savanna ecosystems, vol I: quick start. Las Cruces (NM): USDA<br />
Agricultural Research Service, Jornada Experimental Range. 36 p. URL: http://usda-ars.nmsu.<br />
edu/ (accessed 4 Apr 2007).<br />
Herrick JE, Van Zee JW, Havstad KM, Burkett LM, Whitford WG. 2005b. Monitoring manual<br />
for grassland, shrubland and savanna ecosystems, vol II: design, supplementary methods and<br />
interpretation. Las Cruces (NM): USDA Agricultural Research Service, Jornada Experimental<br />
Range. 200 p. URL: http://usda-ars.nmsu.edu/ (accessed 4 Apr 2007).<br />
Hoag JC, Simonson B, Cornforth B, St John L. 2001. Waterjet Stinger: a tool for planting<br />
dormant nonrooted cuttings. Native Plants Journal 2:84-89.<br />
Hoag JC. 2003. Willow clump plantings. Boise (ID): USDA Natural Resources Conservation<br />
Service. Plant Materials Technical Note No. 42. 8 p.<br />
Hoag JC. 2006a. Personal communication. Aberdeen (ID): USDA Nation Resource Conservation<br />
Service, Aberdeen Plant Materials Center. Plant Ecologist and Wetland Specialist.<br />
Hoag JC. 2006b. The pot planter: a new attachment for the Waterjet Stinger. Native Plants<br />
Journal 7(1): 100-101.<br />
Hoag JC. 2007. Personal communication. Aberdeen (ID): USDA National Resource Conservation<br />
Service, Aberdeen Plant Materials Center. Plant Ecologist and Wetland Specialist.<br />
Hobbs SD. 1982. Performance of artificially shaded container-grown Douglas-fir seedlings on<br />
skeletal soils. Corvallis (OR): Oregon State University, Forest Research Laboratory. Research<br />
Note 71. 5 p.<br />
Hogan MP. 2007. Personal communication. Tahoe City (CA): Integrated Environmental<br />
Restoration Services. Consultant in revegetation.<br />
Hopwood J, Black SH, Fleury S. 2016. Pollinators and <strong>Roadside</strong>s: Best Management Practices<br />
for Managers and Decision Makers. 96 pp. Washington, D.C.: Federal Highway Administration.<br />
(Available at: https://www.environment.fhwa.dot.gov/ecosystems/Pollinators_<strong>Roadside</strong>s/<br />
BMPs_pollinators_roadsides.pdf)<br />
Hopwood J, Black SH, Lee-Mӓder E, Charlap A. Preston R, Mozumder K, Fleury S. 2015.<br />
Literature Review: Pollinator Habitat Enhancement and Best Management Practices<br />
in Highway Rights-of-Way. 68 pp. Washington, D.C.: Federal Highway Administration.<br />
<strong>Roadside</strong> <strong>Revegetation</strong>: An Integrated Approach to Establishing Native Plants and Pollinator Habitat<br />
428
BIBLIOGRAPHY<br />
(Available at: https://www.environment.fhwa.dot.gov/ecosystems/documents/pollinators_BMPs_in_highway_ROW.asp)<br />
Hopwood JL, Winkler L, Deal B, Chivvis M. 2010. Use of roadside prairie plantings by native<br />
bees. Iowa Living Roadway Trust Fund Final Report 90-00-LRTF-011 (Available at: http://ilr.<br />
winningit.com/ResearchProjects/90-00-LRTF-011.aspx)<br />
Hopwood JL. 2008. The contribution of roadside grassland restorations to native bee<br />
conservation. Biological Conservation 141:2632-2640.<br />
Horneck DA, Hart JM, Topper K, Koepsell B. 1989. Methods of soil analysis used in the<br />
soil testing laboratory at Oregon State University. Corvallis (OR): Oregon State University,<br />
Agricultural Experiment Station. SM 89:4. 21 p.<br />
Horning ME, McGovern TR, Darris DC, Mandel NL, Johnson R. 2010. Genecology of Holodiscus<br />
discolor (Rosaceae) in the Pacific Northwest, U.S.A. Restoration Ecology 18(2): 235-243.<br />
Houseal G, Smith D. 2000. Source-identified seed: The Iowa roadside experience. Ecological<br />
Restoration 18(3):173-183.<br />
Hufford KM, Mazer SJ. 2003. Plant ecotypes: genetic differentiation n the age of ecological<br />
restoration. Trends in Ecology and Evolution 18:147-155.<br />
Huntzinger M. 2003. Effects of fire management practices on butterfly diversity in the forested<br />
western United States. Biological Conservation 113(1):1–12.<br />
International Seed Testing Association [ISTA]. 1976. International rules for seed testing.<br />
Seed Science and Technology 4:4-180.<br />
Jackson LE, Strauss RB, Bartolome JW. 1988. Plant and soil dynamics in California annual<br />
grassland. Plant and Soil 110:9-17.<br />
Jacobs DF, Rose R, Haase DL, Alzugaray PO. 2004. Fertilization at planting impairs root<br />
system development and drought avoidance of Douglas-fir seedlings. Annals of Forest<br />
Science 61:643-651.<br />
Jacobs DF, Steinbeck K. 2001. Tree shelters improve the survival and growth of planted<br />
Engelmann spruce seedlings in southwestern Colorado. Western Journal of Applied<br />
Forestry 16(3):114-120.<br />
Jasper DA, Roson AD, Aboot LK. 1979. Phosphorus and the formation of vesicular arbuscular<br />
mycorrhizas. Soil Biology and Biochemistry 11:501-505.<br />
Jenny H. 1980. The soil resource origin and behavior. Ecological Studies 37. 1st edition. New<br />
York (NY): Springer-Verlag Inc. 377 p.<br />
Jepsen S, Schweitzer DF, Young B, Sears N, Ormes M, Black SH. 2015. Conservation Status<br />
and Ecology of Monarchs in the United States. 36 pp. NatureServe, Arlington, Virginia, and<br />
the Xerces Society for Invertebrate Conservation, Portland, Oregon.<br />
Johnson GR, Stritch L, Olwell P, Lambert S, Horning ME, Cronn R. 2010. What are the best<br />
seed sources for ecosystem restoration on BLM and USFS lands? Native Plants Journal<br />
11:117–131.<br />
Johnson RC, Hellier BC, Vance-Borland KW. 2013. Genecology and seed zones for tapertip<br />
onion in the US Great Basin. Botany 91(10): 686-694.<br />
Johnson, AM. 2000. Best Practices Handbook on <strong>Roadside</strong> Vegetation Management. Minnesota<br />
Department of Transportation, Report # 2000-19, University of Minnesota 132 pp., p. 78.<br />
Johst, K., Drechsler M, Thomas J, Settele J. 2006. Influence of mowing on the persistence of<br />
two endangered large blue butterfly species. Journal of Applied Ecology 43(2):333–342.<br />
Kay BL, Evans RA, Young JA. 1977. Soaking procedures and hydroseeder damage to common<br />
bermudagrass seeds. Agronomy Journal 69(4):555-557.<br />
<strong>Roadside</strong> <strong>Revegetation</strong>: An Integrated Approach to Establishing Native Plants and Pollinator Habitat<br />
429
BIBLIOGRAPHY<br />
Kay BL. 1972a. Hydro-seeding limitations and alternatives. Davis (CA): University of California<br />
Davis, Agronomy and Range Science. Agronomy Progress Report #43. 3 p.<br />
Kay BL. 1972b. <strong>Revegetation</strong> of ski slopes and other disturbed mountain sites in California.<br />
Davis (CA): University of California Davis, Agronomy and Range Science. Agronomy Progress<br />
Report #42.<br />
Kay BL. 1974. Erosion control treatments on coarse decomposed granite. Davis (CA): University<br />
of California Davis, Agronomy and Range Science. Agronomy Progress Report #60. 7 p.<br />
Kay BL. 1978. Mulch and chemical stabilizers for land reclamation in dry regions. In: Schaller<br />
F, editor. Reclamation of drastically disturbed lands. Madison (WI): American Society of<br />
Agronomy, Crop Science Society of America, Soil Science Society of America. p. 467-483.<br />
Kay BL.1983. Straw as an erosion control mulch. Davis (CA): University of California Davis,<br />
Agronomy and Range Science. Agronomy Progress Report #140. 11 p.<br />
Keller G, Sherar J. 2003. Low-volume roads engineering: best management practices field<br />
guide. US AID and USDA Forest Service. 158p.<br />
Kemp PJ. 2006. Erosion control product acceptability lists for multi-modal applications. April<br />
2006 edition. Madison (WI): Wisconsin Department of Transportation. 36 p. URL: http://<br />
www. dot.state.wi.us/business/engrserv/pal.htm (accessed 30 May 2006).<br />
Ketcheson GL, Megahan WF, King JG. 1999. “R1-R4” and “BIOSED” sediment prediction<br />
model tests using forest roads in Granitics. Journal of the American Water Resources<br />
Association 35(1):83-98.<br />
Ketcheson GL, Megahan WF. 1996. Sediment production and downslope sediment transport<br />
from forest roads in granitic watersheds. Ogden (UT): USDA Forest Service, Intermountain<br />
Research Station. Research Paper INT-RP-486. 12 p.<br />
Kill DL, Foote LE. 1971. Comparison of long and short fibered mulches. Transactions of the<br />
American Society of Agricultural Engineers 14:942.<br />
Kjelgren R, Montague DT, Rupp LA. 1997. Establishment in treeshelters. II. Effect of shelter<br />
color on gas exchange and hardiness. HortScience 32(7):1284-1287.<br />
Klein, A. M., Vaissiere, B. E., Cane, J. H., Steffan-Dewenter, I., Cunningham, S. A., Kremen, C.,<br />
& Tscharntke, T. 2007. Importance of pollinators in changing landscapes for world crops.<br />
Proceedings of the Royal Society of London B: Biological Sciences, 274(1608), 303-313.<br />
Klock GO. 1981. Some engineering aspects of forest soils. In: Heilman PE, Anderson HW,<br />
Baumgartner DM, editors. Forest soils of the Douglas-fir region. Pullman (WA): Washington<br />
State University Cooperative Extension Service. p. 269-277.<br />
Kloetzel S. 2004. <strong>Revegetation</strong> and restoration planting tools: an in-the-field perspective.<br />
Native Plants Journal 5(1):34-42.<br />
Knapp EE, Rice KJ. 1994. Starting from seed: genetic issues in using native grasses for<br />
restoration. Restoration and Management Notes 12:40-45.<br />
Kramer AT, Havens K. 2014. Plant conservation genetics in a changing world. Trends in Plant<br />
Science 14(11):599-607.<br />
Kramer AT, Larkin DJ, Fant JB. 2015. Assessing potential seed transfer zones for five forb<br />
species from the Great Basin floristic region, USA. Natural Areas Journal. 35: 174–188.Kruess<br />
A and Tscharntke T. 2002. Contrasting responses of plant and insect diversity to variation<br />
in grazing intensity. Biological Conservation 106(3):293–302.<br />
Landis TD, 2009. The target plant concept. In: Dumroese RK, Luna T, Landis TD, editors. Nursery<br />
manual for native plants: A guide for tribal nurseries – Volume 1: Nursery Management.<br />
Washington (DC): USDA Forest Service. P. 15-31.<br />
<strong>Roadside</strong> <strong>Revegetation</strong>: An Integrated Approach to Establishing Native Plants and Pollinator Habitat<br />
430
BIBLIOGRAPHY<br />
Landis T, Tinus RW, McDonald SE, Barnett JP. 1989. The biological component: nursery<br />
pests and mycorrhizae. The container tree nursery manual. Vol 5. Washington (DC): USDA<br />
Forest Service. Agricultural Handbook 674. 171 p.<br />
Landis T, Tinus RW, McDonald SE, Barnett JP. 1994. Nursery planning, development, and<br />
management. The container tree nursery manual. Vol 1. Washington (DC): USDA Forest<br />
Service. Agricultural Handbook 674. 188 p.<br />
Landis TD, Steinfeld D, Watson R. 2002. The long tube stocktype and expandable stinger.<br />
Forest Nursery Notes R6-CP-TP-06-01. p. 15-17.<br />
Landis TD, Steinfeld DE. 1990. Salt injury. In: Hamm PB, Campbell SJ, Hansen EM, editors.<br />
Growing healthy seedlings: identification and management of pests in northwest forest<br />
nurseries. Corvallis (OR): Oregon State University, Forest Research Laboratory. p. 83-86.<br />
Landis TD. 1981. Irrigation water quality in tree nurseries in the inland west. In: Huber RF,<br />
editor. Proceedings of the 1981 Intermountain Nurserymen’s Association meeting; 1981<br />
Aug 11-13; Edmonton, Alberta. Edmonton (Alberta): Canadian Forestry Service, Northern<br />
Forest Research Centre. Information Report NOR-X-241. p. 60-67.<br />
Landis TL, Dreesen DR, Dumroese RK. 2003. Sex and the single Salix: considerations for<br />
riparian restoration. Native Plants Journal 4(2):111-117.<br />
Laycock WA, Richardson BZ. 1975. Long-term effects of pocket gopher control on vegetation<br />
and soils of a subalpine grassland. Journal of Range Management 28(6):458-462.<br />
Lesica, P., Allendorf.FW. 1999. Ecological genetics and the restoration of plant communities:<br />
mix or match? Restoration Ecology 7:42–50.<br />
Lewis L. 2000. Soil bioengineering, an alternative for roadside management–a practical guide.<br />
San Dimas (CA): USDA Forest Service, San Dimas Technology and Development Center.<br />
Technical Report 0077 1801 - SDTDC. 44 p.<br />
Ley TW, Stevens RG, Topielec RR, Neibling WH. 1994. Soil water monitoring and measurement<br />
[online]. Pullman (WA): Washington State University. Pacific Northwest Publication PNW0475.<br />
URL: http://cru.cahe.wsu.edu/CEPublications/pnw0475/pnw0475.html (accessed 4 Aug 2006).<br />
Linhart YB. 1995. Restoration, revegetation, and the importance of genetic and evolutionary<br />
perspectives. In: Roundy BA, McArthur ED, Haley JS, Mann DK, editors. Proceedings, Wildland<br />
shrub and arid land restoration symposium, 1993 October 19-21; Las Vegas, NV. USDA Forest<br />
Service, General Technical Report. INT-GTR-315. p. 271-287.<br />
Lowenstein H, Ptikin FH. 1970. Ponderosa pine transplants aided by black plastic mulch in<br />
Idaho plantation. Tree Planters’ Notes 21(4):23-24.<br />
Luce CH. 1997. Effectiveness of road ripping in restoring infiltration capacity of forest roads.<br />
Restoration Ecology 5(3):265-270.<br />
Mackay DB. 1972. The measurement of viability. In: Roberts EH, editor. Viability of seeds.<br />
Syracuse (NY): Syracuse University Press. p. 172-208.<br />
Mallams K. 2006. Personal communication. Central Point (OR): USDA Forest Service, J Herbert<br />
Stone Nursery. Zone pathologist.<br />
Margulis L, Sagan D, Thomas L. 1997. Microcosmos: four billion years of evolution from our<br />
microbial ancestors. Berkeley (CA): University of California Press. 304 p.<br />
Martin L, Pezeshki SR, Shields Jr FD. 2005. Soaking treatment increases survival of black<br />
willow posts in a large-scale field study. Ecological Restoration 23(2):95-98.<br />
Massu L. 2005. Common control measures for invasive plants of the Pacific Northwest. In:<br />
USDA Forest Service. Pacific Northwest Region invasive plant program: preventing and<br />
managing invasive plants. Final Environmental Impact Statement. Portland (OR): USDA<br />
Forest Service, Pacific Northwest Region. R6-NR-FHP-PR-02-05.<br />
Mast B. 2007. Personal communication. Richland (WA): Wildlands Inc. President.<br />
<strong>Roadside</strong> <strong>Revegetation</strong>: An Integrated Approach to Establishing Native Plants and Pollinator Habitat<br />
431
BIBLIOGRAPHY<br />
Maxwell WG, Ward FR. 1976a. Photo series for quantifying forest residues in the coastal<br />
Douglas-fir-hemlock type and coastal Douglas-fir-hardwood type. Portland (OR): USDA<br />
Forest Service, Pacific Northwest Research Station. General Technical Report PNW-51. 103 p.<br />
Maxwell WG, Ward FR. 1976b. Photo series for quantifying forest residues in the ponderosa<br />
pine type, ponderosa pine and associated species type, lodgepole pine type. Portland<br />
(OR): USDA Forest Service, Pacific Northwest Research Station. General Technical Report<br />
PNW-52. 73 p.<br />
Maxwell WG, Ward FR. 1979. Photo series for quantifying forest residues in the Sierra mixed<br />
conifer type, Sierra true fir type. Portland (OR): USDA Forest Service, Pacific Northwest<br />
Research Station. General Technical Report PNW-95. 79 p.<br />
McCreary DD, Tecklin J. 1997. Effects of seedling protectors and weed control on blue oak<br />
growth and survival. In: Pillsbury NH, Verner J, Tietje WD, technical coordinators. Proceedings<br />
of a symposium on oak woodlands: ecology, management, and urban interface issues;<br />
1996 March 19-22; San Luis Obispo, CA. Albany (CA): USDA Forest Service, Pacific Southwest<br />
Research Station. General Technical Report PSW-GTR-160.<br />
McDonald PM, Helgerson OT. 1991. Mulches aid in regenerating California and Oregon forests:<br />
past present and future. Berkeley (CA): USDA Forest Service, Pacific Southwest Forest and<br />
Range Experiment Station. General Technical Report PSW-123. 19 p.<br />
McDonald SE. 1984. Irrigation in forest-tree nurseries: monitoring and effects on seedling<br />
growth. In: Duryea ML, Landis TD, editors. Forest nursery manual: production of bareroot<br />
seedlings. Boston (MA): Martinus Nijhoff/Dr E Junk Publishers. p. 107-121.<br />
McElroy GH, Dawson WM. 1986. Biomass from short-rotation coppic willow on marginal<br />
land. Biomass 10:255-240.<br />
McGinnies WJ, Crofts KA. 1986. Effects of N and P fertilizer placement on establishment of<br />
seeded species on redistributed mine topsoil. Journal of Range Management 39:118-121.<br />
McGregor SE. 1976. Insect pollination of cultivated crop plants. USDA Agriculture Handbook<br />
No. 496. URL: http//gears.tucson.ars.ag.gov/book/ (accessed 28 April 2016).<br />
McKay JK, Christian CE, Harrison S, Rice KJ. 2005. “How local is local?” – A review of practical<br />
and conceptual issues in the genetics of restoration. Restoration Ecology. 13: 432–440.McLean<br />
EO. 1973. Testing soils for pH and lime requirement. In: Walsh LM, Beaton JD, editors. Soil<br />
testing and plant analysis. Madison (WI): Soil Science Society of America. p. 77-95.<br />
McLendon T, Redente EF. 1992. Effects of nitrogen limitation on species replacement dynamics<br />
during early succession on a semiarid sagebrush site. Oecologia 91:312-317.<br />
Megahan WF. 1974. Deep-rooted plants for erosion control on granitic road fills in the Idaho<br />
Batholith. Ogden (UT): USDA Forest Service, Intermountain Research Station. Research<br />
Paper INT-161. 18 p.<br />
Meyer LD, Wischmeier WH, Daniel WH. 1971. Erosion, runoff, and revegetation of denuded<br />
construction sites. Transactions of the American Society of Agricultural Engineers 14:138-141.<br />
Mijnsbruggea KV, Bischoff A, Smith B. 2010. A question of origin: Where and how to collect<br />
seed for ecological restoration. Basic and Applied Ecology. 11(4): 300-311.Neufeld J, Davison<br />
J. 2000. Practical considerations when selecting a soil testing laboratory for an educational<br />
program [online]. Journal of Extension 38(4). 9 p. URL: http://www.joe.org/ joe/2000august/<br />
rb2.html (accessed 3 Apr 2007).<br />
Millar CI, Libby WJ. 1989. Disneyland or native ecosystem: genetics and the restorationist.<br />
Restoration and Management Notes 7(1):18-24.<br />
Miller RM, Jastrow JD. 1992. The application of VA mycorrhizae to ecosystem restoration<br />
and reclamation. In: Allen MF, editor. Mycorrhizal functioning: an integrative plant-fungal<br />
process. New York (NY): Chapman and Hall. p. 438-467.<br />
<strong>Roadside</strong> <strong>Revegetation</strong>: An Integrated Approach to Establishing Native Plants and Pollinator Habitat<br />
432
BIBLIOGRAPHY<br />
Miller RM, May SW. 1979. Below-ground ecosystems project. In: Land Reclamation Program:<br />
annual report 1978. Argonne (IL): Argonne National Laboratory. ANL/LRP 5. p. 64-70.<br />
Minore D. 1971. Shade benefits Douglas-fir in southwestern Oregon cutover area. Tree Planters’<br />
Notes 22(1):22-23.<br />
Monsen SB, Stevens R. 2004. Seedbed preparation and seeding practices. In: Monsen SB,<br />
Stevens R, Shaw NL, compilers. Restoring western ranges and wildlands. Fort Collins (CO):<br />
USDA Forest Service, Rocky Mountain Research Station. General Technical Report RMRS-<br />
GTR-136 - volume 1. p. 121-154.<br />
Montalvo AM, Williams SL, Rice KJ, Buchmann SL, Cory C, Handel SN, Nabhan GP, Primack<br />
R, Robichaux RH. 1997. Restoration biology: a population biology perspective. Restoration<br />
Ecology 5: 277–290.Morgan JP. 1994. Soil impoverishment: a little-known technique holds<br />
potential for establishing prairie. Restoration and Management Notes 12:55-56.<br />
Morgenson G. 2007. Personal communication. Bismark (ND): Lincoln-Oakes Nurseries. Nursery<br />
Manager.<br />
Munshower FF. 1994. Practical handbook of disturbed land revegetation. Boca Raton (FL):<br />
CRC Press. 265 p.<br />
National Research Council [NRC]. 2005. Assessing and managing the ecological impacts of<br />
paved roads. Washington (DC): National Academies Press. 294 p.<br />
National Research Council [NRC]. 2007. Status of Pollinators in North America. Washington,<br />
D.C.: National Academies Press. 312p.[NRCS] USDA Natural Resources Conservation Service.<br />
1994. Planning and design manual for the control of erosion, sediment, and stormwater. 1st<br />
edition [online]. Mississippi State (MS): Mississippi State University, Agricultural and Biological<br />
Engineering. URL: http://www.abe. msstate.edu/csd/p-dm/index.php (accessed 3 Apr 2007).<br />
National Research Council. 2007. Status of Pollinators in North America. Washington, D.C.:<br />
National Academies Press.<br />
National <strong>Roadside</strong> Vegetation Management Association [NRVMA]. 1997. How to develop<br />
and implement an integrated roadside vegetation management program - a guide for<br />
township, city, county, parish, state, turnpike and other roadside authorities. 48p.<br />
Nitrogen-Fixing Tree Association Staff [NFTA]. 1986. Actinorrhizal trees useful in cool to<br />
cold regions. In: NFT Highlights: a quick guide to useful nitrogen-fixing trees from around<br />
the world. Morrilton (AR): Winrock International.<br />
Norcini JG, Thetford M, Klock-Moore KA, Bell ML, Harbaugh BK, and Aldrich JH. 2001.<br />
Growth, Flowering, and Survival of Blackeyed Susan from Different Regional Seed Sources.<br />
HortTechnology 11(1): 26-30.<br />
Norland MR. 2000. Use of mulches and soil stabilizers for land reclamation. In: Barnhisel RI,<br />
Darmody RG, Daniels WL, editors. Reclamation of drastically disturbed lands. Madison (WI):<br />
American Society of Agronomy. Agronomy Monograph 41. p. 645-666.<br />
Nursery Technical Cooperative [NTC]. 2004. Nursery Technical Cooperative 2003-2004 Annual<br />
Report. Corvallis (OR): Oregon State University, Department of Forest Science.<br />
Odum EP. 1971. Fundamentals of ecology. Philadelphia (PA): WB Saunders Co. 574 p.<br />
Ollerton J, Winfree R, Tarrant S. 2011. How many flowering plants are pollinated by animals?<br />
Oikos 120:321-326<br />
Onstad CA, Wolfe ML, Larson CL, Slack DC. 1984. Tilled soil subsidence during repeated<br />
wetting. Transactions of the American Society of Agricultural Engineers 27:733-736.<br />
Ozores-Hampton M, Obreza TA, Stoffella PJ, Fitzpatrick G. 2002. Immature compost<br />
suppresses weed growth under greenhouse conditions. Compost Science & Utilization<br />
10(2):105-113.<br />
<strong>Roadside</strong> <strong>Revegetation</strong>: An Integrated Approach to Establishing Native Plants and Pollinator Habitat<br />
433
BIBLIOGRAPHY<br />
Ozores-Hampton M. 1998. Compost as an alternative weed control method. HortScience<br />
33(6):938-940.<br />
Page HN, Bork EW. 2005. Effect of planting season, bunchgrass species, and neighbor control<br />
on the success of transplants for grassland restoration. Restoration Ecology 13(4):651–658.<br />
Page I. 1977. Improving the efficiency of ripping. Rotorua (New Zealand): Forest Industries<br />
Review. Forest Research Institute. p. 7- 13.<br />
Palmer JP. 1990. Nutrient cycling: the key to reclamation success. In: Chambers JD, Wade GL,<br />
editors. Evaluating reclamation success: the ecological consideration–proceedings of a<br />
symposium; 1990 Apr 23-26; Charleston, WV. Radnor (PA): USDA Forest Service, Northeastern<br />
Forest Experiment Station. General Technical Report NE-164. p. 27-36.<br />
Palumbo AV, McCarthy JF, Amonette JE, Fisher LS, Wullschleger SD, Daniels WL. 2004.<br />
Prospects for enhancing carbon sequestration and reclamation of degraded lands with<br />
fossil-fuel combustion by-products. Advances in Environmental Research. 8:425-438<br />
Parent V, Koenig R. 2003. Solutions to soil problems. I. High salinity (soluble salts). Logan<br />
(UT): Utah State University Extension. AG/Soils/2003-01. 2 p.<br />
Parr TW and Way JM. 1988. Management of roadside vegetation: the long-term effects of<br />
cutting. Journal of Applied Ecology 25:1073-1087.<br />
Pellett NE, Heleba DA. 1995. Chopped newspaper for weed control in nursery crops.<br />
Environmental Horticulture 13(2):77-81.<br />
Penny GM, Neal JC. 2003. Light, temperature, seed burial, and mulch effects on mulberry<br />
weed (Fatoua villosa) seed germination. Weed Technology 17(2):213-218.<br />
Peterson, D. 2002. Hydrophilic polymers - effects and uses in the landscape. Restoration and<br />
Reclamation Review. Vol 7S. 16 p. URL: http://horticulture.coafes.umn.edu/vd/h5015/01papers/<br />
hydrogel.htm (accessed 2 Aug 2005).<br />
Pezeshki SR, Brown CE, Elcan JM, Shields Jr FD. 2005. Responses of non-dormant black willow<br />
(Salix nigra) cuttings to pre-planting soaking and soil moisture. Restoration Ecology 13:1-7.<br />
Pezeshki SR, Shields FD. 2006. Black willow cutting survival in streambank plantings, southeastern<br />
United States. Journal of the American Water Resources Association 42(1):191-200.<br />
Pill WG, Frett JJ, Williams IH. 1997. Matric priming of Kentucky bluegrass and tall fescue<br />
seeds benefits seedling emergence. HortSci 32:1061-1063.<br />
Pill WG, Nesnow DS. 1999. Germination of hydro-seeded Kentucky bluegrass (Poa pratensis<br />
L.) and perennial ryegrass (Lolium perenne L.) in response to seed agitation in the tank.<br />
Journal of Turfgrass Management 3(2):59-67.<br />
Poff RJ. 1996. Effects of silvicultural practices and wildfire on productivity of forest soils. In:<br />
Sierra Nevada Ecosystem Project: Final report to Congress. Vol II. Assessments and scientific<br />
basis for management options. Davis (CA): University of California, Centers for Water and<br />
Wildland Resources. p. 477-493.<br />
Polster DF. 1997. Restoration of landslides and unstable slopes: considerations for bioengineering<br />
in interior locations. In: Proceedings of the 21st Annual British Columbia Mine<br />
reclamation symposium; 1997 Sept 22-25; Cranbrook, BC. Victoria (BC): British Columbia<br />
Technical Research Committee on Reclamation. p. 153-166.<br />
Potts SG, Biesmeijer JC, Kremen C, Neumann P, Schweiger O, Kunin WE. 2010. Global<br />
pollinator declines: trends, impacts and drivers. Trends in Ecology and Evolution. 25(6)<br />
345-353.<br />
Powell D, Urban C, Johnson C. 1998. Personal communication. Baker City (OR): USDA Forest<br />
Service. Forest Silviculturist, Forest Botanist, Area Ecologist.<br />
Preiadjati A, Smits WTM, Tolkamp GW. 2001. Vegetative propagation to assure a continuous<br />
supply of plant material for forest rehabilitation. In: Hillegers PJM, de Iongh HH. The balance<br />
<strong>Roadside</strong> <strong>Revegetation</strong>: An Integrated Approach to Establishing Native Plants and Pollinator Habitat<br />
434
BIBLIOGRAPHY<br />
between biodiversity conservation and sustainable use of tropical rain forests: workshop<br />
proceedings; 1999 Dec 6-8; Balikpapan, Kalimantan. p. 19-30.<br />
Racey GD, Raitanen E. 1983. Seedling development as affected by fibre and straw mulching at<br />
midhurst Nursery. Ottawa (Ontario): Ontario Ministry of Natural Resources, Forest Resources<br />
Branch. Nursery Notes 94. 5 p.<br />
Rauch N. 2006. Personal communication. Bend (OR): USDA Forest Service Bend Seed Extractory,<br />
Seed Extractory Assistant Manager.<br />
Rauzi F, Tresler RL. 1978. A preliminary report on herbage yields, stand evaluation, soils,<br />
and chemical content of selected grasses and a legume grown on topsoil, White River and<br />
Wind River geologic materials. Laramie (WY): University of Wyoming, Wyoming Agricultural<br />
Experiment Station. Research Journal 124.<br />
Reeder JD, Sabey B. 1987. Nitrogen. In: Williams RD, Schuman GE, editors. Reclaiming mine<br />
soils and overburden in the Western United States. Ankeny (IA): Soil and Water Conservation<br />
Society. p. 155-184.<br />
Rehfeldt, GE. 1994. Evolutionary genetics, the biological species, and the ecology of the Interior<br />
cedar-hemlock forests. Pages 93–100 in Proceedings of the interior cedar–hemlock–white<br />
pine forests: ecology and management. 1993 March 2–4; Spokane, WA. Department of<br />
Natural Resource Sciences, Washington State University, Pullman, Washington,USA.<br />
Resource Efficient Agricultural Production Canada [REAP Canada]. 1991. Effects of carbon<br />
addition on nitrogen fixation and P nutrition of hairy vetch and following crops. In: Abboud<br />
A, Patriquin DG. Processes involved in mobilization of P in different farming systems in<br />
Southwestern Ontario: nutrient levels in plant tissues and soils. Harrow (ON): Agriculture<br />
Canada Ecological Services for Planning. Report to Canada-Ontario SWEEP (Soil and Water<br />
Enhancement Program), SWEEP Report #23 from REAP-Canada. p. 22-24.<br />
Re-Sourcing Associates, Inc, CPM Consultants Inc. 1997. Wood waste recovery: size reduction<br />
technology study. EPA Report No. CDL-97-3. 66 p. URL: http://www.p2pays.org/ref/13/12639.<br />
pdf (accessed 21 June 2007).<br />
Reuter JE, Jassby AD, Marjanovic P, Heyvaert Heyvaert AC, Goldman CR. 1998. Preliminary<br />
phosphorus and nitrogen budgets for Lake Tahoe. In: Annual Progress Report 1998, Lake<br />
Clarity and Watershed Modelling, Presidential Deliverable for Lake Tahoe, USEPA Water and<br />
Watershed Grant; 1998 July 18; Tahoe Research Group, Department of Civil and Environmental<br />
Engineering. Davis (CA): University of California, John Muir Institute for the Environment.<br />
Rice RM. 1982. Sedimentation in the chaparral: How do you handle unusual events?, in<br />
Sediment Budgets and Routing in Forested Drainage Basins, edited by F. J. Swanson and<br />
others. Forest Service, U.S. Dep. Agric., Washington, D. C. pp 39-49.<br />
Ries L, Debinski DM, Wieland ML. 2001. Conservation value of roadside prairie restoration<br />
to butterfly communities. Conservation Biology 15:401–411.<br />
Riley L, Steinfeld D, and Riley S. 2013. Effects of polyacrylamide crystals on seedling<br />
establishment and growth of native species when applied to soils of highly disturbed sites.<br />
Internal report to WFHLD. 24p.<br />
Riley S. 1999. Proposal to cage shrubs [Internal memo Umatilla National Forest]. Located at:<br />
Umatilla National Forest, Pendleton, OR. 10 p.<br />
Ritchie GA. 1985. Root growth potential: principles, procedures and predictive ability. In:<br />
Duryea ML, editor. Proceedings - evaluating seedling quality: principles, procedures and<br />
predictive ability of major tests; 1984 Oct 16-18; Corvallis, OR. Corvallis (OR): Oregon State<br />
University, Forest Research Laboratory. p. 93-104.<br />
Rose R, Haase DL, Boyer D. 1995. Organic matter management in forest nurseries: theory<br />
and practice. Corvallis (OR): Oregon State University, Nursery Technology Cooperative. 65p.<br />
<strong>Roadside</strong> <strong>Revegetation</strong>: An Integrated Approach to Establishing Native Plants and Pollinator Habitat<br />
435
BIBLIOGRAPHY<br />
Rose R. 2002. Slow release fertilizers 101. In: Dumroese RK, Riley LE, Landis TD, technical<br />
coordinators. National proceedings: forest and conservation nursery associations–1999,<br />
2000, and 2001. Ogden (UT): USDA Forest Service, Rocky Mountain Research Station.<br />
Proceedings RMRS-P-24. p. 304-308.<br />
Rose R. 2004. Comparison among soil and tissue testing laboratories. In: Nursery Technology<br />
Cooperative, 2003-2004 Annual Report. Corvallis (OR): Oregon State University, Department<br />
of Forest Science. p. 39-47.<br />
Ross DJ, Cairns A. 1981. Nitrogen availability and microbial biomass in stockpiled topsoils in<br />
Southland. New Zealand Journal of Science 24:137.<br />
Rossi P. 1999. Length of cuttings in establishment and production of short-rotation plantations<br />
of Salix aquatica. New Forests 18:161-177.<br />
Saarinen K, Valtonen A, Jantunen J, Saarnio S. 2005. Butterflies and diurnal moths along<br />
road verges: Does road type affect diversity and abundance? Biological Conservation<br />
123:403-412.<br />
Savolainen O, Pyhäἴärvi T, Knürr T. 2007. Gene flow and local adaptation in trees. Annual<br />
Review of Ecology, Evolution, and Systematics 38:595-619.Schaff SD, Pezeshki SR, Shields<br />
FD. 2002. Effects of pre-planting soaking on growth and survival of black willow cuttings.<br />
Restoration Ecology 10(2):267-274.<br />
Schmidt L. 2000. Guide to handling of tropical and subtropical forest seed. Humlebaek<br />
(Denmark): Danida Forest Seed Centre.<br />
Schröder R, Schröder R., Prasse, R. 2013. From nursery into nature: a study on performance of<br />
cultivated varieties of native plants used in re-vegetation, their wild relatives and evolving<br />
wild × cultivar hybrids. Ecological Engineering. 60: 428-437.[SER] Society for Ecological<br />
Restoration. 2004. The SER international primer on ecological restoration. Tuscon (AZ):<br />
Society for Ecological Restoration, International Science and Policy Working Group. URL:<br />
http://www.ser.org (accessed 20 Aug 2006).<br />
Shaw N. 2004. Production and use of planting stock. In: Monsen SB, Stevens R, Shaw NL.<br />
Restoring western ranges and wildlands. Fort Collins (CO): USDA Forest Service, Rocky<br />
Mountain Research Station. General Technical Report RMRS-GTR-136 - volumes 1-3. p. 745-768.<br />
Sheley R. 2005. Personal communication. Madras (OR): USDA Forest Service, Crooked River<br />
National Grassland.<br />
Skórka P, Lenda M, Moroń D, Kalarus K, and Tryjanowski P. 2013. Factors affecting road<br />
mortality and the suitability of road verges for butterflies. Biological Conservation 159:148-157.<br />
Slick BM, Curtis WR. 1985. A guide for the use of organic materials as mulches in reclamation of<br />
coal minesoils in the Eastern United States. Broomall (PA): USDA Forest Service, Northeastern<br />
Forest Experimental Station. General Technical Report NE-98. 144 p.<br />
Sloan R. 2001. Modified brush layers and live pole drains for landslide reclamation [online].<br />
Santa Barbara (CA): Erosion Control. URL: http://www.forester.net/ec_0107_biotech.html<br />
(accessed 1 Jan 2007).<br />
Smallidge P.J, Leopold DJ. 1997. Vegetation management for the maintenance and conservation<br />
of butterfly habitats in temperate human-dominated habitats. Landscape and Urban<br />
Planning 38:259–280.<br />
Smith MR, Charvat I, Jacobson RL. 1998. Arbuscular mycorrhizae promote establishment of<br />
prairie species in a tallgrass prairie restoration. Canadian Journal of Botany 76(11):1947-1954.<br />
Sobek AA, Skousen JG, Fisher Jr SE. 2000. Chemical and physical properties of overburdens<br />
and minesoils. In: Barnhisel RI, Darmody RG, Daniels WL, editors. Reclamation of drastically<br />
disturbed lands. Madison (WI): American Society of Agronomy. Agronomy Monograph 41.<br />
p. 77-104.<br />
<strong>Roadside</strong> <strong>Revegetation</strong>: An Integrated Approach to Establishing Native Plants and Pollinator Habitat<br />
436
BIBLIOGRAPHY<br />
Soil Survey Staff. 1975. Soil Taxonomy. Washington (DC): USDA Soil Conservation Service.<br />
Agricultural Handbook. 436 p.<br />
Sotir RB, Gray DH. 1992. Soil bioengineering for upland slope protection and erosion reduction.<br />
In: Engineering Field Handbook. Washington (DC): USDA Natural Resources Conservation<br />
Service. EFH- 210. 61 p.<br />
South DB, Mexal JG. 1984. Growing the “best” seedling for reforestation success. Auburn<br />
(AL): Auburn University. Forestry Department Series 12. 11 p.<br />
Spangler MG, Handy RL. 1973. Soil engineering. 3rd edition. New York (NY): Intext Educational<br />
Publishers. 748 p.<br />
St Clair B, Johnson R. 2003. Structure of genetic variation and implications for the management<br />
of seed and planting stock. In: Riley LE, Dumroese RK, Landis TD, technical coordinators.<br />
National proceedings: Forest and Conservation Nursery Associations–2003; 2003 June<br />
9–12; Coeur d’Alene, ID; and 2003 July 14–17; Springfield, IL. Fort Collins (CO): USDA Forest<br />
Service, Rocky Mountain Research Station. Proceedings RMRS-P-33. p. 64-71.<br />
St John L, Ogle DG, Scianna J, Winslow S, Holzworth LK. 2003. Plant materials collection<br />
guide. Boise (ID): USDA Natural Resources Conservation Service. Plant Materials Technical<br />
Note No 1. 12 p.<br />
St John T. 1995. Specially-modified land imprinter inoculates soil with mycorrhizal fungi<br />
(California). Restoration and Management Notes 14(1):84.<br />
St John T. 1999. Nitrate immobilization of the mycorrhizal network for control of exotic ruderals.<br />
CalEPPC News 7(1):4-11.<br />
St. Clair JB, Kilkenny FF, Johsnon RC, Shaw NL, Weaver G. 2013. Genetic variation in adaptive<br />
traits and seed transfer zones for Pseudoroegneria spicata (bluebunch wheatgrass) in the<br />
northwestern United States. Evolutionary Applications 6:933-938.<br />
St. Clair JB, Mandel NL, Vance-Borland KW. 2005. Genecology of Douglas fir in western Oregon<br />
and Washington. Annals of Botany 96:1199-1214.<br />
St-Amour, M. 1998. Evaluation of a powered auger for planting large container seedlings.<br />
Pointe-Claire (Quebec): Forest Engineering Research Institute of Canada. Field Note No.<br />
Silviculture-107. 2 p.<br />
Steed JE, DeWald LE. 2003. Transplanting sedges (Carex spp.) in southwestern riparian<br />
meadows. Restoration Ecology 11(2):247-256.<br />
Steinbrenner EC. 1981. Forest soil productivity relationships. In: Heilman PE, Anderson HW,<br />
Baumgartner DM, editors. Forest soils of the Douglas-fir region. Pullman (WA): Washington<br />
State University Cooperative Extension Service. p. 199-229.<br />
Steinfeld D, Amaranthus MP, Cazares E. 2003. Survival of ponderosa pine (Pinus ponderosa<br />
Doug. ex Laws.) seedlings outplanted with Rhizopogon mycorrhizae inoculated with spores<br />
at the nursery [online]. Journal of Arboriculture 29(4). URL: http://joa.isa-arbor.com/request.<br />
asp?J ournalID=1&ArticleID=94&Type=1 (accessed 3 Apr 2007).<br />
Steinfeld D. 2002. Blaine Road project: findings - willow seedlings and cuttings trials [Internal<br />
memo]. Located at: Ashland Ranger District, Rogue River National Forest, Ashland, OR. 7p.<br />
Steinfeld D. 2004. Soil temperatures under mulch and no mulch on the Chiloquin Highway<br />
revegetation project [personal files]. Located at: USDA Forest Service, Ashland Ranger<br />
District, Rogue River National Forest, Ashland, OR.<br />
Steinfeld D. 2005. Summary of tree shelter temperature recordings in and outside of tree<br />
shelters at the Canyonville planting pocket site [personal files]. Located at: USDA Forest<br />
Service, Ashland Ranger District, Rogue River National Forest, Ashland, OR.<br />
<strong>Roadside</strong> <strong>Revegetation</strong>: An Integrated Approach to Establishing Native Plants and Pollinator Habitat<br />
437
BIBLIOGRAPHY<br />
Steinfeld DE, Landis TD. 1990. Soil compaction. In: Hamm PB, Campbell SJ, Hansen EM,<br />
editors. Growing healthy seedlings. Corvallis (OR): Oregon State University, Forest Research<br />
Laboratory. p. 87-91.<br />
Stevens R, Monsen SB. 2004. Mechanical plant control. In: Monsen SB, Stevens R, Shaw NL,<br />
compilers. Restoring western ranges and wildlands. Fort Collins (CO): USDA Forest Service,<br />
Rocky Mountain Research Station. General Technical Report RMRS-GTR-136 - vol 1. p. 65-87.<br />
Stevens R, Van Epps GA. 1984. Seeding techniques to improve establishment of forage kocia<br />
(Kocia prostrate [L.] Schrad.) and fourwing saltbush (Atriplex canescens [Pursh.] Nutt.). In:<br />
Tiedemann AR, McArthur ED, Stutz HC, Stevens R, Johnson KL, compilers. Proceedingssymposium<br />
on the biology of Atriplex and related chenopods; 1983 May 2-6; Provo, UT.<br />
Ogden (UT): USDA Forest Service, Intermountain Forest and Range Experiment Station.<br />
General Technical Report INT-172. p. 269-272.<br />
Stoner KJL and Joern A. 2004. Landscape vs. local habitat scale influences to insect communities<br />
from tallgrass prairie remnants. Ecological Applications 14:1306–1320.<br />
Stryker J. 2001. Irrigation tutorials. URL: http://www.irrigationtutorials.com/ (accessed 11<br />
Feb 2007).<br />
Sugden EA. 1985. Pollinators of Astragalus monoensis Barneby (Fabaceae): new host records;<br />
potential impact of sheep grazing. Great Basin Naturalist 45:299–312.<br />
Svihra P, Burger D, Harris R. 1993. Treeshelters for nursery plants may increase growth and<br />
be cost effective. California Agriculture 47(4):13-16.<br />
Swistock BR, Mecum KA, Sharpe WE. 1999. Summer temperatures inside ventilated and<br />
unventilated brown plastic treeshelters in Pennsylvania. Northern Journal of Applied<br />
Forestry 16(1):7-10.<br />
Tanaka Y. 1984. Assuring seed quality for seedling production: cone collection and seed<br />
processing, testing, storage, and stratification. In: Duryea ML, Landis TD, editors. Forest<br />
nursery manual: production of bareroot seedlings. Boston (MA): Martinus Nijhoff/Dr W<br />
Junk Publishers. p. 27-40.<br />
Teidemann AR, Lopez CF. 2004. Assessing soil factors in wildland improvement programs.<br />
In: Monsen SB, Stevens R, Shaw NL, compilers. Restoring western ranges and wildlands.<br />
Fort Collins (CO): USDA Forest Service, Rocky Mountain Research Station. General Technical<br />
Report RMRS-GTR-136 - vol 1. p. 39-56.<br />
Tesch SD, Helms JA. 1992. Regeneration methods. In: Hobbs SD, Tesch SD, Owston PW, Stewart<br />
RE, Tappener II JC, Wells GE, editors. Reforestation practices in southwestern Oregon and<br />
northern California. Corvallis (OR): Oregon State University, Forest Research Laboratory.<br />
p 166-201.<br />
Therrell L, Cole D, Claassen V, Ryan C, Davies MA. 2006. Wilderness and backcountry<br />
site restoration guide. Missoula (MT): USDA Forest Service, Missoula Technology and<br />
Development Center. Pub # 0623 2815. 394 p.<br />
Thomas GW. 1967. Problems encountered in soil testing methods. In: Soil testing and plant<br />
analysis. Part 1. Madison (WI): Soil Science Society of America. SSSA Special Publication<br />
Series No. 2. p. 37-54.<br />
Thorup RM. 1984. Ortho agronomy handbook - a practical guide to soil fertility and fertilizer<br />
use. San Francisco (CA): Chevron Chemical Company. 454 p.<br />
Tisdale SL, Nelson WL. 1975. Soil fertility and fertilizers. New York (NY): Macmillan Publishing<br />
Co. 694 p.<br />
Trappe JM, Bollen WB. 1981. Forest soil biology. In: Heilman PE, Anderson HW, Baumgartner<br />
DM, editors. Forest soils of the Douglas-fir region. Pullman (WA): Washington State University<br />
Cooperative Extension Service. p. 145-155.<br />
<strong>Roadside</strong> <strong>Revegetation</strong>: An Integrated Approach to Establishing Native Plants and Pollinator Habitat<br />
438
BIBLIOGRAPHY<br />
Trent A, Nolte D, Wagner K. 2001. Comparison of commercial deer repellents. Missoula<br />
(MT): USDA Forest Service, Missoula Technology and Development Center. Technology<br />
Tip 0124- 2331-MTDC. 6 p.<br />
Trotti J. 2000. Hydraulic seeding and stabilization [online]. Erosion control 7(8).10 p. URL: http://<br />
www.forester.net/ec_0011_hydraulic.html (accessed 16 Jan 2006).<br />
Tuley G. 1985. The growth of young oak trees in shelters. Forestry 58:181-195.<br />
Tuttle RW, Wenberg RD, Sotir RB. 1996. Chapter 16. Streambank and shoreline protection.<br />
In: Engineering Field Handbook. Washington (DC): USDA Natural Resources Conservation<br />
Service. EFH- 210, Part 650. 88 p.<br />
University of Minnesota Extension Service [UMES]. 2004. Soluble Salts. St Paul (MN):<br />
University of Minnesota Extension Service. BU-01731. 3 p.<br />
URL: http://www.lrrb.org/media/reports/200820.pdf (accessed 12 July, 2016).<br />
USDA Agricultural Resource Service. 2012. Plant hardiness zone map. http://planthardiness.<br />
ars.usda.gov/PHZMWeb/USDA. [USFS] USDA Forest Service. 1991. J Herbert Stone Nursery<br />
Annual Report. Central Point (OR): USDA Forest Service, J Herbert Stone Nursery.<br />
USDA Forest Service [USFS]. 2003. BAER Manual–FSM 2523. In: USDA Forest Service. Forest<br />
Service manual FSM 2500–watershed and air management. Washington (DC): USDA Forest<br />
Service National Headquarters. 44 p.<br />
USDA Forest Service [USFS]. 2004. National strategy and implementation plan for invasive<br />
species management. URL: http://www.fs.fed.us/invasivespecies/document/final_national_<br />
strategy_100804.pdf (accessed 14 May 2007).<br />
USDA Forest Service [USFS]. 2005. FSM 2070–native plant materials. URL: http://www.fs.fed.<br />
us/ rangelands/whoarewe/documents/fsm2070_final_2_062905.pdf (accessed 14 May 2007).<br />
USDA Forest Service [USFS]. 2006. Interior Columbia Basin ecosystem management project.<br />
URL: http://www.icbemp.gov/ (accessed 14 May 2007).<br />
USDA Forest Service [USFS]. 2007. Invasive plant prevention. In: Center for Invasive Plant<br />
Management. Invasive plant management: CIPM online textbook. Bozeman (MT): Montana<br />
State University. URL: http://www.weedcenter.org/textbook/8_prevention.html (accessed<br />
3 Apr 2007).<br />
USDA Forest Service, USDI Bureau of Land Management [USDA/USDI]. 2005. <strong>Revegetation</strong><br />
equipment catalog. Boise (ID): Rangeland Technology Equipment Council. URL: http://<br />
reveg- catalog.tamu.edu/09-Seeding.htm (accessed 20 June 2007).Varnes DJ. 1978. Slope<br />
movement types and processes. In: Schuster RL, Krize RJ, editors. Landslides- analysisandcontrol.<br />
Washington (DC): National Academy of Sciences, Transportation Research Board.<br />
Special Report 176. p. 12-33.<br />
USDA Forest Service, USDI Bureau of Land Management [USFS/USDI]. 1994. Record of<br />
decision for the final supplemental environmental impact statement on management of<br />
habitat for late- successional and old growth forest related species within the range of the<br />
northern spotted owl. Portland (OR): USDA Forest Service. 475 p.<br />
USDA Forest Service, USDI Bureau of Land Management [USFS/USDI]. 2001. A collaborative<br />
approach for reducing wildland fire risks to communities and the environment: 10-year<br />
comprehensive strategy. URL: http://www.fireplan.gov/reports/7-19-en.pdf (accessed 14<br />
May 2007).<br />
USDA Natural Resources Conservation Service [NRCS]. 1997. Collecting plant materials.<br />
Brooksville (FL): USDA Natural Resources Conservation Service, Brooksville Plant Materials<br />
Center. Technical Note No. 35. 4 p.<br />
Visser S, Fujikawa J, Griffiths CL, Parkinson D. 1984. Effect of topsoil storage on microbial<br />
activity, primary production and decomposition potential. Plant and Soil 82(1):41-50.<br />
<strong>Roadside</strong> <strong>Revegetation</strong>: An Integrated Approach to Establishing Native Plants and Pollinator Habitat<br />
439
BIBLIOGRAPHY<br />
Visser S, Griffiths CL, Parkinson D. 1984. Topsoil storage effects on primary production and<br />
rates of vesicular-arbuscular mycorrhizal development in Agropyron trachycaulum. Plant<br />
and Soil 82(1):51-60.<br />
Walker RF. 2002. Responses of Jeffrey pine on a surface mine site to fertilizer and lime.<br />
Restoration Ecology 10(2):204-212.<br />
Walker RF. 2005. Growth and nutrition of Jeffrey pine seedlings on a Sierra Nevada surface mine<br />
in response to fertilization three years after planting. Western Journal of Applied Forestry<br />
20(1):28-35.Ward K, Cariveau D, May E, Roswell M, Vaughan M, Williams N, Winfree R, Isaacs<br />
R, Gill K. 2014. Streamlined bee monitoring protocol for assessing pollinator habitat. 16 pp.<br />
The Xerces Society for Invertebrate Conservation. Available online at: http://www.xerces.<br />
org/wp-content/uploads/2014/09/StreamlinedBeeMonitoring_web.pdf<br />
Waring RH, Schlesinger WH. 1985. Forest ecosystems: concepts and management. Orlando<br />
(FL): Academic Press. 340 p.<br />
Warren MS. 1993. A review of butterfly conservation in central southern Britain: II. Site<br />
management and habitat selection of key species. Biological Conservation 64(1):37–49<br />
Wearstler Jr K. 2004. Considerations for collecting and vegetatively propagating poplar<br />
woody plant materials. In: Riley LE, Dumroese RK, Landis TD, technical coordinators. National<br />
proceedings: forest and conservation nursery associations–2003. Fort Collins (CO): USDA<br />
Forest Service, Rocky Mountain Research Station. Proceedings RMRS-P-33. p. 55-56.<br />
Wedin DA, Tilman D. 1996. Influence of nitrogen loading and species composition on the<br />
carbon balance of grasslands. Science 274:1720-1723.<br />
Welker JM, Gordon DR, Rice KJ. 1991. Capture and allocation of nitrogen by Quercus douglasii<br />
seedlings in competition with annual and perennial grasses. Oecologia 87:459-466.<br />
Wert S, Thoms BR. 1981. Effects of skid roads on diameter, height, and volume growth in<br />
Douglas-fir. Soil Science Society of America Journal 45(3):629-632.<br />
Western Federal Lands Highway Division [WFLHD]. 2005. Project development process flow<br />
chart. Vancouver (WA): US Department of Transportation, Western Federal Lands Highway<br />
Division. 206 p. URL: http://www.wfl.fha.dot.gov/design/process/pdf/process_flowchart.<br />
pdf (accessed 20 June 2007).<br />
White AB, Fant JB, Kramer AT. In Prep. Developing genetically appropriate seed mixes of<br />
vulnerable plant species for restoration. A component of AB White’s thesis for a Master of<br />
Science in Plant Biology and Conservation, anticipated from Northwestern University and<br />
Chicago Botanic Garden 2016.<br />
Whiting D, Card A, Wilson C. 2007. Estimating soil texture: sandy, loamy or clayey. Fort Collins<br />
(CO): Colorado State University Extension, Colorado Master Gardener. URL: http://www.ext.<br />
colostate.edu/mg/files/gardennotes/214-EstTexture.html (accessed 9 November 2007).<br />
Wilde SA, Corey RB, Iyer JG, Voigt GK. 1979. Soil and plant analysis for tree culture. 5th<br />
revised edition. New Dehli (India): Oxford & IBH Publishing Co. 224 p.<br />
Williams and others 2007. See BMP Williams DW, Jackson LL, and Smith DD. 2007. Effects of<br />
frequent mowing on survival and persistence of forbs seeded into a species-poor grassland.<br />
Restoration Ecology 15:24-33.<br />
Wilson GWT, Hetrick BAD, Schwab AP. 1991. Reclamation effects on mycorrhizae and<br />
productive capacity of flue-gas desulfurization sludge. Journal of Environmental Quality<br />
20(4):777-783.<br />
Withrow-Robinson B, Johnson R. 2006. Selecting native plant materials for restoration projects:<br />
insuring local adaptation and maintaining genetic diversity. Corvallis (OR): Oregon State<br />
University Extension Service. URL: http://eesc.oregonstate.edu (accessed 10 August 2006).<br />
<strong>Roadside</strong> <strong>Revegetation</strong>: An Integrated Approach to Establishing Native Plants and Pollinator Habitat<br />
440
BIBLIOGRAPHY<br />
Wolf DD, Blaser RE, Morse RD, Neal JL. 1984. Hydro-application of seed and wood-fiber<br />
slurries to bind straw mulch. Reclamation and <strong>Revegetation</strong> Research 3(2):101-107.<br />
Woodmansee RG, Reeder JD, Berg WA. 1978. Nitrogen in drastically disturbed lands. In:<br />
Youngerg CT, editor. Forest and soil land use. Fort Collins (CO): Colorado State University,<br />
Department of Forest and Wood Sciences. p. 376-392.<br />
Yetka LA, Galatowitsch SM. 1999. Factors affecting revegetation of Carex lacustris and Carex<br />
stricta from rhizomes. Restoration Ecology 7:162-171.<br />
Youngberg CT. 1981. Organic matter of forest soils. In: Heilman PE, Anderson HW, Baumgartner<br />
DM, editors. Forest soils of the Douglas-fir region. Pullman (WA): Washington State University<br />
Cooperative Extension Service. p. 137-144.<br />
Zoldoske DF. 1998. Selecting a drip irrigation system for vineyards. Fresno (CA): Center for<br />
Irrigation Technology. URL: http://www.cati.csufresno.edu/cit/rese/98/980803/index.html<br />
(accessed 12 Feb 2007).<br />
<strong>Roadside</strong> <strong>Revegetation</strong>: An Integrated Approach to Establishing Native Plants and Pollinator Habitat<br />
441
APPENDIX<br />
NATIVE REVEGETATION PLANTS FOR POLLINATORS IN THE I-35 CORRIDOR<br />
Plant Type Scientific Name Common Name Plant Family IA KS MN MO OK TX All States Eco- Region<br />
(EPA III)<br />
Height<br />
(feet)<br />
Flower<br />
Color<br />
Showy Flowering Sun<br />
Exposure<br />
Soil<br />
Moisture<br />
Soil Texture<br />
Salt<br />
Toleranc e<br />
Palatability<br />
(Browsing/<br />
Grazing)<br />
Active<br />
Growth<br />
Period<br />
Pollinator<br />
Value<br />
Benefits to<br />
Pollinators<br />
Pollinators<br />
Propagation<br />
Commercially<br />
Available<br />
Grass,<br />
perennial<br />
Andropogon<br />
gerardii<br />
big bluestem Poaceae IA KS MN MO OK TX IA,KS,MN,MO,OK,TX "46,47,48,<br />
49,50,51,<br />
52"<br />
3–8 Green No May–Jun Sun, Part<br />
Shade<br />
Dry<br />
Coarse,<br />
Medium,<br />
Fine<br />
Medium<br />
Medium/<br />
High<br />
Summer Low Nest<br />
material;<br />
Shelter<br />
Seed<br />
Yes<br />
Grass,<br />
perennial<br />
Andropogon<br />
virginicus<br />
broomsedge Poaceae IA MO IA,MO 2–3 Green No May–Jun Sun, Part<br />
Shade<br />
Moist, Dry<br />
Coarse,<br />
Medium,<br />
Fine<br />
Medium Low/Low Summer Low Nest<br />
material;<br />
Shelter<br />
Seed<br />
Yes<br />
Grass,<br />
perennial<br />
Bouteloua<br />
curtipendula<br />
side-oats<br />
grama<br />
Poaceae IA KS MN MO OK TX IA,KS,MN,MO,OK,TX "46,47,48,<br />
51,52"<br />
1–3 Green No Jul–Sep Sun, Part<br />
Shade<br />
Dry<br />
Coarse,<br />
Medium,<br />
Fine<br />
Medium<br />
Medium/<br />
High<br />
Summer Low Nest<br />
material;<br />
Shelter<br />
Seed<br />
Yes<br />
Grass,<br />
perennial<br />
Bouteloua<br />
dactyloides<br />
buffalo grass Poaceae IA KS MO OK TX IA,KS,MO,OK,TX 0.5–1 Green No Jul–Aug Sun Moist, Dry Coarse,<br />
Medium,<br />
Fine<br />
Medium<br />
Medium/<br />
High<br />
Summer Low Nest<br />
material;<br />
Shelter<br />
Seed,<br />
Sprig<br />
Yes<br />
Grass,<br />
perennial<br />
Bouteloua gracilis blue grama Poaceae IA KS MN MO OK TX IA,KS,MN,MO,OK,TX 464,748<br />
5,152<br />
0.5–1.5 Green No May–Jul Sun Dry Coarse,<br />
Medium,<br />
Fine<br />
Medium High/High Summer<br />
and Fall<br />
Low<br />
Nest<br />
material;<br />
Shelter<br />
Seed<br />
Yes<br />
Grass,<br />
perennial<br />
Elymus canadensis<br />
nodding wild<br />
rye<br />
Poaceae IA KS MN MO OK TX IA,KS,MN,MO,OK,TX "46,47,48,<br />
49,50,51,<br />
52"<br />
3–5 Green No Jul–Aug Sun, Part<br />
Shade<br />
Moist, Dry<br />
Coarse,<br />
Medium,<br />
Fine<br />
Medium<br />
Medium/<br />
Medium<br />
Spring,<br />
Summer,<br />
Fall<br />
Low Shelter Seed Yes<br />
Grass,<br />
perennial<br />
Leptochloa dubia<br />
green<br />
sprangletop<br />
Poaceae TX TX 1–3 Green No Jul–Sep Sun, Part<br />
Shade<br />
Dry<br />
Coarse,<br />
Medium,<br />
Fine<br />
Medium<br />
Medium/<br />
High<br />
Spring and<br />
Summer<br />
Low<br />
Nest<br />
material;<br />
Shelter<br />
Seed<br />
Yes<br />
Grass,<br />
perennial<br />
Panicum virgatum switchgrass Poaceae IA KS MO OK TX IA,KS,MO,OK,TX 3–6 Green No Jul–Aug Sun, Part<br />
Shade<br />
Wet, Moist,<br />
Dry<br />
Coarse,<br />
Medium,<br />
Fine<br />
Medium<br />
Medium/<br />
High<br />
Summer Low Shelter Seed Yes<br />
Grass,<br />
perennial<br />
Schizachyrium<br />
scoparium<br />
little bluestem Poaceae IA KS MN MO OK TX IA,KS,MN,MO,OK,TX "46,47,48,<br />
49,50,51,<br />
52"<br />
1–2.5 Green No Aug–Sep Sun, Part<br />
Shade<br />
Moist, Dry<br />
Coarse,<br />
Medium,<br />
Fine<br />
Medium<br />
Medium/<br />
High<br />
Summer<br />
and Fall<br />
Low<br />
Nest<br />
material;<br />
Shelter<br />
Seed<br />
Yes<br />
Grass,<br />
perennial<br />
Sorghastrum<br />
nutans<br />
Indian grass Poaceae IA KS MN MO OK TX IA,KS,MN,MO,OK,TX "46,47,48,<br />
51,52"<br />
3–8 Green No Jul–Sep Sun Moist, Dry Coarse,<br />
Medium,<br />
Fine<br />
Medium<br />
Medium/<br />
High<br />
Summer<br />
and Fall<br />
Low<br />
Nest<br />
material;<br />
Shelter<br />
Seed<br />
Yes<br />
Grass,<br />
perennial<br />
Sporobolus<br />
heterolepis<br />
prairie<br />
dropseed<br />
Poaceae IA KS MN MO OK TX IA,KS,MN,MO,OK,TX "46,47,48,<br />
51,52"<br />
1.5–4 Green No Aug–Sep Sun Moist Coarse,<br />
Medium<br />
None<br />
Low/<br />
Medium<br />
Spring and<br />
Summer<br />
Low<br />
Nest<br />
material;<br />
Shelter<br />
Seed<br />
Yes<br />
Herb,<br />
annual<br />
Castilleja indivisa<br />
entireleaf Indian<br />
paintbrush<br />
Scrophulariaceae<br />
OK TX OK,TX 1–1.5 Red Yes Jul–Sep Sun, Part<br />
Shade<br />
Wet, Moist,<br />
Dry<br />
Coarse,<br />
Medium,<br />
Fine<br />
Low Very High Adult food<br />
(pollen<br />
and/or<br />
nectar)<br />
Hummingbirds<br />
Yes<br />
Herb,<br />
annual<br />
Chamaecrista<br />
fasciculata<br />
partridge pea Fabaceae IA KS MN MO OK TX IA,KS,MN,MO,OK,TX "46,47,51,<br />
52"<br />
1–3 Yellow Yes Jul–Sep Sun, Part<br />
Shade<br />
Moist, Dry<br />
Coarse,<br />
Medium,<br />
Fine<br />
Low<br />
High/<br />
Medium<br />
Spring Very High Adult food<br />
(pollen<br />
and/or<br />
nectar)<br />
Native bees;<br />
Bumble bees;<br />
Flies, beetles,<br />
and wasps<br />
Seed<br />
Yes<br />
<strong>Roadside</strong> <strong>Revegetation</strong>: An Integrated Approach to Establishing Native Plants and Pollinator Habitat<br />
442
APPENDIX<br />
Native <strong>Revegetation</strong> Plants for Pollinators in the I-35 Corridor, continued...<br />
Plant Type Scientific Name Common Name Plant Family IA KS MN MO OK TX All States Eco- Region<br />
(EPA III)<br />
Height<br />
(feet)<br />
Flower<br />
Color<br />
Showy Flowering Sun<br />
Exposure<br />
Soil<br />
Moisture<br />
Soil Texture<br />
Salt<br />
Toleranc e<br />
Palatability<br />
(Browsing/<br />
Grazing)<br />
Active<br />
Growth<br />
Period<br />
Pollinator<br />
Value<br />
Benefits to<br />
Pollinators<br />
Pollinators<br />
Propagation<br />
Commercially<br />
Available<br />
Herb,<br />
annual<br />
Dracopis<br />
amplexicaulis<br />
clasping<br />
coneflower<br />
Asteraceae KS OK TX KS,OK,TX 2–3 Yellow Yes Apr–Jul Part Shade Wet, Moist,<br />
Dry<br />
Coarse,<br />
Medium,<br />
Fine<br />
None Low/Low Spring and<br />
Summer<br />
High<br />
Adult food<br />
(pollen<br />
and/or<br />
nectar)<br />
Native bees Seed Yes<br />
Herb,<br />
annual<br />
Eryngium<br />
leavenworthii<br />
Leavenworth's<br />
eryngo<br />
Apiaceae KS OK TX KS,OK,TX 1.5–3 Purple Yes Jul–Sep Sun, Part<br />
Shade<br />
Dry<br />
Coarse,<br />
Medium,<br />
Fine<br />
Very High<br />
Adult food<br />
(pollen<br />
and/or<br />
nectar)<br />
Native bees<br />
Yes<br />
Herb,<br />
annual<br />
Impatiens<br />
capensis<br />
jewelweed<br />
Balsaminaceae<br />
IA KS MN MO IA,KS,MN,MO 2–5 Orange Yes Jun–Oct Part Shade,<br />
Shade<br />
Wet, Moist<br />
Coarse,<br />
Medium,<br />
Fine<br />
None Summer Very High Adult food<br />
(pollen<br />
and/or<br />
nectar)<br />
Bumble bees;<br />
Butterflies<br />
and Moths;<br />
Hummingbirds<br />
Seed<br />
Yes<br />
Herb,<br />
annual or<br />
perennial<br />
Coreopsis<br />
tinctoria<br />
plains<br />
coreopsis<br />
Asteraceae KS MO OK TX KS,MO,OK,TX 1–2 Yellow Yes Apr–Jun Sun, Part<br />
Shade<br />
Moist, Dry Fine None Spring and<br />
Summer<br />
High<br />
Adult food<br />
(pollen<br />
and/or<br />
nectar)<br />
Native bees;<br />
Flies, beetles,<br />
and wasps<br />
Seed<br />
Yes<br />
Herb,<br />
annual or<br />
perennial<br />
Gaillardia<br />
pulchella<br />
blanketflower Asteraceae KS OK TX KS,OK,TX 1–2 Orange Yes May–Jul Sun, Part<br />
Shade<br />
Moist, Dry<br />
Coarse,<br />
Medium,<br />
Fine<br />
None<br />
Medium/<br />
Medium<br />
Spring,<br />
Summer,<br />
Fall<br />
Very High<br />
Adult food<br />
(pollen<br />
and/or<br />
nectar)<br />
Native bees;<br />
Flies, beetles,<br />
and wasps<br />
Seed<br />
Yes<br />
Herb,<br />
annual or<br />
perennial<br />
Gaura longiflora<br />
longflower<br />
beeblossom<br />
Onagraceae IA KS MO OK TX IA,KS,MO,OK,TX 2–3 White Yes Jul–Sep Sun Dry Very High Adult food<br />
(pollen<br />
and/or<br />
nectar)<br />
Bumble<br />
bees; Moths;<br />
Hummingbirds<br />
Yes<br />
Herb,<br />
annual or<br />
perennial<br />
Glandularia<br />
bipinnatifida<br />
prairie verbena Verbenaceae KS OK TX KS,OK,TX 1 Purple Yes Mar–Dec Sun Dry Coarse,<br />
Medium,<br />
Fine<br />
Very High<br />
Adult food<br />
(pollen<br />
and/or<br />
nectar)<br />
Native bees;<br />
Bumble bees;<br />
Butterflies and<br />
moths; Flies;<br />
Hummingbirds<br />
Yes<br />
Herb,<br />
annual or<br />
perennial<br />
Monarda<br />
citriodora<br />
lemon<br />
beebalm<br />
Lamiaceae KS OK TX KS,OK,TX 1–2 Purple Yes May–Jul Sun, Part<br />
Shade<br />
Dry<br />
Coarse,<br />
Medium,<br />
Fine<br />
Very High<br />
Adult food<br />
(pollen<br />
and/or<br />
nectar)<br />
Native bees;<br />
Bumble bees;<br />
Hummingbirds<br />
Yes<br />
Herb,<br />
annual or<br />
perennial<br />
Monarda<br />
punctata<br />
dotted mint Lamiaceae KS MN OK TX KS,MN,OK,TX 1–3 Purple Yes Jun–Aug Sun Moist Very High Adult food<br />
(pollen<br />
and/or<br />
nectar)<br />
Native bees;<br />
Honey bees;<br />
Bumble bees;<br />
Butterflies<br />
and moths;<br />
Flies, beetles,<br />
and wasps;<br />
Hummingbirds<br />
Yes<br />
Herb,<br />
annual or<br />
perennial<br />
Verbena stricta hoary vervain Verbenaceae IA KS MN MO OK IA,KS,MN,MO,OK 2–3 White Yes Jun–Sep Sun Dry Coarse,<br />
Medium,<br />
Fine<br />
Very High<br />
Adult food<br />
(pollen<br />
and/or<br />
nectar)<br />
Native bees;<br />
Butterflies<br />
and moths;<br />
Hummingbirds<br />
Yes<br />
Herb,<br />
biennial<br />
Castilleja coccinea<br />
Indian<br />
paintbrush<br />
Scrophulariaceae<br />
IA KS MO IA,KS,MO 1–1.5 Red Yes Jul–Sep Sun, Part<br />
Shade<br />
Wet, Moist,<br />
Dry<br />
Coarse,<br />
Medium,<br />
Fine<br />
Low<br />
Spring and<br />
Summer<br />
Very High<br />
Adult food<br />
(pollen<br />
and/or<br />
nectar)<br />
Hummingbirds Seed Yes<br />
<strong>Roadside</strong> <strong>Revegetation</strong>: An Integrated Approach to Establishing Native Plants and Pollinator Habitat<br />
443
APPENDIX<br />
Native <strong>Revegetation</strong> Plants for Pollinators in the I-35 Corridor, continued...<br />
Plant Type Scientific Name Common Name Plant Family IA KS MN MO OK TX All States Eco- Region<br />
(EPA III)<br />
Height<br />
(feet)<br />
Flower<br />
Color<br />
Showy Flowering Sun<br />
Exposure<br />
Soil<br />
Moisture<br />
Soil Texture<br />
Salt<br />
Toleranc e<br />
Palatability<br />
(Browsing/<br />
Grazing)<br />
Active<br />
Growth<br />
Period<br />
Pollinator<br />
Value<br />
Benefits to<br />
Pollinators<br />
Pollinators<br />
Propagation<br />
Commercially<br />
Available<br />
Herb,<br />
biennial<br />
Ipomopsis rubra<br />
standing-cypress<br />
Polemoniaceae<br />
OK TX OK,TX 2–4 Red Yes Jun–Aug Sun, Part<br />
Shade<br />
Dry<br />
Coarse,<br />
Medium<br />
Very High<br />
Adult food<br />
(pollen<br />
and/or<br />
nectar)<br />
Hummingbirds<br />
Yes<br />
Herb,<br />
biennial or<br />
perennial<br />
Cirsium discolor field thistle Asteraceae IA KS MN MO IA,KS,MN,MO 3–8 Purple Yes Aug–Oct Sun Moist Very High Adult food<br />
(pollen<br />
and/or<br />
nectar)<br />
Native bees;<br />
Bumble bees;<br />
Butterflies<br />
and moths;<br />
Flies, beetles,<br />
and wasps;<br />
Hummingbirds<br />
Yes<br />
Herb,<br />
biennial or<br />
perennial<br />
Sphaeralcea<br />
coccinea<br />
scarlet<br />
globemallow<br />
Malvaceae KS OK TX KS,OK,TX 1 Orange Yes Apr–Sep Sun Moist, Dry Medium,<br />
Fine<br />
Medium<br />
Medium/<br />
Medium<br />
Spring and<br />
Summer<br />
Very High<br />
Adult food<br />
(pollen<br />
and/or<br />
nectar)<br />
Native bees;<br />
Hummingbirds<br />
Seed,<br />
Container<br />
Yes<br />
Herb,<br />
biennial or<br />
perennial<br />
Verbena hastata<br />
swamp<br />
verbena<br />
Verbenaceae IA KS MN MO OK IA,KS,MN,MO,OK 3–5 Lavender<br />
Yes Jul–Sep Sun, Part<br />
Shade<br />
Wet, Moist<br />
Coarse,<br />
Medium<br />
Very High<br />
Adult food<br />
(pollen<br />
and/or<br />
nectar)<br />
Native bees;<br />
Butterflies;<br />
Hummingbirds<br />
Yes<br />
Herb,<br />
perennial<br />
Achillea<br />
millefolium<br />
common<br />
yarrow<br />
Asteraceae IA KS MN MO OK TX IA,KS,MN,MO,OK,TX 3 White Yes May–Jul Sun, Part<br />
Shade<br />
Moist, Dry Medium Low Medium/<br />
Low<br />
Spring High Adult food<br />
(pollen<br />
and/or<br />
nectar);<br />
Nest<br />
material<br />
Native bees;<br />
Flies, beetles,<br />
and wasps<br />
Seed,<br />
Container,<br />
Sprig<br />
Yes<br />
Herb,<br />
perennial<br />
Actaea rubra red baneberry Ranunculaceae<br />
IA MN IA,MN 2–3 White Yes Apr–Jun Sun, Part<br />
Shade,<br />
Shade<br />
Moist, Dry Medium Medium Adult food<br />
(pollen<br />
and/or<br />
nectar)<br />
Flies and<br />
beetles<br />
Yes<br />
Herb,<br />
perennial<br />
Agastache<br />
foeniculum<br />
blue giant<br />
hyssop<br />
Lamiaceae MN MN "46,47,48,<br />
49,50,51,<br />
52"<br />
2–4 Blue Yes Jul–Oct Sun, Part<br />
Shade<br />
Dry<br />
Coarse,<br />
Medium,<br />
Fine<br />
Medium Very High Adult food<br />
(pollen<br />
and/or<br />
nectar);<br />
Nest<br />
material<br />
Native bees;<br />
Honey bees;<br />
Bumble bees;<br />
Hummingbirds<br />
Yes<br />
Herb,<br />
perennial<br />
Agastache<br />
nepetoides<br />
yellow giant<br />
hyssop<br />
Lamiaceae IA MO IA,MO 2–4 Yellow Yes Jun–Aug Sun, Part<br />
Shade<br />
Moist, Dry<br />
Coarse,<br />
Medium,<br />
Fine<br />
Medium Very High Adult food<br />
(pollen<br />
and/or<br />
nectar)<br />
Native bees;<br />
Bumble bees;<br />
Flies, beetles,<br />
and wasps;<br />
Hummingbirds<br />
Yes<br />
Herb,<br />
perennial<br />
Agastache<br />
scrophulariifolia<br />
purple giant<br />
hyssop<br />
Lamiaceae MN MN 2–6 Purple Yes Jul–Sep Sun, Part<br />
Shade,<br />
Shade<br />
Dry Very High Adult food<br />
(pollen<br />
and/or<br />
nectar)<br />
Native bees;<br />
Honey bees;<br />
Bumble bees;<br />
Hummingbirds<br />
Yes<br />
Herb,<br />
perennial<br />
Aquilegia<br />
canadensis<br />
red columbine<br />
Ranunculaceae<br />
IA KS MN MO OK IA,KS,MN,MO,OK 1–2 Red Yes Apr–May Sun, Part<br />
Shade<br />
Wet, Moist,<br />
Dry<br />
Coarse,<br />
Medium<br />
Very High<br />
Adult food<br />
(pollen<br />
and/or<br />
nectar)<br />
Bumble bees;<br />
Butterflies;<br />
Hummingbirds<br />
Yes<br />
<strong>Roadside</strong> <strong>Revegetation</strong>: An Integrated Approach to Establishing Native Plants and Pollinator Habitat<br />
444
APPENDIX<br />
Native <strong>Revegetation</strong> Plants for Pollinators in the I-35 Corridor, continued...<br />
Plant Type Scientific Name Common Name Plant Family IA KS MN MO OK TX All States Eco- Region<br />
(EPA III)<br />
Height<br />
(feet)<br />
Flower<br />
Color<br />
Showy Flowering Sun<br />
Exposure<br />
Soil<br />
Moisture<br />
Soil Texture<br />
Salt<br />
Toleranc e<br />
Palatability<br />
(Browsing/<br />
Grazing)<br />
Active<br />
Growth<br />
Period<br />
Pollinator<br />
Value<br />
Benefits to<br />
Pollinators<br />
Pollinators<br />
Propagation<br />
Commercially<br />
Available<br />
Herb,<br />
perennial<br />
Asclepias asperula<br />
ssp. capricornu<br />
antelopehorns<br />
milkweed<br />
Asclepiadaceae<br />
KS OK TX KS,OK,TX 1–2 Green Yes Apr–Jun Sun, Part<br />
Shade<br />
Dry<br />
Coarse,<br />
Medium,<br />
Fine<br />
Medium Very High Adult food<br />
(pollen<br />
and/or<br />
nectar);<br />
Larval food<br />
Native bees;<br />
Honey bees;<br />
Bumble bees;<br />
Butterflies and<br />
moths; Flies,<br />
beetles, and<br />
wasps<br />
Yes<br />
Herb,<br />
perennial<br />
Asclepias<br />
incarnata<br />
swamp<br />
milkweed<br />
Asclepiadaceae<br />
IA KS MO OK TX IA,KS,MO,OK,TX 3–4 Purple Yes Jun–Sep Sun, Part<br />
Shade<br />
Moist<br />
Coarse,<br />
Medium,<br />
Fine<br />
Medium /Low Spring Very High Adult food<br />
(pollen<br />
and/or<br />
nectar);<br />
Larval food<br />
Native bees;<br />
Honey bees;<br />
Bumble bees;<br />
Butterflies;<br />
Monarchs;<br />
Flies, beetles,<br />
and wasps;<br />
Hummingbirds<br />
Seed,<br />
Sprig<br />
Yes<br />
Herb,<br />
perennial<br />
Asclepias<br />
oenotheroides<br />
hierba de<br />
zizotes<br />
Asclepiadaceae<br />
TX TX 1–3 Green Yes Mar–Sep Sun Dry Medium,<br />
Fine<br />
Medium Very High Adult food<br />
(pollen<br />
and/or<br />
nectar);<br />
Larval food<br />
Native bees;<br />
Honey bees;<br />
Bumble bees;<br />
Butterflies;<br />
Monarchs; Flies,<br />
beetles, and<br />
wasps<br />
No<br />
Herb,<br />
perennial<br />
Asclepias<br />
purpurascens<br />
purple<br />
milkweed<br />
Asclepiadaceae<br />
IA KS MO IA,KS,MO 2–3 Purple Yes May–Jul Sun Moist, Dry Coarse,<br />
Medium<br />
Very High<br />
Adult food<br />
(pollen<br />
and/or<br />
nectar);<br />
Larval food<br />
Native bees;<br />
Honey bees;<br />
Bumble bees;<br />
Butterflies<br />
and moths;<br />
Monarchs;<br />
Flies, beetles,<br />
and wasps;<br />
Hummingbirds<br />
Yes<br />
Herb,<br />
perennial<br />
Asclepias syriaca<br />
common<br />
milkweed<br />
Asclepiadaceae<br />
IA KS MN MO OK IA,KS,MN,MO,OK "46,47,48,<br />
49,50,51,<br />
52"<br />
2.5–4 Purple Yes Jun–Aug Sun, Part<br />
Shade<br />
Moist, Dry<br />
Coarse,<br />
Medium,<br />
Fine<br />
Medium Very High Adult food<br />
(pollen<br />
and/or<br />
nectar);<br />
Larval food<br />
Native bees;<br />
Honey bees;<br />
Bumble bees;<br />
Butterflies;<br />
Monarchs; Flies,<br />
beetles, and<br />
wasps<br />
Yes<br />
Herb,<br />
perennial<br />
Asclepias<br />
tuberosa<br />
butterfly<br />
milkweed<br />
Asclepiadaceae<br />
IA KS MN MO OK TX IA,KS,MN,MO,OK,TX "46,47,50,<br />
51,52"<br />
2–3 Orange Yes Jun–Aug Sun, Part<br />
Shade<br />
Dry<br />
Coarse,<br />
Medium<br />
Medium Low/Low Spring and<br />
Summer<br />
Very High<br />
Adult food<br />
(pollen<br />
and/or<br />
nectar);<br />
Larval food<br />
Native bees;<br />
Honey bees;<br />
Bumble bees;<br />
Butterflies;<br />
Monarchs;<br />
Flies, beetles,<br />
and wasps;<br />
Hummingbirds<br />
Seed,<br />
Container<br />
Yes<br />
Herb,<br />
perennial<br />
Asclepias<br />
verticillata<br />
whorled<br />
milkweed<br />
Asclepiadaceae<br />
IA KS MN MO OK TX IA,KS,MN,MO,OK,TX "46,47,48,<br />
51,52"<br />
1–2 Purple No Jun–Sep Sun, Part<br />
Shade<br />
Moist, Dry<br />
Coarse,<br />
Medium,<br />
Fine<br />
Medium Very High Adult food<br />
(pollen<br />
and/or<br />
nectar);<br />
Larval food<br />
Native bees;<br />
Honey bees;<br />
Bumble bees;<br />
Butterflies;<br />
Monarchs; Flies,<br />
beetles, and<br />
wasps<br />
Yes<br />
<strong>Roadside</strong> <strong>Revegetation</strong>: An Integrated Approach to Establishing Native Plants and Pollinator Habitat<br />
445
APPENDIX<br />
Native <strong>Revegetation</strong> Plants for Pollinators in the I-35 Corridor, continued...<br />
Plant Type Scientific Name Common Name Plant Family IA KS MN MO OK TX All States Eco- Region<br />
(EPA III)<br />
Height<br />
(feet)<br />
Flower<br />
Color<br />
Showy Flowering Sun<br />
Exposure<br />
Soil<br />
Moisture<br />
Soil Texture<br />
Salt<br />
Toleranc e<br />
Palatability<br />
(Browsing/<br />
Grazing)<br />
Active<br />
Growth<br />
Period<br />
Pollinator<br />
Value<br />
Benefits to<br />
Pollinators<br />
Pollinators<br />
Propagation<br />
Commercially<br />
Available<br />
Herb,<br />
perennial<br />
Asclepias viridis<br />
green<br />
milkweed<br />
Asclepiadaceae<br />
KS MO OK TX KS,MO,OK,TX 2–3 Green Yes Jun–Aug Sun, Part<br />
Shade<br />
Dry<br />
Coarse,<br />
Medium<br />
Medium Very High Adult food<br />
(pollen<br />
and/or<br />
nectar);<br />
Larval food<br />
Native bees;<br />
Honey bees;<br />
Bumble bees;<br />
Butterflies;<br />
Monarchs; Flies,<br />
beetles, and<br />
wasps<br />
Yes<br />
Herb,<br />
perennial<br />
Baptisia alba var.<br />
macrophylla<br />
white wild<br />
indigo<br />
Fabaceae IA KS MO OK IA,KS,MO,OK 3–6 White Yes May–Jun Sun Moist, Dry Medium,<br />
Fine<br />
Medium Very High Adult food<br />
(pollen<br />
and/or<br />
nectar)<br />
Native bees;<br />
Bumble bees<br />
Yes<br />
Herb,<br />
perennial<br />
Baptisia australis<br />
blue false<br />
indigo<br />
Fabaceae IA KS MO OK TX IA,KS,MO,OK,TX 1.5–2 White Yes Apr–Jun Sun Moist, Dry Medium Very High Adult food<br />
(pollen<br />
and/or<br />
nectar)<br />
Native bees;<br />
Bumble bees<br />
Yes<br />
Herb,<br />
perennial<br />
Baptisia bracteata<br />
cream wild<br />
indigo<br />
Fabaceae IA KS MN MO OK TX IA,KS,MN,MO,OK,TX 1.5–2 White Yes Apr–May Sun Dry Medium Very High Adult food<br />
(pollen<br />
and/or<br />
nectar)<br />
Native bees;<br />
Bumble bees<br />
Yes<br />
Herb,<br />
perennial<br />
Callirhoe<br />
involucrata<br />
purple poppy<br />
mallow<br />
Malvaceae KS MO OK TX KS,MO,OK,TX 1 Purple Yes Mar–Jun Sun, Part<br />
Shade<br />
Dry<br />
Coarse,<br />
Medium,<br />
Fine<br />
Low<br />
Spring and<br />
Summer<br />
Very High<br />
Adult food<br />
(pollen<br />
and/or<br />
nectar)<br />
Native bees;<br />
Flies, beetles,<br />
and wasps<br />
Seed,<br />
Cutting,<br />
Sprig<br />
Yes<br />
Herb,<br />
perennial<br />
Chelone glabra<br />
white<br />
turtlehead<br />
Scrophulariaceae<br />
IA MN MO IA,MN,MO 1–4 White Yes Jul–Sep Sun, Part<br />
Shade,<br />
Shade<br />
Wet Medium Very High Adult food<br />
(pollen<br />
and/or<br />
nectar)<br />
Bumble<br />
bees; Moths;<br />
Hummingbirds<br />
Yes<br />
Herb,<br />
perennial<br />
Conoclinium<br />
coelestinum<br />
blue mistflower<br />
Asteraceae MO OK TX MO,OK,TX 1.5–3 Blue Yes Jun–Aug Part Shade,<br />
Shade<br />
Wet, Moist<br />
Medium,<br />
Fine<br />
None /Low Summer Very High Adult food<br />
(pollen<br />
and/or<br />
nectar)<br />
Native bees;<br />
Honey bees;<br />
Butterflies; Flies,<br />
beetles, and<br />
wasps<br />
Seed,<br />
Sprig<br />
Yes<br />
Herb,<br />
perennial<br />
Coreopsis<br />
lanceolata<br />
lanceleaf<br />
coreopsis<br />
Asteraceae KS MO OK TX KS,MO,OK,TX 1–3 Yellow Yes Apr–Jun Sun Moist, Dry Medium,<br />
Fine<br />
None Low/Low Spring and<br />
Summer<br />
High<br />
Adult food<br />
(pollen<br />
and/or<br />
nectar)<br />
Native bees;<br />
Flies, beetles,<br />
and wasps<br />
Seed,<br />
Container<br />
Yes<br />
Herb,<br />
perennial<br />
Dalea candida<br />
white prairie<br />
clover<br />
Fabaceae IA KS MN MO OK TX IA,KS,MN,MO,OK,TX 1–2 White Yes May–Sep Sun Dry Medium,<br />
Fine<br />
High/High<br />
Spring and<br />
Summer<br />
Very High<br />
Adult food<br />
(pollen<br />
and/or<br />
nectar)<br />
Native bees;<br />
Honey bees;<br />
Bumble bees<br />
Yes<br />
Herb,<br />
perennial<br />
Dalea purpurea<br />
purple prairie<br />
clover<br />
Fabaceae IA KS MN MO OK TX IA,KS,MN,MO,OK,TX "46,47,48,<br />
49,50,51,<br />
52"<br />
1–2.5 Purple Yes Jul–Aug Sun Dry Coarse,<br />
Medium,<br />
Fine<br />
Medium<br />
Medium/<br />
Medium<br />
Spring and<br />
Summer<br />
Very High<br />
Adult food<br />
(pollen<br />
and/or<br />
nectar)<br />
Native bees;<br />
Honey bees;<br />
Bumble bees<br />
Yes<br />
Herb,<br />
perennial<br />
Desmanthus<br />
illinoensis<br />
Illinois<br />
bundleflower<br />
Fabaceae KS MO OK TX KS,MO,OK,TX 3 White Yes May–Jul Sun Moist, Dry Coarse,<br />
Medium,<br />
Fine<br />
None High/High Spring and<br />
Summer<br />
High<br />
Adult food<br />
(pollen<br />
and/or<br />
nectar);<br />
Larval food<br />
Native bees;<br />
Flies<br />
Seed<br />
Yes<br />
<strong>Roadside</strong> <strong>Revegetation</strong>: An Integrated Approach to Establishing Native Plants and Pollinator Habitat<br />
446
APPENDIX<br />
Native <strong>Revegetation</strong> Plants for Pollinators in the I-35 Corridor, continued...<br />
Plant Type Scientific Name Common Name Plant Family IA KS MN MO OK TX All States Eco- Region<br />
(EPA III)<br />
Height<br />
(feet)<br />
Flower<br />
Color<br />
Showy Flowering Sun<br />
Exposure<br />
Soil<br />
Moisture<br />
Soil Texture<br />
Salt<br />
Toleranc e<br />
Palatability<br />
(Browsing/<br />
Grazing)<br />
Active<br />
Growth<br />
Period<br />
Pollinator<br />
Value<br />
Benefits to<br />
Pollinators<br />
Pollinators<br />
Propagation<br />
Commercially<br />
Available<br />
Herb,<br />
perennial<br />
Echinacea<br />
angustifolia<br />
narrowleaf<br />
coneflower<br />
Asteraceae KS OK TX KS,OK,TX 2–3 Pink Yes May–Jul Sun, Part<br />
Shade<br />
Dry<br />
Coarse,<br />
Medium,<br />
Fine<br />
Very High<br />
Adult food<br />
(pollen<br />
and/or<br />
nectar)<br />
Native bees;<br />
Honey bees;<br />
Butterflies<br />
and moths;<br />
Monarchs<br />
Yes<br />
Herb,<br />
perennial<br />
Echinacea pallida<br />
pale purple<br />
coneflower<br />
Asteraceae IA KS MO OK IA,KS,MO,OK 2.5–4 Purple Yes Jun–Aug Sun Dry Coarse,<br />
Medium,<br />
Fine<br />
Low Low/Low Spring and<br />
Summer<br />
Very High<br />
Adult food<br />
(pollen<br />
and/or<br />
nectar)<br />
Native bees;<br />
Honey bees;<br />
Butterflies<br />
and moths;<br />
Monarchs<br />
Seed<br />
Yes<br />
Herb,<br />
perennial<br />
Echinacea<br />
purpurea<br />
purple<br />
coneflower<br />
Asteraceae IA MO OK IA,MO,OK 2.5–4 Purple Yes Jun–Aug Sun Dry Medium,<br />
Fine<br />
Medium Low/Low Spring and<br />
Summer<br />
Very High<br />
Adult food<br />
(pollen<br />
and/or<br />
nectar)<br />
Native bees;<br />
Honey bees;<br />
Butterflies<br />
and moths;<br />
Monarchs;<br />
Hummingbirds<br />
Seed<br />
Yes<br />
Herb,<br />
perennial<br />
Eryngium<br />
yuccifolium<br />
rattlesnake<br />
master<br />
Apiaceae IA KS MN MO OK TX IA,KS,MN,MO,OK,TX 3–5 White No Jul–Sep Sun, Part<br />
Shade<br />
Wet, Moist,<br />
Dry<br />
Very High<br />
Adult food<br />
(pollen<br />
and/or<br />
nectar)<br />
Native bees;<br />
Flies, beetles,<br />
and wasps<br />
Yes<br />
Herb,<br />
perennial<br />
Eupatorium<br />
perfoliatum<br />
common<br />
boneset<br />
Asteraceae IA KS MN MO OK TX IA,KS,MN,MO,OK,TX 3–6 White Yes Jun–Oct Sun, Part<br />
Shade<br />
Wet, Moist<br />
Coarse,<br />
Medium,<br />
Fine<br />
Very High<br />
Adult food<br />
(pollen<br />
and/or<br />
nectar)<br />
Native bees;<br />
Butterflies<br />
and moths;<br />
Monarchs; Flies,<br />
beetles, and<br />
wasps<br />
Yes<br />
Herb,<br />
perennial<br />
Euthamia<br />
graminifolia<br />
flat-top<br />
goldentop<br />
Asteraceae IA MN MO IA,MN,MO 2–4 Yellow Yes Jul–Sep Sun, Part<br />
Shade<br />
Wet, Moist Medium Very High Adult food<br />
(pollen<br />
and/or<br />
nectar)<br />
Native bees;<br />
Flies, beetles,<br />
and wasps<br />
Yes<br />
Herb,<br />
perennial<br />
Eutrochium<br />
fistulosum<br />
joe pye weed Asteraceae OK TX OK,TX 3–7 Pink Yes Jul–Sep Sun Wet, Moist Medium,<br />
Fine<br />
None Low/Low Summer Very High Adult food<br />
(pollen<br />
and/or<br />
nectar)<br />
Native bees;<br />
Monarchs; Flies<br />
and beetles<br />
Container,<br />
Bare<br />
root,<br />
Sprig<br />
Yes<br />
Herb,<br />
perennial<br />
Eutrochium<br />
maculatum<br />
spotted joe<br />
pye weed<br />
Asteraceae MN MN 4–8 Pink Yes Jul–Sep Sun, Part<br />
Shade<br />
Wet<br />
Coarse,<br />
Medium,<br />
Fine<br />
Very High<br />
Adult food<br />
(pollen<br />
and/or<br />
nectar)<br />
Native bees;<br />
Monarchs; Flies,<br />
beetles, and<br />
wasps<br />
Yes<br />
Herb,<br />
perennial<br />
Gentiana<br />
andrewsii<br />
bottle gentian<br />
Gentianaceae<br />
IA MN IA,MN 1–2 Blue Yes Aug–Oct Sun Moist Medium None Low/Low Spring,<br />
Summer,<br />
Fall<br />
Very High<br />
Adult food<br />
(pollen<br />
and/or<br />
nectar)<br />
Bumble bees Seed Yes<br />
Herb,<br />
perennial<br />
Geranium maculatum<br />
wild geranium Geraniaceae IA MN MO IA,MN,MO 1–3 Pink Yes Apr–May Sun, Part<br />
Shade<br />
Moist, Dry High Adult food<br />
(pollen<br />
and/or<br />
nectar)<br />
Native bees;<br />
Bumble bees;<br />
Flies, beetles,<br />
and wasps<br />
Yes<br />
Herb,<br />
perennial<br />
Helianthus<br />
maximiliani<br />
maximilian<br />
sunflower<br />
Asteraceae IA KS MN MO OK TX IA,KS,MN,MO,OK,TX 3–8 Yellow Yes Aug–Nov Sun Moist, Dry Coarse,<br />
Medium,<br />
Fine<br />
Low<br />
High/<br />
Medium<br />
Summer<br />
and Fall<br />
Very High<br />
Adult food<br />
(pollen<br />
and/or<br />
nectar)<br />
Native bees;<br />
Honey bees;<br />
Flies, beetles,<br />
and wasps<br />
Seed,<br />
Bare<br />
root,<br />
Sprig<br />
Yes<br />
<strong>Roadside</strong> <strong>Revegetation</strong>: An Integrated Approach to Establishing Native Plants and Pollinator Habitat<br />
447
APPENDIX<br />
Native <strong>Revegetation</strong> Plants for Pollinators in the I-35 Corridor, continued...<br />
Plant Type Scientific Name Common Name Plant Family IA KS MN MO OK TX All States Eco- Region<br />
(EPA III)<br />
Height<br />
(feet)<br />
Flower<br />
Color<br />
Showy Flowering Sun<br />
Exposure<br />
Soil<br />
Moisture<br />
Soil Texture<br />
Salt<br />
Toleranc e<br />
Palatability<br />
(Browsing/<br />
Grazing)<br />
Active<br />
Growth<br />
Period<br />
Pollinator<br />
Value<br />
Benefits to<br />
Pollinators<br />
Pollinators<br />
Propagation<br />
Commercially<br />
Available<br />
Herb,<br />
perennial<br />
Helianthus<br />
pauciflorus<br />
stiff sunflower Asteraceae IA KS MN MO IA,KS,MN,MO "46,47,48,<br />
49,50,51,<br />
52"<br />
1–4 Yellow Yes Jul–Aug Sun Dry Coarse,<br />
Medium,<br />
Fine<br />
Medium Very High Adult food<br />
(pollen<br />
and/or<br />
nectar)<br />
Native bees;<br />
Flies, beetles,<br />
and wasps<br />
Yes<br />
Herb,<br />
perennial<br />
Helianthus<br />
tuberosus<br />
Jerusalem<br />
artichoke<br />
Asteraceae IA KS MN MO IA,KS,MN,MO 6–10 Yellow Yes Jul–Sep Sun, Part<br />
Shade<br />
Moist, Dry<br />
Coarse,<br />
Medium<br />
Low High/High Spring and<br />
Summer<br />
Very High<br />
Adult food<br />
(pollen<br />
and/or<br />
nectar)<br />
Native bees;<br />
Flies, beetles,<br />
and wasps<br />
Seed,<br />
Tuber<br />
Yes<br />
Herb,<br />
perennial<br />
Heliopsis<br />
helianthoides<br />
smooth oxeye Asteraceae IA KS MN MO IA,KS,MN,MO 3–5 Yellow Yes Jun–Aug Sun Moist, Dry Coarse,<br />
Medium,<br />
Fine<br />
Medium/<br />
Medium<br />
Spring and<br />
Summer<br />
Very High<br />
Adult food<br />
(pollen<br />
and/or<br />
nectar)<br />
Native bees;<br />
Bumble bees;<br />
Butterflies and<br />
moths; Flies,<br />
beetles, and<br />
wasps<br />
Yes<br />
Herb,<br />
perennial<br />
Hibiscus laevis<br />
halberdleaf<br />
rosemallow<br />
Malvaceae IA KS MO OK TX IA,KS,MO,OK,TX 8 White Yes Jun–Aug Sun, Part<br />
Shade<br />
Wet<br />
Medium,<br />
Fine<br />
None Low/Low Spring,<br />
Summer,<br />
Fall<br />
Very High<br />
Adult food<br />
(pollen<br />
and/or<br />
nectar)<br />
Native bees;<br />
Bumble bees;<br />
Hummingbirds<br />
Seed,<br />
Container,<br />
Bare<br />
root,<br />
Cutting<br />
Yes<br />
Herb,<br />
perennial<br />
Liatris aspera<br />
rough blazing<br />
star<br />
Asteraceae IA KS MN MO OK TX IA,KS,MN,MO,OK,TX "46,47,48,<br />
51,52"<br />
2–3 Purple Yes Jul–Sep Sun, Part<br />
Shade<br />
Dry<br />
Coarse,<br />
Medium<br />
Medium Very High Adult food<br />
(pollen<br />
and/or<br />
nectar)<br />
Native bees;<br />
Bumble bees;<br />
Hummingbirds<br />
Yes<br />
Herb,<br />
perennial<br />
Liatris ligulistylis<br />
Rocky<br />
Mountain<br />
blazing star<br />
Asteraceae MN MN 1–3 Purple Yes Jul–Sep Sun Wet, Moist,<br />
Dry<br />
Coarse,<br />
Medium<br />
Very High<br />
Adult food<br />
(pollen<br />
and/or<br />
nectar)<br />
Native bees;<br />
Honey bees;<br />
Bumble bees;<br />
Butterflies;<br />
Monarchs<br />
Yes<br />
Herb,<br />
perennial<br />
Liatris punctata<br />
dotted blazing<br />
star<br />
Asteraceae IA KS MN OK TX IA,KS,MN,OK,TX "46,47,48,<br />
51,52"<br />
1–2 Purple Yes Jul–Sep Sun Dry Coarse,<br />
Medium,<br />
Fine<br />
Medium High/High Summer Very High Adult food<br />
(pollen<br />
and/or<br />
nectar)<br />
Native bees;<br />
Bumble bees;<br />
Hummingbirds<br />
Seed,<br />
Container,<br />
Corm<br />
Yes<br />
Herb,<br />
perennial<br />
Liatris pycnostachya<br />
prairie blazing<br />
star<br />
Asteraceae IA KS MN MO OK TX IA,KS,MN,MO,OK,TX 3–5 Purple Yes Jul–Sep Sun Wet, Moist,<br />
Dry<br />
Coarse,<br />
Medium,<br />
Fine<br />
None<br />
Medium/<br />
Low<br />
Summer Very High Adult food<br />
(pollen<br />
and/or<br />
nectar)<br />
Native bees;<br />
Butterflies<br />
and moths;<br />
Hummingbirds<br />
Seed,<br />
Container,<br />
Corm<br />
Yes<br />
Herb,<br />
perennial<br />
Lilium michiganense<br />
Michigan lily Liliaceae IA MN MO IA,MN,MO 2–6 Orange Yes Jun–Jul Sun, Part<br />
Shade<br />
Wet, Moist<br />
Coarse,<br />
Medium,<br />
Fine<br />
Very High<br />
Adult food<br />
(pollen<br />
and/or<br />
nectar)<br />
Native bees;<br />
Butterflies;<br />
Hummingbirds<br />
Yes<br />
Herb,<br />
perennial<br />
Lobelia cardinalis cardinal flower Campanulaceae<br />
KS MO OK TX KS,MO,OK,TX 2–4 Red Yes Jun–Aug Part Shade,<br />
Shade<br />
Wet, Moist Medium None Medium/<br />
Medium<br />
Spring Very High Adult food<br />
(pollen<br />
and/or<br />
nectar)<br />
Butterflies;<br />
Hummingbirds<br />
Seed,<br />
Container<br />
Yes<br />
Herb,<br />
perennial<br />
Lobelia siphilitica<br />
great blue<br />
lobelia<br />
Campanulaceae<br />
IA KS MN MO IA,KS,MN,MO 1–3 Blue Yes Jun–Aug Sun Wet, Moist Very High Adult food<br />
(pollen<br />
and/or<br />
nectar)<br />
Native bees;<br />
Bumble bees;<br />
Butterflies<br />
and moths;<br />
Flies, beetles,<br />
and wasps;<br />
Hummingbirds<br />
Yes<br />
<strong>Roadside</strong> <strong>Revegetation</strong>: An Integrated Approach to Establishing Native Plants and Pollinator Habitat<br />
448
APPENDIX<br />
Native <strong>Revegetation</strong> Plants for Pollinators in the I-35 Corridor, continued...<br />
Plant Type Scientific Name Common Name Plant Family IA KS MN MO OK TX All States Eco- Region<br />
(EPA III)<br />
Height<br />
(feet)<br />
Flower<br />
Color<br />
Showy Flowering Sun<br />
Exposure<br />
Soil<br />
Moisture<br />
Soil Texture<br />
Salt<br />
Toleranc e<br />
Palatability<br />
(Browsing/<br />
Grazing)<br />
Active<br />
Growth<br />
Period<br />
Pollinator<br />
Value<br />
Benefits to<br />
Pollinators<br />
Pollinators<br />
Propagation<br />
Commercially<br />
Available<br />
Herb,<br />
perennial<br />
Lupinus perennis wild lupine Fabaceae MN MN 1–2 Blue Yes Apr–Jun Sun Dry Medium Very High Adult food<br />
(pollen<br />
and/or<br />
nectar)<br />
Native bees;<br />
Bumble bees<br />
Yes<br />
Herb,<br />
perennial<br />
Mimulus ringens<br />
Allegheny<br />
monkeyflower<br />
Scrophulariaceae<br />
IA KS MN MO IA,KS,MN,MO 1–4 Blue Yes Jun–Sep Sun, Part<br />
Shade<br />
Wet Medium Very High Adult food<br />
(pollen<br />
and/or<br />
nectar)<br />
Bumble bees;<br />
Hummingbirds<br />
Yes<br />
Herb,<br />
perennial<br />
Monarda fistulosa wild bergamot Lamiaceae IA KS MN MO OK TX IA,KS,MN,MO,OK,TX "46,47,48,<br />
49,50,51,<br />
52"<br />
2–4 Purple Yes Jul–Aug Sun, Part<br />
Shade<br />
Moist, Dry<br />
Coarse,<br />
Medium,<br />
Fine<br />
Medium<br />
Medium/<br />
Medium<br />
Spring Very High Adult food<br />
(pollen<br />
and/or<br />
nectar)<br />
Native bees;<br />
Bumble bees;<br />
Hummingbirds<br />
Seed,<br />
Container<br />
Yes<br />
Herb,<br />
perennial<br />
Oenothera macrocarpa<br />
bigfruit<br />
evening<br />
primrose<br />
Onagraceae KS MO OK TX KS,MO,OK,TX 1–1.5 Yellow Yes Apr–Aug Sun Dry Coarse,<br />
Medium<br />
Very High<br />
Adult food<br />
(pollen<br />
and/or<br />
nectar)<br />
Native bees;<br />
Moths<br />
Yes<br />
Herb,<br />
perennial<br />
Oenothera<br />
speciosa<br />
pink evening<br />
primrose<br />
Onagraceae KS MO OK TX KS,MO,OK,TX 1–1.5 Pink Yes May–Jul Sun Dry Coarse,<br />
Medium,<br />
Fine<br />
High<br />
Adult food<br />
(pollen<br />
and/or<br />
nectar)<br />
Native bees;<br />
Butterflies and<br />
moths<br />
Yes<br />
Herb,<br />
perennial<br />
Oligoneuron<br />
rigidum var.<br />
rigidum<br />
stiff goldenrod Asteraceae IA KS MN MO OK TX IA,KS,MN,MO,OK,TX "46,47,48,<br />
49,50,51,<br />
52"<br />
1–5 Yellow Yes Aug–Sep Sun, Part<br />
Shade<br />
Dry<br />
Coarse,<br />
Medium,<br />
Fine<br />
Medium Low/Low Spring and<br />
Summer<br />
Very High<br />
Adult food<br />
(pollen<br />
and/or<br />
nectar)<br />
Native bees;<br />
Honey bees;<br />
Flies, beetles,<br />
and wasps<br />
Seed,<br />
Bare<br />
root,<br />
Sprig<br />
Yes<br />
Herb,<br />
perennial<br />
Penstemon<br />
cobaea<br />
prairie<br />
penstemon<br />
Scrophulariaceae<br />
KS OK TX KS,OK,TX 1–2 Purple Yes May–Jul Sun Dry Coarse,<br />
Medium<br />
Medium Very High Adult food<br />
(pollen<br />
and/or<br />
nectar)<br />
Native bees;<br />
Bumble bees;<br />
Hummingbirds<br />
Yes<br />
Herb,<br />
perennial<br />
Penstemon<br />
digitalis<br />
smooth beard<br />
tongue<br />
Scrophulariaceae<br />
KS MO OK KS,MO,OK 2–3 White Yes Jun–Jul Sun Wet, Moist,<br />
Dry<br />
Coarse,<br />
Medium<br />
Medium<br />
Medium/<br />
Low<br />
Spring and<br />
Summer<br />
Very High<br />
Adult food<br />
(pollen<br />
and/or<br />
nectar)<br />
Native bees;<br />
Bumble bees;<br />
Hummingbirds<br />
Seed,<br />
Container,<br />
Sprig<br />
Yes<br />
Herb,<br />
perennial<br />
Penstemon<br />
gracilis<br />
lilac penstemon<br />
Scrophulariaceae<br />
MN MN 1–2 Lavender<br />
Yes May–Jun Part Shade Moist, Dry Coarse Very High Adult food<br />
(pollen<br />
and/or<br />
nectar)<br />
Native bees;<br />
Hummingbirds<br />
Yes<br />
Herb,<br />
perennial<br />
Penstemon<br />
grandiflorus<br />
large-flowered<br />
beard tongue<br />
Scrophulariaceae<br />
IA MN IA,MN "46,47,48,<br />
49,50,51,<br />
52"<br />
2–3 White Yes Jun–Jul Sun Dry Coarse,<br />
Medium<br />
Medium Very High Adult food<br />
(pollen<br />
and/or<br />
nectar)<br />
Native bees;<br />
Bumble bees;<br />
Hummingbirds<br />
Yes<br />
Herb,<br />
perennial<br />
Penstemon<br />
pallidus<br />
pale beardtongue<br />
Scrophulariaceae<br />
IA MO IA,MO 1–2.5 White Yes May–Jun Sun, Part<br />
Shade<br />
Moist, Dry<br />
Coarse,<br />
Medium<br />
Very High<br />
Adult food<br />
(pollen<br />
and/or<br />
nectar)<br />
Native bees;<br />
Bumble bees;<br />
Hummingbirds<br />
Yes<br />
Herb,<br />
perennial<br />
Penstemon<br />
tubaeflorus<br />
white wand<br />
beardtongue<br />
Scrophulariaceae<br />
KS MO OK KS,MO,OK 1–3 White Yes May–Jun Sun Dry Coarse Very High Adult food<br />
(pollen<br />
and/or<br />
nectar)<br />
Native bees;<br />
Bumble bees;<br />
Butterflies;<br />
Hummingbirds<br />
Yes<br />
<strong>Roadside</strong> <strong>Revegetation</strong>: An Integrated Approach to Establishing Native Plants and Pollinator Habitat<br />
449
APPENDIX<br />
Native <strong>Revegetation</strong> Plants for Pollinators in the I-35 Corridor, continued...<br />
Plant Type Scientific Name Common Name Plant Family IA KS MN MO OK TX All States Eco- Region<br />
(EPA III)<br />
Height<br />
(feet)<br />
Flower<br />
Color<br />
Showy Flowering Sun<br />
Exposure<br />
Soil<br />
Moisture<br />
Soil Texture<br />
Salt<br />
Toleranc e<br />
Palatability<br />
(Browsing/<br />
Grazing)<br />
Active<br />
Growth<br />
Period<br />
Pollinator<br />
Value<br />
Benefits to<br />
Pollinators<br />
Pollinators<br />
Propagation<br />
Commercially<br />
Available<br />
Herb,<br />
perennial<br />
Phlox divaricata<br />
wild blue<br />
phlox<br />
IA KS MN MO IA,KS,MN,MO 3 Purple Yes Jun–Aug Sun, Part<br />
Shade<br />
Moist, Dry<br />
Coarse,<br />
Medium,<br />
Fine<br />
None Low/Low Spring and<br />
Summer<br />
Very High<br />
Adult food<br />
(pollen<br />
and/or<br />
nectar)<br />
Moths; Flies,<br />
beetles,<br />
and wasps;<br />
Hummingbirds<br />
Polemoniaceae<br />
Container,<br />
Sprig<br />
Yes<br />
Herb,<br />
perennial<br />
Phlox pilosa downy phlox Polemoniaceae<br />
IA KS MN MO OK TX IA,KS,MN,MO,OK,TX 1–2 Pink Yes Mar–May Sun, Part<br />
Shade<br />
Moist, Dry Coarse Very High Adult food<br />
(pollen<br />
and/or<br />
nectar)<br />
Native bees;<br />
Bumble bees;<br />
Butterflies and<br />
moths; Flies;<br />
Hummingbirds<br />
Yes<br />
Herb,<br />
perennial<br />
Physostegia<br />
virginiana<br />
obedient plant Lamiaceae IA KS MN MO IA,KS,MN,MO 2–4 Lavender<br />
Yes Jun–Sep Sun, Part<br />
Shade<br />
Wet, Moist<br />
Coarse,<br />
Medium<br />
Very High<br />
Adult food<br />
(pollen<br />
and/or<br />
nectar)<br />
Native bees;<br />
Hummingbirds<br />
Yes<br />
Herb,<br />
perennial<br />
Potentilla arguta tall cinquefoil Rosaceae IA KS MN MO IA,KS,MN,MO 3 Yellow Yes May–Jun Sun, Part<br />
Shade<br />
Dry Medium None Low/Low Spring and<br />
Summer<br />
High<br />
Adult food<br />
(pollen<br />
and/or<br />
nectar)<br />
Native bees;<br />
Flies<br />
Seed,<br />
Bare<br />
root<br />
Yes<br />
Herb,<br />
perennial<br />
Pycnanthemum<br />
tenuifolium<br />
narrowleaf<br />
mountain mint<br />
Lamiaceae IA KS MO OK TX IA,KS,MO,OK,TX 1–3 White No Jun–Aug Sun Wet, Moist,<br />
Dry<br />
Very High<br />
Adult food<br />
(pollen<br />
and/or<br />
nectar)<br />
Native bees;<br />
Honey bees;<br />
Bumble bees;<br />
Flies, beetles,<br />
and wasps<br />
Yes<br />
Herb,<br />
perennial<br />
Pycnanthemum<br />
virginianum<br />
Virginia<br />
mountain mint<br />
Lamiaceae IA MN MO IA,MN,MO 1–3 White No Jun–Aug Sun Moist Very High Adult food<br />
(pollen<br />
and/or<br />
nectar)<br />
Native bees;<br />
Honey bees;<br />
Bumble bees;<br />
Flies, beetles,<br />
and wasps<br />
Yes<br />
Herb,<br />
perennial<br />
Ratibida<br />
columnifera<br />
Mexican hat Asteraceae IA KS MN OK TX IA,KS,MN,OK,TX 1–3 Yellow Yes May–Oct Sun Dry Coarse,<br />
Medium,<br />
Fine<br />
Medium<br />
Medium/<br />
Medium<br />
Summer Very High Adult food<br />
(pollen<br />
and/or<br />
nectar)<br />
Native bees<br />
Seed,<br />
Container<br />
Yes<br />
Herb,<br />
perennial<br />
Ratibida pinnata<br />
gray-headed<br />
coneflower<br />
Asteraceae IA KS MN MO OK IA,KS,MN,MO,OK 3–5 Yellow Yes Jun–Aug Sun Moist, Dry Coarse,<br />
Medium,<br />
Fine<br />
Medium<br />
Medium/<br />
Medium<br />
Spring and<br />
Summer<br />
Very High<br />
Adult food<br />
(pollen<br />
and/or<br />
nectar)<br />
Native bees<br />
Seed,<br />
Container<br />
Yes<br />
Herb,<br />
perennial<br />
Rudbeckia hirta<br />
black-eyed<br />
susan<br />
Asteraceae IA KS MN MO OK TX IA,KS,MN,MO,OK,TX 2–3 Yellow Yes Jun–Aug Sun, Part<br />
Shade<br />
Moist, Dry<br />
Coarse,<br />
Medium,<br />
Fine<br />
Medium Low/Low Fall, Winter<br />
and Spring<br />
Very High<br />
Adult food<br />
(pollen<br />
and/or<br />
nectar)<br />
Native bees;<br />
Butterflies<br />
Seed<br />
Yes<br />
Herb,<br />
perennial<br />
Rudbeckia<br />
laciniata<br />
cutleaf<br />
coneflower<br />
Asteraceae IA KS MN MO IA,KS,MN,MO 3–12 Yellow Yes Jul–Sep Sun, Part<br />
Shade,<br />
Shade<br />
Moist, Dry<br />
Coarse,<br />
Medium,<br />
Fine<br />
None High/High Spring Very High Adult food<br />
(pollen<br />
and/or<br />
nectar)<br />
Native bees;<br />
Honey bees;<br />
Butterflies<br />
Seed,<br />
Container<br />
Yes<br />
Herb,<br />
perennial<br />
Rudbeckia<br />
missouriensis<br />
Missouri<br />
coneflower<br />
Asteraceae MO MO 1–2.5 Yellow Yes Jul–Sep Sun Moist, Dry Coarse,<br />
Medium,<br />
Fine<br />
Medium Very High Adult food<br />
(pollen<br />
and/or<br />
nectar)<br />
Native bees;<br />
Butterflies<br />
Yes<br />
Herb,<br />
perennial<br />
Salvia azurea<br />
azure blue<br />
sage<br />
Lamiaceae KS OK TX KS,OK,TX 3–6 Blue Yes Sep–Nov Part Shade Dry Coarse,<br />
Medium,<br />
Fine<br />
Medium/<br />
Low<br />
Spring and<br />
Summer<br />
Very High<br />
Adult food<br />
(pollen<br />
and/or<br />
nectar)<br />
Native bees;<br />
Bumble bees;<br />
Hummingbirds<br />
Yes<br />
<strong>Roadside</strong> <strong>Revegetation</strong>: An Integrated Approach to Establishing Native Plants and Pollinator Habitat<br />
450
APPENDIX<br />
Native <strong>Revegetation</strong> Plants for Pollinators in the I-35 Corridor, continued...<br />
Plant Type Scientific Name Common Name Plant Family IA KS MN MO OK TX All States Eco- Region<br />
(EPA III)<br />
Height<br />
(feet)<br />
Flower<br />
Color<br />
Showy Flowering Sun<br />
Exposure<br />
Soil<br />
Moisture<br />
Soil Texture<br />
Salt<br />
Toleranc e<br />
Palatability<br />
(Browsing/<br />
Grazing)<br />
Active<br />
Growth<br />
Period<br />
Pollinator<br />
Value<br />
Benefits to<br />
Pollinators<br />
Pollinators<br />
Propagation<br />
Commercially<br />
Available<br />
Herb,<br />
perennial<br />
Salvia lyrata lyreleaf sage Lamiaceae OK TX OK,TX 1–2 Blue Yes Mar–Jun Sun, Part<br />
Shade<br />
Wet, Moist,<br />
Dry<br />
Coarse,<br />
Medium<br />
Very High<br />
Adult food<br />
(pollen<br />
and/or<br />
nectar)<br />
Bumble bees;<br />
Butterflies;<br />
Hummingbirds<br />
Yes<br />
Herb,<br />
perennial<br />
Scrophularia<br />
lanceolata<br />
lanceleaf<br />
figwort<br />
Scrophulariaceae<br />
IA MN IA,MN 4–6 Purple No May–Jul Sun, Part<br />
Shade<br />
Wet, Moist,<br />
Dry<br />
Coarse,<br />
Medium<br />
Medium<br />
Adult food<br />
(pollen<br />
and/or<br />
nectar)<br />
Native bees;<br />
Wasps<br />
Yes<br />
Herb,<br />
perennial<br />
Scrophularia<br />
marilandica<br />
carpenter's<br />
square<br />
Scrophulariaceae<br />
IA KS MO IA,KS,MO 5–10 Purple No Jul–Sep Sun, Part<br />
Shade<br />
Moist, Dry<br />
Coarse,<br />
Medium<br />
Medium<br />
Adult food<br />
(pollen<br />
and/or<br />
nectar)<br />
Native bees;<br />
Wasps<br />
Yes<br />
Herb,<br />
perennial<br />
Scutellaria ovata<br />
heartleaf<br />
skullcap<br />
Lamiaceae KS MO OK KS,MO,OK 1–2 Blue Yes May–Sep Part Shade,<br />
Shade<br />
Moist, Dry<br />
Coarse,<br />
Medium<br />
Very High<br />
Adult food<br />
(pollen<br />
and/or<br />
nectar)<br />
Hummingbirds<br />
Yes<br />
Herb,<br />
perennial<br />
Senna marilandica<br />
Maryland<br />
senna<br />
Fabaceae KS MO OK TX KS,MO,OK,TX 3–6 Yellow Yes Jun–Aug Sun, Part<br />
Shade<br />
Wet, Moist<br />
Coarse,<br />
Medium<br />
None High/High Spring and<br />
Summer<br />
High<br />
Adult food<br />
(pollen<br />
and/or<br />
nectar)<br />
Bumble bees<br />
Seed,<br />
Container<br />
Yes<br />
Herb,<br />
perennial<br />
Silphium<br />
integrifolium<br />
wholeleaf<br />
rosinweed<br />
Asteraceae IA KS MO OK IA,KS,MO,OK 2–6 Yellow Yes Jul–Sep Sun Wet, Moist,<br />
Dry<br />
Very High<br />
Adult food<br />
(pollen<br />
and/or<br />
nectar)<br />
Native bees;<br />
Bumble bees;<br />
Butterflies; Flies,<br />
beetles, and<br />
wasps<br />
Yes<br />
Herb,<br />
perennial<br />
Silphium<br />
perfoliatum<br />
cup plant Asteraceae IA KS MN MO IA,KS,MN,MO 3–8 Yellow Yes Jul–Sep Sun Moist Coarse,<br />
Medium,<br />
Fine<br />
Summer Very High Adult food<br />
(pollen<br />
and/or<br />
nectar);<br />
Nest<br />
material<br />
Native bees;<br />
Honey bees;<br />
Bumble bees;<br />
Butterflies; Flies,<br />
beetles, and<br />
wasps<br />
Seed,<br />
Container<br />
Yes<br />
Herb,<br />
perennial<br />
Solidago gigantea<br />
giant<br />
goldenrod<br />
Asteraceae IA KS MN MO OK TX IA,KS,MN,MO,OK,TX 3–7 Yellow Yes Sep–Nov Part Shade Moist Medium,<br />
Fine<br />
None Medium/ Summer Very High Adult food<br />
(pollen<br />
and/or<br />
nectar)<br />
Native bees;<br />
Honey bees;<br />
Butterflies; Flies,<br />
beetles, and<br />
wasps<br />
Seed<br />
Yes<br />
Herb,<br />
perennial<br />
Solidago<br />
nemoralis<br />
gray goldenrod<br />
Asteraceae IA KS MN MO OK TX IA,KS,MN,MO,OK,TX 4–5 Yellow Yes Aug–Sep Sun, Part<br />
Shade<br />
Dry<br />
Coarse,<br />
Medium,<br />
Fine<br />
Medium<br />
Medium/<br />
Medium<br />
Spring and<br />
Summer<br />
Very High<br />
Adult food<br />
(pollen<br />
and/or<br />
nectar)<br />
Native bees;<br />
Honey bees;<br />
Butterflies; Flies,<br />
beetles, and<br />
wasps<br />
Seed,<br />
Container,<br />
Cutting<br />
Yes<br />
Herb,<br />
perennial<br />
Solidago rugosa<br />
ssp. aspera<br />
cliff goldenrod Asteraceae MO MO "1.5–2.<br />
5"<br />
Yellow Yes Sep–Oct Sun, Part<br />
Shade<br />
Wet, Moist,<br />
Dry<br />
Coarse,<br />
Medium,<br />
Fine<br />
Medium Very High Adult food<br />
(pollen<br />
and/or<br />
nectar)<br />
Native bees;<br />
Honey bees;<br />
Butterflies; Flies,<br />
beetles, and<br />
wasps<br />
Yes<br />
Herb,<br />
perennial<br />
Solidago speciosa<br />
showy<br />
goldenrod<br />
Asteraceae IA KS MN MO OK TX IA,KS,MN,MO,OK,TX "46,47,48,<br />
50,51,52"<br />
1–4 Yellow Yes Aug–Sep Sun, Part<br />
Shade<br />
Dry<br />
Coarse,<br />
Medium,<br />
Fine<br />
Medium Very High Adult food<br />
(pollen<br />
and/or<br />
nectar)<br />
Native bees;<br />
Honey bees;<br />
Butterflies and<br />
moths; Flies,<br />
beetles, and<br />
wasps<br />
Yes<br />
<strong>Roadside</strong> <strong>Revegetation</strong>: An Integrated Approach to Establishing Native Plants and Pollinator Habitat<br />
451
APPENDIX<br />
Native <strong>Revegetation</strong> Plants for Pollinators in the I-35 Corridor, continued...<br />
Plant Type Scientific Name Common Name Plant Family IA KS MN MO OK TX All States Eco- Region<br />
(EPA III)<br />
Height<br />
(feet)<br />
Flower<br />
Color<br />
Showy Flowering Sun<br />
Exposure<br />
Soil<br />
Moisture<br />
Soil Texture<br />
Salt<br />
Toleranc e<br />
Palatability<br />
(Browsing/<br />
Grazing)<br />
Active<br />
Growth<br />
Period<br />
Pollinator<br />
Value<br />
Benefits to<br />
Pollinators<br />
Pollinators<br />
Propagation<br />
Commercially<br />
Available<br />
Herb,<br />
perennial<br />
Symphyotrichum<br />
ericoides var.<br />
ericoides<br />
heath aster Asteraceae IA KS MN MO OK TX IA,KS,MN,MO,OK,TX "46,47,48,<br />
49,50,51,<br />
52"<br />
1–3 White Yes Aug–Oct Sun, Part<br />
Shade<br />
Moist, Dry<br />
Coarse,<br />
Medium,<br />
Fine<br />
Medium Very High Adult food<br />
(pollen<br />
and/or<br />
nectar)<br />
Native bees;<br />
Butterflies and<br />
moths; Flies,<br />
beetles, and<br />
wasps<br />
Yes<br />
Herb,<br />
perennial<br />
Symphyotrichum<br />
laeve var. laeve<br />
smooth aster Asteraceae IA MN MO IA,MN,MO "46,47,48,<br />
50,51,52"<br />
1–3 Lavender<br />
Yes Aug–Oct Sun, Part<br />
Shade<br />
Moist, Dry<br />
Coarse,<br />
Medium,<br />
Fine<br />
Medium Low/Low Spring and<br />
Summer<br />
Very High<br />
Adult food<br />
(pollen<br />
and/or<br />
nectar)<br />
Native bees;<br />
Butterflies and<br />
moths<br />
Seed,<br />
Bare<br />
root<br />
Yes<br />
Herb,<br />
perennial<br />
Symphyotrichum<br />
lateriflorum<br />
calico aster Asteraceae IA KS MN MO OK TX IA,KS,MN,MO,OK,TX 1–3 White Yes Aug–Oct Sun Wet, Moist Low/High Spring,<br />
Summer,<br />
Fall<br />
Very High<br />
Adult food<br />
(pollen<br />
and/or<br />
nectar)<br />
Native bees;<br />
Butterflies and<br />
moths; Flies,<br />
beetles, and<br />
wasps<br />
Yes<br />
Herb,<br />
perennial<br />
Symphyotrichum<br />
novae-angliae<br />
New England<br />
aster<br />
Asteraceae IA KS MN MO IA,KS,MN,MO 2.5–6 Purple Yes Aug–Oct Sun Wet, Moist Very High Adult food<br />
(pollen<br />
and/or<br />
nectar)<br />
Native bees;<br />
Honey bees;<br />
Bumble bees;<br />
Butterflies and<br />
moths<br />
Yes<br />
Herb,<br />
perennial<br />
Symphyotrichum<br />
oblongifolium<br />
aromatic aster Asteraceae IA KS MN MO OK TX IA,KS,MN,MO,OK,TX "46,47,51,<br />
52"<br />
1–2 Lavender<br />
Yes Aug–Sep Sun Dry Coarse,<br />
Medium,<br />
Fine<br />
Low Very High Adult food<br />
(pollen<br />
and/or<br />
nectar)<br />
Native bees;<br />
Butterflies and<br />
moths; Flies,<br />
beetles, and<br />
wasps<br />
Yes<br />
Herb,<br />
perennial<br />
Symphyotrichum<br />
sericeum<br />
silky aster Asteraceae IA KS MN MO OK IA,KS,MN,MO,OK "46,47,48,<br />
51,52"<br />
1–2.5 Lavender<br />
Yes Aug–Oct Sun Dry Coarse,<br />
Medium<br />
Medium Very High Adult food<br />
(pollen<br />
and/or<br />
nectar)<br />
Native bees;<br />
Butterflies and<br />
moths<br />
Yes<br />
Herb,<br />
perennial<br />
Tradescantia<br />
occidentalis<br />
prairie<br />
spiderwort<br />
Commelinaceae<br />
KS OK TX KS,OK,TX 1–2 blue Yes Apr–Jun Sun Moist, Dry Medium High Adult food<br />
(pollen<br />
and/or<br />
nectar)<br />
Native bees;<br />
Flies, beetles,<br />
and wasps<br />
Yes<br />
Herb,<br />
perennial<br />
Verbesina<br />
alternifolia<br />
wingstem Asteraceae IA KS MO OK IA,KS,MO,OK 3–6 Yellow Yes Jul–Sep Sun Wet, Moist Very High Adult food<br />
(pollen<br />
and/or<br />
nectar)<br />
Native bees;<br />
Honey bees;<br />
Bumble bees;<br />
Butterflies<br />
and moths;<br />
Flies, beetles,<br />
and wasps;<br />
Hummingbirds<br />
Yes<br />
Herb,<br />
perennial<br />
Vernonia<br />
baldwinii<br />
Baldwin's<br />
ironweed<br />
Asteraceae IA KS MO OK TX IA,KS,MO,OK,TX 3–5 Purple Yes Jul–Nov Sun Moist Coarse,<br />
Medium,<br />
Fine<br />
Very High<br />
Adult food<br />
(pollen<br />
and/or<br />
nectar)<br />
Native bees;<br />
Butterflies<br />
and moths;<br />
Hummingbirds<br />
Yes<br />
Herb,<br />
perennial<br />
Vernonia<br />
fasciculata<br />
ironweed Asteraceae IA KS MN MO OK IA,KS,MN,MO,OK 4–5 Purple Yes Jul–Sep Sun Moist Coarse,<br />
Medium,<br />
Fine<br />
Very High<br />
Adult food<br />
(pollen<br />
and/or<br />
nectar)<br />
Native bees;<br />
Butterflies<br />
and moths;<br />
Hummingbirds<br />
Yes<br />
<strong>Roadside</strong> <strong>Revegetation</strong>: An Integrated Approach to Establishing Native Plants and Pollinator Habitat<br />
452
APPENDIX<br />
Native <strong>Revegetation</strong> Plants for Pollinators in the I-35 Corridor, continued...<br />
Plant Type Scientific Name Common Name Plant Family IA KS MN MO OK TX All States Eco- Region<br />
(EPA III)<br />
Height<br />
(feet)<br />
Flower<br />
Color<br />
Showy Flowering Sun<br />
Exposure<br />
Soil<br />
Moisture<br />
Soil Texture<br />
Salt<br />
Toleranc e<br />
Palatability<br />
(Browsing/<br />
Grazing)<br />
Active<br />
Growth<br />
Period<br />
Pollinator<br />
Value<br />
Benefits to<br />
Pollinators<br />
Pollinators<br />
Propagation<br />
Commercially<br />
Available<br />
Herb,<br />
perennial<br />
Vernonia<br />
missurica<br />
Missouri<br />
ironweed<br />
Asteraceae MO MO 4–5 Purple Yes Jul–Sep Sun Wet, Moist,<br />
Dry<br />
Coarse,<br />
Medium,<br />
Fine<br />
None Low/Low Spring and<br />
Summer<br />
Very High<br />
Adult food<br />
(pollen<br />
and/or<br />
nectar)<br />
Native bees;<br />
Butterflies<br />
and moths;<br />
Hummingbirds<br />
Seed,<br />
Container,<br />
Bare<br />
root,<br />
Sprig<br />
Yes<br />
Herb,<br />
perennial<br />
Veronicastrum<br />
virginicum<br />
Culver's root<br />
Scrophulariaceae<br />
IA KS MN MO OK IA,KS,MN,MO,OK 4–5 White Yes Jun–Aug Sun Wet, Moist,<br />
Dry<br />
Very High<br />
Adult food<br />
(pollen<br />
and/or<br />
nectar)<br />
Native bees;<br />
Honey bees;<br />
Flies, beetles,<br />
and wasps;<br />
Hummingbirds<br />
Yes<br />
Herb,<br />
perennial<br />
Zizia aptera meadow zizia Apiaceae MN MN 1–3 Yellow Yes May–Jun Sun, Part<br />
Shade,<br />
Shade<br />
Wet, Moist,<br />
Dry<br />
Coarse,<br />
Medium,<br />
Fine<br />
Very High<br />
Adult food<br />
(pollen<br />
and/or<br />
nectar)<br />
Native bees;<br />
Butterflies and<br />
moths; Flies,<br />
beetles, and<br />
wasps<br />
Yes<br />
Herb,<br />
perennial<br />
Zizia aurea golden zizia Apiaceae IA KS MN MO OK IA,KS,MN,MO,OK 1–3 Yellow Yes Apr–Aug Sun, Part<br />
Shade<br />
Wet, Moist,<br />
Dry<br />
Coarse,<br />
Medium<br />
Very High<br />
Adult food<br />
(pollen<br />
and/or<br />
nectar)<br />
Native bees;<br />
Butterflies and<br />
moths; Flies,<br />
beetles, and<br />
wasps<br />
Yes<br />
Shrub Aesculus pavia red buckeye Hippocastanaceae<br />
MO OK TX MO,OK,TX 25 Red Yes May–Jun Part Shade,<br />
Shade<br />
Wet, Moist,<br />
Dry<br />
Coarse,<br />
Medium,<br />
Fine<br />
None Low/Low Spring and<br />
Summer<br />
Very High<br />
Adult food<br />
(pollen<br />
and/or<br />
nectar)<br />
Bumble bees;<br />
Hummingbirds<br />
Seed,<br />
Container,<br />
Bare<br />
root<br />
Yes<br />
Shrub<br />
Amorpha<br />
canescens<br />
lead plant Fabaceae IA KS MN MO OK TX IA,KS,MN,MO,OK,TX "46,47,48,<br />
50,51,52"<br />
1.5–4 Purple Yes Jun–Aug Sun, Part<br />
Shade<br />
Dry<br />
Coarse,<br />
Medium<br />
Medium High/Low Spring and<br />
Summer<br />
Very High<br />
Adult food<br />
(pollen<br />
and/or<br />
nectar)<br />
Native bees;<br />
Honey bees;<br />
Flies, beetles,<br />
and wasps<br />
Seed,<br />
Container,<br />
Bare<br />
root,<br />
Cutting<br />
Yes<br />
Shrub<br />
Amorpha<br />
fruticosa<br />
false indigo<br />
bush<br />
Fabaceae KS OK TX KS,OK,TX 6–12 Purple Yes Apr–Jun Sun, Part<br />
Shade<br />
Moist<br />
Coarse,<br />
Medium,<br />
Fine<br />
Low Low/Low Spring and<br />
Summer<br />
Very High<br />
Adult food<br />
(pollen<br />
and/or<br />
nectar)<br />
Native bees;<br />
Flies, beetles,<br />
and wasps<br />
Seed,<br />
Container,<br />
Bare<br />
root<br />
Yes<br />
Shrub<br />
Ceanothus<br />
americanus<br />
New Jersey tea Rhamnaceae IA KS MN MO OK TX IA,KS,MN,MO,OK,TX "47,50,51,<br />
52"<br />
2–3 White Yes Jun–Jul Sun, Part<br />
Shade<br />
Dry<br />
Coarse,<br />
Medium<br />
High<br />
Medium/<br />
Low<br />
Spring and<br />
Summer<br />
Very High<br />
Adult food<br />
(pollen<br />
and/or<br />
nectar)<br />
Native bees;<br />
Flies, beetles,<br />
and wasps<br />
Seed,<br />
Container,<br />
Bare<br />
root<br />
Yes<br />
Shrub<br />
Cephalanthus<br />
occidentalis<br />
buttonbush Rubiaceae IA KS MO OK TX IA,KS,MO,OK,TX 12 White Yes Jun–Aug Sun, Part<br />
Shade<br />
Moist<br />
Coarse,<br />
Medium,<br />
Fine<br />
Low Low/Low Spring Very High Adult food<br />
(pollen<br />
and/or<br />
nectar)<br />
Native bees;<br />
Honey bees;<br />
Bumble bees;<br />
Hummingbirds<br />
Seed,<br />
Container,<br />
Bare<br />
root,<br />
Cutting<br />
Yes<br />
Shrub Opuntia humifusa devil's-tongue Cactaceae KS MO OK TX KS,MO,OK,TX 1–1.5 Yellow Yes May–Jul Sun Dry Coarse Very High Adult food<br />
(pollen<br />
and/or<br />
nectar)<br />
Native bees;<br />
Butterflies; Flies,<br />
beetles, and<br />
wasps<br />
Yes<br />
<strong>Roadside</strong> <strong>Revegetation</strong>: An Integrated Approach to Establishing Native Plants and Pollinator Habitat<br />
453
APPENDIX<br />
Native <strong>Revegetation</strong> Plants for Pollinators in the I-35 Corridor, continued...<br />
Plant Type Scientific Name Common Name Plant Family IA KS MN MO OK TX All States Eco- Region<br />
(EPA III)<br />
Height<br />
(feet)<br />
Flower<br />
Color<br />
Showy Flowering Sun<br />
Exposure<br />
Soil<br />
Moisture<br />
Soil Texture<br />
Salt<br />
Toleranc e<br />
Palatability<br />
(Browsing/<br />
Grazing)<br />
Active<br />
Growth<br />
Period<br />
Pollinator<br />
Value<br />
Benefits to<br />
Pollinators<br />
Pollinators<br />
Propagation<br />
Commercially<br />
Available<br />
Shrub<br />
Physocarpus<br />
opulifolius<br />
ninebark Rosaceae IA MN MO IA,MN,MO 8 White Yes Apr–Jun Sun, Part<br />
Shade<br />
Moist<br />
Coarse,<br />
Medium,<br />
Fine<br />
None Low/ Spring and<br />
Summer<br />
Very High<br />
Adult food<br />
(pollen<br />
and/or<br />
nectar)<br />
Native bees;<br />
Honey bees<br />
Seed,<br />
Container,<br />
Bare<br />
root,<br />
Cutting<br />
Yes<br />
Shrub Rhus aromatica fragrant sumac Anacardiaceae<br />
KS MO OK TX KS,MO,OK,TX 2-6 Green No Apr–Jun Sun, Part<br />
Shade,<br />
Shade<br />
Moist, Dry<br />
Coarse,<br />
Medium<br />
Low/Low<br />
Spring and<br />
Summer<br />
High<br />
Adult food<br />
(pollen<br />
and/or<br />
nectar);<br />
Nest<br />
material<br />
Native bees;<br />
Honey bees;<br />
Flies, beetles,<br />
and wasps<br />
Yes<br />
Shrub Rhus glabra smooth sumac Anacardiaceae<br />
IA KS MN MO OK TX IA,KS,MN,MO,OK,TX 12 Green Yes Apr–May Sun, Part<br />
Shade<br />
Dry<br />
Coarse,<br />
Medium<br />
Medium Low/Low Spring and<br />
Summer<br />
High<br />
Adult food<br />
(pollen<br />
and/or<br />
nectar);<br />
Nest<br />
material<br />
Native bees;<br />
Honey bees;<br />
Flies, beetles,<br />
and wasps<br />
Seed,<br />
Container,<br />
Bare<br />
root<br />
Yes<br />
Shrub Rhus typhina staghorn<br />
sumac<br />
Anacardiaceae<br />
MN MN 30 Green No May–Jun Sun, Part<br />
Shade<br />
Dry<br />
Coarse,<br />
Medium<br />
None<br />
Medium/<br />
Low<br />
Spring and<br />
Summer<br />
High<br />
Adult food<br />
(pollen<br />
and/or<br />
nectar);<br />
Nest<br />
material<br />
Native bees;<br />
Honey bees;<br />
Flies, beetles,<br />
and wasps<br />
Seed,<br />
Container,<br />
Bare<br />
root<br />
Yes<br />
Shrub Rosa arkansana prairie rose Rosaceae IA KS MN MO OK IA,KS,MN,MO,OK "46,47,48,<br />
49,50,51,<br />
52"<br />
2 White Yes Jun–Aug Sun, Part<br />
Shade<br />
Moist, Dry<br />
Coarse,<br />
Medium,<br />
Fine<br />
Very High<br />
Adult food<br />
(pollen<br />
and/or<br />
nectar);<br />
Nest<br />
material<br />
Native bees;<br />
Bumble bees;<br />
Flies, beetles,<br />
and wasps<br />
Yes<br />
Shrub Rosa carolina pasture rose Rosaceae IA KS MO OK TX IA,KS,MO,OK,TX 2 White Yes Jun–Aug Sun, Part<br />
Shade<br />
Moist, Dry<br />
Coarse,<br />
Medium,<br />
Fine<br />
Medium<br />
Medium/<br />
Medium<br />
Spring and<br />
Summer<br />
Very High<br />
Adult food<br />
(pollen<br />
and/or<br />
nectar);<br />
Nest<br />
material<br />
Native bees;<br />
Bumble bees;<br />
Flies, beetles,<br />
and wasps<br />
Seed,<br />
Container,<br />
Bare<br />
root<br />
Yes<br />
Shrub Salix discolor pussy willow Salicaceae IA KS MN MO OK IA,KS,MN,MO,OK 40 White Yes Dec–Feb Sun Wet, Moist Coarse,<br />
Medium,<br />
Fine<br />
None Medium/ Spring Very High Adult food<br />
(pollen<br />
and/or<br />
nectar)<br />
Native bees;<br />
Honey bees;<br />
Bumble bees;<br />
Butterflies<br />
Seed,<br />
Container,<br />
Bare<br />
root,<br />
Cutting<br />
Yes<br />
Shrub Salix humilis prairie willow Salicaceae IA KS MN MO OK IA,KS,MN,MO,OK 8 White No Mar–May Sun, Part<br />
Shade<br />
Moist, Dry<br />
Coarse,<br />
Medium,<br />
Fine<br />
Low<br />
Medium/<br />
Low<br />
Spring and<br />
Summer<br />
Very High<br />
Adult food<br />
(pollen<br />
and/or<br />
nectar)<br />
Native bees;<br />
Flies, beetles,<br />
and wasps<br />
Container,<br />
Bare<br />
root,<br />
Cutting<br />
Yes<br />
Shrub Salix interior sandbar willow Salicaceae IA MN IA, MN 30 White Yes Mar–Apr Sun Wet, Moist Fine None Medium/ Spring Very High Adult food<br />
(pollen<br />
and/or<br />
nectar)<br />
Native bees;<br />
Honey bees;<br />
Bumble bees;<br />
Butterflies<br />
Seed,<br />
Container,<br />
Bare<br />
root,<br />
Cutting,<br />
Sprig<br />
Yes<br />
<strong>Roadside</strong> <strong>Revegetation</strong>: An Integrated Approach to Establishing Native Plants and Pollinator Habitat<br />
454
APPENDIX<br />
Native <strong>Revegetation</strong> Plants for Pollinators in the I-35 Corridor, continued...<br />
Plant Type Scientific Name Common Name Plant Family IA KS MN MO OK TX All States Eco- Region<br />
(EPA III)<br />
Height<br />
(feet)<br />
Flower<br />
Color<br />
Showy Flowering Sun<br />
Exposure<br />
Soil<br />
Moisture<br />
Soil Texture<br />
Salt<br />
Toleranc e<br />
Palatability<br />
(Browsing/<br />
Grazing)<br />
Active<br />
Growth<br />
Period<br />
Pollinator<br />
Value<br />
Benefits to<br />
Pollinators<br />
Pollinators<br />
Propagation<br />
Commercially<br />
Available<br />
Shrub<br />
Sambucus nigra<br />
ssp. canadensis<br />
American black<br />
elderberry<br />
Caprifoliaceae<br />
IA KS MN MO OK TX IA,KS,MN,MO,OK,TX 12 White Yes Apr–May Sun, Part<br />
Shade<br />
Wet, Moist,<br />
Dry<br />
Medium None Medium/<br />
Low<br />
Spring and<br />
Summer<br />
Very High<br />
Adult food<br />
(pollen<br />
and/or<br />
nectar);<br />
Nest<br />
material<br />
Native bees;<br />
Flies, beetles,<br />
and wasps<br />
Seed,<br />
Container,<br />
Bare<br />
root<br />
Yes<br />
Shrub Spiraea alba white meadowsweet<br />
Rosaceae IA MN IA,MN 3 White Yes May–Jun Sun, Part<br />
Shade<br />
Wet, Moist<br />
Coarse,<br />
Medium,<br />
Fine<br />
None Low/Low Spring and<br />
Summer<br />
Very High<br />
Adult food<br />
(pollen<br />
and/or<br />
nectar)<br />
Native bees;<br />
Bumble bees;<br />
Flies, beetles,<br />
and wasps<br />
Seed,<br />
Container,<br />
Bare<br />
root<br />
Yes<br />
Tree Cercis canadensis eastern redbud Fabaceae KS MO OK TX KS,MO,OK,TX 20 Purple Yes Mar–Apr Sun, Part<br />
Shade<br />
Moist<br />
Coarse,<br />
Medium,<br />
Fine<br />
None<br />
Medium/<br />
Low<br />
Spring and<br />
Summer<br />
Very High<br />
Adult food<br />
(pollen<br />
and/or<br />
nectar);<br />
Nest<br />
material<br />
Native bees;<br />
Bumble bees;<br />
Seed,<br />
Container,<br />
Bare<br />
root,<br />
Cutting<br />
Yes<br />
Tree<br />
Crataegus<br />
crus-galli<br />
cockspur<br />
hawthorn<br />
Rosaceae KS MO OK TX KS,MO,OK,TX 30 White Yes Apr–May Sun Wet, Moist,<br />
Dry<br />
Coarse,<br />
Medium,<br />
Fine<br />
Medium<br />
Medium/<br />
Low<br />
Spring and<br />
Summer<br />
Very High<br />
Adult food<br />
(pollen<br />
and/or<br />
nectar)<br />
Native bees;<br />
Flies, beetles,<br />
and wasps<br />
Seed,<br />
Container,<br />
Bare<br />
root<br />
Yes<br />
Tree Crataegus mollis downy<br />
hawthorn<br />
Rosaceae IA KS MO OK IA,KS,MO,OK 30 White Yes Apr–May Sun Wet, Moist,<br />
Dry<br />
Coarse,<br />
Medium,<br />
Fine<br />
Medium Very High Adult food<br />
(pollen<br />
and/or<br />
nectar)<br />
Native bees;<br />
Flies, beetles,<br />
and wasps<br />
Yes<br />
Tree Prunus americana American plum Rosaceae IA KS MN MO OK IA,KS,MN,MO,OK 24 White Yes Apr–May Sun, Part<br />
Shade<br />
Dry<br />
Coarse,<br />
Medium<br />
Low<br />
Medium/<br />
Low<br />
Spring and<br />
Summer<br />
Very High<br />
Adult food<br />
(pollen<br />
and/or<br />
nectar)<br />
Native bees;<br />
Honey bees;<br />
Bumble bees<br />
Seed,<br />
Container,<br />
Bare<br />
root<br />
Yes<br />
Tree<br />
Prunus angustifolia<br />
Chickasaw<br />
plum<br />
Rosaceae KS MO OK TX KS,MO,OK,TX 25 White Yes Feb–May Sun, Part<br />
Shade<br />
Dry<br />
Medium,<br />
Fine<br />
Low<br />
Medium/<br />
Low<br />
Spring and<br />
Summer<br />
Very High<br />
Adult food<br />
(pollen<br />
and/or<br />
nectar)<br />
Native bees<br />
Seed,<br />
Container,<br />
Bare<br />
root<br />
Yes<br />
Tree Prunus serotina black cherry Rosaceae IA KS MN MO OK TX IA,KS,MN,MO,OK,TX 80 White Yes May–Jun Sun, Part<br />
Shade<br />
Moist, Dry<br />
Coarse,<br />
Medium<br />
Medium Low/Low Spring and<br />
Summer<br />
Very High<br />
Adult food<br />
(pollen<br />
and/or<br />
nectar)<br />
Native bees;<br />
Honey bees;<br />
Bumble bees;<br />
Flies, beetles,<br />
and wasps<br />
Seed,<br />
Container,<br />
Bare<br />
root<br />
Yes<br />
Vine<br />
Bignonia<br />
capreolata<br />
crossvine<br />
Bignoniaceae<br />
MO OK TX MO,OK,TX 10–50 Red Yes Mar–May Sun, Part<br />
Shade<br />
Wet, Moist<br />
Coarse,<br />
Medium,<br />
Fine<br />
High<br />
Adult food<br />
(pollen<br />
and/or<br />
nectar)<br />
Native bees;<br />
Hummingbirds<br />
Yes<br />
Vine Campsis radicans trumpet<br />
creeper<br />
Bignoniaceae<br />
KS MO OK TX KS,MO,OK,TX 2 Red Yes Jun–Aug Sun, Part<br />
Shade<br />
Wet, Moist,<br />
Dry<br />
Coarse,<br />
Medium<br />
None<br />
Spring and<br />
Summer<br />
Very High<br />
Adult food<br />
(pollen<br />
and/or<br />
nectar)<br />
Native bees;<br />
Honey bees;<br />
Bumble bees;<br />
Hummingbirds<br />
Seed,<br />
Container,<br />
Bare<br />
root,<br />
Cutting<br />
Yes<br />
<strong>Roadside</strong> <strong>Revegetation</strong>: An Integrated Approach to Establishing Native Plants and Pollinator Habitat<br />
455
APPENDIX<br />
Native <strong>Revegetation</strong> Plants for Pollinators in the I-35 Corridor, continued...<br />
Plant Type Scientific Name Common Name Plant Family IA KS MN MO OK TX All States Eco- Region<br />
(EPA III)<br />
Height<br />
(feet)<br />
Flower<br />
Color<br />
Showy Flowering Sun<br />
Exposure<br />
Soil<br />
Moisture<br />
Soil Texture<br />
Salt<br />
Toleranc e<br />
Palatability<br />
(Browsing/<br />
Grazing)<br />
Active<br />
Growth<br />
Period<br />
Pollinator<br />
Value<br />
Benefits to<br />
Pollinators<br />
Pollinators<br />
Propagation<br />
Commercially<br />
Available<br />
Vine<br />
Clematis<br />
virginiana<br />
devil's darning<br />
needles<br />
Ranunculaceae<br />
IA MN MO IA,MN,MO 15 White Yes Jun–Aug Sun, Part<br />
Shade<br />
Wet, Moist,<br />
Dry<br />
Medium,<br />
Fine<br />
None<br />
Spring and<br />
Summer<br />
Very High<br />
Adult food<br />
(pollen<br />
and/or<br />
nectar)<br />
Native bees;<br />
Honey bees;<br />
Flies, beetles,<br />
and wasps<br />
Seed,<br />
Container,<br />
Bare<br />
root,<br />
Cutting<br />
Yes<br />
Vine<br />
Lonicera<br />
sempervirens<br />
trumpet<br />
honeysuckle<br />
Caprifoliaceae<br />
TX TX 16 Red Yes Jul–Sep Part Shade,<br />
Shade<br />
Moist, Dry<br />
Medium,<br />
Fine<br />
None<br />
Medium/<br />
Medium<br />
Spring Very High Adult food<br />
(pollen<br />
and/or<br />
nectar)<br />
Bumble bees;<br />
Butterflies<br />
and Moths;<br />
Hummingbirds<br />
Seed,<br />
Container,<br />
Bare<br />
root<br />
Yes<br />
<strong>Roadside</strong> <strong>Revegetation</strong>: An Integrated Approach to Establishing Native Plants and Pollinator Habitat<br />
456
APPENDIX<br />
IOWA — NATIVE REVEGETATION PLANTS FOR POLLINATORS<br />
Plant Type Scientific Name Common Name Plant Family IA KS MN MO OK TX All States Eco- Region<br />
(EPA III)<br />
Height<br />
(feet)<br />
Flower<br />
Color<br />
Showy Flowering Sun<br />
Exposure<br />
Soil<br />
Moisture<br />
Soil Texture<br />
Salt<br />
Tolerance<br />
Palatability<br />
(Browsing/<br />
Grazing)<br />
Active<br />
Growth<br />
Period<br />
Pollinator<br />
Value<br />
Benefits to<br />
Pollinators<br />
Pollinators<br />
Propagation<br />
Commercially<br />
Available<br />
Grass,<br />
perennial<br />
Andropogon<br />
gerardii<br />
big bluestem Poaceae IA KS MN MO OK TX IA,KS,MN,MO,OK,TX "46,47,48,<br />
49,50,51,<br />
52"<br />
3–8 Green No May–Jun Sun, Part<br />
Shade<br />
Dry<br />
Coarse,<br />
Medium,<br />
Fine<br />
Medium<br />
Medium/<br />
High<br />
Summer Low Nest<br />
material;<br />
Shelter<br />
Seed<br />
Yes<br />
Grass,<br />
perennial<br />
Andropogon<br />
virginicus<br />
broomsedge Poaceae IA MO IA,MO 2–3 Green No May–Jun Sun, Part<br />
Shade<br />
Moist,<br />
Dry<br />
Coarse,<br />
Medium,<br />
Fine<br />
Medium Low/Low Summer Low Nest<br />
material;<br />
Shelter<br />
Seed<br />
Yes<br />
Grass,<br />
perennial<br />
Bouteloua<br />
curtipendula<br />
side-oats<br />
grama<br />
Poaceae IA KS MN MO OK TX IA,KS,MN,MO,OK,TX "46,47,48,<br />
51,52"<br />
1–3 Green No Jul–Sep Sun, Part<br />
Shade<br />
Dry<br />
Coarse,<br />
Medium,<br />
Fine<br />
Medium<br />
Medium/<br />
High<br />
Summer Low Nest<br />
material;<br />
Shelter<br />
Seed<br />
Yes<br />
Grass,<br />
perennial<br />
Bouteloua<br />
dactyloides<br />
buffalo grass Poaceae IA KS MO OK TX IA,KS,MO,OK,TX 0.5–1 Green No Jul–Aug Sun Moist,<br />
Dry<br />
Coarse,<br />
Medium,<br />
Fine<br />
Medium<br />
Medium/<br />
High<br />
Summer Low Nest<br />
material;<br />
Shelter<br />
Seed,<br />
Sprig<br />
Yes<br />
Grass,<br />
perennial<br />
Bouteloua gracilis blue grama Poaceae IA KS MN MO OK TX IA,KS,MN,MO,OK,TX 464,748<br />
5,152<br />
0.5–1.5 Green No May–Jul Sun Dry Coarse,<br />
Medium,<br />
Fine<br />
Medium High/High Summer<br />
and Fall<br />
Low<br />
Nest<br />
material;<br />
Shelter<br />
Seed<br />
Yes<br />
Grass,<br />
perennial<br />
Elymus canadensis<br />
nodding wild<br />
rye<br />
Poaceae IA KS MN MO OK TX IA,KS,MN,MO,OK,TX "46,47,48,<br />
49,50,51,<br />
52"<br />
3–5 Green No Jul–Aug Sun, Part<br />
Shade<br />
Moist,<br />
Dry<br />
Coarse,<br />
Medium,<br />
Fine<br />
Medium<br />
Medium/<br />
Medium<br />
Spring,<br />
Summer,<br />
Fall<br />
Low Shelter Seed Yes<br />
Grass,<br />
perennial<br />
Panicum virgatum switchgrass Poaceae IA KS MO OK TX IA,KS,MO,OK,TX 3–6 Green No Jul–Aug Sun, Part<br />
Shade<br />
Wet,<br />
Moist,<br />
Dry<br />
Coarse,<br />
Medium,<br />
Fine<br />
Medium<br />
Medium/<br />
High<br />
Summer Low Shelter Seed Yes<br />
Grass,<br />
perennial<br />
Schizachyrium<br />
scoparium<br />
little bluestem Poaceae IA KS MN MO OK TX IA,KS,MN,MO,OK,TX "46,47,48,<br />
49,50,51,<br />
52"<br />
1–2.5 Green No Aug–Sep Sun, Part<br />
Shade<br />
Moist,<br />
Dry<br />
Coarse,<br />
Medium,<br />
Fine<br />
Medium<br />
Medium/<br />
High<br />
Summer<br />
and Fall<br />
Low<br />
Nest<br />
material;<br />
Shelter<br />
Seed<br />
Yes<br />
Grass,<br />
perennial<br />
Sorghastrum<br />
nutans<br />
Indian grass Poaceae IA KS MN MO OK TX IA,KS,MN,MO,OK,TX "46,47,48,<br />
51,52"<br />
3–8 Green No Jul–Sep Sun Moist,<br />
Dry<br />
Coarse,<br />
Medium,<br />
Fine<br />
Medium<br />
Medium/<br />
High<br />
Summer<br />
and Fall<br />
Low<br />
Nest<br />
material;<br />
Shelter<br />
Seed<br />
Yes<br />
Grass,<br />
perennial<br />
Sporobolus<br />
heterolepis<br />
prairie<br />
dropseed<br />
Poaceae IA KS MN MO OK TX IA,KS,MN,MO,OK,TX "46,47,48,<br />
51,52"<br />
1.5–4 Green No Aug–Sep Sun Moist Coarse,<br />
Medium<br />
None<br />
Low/<br />
Medium<br />
Spring and<br />
Summer<br />
Low<br />
Nest<br />
material;<br />
Shelter<br />
Seed<br />
Yes<br />
Herb,<br />
annual<br />
Chamaecrista<br />
fasciculata<br />
partridge pea Fabaceae IA KS MN MO OK TX IA,KS,MN,MO,OK,TX "46,47,51,<br />
52"<br />
1–3 Yellow Yes Jul–Sep Sun, Part<br />
Shade<br />
Moist,<br />
Dry<br />
Coarse,<br />
Medium,<br />
Fine<br />
Low<br />
High/<br />
Medium<br />
Spring<br />
Very<br />
High<br />
Adult food<br />
(pollen<br />
and/or<br />
nectar)<br />
Native bees; Bumble<br />
bees; Flies, beetles,<br />
and wasps<br />
Seed<br />
Yes<br />
Herb,<br />
annual<br />
Impatiens<br />
capensis<br />
jewelweed<br />
Balsaminaceae<br />
IA KS MN MO IA,KS,MN,MO 2–5 Orange Yes Jun–Oct Part Shade,<br />
Shade<br />
Wet,<br />
Moist<br />
Coarse,<br />
Medium,<br />
Fine<br />
None Summer Very<br />
High<br />
Adult food<br />
(pollen<br />
and/or<br />
nectar)<br />
Bumble bees;<br />
Butterflies and Moths;<br />
Hummingbirds<br />
Seed<br />
Yes<br />
Herb,<br />
annual or<br />
perennial<br />
Gaura longiflora<br />
longflower<br />
beeblossom<br />
Onagraceae IA KS MO OK TX IA,KS,MO,OK,TX 2–3 White Yes Jul–Sep Sun Dry Very<br />
High<br />
Adult food<br />
(pollen<br />
and/or<br />
nectar)<br />
Bumble bees; Moths;<br />
Hummingbirds<br />
Yes<br />
<strong>Roadside</strong> <strong>Revegetation</strong>: An Integrated Approach to Establishing Native Plants and Pollinator Habitat<br />
457
APPENDIX<br />
Iowa — Native <strong>Revegetation</strong> Plants for Pollinators, continued...<br />
Plant Type Scientific Name Common Name Plant Family IA KS MN MO OK TX All States Eco- Region<br />
(EPA III)<br />
Height<br />
(feet)<br />
Flower<br />
Color<br />
Showy Flowering Sun<br />
Exposure<br />
Soil<br />
Moisture<br />
Soil Texture<br />
Salt<br />
Tolerance<br />
Palatability<br />
(Browsing/<br />
Grazing)<br />
Active<br />
Growth<br />
Period<br />
Pollinator<br />
Value<br />
Benefits to<br />
Pollinators<br />
Pollinators<br />
Propagation<br />
Commercially<br />
Available<br />
Herb,<br />
annual or<br />
perennial<br />
Verbena stricta hoary vervain Verbenaceae IA KS MN MO OK IA,KS,MN,MO,OK 2–3 White Yes Jun–Sep Sun Dry Coarse,<br />
Medium,<br />
Fine<br />
Very<br />
High<br />
Adult food<br />
(pollen<br />
and/or<br />
nectar)<br />
Native bees; Butterflies<br />
and moths;<br />
Hummingbirds<br />
Yes<br />
Herb,<br />
biennial<br />
Castilleja coccinea<br />
Indian<br />
paintbrush<br />
Scrophulariaceae<br />
IA KS MO IA,KS,MO 1–1.5 Red Yes Jul–Sep Sun, Part<br />
Shade<br />
Wet,<br />
Moist,<br />
Dry<br />
Coarse,<br />
Medium,<br />
Fine<br />
Low<br />
Spring and<br />
Summer<br />
Very<br />
High<br />
Adult food<br />
(pollen<br />
and/or<br />
nectar)<br />
Hummingbirds Seed Yes<br />
Herb,<br />
biennial or<br />
perennial<br />
Cirsium discolor field thistle Asteraceae IA KS MN MO IA,KS,MN,MO 3–8 Purple Yes Aug–Oct Sun Moist Very<br />
High<br />
Adult food<br />
(pollen<br />
and/or<br />
nectar)<br />
Native bees; Bumble<br />
bees; Butterflies<br />
and moths; Flies,<br />
beetles, and wasps;<br />
Hummingbirds<br />
Yes<br />
Herb,<br />
biennial or<br />
perennial<br />
Verbena hastata<br />
swamp<br />
verbena<br />
Verbenaceae IA KS MN MO OK IA,KS,MN,MO,OK 3–5 Lavender<br />
Yes Jul–Sep Sun, Part<br />
Shade<br />
Wet,<br />
Moist<br />
Coarse,<br />
Medium<br />
Very<br />
High<br />
Adult food<br />
(pollen<br />
and/or<br />
nectar)<br />
Native bees; Butterflies;<br />
Hummingbirds<br />
Yes<br />
Herb,<br />
perennial<br />
Achillea<br />
millefolium<br />
common<br />
yarrow<br />
Asteraceae IA KS MN MO OK TX IA,KS,MN,MO,OK,TX 3 White Yes May–Jul Sun, Part<br />
Shade<br />
Moist,<br />
Dry<br />
Medium Low Medium/<br />
Low<br />
Spring High Adult food<br />
(pollen<br />
and/or<br />
nectar);<br />
Nest<br />
material<br />
Native bees; Flies,<br />
beetles, and wasps<br />
Seed,<br />
Container,<br />
Sprig<br />
Yes<br />
Herb,<br />
perennial<br />
IA MN IA,MN 2–3 White Yes Apr–Jun Sun, Part<br />
Shade,<br />
Shade<br />
Moist,<br />
Dry<br />
Medium<br />
Actaea rubra red baneberry Ranunculaceae<br />
Medium<br />
Adult food<br />
(pollen<br />
and/or<br />
nectar)<br />
Flies and beetles<br />
Yes<br />
Herb,<br />
perennial<br />
Agastache<br />
nepetoides<br />
yellow giant<br />
hyssop<br />
Lamiaceae IA MO IA,MO 2–4 Yellow Yes Jun–Aug Sun, Part<br />
Shade<br />
Moist,<br />
Dry<br />
Coarse,<br />
Medium,<br />
Fine<br />
Medium<br />
Very<br />
High<br />
Adult food<br />
(pollen<br />
and/or<br />
nectar)<br />
Native bees; Bumble<br />
bees; Flies, beetles,<br />
and wasps; Hummingbirds<br />
Yes<br />
Herb,<br />
perennial<br />
Aquilegia<br />
canadensis<br />
red columbine<br />
Ranunculaceae<br />
IA KS MN MO OK IA,KS,MN,MO,OK 1–2 Red Yes Apr–May Sun, Part<br />
Shade<br />
Wet,<br />
Moist,<br />
Dry<br />
Coarse,<br />
Medium<br />
Very<br />
High<br />
Adult food<br />
(pollen<br />
and/or<br />
nectar)<br />
Bumble bees; Butterflies;<br />
Hummingbirds<br />
Yes<br />
Herb,<br />
perennial<br />
Asclepias<br />
incarnata<br />
swamp<br />
milkweed<br />
Asclepiadaceae<br />
IA KS MO OK TX IA,KS,MO,OK,TX 3–4 Purple Yes Jun–Sep Sun, Part<br />
Shade<br />
Moist<br />
Coarse,<br />
Medium,<br />
Fine<br />
Medium /Low Spring Very<br />
High<br />
Adult food<br />
(pollen<br />
and/or<br />
nectar);<br />
Larval food<br />
Native bees; Honey<br />
bees; Bumble bees;<br />
Butterflies; Monarchs;<br />
Flies, beetles, and<br />
wasps; Hummingbirds<br />
Seed,<br />
Sprig<br />
Yes<br />
Herb,<br />
perennial<br />
Asclepias<br />
purpurascens<br />
purple<br />
milkweed<br />
Asclepiadaceae<br />
IA KS MO IA,KS,MO 2–3 Purple Yes May–Jul Sun Moist,<br />
Dry<br />
Coarse,<br />
Medium<br />
Very<br />
High<br />
Adult food<br />
(pollen<br />
and/or<br />
nectar);<br />
Larval food<br />
Native bees; Honey<br />
bees; Bumble bees;<br />
Butterflies and moths;<br />
Monarchs; Flies,<br />
beetles, and wasps;<br />
Hummingbirds<br />
Yes<br />
Herb,<br />
perennial<br />
Asclepias syriaca<br />
common<br />
milkweed<br />
Asclepiadaceae<br />
IA KS MN MO OK IA,KS,MN,MO,OK "46,47,48,<br />
49,50,51,<br />
52"<br />
2.5–4 Purple Yes Jun–Aug Sun, Part<br />
Shade<br />
Moist,<br />
Dry<br />
Coarse,<br />
Medium,<br />
Fine<br />
Medium<br />
Very<br />
High<br />
Adult food<br />
(pollen<br />
and/or<br />
nectar);<br />
Larval food<br />
Native bees; Honey<br />
bees; Bumble bees;<br />
Butterflies; Monarchs;<br />
Flies, beetles, and<br />
wasps<br />
Yes<br />
<strong>Roadside</strong> <strong>Revegetation</strong>: An Integrated Approach to Establishing Native Plants and Pollinator Habitat<br />
458
APPENDIX<br />
Iowa — Native <strong>Revegetation</strong> Plants for Pollinators, continued...<br />
Plant Type Scientific Name Common Name Plant Family IA KS MN MO OK TX All States Eco- Region<br />
(EPA III)<br />
Height<br />
(feet)<br />
Flower<br />
Color<br />
Showy Flowering Sun<br />
Exposure<br />
Soil<br />
Moisture<br />
Soil Texture<br />
Salt<br />
Tolerance<br />
Palatability<br />
(Browsing/<br />
Grazing)<br />
Active<br />
Growth<br />
Period<br />
Pollinator<br />
Value<br />
Benefits to<br />
Pollinators<br />
Pollinators<br />
Propagation<br />
Commercially<br />
Available<br />
Herb,<br />
perennial<br />
Asclepias<br />
tuberosa<br />
butterfly<br />
milkweed<br />
Asclepiadaceae<br />
IA KS MN MO OK TX IA,KS,MN,MO,OK,TX "46,47,50,<br />
51,52"<br />
2–3 Orange Yes Jun–Aug Sun, Part<br />
Shade<br />
Dry<br />
Coarse,<br />
Medium<br />
Medium Low/Low Spring and<br />
Summer<br />
Very<br />
High<br />
Adult food<br />
(pollen<br />
and/or<br />
nectar);<br />
Larval food<br />
Native bees; Honey<br />
bees; Bumble bees;<br />
Butterflies; Monarchs;<br />
Flies, beetles, and<br />
wasps; Hummingbirds<br />
Seed,<br />
Container<br />
Yes<br />
Herb,<br />
perennial<br />
Asclepias<br />
verticillata<br />
whorled<br />
milkweed<br />
Asclepiadaceae<br />
IA KS MN MO OK TX IA,KS,MN,MO,OK,TX "46,47,48,<br />
51,52"<br />
1–2 Purple No Jun–Sep Sun, Part<br />
Shade<br />
Moist,<br />
Dry<br />
Coarse,<br />
Medium,<br />
Fine<br />
Medium<br />
Very<br />
High<br />
Adult food<br />
(pollen<br />
and/or<br />
nectar);<br />
Larval food<br />
Native bees; Honey<br />
bees; Bumble bees;<br />
Butterflies; Monarchs;<br />
Flies, beetles, and<br />
wasps<br />
Yes<br />
Herb,<br />
perennial<br />
Baptisia alba var.<br />
macrophylla<br />
white wild<br />
indigo<br />
Fabaceae IA KS MO OK IA,KS,MO,OK 3–6 White Yes May–Jun Sun Moist,<br />
Dry<br />
Medium,<br />
Fine<br />
Medium<br />
Very<br />
High<br />
Adult food<br />
(pollen<br />
and/or<br />
nectar)<br />
Native bees; Bumble<br />
bees<br />
Yes<br />
Herb,<br />
perennial<br />
Baptisia australis<br />
blue false<br />
indigo<br />
Fabaceae IA KS MO OK TX IA,KS,MO,OK,TX 1.5–2 White Yes Apr–Jun Sun Moist,<br />
Dry<br />
Medium<br />
Very<br />
High<br />
Adult food<br />
(pollen<br />
and/or<br />
nectar)<br />
Native bees; Bumble<br />
bees<br />
Yes<br />
Herb,<br />
perennial<br />
Baptisia bracteata<br />
cream wild<br />
indigo<br />
Fabaceae IA KS MN MO OK TX IA,KS,MN,MO,OK,TX 1.5–2 White Yes Apr–May Sun Dry Medium Very<br />
High<br />
Adult food<br />
(pollen<br />
and/or<br />
nectar)<br />
Native bees; Bumble<br />
bees<br />
Yes<br />
Herb,<br />
perennial<br />
Chelone glabra<br />
white<br />
turtlehead<br />
Scrophulariaceae<br />
IA MN MO IA,MN,MO 1–4 White Yes Jul–Sep Sun, Part<br />
Shade,<br />
Shade<br />
Wet Medium Very<br />
High<br />
Adult food<br />
(pollen<br />
and/or<br />
nectar)<br />
Bumble bees; Moths;<br />
Hummingbirds<br />
Yes<br />
Herb,<br />
perennial<br />
Dalea candida<br />
white prairie<br />
clover<br />
Fabaceae IA KS MN MO OK TX IA,KS,MN,MO,OK,TX 1–2 White Yes May–Sep Sun Dry Medium,<br />
Fine<br />
High/High<br />
Spring and<br />
Summer<br />
Very<br />
High<br />
Adult food<br />
(pollen<br />
and/or<br />
nectar)<br />
Native bees; Honey<br />
bees; Bumble bees<br />
Yes<br />
Herb,<br />
perennial<br />
Dalea purpurea<br />
purple prairie<br />
clover<br />
Fabaceae IA KS MN MO OK TX IA,KS,MN,MO,OK,TX "46,47,48,<br />
49,50,51,<br />
52"<br />
1–2.5 Purple Yes Jul–Aug Sun Dry Coarse,<br />
Medium,<br />
Fine<br />
Medium<br />
Medium/<br />
Medium<br />
Spring and<br />
Summer<br />
Very<br />
High<br />
Adult food<br />
(pollen<br />
and/or<br />
nectar)<br />
Native bees; Honey<br />
bees; Bumble bees<br />
Yes<br />
Herb,<br />
perennial<br />
Echinacea pallida<br />
pale purple<br />
coneflower<br />
Asteraceae IA KS MO OK IA,KS,MO,OK 2.5–4 Purple Yes Jun–Aug Sun Dry Coarse,<br />
Medium,<br />
Fine<br />
Low Low/Low Spring and<br />
Summer<br />
Very<br />
High<br />
Adult food<br />
(pollen<br />
and/or<br />
nectar)<br />
Native bees; Honey<br />
bees; Butterflies and<br />
moths; Monarchs<br />
Seed<br />
Yes<br />
Herb,<br />
perennial<br />
Echinacea<br />
purpurea<br />
purple<br />
coneflower<br />
Asteraceae IA MO OK IA,MO,OK 2.5–4 Purple Yes Jun–Aug Sun Dry Medium,<br />
Fine<br />
Medium Low/Low Spring and<br />
Summer<br />
Very<br />
High<br />
Adult food<br />
(pollen<br />
and/or<br />
nectar)<br />
Native bees; Honey<br />
bees; Butterflies and<br />
moths; Monarchs;<br />
Hummingbirds<br />
Seed<br />
Yes<br />
Herb,<br />
perennial<br />
Eryngium<br />
yuccifolium<br />
rattlesnake<br />
master<br />
Apiaceae IA KS MN MO OK TX IA,KS,MN,MO,OK,TX 3–5 White No Jul–Sep Sun, Part<br />
Shade<br />
Wet,<br />
Moist,<br />
Dry<br />
Very<br />
High<br />
Adult food<br />
(pollen<br />
and/or<br />
nectar)<br />
Native bees; Flies,<br />
beetles, and wasps<br />
Yes<br />
Herb,<br />
perennial<br />
Eupatorium<br />
perfoliatum<br />
common<br />
boneset<br />
Asteraceae IA KS MN MO OK TX IA,KS,MN,MO,OK,TX 3–6 White Yes Jun–Oct Sun, Part<br />
Shade<br />
Wet,<br />
Moist<br />
Coarse,<br />
Medium,<br />
Fine<br />
Very<br />
High<br />
Adult food<br />
(pollen<br />
and/or<br />
nectar)<br />
Native bees; Butterflies<br />
and moths;<br />
Monarchs; Flies,<br />
beetles, and wasps<br />
Yes<br />
<strong>Roadside</strong> <strong>Revegetation</strong>: An Integrated Approach to Establishing Native Plants and Pollinator Habitat<br />
459
APPENDIX<br />
Iowa — Native <strong>Revegetation</strong> Plants for Pollinators, continued...<br />
Plant Type Scientific Name Common Name Plant Family IA KS MN MO OK TX All States Eco- Region<br />
(EPA III)<br />
Height<br />
(feet)<br />
Flower<br />
Color<br />
Showy Flowering Sun<br />
Exposure<br />
Soil<br />
Moisture<br />
Soil Texture<br />
Salt<br />
Tolerance<br />
Palatability<br />
(Browsing/<br />
Grazing)<br />
Active<br />
Growth<br />
Period<br />
Pollinator<br />
Value<br />
Benefits to<br />
Pollinators<br />
Pollinators<br />
Propagation<br />
Commercially<br />
Available<br />
Herb,<br />
perennial<br />
Euthamia<br />
graminifolia<br />
flat-top<br />
goldentop<br />
Asteraceae IA MN MO IA,MN,MO 2–4 Yellow Yes Jul–Sep Sun, Part<br />
Shade<br />
Wet,<br />
Moist<br />
Medium<br />
Very<br />
High<br />
Adult food<br />
(pollen<br />
and/or<br />
nectar)<br />
Native bees; Flies,<br />
beetles, and wasps<br />
Yes<br />
Herb,<br />
perennial<br />
Gentiana<br />
andrewsii<br />
bottle gentian<br />
Gentianaceae<br />
IA MN IA,MN 1–2 Blue Yes Aug–Oct Sun Moist Medium None Low/Low Spring,<br />
Summer,<br />
Fall<br />
Very<br />
High<br />
Adult food<br />
(pollen<br />
and/or<br />
nectar)<br />
Bumble bees Seed Yes<br />
Herb,<br />
perennial<br />
Geranium maculatum<br />
wild geranium Geraniaceae IA MN MO IA,MN,MO 1–3 Pink Yes Apr–May Sun, Part<br />
Shade<br />
Moist,<br />
Dry<br />
High<br />
Adult food<br />
(pollen<br />
and/or<br />
nectar)<br />
Native bees; Bumble<br />
bees; Flies, beetles,<br />
and wasps<br />
Yes<br />
Herb,<br />
perennial<br />
Helianthus<br />
maximiliani<br />
maximilian<br />
sunflower<br />
Asteraceae IA KS MN MO OK TX IA,KS,MN,MO,OK,TX 3–8 Yellow Yes Aug–Nov Sun Moist,<br />
Dry<br />
Coarse,<br />
Medium,<br />
Fine<br />
Low<br />
High/<br />
Medium<br />
Summer<br />
and Fall<br />
Very<br />
High<br />
Adult food<br />
(pollen<br />
and/or<br />
nectar)<br />
Native bees; Honey<br />
bees; Flies, beetles,<br />
and wasps<br />
Seed,<br />
Bare<br />
root,<br />
Sprig<br />
Yes<br />
Herb,<br />
perennial<br />
Helianthus<br />
pauciflorus<br />
stiff sunflower Asteraceae IA KS MN MO IA,KS,MN,MO "46,47,48,<br />
49,50,51,<br />
52"<br />
1–4 Yellow Yes Jul–Aug Sun Dry Coarse,<br />
Medium,<br />
Fine<br />
Medium<br />
Very<br />
High<br />
Adult food<br />
(pollen<br />
and/or<br />
nectar)<br />
Native bees; Flies,<br />
beetles, and wasps<br />
Yes<br />
Herb,<br />
perennial<br />
Helianthus<br />
tuberosus<br />
Jerusalem<br />
artichoke<br />
Asteraceae IA KS MN MO IA,KS,MN,MO 6–10 Yellow Yes Jul–Sep Sun, Part<br />
Shade<br />
Moist,<br />
Dry<br />
Coarse,<br />
Medium<br />
Low High/High Spring and<br />
Summer<br />
Very<br />
High<br />
Adult food<br />
(pollen<br />
and/or<br />
nectar)<br />
Native bees; Flies,<br />
beetles, and wasps<br />
Seed,<br />
Tuber<br />
Yes<br />
Herb,<br />
perennial<br />
Heliopsis<br />
helianthoides<br />
smooth oxeye Asteraceae IA KS MN MO IA,KS,MN,MO 3–5 Yellow Yes Jun–Aug Sun Moist,<br />
Dry<br />
Coarse,<br />
Medium,<br />
Fine<br />
Medium/<br />
Medium<br />
Spring and<br />
Summer<br />
Very<br />
High<br />
Adult food<br />
(pollen<br />
and/or<br />
nectar)<br />
Native bees; Bumble<br />
bees; Butterflies and<br />
moths; Flies, beetles,<br />
and wasps<br />
Yes<br />
Herb,<br />
perennial<br />
Hibiscus laevis<br />
halberdleaf<br />
rosemallow<br />
Malvaceae IA KS MO OK TX IA,KS,MO,OK,TX 8 White Yes Jun–Aug Sun, Part<br />
Shade<br />
Wet<br />
Medium,<br />
Fine<br />
None Low/Low Spring,<br />
Summer,<br />
Fall<br />
Very<br />
High<br />
Adult food<br />
(pollen<br />
and/or<br />
nectar)<br />
Native bees; Bumble<br />
bees; Hummingbirds<br />
Seed,<br />
Container,<br />
Bare<br />
root,<br />
Cutting<br />
Yes<br />
Herb,<br />
perennial<br />
Liatris aspera<br />
rough blazing<br />
star<br />
Asteraceae IA KS MN MO OK TX IA,KS,MN,MO,OK,TX "46,47,48,<br />
51,52"<br />
2–3 Purple Yes Jul–Sep Sun, Part<br />
Shade<br />
Dry<br />
Coarse,<br />
Medium<br />
Medium<br />
Very<br />
High<br />
Adult food<br />
(pollen<br />
and/or<br />
nectar)<br />
Native bees; Bumble<br />
bees; Hummingbirds<br />
Yes<br />
Herb,<br />
perennial<br />
Liatris punctata<br />
dotted blazing<br />
star<br />
Asteraceae IA KS MN OK TX IA,KS,MN,OK,TX "46,47,48,<br />
51,52"<br />
1–2 Purple Yes Jul–Sep Sun Dry Coarse,<br />
Medium,<br />
Fine<br />
Medium High/High Summer Very<br />
High<br />
Adult food<br />
(pollen<br />
and/or<br />
nectar)<br />
Native bees; Bumble<br />
bees; Hummingbirds<br />
Seed,<br />
Container,<br />
Corm<br />
Yes<br />
Herb,<br />
perennial<br />
Liatris pycnostachya<br />
prairie blazing<br />
star<br />
Asteraceae IA KS MN MO OK TX IA,KS,MN,MO,OK,TX 3–5 Purple Yes Jul–Sep Sun Wet,<br />
Moist,<br />
Dry<br />
Coarse,<br />
Medium,<br />
Fine<br />
None<br />
Medium/<br />
Low<br />
Summer<br />
Very<br />
High<br />
Adult food<br />
(pollen<br />
and/or<br />
nectar)<br />
Native bees; Butterflies<br />
and moths;<br />
Hummingbirds<br />
Seed,<br />
Container,<br />
Corm<br />
Yes<br />
Herb,<br />
perennial<br />
Lilium michiganense<br />
Michigan lily Liliaceae IA MN MO IA,MN,MO 2–6 Orange Yes Jun–Jul Sun, Part<br />
Shade<br />
Wet,<br />
Moist<br />
Coarse,<br />
Medium,<br />
Fine<br />
Very<br />
High<br />
Adult food<br />
(pollen<br />
and/or<br />
nectar)<br />
Native bees; Butterflies;<br />
Hummingbirds<br />
Yes<br />
<strong>Roadside</strong> <strong>Revegetation</strong>: An Integrated Approach to Establishing Native Plants and Pollinator Habitat<br />
460
APPENDIX<br />
Iowa — Native <strong>Revegetation</strong> Plants for Pollinators, continued...<br />
Plant Type Scientific Name Common Name Plant Family IA KS MN MO OK TX All States Eco- Region<br />
(EPA III)<br />
Height<br />
(feet)<br />
Flower<br />
Color<br />
Showy Flowering Sun<br />
Exposure<br />
Soil<br />
Moisture<br />
Soil Texture<br />
Salt<br />
Tolerance<br />
Palatability<br />
(Browsing/<br />
Grazing)<br />
Active<br />
Growth<br />
Period<br />
Pollinator<br />
Value<br />
Benefits to<br />
Pollinators<br />
Pollinators<br />
Propagation<br />
Commercially<br />
Available<br />
Herb,<br />
perennial<br />
Lobelia siphilitica<br />
great blue<br />
lobelia<br />
Campanulaceae<br />
IA KS MN MO IA,KS,MN,MO 1–3 Blue Yes Jun–Aug Sun Wet,<br />
Moist<br />
Very<br />
High<br />
Adult food<br />
(pollen<br />
and/or<br />
nectar)<br />
Native bees; Bumble<br />
bees; Butterflies<br />
and moths; Flies,<br />
beetles, and wasps;<br />
Hummingbirds<br />
Yes<br />
Herb,<br />
perennial<br />
Mimulus ringens<br />
Allegheny<br />
monkeyflower<br />
Scrophulariaceae<br />
IA KS MN MO IA,KS,MN,MO 1–4 Blue Yes Jun–Sep Sun, Part<br />
Shade<br />
Wet Medium Very<br />
High<br />
Adult food<br />
(pollen<br />
and/or<br />
nectar)<br />
Bumble bees;<br />
Hummingbirds<br />
Yes<br />
Herb,<br />
perennial<br />
Monarda fistulosa wild bergamot Lamiaceae IA KS MN MO OK TX IA,KS,MN,MO,OK,TX "46,47,48,<br />
49,50,51,<br />
52"<br />
2–4 Purple Yes Jul–Aug Sun, Part<br />
Shade<br />
Moist,<br />
Dry<br />
Coarse,<br />
Medium,<br />
Fine<br />
Medium<br />
Medium/<br />
Medium<br />
Spring<br />
Very<br />
High<br />
Adult food<br />
(pollen<br />
and/or<br />
nectar)<br />
Native bees; Bumble<br />
bees; Hummingbirds<br />
Seed,<br />
Container<br />
Yes<br />
Herb,<br />
perennial<br />
Oligoneuron<br />
rigidum var.<br />
rigidum<br />
stiff goldenrod Asteraceae IA KS MN MO OK TX IA,KS,MN,MO,OK,TX "46,47,48,<br />
49,50,51,<br />
52"<br />
1–5 Yellow Yes Aug–Sep Sun, Part<br />
Shade<br />
Dry<br />
Coarse,<br />
Medium,<br />
Fine<br />
Medium Low/Low Spring and<br />
Summer<br />
Very<br />
High<br />
Adult food<br />
(pollen<br />
and/or<br />
nectar)<br />
Native bees; Honey<br />
bees; Flies, beetles,<br />
and wasps<br />
Seed,<br />
Bare<br />
root,<br />
Sprig<br />
Yes<br />
Herb,<br />
perennial<br />
Penstemon<br />
grandiflorus<br />
large-flowered<br />
beard tongue<br />
Scrophulariaceae<br />
IA MN IA,MN "46,47,48,<br />
49,50,51,<br />
52"<br />
2–3 White Yes Jun–Jul Sun Dry Coarse,<br />
Medium<br />
Medium<br />
Very<br />
High<br />
Adult food<br />
(pollen<br />
and/or<br />
nectar)<br />
Native bees; Bumble<br />
bees; Hummingbirds<br />
Yes<br />
Herb,<br />
perennial<br />
Penstemon<br />
pallidus<br />
pale beardtongue<br />
Scrophulariaceae<br />
IA MO IA,MO 1–2.5 White Yes May–Jun Sun, Part<br />
Shade<br />
Moist,<br />
Dry<br />
Coarse,<br />
Medium<br />
Very<br />
High<br />
Adult food<br />
(pollen<br />
and/or<br />
nectar)<br />
Native bees; Bumble<br />
bees; Hummingbirds<br />
Yes<br />
Herb,<br />
perennial<br />
Phlox divaricata<br />
wild blue<br />
phlox<br />
Polemoniaceae<br />
IA KS MN MO IA,KS,MN,MO 3 Purple Yes Jun–Aug Sun, Part<br />
Shade<br />
Moist,<br />
Dry<br />
Coarse,<br />
Medium,<br />
Fine<br />
None Low/Low Spring and<br />
Summer<br />
Very<br />
High<br />
Adult food<br />
(pollen<br />
and/or<br />
nectar)<br />
Moths; Flies, beetles,<br />
and wasps; Hummingbirds<br />
Container,<br />
Sprig<br />
Yes<br />
Herb,<br />
perennial<br />
Phlox pilosa downy phlox Polemoniaceae<br />
IA KS MN MO OK TX IA,KS,MN,MO,OK,TX 1–2 Pink Yes Mar–May Sun, Part<br />
Shade<br />
Moist,<br />
Dry<br />
Coarse<br />
Very<br />
High<br />
Adult food<br />
(pollen<br />
and/or<br />
nectar)<br />
Native bees; Bumble<br />
bees; Butterflies<br />
and moths; Flies;<br />
Hummingbirds<br />
Yes<br />
Herb,<br />
perennial<br />
Physostegia<br />
virginiana<br />
obedient plant Lamiaceae IA KS MN MO IA,KS,MN,MO 2–4 Lavender<br />
Yes Jun–Sep Sun, Part<br />
Shade<br />
Wet,<br />
Moist<br />
Coarse,<br />
Medium<br />
Very<br />
High<br />
Adult food<br />
(pollen<br />
and/or<br />
nectar)<br />
Native bees;<br />
Hummingbirds<br />
Yes<br />
Herb,<br />
perennial<br />
Potentilla arguta tall cinquefoil Rosaceae IA KS MN MO IA,KS,MN,MO 3 Yellow Yes May–Jun Sun, Part<br />
Shade<br />
Dry Medium None Low/Low Spring and<br />
Summer<br />
High<br />
Adult food<br />
(pollen<br />
and/or<br />
nectar)<br />
Native bees; Flies<br />
Seed,<br />
Bare<br />
root<br />
Yes<br />
Herb,<br />
perennial<br />
Pycnanthemum<br />
tenuifolium<br />
narrowleaf<br />
mountain mint<br />
Lamiaceae IA KS MO OK TX IA,KS,MO,OK,TX 1–3 White No Jun–Aug Sun Wet,<br />
Moist,<br />
Dry<br />
Very<br />
High<br />
Adult food<br />
(pollen<br />
and/or<br />
nectar)<br />
Native bees; Honey<br />
bees; Bumble bees;<br />
Flies, beetles, and<br />
wasps<br />
Yes<br />
Herb,<br />
perennial<br />
Pycnanthemum<br />
virginianum<br />
Virginia<br />
mountain mint<br />
Lamiaceae IA MN MO IA,MN,MO 1–3 White No Jun–Aug Sun Moist Very<br />
High<br />
Adult food<br />
(pollen<br />
and/or<br />
nectar)<br />
Native bees; Honey<br />
bees; Bumble bees;<br />
Flies, beetles, and<br />
wasps<br />
Yes<br />
<strong>Roadside</strong> <strong>Revegetation</strong>: An Integrated Approach to Establishing Native Plants and Pollinator Habitat<br />
461
APPENDIX<br />
Iowa — Native <strong>Revegetation</strong> Plants for Pollinators, continued...<br />
Plant Type Scientific Name Common Name Plant Family IA KS MN MO OK TX All States Eco- Region<br />
(EPA III)<br />
Height<br />
(feet)<br />
Flower<br />
Color<br />
Showy Flowering Sun<br />
Exposure<br />
Soil<br />
Moisture<br />
Soil Texture<br />
Salt<br />
Tolerance<br />
Palatability<br />
(Browsing/<br />
Grazing)<br />
Active<br />
Growth<br />
Period<br />
Pollinator<br />
Value<br />
Benefits to<br />
Pollinators<br />
Pollinators<br />
Propagation<br />
Commercially<br />
Available<br />
Herb,<br />
perennial<br />
Ratibida<br />
columnifera<br />
Mexican hat Asteraceae IA KS MN OK TX IA,KS,MN,OK,TX 1–3 Yellow Yes May–Oct Sun Dry Coarse,<br />
Medium,<br />
Fine<br />
Medium<br />
Medium/<br />
Medium<br />
Summer<br />
Very<br />
High<br />
Adult food<br />
(pollen<br />
and/or<br />
nectar)<br />
Native bees<br />
Seed,<br />
Container<br />
Yes<br />
Herb,<br />
perennial<br />
Ratibida pinnata<br />
gray-headed<br />
coneflower<br />
Asteraceae IA KS MN MO OK IA,KS,MN,MO,OK 3–5 Yellow Yes Jun–Aug Sun Moist,<br />
Dry<br />
Coarse,<br />
Medium,<br />
Fine<br />
Medium<br />
Medium/<br />
Medium<br />
Spring and<br />
Summer<br />
Very<br />
High<br />
Adult food<br />
(pollen<br />
and/or<br />
nectar)<br />
Native bees<br />
Seed,<br />
Container<br />
Yes<br />
Herb,<br />
perennial<br />
Rudbeckia hirta<br />
black-eyed<br />
susan<br />
Asteraceae IA KS MN MO OK TX IA,KS,MN,MO,OK,TX 2–3 Yellow Yes Jun–Aug Sun, Part<br />
Shade<br />
Moist,<br />
Dry<br />
Coarse,<br />
Medium,<br />
Fine<br />
Medium Low/Low Fall, Winter<br />
and Spring<br />
Very<br />
High<br />
Adult food<br />
(pollen<br />
and/or<br />
nectar)<br />
Native bees;<br />
Butterflies<br />
Seed<br />
Yes<br />
Herb,<br />
perennial<br />
Rudbeckia<br />
laciniata<br />
cutleaf<br />
coneflower<br />
Asteraceae IA KS MN MO IA,KS,MN,MO 3–12 Yellow Yes Jul–Sep Sun, Part<br />
Shade,<br />
Shade<br />
Moist,<br />
Dry<br />
Coarse,<br />
Medium,<br />
Fine<br />
None High/High Spring Very<br />
High<br />
Adult food<br />
(pollen<br />
and/or<br />
nectar)<br />
Native bees; Honey<br />
bees; Butterflies<br />
Seed,<br />
Container<br />
Yes<br />
Herb,<br />
perennial<br />
Scrophularia<br />
lanceolata<br />
lanceleaf<br />
figwort<br />
IA MN IA,MN 4–6 Purple No May–Jul Sun, Part<br />
Shade<br />
Wet,<br />
Moist,<br />
Dry<br />
Coarse,<br />
Medium<br />
Scrophulariaceae<br />
Medium<br />
Adult food<br />
(pollen<br />
and/or<br />
nectar)<br />
Native bees; Wasps<br />
Yes<br />
Herb,<br />
perennial<br />
Scrophularia<br />
marilandica<br />
carpenter's<br />
square<br />
IA KS MO IA,KS,MO 5–10 Purple No Jul–Sep Sun, Part<br />
Shade<br />
Moist,<br />
Dry<br />
Coarse,<br />
Medium<br />
Scrophulariaceae<br />
Medium<br />
Adult food<br />
(pollen<br />
and/or<br />
nectar)<br />
Native bees; Wasps<br />
Yes<br />
Herb,<br />
perennial<br />
Silphium<br />
integrifolium<br />
wholeleaf<br />
rosinweed<br />
Asteraceae IA KS MO OK IA,KS,MO,OK 2–6 Yellow Yes Jul–Sep Sun Wet,<br />
Moist,<br />
Dry<br />
Very<br />
High<br />
Adult food<br />
(pollen<br />
and/or<br />
nectar)<br />
Native bees; Bumble<br />
bees; Butterflies; Flies,<br />
beetles, and wasps<br />
Yes<br />
Herb,<br />
perennial<br />
Silphium<br />
perfoliatum<br />
cup plant Asteraceae IA KS MN MO IA,KS,MN,MO 3–8 Yellow Yes Jul–Sep Sun Moist Coarse,<br />
Medium,<br />
Fine<br />
Summer<br />
Very<br />
High<br />
Adult food<br />
(pollen<br />
and/or<br />
nectar);<br />
Nest<br />
material<br />
Native bees; Honey<br />
bees; Bumble bees;<br />
Butterflies; Flies,<br />
beetles, and wasps<br />
Seed,<br />
Container<br />
Yes<br />
Herb,<br />
perennial<br />
Solidago gigantea<br />
giant<br />
goldenrod<br />
Asteraceae IA KS MN MO OK TX IA,KS,MN,MO,OK,TX 3–7 Yellow Yes Sep–Nov Part Shade Moist Medium,<br />
Fine<br />
None Medium/ Summer Very<br />
High<br />
Adult food<br />
(pollen<br />
and/or<br />
nectar)<br />
Native bees; Honey<br />
bees; Butterflies; Flies,<br />
beetles, and wasps<br />
Seed<br />
Yes<br />
Herb,<br />
perennial<br />
Solidago<br />
nemoralis<br />
gray goldenrod<br />
Asteraceae IA KS MN MO OK TX IA,KS,MN,MO,OK,TX 4–5 Yellow Yes Aug–Sep Sun, Part<br />
Shade<br />
Dry<br />
Coarse,<br />
Medium,<br />
Fine<br />
Medium<br />
Medium/<br />
Medium<br />
Spring and<br />
Summer<br />
Very<br />
High<br />
Adult food<br />
(pollen<br />
and/or<br />
nectar)<br />
Native bees; Honey<br />
bees; Butterflies; Flies,<br />
beetles, and wasps<br />
Seed,<br />
Container,<br />
Cutting<br />
Yes<br />
Herb,<br />
perennial<br />
Solidago speciosa<br />
showy<br />
goldenrod<br />
Asteraceae IA KS MN MO OK TX IA,KS,MN,MO,OK,TX "46,47,48,<br />
50,51,52"<br />
1–4 Yellow Yes Aug–Sep Sun, Part<br />
Shade<br />
Dry<br />
Coarse,<br />
Medium,<br />
Fine<br />
Medium<br />
Very<br />
High<br />
Adult food<br />
(pollen<br />
and/or<br />
nectar)<br />
Native bees; Honey<br />
bees; Butterflies and<br />
moths; Flies, beetles,<br />
and wasps<br />
Yes<br />
Herb,<br />
perennial<br />
Symphyotrichum<br />
ericoides var.<br />
ericoides<br />
heath aster Asteraceae IA KS MN MO OK TX IA,KS,MN,MO,OK,TX "46,47,48,<br />
49,50,51,<br />
52"<br />
1–3 White Yes Aug–Oct Sun, Part<br />
Shade<br />
Moist,<br />
Dry<br />
Coarse,<br />
Medium,<br />
Fine<br />
Medium<br />
Very<br />
High<br />
Adult food<br />
(pollen<br />
and/or<br />
nectar)<br />
Native bees; Butterflies<br />
and moths; Flies,<br />
beetles, and wasps<br />
Yes<br />
<strong>Roadside</strong> <strong>Revegetation</strong>: An Integrated Approach to Establishing Native Plants and Pollinator Habitat<br />
462
APPENDIX<br />
Iowa — Native <strong>Revegetation</strong> Plants for Pollinators, continued...<br />
Plant Type Scientific Name Common Name Plant Family IA KS MN MO OK TX All States Eco- Region<br />
(EPA III)<br />
Height<br />
(feet)<br />
Flower<br />
Color<br />
Showy Flowering Sun<br />
Exposure<br />
Soil<br />
Moisture<br />
Soil Texture<br />
Salt<br />
Tolerance<br />
Palatability<br />
(Browsing/<br />
Grazing)<br />
Active<br />
Growth<br />
Period<br />
Pollinator<br />
Value<br />
Benefits to<br />
Pollinators<br />
Pollinators<br />
Propagation<br />
Commercially<br />
Available<br />
Herb,<br />
perennial<br />
Symphyotrichum<br />
laeve var. laeve<br />
smooth aster Asteraceae IA MN MO IA,MN,MO "46,47,48,<br />
50,51,52"<br />
1–3 Lavender<br />
Yes Aug–Oct Sun, Part<br />
Shade<br />
Moist,<br />
Dry<br />
Coarse,<br />
Medium,<br />
Fine<br />
Medium Low/Low Spring and<br />
Summer<br />
Very<br />
High<br />
Adult food<br />
(pollen<br />
and/or<br />
nectar)<br />
Native bees; Butterflies<br />
and moths<br />
Seed,<br />
Bare<br />
root<br />
Yes<br />
Herb,<br />
perennial<br />
Symphyotrichum<br />
lateriflorum<br />
calico aster Asteraceae IA KS MN MO OK TX IA,KS,MN,MO,OK,TX 1–3 White Yes Aug–Oct Sun Wet,<br />
Moist<br />
Low/High<br />
Spring,<br />
Summer,<br />
Fall<br />
Very<br />
High<br />
Adult food<br />
(pollen<br />
and/or<br />
nectar)<br />
Native bees; Butterflies<br />
and moths; Flies,<br />
beetles, and wasps<br />
Yes<br />
Herb,<br />
perennial<br />
Symphyotrichum<br />
novae-angliae<br />
New England<br />
aster<br />
Asteraceae IA KS MN MO IA,KS,MN,MO 2.5–6 Purple Yes Aug–Oct Sun Wet,<br />
Moist<br />
Very<br />
High<br />
Adult food<br />
(pollen<br />
and/or<br />
nectar)<br />
Native bees; Honey<br />
bees; Bumble bees;<br />
Butterflies and moths<br />
Yes<br />
Herb,<br />
perennial<br />
Symphyotrichum<br />
oblongifolium<br />
aromatic aster Asteraceae IA KS MN MO OK TX IA,KS,MN,MO,OK,TX "46,47,51,<br />
52"<br />
1–2 Lavender<br />
Yes Aug–Sep Sun Dry Coarse,<br />
Medium,<br />
Fine<br />
Low<br />
Very<br />
High<br />
Adult food<br />
(pollen<br />
and/or<br />
nectar)<br />
Native bees; Butterflies<br />
and moths; Flies,<br />
beetles, and wasps<br />
Yes<br />
Herb,<br />
perennial<br />
Symphyotrichum<br />
sericeum<br />
silky aster Asteraceae IA KS MN MO OK IA,KS,MN,MO,OK "46,47,48,<br />
51,52"<br />
1–2.5 Lavender<br />
Yes Aug–Oct Sun Dry Coarse,<br />
Medium<br />
Medium<br />
Very<br />
High<br />
Adult food<br />
(pollen<br />
and/or<br />
nectar)<br />
Native bees; Butterflies<br />
and moths<br />
Yes<br />
Herb,<br />
perennial<br />
Verbesina<br />
alternifolia<br />
wingstem Asteraceae IA KS MO OK IA,KS,MO,OK 3–6 Yellow Yes Jul–Sep Sun Wet,<br />
Moist<br />
Very<br />
High<br />
Adult food<br />
(pollen<br />
and/or<br />
nectar)<br />
Native bees; Honey<br />
bees; Bumble bees;<br />
Butterflies and<br />
moths; Flies, beetles,<br />
and wasps; Hummingbirds<br />
Yes<br />
Herb,<br />
perennial<br />
Vernonia<br />
baldwinii<br />
Baldwin's<br />
ironweed<br />
Asteraceae IA KS MO OK TX IA,KS,MO,OK,TX 3–5 Purple Yes Jul–Nov Sun Moist Coarse,<br />
Medium,<br />
Fine<br />
Very<br />
High<br />
Adult food<br />
(pollen<br />
and/or<br />
nectar)<br />
Native bees; Butterflies<br />
and moths;<br />
Hummingbirds<br />
Yes<br />
Herb,<br />
perennial<br />
Vernonia<br />
fasciculata<br />
ironweed Asteraceae IA KS MN MO OK IA,KS,MN,MO,OK 4–5 Purple Yes Jul–Sep Sun Moist Coarse,<br />
Medium,<br />
Fine<br />
Very<br />
High<br />
Adult food<br />
(pollen<br />
and/or<br />
nectar)<br />
Native bees; Butterflies<br />
and moths;<br />
Hummingbirds<br />
Yes<br />
Herb,<br />
perennial<br />
Veronicastrum<br />
virginicum<br />
Culver's root<br />
Scrophulariaceae<br />
IA KS MN MO OK IA,KS,MN,MO,OK 4–5 White Yes Jun–Aug Sun Wet,<br />
Moist,<br />
Dry<br />
Very<br />
High<br />
Adult food<br />
(pollen<br />
and/or<br />
nectar)<br />
Native bees; Honey<br />
bees; Flies, beetles,<br />
and wasps; Hummingbirds<br />
Yes<br />
Herb,<br />
perennial<br />
Zizia aurea golden zizia Apiaceae IA KS MN MO OK IA,KS,MN,MO,OK 1–3 Yellow Yes Apr–Aug Sun, Part<br />
Shade<br />
Wet,<br />
Moist,<br />
Dry<br />
Coarse,<br />
Medium<br />
Very<br />
High<br />
Adult food<br />
(pollen<br />
and/or<br />
nectar)<br />
Native bees; Butterflies<br />
and moths; Flies,<br />
beetles, and wasps<br />
Yes<br />
Shrub<br />
Amorpha<br />
canescens<br />
lead plant Fabaceae IA KS MN MO OK TX IA,KS,MN,MO,OK,TX "46,47,48,<br />
50,51,52"<br />
1.5–4 Purple Yes Jun–Aug Sun, Part<br />
Shade<br />
Dry<br />
Coarse,<br />
Medium<br />
Medium High/Low Spring and<br />
Summer<br />
Very<br />
High<br />
Adult food<br />
(pollen<br />
and/or<br />
nectar)<br />
Native bees; Honey<br />
bees; Flies, beetles,<br />
and wasps<br />
Seed,<br />
Container,<br />
Bare<br />
root,<br />
Cutting<br />
Yes<br />
<strong>Roadside</strong> <strong>Revegetation</strong>: An Integrated Approach to Establishing Native Plants and Pollinator Habitat<br />
463
APPENDIX<br />
Iowa — Native <strong>Revegetation</strong> Plants for Pollinators, continued...<br />
Plant Type Scientific Name Common Name Plant Family IA KS MN MO OK TX All States Eco- Region<br />
(EPA III)<br />
Height<br />
(feet)<br />
Flower<br />
Color<br />
Showy Flowering Sun<br />
Exposure<br />
Soil<br />
Moisture<br />
Soil Texture<br />
Salt<br />
Tolerance<br />
Palatability<br />
(Browsing/<br />
Grazing)<br />
Active<br />
Growth<br />
Period<br />
Pollinator<br />
Value<br />
Benefits to<br />
Pollinators<br />
Pollinators<br />
Propagation<br />
Commercially<br />
Available<br />
Shrub<br />
Ceanothus<br />
americanus<br />
New Jersey tea Rhamnaceae IA KS MN MO OK TX IA,KS,MN,MO,OK,TX "47,50,51,<br />
52"<br />
2–3 White Yes Jun–Jul Sun, Part<br />
Shade<br />
Dry<br />
Coarse,<br />
Medium<br />
High<br />
Medium/<br />
Low<br />
Spring and<br />
Summer<br />
Very<br />
High<br />
Adult food<br />
(pollen<br />
and/or<br />
nectar)<br />
Native bees; Flies,<br />
beetles, and wasps<br />
Seed,<br />
Container,<br />
Bare<br />
root<br />
Yes<br />
Shrub<br />
Cephalanthus<br />
occidentalis<br />
buttonbush Rubiaceae IA KS MO OK TX IA,KS,MO,OK,TX 12 White Yes Jun–Aug Sun, Part<br />
Shade<br />
Moist<br />
Coarse,<br />
Medium,<br />
Fine<br />
Low Low/Low Spring Very<br />
High<br />
Adult food<br />
(pollen<br />
and/or<br />
nectar)<br />
Native bees; Honey<br />
bees; Bumble bees;<br />
Hummingbirds<br />
Seed,<br />
Container,<br />
Bare<br />
root,<br />
Cutting<br />
Yes<br />
Shrub<br />
Physocarpus<br />
opulifolius<br />
ninebark Rosaceae IA MN MO IA,MN,MO 8 White Yes Apr–Jun Sun, Part<br />
Shade<br />
Moist<br />
Coarse,<br />
Medium,<br />
Fine<br />
None Low/ Spring and<br />
Summer<br />
Very<br />
High<br />
Adult food<br />
(pollen<br />
and/or<br />
nectar)<br />
Native bees; Honey<br />
bees<br />
Seed,<br />
Container,<br />
Bare<br />
root,<br />
Cutting<br />
Yes<br />
Shrub Rhus glabra smooth sumac Anacardiaceae<br />
IA KS MN MO OK TX IA,KS,MN,MO,OK,TX 12 Green Yes Apr–May Sun, Part<br />
Shade<br />
Dry<br />
Coarse,<br />
Medium<br />
Medium Low/Low Spring and<br />
Summer<br />
High<br />
Adult food<br />
(pollen<br />
and/or<br />
nectar);<br />
Nest<br />
material<br />
Native bees; Honey<br />
bees; Flies, beetles,<br />
and wasps<br />
Seed,<br />
Container,<br />
Bare<br />
root<br />
Yes<br />
Shrub Rosa arkansana prairie rose Rosaceae IA KS MN MO OK IA,KS,MN,MO,OK "46,47,48,<br />
49,50,51,<br />
52"<br />
2 White Yes Jun–Aug Sun, Part<br />
Shade<br />
Moist,<br />
Dry<br />
Coarse,<br />
Medium,<br />
Fine<br />
Very<br />
High<br />
Adult food<br />
(pollen<br />
and/or<br />
nectar);<br />
Nest<br />
material<br />
Native bees; Bumble<br />
bees; Flies, beetles,<br />
and wasps<br />
Yes<br />
Shrub Rosa carolina pasture rose Rosaceae IA KS MO OK TX IA,KS,MO,OK,TX 2 White Yes Jun–Aug Sun, Part<br />
Shade<br />
Moist,<br />
Dry<br />
Coarse,<br />
Medium,<br />
Fine<br />
Medium<br />
Medium/<br />
Medium<br />
Spring and<br />
Summer<br />
Very<br />
High<br />
Adult food<br />
(pollen<br />
and/or<br />
nectar);<br />
Nest<br />
material<br />
Native bees; Bumble<br />
bees; Flies, beetles,<br />
and wasps<br />
Seed,<br />
Container,<br />
Bare<br />
root<br />
Yes<br />
Shrub Salix discolor pussy willow Salicaceae IA KS MN MO OK IA,KS,MN,MO,OK 40 White Yes Dec–Feb Sun Wet,<br />
Moist<br />
Coarse,<br />
Medium,<br />
Fine<br />
None Medium/ Spring Very<br />
High<br />
Adult food<br />
(pollen<br />
and/or<br />
nectar)<br />
Native bees; Honey<br />
bees; Bumble bees;<br />
Butterflies<br />
Seed,<br />
Container,<br />
Bare<br />
root,<br />
Cutting<br />
Yes<br />
Shrub Salix humilis prairie willow Salicaceae IA KS MN MO OK IA,KS,MN,MO,OK 8 White No Mar–May Sun, Part<br />
Shade<br />
Moist,<br />
Dry<br />
Coarse,<br />
Medium,<br />
Fine<br />
Low<br />
Medium/<br />
Low<br />
Spring and<br />
Summer<br />
Very<br />
High<br />
Adult food<br />
(pollen<br />
and/or<br />
nectar)<br />
Native bees; Flies,<br />
beetles, and wasps<br />
Container,<br />
Bare<br />
root,<br />
Cutting<br />
Yes<br />
<strong>Roadside</strong> <strong>Revegetation</strong>: An Integrated Approach to Establishing Native Plants and Pollinator Habitat<br />
464
APPENDIX<br />
Iowa — Native <strong>Revegetation</strong> Plants for Pollinators, continued...<br />
Plant Type Scientific Name Common Name Plant Family IA KS MN MO OK TX All States Eco- Region<br />
(EPA III)<br />
Height<br />
(feet)<br />
Flower<br />
Color<br />
Showy Flowering Sun<br />
Exposure<br />
Soil<br />
Moisture<br />
Soil Texture<br />
Salt<br />
Tolerance<br />
Palatability<br />
(Browsing/<br />
Grazing)<br />
Active<br />
Growth<br />
Period<br />
Pollinator<br />
Value<br />
Benefits to<br />
Pollinators<br />
Pollinators<br />
Propagation<br />
Commercially<br />
Available<br />
Shrub Salix interior sandbar willow Salicaceae IA MN IA, MN 30 White Yes Mar–Apr Sun Wet,<br />
Moist<br />
Fine None Medium/ Spring Very<br />
High<br />
Adult food<br />
(pollen<br />
and/or<br />
nectar)<br />
Native bees; Honey<br />
bees; Bumble bees;<br />
Butterflies<br />
Seed,<br />
Container,<br />
Bare<br />
root,<br />
Cutting,<br />
Sprig<br />
Yes<br />
Shrub<br />
Sambucus nigra<br />
ssp. canadensis<br />
American black<br />
elderberry<br />
Caprifoliaceae<br />
IA KS MN MO OK TX IA,KS,MN,MO,OK,TX 12 White Yes Apr–May Sun, Part<br />
Shade<br />
Wet,<br />
Moist,<br />
Dry<br />
Medium None Medium/<br />
Low<br />
Spring and<br />
Summer<br />
Very<br />
High<br />
Adult food<br />
(pollen<br />
and/or<br />
nectar);<br />
Nest<br />
material<br />
Native bees; Flies,<br />
beetles, and wasps<br />
Seed,<br />
Container,<br />
Bare<br />
root<br />
Yes<br />
Shrub Spiraea alba white meadowsweet<br />
Rosaceae IA MN IA,MN 3 White Yes May–Jun Sun, Part<br />
Shade<br />
Wet,<br />
Moist<br />
Coarse,<br />
Medium,<br />
Fine<br />
None Low/Low Spring and<br />
Summer<br />
Very<br />
High<br />
Adult food<br />
(pollen<br />
and/or<br />
nectar)<br />
Native bees; Bumble<br />
bees; Flies, beetles,<br />
and wasps<br />
Seed,<br />
Container,<br />
Bare<br />
root<br />
Yes<br />
Tree Crataegus mollis downy<br />
hawthorn<br />
Rosaceae IA KS MO OK IA,KS,MO,OK 30 White Yes Apr–May Sun Wet,<br />
Moist,<br />
Dry<br />
Coarse,<br />
Medium,<br />
Fine<br />
Medium<br />
Very<br />
High<br />
Adult food<br />
(pollen<br />
and/or<br />
nectar)<br />
Native bees; Flies,<br />
beetles, and wasps<br />
Yes<br />
Tree Prunus americana American plum Rosaceae IA KS MN MO OK IA,KS,MN,MO,OK 24 White Yes Apr–May Sun, Part<br />
Shade<br />
Dry<br />
Coarse,<br />
Medium<br />
Low<br />
Medium/<br />
Low<br />
Spring and<br />
Summer<br />
Very<br />
High<br />
Adult food<br />
(pollen<br />
and/or<br />
nectar)<br />
Native bees; Honey<br />
bees; Bumble bees<br />
Seed,<br />
Container,<br />
Bare<br />
root<br />
Yes<br />
Tree Prunus serotina black cherry Rosaceae IA KS MN MO OK TX IA,KS,MN,MO,OK,TX 80 White Yes May–Jun Sun, Part<br />
Shade<br />
Moist,<br />
Dry<br />
Coarse,<br />
Medium<br />
Medium Low/Low Spring and<br />
Summer<br />
Very<br />
High<br />
Adult food<br />
(pollen<br />
and/or<br />
nectar)<br />
Native bees; Honey<br />
bees; Bumble bees;<br />
Flies, beetles, and<br />
wasps<br />
Seed,<br />
Container,<br />
Bare<br />
root<br />
Yes<br />
Vine<br />
Clematis<br />
virginiana<br />
devil's darning<br />
needles<br />
Ranunculaceae<br />
IA MN MO IA,MN,MO 15 White Yes Jun–Aug Sun, Part<br />
Shade<br />
Wet,<br />
Moist,<br />
Dry<br />
Medium,<br />
Fine<br />
None<br />
Spring and<br />
Summer<br />
Very<br />
High<br />
Adult food<br />
(pollen<br />
and/or<br />
nectar)<br />
Native bees; Honey<br />
bees; Flies, beetles,<br />
and wasps<br />
Seed,<br />
Container,<br />
Bare<br />
root,<br />
Cutting<br />
Yes<br />
<strong>Roadside</strong> <strong>Revegetation</strong>: An Integrated Approach to Establishing Native Plants and Pollinator Habitat<br />
465
APPENDIX<br />
KANSAS — NATIVE REVEGETATION PLANTS FOR POLLINATORS<br />
Plant Type Scientific Name Common Name Plant Family IA KS MN MO OK TX All States Eco- Region<br />
(EPA III)<br />
Height<br />
(feet)<br />
Flower<br />
Color<br />
Showy Flowering Sun<br />
Exposure<br />
Soil<br />
Moisture<br />
Soil Texture<br />
Salt<br />
Tolerance<br />
Palatability<br />
(Browsing/<br />
Grazing)<br />
Active<br />
Growth<br />
Period<br />
Pollinator<br />
Value<br />
Benefits to<br />
Pollinators<br />
Pollinators<br />
Propagation<br />
Commercially<br />
Available<br />
Grass,<br />
perennial<br />
Andropogon<br />
gerardii<br />
big bluestem Poaceae IA KS MN MO OK TX IA,KS,MN,MO,OK,TX "46,47,48,<br />
49,50,51,<br />
52"<br />
3–8 Green No May–Jun Sun, Part<br />
Shade<br />
Dry<br />
Coarse,<br />
Medium,<br />
Fine<br />
Medium<br />
Medium/<br />
High<br />
Summer<br />
Low<br />
Nest<br />
material;<br />
Shelter<br />
Seed<br />
Yes<br />
Grass,<br />
perennial<br />
Bouteloua<br />
curtipendula<br />
side-oats<br />
grama<br />
Poaceae IA KS MN MO OK TX IA,KS,MN,MO,OK,TX "46,47,48,<br />
51,52"<br />
1–3 Green No Jul–Sep Sun, Part<br />
Shade<br />
Dry<br />
Coarse,<br />
Medium,<br />
Fine<br />
Medium<br />
Medium/<br />
High<br />
Summer<br />
Low<br />
Nest<br />
material;<br />
Shelter<br />
Seed<br />
Yes<br />
Grass,<br />
perennial<br />
Bouteloua<br />
dactyloides<br />
buffalo grass Poaceae IA KS MO OK TX IA,KS,MO,OK,TX 0.5–1 Green No Jul–Aug Sun Moist, Dry Coarse,<br />
Medium,<br />
Fine<br />
Medium<br />
Medium/<br />
High<br />
Summer<br />
Low<br />
Nest<br />
material;<br />
Shelter<br />
Seed,<br />
Sprig<br />
Yes<br />
Grass,<br />
perennial<br />
Bouteloua gracilis blue grama Poaceae IA KS MN MO OK TX IA,KS,MN,MO,OK,TX 464,748<br />
5,152<br />
0.5–1.5 Green No May–Jul Sun Dry Coarse,<br />
Medium,<br />
Fine<br />
Medium High/High Summer<br />
and<br />
Fall<br />
Low<br />
Nest<br />
material;<br />
Shelter<br />
Seed<br />
Yes<br />
Grass,<br />
perennial<br />
Elymus canadensis<br />
nodding wild<br />
rye<br />
Poaceae IA KS MN MO OK TX IA,KS,MN,MO,OK,TX "46,47,48,<br />
49,50,51,<br />
52"<br />
3–5 Green No Jul–Aug Sun, Part<br />
Shade<br />
Moist, Dry<br />
Coarse,<br />
Medium,<br />
Fine<br />
Medium<br />
Medium/<br />
Medium<br />
Spring,<br />
Summer,<br />
Fall<br />
Low Shelter Seed Yes<br />
Grass,<br />
perennial<br />
Panicum virgatum switchgrass Poaceae IA KS MO OK TX IA,KS,MO,OK,TX 3–6 Green No Jul–Aug Sun, Part<br />
Shade<br />
Wet, Moist,<br />
Dry<br />
Coarse,<br />
Medium,<br />
Fine<br />
Medium<br />
Medium/<br />
High<br />
Summer<br />
Low Shelter Seed Yes<br />
Grass,<br />
perennial<br />
Schizachyrium<br />
scoparium<br />
little bluestem Poaceae IA KS MN MO OK TX IA,KS,MN,MO,OK,TX "46,47,48,<br />
49,50,51,<br />
52"<br />
1–2.5 Green No Aug–Sep Sun, Part<br />
Shade<br />
Moist, Dry<br />
Coarse,<br />
Medium,<br />
Fine<br />
Medium<br />
Medium/<br />
High<br />
Summer<br />
and<br />
Fall<br />
Low<br />
Nest<br />
material;<br />
Shelter<br />
Seed<br />
Yes<br />
Grass,<br />
perennial<br />
Sorghastrum<br />
nutans<br />
Indian grass Poaceae IA KS MN MO OK TX IA,KS,MN,MO,OK,TX "46,47,48,<br />
51,52"<br />
3–8 Green No Jul–Sep Sun Moist, Dry Coarse,<br />
Medium,<br />
Fine<br />
Medium<br />
Medium/<br />
High<br />
Summer<br />
and<br />
Fall<br />
Low<br />
Nest<br />
material;<br />
Shelter<br />
Seed<br />
Yes<br />
Grass,<br />
perennial<br />
Sporobolus<br />
heterolepis<br />
prairie<br />
dropseed<br />
Poaceae IA KS MN MO OK TX IA,KS,MN,MO,OK,TX "46,47,48,<br />
51,52"<br />
1.5–4 Green No Aug–Sep Sun Moist Coarse,<br />
Medium<br />
None<br />
Low/<br />
Medium<br />
Spring<br />
and<br />
Summer<br />
Low<br />
Nest<br />
material;<br />
Shelter<br />
Seed<br />
Yes<br />
Herb,<br />
annual<br />
Chamaecrista<br />
fasciculata<br />
partridge pea Fabaceae IA KS MN MO OK TX IA,KS,MN,MO,OK,TX "46,47,51,<br />
52"<br />
1–3 Yellow Yes Jul–Sep Sun, Part<br />
Shade<br />
Moist, Dry<br />
Coarse,<br />
Medium,<br />
Fine<br />
Low<br />
High/<br />
Medium<br />
Spring Very High Adult food<br />
(pollen and/<br />
or nectar)<br />
Native bees;<br />
Bumble bees;<br />
Flies, beetles, and<br />
wasps<br />
Seed<br />
Yes<br />
Herb,<br />
annual<br />
Dracopis<br />
amplexicaulis<br />
clasping<br />
coneflower<br />
Asteraceae KS OK TX KS,OK,TX 2–3 Yellow Yes Apr–Jul Part<br />
Shade<br />
Wet, Moist,<br />
Dry<br />
Coarse,<br />
Medium,<br />
Fine<br />
None Low/Low Spring<br />
and<br />
Summer<br />
High<br />
Adult food<br />
(pollen and/<br />
or nectar)<br />
Native bees Seed Yes<br />
Herb,<br />
annual<br />
Eryngium<br />
leavenworthii<br />
Leavenworth's<br />
eryngo<br />
Apiaceae KS OK TX KS,OK,TX 1.5–3 Purple Yes Jul–Sep Sun, Part<br />
Shade<br />
Dry<br />
Coarse,<br />
Medium,<br />
Fine<br />
Very High<br />
Adult food<br />
(pollen and/<br />
or nectar)<br />
Native bees<br />
Yes<br />
<strong>Roadside</strong> <strong>Revegetation</strong>: An Integrated Approach to Establishing Native Plants and Pollinator Habitat<br />
466
APPENDIX<br />
Kansas — Native <strong>Revegetation</strong> Plants for Pollinators, continued...<br />
Plant Type Scientific Name Common Name Plant Family IA KS MN MO OK TX All States Eco- Region<br />
(EPA III)<br />
Height<br />
(feet)<br />
Flower<br />
Color<br />
Showy Flowering Sun<br />
Exposure<br />
Soil<br />
Moisture<br />
Soil Texture<br />
Salt<br />
Tolerance<br />
Palatability<br />
(Browsing/<br />
Grazing)<br />
Active<br />
Growth<br />
Period<br />
Pollinator<br />
Value<br />
Benefits to<br />
Pollinators<br />
Pollinators<br />
Propagation<br />
Commercially<br />
Available<br />
Herb,<br />
annual<br />
Impatiens<br />
capensis<br />
jewelweed<br />
IA KS MN MO IA,KS,MN,MO 2–5 Orange Yes Jun–Oct Part<br />
Shade,<br />
Shade<br />
Wet, Moist<br />
Coarse,<br />
Medium,<br />
Fine<br />
None<br />
Balsaminaceae<br />
Summer<br />
Very High<br />
Adult food<br />
(pollen and/<br />
or nectar)<br />
Bumble bees;<br />
Butterflies and<br />
Moths; Hummingbirds<br />
Seed<br />
Yes<br />
Herb,<br />
annual or<br />
perennial<br />
Coreopsis<br />
tinctoria<br />
plains<br />
coreopsis<br />
Asteraceae KS MO OK TX KS,MO,OK,TX 1–2 Yellow Yes Apr–Jun Sun, Part<br />
Shade<br />
Moist, Dry Fine None Spring<br />
and<br />
Summer<br />
High<br />
Adult food<br />
(pollen and/<br />
or nectar)<br />
Native bees; Flies,<br />
beetles, and<br />
wasps<br />
Seed<br />
Yes<br />
Herb,<br />
annual or<br />
perennial<br />
Gaillardia<br />
pulchella<br />
blanketflower Asteraceae KS OK TX KS,OK,TX 1–2 Orange Yes May–Jul Sun, Part<br />
Shade<br />
Moist, Dry<br />
Coarse,<br />
Medium,<br />
Fine<br />
None<br />
Medium/<br />
Medium<br />
Spring,<br />
Summer,<br />
Fall<br />
Very High<br />
Adult food<br />
(pollen and/<br />
or nectar)<br />
Native bees; Flies,<br />
beetles, and<br />
wasps<br />
Seed<br />
Yes<br />
Herb,<br />
annual or<br />
perennial<br />
Gaura longiflora<br />
longflower<br />
beeblossom<br />
Onagraceae IA KS MO OK TX IA,KS,MO,OK,TX 2–3 White Yes Jul–Sep Sun Dry Very High Adult food<br />
(pollen and/<br />
or nectar)<br />
Bumble bees;<br />
Moths; Hummingbirds<br />
Yes<br />
Herb,<br />
annual or<br />
perennial<br />
Glandularia<br />
bipinnatifida<br />
prairie verbena Verbenaceae KS OK TX KS,OK,TX 1 Purple Yes Mar–Dec Sun Dry Coarse,<br />
Medium,<br />
Fine<br />
Very High<br />
Adult food<br />
(pollen and/<br />
or nectar)<br />
Native bees;<br />
Bumble bees;<br />
Butterflies and<br />
moths; Flies;<br />
Hummingbirds<br />
Yes<br />
Herb,<br />
annual or<br />
perennial<br />
Monarda<br />
citriodora<br />
lemon<br />
beebalm<br />
Lamiaceae KS OK TX KS,OK,TX 1–2 Purple Yes May–Jul Sun, Part<br />
Shade<br />
Dry<br />
Coarse,<br />
Medium,<br />
Fine<br />
Very High<br />
Adult food<br />
(pollen and/<br />
or nectar)<br />
Native bees;<br />
Bumble bees;<br />
Hummingbirds<br />
Yes<br />
Herb,<br />
annual or<br />
perennial<br />
Monarda<br />
punctata<br />
dotted mint Lamiaceae KS MN OK TX KS,MN,OK,TX 1–3 Purple Yes Jun–Aug Sun Moist Very High Adult food<br />
(pollen and/<br />
or nectar)<br />
Native bees;<br />
Honey bees;<br />
Bumble bees;<br />
Butterflies and<br />
moths; Flies, beetles,<br />
and wasps;<br />
Hummingbirds<br />
Yes<br />
Herb,<br />
annual or<br />
perennial<br />
Verbena stricta hoary vervain Verbenaceae IA KS MN MO OK IA,KS,MN,MO,OK 2–3 White Yes Jun–Sep Sun Dry Coarse,<br />
Medium,<br />
Fine<br />
Very High<br />
Adult food<br />
(pollen and/<br />
or nectar)<br />
Native bees;<br />
Butterflies and<br />
moths; Hummingbirds<br />
Yes<br />
Herb,<br />
biennial<br />
Castilleja coccinea<br />
Indian<br />
paintbrush<br />
Scrophulariaceae<br />
IA KS MO IA,KS,MO 1–1.5 Red Yes Jul–Sep Sun, Part<br />
Shade<br />
Wet, Moist,<br />
Dry<br />
Coarse,<br />
Medium,<br />
Fine<br />
Low<br />
Spring<br />
and<br />
Summer<br />
Very High<br />
Adult food<br />
(pollen and/<br />
or nectar)<br />
Hummingbirds Seed Yes<br />
Herb,<br />
biennial or<br />
perennial<br />
Cirsium discolor field thistle Asteraceae IA KS MN MO IA,KS,MN,MO 3–8 Purple Yes Aug–Oct Sun Moist Very High Adult food<br />
(pollen and/<br />
or nectar)<br />
Native bees;<br />
Bumble bees;<br />
Butterflies and<br />
moths; Flies, beetles,<br />
and wasps;<br />
Hummingbirds<br />
Yes<br />
Herb,<br />
biennial or<br />
perennial<br />
Sphaeralcea<br />
coccinea<br />
scarlet<br />
globemallow<br />
Malvaceae KS OK TX KS,OK,TX 1 Orange Yes Apr–Sep Sun Moist, Dry Medium,<br />
Fine<br />
Medium<br />
Medium/<br />
Medium<br />
Spring<br />
and<br />
Summer<br />
Very High<br />
Adult food<br />
(pollen and/<br />
or nectar)<br />
Native bees;<br />
Hummingbirds<br />
Seed,<br />
Container<br />
Yes<br />
Herb,<br />
biennial or<br />
perennial<br />
Verbena hastata<br />
swamp<br />
verbena<br />
Verbenaceae IA KS MN MO OK IA,KS,MN,MO,OK 3–5 Lavender<br />
Yes Jul–Sep Sun, Part<br />
Shade<br />
Wet, Moist<br />
Coarse,<br />
Medium<br />
Very High<br />
Adult food<br />
(pollen and/<br />
or nectar)<br />
Native bees;<br />
Butterflies;<br />
Hummingbirds<br />
Yes<br />
<strong>Roadside</strong> <strong>Revegetation</strong>: An Integrated Approach to Establishing Native Plants and Pollinator Habitat<br />
467
APPENDIX<br />
Kansas — Native <strong>Revegetation</strong> Plants for Pollinators, continued...<br />
Plant Type Scientific Name Common Name Plant Family IA KS MN MO OK TX All States Eco- Region<br />
(EPA III)<br />
Height<br />
(feet)<br />
Flower<br />
Color<br />
Showy Flowering Sun<br />
Exposure<br />
Soil<br />
Moisture<br />
Soil Texture<br />
Salt<br />
Tolerance<br />
Palatability<br />
(Browsing/<br />
Grazing)<br />
Active<br />
Growth<br />
Period<br />
Pollinator<br />
Value<br />
Benefits to<br />
Pollinators<br />
Pollinators<br />
Propagation<br />
Commercially<br />
Available<br />
Herb,<br />
perennial<br />
Achillea<br />
millefolium<br />
common<br />
yarrow<br />
Asteraceae IA KS MN MO OK TX IA,KS,MN,MO,OK,TX 3 White Yes May–Jul Sun, Part<br />
Shade<br />
Moist, Dry Medium Low Medium/<br />
Low<br />
Spring High Adult food<br />
(pollen and/<br />
or nectar);<br />
Nest<br />
material<br />
Native bees; Flies,<br />
beetles, and<br />
wasps<br />
Seed,<br />
Container,<br />
Sprig<br />
Yes<br />
Herb,<br />
perennial<br />
Aquilegia<br />
canadensis<br />
red columbine<br />
Ranunculaceae<br />
IA KS MN MO OK IA,KS,MN,MO,OK 1–2 Red Yes Apr–May Sun, Part<br />
Shade<br />
Wet, Moist,<br />
Dry<br />
Coarse,<br />
Medium<br />
Very High<br />
Adult food<br />
(pollen and/<br />
or nectar)<br />
Bumble bees;<br />
Butterflies;<br />
Hummingbirds<br />
Yes<br />
Herb,<br />
perennial<br />
Asclepias asperula<br />
ssp. capricornu<br />
antelopehorns<br />
milkweed<br />
Asclepiadaceae<br />
KS OK TX KS,OK,TX 1–2 Green Yes Apr–Jun Sun, Part<br />
Shade<br />
Dry<br />
Coarse,<br />
Medium,<br />
Fine<br />
Medium Very High Adult food<br />
(pollen and/<br />
or nectar);<br />
Larval food<br />
Native bees; Honey<br />
bees; Bumble<br />
bees; Butterflies<br />
and moths; Flies,<br />
beetles, and<br />
wasps<br />
Yes<br />
Herb,<br />
perennial<br />
Asclepias<br />
incarnata<br />
swamp<br />
milkweed<br />
Asclepiadaceae<br />
IA KS MO OK TX IA,KS,MO,OK,TX 3–4 Purple Yes Jun–Sep Sun, Part<br />
Shade<br />
Moist<br />
Coarse,<br />
Medium,<br />
Fine<br />
Medium /Low Spring Very High Adult food<br />
(pollen and/<br />
or nectar);<br />
Larval food<br />
Native bees; Honey<br />
bees; Bumble<br />
bees; Butterflies;<br />
Monarchs; Flies,<br />
beetles, and<br />
wasps; Hummingbirds<br />
Seed,<br />
Sprig<br />
Yes<br />
Herb,<br />
perennial<br />
Asclepias<br />
purpurascens<br />
purple<br />
milkweed<br />
Asclepiadaceae<br />
IA KS MO IA,KS,MO 2–3 Purple Yes May–Jul Sun Moist, Dry Coarse,<br />
Medium<br />
Very High<br />
Adult food<br />
(pollen and/<br />
or nectar);<br />
Larval food<br />
Native bees;<br />
Honey bees;<br />
Bumble bees;<br />
Butterflies and<br />
moths; Monarchs;<br />
Flies, beetles,<br />
and wasps;<br />
Hummingbirds<br />
Yes<br />
Herb,<br />
perennial<br />
Asclepias syriaca<br />
common<br />
milkweed<br />
Asclepiadaceae<br />
IA KS MN MO OK IA,KS,MN,MO,OK "46,47,48,<br />
49,50,51,<br />
52"<br />
2.5–4 Purple Yes Jun–Aug Sun, Part<br />
Shade<br />
Moist, Dry<br />
Coarse,<br />
Medium,<br />
Fine<br />
Medium Very High Adult food<br />
(pollen and/<br />
or nectar);<br />
Larval food<br />
Native bees; Honey<br />
bees; Bumble<br />
bees; Butterflies;<br />
Monarchs; Flies,<br />
beetles, and<br />
wasps<br />
Yes<br />
Herb,<br />
perennial<br />
Asclepias<br />
tuberosa<br />
butterfly<br />
milkweed<br />
Asclepiadaceae<br />
IA KS MN MO OK TX IA,KS,MN,MO,OK,TX "46,47,50,<br />
51,52"<br />
2–3 Orange Yes Jun–Aug Sun, Part<br />
Shade<br />
Dry<br />
Coarse,<br />
Medium<br />
Medium Low/Low Spring<br />
and<br />
Summer<br />
Very High<br />
Adult food<br />
(pollen and/<br />
or nectar);<br />
Larval food<br />
Native bees; Honey<br />
bees; Bumble<br />
bees; Butterflies;<br />
Monarchs; Flies,<br />
beetles, and<br />
wasps; Hummingbirds<br />
Seed,<br />
Container<br />
Yes<br />
Herb,<br />
perennial<br />
Asclepias<br />
verticillata<br />
whorled<br />
milkweed<br />
Asclepiadaceae<br />
IA KS MN MO OK TX IA,KS,MN,MO,OK,TX "46,47,48,<br />
51,52"<br />
1–2 Purple No Jun–Sep Sun, Part<br />
Shade<br />
Moist, Dry<br />
Coarse,<br />
Medium,<br />
Fine<br />
Medium Very High Adult food<br />
(pollen and/<br />
or nectar);<br />
Larval food<br />
Native bees; Honey<br />
bees; Bumble<br />
bees; Butterflies;<br />
Monarchs; Flies,<br />
beetles, and<br />
wasps<br />
Yes<br />
Herb,<br />
perennial<br />
Asclepias viridis<br />
green<br />
milkweed<br />
Asclepiadaceae<br />
KS MO OK TX KS,MO,OK,TX 2–3 Green Yes Jun–Aug Sun, Part<br />
Shade<br />
Dry<br />
Coarse,<br />
Medium<br />
Medium Very High Adult food<br />
(pollen and/<br />
or nectar);<br />
Larval food<br />
Native bees; Honey<br />
bees; Bumble<br />
bees; Butterflies;<br />
Monarchs; Flies,<br />
beetles, and<br />
wasps<br />
Yes<br />
<strong>Roadside</strong> <strong>Revegetation</strong>: An Integrated Approach to Establishing Native Plants and Pollinator Habitat<br />
468
APPENDIX<br />
Kansas — Native <strong>Revegetation</strong> Plants for Pollinators, continued...<br />
Plant Type Scientific Name Common Name Plant Family IA KS MN MO OK TX All States Eco- Region<br />
(EPA III)<br />
Height<br />
(feet)<br />
Flower<br />
Color<br />
Showy Flowering Sun<br />
Exposure<br />
Soil<br />
Moisture<br />
Soil Texture<br />
Salt<br />
Tolerance<br />
Palatability<br />
(Browsing/<br />
Grazing)<br />
Active<br />
Growth<br />
Period<br />
Pollinator<br />
Value<br />
Benefits to<br />
Pollinators<br />
Pollinators<br />
Propagation<br />
Commercially<br />
Available<br />
Herb,<br />
perennial<br />
Baptisia alba var.<br />
macrophylla<br />
white wild<br />
indigo<br />
Fabaceae IA KS MO OK IA,KS,MO,OK 3–6 White Yes May–Jun Sun Moist, Dry Medium,<br />
Fine<br />
Medium Very High Adult food<br />
(pollen and/<br />
or nectar)<br />
Native bees;<br />
Bumble bees<br />
Yes<br />
Herb,<br />
perennial<br />
Baptisia australis<br />
blue false<br />
indigo<br />
Fabaceae IA KS MO OK TX IA,KS,MO,OK,TX 1.5–2 White Yes Apr–Jun Sun Moist, Dry Medium Very High Adult food<br />
(pollen and/<br />
or nectar)<br />
Native bees;<br />
Bumble bees<br />
Yes<br />
Herb,<br />
perennial<br />
Baptisia bracteata<br />
cream wild<br />
indigo<br />
Fabaceae IA KS MN MO OK TX IA,KS,MN,MO,OK,TX 1.5–2 White Yes Apr–May Sun Dry Medium Very High Adult food<br />
(pollen and/<br />
or nectar)<br />
Native bees;<br />
Bumble bees<br />
Yes<br />
Herb,<br />
perennial<br />
Callirhoe<br />
involucrata<br />
purple poppy<br />
mallow<br />
Malvaceae KS MO OK TX KS,MO,OK,TX 1 Purple Yes Mar–Jun Sun, Part<br />
Shade<br />
Dry<br />
Coarse,<br />
Medium,<br />
Fine<br />
Low<br />
Spring<br />
and<br />
Summer<br />
Very High<br />
Adult food<br />
(pollen and/<br />
or nectar)<br />
Native bees; Flies,<br />
beetles, and<br />
wasps<br />
Seed,<br />
Cutting,<br />
Sprig<br />
Yes<br />
Herb,<br />
perennial<br />
Coreopsis<br />
lanceolata<br />
lanceleaf<br />
coreopsis<br />
Asteraceae KS MO OK TX KS,MO,OK,TX 1–3 Yellow Yes Apr–Jun Sun Moist, Dry Medium,<br />
Fine<br />
None Low/Low Spring<br />
and<br />
Summer<br />
High<br />
Adult food<br />
(pollen and/<br />
or nectar)<br />
Native bees; Flies,<br />
beetles, and<br />
wasps<br />
Seed,<br />
Container<br />
Yes<br />
Herb,<br />
perennial<br />
Dalea candida<br />
white prairie<br />
clover<br />
Fabaceae IA KS MN MO OK TX IA,KS,MN,MO,OK,TX 1–2 White Yes May–Sep Sun Dry Medium,<br />
Fine<br />
High/High<br />
Spring<br />
and<br />
Summer<br />
Very High<br />
Adult food<br />
(pollen and/<br />
or nectar)<br />
Native bees;<br />
Honey bees;<br />
Bumble bees<br />
Yes<br />
Herb,<br />
perennial<br />
Dalea purpurea<br />
purple prairie<br />
clover<br />
Fabaceae IA KS MN MO OK TX IA,KS,MN,MO,OK,TX "46,47,48,<br />
49,50,51,<br />
52"<br />
1–2.5 Purple Yes Jul–Aug Sun Dry Coarse,<br />
Medium,<br />
Fine<br />
Medium<br />
Medium/<br />
Medium<br />
Spring<br />
and<br />
Summer<br />
Very High<br />
Adult food<br />
(pollen and/<br />
or nectar)<br />
Native bees;<br />
Honey bees;<br />
Bumble bees<br />
Yes<br />
Herb,<br />
perennial<br />
Desmanthus<br />
illinoensis<br />
Illinois<br />
bundleflower<br />
Fabaceae KS MO OK TX KS,MO,OK,TX 3 White Yes May–Jul Sun Moist, Dry Coarse,<br />
Medium,<br />
Fine<br />
None High/High Spring<br />
and<br />
Summer<br />
High<br />
Adult food<br />
(pollen and/<br />
or nectar);<br />
Larval food<br />
Native bees; Flies Seed Yes<br />
Herb,<br />
perennial<br />
Echinacea<br />
angustifolia<br />
narrowleaf<br />
coneflower<br />
Asteraceae KS OK TX KS,OK,TX 2–3 Pink Yes May–Jul Sun, Part<br />
Shade<br />
Dry<br />
Coarse,<br />
Medium,<br />
Fine<br />
Very High<br />
Adult food<br />
(pollen and/<br />
or nectar)<br />
Native bees;<br />
Honey bees;<br />
Butterflies and<br />
moths; Monarchs<br />
Yes<br />
Herb,<br />
perennial<br />
Echinacea pallida<br />
pale purple<br />
coneflower<br />
Asteraceae IA KS MO OK IA,KS,MO,OK 2.5–4 Purple Yes Jun–Aug Sun Dry Coarse,<br />
Medium,<br />
Fine<br />
Low Low/Low Spring<br />
and<br />
Summer<br />
Very High<br />
Adult food<br />
(pollen and/<br />
or nectar)<br />
Native bees;<br />
Honey bees;<br />
Butterflies and<br />
moths; Monarchs<br />
Seed<br />
Yes<br />
Herb,<br />
perennial<br />
Eryngium<br />
yuccifolium<br />
rattlesnake<br />
master<br />
Apiaceae IA KS MN MO OK TX IA,KS,MN,MO,OK,TX 3–5 White No Jul–Sep Sun, Part<br />
Shade<br />
Wet, Moist,<br />
Dry<br />
Very High<br />
Adult food<br />
(pollen and/<br />
or nectar)<br />
Native bees; Flies,<br />
beetles, and<br />
wasps<br />
Yes<br />
Herb,<br />
perennial<br />
Eupatorium<br />
perfoliatum<br />
common<br />
boneset<br />
Asteraceae IA KS MN MO OK TX IA,KS,MN,MO,OK,TX 3–6 White Yes Jun–Oct Sun, Part<br />
Shade<br />
Wet, Moist<br />
Coarse,<br />
Medium,<br />
Fine<br />
Very High<br />
Adult food<br />
(pollen and/<br />
or nectar)<br />
Native bees;<br />
Butterflies and<br />
moths; Monarchs;<br />
Flies, beetles, and<br />
wasps<br />
Yes<br />
Herb,<br />
perennial<br />
Helianthus<br />
maximiliani<br />
maximilian<br />
sunflower<br />
Asteraceae IA KS MN MO OK TX IA,KS,MN,MO,OK,TX 3–8 Yellow Yes Aug–Nov Sun Moist, Dry Coarse,<br />
Medium,<br />
Fine<br />
Low<br />
High/<br />
Medium<br />
Summer<br />
and<br />
Fall<br />
Very High<br />
Adult food<br />
(pollen and/<br />
or nectar)<br />
Native bees;<br />
Honey bees;<br />
Flies, beetles, and<br />
wasps<br />
Seed,<br />
Bare<br />
root,<br />
Sprig<br />
Yes<br />
<strong>Roadside</strong> <strong>Revegetation</strong>: An Integrated Approach to Establishing Native Plants and Pollinator Habitat<br />
469
APPENDIX<br />
Kansas — Native <strong>Revegetation</strong> Plants for Pollinators, continued...<br />
Plant Type Scientific Name Common Name Plant Family IA KS MN MO OK TX All States Eco- Region<br />
(EPA III)<br />
Height<br />
(feet)<br />
Flower<br />
Color<br />
Showy Flowering Sun<br />
Exposure<br />
Soil<br />
Moisture<br />
Soil Texture<br />
Salt<br />
Tolerance<br />
Palatability<br />
(Browsing/<br />
Grazing)<br />
Active<br />
Growth<br />
Period<br />
Pollinator<br />
Value<br />
Benefits to<br />
Pollinators<br />
Pollinators<br />
Propagation<br />
Commercially<br />
Available<br />
Herb,<br />
perennial<br />
Helianthus<br />
pauciflorus<br />
stiff sunflower Asteraceae IA KS MN MO IA,KS,MN,MO "46,47,48,<br />
49,50,51,<br />
52"<br />
1–4 Yellow Yes Jul–Aug Sun Dry Coarse,<br />
Medium,<br />
Fine<br />
Medium Very High Adult food<br />
(pollen and/<br />
or nectar)<br />
Native bees; Flies,<br />
beetles, and<br />
wasps<br />
Yes<br />
Herb,<br />
perennial<br />
Helianthus<br />
tuberosus<br />
Jerusalem<br />
artichoke<br />
Asteraceae IA KS MN MO IA,KS,MN,MO 6–10 Yellow Yes Jul–Sep Sun, Part<br />
Shade<br />
Moist, Dry<br />
Coarse,<br />
Medium<br />
Low High/High Spring<br />
and<br />
Summer<br />
Very High<br />
Adult food<br />
(pollen and/<br />
or nectar)<br />
Native bees; Flies,<br />
beetles, and<br />
wasps<br />
Seed,<br />
Tuber<br />
Yes<br />
Herb,<br />
perennial<br />
Heliopsis<br />
helianthoides<br />
smooth oxeye Asteraceae IA KS MN MO IA,KS,MN,MO 3–5 Yellow Yes Jun–Aug Sun Moist, Dry Coarse,<br />
Medium,<br />
Fine<br />
Medium/<br />
Medium<br />
Spring<br />
and<br />
Summer<br />
Very High<br />
Adult food<br />
(pollen and/<br />
or nectar)<br />
Native bees;<br />
Bumble bees;<br />
Butterflies and<br />
moths; Flies,<br />
beetles, and<br />
wasps<br />
Yes<br />
Herb,<br />
perennial<br />
Hibiscus laevis<br />
halberdleaf<br />
rosemallow<br />
Malvaceae IA KS MO OK TX IA,KS,MO,OK,TX 8 White Yes Jun–Aug Sun, Part<br />
Shade<br />
Wet<br />
Medium,<br />
Fine<br />
None Low/Low Spring,<br />
Summer,<br />
Fall<br />
Very High<br />
Adult food<br />
(pollen and/<br />
or nectar)<br />
Native bees;<br />
Bumble bees;<br />
Hummingbirds<br />
Seed,<br />
Container,<br />
Bare<br />
root,<br />
Cutting<br />
Yes<br />
Herb,<br />
perennial<br />
Liatris aspera<br />
rough blazing<br />
star<br />
Asteraceae IA KS MN MO OK TX IA,KS,MN,MO,OK,TX "46,47,48,<br />
51,52"<br />
2–3 Purple Yes Jul–Sep Sun, Part<br />
Shade<br />
Dry<br />
Coarse,<br />
Medium<br />
Medium Very High Adult food<br />
(pollen and/<br />
or nectar)<br />
Native bees;<br />
Bumble bees;<br />
Hummingbirds<br />
Yes<br />
Herb,<br />
perennial<br />
Liatris punctata<br />
dotted blazing<br />
star<br />
Asteraceae IA KS MN OK TX IA,KS,MN,OK,TX "46,47,48,<br />
51,52"<br />
1–2 Purple Yes Jul–Sep Sun Dry Coarse,<br />
Medium,<br />
Fine<br />
Medium High/High Summer<br />
Very High<br />
Adult food<br />
(pollen and/<br />
or nectar)<br />
Native bees;<br />
Bumble bees;<br />
Hummingbirds<br />
Seed,<br />
Container,<br />
Corm<br />
Yes<br />
Herb,<br />
perennial<br />
prairie blazing<br />
star<br />
Asteraceae IA KS MN MO OK TX IA,KS,MN,MO,OK,TX 3–5 Purple Yes Jul–Sep Sun Wet, Moist,<br />
Dry<br />
Coarse,<br />
Medium,<br />
Fine<br />
None<br />
Medium/<br />
Low<br />
Liatris pycnostachya<br />
Summer<br />
Very High<br />
Adult food<br />
(pollen and/<br />
or nectar)<br />
Native bees;<br />
Butterflies and<br />
moths; Hummingbirds<br />
Seed,<br />
Container,<br />
Corm<br />
Yes<br />
Herb,<br />
perennial<br />
Lobelia cardinalis cardinal flower Campanulaceae<br />
KS MO OK TX KS,MO,OK,TX 2–4 Red Yes Jun–Aug Part<br />
Shade,<br />
Shade<br />
Wet, Moist Medium None Medium/<br />
Medium<br />
Spring Very High Adult food<br />
(pollen and/<br />
or nectar)<br />
Butterflies;<br />
Hummingbirds<br />
Seed,<br />
Container<br />
Yes<br />
Herb,<br />
perennial<br />
Lobelia siphilitica<br />
great blue<br />
lobelia<br />
Campanulaceae<br />
IA KS MN MO IA,KS,MN,MO 1–3 Blue Yes Jun–Aug Sun Wet, Moist Very High Adult food<br />
(pollen and/<br />
or nectar)<br />
Native bees;<br />
Bumble bees;<br />
Butterflies and<br />
moths; Flies, beetles,<br />
and wasps;<br />
Hummingbirds<br />
Yes<br />
Herb,<br />
perennial<br />
Mimulus ringens<br />
Allegheny<br />
monkeyflower<br />
Scrophulariaceae<br />
IA KS MN MO IA,KS,MN,MO 1–4 Blue Yes Jun–Sep Sun, Part<br />
Shade<br />
Wet Medium Very High Adult food<br />
(pollen and/<br />
or nectar)<br />
Bumble bees;<br />
Hummingbirds<br />
Yes<br />
Herb,<br />
perennial<br />
Monarda fistulosa wild bergamot Lamiaceae IA KS MN MO OK TX IA,KS,MN,MO,OK,TX "46,47,48,<br />
49,50,51,<br />
52"<br />
2–4 Purple Yes Jul–Aug Sun, Part<br />
Shade<br />
Moist, Dry<br />
Coarse,<br />
Medium,<br />
Fine<br />
Medium<br />
Medium/<br />
Medium<br />
Spring Very High Adult food<br />
(pollen and/<br />
or nectar)<br />
Native bees;<br />
Bumble bees;<br />
Hummingbirds<br />
Seed,<br />
Container<br />
Yes<br />
Herb,<br />
perennial<br />
Oenothera macrocarpa<br />
bigfruit<br />
evening<br />
primrose<br />
Onagraceae KS MO OK TX KS,MO,OK,TX 1–1.5 Yellow Yes Apr–Aug Sun Dry Coarse,<br />
Medium<br />
Very High<br />
Adult food<br />
(pollen and/<br />
or nectar)<br />
Native bees;<br />
Moths<br />
Yes<br />
Herb,<br />
perennial<br />
Oenothera<br />
speciosa<br />
pink evening<br />
primrose<br />
Onagraceae KS MO OK TX KS,MO,OK,TX 1–1.5 Pink Yes May–Jul Sun Dry Coarse,<br />
Medium,<br />
Fine<br />
High<br />
Adult food<br />
(pollen and/<br />
or nectar)<br />
Native bees;<br />
Butterflies and<br />
moths<br />
Yes<br />
<strong>Roadside</strong> <strong>Revegetation</strong>: An Integrated Approach to Establishing Native Plants and Pollinator Habitat<br />
470
APPENDIX<br />
Kansas — Native <strong>Revegetation</strong> Plants for Pollinators, continued...<br />
Plant Type Scientific Name Common Name Plant Family IA KS MN MO OK TX All States Eco- Region<br />
(EPA III)<br />
Height<br />
(feet)<br />
Flower<br />
Color<br />
Showy Flowering Sun<br />
Exposure<br />
Soil<br />
Moisture<br />
Soil Texture<br />
Salt<br />
Tolerance<br />
Palatability<br />
(Browsing/<br />
Grazing)<br />
Active<br />
Growth<br />
Period<br />
Pollinator<br />
Value<br />
Benefits to<br />
Pollinators<br />
Pollinators<br />
Propagation<br />
Commercially<br />
Available<br />
Herb,<br />
perennial<br />
Oligoneuron<br />
rigidum var.<br />
rigidum<br />
stiff goldenrod Asteraceae IA KS MN MO OK TX IA,KS,MN,MO,OK,TX "46,47,48,<br />
49,50,51,<br />
52"<br />
1–5 Yellow Yes Aug–Sep Sun, Part<br />
Shade<br />
Dry<br />
Coarse,<br />
Medium,<br />
Fine<br />
Medium Low/Low Spring<br />
and<br />
Summer<br />
Very High<br />
Adult food<br />
(pollen and/<br />
or nectar)<br />
Native bees;<br />
Honey bees;<br />
Flies, beetles, and<br />
wasps<br />
Seed,<br />
Bare<br />
root,<br />
Sprig<br />
Yes<br />
Herb,<br />
perennial<br />
Penstemon<br />
cobaea<br />
prairie<br />
penstemon<br />
Scrophulariaceae<br />
KS OK TX KS,OK,TX 1–2 Purple Yes May–Jul Sun Dry Coarse,<br />
Medium<br />
Medium Very High Adult food<br />
(pollen and/<br />
or nectar)<br />
Native bees;<br />
Bumble bees;<br />
Hummingbirds<br />
Yes<br />
Herb,<br />
perennial<br />
Penstemon<br />
digitalis<br />
smooth beard<br />
tongue<br />
Scrophulariaceae<br />
KS MO OK KS,MO,OK 2–3 White Yes Jun–Jul Sun Wet, Moist,<br />
Dry<br />
Coarse,<br />
Medium<br />
Medium<br />
Medium/<br />
Low<br />
Spring<br />
and<br />
Summer<br />
Very High<br />
Adult food<br />
(pollen and/<br />
or nectar)<br />
Native bees;<br />
Bumble bees;<br />
Hummingbirds<br />
Seed,<br />
Container,<br />
Sprig<br />
Yes<br />
Herb,<br />
perennial<br />
Penstemon<br />
tubaeflorus<br />
white wand<br />
beardtongue<br />
Scrophulariaceae<br />
KS MO OK KS,MO,OK 1–3 White Yes May–Jun Sun Dry Coarse Very High Adult food<br />
(pollen and/<br />
or nectar)<br />
Native bees;<br />
Bumble bees;<br />
Butterflies;<br />
Hummingbirds<br />
Yes<br />
Herb,<br />
perennial<br />
Phlox divaricata<br />
wild blue<br />
phlox<br />
Polemoniaceae<br />
IA KS MN MO IA,KS,MN,MO 3 Purple Yes Jun–Aug Sun, Part<br />
Shade<br />
Moist, Dry<br />
Coarse,<br />
Medium,<br />
Fine<br />
None Low/Low Spring<br />
and<br />
Summer<br />
Very High<br />
Adult food<br />
(pollen and/<br />
or nectar)<br />
Moths; Flies, beetles,<br />
and wasps;<br />
Hummingbirds<br />
Container,<br />
Sprig<br />
Yes<br />
Herb,<br />
perennial<br />
Phlox pilosa downy phlox Polemoniaceae<br />
IA KS MN MO OK TX IA,KS,MN,MO,OK,TX 1–2 Pink Yes Mar–May Sun, Part<br />
Shade<br />
Moist, Dry Coarse Very High Adult food<br />
(pollen and/<br />
or nectar)<br />
Native bees;<br />
Bumble bees;<br />
Butterflies and<br />
moths; Flies;<br />
Hummingbirds<br />
Yes<br />
Herb,<br />
perennial<br />
Physostegia<br />
virginiana<br />
obedient plant Lamiaceae IA KS MN MO IA,KS,MN,MO 2–4 Lavender<br />
Yes Jun–Sep Sun, Part<br />
Shade<br />
Wet, Moist<br />
Coarse,<br />
Medium<br />
Very High<br />
Adult food<br />
(pollen and/<br />
or nectar)<br />
Native bees;<br />
Hummingbirds<br />
Yes<br />
Herb,<br />
perennial<br />
Potentilla arguta tall cinquefoil Rosaceae IA KS MN MO IA,KS,MN,MO 3 Yellow Yes May–Jun Sun, Part<br />
Shade<br />
Dry Medium None Low/Low Spring<br />
and<br />
Summer<br />
High<br />
Adult food<br />
(pollen and/<br />
or nectar)<br />
Native bees; Flies<br />
Seed,<br />
Bare root<br />
Yes<br />
Herb,<br />
perennial<br />
Pycnanthemum<br />
tenuifolium<br />
narrowleaf<br />
mountain mint<br />
Lamiaceae IA KS MO OK TX IA,KS,MO,OK,TX 1–3 White No Jun–Aug Sun Wet, Moist,<br />
Dry<br />
Very High<br />
Adult food<br />
(pollen and/<br />
or nectar)<br />
Native bees;<br />
Honey bees;<br />
Bumble bees;<br />
Flies, beetles, and<br />
wasps<br />
Yes<br />
Herb,<br />
perennial<br />
Ratibida<br />
columnifera<br />
Mexican hat Asteraceae IA KS MN OK TX IA,KS,MN,OK,TX 1–3 Yellow Yes May–Oct Sun Dry Coarse,<br />
Medium,<br />
Fine<br />
Medium<br />
Medium/<br />
Medium<br />
Summer<br />
Very High<br />
Adult food<br />
(pollen and/<br />
or nectar)<br />
Native bees<br />
Seed,<br />
Container<br />
Yes<br />
Herb,<br />
perennial<br />
Ratibida pinnata<br />
gray-headed<br />
coneflower<br />
Asteraceae IA KS MN MO OK IA,KS,MN,MO,OK 3–5 Yellow Yes Jun–Aug Sun Moist, Dry Coarse,<br />
Medium,<br />
Fine<br />
Medium<br />
Medium/<br />
Medium<br />
Spring<br />
and<br />
Summer<br />
Very High<br />
Adult food<br />
(pollen and/<br />
or nectar)<br />
Native bees<br />
Seed,<br />
Container<br />
Yes<br />
Herb,<br />
perennial<br />
Rudbeckia hirta<br />
black-eyed<br />
susan<br />
Asteraceae IA KS MN MO OK TX IA,KS,MN,MO,OK,TX 2–3 Yellow Yes Jun–Aug Sun, Part<br />
Shade<br />
Moist, Dry<br />
Coarse,<br />
Medium,<br />
Fine<br />
Medium Low/Low Fall,<br />
Winter<br />
and<br />
Spring<br />
Very High<br />
Adult food<br />
(pollen and/<br />
or nectar)<br />
Native bees;<br />
Butterflies<br />
Seed<br />
Yes<br />
Herb,<br />
perennial<br />
Rudbeckia<br />
laciniata<br />
cutleaf<br />
coneflower<br />
Asteraceae IA KS MN MO IA,KS,MN,MO 3–12 Yellow Yes Jul–Sep Sun, Part<br />
Shade,<br />
Shade<br />
Moist, Dry<br />
Coarse,<br />
Medium,<br />
Fine<br />
None High/High Spring Very High Adult food<br />
(pollen and/<br />
or nectar)<br />
Native bees;<br />
Honey bees;<br />
Butterflies<br />
Seed,<br />
Container<br />
Yes<br />
<strong>Roadside</strong> <strong>Revegetation</strong>: An Integrated Approach to Establishing Native Plants and Pollinator Habitat<br />
471
APPENDIX<br />
Kansas — Native <strong>Revegetation</strong> Plants for Pollinators, continued...<br />
Plant Type Scientific Name Common Name Plant Family IA KS MN MO OK TX All States Eco- Region<br />
(EPA III)<br />
Height<br />
(feet)<br />
Flower<br />
Color<br />
Showy Flowering Sun<br />
Exposure<br />
Soil<br />
Moisture<br />
Soil Texture<br />
Salt<br />
Tolerance<br />
Palatability<br />
(Browsing/<br />
Grazing)<br />
Active<br />
Growth<br />
Period<br />
Pollinator<br />
Value<br />
Benefits to<br />
Pollinators<br />
Pollinators<br />
Propagation<br />
Commercially<br />
Available<br />
Herb,<br />
perennial<br />
Salvia azurea<br />
azure blue<br />
sage<br />
Lamiaceae KS OK TX KS,OK,TX 3–6 Blue Yes Sep–Nov Part<br />
Shade<br />
Dry<br />
Coarse,<br />
Medium,<br />
Fine<br />
Medium/<br />
Low<br />
Spring<br />
and<br />
Summer<br />
Very High<br />
Adult food<br />
(pollen and/<br />
or nectar)<br />
Native bees;<br />
Bumble bees;<br />
Hummingbirds<br />
Yes<br />
Herb,<br />
perennial<br />
Scrophularia<br />
marilandica<br />
carpenter's<br />
square<br />
Scrophulariaceae<br />
IA KS MO IA,KS,MO 5–10 Purple No Jul–Sep Sun, Part<br />
Shade<br />
Moist, Dry<br />
Coarse,<br />
Medium<br />
Medium<br />
Adult food<br />
(pollen and/<br />
or nectar)<br />
Native bees;<br />
Wasps<br />
Yes<br />
Herb,<br />
perennial<br />
Scutellaria ovata<br />
heartleaf<br />
skullcap<br />
Lamiaceae KS MO OK KS,MO,OK 1–2 Blue Yes May–Sep Part<br />
Shade,<br />
Shade<br />
Moist, Dry<br />
Coarse,<br />
Medium<br />
Very High<br />
Adult food<br />
(pollen and/<br />
or nectar)<br />
Hummingbirds<br />
Yes<br />
Herb,<br />
perennial<br />
Senna marilandica<br />
Maryland<br />
senna<br />
Fabaceae KS MO OK TX KS,MO,OK,TX 3–6 Yellow Yes Jun–Aug Sun, Part<br />
Shade<br />
Wet, Moist<br />
Coarse,<br />
Medium<br />
None High/High Spring<br />
and<br />
Summer<br />
High<br />
Adult food<br />
(pollen and/<br />
or nectar)<br />
Bumble bees<br />
Seed,<br />
Container<br />
Yes<br />
Herb,<br />
perennial<br />
Silphium<br />
integrifolium<br />
wholeleaf<br />
rosinweed<br />
Asteraceae IA KS MO OK IA,KS,MO,OK 2–6 Yellow Yes Jul–Sep Sun Wet, Moist,<br />
Dry<br />
Very High<br />
Adult food<br />
(pollen and/<br />
or nectar)<br />
Native bees;<br />
Bumble bees;<br />
Butterflies; Flies,<br />
beetles, and<br />
wasps<br />
Yes<br />
Herb,<br />
perennial<br />
Silphium<br />
perfoliatum<br />
cup plant Asteraceae IA KS MN MO IA,KS,MN,MO 3–8 Yellow Yes Jul–Sep Sun Moist Coarse,<br />
Medium,<br />
Fine<br />
Summer<br />
Very High<br />
Adult food<br />
(pollen and/<br />
or nectar);<br />
Nest<br />
material<br />
Native bees; Honey<br />
bees; Bumble<br />
bees; Butterflies;<br />
Flies, beetles, and<br />
wasps<br />
Seed,<br />
Container<br />
Yes<br />
Herb,<br />
perennial<br />
Solidago gigantea<br />
giant<br />
goldenrod<br />
Asteraceae IA KS MN MO OK TX IA,KS,MN,MO,OK,TX 3–7 Yellow Yes Sep–Nov Part<br />
Shade<br />
Moist<br />
Medium,<br />
Fine<br />
None Medium/ Summer<br />
Very High<br />
Adult food<br />
(pollen and/<br />
or nectar)<br />
Native bees;<br />
Honey bees;<br />
Butterflies; Flies,<br />
beetles, and<br />
wasps<br />
Seed<br />
Yes<br />
Herb,<br />
perennial<br />
Solidago<br />
nemoralis<br />
gray goldenrod<br />
Asteraceae IA KS MN MO OK TX IA,KS,MN,MO,OK,TX 4–5 Yellow Yes Aug–Sep Sun, Part<br />
Shade<br />
Dry<br />
Coarse,<br />
Medium,<br />
Fine<br />
Medium<br />
Medium/<br />
Medium<br />
Spring<br />
and<br />
Summer<br />
Very High<br />
Adult food<br />
(pollen and/<br />
or nectar)<br />
Native bees;<br />
Honey bees;<br />
Butterflies; Flies,<br />
beetles, and<br />
wasps<br />
Seed,<br />
Container,<br />
Cutting<br />
Yes<br />
Herb,<br />
perennial<br />
Solidago speciosa<br />
showy<br />
goldenrod<br />
Asteraceae IA KS MN MO OK TX IA,KS,MN,MO,OK,TX "46,47,48,<br />
50,51,52"<br />
1–4 Yellow Yes Aug–Sep Sun, Part<br />
Shade<br />
Dry<br />
Coarse,<br />
Medium,<br />
Fine<br />
Medium Very High Adult food<br />
(pollen and/<br />
or nectar)<br />
Native bees;<br />
Honey bees;<br />
Butterflies and<br />
moths; Flies,<br />
beetles, and<br />
wasps<br />
Yes<br />
Herb,<br />
perennial<br />
Symphyotrichum<br />
ericoides var.<br />
ericoides<br />
heath aster Asteraceae IA KS MN MO OK TX IA,KS,MN,MO,OK,TX "46,47,48,<br />
49,50,51,<br />
52"<br />
1–3 White Yes Aug–Oct Sun, Part<br />
Shade<br />
Moist, Dry<br />
Coarse,<br />
Medium,<br />
Fine<br />
Medium Very High Adult food<br />
(pollen and/<br />
or nectar)<br />
Native bees;<br />
Butterflies and<br />
moths; Flies,<br />
beetles, and<br />
wasps<br />
Yes<br />
Herb,<br />
perennial<br />
Symphyotrichum<br />
lateriflorum<br />
calico aster Asteraceae IA KS MN MO OK TX IA,KS,MN,MO,OK,TX 1–3 White Yes Aug–Oct Sun Wet, Moist Low/High Spring,<br />
Summer,<br />
Fall<br />
Very High<br />
Adult food<br />
(pollen and/<br />
or nectar)<br />
Native bees;<br />
Butterflies and<br />
moths; Flies,<br />
beetles, and<br />
wasps<br />
Yes<br />
<strong>Roadside</strong> <strong>Revegetation</strong>: An Integrated Approach to Establishing Native Plants and Pollinator Habitat<br />
472
APPENDIX<br />
Kansas — Native <strong>Revegetation</strong> Plants for Pollinators, continued...<br />
Plant Type Scientific Name Common Name Plant Family IA KS MN MO OK TX All States Eco- Region<br />
(EPA III)<br />
Height<br />
(feet)<br />
Flower<br />
Color<br />
Showy Flowering Sun<br />
Exposure<br />
Soil<br />
Moisture<br />
Soil Texture<br />
Salt<br />
Tolerance<br />
Palatability<br />
(Browsing/<br />
Grazing)<br />
Active<br />
Growth<br />
Period<br />
Pollinator<br />
Value<br />
Benefits to<br />
Pollinators<br />
Pollinators<br />
Propagation<br />
Commercially<br />
Available<br />
Herb,<br />
perennial<br />
Symphyotrichum<br />
novae-angliae<br />
New England<br />
aster<br />
Asteraceae IA KS MN MO IA,KS,MN,MO 2.5–6 Purple Yes Aug–Oct Sun Wet, Moist Very High Adult food<br />
(pollen and/<br />
or nectar)<br />
Native bees;<br />
Honey bees;<br />
Bumble bees;<br />
Butterflies and<br />
moths<br />
Yes<br />
Herb,<br />
perennial<br />
Symphyotrichum<br />
oblongifolium<br />
aromatic aster Asteraceae IA KS MN MO OK TX IA,KS,MN,MO,OK,TX "46,47,51,<br />
52"<br />
1–2 Lavender<br />
Yes Aug–Sep Sun Dry Coarse,<br />
Medium,<br />
Fine<br />
Low Very High Adult food<br />
(pollen and/<br />
or nectar)<br />
Native bees;<br />
Butterflies and<br />
moths; Flies,<br />
beetles, and<br />
wasps<br />
Yes<br />
Herb,<br />
perennial<br />
Symphyotrichum<br />
sericeum<br />
silky aster Asteraceae IA KS MN MO OK IA,KS,MN,MO,OK "46,47,48,<br />
51,52"<br />
1–2.5 Lavender<br />
Yes Aug–Oct Sun Dry Coarse,<br />
Medium<br />
Medium Very High Adult food<br />
(pollen and/<br />
or nectar)<br />
Native bees;<br />
Butterflies and<br />
moths<br />
Yes<br />
Herb,<br />
perennial<br />
Tradescantia<br />
occidentalis<br />
prairie<br />
spiderwort<br />
Commelinaceae<br />
KS OK TX KS,OK,TX 1–2 blue Yes Apr–Jun Sun Moist, Dry Medium High Adult food<br />
(pollen and/<br />
or nectar)<br />
Native bees; Flies,<br />
beetles, and<br />
wasps<br />
Yes<br />
Herb,<br />
perennial<br />
Verbesina<br />
alternifolia<br />
wingstem Asteraceae IA KS MO OK IA,KS,MO,OK 3–6 Yellow Yes Jul–Sep Sun Wet, Moist Very High Adult food<br />
(pollen and/<br />
or nectar)<br />
Native bees;<br />
Honey bees;<br />
Bumble bees;<br />
Butterflies and<br />
moths; Flies, beetles,<br />
and wasps;<br />
Hummingbirds<br />
Yes<br />
Herb,<br />
perennial<br />
Vernonia<br />
baldwinii<br />
Baldwin's<br />
ironweed<br />
Asteraceae IA KS MO OK TX IA,KS,MO,OK,TX 3–5 Purple Yes Jul–Nov Sun Moist Coarse,<br />
Medium,<br />
Fine<br />
Very High<br />
Adult food<br />
(pollen and/<br />
or nectar)<br />
Native bees;<br />
Butterflies and<br />
moths; Hummingbirds<br />
Yes<br />
Herb,<br />
perennial<br />
Vernonia<br />
fasciculata<br />
ironweed Asteraceae IA KS MN MO OK IA,KS,MN,MO,OK 4–5 Purple Yes Jul–Sep Sun Moist Coarse,<br />
Medium,<br />
Fine<br />
Very High<br />
Adult food<br />
(pollen and/<br />
or nectar)<br />
Native bees;<br />
Butterflies and<br />
moths; Hummingbirds<br />
Yes<br />
Herb,<br />
perennial<br />
Veronicastrum<br />
virginicum<br />
Culver's root<br />
Scrophulariaceae<br />
IA KS MN MO OK IA,KS,MN,MO,OK 4–5 White Yes Jun–Aug Sun Wet, Moist,<br />
Dry<br />
Very High<br />
Adult food<br />
(pollen and/<br />
or nectar)<br />
Native bees;<br />
Honey bees;<br />
Flies, beetles,<br />
and wasps;<br />
Hummingbirds<br />
Yes<br />
Herb,<br />
perennial<br />
Zizia aurea golden zizia Apiaceae IA KS MN MO OK IA,KS,MN,MO,OK 1–3 Yellow Yes Apr–Aug Sun, Part<br />
Shade<br />
Wet, Moist,<br />
Dry<br />
Coarse,<br />
Medium<br />
Very High<br />
Adult food<br />
(pollen and/<br />
or nectar)<br />
Native bees;<br />
Butterflies and<br />
moths; Flies,<br />
beetles, and<br />
wasps<br />
Yes<br />
Shrub<br />
Amorpha<br />
canescens<br />
lead plant Fabaceae IA KS MN MO OK TX IA,KS,MN,MO,OK,TX "46,47,48,<br />
50,51,52"<br />
1.5–4 Purple Yes Jun–Aug Sun, Part<br />
Shade<br />
Dry<br />
Coarse,<br />
Medium<br />
Medium High/Low Spring<br />
and<br />
Summer<br />
Very High<br />
Adult food<br />
(pollen and/<br />
or nectar)<br />
Native bees;<br />
Honey bees;<br />
Flies, beetles, and<br />
wasps<br />
Seed,<br />
Container,<br />
Bare<br />
root,<br />
Cutting<br />
Yes<br />
Shrub<br />
Amorpha<br />
fruticosa<br />
false indigo<br />
bush<br />
Fabaceae KS OK TX KS,OK,TX 6–12 Purple Yes Apr–Jun Sun, Part<br />
Shade<br />
Moist<br />
Coarse,<br />
Medium,<br />
Fine<br />
Low Low/Low Spring<br />
and<br />
Summer<br />
Very High<br />
Adult food<br />
(pollen and/<br />
or nectar)<br />
Native bees; Flies,<br />
beetles, and<br />
wasps<br />
Seed,<br />
Container,<br />
Bare<br />
root<br />
Yes<br />
<strong>Roadside</strong> <strong>Revegetation</strong>: An Integrated Approach to Establishing Native Plants and Pollinator Habitat<br />
473
APPENDIX<br />
Kansas — Native <strong>Revegetation</strong> Plants for Pollinators, continued...<br />
Plant Type Scientific Name Common Name Plant Family IA KS MN MO OK TX All States Eco- Region<br />
(EPA III)<br />
Height<br />
(feet)<br />
Flower<br />
Color<br />
Showy Flowering Sun<br />
Exposure<br />
Soil<br />
Moisture<br />
Soil Texture<br />
Salt<br />
Tolerance<br />
Palatability<br />
(Browsing/<br />
Grazing)<br />
Active<br />
Growth<br />
Period<br />
Pollinator<br />
Value<br />
Benefits to<br />
Pollinators<br />
Pollinators<br />
Propagation<br />
Commercially<br />
Available<br />
Shrub<br />
Ceanothus<br />
americanus<br />
New Jersey tea Rhamnaceae IA KS MN MO OK TX IA,KS,MN,MO,OK,TX "47,50,51,<br />
52"<br />
2–3 White Yes Jun–Jul Sun, Part<br />
Shade<br />
Dry<br />
Coarse,<br />
Medium<br />
High<br />
Medium/<br />
Low<br />
Spring<br />
and<br />
Summer<br />
Very High<br />
Adult food<br />
(pollen and/<br />
or nectar)<br />
Native bees; Flies,<br />
beetles, and<br />
wasps<br />
Seed,<br />
Container,<br />
Bare<br />
root<br />
Yes<br />
Shrub<br />
Cephalanthus<br />
occidentalis<br />
buttonbush Rubiaceae IA KS MO OK TX IA,KS,MO,OK,TX 12 White Yes Jun–Aug Sun, Part<br />
Shade<br />
Moist<br />
Coarse,<br />
Medium,<br />
Fine<br />
Low Low/Low Spring Very High Adult food<br />
(pollen and/<br />
or nectar)<br />
Native bees;<br />
Honey bees;<br />
Bumble bees;<br />
Hummingbirds<br />
Seed,<br />
Container,<br />
Bare<br />
root,<br />
Cutting<br />
Yes<br />
Shrub Opuntia humifusa devil's-tongue Cactaceae KS MO OK TX KS,MO,OK,TX 1–1.5 Yellow Yes May–Jul Sun Dry Coarse Very High Adult food<br />
(pollen and/<br />
or nectar)<br />
Native bees;<br />
Butterflies; Flies,<br />
beetles, and<br />
wasps<br />
Yes<br />
Shrub Rhus aromatica fragrant sumac Anacardiaceae<br />
KS MO OK TX KS,MO,OK,TX 2-6 Green No Apr–Jun Sun, Part<br />
Shade,<br />
Shade<br />
Moist, Dry<br />
Coarse,<br />
Medium<br />
Low/Low<br />
Spring<br />
and<br />
Summer<br />
High<br />
Adult food<br />
(pollen and/<br />
or nectar);<br />
Nest<br />
material<br />
Native bees;<br />
Honey bees;<br />
Flies, beetles, and<br />
wasps<br />
Yes<br />
Shrub Rhus glabra smooth sumac Anacardiaceae<br />
IA KS MN MO OK TX IA,KS,MN,MO,OK,TX 12 Green Yes Apr–May Sun, Part<br />
Shade<br />
Dry<br />
Coarse,<br />
Medium<br />
Medium Low/Low Spring<br />
and<br />
Summer<br />
High<br />
Adult food<br />
(pollen and/<br />
or nectar);<br />
Nest<br />
material<br />
Native bees;<br />
Honey bees;<br />
Flies, beetles, and<br />
wasps<br />
Seed,<br />
Container,<br />
Bare<br />
root<br />
Yes<br />
Shrub Rosa arkansana prairie rose Rosaceae IA KS MN MO OK IA,KS,MN,MO,OK "46,47,48,<br />
49,50,51,<br />
52"<br />
2 White Yes Jun–Aug Sun, Part<br />
Shade<br />
Moist, Dry<br />
Coarse,<br />
Medium,<br />
Fine<br />
Very High<br />
Adult food<br />
(pollen and/<br />
or nectar);<br />
Nest<br />
material<br />
Native bees;<br />
Bumble bees;<br />
Flies, beetles, and<br />
wasps<br />
Yes<br />
Shrub Rosa carolina pasture rose Rosaceae IA KS MO OK TX IA,KS,MO,OK,TX 2 White Yes Jun–Aug Sun, Part<br />
Shade<br />
Moist, Dry<br />
Coarse,<br />
Medium,<br />
Fine<br />
Medium<br />
Medium/<br />
Medium<br />
Spring<br />
and<br />
Summer<br />
Very High<br />
Adult food<br />
(pollen and/<br />
or nectar);<br />
Nest<br />
material<br />
Native bees;<br />
Bumble bees;<br />
Flies, beetles, and<br />
wasps<br />
Seed,<br />
Container,<br />
Bare<br />
root<br />
Yes<br />
Shrub Salix discolor pussy willow Salicaceae IA KS MN MO OK IA,KS,MN,MO,OK 40 White Yes Dec–Feb Sun Wet, Moist Coarse,<br />
Medium,<br />
Fine<br />
None Medium/ Spring Very High Adult food<br />
(pollen and/<br />
or nectar)<br />
Native bees;<br />
Honey bees;<br />
Bumble bees;<br />
Butterflies<br />
Seed,<br />
Container,<br />
Bare<br />
root,<br />
Cutting<br />
Yes<br />
Shrub Salix humilis prairie willow Salicaceae IA KS MN MO OK IA,KS,MN,MO,OK 8 White No Mar–May Sun, Part<br />
Shade<br />
Moist, Dry<br />
Coarse,<br />
Medium,<br />
Fine<br />
Low<br />
Medium/<br />
Low<br />
Very High<br />
Adult food<br />
(pollen and/<br />
or nectar)<br />
Native bees; Flies,<br />
beetles, and<br />
wasps<br />
Spring<br />
and<br />
Summer<br />
Container,<br />
Bare<br />
root,<br />
Cutting<br />
Yes<br />
Shrub<br />
Sambucus nigra<br />
ssp. canadensis<br />
American black<br />
elderberry<br />
Caprifoliaceae<br />
IA KS MN MO OK TX IA,KS,MN,MO,OK,TX 12 White Yes Apr–May Sun, Part<br />
Shade<br />
Wet, Moist,<br />
Dry<br />
Medium None Medium/<br />
Low<br />
Spring<br />
and<br />
Summer<br />
Very High<br />
Adult food<br />
(pollen and/<br />
or nectar);<br />
Nest<br />
material<br />
Native bees; Flies,<br />
beetles, and<br />
wasps<br />
Seed,<br />
Container,<br />
Bare<br />
root<br />
Yes<br />
Tree Cercis canadensis eastern redbud Fabaceae KS MO OK TX KS,MO,OK,TX 20 Purple Yes Mar–Apr Sun, Part<br />
Shade<br />
Moist<br />
Coarse,<br />
Medium,<br />
Fine<br />
None<br />
Medium/<br />
Low<br />
Spring<br />
and<br />
Summer<br />
Very High<br />
Adult food<br />
(pollen and/<br />
or nectar);<br />
Nest<br />
material<br />
Native bees;<br />
Bumble bees;<br />
Seed,<br />
Container,<br />
Bare<br />
root,<br />
Cutting<br />
Yes<br />
<strong>Roadside</strong> <strong>Revegetation</strong>: An Integrated Approach to Establishing Native Plants and Pollinator Habitat<br />
474
APPENDIX<br />
Kansas — Native <strong>Revegetation</strong> Plants for Pollinators, continued...<br />
Plant Type Scientific Name Common Name Plant Family IA KS MN MO OK TX All States Eco- Region<br />
(EPA III)<br />
Height<br />
(feet)<br />
Flower<br />
Color<br />
Showy Flowering Sun<br />
Exposure<br />
Soil<br />
Moisture<br />
Soil Texture<br />
Salt<br />
Tolerance<br />
Palatability<br />
(Browsing/<br />
Grazing)<br />
Active<br />
Growth<br />
Period<br />
Pollinator<br />
Value<br />
Benefits to<br />
Pollinators<br />
Pollinators<br />
Propagation<br />
Commercially<br />
Available<br />
Tree<br />
Crataegus<br />
crus-galli<br />
cockspur<br />
hawthorn<br />
Rosaceae KS MO OK TX KS,MO,OK,TX 30 White Yes Apr–May Sun Wet, Moist,<br />
Dry<br />
Coarse,<br />
Medium,<br />
Fine<br />
Medium<br />
Medium/<br />
Low<br />
Spring<br />
and<br />
Summer<br />
Very High<br />
Adult food<br />
(pollen and/<br />
or nectar)<br />
Native bees; Flies,<br />
beetles, and<br />
wasps<br />
Seed,<br />
Container,<br />
Bare<br />
root<br />
Yes<br />
Tree Crataegus mollis downy<br />
hawthorn<br />
Rosaceae IA KS MO OK IA,KS,MO,OK 30 White Yes Apr–May Sun Wet, Moist,<br />
Dry<br />
Coarse,<br />
Medium,<br />
Fine<br />
Medium Very High Adult food<br />
(pollen and/<br />
or nectar)<br />
Native bees; Flies,<br />
beetles, and<br />
wasps<br />
Yes<br />
Tree Prunus americana American plum Rosaceae IA KS MN MO OK IA,KS,MN,MO,OK 24 White Yes Apr–May Sun, Part<br />
Shade<br />
Dry<br />
Coarse,<br />
Medium<br />
Low<br />
Medium/<br />
Low<br />
Spring<br />
and<br />
Summer<br />
Very High<br />
Adult food<br />
(pollen and/<br />
or nectar)<br />
Native bees;<br />
Honey bees;<br />
Bumble bees<br />
Seed,<br />
Container,<br />
Bare<br />
root<br />
Yes<br />
Tree<br />
Prunus angustifolia<br />
Chickasaw<br />
plum<br />
Rosaceae KS MO OK TX KS,MO,OK,TX 25 White Yes Feb–May Sun, Part<br />
Shade<br />
Dry<br />
Medium,<br />
Fine<br />
Low<br />
Medium/<br />
Low<br />
Spring<br />
and<br />
Summer<br />
Very High<br />
Adult food<br />
(pollen and/<br />
or nectar)<br />
Native bees<br />
Seed,<br />
Container,<br />
Bare<br />
root<br />
Yes<br />
Tree Prunus serotina black cherry Rosaceae IA KS MN MO OK TX IA,KS,MN,MO,OK,TX 80 White Yes May–Jun Sun, Part<br />
Shade<br />
Moist, Dry<br />
Coarse,<br />
Medium<br />
Medium Low/Low Spring<br />
and<br />
Summer<br />
Very High<br />
Adult food<br />
(pollen and/<br />
or nectar)<br />
Native bees;<br />
Honey bees;<br />
Bumble bees;<br />
Flies, beetles, and<br />
wasps<br />
Seed,<br />
Container,<br />
Bare<br />
root<br />
Yes<br />
Vine Campsis radicans trumpet<br />
creeper<br />
Bignoniaceae<br />
KS MO OK TX KS,MO,OK,TX 2 Red Yes Jun–Aug Sun, Part<br />
Shade<br />
Wet, Moist,<br />
Dry<br />
Coarse,<br />
Medium<br />
None<br />
Spring<br />
and<br />
Summer<br />
Very High<br />
Adult food<br />
(pollen and/<br />
or nectar)<br />
Native bees;<br />
Honey bees;<br />
Bumble bees;<br />
Hummingbirds<br />
Seed,<br />
Container,<br />
Bare<br />
root,<br />
Cutting<br />
Yes<br />
<strong>Roadside</strong> <strong>Revegetation</strong>: An Integrated Approach to Establishing Native Plants and Pollinator Habitat<br />
475
APPENDIX<br />
MINNESOTA — NATIVE REVEGETATION PLANTS FOR POLLINATORS<br />
Plant Type Scientific Name Common Name Plant Family IA KS MN MO OK TX All States Eco- Region<br />
(EPA III)<br />
Height<br />
(feet)<br />
Flower<br />
Color<br />
Showy Flowering Sun<br />
Exposure<br />
Soil<br />
Moisture<br />
Soil<br />
Texture<br />
Salt<br />
Tolerance<br />
Palatability<br />
(Browsing/<br />
Grazing)<br />
Active<br />
Growth<br />
Period<br />
Pollinator<br />
Value<br />
Benefits to<br />
Pollinators<br />
Pollinators<br />
Propagation<br />
Commercially<br />
Available<br />
Plant Type Scientific Name Common<br />
Name<br />
Plant Family IA KS MN MO OK TX All States Eco- Region<br />
(EPA<br />
III)<br />
Height<br />
(feet)<br />
Flower<br />
Color<br />
Showy<br />
Sun<br />
Exposure<br />
Soil<br />
Moisture<br />
Soil<br />
Texture<br />
Salt<br />
Tolerance<br />
Flowering<br />
Palatability<br />
(Browsing/<br />
Grazing)<br />
Active<br />
Growth<br />
Period<br />
Pollinator<br />
Value<br />
Benefits to<br />
Pollinators<br />
Pollinators<br />
Propagation<br />
Commercially<br />
Available<br />
Grass,<br />
perennial<br />
Andropogon<br />
gerardii<br />
big bluestem Poaceae IA KS MN MO OK TX IA,KS,MN,MO,OK,TX "46,47,48,<br />
49,50,51,<br />
52"<br />
3–8 Green No May–Jun Sun, Part<br />
Shade<br />
Dry<br />
Coarse,<br />
Medium,<br />
Fine<br />
Medium<br />
Medium/<br />
High<br />
Summer Low Nest<br />
material;<br />
Shelter<br />
Seed<br />
Yes<br />
Grass,<br />
perennial<br />
Bouteloua<br />
curtipendula<br />
side-oats<br />
grama<br />
Poaceae IA KS MN MO OK TX IA,KS,MN,MO,OK,TX "46,47,48,<br />
51,52"<br />
1–3 Green No Jul–Sep Sun, Part<br />
Shade<br />
Dry<br />
Coarse,<br />
Medium,<br />
Fine<br />
Medium<br />
Medium/<br />
High<br />
Summer Low Nest<br />
material;<br />
Shelter<br />
Seed<br />
Yes<br />
Grass,<br />
perennial<br />
Bouteloua gracilis blue grama Poaceae IA KS MN MO OK TX IA,KS,MN,MO,OK,TX 464,748<br />
5,152<br />
0.5–1.5 Green No May–Jul Sun Dry Coarse,<br />
Medium,<br />
Fine<br />
Medium<br />
High/<br />
High<br />
Summer<br />
and Fall<br />
Low<br />
Nest<br />
material;<br />
Shelter<br />
Seed<br />
Yes<br />
Grass,<br />
perennial<br />
Elymus canadensis<br />
nodding wild<br />
rye<br />
Poaceae IA KS MN MO OK TX IA,KS,MN,MO,OK,TX "46,47,48,<br />
49,50,51,<br />
52"<br />
3–5 Green No Jul–Aug Sun, Part<br />
Shade<br />
Moist, Dry<br />
Coarse,<br />
Medium,<br />
Fine<br />
Medium<br />
Medium/<br />
Medium<br />
Spring,<br />
Summer,<br />
Fall<br />
Low Shelter Seed Yes<br />
Grass,<br />
perennial<br />
Schizachyrium<br />
scoparium<br />
little bluestem Poaceae IA KS MN MO OK TX IA,KS,MN,MO,OK,TX "46,47,48,<br />
49,50,51,<br />
52"<br />
1–2.5 Green No Aug–Sep Sun, Part<br />
Shade<br />
Moist, Dry<br />
Coarse,<br />
Medium,<br />
Fine<br />
Medium<br />
Medium/<br />
High<br />
Summer<br />
and Fall<br />
Low<br />
Nest<br />
material;<br />
Shelter<br />
Seed<br />
Yes<br />
Grass,<br />
perennial<br />
Sorghastrum<br />
nutans<br />
Indian grass Poaceae IA KS MN MO OK TX IA,KS,MN,MO,OK,TX "46,47,48,<br />
51,52"<br />
3–8 Green No Jul–Sep Sun Moist, Dry Coarse,<br />
Medium,<br />
Fine<br />
Medium<br />
Medium/<br />
High<br />
Summer<br />
and Fall<br />
Low<br />
Nest<br />
material;<br />
Shelter<br />
Seed<br />
Yes<br />
Grass,<br />
perennial<br />
Sporobolus<br />
heterolepis<br />
prairie<br />
dropseed<br />
Poaceae IA KS MN MO OK TX IA,KS,MN,MO,OK,TX "46,47,48,<br />
51,52"<br />
1.5–4 Green No Aug–Sep Sun Moist Coarse,<br />
Medium<br />
None<br />
Low/<br />
Medium<br />
Spring<br />
and<br />
Summer<br />
Low<br />
Nest<br />
material;<br />
Shelter<br />
Seed<br />
Yes<br />
Herb,<br />
annual<br />
Chamaecrista<br />
fasciculata<br />
partridge pea Fabaceae IA KS MN MO OK TX IA,KS,MN,MO,OK,TX "46,47,51,<br />
52"<br />
1–3 Yellow Yes Jul–Sep Sun, Part<br />
Shade<br />
Moist, Dry<br />
Coarse,<br />
Medium,<br />
Fine<br />
Low<br />
High/<br />
Medium<br />
Spring Very High Adult food<br />
(pollen<br />
and/or<br />
nectar)<br />
Native bees;<br />
Bumble bees;<br />
Flies, beetles,<br />
and wasps<br />
Seed<br />
Yes<br />
Herb,<br />
annual<br />
Impatiens<br />
capensis<br />
jewelweed<br />
Balsaminaceae<br />
IA KS MN MO IA,KS,MN,MO 2–5 Orange Yes Jun–Oct Part Shade,<br />
Shade<br />
Wet, Moist<br />
Coarse,<br />
Medium,<br />
Fine<br />
None Summer Very High Adult food<br />
(pollen<br />
and/or<br />
nectar)<br />
Bumble bees;<br />
Butterflies<br />
and Moths;<br />
Hummingbirds<br />
Seed<br />
Yes<br />
Herb,<br />
annual or<br />
perennial<br />
Monarda<br />
punctata<br />
dotted mint Lamiaceae KS MN OK TX KS,MN,OK,TX 1–3 Purple Yes Jun–Aug Sun Moist Very High Adult food<br />
(pollen<br />
and/or<br />
nectar)<br />
Native bees;<br />
Honey bees;<br />
Bumble bees;<br />
Butterflies and<br />
moths; Flies, beetles,<br />
and wasps;<br />
Hummingbirds<br />
Yes<br />
Herb,<br />
annual or<br />
perennial<br />
Verbena stricta hoary vervain Verbenaceae IA KS MN MO OK IA,KS,MN,MO,OK 2–3 White Yes Jun–Sep Sun Dry Coarse,<br />
Medium,<br />
Fine<br />
Very High<br />
Adult food<br />
(pollen<br />
and/or<br />
nectar)<br />
Native bees;<br />
Butterflies<br />
and moths;<br />
Hummingbirds<br />
Yes<br />
<strong>Roadside</strong> <strong>Revegetation</strong>: An Integrated Approach to Establishing Native Plants and Pollinator Habitat<br />
476
APPENDIX<br />
Minnesota — Native <strong>Revegetation</strong> Plants for Pollinators, continued...<br />
Plant Type Scientific Name Common Name Plant Family IA KS MN MO OK TX All States Eco- Region<br />
(EPA III)<br />
Height<br />
(feet)<br />
Flower<br />
Color<br />
Showy Flowering Sun<br />
Exposure<br />
Soil<br />
Moisture<br />
Soil<br />
Texture<br />
Salt<br />
Tolerance<br />
Palatability<br />
(Browsing/<br />
Grazing)<br />
Active<br />
Growth<br />
Period<br />
Pollinator<br />
Value<br />
Benefits to<br />
Pollinators<br />
Pollinators<br />
Propagation<br />
Commercially<br />
Available<br />
Herb,<br />
biennial or<br />
perennial<br />
Cirsium discolor field thistle Asteraceae IA KS MN MO IA,KS,MN,MO 3–8 Purple Yes Aug–Oct Sun Moist Very High Adult food<br />
(pollen<br />
and/or<br />
nectar)<br />
Native bees;<br />
Bumble bees;<br />
Butterflies and<br />
moths; Flies, beetles,<br />
and wasps;<br />
Hummingbirds<br />
Yes<br />
Herb,<br />
biennial or<br />
perennial<br />
Verbena hastata<br />
swamp<br />
verbena<br />
Verbenaceae IA KS MN MO OK IA,KS,MN,MO,OK 3–5 Lavender<br />
Yes Jul–Sep Sun, Part<br />
Shade<br />
Wet, Moist<br />
Coarse,<br />
Medium<br />
Very High<br />
Adult food<br />
(pollen<br />
and/or<br />
nectar)<br />
Native bees;<br />
Butterflies;<br />
Hummingbirds<br />
Yes<br />
Herb,<br />
perennial<br />
Achillea<br />
millefolium<br />
common<br />
yarrow<br />
Asteraceae IA KS MN MO OK TX IA,KS,MN,MO,OK,TX 3 White Yes May–Jul Sun, Part<br />
Shade<br />
Moist, Dry Medium Low Medium/<br />
Low<br />
Spring High Adult food<br />
(pollen<br />
and/or<br />
nectar);<br />
Nest<br />
material<br />
Native bees;<br />
Flies, beetles,<br />
and wasps<br />
Seed,<br />
Container,<br />
Sprig<br />
Yes<br />
Herb,<br />
perennial<br />
Actaea rubra red baneberry Ranunculaceae<br />
IA MN IA,MN 2–3 White Yes Apr–Jun Sun, Part<br />
Shade,<br />
Shade<br />
Moist, Dry Medium Medium Adult food<br />
(pollen<br />
and/or<br />
nectar)<br />
Flies and beetles<br />
Yes<br />
Herb,<br />
perennial<br />
Agastache<br />
foeniculum<br />
blue giant<br />
hyssop<br />
Lamiaceae MN MN "46,47,48,<br />
49,50,51,<br />
52"<br />
2–4 Blue Yes Jul–Oct Sun, Part<br />
Shade<br />
Dry<br />
Coarse,<br />
Medium,<br />
Fine<br />
Medium Very High Adult food<br />
(pollen<br />
and/or<br />
nectar);<br />
Nest<br />
material<br />
Native bees;<br />
Honey bees;<br />
Bumble bees;<br />
Hummingbirds<br />
Yes<br />
Herb,<br />
perennial<br />
Agastache<br />
scrophulariifolia<br />
purple giant<br />
hyssop<br />
Lamiaceae MN MN 2–6 Purple Yes Jul–Sep Sun, Part<br />
Shade,<br />
Shade<br />
Dry Very High Adult food<br />
(pollen<br />
and/or<br />
nectar)<br />
Native bees;<br />
Honey bees;<br />
Bumble bees;<br />
Hummingbirds<br />
Yes<br />
Herb,<br />
perennial<br />
Aquilegia<br />
canadensis<br />
red columbine<br />
Ranunculaceae<br />
IA KS MN MO OK IA,KS,MN,MO,OK 1–2 Red Yes Apr–May Sun, Part<br />
Shade<br />
Wet, Moist,<br />
Dry<br />
Coarse,<br />
Medium<br />
Very High<br />
Adult food<br />
(pollen<br />
and/or<br />
nectar)<br />
Bumble bees;<br />
Butterflies;<br />
Hummingbirds<br />
Yes<br />
Herb,<br />
perennial<br />
Asclepias syriaca<br />
common<br />
milkweed<br />
Asclepiadaceae<br />
IA KS MN MO OK IA,KS,MN,MO,OK "46,47,48,<br />
49,50,51,<br />
52"<br />
2.5–4 Purple Yes Jun–Aug Sun, Part<br />
Shade<br />
Moist, Dry<br />
Coarse,<br />
Medium,<br />
Fine<br />
Medium Very High Adult food<br />
(pollen<br />
and/or<br />
nectar);<br />
Larval food<br />
Native bees;<br />
Honey bees;<br />
Bumble bees;<br />
Butterflies;<br />
Monarchs; Flies,<br />
beetles, and<br />
wasps<br />
Yes<br />
Herb,<br />
perennial<br />
Asclepias<br />
tuberosa<br />
butterfly<br />
milkweed<br />
Asclepiadaceae<br />
IA KS MN MO OK TX IA,KS,MN,MO,OK,TX "46,47,50,<br />
51,52"<br />
2–3 Orange Yes Jun–Aug Sun, Part<br />
Shade<br />
Dry<br />
Coarse,<br />
Medium<br />
Medium Low/Low Spring<br />
and<br />
Summer<br />
Very High<br />
Adult food<br />
(pollen<br />
and/or<br />
nectar);<br />
Larval food<br />
Native bees;<br />
Honey bees;<br />
Bumble bees;<br />
Butterflies;<br />
Monarchs; Flies,<br />
beetles, and<br />
wasps; Hummingbirds<br />
Seed,<br />
Container<br />
Yes<br />
<strong>Roadside</strong> <strong>Revegetation</strong>: An Integrated Approach to Establishing Native Plants and Pollinator Habitat<br />
477
APPENDIX<br />
Minnesota — Native <strong>Revegetation</strong> Plants for Pollinators, continued...<br />
Plant Type Scientific Name Common Name Plant Family IA KS MN MO OK TX All States Eco- Region<br />
(EPA III)<br />
Height<br />
(feet)<br />
Flower<br />
Color<br />
Showy Flowering Sun<br />
Exposure<br />
Soil<br />
Moisture<br />
Soil<br />
Texture<br />
Salt<br />
Tolerance<br />
Palatability<br />
(Browsing/<br />
Grazing)<br />
Active<br />
Growth<br />
Period<br />
Pollinator<br />
Value<br />
Benefits to<br />
Pollinators<br />
Pollinators<br />
Propagation<br />
Commercially<br />
Available<br />
Herb,<br />
perennial<br />
Asclepias<br />
verticillata<br />
whorled<br />
milkweed<br />
Asclepiadaceae<br />
IA KS MN MO OK TX IA,KS,MN,MO,OK,TX "46,47,48,<br />
51,52"<br />
1–2 Purple No Jun–Sep Sun, Part<br />
Shade<br />
Moist, Dry<br />
Coarse,<br />
Medium,<br />
Fine<br />
Medium Very High Adult food<br />
(pollen<br />
and/or<br />
nectar);<br />
Larval food<br />
Native bees;<br />
Honey bees;<br />
Bumble bees;<br />
Butterflies;<br />
Monarchs; Flies,<br />
beetles, and<br />
wasps<br />
Yes<br />
Herb,<br />
perennial<br />
Baptisia bracteata<br />
cream wild<br />
indigo<br />
Fabaceae IA KS MN MO OK TX IA,KS,MN,MO,OK,TX 1.5–2 White Yes Apr–May Sun Dry Medium Very High Adult food<br />
(pollen<br />
and/or<br />
nectar)<br />
Native bees;<br />
Bumble bees<br />
Yes<br />
Herb,<br />
perennial<br />
Chelone glabra<br />
white<br />
turtlehead<br />
Scrophulariaceae<br />
IA MN MO IA,MN,MO 1–4 White Yes Jul–Sep Sun, Part<br />
Shade,<br />
Shade<br />
Wet Medium Very High Adult food<br />
(pollen<br />
and/or<br />
nectar)<br />
Bumble<br />
bees; Moths;<br />
Hummingbirds<br />
Yes<br />
Herb,<br />
perennial<br />
Dalea candida<br />
white prairie<br />
clover<br />
Fabaceae IA KS MN MO OK TX IA,KS,MN,MO,OK,TX 1–2 White Yes May–Sep Sun Dry Medium,<br />
Fine<br />
High/<br />
High<br />
Spring<br />
and<br />
Summer<br />
Very High<br />
Adult food<br />
(pollen<br />
and/or<br />
nectar)<br />
Native bees;<br />
Honey bees;<br />
Bumble bees<br />
Yes<br />
Herb,<br />
perennial<br />
Dalea purpurea<br />
purple prairie<br />
clover<br />
Fabaceae IA KS MN MO OK TX IA,KS,MN,MO,OK,TX "46,47,48,<br />
49,50,51,<br />
52"<br />
1–2.5 Purple Yes Jul–Aug Sun Dry Coarse,<br />
Medium,<br />
Fine<br />
Medium<br />
Medium/<br />
Medium<br />
Spring<br />
and<br />
Summer<br />
Very High<br />
Adult food<br />
(pollen<br />
and/or<br />
nectar)<br />
Native bees;<br />
Honey bees;<br />
Bumble bees<br />
Yes<br />
Herb,<br />
perennial<br />
Eryngium<br />
yuccifolium<br />
rattlesnake<br />
master<br />
Apiaceae IA KS MN MO OK TX IA,KS,MN,MO,OK,TX 3–5 White No Jul–Sep Sun, Part<br />
Shade<br />
Wet, Moist,<br />
Dry<br />
Very High<br />
Adult food<br />
(pollen<br />
and/or<br />
nectar)<br />
Native bees;<br />
Flies, beetles,<br />
and wasps<br />
Yes<br />
Herb,<br />
perennial<br />
Eupatorium<br />
perfoliatum<br />
common<br />
boneset<br />
Asteraceae IA KS MN MO OK TX IA,KS,MN,MO,OK,TX 3–6 White Yes Jun–Oct Sun, Part<br />
Shade<br />
Wet, Moist<br />
Coarse,<br />
Medium,<br />
Fine<br />
Very High<br />
Adult food<br />
(pollen<br />
and/or<br />
nectar)<br />
Native bees;<br />
Butterflies<br />
and moths;<br />
Monarchs; Flies,<br />
beetles, and<br />
wasps<br />
Yes<br />
Herb,<br />
perennial<br />
Euthamia<br />
graminifolia<br />
flat-top<br />
goldentop<br />
Asteraceae IA MN MO IA,MN,MO 2–4 Yellow Yes Jul–Sep Sun, Part<br />
Shade<br />
Wet, Moist Medium Very High Adult food<br />
(pollen<br />
and/or<br />
nectar)<br />
Native bees;<br />
Flies, beetles,<br />
and wasps<br />
Yes<br />
Herb,<br />
perennial<br />
Eutrochium<br />
maculatum<br />
spotted joe<br />
pye weed<br />
Asteraceae MN MN 4–8 Pink Yes Jul–Sep Sun, Part<br />
Shade<br />
Wet<br />
Coarse,<br />
Medium,<br />
Fine<br />
Very High<br />
Adult food<br />
(pollen<br />
and/or<br />
nectar)<br />
Native bees;<br />
Monarchs; Flies,<br />
beetles, and<br />
wasps<br />
Yes<br />
Herb,<br />
perennial<br />
Gentiana<br />
andrewsii<br />
bottle gentian<br />
Gentianaceae<br />
IA MN IA,MN 1–2 Blue Yes Aug–Oct Sun Moist Medium None Low/Low Spring,<br />
Summer,<br />
Fall<br />
Very High<br />
Adult food<br />
(pollen<br />
and/or<br />
nectar)<br />
Bumble bees Seed Yes<br />
Herb,<br />
perennial<br />
Geranium maculatum<br />
wild geranium Geraniaceae IA MN MO IA,MN,MO 1–3 Pink Yes Apr–May Sun, Part<br />
Shade<br />
Moist, Dry High Adult food<br />
(pollen<br />
and/or<br />
nectar)<br />
Native bees;<br />
Bumble bees;<br />
Flies, beetles,<br />
and wasps<br />
Yes<br />
<strong>Roadside</strong> <strong>Revegetation</strong>: An Integrated Approach to Establishing Native Plants and Pollinator Habitat<br />
478
APPENDIX<br />
Minnesota — Native <strong>Revegetation</strong> Plants for Pollinators, continued...<br />
Plant Type Scientific Name Common Name Plant Family IA KS MN MO OK TX All States Eco- Region<br />
(EPA III)<br />
Height<br />
(feet)<br />
Flower<br />
Color<br />
Showy Flowering Sun<br />
Exposure<br />
Soil<br />
Moisture<br />
Soil<br />
Texture<br />
Salt<br />
Tolerance<br />
Palatability<br />
(Browsing/<br />
Grazing)<br />
Active<br />
Growth<br />
Period<br />
Pollinator<br />
Value<br />
Benefits to<br />
Pollinators<br />
Pollinators<br />
Propagation<br />
Commercially<br />
Available<br />
Herb,<br />
perennial<br />
Helianthus<br />
maximiliani<br />
maximilian<br />
sunflower<br />
Asteraceae IA KS MN MO OK TX IA,KS,MN,MO,OK,TX 3–8 Yellow Yes Aug–Nov Sun Moist, Dry Coarse,<br />
Medium,<br />
Fine<br />
Low<br />
High/<br />
Medium<br />
Summer<br />
and Fall<br />
Very High<br />
Adult food<br />
(pollen<br />
and/or<br />
nectar)<br />
Native bees;<br />
Honey bees;<br />
Flies, beetles,<br />
and wasps<br />
Seed,<br />
Bare root,<br />
Sprig<br />
Yes<br />
Herb,<br />
perennial<br />
Helianthus<br />
pauciflorus<br />
stiff sunflower Asteraceae IA KS MN MO IA,KS,MN,MO "46,47,48,<br />
49,50,51,<br />
52"<br />
1–4 Yellow Yes Jul–Aug Sun Dry Coarse,<br />
Medium,<br />
Fine<br />
Medium Very High Adult food<br />
(pollen<br />
and/or<br />
nectar)<br />
Native bees;<br />
Flies, beetles,<br />
and wasps<br />
Yes<br />
Herb,<br />
perennial<br />
Helianthus<br />
tuberosus<br />
Jerusalem<br />
artichoke<br />
Asteraceae IA KS MN MO IA,KS,MN,MO 6–10 Yellow Yes Jul–Sep Sun, Part<br />
Shade<br />
Moist, Dry<br />
Coarse,<br />
Medium<br />
Low<br />
High/<br />
High<br />
Spring<br />
and<br />
Summer<br />
Very High<br />
Adult food<br />
(pollen<br />
and/or<br />
nectar)<br />
Native bees;<br />
Flies, beetles,<br />
and wasps<br />
Seed,<br />
Tuber<br />
Yes<br />
Herb,<br />
perennial<br />
Heliopsis<br />
helianthoides<br />
smooth oxeye Asteraceae IA KS MN MO IA,KS,MN,MO 3–5 Yellow Yes Jun–Aug Sun Moist, Dry Coarse,<br />
Medium,<br />
Fine<br />
Medium/<br />
Medium<br />
Spring<br />
and<br />
Summer<br />
Very High<br />
Adult food<br />
(pollen<br />
and/or<br />
nectar)<br />
Native bees;<br />
Bumble bees;<br />
Butterflies and<br />
moths; Flies,<br />
beetles, and<br />
wasps<br />
Yes<br />
Herb,<br />
perennial<br />
Liatris aspera<br />
rough blazing<br />
star<br />
Asteraceae IA KS MN MO OK TX IA,KS,MN,MO,OK,TX "46,47,48,<br />
51,52"<br />
2–3 Purple Yes Jul–Sep Sun, Part<br />
Shade<br />
Dry<br />
Coarse,<br />
Medium<br />
Medium Very High Adult food<br />
(pollen<br />
and/or<br />
nectar)<br />
Native bees;<br />
Bumble bees;<br />
Hummingbirds<br />
Yes<br />
Herb,<br />
perennial<br />
Liatris ligulistylis<br />
Rocky<br />
Mountain<br />
blazing star<br />
Asteraceae MN MN 1–3 Purple Yes Jul–Sep Sun Wet, Moist,<br />
Dry<br />
Coarse,<br />
Medium<br />
Very High<br />
Adult food<br />
(pollen<br />
and/or<br />
nectar)<br />
Native bees;<br />
Honey bees;<br />
Bumble bees;<br />
Butterflies;<br />
Monarchs<br />
Yes<br />
Herb,<br />
perennial<br />
Liatris punctata<br />
dotted blazing<br />
star<br />
Asteraceae IA KS MN OK TX IA,KS,MN,OK,TX "46,47,48,<br />
51,52"<br />
1–2 Purple Yes Jul–Sep Sun Dry Coarse,<br />
Medium,<br />
Fine<br />
Medium<br />
High/<br />
High<br />
Summer Very High Adult food<br />
(pollen<br />
and/or<br />
nectar)<br />
Native bees;<br />
Bumble bees;<br />
Hummingbirds<br />
Seed,<br />
Container,<br />
Corm<br />
Yes<br />
Herb,<br />
perennial<br />
Liatris pycnostachya<br />
prairie blazing<br />
star<br />
Asteraceae IA KS MN MO OK TX IA,KS,MN,MO,OK,TX 3–5 Purple Yes Jul–Sep Sun Wet, Moist,<br />
Dry<br />
Coarse,<br />
Medium,<br />
Fine<br />
None<br />
Medium/<br />
Low<br />
Summer Very High Adult food<br />
(pollen<br />
and/or<br />
nectar)<br />
Native bees;<br />
Butterflies<br />
and moths;<br />
Hummingbirds<br />
Seed,<br />
Container,<br />
Corm<br />
Yes<br />
Herb,<br />
perennial<br />
Lilium michiganense<br />
Michigan lily Liliaceae IA MN MO IA,MN,MO 2–6 Orange Yes Jun–Jul Sun, Part<br />
Shade<br />
Wet, Moist<br />
Coarse,<br />
Medium,<br />
Fine<br />
Very High<br />
Adult food<br />
(pollen<br />
and/or<br />
nectar)<br />
Native bees;<br />
Butterflies;<br />
Hummingbirds<br />
Yes<br />
Herb,<br />
perennial<br />
Lobelia siphilitica<br />
great blue<br />
lobelia<br />
Campanulaceae<br />
IA KS MN MO IA,KS,MN,MO 1–3 Blue Yes Jun–Aug Sun Wet, Moist Very High Adult food<br />
(pollen<br />
and/or<br />
nectar)<br />
Native bees;<br />
Bumble bees;<br />
Butterflies and<br />
moths; Flies, beetles,<br />
and wasps;<br />
Hummingbirds<br />
Yes<br />
Herb,<br />
perennial<br />
Lupinus perennis wild lupine Fabaceae MN MN 1–2 Blue Yes Apr–Jun Sun Dry Medium Very High Adult food<br />
(pollen<br />
and/or<br />
nectar)<br />
Native bees;<br />
Bumble bees<br />
Yes<br />
<strong>Roadside</strong> <strong>Revegetation</strong>: An Integrated Approach to Establishing Native Plants and Pollinator Habitat<br />
479
APPENDIX<br />
Minnesota — Native <strong>Revegetation</strong> Plants for Pollinators, continued...<br />
Plant Type Scientific Name Common Name Plant Family IA KS MN MO OK TX All States Eco- Region<br />
(EPA III)<br />
Height<br />
(feet)<br />
Flower<br />
Color<br />
Showy Flowering Sun<br />
Exposure<br />
Soil<br />
Moisture<br />
Soil<br />
Texture<br />
Salt<br />
Tolerance<br />
Palatability<br />
(Browsing/<br />
Grazing)<br />
Active<br />
Growth<br />
Period<br />
Pollinator<br />
Value<br />
Benefits to<br />
Pollinators<br />
Pollinators<br />
Propagation<br />
Commercially<br />
Available<br />
Herb,<br />
perennial<br />
Mimulus ringens<br />
Allegheny<br />
monkeyflower<br />
Scrophulariaceae<br />
IA KS MN MO IA,KS,MN,MO 1–4 Blue Yes Jun–Sep Sun, Part<br />
Shade<br />
Wet Medium Very High Adult food<br />
(pollen<br />
and/or<br />
nectar)<br />
Bumble bees;<br />
Hummingbirds<br />
Yes<br />
Herb,<br />
perennial<br />
Monarda fistulosa wild bergamot Lamiaceae IA KS MN MO OK TX IA,KS,MN,MO,OK,TX "46,47,48,<br />
49,50,51,<br />
52"<br />
2–4 Purple Yes Jul–Aug Sun, Part<br />
Shade<br />
Moist, Dry<br />
Coarse,<br />
Medium,<br />
Fine<br />
Medium<br />
Medium/<br />
Medium<br />
Spring Very High Adult food<br />
(pollen<br />
and/or<br />
nectar)<br />
Native bees;<br />
Bumble bees;<br />
Hummingbirds<br />
Seed,<br />
Container<br />
Yes<br />
Herb,<br />
perennial<br />
Oligoneuron<br />
rigidum var.<br />
rigidum<br />
stiff goldenrod Asteraceae IA KS MN MO OK TX IA,KS,MN,MO,OK,TX "46,47,48,<br />
49,50,51,<br />
52"<br />
1–5 Yellow Yes Aug–Sep Sun, Part<br />
Shade<br />
Dry<br />
Coarse,<br />
Medium,<br />
Fine<br />
Medium Low/Low Spring<br />
and<br />
Summer<br />
Very High<br />
Adult food<br />
(pollen<br />
and/or<br />
nectar)<br />
Native bees;<br />
Honey bees;<br />
Flies, beetles,<br />
and wasps<br />
Seed,<br />
Bare root,<br />
Sprig<br />
Yes<br />
Herb,<br />
perennial<br />
Penstemon<br />
gracilis<br />
lilac penstemon<br />
Scrophulariaceae<br />
MN MN 1–2 Lavender<br />
Yes May–Jun Part Shade Moist, Dry Coarse Very High Adult food<br />
(pollen<br />
and/or<br />
nectar)<br />
Native bees;<br />
Hummingbirds<br />
Yes<br />
Herb,<br />
perennial<br />
Penstemon<br />
grandiflorus<br />
large-flowered<br />
beard tongue<br />
Scrophulariaceae<br />
IA MN IA,MN "46,47,48,<br />
49,50,51,<br />
52"<br />
2–3 White Yes Jun–Jul Sun Dry Coarse,<br />
Medium<br />
Medium Very High Adult food<br />
(pollen<br />
and/or<br />
nectar)<br />
Native bees;<br />
Bumble bees;<br />
Hummingbirds<br />
Yes<br />
Herb,<br />
perennial<br />
Phlox divaricata<br />
wild blue<br />
phlox<br />
Polemoniaceae<br />
IA KS MN MO IA,KS,MN,MO 3 Purple Yes Jun–Aug Sun, Part<br />
Shade<br />
Moist, Dry<br />
Coarse,<br />
Medium,<br />
Fine<br />
None Low/Low Spring<br />
and<br />
Summer<br />
Very High<br />
Adult food<br />
(pollen<br />
and/or<br />
nectar)<br />
Moths; Flies, beetles,<br />
and wasps;<br />
Hummingbirds<br />
Container,<br />
Sprig<br />
Yes<br />
Herb,<br />
perennial<br />
Phlox pilosa downy phlox Polemoniaceae<br />
IA KS MN MO OK TX IA,KS,MN,MO,OK,TX 1–2 Pink Yes Mar–May Sun, Part<br />
Shade<br />
Moist, Dry Coarse Very High Adult food<br />
(pollen<br />
and/or<br />
nectar)<br />
Native bees;<br />
Bumble bees;<br />
Butterflies and<br />
moths; Flies;<br />
Hummingbirds<br />
Yes<br />
Herb,<br />
perennial<br />
Physostegia<br />
virginiana<br />
obedient plant Lamiaceae IA KS MN MO IA,KS,MN,MO 2–4 Lavender<br />
Yes Jun–Sep Sun, Part<br />
Shade<br />
Wet, Moist<br />
Coarse,<br />
Medium<br />
Very High<br />
Adult food<br />
(pollen<br />
and/or<br />
nectar)<br />
Native bees;<br />
Hummingbirds<br />
Yes<br />
Herb,<br />
perennial<br />
Potentilla arguta tall cinquefoil Rosaceae IA KS MN MO IA,KS,MN,MO 3 Yellow Yes May–Jun Sun, Part<br />
Shade<br />
Dry Medium None Low/Low Spring<br />
and<br />
Summer<br />
High<br />
Adult food<br />
(pollen<br />
and/or<br />
nectar)<br />
Native bees; Flies<br />
Seed,<br />
Bare root<br />
Yes<br />
Herb,<br />
perennial<br />
Pycnanthemum<br />
virginianum<br />
Virginia<br />
mountain mint<br />
Lamiaceae IA MN MO IA,MN,MO 1–3 White No Jun–Aug Sun Moist Very High Adult food<br />
(pollen<br />
and/or<br />
nectar)<br />
Native bees;<br />
Honey bees;<br />
Bumble bees;<br />
Flies, beetles,<br />
and wasps<br />
Yes<br />
Herb,<br />
perennial<br />
Ratibida<br />
columnifera<br />
Mexican hat Asteraceae IA KS MN OK TX IA,KS,MN,OK,TX 1–3 Yellow Yes May–Oct Sun Dry Coarse,<br />
Medium,<br />
Fine<br />
Medium<br />
Medium/<br />
Medium<br />
Summer Very High Adult food<br />
(pollen<br />
and/or<br />
nectar)<br />
Native bees<br />
Seed,<br />
Container<br />
Yes<br />
Herb,<br />
perennial<br />
Ratibida pinnata<br />
gray-headed<br />
coneflower<br />
Asteraceae IA KS MN MO OK IA,KS,MN,MO,OK 3–5 Yellow Yes Jun–Aug Sun Moist, Dry Coarse,<br />
Medium,<br />
Fine<br />
Medium<br />
Medium/<br />
Medium<br />
Spring<br />
and<br />
Summer<br />
Very High<br />
Adult food<br />
(pollen<br />
and/or<br />
nectar)<br />
Native bees<br />
Seed,<br />
Container<br />
Yes<br />
<strong>Roadside</strong> <strong>Revegetation</strong>: An Integrated Approach to Establishing Native Plants and Pollinator Habitat<br />
480
APPENDIX<br />
Minnesota — Native <strong>Revegetation</strong> Plants for Pollinators, continued...<br />
Plant Type Scientific Name Common Name Plant Family IA KS MN MO OK TX All States Eco- Region<br />
(EPA III)<br />
Height<br />
(feet)<br />
Flower<br />
Color<br />
Showy Flowering Sun<br />
Exposure<br />
Soil<br />
Moisture<br />
Soil<br />
Texture<br />
Salt<br />
Tolerance<br />
Palatability<br />
(Browsing/<br />
Grazing)<br />
Active<br />
Growth<br />
Period<br />
Pollinator<br />
Value<br />
Benefits to<br />
Pollinators<br />
Pollinators<br />
Propagation<br />
Commercially<br />
Available<br />
Herb,<br />
perennial<br />
Rudbeckia hirta<br />
black-eyed<br />
susan<br />
Asteraceae IA KS MN MO OK TX IA,KS,MN,MO,OK,TX 2–3 Yellow Yes Jun–Aug Sun, Part<br />
Shade<br />
Moist, Dry<br />
Coarse,<br />
Medium,<br />
Fine<br />
Medium Low/Low Fall,<br />
Winter<br />
and<br />
Spring<br />
Very High<br />
Adult food<br />
(pollen<br />
and/or<br />
nectar)<br />
Native bees;<br />
Butterflies<br />
Seed<br />
Yes<br />
Herb,<br />
perennial<br />
Rudbeckia<br />
laciniata<br />
cutleaf<br />
coneflower<br />
Asteraceae IA KS MN MO IA,KS,MN,MO 3–12 Yellow Yes Jul–Sep Sun, Part<br />
Shade,<br />
Shade<br />
Moist, Dry<br />
Coarse,<br />
Medium,<br />
Fine<br />
None<br />
High/<br />
High<br />
Spring Very High Adult food<br />
(pollen<br />
and/or<br />
nectar)<br />
Native bees;<br />
Honey bees;<br />
Butterflies<br />
Seed,<br />
Container<br />
Yes<br />
Herb,<br />
perennial<br />
Scrophularia<br />
lanceolata<br />
lanceleaf<br />
figwort<br />
Scrophulariaceae<br />
IA MN IA,MN 4–6 Purple No May–Jul Sun, Part<br />
Shade<br />
Wet, Moist,<br />
Dry<br />
Coarse,<br />
Medium<br />
Medium<br />
Adult food<br />
(pollen<br />
and/or<br />
nectar)<br />
Native bees;<br />
Wasps<br />
Yes<br />
Herb,<br />
perennial<br />
Silphium<br />
perfoliatum<br />
cup plant Asteraceae IA KS MN MO IA,KS,MN,MO 3–8 Yellow Yes Jul–Sep Sun Moist Coarse,<br />
Medium,<br />
Fine<br />
Summer Very High Adult food<br />
(pollen<br />
and/or<br />
nectar);<br />
Nest<br />
material<br />
Native bees;<br />
Honey bees;<br />
Bumble bees;<br />
Butterflies; Flies,<br />
beetles, and<br />
wasps<br />
Seed,<br />
Container<br />
Yes<br />
Herb,<br />
perennial<br />
Solidago gigantea<br />
giant<br />
goldenrod<br />
Asteraceae IA KS MN MO OK TX IA,KS,MN,MO,OK,TX 3–7 Yellow Yes Sep–Nov Part Shade Moist Medium,<br />
Fine<br />
None Medium/ Summer Very High Adult food<br />
(pollen<br />
and/or<br />
nectar)<br />
Native bees;<br />
Honey bees;<br />
Butterflies; Flies,<br />
beetles, and<br />
wasps<br />
Seed<br />
Yes<br />
Herb,<br />
perennial<br />
Solidago<br />
nemoralis<br />
gray goldenrod<br />
Asteraceae IA KS MN MO OK TX IA,KS,MN,MO,OK,TX 4–5 Yellow Yes Aug–Sep Sun, Part<br />
Shade<br />
Dry<br />
Coarse,<br />
Medium,<br />
Fine<br />
Medium<br />
Medium/<br />
Medium<br />
Spring<br />
and<br />
Summer<br />
Very High<br />
Adult food<br />
(pollen<br />
and/or<br />
nectar)<br />
Native bees;<br />
Honey bees;<br />
Butterflies; Flies,<br />
beetles, and<br />
wasps<br />
Seed,<br />
Container,<br />
Cutting<br />
Yes<br />
Herb,<br />
perennial<br />
Solidago speciosa<br />
showy<br />
goldenrod<br />
Asteraceae IA KS MN MO OK TX IA,KS,MN,MO,OK,TX "46,47,48,<br />
50,51,52"<br />
1–4 Yellow Yes Aug–Sep Sun, Part<br />
Shade<br />
Dry<br />
Coarse,<br />
Medium,<br />
Fine<br />
Medium Very High Adult food<br />
(pollen<br />
and/or<br />
nectar)<br />
Native bees;<br />
Honey bees;<br />
Butterflies and<br />
moths; Flies,<br />
beetles, and<br />
wasps<br />
Yes<br />
Herb,<br />
perennial<br />
Symphyotrichum<br />
ericoides var.<br />
ericoides<br />
heath aster Asteraceae IA KS MN MO OK TX IA,KS,MN,MO,OK,TX "46,47,48,<br />
49,50,51,<br />
52"<br />
1–3 White Yes Aug–Oct Sun, Part<br />
Shade<br />
Moist, Dry<br />
Coarse,<br />
Medium,<br />
Fine<br />
Medium Very High Adult food<br />
(pollen<br />
and/or<br />
nectar)<br />
Native bees;<br />
Butterflies and<br />
moths; Flies,<br />
beetles, and<br />
wasps<br />
Yes<br />
Herb,<br />
perennial<br />
Symphyotrichum<br />
laeve var. laeve<br />
smooth aster Asteraceae IA MN MO IA,MN,MO "46,47,48,<br />
50,51,52"<br />
1–3 Lavender<br />
Yes Aug–Oct Sun, Part<br />
Shade<br />
Moist, Dry<br />
Coarse,<br />
Medium,<br />
Fine<br />
Medium Low/Low Spring<br />
and<br />
Summer<br />
Very High<br />
Adult food<br />
(pollen<br />
and/or<br />
nectar)<br />
Native bees;<br />
Butterflies and<br />
moths<br />
Seed,<br />
Bare root<br />
Yes<br />
Herb,<br />
perennial<br />
Symphyotrichum<br />
lateriflorum<br />
calico aster Asteraceae IA KS MN MO OK TX IA,KS,MN,MO,OK,TX 1–3 White Yes Aug–Oct Sun Wet, Moist Low/High Spring,<br />
Summer,<br />
Fall<br />
Very High<br />
Adult food<br />
(pollen<br />
and/or<br />
nectar)<br />
Native bees;<br />
Butterflies and<br />
moths; Flies,<br />
beetles, and<br />
wasps<br />
Yes<br />
<strong>Roadside</strong> <strong>Revegetation</strong>: An Integrated Approach to Establishing Native Plants and Pollinator Habitat<br />
481
APPENDIX<br />
Minnesota — Native <strong>Revegetation</strong> Plants for Pollinators, continued...<br />
Plant Type Scientific Name Common Name Plant Family IA KS MN MO OK TX All States Eco- Region<br />
(EPA III)<br />
Height<br />
(feet)<br />
Flower<br />
Color<br />
Showy Flowering Sun<br />
Exposure<br />
Soil<br />
Moisture<br />
Soil<br />
Texture<br />
Salt<br />
Tolerance<br />
Palatability<br />
(Browsing/<br />
Grazing)<br />
Active<br />
Growth<br />
Period<br />
Pollinator<br />
Value<br />
Benefits to<br />
Pollinators<br />
Pollinators<br />
Propagation<br />
Commercially<br />
Available<br />
Herb,<br />
perennial<br />
Symphyotrichum<br />
novae-angliae<br />
New England<br />
aster<br />
Asteraceae IA KS MN MO IA,KS,MN,MO 2.5–6 Purple Yes Aug–Oct Sun Wet, Moist Very High Adult food<br />
(pollen<br />
and/or<br />
nectar)<br />
Native bees;<br />
Honey bees;<br />
Bumble bees;<br />
Butterflies and<br />
moths<br />
Yes<br />
Herb,<br />
perennial<br />
Symphyotrichum<br />
oblongifolium<br />
aromatic aster Asteraceae IA KS MN MO OK TX IA,KS,MN,MO,OK,TX "46,47,51,<br />
52"<br />
1–2 Lavender<br />
Yes Aug–Sep Sun Dry Coarse,<br />
Medium,<br />
Fine<br />
Low Very High Adult food<br />
(pollen<br />
and/or<br />
nectar)<br />
Native bees;<br />
Butterflies and<br />
moths; Flies,<br />
beetles, and<br />
wasps<br />
Yes<br />
Herb,<br />
perennial<br />
Symphyotrichum<br />
sericeum<br />
silky aster Asteraceae IA KS MN MO OK IA,KS,MN,MO,OK "46,47,48,<br />
51,52"<br />
1–2.5 Lavender<br />
Yes Aug–Oct Sun Dry Coarse,<br />
Medium<br />
Medium Very High Adult food<br />
(pollen<br />
and/or<br />
nectar)<br />
Native bees;<br />
Butterflies and<br />
moths<br />
Yes<br />
Herb,<br />
perennial<br />
Vernonia<br />
fasciculata<br />
ironweed Asteraceae IA KS MN MO OK IA,KS,MN,MO,OK 4–5 Purple Yes Jul–Sep Sun Moist Coarse,<br />
Medium,<br />
Fine<br />
Very High<br />
Adult food<br />
(pollen<br />
and/or<br />
nectar)<br />
Native bees;<br />
Butterflies<br />
and moths;<br />
Hummingbirds<br />
Yes<br />
Herb,<br />
perennial<br />
Veronicastrum<br />
virginicum<br />
Culver's root<br />
Scrophulariaceae<br />
IA KS MN MO OK IA,KS,MN,MO,OK 4–5 White Yes Jun–Aug Sun Wet, Moist,<br />
Dry<br />
Very High<br />
Adult food<br />
(pollen<br />
and/or<br />
nectar)<br />
Native bees;<br />
Honey bees;<br />
Flies, beetles,<br />
and wasps;<br />
Hummingbirds<br />
Yes<br />
Herb,<br />
perennial<br />
Zizia aptera meadow zizia Apiaceae MN MN 1–3 Yellow Yes May–Jun Sun, Part<br />
Shade,<br />
Shade<br />
Wet, Moist,<br />
Dry<br />
Coarse,<br />
Medium,<br />
Fine<br />
Very High<br />
Adult food<br />
(pollen<br />
and/or<br />
nectar)<br />
Native bees;<br />
Butterflies and<br />
moths; Flies,<br />
beetles, and<br />
wasps<br />
Yes<br />
Herb,<br />
perennial<br />
Zizia aurea golden zizia Apiaceae IA KS MN MO OK IA,KS,MN,MO,OK 1–3 Yellow Yes Apr–Aug Sun, Part<br />
Shade<br />
Wet, Moist,<br />
Dry<br />
Coarse,<br />
Medium<br />
Very High<br />
Adult food<br />
(pollen<br />
and/or<br />
nectar)<br />
Native bees;<br />
Butterflies and<br />
moths; Flies,<br />
beetles, and<br />
wasps<br />
Yes<br />
Shrub<br />
Amorpha<br />
canescens<br />
lead plant Fabaceae IA KS MN MO OK TX IA,KS,MN,MO,OK,TX "46,47,48,<br />
50,51,52"<br />
1.5–4 Purple Yes Jun–Aug Sun, Part<br />
Shade<br />
Dry<br />
Coarse,<br />
Medium<br />
Medium High/Low Spring<br />
and<br />
Summer<br />
Very High<br />
Adult food<br />
(pollen<br />
and/or<br />
nectar)<br />
Native bees;<br />
Honey bees;<br />
Flies, beetles,<br />
and wasps<br />
Seed,<br />
Container,<br />
Bare<br />
root,<br />
Cutting<br />
Yes<br />
Shrub<br />
Ceanothus<br />
americanus<br />
New Jersey tea Rhamnaceae IA KS MN MO OK TX IA,KS,MN,MO,OK,TX "47,50,51,<br />
52"<br />
2–3 White Yes Jun–Jul Sun, Part<br />
Shade<br />
Dry<br />
Coarse,<br />
Medium<br />
High<br />
Medium/<br />
Low<br />
Spring<br />
and<br />
Summer<br />
Very High<br />
Adult food<br />
(pollen<br />
and/or<br />
nectar)<br />
Native bees;<br />
Flies, beetles,<br />
and wasps<br />
Seed,<br />
Container,<br />
Bare<br />
root<br />
Yes<br />
Shrub<br />
Physocarpus<br />
opulifolius<br />
ninebark Rosaceae IA MN MO IA,MN,MO 8 White Yes Apr–Jun Sun, Part<br />
Shade<br />
Moist<br />
Coarse,<br />
Medium,<br />
Fine<br />
None Low/ Spring<br />
and<br />
Summer<br />
Very High<br />
Adult food<br />
(pollen<br />
and/or<br />
nectar)<br />
Native bees;<br />
Honey bees<br />
Seed,<br />
Container,<br />
Bare<br />
root,<br />
Cutting<br />
Yes<br />
<strong>Roadside</strong> <strong>Revegetation</strong>: An Integrated Approach to Establishing Native Plants and Pollinator Habitat<br />
482
APPENDIX<br />
Minnesota — Native <strong>Revegetation</strong> Plants for Pollinators, continued...<br />
Plant Type Scientific Name Common Name Plant Family IA KS MN MO OK TX All States Eco- Region<br />
(EPA III)<br />
Height<br />
(feet)<br />
Flower<br />
Color<br />
Showy Flowering Sun<br />
Exposure<br />
Soil<br />
Moisture<br />
Soil<br />
Texture<br />
Salt<br />
Tolerance<br />
Palatability<br />
(Browsing/<br />
Grazing)<br />
Active<br />
Growth<br />
Period<br />
Pollinator<br />
Value<br />
Benefits to<br />
Pollinators<br />
Pollinators<br />
Propagation<br />
Commercially<br />
Available<br />
Shrub Rhus glabra smooth sumac Anacardiaceae<br />
IA KS MN MO OK TX IA,KS,MN,MO,OK,TX 12 Green Yes Apr–May Sun, Part<br />
Shade<br />
Dry<br />
Coarse,<br />
Medium<br />
Medium Low/Low Spring<br />
and<br />
Summer<br />
High<br />
Adult food<br />
(pollen<br />
and/or<br />
nectar);<br />
Nest<br />
material<br />
Native bees;<br />
Honey bees;<br />
Flies, beetles,<br />
and wasps<br />
Seed,<br />
Container,<br />
Bare<br />
root<br />
Yes<br />
Shrub Rhus typhina staghorn<br />
sumac<br />
Anacardiaceae<br />
MN MN 30 Green No May–Jun Sun, Part<br />
Shade<br />
Dry<br />
Coarse,<br />
Medium<br />
None<br />
Medium/<br />
Low<br />
Spring<br />
and<br />
Summer<br />
High<br />
Adult food<br />
(pollen<br />
and/or<br />
nectar);<br />
Nest<br />
material<br />
Native bees;<br />
Honey bees;<br />
Flies, beetles,<br />
and wasps<br />
Seed,<br />
Container,<br />
Bare<br />
root<br />
Yes<br />
Shrub Rosa arkansana prairie rose Rosaceae IA KS MN MO OK IA,KS,MN,MO,OK "46,47,48,<br />
49,50,51,<br />
52"<br />
2 White Yes Jun–Aug Sun, Part<br />
Shade<br />
Moist, Dry<br />
Coarse,<br />
Medium,<br />
Fine<br />
Very High<br />
Adult food<br />
(pollen<br />
and/or<br />
nectar);<br />
Nest<br />
material<br />
Native bees;<br />
Bumble bees;<br />
Flies, beetles,<br />
and wasps<br />
Yes<br />
Shrub Salix discolor pussy willow Salicaceae IA KS MN MO OK IA,KS,MN,MO,OK 40 White Yes Dec–Feb Sun Wet, Moist Coarse,<br />
Medium,<br />
Fine<br />
None Medium/ Spring Very High Adult food<br />
(pollen<br />
and/or<br />
nectar)<br />
Native bees;<br />
Honey bees;<br />
Bumble bees;<br />
Butterflies<br />
Seed,<br />
Container,<br />
Bare<br />
root,<br />
Cutting<br />
Yes<br />
Shrub Salix humilis prairie willow Salicaceae IA KS MN MO OK IA,KS,MN,MO,OK 8 White No Mar–May Sun, Part<br />
Shade<br />
Moist, Dry<br />
Coarse,<br />
Medium,<br />
Fine<br />
Low<br />
Medium/<br />
Low<br />
Spring<br />
and<br />
Summer<br />
Very High<br />
Adult food<br />
(pollen<br />
and/or<br />
nectar)<br />
Native bees;<br />
Flies, beetles,<br />
and wasps<br />
Container,<br />
Bare<br />
root,<br />
Cutting<br />
Yes<br />
Shrub Salix interior sandbar willow Salicaceae IA MN IA, MN 30 White Yes Mar–Apr Sun Wet, Moist Fine None Medium/ Spring Very High Adult food<br />
(pollen<br />
and/or<br />
nectar)<br />
Native bees;<br />
Honey bees;<br />
Bumble bees;<br />
Butterflies<br />
Seed,<br />
Container,<br />
Bare<br />
root,<br />
Cutting,<br />
Sprig<br />
Yes<br />
Shrub<br />
Sambucus nigra<br />
ssp. canadensis<br />
American black<br />
elderberry<br />
Caprifoliaceae<br />
IA KS MN MO OK TX IA,KS,MN,MO,OK,TX 12 White Yes Apr–May Sun, Part<br />
Shade<br />
Wet, Moist,<br />
Dry<br />
Medium None Medium/<br />
Low<br />
Spring<br />
and<br />
Summer<br />
Very High<br />
Adult food<br />
(pollen<br />
and/or<br />
nectar);<br />
Nest<br />
material<br />
Native bees;<br />
Flies, beetles,<br />
and wasps<br />
Seed,<br />
Container,<br />
Bare<br />
root<br />
Yes<br />
Shrub Spiraea alba white meadowsweet<br />
Rosaceae IA MN IA,MN 3 White Yes May–Jun Sun, Part<br />
Shade<br />
Wet, Moist<br />
Coarse,<br />
Medium,<br />
Fine<br />
None Low/Low Spring<br />
and<br />
Summer<br />
Very High<br />
Adult food<br />
(pollen<br />
and/or<br />
nectar)<br />
Native bees;<br />
Bumble bees;<br />
Flies, beetles,<br />
and wasps<br />
Seed,<br />
Container,<br />
Bare<br />
root<br />
Yes<br />
Tree Prunus americana American plum Rosaceae IA KS MN MO OK IA,KS,MN,MO,OK 24 White Yes Apr–May Sun, Part<br />
Shade<br />
Dry<br />
Coarse,<br />
Medium<br />
Low<br />
Medium/<br />
Low<br />
Spring<br />
and<br />
Summer<br />
Very High<br />
Adult food<br />
(pollen<br />
and/or<br />
nectar)<br />
Native bees;<br />
Honey bees;<br />
Bumble bees<br />
Seed,<br />
Container,<br />
Bare<br />
root<br />
Yes<br />
Tree Prunus serotina black cherry Rosaceae IA KS MN MO OK TX IA,KS,MN,MO,OK,TX 80 White Yes May–Jun Sun, Part<br />
Shade<br />
Moist, Dry<br />
Coarse,<br />
Medium<br />
Medium Low/Low Spring<br />
and<br />
Summer<br />
Very High<br />
Adult food<br />
(pollen<br />
and/or<br />
nectar)<br />
Native bees;<br />
Honey bees;<br />
Bumble bees;<br />
Flies, beetles,<br />
and wasps<br />
Seed,<br />
Container,<br />
Bare<br />
root<br />
Yes<br />
<strong>Roadside</strong> <strong>Revegetation</strong>: An Integrated Approach to Establishing Native Plants and Pollinator Habitat<br />
483
APPENDIX<br />
Minnesota — Native <strong>Revegetation</strong> Plants for Pollinators, continued...<br />
Plant Type Scientific Name Common Name Plant Family IA KS MN MO OK TX All States Eco- Region<br />
(EPA III)<br />
Height<br />
(feet)<br />
Flower<br />
Color<br />
Showy Flowering Sun<br />
Exposure<br />
Soil<br />
Moisture<br />
Soil<br />
Texture<br />
Salt<br />
Tolerance<br />
Palatability<br />
(Browsing/<br />
Grazing)<br />
Active<br />
Growth<br />
Period<br />
Pollinator<br />
Value<br />
Benefits to<br />
Pollinators<br />
Pollinators<br />
Propagation<br />
Commercially<br />
Available<br />
Vine<br />
Clematis<br />
virginiana<br />
devil's darning<br />
needles<br />
Ranunculaceae<br />
IA MN MO IA,MN,MO 15 White Yes Jun–Aug Sun, Part<br />
Shade<br />
Wet, Moist,<br />
Dry<br />
Medium,<br />
Fine<br />
None<br />
Spring<br />
and<br />
Summer<br />
Very High<br />
Adult food<br />
(pollen<br />
and/or<br />
nectar)<br />
Native bees;<br />
Honey bees;<br />
Flies, beetles,<br />
and wasps<br />
Seed,<br />
Container,<br />
Bare<br />
root,<br />
Cutting<br />
Yes<br />
<strong>Roadside</strong> <strong>Revegetation</strong>: An Integrated Approach to Establishing Native Plants and Pollinator Habitat<br />
484
APPENDIX<br />
Missouri — Native <strong>Revegetation</strong> Plants for Pollinators, continued...<br />
MISSOURI — NATIVE REVEGETATION PLANTS FOR POLLINATORS<br />
Plant Type Scientific Name Common Name Plant Family IA KS MN MO OK TX All States Eco- Region<br />
(EPA III)<br />
Height<br />
(feet)<br />
Flower<br />
Color<br />
Showy Flowering Sun<br />
Exposure<br />
Soil<br />
Moisture<br />
Soil Texture<br />
Salt<br />
Tolerance<br />
Palatability<br />
(Browsing/<br />
Grazing)<br />
Active<br />
Growth<br />
Period<br />
Pollinator<br />
Value<br />
Benefits to<br />
Pollinators<br />
Pollinators<br />
Propagation<br />
Commercially<br />
Available<br />
Grass,<br />
perennial<br />
Andropogon<br />
gerardii<br />
big bluestem Poaceae IA KS MN MO OK TX IA,KS,MN,MO,OK,TX "46,47,48,<br />
49,50,51,<br />
52"<br />
3–8 Green No May–Jun Sun, Part<br />
Shade<br />
Dry<br />
Coarse,<br />
Medium,<br />
Fine<br />
Medium<br />
Medium/<br />
High<br />
Summer Low Nest<br />
material;<br />
Shelter<br />
Seed<br />
Yes<br />
Grass,<br />
perennial<br />
Andropogon<br />
virginicus<br />
broomsedge Poaceae IA MO IA,MO 2–3 Green No May–Jun Sun, Part<br />
Shade<br />
Moist, Dry<br />
Coarse,<br />
Medium,<br />
Fine<br />
Medium Low/Low Summer Low Nest<br />
material;<br />
Shelter<br />
Seed<br />
Yes<br />
Grass,<br />
perennial<br />
Bouteloua<br />
curtipendula<br />
side-oats<br />
grama<br />
Poaceae IA KS MN MO OK TX IA,KS,MN,MO,OK,TX "46,47,48,<br />
51,52"<br />
1–3 Green No Jul–Sep Sun, Part<br />
Shade<br />
Dry<br />
Coarse,<br />
Medium,<br />
Fine<br />
Medium<br />
Medium/<br />
High<br />
Summer Low Nest<br />
material;<br />
Shelter<br />
Seed<br />
Yes<br />
Grass,<br />
perennial<br />
Bouteloua<br />
dactyloides<br />
buffalo grass Poaceae IA KS MO OK TX IA,KS,MO,OK,TX 0.5–1 Green No Jul–Aug Sun Moist, Dry Coarse,<br />
Medium,<br />
Fine<br />
Medium<br />
Medium/<br />
High<br />
Summer Low Nest<br />
material;<br />
Shelter<br />
Seed,<br />
Sprig<br />
Yes<br />
Grass,<br />
perennial<br />
Bouteloua gracilis blue grama Poaceae IA KS MN MO OK TX IA,KS,MN,MO,OK,TX 464,748<br />
5,152<br />
0.5–1.5 Green No May–Jul Sun Dry Coarse,<br />
Medium,<br />
Fine<br />
Medium High/High Summer<br />
and Fall<br />
Low<br />
Nest<br />
material;<br />
Shelter<br />
Seed<br />
Yes<br />
Grass,<br />
perennial<br />
Elymus canadensis<br />
nodding wild<br />
rye<br />
Poaceae IA KS MN MO OK TX IA,KS,MN,MO,OK,TX "46,47,48,<br />
49,50,51,<br />
52"<br />
3–5 Green No Jul–Aug Sun, Part<br />
Shade<br />
Moist, Dry<br />
Coarse,<br />
Medium,<br />
Fine<br />
Medium<br />
Medium/<br />
Medium<br />
Spring,<br />
Summer,<br />
Fall<br />
Low Shelter Seed Yes<br />
Grass,<br />
perennial<br />
Panicum virgatum switchgrass Poaceae IA KS MO OK TX IA,KS,MO,OK,TX 3–6 Green No Jul–Aug Sun, Part<br />
Shade<br />
Wet, Moist,<br />
Dry<br />
Coarse,<br />
Medium,<br />
Fine<br />
Medium<br />
Medium/<br />
High<br />
Summer Low Shelter Seed Yes<br />
Grass,<br />
perennial<br />
Schizachyrium<br />
scoparium<br />
little bluestem Poaceae IA KS MN MO OK TX IA,KS,MN,MO,OK,TX "46,47,48,<br />
49,50,51,<br />
52"<br />
1–2.5 Green No Aug–Sep Sun, Part<br />
Shade<br />
Moist, Dry<br />
Coarse,<br />
Medium,<br />
Fine<br />
Medium<br />
Medium/<br />
High<br />
Summer<br />
and Fall<br />
Low<br />
Nest<br />
material;<br />
Shelter<br />
Seed<br />
Yes<br />
Grass,<br />
perennial<br />
Sorghastrum<br />
nutans<br />
Indian grass Poaceae IA KS MN MO OK TX IA,KS,MN,MO,OK,TX "46,47,48,<br />
51,52"<br />
3–8 Green No Jul–Sep Sun Moist, Dry Coarse,<br />
Medium,<br />
Fine<br />
Medium<br />
Medium/<br />
High<br />
Summer<br />
and Fall<br />
Low<br />
Nest<br />
material;<br />
Shelter<br />
Seed<br />
Yes<br />
Grass,<br />
perennial<br />
Sporobolus<br />
heterolepis<br />
prairie<br />
dropseed<br />
Poaceae IA KS MN MO OK TX IA,KS,MN,MO,OK,TX "46,47,48,<br />
51,52"<br />
1.5–4 Green No Aug–Sep Sun Moist Coarse,<br />
Medium<br />
None<br />
Low/<br />
Medium<br />
Spring and<br />
Summer<br />
Low<br />
Nest<br />
material;<br />
Shelter<br />
Seed<br />
Yes<br />
Herb,<br />
annual<br />
Chamaecrista<br />
fasciculata<br />
partridge pea Fabaceae IA KS MN MO OK TX IA,KS,MN,MO,OK,TX "46,47,51,<br />
52"<br />
1–3 Yellow Yes Jul–Sep Sun, Part<br />
Shade<br />
Moist, Dry<br />
Coarse,<br />
Medium,<br />
Fine<br />
Low<br />
High/<br />
Medium<br />
Spring Very High Adult food<br />
(pollen<br />
and/or<br />
nectar)<br />
Native bees;<br />
Bumble bees;<br />
Flies, beetles,<br />
and wasps<br />
Seed<br />
Yes<br />
Herb,<br />
annual<br />
Impatiens<br />
capensis<br />
jewelweed<br />
Balsaminaceae<br />
IA KS MN MO IA,KS,MN,MO 2–5 Orange Yes Jun–Oct Part Shade,<br />
Shade<br />
Wet, Moist<br />
Coarse,<br />
Medium,<br />
Fine<br />
None Summer Very High Adult food<br />
(pollen<br />
and/or<br />
nectar)<br />
Bumble bees;<br />
Butterflies<br />
and Moths;<br />
Hummingbirds<br />
Seed<br />
Yes<br />
Herb,<br />
annual or<br />
perennial<br />
Coreopsis<br />
tinctoria<br />
plains<br />
coreopsis<br />
Asteraceae KS MO OK TX KS,MO,OK,TX 1–2 Yellow Yes Apr–Jun Sun, Part<br />
Shade<br />
Moist, Dry Fine None Spring and<br />
Summer<br />
High<br />
Adult food<br />
(pollen<br />
and/or<br />
nectar)<br />
Native bees;<br />
Flies, beetles,<br />
and wasps<br />
Seed<br />
Yes<br />
<strong>Roadside</strong> <strong>Revegetation</strong>: An Integrated Approach to Establishing Native Plants and Pollinator Habitat<br />
485
APPENDIX<br />
Missouri — Native <strong>Revegetation</strong> Plants for Pollinators, continued...<br />
Plant Type Scientific Name Common Name Plant Family IA KS MN MO OK TX All States Eco- Region<br />
(EPA III)<br />
Height<br />
(feet)<br />
Flower<br />
Color<br />
Showy Flowering Sun<br />
Exposure<br />
Soil<br />
Moisture<br />
Soil Texture<br />
Salt<br />
Tolerance<br />
Palatability<br />
(Browsing/<br />
Grazing)<br />
Active<br />
Growth<br />
Period<br />
Pollinator<br />
Value<br />
Benefits to<br />
Pollinators<br />
Pollinators<br />
Propagation<br />
Commercially<br />
Available<br />
Herb,<br />
annual or<br />
perennial<br />
Gaura longiflora<br />
longflower<br />
beeblossom<br />
Onagraceae IA KS MO OK TX IA,KS,MO,OK,TX 2–3 White Yes Jul–Sep Sun Dry Very High Adult food<br />
(pollen<br />
and/or<br />
nectar)<br />
Bumble<br />
bees; Moths;<br />
Hummingbirds<br />
Yes<br />
Herb,<br />
annual or<br />
perennial<br />
Verbena stricta hoary vervain Verbenaceae IA KS MN MO OK IA,KS,MN,MO,OK 2–3 White Yes Jun–Sep Sun Dry Coarse,<br />
Medium,<br />
Fine<br />
Very High<br />
Adult food<br />
(pollen<br />
and/or<br />
nectar)<br />
Native bees;<br />
Butterflies<br />
and moths;<br />
Hummingbirds<br />
Yes<br />
Herb,<br />
biennial<br />
Castilleja coccinea<br />
Indian<br />
paintbrush<br />
Scrophulariaceae<br />
IA KS MO IA,KS,MO 1–1.5 Red Yes Jul–Sep Sun, Part<br />
Shade<br />
Wet, Moist,<br />
Dry<br />
Coarse,<br />
Medium,<br />
Fine<br />
Low<br />
Spring and<br />
Summer<br />
Very High<br />
Adult food<br />
(pollen<br />
and/or<br />
nectar)<br />
Hummingbirds Seed Yes<br />
Herb,<br />
biennial or<br />
perennial<br />
Cirsium discolor field thistle Asteraceae IA KS MN MO IA,KS,MN,MO 3–8 Purple Yes Aug–Oct Sun Moist Very High Adult food<br />
(pollen<br />
and/or<br />
nectar)<br />
Native bees;<br />
Bumble bees;<br />
Butterflies and<br />
moths; Flies, beetles,<br />
and wasps;<br />
Hummingbirds<br />
Yes<br />
Herb,<br />
biennial or<br />
perennial<br />
Verbena hastata<br />
swamp<br />
verbena<br />
Verbenaceae IA KS MN MO OK IA,KS,MN,MO,OK 3–5 Lavender<br />
Yes Jul–Sep Sun, Part<br />
Shade<br />
Wet, Moist<br />
Coarse,<br />
Medium<br />
Very High<br />
Adult food<br />
(pollen<br />
and/or<br />
nectar)<br />
Native bees;<br />
Butterflies;<br />
Hummingbirds<br />
Yes<br />
Herb,<br />
perennial<br />
Achillea<br />
millefolium<br />
common<br />
yarrow<br />
Asteraceae IA KS MN MO OK TX IA,KS,MN,MO,OK,TX 3 White Yes May–Jul Sun, Part<br />
Shade<br />
Moist, Dry Medium Low Medium/<br />
Low<br />
Spring High Adult food<br />
(pollen<br />
and/or<br />
nectar);<br />
Nest<br />
material<br />
Native bees;<br />
Flies, beetles,<br />
and wasps<br />
Seed,<br />
Container,<br />
Sprig<br />
Yes<br />
Herb,<br />
perennial<br />
Agastache<br />
nepetoides<br />
yellow giant<br />
hyssop<br />
Lamiaceae IA MO IA,MO 2–4 Yellow Yes Jun–Aug Sun, Part<br />
Shade<br />
Moist, Dry<br />
Coarse,<br />
Medium,<br />
Fine<br />
Medium Very High Adult food<br />
(pollen<br />
and/or<br />
nectar)<br />
Native bees;<br />
Bumble bees;<br />
Flies, beetles,<br />
and wasps;<br />
Hummingbirds<br />
Yes<br />
Herb,<br />
perennial<br />
Aquilegia<br />
canadensis<br />
red columbine<br />
Ranunculaceae<br />
IA KS MN MO OK IA,KS,MN,MO,OK 1–2 Red Yes Apr–May Sun, Part<br />
Shade<br />
Wet, Moist,<br />
Dry<br />
Coarse,<br />
Medium<br />
Very High<br />
Adult food<br />
(pollen<br />
and/or<br />
nectar)<br />
Bumble bees;<br />
Butterflies;<br />
Hummingbirds<br />
Yes<br />
Herb,<br />
perennial<br />
Asclepias<br />
incarnata<br />
swamp<br />
milkweed<br />
Asclepiadaceae<br />
IA KS MO OK TX IA,KS,MO,OK,TX 3–4 Purple Yes Jun–Sep Sun, Part<br />
Shade<br />
Moist<br />
Coarse,<br />
Medium,<br />
Fine<br />
Medium /Low Spring Very High Adult food<br />
(pollen<br />
and/or<br />
nectar);<br />
Larval<br />
food<br />
Native bees;<br />
Honey bees;<br />
Bumble bees;<br />
Butterflies;<br />
Monarchs; Flies,<br />
beetles, and<br />
wasps; Hummingbirds<br />
Seed,<br />
Sprig<br />
Yes<br />
Herb,<br />
perennial<br />
Asclepias<br />
purpurascens<br />
purple<br />
milkweed<br />
Asclepiadaceae<br />
IA KS MO IA,KS,MO 2–3 Purple Yes May–Jul Sun Moist, Dry Coarse,<br />
Medium<br />
Very High<br />
Adult food<br />
(pollen<br />
and/or<br />
nectar);<br />
Larval<br />
food<br />
Native bees;<br />
Honey bees;<br />
Bumble bees;<br />
Butterflies<br />
and moths;<br />
Monarchs; Flies,<br />
beetles, and<br />
wasps; Hummingbirds<br />
Yes<br />
<strong>Roadside</strong> <strong>Revegetation</strong>: An Integrated Approach to Establishing Native Plants and Pollinator Habitat<br />
486
APPENDIX<br />
Missouri — Native <strong>Revegetation</strong> Plants for Pollinators, continued...<br />
Plant Type Scientific Name Common Name Plant Family IA KS MN MO OK TX All States Eco- Region<br />
(EPA III)<br />
Height<br />
(feet)<br />
Flower<br />
Color<br />
Showy Flowering Sun<br />
Exposure<br />
Soil<br />
Moisture<br />
Soil Texture<br />
Salt<br />
Tolerance<br />
Palatability<br />
(Browsing/<br />
Grazing)<br />
Active<br />
Growth<br />
Period<br />
Pollinator<br />
Value<br />
Benefits to<br />
Pollinators<br />
Pollinators<br />
Propagation<br />
Commercially<br />
Available<br />
Herb,<br />
perennial<br />
Asclepias syriaca<br />
common<br />
milkweed<br />
Asclepiadaceae<br />
IA KS MN MO OK IA,KS,MN,MO,OK "46,47,48,<br />
49,50,51,<br />
52"<br />
2.5–4 Purple Yes Jun–Aug Sun, Part<br />
Shade<br />
Moist, Dry<br />
Coarse,<br />
Medium,<br />
Fine<br />
Medium Very High Adult food<br />
(pollen<br />
and/or<br />
nectar);<br />
Larval<br />
food<br />
Native bees;<br />
Honey bees;<br />
Bumble bees;<br />
Butterflies;<br />
Monarchs; Flies,<br />
beetles, and<br />
wasps<br />
Yes<br />
Herb,<br />
perennial<br />
Asclepias<br />
tuberosa<br />
butterfly<br />
milkweed<br />
Asclepiadaceae<br />
IA KS MN MO OK TX IA,KS,MN,MO,OK,TX "46,47,50,<br />
51,52"<br />
2–3 Orange Yes Jun–Aug Sun, Part<br />
Shade<br />
Dry<br />
Coarse,<br />
Medium<br />
Medium Low/Low Spring and<br />
Summer<br />
Very High<br />
Adult food<br />
(pollen<br />
and/or<br />
nectar);<br />
Larval<br />
food<br />
Native bees;<br />
Honey bees;<br />
Bumble bees;<br />
Butterflies;<br />
Monarchs; Flies,<br />
beetles, and<br />
wasps; Hummingbirds<br />
Seed,<br />
Container<br />
Yes<br />
Herb,<br />
perennial<br />
Asclepias<br />
verticillata<br />
whorled<br />
milkweed<br />
Asclepiadaceae<br />
IA KS MN MO OK TX IA,KS,MN,MO,OK,TX "46,47,48,<br />
51,52"<br />
1–2 Purple No Jun–Sep Sun, Part<br />
Shade<br />
Moist, Dry<br />
Coarse,<br />
Medium,<br />
Fine<br />
Medium Very High Adult food<br />
(pollen<br />
and/or<br />
nectar);<br />
Larval<br />
food<br />
Native bees;<br />
Honey bees;<br />
Bumble bees;<br />
Butterflies;<br />
Monarchs; Flies,<br />
beetles, and<br />
wasps<br />
Yes<br />
Herb,<br />
perennial<br />
Asclepias viridis<br />
green<br />
milkweed<br />
Asclepiadaceae<br />
KS MO OK TX KS,MO,OK,TX 2–3 Green Yes Jun–Aug Sun, Part<br />
Shade<br />
Dry<br />
Coarse,<br />
Medium<br />
Medium Very High Adult food<br />
(pollen<br />
and/or<br />
nectar);<br />
Larval<br />
food<br />
Native bees;<br />
Honey bees;<br />
Bumble bees;<br />
Butterflies;<br />
Monarchs; Flies,<br />
beetles, and<br />
wasps<br />
Yes<br />
Herb,<br />
perennial<br />
Baptisia alba var.<br />
macrophylla<br />
white wild<br />
indigo<br />
Fabaceae IA KS MO OK IA,KS,MO,OK 3–6 White Yes May–Jun Sun Moist, Dry Medium,<br />
Fine<br />
Medium Very High Adult food<br />
(pollen<br />
and/or<br />
nectar)<br />
Native bees;<br />
Bumble bees<br />
Yes<br />
Herb,<br />
perennial<br />
Baptisia australis<br />
blue false<br />
indigo<br />
Fabaceae IA KS MO OK TX IA,KS,MO,OK,TX 1.5–2 White Yes Apr–Jun Sun Moist, Dry Medium Very High Adult food<br />
(pollen<br />
and/or<br />
nectar)<br />
Native bees;<br />
Bumble bees<br />
Yes<br />
Herb,<br />
perennial<br />
Baptisia bracteata<br />
cream wild<br />
indigo<br />
Fabaceae IA KS MN MO OK TX IA,KS,MN,MO,OK,TX 1.5–2 White Yes Apr–May Sun Dry Medium Very High Adult food<br />
(pollen<br />
and/or<br />
nectar)<br />
Native bees;<br />
Bumble bees<br />
Yes<br />
Herb,<br />
perennial<br />
Callirhoe<br />
involucrata<br />
purple poppy<br />
mallow<br />
Malvaceae KS MO OK TX KS,MO,OK,TX 1 Purple Yes Mar–Jun Sun, Part<br />
Shade<br />
Dry<br />
Coarse,<br />
Medium,<br />
Fine<br />
Low<br />
Spring and<br />
Summer<br />
Very High<br />
Adult food<br />
(pollen<br />
and/or<br />
nectar)<br />
Native bees;<br />
Flies, beetles,<br />
and wasps<br />
Seed,<br />
Cutting,<br />
Sprig<br />
Yes<br />
Herb,<br />
perennial<br />
Chelone glabra<br />
white<br />
turtlehead<br />
Scrophulariaceae<br />
IA MN MO IA,MN,MO 1–4 White Yes Jul–Sep Sun, Part<br />
Shade,<br />
Shade<br />
Wet Medium Very High Adult food<br />
(pollen<br />
and/or<br />
nectar)<br />
Bumble<br />
bees; Moths;<br />
Hummingbirds<br />
Yes<br />
Herb,<br />
perennial<br />
Conoclinium<br />
coelestinum<br />
blue mistflower<br />
Asteraceae MO OK TX MO,OK,TX 1.5–3 Blue Yes Jun–Aug Part Shade,<br />
Shade<br />
Wet, Moist<br />
Medium,<br />
Fine<br />
None /Low Summer Very High Adult food<br />
(pollen<br />
and/or<br />
nectar)<br />
Native bees;<br />
Honey bees;<br />
Butterflies; Flies,<br />
beetles, and<br />
wasps<br />
Seed,<br />
Sprig<br />
Yes<br />
<strong>Roadside</strong> <strong>Revegetation</strong>: An Integrated Approach to Establishing Native Plants and Pollinator Habitat<br />
487
APPENDIX<br />
Missouri — Native <strong>Revegetation</strong> Plants for Pollinators, continued...<br />
Plant Type Scientific Name Common Name Plant Family IA KS MN MO OK TX All States Eco- Region<br />
(EPA III)<br />
Height<br />
(feet)<br />
Flower<br />
Color<br />
Showy Flowering Sun<br />
Exposure<br />
Soil<br />
Moisture<br />
Soil Texture<br />
Salt<br />
Tolerance<br />
Palatability<br />
(Browsing/<br />
Grazing)<br />
Active<br />
Growth<br />
Period<br />
Pollinator<br />
Value<br />
Benefits to<br />
Pollinators<br />
Pollinators<br />
Propagation<br />
Commercially<br />
Available<br />
Herb,<br />
perennial<br />
Coreopsis<br />
lanceolata<br />
lanceleaf<br />
coreopsis<br />
Asteraceae KS MO OK TX KS,MO,OK,TX 1–3 Yellow Yes Apr–Jun Sun Moist, Dry Medium,<br />
Fine<br />
None Low/Low Spring and<br />
Summer<br />
High<br />
Adult food<br />
(pollen<br />
and/or<br />
nectar)<br />
Native bees;<br />
Flies, beetles,<br />
and wasps<br />
Seed,<br />
Container<br />
Yes<br />
Herb,<br />
perennial<br />
Dalea candida<br />
white prairie<br />
clover<br />
Fabaceae IA KS MN MO OK TX IA,KS,MN,MO,OK,TX 1–2 White Yes May–Sep Sun Dry Medium,<br />
Fine<br />
High/High<br />
Spring and<br />
Summer<br />
Very High<br />
Adult food<br />
(pollen<br />
and/or<br />
nectar)<br />
Native bees;<br />
Honey bees;<br />
Bumble bees<br />
Yes<br />
Herb,<br />
perennial<br />
Dalea purpurea<br />
purple prairie<br />
clover<br />
Fabaceae IA KS MN MO OK TX IA,KS,MN,MO,OK,TX "46,47,48,<br />
49,50,51,<br />
52"<br />
1–2.5 Purple Yes Jul–Aug Sun Dry Coarse,<br />
Medium,<br />
Fine<br />
Medium<br />
Medium/<br />
Medium<br />
Spring and<br />
Summer<br />
Very High<br />
Adult food<br />
(pollen<br />
and/or<br />
nectar)<br />
Native bees;<br />
Honey bees;<br />
Bumble bees<br />
Yes<br />
Herb,<br />
perennial<br />
Desmanthus<br />
illinoensis<br />
Illinois<br />
bundleflower<br />
Fabaceae KS MO OK TX KS,MO,OK,TX 3 White Yes May–Jul Sun Moist, Dry Coarse,<br />
Medium,<br />
Fine<br />
None High/High Spring and<br />
Summer<br />
High<br />
Adult food<br />
(pollen<br />
and/or<br />
nectar);<br />
Larval<br />
food<br />
Native bees; Flies Seed Yes<br />
Herb,<br />
perennial<br />
Echinacea pallida<br />
pale purple<br />
coneflower<br />
Asteraceae IA KS MO OK IA,KS,MO,OK 2.5–4 Purple Yes Jun–Aug Sun Dry Coarse,<br />
Medium,<br />
Fine<br />
Low Low/Low Spring and<br />
Summer<br />
Very High<br />
Adult food<br />
(pollen<br />
and/or<br />
nectar)<br />
Native bees;<br />
Honey bees;<br />
Butterflies and<br />
moths; Monarchs<br />
Seed<br />
Yes<br />
Herb,<br />
perennial<br />
Echinacea<br />
purpurea<br />
purple<br />
coneflower<br />
Asteraceae IA MO OK IA,MO,OK 2.5–4 Purple Yes Jun–Aug Sun Dry Medium,<br />
Fine<br />
Medium Low/Low Spring and<br />
Summer<br />
Very High<br />
Adult food<br />
(pollen<br />
and/or<br />
nectar)<br />
Native bees;<br />
Honey bees;<br />
Butterflies<br />
and moths;<br />
Monarchs;<br />
Hummingbirds<br />
Seed<br />
Yes<br />
Herb,<br />
perennial<br />
Eryngium<br />
yuccifolium<br />
rattlesnake<br />
master<br />
Apiaceae IA KS MN MO OK TX IA,KS,MN,MO,OK,TX 3–5 White No Jul–Sep Sun, Part<br />
Shade<br />
Wet, Moist,<br />
Dry<br />
Very High<br />
Adult food<br />
(pollen<br />
and/or<br />
nectar)<br />
Native bees;<br />
Flies, beetles,<br />
and wasps<br />
Yes<br />
Herb,<br />
perennial<br />
Eupatorium<br />
perfoliatum<br />
common<br />
boneset<br />
Asteraceae IA KS MN MO OK TX IA,KS,MN,MO,OK,TX 3–6 White Yes Jun–Oct Sun, Part<br />
Shade<br />
Wet, Moist<br />
Coarse,<br />
Medium,<br />
Fine<br />
Very High<br />
Adult food<br />
(pollen<br />
and/or<br />
nectar)<br />
Native bees;<br />
Butterflies<br />
and moths;<br />
Monarchs; Flies,<br />
beetles, and<br />
wasps<br />
Yes<br />
Herb,<br />
perennial<br />
Euthamia<br />
graminifolia<br />
flat-top<br />
goldentop<br />
Asteraceae IA MN MO IA,MN,MO 2–4 Yellow Yes Jul–Sep Sun, Part<br />
Shade<br />
Wet, Moist Medium Very High Adult food<br />
(pollen<br />
and/or<br />
nectar)<br />
Native bees;<br />
Flies, beetles,<br />
and wasps<br />
Yes<br />
Herb,<br />
perennial<br />
Geranium maculatum<br />
wild geranium Geraniaceae IA MN MO IA,MN,MO 1–3 Pink Yes Apr–May Sun, Part<br />
Shade<br />
Moist, Dry High Adult food<br />
(pollen<br />
and/or<br />
nectar)<br />
Native bees;<br />
Bumble bees;<br />
Flies, beetles,<br />
and wasps<br />
Yes<br />
Herb,<br />
perennial<br />
Helianthus<br />
maximiliani<br />
maximilian<br />
sunflower<br />
Asteraceae IA KS MN MO OK TX IA,KS,MN,MO,OK,TX 3–8 Yellow Yes Aug–Nov Sun Moist, Dry Coarse,<br />
Medium,<br />
Fine<br />
Low<br />
High/<br />
Medium<br />
Summer<br />
and Fall<br />
Very High<br />
Adult food<br />
(pollen<br />
and/or<br />
nectar)<br />
Native bees;<br />
Honey bees;<br />
Flies, beetles,<br />
and wasps<br />
Seed,<br />
Bare<br />
root,<br />
Sprig<br />
Yes<br />
<strong>Roadside</strong> <strong>Revegetation</strong>: An Integrated Approach to Establishing Native Plants and Pollinator Habitat<br />
488
APPENDIX<br />
Missouri — Native <strong>Revegetation</strong> Plants for Pollinators, continued...<br />
Plant Type Scientific Name Common Name Plant Family IA KS MN MO OK TX All States Eco- Region<br />
(EPA III)<br />
Height<br />
(feet)<br />
Flower<br />
Color<br />
Showy Flowering Sun<br />
Exposure<br />
Soil<br />
Moisture<br />
Soil Texture<br />
Salt<br />
Tolerance<br />
Palatability<br />
(Browsing/<br />
Grazing)<br />
Active<br />
Growth<br />
Period<br />
Pollinator<br />
Value<br />
Benefits to<br />
Pollinators<br />
Pollinators<br />
Propagation<br />
Commercially<br />
Available<br />
Herb,<br />
perennial<br />
Helianthus<br />
pauciflorus<br />
stiff sunflower Asteraceae IA KS MN MO IA,KS,MN,MO "46,47,48,<br />
49,50,51,<br />
52"<br />
1–4 Yellow Yes Jul–Aug Sun Dry Coarse,<br />
Medium,<br />
Fine<br />
Medium Very High Adult food<br />
(pollen<br />
and/or<br />
nectar)<br />
Native bees;<br />
Flies, beetles,<br />
and wasps<br />
Yes<br />
Herb,<br />
perennial<br />
Helianthus<br />
tuberosus<br />
Jerusalem<br />
artichoke<br />
Asteraceae IA KS MN MO IA,KS,MN,MO 6–10 Yellow Yes Jul–Sep Sun, Part<br />
Shade<br />
Moist, Dry<br />
Coarse,<br />
Medium<br />
Low High/High Spring and<br />
Summer<br />
Very High<br />
Adult food<br />
(pollen<br />
and/or<br />
nectar)<br />
Native bees;<br />
Flies, beetles,<br />
and wasps<br />
Seed,<br />
Tuber<br />
Yes<br />
Herb,<br />
perennial<br />
Heliopsis<br />
helianthoides<br />
smooth oxeye Asteraceae IA KS MN MO IA,KS,MN,MO 3–5 Yellow Yes Jun–Aug Sun Moist, Dry Coarse,<br />
Medium,<br />
Fine<br />
Medium/<br />
Medium<br />
Spring and<br />
Summer<br />
Very High<br />
Adult food<br />
(pollen<br />
and/or<br />
nectar)<br />
Native bees;<br />
Bumble bees;<br />
Butterflies and<br />
moths; Flies,<br />
beetles, and<br />
wasps<br />
Yes<br />
Herb,<br />
perennial<br />
Hibiscus laevis<br />
halberdleaf<br />
rosemallow<br />
Malvaceae IA KS MO OK TX IA,KS,MO,OK,TX 8 White Yes Jun–Aug Sun, Part<br />
Shade<br />
Wet<br />
Medium,<br />
Fine<br />
None Low/Low Spring,<br />
Summer,<br />
Fall<br />
Very High<br />
Adult food<br />
(pollen<br />
and/or<br />
nectar)<br />
Native bees;<br />
Bumble bees;<br />
Hummingbirds<br />
Seed,<br />
Container,<br />
Bare<br />
root,<br />
Cutting<br />
Yes<br />
Herb,<br />
perennial<br />
Liatris aspera<br />
rough blazing<br />
star<br />
Asteraceae IA KS MN MO OK TX IA,KS,MN,MO,OK,TX "46,47,48,<br />
51,52"<br />
2–3 Purple Yes Jul–Sep Sun, Part<br />
Shade<br />
Dry<br />
Coarse,<br />
Medium<br />
Medium Very High Adult food<br />
(pollen<br />
and/or<br />
nectar)<br />
Native bees;<br />
Bumble bees;<br />
Hummingbirds<br />
Yes<br />
Herb,<br />
perennial<br />
Liatris pycnostachya<br />
prairie blazing<br />
star<br />
Asteraceae IA KS MN MO OK TX IA,KS,MN,MO,OK,TX 3–5 Purple Yes Jul–Sep Sun Wet, Moist,<br />
Dry<br />
Coarse,<br />
Medium,<br />
Fine<br />
None<br />
Medium/<br />
Low<br />
Summer Very High Adult food<br />
(pollen<br />
and/or<br />
nectar)<br />
Native bees;<br />
Butterflies<br />
and moths;<br />
Hummingbirds<br />
Seed,<br />
Container,<br />
Corm<br />
Yes<br />
Herb,<br />
perennial<br />
Lilium michiganense<br />
Michigan lily Liliaceae IA MN MO IA,MN,MO 2–6 Orange Yes Jun–Jul Sun, Part<br />
Shade<br />
Wet, Moist<br />
Coarse,<br />
Medium,<br />
Fine<br />
Very High<br />
Adult food<br />
(pollen<br />
and/or<br />
nectar)<br />
Native bees;<br />
Butterflies;<br />
Hummingbirds<br />
Yes<br />
Herb,<br />
perennial<br />
Lobelia cardinalis cardinal flower Campanulaceae<br />
KS MO OK TX KS,MO,OK,TX 2–4 Red Yes Jun–Aug Part Shade,<br />
Shade<br />
Wet, Moist Medium None Medium/<br />
Medium<br />
Spring Very High Adult food<br />
(pollen<br />
and/or<br />
nectar)<br />
Butterflies;<br />
Hummingbirds<br />
Seed,<br />
Container<br />
Yes<br />
Herb,<br />
perennial<br />
Lobelia siphilitica<br />
great blue<br />
lobelia<br />
Campanulaceae<br />
IA KS MN MO IA,KS,MN,MO 1–3 Blue Yes Jun–Aug Sun Wet, Moist Very High Adult food<br />
(pollen<br />
and/or<br />
nectar)<br />
Native bees;<br />
Bumble bees;<br />
Butterflies and<br />
moths; Flies, beetles,<br />
and wasps;<br />
Hummingbirds<br />
Yes<br />
Herb,<br />
perennial<br />
Mimulus ringens<br />
Allegheny<br />
monkeyflower<br />
Scrophulariaceae<br />
IA KS MN MO IA,KS,MN,MO 1–4 Blue Yes Jun–Sep Sun, Part<br />
Shade<br />
Wet Medium Very High Adult food<br />
(pollen<br />
and/or<br />
nectar)<br />
Bumble bees;<br />
Hummingbirds<br />
Yes<br />
Herb,<br />
perennial<br />
Monarda fistulosa wild bergamot Lamiaceae IA KS MN MO OK TX IA,KS,MN,MO,OK,TX "46,47,48,<br />
49,50,51,<br />
52"<br />
2–4 Purple Yes Jul–Aug Sun, Part<br />
Shade<br />
Moist, Dry<br />
Coarse,<br />
Medium,<br />
Fine<br />
Medium<br />
Medium/<br />
Medium<br />
Spring Very High Adult food<br />
(pollen<br />
and/or<br />
nectar)<br />
Native bees;<br />
Bumble bees;<br />
Hummingbirds<br />
Seed,<br />
Container<br />
Yes<br />
<strong>Roadside</strong> <strong>Revegetation</strong>: An Integrated Approach to Establishing Native Plants and Pollinator Habitat<br />
489
APPENDIX<br />
Missouri — Native <strong>Revegetation</strong> Plants for Pollinators, continued...<br />
Plant Type Scientific Name Common Name Plant Family IA KS MN MO OK TX All States Eco- Region<br />
(EPA III)<br />
Height<br />
(feet)<br />
Flower<br />
Color<br />
Showy Flowering Sun<br />
Exposure<br />
Soil<br />
Moisture<br />
Soil Texture<br />
Salt<br />
Tolerance<br />
Palatability<br />
(Browsing/<br />
Grazing)<br />
Active<br />
Growth<br />
Period<br />
Pollinator<br />
Value<br />
Benefits to<br />
Pollinators<br />
Pollinators<br />
Propagation<br />
Commercially<br />
Available<br />
Herb,<br />
perennial<br />
Oenothera macrocarpa<br />
bigfruit<br />
evening<br />
primrose<br />
Onagraceae KS MO OK TX KS,MO,OK,TX 1–1.5 Yellow Yes Apr–Aug Sun Dry Coarse,<br />
Medium<br />
Very High<br />
Adult food<br />
(pollen<br />
and/or<br />
nectar)<br />
Native bees;<br />
Moths<br />
Yes<br />
Herb,<br />
perennial<br />
Oenothera<br />
speciosa<br />
pink evening<br />
primrose<br />
Onagraceae KS MO OK TX KS,MO,OK,TX 1–1.5 Pink Yes May–Jul Sun Dry Coarse,<br />
Medium,<br />
Fine<br />
High<br />
Adult food<br />
(pollen<br />
and/or<br />
nectar)<br />
Native bees;<br />
Butterflies and<br />
moths<br />
Yes<br />
Herb,<br />
perennial<br />
Oligoneuron<br />
rigidum var.<br />
rigidum<br />
stiff goldenrod Asteraceae IA KS MN MO OK TX IA,KS,MN,MO,OK,TX "46,47,48,<br />
49,50,51,<br />
52"<br />
1–5 Yellow Yes Aug–Sep Sun, Part<br />
Shade<br />
Dry<br />
Coarse,<br />
Medium,<br />
Fine<br />
Medium Low/Low Spring and<br />
Summer<br />
Very High<br />
Adult food<br />
(pollen<br />
and/or<br />
nectar)<br />
Native bees;<br />
Honey bees;<br />
Flies, beetles,<br />
and wasps<br />
Seed,<br />
Bare<br />
root,<br />
Sprig<br />
Yes<br />
Herb,<br />
perennial<br />
Penstemon<br />
digitalis<br />
smooth beard<br />
tongue<br />
Scrophulariaceae<br />
KS MO OK KS,MO,OK 2–3 White Yes Jun–Jul Sun Wet, Moist,<br />
Dry<br />
Coarse,<br />
Medium<br />
Medium<br />
Medium/<br />
Low<br />
Spring and<br />
Summer<br />
Very High<br />
Adult food<br />
(pollen<br />
and/or<br />
nectar)<br />
Native bees;<br />
Bumble bees;<br />
Hummingbirds<br />
Seed,<br />
Container,<br />
Sprig<br />
Yes<br />
Herb,<br />
perennial<br />
Penstemon<br />
pallidus<br />
pale beardtongue<br />
Scrophulariaceae<br />
IA MO IA,MO 1–2.5 White Yes May–Jun Sun, Part<br />
Shade<br />
Moist, Dry<br />
Coarse,<br />
Medium<br />
Very High<br />
Adult food<br />
(pollen<br />
and/or<br />
nectar)<br />
Native bees;<br />
Bumble bees;<br />
Hummingbirds<br />
Yes<br />
Herb,<br />
perennial<br />
Penstemon<br />
tubaeflorus<br />
white wand<br />
beardtongue<br />
Scrophulariaceae<br />
KS MO OK KS,MO,OK 1–3 White Yes May–Jun Sun Dry Coarse Very High Adult food<br />
(pollen<br />
and/or<br />
nectar)<br />
Native bees;<br />
Bumble bees;<br />
Butterflies;<br />
Hummingbirds<br />
Yes<br />
Herb,<br />
perennial<br />
Phlox divaricata<br />
wild blue<br />
phlox<br />
Polemoniaceae<br />
IA KS MN MO IA,KS,MN,MO 3 Purple Yes Jun–Aug Sun, Part<br />
Shade<br />
Moist, Dry<br />
Coarse,<br />
Medium,<br />
Fine<br />
None Low/Low Spring and<br />
Summer<br />
Very High<br />
Adult food<br />
(pollen<br />
and/or<br />
nectar)<br />
Moths; Flies, beetles,<br />
and wasps;<br />
Hummingbirds<br />
Container,<br />
Sprig<br />
Yes<br />
Herb,<br />
perennial<br />
Phlox pilosa downy phlox Polemoniaceae<br />
IA KS MN MO OK TX IA,KS,MN,MO,OK,TX 1–2 Pink Yes Mar–May Sun, Part<br />
Shade<br />
Moist, Dry Coarse Very High Adult food<br />
(pollen<br />
and/or<br />
nectar)<br />
Native bees;<br />
Bumble bees;<br />
Butterflies and<br />
moths; Flies;<br />
Hummingbirds<br />
Yes<br />
Herb,<br />
perennial<br />
Physostegia<br />
virginiana<br />
obedient plant Lamiaceae IA KS MN MO IA,KS,MN,MO 2–4 Lavender<br />
Yes Jun–Sep Sun, Part<br />
Shade<br />
Wet, Moist<br />
Coarse,<br />
Medium<br />
Very High<br />
Adult food<br />
(pollen<br />
and/or<br />
nectar)<br />
Native bees;<br />
Hummingbirds<br />
Yes<br />
Herb,<br />
perennial<br />
Potentilla arguta tall cinquefoil Rosaceae IA KS MN MO IA,KS,MN,MO 3 Yellow Yes May–Jun Sun, Part<br />
Shade<br />
Dry Medium None Low/Low Spring and<br />
Summer<br />
High<br />
Adult food<br />
(pollen<br />
and/or<br />
nectar)<br />
Native bees; Flies<br />
Seed,<br />
Bare<br />
root<br />
Yes<br />
Herb,<br />
perennial<br />
Pycnanthemum<br />
tenuifolium<br />
narrowleaf<br />
mountain mint<br />
Lamiaceae IA KS MO OK TX IA,KS,MO,OK,TX 1–3 White No Jun–Aug Sun Wet, Moist,<br />
Dry<br />
Very High<br />
Adult food<br />
(pollen<br />
and/or<br />
nectar)<br />
Native bees;<br />
Honey bees;<br />
Bumble bees;<br />
Flies, beetles,<br />
and wasps<br />
Yes<br />
Herb,<br />
perennial<br />
Pycnanthemum<br />
virginianum<br />
Virginia<br />
mountain mint<br />
Lamiaceae IA MN MO IA,MN,MO 1–3 White No Jun–Aug Sun Moist Very High Adult food<br />
(pollen<br />
and/or<br />
nectar)<br />
Native bees;<br />
Honey bees;<br />
Bumble bees;<br />
Flies, beetles,<br />
and wasps<br />
Yes<br />
<strong>Roadside</strong> <strong>Revegetation</strong>: An Integrated Approach to Establishing Native Plants and Pollinator Habitat<br />
490
APPENDIX<br />
Missouri — Native <strong>Revegetation</strong> Plants for Pollinators, continued...<br />
Plant Type Scientific Name Common Name Plant Family IA KS MN MO OK TX All States Eco- Region<br />
(EPA III)<br />
Height<br />
(feet)<br />
Flower<br />
Color<br />
Showy Flowering Sun<br />
Exposure<br />
Soil<br />
Moisture<br />
Soil Texture<br />
Salt<br />
Tolerance<br />
Palatability<br />
(Browsing/<br />
Grazing)<br />
Active<br />
Growth<br />
Period<br />
Pollinator<br />
Value<br />
Benefits to<br />
Pollinators<br />
Pollinators<br />
Propagation<br />
Commercially<br />
Available<br />
Herb,<br />
perennial<br />
Ratibida pinnata<br />
gray-headed<br />
coneflower<br />
Asteraceae IA KS MN MO OK IA,KS,MN,MO,OK 3–5 Yellow Yes Jun–Aug Sun Moist, Dry Coarse,<br />
Medium,<br />
Fine<br />
Medium<br />
Medium/<br />
Medium<br />
Spring and<br />
Summer<br />
Very High<br />
Adult food<br />
(pollen<br />
and/or<br />
nectar)<br />
Native bees<br />
Seed,<br />
Container<br />
Yes<br />
Herb,<br />
perennial<br />
Rudbeckia hirta<br />
black-eyed<br />
susan<br />
Asteraceae IA KS MN MO OK TX IA,KS,MN,MO,OK,TX 2–3 Yellow Yes Jun–Aug Sun, Part<br />
Shade<br />
Moist, Dry<br />
Coarse,<br />
Medium,<br />
Fine<br />
Medium Low/Low Fall, Winter<br />
and Spring<br />
Very High<br />
Adult food<br />
(pollen<br />
and/or<br />
nectar)<br />
Native bees;<br />
Butterflies<br />
Seed<br />
Yes<br />
Herb,<br />
perennial<br />
Rudbeckia<br />
laciniata<br />
cutleaf<br />
coneflower<br />
Asteraceae IA KS MN MO IA,KS,MN,MO 3–12 Yellow Yes Jul–Sep Sun, Part<br />
Shade,<br />
Shade<br />
Moist, Dry<br />
Coarse,<br />
Medium,<br />
Fine<br />
None High/High Spring Very High Adult food<br />
(pollen<br />
and/or<br />
nectar)<br />
Native bees;<br />
Honey bees;<br />
Butterflies<br />
Seed,<br />
Container<br />
Yes<br />
Herb,<br />
perennial<br />
Rudbeckia<br />
missouriensis<br />
Missouri<br />
coneflower<br />
Asteraceae MO MO 1–2.5 Yellow Yes Jul–Sep Sun Moist, Dry Coarse,<br />
Medium,<br />
Fine<br />
Medium Very High Adult food<br />
(pollen<br />
and/or<br />
nectar)<br />
Native bees;<br />
Butterflies<br />
Yes<br />
Herb,<br />
perennial<br />
Scrophularia<br />
marilandica<br />
carpenter's<br />
square<br />
Scrophulariaceae<br />
IA KS MO IA,KS,MO 5–10 Purple No Jul–Sep Sun, Part<br />
Shade<br />
Moist, Dry<br />
Coarse,<br />
Medium<br />
Medium<br />
Adult food<br />
(pollen<br />
and/or<br />
nectar)<br />
Native bees;<br />
Wasps<br />
Yes<br />
Herb,<br />
perennial<br />
Scutellaria ovata<br />
heartleaf<br />
skullcap<br />
Lamiaceae KS MO OK KS,MO,OK 1–2 Blue Yes May–Sep Part Shade,<br />
Shade<br />
Moist, Dry<br />
Coarse,<br />
Medium<br />
Very High<br />
Adult food<br />
(pollen<br />
and/or<br />
nectar)<br />
Hummingbirds<br />
Yes<br />
Herb,<br />
perennial<br />
Senna marilandica<br />
Maryland<br />
senna<br />
Fabaceae KS MO OK TX KS,MO,OK,TX 3–6 Yellow Yes Jun–Aug Sun, Part<br />
Shade<br />
Wet, Moist<br />
Coarse,<br />
Medium<br />
None High/High Spring and<br />
Summer<br />
High<br />
Adult food<br />
(pollen<br />
and/or<br />
nectar)<br />
Bumble bees<br />
Seed,<br />
Container<br />
Yes<br />
Herb,<br />
perennial<br />
Silphium<br />
integrifolium<br />
wholeleaf<br />
rosinweed<br />
Asteraceae IA KS MO OK IA,KS,MO,OK 2–6 Yellow Yes Jul–Sep Sun Wet, Moist,<br />
Dry<br />
Very High<br />
Adult food<br />
(pollen<br />
and/or<br />
nectar)<br />
Native bees;<br />
Bumble bees;<br />
Butterflies; Flies,<br />
beetles, and<br />
wasps<br />
Yes<br />
Herb,<br />
perennial<br />
Silphium<br />
perfoliatum<br />
cup plant Asteraceae IA KS MN MO IA,KS,MN,MO 3–8 Yellow Yes Jul–Sep Sun Moist Coarse,<br />
Medium,<br />
Fine<br />
Summer Very High Adult food<br />
(pollen<br />
and/or<br />
nectar);<br />
Nest<br />
material<br />
Native bees;<br />
Honey bees;<br />
Bumble bees;<br />
Butterflies; Flies,<br />
beetles, and<br />
wasps<br />
Seed,<br />
Container<br />
Yes<br />
Herb,<br />
perennial<br />
Solidago gigantea<br />
giant<br />
goldenrod<br />
Asteraceae IA KS MN MO OK TX IA,KS,MN,MO,OK,TX 3–7 Yellow Yes Sep–Nov Part Shade Moist Medium,<br />
Fine<br />
None Medium/ Summer Very High Adult food<br />
(pollen<br />
and/or<br />
nectar)<br />
Native bees;<br />
Honey bees;<br />
Butterflies; Flies,<br />
beetles, and<br />
wasps<br />
Seed<br />
Yes<br />
Herb,<br />
perennial<br />
Solidago<br />
nemoralis<br />
gray goldenrod<br />
Asteraceae IA KS MN MO OK TX IA,KS,MN,MO,OK,TX 4–5 Yellow Yes Aug–Sep Sun, Part<br />
Shade<br />
Dry<br />
Coarse,<br />
Medium,<br />
Fine<br />
Medium<br />
Medium/<br />
Medium<br />
Spring and<br />
Summer<br />
Very High<br />
Adult food<br />
(pollen<br />
and/or<br />
nectar)<br />
Native bees;<br />
Honey bees;<br />
Butterflies; Flies,<br />
beetles, and<br />
wasps<br />
Seed,<br />
Container,<br />
Cutting<br />
Yes<br />
<strong>Roadside</strong> <strong>Revegetation</strong>: An Integrated Approach to Establishing Native Plants and Pollinator Habitat<br />
491
APPENDIX<br />
Missouri — Native <strong>Revegetation</strong> Plants for Pollinators, continued...<br />
Plant Type Scientific Name Common Name Plant Family IA KS MN MO OK TX All States Eco- Region<br />
(EPA III)<br />
Height<br />
(feet)<br />
Flower<br />
Color<br />
Showy Flowering Sun<br />
Exposure<br />
Soil<br />
Moisture<br />
Soil Texture<br />
Salt<br />
Tolerance<br />
Palatability<br />
(Browsing/<br />
Grazing)<br />
Active<br />
Growth<br />
Period<br />
Pollinator<br />
Value<br />
Benefits to<br />
Pollinators<br />
Pollinators<br />
Propagation<br />
Commercially<br />
Available<br />
Herb,<br />
perennial<br />
Solidago rugosa<br />
ssp. aspera<br />
cliff goldenrod Asteraceae MO MO "1.5–2.<br />
5"<br />
Yellow Yes Sep–Oct Sun, Part<br />
Shade<br />
Wet, Moist,<br />
Dry<br />
Coarse,<br />
Medium,<br />
Fine<br />
Medium Very High Adult food<br />
(pollen<br />
and/or<br />
nectar)<br />
Native bees;<br />
Honey bees;<br />
Butterflies; Flies,<br />
beetles, and<br />
wasps<br />
Yes<br />
Herb,<br />
perennial<br />
Solidago speciosa<br />
showy<br />
goldenrod<br />
Asteraceae IA KS MN MO OK TX IA,KS,MN,MO,OK,TX "46,47,48,<br />
50,51,52"<br />
1–4 Yellow Yes Aug–Sep Sun, Part<br />
Shade<br />
Dry<br />
Coarse,<br />
Medium,<br />
Fine<br />
Medium Very High Adult food<br />
(pollen<br />
and/or<br />
nectar)<br />
Native bees;<br />
Honey bees;<br />
Butterflies and<br />
moths; Flies,<br />
beetles, and<br />
wasps<br />
Yes<br />
Herb,<br />
perennial<br />
Symphyotrichum<br />
ericoides var.<br />
ericoides<br />
heath aster Asteraceae IA KS MN MO OK TX IA,KS,MN,MO,OK,TX "46,47,48,<br />
49,50,51,<br />
52"<br />
1–3 White Yes Aug–Oct Sun, Part<br />
Shade<br />
Moist, Dry<br />
Coarse,<br />
Medium,<br />
Fine<br />
Medium Very High Adult food<br />
(pollen<br />
and/or<br />
nectar)<br />
Native bees;<br />
Butterflies and<br />
moths; Flies,<br />
beetles, and<br />
wasps<br />
Yes<br />
Herb,<br />
perennial<br />
Symphyotrichum<br />
laeve var. laeve<br />
smooth aster Asteraceae IA MN MO IA,MN,MO "46,47,48,<br />
50,51,52"<br />
1–3 Lavender<br />
Yes Aug–Oct Sun, Part<br />
Shade<br />
Moist, Dry<br />
Coarse,<br />
Medium,<br />
Fine<br />
Medium Low/Low Spring and<br />
Summer<br />
Very High<br />
Adult food<br />
(pollen<br />
and/or<br />
nectar)<br />
Native bees;<br />
Butterflies and<br />
moths<br />
Seed,<br />
Bare<br />
root<br />
Yes<br />
Herb,<br />
perennial<br />
Symphyotrichum<br />
lateriflorum<br />
calico aster Asteraceae IA KS MN MO OK TX IA,KS,MN,MO,OK,TX 1–3 White Yes Aug–Oct Sun Wet, Moist Low/High Spring,<br />
Summer,<br />
Fall<br />
Very High<br />
Adult food<br />
(pollen<br />
and/or<br />
nectar)<br />
Native bees;<br />
Butterflies and<br />
moths; Flies,<br />
beetles, and<br />
wasps<br />
Yes<br />
Herb,<br />
perennial<br />
Symphyotrichum<br />
novae-angliae<br />
New England<br />
aster<br />
Asteraceae IA KS MN MO IA,KS,MN,MO 2.5–6 Purple Yes Aug–Oct Sun Wet, Moist Very High Adult food<br />
(pollen<br />
and/or<br />
nectar)<br />
Native bees;<br />
Honey bees;<br />
Bumble bees;<br />
Butterflies and<br />
moths<br />
Yes<br />
Herb,<br />
perennial<br />
Symphyotrichum<br />
oblongifolium<br />
aromatic aster Asteraceae IA KS MN MO OK TX IA,KS,MN,MO,OK,TX "46,47,51,<br />
52"<br />
1–2 Lavender<br />
Yes Aug–Sep Sun Dry Coarse,<br />
Medium,<br />
Fine<br />
Low Very High Adult food<br />
(pollen<br />
and/or<br />
nectar)<br />
Native bees;<br />
Butterflies and<br />
moths; Flies,<br />
beetles, and<br />
wasps<br />
Yes<br />
Herb,<br />
perennial<br />
Symphyotrichum<br />
sericeum<br />
silky aster Asteraceae IA KS MN MO OK IA,KS,MN,MO,OK "46,47,48,<br />
51,52"<br />
1–2.5 Lavender<br />
Yes Aug–Oct Sun Dry Coarse,<br />
Medium<br />
Medium Very High Adult food<br />
(pollen<br />
and/or<br />
nectar)<br />
Native bees;<br />
Butterflies and<br />
moths<br />
Yes<br />
Herb,<br />
perennial<br />
Verbesina<br />
alternifolia<br />
wingstem Asteraceae IA KS MO OK IA,KS,MO,OK 3–6 Yellow Yes Jul–Sep Sun Wet, Moist Very High Adult food<br />
(pollen<br />
and/or<br />
nectar)<br />
Native bees;<br />
Honey bees;<br />
Bumble bees;<br />
Butterflies and<br />
moths; Flies, beetles,<br />
and wasps;<br />
Hummingbirds<br />
Yes<br />
Herb,<br />
perennial<br />
Vernonia<br />
baldwinii<br />
Baldwin's<br />
ironweed<br />
Asteraceae IA KS MO OK TX IA,KS,MO,OK,TX 3–5 Purple Yes Jul–Nov Sun Moist Coarse,<br />
Medium,<br />
Fine<br />
Very High<br />
Adult food<br />
(pollen<br />
and/or<br />
nectar)<br />
Native bees;<br />
Butterflies<br />
and moths;<br />
Hummingbirds<br />
Yes<br />
<strong>Roadside</strong> <strong>Revegetation</strong>: An Integrated Approach to Establishing Native Plants and Pollinator Habitat<br />
492
APPENDIX<br />
Missouri — Native <strong>Revegetation</strong> Plants for Pollinators, continued...<br />
Plant Type Scientific Name Common Name Plant Family IA KS MN MO OK TX All States Eco- Region<br />
(EPA III)<br />
Height<br />
(feet)<br />
Flower<br />
Color<br />
Showy Flowering Sun<br />
Exposure<br />
Soil<br />
Moisture<br />
Soil Texture<br />
Salt<br />
Tolerance<br />
Palatability<br />
(Browsing/<br />
Grazing)<br />
Active<br />
Growth<br />
Period<br />
Pollinator<br />
Value<br />
Benefits to<br />
Pollinators<br />
Pollinators<br />
Propagation<br />
Commercially<br />
Available<br />
Herb,<br />
perennial<br />
Vernonia<br />
fasciculata<br />
ironweed Asteraceae IA KS MN MO OK IA,KS,MN,MO,OK 4–5 Purple Yes Jul–Sep Sun Moist Coarse,<br />
Medium,<br />
Fine<br />
Very High<br />
Adult food<br />
(pollen<br />
and/or<br />
nectar)<br />
Native bees;<br />
Butterflies<br />
and moths;<br />
Hummingbirds<br />
Yes<br />
Herb,<br />
perennial<br />
Vernonia<br />
missurica<br />
Missouri<br />
ironweed<br />
Asteraceae MO MO 4–5 Purple Yes Jul–Sep Sun Wet, Moist,<br />
Dry<br />
Coarse,<br />
Medium,<br />
Fine<br />
None Low/Low Spring and<br />
Summer<br />
Very High<br />
Adult food<br />
(pollen<br />
and/or<br />
nectar)<br />
Native bees;<br />
Butterflies<br />
and moths;<br />
Hummingbirds<br />
Seed,<br />
Container,<br />
Bare<br />
root,<br />
Sprig<br />
Yes<br />
Herb,<br />
perennial<br />
Veronicastrum<br />
virginicum<br />
Culver's root<br />
Scrophulariaceae<br />
IA KS MN MO OK IA,KS,MN,MO,OK 4–5 White Yes Jun–Aug Sun Wet, Moist,<br />
Dry<br />
Very High<br />
Adult food<br />
(pollen<br />
and/or<br />
nectar)<br />
Native bees;<br />
Honey bees;<br />
Flies, beetles,<br />
and wasps;<br />
Hummingbirds<br />
Yes<br />
Herb,<br />
perennial<br />
Zizia aurea golden zizia Apiaceae IA KS MN MO OK IA,KS,MN,MO,OK 1–3 Yellow Yes Apr–Aug Sun, Part<br />
Shade<br />
Wet, Moist,<br />
Dry<br />
Coarse,<br />
Medium<br />
Very High<br />
Adult food<br />
(pollen<br />
and/or<br />
nectar)<br />
Native bees;<br />
Butterflies and<br />
moths; Flies,<br />
beetles, and<br />
wasps<br />
Yes<br />
Shrub Aesculus pavia red buckeye Hippocastanaceae<br />
MO OK TX MO,OK,TX 25 Red Yes May–Jun Part Shade,<br />
Shade<br />
Wet, Moist,<br />
Dry<br />
Coarse,<br />
Medium,<br />
Fine<br />
None Low/Low Spring and<br />
Summer<br />
Very High<br />
Adult food<br />
(pollen<br />
and/or<br />
nectar)<br />
Bumble bees;<br />
Hummingbirds<br />
Seed,<br />
Container,<br />
Bare<br />
root<br />
Yes<br />
Shrub<br />
Amorpha<br />
canescens<br />
lead plant Fabaceae IA KS MN MO OK TX IA,KS,MN,MO,OK,TX "46,47,48,<br />
50,51,52"<br />
1.5–4 Purple Yes Jun–Aug Sun, Part<br />
Shade<br />
Dry<br />
Coarse,<br />
Medium<br />
Medium High/Low Spring and<br />
Summer<br />
Very High<br />
Adult food<br />
(pollen<br />
and/or<br />
nectar)<br />
Native bees;<br />
Honey bees;<br />
Flies, beetles,<br />
and wasps<br />
Seed,<br />
Container,<br />
Bare<br />
root,<br />
Cutting<br />
Yes<br />
Shrub<br />
Ceanothus<br />
americanus<br />
New Jersey tea Rhamnaceae IA KS MN MO OK TX IA,KS,MN,MO,OK,TX "47,50,51,<br />
52"<br />
2–3 White Yes Jun–Jul Sun, Part<br />
Shade<br />
Dry<br />
Coarse,<br />
Medium<br />
High<br />
Medium/<br />
Low<br />
Spring and<br />
Summer<br />
Very High<br />
Adult food<br />
(pollen<br />
and/or<br />
nectar)<br />
Native bees;<br />
Flies, beetles,<br />
and wasps<br />
Seed,<br />
Container,<br />
Bare<br />
root<br />
Yes<br />
Shrub<br />
Cephalanthus<br />
occidentalis<br />
buttonbush Rubiaceae IA KS MO OK TX IA,KS,MO,OK,TX 12 White Yes Jun–Aug Sun, Part<br />
Shade<br />
Moist<br />
Coarse,<br />
Medium,<br />
Fine<br />
Low Low/Low Spring Very High Adult food<br />
(pollen<br />
and/or<br />
nectar)<br />
Native bees;<br />
Honey bees;<br />
Bumble bees;<br />
Hummingbirds<br />
Seed,<br />
Container,<br />
Bare<br />
root,<br />
Cutting<br />
Yes<br />
Shrub Opuntia humifusa devil's-tongue Cactaceae KS MO OK TX KS,MO,OK,TX 1–1.5 Yellow Yes May–Jul Sun Dry Coarse Very High Adult food<br />
(pollen<br />
and/or<br />
nectar)<br />
Native bees;<br />
Butterflies; Flies,<br />
beetles, and<br />
wasps<br />
Yes<br />
Shrub<br />
Physocarpus<br />
opulifolius<br />
ninebark Rosaceae IA MN MO IA,MN,MO 8 White Yes Apr–Jun Sun, Part<br />
Shade<br />
Moist<br />
Coarse,<br />
Medium,<br />
Fine<br />
None Low/ Spring and<br />
Summer<br />
Very High<br />
Adult food<br />
(pollen<br />
and/or<br />
nectar)<br />
Native bees;<br />
Honey bees<br />
Seed,<br />
Container,<br />
Bare<br />
root,<br />
Cutting<br />
Yes<br />
<strong>Roadside</strong> <strong>Revegetation</strong>: An Integrated Approach to Establishing Native Plants and Pollinator Habitat<br />
493
APPENDIX<br />
Missouri — Native <strong>Revegetation</strong> Plants for Pollinators, continued...<br />
Plant Type Scientific Name Common Name Plant Family IA KS MN MO OK TX All States Eco- Region<br />
(EPA III)<br />
Height<br />
(feet)<br />
Flower<br />
Color<br />
Showy Flowering Sun<br />
Exposure<br />
Soil<br />
Moisture<br />
Soil Texture<br />
Salt<br />
Tolerance<br />
Palatability<br />
(Browsing/<br />
Grazing)<br />
Active<br />
Growth<br />
Period<br />
Pollinator<br />
Value<br />
Benefits to<br />
Pollinators<br />
Pollinators<br />
Propagation<br />
Commercially<br />
Available<br />
Shrub Rhus aromatica fragrant sumac Anacardiaceae<br />
KS MO OK TX KS,MO,OK,TX 2-6 Green No Apr–Jun Sun, Part<br />
Shade,<br />
Shade<br />
Moist, Dry<br />
Coarse,<br />
Medium<br />
Low/Low<br />
Spring and<br />
Summer<br />
High<br />
Adult food<br />
(pollen<br />
and/or<br />
nectar);<br />
Nest<br />
material<br />
Native bees;<br />
Honey bees;<br />
Flies, beetles,<br />
and wasps<br />
Yes<br />
Shrub Rhus glabra smooth sumac Anacardiaceae<br />
IA KS MN MO OK TX IA,KS,MN,MO,OK,TX 12 Green Yes Apr–May Sun, Part<br />
Shade<br />
Dry<br />
Coarse,<br />
Medium<br />
Medium Low/Low Spring and<br />
Summer<br />
High<br />
Adult food<br />
(pollen<br />
and/or<br />
nectar);<br />
Nest<br />
material<br />
Native bees;<br />
Honey bees;<br />
Flies, beetles,<br />
and wasps<br />
Seed,<br />
Container,<br />
Bare<br />
root<br />
Yes<br />
Shrub Rosa arkansana prairie rose Rosaceae IA KS MN MO OK IA,KS,MN,MO,OK "46,47,48,<br />
49,50,51,<br />
52"<br />
2 White Yes Jun–Aug Sun, Part<br />
Shade<br />
Moist, Dry<br />
Coarse,<br />
Medium,<br />
Fine<br />
Very High<br />
Adult food<br />
(pollen<br />
and/or<br />
nectar);<br />
Nest<br />
material<br />
Native bees;<br />
Bumble bees;<br />
Flies, beetles,<br />
and wasps<br />
Yes<br />
Shrub Rosa carolina pasture rose Rosaceae IA KS MO OK TX IA,KS,MO,OK,TX 2 White Yes Jun–Aug Sun, Part<br />
Shade<br />
Moist, Dry<br />
Coarse,<br />
Medium,<br />
Fine<br />
Medium<br />
Medium/<br />
Medium<br />
Spring and<br />
Summer<br />
Very High<br />
Adult food<br />
(pollen<br />
and/or<br />
nectar);<br />
Nest<br />
material<br />
Native bees;<br />
Bumble bees;<br />
Flies, beetles,<br />
and wasps<br />
Seed,<br />
Container,<br />
Bare<br />
root<br />
Yes<br />
Shrub Salix discolor pussy willow Salicaceae IA KS MN MO OK IA,KS,MN,MO,OK 40 White Yes Dec–Feb Sun Wet, Moist Coarse,<br />
Medium,<br />
Fine<br />
None Medium/ Spring Very High Adult food<br />
(pollen<br />
and/or<br />
nectar)<br />
Native bees;<br />
Honey bees;<br />
Bumble bees;<br />
Butterflies<br />
Seed,<br />
Container,<br />
Bare<br />
root,<br />
Cutting<br />
Yes<br />
Shrub Salix humilis prairie willow Salicaceae IA KS MN MO OK IA,KS,MN,MO,OK 8 White No Mar–May Sun, Part<br />
Shade<br />
Moist, Dry<br />
Coarse,<br />
Medium,<br />
Fine<br />
Low<br />
Medium/<br />
Low<br />
Spring and<br />
Summer<br />
Very High<br />
Adult food<br />
(pollen<br />
and/or<br />
nectar)<br />
Native bees;<br />
Flies, beetles,<br />
and wasps<br />
Container,<br />
Bare<br />
root,<br />
Cutting<br />
Yes<br />
Shrub<br />
Sambucus nigra<br />
ssp. canadensis<br />
American black<br />
elderberry<br />
Caprifoliaceae<br />
IA KS MN MO OK TX IA,KS,MN,MO,OK,TX 12 White Yes Apr–May Sun, Part<br />
Shade<br />
Wet, Moist,<br />
Dry<br />
Medium None Medium/<br />
Low<br />
Spring and<br />
Summer<br />
Very High<br />
Adult food<br />
(pollen<br />
and/or<br />
nectar);<br />
Nest<br />
material<br />
Native bees;<br />
Flies, beetles,<br />
and wasps<br />
Seed,<br />
Container,<br />
Bare<br />
root<br />
Yes<br />
Tree Cercis canadensis eastern redbud Fabaceae KS MO OK TX KS,MO,OK,TX 20 Purple Yes Mar–Apr Sun, Part<br />
Shade<br />
Moist<br />
Coarse,<br />
Medium,<br />
Fine<br />
None<br />
Medium/<br />
Low<br />
Spring and<br />
Summer<br />
Very High<br />
Adult food<br />
(pollen<br />
and/or<br />
nectar);<br />
Nest<br />
material<br />
Native bees;<br />
Bumble bees;<br />
Seed,<br />
Container,<br />
Bare<br />
root,<br />
Cutting<br />
Yes<br />
Tree<br />
Crataegus<br />
crus-galli<br />
cockspur<br />
hawthorn<br />
Rosaceae KS MO OK TX KS,MO,OK,TX 30 White Yes Apr–May Sun Wet, Moist,<br />
Dry<br />
Coarse,<br />
Medium,<br />
Fine<br />
Medium<br />
Medium/<br />
Low<br />
Spring and<br />
Summer<br />
Very High<br />
Adult food<br />
(pollen<br />
and/or<br />
nectar)<br />
Native bees;<br />
Flies, beetles,<br />
and wasps<br />
Seed,<br />
Container,<br />
Bare<br />
root<br />
Yes<br />
<strong>Roadside</strong> <strong>Revegetation</strong>: An Integrated Approach to Establishing Native Plants and Pollinator Habitat<br />
494
APPENDIX<br />
Missouri — Native <strong>Revegetation</strong> Plants for Pollinators, continued...<br />
Plant Type Scientific Name Common Name Plant Family IA KS MN MO OK TX All States Eco- Region<br />
(EPA III)<br />
Height<br />
(feet)<br />
Flower<br />
Color<br />
Showy Flowering Sun<br />
Exposure<br />
Soil<br />
Moisture<br />
Soil Texture<br />
Salt<br />
Tolerance<br />
Palatability<br />
(Browsing/<br />
Grazing)<br />
Active<br />
Growth<br />
Period<br />
Pollinator<br />
Value<br />
Benefits to<br />
Pollinators<br />
Pollinators<br />
Propagation<br />
Commercially<br />
Available<br />
Tree Crataegus mollis downy<br />
hawthorn<br />
Rosaceae IA KS MO OK IA,KS,MO,OK 30 White Yes Apr–May Sun Wet, Moist,<br />
Dry<br />
Coarse,<br />
Medium,<br />
Fine<br />
Medium Very High Adult food<br />
(pollen<br />
and/or<br />
nectar)<br />
Native bees;<br />
Flies, beetles,<br />
and wasps<br />
Yes<br />
Tree Prunus americana American plum Rosaceae IA KS MN MO OK IA,KS,MN,MO,OK 24 White Yes Apr–May Sun, Part<br />
Shade<br />
Dry<br />
Coarse,<br />
Medium<br />
Low<br />
Medium/<br />
Low<br />
Spring and<br />
Summer<br />
Very High<br />
Adult food<br />
(pollen<br />
and/or<br />
nectar)<br />
Native bees;<br />
Honey bees;<br />
Bumble bees<br />
Seed,<br />
Container,<br />
Bare<br />
root<br />
Yes<br />
Tree<br />
Prunus angustifolia<br />
Chickasaw<br />
plum<br />
Rosaceae KS MO OK TX KS,MO,OK,TX 25 White Yes Feb–May Sun, Part<br />
Shade<br />
Dry<br />
Medium,<br />
Fine<br />
Low<br />
Medium/<br />
Low<br />
Spring and<br />
Summer<br />
Very High<br />
Adult food<br />
(pollen<br />
and/or<br />
nectar)<br />
Native bees<br />
Seed,<br />
Container,<br />
Bare<br />
root<br />
Yes<br />
Tree Prunus serotina black cherry Rosaceae IA KS MN MO OK TX IA,KS,MN,MO,OK,TX 80 White Yes May–Jun Sun, Part<br />
Shade<br />
Moist, Dry<br />
Coarse,<br />
Medium<br />
Medium Low/Low Spring and<br />
Summer<br />
Very High<br />
Adult food<br />
(pollen<br />
and/or<br />
nectar)<br />
Native bees;<br />
Honey bees;<br />
Bumble bees;<br />
Flies, beetles,<br />
and wasps<br />
Seed,<br />
Container,<br />
Bare<br />
root<br />
Yes<br />
Vine<br />
Bignonia<br />
capreolata<br />
crossvine<br />
Bignoniaceae<br />
MO OK TX MO,OK,TX 10–50 Red Yes Mar–May Sun, Part<br />
Shade<br />
Wet, Moist<br />
Coarse,<br />
Medium,<br />
Fine<br />
High<br />
Adult food<br />
(pollen<br />
and/or<br />
nectar)<br />
Native bees;<br />
Hummingbirds<br />
Yes<br />
Vine Campsis radicans trumpet<br />
creeper<br />
Bignoniaceae<br />
KS MO OK TX KS,MO,OK,TX 2 Red Yes Jun–Aug Sun, Part<br />
Shade<br />
Wet, Moist,<br />
Dry<br />
Coarse,<br />
Medium<br />
None<br />
Spring and<br />
Summer<br />
Very High<br />
Adult food<br />
(pollen<br />
and/or<br />
nectar)<br />
Native bees;<br />
Honey bees;<br />
Bumble bees;<br />
Hummingbirds<br />
Seed,<br />
Container,<br />
Bare<br />
root,<br />
Cutting<br />
Yes<br />
Vine<br />
Clematis<br />
virginiana<br />
devil's darning<br />
needles<br />
Ranunculaceae<br />
IA MN MO IA,MN,MO 15 White Yes Jun–Aug Sun, Part<br />
Shade<br />
Wet, Moist,<br />
Dry<br />
Medium,<br />
Fine<br />
None<br />
Spring and<br />
Summer<br />
Very High<br />
Adult food<br />
(pollen<br />
and/or<br />
nectar)<br />
Native bees;<br />
Honey bees;<br />
Flies, beetles,<br />
and wasps<br />
Seed,<br />
Container,<br />
Bare<br />
root,<br />
Cutting<br />
Yes<br />
<strong>Roadside</strong> <strong>Revegetation</strong>: An Integrated Approach to Establishing Native Plants and Pollinator Habitat<br />
495
APPENDIX<br />
OKLAHOMA — NATIVE REVEGETATION PLANTS FOR POLLINATORS<br />
Plant Type Scientific Name Common Name Plant Family IA KS MN MO OK TX All States Eco- Region<br />
(EPA III)<br />
Height<br />
(feet)<br />
Flower<br />
Color<br />
Showy Flowering Sun<br />
Exposure<br />
Soil<br />
Moisture<br />
Soil<br />
Texture<br />
Salt<br />
Tolerance<br />
Palatability<br />
(Browsing/<br />
Grazing)<br />
Active<br />
Growth<br />
Period<br />
Pollinator<br />
Value<br />
Benefits to<br />
Pollinators<br />
Pollinators<br />
Propagation<br />
Commercially<br />
Available<br />
Grass,<br />
perennial<br />
Andropogon<br />
gerardii<br />
big bluestem Poaceae IA KS MN MO OK TX IA,KS,MN,MO,OK,TX "46,47,48,<br />
49,50,51,<br />
52"<br />
3–8 Green No May–Jun Sun, Part<br />
Shade<br />
Dry<br />
Coarse,<br />
Medium,<br />
Fine<br />
Medium<br />
Medium/<br />
High<br />
Summer Low Nest<br />
material;<br />
Shelter<br />
Seed<br />
Yes<br />
Grass,<br />
perennial<br />
Bouteloua<br />
curtipendula<br />
side-oats grama Poaceae IA KS MN MO OK TX IA,KS,MN,MO,OK,TX "46,47,48,<br />
51,52"<br />
1–3 Green No Jul–Sep Sun, Part<br />
Shade<br />
Dry<br />
Coarse,<br />
Medium,<br />
Fine<br />
Medium<br />
Medium/<br />
High<br />
Summer Low Nest<br />
material;<br />
Shelter<br />
Seed<br />
Yes<br />
Grass,<br />
perennial<br />
Bouteloua<br />
dactyloides<br />
buffalo grass Poaceae IA KS MO OK TX IA,KS,MO,OK,TX 0.5–1 Green No Jul–Aug Sun Moist,<br />
Dry<br />
Coarse,<br />
Medium,<br />
Fine<br />
Medium<br />
Medium/<br />
High<br />
Summer Low Nest<br />
material;<br />
Shelter<br />
Seed,<br />
Sprig<br />
Yes<br />
Grass,<br />
perennial<br />
Bouteloua<br />
gracilis<br />
blue grama Poaceae IA KS MN MO OK TX IA,KS,MN,MO,OK,TX 464,748<br />
5,152<br />
0.5–1.5 Green No May–Jul Sun Dry Coarse,<br />
Medium,<br />
Fine<br />
Medium<br />
High/<br />
High<br />
Summer<br />
and Fall<br />
Low<br />
Nest<br />
material;<br />
Shelter<br />
Seed<br />
Yes<br />
Grass,<br />
perennial<br />
Elymus<br />
canadensis<br />
nodding wild<br />
rye<br />
Poaceae IA KS MN MO OK TX IA,KS,MN,MO,OK,TX "46,47,48,<br />
49,50,51,<br />
52"<br />
3–5 Green No Jul–Aug Sun, Part<br />
Shade<br />
Moist,<br />
Dry<br />
Coarse,<br />
Medium,<br />
Fine<br />
Medium<br />
Medium/<br />
Medium<br />
Spring,<br />
Summer,<br />
Fall<br />
Low Shelter Seed Yes<br />
Grass,<br />
perennial<br />
Panicum<br />
virgatum<br />
switchgrass Poaceae IA KS MO OK TX IA,KS,MO,OK,TX 3–6 Green No Jul–Aug Sun, Part<br />
Shade<br />
Wet,<br />
Moist,<br />
Dry<br />
Coarse,<br />
Medium,<br />
Fine<br />
Medium<br />
Medium/<br />
High<br />
Summer Low Shelter Seed Yes<br />
Grass,<br />
perennial<br />
Schizachyrium<br />
scoparium<br />
little bluestem Poaceae IA KS MN MO OK TX IA,KS,MN,MO,OK,TX "46,47,48,<br />
49,50,51,<br />
52"<br />
1–2.5 Green No Aug–Sep Sun, Part<br />
Shade<br />
Moist,<br />
Dry<br />
Coarse,<br />
Medium,<br />
Fine<br />
Medium<br />
Medium/<br />
High<br />
Summer<br />
and Fall<br />
Low<br />
Nest<br />
material;<br />
Shelter<br />
Seed<br />
Yes<br />
Grass,<br />
perennial<br />
Sorghastrum<br />
nutans<br />
Indian grass Poaceae IA KS MN MO OK TX IA,KS,MN,MO,OK,TX "46,47,48,<br />
51,52"<br />
3–8 Green No Jul–Sep Sun Moist,<br />
Dry<br />
Coarse,<br />
Medium,<br />
Fine<br />
Medium<br />
Medium/<br />
High<br />
Summer<br />
and Fall<br />
Low<br />
Nest<br />
material;<br />
Shelter<br />
Seed<br />
Yes<br />
Grass,<br />
perennial<br />
Sporobolus<br />
heterolepis<br />
prairie dropseed Poaceae IA KS MN MO OK TX IA,KS,MN,MO,OK,TX "46,47,48,<br />
51,52"<br />
1.5–4 Green No Aug–Sep Sun Moist Coarse,<br />
Medium<br />
None<br />
Low/<br />
Medium<br />
Spring<br />
and<br />
Summer<br />
Low<br />
Nest<br />
material;<br />
Shelter<br />
Seed<br />
Yes<br />
Herb, annual<br />
Castilleja<br />
indivisa<br />
entireleaf Indian<br />
paintbrush<br />
Scrophulariaceae<br />
OK TX OK,TX 1–1.5 Red Yes Jul–Sep Sun, Part<br />
Shade<br />
Wet,<br />
Moist,<br />
Dry<br />
Coarse,<br />
Medium,<br />
Fine<br />
Low<br />
Very<br />
High<br />
Adult food<br />
(pollen<br />
and/or<br />
nectar)<br />
Hummingbirds<br />
Yes<br />
Herb, annual<br />
Chamaecrista<br />
fasciculata<br />
partridge pea Fabaceae IA KS MN MO OK TX IA,KS,MN,MO,OK,TX "46,47,51,<br />
52"<br />
1–3 Yellow Yes Jul–Sep Sun, Part<br />
Shade<br />
Moist,<br />
Dry<br />
Coarse,<br />
Medium,<br />
Fine<br />
Low<br />
High/<br />
Medium<br />
Spring<br />
Very<br />
High<br />
Adult food<br />
(pollen<br />
and/or<br />
nectar)<br />
Native bees; Bumble<br />
bees; Flies, beetles, and<br />
wasps<br />
Seed<br />
Yes<br />
Herb, annual<br />
Dracopis<br />
amplexicaulis<br />
clasping<br />
coneflower<br />
Asteraceae KS OK TX KS,OK,TX 2–3 Yellow Yes Apr–Jul Part<br />
Shade<br />
Wet,<br />
Moist,<br />
Dry<br />
Coarse,<br />
Medium,<br />
Fine<br />
None Low/Low Spring<br />
and<br />
Summer<br />
High<br />
Adult food<br />
(pollen<br />
and/or<br />
nectar)<br />
Native bees Seed Yes<br />
Herb, annual<br />
Eryngium<br />
leavenworthii<br />
Leavenworth's<br />
eryngo<br />
Apiaceae KS OK TX KS,OK,TX 1.5–3 Purple Yes Jul–Sep Sun, Part<br />
Shade<br />
Dry<br />
Coarse,<br />
Medium,<br />
Fine<br />
Very<br />
High<br />
Adult food<br />
(pollen<br />
and/or<br />
nectar)<br />
Native bees<br />
Yes<br />
<strong>Roadside</strong> <strong>Revegetation</strong>: An Integrated Approach to Establishing Native Plants and Pollinator Habitat<br />
496
APPENDIX<br />
Oklahoma — Native <strong>Revegetation</strong> Plants for Pollinators, continued...<br />
Plant Type Scientific Name Common Name Plant Family IA KS MN MO OK TX All States Eco- Region<br />
(EPA III)<br />
Height<br />
(feet)<br />
Flower<br />
Color<br />
Showy Flowering Sun<br />
Exposure<br />
Soil<br />
Moisture<br />
Soil<br />
Texture<br />
Salt<br />
Tolerance<br />
Palatability<br />
(Browsing/<br />
Grazing)<br />
Active<br />
Growth<br />
Period<br />
Pollinator<br />
Value<br />
Benefits to<br />
Pollinators<br />
Pollinators<br />
Propagation<br />
Commercially<br />
Available<br />
Herb, annual<br />
or perennial<br />
Coreopsis<br />
tinctoria<br />
plains coreopsis Asteraceae KS MO OK TX KS,MO,OK,TX 1–2 Yellow Yes Apr–Jun Sun, Part<br />
Shade<br />
Moist,<br />
Dry<br />
Fine None Spring<br />
and<br />
Summer<br />
High<br />
Adult food<br />
(pollen<br />
and/or<br />
nectar)<br />
Native bees; Flies,<br />
beetles, and wasps<br />
Seed<br />
Yes<br />
Herb, annual<br />
or perennial<br />
Gaillardia<br />
pulchella<br />
blanketflower Asteraceae KS OK TX KS,OK,TX 1–2 Orange Yes May–Jul Sun, Part<br />
Shade<br />
Moist,<br />
Dry<br />
Coarse,<br />
Medium,<br />
Fine<br />
None<br />
Medium/<br />
Medium<br />
Spring,<br />
Summer,<br />
Fall<br />
Very<br />
High<br />
Adult food<br />
(pollen<br />
and/or<br />
nectar)<br />
Native bees; Flies,<br />
beetles, and wasps<br />
Seed<br />
Yes<br />
Herb, annual<br />
or perennial<br />
Gaura longiflora<br />
longflower<br />
beeblossom<br />
Onagraceae IA KS MO OK TX IA,KS,MO,OK,TX 2–3 White Yes Jul–Sep Sun Dry Very<br />
High<br />
Adult food<br />
(pollen<br />
and/or<br />
nectar)<br />
Bumble bees; Moths;<br />
Hummingbirds<br />
Yes<br />
Herb, annual<br />
or perennial<br />
Glandularia<br />
bipinnatifida<br />
prairie verbena Verbenaceae KS OK TX KS,OK,TX 1 Purple Yes Mar–Dec Sun Dry Coarse,<br />
Medium,<br />
Fine<br />
Very<br />
High<br />
Adult food<br />
(pollen<br />
and/or<br />
nectar)<br />
Native bees; Bumble<br />
bees; Butterflies and<br />
moths; Flies; Hummingbirds<br />
Yes<br />
Herb, annual<br />
or perennial<br />
Monarda<br />
citriodora<br />
lemon beebalm Lamiaceae KS OK TX KS,OK,TX 1–2 Purple Yes May–Jul Sun, Part<br />
Shade<br />
Dry<br />
Coarse,<br />
Medium,<br />
Fine<br />
Very<br />
High<br />
Adult food<br />
(pollen<br />
and/or<br />
nectar)<br />
Native bees; Bumble<br />
bees; Hummingbirds<br />
Yes<br />
Herb, annual<br />
or perennial<br />
Monarda<br />
punctata<br />
dotted mint Lamiaceae KS MN OK TX KS,MN,OK,TX 1–3 Purple Yes Jun–Aug Sun Moist Very<br />
High<br />
Adult food<br />
(pollen<br />
and/or<br />
nectar)<br />
Native bees; Honey bees;<br />
Bumble bees; Butterflies<br />
and moths; Flies, beetles,<br />
and wasps; Hummingbirds<br />
Yes<br />
Herb, annual<br />
or perennial<br />
Verbena stricta hoary vervain Verbenaceae IA KS MN MO OK IA,KS,MN,MO,OK 2–3 White Yes Jun–Sep Sun Dry Coarse,<br />
Medium,<br />
Fine<br />
Very<br />
High<br />
Adult food<br />
(pollen<br />
and/or<br />
nectar)<br />
Native bees; Butterflies<br />
and moths; Hummingbirds<br />
Yes<br />
Herb, biennial Ipomopsis rubra standing-cypress<br />
Polemoniaceae<br />
OK TX OK,TX 2–4 Red Yes Jun–Aug Sun, Part<br />
Shade<br />
Dry<br />
Coarse,<br />
Medium<br />
Very<br />
High<br />
Adult food<br />
(pollen<br />
and/or<br />
nectar)<br />
Hummingbirds<br />
Yes<br />
Herb, biennial<br />
or perennial<br />
Sphaeralcea<br />
coccinea<br />
scarlet<br />
globemallow<br />
Malvaceae KS OK TX KS,OK,TX 1 Orange Yes Apr–Sep Sun Moist,<br />
Dry<br />
Medium,<br />
Fine<br />
Medium<br />
Medium/<br />
Medium<br />
Spring<br />
and<br />
Summer<br />
Very<br />
High<br />
Adult food<br />
(pollen<br />
and/or<br />
nectar)<br />
Native bees; Hummingbirds<br />
Seed,<br />
Container<br />
Yes<br />
Herb, biennial<br />
or perennial<br />
Verbena hastata swamp verbena Verbenaceae IA KS MN MO OK IA,KS,MN,MO,OK 3–5 Lavender<br />
Yes Jul–Sep Sun, Part<br />
Shade<br />
Wet,<br />
Moist<br />
Coarse,<br />
Medium<br />
Very<br />
High<br />
Adult food<br />
(pollen<br />
and/or<br />
nectar)<br />
Native bees; Butterflies;<br />
Hummingbirds<br />
Yes<br />
Herb,<br />
perennial<br />
Achillea<br />
millefolium<br />
common yarrow Asteraceae IA KS MN MO OK TX IA,KS,MN,MO,OK,TX 3 White Yes May–Jul Sun, Part<br />
Shade<br />
Moist,<br />
Dry<br />
Medium Low Medium/<br />
Low<br />
Spring High Adult food<br />
(pollen<br />
and/or<br />
nectar);<br />
Nest<br />
material<br />
Native bees; Flies,<br />
beetles, and wasps<br />
Seed,<br />
Container,<br />
Sprig<br />
Yes<br />
<strong>Roadside</strong> <strong>Revegetation</strong>: An Integrated Approach to Establishing Native Plants and Pollinator Habitat<br />
497
APPENDIX<br />
Oklahoma — Native <strong>Revegetation</strong> Plants for Pollinators, continued...<br />
Plant Type Scientific Name Common Name Plant Family IA KS MN MO OK TX All States Eco- Region<br />
(EPA III)<br />
Height<br />
(feet)<br />
Flower<br />
Color<br />
Showy Flowering Sun<br />
Exposure<br />
Soil<br />
Moisture<br />
Soil<br />
Texture<br />
Salt<br />
Tolerance<br />
Palatability<br />
(Browsing/<br />
Grazing)<br />
Active<br />
Growth<br />
Period<br />
Pollinator<br />
Value<br />
Benefits to<br />
Pollinators<br />
Pollinators<br />
Propagation<br />
Commercially<br />
Available<br />
Herb,<br />
perennial<br />
Aquilegia<br />
canadensis<br />
red columbine<br />
Ranunculaceae<br />
IA KS MN MO OK IA,KS,MN,MO,OK 1–2 Red Yes Apr–May Sun, Part<br />
Shade<br />
Wet,<br />
Moist,<br />
Dry<br />
Coarse,<br />
Medium<br />
Very<br />
High<br />
Adult food<br />
(pollen<br />
and/or<br />
nectar)<br />
Bumble bees; Butterflies;<br />
Hummingbirds<br />
Yes<br />
Herb,<br />
perennial<br />
Asclepias<br />
asperula ssp.<br />
capricornu<br />
antelopehorns<br />
milkweed<br />
Asclepiadaceae<br />
KS OK TX KS,OK,TX 1–2 Green Yes Apr–Jun Sun, Part<br />
Shade<br />
Dry<br />
Coarse,<br />
Medium,<br />
Fine<br />
Medium<br />
Very<br />
High<br />
Adult food<br />
(pollen<br />
and/or<br />
nectar);<br />
Larval food<br />
Native bees; Honey bees;<br />
Bumble bees; Butterflies<br />
and moths; Flies, beetles,<br />
and wasps<br />
Yes<br />
Herb,<br />
perennial<br />
Asclepias<br />
incarnata<br />
swamp<br />
milkweed<br />
Asclepiadaceae<br />
IA KS MO OK TX IA,KS,MO,OK,TX 3–4 Purple Yes Jun–Sep Sun, Part<br />
Shade<br />
Moist<br />
Coarse,<br />
Medium,<br />
Fine<br />
Medium /Low Spring Very<br />
High<br />
Adult food<br />
(pollen<br />
and/or<br />
nectar);<br />
Larval food<br />
Native bees; Honey bees;<br />
Bumble bees; Butterflies;<br />
Monarchs; Flies, beetles,<br />
and wasps; Hummingbirds<br />
Seed,<br />
Sprig<br />
Yes<br />
Herb,<br />
perennial<br />
Asclepias syriaca<br />
common<br />
milkweed<br />
Asclepiadaceae<br />
IA KS MN MO OK IA,KS,MN,MO,OK "46,47,48,<br />
49,50,51,<br />
52"<br />
2.5–4 Purple Yes Jun–Aug Sun, Part<br />
Shade<br />
Moist,<br />
Dry<br />
Coarse,<br />
Medium,<br />
Fine<br />
Medium<br />
Very<br />
High<br />
Adult food<br />
(pollen<br />
and/or<br />
nectar);<br />
Larval food<br />
Native bees; Honey bees;<br />
Bumble bees; Butterflies;<br />
Monarchs; Flies, beetles,<br />
and wasps<br />
Yes<br />
Herb,<br />
perennial<br />
Asclepias<br />
tuberosa<br />
butterfly<br />
milkweed<br />
Asclepiadaceae<br />
IA KS MN MO OK TX IA,KS,MN,MO,OK,TX "46,47,50,<br />
51,52"<br />
2–3 Orange Yes Jun–Aug Sun, Part<br />
Shade<br />
Dry<br />
Coarse,<br />
Medium<br />
Medium Low/Low Spring<br />
and<br />
Summer<br />
Very<br />
High<br />
Adult food<br />
(pollen<br />
and/or<br />
nectar);<br />
Larval food<br />
Native bees; Honey bees;<br />
Bumble bees; Butterflies;<br />
Monarchs; Flies, beetles,<br />
and wasps; Hummingbirds<br />
Seed,<br />
Container<br />
Yes<br />
Herb,<br />
perennial<br />
Asclepias<br />
verticillata<br />
whorled<br />
milkweed<br />
Asclepiadaceae<br />
IA KS MN MO OK TX IA,KS,MN,MO,OK,TX "46,47,48,<br />
51,52"<br />
1–2 Purple No Jun–Sep Sun, Part<br />
Shade<br />
Moist,<br />
Dry<br />
Coarse,<br />
Medium,<br />
Fine<br />
Medium<br />
Very<br />
High<br />
Adult food<br />
(pollen<br />
and/or<br />
nectar);<br />
Larval food<br />
Native bees; Honey bees;<br />
Bumble bees; Butterflies;<br />
Monarchs; Flies, beetles,<br />
and wasps<br />
Yes<br />
Herb,<br />
perennial<br />
Asclepias viridis green milkweed Asclepiadaceae<br />
KS MO OK TX KS,MO,OK,TX 2–3 Green Yes Jun–Aug Sun, Part<br />
Shade<br />
Dry<br />
Coarse,<br />
Medium<br />
Medium<br />
Very<br />
High<br />
Adult food<br />
(pollen<br />
and/or<br />
nectar);<br />
Larval food<br />
Native bees; Honey bees;<br />
Bumble bees; Butterflies;<br />
Monarchs; Flies, beetles,<br />
and wasps<br />
Yes<br />
Herb,<br />
perennial<br />
Baptisia alba var.<br />
macrophylla<br />
white wild<br />
indigo<br />
Fabaceae IA KS MO OK IA,KS,MO,OK 3–6 White Yes May–Jun Sun Moist,<br />
Dry<br />
Medium,<br />
Fine<br />
Medium<br />
Very<br />
High<br />
Adult food<br />
(pollen<br />
and/or<br />
nectar)<br />
Native bees; Bumble<br />
bees<br />
Yes<br />
Herb,<br />
perennial<br />
Baptisia australis blue false indigo Fabaceae IA KS MO OK TX IA,KS,MO,OK,TX 1.5–2 White Yes Apr–Jun Sun Moist,<br />
Dry<br />
Medium<br />
Very<br />
High<br />
Adult food<br />
(pollen<br />
and/or<br />
nectar)<br />
Native bees; Bumble<br />
bees<br />
Yes<br />
Herb,<br />
perennial<br />
Baptisia<br />
bracteata<br />
cream wild<br />
indigo<br />
Fabaceae IA KS MN MO OK TX IA,KS,MN,MO,OK,TX 1.5–2 White Yes Apr–May Sun Dry Medium Very<br />
High<br />
Adult food<br />
(pollen<br />
and/or<br />
nectar)<br />
Native bees; Bumble<br />
bees<br />
Yes<br />
Herb,<br />
perennial<br />
Callirhoe<br />
involucrata<br />
purple poppy<br />
mallow<br />
Malvaceae KS MO OK TX KS,MO,OK,TX 1 Purple Yes Mar–Jun Sun, Part<br />
Shade<br />
Dry<br />
Coarse,<br />
Medium,<br />
Fine<br />
Low<br />
Spring<br />
and<br />
Summer<br />
Very<br />
High<br />
Adult food<br />
(pollen<br />
and/or<br />
nectar)<br />
Native bees; Flies,<br />
beetles, and wasps<br />
Seed,<br />
Cutting,<br />
Sprig<br />
Yes<br />
<strong>Roadside</strong> <strong>Revegetation</strong>: An Integrated Approach to Establishing Native Plants and Pollinator Habitat<br />
498
APPENDIX<br />
Oklahoma — Native <strong>Revegetation</strong> Plants for Pollinators, continued...<br />
Plant Type Scientific Name Common Name Plant Family IA KS MN MO OK TX All States Eco- Region<br />
(EPA III)<br />
Height<br />
(feet)<br />
Flower<br />
Color<br />
Showy Flowering Sun<br />
Exposure<br />
Soil<br />
Moisture<br />
Soil<br />
Texture<br />
Salt<br />
Tolerance<br />
Palatability<br />
(Browsing/<br />
Grazing)<br />
Active<br />
Growth<br />
Period<br />
Pollinator<br />
Value<br />
Benefits to<br />
Pollinators<br />
Pollinators<br />
Propagation<br />
Commercially<br />
Available<br />
Herb,<br />
perennial<br />
Conoclinium<br />
coelestinum<br />
blue mistflower Asteraceae MO OK TX MO,OK,TX 1.5–3 Blue Yes Jun–Aug Part<br />
Shade,<br />
Shade<br />
Wet,<br />
Moist<br />
Medium,<br />
Fine<br />
None /Low Summer Very<br />
High<br />
Adult food<br />
(pollen<br />
and/or<br />
nectar)<br />
Native bees; Honey bees;<br />
Butterflies; Flies, beetles,<br />
and wasps<br />
Seed,<br />
Sprig<br />
Yes<br />
Herb,<br />
perennial<br />
Coreopsis<br />
lanceolata<br />
lanceleaf<br />
coreopsis<br />
Asteraceae KS MO OK TX KS,MO,OK,TX 1–3 Yellow Yes Apr–Jun Sun Moist,<br />
Dry<br />
Medium,<br />
Fine<br />
None Low/Low Spring<br />
and<br />
Summer<br />
High<br />
Adult food<br />
(pollen<br />
and/or<br />
nectar)<br />
Native bees; Flies,<br />
beetles, and wasps<br />
Seed,<br />
Container<br />
Yes<br />
Herb,<br />
perennial<br />
Dalea candida<br />
white prairie<br />
clover<br />
Fabaceae IA KS MN MO OK TX IA,KS,MN,MO,OK,TX 1–2 White Yes May–Sep Sun Dry Medium,<br />
Fine<br />
High/<br />
High<br />
Spring<br />
and<br />
Summer<br />
Very<br />
High<br />
Adult food<br />
(pollen<br />
and/or<br />
nectar)<br />
Native bees; Honey bees;<br />
Bumble bees<br />
Yes<br />
Herb,<br />
perennial<br />
Dalea purpurea<br />
purple prairie<br />
clover<br />
Fabaceae IA KS MN MO OK TX IA,KS,MN,MO,OK,TX "46,47,48,<br />
49,50,51,<br />
52"<br />
1–2.5 Purple Yes Jul–Aug Sun Dry Coarse,<br />
Medium,<br />
Fine<br />
Medium<br />
Medium/<br />
Medium<br />
Spring<br />
and<br />
Summer<br />
Very<br />
High<br />
Adult food<br />
(pollen<br />
and/or<br />
nectar)<br />
Native bees; Honey bees;<br />
Bumble bees<br />
Yes<br />
Herb,<br />
perennial<br />
Desmanthus<br />
illinoensis<br />
Illinois bundleflower<br />
Fabaceae KS MO OK TX KS,MO,OK,TX 3 White Yes May–Jul Sun Moist,<br />
Dry<br />
Coarse,<br />
Medium,<br />
Fine<br />
None<br />
High/<br />
High<br />
Spring<br />
and<br />
Summer<br />
High<br />
Adult food<br />
(pollen<br />
and/or<br />
nectar);<br />
Larval food<br />
Native bees; Flies Seed Yes<br />
Herb,<br />
perennial<br />
Echinacea<br />
angustifolia<br />
narrowleaf<br />
coneflower<br />
Asteraceae KS OK TX KS,OK,TX 2–3 Pink Yes May–Jul Sun, Part<br />
Shade<br />
Dry<br />
Coarse,<br />
Medium,<br />
Fine<br />
Very<br />
High<br />
Adult food<br />
(pollen<br />
and/or<br />
nectar)<br />
Native bees; Honey bees;<br />
Butterflies and moths;<br />
Monarchs<br />
Yes<br />
Herb,<br />
perennial<br />
Echinacea<br />
pallida<br />
pale purple<br />
coneflower<br />
Asteraceae IA KS MO OK IA,KS,MO,OK 2.5–4 Purple Yes Jun–Aug Sun Dry Coarse,<br />
Medium,<br />
Fine<br />
Low Low/Low Spring<br />
and<br />
Summer<br />
Very<br />
High<br />
Adult food<br />
(pollen<br />
and/or<br />
nectar)<br />
Native bees; Honey bees;<br />
Butterflies and moths;<br />
Monarchs<br />
Seed<br />
Yes<br />
Herb,<br />
perennial<br />
Echinacea<br />
purpurea<br />
purple<br />
coneflower<br />
Asteraceae IA MO OK IA,MO,OK 2.5–4 Purple Yes Jun–Aug Sun Dry Medium,<br />
Fine<br />
Medium Low/Low Spring<br />
and<br />
Summer<br />
Very<br />
High<br />
Adult food<br />
(pollen<br />
and/or<br />
nectar)<br />
Native bees; Honey bees;<br />
Butterflies and moths;<br />
Monarchs; Hummingbirds<br />
Seed<br />
Yes<br />
Herb,<br />
perennial<br />
Eryngium<br />
yuccifolium<br />
rattlesnake<br />
master<br />
Apiaceae IA KS MN MO OK TX IA,KS,MN,MO,OK,TX 3–5 White No Jul–Sep Sun, Part<br />
Shade<br />
Wet,<br />
Moist,<br />
Dry<br />
Very<br />
High<br />
Adult food<br />
(pollen<br />
and/or<br />
nectar)<br />
Native bees; Flies,<br />
beetles, and wasps<br />
Yes<br />
Herb,<br />
perennial<br />
Eupatorium<br />
perfoliatum<br />
common<br />
boneset<br />
Asteraceae IA KS MN MO OK TX IA,KS,MN,MO,OK,TX 3–6 White Yes Jun–Oct Sun, Part<br />
Shade<br />
Wet,<br />
Moist<br />
Coarse,<br />
Medium,<br />
Fine<br />
Very<br />
High<br />
Adult food<br />
(pollen<br />
and/or<br />
nectar)<br />
Native bees; Butterflies<br />
and moths; Monarchs;<br />
Flies, beetles, and wasps<br />
Yes<br />
Herb,<br />
perennial<br />
Eutrochium<br />
fistulosum<br />
joe pye weed Asteraceae OK TX OK,TX 3–7 Pink Yes Jul–Sep Sun Wet,<br />
Moist<br />
Medium,<br />
Fine<br />
None Low/Low Summer Very<br />
High<br />
Adult food<br />
(pollen<br />
and/or<br />
nectar)<br />
Native bees; Monarchs;<br />
Flies and beetles<br />
Container,<br />
Bare<br />
root,<br />
Sprig<br />
Yes<br />
Herb,<br />
perennial<br />
Helianthus<br />
maximiliani<br />
maximilian<br />
sunflower<br />
Asteraceae IA KS MN MO OK TX IA,KS,MN,MO,OK,TX 3–8 Yellow Yes Aug–Nov Sun Moist,<br />
Dry<br />
Coarse,<br />
Medium,<br />
Fine<br />
Low<br />
High/<br />
Medium<br />
Summer<br />
and Fall<br />
Very<br />
High<br />
Adult food<br />
(pollen<br />
and/or<br />
nectar)<br />
Native bees; Honey bees;<br />
Flies, beetles, and wasps<br />
Seed,<br />
Bare root,<br />
Sprig<br />
Yes<br />
<strong>Roadside</strong> <strong>Revegetation</strong>: An Integrated Approach to Establishing Native Plants and Pollinator Habitat<br />
499
APPENDIX<br />
Oklahoma — Native <strong>Revegetation</strong> Plants for Pollinators, continued...<br />
Plant Type Scientific Name Common Name Plant Family IA KS MN MO OK TX All States Eco- Region<br />
(EPA III)<br />
Height<br />
(feet)<br />
Flower<br />
Color<br />
Showy Flowering Sun<br />
Exposure<br />
Soil<br />
Moisture<br />
Soil<br />
Texture<br />
Salt<br />
Tolerance<br />
Palatability<br />
(Browsing/<br />
Grazing)<br />
Active<br />
Growth<br />
Period<br />
Pollinator<br />
Value<br />
Benefits to<br />
Pollinators<br />
Pollinators<br />
Propagation<br />
Commercially<br />
Available<br />
Herb,<br />
perennial<br />
Hibiscus laevis<br />
halberdleaf<br />
rosemallow<br />
Malvaceae IA KS MO OK TX IA,KS,MO,OK,TX 8 White Yes Jun–Aug Sun, Part<br />
Shade<br />
Wet<br />
Medium,<br />
Fine<br />
None Low/Low Spring,<br />
Summer,<br />
Fall<br />
Very<br />
High<br />
Adult food<br />
(pollen<br />
and/or<br />
nectar)<br />
Native bees; Bumble<br />
bees; Hummingbirds<br />
Seed,<br />
Container,<br />
Bare<br />
root,<br />
Cutting<br />
Yes<br />
Herb,<br />
perennial<br />
Liatris aspera<br />
rough blazing<br />
star<br />
Asteraceae IA KS MN MO OK TX IA,KS,MN,MO,OK,TX "46,47,48,<br />
51,52"<br />
2–3 Purple Yes Jul–Sep Sun, Part<br />
Shade<br />
Dry<br />
Coarse,<br />
Medium<br />
Medium<br />
Very<br />
High<br />
Adult food<br />
(pollen<br />
and/or<br />
nectar)<br />
Native bees; Bumble<br />
bees; Hummingbirds<br />
Yes<br />
Herb,<br />
perennial<br />
Liatris punctata<br />
dotted blazing<br />
star<br />
Asteraceae IA KS MN OK TX IA,KS,MN,OK,TX "46,47,48,<br />
51,52"<br />
1–2 Purple Yes Jul–Sep Sun Dry Coarse,<br />
Medium,<br />
Fine<br />
Medium<br />
High/<br />
High<br />
Summer<br />
Very<br />
High<br />
Adult food<br />
(pollen<br />
and/or<br />
nectar)<br />
Native bees; Bumble<br />
bees; Hummingbirds<br />
Seed,<br />
Container,<br />
Corm<br />
Yes<br />
Herb,<br />
perennial<br />
Liatris pycnostachya<br />
prairie blazing<br />
star<br />
Asteraceae IA KS MN MO OK TX IA,KS,MN,MO,OK,TX 3–5 Purple Yes Jul–Sep Sun Wet,<br />
Moist,<br />
Dry<br />
Coarse,<br />
Medium,<br />
Fine<br />
None<br />
Medium/<br />
Low<br />
Summer<br />
Very<br />
High<br />
Adult food<br />
(pollen<br />
and/or<br />
nectar)<br />
Native bees; Butterflies<br />
and moths; Hummingbirds<br />
Seed,<br />
Container,<br />
Corm<br />
Yes<br />
Herb,<br />
perennial<br />
Lobelia<br />
cardinalis<br />
cardinal flower<br />
Campanulaceae<br />
KS MO OK TX KS,MO,OK,TX 2–4 Red Yes Jun–Aug Part<br />
Shade,<br />
Shade<br />
Wet,<br />
Moist<br />
Medium None Medium/<br />
Medium<br />
Spring<br />
Very<br />
High<br />
Adult food<br />
(pollen<br />
and/or<br />
nectar)<br />
Butterflies; Hummingbirds<br />
Seed,<br />
Container<br />
Yes<br />
Herb,<br />
perennial<br />
Monarda<br />
fistulosa<br />
wild bergamot Lamiaceae IA KS MN MO OK TX IA,KS,MN,MO,OK,TX "46,47,48,<br />
49,50,51,<br />
52"<br />
2–4 Purple Yes Jul–Aug Sun, Part<br />
Shade<br />
Moist,<br />
Dry<br />
Coarse,<br />
Medium,<br />
Fine<br />
Medium<br />
Medium/<br />
Medium<br />
Spring<br />
Very<br />
High<br />
Adult food<br />
(pollen<br />
and/or<br />
nectar)<br />
Native bees; Bumble<br />
bees; Hummingbirds<br />
Seed,<br />
Container<br />
Yes<br />
Herb,<br />
perennial<br />
Oenothera<br />
macrocarpa<br />
bigfruit evening<br />
primrose<br />
Onagraceae KS MO OK TX KS,MO,OK,TX 1–1.5 Yellow Yes Apr–Aug Sun Dry Coarse,<br />
Medium<br />
Very<br />
High<br />
Adult food<br />
(pollen<br />
and/or<br />
nectar)<br />
Native bees; Moths<br />
Yes<br />
Herb,<br />
perennial<br />
Oenothera<br />
speciosa<br />
pink evening<br />
primrose<br />
Onagraceae KS MO OK TX KS,MO,OK,TX 1–1.5 Pink Yes May–Jul Sun Dry Coarse,<br />
Medium,<br />
Fine<br />
High<br />
Adult food<br />
(pollen<br />
and/or<br />
nectar)<br />
Native bees; Butterflies<br />
and moths<br />
Yes<br />
Herb,<br />
perennial<br />
Oligoneuron<br />
rigidum var.<br />
rigidum<br />
stiff goldenrod Asteraceae IA KS MN MO OK TX IA,KS,MN,MO,OK,TX "46,47,48,<br />
49,50,51,<br />
52"<br />
1–5 Yellow Yes Aug–Sep Sun, Part<br />
Shade<br />
Dry<br />
Coarse,<br />
Medium,<br />
Fine<br />
Medium Low/Low Spring<br />
and<br />
Summer<br />
Very<br />
High<br />
Adult food<br />
(pollen<br />
and/or<br />
nectar)<br />
Native bees; Honey bees;<br />
Flies, beetles, and wasps<br />
Seed,<br />
Bare root,<br />
Sprig<br />
Yes<br />
Herb,<br />
perennial<br />
Penstemon<br />
cobaea<br />
prairie<br />
penstemon<br />
Scrophulariaceae<br />
KS OK TX KS,OK,TX 1–2 Purple Yes May–Jul Sun Dry Coarse,<br />
Medium<br />
Medium<br />
Very<br />
High<br />
Adult food<br />
(pollen<br />
and/or<br />
nectar)<br />
Native bees; Bumble<br />
bees; Hummingbirds<br />
Yes<br />
Herb,<br />
perennial<br />
Penstemon<br />
digitalis<br />
smooth beard<br />
tongue<br />
Scrophulariaceae<br />
KS MO OK KS,MO,OK 2–3 White Yes Jun–Jul Sun Wet,<br />
Moist,<br />
Dry<br />
Coarse,<br />
Medium<br />
Medium<br />
Medium/<br />
Low<br />
Spring<br />
and<br />
Summer<br />
Very<br />
High<br />
Adult food<br />
(pollen<br />
and/or<br />
nectar)<br />
Native bees; Bumble<br />
bees; Hummingbirds<br />
Seed,<br />
Container,<br />
Sprig<br />
Yes<br />
Herb,<br />
perennial<br />
Penstemon<br />
tubaeflorus<br />
white wand<br />
beardtongue<br />
Scrophulariaceae<br />
KS MO OK KS,MO,OK 1–3 White Yes May–Jun Sun Dry Coarse Very<br />
High<br />
Adult food<br />
(pollen<br />
and/or<br />
nectar)<br />
Native bees; Bumble<br />
bees; Butterflies;<br />
Hummingbirds<br />
Yes<br />
<strong>Roadside</strong> <strong>Revegetation</strong>: An Integrated Approach to Establishing Native Plants and Pollinator Habitat<br />
500
APPENDIX<br />
Oklahoma — Native <strong>Revegetation</strong> Plants for Pollinators, continued...<br />
Plant Type Scientific Name Common Name Plant Family IA KS MN MO OK TX All States Eco- Region<br />
(EPA III)<br />
Height<br />
(feet)<br />
Flower<br />
Color<br />
Showy Flowering Sun<br />
Exposure<br />
Soil<br />
Moisture<br />
Soil<br />
Texture<br />
Salt<br />
Tolerance<br />
Palatability<br />
(Browsing/<br />
Grazing)<br />
Active<br />
Growth<br />
Period<br />
Pollinator<br />
Value<br />
Benefits to<br />
Pollinators<br />
Pollinators<br />
Propagation<br />
Commercially<br />
Available<br />
Herb,<br />
perennial<br />
Phlox pilosa downy phlox Polemoniaceae<br />
IA KS MN MO OK TX IA,KS,MN,MO,OK,TX 1–2 Pink Yes Mar–May Sun, Part<br />
Shade<br />
Moist,<br />
Dry<br />
Coarse<br />
Very<br />
High<br />
Adult food<br />
(pollen<br />
and/or<br />
nectar)<br />
Native bees; Bumble<br />
bees; Butterflies and<br />
moths; Flies; Hummingbirds<br />
Yes<br />
Herb,<br />
perennial<br />
Pycnanthemum<br />
tenuifolium<br />
narrowleaf<br />
mountain mint<br />
Lamiaceae IA KS MO OK TX IA,KS,MO,OK,TX 1–3 White No Jun–Aug Sun Wet,<br />
Moist,<br />
Dry<br />
Very<br />
High<br />
Adult food<br />
(pollen<br />
and/or<br />
nectar)<br />
Native bees; Honey<br />
bees; Bumble bees; Flies,<br />
beetles, and wasps<br />
Yes<br />
Herb,<br />
perennial<br />
Ratibida<br />
columnifera<br />
Mexican hat Asteraceae IA KS MN OK TX IA,KS,MN,OK,TX 1–3 Yellow Yes May–Oct Sun Dry Coarse,<br />
Medium,<br />
Fine<br />
Medium<br />
Medium/<br />
Medium<br />
Summer<br />
Very<br />
High<br />
Adult food<br />
(pollen<br />
and/or<br />
nectar)<br />
Native bees<br />
Seed,<br />
Container<br />
Yes<br />
Herb,<br />
perennial<br />
Ratibida pinnata<br />
gray-headed<br />
coneflower<br />
Asteraceae IA KS MN MO OK IA,KS,MN,MO,OK 3–5 Yellow Yes Jun–Aug Sun Moist,<br />
Dry<br />
Coarse,<br />
Medium,<br />
Fine<br />
Medium<br />
Medium/<br />
Medium<br />
Spring<br />
and<br />
Summer<br />
Very<br />
High<br />
Adult food<br />
(pollen<br />
and/or<br />
nectar)<br />
Native bees<br />
Seed,<br />
Container<br />
Yes<br />
Herb,<br />
perennial<br />
Rudbeckia hirta<br />
black-eyed<br />
susan<br />
Asteraceae IA KS MN MO OK TX IA,KS,MN,MO,OK,TX 2–3 Yellow Yes Jun–Aug Sun, Part<br />
Shade<br />
Moist,<br />
Dry<br />
Coarse,<br />
Medium,<br />
Fine<br />
Medium Low/Low Fall,<br />
Winter<br />
and<br />
Spring<br />
Very<br />
High<br />
Adult food<br />
(pollen<br />
and/or<br />
nectar)<br />
Native bees; Butterflies Seed Yes<br />
Herb,<br />
perennial<br />
Salvia azurea azure blue sage Lamiaceae KS OK TX KS,OK,TX 3–6 Blue Yes Sep–Nov Part<br />
Shade<br />
Dry<br />
Coarse,<br />
Medium,<br />
Fine<br />
Medium/<br />
Low<br />
Spring<br />
and<br />
Summer<br />
Very<br />
High<br />
Adult food<br />
(pollen<br />
and/or<br />
nectar)<br />
Native bees; Bumble<br />
bees; Hummingbirds<br />
Yes<br />
Herb,<br />
perennial<br />
Salvia lyrata lyreleaf sage Lamiaceae OK TX OK,TX 1–2 Blue Yes Mar–Jun Sun, Part<br />
Shade<br />
Wet,<br />
Moist,<br />
Dry<br />
Coarse,<br />
Medium<br />
Very<br />
High<br />
Adult food<br />
(pollen<br />
and/or<br />
nectar)<br />
Bumble bees; Butterflies;<br />
Hummingbirds<br />
Yes<br />
Herb,<br />
perennial<br />
Scutellaria ovata<br />
heartleaf<br />
skullcap<br />
Lamiaceae KS MO OK KS,MO,OK 1–2 Blue Yes May–Sep Part<br />
Shade,<br />
Shade<br />
Moist,<br />
Dry<br />
Coarse,<br />
Medium<br />
Very<br />
High<br />
Adult food<br />
(pollen<br />
and/or<br />
nectar)<br />
Hummingbirds<br />
Yes<br />
Herb,<br />
perennial<br />
Senna marilandica<br />
Maryland senna Fabaceae KS MO OK TX KS,MO,OK,TX 3–6 Yellow Yes Jun–Aug Sun, Part<br />
Shade<br />
Wet,<br />
Moist<br />
Coarse,<br />
Medium<br />
None<br />
High/<br />
High<br />
Spring<br />
and<br />
Summer<br />
High<br />
Adult food<br />
(pollen<br />
and/or<br />
nectar)<br />
Bumble bees<br />
Seed,<br />
Container<br />
Yes<br />
Herb,<br />
perennial<br />
Silphium<br />
integrifolium<br />
wholeleaf<br />
rosinweed<br />
Asteraceae IA KS MO OK IA,KS,MO,OK 2–6 Yellow Yes Jul–Sep Sun Wet,<br />
Moist,<br />
Dry<br />
Very<br />
High<br />
Adult food<br />
(pollen<br />
and/or<br />
nectar)<br />
Native bees; Bumble<br />
bees; Butterflies; Flies,<br />
beetles, and wasps<br />
Yes<br />
Herb,<br />
perennial<br />
Solidago<br />
gigantea<br />
giant goldenrod Asteraceae IA KS MN MO OK TX IA,KS,MN,MO,OK,TX 3–7 Yellow Yes Sep–Nov Part<br />
Shade<br />
Moist<br />
Medium,<br />
Fine<br />
None Medium/ Summer Very<br />
High<br />
Adult food<br />
(pollen<br />
and/or<br />
nectar)<br />
Native bees; Honey bees;<br />
Butterflies; Flies, beetles,<br />
and wasps<br />
Seed<br />
Yes<br />
Herb,<br />
perennial<br />
Solidago<br />
nemoralis<br />
gray goldenrod Asteraceae IA KS MN MO OK TX IA,KS,MN,MO,OK,TX 4–5 Yellow Yes Aug–Sep Sun, Part<br />
Shade<br />
Dry<br />
Coarse,<br />
Medium,<br />
Fine<br />
Medium<br />
Medium/<br />
Medium<br />
Spring<br />
and<br />
Summer<br />
Very<br />
High<br />
Adult food<br />
(pollen<br />
and/or<br />
nectar)<br />
Native bees; Honey bees;<br />
Butterflies; Flies, beetles,<br />
and wasps<br />
Seed,<br />
Container,<br />
Cutting<br />
Yes<br />
<strong>Roadside</strong> <strong>Revegetation</strong>: An Integrated Approach to Establishing Native Plants and Pollinator Habitat<br />
501
APPENDIX<br />
Oklahoma — Native <strong>Revegetation</strong> Plants for Pollinators, continued...<br />
Plant Type Scientific Name Common Name Plant Family IA KS MN MO OK TX All States Eco- Region<br />
(EPA III)<br />
Height<br />
(feet)<br />
Flower<br />
Color<br />
Showy Flowering Sun<br />
Exposure<br />
Soil<br />
Moisture<br />
Soil<br />
Texture<br />
Salt<br />
Tolerance<br />
Palatability<br />
(Browsing/<br />
Grazing)<br />
Active<br />
Growth<br />
Period<br />
Pollinator<br />
Value<br />
Benefits to<br />
Pollinators<br />
Pollinators<br />
Propagation<br />
Commercially<br />
Available<br />
Herb,<br />
perennial<br />
Solidago<br />
speciosa<br />
showy<br />
goldenrod<br />
Asteraceae IA KS MN MO OK TX IA,KS,MN,MO,OK,TX "46,47,48,<br />
50,51,52"<br />
1–4 Yellow Yes Aug–Sep Sun, Part<br />
Shade<br />
Dry<br />
Coarse,<br />
Medium,<br />
Fine<br />
Medium<br />
Very<br />
High<br />
Adult food<br />
(pollen<br />
and/or<br />
nectar)<br />
Native bees; Honey bees;<br />
Butterflies and moths;<br />
Flies, beetles, and wasps<br />
Yes<br />
Herb,<br />
perennial<br />
Symphyotrichum<br />
ericoides var.<br />
ericoides<br />
heath aster Asteraceae IA KS MN MO OK TX IA,KS,MN,MO,OK,TX "46,47,48,<br />
49,50,51,<br />
52"<br />
1–3 White Yes Aug–Oct Sun, Part<br />
Shade<br />
Moist,<br />
Dry<br />
Coarse,<br />
Medium,<br />
Fine<br />
Medium<br />
Very<br />
High<br />
Adult food<br />
(pollen<br />
and/or<br />
nectar)<br />
Native bees; Butterflies<br />
and moths; Flies, beetles,<br />
and wasps<br />
Yes<br />
Herb,<br />
perennial<br />
Symphyotrichum<br />
lateriflorum<br />
calico aster Asteraceae IA KS MN MO OK TX IA,KS,MN,MO,OK,TX 1–3 White Yes Aug–Oct Sun Wet,<br />
Moist<br />
Low/<br />
High<br />
Spring,<br />
Summer,<br />
Fall<br />
Very<br />
High<br />
Adult food<br />
(pollen<br />
and/or<br />
nectar)<br />
Native bees; Butterflies<br />
and moths; Flies, beetles,<br />
and wasps<br />
Yes<br />
Herb,<br />
perennial<br />
Symphyotrichum<br />
oblongifolium<br />
aromatic aster Asteraceae IA KS MN MO OK TX IA,KS,MN,MO,OK,TX "46,47,51,<br />
52"<br />
1–2 Lavender<br />
Yes Aug–Sep Sun Dry Coarse,<br />
Medium,<br />
Fine<br />
Low<br />
Very<br />
High<br />
Adult food<br />
(pollen<br />
and/or<br />
nectar)<br />
Native bees; Butterflies<br />
and moths; Flies, beetles,<br />
and wasps<br />
Yes<br />
Herb,<br />
perennial<br />
Symphyotrichum<br />
sericeum<br />
silky aster Asteraceae IA KS MN MO OK IA,KS,MN,MO,OK "46,47,48,<br />
51,52"<br />
1–2.5 Lavender<br />
Yes Aug–Oct Sun Dry Coarse,<br />
Medium<br />
Medium<br />
Very<br />
High<br />
Adult food<br />
(pollen<br />
and/or<br />
nectar)<br />
Native bees; Butterflies<br />
and moths<br />
Yes<br />
Herb,<br />
perennial<br />
Tradescantia<br />
occidentalis<br />
prairie<br />
spiderwort<br />
Commelinaceae<br />
KS OK TX KS,OK,TX 1–2 blue Yes Apr–Jun Sun Moist,<br />
Dry<br />
Medium High Adult food<br />
(pollen<br />
and/or<br />
nectar)<br />
Native bees; Flies,<br />
beetles, and wasps<br />
Yes<br />
Herb,<br />
perennial<br />
Verbesina<br />
alternifolia<br />
wingstem Asteraceae IA KS MO OK IA,KS,MO,OK 3–6 Yellow Yes Jul–Sep Sun Wet,<br />
Moist<br />
Very<br />
High<br />
Adult food<br />
(pollen<br />
and/or<br />
nectar)<br />
Native bees; Honey bees;<br />
Bumble bees; Butterflies<br />
and moths; Flies, beetles,<br />
and wasps; Hummingbirds<br />
Yes<br />
Herb,<br />
perennial<br />
Vernonia<br />
baldwinii<br />
Baldwin's<br />
ironweed<br />
Asteraceae IA KS MO OK TX IA,KS,MO,OK,TX 3–5 Purple Yes Jul–Nov Sun Moist Coarse,<br />
Medium,<br />
Fine<br />
Very<br />
High<br />
Adult food<br />
(pollen<br />
and/or<br />
nectar)<br />
Native bees; Butterflies<br />
and moths; Hummingbirds<br />
Yes<br />
Herb,<br />
perennial<br />
Vernonia<br />
fasciculata<br />
ironweed Asteraceae IA KS MN MO OK IA,KS,MN,MO,OK 4–5 Purple Yes Jul–Sep Sun Moist Coarse,<br />
Medium,<br />
Fine<br />
Very<br />
High<br />
Adult food<br />
(pollen<br />
and/or<br />
nectar)<br />
Native bees; Butterflies<br />
and moths; Hummingbirds<br />
Yes<br />
Herb,<br />
perennial<br />
Veronicastrum<br />
virginicum<br />
Culver's root<br />
Scrophulariaceae<br />
IA KS MN MO OK IA,KS,MN,MO,OK 4–5 White Yes Jun–Aug Sun Wet,<br />
Moist,<br />
Dry<br />
Very<br />
High<br />
Adult food<br />
(pollen<br />
and/or<br />
nectar)<br />
Native bees; Honey bees;<br />
Flies, beetles, and wasps;<br />
Hummingbirds<br />
Yes<br />
Herb,<br />
perennial<br />
Zizia aurea golden zizia Apiaceae IA KS MN MO OK IA,KS,MN,MO,OK 1–3 Yellow Yes Apr–Aug Sun, Part<br />
Shade<br />
Wet,<br />
Moist,<br />
Dry<br />
Coarse,<br />
Medium<br />
Very<br />
High<br />
Adult food<br />
(pollen<br />
and/or<br />
nectar)<br />
Native bees; Butterflies<br />
and moths; Flies, beetles,<br />
and wasps<br />
Yes<br />
Shrub Aesculus pavia red buckeye Hippocastanaceae<br />
MO OK TX MO,OK,TX 25 Red Yes May–Jun Part<br />
Shade,<br />
Shade<br />
Wet,<br />
Moist,<br />
Dry<br />
Coarse,<br />
Medium,<br />
Fine<br />
None Low/Low Spring<br />
and<br />
Summer<br />
Very<br />
High<br />
Adult food<br />
(pollen<br />
and/or<br />
nectar)<br />
Bumble bees; Hummingbirds<br />
Seed,<br />
Container,<br />
Bare<br />
root<br />
Yes<br />
<strong>Roadside</strong> <strong>Revegetation</strong>: An Integrated Approach to Establishing Native Plants and Pollinator Habitat<br />
502
APPENDIX<br />
Oklahoma — Native <strong>Revegetation</strong> Plants for Pollinators, continued...<br />
Plant Type Scientific Name Common Name Plant Family IA KS MN MO OK TX All States Eco- Region<br />
(EPA III)<br />
Height<br />
(feet)<br />
Flower<br />
Color<br />
Showy Flowering Sun<br />
Exposure<br />
Soil<br />
Moisture<br />
Soil<br />
Texture<br />
Salt<br />
Tolerance<br />
Palatability<br />
(Browsing/<br />
Grazing)<br />
Active<br />
Growth<br />
Period<br />
Pollinator<br />
Value<br />
Benefits to<br />
Pollinators<br />
Pollinators<br />
Propagation<br />
Commercially<br />
Available<br />
Shrub<br />
Amorpha<br />
canescens<br />
lead plant Fabaceae IA KS MN MO OK TX IA,KS,MN,MO,OK,TX "46,47,48,<br />
50,51,52"<br />
1.5–4 Purple Yes Jun–Aug Sun, Part<br />
Shade<br />
Dry<br />
Coarse,<br />
Medium<br />
Medium<br />
High/<br />
Low<br />
Spring<br />
and<br />
Summer<br />
Very<br />
High<br />
Adult food<br />
(pollen<br />
and/or<br />
nectar)<br />
Native bees; Honey bees;<br />
Flies, beetles, and wasps<br />
Seed,<br />
Container,<br />
Bare<br />
root,<br />
Cutting<br />
Yes<br />
Shrub<br />
Amorpha<br />
fruticosa<br />
false indigo<br />
bush<br />
Fabaceae KS OK TX KS,OK,TX 6–12 Purple Yes Apr–Jun Sun, Part<br />
Shade<br />
Moist<br />
Coarse,<br />
Medium,<br />
Fine<br />
Low Low/Low Spring<br />
and<br />
Summer<br />
Very<br />
High<br />
Adult food<br />
(pollen<br />
and/or<br />
nectar)<br />
Native bees; Flies,<br />
beetles, and wasps<br />
Seed,<br />
Container,<br />
Bare<br />
root<br />
Yes<br />
Shrub<br />
Ceanothus<br />
americanus<br />
New Jersey tea Rhamnaceae IA KS MN MO OK TX IA,KS,MN,MO,OK,TX "47,50,51,<br />
52"<br />
2–3 White Yes Jun–Jul Sun, Part<br />
Shade<br />
Dry<br />
Coarse,<br />
Medium<br />
High<br />
Medium/<br />
Low<br />
Spring<br />
and<br />
Summer<br />
Very<br />
High<br />
Adult food<br />
(pollen<br />
and/or<br />
nectar)<br />
Native bees; Flies,<br />
beetles, and wasps<br />
Seed,<br />
Container,<br />
Bare<br />
root<br />
Yes<br />
Shrub<br />
Cephalanthus<br />
occidentalis<br />
buttonbush Rubiaceae IA KS MO OK TX IA,KS,MO,OK,TX 12 White Yes Jun–Aug Sun, Part<br />
Shade<br />
Moist<br />
Coarse,<br />
Medium,<br />
Fine<br />
Low Low/Low Spring Very<br />
High<br />
Adult food<br />
(pollen<br />
and/or<br />
nectar)<br />
Native bees; Honey bees;<br />
Bumble bees; Hummingbirds<br />
Seed,<br />
Container,<br />
Bare<br />
root,<br />
Cutting<br />
Yes<br />
Shrub<br />
Opuntia<br />
humifusa<br />
devil's-tongue Cactaceae KS MO OK TX KS,MO,OK,TX 1–1.5 Yellow Yes May–Jul Sun Dry Coarse Very<br />
High<br />
Adult food<br />
(pollen<br />
and/or<br />
nectar)<br />
Native bees; Butterflies;<br />
Flies, beetles, and wasps<br />
Yes<br />
Shrub Rhus aromatica fragrant sumac Anacardiaceae<br />
KS MO OK TX KS,MO,OK,TX 2-6 Green No Apr–Jun Sun, Part<br />
Shade,<br />
Shade<br />
Moist,<br />
Dry<br />
Coarse,<br />
Medium<br />
Low/Low<br />
Spring<br />
and<br />
Summer<br />
High<br />
Adult food<br />
(pollen<br />
and/or<br />
nectar);<br />
Nest<br />
material<br />
Native bees; Honey bees;<br />
Flies, beetles, and wasps<br />
Yes<br />
Shrub Rhus glabra smooth sumac Anacardiaceae<br />
IA KS MN MO OK TX IA,KS,MN,MO,OK,TX 12 Green Yes Apr–May Sun, Part<br />
Shade<br />
Dry<br />
Coarse,<br />
Medium<br />
Medium Low/Low Spring<br />
and<br />
Summer<br />
High<br />
Adult food<br />
(pollen<br />
and/or<br />
nectar);<br />
Nest<br />
material<br />
Native bees; Honey bees;<br />
Flies, beetles, and wasps<br />
Seed,<br />
Container,<br />
Bare<br />
root<br />
Yes<br />
Shrub Rosa arkansana prairie rose Rosaceae IA KS MN MO OK IA,KS,MN,MO,OK "46,47,48,<br />
49,50,51,<br />
52"<br />
2 White Yes Jun–Aug Sun, Part<br />
Shade<br />
Moist,<br />
Dry<br />
Coarse,<br />
Medium,<br />
Fine<br />
Very<br />
High<br />
Adult food<br />
(pollen<br />
and/or<br />
nectar);<br />
Nest<br />
material<br />
Native bees; Bumble<br />
bees; Flies, beetles, and<br />
wasps<br />
Yes<br />
Shrub Rosa carolina pasture rose Rosaceae IA KS MO OK TX IA,KS,MO,OK,TX 2 White Yes Jun–Aug Sun, Part<br />
Shade<br />
Moist,<br />
Dry<br />
Coarse,<br />
Medium,<br />
Fine<br />
Medium<br />
Medium/<br />
Medium<br />
Spring<br />
and<br />
Summer<br />
Very<br />
High<br />
Adult food<br />
(pollen<br />
and/or<br />
nectar);<br />
Nest<br />
material<br />
Native bees; Bumble<br />
bees; Flies, beetles, and<br />
wasps<br />
Seed,<br />
Container,<br />
Bare<br />
root<br />
Yes<br />
Shrub Salix discolor pussy willow Salicaceae IA KS MN MO OK IA,KS,MN,MO,OK 40 White Yes Dec–Feb Sun Wet,<br />
Moist<br />
Coarse,<br />
Medium,<br />
Fine<br />
None Medium/ Spring Very<br />
High<br />
Adult food<br />
(pollen<br />
and/or<br />
nectar)<br />
Native bees; Honey bees;<br />
Bumble bees; Butterflies<br />
Seed,<br />
Container,<br />
Bare<br />
root,<br />
Cutting<br />
Yes<br />
<strong>Roadside</strong> <strong>Revegetation</strong>: An Integrated Approach to Establishing Native Plants and Pollinator Habitat<br />
503
APPENDIX<br />
Oklahoma — Native <strong>Revegetation</strong> Plants for Pollinators, continued...<br />
Plant Type Scientific Name Common Name Plant Family IA KS MN MO OK TX All States Eco- Region<br />
(EPA III)<br />
Height<br />
(feet)<br />
Flower<br />
Color<br />
Showy Flowering Sun<br />
Exposure<br />
Soil<br />
Moisture<br />
Soil<br />
Texture<br />
Salt<br />
Tolerance<br />
Palatability<br />
(Browsing/<br />
Grazing)<br />
Active<br />
Growth<br />
Period<br />
Pollinator<br />
Value<br />
Benefits to<br />
Pollinators<br />
Pollinators<br />
Propagation<br />
Commercially<br />
Available<br />
Shrub Salix humilis prairie willow Salicaceae IA KS MN MO OK IA,KS,MN,MO,OK 8 White No Mar–May Sun, Part<br />
Shade<br />
Moist,<br />
Dry<br />
Coarse,<br />
Medium,<br />
Fine<br />
Low<br />
Medium/<br />
Low<br />
Spring<br />
and<br />
Summer<br />
Very<br />
High<br />
Adult food<br />
(pollen<br />
and/or<br />
nectar)<br />
Native bees; Flies,<br />
beetles, and wasps<br />
Container,<br />
Bare<br />
root,<br />
Cutting<br />
Yes<br />
Shrub<br />
Sambucus nigra<br />
ssp. canadensis<br />
American black<br />
elderberry<br />
Caprifoliaceae<br />
IA KS MN MO OK TX IA,KS,MN,MO,OK,TX 12 White Yes Apr–May Sun, Part<br />
Shade<br />
Wet,<br />
Moist,<br />
Dry<br />
Medium None Medium/<br />
Low<br />
Spring<br />
and<br />
Summer<br />
Very<br />
High<br />
Adult food<br />
(pollen<br />
and/or<br />
nectar);<br />
Nest<br />
material<br />
Native bees; Flies,<br />
beetles, and wasps<br />
Seed,<br />
Container,<br />
Bare<br />
root<br />
Yes<br />
Tree<br />
Cercis canadensis<br />
eastern redbud Fabaceae KS MO OK TX KS,MO,OK,TX 20 Purple Yes Mar–Apr Sun, Part<br />
Shade<br />
Moist<br />
Coarse,<br />
Medium,<br />
Fine<br />
None<br />
Medium/<br />
Low<br />
Spring<br />
and<br />
Summer<br />
Very<br />
High<br />
Adult food<br />
(pollen<br />
and/or<br />
nectar);<br />
Nest<br />
material<br />
Native bees; Bumble<br />
bees;<br />
Seed,<br />
Container,<br />
Bare<br />
root,<br />
Cutting<br />
Yes<br />
Tree<br />
Crataegus<br />
crus-galli<br />
cockspur<br />
hawthorn<br />
Rosaceae KS MO OK TX KS,MO,OK,TX 30 White Yes Apr–May Sun Wet,<br />
Moist,<br />
Dry<br />
Coarse,<br />
Medium,<br />
Fine<br />
Medium<br />
Medium/<br />
Low<br />
Spring<br />
and<br />
Summer<br />
Very<br />
High<br />
Adult food<br />
(pollen<br />
and/or<br />
nectar)<br />
Native bees; Flies,<br />
beetles, and wasps<br />
Seed,<br />
Container,<br />
Bare<br />
root<br />
Yes<br />
Tree Crataegus mollis downy<br />
hawthorn<br />
Rosaceae IA KS MO OK IA,KS,MO,OK 30 White Yes Apr–May Sun Wet,<br />
Moist,<br />
Dry<br />
Coarse,<br />
Medium,<br />
Fine<br />
Medium<br />
Very<br />
High<br />
Adult food<br />
(pollen<br />
and/or<br />
nectar)<br />
Native bees; Flies,<br />
beetles, and wasps<br />
Yes<br />
Tree<br />
Prunus<br />
americana<br />
American plum Rosaceae IA KS MN MO OK IA,KS,MN,MO,OK 24 White Yes Apr–May Sun, Part<br />
Shade<br />
Dry<br />
Coarse,<br />
Medium<br />
Low<br />
Medium/<br />
Low<br />
Spring<br />
and<br />
Summer<br />
Very<br />
High<br />
Adult food<br />
(pollen<br />
and/or<br />
nectar)<br />
Native bees; Honey bees;<br />
Bumble bees<br />
Seed,<br />
Container,<br />
Bare<br />
root<br />
Yes<br />
Tree<br />
Prunus<br />
angustifolia<br />
Chickasaw plum Rosaceae KS MO OK TX KS,MO,OK,TX 25 White Yes Feb–May Sun, Part<br />
Shade<br />
Dry<br />
Medium,<br />
Fine<br />
Low<br />
Medium/<br />
Low<br />
Spring<br />
and<br />
Summer<br />
Very<br />
High<br />
Adult food<br />
(pollen<br />
and/or<br />
nectar)<br />
Native bees<br />
Seed,<br />
Container,<br />
Bare<br />
root<br />
Yes<br />
Tree Prunus serotina black cherry Rosaceae IA KS MN MO OK TX IA,KS,MN,MO,OK,TX 80 White Yes May–Jun Sun, Part<br />
Shade<br />
Moist,<br />
Dry<br />
Coarse,<br />
Medium<br />
Medium Low/Low Spring<br />
and<br />
Summer<br />
Very<br />
High<br />
Adult food<br />
(pollen<br />
and/or<br />
nectar)<br />
Native bees; Honey<br />
bees; Bumble bees; Flies,<br />
beetles, and wasps<br />
Seed,<br />
Container,<br />
Bare<br />
root<br />
Yes<br />
Vine<br />
Bignonia<br />
capreolata<br />
crossvine<br />
Bignoniaceae<br />
MO OK TX MO,OK,TX 10–50 Red Yes Mar–May Sun, Part<br />
Shade<br />
Wet,<br />
Moist<br />
Coarse,<br />
Medium,<br />
Fine<br />
High<br />
Adult food<br />
(pollen<br />
and/or<br />
nectar)<br />
Native bees; Hummingbirds<br />
Yes<br />
Vine<br />
Campsis<br />
radicans<br />
trumpet creeper<br />
Bignoniaceae<br />
KS MO OK TX KS,MO,OK,TX 2 Red Yes Jun–Aug Sun, Part<br />
Shade<br />
Wet,<br />
Moist,<br />
Dry<br />
Coarse,<br />
Medium<br />
None<br />
Spring<br />
and<br />
Summer<br />
Very<br />
High<br />
Adult food<br />
(pollen<br />
and/or<br />
nectar)<br />
Native bees; Honey bees;<br />
Bumble bees; Hummingbirds<br />
Seed,<br />
Container,<br />
Bare<br />
root,<br />
Cutting<br />
Yes<br />
<strong>Roadside</strong> <strong>Revegetation</strong>: An Integrated Approach to Establishing Native Plants and Pollinator Habitat<br />
504
APPENDIX<br />
TEXAS — NATIVE REVEGETATION PLANTS FOR POLLINATORS<br />
Plant Type Scientific Name Common Name Plant Family IA KS MN MO OK TX All States Eco- Region<br />
(EPA III)<br />
Height<br />
(feet)<br />
Flower<br />
Color<br />
Showy Flowering Sun<br />
Exposure<br />
Soil<br />
Moisture<br />
Soil<br />
Texture<br />
Salt<br />
Tolerance<br />
Palatability<br />
(Browsing/<br />
Grazing)<br />
Active<br />
Growth<br />
Period<br />
Pollinator<br />
Value<br />
Pollinators<br />
Benefits<br />
to Pollinators<br />
Propagation<br />
Commercially<br />
Available<br />
Grass,<br />
perennial<br />
Andropogon<br />
gerardii<br />
big bluestem Poaceae IA KS MN MO OK TX IA,KS,MN,MO,OK,TX "46,47,48,<br />
49,50,51,<br />
52"<br />
3–8 Green No May–Jun Sun, Part<br />
Shade<br />
Dry<br />
Coarse,<br />
Medium,<br />
Fine<br />
Medium<br />
Medium/<br />
High<br />
Summer Low Nest<br />
material;<br />
Shelter<br />
Seed<br />
Yes<br />
Grass,<br />
perennial<br />
Bouteloua<br />
curtipendula<br />
side-oats<br />
grama<br />
Poaceae IA KS MN MO OK TX IA,KS,MN,MO,OK,TX "46,47,48,<br />
51,52"<br />
1–3 Green No Jul–Sep Sun, Part<br />
Shade<br />
Dry<br />
Coarse,<br />
Medium,<br />
Fine<br />
Medium<br />
Medium/<br />
High<br />
Summer Low Nest<br />
material;<br />
Shelter<br />
Seed<br />
Yes<br />
Grass,<br />
perennial<br />
Bouteloua<br />
dactyloides<br />
buffalo grass Poaceae IA KS MO OK TX IA,KS,MO,OK,TX 0.5–1 Green No Jul–Aug Sun Moist, Dry Coarse,<br />
Medium,<br />
Fine<br />
Medium<br />
Medium/<br />
High<br />
Summer Low Nest<br />
material;<br />
Shelter<br />
Seed,<br />
Sprig<br />
Yes<br />
Grass,<br />
perennial<br />
Bouteloua gracilis blue grama Poaceae IA KS MN MO OK TX IA,KS,MN,MO,OK,TX 464,748<br />
5,152<br />
0.5–1.5 Green No May–Jul Sun Dry Coarse,<br />
Medium,<br />
Fine<br />
Medium High/High Summer<br />
and Fall<br />
Low<br />
Nest<br />
material;<br />
Shelter<br />
Seed<br />
Yes<br />
Grass,<br />
perennial<br />
Elymus canadensis<br />
nodding wild<br />
rye<br />
Poaceae IA KS MN MO OK TX IA,KS,MN,MO,OK,TX "46,47,48,<br />
49,50,51,<br />
52"<br />
3–5 Green No Jul–Aug Sun, Part<br />
Shade<br />
Moist, Dry<br />
Coarse,<br />
Medium,<br />
Fine<br />
Medium<br />
Medium/<br />
Medium<br />
Spring,<br />
Summer,<br />
Fall<br />
Low Shelter Seed Yes<br />
Grass,<br />
perennial<br />
Leptochloa dubia<br />
green<br />
sprangletop<br />
Poaceae TX TX 1–3 Green No Jul–Sep Sun, Part<br />
Shade<br />
Dry<br />
Coarse,<br />
Medium,<br />
Fine<br />
Medium<br />
Medium/<br />
High<br />
Spring<br />
and<br />
Summer<br />
Low<br />
Nest<br />
material;<br />
Shelter<br />
Seed<br />
Yes<br />
Grass,<br />
perennial<br />
Panicum virgatum switchgrass Poaceae IA KS MO OK TX IA,KS,MO,OK,TX 3–6 Green No Jul–Aug Sun, Part<br />
Shade<br />
Wet, Moist,<br />
Dry<br />
Coarse,<br />
Medium,<br />
Fine<br />
Medium<br />
Medium/<br />
High<br />
Summer Low Shelter Seed Yes<br />
Grass,<br />
perennial<br />
Schizachyrium<br />
scoparium<br />
little bluestem Poaceae IA KS MN MO OK TX IA,KS,MN,MO,OK,TX "46,47,48,<br />
49,50,51,<br />
52"<br />
1–2.5 Green No Aug–Sep Sun, Part<br />
Shade<br />
Moist, Dry<br />
Coarse,<br />
Medium,<br />
Fine<br />
Medium<br />
Medium/<br />
High<br />
Summer<br />
and Fall<br />
Low<br />
Nest<br />
material;<br />
Shelter<br />
Seed<br />
Yes<br />
Grass,<br />
perennial<br />
Sorghastrum<br />
nutans<br />
Indian grass Poaceae IA KS MN MO OK TX IA,KS,MN,MO,OK,TX "46,47,48,<br />
51,52"<br />
3–8 Green No Jul–Sep Sun Moist, Dry Coarse,<br />
Medium,<br />
Fine<br />
Medium<br />
Medium/<br />
High<br />
Summer<br />
and Fall<br />
Low<br />
Nest<br />
material;<br />
Shelter<br />
Seed<br />
Yes<br />
Grass,<br />
perennial<br />
Sporobolus<br />
heterolepis<br />
prairie<br />
dropseed<br />
Poaceae IA KS MN MO OK TX IA,KS,MN,MO,OK,TX "46,47,48,<br />
51,52"<br />
1.5–4 Green No Aug–Sep Sun Moist Coarse,<br />
Medium<br />
None<br />
Low/<br />
Medium<br />
Spring<br />
and<br />
Summer<br />
Low<br />
Nest<br />
material;<br />
Shelter<br />
Seed<br />
Yes<br />
Herb,<br />
annual<br />
Castilleja indivisa<br />
entireleaf Indian<br />
paintbrush<br />
Scrophulariaceae<br />
OK TX OK,TX 1–1.5 Red Yes Jul–Sep Sun, Part<br />
Shade<br />
Wet, Moist,<br />
Dry<br />
Coarse,<br />
Medium,<br />
Fine<br />
Low Very High Adult<br />
food<br />
(pollen<br />
and/or<br />
nectar)<br />
Hummingbirds<br />
Yes<br />
Herb,<br />
annual<br />
Chamaecrista<br />
fasciculata<br />
partridge pea Fabaceae IA KS MN MO OK TX IA,KS,MN,MO,OK,TX "46,47,51,<br />
52"<br />
1–3 Yellow Yes Jul–Sep Sun, Part<br />
Shade<br />
Moist, Dry<br />
Coarse,<br />
Medium,<br />
Fine<br />
Low<br />
High/<br />
Medium<br />
Spring Very High Adult<br />
food<br />
(pollen<br />
and/or<br />
nectar)<br />
Native bees;<br />
Bumble bees;<br />
Flies, beetles, and<br />
wasps<br />
Seed<br />
Yes<br />
Herb,<br />
annual<br />
Dracopis<br />
amplexicaulis<br />
clasping<br />
coneflower<br />
Asteraceae KS OK TX KS,OK,TX 2–3 Yellow Yes Apr–Jul Part Shade Wet, Moist,<br />
Dry<br />
Coarse,<br />
Medium,<br />
Fine<br />
None Low/Low Spring<br />
and<br />
Summer<br />
High<br />
Adult<br />
food<br />
(pollen<br />
and/or<br />
nectar)<br />
Native bees Seed Yes<br />
<strong>Roadside</strong> <strong>Revegetation</strong>: An Integrated Approach to Establishing Native Plants and Pollinator Habitat<br />
505
APPENDIX<br />
Texas — Native <strong>Revegetation</strong> Plants for Pollinators, continued...<br />
Plant Type Scientific Name Common Name Plant Family IA KS MN MO OK TX All States Eco- Region<br />
(EPA III)<br />
Height<br />
(feet)<br />
Flower<br />
Color<br />
Showy Flowering Sun<br />
Exposure<br />
Soil<br />
Moisture<br />
Soil<br />
Texture<br />
Salt<br />
Tolerance<br />
Palatability<br />
(Browsing/<br />
Grazing)<br />
Active<br />
Growth<br />
Period<br />
Pollinator<br />
Value<br />
Pollinators<br />
Benefits<br />
to Pollinators<br />
Propagation<br />
Commercially<br />
Available<br />
Herb,<br />
annual<br />
Eryngium<br />
leavenworthii<br />
Leavenworth's<br />
eryngo<br />
Apiaceae KS OK TX KS,OK,TX 1.5–3 Purple Yes Jul–Sep Sun, Part<br />
Shade<br />
Dry<br />
Coarse,<br />
Medium,<br />
Fine<br />
Very High<br />
Adult<br />
food<br />
(pollen<br />
and/or<br />
nectar)<br />
Native bees<br />
Yes<br />
Herb,<br />
annual or<br />
perennial<br />
Coreopsis<br />
tinctoria<br />
plains<br />
coreopsis<br />
Asteraceae KS MO OK TX KS,MO,OK,TX 1–2 Yellow Yes Apr–Jun Sun, Part<br />
Shade<br />
Moist, Dry Fine None Spring<br />
and<br />
Summer<br />
High<br />
Adult<br />
food<br />
(pollen<br />
and/or<br />
nectar)<br />
Native bees; Flies,<br />
beetles, and<br />
wasps<br />
Seed<br />
Yes<br />
Herb,<br />
annual or<br />
perennial<br />
Gaillardia<br />
pulchella<br />
blanketflower Asteraceae KS OK TX KS,OK,TX 1–2 Orange Yes May–Jul Sun, Part<br />
Shade<br />
Moist, Dry<br />
Coarse,<br />
Medium,<br />
Fine<br />
None<br />
Medium/<br />
Medium<br />
Spring,<br />
Summer,<br />
Fall<br />
Very High<br />
Adult<br />
food<br />
(pollen<br />
and/or<br />
nectar)<br />
Native bees; Flies,<br />
beetles, and<br />
wasps<br />
Seed<br />
Yes<br />
Herb,<br />
annual or<br />
perennial<br />
Gaura longiflora<br />
longflower<br />
beeblossom<br />
Onagraceae IA KS MO OK TX IA,KS,MO,OK,TX 2–3 White Yes Jul–Sep Sun Dry Very High Adult<br />
food<br />
(pollen<br />
and/or<br />
nectar)<br />
Bumble bees;<br />
Moths; Hummingbirds<br />
Yes<br />
Herb,<br />
annual or<br />
perennial<br />
Glandularia<br />
bipinnatifida<br />
prairie verbena Verbenaceae KS OK TX KS,OK,TX 1 Purple Yes Mar–Dec Sun Dry Coarse,<br />
Medium,<br />
Fine<br />
Very High<br />
Adult<br />
food<br />
(pollen<br />
and/or<br />
nectar)<br />
Native bees;<br />
Bumble bees;<br />
Butterflies and<br />
moths; Flies;<br />
Hummingbirds<br />
Yes<br />
Herb,<br />
annual or<br />
perennial<br />
Monarda<br />
citriodora<br />
lemon<br />
beebalm<br />
Lamiaceae KS OK TX KS,OK,TX 1–2 Purple Yes May–Jul Sun, Part<br />
Shade<br />
Dry<br />
Coarse,<br />
Medium,<br />
Fine<br />
Very High<br />
Adult<br />
food<br />
(pollen<br />
and/or<br />
nectar)<br />
Native bees;<br />
Bumble bees;<br />
Hummingbirds<br />
Yes<br />
Herb,<br />
annual or<br />
perennial<br />
Monarda<br />
punctata<br />
dotted mint Lamiaceae KS MN OK TX KS,MN,OK,TX 1–3 Purple Yes Jun–Aug Sun Moist Very High Adult<br />
food<br />
(pollen<br />
and/or<br />
nectar)<br />
Native bees;<br />
Honey bees;<br />
Bumble bees;<br />
Butterflies and<br />
moths; Flies, beetles,<br />
and wasps;<br />
Hummingbirds<br />
Yes<br />
Herb,<br />
biennial<br />
Ipomopsis rubra<br />
standing-cypress<br />
Polemoniaceae<br />
OK TX OK,TX 2–4 Red Yes Jun–Aug Sun, Part<br />
Shade<br />
Dry<br />
Coarse,<br />
Medium<br />
Very High<br />
Adult<br />
food<br />
(pollen<br />
and/or<br />
nectar)<br />
Hummingbirds<br />
Yes<br />
Herb,<br />
biennial or<br />
perennial<br />
Sphaeralcea<br />
coccinea<br />
scarlet<br />
globemallow<br />
Malvaceae KS OK TX KS,OK,TX 1 Orange Yes Apr–Sep Sun Moist, Dry Medium,<br />
Fine<br />
Medium<br />
Medium/<br />
Medium<br />
Spring<br />
and<br />
Summer<br />
Very High<br />
Adult<br />
food<br />
(pollen<br />
and/or<br />
nectar)<br />
Native bees;<br />
Hummingbirds<br />
Seed,<br />
Container<br />
Yes<br />
Herb,<br />
perennial<br />
Achillea<br />
millefolium<br />
common<br />
yarrow<br />
Asteraceae IA KS MN MO OK TX IA,KS,MN,MO,OK,TX 3 White Yes May–Jul Sun, Part<br />
Shade<br />
Moist, Dry Medium Low Medium/<br />
Low<br />
Spring High Adult<br />
food<br />
(pollen<br />
and/or<br />
nectar);<br />
Nest<br />
material<br />
Native bees; Flies,<br />
beetles, and<br />
wasps<br />
Seed,<br />
Container,<br />
Sprig<br />
Yes<br />
<strong>Roadside</strong> <strong>Revegetation</strong>: An Integrated Approach to Establishing Native Plants and Pollinator Habitat<br />
506
APPENDIX<br />
Texas — Native <strong>Revegetation</strong> Plants for Pollinators, continued...<br />
Plant Type Scientific Name Common Name Plant Family IA KS MN MO OK TX All States Eco- Region<br />
(EPA III)<br />
Height<br />
(feet)<br />
Flower<br />
Color<br />
Showy Flowering Sun<br />
Exposure<br />
Soil<br />
Moisture<br />
Soil<br />
Texture<br />
Salt<br />
Tolerance<br />
Palatability<br />
(Browsing/<br />
Grazing)<br />
Active<br />
Growth<br />
Period<br />
Pollinator<br />
Value<br />
Pollinators<br />
Benefits<br />
to Pollinators<br />
Propagation<br />
Commercially<br />
Available<br />
Herb,<br />
perennial<br />
Asclepias asperula<br />
ssp. capricornu<br />
antelopehorns<br />
milkweed<br />
Asclepiadaceae<br />
KS OK TX KS,OK,TX 1–2 Green Yes Apr–Jun Sun, Part<br />
Shade<br />
Dry<br />
Coarse,<br />
Medium,<br />
Fine<br />
Medium Very High Adult<br />
food<br />
(pollen<br />
and/or<br />
nectar);<br />
Larval<br />
food<br />
Native bees; Honey<br />
bees; Bumble<br />
bees; Butterflies<br />
and moths; Flies,<br />
beetles, and<br />
wasps<br />
Yes<br />
Herb,<br />
perennial<br />
Asclepias<br />
incarnata<br />
swamp<br />
milkweed<br />
Asclepiadaceae<br />
IA KS MO OK TX IA,KS,MO,OK,TX 3–4 Purple Yes Jun–Sep Sun, Part<br />
Shade<br />
Moist<br />
Coarse,<br />
Medium,<br />
Fine<br />
Medium /Low Spring Very High Adult<br />
food<br />
(pollen<br />
and/or<br />
nectar);<br />
Larval<br />
food<br />
Native bees; Honey<br />
bees; Bumble<br />
bees; Butterflies;<br />
Monarchs; Flies,<br />
beetles, and<br />
wasps; Hummingbirds<br />
Seed,<br />
Sprig<br />
Yes<br />
Herb,<br />
perennial<br />
Asclepias<br />
oenotheroides<br />
hierba de<br />
zizotes<br />
Asclepiadaceae<br />
TX TX 1–3 Green Yes Mar–Sep Sun Dry Medium,<br />
Fine<br />
Medium Very High Adult<br />
food<br />
(pollen<br />
and/or<br />
nectar);<br />
Larval<br />
food<br />
Native bees; Honey<br />
bees; Bumble<br />
bees; Butterflies;<br />
Monarchs; Flies,<br />
beetles, and<br />
wasps<br />
No<br />
Herb,<br />
perennial<br />
Asclepias<br />
tuberosa<br />
butterfly<br />
milkweed<br />
Asclepiadaceae<br />
IA KS MN MO OK TX IA,KS,MN,MO,OK,TX "46,47,50,<br />
51,52"<br />
2–3 Orange Yes Jun–Aug Sun, Part<br />
Shade<br />
Dry<br />
Coarse,<br />
Medium<br />
Medium Low/Low Spring<br />
and<br />
Summer<br />
Very High<br />
Adult<br />
food<br />
(pollen<br />
and/or<br />
nectar);<br />
Larval<br />
food<br />
Native bees; Honey<br />
bees; Bumble<br />
bees; Butterflies;<br />
Monarchs; Flies,<br />
beetles, and<br />
wasps; Hummingbirds<br />
Seed,<br />
Container<br />
Yes<br />
Herb,<br />
perennial<br />
Asclepias<br />
verticillata<br />
whorled<br />
milkweed<br />
Asclepiadaceae<br />
IA KS MN MO OK TX IA,KS,MN,MO,OK,TX "46,47,48,<br />
51,52"<br />
1–2 Purple No Jun–Sep Sun, Part<br />
Shade<br />
Moist, Dry<br />
Coarse,<br />
Medium,<br />
Fine<br />
Medium Very High Adult<br />
food<br />
(pollen<br />
and/or<br />
nectar);<br />
Larval<br />
food<br />
Native bees; Honey<br />
bees; Bumble<br />
bees; Butterflies;<br />
Monarchs; Flies,<br />
beetles, and<br />
wasps<br />
Yes<br />
Herb,<br />
perennial<br />
Asclepias viridis<br />
green<br />
milkweed<br />
Asclepiadaceae<br />
KS MO OK TX KS,MO,OK,TX 2–3 Green Yes Jun–Aug Sun, Part<br />
Shade<br />
Dry<br />
Coarse,<br />
Medium<br />
Medium Very High Adult<br />
food<br />
(pollen<br />
and/or<br />
nectar);<br />
Larval<br />
food<br />
Native bees; Honey<br />
bees; Bumble<br />
bees; Butterflies;<br />
Monarchs; Flies,<br />
beetles, and<br />
wasps<br />
Yes<br />
Herb,<br />
perennial<br />
Baptisia australis<br />
blue false<br />
indigo<br />
Fabaceae IA KS MO OK TX IA,KS,MO,OK,TX 1.5–2 White Yes Apr–Jun Sun Moist, Dry Medium Very High Adult<br />
food<br />
(pollen<br />
and/or<br />
nectar)<br />
Native bees;<br />
Bumble bees<br />
Yes<br />
Herb,<br />
perennial<br />
Baptisia bracteata<br />
cream wild<br />
indigo<br />
Fabaceae IA KS MN MO OK TX IA,KS,MN,MO,OK,TX 1.5–2 White Yes Apr–May Sun Dry Medium Very High Adult<br />
food<br />
(pollen<br />
and/or<br />
nectar)<br />
Native bees;<br />
Bumble bees<br />
Yes<br />
<strong>Roadside</strong> <strong>Revegetation</strong>: An Integrated Approach to Establishing Native Plants and Pollinator Habitat<br />
507
APPENDIX<br />
Texas — Native <strong>Revegetation</strong> Plants for Pollinators, continued...<br />
Plant Type Scientific Name Common Name Plant Family IA KS MN MO OK TX All States Eco- Region<br />
(EPA III)<br />
Height<br />
(feet)<br />
Flower<br />
Color<br />
Showy Flowering Sun<br />
Exposure<br />
Soil<br />
Moisture<br />
Soil<br />
Texture<br />
Salt<br />
Tolerance<br />
Palatability<br />
(Browsing/<br />
Grazing)<br />
Active<br />
Growth<br />
Period<br />
Pollinator<br />
Value<br />
Pollinators<br />
Benefits<br />
to Pollinators<br />
Propagation<br />
Commercially<br />
Available<br />
Herb,<br />
perennial<br />
Callirhoe<br />
involucrata<br />
purple poppy<br />
mallow<br />
Malvaceae KS MO OK TX KS,MO,OK,TX 1 Purple Yes Mar–Jun Sun, Part<br />
Shade<br />
Dry<br />
Coarse,<br />
Medium,<br />
Fine<br />
Low<br />
Spring<br />
and<br />
Summer<br />
Very High<br />
Adult<br />
food<br />
(pollen<br />
and/or<br />
nectar)<br />
Native bees; Flies,<br />
beetles, and<br />
wasps<br />
Seed,<br />
Cutting,<br />
Sprig<br />
Yes<br />
Herb,<br />
perennial<br />
Conoclinium<br />
coelestinum<br />
blue mistflower<br />
Asteraceae MO OK TX MO,OK,TX 1.5–3 Blue Yes Jun–Aug Part Shade,<br />
Shade<br />
Wet, Moist<br />
Medium,<br />
Fine<br />
None /Low Summer Very High Adult<br />
food<br />
(pollen<br />
and/or<br />
nectar)<br />
Native bees;<br />
Honey bees;<br />
Butterflies; Flies,<br />
beetles, and<br />
wasps<br />
Seed,<br />
Sprig<br />
Yes<br />
Herb,<br />
perennial<br />
Coreopsis<br />
lanceolata<br />
lanceleaf<br />
coreopsis<br />
Asteraceae KS MO OK TX KS,MO,OK,TX 1–3 Yellow Yes Apr–Jun Sun Moist, Dry Medium,<br />
Fine<br />
None Low/Low Spring<br />
and<br />
Summer<br />
High<br />
Adult<br />
food<br />
(pollen<br />
and/or<br />
nectar)<br />
Native bees; Flies,<br />
beetles, and<br />
wasps<br />
Seed,<br />
Container<br />
Yes<br />
Herb,<br />
perennial<br />
Dalea candida<br />
white prairie<br />
clover<br />
Fabaceae IA KS MN MO OK TX IA,KS,MN,MO,OK,TX 1–2 White Yes May–Sep Sun Dry Medium,<br />
Fine<br />
High/High<br />
Spring<br />
and<br />
Summer<br />
Very High<br />
Adult<br />
food<br />
(pollen<br />
and/or<br />
nectar)<br />
Native bees;<br />
Honey bees;<br />
Bumble bees<br />
Yes<br />
Herb,<br />
perennial<br />
Dalea purpurea<br />
purple prairie<br />
clover<br />
Fabaceae IA KS MN MO OK TX IA,KS,MN,MO,OK,TX "46,47,48,<br />
49,50,51,<br />
52"<br />
1–2.5 Purple Yes Jul–Aug Sun Dry Coarse,<br />
Medium,<br />
Fine<br />
Medium<br />
Medium/<br />
Medium<br />
Spring<br />
and<br />
Summer<br />
Very High<br />
Adult<br />
food<br />
(pollen<br />
and/or<br />
nectar)<br />
Native bees;<br />
Honey bees;<br />
Bumble bees<br />
Yes<br />
Herb,<br />
perennial<br />
Desmanthus<br />
illinoensis<br />
Illinois<br />
bundleflower<br />
Fabaceae KS MO OK TX KS,MO,OK,TX 3 White Yes May–Jul Sun Moist, Dry Coarse,<br />
Medium,<br />
Fine<br />
None High/High Spring<br />
and<br />
Summer<br />
High<br />
Adult<br />
food<br />
(pollen<br />
and/or<br />
nectar);<br />
Larval<br />
food<br />
Native bees; Flies Seed Yes<br />
Herb,<br />
perennial<br />
Echinacea<br />
angustifolia<br />
narrowleaf<br />
coneflower<br />
Asteraceae KS OK TX KS,OK,TX 2–3 Pink Yes May–Jul Sun, Part<br />
Shade<br />
Dry<br />
Coarse,<br />
Medium,<br />
Fine<br />
Very High<br />
Adult<br />
food<br />
(pollen<br />
and/or<br />
nectar)<br />
Native bees;<br />
Honey bees;<br />
Butterflies and<br />
moths; Monarchs<br />
Yes<br />
Herb,<br />
perennial<br />
Eryngium<br />
yuccifolium<br />
rattlesnake<br />
master<br />
Apiaceae IA KS MN MO OK TX IA,KS,MN,MO,OK,TX 3–5 White No Jul–Sep Sun, Part<br />
Shade<br />
Wet, Moist,<br />
Dry<br />
Very High<br />
Adult<br />
food<br />
(pollen<br />
and/or<br />
nectar)<br />
Native bees; Flies,<br />
beetles, and<br />
wasps<br />
Yes<br />
Herb,<br />
perennial<br />
Eupatorium<br />
perfoliatum<br />
common<br />
boneset<br />
Asteraceae IA KS MN MO OK TX IA,KS,MN,MO,OK,TX 3–6 White Yes Jun–Oct Sun, Part<br />
Shade<br />
Wet, Moist<br />
Coarse,<br />
Medium,<br />
Fine<br />
Very High<br />
Adult<br />
food<br />
(pollen<br />
and/or<br />
nectar)<br />
Native bees;<br />
Butterflies and<br />
moths; Monarchs;<br />
Flies, beetles, and<br />
wasps<br />
Yes<br />
Herb,<br />
perennial<br />
Eutrochium<br />
fistulosum<br />
joe pye weed Asteraceae OK TX OK,TX 3–7 Pink Yes Jul–Sep Sun Wet, Moist Medium,<br />
Fine<br />
None Low/Low Summer Very High Adult<br />
food<br />
(pollen<br />
and/or<br />
nectar)<br />
Native bees;<br />
Monarchs; Flies<br />
and beetles<br />
Container,<br />
Bare<br />
root,<br />
Sprig<br />
Yes<br />
<strong>Roadside</strong> <strong>Revegetation</strong>: An Integrated Approach to Establishing Native Plants and Pollinator Habitat<br />
508
APPENDIX<br />
Texas — Native <strong>Revegetation</strong> Plants for Pollinators, continued...<br />
Plant Type Scientific Name Common Name Plant Family IA KS MN MO OK TX All States Eco- Region<br />
(EPA III)<br />
Height<br />
(feet)<br />
Flower<br />
Color<br />
Showy Flowering Sun<br />
Exposure<br />
Soil<br />
Moisture<br />
Soil<br />
Texture<br />
Salt<br />
Tolerance<br />
Palatability<br />
(Browsing/<br />
Grazing)<br />
Active<br />
Growth<br />
Period<br />
Pollinator<br />
Value<br />
Pollinators<br />
Benefits<br />
to Pollinators<br />
Propagation<br />
Commercially<br />
Available<br />
Herb,<br />
perennial<br />
Helianthus<br />
maximiliani<br />
maximilian<br />
sunflower<br />
Asteraceae IA KS MN MO OK TX IA,KS,MN,MO,OK,TX 3–8 Yellow Yes Aug–Nov Sun Moist, Dry Coarse,<br />
Medium,<br />
Fine<br />
Low<br />
High/<br />
Medium<br />
Summer<br />
and Fall<br />
Very High<br />
Adult<br />
food<br />
(pollen<br />
and/or<br />
nectar)<br />
Native bees;<br />
Honey bees;<br />
Flies, beetles, and<br />
wasps<br />
Seed,<br />
Bare<br />
root,<br />
Sprig<br />
Yes<br />
Herb,<br />
perennial<br />
Hibiscus laevis<br />
halberdleaf<br />
rosemallow<br />
Malvaceae IA KS MO OK TX IA,KS,MO,OK,TX 8 White Yes Jun–Aug Sun, Part<br />
Shade<br />
Wet<br />
Medium,<br />
Fine<br />
None Low/Low Spring,<br />
Summer,<br />
Fall<br />
Very High<br />
Adult<br />
food<br />
(pollen<br />
and/or<br />
nectar)<br />
Native bees;<br />
Bumble bees;<br />
Hummingbirds<br />
Seed,<br />
Container,<br />
Bare<br />
root,<br />
Cutting<br />
Yes<br />
Herb,<br />
perennial<br />
Liatris aspera<br />
rough blazing<br />
star<br />
Asteraceae IA KS MN MO OK TX IA,KS,MN,MO,OK,TX "46,47,48,<br />
51,52"<br />
2–3 Purple Yes Jul–Sep Sun, Part<br />
Shade<br />
Dry<br />
Coarse,<br />
Medium<br />
Medium Very High Adult<br />
food<br />
(pollen<br />
and/or<br />
nectar)<br />
Native bees;<br />
Bumble bees;<br />
Hummingbirds<br />
Yes<br />
Herb,<br />
perennial<br />
Liatris punctata<br />
dotted blazing<br />
star<br />
Asteraceae IA KS MN OK TX IA,KS,MN,OK,TX "46,47,48,<br />
51,52"<br />
1–2 Purple Yes Jul–Sep Sun Dry Coarse,<br />
Medium,<br />
Fine<br />
Medium High/High Summer Very High Adult<br />
food<br />
(pollen<br />
and/or<br />
nectar)<br />
Native bees;<br />
Bumble bees;<br />
Hummingbirds<br />
Seed,<br />
Container,<br />
Corm<br />
Yes<br />
Herb,<br />
perennial<br />
Liatris pycnostachya<br />
prairie blazing<br />
star<br />
Asteraceae IA KS MN MO OK TX IA,KS,MN,MO,OK,TX 3–5 Purple Yes Jul–Sep Sun Wet, Moist,<br />
Dry<br />
Coarse,<br />
Medium,<br />
Fine<br />
None<br />
Medium/<br />
Low<br />
Summer Very High Adult<br />
food<br />
(pollen<br />
and/or<br />
nectar)<br />
Native bees;<br />
Butterflies and<br />
moths; Hummingbirds<br />
Seed,<br />
Container,<br />
Corm<br />
Yes<br />
Herb,<br />
perennial<br />
Lobelia cardinalis cardinal flower Campanulaceae<br />
KS MO OK TX KS,MO,OK,TX 2–4 Red Yes Jun–Aug Part Shade,<br />
Shade<br />
Wet, Moist Medium None Medium/<br />
Medium<br />
Spring Very High Adult<br />
food<br />
(pollen<br />
and/or<br />
nectar)<br />
Butterflies;<br />
Hummingbirds<br />
Seed,<br />
Container<br />
Yes<br />
Herb,<br />
perennial<br />
Monarda fistulosa wild bergamot Lamiaceae IA KS MN MO OK TX IA,KS,MN,MO,OK,TX "46,47,48,<br />
49,50,51,<br />
52"<br />
2–4 Purple Yes Jul–Aug Sun, Part<br />
Shade<br />
Moist, Dry<br />
Coarse,<br />
Medium,<br />
Fine<br />
Medium<br />
Medium/<br />
Medium<br />
Spring Very High Adult<br />
food<br />
(pollen<br />
and/or<br />
nectar)<br />
Native bees;<br />
Bumble bees;<br />
Hummingbirds<br />
Seed,<br />
Container<br />
Yes<br />
Herb,<br />
perennial<br />
Oenothera macrocarpa<br />
bigfruit<br />
evening<br />
primrose<br />
Onagraceae KS MO OK TX KS,MO,OK,TX 1–1.5 Yellow Yes Apr–Aug Sun Dry Coarse,<br />
Medium<br />
Very High<br />
Adult<br />
food<br />
(pollen<br />
and/or<br />
nectar)<br />
Native bees;<br />
Moths<br />
Yes<br />
Herb,<br />
perennial<br />
Oenothera<br />
speciosa<br />
pink evening<br />
primrose<br />
Onagraceae KS MO OK TX KS,MO,OK,TX 1–1.5 Pink Yes May–Jul Sun Dry Coarse,<br />
Medium,<br />
Fine<br />
High<br />
Adult<br />
food<br />
(pollen<br />
and/or<br />
nectar)<br />
Native bees;<br />
Butterflies and<br />
moths<br />
Yes<br />
Herb,<br />
perennial<br />
Oligoneuron<br />
rigidum var.<br />
rigidum<br />
stiff goldenrod Asteraceae IA KS MN MO OK TX IA,KS,MN,MO,OK,TX "46,47,48,<br />
49,50,51,<br />
52"<br />
1–5 Yellow Yes Aug–Sep Sun, Part<br />
Shade<br />
Dry<br />
Coarse,<br />
Medium,<br />
Fine<br />
Medium Low/Low Spring<br />
and<br />
Summer<br />
Very High<br />
Adult<br />
food<br />
(pollen<br />
and/or<br />
nectar)<br />
Native bees;<br />
Honey bees;<br />
Flies, beetles, and<br />
wasps<br />
Seed,<br />
Bare<br />
root,<br />
Sprig<br />
Yes<br />
<strong>Roadside</strong> <strong>Revegetation</strong>: An Integrated Approach to Establishing Native Plants and Pollinator Habitat<br />
509
APPENDIX<br />
Texas — Native <strong>Revegetation</strong> Plants for Pollinators, continued...<br />
Plant Type Scientific Name Common Name Plant Family IA KS MN MO OK TX All States Eco- Region<br />
(EPA III)<br />
Height<br />
(feet)<br />
Flower<br />
Color<br />
Showy Flowering Sun<br />
Exposure<br />
Soil<br />
Moisture<br />
Soil<br />
Texture<br />
Salt<br />
Tolerance<br />
Palatability<br />
(Browsing/<br />
Grazing)<br />
Active<br />
Growth<br />
Period<br />
Pollinator<br />
Value<br />
Pollinators<br />
Benefits<br />
to Pollinators<br />
Propagation<br />
Commercially<br />
Available<br />
Herb,<br />
perennial<br />
Penstemon<br />
cobaea<br />
prairie<br />
penstemon<br />
Scrophulariaceae<br />
KS OK TX KS,OK,TX 1–2 Purple Yes May–Jul Sun Dry Coarse,<br />
Medium<br />
Medium Very High Adult<br />
food<br />
(pollen<br />
and/or<br />
nectar)<br />
Native bees;<br />
Bumble bees;<br />
Hummingbirds<br />
Yes<br />
Herb,<br />
perennial<br />
Phlox pilosa downy phlox Polemoniaceae<br />
IA KS MN MO OK TX IA,KS,MN,MO,OK,TX 1–2 Pink Yes Mar–May Sun, Part<br />
Shade<br />
Moist, Dry Coarse Very High Adult<br />
food<br />
(pollen<br />
and/or<br />
nectar)<br />
Native bees;<br />
Bumble bees;<br />
Butterflies and<br />
moths; Flies;<br />
Hummingbirds<br />
Yes<br />
Herb,<br />
perennial<br />
Pycnanthemum<br />
tenuifolium<br />
narrowleaf<br />
mountain mint<br />
Lamiaceae IA KS MO OK TX IA,KS,MO,OK,TX 1–3 White No Jun–Aug Sun Wet, Moist,<br />
Dry<br />
Very High<br />
Adult<br />
food<br />
(pollen<br />
and/or<br />
nectar)<br />
Native bees;<br />
Honey bees;<br />
Bumble bees;<br />
Flies, beetles, and<br />
wasps<br />
Yes<br />
Herb,<br />
perennial<br />
Ratibida<br />
columnifera<br />
Mexican hat Asteraceae IA KS MN OK TX IA,KS,MN,OK,TX 1–3 Yellow Yes May–Oct Sun Dry Coarse,<br />
Medium,<br />
Fine<br />
Medium<br />
Medium/<br />
Medium<br />
Summer Very High Adult<br />
food<br />
(pollen<br />
and/or<br />
nectar)<br />
Native bees<br />
Seed,<br />
Container<br />
Yes<br />
Herb,<br />
perennial<br />
Rudbeckia hirta<br />
black-eyed<br />
susan<br />
Asteraceae IA KS MN MO OK TX IA,KS,MN,MO,OK,TX 2–3 Yellow Yes Jun–Aug Sun, Part<br />
Shade<br />
Moist, Dry<br />
Coarse,<br />
Medium,<br />
Fine<br />
Medium Low/Low Fall,<br />
Winter<br />
and<br />
Spring<br />
Very High<br />
Adult<br />
food<br />
(pollen<br />
and/or<br />
nectar)<br />
Native bees;<br />
Butterflies<br />
Seed<br />
Yes<br />
Herb,<br />
perennial<br />
Salvia azurea<br />
azure blue<br />
sage<br />
Lamiaceae KS OK TX KS,OK,TX 3–6 Blue Yes Sep–Nov Part Shade Dry Coarse,<br />
Medium,<br />
Fine<br />
Medium/<br />
Low<br />
Spring<br />
and<br />
Summer<br />
Very High<br />
Adult<br />
food<br />
(pollen<br />
and/or<br />
nectar)<br />
Native bees;<br />
Bumble bees;<br />
Hummingbirds<br />
Yes<br />
Herb,<br />
perennial<br />
Salvia lyrata lyreleaf sage Lamiaceae OK TX OK,TX 1–2 Blue Yes Mar–Jun Sun, Part<br />
Shade<br />
Wet, Moist,<br />
Dry<br />
Coarse,<br />
Medium<br />
Very High<br />
Adult<br />
food<br />
(pollen<br />
and/or<br />
nectar)<br />
Bumble bees;<br />
Butterflies;<br />
Hummingbirds<br />
Yes<br />
Herb,<br />
perennial<br />
Senna marilandica<br />
Maryland<br />
senna<br />
Fabaceae KS MO OK TX KS,MO,OK,TX 3–6 Yellow Yes Jun–Aug Sun, Part<br />
Shade<br />
Wet, Moist<br />
Coarse,<br />
Medium<br />
None High/High Spring<br />
and<br />
Summer<br />
High<br />
Adult<br />
food<br />
(pollen<br />
and/or<br />
nectar)<br />
Bumble bees<br />
Seed,<br />
Container<br />
Yes<br />
Herb,<br />
perennial<br />
Solidago gigantea<br />
giant<br />
goldenrod<br />
Asteraceae IA KS MN MO OK TX IA,KS,MN,MO,OK,TX 3–7 Yellow Yes Sep–Nov Part Shade Moist Medium,<br />
Fine<br />
None Medium/ Summer Very High Adult<br />
food<br />
(pollen<br />
and/or<br />
nectar)<br />
Native bees;<br />
Honey bees;<br />
Butterflies; Flies,<br />
beetles, and<br />
wasps<br />
Seed<br />
Yes<br />
Herb,<br />
perennial<br />
Solidago<br />
nemoralis<br />
gray goldenrod<br />
Asteraceae IA KS MN MO OK TX IA,KS,MN,MO,OK,TX 4–5 Yellow Yes Aug–Sep Sun, Part<br />
Shade<br />
Dry<br />
Coarse,<br />
Medium,<br />
Fine<br />
Medium<br />
Medium/<br />
Medium<br />
Spring<br />
and<br />
Summer<br />
Very High<br />
Adult<br />
food<br />
(pollen<br />
and/or<br />
nectar)<br />
Native bees;<br />
Honey bees;<br />
Butterflies; Flies,<br />
beetles, and<br />
wasps<br />
Seed,<br />
Container,<br />
Cutting<br />
Yes<br />
<strong>Roadside</strong> <strong>Revegetation</strong>: An Integrated Approach to Establishing Native Plants and Pollinator Habitat<br />
510
APPENDIX<br />
Texas — Native <strong>Revegetation</strong> Plants for Pollinators, continued...<br />
Plant Type Scientific Name Common Name Plant Family IA KS MN MO OK TX All States Eco- Region<br />
(EPA III)<br />
Height<br />
(feet)<br />
Flower<br />
Color<br />
Showy Flowering Sun<br />
Exposure<br />
Soil<br />
Moisture<br />
Soil<br />
Texture<br />
Salt<br />
Tolerance<br />
Palatability<br />
(Browsing/<br />
Grazing)<br />
Active<br />
Growth<br />
Period<br />
Pollinator<br />
Value<br />
Pollinators<br />
Benefits<br />
to Pollinators<br />
Propagation<br />
Commercially<br />
Available<br />
Herb,<br />
perennial<br />
Solidago speciosa<br />
showy<br />
goldenrod<br />
Asteraceae IA KS MN MO OK TX IA,KS,MN,MO,OK,TX "46,47,48,<br />
50,51,52"<br />
1–4 Yellow Yes Aug–Sep Sun, Part<br />
Shade<br />
Dry<br />
Coarse,<br />
Medium,<br />
Fine<br />
Medium Very High Adult<br />
food<br />
(pollen<br />
and/or<br />
nectar)<br />
Native bees;<br />
Honey bees;<br />
Butterflies and<br />
moths; Flies,<br />
beetles, and<br />
wasps<br />
Yes<br />
Herb,<br />
perennial<br />
Symphyotrichum<br />
ericoides var.<br />
ericoides<br />
heath aster Asteraceae IA KS MN MO OK TX IA,KS,MN,MO,OK,TX "46,47,48,<br />
49,50,51,<br />
52"<br />
1–3 White Yes Aug–Oct Sun, Part<br />
Shade<br />
Moist, Dry<br />
Coarse,<br />
Medium,<br />
Fine<br />
Medium Very High Adult<br />
food<br />
(pollen<br />
and/or<br />
nectar)<br />
Native bees;<br />
Butterflies and<br />
moths; Flies,<br />
beetles, and<br />
wasps<br />
Yes<br />
Herb,<br />
perennial<br />
Symphyotrichum<br />
lateriflorum<br />
calico aster Asteraceae IA KS MN MO OK TX IA,KS,MN,MO,OK,TX 1–3 White Yes Aug–Oct Sun Wet, Moist Low/High Spring,<br />
Summer,<br />
Fall<br />
Very High<br />
Adult<br />
food<br />
(pollen<br />
and/or<br />
nectar)<br />
Native bees;<br />
Butterflies and<br />
moths; Flies,<br />
beetles, and<br />
wasps<br />
Yes<br />
Herb,<br />
perennial<br />
Symphyotrichum<br />
oblongifolium<br />
aromatic aster Asteraceae IA KS MN MO OK TX IA,KS,MN,MO,OK,TX "46,47,51,<br />
52"<br />
1–2 Lavender<br />
Yes Aug–Sep Sun Dry Coarse,<br />
Medium,<br />
Fine<br />
Low Very High Adult<br />
food<br />
(pollen<br />
and/or<br />
nectar)<br />
Native bees;<br />
Butterflies and<br />
moths; Flies,<br />
beetles, and<br />
wasps<br />
Yes<br />
Herb,<br />
perennial<br />
Tradescantia<br />
occidentalis<br />
prairie<br />
spiderwort<br />
Commelinaceae<br />
KS OK TX KS,OK,TX 1–2 blue Yes Apr–Jun Sun Moist, Dry Medium High Adult<br />
food<br />
(pollen<br />
and/or<br />
nectar)<br />
Native bees; Flies,<br />
beetles, and<br />
wasps<br />
Yes<br />
Herb,<br />
perennial<br />
Vernonia<br />
baldwinii<br />
Baldwin's<br />
ironweed<br />
Asteraceae IA KS MO OK TX IA,KS,MO,OK,TX 3–5 Purple Yes Jul–Nov Sun Moist Coarse,<br />
Medium,<br />
Fine<br />
Very High<br />
Adult<br />
food<br />
(pollen<br />
and/or<br />
nectar)<br />
Native bees;<br />
Butterflies and<br />
moths; Hummingbirds<br />
Yes<br />
Shrub Aesculus pavia red buckeye Hippocastanaceae<br />
MO OK TX MO,OK,TX 25 Red Yes May–Jun Part Shade,<br />
Shade<br />
Wet, Moist,<br />
Dry<br />
Coarse,<br />
Medium,<br />
Fine<br />
None Low/Low Spring<br />
and<br />
Summer<br />
Very High<br />
Adult<br />
food<br />
(pollen<br />
and/or<br />
nectar)<br />
Bumble bees;<br />
Hummingbirds<br />
Seed,<br />
Container,<br />
Bare<br />
root<br />
Yes<br />
Shrub<br />
Amorpha<br />
canescens<br />
lead plant Fabaceae IA KS MN MO OK TX IA,KS,MN,MO,OK,TX "46,47,48,<br />
50,51,52"<br />
1.5–4 Purple Yes Jun–Aug Sun, Part<br />
Shade<br />
Dry<br />
Coarse,<br />
Medium<br />
Medium High/Low Spring<br />
and<br />
Summer<br />
Very High<br />
Adult<br />
food<br />
(pollen<br />
and/or<br />
nectar)<br />
Native bees;<br />
Honey bees;<br />
Flies, beetles, and<br />
wasps<br />
Seed,<br />
Container,<br />
Bare<br />
root,<br />
Cutting<br />
Yes<br />
Shrub<br />
Amorpha<br />
fruticosa<br />
false indigo<br />
bush<br />
Fabaceae KS OK TX KS,OK,TX 6–12 Purple Yes Apr–Jun Sun, Part<br />
Shade<br />
Moist<br />
Coarse,<br />
Medium,<br />
Fine<br />
Low Low/Low Spring<br />
and<br />
Summer<br />
Very High<br />
Adult<br />
food<br />
(pollen<br />
and/or<br />
nectar)<br />
Native bees; Flies,<br />
beetles, and<br />
wasps<br />
Seed,<br />
Container,<br />
Bare<br />
root<br />
Yes<br />
Shrub<br />
Ceanothus<br />
americanus<br />
New Jersey tea Rhamnaceae IA KS MN MO OK TX IA,KS,MN,MO,OK,TX "47,50,51,<br />
52"<br />
2–3 White Yes Jun–Jul Sun, Part<br />
Shade<br />
Dry<br />
Coarse,<br />
Medium<br />
High<br />
Medium/<br />
Low<br />
Spring<br />
and<br />
Summer<br />
Very High<br />
Adult<br />
food<br />
(pollen<br />
and/or<br />
nectar)<br />
Native bees; Flies,<br />
beetles, and<br />
wasps<br />
Seed,<br />
Container,<br />
Bare<br />
root<br />
Yes<br />
<strong>Roadside</strong> <strong>Revegetation</strong>: An Integrated Approach to Establishing Native Plants and Pollinator Habitat<br />
511
APPENDIX<br />
Texas — Native <strong>Revegetation</strong> Plants for Pollinators, continued...<br />
Plant Type Scientific Name Common Name Plant Family IA KS MN MO OK TX All States Eco- Region<br />
(EPA III)<br />
Height<br />
(feet)<br />
Flower<br />
Color<br />
Showy Flowering Sun<br />
Exposure<br />
Soil<br />
Moisture<br />
Soil<br />
Texture<br />
Salt<br />
Tolerance<br />
Palatability<br />
(Browsing/<br />
Grazing)<br />
Active<br />
Growth<br />
Period<br />
Pollinator<br />
Value<br />
Pollinators<br />
Benefits<br />
to Pollinators<br />
Propagation<br />
Commercially<br />
Available<br />
Shrub<br />
Cephalanthus<br />
occidentalis<br />
buttonbush Rubiaceae IA KS MO OK TX IA,KS,MO,OK,TX 12 White Yes Jun–Aug Sun, Part<br />
Shade<br />
Moist<br />
Coarse,<br />
Medium,<br />
Fine<br />
Low Low/Low Spring Very High Adult<br />
food<br />
(pollen<br />
and/or<br />
nectar)<br />
Native bees;<br />
Honey bees;<br />
Bumble bees;<br />
Hummingbirds<br />
Seed,<br />
Container,<br />
Bare<br />
root,<br />
Cutting<br />
Yes<br />
Shrub Opuntia humifusa devil's-tongue Cactaceae KS MO OK TX KS,MO,OK,TX 1–1.5 Yellow Yes May–Jul Sun Dry Coarse Very High Adult<br />
food<br />
(pollen<br />
and/or<br />
nectar)<br />
Native bees;<br />
Butterflies; Flies,<br />
beetles, and<br />
wasps<br />
Yes<br />
Shrub Rhus aromatica fragrant sumac Anacardiaceae<br />
KS MO OK TX KS,MO,OK,TX 2-6 Green No Apr–Jun Sun, Part<br />
Shade,<br />
Shade<br />
Moist, Dry<br />
Coarse,<br />
Medium<br />
Low/Low<br />
Spring<br />
and<br />
Summer<br />
High<br />
Adult<br />
food<br />
(pollen<br />
and/or<br />
nectar);<br />
Nest<br />
material<br />
Native bees;<br />
Honey bees;<br />
Flies, beetles, and<br />
wasps<br />
Yes<br />
Shrub Rhus glabra smooth sumac Anacardiaceae<br />
IA KS MN MO OK TX IA,KS,MN,MO,OK,TX 12 Green Yes Apr–May Sun, Part<br />
Shade<br />
Dry<br />
Coarse,<br />
Medium<br />
Medium Low/Low Spring<br />
and<br />
Summer<br />
High<br />
Adult<br />
food<br />
(pollen<br />
and/or<br />
nectar);<br />
Nest<br />
material<br />
Native bees;<br />
Honey bees;<br />
Flies, beetles, and<br />
wasps<br />
Seed,<br />
Container,<br />
Bare<br />
root<br />
Yes<br />
Shrub Rosa carolina pasture rose Rosaceae IA KS MO OK TX IA,KS,MO,OK,TX 2 White Yes Jun–Aug Sun, Part<br />
Shade<br />
Moist, Dry<br />
Coarse,<br />
Medium,<br />
Fine<br />
Medium<br />
Medium/<br />
Medium<br />
Spring<br />
and<br />
Summer<br />
Very High<br />
Adult<br />
food<br />
(pollen<br />
and/or<br />
nectar);<br />
Nest<br />
material<br />
Native bees;<br />
Bumble bees;<br />
Flies, beetles, and<br />
wasps<br />
Seed,<br />
Container,<br />
Bare<br />
root<br />
Yes<br />
Shrub<br />
Sambucus nigra<br />
ssp. canadensis<br />
American black<br />
elderberry<br />
Caprifoliaceae<br />
IA KS MN MO OK TX IA,KS,MN,MO,OK,TX 12 White Yes Apr–May Sun, Part<br />
Shade<br />
Wet, Moist,<br />
Dry<br />
Medium None Medium/<br />
Low<br />
Spring<br />
and<br />
Summer<br />
Very High<br />
Adult<br />
food<br />
(pollen<br />
and/or<br />
nectar);<br />
Nest<br />
material<br />
Native bees; Flies,<br />
beetles, and<br />
wasps<br />
Seed,<br />
Container,<br />
Bare<br />
root<br />
Yes<br />
Tree Cercis canadensis eastern redbud Fabaceae KS MO OK TX KS,MO,OK,TX 20 Purple Yes Mar–Apr Sun, Part<br />
Shade<br />
Moist<br />
Coarse,<br />
Medium,<br />
Fine<br />
None<br />
Medium/<br />
Low<br />
Spring<br />
and<br />
Summer<br />
Very High<br />
Adult<br />
food<br />
(pollen<br />
and/or<br />
nectar);<br />
Nest<br />
material<br />
Native bees;<br />
Bumble bees;<br />
Seed,<br />
Container,<br />
Bare<br />
root,<br />
Cutting<br />
Yes<br />
Tree<br />
Crataegus<br />
crus-galli<br />
cockspur<br />
hawthorn<br />
Rosaceae KS MO OK TX KS,MO,OK,TX 30 White Yes Apr–May Sun Wet, Moist,<br />
Dry<br />
Coarse,<br />
Medium,<br />
Fine<br />
Medium<br />
Medium/<br />
Low<br />
Spring<br />
and<br />
Summer<br />
Very High<br />
Adult<br />
food<br />
(pollen<br />
and/or<br />
nectar)<br />
Native bees; Flies,<br />
beetles, and<br />
wasps<br />
Seed,<br />
Container,<br />
Bare<br />
root<br />
Yes<br />
<strong>Roadside</strong> <strong>Revegetation</strong>: An Integrated Approach to Establishing Native Plants and Pollinator Habitat<br />
512
APPENDIX<br />
Texas — Native <strong>Revegetation</strong> Plants for Pollinators, continued...<br />
Plant Type Scientific Name Common Name Plant Family IA KS MN MO OK TX All States Eco- Region<br />
(EPA III)<br />
Height<br />
(feet)<br />
Flower<br />
Color<br />
Showy Flowering Sun<br />
Exposure<br />
Soil<br />
Moisture<br />
Soil<br />
Texture<br />
Salt<br />
Tolerance<br />
Palatability<br />
(Browsing/<br />
Grazing)<br />
Active<br />
Growth<br />
Period<br />
Pollinator<br />
Value<br />
Pollinators<br />
Benefits<br />
to Pollinators<br />
Propagation<br />
Commercially<br />
Available<br />
Tree<br />
Prunus angustifolia<br />
Chickasaw<br />
plum<br />
Rosaceae KS MO OK TX KS,MO,OK,TX 25 White Yes Feb–May Sun, Part<br />
Shade<br />
Dry<br />
Medium,<br />
Fine<br />
Low<br />
Medium/<br />
Low<br />
Spring<br />
and<br />
Summer<br />
Very High<br />
Adult<br />
food<br />
(pollen<br />
and/or<br />
nectar)<br />
Native bees<br />
Seed,<br />
Container,<br />
Bare<br />
root<br />
Yes<br />
Tree Prunus serotina black cherry Rosaceae IA KS MN MO OK TX IA,KS,MN,MO,OK,TX 80 White Yes May–Jun Sun, Part<br />
Shade<br />
Moist, Dry<br />
Coarse,<br />
Medium<br />
Medium Low/Low Spring<br />
and<br />
Summer<br />
Very High<br />
Adult<br />
food<br />
(pollen<br />
and/or<br />
nectar)<br />
Native bees;<br />
Honey bees;<br />
Bumble bees;<br />
Flies, beetles, and<br />
wasps<br />
Seed,<br />
Container,<br />
Bare<br />
root<br />
Yes<br />
Vine<br />
Bignonia<br />
capreolata<br />
crossvine<br />
Bignoniaceae<br />
MO OK TX MO,OK,TX 10–50 Red Yes Mar–May Sun, Part<br />
Shade<br />
Wet, Moist<br />
Coarse,<br />
Medium,<br />
Fine<br />
High<br />
Adult<br />
food<br />
(pollen<br />
and/or<br />
nectar)<br />
Native bees;<br />
Hummingbirds<br />
Yes<br />
Vine Campsis radicans trumpet<br />
creeper<br />
Bignoniaceae<br />
KS MO OK TX KS,MO,OK,TX 2 Red Yes Jun–Aug Sun, Part<br />
Shade<br />
Wet, Moist,<br />
Dry<br />
Coarse,<br />
Medium<br />
None<br />
Spring<br />
and<br />
Summer<br />
Very High<br />
Adult<br />
food<br />
(pollen<br />
and/or<br />
nectar)<br />
Native bees;<br />
Honey bees;<br />
Bumble bees;<br />
Hummingbirds<br />
Seed,<br />
Container,<br />
Bare<br />
root,<br />
Cutting<br />
Yes<br />
Vine<br />
Lonicera<br />
sempervirens<br />
trumpet<br />
honeysuckle<br />
Caprifoliaceae<br />
TX TX 16 Red Yes Jul–Sep Part Shade,<br />
Shade<br />
Moist, Dry<br />
Medium,<br />
Fine<br />
None<br />
Medium/<br />
Medium<br />
Spring Very High Adult<br />
food<br />
(pollen<br />
and/or<br />
nectar)<br />
Bumble bees;<br />
Butterflies and<br />
Moths; Hummingbirds<br />
Seed,<br />
Container,<br />
Bare<br />
root<br />
Yes<br />
<strong>Roadside</strong> <strong>Revegetation</strong>: An Integrated Approach to Establishing Native Plants and Pollinator Habitat<br />
513
U.S. Department of Transportation<br />
Federal Highway Administration