

centaflex - engine.com.sg
centaflex - engine.com.sg
centaflex - engine.com.sg

Create successful ePaper yourself
Turn your PDF publications into a flip-book with our unique Google optimized e-Paper software.
Fitting instructions for CENTAFLEX-A-couplings<br />
with highly elastic rubber elements. Important notes - observe strictly<br />
The radial and axial screws connecting the rubber element to the hubs<br />
must all be tightened to the torque given in the table below, using a<br />
torque wrench.<br />
Tightening with a torque wrench is par-ticularly important withthe larger<br />
sizes. Tightening “by feel” will not do, as experience has proved the<br />
tightening torques in such cases are far too low.<br />
Tightening torques which are too low will inevitably lead to slackening<br />
of the screws in service and consequently to the destruction of the<br />
coupling.<br />
Ensure that on tightening the screws, the aluminium bushes in the rubber<br />
part are not twisted at the same time, but sit straight.<br />
In order to reduce friction between the screw head and the aluminium<br />
part, a small amount of grease should be applied under the head of<br />
the screw before fitting. If necessary, use a suitable tool for applying<br />
counter pressure on the element to prevent twisting of the rubber<br />
part during tightening of the screws. This is particularly important with<br />
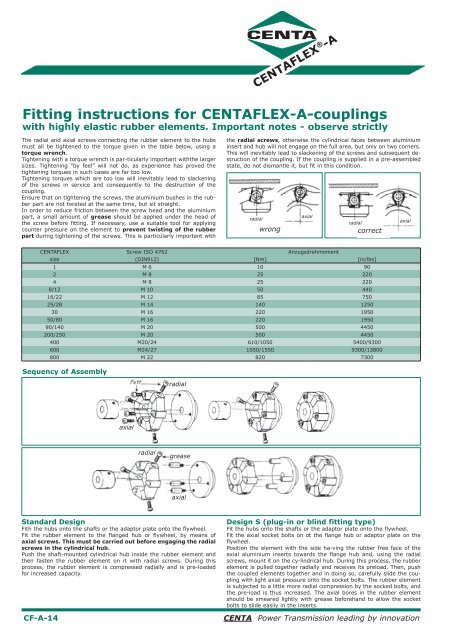
Sequency of Assembly<br />
Standard Design<br />
Fith the hubs onto the shafts or the adaptor plate onto the flywheel.<br />
Fit the rubber element to the flanged hub or flywheel, by means of<br />
axial screws. This must be carried out before engaging the radial<br />
screws in the cylindrical hub.<br />
Push the shaft-mounted cylindrical hub inside the rubber element and<br />
then fasten the rubber element on it with radial screws. During this<br />
process, the rubber element is <strong>com</strong>pressed radially and is pre-loaded<br />
for increased capacity.<br />
the radial screws, otherwise the cylindrical faces between aluminium<br />
insert and hub will not engage on the full area, but only on two corners.<br />
This will inevitably lead to slackening of the screws and subsequent destruction<br />
of the coupling. If the coupling is supplied in a pre-assembled<br />
state, do not dismantle it, but fit in this condition.<br />
wrong<br />
CENTAFLEX Screw ISO 4762 Anzugsdrehmoment<br />
CF-A-14<br />
radial<br />
axial<br />
radial<br />
correct<br />
size (DIN912) [Nm] [in/lbs]<br />
1 M 6 10 90<br />
2 M 8 25 220<br />
4 M 8 25 220<br />
8/12 M 10 50 440<br />
16/22 M 12 85 750<br />
25/28 M 14 140 1250<br />
30 M 16 220 1950<br />
50/80 M 16 220 1950<br />
90/140 M 20 500 4450<br />
200/250 M 20 500 4450<br />
400 M20/24 610/1050 5400/9300<br />
600 M24/27 1050/1550 9300/13800<br />
800 M 22 820 7300<br />
axial<br />
radial<br />
radial<br />
grease<br />
axial<br />
CENTAFLEX ® -A<br />
axial<br />
Design S (plug-in or blind fitting type)<br />
Fit the hubs onto the shafts or the adaptor plate onto the flywheel.<br />
Fit the axial socket bolts on ot the flange hub or adaptor plate on the<br />
flywheel.<br />
Position the element with the side ha-ving the rubber free face of the<br />
axial aluminium inserts towards the flange hub and, using the radial<br />
screws, mount it on the cy-lindrical hub. During this process, the rubber<br />
element is pulled together radially and receives its preload. Then, push<br />
the coupled elements together and in doing so, carefully slide the coupling<br />
with light axial pressure onto the socket bolts. The rubber element<br />
is subjected to a little more radial <strong>com</strong>pression by the socked bolts, and<br />
the pre-load is thus increased. The axial bores in the rubber element<br />
should be smeared lightly with grease beforehand to allow the socket<br />
bolts to slide easily in the inserts.<br />
CENTA Power Transmission leading by innovation