

Apple Installing the Network Server 200-MHz Processor Card Upgrade - Installing the Network Server 200-MHz Processor Card Upgrade
Apple Installing the Network Server 200-MHz Processor Card Upgrade - Installing the Network Server 200-MHz Processor Card Upgrade
Apple Installing the Network Server 200-MHz Processor Card Upgrade - Installing the Network Server 200-MHz Processor Card Upgrade

Create successful ePaper yourself
Turn your PDF publications into a flip-book with our unique Google optimized e-Paper software.
K<br />
<strong>Installing</strong> <strong>the</strong> <strong>Network</strong> <strong>Server</strong> <strong>200</strong>-<strong>MHz</strong><br />
<strong>Processor</strong> <strong>Card</strong> <strong>Upgrade</strong><br />
These are <strong>the</strong> instructions for<br />
m removing your existing processor card (132 or 150 <strong>MHz</strong>)<br />
m installing <strong>the</strong> <strong>200</strong>-<strong>MHz</strong> processor card upgrade for <strong>the</strong> <strong>Network</strong> <strong>Server</strong>.<br />
In addition to <strong>the</strong> card, you’ll need<br />
m a grounding wrist strap<br />
m an antistatic mat<br />
1 If <strong>the</strong> server is running, shut down <strong>the</strong> operating system, turn <strong>the</strong> server off, and<br />
unplug it.<br />
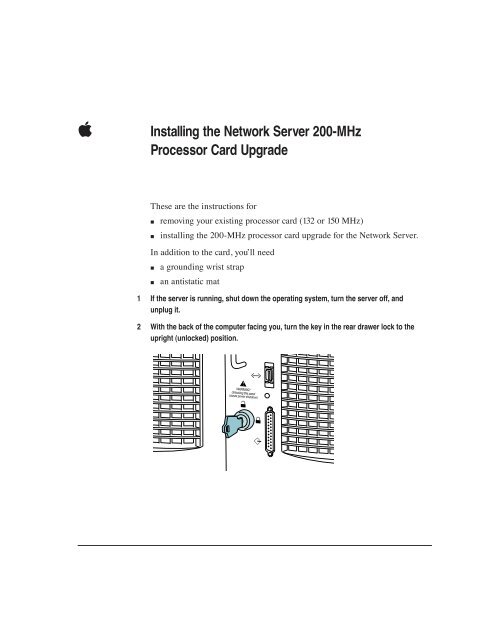
2 With <strong>the</strong> back of <strong>the</strong> computer facing you, turn <strong>the</strong> key in <strong>the</strong> rear drawer lock to <strong>the</strong><br />
upright (unlocked) position.
3 Unscrew <strong>the</strong> four thumbscrews on <strong>the</strong> right rear panel.<br />
2 <strong>Installing</strong> <strong>the</strong> <strong>Network</strong> <strong>Server</strong> <strong>200</strong>-<strong>MHz</strong> <strong>Processor</strong> <strong>Upgrade</strong> <strong>Card</strong>
4 Slide open <strong>the</strong> drawer.<br />
PowerPC 604 processor card<br />
IMPORTANT The rear drawer containing <strong>the</strong> logic module (including<br />
expansion cards, <strong>the</strong> processor card, and memory) is not grounded when it’s<br />
in <strong>the</strong> open position. Before handling any components that you’re installing<br />
in <strong>the</strong> rear drawer, and before touching any of <strong>the</strong> logic module components<br />
within <strong>the</strong> drawer, be sure to use an antistatic mat, wear a grounding wrist<br />
strap, and touch an unpainted metal surface on <strong>the</strong> server cabinet to discharge<br />
any static electricity.<br />
<strong>Installing</strong> <strong>the</strong> <strong>Network</strong> <strong>Server</strong> <strong>200</strong>-<strong>MHz</strong> <strong>Processor</strong> <strong>Upgrade</strong> <strong>Card</strong> 3
5 With <strong>the</strong> grounding wrist strap on, hold <strong>the</strong> processor card by <strong>the</strong> edges, and pull it out<br />
of <strong>the</strong> logic board connector.<br />
Place <strong>the</strong> old processor card on <strong>the</strong> antistatic mat.<br />
WARNING Make sure you hold <strong>the</strong> processor card by <strong>the</strong> edges, never by<br />
<strong>the</strong> heat sink.<br />
6 Position <strong>the</strong> bottom edges of <strong>the</strong> <strong>200</strong>-<strong>MHz</strong> card in <strong>the</strong> processor card guides, and<br />
slide <strong>the</strong> card in until it touches <strong>the</strong> connector. Then press in on <strong>the</strong> card so that it is<br />
seated firmly.<br />
IMPORTANT You may need to steady <strong>the</strong> drawer with one hand while pushing<br />
with <strong>the</strong> o<strong>the</strong>r hand to seat <strong>the</strong> card.<br />
WARNING Do not force <strong>the</strong> card or you may damage it.<br />
7 Close <strong>the</strong> rear drawer, tighten <strong>the</strong> thumbscrews, and turn <strong>the</strong> key to <strong>the</strong> right (locked)<br />
position.<br />
8 Restart <strong>the</strong> <strong>Network</strong> <strong>Server</strong>.<br />
4 <strong>Installing</strong> <strong>the</strong> <strong>Network</strong> <strong>Server</strong> <strong>200</strong>-<strong>MHz</strong> <strong>Processor</strong> <strong>Upgrade</strong> <strong>Card</strong>
Communications regulation information<br />
FCC statement<br />
This equipment has been tested and found to comply with <strong>the</strong> limits for a Class A digital device,<br />
pursuant to Part 15 of FCC rules. These limits are designed to provide reasonable protection<br />
against radio interference when <strong>the</strong> equipment is operated in a commercial environment. This<br />
equipment generates, uses, and can radiate radio-frequency energy, and if not installed and used<br />
in accordance with <strong>Apple</strong>’s instructions, may cause interference to radio communications.<br />
Operation of this equipment in a residential area is likely to cause such interference, in which<br />
case <strong>the</strong> user will be required to correct <strong>the</strong> interference at his or her own expense.<br />
IMPORTANT Changes or modifications to this product not authorized by <strong>Apple</strong> Computer, Inc.,<br />
could void <strong>the</strong> FCC verification and negate your authority to operate <strong>the</strong> product.<br />
This product was tested for FCC compliance under conditions that included <strong>the</strong> use of <strong>Apple</strong><br />
peripheral devices and <strong>Apple</strong> shielded cables and connectors between system components. It is<br />
important that you use <strong>Apple</strong> peripheral devices and shielded cables and connectors between<br />
system components to reduce <strong>the</strong> possibility of causing interference to radios, television sets,<br />
and o<strong>the</strong>r electronic devices. You can obtain <strong>Apple</strong> peripheral devices and <strong>the</strong> proper shielded<br />
cables and connectors through an <strong>Apple</strong>-authorized dealer. For non-<strong>Apple</strong> peripheral devices,<br />
contact <strong>the</strong> manufacturer or dealer for assistance.<br />
Industry Canada statement<br />
This Class A device meets all requirements of <strong>the</strong> Canadian Interference-Causing equipment<br />
regulations.<br />
Cet appareil numérique de la Class A respecte toutes les exigences du Règlement sur le matériel<br />
brouilleur du Canada.<br />
CISPR 22 statement<br />
IMPORTANT This is a Class A product. In a domestic environment this product may cause radio<br />
interference, in which case <strong>the</strong> user may be required to take adequate measures.<br />
VCCI Class 1 statement
K<br />
© 1997 <strong>Apple</strong> Computer, Inc. All rights reserved.<br />
<strong>Apple</strong> and <strong>the</strong> <strong>Apple</strong> logo are trademarks of <strong>Apple</strong> Computer, Inc.,<br />
registered in <strong>the</strong> U.S. and o<strong>the</strong>r countries. PowerPC is a trademark of<br />
International Business Machines Corporation, used under license <strong>the</strong>refrom.<br />
033-0048-A


