

Brother GL-100 - User's Guide for GL100
Brother GL-100 - User's Guide for GL100
Brother GL-100 - User's Guide for GL100

You also want an ePaper? Increase the reach of your titles
YUMPU automatically turns print PDFs into web optimized ePapers that Google loves.
GENERAL PRECAUTIONS<br />
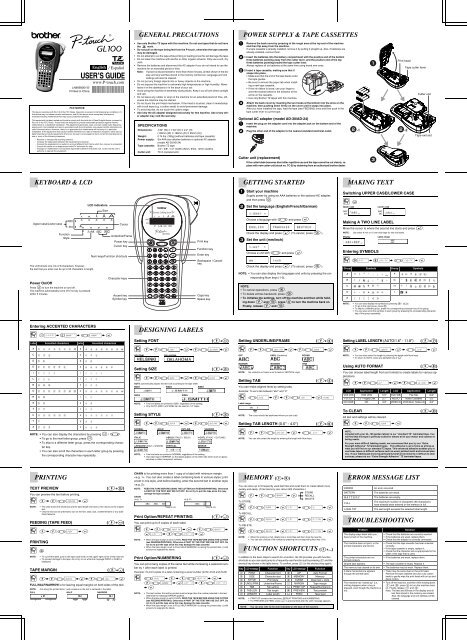
POWER SUPPLY & TAPE CASSETTES<br />
LN9959001A<br />
Printed in China<br />
FCC NOTICE<br />
English<br />
/ Español<br />
www.P-touch.com<br />
This device complies with Part 15 of the FCC Rules. Operation is subject to the following two conditions: (1)<br />
this device may not cause harmful interference, and (2) this device must accept any interference<br />
received,including interference that may cause undesired operation.<br />
This equipment has been tested and found to comply with the limits <strong>for</strong> a Class B digital device, pursuant to<br />
Part 15 of the FCC Rules. These limits are designed to provide reasonable protection against harmful<br />
interference in a residential installation. This equipment generates, uses, and can radiate radio frequency<br />
energy and, if not installed and used in accordance with the instructions, may cause harmful interference to<br />
radio communications. However, there is no guarantee that interference will not occur in a particular<br />
installation. If this equipment does cause harmful interference to radio or television reception, which can be<br />
determined by turning the equipment off and on, the user is encouraged to try to correct the interference by<br />
one or more of the following measures:<br />
- Reorient or relocate the receiving antenna.<br />
- Increase the separation between the equipment and receiver.<br />
- Connect the equipment to an outlet on a circuit different from that to which the receiver is connected.<br />
- Consult the dealer or an experienced radio/TV technician <strong>for</strong> help.<br />
- Changes or modifications not expressly approved by <strong>Brother</strong> Industries, Ltd. could void the user’s<br />
authority to operate the equipment.<br />
• Use only <strong>Brother</strong> TZ tapes with this machine. Do not use tapes that do not have<br />
the mark.<br />
• Do not pull on the tape being fed from the P-touch, otherwise the tape cassette<br />
may be damaged.<br />
• Do not attempt to cut the tape while printing or feeding since this will damage the tape.<br />
• Do not clean the machine with alcohol or other organic solvents. Only use a soft, dry<br />
cloth.<br />
• Remove the batteries and disconnect the AC adapter if you do not intend to use the<br />
machine <strong>for</strong> an extended period of time.<br />
Note: If power is disconnected <strong>for</strong> more than three minutes, all text shown in the display<br />
and any text files stored in the memory will be lost. Language and unit<br />
settings will also be cleared.<br />
• Do not put any <strong>for</strong>eign objects into or heavy objects on the machine.<br />
• Do not expose the machine to extremely high temperatures or high humidity. Never<br />
leave it on the dashboard or in the back of your car.<br />
• Avoid using the machine in extremely dusty places. Keep it out of both direct sunlight<br />
and rain.<br />
• Do not leave any rubber or vinyl on the machine <strong>for</strong> an extended period of time, otherwise<br />
the machine may be stained.<br />
• Do not touch the print head mechanism. If the head is touched, clean it immediately<br />
with a soft wipe (e.g. a cotton swab) to avoid permanent damage.<br />
• To avoid injuries, do not touch the cutter's edge.<br />
• Use only the AC adapter designed exclusively <strong>for</strong> this machine. Use of any other<br />
adapter may void the warranty.<br />
SPECIFICATIONS<br />
Dimensions:<br />
Weight:<br />
Power supply:<br />
Tape cassette:<br />
Cutter unit:<br />
4.32" (W) ✕ 7.84" (D) ✕ 2.2" (H)<br />
(108mm (W) ✕ 196mm (D) ✕ 55mm (H))<br />
0.74 lbs. (335g) (without batteries and tape cassette)<br />
Six AAA size alkaline batteries or optional AC adapter<br />
(model AD-30/AD-24)<br />
<strong>Brother</strong> TZ tape<br />
1/4" / 3/8" / 1/2" (width) (6mm, 9mm, 12mm (width))<br />
TC-5 (replacement)<br />
a<br />
Remove the back cover by pressing in the rough area at the top end of the machine<br />
and then flip away from the machine.<br />
If a tape cassette is already installed, remove it by pulling it straight up. Also, if batteries are<br />
already installed, remove them.<br />
b-1 Insert the batteries into the battery compartment with the positive end of the bottom<br />
three batteries pointing away from the cutter lever, and the positive end of the top<br />
three batteries pointing toward the tape cutter lever.<br />
Always replace all six batteries at the same time using brand new ones.<br />
b-2 Insert a tape cassette, making sure that it<br />
snaps into place.<br />
• Make sure that the end of the tape feeds under<br />
the tape guides.<br />
• Be sure to remove the paper tab when installing<br />
a new tape cassette.<br />
• If the ink ribbon is loose, use your finger to<br />
wind the toothed wheel in the direction of the<br />
arrow on the cassette.<br />
• Use only <strong>Brother</strong> TZ tapes with this machine.<br />
c<br />
Attach the back cover by inserting the two hooks at the bottom into the slots on the<br />
machine, then pushing down firmly on the cover until it snaps into place.<br />
After you have installed the tape, feed the tape (see FEEDING) once and then push in the<br />
tape cutter lever to cut the tape.<br />
Optional AC adapter (model AD-30/AD-24)<br />
a<br />
b<br />
Insert the plug on the adapter cord into the adapter jack on the bottom end of the<br />
machine.<br />
Plug the other end of the adapter to the nearest standard electrical outlet.<br />
Print head<br />
Tape cutter lever<br />
Cutter unit<br />
Tape exit slot<br />
Cutter unit (replacement)<br />
If the cutter blade becomes blunt after repetitive use and the tape cannot be cut cleanly, replace<br />
with new cutter unit (stock no. TC-5) by obtaining from an authorized brother dealer.<br />
KEYBOARD & LCD<br />
GETTING STARTED<br />
MAKING TEXT<br />
LCD indicators<br />
Size<br />
a Start your machine<br />
Supply power by using six AAA batteries or the optional AC adapter,<br />
and then press a.<br />
b Set the language (English/French/German)<br />
Switching UPPER CASE/LOWER CASE<br />
" j<br />
Upper case<br />
ABC<br />
abc<br />
Lower case<br />
ABC<br />
abc<br />
Upper case/Lower case<br />
Cursor<br />
Choose a language with b and press e.<br />
Making A TWO LINE LABEL<br />
Move the cursor to where the second line starts and press e.<br />
The LCD shows one row of 8 characters; however,<br />
the text that you enter can be up to 55 characters in length.<br />
Power On/Off<br />
Function<br />
Style<br />
Press a to turn the machine on and off.<br />
The machine automatically turns off if no key is pressed<br />
within 5 minutes.<br />
Underline/Frame<br />
Power key<br />
Cursor key<br />
Num keys/Function shortcuts<br />
Character keys<br />
Accent key<br />
Symbol key<br />
Print key<br />
Function key<br />
Enter key<br />
Backspace / Cancel<br />
key<br />
Caps key<br />
Space key<br />
Check the display and press e. (To cancel, press d.)<br />
c Set the unit (mm/inch)<br />
Choose a unit with b and press e.<br />
Check the display and press e. (To cancel, press d.)<br />
NOTE: • You can also display the languages and units by pressing the corresponding<br />
Num keys (1-3).<br />
NOTE:<br />
• To cancel operations, press d.<br />
• To delete entries backward, press d.<br />
• To initialize the settings, turn off the machine and then while holding<br />
down f and d, press a to turn the machine back on.<br />
Finally, release f and d.<br />
NOTE:<br />
Display<br />
Use either 9 mm or 12 mm wide tape <strong>for</strong> two line labels.<br />
Entering SYMBOLS<br />
Label image<br />
ABC<br />
DEF<br />
" h > B > b > e<br />
Group Symbols Group Symbols<br />
A<br />
B<br />
C<br />
D<br />
E<br />
NOTE: • You can also display the symbols by pressing h / b.<br />
• To go to the next group, press h.<br />
• To skip to a different group, press the corresponding character key of the group.<br />
• You can also scroll the symbols in each group by pressing the corresponding character<br />
key of the group repeatedly.<br />
F<br />
G<br />
H<br />
I<br />
Entering ACCENTED CHARACTERS<br />
" g > E > b > e<br />
Letter Accented characters Letter Accented characters<br />
DESIGNING LABELS<br />
Setting FONT<br />
(f+1)<br />
Setting UNDERLINE/FRAME<br />
(f+4)<br />
Setting LABEL LENGTH (AUTO/1.6" - 11.8")<br />
(f+7)<br />
A<br />
a<br />
" f > f/b > e > f/b > e<br />
" f > f/b > e > f/b > e<br />
" f > f/b > e > b > e<br />
C<br />
c<br />
D<br />
d<br />
E<br />
e<br />
I<br />
i<br />
L<br />
l<br />
N<br />
n<br />
O<br />
o<br />
R<br />
r<br />
S<br />
s<br />
T<br />
t<br />
U<br />
u<br />
Y<br />
y<br />
Z<br />
z<br />
NOTE: • You can also display the characters by pressing g / b.<br />
• To go to the next letter group, press g.<br />
• To skip to a different letter group, press the corresponding character<br />
key.<br />
• You can also scroll the characters in each letter group by pressing<br />
the corresponding character key repeatedly.<br />
HELSINKI<br />
Setting SIZE<br />
OKLAHOMA<br />
(f+2)<br />
" f > f/b > e > f/b > e<br />
AUTO automatically adjusts the text size according to the tape width.<br />
SIZE1 SIZE2 SIZE3<br />
SIZE4<br />
NOTE:<br />
SIZE5<br />
• Two line labels are printed in SIZE1 regardless of the setting.<br />
• Only AUTO, SIZE1 and SIZE2 can be used on 1/4” tapes.<br />
Setting STYLE<br />
(f+3)<br />
" f > f/b > e > f/b > e<br />
NORMAL BOLD OUTLINE SHADOW<br />
ITALIC I+BOLD (ITALIC + BOLD) I+OUTL (ITALIC + OUTLINE)<br />
I+SHADOW (ITALIC + SHADOW) VERTICAL MIRROR<br />
NOTE:<br />
• Two line texts are printed in NORMAL regardless of the setting.<br />
• Use clear tape in MIRROR, so the labels appear on the other side when stuck on glass,<br />
windows or other transparent surfaces.<br />
OFF UNDL (Underline) ROUND<br />
BANNER WOODEN VINE<br />
NOTE: No underline or frame is set to texts in VERTICAL style.<br />
Setting TAB<br />
(f+5)<br />
You can make aligned texts by setting tabs.<br />
Example: To set a tab between “abc” and “d”<br />
" b > f > f/b > e<br />
Label image<br />
abc d<br />
Tab<br />
NOTE: The cursor should be positioned where you set a tab.<br />
Setting TAB LENGTH (0.0" - 4.0") (f+6)<br />
" f > f/b > e > b > e<br />
NOTE: You can also select the length by entering the length with Num keys.<br />
NOTE:<br />
• You can also select the length by entering the length with Num keys.<br />
• To return to AUTO, press any alphabet key or i.<br />
Using AUTO FORMAT<br />
(f+8)<br />
You can choose label length from six <strong>for</strong>mats to create labels <strong>for</strong> various applications.<br />
" f > f/b > e > f/b > e<br />
LCD Application Length LCD Application Length<br />
VCR VHS VCR VHS 5.5" FILE TAB File Tab 2.8"<br />
FD 3.5" 3.5" Floppy Disk 2.7" AUDIO Audio Cassette 3.5"<br />
CD CASE CD 3.9" VIDEO 8 VCR 8mm (Video 8) 3.6"<br />
To CLEAR<br />
All text and settings will be cleared.<br />
" f > f/b > e<br />
(f+0)<br />
NOTE:<br />
Included with your <strong>GL</strong>-<strong>100</strong> garden labeler is our “standard TZ” laminated tape. You<br />
will find that this tape is perfectly suited <strong>for</strong> almost all of your indoor and outdoor labeling<br />
needs.<br />
For your more difficult labeling needs, we recommend that you try our “Extra<br />
Strength Adhesive” TZ laminated tapes. This adhesive is up to twice as strong as<br />
what you will find on our standard TZ tapes. This enhanced adhesive enables you to<br />
use these tapes on difficult surfaces such as wood, painted metal and textured plastics.<br />
If your labeling job involves particularly harsh environments or difficult to stick<br />
surfaces, please try our “Extra Strength Adhesive” TZ laminated tapes.<br />
PRINTING<br />
TEXT PREVIEW<br />
You can preview the text be<strong>for</strong>e printing.<br />
" f > f/b > e<br />
NOTE:<br />
(f+c)<br />
• The LCD shows the whole text and the label length (mm/inch), then returns to the original<br />
text.<br />
• Only the text can be previewed, but not the font, style, size, underline/frame or any additional<br />
features.<br />
FEEDING (TAPE FEED)<br />
(f+i)<br />
CHAIN is <strong>for</strong> printing more than 1 copy of a label with minimum margin<br />
. You can also create a label containing texts in various styles; print<br />
a text in one style, and be<strong>for</strong>e feeding, enter the second text in another style<br />
.<br />
NOTE: FEED THE TAPE BEFORE USING THE CUTTER (see FEEDING/PRINTING). Otherwise<br />
A PART OF THE TEXT MAY BE CUT OFF. Do not try to pull the tape since this may<br />
damage the tape cassette.<br />
CHAIN<br />
<br />
ABC<br />
ABC<br />
ABC<br />
(feed & cut)<br />
Print Option/REPEAT PRINTING<br />
You can print up to 9 copies of each label.<br />
ABC<br />
ABC<br />
DEF<br />
(feed & cut)<br />
(f+,)<br />
MEMORY (F+9)<br />
You can store up to 9 frequently used text files and recall them to create labels more<br />
quickly and easily. (Total memory size: about 300 characters.)<br />
" f > f/b<br />
STORE<br />
> e RECALL<br />
DELETE<br />
To STORE;<br />
" f/b > e > b > e<br />
To RECALL;<br />
" f/b > e > b > e<br />
To DELETE;<br />
ERROR MESSAGE LIST<br />
ERROR<br />
BATTERY<br />
B A T T E R Y<br />
FULL<br />
LONG TXT<br />
An error occurred.<br />
The batteries are weak.<br />
The batteries are empty.<br />
The maximum number of characters (55 characters)<br />
have already been entered or the memory is full.<br />
The text length exceeds the selected label length.<br />
TROUBLESHOOTING<br />
" f > f/b > e<br />
PRINTING<br />
" c<br />
NOTE:<br />
• To cut off the label, push in the tape cutter lever on the upper-right corner of the machine.<br />
• To prevent damage to the tape, do not try to cut while the message PRINT or FEED is<br />
displayed.<br />
TAPE MARGIN<br />
(f+.)<br />
" f > f/b > e > f/b > e<br />
FULL/HALF/NARROW is <strong>for</strong> leaving equal margins on both sides of the text.<br />
NOTE: Cut along the printed dots (:) with scissors so the text is centered in the label.<br />
FULL HALF NARROW<br />
1" 1" 1/2" 1/2" 1/6" 1/6"<br />
" f > f/b > e > f/b ><br />
e > f/b > e<br />
NOTE:<br />
• When the tape margin is set to CHAIN, FEED THE TAPE BEFORE USING THE CUTTER<br />
(see FEEDING/PRINTING). Otherwise A PART OF THE TEXT MAY BE CUT OFF. Do<br />
not try to pull the tape since this may damage the tape cassette.<br />
• When the tape margin is set to FULL/HALF/NARROW, cut along the printed dots (:) with<br />
scissors to separate the labels.<br />
Print Option/NUMBERING<br />
(f+,)<br />
You can print many copies of the same text while increasing a selected number<br />
by 1 after each label is printed.<br />
Example: To print copies of a label containing a serial number (0123, 0124 and 0125)<br />
" b > f > f/b > e ><br />
f/b > e > f/b<br />
NOTE:<br />
> e<br />
• The last number that will be printed must be larger than the number selected in the text,<br />
otherwise the message ERROR appears.<br />
• When the tape margin is set to CHAIN, FEED THE TAPE BEFORE USING THE CUTTER<br />
(see FEEDING/PRINTING). Otherwise A PART OF THE TEXT MAY BE CUT OFF. Do<br />
not try to pull the tape since this may damage the tape cassette.<br />
• When the tape margin is set to FULL/HALF/NARROW, cut along the printed dots (:) with<br />
scissors to separate the labels.<br />
" f/b > e > b > e<br />
NOTE:<br />
• When the memory is full, delete one or more files and then store the new file.<br />
• You can also choose a file number by pressing the corresponding Num key (1-9).<br />
FUNCTION SHORTCUTS (F+...)<br />
In addition to the basic steps to search <strong>for</strong> a function, <strong>GL</strong><strong>100</strong> provides you with function<br />
shortcuts so you can easily jump to a frequently used function just by pressing f and the<br />
shortcut key shown in the table below. To confirm, press e (or the shortcut key again).<br />
Key LCD message Function Key LCD message Function<br />
1 FONT Character font 8 A/F Auto Format<br />
2 SIZE Character size 9 MEMORY Memory<br />
3 STYLE Print style 0 CLEAR Clear text + style<br />
4 UNDL/FRM Underline/Frame . MARGIN Tape margin<br />
5 TAB Tab setting , PRINT OP Repeat/Numbering<br />
6 TAB LEN Tab length c PREVIEW Text preview<br />
7 LENGTH Label length i FEED Tape feed<br />
NOTE:<br />
NOTE:<br />
• PRINT OP contains two functions, REPEAT PRINTING and NUMBERING.<br />
• For PREVIEW and FEED, press e to preview/feed after the LCD message appears.<br />
You can also refer to the chart indicated on the back of the machine.<br />
Problem<br />
The display stays blank after you<br />
have turned on the machine.<br />
The machine does not print, or the<br />
printed characters are blurred.<br />
The printed characters are not<br />
<strong>for</strong>med properly.<br />
Striped tape appears.<br />
The memory has cleared on its own.<br />
A blank horizontal line appears<br />
through the printed label.<br />
The machine has “locked up” (i.e.,<br />
nothing happens when a key is<br />
pressed, even though the machine is<br />
on).<br />
Solution<br />
• Check that the batteries are correctly inserted.<br />
• If the batteries are weak, replace them.<br />
• Check that the adapter is correctly connected.<br />
• Check that the tape cassette has been inserted<br />
correctly.<br />
• If the tape cassette is empty, replace it.<br />
• Check that the character size is appropriate <strong>for</strong> the<br />
width of the tape that is used.<br />
• If the batteries are weak, replace them.<br />
• The tape cassette is empty. Replace it.<br />
• The batteries may be weak. Replace them.<br />
• There may be some dust on the print head.<br />
Remove the tape cassette and use a dry cotton<br />
swab to gently wipe the print head with an up-anddown<br />
motion.<br />
• Turn off the machine, and then while holding down<br />
f and d, press a to turn the machine back<br />
on. Finally, release f and d.<br />
Note: The text and <strong>for</strong>mats in the display and all<br />
text files stored in the memory are erased.<br />
Also, the language and unit settings will be<br />
cleared.
PRECAUCIONES GENERALES<br />
FUENTE DE ALIMENTACIÓN Y CARTUCHOS DE CINTA<br />
AVISO DE LA FCC<br />
Español<br />
/ English<br />
www.P-touch.com<br />
Impreso en China<br />
●Antes de usar su equipo por primera vez, lea cuidadosamente<br />
esta guía de usuario.<br />
●Guarde esta guía de usuario para futuras referencias.<br />
Este dispositivo cumple la Parte 15 de las Normas FCC. El funcionamiento está sujeto a las dos condiciones<br />
siguientes: (1) este dispositivo no puede causar interferencias perjudiciales y (2) este dispositivo debe aceptar<br />
cualquier interferencia que reciba, incluso interferencias que puedan dar lugar a un funcionamiento no deseado.<br />
Este equipo ha sido probado y cumple con los límites de un aparato digital de la Clase B, siguiendo el<br />
apartado 15 de las normas de la FCC. Estos límites están pensados para proporcionar una protección<br />
razonable contra interferencias nocivas dentro de una instalación residencial. Este equipo podría interferir<br />
de <strong>for</strong>ma nociva con comunicaciones por radio si no se instala y utiliza siguiendo las instrucciones. No<br />
obstante, no existe ninguna garantía de que no vayan a suceder interferencias en una instalación concreta.<br />
Si este equipo causara interferencias nocivas con la recepción de radio o televisión, lo cual puede<br />
determinarse poniendo el equipo en ON u OFF, se recomienda que el usuario intente corregir dichas<br />
interferencias mediante una de las siguientes medidas:<br />
- Verifique la colocación del adaptador.<br />
- Aumente la separación entre el equipo y el receptor.<br />
- Conecte el equipo en una toma de un circuito diferente de la que esté conectada el adaptador.<br />
- Consulte a su distribuidor o a un técnico experimentado de radio/televisión.<br />
- Los cambios o modificaciones no expresamente aprobados por <strong>Brother</strong> Industries, Ltd. pueden anular<br />
el derecho de utilización del equipo.<br />
• Utilice solamente cintas TZ de <strong>Brother</strong> con esta máquina. No utilice cintas que<br />
no tengan la marca .<br />
• No tire de la cinta de la P-touch porque pueden dañarse los cartuchos.<br />
• No intente cortar la cinta mientras imprime o avanza ya que si lo hace dañará la cinta.<br />
• No limpie la máquina con alcohol o cualquier otro disolvente orgánico. Utilice<br />
solamente un paño suave y seco.<br />
• Quite las pilas y desconecte el adaptador de CA (ca) si no tiene intención de utilizar<br />
la máquina durante un período largo de tiempo.<br />
Nota: Si desconecta la alimentación durante más de tres minutos, todo el texto<br />
mostrado en el visualizador y los archivos de texto almacenados en la<br />
memoria se perderán. También se borrarán los ajustes de idioma y de<br />
unidad.<br />
• No ponga objetos extraños o pesados sobre o en el interior de la máquina.<br />
• No exponga la máquina a temperaturas muy altas o a humedad extrema. Nunca deje<br />
la máquina sobre el tablero de instrumentos o en la parte de atrás de su coche.<br />
• Evite utilizar la máquina en lugares muy polvorientos. Manténgala alejada de la luz<br />
directa del sol y de la lluvia.<br />
• No deje objetos de goma o de plástico sobre la máquina durante mucho tiempo<br />
porque podrían causar manchas en la máquina.<br />
• No toque el mecanismo la cabeza de impresión. Si toca el cabezal, límpielo<br />
inmediatamente con un paño suave (por ejemplo, algodón) para evitar dañarlo<br />
permanentemente.<br />
• Para evitar accidentes, no toque el borde de la cuchilla.<br />
• Use sólo el adaptador de CA (ca) diseñado exclusivamente para esta máquina.<br />
Si usa otro adaptador, se anulará la garantía.<br />
ESPECIFICACIONES<br />
Dimensiones:<br />
Peso:<br />
Fuente de alimentación:<br />
Cartucho de cinta:<br />
Unidad del cortador:<br />
4.32" (ancho) ✕ 7.84" (grueso) ✕ 2.2" (alto)<br />
(108 mm (ancho) ✕ 196 mm (grueso) ✕ 55 mm (alto))<br />
0.74 lbs. (335 g) (sin pilas ni cartucho de cinta)<br />
Seis pilas alcalinas tamaño AAA o adaptador de CA (ca)<br />
(modelo AD-30/AD-24) opcional<br />
Cinta TZ de <strong>Brother</strong><br />
1/4", 3/8", 1/2" (ancho) (6 mm, 9 mm, 12 mm (ancho))<br />
TC-5 (reemplazamiento)<br />
a<br />
Quite la cubierta posterior presionando la parte áspera del extremo superior de la<br />
máquina.<br />
Si el cartucho de cinta ya está instalado, extráigalo tirando de él hacia arriba. Si las pilas<br />
también están instaladas, quítelas.<br />
b-1 Inserte las pilas en el compartimiento de las pilas con el extremo positivo de las tres pilas<br />
de abajo apuntando en dirección opuesta a la palanca del cortador de la cinta, y el extremo<br />
positivo de las tres pilas de arriba apuntando hacia la palanca del cortador de la cinta.<br />
Reemplace siempre las seis pilas al mismo tiempo por otras nuevas.<br />
b-2 Inserte un cartucho de cinta y asegúrese de<br />
que encaje en su lugar.<br />
• Asegúrese de que el extremo de la cinta pasa<br />
por debajo de las guías de la cinta.<br />
• Asegúrese de quitar el retén al colocar un<br />
cartucho de cinta nuevo.<br />
• Si la cinta entintadora está floja, utilice el dedo<br />
para enrollar la rueda dentada en el sentido de<br />
la flecha del cartucho.<br />
• Utilice solamente cintas TZ de <strong>Brother</strong> con<br />
esta máquina.<br />
c<br />
Coloque la cubierta posterior insertando los dos ganchos de la parte inferior en las<br />
ranuras de la máquina y, a continuación, mantenga presionada la cubierta con fuerza<br />
hasta que encaje en su lugar.<br />
Después de haber colocado la cinta, aváncela una vez (consulte AVANCE) y, a continuación,<br />
presione la palanca del cortador de la cinta para cortarla.<br />
Adaptador de CA (ca) (modelo AD-30/AD-24) opcional<br />
a<br />
b<br />
Inserte la clavija del cable del adaptador en la toma para el mismo del extremo<br />
inferior de la máquina.<br />
Inserte el enchufe en la toma de corriente estándar más próxima.<br />
Unidad del cortador (reemplazamiento)<br />
Si la cuchilla del cortador está desafilada por uso continuo y no se puede cortar bien<br />
la cinta, reemplace el cortador por otra unidad nueva (referencia TC-5) en el distribuidor<br />
de <strong>Brother</strong> autorizado.<br />
Cabeza de impresión<br />
Palanca del cortador<br />
de la cinta<br />
Unidad del cortador<br />
Ranura de salida<br />
de la cinta<br />
TECLADO Y LCD<br />
COMIENZO<br />
CREACIÓN DE TEXTO<br />
Indicadores del LCD<br />
Tamaño<br />
a Encienda la máquina<br />
Suministre energía con seis pilas alcalinas AAA o el adaptador de CA<br />
(ca) opcional y, a continuación, presione a.<br />
b Ajuste el idioma (Inglés/Francés/Alemán)<br />
Alternar entre MAYÚSCULAS Y MINÚSCULAS<br />
" j<br />
Mayúsculas<br />
Minúsculas<br />
Mayúsculas/Minúsculas<br />
Cursor<br />
Seleccione un idioma con b y presione e.<br />
ABC<br />
abc<br />
ABC<br />
abc<br />
Creación de DOS LÍNEAS DE TEXTO<br />
Función<br />
Estilo<br />
Subrayado/<br />
Enmarcado<br />
Power<br />
Cursor<br />
Print<br />
Function<br />
Compruebe el visualizador y presione e. (Para cancelar, presione<br />
d.)<br />
c Ajuste la unidad (mm/pulgadas)<br />
Mueva el cursor hacia donde comienza la segunda línea y presione e.<br />
NOTA:<br />
Display<br />
Utilice cinta de 9 mm o 12 mm de ancho para dos líneas de texto.<br />
Label image<br />
ABC<br />
DEF<br />
Números/accesos rápidos a funciones<br />
El visualizador de cristal líquido (LCD) muestra una linea de 8 caracteres; sin embargo,<br />
el texto que se introduzca puede tener una longitud de hasta 55 caracteres.<br />
Enter<br />
Un espacio atrás<br />
Seleccione una unidad con b y presione e.<br />
Compruebe el visualizador y presione e. (Para cancelar, presione<br />
d.)<br />
Introducción de SÍMBOLOS<br />
" h > B > b > e<br />
Grupo Símbolos Grupo Símbolos<br />
Encendido y apagado<br />
Presione a para encender y apagar la máquina.<br />
La máquina se apagará automáticamente después de 5 minutos.<br />
Caracteres<br />
Acentos<br />
Símbolos<br />
Mayúsculas<br />
Espacio<br />
NOTA: • También podrá visualizar los idiomas y unidades presionando las<br />
teclas de números correspondientes (1-3).<br />
NOTA:<br />
• Para cancelar operaciones, presione d.<br />
• Para eliminar entradas hacia atrás, presione d.<br />
• Para inicializar los ajustes, apague la máquina y, a continuación,<br />
manteniendo presionadas f y d, presione a para volver<br />
a encenderla. Finalmente, suelte f y d.<br />
A<br />
B<br />
C<br />
D<br />
E<br />
NOTA: • También podrá visualizar los símbolos si presiona h / b.<br />
• Para ir al grupo siguiente, presione h.<br />
• Para pasar a un grupo diferente, presione la tecla de letra del grupo correspondiente.<br />
• También podrá desplazarse por los símbolos de cada grupo presionando repetidamente<br />
la tecla de letra del grupo correspondiente.<br />
F<br />
G<br />
H<br />
I<br />
Introducción de CARACTERES ACENTUADOS<br />
" g > E > b > e<br />
Letra Caracteres acentuados Letra Caracteres acentuados<br />
A<br />
a<br />
DISEÑO DE ETIQUETAS<br />
Ajuste del TIPO DE LETRA<br />
(f+1)<br />
" f > f/b > e > f/b > e<br />
Ajuste de SUBRAYADO/ENMARCADO<br />
(f+4)<br />
" f > f/b > e > f/b > e<br />
Ajuste de LONGITUD DE ETIQUETA<br />
(AUTO/1.6" – 11.8")<br />
(f+7)<br />
C<br />
c<br />
HELSINKI<br />
OKLAHOMA<br />
OFF UNDL (Subrayado) ROUND<br />
" f > f/b > e > b > e<br />
D<br />
E<br />
I<br />
L<br />
N<br />
O<br />
d<br />
e<br />
i<br />
l<br />
n<br />
o<br />
Ajuste del TAMAÑO<br />
(f+2)<br />
" f > f/b > e > f/b > e<br />
AUTO ajusta automáticamente el tamaño del texto según la anchura de la cinta.<br />
SIZE1 SIZE2 SIZE3<br />
BANNER WOODEN VINE<br />
NOTA:<br />
Para textos de estilo VERTICAL no se ajusta subrayado ni enmarcado.<br />
Ajuste de TABULADOR<br />
También podrá crear textos alineados ajustando tabuladores.<br />
Ejemplo: Para ajustar un tabulador entre “abc” y “d”<br />
(f+5)<br />
NOTA:<br />
• También podrá seleccionar la longitud con las teclas de números<br />
• Para volver a AUTO, presione cualquier tecla alfabética o i.<br />
Uso de FORMATO AUTOMÁTICO<br />
(f+8)<br />
También podrá seleccionar una longitud de etiqueta entre seis <strong>for</strong>matos<br />
posibles para crear etiquetas para diversas aplicaciones.<br />
" f > f/b > e > f/b > e<br />
R<br />
S<br />
T<br />
U<br />
r<br />
s<br />
t<br />
u<br />
SIZE4<br />
NOTA:<br />
SIZE5<br />
• Se imprimen dos líneas de texto en SIZE1, independientemente del ajuste.<br />
• Sólo AUTO, SIZE1 y SIZE2 se pueden utilizar con cintas de 1/4”.<br />
Ajuste del ESTILO<br />
(f+3)<br />
" b > f > f/b > e<br />
Imagen de la etiqueta<br />
NOTA:<br />
abc<br />
d<br />
Tabulador<br />
El cursor deberá colocarse donde ajuste el tabulador.<br />
LCD Aplicación Longitud LCD Aplicación Longitud<br />
VCR VHS VCR VHS 5.5" FILE TAB Tabulador de archivo 2.8"<br />
FD 3.5" Disquete de 3,5" 2.7" AUDIO Casete de audio 3.5"<br />
CD CASE CD 3.9" VIDEO 8 VCR 8 mm (Video 8) 3.6"<br />
Para BORRAR<br />
(f+0)<br />
Y<br />
Z<br />
y<br />
z<br />
" f > f/b > e > f/b > e<br />
NORMAL BOLD OUTLINE SHADOW<br />
Ajuste de LONGITUD DE TABULADOR<br />
(0.0" – 4.0") (f+6)<br />
Se borrarán todos los ajustes y el texto.<br />
" f > f/b > e<br />
NOTA: • También podrá visualizar los caracteres si presiona g / b.<br />
• Para ir al grupo de letras siguiente, presione g.<br />
• Para pasar a un grupo de letras diferente, presione la tecla de letra<br />
correspondiente.<br />
• También podrá desplazarse por los caracteres de cada grupo de<br />
letras presionando repetidamente la tecla de letra correspondiente.<br />
ITALIC I+BOLD (ITALIC + BOLD) I+OUTL (ITALIC + OUTLINE)<br />
I+SHADOW (ITALIC + SHADOW) VERTICAL MIRROR<br />
NOTA:<br />
• Se imprimen dos líneas de texto en NORMAL, independientemente del ajuste.<br />
• Utilice cinta transparente en MIRROR para que las etiquetas aparezcan por el otro lado<br />
cuando se peguen en cristal, ventanas y otras superficies transparentes.<br />
" f > f/b > e > b > e<br />
NOTA:<br />
También podrá seleccionar la longitud con las teclas de números<br />
NOTA:<br />
Su rotulador para jardín <strong>GL</strong>-<strong>100</strong> incluye nuestra cinta laminada “TZ estándar”. Usted<br />
encontrará que esta cinta es ideal para utilizarse para casi todas sus necesidades de rotulado,<br />
tanto en interiores como en exteriores.<br />
Para necesidades difíciles, le recomendamos probar nuestra cinta laminada “TZ Extra fuerte”.<br />
Este adhesivo tiene el doble de fuerza que el de las cintas “TZ estándar”. Este adhesivo<br />
mejorado facilita la colocación de la cinta en superficies difíciles como madera, metal pintado<br />
y plásticos texturizados. Si su trabajo de etiquetado es en un ambiente especialmente difícil<br />
o en superficies que se dificulte al adhesión, pruebe nuestras cintas adhesivas “TZ Extra<br />
Fuerte”.<br />
IMPRESIÓN<br />
VISTA PRELIMINAR DEL TEXTO<br />
Podrá realizar una vista preliminar del texto antes de imprimirlo.<br />
" f > f/b > e<br />
NOTA:<br />
(f+c)<br />
• En el visualizador LCD se muestra todo el texto y la longitud de la etiqueta (mm/pulgada)<br />
y después se vuelve al texto original.<br />
• Sólo se podrá tener una vista preliminar del texto, no del tipo de letra, tamaño, subrayado/<br />
enmarcado ni cualquier otra característica.<br />
AVANCE (AVANCE DE CINTA)<br />
" f > f/b > e<br />
IMPRESIÓN<br />
" c<br />
NOTA:<br />
(f+i)<br />
• Para cortar la etiqueta, presione la palanca del cortador de la cinta de la esquina superior<br />
derecha de la máquina.<br />
• Para evitar dañar la cinta, no trate de cortarla mientras esté visualizándose el mensaje<br />
“PRINT” o “FEED”.<br />
MARGEN DE LA CINTA<br />
(f+.)<br />
" f > f/b > e > f/b > e<br />
FULL/HALF/NARROW permite dejar márgenes iguales en ambos lados del<br />
texto.<br />
NOTA: Utilice unas tijeras para cortar a lo largo de los puntos impresos (:) y centrar el texto dentro<br />
de la etiqueta.<br />
FULL HALF NARROW<br />
1" 1" 1/2" 1/2" 1/6" 1/6"<br />
CHAIN permite imprimir más de una copia de la etiqueta con un margen mínimo<br />
. También podrá crear una etiqueta con texto que incluya varios<br />
estilos, imprimir texto con un solo estilo y, antes de avanzar, introducir el<br />
segundo texto en otro estilo .<br />
NOTA: AVANCE LA CINTA ANTES DE UTILIZAR EL CORTADOR (consulte AVANCE E<br />
IMPRESIÓN). De lo contrario, PODRÍA CORTARSE UNA PARTE DE TEXTO. No tire de<br />
la cinta, puesto que puede dañarse el cartucho.<br />
CHAIN<br />
<br />
Opción de impresión/REPETIR IMPRESIÓN(f+,)<br />
Esta opción permite imprimir hasta nueve copias de la misma etiqueta.<br />
" f > f/b > e > f/b ><br />
e > f/b > e<br />
NOTA:<br />
• Cuando el margen de cinta esté en CHAIN, AVANCE LA CINTA ANTES DE UTILIZAR<br />
EL CORTADOR (consulte AVANCE E IMPRESIÓN). De lo contrario, PODRÍA<br />
CORTARSE UNA PARTE DE TEXTO. No tire de la cinta, puesto que puede dañarse<br />
el cartucho.<br />
• Cuando el margen de cinta está en FULL/HALF/NARROW, utilice unas tijeras para cortar<br />
a lo largo de los puntos impresos (:) y separar las etiquetas.<br />
Opción de impresión/NUMERACIÓN<br />
(f+,)<br />
Esta opción permite imprimir muchas copias del mismo texto aumentando un<br />
número seleccionado en 1 después de la impresión de cada etiqueta.<br />
Ejemplo: Para imprimir copias de etiquetas que contengan un número de serie (0123,<br />
0124 y 0125)<br />
" b > f > f/b > e ><br />
f/b > e > f/b<br />
> e<br />
NOTA:<br />
ABC<br />
ABC<br />
ABC<br />
(avanzar (avanzar y cortar) y cortar)<br />
ABC<br />
DEF<br />
(avanzar y cortar)<br />
• El último número que se imprimirá deberá ser superior al seleccionado en el texto, ya que<br />
de lo contrario aparecería el mensaje “ERROR”.<br />
• Cuando el margen de cinta esté en CHAIN, AVANCE LA CINTA ANTES DE UTILIZAR<br />
EL CORTADOR (consulte AVANCE E IMPRESIÓN). De lo contrario, PODRÍA<br />
CORTARSE UNA PARTE DE TEXTO. No tire de la cinta, puesto que puede dañarse<br />
el cartucho.<br />
• Cuando el margen de cinta está en FULL/HALF/NARROW, utilice unas tijeras para cortar<br />
a lo largo de los puntos impresos (:) y separar las etiquetas.<br />
ABC<br />
NOTA:<br />
MEMORIA (F+9)<br />
Es posible almacenar hasta 9 archivos de texto utilizados con frecuencia e invocarlos<br />
para crear etiquetas con mayor rapidez y facilidad.<br />
" f > f/b<br />
ALMACENAR<br />
> e INVOCAR<br />
Para ALMACENAR;<br />
" f/b > e<br />
BORRAR<br />
> b > e<br />
Para INVOCAR;<br />
" f/b > e > b > e<br />
Para BORRAR;<br />
" f/b > e > b > e<br />
• Cuando la memoria esté llena, borre uno o varios archivos y, a continuación, almacene el nuevo.<br />
• También podrá seleccionar un número de archivo al presionar la tecla de número<br />
correspondiente (1-9).<br />
TECLAS DE ACCESO RÁPIDO<br />
A FUNCIONES (F+...)<br />
Además de los pasos básicos para buscar una función, la <strong>GL</strong><strong>100</strong> incluye teclas de acceso<br />
rápido a funciones que permiten pasar fácilmente a una función utilizada con frecuencia sólo<br />
con presionar f y la tecla de acceso rápido mostrada en la tabla que se presenta a<br />
continuación. Para confirmar, presione e (o de nuevo la tecla de acceso rápido).<br />
Tecla Mensaje en LCD Función Tecla Mensaje en LCD Función<br />
1 FONT Tipo de letra 8 A/F Formato automático<br />
2 SIZE Tamaño de caracteres 9 MEMORY Memoria<br />
3 STYLE Estilo de impresión 0 CLEAR Borrar texto + estilo<br />
4 UNDL/FRM Subrayado/Enmarcado . MARGIN Margen de cinta<br />
5 TAB Ajuste de tabulador , PRINT OP Repetir/Numeración<br />
6 TAB LEN Longitud de tabulador c PREVIEW Vista preliminar del texto<br />
7 LENGTH Longitud de etiqueta i FEED Avance de cinta<br />
NOTA:<br />
NOTA:<br />
• PRINT OP tiene dos funciones: REPETIR IMPRESIÓN Y NUMERACIÓN.<br />
• Para PREVIEW y FEED, presione e para vista preliminar y avance de cinta después<br />
de que aparezca el mensaje en el LCD.<br />
También puede consultar el diagrama localizado en la parte posterior de la máquina.<br />
LISTA DE MENSAJES DE ERROR<br />
ERROR<br />
BATTERY<br />
B A T T E R Y<br />
FULL<br />
LONG TXT<br />
Ha ocurrido un error.<br />
Las pilas están débiles.<br />
Las pilas se han agotado.<br />
Ya se ha introducido el número máximo de caracteres<br />
(55 caracteres) o la memoria está llena.<br />
La longitud de texto supera la longitud de etiqueta seleccionada.<br />
SOLUCIONES A PEQUEÑOS<br />
PROBLEMAS<br />
Problema<br />
La pantalla permanece en blanco<br />
después de encender la máquina.<br />
La máquina no imprime o los caracteres<br />
están borrosos.<br />
Los caracteres impresos no están<br />
<strong>for</strong>mados correctamente.<br />
Aparece una cinta a rayas.<br />
La memoria se ha borrado por sí sola.<br />
Aparece una línea en blanco horizontal a<br />
través de la etiqueta.<br />
La máquina se ha bloqueado (es decir,<br />
no sucede nada al presionar una tecla,<br />
incluso aunque la máquina esté<br />
encendida).<br />
Solución<br />
• Compruebe si las pilas están correctamente insertadas.<br />
• Si las pilas están débiles, reemplácelas.<br />
• Compruebe si el adaptador de CA (ca) está<br />
correctamente conectado.<br />
• Compruebe si el cartucho de cinta está correctamente<br />
insertado.<br />
• Si el cartucho de cinta está vacío, reemplácelo.<br />
• Compruebe si el tamaño de caracteres es el<br />
adecuado al ancho de la cinta que esté utilizando.<br />
• Si las pilas están débiles, reemplácelas.<br />
• El cartucho de cinta está vacío. Reemplácelo.<br />
• Las pilas pueden estar débiles. Reemplácelas.<br />
• Es posible que haya polvo en la cabeza de impresión.<br />
Extraiga el cartucho de cinta y utilice un palillo de<br />
cabeza de algodón para frotar suavemente la cabeza<br />
de impresión con movimiento vertical.<br />
• Apague la máquina y después, manteniendo<br />
presionadas f y d, presione a para volver<br />
encenderla. Finalmente, suelte f y d.<br />
Nota: Se borrarán el texto y los <strong>for</strong>matos del<br />
visualizador y todos los archivos de texto<br />
almacenados en la memoria.También se<br />
borrarán los ajustes de idioma y de unidad.


