

Brother MFC-8670DN - Quick Setup Guide
Brother MFC-8670DN - Quick Setup Guide
Brother MFC-8670DN - Quick Setup Guide

Create successful ePaper yourself
Turn your PDF publications into a flip-book with our unique Google optimized e-Paper software.
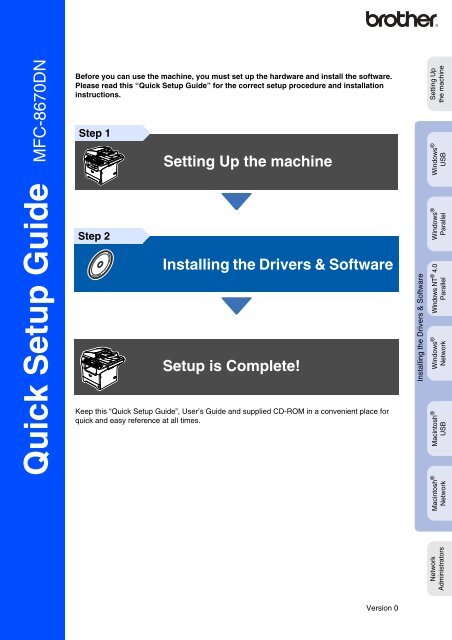
<strong>MFC</strong>-<strong>8670DN</strong><br />
Before you can use the machine, you must set up the hardware and install the software.<br />
Please read this “<strong>Quick</strong> <strong>Setup</strong> <strong>Guide</strong>” for the correct setup procedure and installation<br />
instructions.<br />
Step 1<br />
Setting Up the machine<br />
Setting Up<br />
the machine<br />
Windows ®<br />
USB<br />
<strong>Quick</strong> <strong>Setup</strong> <strong>Guide</strong><br />
Step 2<br />
Installing the Drivers & Software<br />
<strong>Setup</strong> is Complete!<br />
Keep this “<strong>Quick</strong> <strong>Setup</strong> <strong>Guide</strong>”, User’s <strong>Guide</strong> and supplied CD-ROM in a convenient place for<br />
quick and easy reference at all times.<br />
Installing the Drivers & Software<br />
Windows ®<br />
Parallel<br />
Windows NT ® 4.0<br />
Parallel<br />
Windows ®<br />
Network<br />
Macintosh ®<br />
USB<br />
Macintosh ®<br />
Network<br />
Network<br />
Administrators<br />
Version 0
Warning Caution Improper <strong>Setup</strong> Note User’s <strong>Guide</strong><br />
Warnings tell you<br />
what to do to prevent<br />
possible personal<br />
injury.<br />
Cautions specify<br />
procedures you<br />
must follow or avoid<br />
to prevent possible<br />
damage to the<br />
machine or other<br />
objects.<br />
Improper <strong>Setup</strong><br />
icons alert you to<br />
devices and<br />
operations that are<br />
not compatible with<br />
the machine.<br />
Notes tell you how<br />
you should respond<br />
to a situation that<br />
may arise or give<br />
tips about how the<br />
current operation<br />
works with other<br />
features.<br />
Indicates reference<br />
to the User’s <strong>Guide</strong>.
■ Getting Started<br />
Carton Components<br />
1<br />
2<br />
3<br />
4<br />
5<br />
1. Automatic Document Feeder (ADF)<br />
2. Control Panel<br />
3. Face-down Output Tray<br />
Support Flap (Support Flap)<br />
4. Front Cover<br />
8<br />
7<br />
5. Paper Tray<br />
6. Power Switch<br />
7. Document Cover<br />
8. ADF Document Output Support<br />
Flap<br />
6<br />
<strong>Quick</strong> <strong>Setup</strong> <strong>Guide</strong><br />
CD-ROMs<br />
One CD-ROM for Windows ®<br />
and Macintosh ®<br />
One CD-ROM for<br />
Windows Vista ®<br />
User’s <strong>Guide</strong><br />
Drum Unit Assembly<br />
(including Toner Cartridge)<br />
AC Power Cord<br />
Telephone Line Cord<br />
USB Cable<br />
Product Registration and<br />
Test Sheet<br />
(USA only)<br />
Accessory Order Form<br />
Carton components may differ from one country to another.<br />
Save all packing materials and the carton in case for any reason you must ship your machine.<br />
The USB interface cable is a standard accessory. Please purchase the appropriate interface cable if you<br />
intend to use the Parallel or Network interface.<br />
Do NOT connect the interface cable at this time. Connecting the interface cable is done during the<br />
software installation process.<br />
■ USB interface cable<br />
Please make sure you use a USB 2.0 interface cable that is no longer than 6 feet (2.0 meters).<br />
When you use a USB cable, make sure you connect it to the USB port of your computer and not to a<br />
USB port on a keyboard or non-powered USB hub.<br />
■ Parallel interface cable<br />
Please make sure you use a Parallel interface cable that is no longer than 6 feet (2.0 meters).<br />
Use a shielded interface cable that is IEEE 1284-compliant.<br />
■ Network cable<br />
Use a straight-through Category 5 (or greater) twisted-pair cable for 10BASE-T or 100Base-TX Fast<br />
Ethernet Network.<br />
1
Control Panel<br />
<strong>MFC</strong>-<strong>8670DN</strong><br />
1 2 3 4 5 6<br />
11<br />
10<br />
9 8<br />
7<br />
1 One Touch keys 2 Status LED 3 LCD (Liquid Crystal Display)<br />
4 Menu keys 5 Dial Pad 6 Stop/Exit key<br />
7 Start key 8 Copy keys 9 Mode keys<br />
10 Fax and telephone keys 11 Print keys<br />
For the details of the control panel, see “Control panel overview” in Chapter 1 of the User’s <strong>Guide</strong>.<br />
When you move the machine, grasp the side handholds that are under the scanner. Do NOT carry the<br />
machine by holding it at the bottom.<br />
2
Table of Contents<br />
Step 1<br />
Setting Up the machine<br />
Step 2<br />
1. Install the Drum Unit and Toner Cartridge Assembly ....................................4<br />
2. Load Paper in the Paper Tray ..........................................................................5<br />
3. Release the Scanner Lock ................................................................................6<br />
4. Install the Power Cord and Phone Line ..........................................................6<br />
5. Setting the Date and Time ................................................................................8<br />
6. Setting Automatic daylight saving time ..........................................................8<br />
7. Setting your Station ID .....................................................................................9<br />
8. Choosing the correct Receive Mode .............................................................10<br />
9. Tone and Pulse dialing mode (Canada only) ................................................11<br />
10. Selecting Your Language (Canada only) ......................................................11<br />
11. Setting the LCD Contrast ...............................................................................11<br />
12. Sending in the Product Registration and Test Sheet (USA Only) ..............11<br />
Installing the Drivers & Software<br />
Supplied CD-ROM “MFL-Pro Suite” ..............................................................................12<br />
For USB Interface Cable Users<br />
(For Windows ® 98/98SE/Me/2000 Professional/XP/XP Professional x64 Edition/Windows Vista ® ) 14<br />
For Parallel Interface Cable Users<br />
(For Windows ® 98/98SE/Me/2000 Professional/XP/XP Professional x64 Edition) ..17<br />
For Windows NT ® Workstation Version 4.0 Users ......................................................20<br />
For Network Interface Cable Users<br />
(For Windows ® 98/98SE/Me/NT/2000 Professional/XP/XP Professional x64 Edition/Windows Vista ® ) ...22<br />
For USB Interface Cable Users ......................................................................................27<br />
■ For Mac OS ® 9.1 to 9.2 ......................................................................................27<br />
■ For Mac OS ® X 10.2.4 or greater .......................................................................29<br />
For Network Interface Cable Users ...............................................................................33<br />
■ For Mac OS ® 9.1 to 9.2 ......................................................................................33<br />
■ For Mac OS ® X 10.2.4 or greater .......................................................................35<br />
■ For Network Users and Administrators<br />
BRAdmin Professional configuration utility<br />
(For Windows ® 98/98SE/Me/2000 Professional/XP/XP Professional x64 Editon Users) .40<br />
BRAdmin Light configuration utility (For Windows Vista ® users) .............................42<br />
BRAdmin Light configuration utility (For Mac OS ® X users) ......................................43<br />
■ Options and Consumables<br />
Options ............................................................................................................................44<br />
Replacement Consumables ...........................................................................................44<br />
3
Step 1<br />
Setting Up the machine<br />
1 Install the Drum Unit and Toner Cartridge Assembly<br />
Do NOT connect the interface cable.<br />
Connecting the interface cable is<br />
done during the software<br />
installation process.<br />
2 Unpack the drum unit and toner cartridge<br />
assembly.<br />
1 Open the front cover by pressing the front<br />
cover release button (1).<br />
3 Gently rock the drum assembly from side to<br />
side several times to distribute the toner<br />
evenly inside the assembly.<br />
(1)<br />
4 Put the drum unit assembly into the<br />
machine until it clicks into place.<br />
5 Close the front cover of the machine.<br />
4
2 Load Paper in the Paper Tray<br />
1 Pull the paper tray completely out of the<br />
machine.<br />
3 Fan the stack of paper well to avoid paper<br />
jams and misfeeds.<br />
Setting Up<br />
the machine<br />
4 Put paper in the paper tray.<br />
Check that the paper is flat in the tray and<br />
below the maximum paper mark (1).<br />
Windows ®<br />
USB<br />
2 While pressing the paper guide release<br />
lever (1), slide the adjusters to fit the paper<br />
size. Check that the guides are firmly in the<br />
slots.<br />
Windows ®<br />
Parallel<br />
(1)<br />
(1)<br />
Macintosh ®<br />
Network<br />
Windows NT ® 4.0<br />
Parallel<br />
Windows ®<br />
Network<br />
For Legal size paper, press the lever (1)<br />
located at the back of the tray and pull out the<br />
back of the paper tray. Move the tray lock<br />
button (2) to the lock position.<br />
5 Put the paper tray firmly back into the<br />
machine and unfold the output tray support<br />
flap (1) before you use the machine.<br />
Macintosh ®<br />
USB<br />
(1)<br />
Network<br />
Administrators<br />
(1) (2)<br />
For details on supported paper<br />
specifications, see “Acceptable paper and<br />
other media” in Chapter 2 of the User’s<br />
<strong>Guide</strong>.<br />
5
Step 1<br />
Setting Up the machine<br />
3<br />
Release the Scanner<br />
Lock<br />
4<br />
Install the Power Cord<br />
and Phone Line<br />
1 Push the lever (1) up to unlock the scanner.<br />
(The gray scanner lock lever is located at<br />
the back left side, under the document cover<br />
(2).)<br />
(2)<br />
Do not connect the Parallel or USB<br />
cable yet.<br />
1 Make sure that the power switch is off.<br />
Connect the AC power cord to the machine.<br />
(1)<br />
2 Plug the AC power cord into an AC outlet.<br />
Turn the power switch on.<br />
If Scanner Locked appears on the LCD,<br />
immediately release the scanner lock and<br />
press Stop/Exit.<br />
3 Connect one end of the telephone line cord<br />
to the jack on the machine marked LINE<br />
and the other end to a modular wall jack.<br />
6
Warning<br />
■ The machine must be grounded using a 3-prong<br />
plug.<br />
■ Since the machine is grounded through the power<br />
outlet, you can protect yourself from potentially<br />
hazardous electrical conditions on the telephone<br />
network by keeping the power cord connected to<br />
your machine when you connect it to a telephone<br />
line. Similarly, you can protect yourself when you<br />
want to move your machine by disconnecting the<br />
telephone line first and then the power cord.<br />
If you are sharing one phone line with an<br />
external telephone, connect it as shown<br />
below.<br />
Setting Up<br />
the machine<br />
Windows ®<br />
USB<br />
Extension<br />
Telephone<br />
Windows ®<br />
Parallel<br />
External<br />
Telephone<br />
Windows NT ® 4.0<br />
Parallel<br />
If you are sharing one phone line with an<br />
external telephone answering device,<br />
connect it as shown below.<br />
Windows ®<br />
Network<br />
TAD<br />
TAD<br />
Macintosh ®<br />
USB<br />
Please set the receive mode to<br />
External TAD.<br />
For more details, see “Choosing the correct<br />
Receive Mode” on page 10 and “Connecting<br />
an external TAD (Telephone Answering<br />
Device)” in Chapter 7 of the User’s <strong>Guide</strong>.<br />
Macintosh ®<br />
Network<br />
Network<br />
Administrators<br />
7
Step 1<br />
Setting Up the machine<br />
5<br />
Setting the Date and<br />
Time<br />
The machine displays the date and time, and prints it<br />
on every fax you send.<br />
1 Press Menu.<br />
2 Press 0.<br />
3 Press 2.<br />
4 Enter the last two digits of the year on the<br />
dial pad, and then press OK.<br />
02.Date/Time<br />
7 Enter the time in 24-hour format on the dial<br />
pad, and then press OK.<br />
02.Date/Time<br />
03/25/2008<br />
Time:15:25<br />
Enter & OK Key<br />
(e.g. Enter 1, 5, 2, 5 for 3:25 P.M.)<br />
8 Press Stop/Exit.<br />
If you make a mistake, press Stop/Exit to<br />
start from Step 1.<br />
Year:2008<br />
Enter & OK Key<br />
(e.g. Enter 0, 8 for 2008.)<br />
5 Enter the two digits for the month on the dial<br />
pad, and then press OK.<br />
02.Date/Time<br />
XX/XX/2008<br />
Month:03<br />
Enter & OK Key<br />
(e.g. Enter 0, 3 for March.)<br />
6 Enter the two digits for the day on the dial<br />
pad, and then press OK.<br />
02.Date/Time<br />
03/XX/2008<br />
6<br />
Setting Automatic<br />
daylight saving time<br />
You can set the machine to change automatically for<br />
Daylight Saving Time.<br />
It will set itself forward one hour in the Spring, and<br />
back one hour in the Fall.<br />
1 Press Menu, 1, 5.<br />
15.Auto Daylight<br />
<br />
<br />
On<br />
Off<br />
Select and OK<br />
2 Press or to select On, or Off.<br />
Press OK.<br />
3 Press Stop/Exit.<br />
Day:25<br />
Enter & OK Key<br />
(e.g. Enter 2, 5.)<br />
8
7 Setting your Station ID<br />
You should store your name and fax number to be printed on all fax pages that you send.<br />
1 Press Menu.<br />
Press One Two<br />
key time times<br />
2 Press 0.<br />
3 Press 3.<br />
4 Enter your fax number (up to 20 digits) on<br />
the dial pad, and then press OK.<br />
03.Station ID<br />
Fax:_<br />
Enter & OK Key<br />
5 Enter your telephone number (up to 20<br />
digits) on the dial pad, and then press OK.<br />
(If your telephone number and fax number<br />
are the same, enter the same number<br />
again.)<br />
03.Station ID<br />
Fax:908XXXXXXXX<br />
Tel:_<br />
Enter & OK Key<br />
6 Use the dial pad to enter your name (up to<br />
20 characters), and then press OK.<br />
03.Station ID<br />
Fax:908XXXXXXXX<br />
Tel:908XXXXXXXX<br />
Name:_<br />
Enter & OK Key<br />
7 Press Stop/Exit.<br />
Three<br />
times<br />
Four<br />
times<br />
2 A B C 2<br />
3 D E F 3<br />
4 G H I 4<br />
5 J K L 5<br />
6 M N O 6<br />
7 P Q R S<br />
8 T U V 8<br />
9 W X Y Z<br />
For more details, see “Entering Text” in<br />
Chapter D of the User’s <strong>Guide</strong>.<br />
NOTICE (For USA)<br />
The Telephone Consumer Protection Act of 1991<br />
makes it unlawful for any person to use a computer<br />
or electronic device to send any message via a<br />
telephone fax machine unless such messages<br />
clearly contain, in a margin at the top or bottom of<br />
each transmitted page, or on the first page of the<br />
transmission, the date and time it is sent and an<br />
identification of the business or other entity or other<br />
individual sending the message and the telephone<br />
number of the sending machine or such business,<br />
other entity or individual.<br />
To program this information into your machine, see<br />
Setting the Date and Time on page 8 and Setting<br />
your Station ID on page 9.<br />
Setting Up<br />
the machine<br />
Windows ®<br />
USB<br />
Windows ®<br />
Parallel<br />
Windows NT ® 4.0<br />
Parallel<br />
Windows ®<br />
Network<br />
Macintosh ®<br />
USB<br />
■ Refer to the following chart for entering<br />
your name.<br />
■ If you need to enter a character that is on<br />
the same key as the previous character,<br />
press to move the cursor to the right.<br />
■ If you entered a letter incorrectly and want<br />
to change it, press to move the cursor<br />
under the incorrect character, press<br />
Clear/Back.<br />
Macintosh ®<br />
Network<br />
Network<br />
Administrators<br />
9
Step 1<br />
Setting Up the machine<br />
8 Choosing the correct Receive Mode<br />
The correct Receive mode is determined by the external devices and telephone subscriber services (Voicemail,<br />
Distinctive Ring, etc.) you have (or will be using) on the same line as the <strong>Brother</strong> machine.<br />
Will you be using a Distinctive Ring number for receiving faxes?<br />
<strong>Brother</strong> uses the term "Distinctive Ring" but other telephone companies have other names for this service such<br />
as Custom Ringing, RingMaster, Personalized Ring, Teen Ring, Ident-A-Call, and Smart Ring. See Distinctive<br />
Ring in Chapter 7 of the User's <strong>Guide</strong> for instruction on setting up your machine using this feature.<br />
Will you be using Voicemail on the same telephone line as your <strong>Brother</strong> machine?<br />
If you have Voicemail on the same telephone line as your <strong>Brother</strong> machine, there is a strong possibility that Voice<br />
mail and the <strong>Brother</strong> machine will conflict with each other when receiving incoming calls. See Voice Mail in<br />
Chapter 7 of the User's <strong>Guide</strong> for instructions on setting up your machine using this service.<br />
Will you be using a Telephone Answering Device on the same telephone line as your<br />
<strong>Brother</strong> machine?<br />
Your external telephone answering device (TAD) will automatically answer every call. Voice messages are<br />
stored on the external TAD and fax messages are printed. Choose External TAD as your receive mode. See<br />
the instructions on the next page.<br />
Will you be using your <strong>Brother</strong> machine on a dedicated fax line?<br />
Your machine automatically answers every call as a fax. Choose Fax Only as your receive mode. See the<br />
instructions on the next page.<br />
Will you be using your <strong>Brother</strong> machine on the same line as your telephone?<br />
Do you want to receive voice calls and faxes automatically<br />
The Fax/Tel receive mode is used when sharing the <strong>Brother</strong> machine and your telephone on the same line. Choose Fax/<br />
Tel as your receive mode. See the instructions on the next page.<br />
Important Note: You can not receive voice messages on either Voicemail or an answering machine when choosing the Fax/<br />
Tel mode.<br />
Do you expect to receive very few faxes?<br />
Choose Manual as your receive mode. You control the phone line and must answer every call yourself. See the instructions<br />
on the next page.<br />
1 Press Menu.<br />
2 Press 0.<br />
3 Press 1.<br />
4 Press or to select the mode.<br />
Press OK.<br />
5 Press Stop/Exit.<br />
For more details, see “Receiving a fax” in Chapter 6 of the User’s <strong>Guide</strong>.<br />
10
9<br />
Tone and Pulse dialing<br />
mode (Canada only)<br />
Your machine comes set for Tone dialing service. If<br />
you have Pulse dialing service (rotary), you need to<br />
change the dialing mode.<br />
1 Press Menu.<br />
2 Press 0.<br />
3 Press 4.<br />
4 Press or to select Pulse (or Tone).<br />
Press OK.<br />
12<br />
Sending in the Product<br />
Registration and Test<br />
Sheet (USA Only)<br />
1 Fill out the Product Registration and Test<br />
Sheet.<br />
Setting Up<br />
the machine<br />
Windows ®<br />
USB<br />
5 Press Stop/Exit.<br />
10<br />
Selecting Your<br />
Language (Canada only)<br />
2 Place the sheet face up in the Automatic<br />
Document Feeder.<br />
Windows ®<br />
Parallel<br />
1 Press Menu.<br />
2 Press 0.<br />
3 Press 0.<br />
4 Select your language (English or French)<br />
by using or , and then press OK.<br />
5 Press Stop/Exit.<br />
11 Setting the LCD Contrast<br />
You can change the contrast to help the LCD look<br />
lighter or darker.<br />
1 Press Menu.<br />
2 Press 1.<br />
3 Press 8.<br />
4 Press to increase the contrast.<br />
—OR—<br />
Press to decrease the contrast.<br />
Press OK.<br />
Make sure<br />
(Fax) is illuminated in Blue.<br />
3 Enter the toll-free fax number:<br />
1-877-268-9575.<br />
4 Press Start.<br />
■ You will receive a confirmation fax of your<br />
Product Registration.<br />
■ You can also register your product online<br />
using the On-Line Registration link from<br />
the installation CD-ROM or go to<br />
http://www.brother.com/registration<br />
Windows NT ® 4.0<br />
Parallel<br />
Windows ®<br />
Network<br />
Macintosh ®<br />
USB<br />
Macintosh ®<br />
Network<br />
5 Press Stop/Exit.<br />
Go to the next page to<br />
install the drivers & software<br />
Network<br />
Administrators<br />
11
Step 2<br />
Installing the Drivers & Software<br />
Supplied CD-ROM “MFL-Pro Suite”<br />
Before installing the driver and software, please make sure that the supplied CD-ROM you are using<br />
matches your operation system.<br />
For Windows Vista ® use the supplied CD-ROM labeled Windows Vista ® .<br />
The CD-ROM includes the following items:<br />
Install MFL-Pro Suite<br />
You can install the MFL-Pro Suite and multifunction<br />
drivers.<br />
Install Optional Applications<br />
(Install Other Drivers or Utilities)<br />
You can install additional MFL-Pro Suite software<br />
utilities.<br />
Documentation (User’s <strong>Guide</strong>)<br />
View the User’s <strong>Guide</strong> and other document in PDF<br />
format (Viewer included). The User’s <strong>Guide</strong> on the<br />
CD-ROM includes the Software and Network User’s<br />
<strong>Guide</strong> for features available when connected to a<br />
computer (e.g. Printing, Scanning and networking<br />
details).<br />
On-Line Registration<br />
You will be pointed to the <strong>Brother</strong> Product Registration<br />
Web page for quick registration of your machine.<br />
<strong>Brother</strong> Support<br />
View contact information for <strong>Brother</strong> Customer Service<br />
and how to locate a <strong>Brother</strong> Authorized Service Center.<br />
Repair MFL-Pro Suite<br />
(For USB and Parallel cable users only)<br />
If you experience errors while installing the MFL-Pro<br />
Suite, you can use this function to automatically repair<br />
and re-install the software.<br />
MFL-Pro Suite includes Printer Driver,<br />
Scanner Driver, ScanSoft ® PaperPort ® SE<br />
with OCR, <strong>Brother</strong> ControlCenter2 and<br />
True Type ® fonts.<br />
PaperPort ® SE is a document management<br />
application for viewing scanned documents.<br />
Start Here OS 9.1-9.2<br />
You can install the printer driver, scanner driver and<br />
Presto! ® PageManager ® for Mac OS ® 9.1 - 9.2.<br />
Start Here OSX<br />
You can install the MFL-Pro Suite that includes the<br />
printer driver, scanner driver and the <strong>Brother</strong><br />
ControlCenter2 for Mac OS ® 10.2.4 or greater. You<br />
can also install Presto! ® PageManager ® to add OCR<br />
capability to the <strong>Brother</strong> ControlCenter2 and easily<br />
scan, share and organize photos and documents.<br />
Readme.html<br />
You can get important information and<br />
troubleshooting tips.<br />
Documentation<br />
View the User’s <strong>Guide</strong> and other document in PDF<br />
format (Viewer included). The User’s <strong>Guide</strong> on the<br />
CD-ROM includes the Software and Network User’s<br />
<strong>Guide</strong> for features available when connected to a<br />
computer (e.g. Printing, Scanning and networking<br />
details).<br />
<strong>Brother</strong> Solutions Center<br />
You can access the <strong>Brother</strong> Solutions Center, a Web<br />
site offering information about your <strong>Brother</strong> product<br />
including FAQs, User’s <strong>Guide</strong>s, Driver updates and<br />
Tips for using your machine.<br />
On-Line Registration<br />
You will be pointed to the <strong>Brother</strong> Product Registration<br />
Web Page for quick registration of your machine.<br />
12
Step 2<br />
Installing the Drivers & Software<br />
Follow the instructions on this page for your operating system and interface cable.<br />
For the latest drivers and to find the best solution for your problem or question, access the <strong>Brother</strong> Solutions<br />
Center directly from the driver or go to http://solutions.brother.com<br />
Setting Up<br />
the machine<br />
USB Interface Cable Users .......................................... Go to page 14<br />
(For Windows ® 98/98SE/Me/2000 Professional/XP/XP Professional x64 Edition/Windows Vista ® )<br />
Windows ®<br />
USB<br />
Parallel Interface Cable Users..................................... Go to page 17<br />
(For Windows ® 98/98SE/Me/2000 Professional/XP/XP Professional x64 Edition )<br />
Windows ®<br />
Parallel<br />
Windows NT ® Workstation Version 4.0 Users........... Go to page 20<br />
(For Parallel Interface Cable Users)<br />
Windows NT ® 4.0<br />
Parallel<br />
Network Interface Cable Users.................................... Go to page 22<br />
(For Windows ® 98/98SE/Me/NT/2000 Professional/XP/XP Professional x64 Edition/Windows Vista ® )<br />
Windows ®<br />
Network<br />
USB Interface Cable Users<br />
■ For Mac OS ® 9.1 to 9.2 ............................................. Go to page 27<br />
■ For Mac OS ® X 10.2.4 or greater ............................. Go to page 29<br />
Macintosh ®<br />
USB<br />
Network Interface Cable Users<br />
■ For Mac OS ® 9.1 to 9.2 ............................................. Go to page 33<br />
■ For Mac OS ® X 10.2.4 or greater ............................. Go to page 35<br />
Macintosh ®<br />
Network<br />
For Network Users and Administrators...................... Go to page 40<br />
Network<br />
Administrators<br />
13
Step 2<br />
Installing the Drivers & Software<br />
For USB Interface Cable Users<br />
(For Windows ® 98/98SE/Me/2000 Professional/XP/XP Professional x64 Edition/Windows Vista ® )<br />
Make sure that you have finished the instructions from Step 1 “Setting Up<br />
the machine” on pages 4 through 11.<br />
Please close any applications running before<br />
installing the MFL-Pro Suite.<br />
1 Turn off and unplug the machine from the<br />
AC outlet and disconnect it from your<br />
computer, if you already connected an<br />
interface cable.<br />
■ If this window does not appear, use<br />
Windows ® Explorer to run the setup.exe*<br />
program from the root folder of the <strong>Brother</strong><br />
CD-ROM.<br />
* start.exe for Windows Vista ®<br />
■ For Windows Vista ® , when the User<br />
Account Control screen appears, click<br />
Allow.<br />
2 Turn on your computer.<br />
(For Windows ® 2000 Professional/XP/<br />
XP Professional x64 Edition/Windows<br />
Vista ® , you must be logged on with<br />
Administrator rights.)<br />
5 After reading and accepting the ScanSoft ®<br />
PaperPort ® SE License Agreement, click<br />
Yes.<br />
3 Put the supplied CD-ROM into your<br />
CD-ROM drive. If the model name screen<br />
appears, choose your machine. If the<br />
language screen appears, choose your<br />
language.<br />
Make sure that the supplied CD-ROM you are<br />
using matches your operating system.<br />
For Windows Vista ® use the supplied<br />
CD-ROM labeled Windows Vista ® .<br />
4 The CD-ROM main menu will appear.<br />
Click Install MFL-Pro Suite.<br />
The installation of PaperPort ® SE will<br />
automatically start and is followed by the<br />
installation of MFL-Pro Suite.<br />
6 When the <strong>Brother</strong> MFL-Pro Suite Software<br />
License Agreement window appears, click<br />
Yes if you agree to the Software Licence<br />
Agreement.<br />
14
7 Choose Local Connection, and then click<br />
Next. The installation will continue.<br />
Setting Up<br />
the machine<br />
■ For Windows Vista ® , when this screen<br />
appears, click the check box and click<br />
Install.<br />
DO NOT connect the machine to a<br />
USB port on a keyboard or a nonpowered<br />
USB hub. <strong>Brother</strong><br />
recommends that you connect the<br />
machine directly to your computer.<br />
Windows ®<br />
USB<br />
9 Plug in the power cord and turn on the<br />
machine.<br />
■ If you want to install the PS driver (<strong>Brother</strong>’s<br />
BR-Script Driver), choose Custom Install<br />
and then follow the on-screen instructions.<br />
When the Select Components* screen<br />
appears, check PS Printer Driver, and<br />
then continue following the on-screen<br />
instructions.<br />
8 When this screen appears, connect the<br />
USB interface cable to your PC, and then<br />
connect it to the machine.<br />
(For Windows ® XP/XP Professional x64 Edition/<br />
Windows Vista ® )<br />
It will take a few seconds for the installation<br />
screens to appear.<br />
The installation of the <strong>Brother</strong> drivers will<br />
automatically start. The installation screens<br />
appear one after another. Please wait, it will<br />
take a few seconds for all the screens to<br />
appear.<br />
* Select Features for Windows Vista ® Continued ..<br />
DO NOT try to cancel any of the<br />
screens during this installation.<br />
(For Windows ® 98/98SE/Me/2000)<br />
Network<br />
Administrators<br />
Installing the Drivers & Software<br />
15
Step 2<br />
Installing the Drivers & Software<br />
For USB Interface Cable Users<br />
(For Windows ® 98/98SE/Me/2000 Professional/XP/XP Professional x64 Edition/Windows Vista ® )<br />
0 When the On-Line Registration screen is<br />
displayed, make your selection and follow<br />
the on-screen instructions. Once you have<br />
completed the registration process, close<br />
your web browser to return to this window.<br />
Then click Next.<br />
A Click Finish to restart your computer.<br />
(After restarting the computer, for<br />
Windows ® 2000 Professional/XP/<br />
XP Professional x64 Edition/<br />
Windows Vista ® , you must be logged on<br />
with Administrator rights.)<br />
After restarting the computer, the Installation<br />
Diagnostics will run automatically. If the<br />
installation is unsuccessful, the installation<br />
results window will be shown. If the<br />
Installation Diagnostics shows a failure,<br />
please follow the on-screen instruction or read<br />
on-line help and FAQs in<br />
Start/All Programs (Programs)/<strong>Brother</strong>/<br />
MFL-Pro Suite <strong>MFC</strong>-XXXX (where XXXX is<br />
your model name).<br />
The MFL-Pro Suite (including, Printer<br />
driver and Scanner driver) has been<br />
installed and the installation is now<br />
complete.<br />
16
For Parallel Interface Cable Users<br />
(For Windows ® 98/98SE/Me/2000 Professional/XP/XP Professional x64 Edition)<br />
Make sure that you have finished the instructions from Step 1 “Setting Up<br />
the machine” on pages 4 through 11.<br />
Setting Up<br />
the machine<br />
Please close any applications running before<br />
installing the MFL-Pro Suite.<br />
1 Turn off and unplug the machine from the<br />
AC outlet and disconnect it from your<br />
computer, if you already connected an<br />
interface cable.<br />
■ If this window does not appear, use<br />
Windows ® Explorer to run the setup.exe<br />
program from the root folder of the <strong>Brother</strong><br />
CD-ROM.<br />
5 After reading and accepting the ScanSoft ®<br />
PaperPort ® SE License Agreement, click<br />
Yes.<br />
Windows ®<br />
USB<br />
Windows ®<br />
Parallel<br />
2 Turn on your computer.<br />
(For Windows ® 2000 Professional/XP/<br />
XP Professional x64 Edition, you must be<br />
logged on with Administrator rights.)<br />
3 Put the supplied CD-ROM into your<br />
CD-ROM drive. If the model name screen<br />
appears, choose your machine. If the<br />
language screen appears, choose your<br />
language.<br />
The installation of PaperPort ® SE will<br />
automatically start and is followed by the<br />
installation of MFL-Pro Suite.<br />
6 When the <strong>Brother</strong> MFL-Pro Suite Software<br />
License Agreement window appears, click<br />
Yes if you agree to the Software License<br />
Agreement.<br />
Installing the Drivers & Software<br />
Make sure that the supplied CD-ROM you are<br />
using matches your operating system.<br />
For Windows Vista ® use the supplied<br />
CD-ROM labeled Windows Vista ® .<br />
4 The CD-ROM main menu will appear.<br />
Click Install MFL-Pro Suite.<br />
Continued ..<br />
Network<br />
Administrators<br />
17
Step 2<br />
Installing the Drivers & Software<br />
For Parallel Interface Cable Users<br />
(For Windows ® 98/98SE/Me/2000 Professional/XP/XP Professional x64 Edition)<br />
7 Choose Local Connection, and then click<br />
Next. The installation will continue.<br />
DO NOT plug in the power cord<br />
before connecting the parallel<br />
interface cable. It may cause<br />
damage to your machine.<br />
■ If you want to install the PS driver (<strong>Brother</strong>’s<br />
BR-Script Driver), choose Custom Install<br />
and then follow the on-screen instructions.<br />
When the Select Components screen<br />
appears, check PS Printer Driver, and<br />
then continue following the on-screen<br />
instructions.<br />
8 When this screen appears, connect the<br />
parallel interface cable to your PC, and then<br />
connect it to the machine.<br />
(For Windows ® XP/XP Professional x64 Edition)<br />
<strong>Brother</strong> recommends that you connect the<br />
machine directly to your computer.<br />
9 Plug in the power cord and turn on the<br />
machine.<br />
(For Windows ® 98/98SE/Me/2000)<br />
0 For Windows ® 98/98SE/Me/<br />
2000 Professional users, click Next.<br />
For Windows ® XP/XP Professional x64<br />
Edition users, wait for a while since the<br />
installation of the <strong>Brother</strong> drivers will<br />
automatically start. The screens appear one<br />
after another.<br />
DO NOT try to cancel any of the<br />
screens during this installation.<br />
18
A When the On-Line Registration screen is<br />
displayed, make your selection and follow<br />
the on-screen instructions. Once you have<br />
completed the registration process, close<br />
your web browser to return to this window.<br />
Then click Next.<br />
Setting Up<br />
the machine<br />
B When the following screen appears, click<br />
Finish and wait as the PC restarts<br />
Windows ® and continues the installation.<br />
Windows ®<br />
Parallel<br />
C After the computer restarts, the installation<br />
of the <strong>Brother</strong> drivers will automatically start.<br />
Follow the instructions on the screen.<br />
(For Windows ® 2000 Professional/XP/<br />
XP Professional x64 Edition, you must be<br />
logged on with Administrator rights.)<br />
Installing the Drivers & Software<br />
After restarting the computer, the Installation<br />
Diagnostics will run automatically. If the<br />
installation is unsuccessful, the installation<br />
results window will be shown. If the<br />
Installation Diagnostics shows a failure,<br />
please follow the on-screen instruction or read<br />
on-line help and FAQs in<br />
Start/All Programs (Programs)/<strong>Brother</strong>/<br />
MFL-Pro Suite <strong>MFC</strong>-XXXX (where XXXX is<br />
your model name).<br />
The MFL-Pro Suite (including, Printer<br />
driver and Scanner driver) has been<br />
installed and the installation is now<br />
complete.<br />
Network<br />
Administrators<br />
19
Step 2<br />
Installing the Drivers & Software<br />
For Windows NT ® Workstation Version 4.0 Users<br />
Make sure that you have finished the instructions from Step 1 “Setting Up<br />
the machine” on pages 4 through 11.<br />
Please close any applications running before<br />
installing the MFL-Pro Suite.<br />
1 Turn off and unplug the machine from the<br />
AC outlet.<br />
2 Turn on your computer.<br />
You must be logged on with Administrator<br />
rights.<br />
DO NOT plug in the power cord<br />
before connecting the parallel<br />
interface cable. It may cause<br />
damage to your machine.<br />
5 Put the Supplied CD-ROM into your<br />
CD-ROM drive. If the model name screen<br />
appears, choose your machine. If the<br />
language screen appears, choose your<br />
language.<br />
Make sure that the supplied CD-ROM you are<br />
using matches your operating system.<br />
6 The CD-ROM main menu will appear.<br />
Click Install MFL-Pro Suite.<br />
3 Connect the parallel interface cable to your<br />
computer, and then connect it to the<br />
machine.<br />
If this window does not appear, use Windows ®<br />
Explorer to run the setup.exe program from<br />
the root folder of the <strong>Brother</strong> CD-ROM.<br />
<strong>Brother</strong> recommends that you connect the<br />
machine directly to your computer.<br />
7 After reading and accepting the ScanSoft ®<br />
PaperPort ® SE License Agreement, click<br />
Yes.<br />
4 Plug in the power cord and turn on the<br />
machine.<br />
The installation of PaperPort ® SE will<br />
automatically start and is followed by the<br />
installation of MFL-Pro Suite.<br />
20
8 When the <strong>Brother</strong> MFL-Pro Suite Software<br />
License Agreement window appears, click<br />
Yes if you agree to the Software License<br />
Agreement.<br />
A Click Finish and wait as the PC restarts<br />
Windows ® and continues the installation.<br />
(You must be logged on with Administrator<br />
rights.)<br />
Setting Up<br />
the machine<br />
9 Choose Local Connection, and then click<br />
Next. The installation will continue.<br />
If you want to install the PS driver (<strong>Brother</strong>’s<br />
BR-Script Driver), choose Custom Install and<br />
then follow the on-screen instructions. When<br />
the Select Components screen appears,<br />
check PS Printer Driver, and then continue<br />
following the on-screen instructions.<br />
After restarting the computer, the Installation<br />
Diagnostics will run automatically. If the<br />
installation is unsuccessful, the installation<br />
results window will be shown. If the<br />
Installation Diagnostics shows a failure,<br />
please follow the on-screen instruction or read<br />
on-line help and FAQs in Start/Programs/<br />
<strong>Brother</strong>/MFL-Pro Suite <strong>MFC</strong>-XXXX (where<br />
XXXX is your model name).<br />
The MFL-Pro Suite (including, Printer<br />
driver and Scanner driver) has been<br />
installed and the installation is now<br />
complete.<br />
Installing the Drivers & Software<br />
0 When the On-Line Registration screen is<br />
displayed, make your selection and follow<br />
the on-screen instructions. Once you have<br />
completed the registration process, close<br />
your web browser to return to this window.<br />
Then click Next.<br />
Network<br />
Administrators<br />
Windows NT ® 4.0<br />
Parallel<br />
21
Step 2<br />
Installing the Drivers & Software<br />
For Network Interface Cable Users<br />
(For Windows ® 98/98SE/Me/NT/2000 Professional/XP/XP Professional x64 Edition/Windows Vista ® )<br />
Make sure that you have finished the instructions from Step 1 “Setting Up<br />
the machine” on pages 4 through 11.<br />
1 Turn off and unplug the machine from AC<br />
outlet.<br />
2 Connect the network cable to the machine,<br />
and then connect it to a free port on your<br />
hub.<br />
Make sure that the supplied CD-ROM you are<br />
using matches your operating system.<br />
For Windows Vista ® use the supplied<br />
CD-ROM labeled Windows Vista ® .<br />
6 The CD-ROM main menu will appear.<br />
Click Install MFL-Pro Suite.<br />
3 Plug in the power cord and turn on the<br />
machine.<br />
■ If this window does not appear, use<br />
Windows ® Explorer to run the setup.exe*<br />
program from the root folder of the <strong>Brother</strong><br />
CD-ROM.<br />
* start.exe for Windows Vista ®<br />
■ For Windows Vista ® , when the User<br />
Account Control screen appears, click<br />
Allow.<br />
4 Turn on your computer.<br />
(For Windows ® 2000 Professional/XP/<br />
XP Professional x64 Edition/<br />
Windows NT ® 4.0/Windows Vista ® , you<br />
must be logged on with Administrator<br />
rights.)<br />
Close any applications running before<br />
installing the <strong>MFC</strong>-Pro Suite.<br />
Before installation, if you are using Personal<br />
Firewall software, disable it. Once you are<br />
sure that you can print after the installation,<br />
re-start your Personal Firewall software.<br />
5 Put the supplied CD-ROM into your<br />
CD-ROM drive. If the model name screen<br />
appears, choose your machine. If the<br />
language screen appears, choose your<br />
language.<br />
7 After reading and accepting the ScanSoft ®<br />
PaperPort ® SE License Agreement, click<br />
Yes.<br />
The installation of PaperPort ® SE will<br />
automatically start and is followed by the<br />
installation of MFL-Pro Suite.<br />
22
8 When the <strong>Brother</strong> MFL-Pro Suite Software<br />
License Agreement window appears, read<br />
the agreement, then click Yes if you agree<br />
to its terms.<br />
This window will not appear if there is only one<br />
of this <strong>Brother</strong> model connected on the<br />
network, it will be selected automatically.<br />
B If the machine is not yet configured for use<br />
on your network, the following screen<br />
appears.<br />
9 Choose Network Connection and then<br />
Click OK.<br />
click Next.<br />
The Configure IP Address will appear.<br />
Enter the proper IP address information for<br />
your network by following the on-screen<br />
instructions.<br />
For Windows Vista ® , when this screen<br />
appears, click the check box and click Install.<br />
If you want to install the PS driver (<strong>Brother</strong>’s<br />
BR-Script Driver), choose Custom Install and<br />
then follow the on-screen instructions. When<br />
the Select Components* screen appears,<br />
check PS Printer Driver, and then continue<br />
following the on-screen instructions.<br />
C When the On-Line Registration screen is<br />
* Select Features for Windows Vista ® displayed, make your selection and follow<br />
the on-screen instructions. Once you have<br />
completed the registration process, close<br />
your web browser to return to this window.<br />
Then click Next.<br />
0 The installation of the <strong>Brother</strong> drivers will<br />
automatically start. The installation screens<br />
appear one after another. Please wait, it will<br />
take a few seconds for all the screens to<br />
appear.<br />
DO NOT try to cancel any of the<br />
screens during this installation.<br />
Installing the Drivers & Software<br />
Setting Up<br />
the machine<br />
Windows ®<br />
Network<br />
A If the machine is configured for your<br />
network, select your machine from the list<br />
and then click Next.<br />
Continued ..<br />
Network<br />
Administrators<br />
23
Step 2<br />
Installing the Drivers & Software<br />
For Network Interface Cable Users<br />
(For Windows ® 98/98SE/Me/NT/2000 Professional/XP/XP Professional x64 Edition/Windows Vista ® )<br />
D Click Finish to restart your computer.<br />
(For Windows ® 2000 Professional/XP/<br />
XP Professional x64 Edition/<br />
Windows NT ® 4.0/Windows Vista ® , you<br />
must be logged on with Administrator<br />
rights.)<br />
2 Click the Advanced tab and Settings...<br />
button.<br />
The MFL-Pro Suite (including, Printer<br />
driver and Scanner driver) has been<br />
installed and the installation is now<br />
complete.<br />
■ After restarting the computer, the<br />
Installation Diagnostics will run<br />
automatically. If the installation is<br />
unsuccessful, the installation results<br />
window will be shown. If the Installation<br />
Diagnostics shows a failure, please follow<br />
the on-screen instruction or read on-line<br />
help and FAQs in<br />
Start/All Programs (Programs)/<strong>Brother</strong>/<br />
MFL-Pro Suite <strong>MFC</strong>-XXXX (where XXXX<br />
is your model name).<br />
■ Once you are sure that you can print after<br />
the installation, restart your Firewall<br />
software.<br />
■ Firewall settings on your PC may reject the<br />
necessary network connection for Network<br />
Scanning and PC-Fax.<br />
If you are using the Windows ® Firewall<br />
follow the instructions for Windows ® XP<br />
SP2, XP Professional x64 Edition or<br />
Windows Vista ® . If you are using a personal<br />
Firewall software, see the User's <strong>Guide</strong> for<br />
your software or contact the software<br />
manufacturer.<br />
■ Windows ® XP SP2 and XP Professional<br />
x64 Edition users:<br />
1 Click the Start button, Control Panel,<br />
Network and Internet connections and<br />
then Windows Firewall.<br />
Make sure that Windows Firewall on the<br />
General tab is set to On.<br />
3 Click the Add button.<br />
4 To add port 54925 for network scanning,<br />
enter the information below:<br />
1) In Description of service: - Enter any<br />
description, for example “<strong>Brother</strong><br />
Scanner”.<br />
2) In Name or IP address (for example<br />
192.168.0.12) of the computer<br />
hosting this service on your<br />
network: - Enter “Localhost”.<br />
3) In External Port Number for this<br />
service: - Enter “54925”.<br />
4) In Internal Port number for this<br />
service: - Enter “54925”.<br />
5) Make sure UDP is selected.<br />
6) Click OK.<br />
1<br />
2<br />
3<br />
4<br />
5 Click the Add button.<br />
6 To add port 54926 for Network PC-Fax,<br />
enter the information below:<br />
1) In Description of service: - Enter any<br />
description, for example “<strong>Brother</strong><br />
PC-Fax”.<br />
2) In Name or IP address (for example<br />
192.168.0.12) of the computer<br />
hosting this service on your<br />
network: - Enter “Localhost”.<br />
3) In External Port Number for this<br />
service: - Enter “54926”.<br />
4) In Internal Port number for this<br />
service: - Enter “54926”.<br />
5) Make sure UDP is selected.<br />
6) Click OK.<br />
5<br />
24
7 If you still have trouble with your network<br />
connection, click the Add button.<br />
8 To add port 137 for both network<br />
scanning and Network PC-Fax receiving,<br />
enter the information below:<br />
1) In Description of service: - Enter any<br />
description, for example “<strong>Brother</strong><br />
PC-Fax Receiving”.<br />
2) In Name or IP address (for example<br />
192.168.0.12) of the computer<br />
hosting this service on your<br />
network: - Enter “Localhost”.<br />
3) In External Port Number for this<br />
service: - Enter “137”.<br />
4) In Internal Port number for this<br />
service: - Enter “137”.<br />
5) Make sure UDP is selected.<br />
6) Click OK.<br />
9 Make sure if the new settings are added<br />
and are checked, and then click OK.<br />
■ Windows Vista ® users:<br />
1 Click the Start button, Control Panel,<br />
Network and Internet, Windows<br />
Firewall and click change settings.<br />
2 When the User Account Control screen<br />
appears, do the following.<br />
■ For Users who have administrator<br />
rights: Click Continue.<br />
■ Users who do not have administrator<br />
rights: Enter the administrator<br />
password and click OK.<br />
4 Click the Exceptions tab.<br />
5 Click the Add port... button.<br />
6 To add port 54925 for network scanning,<br />
enter the information below:<br />
1) In Name: Enter any description, for<br />
example “<strong>Brother</strong> Scanner”.<br />
2) In Port number: Enter “54925”.<br />
3) Make sure UDP is selected.<br />
Then, click OK.<br />
1<br />
2<br />
3<br />
7 Click the Add port... button.<br />
8 To add port 54926 for Network PC-Fax,<br />
enter the information below:<br />
1) In Name: Enter any description, for<br />
example “<strong>Brother</strong> PC-Fax”.<br />
2) In Port number: Enter “54926”.<br />
3) Make sure UDP is selected.<br />
Then, click OK.<br />
9 Make sure that the new setting is added<br />
and is checked, and then click OK.<br />
Installing the Drivers & Software<br />
Setting Up<br />
the machine<br />
Windows ®<br />
Network<br />
3 Make sure that Windows Firewall on the<br />
General tab is set to On.<br />
Continued ...<br />
Network<br />
Administrators<br />
25
Step 2<br />
Installing the Drivers & Software<br />
For Network Interface Cable Users<br />
(For Windows ® 98/98SE/Me/NT/2000 Professional/XP/XP Professional x64 Edition/Windows Vista ® )<br />
.<br />
10 If you still have trouble with your network<br />
connection such as Network Scanning or<br />
Printing, check the File and Printer<br />
Sharing box in the Exceptions tab and<br />
then click OK.<br />
■ For Network installations, the Repair<br />
MFL-Pro Suite selection from the main<br />
menu is not supported.<br />
■ Network Scanning, Network Remote <strong>Setup</strong>,<br />
Network PC-FAX Receiving are not<br />
supported in Windows NT ® 4.0.<br />
■ For configuration of advanced network<br />
functions such as Scan to FTP, see the<br />
Software and Network User’s <strong>Guide</strong>s<br />
located on the CD-ROM.<br />
26
For USB Interface Cable Users<br />
For Mac OS ® 9.1 to 9.2<br />
Make sure that you have finished the instructions from Step 1 “Setting Up<br />
the machine” on pages 4 through 11.<br />
Setting Up<br />
the machine<br />
1 Turn off and unplug the machine from the<br />
AC outlet and disconnect it from your<br />
Macintosh ® , if you already connected an<br />
interface cable.<br />
6 Follow the on-screen instructions, and<br />
restart your Macintosh ® .<br />
7 Connect the USB interface cable to your<br />
Macintosh ® , and then connect it to the<br />
machine.<br />
2 Turn on your Macintosh ® .<br />
3 Insert the supplied CD-ROM for Macintosh ®<br />
into your CD-ROM drive.<br />
4 Double-click the Start Here OS 9.1-9.2 icon<br />
to install the printer and scanner drivers. If<br />
the language screen appears, choose your<br />
language.<br />
DO NOT connect the machine to a<br />
USB port on a keyboard or a nonpowered<br />
USB hub.<br />
8 Plug in the power cord and turn on the<br />
machine.<br />
Macintosh ®<br />
USB<br />
Installing the Drivers & Software<br />
Windows ®<br />
Network<br />
5 Click MFL-Pro Suite to install.<br />
9 From the Apple ® menu, click the Chooser.<br />
Continued ...<br />
Network<br />
Administrators<br />
27
Step 2<br />
Installing the Drivers & Software<br />
For USB Interface Cable Users<br />
0 Click the <strong>Brother</strong> Laser icon.<br />
On the right side of the Chooser, choose<br />
the machine to which you want to print.<br />
Close the Chooser.<br />
The printer and scanner drivers have<br />
been installed.<br />
The <strong>Brother</strong> ControlCenter2 is not supported<br />
in Mac OS ® 9.x.<br />
A To install Presto! ® PageManager ® , click the<br />
Presto! PageManager icon and follow the<br />
on-screen instructions.<br />
You can easily scan, share and organize<br />
photos and documents using Presto! ®<br />
PageManager ® .<br />
Presto! ® PageManager ® has been<br />
installed and the installation is now<br />
complete.<br />
28
For Mac OS ® X 10.2.4 or greater<br />
Make sure that you have finished the instructions from Step 1 “Setting Up<br />
the machine” on pages 4 through 11.<br />
Setting Up<br />
the machine<br />
For Mac OS ® X 10.2.0 to 10.2.3 user, upgrade<br />
to Mac OS ® X 10.2.4 or greater.<br />
(For the latest information for Mac OS ® X, visit<br />
http://solutions.brother.com)<br />
5 Click MFL-Pro Suite to install.<br />
1 Turn off and unplug the machine from the<br />
AC outlet and disconnect it from your<br />
Macintosh ® , if you already connected an<br />
interface cable.<br />
2 Turn on your Macintosh ® .<br />
3 Insert the supplied CD-ROM for Macintosh ®<br />
into your CD-ROM drive.<br />
6 Follow the on-screen instructions, and<br />
restart your Macintosh ® .<br />
7 For Mac OS ® X 10.5 users ➝<br />
Connect the USB cable to your Macintosh<br />
and then to the machine.<br />
For Mac OS ® X 10.2.4 to 10.4.x users ➝<br />
Wait for the DeviceSelector window to<br />
appear before connecting the USB cable.<br />
After the DeviceSelector window appears,<br />
connect the USB interface cable to your<br />
Macintosh ® and then to the machine.<br />
Installing the Drivers & Software<br />
4 Double-click the Start Here OSX icon to<br />
install the drivers and MFL-Pro Suite. If the<br />
language screen appears, choose your<br />
language.<br />
Macintosh ®<br />
USB<br />
The DeviceSelector window will not appear if<br />
you have connected a USB interface cable to<br />
the machine before restarting your<br />
Macintosh ® , if you are overwriting a previously<br />
installed version of the <strong>Brother</strong> software, or if<br />
you are using Mac OS ® X 10.5. If you<br />
encounter this problem continue with the<br />
installation but skip Step 12. You should<br />
choose your <strong>Brother</strong> machine from the Model<br />
pull-down list in the main screen of<br />
ControlCenter2 (For details, see the Software<br />
User’s <strong>Guide</strong> on the CD-ROM).<br />
Continued ...<br />
Network<br />
Administrators<br />
29
Step 2<br />
Installing the Drivers & Software<br />
For USB Interface Cable Users<br />
DO NOT connect the machine to a<br />
USB port on a keyboard or a nonpowered<br />
USB hub.<br />
For configuration of advanced network<br />
functions such as Scan to FTP, see the<br />
Software and Network User’s <strong>Guide</strong>s located<br />
on the CD-ROM.<br />
A To install Presto! ® PageManager ® , click the<br />
Presto! PageManager icon and follow the<br />
on-screen instructions.<br />
8 Plug in the power cord and turn on the<br />
machine.<br />
When Presto! ® PageManager ® is installed<br />
OCR capability is added to the <strong>Brother</strong><br />
ControlCenter2. You can easily scan, share,<br />
and organize photos and documents using<br />
Presto! ® PageManager ® .<br />
For Mac OS ® X 10.5 users<br />
➝ Go to 9<br />
For Mac OS ® X 10.2.4 to 10.4.x users<br />
➝ Go to B<br />
Presto! ® PageManager ® has been<br />
installed and the installation is now<br />
complete.<br />
B Choose USB and then click OK.<br />
9 The <strong>Brother</strong> software will search for the<br />
<strong>Brother</strong> device. During this time the<br />
following screen will appear.<br />
0 When this screen appears, click OK.<br />
C Click Go, then choose Application.<br />
The MFL-Pro Suite drivers and <strong>Brother</strong><br />
Control Center2 have been installed.<br />
Continue to step 11<br />
30
D Double-click the Utilities folder.<br />
H Choose your model name, and then click<br />
Add.<br />
For Mac OS ® X 10.2.4 to 10.3 users:<br />
Setting Up<br />
the machine<br />
E Double-click the Print <strong>Setup</strong> Utility icon.<br />
For Mac OS ® X 10.4.x users:<br />
For Mac OS ® X 10.2.x users, open Print<br />
Center icon.<br />
F Click Add.<br />
I Click Printer <strong>Setup</strong> Utility, then choose<br />
Quit Printer <strong>Setup</strong> Utility.<br />
Installing the Drivers & Software<br />
For Mac OS ® X 10.2.4 to 10.3.x users<br />
➝ Go to G<br />
Macintosh ®<br />
USB<br />
For Mac OS ® X 10.4 users<br />
➝ Go to H<br />
G Choose USB.<br />
The MFL-Pro Suite, drivers and <strong>Brother</strong><br />
ControlCenter2 have been installed.<br />
Continued ...<br />
Network<br />
Administrators<br />
31
Step 2<br />
Installing the Drivers & Software<br />
For USB Interface Cable Users<br />
J To install Presto! ® PageManager ® , click the<br />
Presto! PageManager icon and follow the<br />
on-screen instructions.<br />
When Presto! ® PageManager ® is installed<br />
OCR capability is added to the <strong>Brother</strong><br />
ControlCenter2. You can easily scan, share,<br />
and organize photos and documents using<br />
Presto! ® PageManager ® .<br />
Presto! ® PageManager ® has been<br />
installed and the installation is now<br />
complete.<br />
32
For Network Interface Cable Users<br />
For Mac OS ® 9.1 to 9.2<br />
Make sure that you have finished the instructions from Step 1 “Setting Up<br />
the machine” on pages 4 through 11.<br />
Setting Up<br />
the machine<br />
1 Turn off and unplug the machine from the<br />
AC outlet.<br />
7 Connect the network interface cable to the<br />
machine, and then connect it to a free port<br />
on your hub.<br />
2 Turn on your Macintosh ® .<br />
3 Insert the supplied CD-ROM for Macintosh ®<br />
into your CD-ROM drive.<br />
4 Double-click the Start Here OS 9.1-9.2 icon<br />
to install the printer driver. If the language<br />
screen appears, choose your language.<br />
8 Plug in the power cord and turn on the<br />
machine.<br />
9 From the Apple ® menu click Chooser.<br />
Installing the Drivers & Software<br />
5 Click MFL-Pro Suite to install.<br />
Macintosh ®<br />
USB<br />
Macintosh ®<br />
Network<br />
6 Follow the on-screen instructions, and<br />
restart your Macintosh ® .<br />
Continued ...<br />
Network<br />
Administrators<br />
33
Step 2<br />
Installing the Drivers & Software<br />
For Network Interface Cable Users<br />
0 Click the <strong>Brother</strong> Laser (IP) icon, and then<br />
choose BRN_XXXXXX.<br />
Close the Chooser.<br />
XXXXXX are the last six digits of the Ethernet<br />
address.<br />
The Printer driver has been installed.<br />
The <strong>Brother</strong> ControlCenter2 and Network<br />
Scanning are not supported in Mac OS ® 9.x.<br />
A To install Presto! ® PageManager ® , click the<br />
Presto! PageManager icon and follow the<br />
on-screen instructions.<br />
You can easily scan, share and organize<br />
photos and documents using Presto! ®<br />
PageManager ® .<br />
Presto! ® PageManager ® has been<br />
installed and the installation is now<br />
complete.<br />
34
For Mac OS ® X 10.2.4 or greater<br />
Make sure that you have finished the instructions from Step 1 “Setting Up<br />
the machine” on pages 4 through 11.<br />
Setting Up<br />
the machine<br />
1 Turn off and unplug the machine from the<br />
AC outlet and disconnect it from your<br />
Macintosh ® if you already connected an<br />
interface cable.<br />
7 For Mac OS ® X 10.5 users ➝<br />
Connect the network cable to the machine,<br />
then connect it to a free port on your hub.<br />
For Mac OS ® X 10.2.4 to 10.4.x users ➝<br />
Wait for the DeviceSelector window to<br />
appear before connecting the network<br />
cable.<br />
2 Turn on your Macintosh ® .<br />
3 Insert the supplied CD-ROM for Macintosh ®<br />
into your CD-ROM drive.<br />
4 Double-click the Start Here OSX icon to<br />
install the drivers and MFL-Pro Suite. If the<br />
language screen appears, choose your<br />
language.<br />
5 Click MFL-Pro Suite to install.<br />
After the DeviceSelector window appears,<br />
connect the network interface cable to the<br />
machine, and then connect it to a free port<br />
on your hub.<br />
The DeviceSelector window will not appear if<br />
you have also connected a Network interface<br />
cable to the machine before restarting your<br />
Macintosh ® , if you are overwriting a previously<br />
installed version of the <strong>Brother</strong> software, or if<br />
you are using Mac OS ® X 10.5. If you<br />
encounter this problem continue with the<br />
installation skipping Steps 12 to 14. You<br />
should select your <strong>Brother</strong> machine from the<br />
Model pull-down list in the main screen of<br />
ControlCenter2. (For details, see the Software<br />
Use’s <strong>Guide</strong> on CD-ROM.)<br />
Installing the Drivers & Software<br />
Macintosh ®<br />
Network<br />
6 Follow the on-screen instructions, and<br />
restart your Macintosh ® .<br />
Continued ...<br />
Network<br />
Administrators<br />
35
Step 2<br />
Installing the Drivers & Software<br />
For Network Interface Cable Users<br />
8 Plug in the power cord and turn on the<br />
machine.<br />
■ If this screen appears click OK.<br />
Enter a name for your Macintosh ® in<br />
Display Name up to 15 characters long<br />
and click OK.<br />
Go to step ><br />
For Mac OS ® X 10.5 users<br />
➝ Go to 9<br />
For Mac OS ® X 10.2.4 to 10.4.x users<br />
➝ Go to B<br />
9 The <strong>Brother</strong> software will search for the<br />
<strong>Brother</strong> device. During this time the<br />
following screen will appear.<br />
■ If the machine is configured for your<br />
network, choose the machine from the list,<br />
and then click OK. This window will not<br />
appear if there is only one machine<br />
connected on the network, it will be chosen<br />
automatically. Go to step ?.<br />
■ If you want to use the machine’s Scan key<br />
to scan over the network you must check<br />
the Register your computer with the<br />
"Scan To" function on the machine<br />
box.<br />
■ The name you enter will appear on the<br />
machine’s LCD when you press the Scan<br />
key and choose a scan option. (For more<br />
information, see Network Scanning in the<br />
Software User’s <strong>Guide</strong> on the CD-ROM.)<br />
0 When this screen appears, click OK.<br />
The MFL-Pro Suite drivers and <strong>Brother</strong><br />
Control Center2 has been installed.<br />
Continue to step 11<br />
For configuration of advanced network<br />
functions such as Scan to FTP, see the<br />
Software and Network User’s <strong>Guide</strong>s located<br />
on the CD-ROM.<br />
36
A To install Presto! ® PageManager ® , click the<br />
Presto! PageManager icon and follow the<br />
on-screen instructions.<br />
D Click Browse.<br />
Setting Up<br />
the machine<br />
When Presto! ® PageManager ® is installed<br />
OCR capability is added to the <strong>Brother</strong><br />
ControlCenter2. You can easily scan, share,<br />
and organize photos and documents using<br />
Presto! ® PageManager ® .<br />
E Choose your model name, and then click<br />
OK. Click OK again to close the<br />
DeviceSelector.<br />
Presto! ® PageManager ® has been<br />
installed and the installation is now<br />
complete.<br />
B Choose Network and then click OK.<br />
F Click Go, then choose Applications.<br />
Installing the Drivers & Software<br />
C If you want to use the Scan key on the<br />
machine, you must check Register your<br />
computer with the "Scan To" functions at<br />
the machine box and enter a name you want<br />
to use for your Macintosh ® in Display Name.<br />
The name you enter will appear on the<br />
machine’s LCD when you press the Scan<br />
key and choose a scan option. You can enter<br />
any name up to 15 characters long.<br />
(For more information on network scanning,<br />
see Chapter 10 of the Software User’s <strong>Guide</strong><br />
on the CD-ROM.)<br />
G Double-click the Utilities folder.<br />
Macintosh ®<br />
Network<br />
Continued ...<br />
Network<br />
Administrators<br />
37
Step 2<br />
Installing the Drivers & Software<br />
For Network Interface Cable Users<br />
H Double-click the Print <strong>Setup</strong> Utility icon.<br />
K Choose your model name and then click<br />
Add.<br />
For Mac OS ® X 10.2.4 to 10.3 users:<br />
For Mac OS ® X 10.2.x users, open Print<br />
Center icon.<br />
I Click Add.<br />
For Mac OS ® X 10.4.x users:<br />
For Mac OS ® X 10.2.4 to 10.3.x users<br />
➝ Go to J<br />
For Mac OS ® X 10.4 users<br />
➝ Go to K<br />
J Make the selection shown below.<br />
L Click Printer <strong>Setup</strong> Utility, then choose<br />
Quit Printer <strong>Setup</strong> Utility.<br />
The MFL-Pro Suite, Printer driver,<br />
Scanner driver and ControlCenter2<br />
have been installed.<br />
For configuration of advanced network<br />
functions such as Scan to FTP, see the<br />
Software and Network User’s <strong>Guide</strong>s located<br />
on the CD-ROM.<br />
38
M To install Presto! ® PageManager ® , click the<br />
Presto! PageManager icon and follow the<br />
on-screen instructions.<br />
When Presto! ® PageManager ® is installed<br />
OCR capability is added to the <strong>Brother</strong><br />
ControlCenter2. You can also easily scan,<br />
share, and organize photos and documents<br />
using Presto! ® PageManager ® .<br />
Presto! ® PageManager ® has been<br />
installed and the installation is now<br />
complete.<br />
Network<br />
Administrators<br />
Macintosh ®<br />
Network<br />
Setting Up<br />
the machine<br />
Installing the Drivers & Software<br />
39
■ For Network Users and Administrators<br />
BRAdmin Professional configuration utility<br />
(For Windows ® 98/98SE/Me/2000 Professional/XP/XP Professional x64 Editon Users)<br />
The BRAdmin Professional utility is designed to manage your <strong>Brother</strong> network connected<br />
devices such as network-ready Multifunction devices and/or network-ready printers in a Local<br />
Area Network (LAN) environment.<br />
For more information on BRAdmin Professional and BRAdmin Light, go to<br />
http://solutions.brother.com<br />
Installing the BRAdmin Professional configuration utility<br />
1 Put the supplied CD-ROM into your CD-ROM drive.<br />
The opening screen will appear automatically.<br />
Follow the on-screen instructions.<br />
Make sure that the supplied CD-ROM you are using matches to your operating system.<br />
2 Click the Install Optional Applications icon on the main menu screen.<br />
3 Click BRAdmin Professional and follow the on-screen instructions.<br />
40
Setting your IP Address, Subnet Mask and Gateway using BRAdmin<br />
Professional<br />
1 Start BRAdmin Professional, and select<br />
TCP/IP.<br />
3 Double-click the new device.<br />
Setting Up<br />
the machine<br />
2 Click Devices, then choose Search Active<br />
Devices.<br />
BRAdmin will search for new devices<br />
automatically.<br />
The default password for the print server is<br />
“access”. You can use BRAdmin<br />
Professional or a web browser to change this<br />
password.<br />
4 Enter the IP Address, Subnet Mask and<br />
Gateway, and then click the OK button.<br />
5 The address information will be saved to the<br />
machine.<br />
For more information on network<br />
administration, please see the Network<br />
User’s <strong>Guide</strong> in the programs menu or go to<br />
http://solutions.brother.com<br />
Network<br />
Administrators<br />
Windows ®<br />
USB<br />
Windows ®<br />
Parallel<br />
Windows NT ® 4.0<br />
Parallel<br />
Windows ®<br />
Network<br />
Macintosh ®<br />
Network<br />
Macintosh ®<br />
USB<br />
41
BRAdmin Light configuration utility<br />
(For Windows Vista ® users)<br />
The BRAdmin Light is a utility for initial setup of <strong>Brother</strong> network connected devices. It can also<br />
search for <strong>Brother</strong> products on your network, view the status and configure basic network<br />
settings, such as IP address.<br />
For more information on BRAdmin Light, visit us at http://solutions.brother.com.<br />
■ If you require more advanced printer management, use the latest <strong>Brother</strong> BRAdmin Professional utility<br />
version that is available as a download from http://solutions.brother.com.<br />
■ Make sure that you are using the Vista CD-ROM.<br />
Installing the BRAdmin Light<br />
configuration utility<br />
The default password for the print server is<br />
‘access’. You can use BRAdmin Light to<br />
change this password.<br />
1 Click Install Other Drivers or Utilities on<br />
the menu screen.<br />
Setting your IP address, Subnet<br />
Mask and Gateway using BRAdmin<br />
Light<br />
If you have a DHCP/BOOTP/RARP server in<br />
your network, you don’t have to do the<br />
following operation. Because the print server<br />
will automatically obtain its IP address.<br />
1 Start BRAdmin Light. It will search for new<br />
devices automatically.<br />
2 Double-click the unconfigured device.<br />
2 Click BRAdmin Light and follow the<br />
on-screen instructions.<br />
3 Choose STATIC for the Boot Method.<br />
Enter the IP Address, Subnet Mask and<br />
Gateway, and then click OK.<br />
3 When the User Account Control screen<br />
appears, click Allow.<br />
4 The address information will be saved to the<br />
machine.<br />
42
BRAdmin Light configuration utility<br />
(For Mac OS ® X users)<br />
The <strong>Brother</strong> BRAdmin Light software is a Java application that is designed for the Apple Mac<br />
OS ® X environment. It supports some of the features of the Windows BRAdmin Professional<br />
software. For example, using the BRAdmin Light software, you can change some network<br />
settings on <strong>Brother</strong>’s network ready printers and multifunction devices.<br />
The BRAdmin Light software will be installed automatically when you install the MFL-Pro Suite.<br />
If you have already installed the MFL-Pro Suite, you don’t have to install it again.<br />
For more information on BRAdmin Light, visit us at http://solutions.brother.com.<br />
Setting your IP address, Subnet Mask and Gateway using BRAdmin Light<br />
Setting Up<br />
the machine<br />
■ If you have a DHCP/BOOTP/RARP server<br />
in your network, you don’t have to do the<br />
following operation. The print server will<br />
automatically obtain its own IP address.<br />
Make sure that version 1.4.1_07 or later of<br />
Java client software is installed on your<br />
computer.<br />
■ The default password for the print server is<br />
“access”. You can use BRAdmin Light to<br />
change this password.<br />
1 Double-click the Macintosh HD icon on<br />
your desktop.<br />
3 Double-click the BRAdminLight.jar file.<br />
Run the BRAdmin Light software. BRAdmin<br />
Light searches new devices automatically.<br />
4 Double-click the new device.<br />
2 Choose Library, Printers, <strong>Brother</strong> and<br />
then Utilities.<br />
5 Enter the IP Address, Subnet Mask and<br />
Gateway, and then click OK.<br />
6 The address information will be saved to the<br />
printer.<br />
Network<br />
Administrators<br />
Windows ®<br />
Network<br />
Windows ®<br />
USB<br />
Windows ®<br />
Parallel<br />
Windows NT ® 4.0<br />
Parallel<br />
Macintosh ®<br />
USB<br />
Macintosh ®<br />
Network<br />
43
■ Options and Consumables<br />
Options<br />
The machine has the following optional accessories. You can expand the capabilities of the<br />
machine by adding these items.<br />
Lower Tray Unit<br />
Memory<br />
LT-5300<br />
Second lower paper tray unit expands total input capacity up<br />
to 500 sheets.<br />
You can expand the memory by installing a (144-pin DIMM)<br />
memory module. For more details, see “Memory Board” in<br />
Chapter B of the User’s <strong>Guide</strong>.<br />
Replacement Consumables<br />
When the time comes to replace consumables, an error message will be indicated on the LCD.<br />
For more information about the consumables for your machine, visit<br />
http://solutions.brother.com or contact your local <strong>Brother</strong> re-seller.<br />
Drum Unit<br />
DR-520<br />
Toner Cartridge<br />
TN-550 / TN-580<br />
44
Trademarks<br />
The <strong>Brother</strong> logo is a registered trademark of <strong>Brother</strong> Industries, Ltd.<br />
<strong>Brother</strong> is a registered trademark of <strong>Brother</strong> Industries, Ltd.<br />
Multi-Function Link is a registered trademark of <strong>Brother</strong> International Corporation.<br />
Windows Vista ® is either a registered trademark or a trademark of Microsoft Corporation in the United States and<br />
other countries.<br />
Microsoft, Windows, Windows NT and Windows Server are registered trademark or a trademark of Microsoft<br />
Corporation in the United States and/or other countries.<br />
Macintosh and True Type are registered trademarks of Apple Inc.<br />
Postscript and Postscript 3 are registered trademarks or trademarks of Adobe Systems Incorporated.<br />
PaperPort is a registered trademark of ScanSoft, Inc.<br />
Presto! PageManager is a registered trademark of NewSoft Technology Corporation.<br />
Each company whose software title is mentioned in this manual has a Software License Agreement specific to its<br />
proprietary programs.<br />
All other brand and product names mentioned in this manual are registered trademarks of their respective<br />
companies.<br />
Compilation and Publication<br />
Under the supervision of <strong>Brother</strong> Industries, Ltd., this manual has been compiled and published, covering the<br />
latest product descriptions and specifications.<br />
The contents of this manual and the specifications of this product are subject to change without notice.<br />
<strong>Brother</strong> reserves the right to make changes without notice in the specifications and materials contained herein and<br />
shall not be responsible for any damages (including consequential) caused by reliance on the materials presented,<br />
including but not limited to typographical and other errors relating to the publication.<br />
This product is designed for use in a Professional Environment.<br />
©2006 <strong>Brother</strong> Industries, Ltd. ©1998-2006 TROY Group, Inc.<br />
©1983-2006 PACIFIC SOFTWORKS INC.<br />
This product includes the “KASAGO TCP/IP” software developed by Elmic Systems, Inc. ALL RIGHTS<br />
RESERVED.
US/CAN


