

Honeywell Round® Non-Programmable Thermostat (CT87) - Round Non-Programmable Thermostat Installation Manual (English,French)
Honeywell Round® Non-Programmable Thermostat (CT87) - Round Non-Programmable Thermostat Installation Manual (English,French)
Honeywell Round® Non-Programmable Thermostat (CT87) - Round Non-Programmable Thermostat Installation Manual (English,French)

You also want an ePaper? Increase the reach of your titles
YUMPU automatically turns print PDFs into web optimized ePapers that Google loves.
60<br />
80<br />
90<br />
60<br />
70<br />
70<br />
80<br />
90<br />
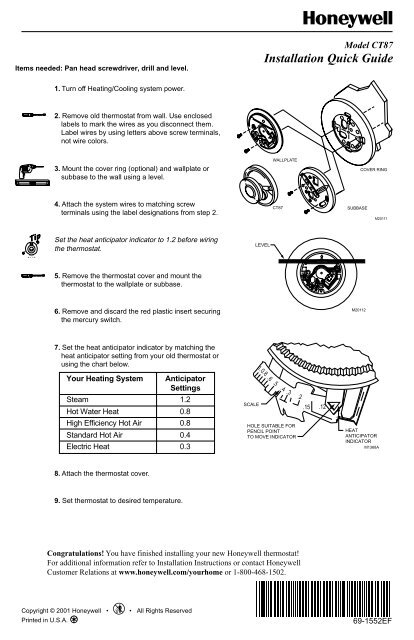
Items needed: Pan head screwdriver, drill and level.<br />
Model <strong>CT87</strong><br />
<strong>Installation</strong> Quick Guide<br />
1. Turn off Heating/Cooling system power.<br />
2. Remove old thermostat from wall. Use enclosed<br />
labels to mark the wires as you disconnect them.<br />
Label wires by using letters above screw terminals,<br />
not wire colors.<br />
3. Mount the cover ring (optional) and wallplate or<br />
subbase to the wall using a level.<br />
WALLPLATE<br />
COVER RING<br />
4. Attach the system wires to matching screw<br />
terminals using the label designations from step 2.<br />
<strong>CT87</strong><br />
SUBBASE<br />
M20111<br />
Set the heat anticipator indicator to 1.2 before wiring<br />
the thermostat.<br />
LEVEL<br />
5. Remove the thermostat cover and mount the<br />
thermostat to the wallplate or subbase.<br />
6. Remove and discard the red plastic insert securing<br />
the mercury switch.<br />
M20112<br />
7. Set the heat anticipator indicator by matching the<br />
heat anticipator setting from your old thermostat or<br />
using the chart below.<br />
Your Heating System<br />
Steam<br />
Hot Water Heat<br />
High Efficiency Hot Air<br />
Standard Hot Air<br />
Electric Heat<br />
Anticipator<br />
Settings<br />
1.2<br />
0.8<br />
0.8<br />
0.4<br />
0.3<br />
SCALE<br />
1.0.5<br />
.8 .6<br />
.4<br />
.3<br />
HOLE SUITABLE FOR<br />
PENCIL POINT<br />
TO MOVE INDICATOR<br />
.2<br />
.15 .12<br />
HEAT<br />
ANTICIPATOR<br />
INDICATOR<br />
M1368A<br />
8. Attach the thermostat cover.<br />
9. Set thermostat to desired temperature.<br />
Congratulations! You have finished installing your new <strong>Honeywell</strong> thermostat!<br />
For additional information refer to <strong>Installation</strong> Instructions or contact <strong>Honeywell</strong><br />
Customer Relations at www.honeywell.com/yourhome or 1-800-468-1502.<br />
Copyright © 2001 <strong>Honeywell</strong> • • All Rights Reserved<br />
Printed in U.S.A.<br />
69-1552EF
60<br />
70<br />
80<br />
70<br />
80<br />
90<br />
60<br />
90<br />
Outils requis : Tournevis pour vis à tête cylindrique,<br />
perceuse et niveau<br />
Modèle <strong>CT87</strong><br />
Mini-guide d’installation<br />
1. Couper l’alimentation du système de chauffagerefroidissement.<br />
2. Retirer l’ancien thermostat du mur. Utiliser les<br />
étiquettes qui accompagnent le nouveau thermostat<br />
pour identifier les fils à mesure qu’ils sont<br />
débranchés. Identifier les fils par les lettres qui<br />
figurent au-dessus des bornes à vis, et non selon la<br />
couleur des fils.<br />
PLAQUE MURALE<br />
ANNEAU<br />
3. Placer l’anneau (en option) et la plaque murale ou<br />
la plaque de fixation sur le mur en se servant d’un<br />
niveau.<br />
<strong>CT87</strong><br />
PLAQUE DE FIXATION<br />
MF20111<br />
TRUC<br />
4. Relier les fils du système aux bornes à vis<br />
correspondantes en se servant des étiquettes de<br />
l’étape 2.<br />
Régler la résistance anticipatrice de chaleur à 1,2<br />
avant de raccorder les fils du thermostat.<br />
NIVEAU<br />
5. Retirer le couvercle du thermostat et fixer le<br />
thermostat sur la plaque de fixation ou la plaque<br />
murale.<br />
MF20112<br />
6. Retirer le morceau de plastique rouge qui sert à<br />
protéger l’ampoule de mercure et le jeter.<br />
7. Régler la résistance anticipatrice de chaleur au<br />
même réglage que celui de l’ancien thermostat ou<br />
selon le tableau ci-dessous.<br />
Votre système de chauffage<br />
Vapeur<br />
Chauffage à eau chaude<br />
Chauffage à air à haut rendement<br />
Chauffage à air ordinaire<br />
Chauffage électrique<br />
Réglage de la<br />
résistance<br />
anticipatrice<br />
1,2<br />
0,8<br />
0,8<br />
0,4<br />
0,3<br />
ÉCHELLE<br />
1.0.5<br />
.8 .6<br />
.4<br />
.3<br />
INSÉRER LA POINTE<br />
D’UN CRAYON DANS<br />
L’OUVERTURE POUR<br />
DÉPLACER L’INDICATEUR<br />
.2<br />
.15 .12<br />
INDICATEUR<br />
DE LA RÉSISTANCE<br />
ANTICIPATRICE<br />
MF1368A<br />
8. Remettre en place le couvercle du thermostat.<br />
9. Régler le thermostat au point de consigne désiré.<br />
Félicitations! Votre nouveau thermostat <strong>Honeywell</strong> est maintenant installé! Pour obtenir des renseignements<br />
plus détaillés, consultez la notice d’installation ou communiquez avec les Services à la clientèle de <strong>Honeywell</strong>, au<br />
www.honeywell.com/yourhome ou au 1-800-468-1502.<br />
69-1552EF<br />
Copyright<br />
Copyright ©<br />
2001<br />
2001<br />
<strong>Honeywell</strong><br />
<strong>Honeywell</strong> • • Tous<br />
All Rights<br />
droits<br />
Reserved<br />
réservés<br />
Printed<br />
Imprimé<br />
in<br />
aux<br />
U.S.A.<br />
États-Unis


