

Honeywell Programmable Wireless FocusPRO Comfort System - Programmable Wireless FocusPRO Comfort System Operating Manual (English,French,Spanish)
Honeywell Programmable Wireless FocusPRO Comfort System - Programmable Wireless FocusPRO Comfort System Operating Manual (English,French,Spanish)
Honeywell Programmable Wireless FocusPRO Comfort System - Programmable Wireless FocusPRO Comfort System Operating Manual (English,French,Spanish)

Create successful ePaper yourself
Turn your PDF publications into a flip-book with our unique Google optimized e-Paper software.
<strong>Operating</strong> <strong>Manual</strong><br />
<strong>Operating</strong><br />
<strong>Manual</strong><br />
FocusPro ® TH6320R<br />
<strong>Wireless</strong> Thermostat<br />
Thermostat Sans Fil<br />
Termóstato inalámbrico<br />
69-2093EFS-07
Quick Reference<br />
Card<br />
Grasp and pull to<br />
see basic operating<br />
instructions at a<br />
glance.<br />
Battery Holder<br />
Press down and pull to<br />
remove batteries.<br />
Batteries should be<br />
replaced once a year<br />
(see page 16).<br />
M28450<br />
CAUTION: EQUIPMENT DAMAGE HAZARD. To prevent possible compressor damage, do<br />
not operate cooling system when outdoor temperature is below 50 °F (10 °C).<br />
Need Help?<br />
For assistance with this product please visit http://yourhome.honeywell.com<br />
or call <strong>Honeywell</strong> Customer Care toll-free at 1-800-468-1502<br />
Read and save these instructions.<br />
® U.S. Registered Trademark. Patents pending.<br />
Copyright © 2013 <strong>Honeywell</strong> International Inc. All rights reserved.
Français : voir la page 20 • Español: vea la página 40<br />
Contents<br />
About your new thermostat<br />
Programming at a glance.................... 2<br />
Quick reference to controls.................. 3<br />
Quick reference to display................... 4<br />
Programming & Operation<br />
Set time and day.................................. 5<br />
Fan settings (auto/on).......................... 6<br />
<strong>System</strong> settings (heat/cool.................. 7<br />
Program schedules.............................. 8<br />
Program schedule overrides.............. 10<br />
Auto-changeover (heat/cool)............. 12<br />
Remote control.................................. 13<br />
Display outdoor climate..................... 14<br />
Find lost remote control..................... 14<br />
Special features................................. 15<br />
Appendices<br />
Battery replacement.......................... 16<br />
In case of difficulty............................. 18<br />
Limited warranty................................ 19<br />
Regulatory information...................... 60<br />
1 69-2093EFS—07
<strong>Operating</strong> <strong>Manual</strong><br />
About your new thermostat<br />
Your new thermostat is pre-programmed and ready to go. All you have to do is set<br />
the time and day. Then check the settings below and change if needed:<br />
1. Set time and day (required for proper operation)....................See page 5<br />
2. Select fan setting (Auto/On)......................................................See page 6<br />
3. Select system setting (Heat/Cool).............................................See page 7<br />
4. Program schedules: Preset to energy-saving levels<br />
while you’re at work or asleep (assumes you<br />
wake at 6 am, leave at 8 am, return at 6 pm<br />
and go to bed at 10 pm)..........................................................See pages 8-9<br />
CAUTION: EQUIPMENT DAMAGE HAZARD. You can override the program schedule at any<br />
time, and manually adjust the temperature (see pages 10-11).<br />
69-2093EFS—07 2
Français : voir la page 20 • Español: vea la página 40<br />
Quick reference to controls<br />
Digital display (see page 4) Battery holder (see page 16)<br />
Temperature buttons<br />
Press to adjust temperature<br />
settings (see page 9–11)<br />
M28451<br />
Function buttons<br />
Press to select the function displayed just above each button.<br />
(Functions change depending on the task.)<br />
Hold button<br />
Press to override programmed<br />
temperature control (see page 11)<br />
3 69-2093EFS—07
<strong>Operating</strong> <strong>Manual</strong><br />
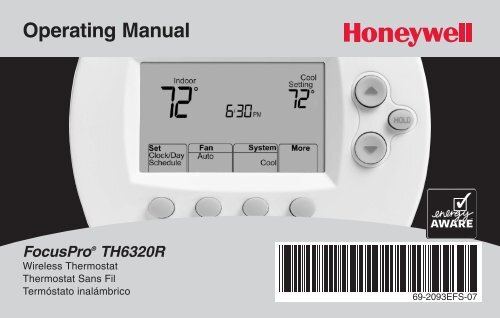
Quick reference to display screen<br />
Current inside temperature<br />
Low battery warnings<br />
(see pages 16–17)<br />
Current time/day<br />
(see page 5)<br />
Recovery<br />
(see page 15)<br />
Current program<br />
period<br />
Wake/Leave/Return/<br />
Sleep (see pages 8-9)<br />
Set Clock/Day/<br />
Schedule<br />
(see pages 5 and 9)<br />
Fan Setting<br />
Auto/On (see page 6)<br />
Indoor Recovery Replace Battery Heat<br />
75<br />
Setting<br />
AM<br />
6:30 75<br />
Aux Heat On<br />
Set<br />
Wake<br />
Fan <strong>System</strong> More<br />
Clock/Day<br />
Schedule<br />
Auto<br />
Heat<br />
<strong>System</strong> setting<br />
Heat/Cool/Auto/Off/Em<br />
Heat (see page 7)<br />
69-2093EFS—07 4<br />
M28452<br />
Temperature setting<br />
(see pages 9–11).<br />
Auxillary heat<br />
(Only for heat pumps with<br />
auxillary heat)<br />
<strong>System</strong> status<br />
Heat On/Cool On<br />
(If flashing, see page 15)<br />
More<br />
Press to view outdoor climate (if<br />
outdoor sensor is installed), or to find<br />
a misplaced remote control if installed<br />
(see page 14)
Français : voir la page 20 • Español: vea la página 40<br />
Set the time and day<br />
Press SET CLOCK/DAY/SCHEDULE, then adjust time<br />
4:30<br />
PM<br />
Set Fan <strong>System</strong> More<br />
Clock/Day Auto<br />
Heat<br />
Schedule<br />
Press SET DAY, then select current day<br />
M28453<br />
1. Press SET CLOCK/DAY/SCHEDULE,<br />
then press s or t to set clock.<br />
2. Press SET DAY, then press s or t<br />
to select the day of week.<br />
3. Press DONE to save.<br />
Note: If the SET CLOCK/DAY/SCHEDULE<br />
option is not displayed, press DONE or<br />
CANCEL.<br />
Done<br />
Wed<br />
Set<br />
Day<br />
Set<br />
Schedule<br />
Note: If the display flashes Set Clock,<br />
the thermostat will follow your settings<br />
for the weekday “Wake” time period until<br />
you reset the time and day.<br />
M28454<br />
5 69-2093EFS—07
<strong>Operating</strong> <strong>Manual</strong><br />
Select the fan setting<br />
Set Fan <strong>System</strong> More<br />
Clock/Day Auto<br />
Heat<br />
Schedule<br />
Set<br />
Clock/Day<br />
Schedule<br />
M28455<br />
Fan <strong>System</strong> More<br />
On Heat<br />
M28456<br />
Press FAN to select Auto or On.<br />
In “Auto” mode (the most commonly used<br />
setting), the fan runs only when the heating<br />
or cooling system is on.<br />
If set to “On,” the fan runs continuously.<br />
Note: Options may vary<br />
depending on your heating/ cooling<br />
equipment.<br />
69-2093EFS—07 6
Français : voir la page 20 • Español: vea la página 40<br />
Select the system setting<br />
Set Fan <strong>System</strong> More<br />
Clock/Day Auto<br />
Heat<br />
Schedule<br />
M28457<br />
Set Fan <strong>System</strong> More<br />
Clock/Day Auto<br />
Schedule<br />
Cool<br />
M28458<br />
Note: Options may vary<br />
depending on your heating/ cooling<br />
equipment.<br />
Press SYSTEM to select:<br />
• Heat: Thermostat controls only the<br />
heating system.<br />
• Cool: Thermostat controls only the<br />
cooling system.<br />
• Off: All systems are off.<br />
• Auto: Thermostat automatically selects<br />
heating or cooling depending on the<br />
indoor temperature.<br />
• Em Heat: (only for heat pumps with<br />
auxiliary heat): Thermostat controls<br />
Emergency and Auxiliary Heat.<br />
Compressor is locked out.<br />
7 69-2093EFS—07
<strong>Operating</strong> <strong>Manual</strong><br />
Energy-saving settings for maximum cost savings<br />
This thermostat is pre-set to use energy-saving program settings. We recommend<br />
these settings, since they can reduce your heating/cooling expenses.<br />
(See next page to adjust times and temperatures of each time period.)<br />
Wake<br />
(6:00 am)<br />
Leave<br />
(8:00 am)<br />
Return<br />
(6:00 pm)<br />
Sleep<br />
(10:00 pm)<br />
Heat (Mon-Fri) Cool (Mon-Fri) Heat (Sat-Sun) Cool (Sat-Sun)<br />
70 ° 78 ° 70 ° 78 °<br />
62 ° 85 ° 62 °<br />
[Or cancel period]<br />
85 °<br />
[Or cancel period]<br />
70 ° 78 ° 70 °<br />
[Or cancel period]<br />
78 °<br />
[Or cancel period]<br />
62 ° 82 ° 62 ° 82 °<br />
69-2093EFS—07 8
To adjust program schedules<br />
Set Fan <strong>System</strong> More<br />
Clock/Day Auto<br />
Heat<br />
Schedule<br />
Done<br />
Done<br />
Set<br />
Day<br />
Set Schedule<br />
6:00<br />
Mon Tues Wed Thur Fri<br />
Wake<br />
Cancel<br />
Period<br />
AM<br />
Set<br />
Schedule<br />
70<br />
Heat<br />
Setting<br />
Next<br />
M28459<br />
Français : voir la page 20 • Español: vea la página 40<br />
1. Press SET CLOCK/DAY/SCHEDULE, then SET<br />
SCHEDULE.<br />
2. Press s or t to set your weekday Wake time<br />
(Mon–Fri), then press NEXT.<br />
3. Press s or t to set the temperature for this<br />
time period, then press NEXT.<br />
4. Set time and temperature for the next time<br />
period (Leave). Repeat steps 2 and 3 for each<br />
weekday time period.<br />
5. Press NEXT to set Weekend time periods (Sat-<br />
Sun), then press DONE to save & exit.<br />
Note: Make sure the thermostat is set to the<br />
system you want to program (Heat or Cool).<br />
9 69-2093EFS—07
<strong>Operating</strong> <strong>Manual</strong><br />
Program schedule override (temporary)<br />
Press to temporarily adjust temperature.<br />
Indoor<br />
Heat<br />
75<br />
Setting<br />
Hold Until<br />
6:00 75<br />
PM<br />
Cancel Fan <strong>System</strong> More<br />
Auto<br />
Heat<br />
Press to resume<br />
program schedule<br />
Temperature will be<br />
maintained until the<br />
time shown<br />
M28460<br />
Press s or t to immediately adjust<br />
the temperature. This will temporarily<br />
override the temperature setting for<br />
the current time period.<br />
The new temperature will be<br />
maintained only until the next<br />
programmed time period begins (see<br />
page 8).<br />
To cancel the temporary setting at<br />
any time, press CANCEL.<br />
69-2093EFS—07 10
Program schedule override (permanent)<br />
Press to permanently adjust temperature.<br />
Indoor<br />
Heat<br />
75<br />
Setting<br />
Hold<br />
6:00 75<br />
PM<br />
Cancel Fan <strong>System</strong> More<br />
Auto<br />
Heat<br />
Press to resume<br />
program schedule<br />
Français : voir la page 20 • Español: vea la página 40<br />
M28461<br />
Press HOLD to permanently adjust<br />
the temperature. This will override<br />
the temperature settings for all time<br />
periods.<br />
The “Hold” feature turns off the program<br />
schedule and allows you to<br />
adjust the thermostat manually, as<br />
needed.<br />
Whatever temperature you set will<br />
be maintained 24 hours a day until<br />
you manually change it, or press<br />
CANCEL to resume the programmed<br />
schedule.<br />
11 69-2093EFS—07
<strong>Operating</strong> <strong>Manual</strong><br />
Auto Changeover<br />
Set Fan <strong>System</strong> More<br />
Clock/Day Auto<br />
Schedule<br />
Auto<br />
Press until screen<br />
displays “Auto”<br />
M28462<br />
Auto Changeover is a feature used in climates<br />
where both air conditioning and heating are<br />
often used on the same day. When the system is<br />
set to Auto, the thermostat automatically selects<br />
heating or cooling depending on the indoor temperature.<br />
Heat and cool settings must be at least 3<br />
degrees apart. The thermostat will automatically<br />
adjust settings to maintain this 3-degree separation.<br />
Note: The Auto system setting<br />
may not appear, depending on<br />
how your thermostat was installed.<br />
69-2093EFS—07 12
Français : voir la page 20 • Español: vea la página 40<br />
Remote control<br />
Temperature is measured at location<br />
of remote control<br />
72<br />
Remote has Control75<br />
Reading<br />
at Thermostat<br />
at Remote<br />
Cancel<br />
Fan<br />
Auto<br />
More<br />
M28463<br />
The optional remote control can act as a<br />
mobile thermostat, to maintain a comfortable<br />
temperature as you move from room to<br />
room.<br />
When the system is responding to<br />
temperatures measured at the Remote, the<br />
thermostat will display “Remote has Control.”<br />
Press CANCEL to restore temperature control<br />
to the thermostat (the system will only<br />
respond to temperatures measured at the<br />
thermostat).<br />
Note: The thermostat may take up to 15 seconds to respond to commands entered at<br />
the remote control. See Remote Control <strong>Operating</strong> <strong>Manual</strong> for more information.<br />
13 69-2093EFS—07
<strong>Operating</strong> <strong>Manual</strong><br />
Additional features<br />
Set Fan <strong>System</strong> More<br />
Clock/Day Auto<br />
Heat<br />
Schedule<br />
Press to display more<br />
options<br />
M28464<br />
To display outdoor climate<br />
If you have an outdoor air sensor, press<br />
MORE to display the current outdoor temperature<br />
and humidity. Press DONE to exit.<br />
Outdoor<br />
Outdoor<br />
85<br />
Humidity<br />
50 %<br />
Done<br />
M28465<br />
Outdoor<br />
temperature<br />
FindRemote<br />
Outdoor<br />
humidity<br />
Press to find a lost<br />
remote control<br />
To find a lost remote control<br />
If you misplace a remote control, press<br />
MORE, then FIND REMOTE. The remote will<br />
beep for two minutes to help you locate it.<br />
Press anywhere on the display screen to<br />
stop the beeping.<br />
69-2093EFS—07 14
Français : voir la page 20 • Español: vea la página 40<br />
Special features<br />
Built-in compressor protection: This feature helps prevent damage to the<br />
compressor in your air conditioning or heat pump system. Damage can occur if the<br />
compressor is re-started too soon after shutdown. This feature forces the compressor<br />
to wait for a few minutes before restarting.<br />
During the wait time, the display will flash the message Cool On (or Heat On if you<br />
have a heat pump).<br />
Adaptive Intelligent Recovery: This feature eliminates the guesswork when setting<br />
your schedule. It allows the thermostat to “learn” how long your furnace and air<br />
conditioner take to reach programmed temperature settings, so the temperature is<br />
reached at the time you set.<br />
Note: When Adaptive Intelligent Recovery is in effect, the thermostat will<br />
display “Recovery.”<br />
15 69-2093EFS—07
<strong>Operating</strong> <strong>Manual</strong><br />
Battery replacement<br />
Press down and pull to remove.<br />
Replace Battery<br />
Insert fresh AA alkaline<br />
batteries, then reinstall<br />
battery holder.<br />
M28466<br />
Install fresh batteries when the REPLACE<br />
BATTERY warning begins flashing. The warning<br />
flashes about two months before the batteries<br />
are depleted.<br />
Remove the battery holder and install 2 fresh<br />
AA alkaline batteries.<br />
After batteries are installed, the thermostat will<br />
automatically restore communication with the<br />
wireless network within a few minutes.<br />
Note: If batteries are inserted within 2 minutes,<br />
the time and day will not have to be reset. All<br />
other settings are retained in memory.<br />
M28442<br />
69-2093EFS—07 16
Battery replacement (outdoor air sensor)<br />
Français : voir la page 20 • Español: vea la página 40<br />
M28443<br />
Remove sensor<br />
from bracket<br />
Replace outdoor sensor batteries when the<br />
REPLACE BATTERY OUTDOOR warning begins<br />
flashing on the thermostat. The warning<br />
flashes about two months before the<br />
batteries are depleted.<br />
Remove the sensor from the bracket, remove<br />
the cover and install 2 fresh AA lithium<br />
batteries.<br />
After batteries are installed, the sensor will<br />
automatically restore communication with the<br />
wireless network within a few minutes.<br />
Remove cover and<br />
install 2 fresh AA<br />
lithium batteries<br />
M28444<br />
17 69-2093EFS—07
<strong>Operating</strong> <strong>Manual</strong><br />
In case of difficulty<br />
Heating or cooling<br />
system does not<br />
respond<br />
• Check circuit breaker and reset if necessary.<br />
• Make sure power switch at heating & cooling system is on.<br />
• Make sure furnace door is closed securely.<br />
• Wait 5 minutes for the system to respond.<br />
Screen displays<br />
“No Signal”<br />
Thermostat has lost radio contact with the wireless network (usually because of<br />
a power outage). To restore power:<br />
• Check circuit breaker and reset if necessary.<br />
• Make sure power switch at heating & cooling system is on.<br />
• Make sure furnace door is closed securely.<br />
After power is restored, the thermostat will automatically restore wireless<br />
communication within a few minutes.<br />
69-2093EFS—07 18
Up to 5-year limited warranty<br />
<strong>Honeywell</strong> warrants this product, excluding battery, to be free from<br />
defects in the workmanship or materials, under normal use and service,<br />
for a period of three (3) years from the date of purchase by the consumer.<br />
If at any time during the warranty period the product is determined<br />
to be defective or malfunctions, <strong>Honeywell</strong> shall repair or replace it (at<br />
<strong>Honeywell</strong>’s option).<br />
If the product is defective,<br />
(i) return it, with a bill of sale or other dated proof of purchase, to the<br />
place from which you purchased it; or<br />
(ii) call <strong>Honeywell</strong> Customer Care at 1-800-468-1502. Customer Care<br />
will make the determination whether the product should be returned to<br />
the following address: <strong>Honeywell</strong> Return Goods, Dock 4 MN10-3860,<br />
1985 Douglas Dr. N., Golden Valley, MN 55422, or whether a replacement<br />
product can be sent to you.<br />
This warranty does not cover removal or reinstallation costs. This warranty<br />
shall not apply if it is shown by <strong>Honeywell</strong> that the defect or malfunction<br />
was caused by damage which occurred while the product was<br />
in the possession of a consumer.<br />
<strong>Honeywell</strong>’s sole responsibility shall be to repair or replace the product<br />
within the terms stated above. HONEYWELL SHALL NOT BE<br />
LIABLE FOR ANY LOSS OR DAMAGE OF ANY KIND, INCLUDING<br />
ANY INCIDENTAL OR CONSEQUENTIAL DAMAGES RESULTING,<br />
DIRECTLY OR INDIRECTLY, FROM ANY BREACH OF ANY<br />
Français : voir la page 20 • Español: vea la página 40<br />
WARRANTY, EXPRESS OR IMPLIED, OR ANY OTHER FAILURE OF<br />
THIS PRODUCT. Some states do not allow the exclusion or limitation<br />
of incidental or consequential damages, so this limitation may not apply<br />
to you.<br />
THIS WARRANTY IS THE ONLY EXPRESS WARRANTY<br />
HONEYWELL MAKES ON THIS PRODUCT. THE DURATION OF<br />
ANY IMPLIED WARRANTIES, INCLUDING THE WARRANTIES OF<br />
MERCHANTABILITY AND FITNESS FOR A PARTICULAR PURPOSE,<br />
IS HEREBY LIMITED TO THE THREE-YEAR DURATION OF THIS<br />
WARRANTY. Some states do not allow limitations on how long an<br />
implied warranty lasts, so the above<br />
limitation may not apply to you.<br />
This warranty gives you specific legal rights, and you may have other<br />
rights which vary from state to state.<br />
If you have any questions concerning this warranty, please write<br />
<strong>Honeywell</strong> Customer Relations, 1985 Douglas Dr, Golden Valley, MN<br />
55422 or call 1-800-468-1502.<br />
When the product is registered on-line at<br />
www.warranty.<strong>Honeywell</strong>.com, the standard manufacture coverage<br />
stated above extends to a period of (5) years.<br />
19 69-2093EFS—07
Carte de référence<br />
rapide<br />
Tirer pour voir d’un coup<br />
d’œil les instructions de<br />
fonctionnement de base.<br />
Porte-piles<br />
Appuyer et tirer pour<br />
enlever les piles.<br />
Les piles devraient être<br />
remplacées une fois<br />
par an (page 36).<br />
M28450<br />
MISE EN GARDE : RISQUE DE DOMMAGE MATÉRIEL. Pour éviter d’endommager le<br />
compresseur, ne pas faire fonctionner le système de refroidissement lorsque la température<br />
extérieure est inférieure à 10 °C (50 °F).<br />
Besoin d’aide?<br />
Pour obtenir de l’assistance au sujet de ce produit, consulter le http://yourhome.honeywell.com<br />
ou téléphoner sans frais aux Services à la clientèle de <strong>Honeywell</strong> au 1-800-468-1502<br />
Prière de lire le mode d’emploi et de le conserver en lieu sûr.<br />
® Marque de commerce enregistrée aux États-Unis. Brevets en instance.<br />
Copyright © 2013 <strong>Honeywell</strong> International Inc. Tous droits réservés.
<strong>English</strong>: see page 1 • Español: vea la página 40<br />
Table des matières<br />
Un mot sur votre nouvel appareil<br />
Programmation en un coup d’oeil...... 22<br />
Coup d’oeil sur les commandes........ 23<br />
Coup d’oeil sur l’affichage................. 24<br />
Programmation et Fonctionnement<br />
Réglage de l’heure et du jour............ 25<br />
Réglage du ventilateur (Auto/On) ..... 26<br />
Réglage du système (Heat/Cool)...... 27<br />
Horaires programmés........................ 28<br />
Dérogation à l’horaire................... 30-31<br />
Commutation chaud-froid<br />
automatique..............................................32<br />
Télécommande.................................. 33<br />
Affichage de la temp. extérieure..........34<br />
Retrouver une télécommande<br />
égarée................................................ 34<br />
Caractéristiques spéciales....................35<br />
Annexes<br />
Remplacement des piles................... 36<br />
En cas de difficulté............................ 38<br />
Garantie limitée................................. 39<br />
Information sur la<br />
réglementation................................... 60<br />
21 69-2093EFS—07
Mode d’emploi<br />
Un mot sur votre nouvel appareil<br />
Votre nouveau thermostat est préprogrammé et prêt à l’emploi. Il suffit de régler<br />
l’heure et la date. Il faudra ensuite vérifier si les réglages prévus conviennent et les<br />
modifier au besoin :<br />
1. Régler l’heure et le jour............................................................Voir page 25<br />
2. Sélectionner le réglage du ventilateur....................................Voir page 26<br />
3. Sélectionner le réglage du système.......................................Voir page 27<br />
4. Horaire programmé : Horaire économiseur préréglé pour<br />
les périodes de travail et de sommeil (en supposant que le<br />
réveil est à 6:00, le départ de la maison à 8:00, le retour<br />
à 18:00 et le coucher à 22:00).............................................Voir pages 28-29<br />
Régler la température au moyen d’une seule touche : Il est possible de déroger à<br />
l’horaire programmé en tout temps et de régler manuellement la température (voir pages<br />
30-31).<br />
69-2093EFS—07 22
<strong>English</strong>: see page 1 • Español: vea la página 40<br />
Coup d’oeil sur les commandes<br />
Affichage numérique (voir p. 24)<br />
Porte-piles (voir p. 36)<br />
Touches de réglage de la<br />
température<br />
Appuyer sur le bouton pour<br />
régler la température<br />
(voir p. 29-31).<br />
Boutons de fonctions<br />
Appuyer pour sélectionner la fonction affichée<br />
sous chaque bouton. (Le changement de<br />
fonction dépend de la tâche accomplie.)<br />
M28451<br />
Bouton de Hold<br />
Appuyer pour déroger au programme<br />
(voir p. 31).<br />
23 69-2093EFS—07
Mode d’emploi<br />
Coup d’oeil sur l’affichage<br />
Température ambiante<br />
Recovery<br />
(voir p. 35)<br />
Période du programme<br />
Wake/Leave/Return/<br />
Sleep (voir p. 28–29)<br />
Set Clock/Day/<br />
Schedule<br />
(see pages 25 and 29)<br />
Réglage du ventilateur<br />
Auto/On (voir p. 26)<br />
Avertissement de piles<br />
(voir p. 36–37)<br />
Indoor Recovery Replace Battery Heat<br />
75<br />
Setting<br />
AM<br />
6:30 75<br />
Aux Heat On<br />
Set<br />
Wake<br />
Fan <strong>System</strong> More<br />
Clock/Day<br />
Schedule<br />
Auto<br />
Heat<br />
Réglage du système<br />
Heat/Cool/Auto/Off/Em<br />
Heat (voir p. 27)<br />
69-2093EFS—07 24<br />
M28452<br />
Heure/jour en cours<br />
(voir p. 25)<br />
Point consigne de temp.<br />
(voir p. 29–31).<br />
Chauffage auxiliaire<br />
(Pour thermopompes<br />
avec chauffage auxiliaire<br />
seulement)<br />
État du système<br />
Heat On/Cool On<br />
(Si l’affichage clignote, voir<br />
p. 35)<br />
More<br />
Appuyer pour voir la température<br />
extérieure (si un capteur extérieur<br />
est installé), ou pour retrouver une<br />
télécommande égarée selon le cas<br />
(voir p. 34)
<strong>English</strong>: see page 1 • Español: vea la página 40<br />
Régler l’heure et le jour<br />
Appuyer sur SET CLOCK/DAY/SCHEDULE et régler l’heure.<br />
4:30<br />
PM<br />
Set Fan <strong>System</strong> More<br />
Clock/Day Auto<br />
Heat<br />
Schedule<br />
Appuyer sur SET DAY, puis sélectionner le jour en cours.<br />
M28453<br />
1. Appuyer sur les touches<br />
SET CLOCK/DAY/SCHEDULE puis appuyer sur<br />
s ou t pour régler l’heure.<br />
2. Appuyer sur les touches<br />
SET DAY puis appuyer sur s ou t pour<br />
sélectionner le jour de la semaine.<br />
3. Appuyer sur DONE pour enregistrer.<br />
Remarque : Si l’option SET CLOCK/DAY/<br />
SCHEDULE n’est pas affichée, appuyer sur<br />
DONE ou CANCEL.<br />
Done<br />
Wed<br />
Set<br />
Day<br />
Set<br />
Schedule<br />
Remarque : Si les mots Set Clock<br />
clignotent à l’écran, le thermostat<br />
respectera la consigne prévue pour la<br />
période de réveil (WAKE) jusqu’à ce que le<br />
jour et l’heure soient réglés.<br />
M28454<br />
25 69-2093EFS—07
Mode d’emploi<br />
Sélectionner le réglage du ventilateur<br />
Set Fan <strong>System</strong> More<br />
Clock/Day Auto<br />
Heat<br />
Schedule<br />
M28455<br />
Appuyer sur la touche du ventilateur<br />
(FAN) pour sélectionner son mode de<br />
fonctionnement (Auto ou On).<br />
Set<br />
Clock/Day<br />
Schedule<br />
Fan <strong>System</strong> More<br />
On Heat<br />
Remarque : Les choix peuvent<br />
varier en fonction du système de<br />
chauffage-refroidissement.<br />
M28456<br />
En mode de fonctionnement automatique<br />
(AUTO), qui est le réglage le plus<br />
fréquent, le ventilateur fonctionne<br />
seulement quand le système de chauffage<br />
ou de refroidissement est en marche.<br />
Si cet interrupteur est réglé à «ON», le<br />
ventilateur fonctionne sans interruption.<br />
69-2093EFS—07 26
Sélectionner le réglage du système<br />
Set Fan <strong>System</strong> More<br />
Clock/Day Auto<br />
Heat<br />
Schedule<br />
M28457<br />
Set Fan <strong>System</strong> More<br />
Clock/Day Auto<br />
Schedule<br />
Cool<br />
M28458<br />
Remarque : Les choix peuvent<br />
varier en fonction du système de<br />
chauffage-refroidissement.<br />
<strong>English</strong>: see page 1 • Español: vea la página 40<br />
Appuyer sur SYSTEM pour sélectionner :<br />
• Heat : Thermostat commande le<br />
fonctionnement du système de chauffage.<br />
• Cool : Thermostat commande le fonctionnement<br />
du système de refroidissement.<br />
• Off : Tous les systèmes sont à l’arrêt.<br />
• Auto : Thermostat passe automatiquement<br />
du système de chauffage au système de<br />
refroidissement en fonction de la température<br />
à l’intérieur.<br />
• Em Heat : (Thermopompes avec chauffage<br />
auxiliaire seulement) : Le thermostat commande<br />
le fonctionnement du chauffage auxiliaire<br />
et du chauffage d’urgence. Le compresseur<br />
est mis sous sécurité.<br />
27 69-2093EFS—07
Mode d’emploi<br />
Réglages d’économie d’énergie pour des économies d’énergie maximales<br />
Ce thermostat est préréglé sur un programme d’économie d’énergie. Nous recommandons<br />
de conserver ces points de consigne, puisqu’ils pourraient vous faire réduire<br />
vos frais de chauffage-refroidissement. (Voir à la page suivante comment régler<br />
l’heure et la température de consigne pour chacune des périodes.)<br />
Wake/Lever<br />
(06:00)<br />
Leave/Départ<br />
(08:00)<br />
Return/Retour<br />
(18:00)<br />
Sleep/Sommeil<br />
(22:00)<br />
Heat/Chauffage<br />
(Lun.-Ven.)<br />
69-2093EFS—07 28<br />
Cool/Refroidissement<br />
(Lun.-Ven.)<br />
Heat/Chauffage<br />
(Sam.-Dim.)<br />
Cool/Refroidissement<br />
(Sam.-Dim.)<br />
70 ° 78 ° 70 ° 78 °<br />
62 ° 85 ° 62 ° 85<br />
[Ou annuler la période]<br />
70 ° 78 ° 70 ° 78<br />
[Ou annuler la période]<br />
62 ° 82 ° 62 ° 82 °<br />
°<br />
[Ou annuler la période]<br />
°<br />
[Ou annuler la période]
<strong>English</strong>: see page 1 • Español: vea la página 40<br />
Réglage de l’horaire<br />
Set Fan <strong>System</strong> More<br />
Clock/Day Auto<br />
Heat<br />
Schedule<br />
Done<br />
Done<br />
Set<br />
Day<br />
Set Schedule<br />
6:00<br />
Mon Tues Wed Thur Fri<br />
Wake<br />
Cancel<br />
Period<br />
AM<br />
Set<br />
Schedule<br />
70<br />
Heat<br />
Setting<br />
Next<br />
M28459<br />
1. Appuyer sur SET CLOCK/DAY/SCHEDULE, puis sur<br />
SET SCHEDULE.<br />
2. Appuyer sur s ou t pour régler l’heure du<br />
réveil des jours de semaine (Lun-Ven), puis<br />
appuyer sur NEXT.<br />
3. Appuyer sur s ou t pour régler la température<br />
de consigne pour cette période, puis appuyer<br />
sur NEXT.<br />
4. Régler la température et l’heure de la période<br />
suivante (départ). Répéter étapes 2 et 3 pour<br />
chaque période des jours de semaine.<br />
5. Appuyer sur NEXT pour régler les périodes<br />
Sam-Dim, puis appuyer sur DONE pour<br />
enregistrer le programme.<br />
Remarque : S’assurer que le thermostat est réglé<br />
au système que l’on souhaite faire fonctionner<br />
(Heat ou Cool).<br />
29 69-2093EFS—07
Mode d’emploi<br />
Dérogation (temporaire) au programme<br />
Appuyer pour régler temporairement la température.<br />
Indoor<br />
Heat<br />
75<br />
Setting<br />
Hold Until<br />
6:00 75<br />
PM<br />
Cancel Fan <strong>System</strong> More<br />
Auto<br />
Heat<br />
Appuyer pour<br />
reprendre l’horaire<br />
programmé<br />
La température sera<br />
maintenue jusqu’à<br />
l’heure affichée<br />
M28460<br />
Appuyer sur s ou t pour ajuster<br />
immédiatement la température.<br />
Cette fonction permet de déroger<br />
à la température de consigne de la<br />
période en cours.<br />
La nouvelle température de consigne<br />
restera en vigueur jusqu’au début de<br />
la prochaine période seulement (voir<br />
la page 28).<br />
Pour annuler le réglage temporaire,<br />
appuyer sur CANCEL.<br />
69-2093EFS—07 30
Dérogation (permanente) au programme<br />
Appuyer pour régler la température de manière permanente.<br />
Indoor<br />
Heat<br />
75<br />
Setting<br />
Hold<br />
6:00 75<br />
PM<br />
Cancel Fan <strong>System</strong> More<br />
Auto<br />
Heat<br />
Appuyer pour reprendre<br />
l’horaire programmé<br />
<strong>English</strong>: see page 1 • Español: vea la página 40<br />
M28461<br />
Appuyer sur HOLD pour ajuster la température<br />
en permanence. Cette fonction<br />
permet de déroger à la température de<br />
consigne pour toutes les périodes.<br />
La fonction de maintien «Hold» met<br />
le programme hors service et permet<br />
d’ajuster le thermostat manuellement, au<br />
besoin.<br />
Peu importe la température réglée, le thermostat<br />
maintiendra cette même température<br />
toute la journée (24 heures) jusqu’à<br />
ce que le point de consigne soit modifié<br />
manuellement ou qu’on appuie sur la<br />
touche CANCEL pour annuler la fonction de<br />
maintien et revenir au programme.<br />
31 69-2093EFS—07
Mode d’emploi<br />
Commutation chaud-froid automatique<br />
Set Fan <strong>System</strong> More<br />
Clock/Day Auto<br />
Schedule<br />
Auto<br />
Appuyer jusqu’à ce que<br />
l’écran affiche «Auto»<br />
M28462<br />
Remarque : Le réglage Auto peut<br />
ne pas apparaître, selon la façon<br />
dont le thermostat a été installé.<br />
Cette caractéristique est employée dans les<br />
endroits où le chauffage et le refroidissement<br />
sont parfois en service le même jour. Lorsque le<br />
système fonctionne en mode Auto, le thermostat<br />
sélectionne automatiquement le chauffage ou le<br />
refroidissement selon la température à l’intérieur.<br />
Il doit absolument y avoir au moins trois<br />
degrés d’écart entre les points de consigne de<br />
chauffage et de refroidissement. Le thermostat<br />
ajustera automatiquement les points de consigne<br />
pour conserver ces trois degrés d’écart.<br />
69-2093EFS—07 32
<strong>English</strong>: see page 1 • Español: vea la página 40<br />
Télécommande<br />
La température est mesurée à<br />
l’emplacement de la télécommande<br />
72<br />
Remote has Control75<br />
Reading<br />
at Thermostat<br />
at Remote<br />
Cancel<br />
Fan<br />
Auto<br />
More<br />
M28463<br />
La télécommande optionnelle peut servir<br />
de thermostat mobile afin de maintenir une<br />
température agréable à mesure qu’on se<br />
déplace de pièce en pièce.<br />
Lorsque le système réagit aux températures<br />
mesurées à la télécommande, le thermostat<br />
affiche les mots «Remote has Control».<br />
Appuyer sur CANCEL pour que la régulation<br />
de la température revienne au thermostat<br />
(le système réagira seulement aux<br />
températures mesurées au thermostat).<br />
Remarque : Il faut parfois jusqu’à 15 secondes avant que le thermostat réagisse aux<br />
commandes entrées à la télécommande. Voir le Mode d’emploi de la télécommande<br />
pour obtenir plus de renseignements.<br />
33 69-2093EFS—07
Mode d’emploi<br />
Caractéristiques additionnelles<br />
Set Fan <strong>System</strong> More<br />
Clock/Day Auto<br />
Heat<br />
Schedule<br />
Appuyer pour afficher<br />
d’autres options<br />
Outdoor<br />
Outdoor<br />
85<br />
Humidity<br />
50 %<br />
Done<br />
M28465<br />
Température<br />
extérieure<br />
FindRemote<br />
Humidité<br />
extérieure<br />
Appuyer pour retrouver<br />
une télécommande<br />
égarée<br />
M28464<br />
69-2093EFS—07 34<br />
Pour afficher la température extérieure<br />
S’il y a un capteur d’air extérieur, appuyer<br />
sur MORE pour afficher la température et<br />
l’humidité extérieures. Appuyer sur DONE pour<br />
quitter.<br />
Pour retrouver une télécommande égarée<br />
Pour retrouver une télécommande égarée,<br />
appuyer sur MORE, puis sur FIND REMOTE. La<br />
télécommande émettra un son pendant deux<br />
minutes pour donner à l’utilisateur le temps<br />
de la retrouver. Appuyer n’importe où sur<br />
l’écran pour interrompre la tonalité.
<strong>English</strong>: see page 1 • Español: vea la página 40<br />
Caractéristiques spéciales<br />
Protection intégrée du compresseur : Cette fonction sert à éviter d’endommager<br />
le compresseur qui fait partie du système de refroidissement ou de la thermopompe.<br />
Le compresseur pourrait en effet être endommagé s’il redémarre trop rapidement<br />
après avoir été mis à l’arrêt. Cette fonction oblige le compresseur à attendre 5<br />
minutes avant de redémarrer.<br />
Pendant cette attente, les mots «Cool On» (ou«Heat On» si le système utilisé est<br />
une thermopompe) clignotent à l’écran.<br />
Fonction de reprise auto-adaptative : Cette caractéristique qui évite des<br />
tâtonnements à l’utilisateur au moment d’établir son horaire. Elle permet au<br />
thermostat «d’apprendre» combien de temps il faut au système de chauffage ou de<br />
refroidissement pour atteindre la température souhaitée pour que la température<br />
désirée soit atteinte à l’heure prévue.<br />
Remarque : Quand la fonction de reprise auto-adaptative est en service, le<br />
thermostat affiche «Recovery».<br />
35 69-2093EFS—07
Mode d’emploi<br />
Remplacement des piles (thermostat)<br />
Appuyer et tirer pour retirer les piles<br />
Replace Battery<br />
Insérer deux piles<br />
alcalines neuves de taille<br />
AA, puis remettre en place<br />
le porte-piles<br />
M28466<br />
M28442<br />
69-2093EFS—07 36<br />
Installer des piles neuves lorsque<br />
l’avertissement de remplacement des piles<br />
REPLACE BATTERY commence à clignoter à<br />
l’écran. Ce message clignote pendant environ<br />
deux mois avant que les piles ne soient<br />
complètement épuisées.<br />
Retirer le porte-piles et insérer 2 piles neuves<br />
alcalines AA.<br />
Une fois les piles insérées, le thermostat<br />
rétablira automatiquement la communication<br />
avec le réseau sans fil au bout de quelques<br />
minutes.<br />
Remarque : Si les piles sont insérées moins de<br />
2 minutes), il ne sera pas nécessaire de régler à<br />
nouveau l’heure et le jour.
Remplacement des piles (capteur d’air extérieur)<br />
M28443<br />
Retirer le<br />
couvercle et<br />
installer deux<br />
piles AA neuves<br />
au lithium<br />
Retirer le capteur<br />
de son support<br />
M28444<br />
<strong>English</strong>: see page 1 • Español: vea la página 40<br />
Remplacer les piles du capteur extérieur<br />
lorsque l’avertissement REPLACE BATTERY<br />
OUTDOOR commence à clignoter au<br />
thermostat. Ce message clignote pendant<br />
environ deux mois avant que les piles ne<br />
soient complètement épuisées.<br />
Retirer le capteur de son support, retirer le<br />
couvercle et insérer deux piles AA neuves au<br />
lithium.<br />
Une fois les piles insérées, le capteur<br />
rétablira automatiquement la communication<br />
avec le réseau sans fil au bout de quelques<br />
minutes.<br />
37 69-2093EFS—07
Mode d’emploi<br />
En cas de difficulté<br />
Le système de<br />
chauffage ou de<br />
refroidissement<br />
ne répond pas<br />
L’écran affiche<br />
«No signal»<br />
• S’assurer que le coupe-circuit n’est pas déclenché et le remettre en<br />
position de marche au besoin.<br />
• S’assurer que le bouton de marche-arrêt du système de chauffage ou de<br />
refroidissement est à la position de marche.<br />
• S’assurer que la porte de l’appareil de chauffage est bien fermée.<br />
• Attendre 5 minutes pour laisser au système le temps de réagir.<br />
Le thermostat a perdu le signal radio avec le réseau sans fil (habituellement à<br />
la suite d’une panne de courant). Pour rétablir l’alimentation :<br />
• S’assurer que le coupe-circuit n’est pas déclenché et le remettre en<br />
position de marche au besoin.<br />
• S’assurer que le bouton de marche-arrêt du système de chauffage ou de<br />
refroidissement est à la position de marche.<br />
• S’assurer que la porte de l’appareil de chauffage est bien fermée.<br />
Une fois l’alimentation rétablie, le thermostat rétablira automatiquement la<br />
communication avec le réseau sans fil au bout de quelques minutes.<br />
69-2093EFS—07 38
Garantie limitée jusqu’à 5 ans<br />
<strong>Honeywell</strong> garantit ce produit, à l’exception de la pile, contre tout vice de<br />
fabrication ou de matière dans la mesure où il en est fait une utilisation<br />
et un entretien convenables, et ce, pour trois (3) ans à partir de la date<br />
d’achat par le consommateur. En cas de défectuosité ou de mauvais<br />
fonctionnement pendant la période de garantie, <strong>Honeywell</strong> remplacera<br />
ou réparera le produit (au gré de <strong>Honeywell</strong>) dans un délai raisonnable.<br />
Si le produit est défectueux,<br />
(i) le retourner, accompagné d’une preuve d’achat indiquant la date<br />
d’achat, au détaillant auprès de qui il a été acheté, ou<br />
(ii) s’adresser aux Services à la clientèle de <strong>Honeywell</strong> en composant<br />
le 1-800-468-1502. Les Services à la clientèle détermineront alors si<br />
le produit doit être retourné à l’adresse suivante : <strong>Honeywell</strong> Return<br />
Goods, Dock 4 MN 10-3860, 1985 Douglas Dr. N., Golden Valley, MN<br />
55422, ou si un produit de remplacement peut vous être expédié.<br />
La présente garantie ne couvre pas les frais de retrait ou de<br />
réinstallation. La présente garantie ne s’appliquera pas s’il est<br />
démontré que la défectuosité ou le mauvais fonctionnement est dû à<br />
un endommagement du produit alors que le consommateur l’avait en<br />
sa possession.<br />
La responsabilité de <strong>Honeywell</strong> se limite à réparer ou à remplacer le<br />
produit conformément aux modalités susmentionnées. HONEYWELL<br />
N’EST EN AUCUN CAS RESPONSABLE DES PERTES OU<br />
DOMMAGES, Y COMPRIS LES DOMMAGES INDIRECTS OU<br />
ACCESSOIRES DÉCOULANT DIRECTEMENT OU INDIRECTEMENT<br />
D’UNE VIOLATION QUELCONQUE D’UNE GARANTIE, EXPRESSE<br />
OU TACITE, APPLICABLE AU PRÉSENT PRODUIT NI DE TOUTE<br />
<strong>English</strong>: see page 1 • Español: vea la página 40<br />
AUTRE DÉFECTUOSITÉ DU PRÉSENT PRODUIT. Certaines provinces<br />
ne permettent pas l’exclusion ou la restriction des dommages indirects<br />
et, par conséquent, la présente restriction peut ne pas s’appliquer.<br />
LA PRÉSENTE GARANTIE TIENT LIEU DE TOUTES LES AUTRES<br />
GARANTIES EXPRESSES ACCORDÉES PAR HONEYWELL POUR<br />
CE PRODUIT, ET LES GARANTIES DE VALEUR MARCHANDE<br />
ET DE CONFORMITÉ À UNE FIN PARTICULIÈRE SONT PAR LES<br />
PRÉSENTES EXCLUES APRÈS LA PÉRIODE DE UN AN DE LA<br />
PRÉSENTE GARANTIE. Certaines provinces ne permettent pas de<br />
limiter la durée des garanties tacites et, par conséquent, la présente<br />
limitation peut ne pas s’appliquer.<br />
La présente garantie donne au consommateur des droits légaux<br />
spécifiques et peut-être certains autres droits qui peuvent varier d’une<br />
province à l’autre Pour toute question concernant la présente garantie,<br />
prière d’écrire aux Services à la clientèle de <strong>Honeywell</strong> à l’adresse<br />
suivante : <strong>Honeywell</strong> Customer Relations, 1985 Douglas Drive, Golden<br />
Valley, MN 55422, ou encore composer le 1-800-468-1502.<br />
Lorsque le produit est inscrit en ligne à l’adresse<br />
www.warranty. <strong>Honeywell</strong>.com, la garantie standard du fabricant décrite<br />
ci-dessus est prolongée jusqu’à cinq (5) ans.<br />
39 69-2093EFS—07
Tarjeta de referencia<br />
Sujete la tarjeta y jale<br />
de ella para ver rápidamente<br />
las instrucciones<br />
básicas de<br />
funcionamiento.<br />
Soporte de las<br />
baterías<br />
Presione y jale para retirar<br />
las baterías. Las baterías<br />
deben reemplazarse una<br />
vez al año. (vea la pág. 46).<br />
M28450<br />
PRECAUCIÓN: RIESGO DE DAÑO AL EQUIPO. Para evitar posibles daños al compresor,<br />
no haga funcionar el sistema de refrigeración cuando la temperatura exterior sea inferior a<br />
50 °F (10 °C).<br />
¿Necesita ayuda?<br />
Consulte sobre este producto en http://yourhome.honeywell.com<br />
o llamando sin cargo a atención al cliente de <strong>Honeywell</strong> 1-800-468-1502<br />
Lea y guarde estas instrucciones<br />
® Marca registrada de los EE. UU. Patentes en trámite.<br />
Copyright © 2013 <strong>Honeywell</strong> International Inc. Todos los derechos reservados.
<strong>English</strong>: see page 1 • Français : voir la page 21<br />
Índice<br />
Acerca de su termostato nuevo<br />
Programación rápida......................... 42<br />
Referencia de los controles............... 43<br />
Referencia de la pantalla................... 44<br />
Programación y funcionamiento<br />
Configuración de la hora/día............. 45<br />
Configuración del ventilador.............. 46<br />
Configuración del sistema................. 47<br />
Cronogramas del programa............... 48<br />
Anulación del cronograma<br />
del programa..................................... 50<br />
Función Auto Changeover<br />
(Heat/Cool)................................................52<br />
Control remoto.........................................53<br />
Visualización de la<br />
temperatura exterior...............................54<br />
Búsqueda del control remoto<br />
extraviado.......................................... 54<br />
Funciones especiales........................ 55<br />
Apéndices<br />
Reemplazo de las baterías................ 56<br />
En caso de inconvenientes................ 58<br />
Garantía limitada............................... 59<br />
Información reguladora...................... 61<br />
41 69-2093EFS—07
Manuel d’utilisation<br />
Acerca de su termostato nuevo<br />
Su termostato nuevo está preprogramado y listo para funcionar. Todo lo que tiene<br />
que hacer es configurar la hora y el día. Luego, revise las siguientes configuraciones<br />
y, si es necesario, cámbielas:<br />
1. Configuración de la hora/día (necesaria)................................ Vea la pág. 45<br />
2. Selección de la configuración del ventilador (Auto/On)......... Vea la pág. 46<br />
3. Selección de la configuración del sistema (Heat/Cool)......... Vea la pág. 47<br />
4. Cronogramas del programa: predeterminados en<br />
niveles de ahorro de energía mientras está en el<br />
trabajo o duerme.................................................................Vea la pág. 48-49<br />
CONTROL DE TEMP. AL TACTO: puede anular la configuración del cronograma en<br />
cualquier momento y ajustar manualmente la temperatura (vea las págs. 50 a 51).<br />
69-2093EFS—07 42
Referencia rápida de los controles<br />
<strong>English</strong>: see page 1 • Français : voir la page 21<br />
Pantalla digital (vea la pág. 44)<br />
Soporte de las baterías<br />
(vea la pág. 56)<br />
Botones de la temperatura<br />
Presione para ajustar las<br />
configuraciones de temperatura<br />
(vea la pág. 50-51)<br />
Botones de funciones<br />
Presione para elegir la función que se<br />
muestra encima de cada botón.<br />
M28451<br />
Botón Hold<br />
Presione para anular el control de<br />
temperatura programada<br />
(vea la pág. 51)<br />
43 69-2093EFS—07
Manuel d’utilisation<br />
Referencia rápida de la pantalla<br />
Temperatura interior actual<br />
Avisos de batería baja<br />
(vea págs. 56-57)<br />
Hora y día actuales<br />
(vea pág. 45)<br />
Recovery<br />
(vea pág. 55)<br />
Período del programa<br />
Wake/Leave/Return/<br />
Sleep (vea págs. 48-49)<br />
Set Clock/Day/<br />
Schedule<br />
(vea págs. 45 & 49)<br />
Config. del ventilador<br />
Auto/On (vea pág. 46)<br />
Indoor Recovery Replace Battery Heat<br />
75<br />
Setting<br />
AM<br />
6:30 75<br />
Aux Heat On<br />
Set<br />
Wake<br />
Fan <strong>System</strong> More<br />
Clock/Day<br />
Schedule<br />
Auto<br />
Heat<br />
Config. del sistema<br />
Heat/Cool/Auto/Off/Em<br />
Heat (vea pág. 47)<br />
69-2093EFS—07 44<br />
M28452<br />
Config. de la temp.<br />
(vea págs. 49–51).<br />
Calefacción auxiliar<br />
(solo para bombas de<br />
calor con calefacción<br />
auxiliar)<br />
Estado del sistema<br />
Heat On/Cool On<br />
(si destella, vea p. 55)<br />
More<br />
Presione para ver la temperatura<br />
exterior (si se instaló un sensor<br />
exterior) o para buscar un control<br />
remoto extraviado si está instalado<br />
(vea pág. 54)
Configuración de la hora y el día<br />
Presione SET CLOCK/DAY/SCHEDULE, y luego<br />
ajuste la hora<br />
4:30<br />
PM<br />
Set Fan <strong>System</strong> More<br />
Clock/Day Auto<br />
Heat<br />
Schedule<br />
Presione SET DAY, y luego seleccione el día<br />
Done<br />
Wed<br />
Set<br />
Day<br />
Set<br />
Schedule<br />
<strong>English</strong>: see page 1 • Français : voir la page 21<br />
M28453<br />
1. Presione SET CLOCK/DAY/SCHEDULE,<br />
luego presione s o t para<br />
configurar la hora.<br />
2. Presione SET DAY, y luego presione<br />
s o t para seleccionar<br />
el día de la semana.<br />
3. Presione DONE para guardar.<br />
Nota: si en la pantalla aparece el<br />
mensaje Set Clock, el termostato<br />
seguirá sus configuraciones para el<br />
período “Wake” de los días de semana,<br />
hasta que vuelva a configurar la hora y<br />
el día.<br />
45 69-2093EFS—07<br />
M28454<br />
Nota: si no se muestra la opción SET<br />
CLOCK/DAY/SCHEDULE presione DONE o<br />
CANCEL.
Manuel d’utilisation<br />
Selección de la configuración del ventilador<br />
Set Fan <strong>System</strong> More<br />
Clock/Day Auto<br />
Heat<br />
Schedule<br />
Set<br />
Clock/Day<br />
Schedule<br />
M28455<br />
Fan <strong>System</strong> More<br />
On Heat<br />
M28456<br />
Presione FAN para seleccionar Auto u On.<br />
En el modo “Auto”, la configuración más<br />
comúnmente utilizada, el ventilador<br />
funciona solamente cuando está<br />
encendido el sistema de calefacción o<br />
refrigeración.<br />
Si se configura en “On,” el ventilador<br />
funciona continuamente.<br />
Nota: las opciones pueden variar<br />
según el equipo de calefacción/<br />
refrigeración.<br />
69-2093EFS—07 46
Selección de la configuración del sistema<br />
<strong>English</strong>: see page 1 • Français : voir la page 21<br />
Set Fan <strong>System</strong> More<br />
Clock/Day Auto<br />
Heat<br />
Schedule<br />
M28457<br />
Set Fan <strong>System</strong> More<br />
Clock/Day Auto<br />
Schedule<br />
Cool<br />
M28458<br />
Nota: las opciones pueden variar<br />
según el equipo de calefacción/<br />
refrigeración.<br />
Presione SYSTEM para seleccionar:<br />
• Heat: el termostato controla solamente el<br />
sistema de calefacción.<br />
• Cool: el termostato controla solamente el<br />
sistema de refrigeración.<br />
• Off: los sistemas de calefacción y<br />
refrigeración están apagados.<br />
• Auto: el termostato elige cuándo calentar o<br />
refrigerar, según la temperatura interior.<br />
• Em Heat: (solamente para bombas de calor<br />
con calefacción auxiliar): el termostato<br />
controla la calefacción auxiliar y de<br />
emergencia. El compresor se bloquea.<br />
47 69-2093EFS—07
Manuel d’utilisation<br />
Configuraciones de ahorro de energía para máximo ahorro de costos<br />
Este termostato viene predeterminado con configuraciones para un programa de<br />
ahorro de energía. Recomendamos estas configuraciones debido a que reducen los<br />
gastos de calefacción y refrigeración. (Vea la pág. siguiente para ajustar las horas y<br />
las temperaturas de cada período).<br />
Wake<br />
(6:00 am)<br />
Leave<br />
(8:00 am)<br />
Return<br />
(6:00 pm)<br />
Sleep<br />
(10:00 pm)<br />
Heat (Lun-Vier) Cool (Lun-Vier) Heat (Sáb-Dom) Cool (Sáb-Dom)<br />
70 ° 78 ° 70 ° 78 °<br />
62 ° 85 ° 62 °<br />
[Or cancel period]<br />
85 °<br />
[Or cancel period]<br />
70 ° 78 ° 70 °<br />
[Or cancel period]<br />
78 °<br />
[Or cancel period]<br />
62 ° 82 ° 62 ° 82 °<br />
69-2093EFS—07 48
Para ajustar los cronogramas del programa<br />
Set Fan <strong>System</strong> More<br />
Clock/Day Auto<br />
Heat<br />
Schedule<br />
Done<br />
Done<br />
Set<br />
Day<br />
Set Schedule<br />
6:00<br />
Mon Tues Wed Thur Fri<br />
Wake<br />
Cancel<br />
Period<br />
AM<br />
Set<br />
Schedule<br />
70<br />
Heat<br />
Setting<br />
Next<br />
M28459<br />
<strong>English</strong>: see page 1 • Français : voir la page 21<br />
1. Presione SET CLOCK/DAY/SCHEDULE, y luego SET<br />
SCHEDULE.<br />
2. Presione s o t para configurar la hora Wake<br />
(de lunes a viernes) y luego presione NEXT.<br />
3. Presione s o t para configurar la temperatura<br />
para este período y luego presione NEXT.<br />
4. Configure la hora y la temperatura para el<br />
próximo período (Leave). Repita los pasos 2 y<br />
3 para cada día de la semana.<br />
5. Presione NEXT para configurar los períodos<br />
para el fin de semana (de sábado a domingo) y<br />
luego presione DONE para guardar y salir.<br />
Nota: asegúrese de que el termostato esté configurado<br />
en el sistema que desea programar (Heat o Cool).<br />
49 69-2093EFS—07
Manuel d’utilisation<br />
Anulación del cronograma del programa (temporal)<br />
Presione para ajustar temporalmente la temp.<br />
Indoor<br />
Heat<br />
75<br />
Setting<br />
Hold Until<br />
6:00 75<br />
PM<br />
Cancel Fan <strong>System</strong> More<br />
Auto<br />
Heat<br />
Presione para volver<br />
al cronograma del<br />
programa<br />
La temperatura se<br />
mantendrá hasta la<br />
hora que se muestra<br />
69-2093EFS—07 50<br />
M28460<br />
Presione s o t para ajustar<br />
la temperatura inmediatamente.<br />
Esto anulará temporalmente la<br />
configuración de la temperatura para<br />
el período actual.<br />
La nueva temperatura se mantendrá<br />
solamente hasta que comience el<br />
próximo período programado (vea la<br />
pág. 48).<br />
Para cancelar esta configuración en<br />
cualquier momento, presione CANCEL.
<strong>English</strong>: see page 1 • Français : voir la page 21<br />
Anulación del cronograma del programa (permanente)<br />
Presione para ajustar permanentemente la temp.<br />
Indoor<br />
Heat<br />
75<br />
Setting<br />
Hold<br />
6:00 75<br />
PM<br />
Cancel Fan <strong>System</strong> More<br />
Auto<br />
Heat<br />
Presione para volver al<br />
cronograma del programa<br />
M28461<br />
Presione HOLD para ajustar permanentemente<br />
la temperatura. Esto<br />
anulará las configuraciones de temperatura<br />
para todos los períodos.<br />
La función “Hold” apaga el cronograma<br />
del programa y le permite<br />
ajustar el termostato manualmente,<br />
según sea necesario.<br />
La temperatura que usted configure<br />
se mantendrá las 24 horas del día,<br />
hasta que la cambie manualmente o<br />
presione CANCEL para volver al cronograma<br />
programado.<br />
51 69-2093EFS—07
Manuel d’utilisation<br />
Función Auto Changeover (Heat/Cool)<br />
Set Fan <strong>System</strong> More<br />
Clock/Day Auto<br />
Schedule<br />
Auto<br />
Presione hasta que la<br />
pantalla muestre “Auto”<br />
M28462<br />
Nota: quizás la configuración<br />
Auto del sistema no aparezca,<br />
según cómo haya sido instalado el<br />
termostato.<br />
69-2093EFS—07 52<br />
Auto Changeover es una función utilizada<br />
en climas donde, a menudo, se usan el<br />
acondicionador de aire y la calefacción en el<br />
mismo día. Cuando el sistema está configurado<br />
en Auto, el termostato elige automáticamente<br />
cuándo calentar o refrigerar, según la<br />
temperatura interior.<br />
Las configuraciones de calor y frío deben tener,<br />
al menos, 3 grados de diferencia. El termostato<br />
ajustará automáticamente las configuraciones<br />
para mantener esta diferencia de 3 grados.
<strong>English</strong>: see page 1 • Français : voir la page 21<br />
Control remoto<br />
La temperatura se mide en la<br />
ubicación del control remoto<br />
72<br />
Remote has Control75<br />
Reading<br />
at Thermostat<br />
at Remote<br />
Cancel<br />
Fan<br />
Auto<br />
More<br />
M28463<br />
El control remoto opcional puede funcionar<br />
como termostato móvil para mantener una<br />
temperatura agradable mientras pasa de una<br />
habitación a otra.<br />
Cuando el sistema responda a las<br />
temperaturas medidas en el control remoto, el<br />
termostato mostrará el mensaje “Remote has<br />
Control.”<br />
Presione CANCEL para restablecer el control de<br />
temperatura en el termostato (el sistema solo<br />
responderá a las temperaturas medidas en el<br />
termostato).<br />
Nota: el termostato puede demorar hasta 15 segundos en responder a los comandos<br />
ingresados en el control remoto. Consulte el <strong>Manual</strong> de funcionamiento del control<br />
remoto para obtener más información.<br />
53 69-2093EFS—07
Manuel d’utilisation<br />
Funciones adicionales<br />
Set Fan <strong>System</strong> More<br />
Clock/Day Auto<br />
Heat<br />
Schedule<br />
Presione para mostrar<br />
más opciones<br />
Outdoor<br />
Outdoor<br />
85<br />
Humidity<br />
50 %<br />
Done<br />
Temperatura<br />
exterior<br />
FindRemote<br />
Humedad<br />
exterior<br />
M28464<br />
Presione para<br />
buscar un control<br />
M28465<br />
remoto extraviado<br />
69-2093EFS—07 54<br />
Visualizar la temperatura exterior<br />
Si tiene un sensor de aire exterior, presione<br />
MORE para visualizar la temperatura y la<br />
humedad exteriores actuales. Presione DONE<br />
para salir.<br />
Buscar un control remoto extraviado<br />
Si extravió un control remoto, presione<br />
MORE y luego FIND REMOTE. El control remoto<br />
emitirá un pitido durante dos minutos para<br />
ayudarlo a ubicarlo. Presione en cualquier<br />
lugar de la pantalla de control remoto para<br />
detener el pitido.
<strong>English</strong>: see page 1 • Français : voir la page 21<br />
Características especiales<br />
Protección del compresor incorporada: esta función ayuda a evitar daños al<br />
compresor en su acondicionador de aire o en su sistema de bomba de calor. El<br />
compresor puede dañarse si se vuelve a iniciar inmediatamente después de ser<br />
apagado. Esta característica hace que el compresor demore unos minutos antes de<br />
volver a iniciarse.<br />
Durante el tiempo de espera, la pantalla mostrará el mensaje Cool On (o Heat On si<br />
tiene una bomba de calor).<br />
Adaptive Intelligent Recovery: esta función elimina la necesidad de conjeturas a la<br />
hora de configurar un cronograma. Permite que el termostato “sepa” cuánto demora<br />
su sistema de calefacción y su aire acondicionado para alcanzar las configuraciones<br />
de temperatura programadas, de manera que se alcance esa temperatura a la hora<br />
que usted configuró.<br />
Nota: cuando la función Adaptive Intelligent Recovery esté activada, el<br />
termostato mostrará “Recovery”.<br />
55 69-2093EFS—07
Manuel d’utilisation<br />
Reemplazo de las baterías (termostato)<br />
Presione y jale para retirar<br />
Replace Battery<br />
Instale las baterías<br />
alcalinas AA nuevas<br />
y vuelva a colocar el<br />
soporte de las baterías<br />
M28466<br />
la memoria.<br />
M28442<br />
69-2093EFS—07 56<br />
Instale las baterías nuevas cuando el aviso<br />
REPLACE BATTERY comience a destellar. El aviso<br />
destellará durante, aproximadamente, dos<br />
meses antes de que se agoten las baterías.<br />
Retire el soporte de las baterías e instale 2<br />
baterías alcalinas AA nuevas.<br />
Después de instalar las baterías, el termostato<br />
restablecerá automáticamente la comunicación<br />
con la red inalámbrica en pocos minutos.<br />
Nota: si coloca las baterías a los dos minutos,<br />
no tendrá que volver a configurar la hora y el<br />
día. Las demás configuraciones permanecen en
<strong>English</strong>: see page 1 • Français : voir la page 21<br />
Reemplazo de las baterías (sensor de aire exterior)<br />
M28443<br />
Quite la tapa<br />
e instale 2<br />
baterías AA de<br />
litio nuevas<br />
Retire el sensor<br />
del soporte<br />
M28444<br />
Reemplace las baterías del sensor exterior<br />
cuando el aviso REPLACE BATTERY OUTDOOR<br />
comience a destellar en el termostato. El<br />
aviso destellará durante, aproximadamente,<br />
dos meses antes de que se agoten las<br />
baterías.<br />
Retire el sensor del soporte, quite la tapa e<br />
instale 2 baterías AA de litio nuevas.<br />
Después de instalar las baterías, el<br />
sensor restablecerá automáticamente la<br />
comunicación con la red inalámbrica en<br />
pocos minutos.<br />
57 69-2093EFS—07
Manuel d’utilisation<br />
En caso de inconvenientes<br />
El sistema de<br />
calefacción o<br />
refrigeración no<br />
responde<br />
• Controle el interruptor de circuito y, si es necesario, reinícielo.<br />
• Asegúrese de que el interruptor de energía del sistema de calefacción y<br />
efrigeración esté encendido.<br />
• Asegúrese de que la puerta del sistema de calefacción esté bien cerrada.<br />
• Espere 5 minutos para que responda el sistema.<br />
La pantalla muestra<br />
“No signal”<br />
El termostato perdió contacto con la red inalámbrica (generalmente, debido a<br />
un corte de energía). Para restaurar la energía:<br />
• Controle el interruptor de circuito y, si es necesario, reinícielo.<br />
• Asegúrese de que el interruptor de energía del sistema de calefacción y<br />
refrigeración esté encendido.<br />
• Asegúrese de que la puerta del sistema de calefacción esté bien cerrada.<br />
Después de restaurar la energía, el termostato restablecerá automáticamente la<br />
comunicación inalámbrica en pocos minutos.<br />
69-2093EFS—07 58
Garantía limitada por hasta 5 años<br />
<strong>Honeywell</strong> garantiza, por el término de tres (3) años a partir de la fecha<br />
de compra por parte del consumidor, que este producto, sin incluir las<br />
baterías, no presentará defectos en los materiales ni en lo referente<br />
a la mano de obra, en condiciones normales de uso y de servicio. Si<br />
en algún momento durante el período de vigencia de la garantía se<br />
determina que el producto es defectuoso o que funciona mal, <strong>Honeywell</strong><br />
lo reparará o lo reemplazará (a elección de <strong>Honeywell</strong>).<br />
Si el producto presenta defectos,<br />
(i) devuélvalo, con la factura de venta o cualquier otro comprobante de<br />
compra, al lugar donde lo compró o<br />
(ii) llame al Servicio al cliente de <strong>Honeywell</strong> al 1-800-468-1502. El<br />
Servicio al cliente decidirá si el producto debe ser devuelto a la<br />
siguiente dirección: <strong>Honeywell</strong> Return Goods, Dock 4 MN10-3860, 1985<br />
Douglas Dr. N., Golden Valley, MN 55422, o si se le puede enviar un<br />
producto de reemplazo.<br />
Esta garantía no cubre los gastos de extracción ni de reinstalación. Esta<br />
garantía no se aplicará si <strong>Honeywell</strong> demuestra que el defecto o el mal<br />
funcionamiento fueron causados por daños que se produjeron mientras<br />
el producto estaba en posesión de un consumidor.<br />
La única responsabilidad de <strong>Honeywell</strong> será la de reparar o reemplazar<br />
el producto dentro de los términos mencionados anteriormente.<br />
HONEYWELL NO SERÁ RESPONSABLE DE LA PÉRDIDA NI DAÑO<br />
DE NINGÚN TIPO, QUE INCLUYE CUALQUIER DAÑO INCIDENTAL<br />
O CONSECUENTE QUE RESULTE, DIRECTA O INDIRECTAMENTE,<br />
<strong>English</strong>: see page 1 • Français : voir la page 21<br />
DE CUALQUIER INCUMPLIMIENTO DE CUALQUIER GARANTÍA,<br />
EXPRESA O IMPLÍCITA, O DE CUALQUIER OTRA FALLA DE ESTE<br />
PRODUCTO. Algunos estados no permiten la exclusión ni la limitación<br />
de los daños incidentales o consecuentes, por lo que es posible que<br />
esta limitación no se aplique en su caso.<br />
ESTA GARANTÍA ES LA ÚNICA GARANTÍA EXPRESA QUE<br />
HONEYWELL REALIZA SOBRE ESTE PRODUCTO. LA DURACIÓN<br />
DE CUALQUIERA DE LAS GARANTÍAS IMPLÍCITAS, INCLUIDAS<br />
LAS GARANTÍAS DE APTITUD E IDONEIDAD PARA UN FIN<br />
DETERMINADO, QUEDA, POR EL PRESENTE, LIMITADA A LA<br />
DURACIÓN DE TRES AÑOS DE ESTA GARANTÍA. Algunos estados no<br />
permiten limitaciones en cuanto a la duración de una garantía implícita,<br />
por lo que es posible que la limitación anterior no se aplique en su caso.<br />
Esta garantía le otorga derechos legales específicos y es posible que<br />
usted goce de otros derechos que varían según el estado.<br />
Si tiene preguntas sobre esta garantía, escriba a <strong>Honeywell</strong> Customer<br />
Relations, 1985 Douglas Dr, Golden Valley, MN 55422 o llame al 1-800-<br />
468-1502.<br />
Si el producto está registrado en línea en www.warranty.<strong>Honeywell</strong>.com,<br />
la cobertura de fabricación estándar arriba mencionada se prolongará<br />
por un período de cinco (5) años.<br />
59 69-2093EFS—07
<strong>Operating</strong> <strong>Manual</strong><br />
Regulatory information<br />
FCC Compliance Statement (Part 15.19) (USA only)<br />
This device complies with Part 15 of FCC Rules. Operation is subject to the<br />
following two conditions:<br />
1 This device may not cause harmful interference, and<br />
2 This device must accept any interference received, including interference<br />
that may cause undesired operation.<br />
FCC Warning (Part 15.21) (USA only)<br />
Changes or modifications not expressly approved by the party responsible for<br />
compliance could void the user’s authority to operate the equipment.<br />
FCC Interference Statement (Part 15.105 (b)) (USA only)<br />
This equipment has been tested and found to comply with the limits for a<br />
Class B digital device, pursuant to Part 15 of the FCC Rules. These limits<br />
are designed to provide reasonable protection against harmful interference<br />
in a residential installation. This equipment generates uses and can radiate<br />
radio frequency energy and, if not installed and used in accordance with<br />
the instructions, may cause harmful interference to radio communications.<br />
However, there is no guarantee that interference will not occur in a particular<br />
installation. If this equipment does cause harmful interference to radio or<br />
television reception, which can be determined by turning the equipment off<br />
and on, the user is encouraged to try to correct the interference by one of the<br />
following measures:<br />
• Reorient or relocate the receiving antenna.<br />
• Increase the separation between the equipment and receiver.<br />
• Connect the equipment into an outlet on a circuit different from that to<br />
which the receiver is connected.<br />
• Consult the dealer or an experienced radio/TV technician for help.<br />
Exposure Limits<br />
To comply with FCC and Industry Canada RF exposure limits for general<br />
population/uncontrolled exposure, the antenna(s) used for this transmitter must<br />
be installed to provide a separation distance of at least 20 cm from all persons<br />
and must not be co-located or operating in conjunction with any other antenna<br />
or transmitter.<br />
Industry Canada Section 7.1.5 of RSS-GEN<br />
Operation is subject to the following two conditions:<br />
1 this device may not cause interference, and<br />
2 this device must accept any interference, including interference that may<br />
cause undesired operation of the device.<br />
Limites d’exposition<br />
Pour être conformes aux limites d’exposition aux radiofréquences établies par<br />
la FCC et Industrie Canada pour le grand public/l’exposition non contrôlée,<br />
la ou les antennes employées par le transmetteur doivent être installées sur<br />
une structure extérieure permanente à au moins 20 cm de distance de toute<br />
personne et ne peuvent être situées au même endroit qu’une autre antenne ou<br />
un autre transmetteur ou fonctionner conjointement avec une autre antenne ou<br />
un autre transmetteur.<br />
Industrie Canada Alinéa 7.1.5 de CNR-GEN<br />
Le fonctionnement de ce système est assorti aux deux conditions suivantes :<br />
1 L’appareil ne peut causer d’interférences nuisibles, et<br />
2 L’appareil doit accepter les interférences reçues, y compris celles qui pourraient<br />
nuire à son fonctionnement.<br />
69-2093EFS—07 60
Información reguladora<br />
Declaración de conformidad con las regulaciones FCC<br />
(Sección 15.19) (solo en los EE. UU.)<br />
Este dispositivo cumple con la Sección 15 de las regulaciones FCC. El funcionamiento<br />
está sujeto a las dos condiciones siguientes:<br />
1 Este dispositivo no debe causar interferencia perjudicial.<br />
2 Este dispositivo deberá aceptar cualquier interferencia quese reciba,<br />
incluso la interferencia que pudiese causar el funcionamiento no deseado.<br />
Advertencia de la FCC (Sección 15.21) (solo en los EE. UU.)<br />
Los cambios o las modificaciones que no hayan sido expresamente aprobados<br />
por la parte responsable del cumplimiento de las regulaciones podrían<br />
anular la autoridad del usuario para hacer funcionar el equipo.<br />
Declaración de la FCC sobre interferencias (Sección 15.105(b)) (solo en<br />
los EE. UU.)<br />
Este equipo fue probado y cumple con los límites de los dispositivos digitales<br />
clase B, conforme a la Sección 15 de las regulaciones FCC. Estos límites<br />
están diseñados para ofrecer una protección razonable contra la interferencia<br />
perjudicial en una instalación residencial. Este equipo genera usos y puede<br />
irradiar energía de frecuencia de radio y, si no se instala y se utiliza según las<br />
instrucciones, puede producir una interferencia perjudicial en la comunicación<br />
radial. Sin embargo, no se garantiza que no habrá interferencia en una instalación<br />
particular. Si este equipo produce una interferencia perjudicial en la<br />
recepción televisiva o radial, lo cual puede determinarse al apagar y encender<br />
el equipo, se recomienda que el usuario intente corregir la interferencia con<br />
una o más de las siguientes medidas:<br />
• Vuelva a orientar y ubicar la antena receptora.<br />
• Aumente la distancia entre el equipo y el receptor.<br />
• Conecte el equipo a un tomacorriente en un circuito diferente a aquel en<br />
Français : voir la page 20 • Español: vea la página 40<br />
el que está conectado el receptor.<br />
• Consulte con su distribuidor o con un técnico experto en radio/televisión<br />
para recibir ayuda.<br />
Límites de exposición<br />
Para cumplir con los límites de exposición RF que establecen la FCC y<br />
Industry Canada para la población en general/exposición no controlada, la o<br />
las antenas usadas para este transmisor deben instalarse a una distancia de<br />
separación de, al menos, 20 cm de todas las personas, y no deben colocarse<br />
ni utilizarse junto con otra antena o transmisor.<br />
Sección de Industry Canada 7.1.5 de RSS-GEN<br />
El funcionamiento está sujeto a las dos condiciones siguientes:<br />
1 Este dispositivo no debe causar interferencia.<br />
2 Este dispositivo deberá aceptar cualquier interferencia, incluso la interferencia<br />
que pudiese causar el funcionamiento no deseado del dispositivo.<br />
61 69-2093EFS—07
Automation and Control Solutions<br />
<strong>Honeywell</strong> International Inc.<br />
1985 Douglas Drive North<br />
Golden Valley, MN 55422<br />
http://yourhome.honeywell.com<br />
<strong>Honeywell</strong> Limited<br />
705 Montrichard Avenue<br />
Saint-Jean-sur-Richelieu, Quebec<br />
J2X 5K8<br />
® U.S. Registered Trademark.<br />
© 2013 <strong>Honeywell</strong> International Inc.<br />
69-2093EFS—07 M.S. Rev. 12-13<br />
Printed in U.S.A.


