

Philips Clock Radio - Quick start guide - ESP
Philips Clock Radio - Quick start guide - ESP
Philips Clock Radio - Quick start guide - ESP

You also want an ePaper? Increase the reach of your titles
YUMPU automatically turns print PDFs into web optimized ePapers that Google loves.
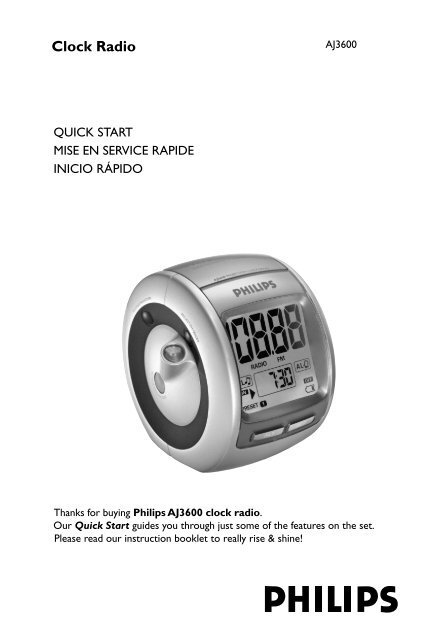
<strong>Clock</strong> <strong>Radio</strong><br />
AJ3600<br />
QUICK START<br />
MISE EN SERVICE RAPIDE<br />
INICIO RÁPIDO<br />
Thanks for buying <strong>Philips</strong> AJ3600 clock radio.<br />
Our <strong>Quick</strong> Start <strong>guide</strong>s you through just some of the features on the set.<br />
Please read our instruction booklet to really rise & shine!
1<br />
PRESET 1-5<br />
SET<br />
TIME<br />
2<br />
3<br />
B<br />
SET ALARM<br />
1 2<br />
SET ALARM<br />
S<br />
HOUR +<br />
5<br />
4<br />
3<br />
MINUTE +<br />
DC 7.5V<br />
A<br />
C<br />
4XAA/R6/UM3 1.5V<br />
ENGLISH<br />
<strong>Quick</strong> <strong>start</strong> as easy as ABC!<br />
Step A<br />
• Connect the supplied mains adapter to the set’s<br />
7.5V DC jack and the plug into a wall outlet or<br />
insert 4 batteries into the battery compartment.<br />
Step B<br />
How to set the <strong>Clock</strong> & Alarm times<br />
1. Check the radio is switched off.<br />
2. Press and hold SET TIME/SET ALARM 1/<br />
SET ALARM 2.<br />
3. Press and hold HOUR+/MINUTE+.<br />
4. Press SET TIME/SET ALARM 1/SET ALARM 2.<br />
Step C<br />
Selecting the Alarm mode<br />
Press briefly:<br />
• AL1 once for radio<br />
or /and<br />
• AL2 once for buzzer<br />
Helpful hints:<br />
– If you have selected AL1 (AL ) , make sure you<br />
have properly tuned to a station before turning off<br />
the set (See TUNING TO RADIO STATIONS).<br />
3 ways to switch off the alarm<br />
• Either press briefly: ALARM RESET/SLEEP or<br />
REPEAT ALARM/ BRIGHTNESS CONTROL<br />
.<br />
• Press AL1 or AL2.<br />
Special feature:(See S)<br />
Projection (Optimum: Within 2.5m)<br />
With this projection feature, you can conveniently<br />
project the clock time onto a surface e.g. walls,<br />
ceiling.<br />
1. Press PROJECTION ON/OFF to switch on.<br />
2. Turn the Projection lens wheel (maximum<br />
180º left or right) and also the set, if necessary, to<br />
find a suitable projection surface.<br />
Helpful hints:<br />
– For longer projection time, please use the supplied<br />
7.5V AC adapter to operate the set.<br />
FRANÇAIS<br />
Mise en Service Rapide c’est simple<br />
comme bonjour!<br />
Étape A<br />
• Connectez l’adaptateur secteur à la prise DC 7.5V de<br />
l’équipement et à la prise d’alimentation ou insérez<br />
quatre piles comme indiqué dans ce compartiment.<br />
Étape B<br />
Mise à l’heure de l’horloge et de l’alarme<br />
1. Vérifiez que la radio est éteinte.<br />
2. Appuyez sans relâcher sur SET TIME/SET<br />
ALARM 1/SET ALARM 2. (l’heure clignote)<br />
3. Appuyez sans relâcher sur HOUR+/MINUTE+.<br />
4. Appuyez sur SET TIME/SET ALARM 1/SET<br />
ALARM 2.<br />
Étape C<br />
Pour sélectionner le mode d’alarme<br />
Appuyez soit brièvement sur:<br />
• AL1 une fois pour sélectionner radio .<br />
ou /et<br />
• AL2 une fois pour sélectionner ronfleur .<br />
Conseils utiles:<br />
– Si vous avez sélectionné AL1 (AL ), assurez-vous<br />
que vous avez effectivement une réception radio
avant d’éteindre l’appareil (voir en RECHERCHE DE<br />
STATIONS).<br />
3 façons d’éteindre<br />
• Appuyez soit brièvement sur: ALARM RESET/<br />
SLEEP ou REPEAT ALARM/ BRIGHTNESS CONTROL<br />
.<br />
• Appuyez sur AL1 ou AL2.<br />
Caractéristique Spécial: (voir S)<br />
Projection (Optimale: Dans 2.5m)<br />
La fonction projection vous permet de projeter l'heure<br />
sur une surface, par exemple un mur ou un plafond.<br />
1. Appuyez sur PROJECTION ON/OFF pour<br />
mettre l’appareil sous tension.<br />
2. Tournez le sélecteur rotatif de la lentille de<br />
projection (180 ° maximum à gauche ou à droite)<br />
ainsi que l'appareil, si nécessaire, pour identifier la<br />
surface de projection la plus adaptée.<br />
Característica especial: ( Véase S)<br />
Proyección (óptima: Antes de que transcurra 2.5m)<br />
Con esta prestación de proyección, Vd. puede<br />
cómodamente proyectar la hora del reloj sobre una<br />
superficie, por ejemplo las paredes, el techo.<br />
1. Pulse PROJECTION ON/OFF en el aparato<br />
para encenderlo.<br />
2. Gire la rueda de la Lente de proyección (hasta un<br />
máximo de 180° a la izquierda o la derecha) y<br />
también el aparato, si es necesario, para encontrar<br />
un superficie de proyección apropiada.<br />
Consejos prácticos:<br />
– Para un tiempo de proyección mayor, utilice el<br />
adaptador de CA de 7.5V suministrado para utilizar<br />
el aparato.<br />
Conseils utiles:<br />
– Si vous souhaitez augmenter le temps de projection,<br />
utilisez l’adaptateur secteur 7.5V fourni avec l’appareil.<br />
<strong>ESP</strong>AÑOL<br />
Comienzo rápido tan fácil como el<br />
ABC!<br />
Camina A<br />
• Conecte el adaptador a la entrada DC 7.5V del<br />
aparato y a la toma de la red o inserte cuatro<br />
pilas como se indica en el compartimento.<br />
Camina B<br />
Cómo fijar los tiempos del relof & alarmar<br />
1. Compruebe que la radio está desconectado.<br />
2. Mantenga pulsado SET TIME/SET ALARM 1/<br />
SET ALARM 2.<br />
3. Mantenga pulsado HOUR+/MINUTE+.<br />
4. Pulse SET TIME/SET ALARM 1/SET ALARM 2.<br />
Camina C<br />
Para seleccionar entre las funciones de<br />
alarma<br />
Pulse breve:<br />
• AL1 una veces para seleccionar radio<br />
o /y<br />
• AL2 una veces para seleccionar zumbadar<br />
Consejos prácticos:<br />
– Si ha seleccionado, AL1 (AL ) , compruebe que ha<br />
sintonizado con una emisora antes de apagar el<br />
aparato (Véase SINTONIZACIÓN DE EMISORAS).<br />
3 modos para apagar la alarma<br />
• Pulse breve: ALARM RESET/SLEEP o<br />
REPEAT ALARM/ BRIGHTNESS CONTROL<br />
.<br />
• Pulse AL1 o AL2.


