

Philips NIVEA FOR MEN shaver - User manual - POR
Philips NIVEA FOR MEN shaver - User manual - POR
Philips NIVEA FOR MEN shaver - User manual - POR

Create successful ePaper yourself
Turn your PDF publications into a flip-book with our unique Google optimized e-Paper software.
3<br />
4<br />
1<br />
7<br />
A<br />
2<br />
B<br />
3 4<br />
5<br />
6<br />
8<br />
9<br />
10
English 6<br />
Deutsch 19<br />
Español 34<br />
Français 48<br />
Italiano 63<br />
Nederlands 77<br />
Português 92<br />
Türkçe 107<br />
HS8023, HS8020, HS8015
English<br />
Introduction<br />
Congratulations on your purchase and welcome<br />
to <strong>Philips</strong>! To fully benefit from the support that<br />
<strong>Philips</strong> offers, register your product at www.philips.<br />
com/welcome.<br />
Important<br />
Read this user <strong>manual</strong> carefully before you use the<br />
appliance and save it for future reference.<br />
Danger<br />
- Make sure the adapter does not get wet (your<br />
adapter may differ from the one shown in the<br />
figure).<br />
Warning<br />
- The adapter contains a transformer. Do not cut<br />
off the adapter to replace it with another plug, as<br />
this causes a hazardous situation.<br />
- This appliance is not intended for use by persons<br />
(including children) with reduced physical, sensory<br />
or mental capabilities, or lack of experience<br />
and knowledge, unless they have been given<br />
supervision or instruction concerning use of the<br />
appliance by a person responsible for their safety.<br />
- Children should be supervised to ensure that they<br />
do not play with the appliance.<br />
Caution<br />
- Never immerse the charger in water nor rinse it<br />
under the tap.<br />
- Always place and use the charger on a surface<br />
that is fluid-resistant.<br />
- Use, charge and store the appliance at a<br />
temperature between 5°C and 35°C.<br />
- Only use the adapter and the charger supplied.
English<br />
<br />
-<br />
-<br />
Do not use the <strong>shaver</strong> or the charger if it is<br />
damaged.<br />
If the adapter is damaged, always have it replaced<br />
with one of the original type in order to avoid a<br />
hazard.<br />
Compliance with standards<br />
- This <strong>shaver</strong> complies with the internationally<br />
approved safety regulations and can be safely used<br />
in the bath or shower and cleaned under the tap.<br />
- This <strong>Philips</strong> appliance complies with all standards<br />
regarding electromagnetic fields (EMF). If handled<br />
properly and according to the instructions in this<br />
user <strong>manual</strong>, the appliance is safe to use based on<br />
scientific evidence available today.<br />
General<br />
- The adapter transforms 100-240 volts to a safe<br />
low voltage of less than 24 volts.<br />
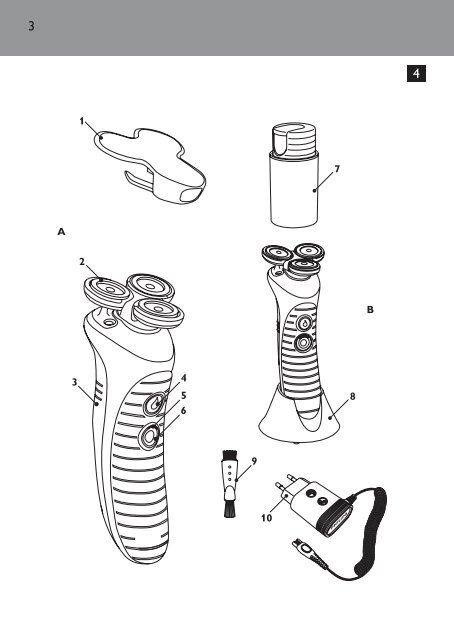
Overview (Fig. 4)<br />
A Shaver<br />
1 Protection cap<br />
2 Shaving unit<br />
3 Shaving conditioner cartridge<br />
4 Shaving conditioner button<br />
5 Charging light<br />
6 On/off button<br />
B Accessories<br />
1 <strong>NIVEA</strong> <strong>FOR</strong> <strong>MEN</strong> shaving conditioner bottle<br />
2 Charger<br />
3 Cleaning brush<br />
4 Adapter (your adapter may differ from the one<br />
shown in the figure)
English<br />
Getting started<br />
Charging<br />
1 Put the small plug in the charger and put the<br />
adapter in the wall socket.<br />
2 Put the <strong>shaver</strong> in the charger.<br />
, The <strong>shaver</strong> is being charged.<br />
3 Charge the <strong>shaver</strong> for 8 hours.<br />
Note: Charge the <strong>shaver</strong> before you use it for the first<br />
time or when the charging light indicates that the<br />
battery is empty (see section ‘Charge indications’).<br />
Note: A fully charged <strong>shaver</strong> has a shaving time of up<br />
to 30 minutes.<br />
Charge indications<br />
Charging<br />
- During charging, the charging light lights up green.<br />
Battery low<br />
- When the battery is low, the charging light lights<br />
up red. When you switch off the <strong>shaver</strong>, the red<br />
light slowly goes out.
English<br />
<br />
Filling the shaving conditioner cartridge<br />
1 Remove the tab of the <strong>NIVEA</strong> <strong>FOR</strong> <strong>MEN</strong><br />
shaving conditioner bottle.<br />
2 Turn the cap of the conditioner bottle<br />
clockwise (‘click’).<br />
, The cap moves downwards and the conditioner<br />
nozzle appears.<br />
3 Place the nozzle of the conditioner bottle in<br />
the filling opening of the conditioner cartridge.<br />
4 Move the bottle up and down approx. 5 times<br />
to pump shaving conditioner into the cartridge<br />
until you see that the cartridge is full.<br />
Do not fill the cartridge beyond the MAX<br />
indication.<br />
Using your <strong>shaver</strong><br />
Note: Your skin may need 2 to 3 weeks to get<br />
accustomed to a new shaving system.<br />
1 Make sure there is sufficient shaving<br />
conditioner in the shaving conditioner<br />
cartridge.<br />
2 Press the on/off button to switch on the <strong>shaver</strong>.<br />
3 Make sure the battery is not low (see chapter<br />
‘Getting started’, section ‘Charge indications’).
10<br />
English<br />
4 Gently move the shaving unit in circles over<br />
your skin and press the shaving conditioner<br />
button until there is enough shaving<br />
conditioner on your skin for a comfortable<br />
shave.<br />
- When you release the shaving conditioner button,<br />
the appliance stops dispensing conditioner.<br />
- Press the shaving conditioner button again to<br />
apply more shaving conditioner during shaving<br />
to ensure that the shaving unit continues to glide<br />
smoothly over your skin.<br />
Note: The shaving conditioner button only works when<br />
the <strong>shaver</strong> is switched on.<br />
Note: This <strong>shaver</strong> can be used in a way similar to a<br />
razor blade: you can use the <strong>shaver</strong> on a wet face.<br />
Unlike a conventional electric <strong>shaver</strong>, this appliance<br />
has no hair chamber that collects stubble. To prevent<br />
stubble from falling on your clothes, apply sufficient<br />
shaving conditioner while shaving.<br />
5 Thoroughly clean the <strong>shaver</strong> after every use<br />
(see chapter ‘Cleaning’).<br />
6 Slide the protection cap onto the <strong>shaver</strong> to<br />
prevent damage.<br />
Tips for optimal gliding and a smooth<br />
shaving result<br />
- Gently move the <strong>shaver</strong> in circles over your skin.<br />
- Do not exert too much pressure on the <strong>shaver</strong>, as<br />
this may cause skin irritation.<br />
- To ensure proper gliding, apply shaving conditioner<br />
regularly.<br />
- You can also use the <strong>shaver</strong> in the bath or shower.
Cleaning and maintenance<br />
Clean the <strong>shaver</strong> after every use.<br />
English 11<br />
Do not use abrasives, scourers or liquids such as<br />
alcohol, petrol or acetone to clean the appliance.<br />
Be careful with hot water. Always check if the<br />
water is not too hot, to prevent your hands from<br />
getting burnt.<br />
Never dry the shaving unit with a towel or tissue,<br />
as this may damage the shaving heads.<br />
Note: The <strong>shaver</strong> is watertight and can be cleaned<br />
under the tap.<br />
1 Press the on/off button to switch on the <strong>shaver</strong>.<br />
2 Clean the <strong>shaver</strong> while it is switched on.<br />
There are two ways to clean the <strong>shaver</strong>:<br />
- Rinse the shaving unit under a hot tap for at least<br />
30 seconds.<br />
- Immerse the shaving unit in hot water for at least<br />
30 seconds.<br />
3 Switch off the <strong>shaver</strong> and shake off excess<br />
water.<br />
4 Slide the protection cap onto the <strong>shaver</strong> to<br />
prevent damage.<br />
Note: If the <strong>shaver</strong> doesn’t shave as well as it used<br />
to and you are unable to solve this with the cleaning<br />
methods described in this chapter, consult chapter<br />
‘Frequently Asked Questions’ for an extra-thorough<br />
cleaning method.
12<br />
English<br />
Replacement<br />
Shaving conditioner cartridge<br />
For hygienic reasons, we advise you to replace the<br />
shaving conditioner cartridge twice a year. You can<br />
order a new shaving conditioner cartridge from<br />
<strong>Philips</strong> Consumer Care by telephone. To find its<br />
phone number, visit www.philips.com and click on<br />
‘<strong>Philips</strong> Consumer Care’.<br />
1 Remove the shaving conditioner cartridge from<br />
the <strong>shaver</strong>.<br />
2 Insert the lug at the top of the new shaving<br />
conditioner cartridge into the slot in the rim of<br />
the <strong>shaver</strong> (1). Then press the bottom part of<br />
the cartridge with your thumb (2) to attach the<br />
cartridge to the <strong>shaver</strong> (‘click’).<br />
3 Fill the shaving conditioner cartridge (see<br />
chapter ‘Getting started’).<br />
Shaving unit<br />
Replace the shaving unit every year for optimal<br />
shaving results.<br />
Only replace the shaving unit with an HS85 <strong>Philips</strong><br />
Shaving Unit.<br />
1 Pull the old shaving unit off the <strong>shaver</strong>.<br />
2 Put the new shaving unit on the <strong>shaver</strong>.
<strong>NIVEA</strong> <strong>FOR</strong> <strong>MEN</strong> shaving conditioner<br />
bottle<br />
Only use <strong>NIVEA</strong> <strong>FOR</strong> <strong>MEN</strong> shaving conditioner<br />
bottles.<br />
Disposal<br />
-<br />
English 13<br />
Do not throw away the appliance with the normal<br />
household waste at the end of its life, but hand<br />
it in at an official collection point for recycling. By<br />
doing this, you help to preserve the environment.<br />
- The rechargeable <strong>shaver</strong> battery contains<br />
substances that may pollute the environment.<br />
Always remove the battery before you discard<br />
and hand in the <strong>shaver</strong> at an official collection<br />
point. Dispose of the battery at an official<br />
collection point for batteries. If you have trouble<br />
removing the battery, you can also take the <strong>shaver</strong><br />
to a <strong>Philips</strong> service centre. The staff of this centre<br />
will remove the battery for you and will dispose of<br />
it in an environmentally safe way.<br />
Disposal of the rechargeable battery<br />
Only remove the rechargeable battery when<br />
you discard the <strong>shaver</strong>. Make sure the battery is<br />
completely empty when you remove it.<br />
Be careful, the battery strips are sharp.
14<br />
English<br />
1 Remove the shaving conditioner cartridge from<br />
the <strong>shaver</strong>.<br />
2 Undo the three screws at the back of the<br />
<strong>shaver</strong>.<br />
3 Remove the back panel of the housing with a<br />
screwdriver.<br />
4 Remove the rechargeable battery.<br />
Guarantee and service<br />
If you need service or information or if you<br />
have a problem, please visit the <strong>Philips</strong> website at<br />
www.philips.com or contact the <strong>Philips</strong> Consumer<br />
Care Centre in your country (you find its phone<br />
number in the worldwide guarantee leaflet). If there<br />
is no Consumer Care Centre in your country, go to<br />
your local <strong>Philips</strong> dealer.<br />
Guarantee restrictions<br />
The shaving heads (cutters and guards) are not<br />
covered by the terms of the international guarantee<br />
because they are subject to wear.<br />
The conditioner cartridge is a disposable item and<br />
is not covered by the terms of the international<br />
guarantee.
English 15<br />
Question<br />
Why doesn’t<br />
the shaving unit<br />
glide smoothly<br />
over my skin?<br />
Why doesn’t<br />
the <strong>shaver</strong><br />
shave as well as<br />
it used to?<br />
Why<br />
doesn’t the<br />
<strong>shaver</strong> work<br />
when I press<br />
the on/off<br />
button?<br />
Frequently asked questions<br />
This chapter lists the questions most frequently<br />
asked about the <strong>shaver</strong>. If you cannot find the answer<br />
to your question, contact the Consumer Care<br />
Centre in your country.<br />
Answer<br />
You may not have applied enough shaving<br />
conditioner. Press the shaving conditioner button<br />
until a sufficient amount of <strong>NIVEA</strong> <strong>FOR</strong> <strong>MEN</strong><br />
shaving conditioner has been released. This makes<br />
the shaving unit glide smoothly over your skin again.<br />
You may not have cleaned the <strong>shaver</strong> properly.<br />
Thoroughly clean the <strong>shaver</strong> (see chapter ‘Cleaning<br />
and maintenance’).<br />
Long hairs may be obstructing the shaving heads.<br />
Clean the shaving heads by following the steps of the<br />
extra-thorough cleaning method described below.<br />
The shaving unit may be damaged or worn. Replace<br />
the shaving unit (see chapter ‘Replacement’).<br />
The battery may be empty. Recharge the battery<br />
(see chapter ‘Getting started’).<br />
Dried shaving conditioner may block the shaving<br />
heads in the shaving unit. Clean the <strong>shaver</strong><br />
thoroughly before you continue shaving (see chapter<br />
‘Cleaning and maintenance’).
16<br />
English<br />
Question<br />
Why does<br />
little shaving<br />
conditioner<br />
come out of<br />
the holes even<br />
though there<br />
is enough<br />
conditioner in<br />
the cartridge?<br />
Why<br />
doesn’t any<br />
shaving<br />
conditioner<br />
come out<br />
of the holes<br />
when I press<br />
the shaving<br />
conditioner<br />
button?<br />
Answer<br />
You may not have reassembled the shaving unit<br />
properly after extra-thorough cleaning. When you<br />
reassemble the shaving unit, make sure you turn each<br />
guard anticlockwise until it locks into position.<br />
One of the conditioner holes may be blocked. Rinse<br />
or soak the shaving unit. If this does not work, pump<br />
shaving conditioner into the shaving conditioner<br />
cartridge until conditioner starts to come out of the<br />
blocked hole. If this does not work either, try the<br />
following method: 1) Switch off the <strong>shaver</strong> 2) Pull the<br />
shaving unit off the <strong>shaver</strong> 3) Put your finger on the<br />
hole that is not blocked 4) Switch on the <strong>shaver</strong> 5)<br />
Press the shaving conditioner button several seconds<br />
until conditioner starts to come out of the blocked<br />
hole again.<br />
You may not have put the shaving heads back into<br />
their original holders. One of the shaving heads does<br />
not have a shaving conditioner hole in its centre and<br />
needs to be placed in a specific holder. Make sure<br />
you put the shaving head without conditioner hole in<br />
the correct holder.This is the holder that is closest to<br />
the on/off button when the shaving unit is assembled<br />
on the <strong>shaver</strong>.<br />
The shaving cartridge is almost empty. Refill the<br />
shaving conditioner cartridge (see chapter ‘Getting<br />
started’).
English 17<br />
Question<br />
I dropped the<br />
<strong>shaver</strong> and<br />
the shaving<br />
unit fell apart.<br />
How should I<br />
reassemble the<br />
shaving unit?<br />
Why does the<br />
<strong>shaver</strong> suddenly<br />
produce a<br />
strange noise?<br />
Answer<br />
Place the cutters in the shaving head holders with<br />
the cutter legs pointing upwards. Place the guards<br />
onto the holders (over the cutters) and turn them<br />
anticlockwise until they lock into position. One of the<br />
guards does not have a shaving conditioner hole in<br />
the centre and needs to be attached onto a specific<br />
holder. This is the holder that is closest to the on/off<br />
button when the shaving unit is assembled on the<br />
<strong>shaver</strong>. If the cutters and the guards have become<br />
mixed up, it may take several weeks before optimal<br />
shaving performance is restored.<br />
You probably did not reassemble the shaving unit<br />
properly. Place the cutters in the shaving head<br />
holders with the cutter legs pointing upwards. Place<br />
the guards onto the holders (over the cutters)<br />
and turn them anticlockwise until they lock into<br />
position. One of the guards does not have a shaving<br />
conditioner hole in the centre and needs to be<br />
attached onto a specific holder. This is the holder<br />
that is closest to the on/off button when the shaving<br />
unit is assembled on the <strong>shaver</strong>. If the cutters and<br />
the guards have become mixed up, it may take<br />
several weeks before optimal shaving performance<br />
is restored.<br />
Extra-thorough cleaning method<br />
Make sure the appliance is switched off.<br />
1 Pull the shaving unit off the <strong>shaver</strong>.
18<br />
English<br />
2 Turn the guard clockwise and lift it from the<br />
shaving unit.<br />
Note: Only remove one shaving head at a time. This<br />
ensures that you always put the shaving head back<br />
into its original holder, which is necessary because two<br />
of the shaving heads have special holes for the shaving<br />
conditioner. This also ensures that you do not mix up<br />
the cutters and guards of different shaving heads,<br />
which affects the shaving performance.<br />
3 If necessary, remove the cutter from the guard.<br />
4 Clean the cutter and guard with the brush<br />
supplied.<br />
5 After cleaning, place the cutter back<br />
into the shaving unit with the cutter legs<br />
pointing upwards.<br />
6 Place the guard back onto the shaving head<br />
holder (over the cutter).<br />
7 Turn the guard anticlockwise until it locks into<br />
position.<br />
8 Put the shaving unit back onto the <strong>shaver</strong><br />
(‘click’).
Deutsch<br />
19<br />
Einführung<br />
Herzlichen Glückwunsch zu Ihrem Kauf und<br />
willkommen bei <strong>Philips</strong>! Um den Support von<br />
<strong>Philips</strong> optimal nutzen zu können, registrieren Sie Ihr<br />
Produkt bitte unter www.philips.com/welcome.<br />
Wichtig<br />
Lesen Sie diese Bedienungsanleitung vor dem<br />
Gebrauch des Geräts aufmerksam durch, und<br />
bewahren Sie sie für eine spätere Verwendung auf.<br />
Gefahr<br />
- Achten Sie darauf, dass der Adapter nicht nass<br />
wird (Ihr Adapter ist ggf. nicht mit dem Adapter<br />
auf der Abbildung identisch).<br />
Warnhinweis<br />
- Der Adapter enthält einen Transformator. Ersetzen<br />
Sie den Adapter keinesfalls durch einen anderen<br />
Stecker, da dies den Benutzer gefährden kann.<br />
- Dieses Gerät ist für Benutzer (einschl. Kinder)<br />
mit eingeschränkten physischen, sensorischen<br />
oder psychischen Fähigkeiten bzw. ohne jegliche<br />
Erfahrung oder Vorwissen nur dann geeignet, wenn<br />
eine angemessene Aufsicht oder ausführliche<br />
Anleitung zur Benutzung des Geräts durch eine<br />
verantwortliche Person sichergestellt ist.<br />
- Achten Sie darauf, dass Kinder nicht mit dem<br />
Gerät spielen.<br />
Achtung<br />
- Tauchen Sie das Ladegerät niemals in Wasser;<br />
spülen Sie es auch nicht unter fließendem Wasser<br />
ab.<br />
- Stellen Sie das Ladegerät immer auf eine<br />
wasserundurchlässige Oberfläche.
20<br />
Deutsch<br />
- Benutzen und laden Sie das Gerät bei<br />
Temperaturen zwischen 5 °C und<br />
35 °C. Bewahren Sie es auch in diesem<br />
Temperaturbereich auf.<br />
- Verwenden Sie ausschließlich den mitgelieferten<br />
Adapter und das Ladegerät.<br />
- Verwenden Sie den Rasierer und das Ladegerät<br />
nicht, wenn Beschädigungen daran erkennbar sind.<br />
- Wenn der Adapter defekt oder beschädigt ist, darf<br />
er nur durch ein Original-Ersatzteil ausgetauscht<br />
werden, um Gefährdungen zu vermeiden.<br />
Normerfüllung<br />
- Dieser Rasierer erfüllt die internationalen<br />
Sicherheitsvorschriften und kann ohne Bedenken<br />
unter der Dusche oder in der Badewanne benutzt<br />
sowie unter fließendem Wasser gereinigt werden.<br />
- Dieses <strong>Philips</strong> Gerät erfüllt sämtliche Normen<br />
bezüglich elektromagnetischer Felder (EMF).<br />
Nach aktuellen wissenschaftlichen Erkenntnissen<br />
ist das Gerät sicher im Gebrauch, sofern<br />
es ordnungsgemäß und entsprechend den<br />
Anweisungen in dieser Bedienungsanleitung<br />
gehandhabt wird.<br />
Allgemeines<br />
- Der Adapter wandelt Netzspannungen von 100<br />
bis 240 Volt in eine sichere Betriebsspannung von<br />
unter 24 Volt um.<br />
Übersicht (Abb. 4)<br />
A Rasierer<br />
1 Schutzkappe<br />
2 Schereinheit<br />
3 Shaving Conditioner-Kartusche<br />
4 Shaving Conditioner-Taste<br />
5 Ladeanzeige
6 Ein-/Ausschalter<br />
B Zubehör<br />
1 <strong>NIVEA</strong> <strong>FOR</strong> <strong>MEN</strong> Shaving Conditioner-Flasche<br />
2 Ladegerät<br />
3 Reinigungsbürste<br />
4 Adapter (Ihr Adapter ist ggf. nicht mit dem<br />
Adapter auf der Abbildung identisch).<br />
Vorbereitungen<br />
Deutsch 21<br />
Laden<br />
1 Stecken Sie den kleinen Stecker in das<br />
Ladegerät und den Adapter in die Steckdose.<br />
2 Stellen Sie den Rasierer in das Ladegerät.<br />
, Der Rasierer wird geladen.<br />
3 Laden Sie den Rasierer 8 Stunden lang auf.<br />
Hinweis: Laden Sie den Rasierer vor dem ersten<br />
Gebrauch auf oder wenn die Ladeanzeige am Rasierer<br />
anzeigt, dass der Akku leer ist (siehe Abschnitt<br />
“Ladeanzeigen”).<br />
Hinweis: Mit einem vollständig geladenen Rasierer<br />
können Sie sich bis zu 30 Minuten lang rasieren.
22<br />
Deutsch<br />
Ladeanzeigen<br />
Laden<br />
- Während des Ladevorgangs leuchtet die<br />
Ladeanzeige grün.<br />
Akku fast leer<br />
- Wenn der Akku fast leer ist, leuchtet die<br />
Ladeanzeige rot. Wenn Sie den Rasierer<br />
ausschalten, erlischt die rote Kontrollanzeige<br />
langsam.<br />
Die Shaving Conditioner-Kartusche befüllen<br />
1 Entfernen Sie den Verschluss der Flasche<br />
<strong>NIVEA</strong> <strong>FOR</strong> <strong>MEN</strong> Shaving Conditioner.<br />
2 Drehen Sie die Kappe der Flasche im<br />
Uhrzeigersinn, bis Sie ein Klicken hören.<br />
, Die Kappe bewegt sich nach unten und die<br />
Conditioner-Düse tritt hervor.<br />
3 Stecken Sie die Düse der Conditioner-<br />
Flasche in die Einfüllöffnung der Conditioner-<br />
Kartusche.<br />
4 Bewegen Sie die Flasche 5 Mal auf und ab,<br />
um Shaving Conditioner in die Kartusche zu<br />
pumpen, bis Sie sehen, dass die Kartusche voll<br />
ist.<br />
Überschreiten Sie beim Füllen der Kartusche nicht<br />
die Markierung MAX.
Deutsch 23<br />
Den Rasierer benutzen<br />
Hinweis: Es kann 2 bis 3 Wochen dauern, bis sich Ihre<br />
Haut an ein neues Rasiersystem gewöhnt hat.<br />
-<br />
-<br />
1 Vergewissern Sie sich, dass sich genügend<br />
Shaving Conditioner in der Shaving<br />
Conditioner-Kartusche befindet.<br />
2 Zum Einschalten des Rasierers drücken Sie den<br />
Ein-/Ausschalter.<br />
3 Vergewissern Sie sich, dass der Akku<br />
ausreichend geladen ist (siehe Kapitel “Für<br />
den Gebrauch vorbereiten”, Abschnitt<br />
“Ladeanzeigen”).<br />
4 Führen Sie den Rasierer sanft mit kreisenden<br />
Bewegungen über die Haut. Halten Sie<br />
dabei die Shaving Conditioner-Taste so<br />
lange gedrückt, bis sich genügend Shaving<br />
Conditioner für eine angenehme Rasur auf<br />
Ihrer Haut befindet.<br />
Wenn Sie die Shaving Conditioner-Taste loslassen,<br />
wird kein Conditioner mehr abgegeben.<br />
Drücken Sie die Shaving Conditioner-Taste<br />
während der Rasur erneut, um mehr Conditioner<br />
aufzutragen und zu gewährleisten, dass die<br />
Schereinheit sanft über die Haut gleitet.<br />
Hinweis: Die Taste für den Shaving Conditioner<br />
funktioniert nur bei eingeschaltetem Rasierer.<br />
Hinweis: Dieser Rasierer kann wie ein Nassrasierer<br />
auf dem angefeuchteten Gesicht benutzt werden.<br />
Anders als herkömmliche elektrische Rasierer verfügt<br />
dieses Gerät über keine Haarauffangkammer. Damit<br />
keine Bartstoppeln auf Ihre Kleidung fallen, sollten
24<br />
Deutsch<br />
Sie während der Rasur genügend Shaving Conditioner<br />
auftragen.<br />
5 Reinigen Sie den Rasierer nach jedem<br />
Gebrauch gründlich (siehe Kapitel “Reinigung”).<br />
6 Setzen Sie die Schutzkappe auf den Rasierer,<br />
um Beschädigungen zu vermeiden.<br />
Tipps für ein optimales Gleitverhalten und<br />
eine glatte Rasur<br />
- Führen Sie den Rasierer sanft mit kreisenden<br />
Bewegungen über die Haut.<br />
- Üben Sie nicht zu viel Druck auf den Rasierer aus,<br />
da dies zu Hautirritationen führen kann.<br />
- Damit der Rasierer gut über die Haut gleiten kann,<br />
tragen Sie regelmäßig Shaving Conditioner auf.<br />
- Sie können den Rasierer auch in der Badewanne<br />
oder unter der Dusche verwenden.<br />
Reinigung und Wartung<br />
Reinigen Sie den Rasierer nach jedem Gebrauch.<br />
Verwenden Sie für die Reinigung keine<br />
Scheuermittel oder Lösungsmittel wie Alkohol,<br />
Benzin oder Azeton.<br />
Gehen Sie vorsichtig mit heißem Wasser um.<br />
Achten Sie darauf, dass das Wasser nicht zu heiß ist<br />
und Sie sich nicht die Hände verbrühen.<br />
Trocknen Sie die Schereinheit niemals mit einem<br />
Tuch ab, um Beschädigungen der Scherköpfe zu<br />
vermeiden.<br />
Hinweis: Der Rasierer ist wasserdicht und kann unter<br />
fließendem Wasser gereinigt werden.<br />
1 Zum Einschalten des Rasierers drücken Sie den<br />
Ein-/Ausschalter.
Deutsch 25<br />
2 Reinigen Sie den Rasierer, während er<br />
eingeschaltet ist.<br />
Es gibt zwei Möglichkeiten, den Rasierer zu reinigen:<br />
- Spülen Sie die Schereinheit mindestens<br />
30 Sekunden lang unter fließendem heißen<br />
Wasser aus.<br />
- Tauchen Sie die Schereinheit mindestens<br />
30 Sekunden lang in heißes Wasser.<br />
3 Schalten Sie dann den Rasierer aus und<br />
schütteln Sie überschüssiges Wasser ab.<br />
4 Setzen Sie die Schutzkappe auf den Rasierer,<br />
um Beschädigungen zu vermeiden.<br />
Hinweis: Lässt die Leistung des Rasierers nach und Sie<br />
können dieses Problem nicht mithilfe der in diesem<br />
Kapitel beschriebenen Reinigungsmethoden beheben,<br />
finden Sie im Kapitel “Häufig gestellte Fragen” Tipps für<br />
eine besonders gründliche Reinigung.<br />
Ersatz<br />
Shaving Conditioner-Kartusche<br />
Aus hygienischen Gründen empfiehlt sich zweimal<br />
pro Jahr ein Austausch der Shaving Conditioner-<br />
Kartusche. Neue Shaving Conditioner-Kartuschen<br />
können Sie telefonisch beim <strong>Philips</strong> Kundendienst<br />
bestellen. Die Telefonnummer finden Sie unter<br />
www.philips.com über den Link ‘<strong>Philips</strong><br />
Kundendienst’.
26<br />
Deutsch<br />
1 Nehmen Sie die Shaving Conditioner-<br />
Kartusche aus dem Rasierer.<br />
2 Setzen Sie die Führung am oberen Ende der<br />
neuen Shaving Conditioner-Kartusche in den<br />
Schlitz am Rand des Rasierers (1). Drücken Sie<br />
dann mit dem Daumen gegen die Unterseite<br />
der Kartusche (2), bis sie mit einem Klicken am<br />
Rasierer einrastet.<br />
3 Befüllen Sie die Shaving Conditioner-<br />
Kartusche (siehe Kapitel “Für den Gebrauch<br />
vorbereiten”).<br />
Schereinheit<br />
Tauschen Sie die Schereinheit jährlich aus, um auch<br />
weiterhin optimale Rasierergebnisse zu erzielen.<br />
Ersetzen Sie die Schereinheit ausschließlich durch<br />
eine HS85 <strong>Philips</strong> Schereinheit.<br />
1 Ziehen Sie die alte Schereinheit vom Rasierer<br />
ab.<br />
2 Setzen Sie die neue Schereinheit auf den<br />
Rasierer.
<strong>NIVEA</strong> <strong>FOR</strong> <strong>MEN</strong> Shaving Conditioner-<br />
Flasche<br />
Benutzen Sie ausschließlich <strong>NIVEA</strong> <strong>FOR</strong> <strong>MEN</strong><br />
Shaving Conditioner-Flaschen.<br />
Entsorgung<br />
-<br />
Deutsch 27<br />
Werfen Sie das Gerät am Ende der Lebensdauer<br />
nicht in den normalen Hausmüll. Bringen Sie es<br />
zum Recycling zu einer offiziellen Sammelstelle.<br />
Auf diese Weise helfen Sie, die Umwelt zu<br />
schonen.<br />
- Der Rasierer-Akku enthält Substanzen, die die<br />
Umwelt gefährden können. Entfernen Sie den<br />
Akku, bevor Sie den Rasierer an einer offiziellen<br />
Recyclingstelle abgeben. Geben Sie den<br />
gebrauchten Akku bei einer Batteriesammelstelle<br />
ab. Falls Sie beim Entfernen des Akkus Probleme<br />
haben, können Sie den Rasierer auch an ein<br />
<strong>Philips</strong> Service-Center geben. Dort wird der Akku<br />
umweltgerecht entsorgt.<br />
Den Akku entsorgen<br />
Nehmen Sie den Akku nur zur Entsorgung des<br />
Rasierers heraus. Vergewissern Sie sich, dass der<br />
Akku beim Herausnehmen vollständig entladen ist.<br />
Vorsicht: Die Schienen am Akku sind scharf!<br />
1 Nehmen Sie die Shaving Conditioner-<br />
Kartusche aus dem Rasierer.
28<br />
Deutsch<br />
2 Lösen Sie die drei Schrauben auf der Rückseite<br />
des Rasierers.<br />
3 Entfernen Sie das rückwärtige Gehäuse mit<br />
einem Schraubendreher.<br />
4 Entfernen Sie den Akku.<br />
Garantie und Kundendienst<br />
Benötigen Sie weitere Informationen oder treten<br />
Probleme auf, besuchen Sie bitte die <strong>Philips</strong> Website<br />
(www.philips.com), oder setzen Sie sich mit einem<br />
<strong>Philips</strong> Service-Center in Ihrem Land in Verbindung<br />
(Telefonnummer siehe Garantieschrift). Sollte es in<br />
Ihrem Land kein Service-Center geben, wenden Sie<br />
sich bitte an Ihren <strong>Philips</strong> Händler.<br />
Garantieeinschränkungen<br />
Die Scherköpfe (Schermesser und Scherkörbe)<br />
unterliegen nicht den Bedingungen der<br />
internationalen Garantie, da sie einem normalen<br />
Verschleiß ausgesetzt sind.<br />
Die Conditioner-Kartusche ist ein Einweg-Artikel<br />
und unterliegt somit nicht den Bedingungen der<br />
internationalen Garantie.<br />
Häufig gestellte Fragen<br />
Dieses Kapitel enthält die am häufigsten zu diesem<br />
Rasierer gestellten Fragen. Sollten Sie hier keine
Deutsch 29<br />
Antwort auf Ihre Frage finden, wenden Sie sich bitte<br />
an das <strong>Philips</strong> Service-Center in Ihrem Land.<br />
Frage<br />
Warum gleitet<br />
die Schereinheit<br />
nicht sanft über<br />
meine Haut?<br />
Weshalb rasiert<br />
der Rasierer<br />
nicht mehr so<br />
gut wie bisher?<br />
Warum<br />
funktioniert der<br />
Rasierer nicht,<br />
wenn ich den<br />
Ein-/Ausschalter<br />
drücke?<br />
Antwort<br />
Möglicherweise haben Sie nicht genug Shaving<br />
Conditioner aufgetragen. Halten Sie die Shaving<br />
Conditioner-Taste so lange gedrückt, bis eine<br />
ausreichende Menge <strong>NIVEA</strong> <strong>FOR</strong> <strong>MEN</strong> Shaving<br />
Conditioner abgegeben wurde. So kann die<br />
Schereinheit wieder sanft über Ihre Haut gleiten.<br />
Möglicherweise haben Sie den Rasierer nicht richtig<br />
gereinigt. Reinigen Sie den Rasierer gründlich (siehe<br />
Kapitel “Reinigung und Wartung”).<br />
Möglicherweise blockieren lange Haare die<br />
Scherköpfe. Reinigen Sie die Scherköpfe, indem<br />
Sie die unten beschriebene, besonders gründliche<br />
Reinigungsmethode befolgen.<br />
Möglicherweise ist die Schereinheit beschädigt<br />
oder abgenutzt. Wechseln Sie sie aus (siehe Kapitel<br />
“Ersatz”).<br />
Möglicherweise ist der Akku leer. Laden Sie ihn<br />
wieder auf (siehe Kapitel “Für den Gebrauch<br />
vorbereiten”).<br />
Möglicherweise verstopft getrockneter Shaving<br />
Conditioner die Scherköpfe in der Schereinheit.<br />
Reinigen Sie den Rasierer gründlich, bevor Sie mit<br />
der Rasur fortfahren (siehe Kapitel “Reinigung und<br />
Wartung”).
30<br />
Deutsch<br />
Frage<br />
Warum kommt<br />
trotz befüllter<br />
Conditioner-<br />
Kartusche nur<br />
wenig Shaving<br />
Conditioner aus<br />
den Öffnungen?<br />
Antwort<br />
Sie haben die Schereinheit nach der besonders<br />
gründlichen Reinigung ggf. nicht richtig<br />
zusammengesetzt. Achten Sie beim Wiedereinsetzen<br />
der Schereinheit darauf, jeden Scherkorb entgegen<br />
dem Uhrzeigersinn zu drehen, bis er einrastet.<br />
Möglicherweise ist eine der Zuführungsöffnungen<br />
verstopft. Spülen Sie die Schereinheit ab, oder<br />
weichen Sie sie ein. Sollte das nicht funktionieren,<br />
pumpen Sie Shaving Conditioner in die Kartusche,<br />
bis Conditioner aus der verstopften Öffnung fließt.<br />
Sollte auch das nicht funktionieren, versuchen Sie<br />
die folgende Methode: 1) Schalten Sie den Rasierer<br />
aus. 2) Ziehen Sie die Schereinheit vom Rasierer<br />
ab. 3) Legen Sie einen Finger auf die Öffnung, die<br />
nicht verstopft ist. 4) Schalten Sie den Rasierer ein.<br />
5) Halten Sie die Shaving Conditioner-Taste einige<br />
Sekunden lang gedrückt, bis wieder Conditioner aus<br />
der verstopften Öffnung fließt.<br />
Sie haben die Scherköpfe ggf. nicht wieder in<br />
die dazugehörigen Scherkopfhalter eingesetzt.<br />
Einer der Scherköpfe hat in der Mitte keine<br />
Shaving Conditioner-Öffnung und gehört in einen<br />
bestimmten Scherkopfhalter. Achten Sie darauf, dass<br />
Sie den Scherkopf ohne Conditioner-Öffnung in den<br />
richtigen Scherkopfhalter einsetzen. Dieser befindet<br />
sich am nächstem zum Ein-/Ausschalter, wenn die<br />
Schereinheit auf dem Rasierer angebracht ist.
Deutsch 31<br />
Frage<br />
Warum kommt<br />
kein Shaving<br />
Conditioner aus<br />
den Öffnungen,<br />
wenn ich<br />
die Shaving<br />
Conditioner-<br />
Taste drücke?<br />
Ich habe den<br />
Rasierer fallen<br />
gelassen.<br />
Dabei ist die<br />
Schereinheit<br />
abgefallen. Wie<br />
setze ich die<br />
Schereinheit<br />
wieder<br />
zusammen?<br />
Warum erzeugt<br />
der Rasierer<br />
ganz plötzlich<br />
ein seltsames<br />
Geräusch?<br />
Antwort<br />
Die Shaving Conditioner-Kartusche ist fast leer.<br />
Füllen Sie sie auf (siehe Kapitel “Für den Gebrauch<br />
vorbereiten”).<br />
Setzen Sie die Schermesser mit den Vorsprüngen<br />
nach oben in die Scherkopfhalter. Setzen Sie die<br />
Scherkörbe auf die Scherkopfhalter (über die<br />
Schermesser) und drehen Sie sie entgegen dem<br />
Uhrzeigersinn, bis sie einrasten. Einer der Scherkörbe<br />
hat in der Mitte keine Shaving Conditioner-Öffnung<br />
und gehört auf einen bestimmten Scherkopfhalter.<br />
Dieser befindet sich am nächstem zum Ein-/<br />
Ausschalter, wenn die Schereinheit auf dem Rasierer<br />
angebracht ist. Werden Schermesser und Scherkörbe<br />
vertauscht, kann es mehrere Wochen dauern, bis<br />
eine optimale Rasierleistung wieder hergestellt ist.<br />
Sie haben ggf. die Schereinheit falsch eingebaut.<br />
Setzen Sie die Schermesser mit den Vorsprüngen<br />
nach oben in die Scherkopfhalter. Setzen Sie die<br />
Scherkörbe auf die Scherkopfhalter (über die<br />
Schermesser) und drehen Sie sie entgegen dem<br />
Uhrzeigersinn, bis sie einrasten. Einer der Scherkörbe<br />
hat in der Mitte keine Shaving Conditioner-Öffnung<br />
und gehört auf einen bestimmten Scherkopfhalter.<br />
Dieser befindet sich am nächstem zum Ein-/<br />
Ausschalter, wenn die Schereinheit auf dem Rasierer<br />
angebracht ist. Werden Schermesser und Scherkörbe<br />
vertauscht, kann es mehrere Wochen dauern, bis<br />
eine optimale Rasierleistung wieder hergestellt ist.
32<br />
Deutsch<br />
Besonders gründliche Reinigungsmethode<br />
Vergewissern Sie sich, dass das Gerät ausgeschaltet<br />
ist.<br />
1 Ziehen Sie die Schereinheit vom Rasierer ab.<br />
2 Drehen Sie den Scherkorb im Uhrzeigersinn<br />
und nehmen Sie ihn aus der Schereinheit<br />
heraus.<br />
Hinweis: Entfernen Sie jeweils nur einen Scherkopf.<br />
Damit stellen Sie sicher, dass Sie den Scherkopf<br />
auch wieder in den entsprechenden Scherkopfhalter<br />
zurücksetzen. Dies ist umso wichtiger, da zwei der<br />
Scherköpfe über spezielle Öffnungen für Shaving<br />
Conditioner verfügen. Gleichzeitig wird sichergestellt,<br />
dass Sie die Schermesser und Scherkörbe der<br />
verschiedenen Scherköpfe nicht vertauschen. Dies<br />
hätte negative Auswirkungen auf die Rasierergebnisse.<br />
3 Entfernen Sie, falls notwendig, das Schermesser<br />
vom Scherkorb.<br />
4 Reinigen Sie das Schermesser und den<br />
Scherkorb mit der beiliegenden Bürste.<br />
5 Setzen Sie nach dem Reinigen das Schermesser<br />
mit den Vorsprüngen nach oben wieder in die<br />
Schereinheit.<br />
6 Setzen Sie den Scherkorb wieder auf den<br />
Scherkopfhalter (über das Schermesser).
Deutsch 33<br />
7 Drehen Sie den Scherkorb entgegen dem<br />
Uhrzeigersinn, bis er einrastet.<br />
8 Setzen Sie die Schereinheit wieder auf den<br />
Rasierer. Sie rastet mit einem Klicken ein.
34<br />
Español<br />
Introducción<br />
Enhorabuena por la compra de este producto y<br />
bienvenido a <strong>Philips</strong>. Para sacar el mayor partido<br />
de la asistencia que <strong>Philips</strong> le ofrece, registre su<br />
producto en www.philips.com/welcome.<br />
Importante<br />
Antes de usar el aparato, lea atentamente este<br />
<strong>manual</strong> de usuario y consérvelo por si necesitara<br />
consultarlo en el futuro.<br />
Peligro<br />
- Asegúrese de que el adaptador no se moje (es<br />
posible que el adaptador de su aparato sea<br />
diferente al que se muestra en el dibujo).<br />
Advertencia<br />
- El adaptador incorpora un transformador. No<br />
corte el adaptador para sustituirlo por otra clavija,<br />
ya que podría provocar situaciones de peligro.<br />
- Este aparato no debe ser usado por personas<br />
(adultos o niños) con su capacidad física, psíquica<br />
o sensorial reducida, ni por quienes no tengan<br />
los conocimientos y la experiencia necesarios, a<br />
menos que sean supervisados o instruidos acerca<br />
del uso del aparato por una persona responsable<br />
de su seguridad.<br />
- Asegúrese de que los niños no jueguen con este<br />
aparato.<br />
Precaución<br />
- No sumerja nunca el cargador en agua ni lo<br />
enjuague bajo el grifo.<br />
- Coloque y utilice siempre el cargador sobre una<br />
superficie resistente a los líquidos.<br />
- Utilice, cargue y guarde el aparato a una<br />
temperatura entre 5 °C y 35 °C.
-<br />
-<br />
-<br />
Español 35<br />
Utilice únicamente el adaptador y el cargador<br />
suministrados.<br />
No utilice la afeitadora ni el cargador si están<br />
dañados.<br />
Si el adaptador está dañado, sustitúyalo siempre<br />
por otro del modelo original para evitar<br />
situaciones de peligro.<br />
Cumplimiento de normas<br />
- Esta afeitadora cumple las normas de seguridad<br />
aprobadas internacionalmente, se puede utilizar<br />
de manera segura en el baño o en la ducha y se<br />
puede lavar bajo el grifo.<br />
- Este aparato <strong>Philips</strong> cumple todos los estándares<br />
sobre campos electromagnéticos (CEM). Si<br />
se utiliza correctamente y de acuerdo con las<br />
instrucciones de este <strong>manual</strong>, el aparato se puede<br />
usar de forma segura según los conocimientos<br />
científicos disponibles hoy en día.<br />
General<br />
- El adaptador transforma la corriente de 100<br />
- 240 voltios en un bajo voltaje de seguridad<br />
inferior a 24 voltios.<br />
Vista general (fig. 4)<br />
A Afeitadora<br />
1 Tapa protectora<br />
2 Unidad de afeitado<br />
3 Cartucho de loción de afeitado<br />
4 Botón de loción de afeitado<br />
5 Piloto de carga<br />
6 Botón de encendido/apagado<br />
B Accesorios<br />
1 Frasco de loción de afeitado <strong>NIVEA</strong> <strong>FOR</strong> <strong>MEN</strong><br />
2 Cargador<br />
3 Cepillo de limpieza
36<br />
Español<br />
4 Adaptador (es posible que el adaptador de su<br />
aparato sea diferente al que se muestra en el<br />
dibujo)<br />
Antes de empezar<br />
Carga<br />
1 Enchufe la clavija pequeña al cargador y<br />
conecte el adaptador a la red.<br />
2 Coloque la afeitadora en el cargador.<br />
, La afeitadora se está cargando.<br />
3 Cargue la afeitadora durante 8 horas.<br />
Nota: Cargue la afeitadora antes de utilizarla por<br />
primera vez o cuando el piloto de carga indique que la<br />
batería está agotada (consulte la sección “Indicaciones<br />
de carga”).<br />
Nota: Una afeitadora completamente cargada<br />
proporciona un tiempo de afeitado de hasta<br />
30 minutos.<br />
Indicaciones de carga<br />
Carga<br />
- Durante la carga, el piloto de carga se ilumina en<br />
verde.<br />
Batería baja<br />
- Cuando la batería tiene poca carga, el piloto de<br />
carga se ilumina en rojo. Al apagar la afeitadora, el<br />
piloto rojo se va apagando lentamente.
Español 37<br />
Llenado del cartucho de loción de afeitado<br />
1 Retire la lengüeta del frasco de loción de<br />
afeitado <strong>NIVEA</strong> <strong>FOR</strong> <strong>MEN</strong>.<br />
2 Gire el tapón del frasco de loción de afeitado<br />
en el sentido de las agujas del reloj (“clic”).<br />
, El tapón se desplaza hacia abajo y aparece la<br />
boquilla de loción de afeitado.<br />
3 Introduzca la boquilla del frasco de loción de<br />
afeitado en la abertura de llenado del cartucho<br />
de loción.<br />
4 Mueva el frasco hacia arriba y hacia abajo unas<br />
5 veces para bombear la loción de afeitado al<br />
interior del cartucho hasta que vea que éste<br />
está lleno.<br />
No llene el cartucho por encima de la indicación<br />
MAX.<br />
Uso de la afeitadora<br />
Nota: Su piel puede necesitar de 2 a 3 semanas para<br />
acostumbrarse a un nuevo sistema de afeitado.<br />
1 Asegúrese de que haya suficiente loción de<br />
afeitado en el cartucho de loción.<br />
2 Pulse el botón de encendido/apagado para<br />
encender la afeitadora.
38<br />
Español<br />
-<br />
-<br />
3 Asegúrese de que la batería tenga suficiente<br />
carga (consulte la sección “Indicaciones de<br />
carga” del capítulo “Antes de empezar”).<br />
4 Desplace suavemente la afeitadora en círculos<br />
sobre la piel y pulse el botón de loción de<br />
afeitado hasta aplicarse suficiente loción sobre<br />
la piel para un afeitado cómodo.<br />
Al soltar el botón de loción de afeitado, la<br />
afeitadora deja de dispensar loción.<br />
Pulse de nuevo el botón de loción de afeitado<br />
para aplicar una mayor cantidad de loción durante<br />
el afeitado y asegurarse de que la unidad de<br />
afeitado se deslice suavemente sobre su piel.<br />
Nota: El botón de loción de afeitado sólo funciona<br />
cuando la afeitadora está encendida.<br />
Nota: El uso de esta afeitadora es similar al de una<br />
cuchilla de afeitar: puede utilizarla sobre la cara<br />
humedecida. A diferencia de las afeitadoras eléctricas<br />
convencionales, este aparato no dispone de cámara de<br />
recogida del pelo. Con el fin de evitar que los restos de<br />
barba caigan sobre su ropa, aplique una cantidad de<br />
loción suficiente durante el afeitado.<br />
5 Lave cuidadosamente la afeitadora después de<br />
cada uso (consulte el capítulo “Limpieza”).<br />
6 Para evitar deterioros y daños, coloque la tapa<br />
protectora en la afeitadora.<br />
Recomendaciones para un deslizamiento<br />
óptimo y un afeitado suave<br />
- Desplace suavemente la afeitadora en círculos<br />
sobre la piel.<br />
- No ejerza demasiada presión sobre la afeitadora,<br />
ya que podría causar irritación en la piel.
-<br />
-<br />
Con el fin de asegurar un deslizamiento adecuado,<br />
aplique loción de afeitado con regularidad.<br />
También puede utilizar la afeitadora en el baño o<br />
en la ducha.<br />
Limpieza y mantenimiento<br />
Español 39<br />
Lave siempre la afeitadora después de utilizarla.<br />
No use productos abrasivos ni líquidos tales como<br />
alcohol, gasolina o acetona, para limpiar el aparato.<br />
Tenga cuidado con el agua caliente. Compruebe<br />
siempre que el agua no esté demasiado caliente<br />
para evitar quemarse las manos.<br />
No seque nunca la unidad de afeitado con una<br />
toalla o un paño, ya que esto podría dañar los<br />
cabezales de afeitado.<br />
Nota: La afeitadora es hermética y puede lavarse bajo<br />
el grifo.<br />
1 Pulse el botón de encendido/apagado para<br />
encender la afeitadora.<br />
2 Lave la afeitadora mientras está encendida.<br />
Hay dos maneras de lavar la afeitadora:<br />
- Enjuague la unidad de afeitado bajo el grifo con<br />
agua caliente durante al menos 30 segundos.<br />
- Sumerja la unidad de afeitado en agua<br />
caliente durante al menos 30 segundos.<br />
3 Apague la afeitadora y sacúdala para eliminar el<br />
exceso de agua.
40<br />
Español<br />
4 Para evitar deterioros y daños, coloque la tapa<br />
protectora en la afeitadora.<br />
Nota: Si la afeitadora no afeita igual de bien que antes<br />
y no pudiera solucionar este problema con los métodos<br />
de limpieza descritos en este capítulo, consulte el<br />
capítulo “Preguntas más frecuentes” para obtener<br />
información sobre un método de limpieza más a fondo.<br />
Sustitución<br />
Cartucho de loción de afeitado<br />
Por razones de higiene, le aconsejamos que sustituya<br />
el cartucho de loción de afeitado dos veces al<br />
año. Podrá adquirir nuevos cartuchos de loción de<br />
afeitado en un centro de servicio <strong>Philips</strong>.<br />
1 Quite el cartucho de loción de afeitado de la<br />
afeitadora.<br />
2 Inserte el saliente de la parte superior del<br />
nuevo cartucho de loción en la ranura del<br />
borde de la afeitadora (1). A continuación,<br />
presione la parte inferior del cartucho<br />
con el pulgar (2) para fijar el cartucho a la<br />
afeitadora (“clic”).<br />
3 Llene el cartucho de loción de afeitado<br />
(consulte el capítulo “Antes de empezar”).<br />
Unidad de afeitado<br />
Reemplace la unidad de afeitado anualmente para<br />
obtener unos resultados óptimos.<br />
Para sustituir la unidad de afeitado, utilice únicamente<br />
una unidad de afeitado <strong>Philips</strong> HS85.
Español 41<br />
1 Quite la unidad de afeitado usada de la<br />
afeitadora.<br />
2 Ponga la unidad de afeitado nueva en la<br />
afeitadora.<br />
Frasco de loción de afeitado <strong>NIVEA</strong> <strong>FOR</strong><br />
<strong>MEN</strong><br />
Utilice únicamente frascos de loción de afeitado<br />
<strong>NIVEA</strong> <strong>FOR</strong> <strong>MEN</strong>.<br />
Cómo deshacerse del aparato<br />
-<br />
Al final de su vida útil, no tire el aparato junto con<br />
la basura normal del hogar. Llévelo a un punto de<br />
recogida oficial para su reciclado. De esta manera<br />
ayudará a conservar el medio ambiente.<br />
-<br />
La batería recargable de la afeitadora contiene<br />
sustancias que pueden contaminar el medio<br />
ambiente. Quite siempre la batería antes de<br />
deshacerse de la afeitadora o de llevarla a un<br />
punto de recogida oficial. Deposite la batería en<br />
un lugar de recogida oficial. Si no puede quitar<br />
la batería, puede llevar el aparato a un centro<br />
de servicio <strong>Philips</strong>, donde el personal del mismo
42<br />
Español<br />
extraerá la batería y se deshará de ella de forma<br />
no perjudicial para el medio ambiente.<br />
Cómo quitar la batería recargable<br />
Quite la batería únicamente cuando deseche<br />
la afeitadora. Asegúrese de que la batería esté<br />
completamente descargada cuando la quite del<br />
aparato.<br />
Tenga cuidado con las tiras de la batería ya que<br />
están afiladas.<br />
1 Quite el cartucho de loción de afeitado de la<br />
afeitadora.<br />
2 Desenrosque los tres tornillos de la parte<br />
posterior de la afeitadora.<br />
3 Quite el panel posterior de la carcasa con un<br />
destornillador.<br />
4 Extraiga la batería recargable.<br />
Garantía y servicio<br />
Si necesita información o si tiene algún problema,<br />
visite la página Web de <strong>Philips</strong> en www.philips.com,<br />
o póngase en contacto con el Servicio de Atención<br />
al Cliente de <strong>Philips</strong> en su país (hallará el número de<br />
teléfono en el folleto de la garantía mundial). Si no<br />
hay Servicio de Atención al Cliente de <strong>Philips</strong> en su<br />
país, diríjase a su distribuidor local <strong>Philips</strong>.
Español 43<br />
Restricciones de la garantía<br />
Los cabezales de afeitado (cuchillas y protectores)<br />
no están cubiertos por las condiciones de la garantía<br />
internacional debido a que están sujetos a desgaste.<br />
El cartucho de loción es un elemento desechable y<br />
no está cubierto por las condiciones de la garantía<br />
internacional.<br />
Pregunta<br />
¿Por qué la<br />
afeitadora<br />
no se desliza<br />
suavemente<br />
sobre mi piel?<br />
¿Por qué la<br />
afeitadora no<br />
afeita igual de<br />
bien que antes?<br />
Preguntas más frecuentes<br />
En este capítulo se exponen las preguntas más<br />
frecuentes sobre la afeitadora. Si no encuentra la<br />
respuesta a su pregunta, póngase en contacto con el<br />
Servicio de Atención al Consumidor de su país.<br />
Respuesta<br />
Es posible que no haya aplicado suficiente loción de<br />
afeitado. Pulse el botón de loción de afeitado hasta<br />
que se haya aplicado una cantidad suficiente de<br />
loción <strong>NIVEA</strong> <strong>FOR</strong> <strong>MEN</strong>. Esto hará que la afeitadora<br />
vuelva a deslizarse suavemente sobre su piel.<br />
Es posible que no haya limpiado bien la afeitadora.<br />
Límpiela a fondo (consulte el capítulo “Limpieza y<br />
mantenimiento”).<br />
Puede haber pelos largos obstruyendo los cabezales<br />
de afeitado. Para limpiarlos, siga los pasos del<br />
método de limpieza a fondo que se describe a<br />
continuación.<br />
Es posible que la unidad de afeitado esté dañada<br />
o gastada. Reemplácela (consulte el capítulo<br />
“Sustitución”).
44<br />
Español<br />
Pregunta<br />
¿Por qué no<br />
funciona la<br />
afeitadora al<br />
pulsar el botón<br />
de encendido/<br />
apagado?<br />
¿Por qué sale<br />
poca cantidad<br />
de loción de<br />
afeitado por los<br />
orificios a pesar<br />
de que hay<br />
suficiente loción<br />
en el cartucho?<br />
Respuesta<br />
Puede que la batería esté descargada. Vuelva a<br />
cargarla (consulte el capítulo “Antes de empezar”).<br />
La loción seca puede bloquear los cabezales de<br />
la unidad de afeitado. Lave a fondo la afeitadora<br />
antes de continuar afeitándose (consulte el capítulo<br />
“Limpieza y mantenimiento”).<br />
Es posible que no haya montado bien la unidad de<br />
afeitado tras lavarla a fondo. Al montarla, asegúrese<br />
de girar cada protector en sentido contrario al de las<br />
agujas del reloj hasta que encaje en su sitio.<br />
Uno de los orificios de la loción podría estar<br />
bloqueado. Enjuague o sumerja la unidad de afeitado<br />
en agua. Si este método no diera resultado, bombee<br />
loción de afeitado al interior del cartucho hasta<br />
que comience a salir de nuevo loción por el orificio<br />
bloqueado. Si este método tampoco diera resultado,<br />
intente lo siguiente: 1) Apague la afeitadora 2) Quite<br />
la unidad de afeitado de la afeitadora 3) Coloque<br />
un dedo sobre el orificio que no esté bloqueado<br />
4) Encienda la afeitadora 5) Pulse el botón de<br />
loción de afeitado durante varios segundos hasta<br />
que comience a salir de nuevo loción por el orificio<br />
bloqueado.
Español 45<br />
Pregunta<br />
¿Por qué<br />
no sale loción<br />
de afeitado por<br />
los orificios al<br />
pulsar el botón<br />
de loción de<br />
afeitado?<br />
Se me ha caído<br />
la afeitadora<br />
y se ha<br />
desmontado<br />
la unidad de<br />
afeitado. ¿Cómo<br />
puedo volver a<br />
montarla?<br />
Respuesta<br />
Es posible que no haya colocado los cabezales de<br />
afeitado en sus soportes originales. Uno de los<br />
cabezales de afeitado no tiene orificio para la loción<br />
en su parte central y debe colocarse en un soporte<br />
específico. Asegúrese de que coloca el cabezal sin<br />
orificio en el soporte adecuado, es decir, en el que<br />
está más cerca del botón de encendido/apagado<br />
cuando la unidad de afeitado está montada en la<br />
afeitadora.<br />
El cartucho de loción de afeitado está casi vacío.<br />
Rellénelo (consulte el capítulo “Antes de empezar”).<br />
Coloque las cuchillas en los soportes del cabezal<br />
de afeitado con las hojas hacia arriba. Coloque los<br />
protectores en los soportes (sobre las cuchillas) y<br />
gírelos en sentido contrario al de las agujas del reloj<br />
hasta que encajen en su sitio. Uno de los protectores<br />
no tiene orificio para la loción en su parte central<br />
y debe colocarse en un soporte específico, es decir,<br />
el que está más cerca del botón de encendido/<br />
apagado cuando la unidad de afeitado está montada<br />
en la afeitadora. Si las cuchillas y los protectores se<br />
han mezclado, pasarán varias semanas hasta que el<br />
rendimiento de afeitado vuelva a ser óptimo.
46<br />
Español<br />
Pregunta<br />
¿Por qué la<br />
afeitadora<br />
emite un ruido<br />
extraño de<br />
repente?<br />
Respuesta<br />
Es probable que no haya montado bien la unidad<br />
de afeitado. Coloque las cuchillas en los soportes<br />
del cabezal de afeitado con las hojas hacia arriba.<br />
Coloque los protectores en los soportes (sobre<br />
las cuchillas) y gírelos en sentido contrario al de las<br />
agujas del reloj hasta que encajen en su sitio. Uno<br />
de los protectores no tiene orificio para la loción<br />
en su parte central y debe colocarse en un soporte<br />
específico, es decir, el que está más cerca del botón<br />
de encendido/apagado cuando la unidad de afeitado<br />
está montada en la afeitadora. Si las cuchillas y los<br />
protectores se han mezclado, pasarán varias semanas<br />
hasta que el rendimiento de afeitado vuelva a ser<br />
óptimo.<br />
Método de limpieza a fondo<br />
Asegúrese de que el aparato está apagado.<br />
1 Quite la unidad de afeitado de la afeitadora.<br />
2 Gire el protector en el sentido de las agujas<br />
del reloj y levántelo de la unidad de afeitado.<br />
Nota: Quite los cabezales de uno en uno, así se<br />
asegurará de colocarlos siempre en su soporte<br />
original. Esto es importante, ya que dos de ellos tienen<br />
unos orificios especiales para la loción de afeitado.<br />
Además, evitará que se mezclen las cuchillas y los<br />
protectores de los diferentes cabezales, lo cual afecta<br />
al rendimiento de afeitado.<br />
3 Quite la cuchilla del protector si fuera<br />
necesario.
Español 47<br />
4 Limpie la cuchilla y el protector con el cepillo<br />
que se suministra.<br />
5 Una vez limpia, vuelva a colocar la cuchilla en la<br />
unidad de afeitado con las hojas hacia arriba.<br />
6 Vuelva a colocar el protector en el soporte del<br />
cabezal de afeitado (sobre la cuchilla).<br />
7 Gire el protector en sentido contrario al de las<br />
agujas del reloj hasta que encaje en su sitio.<br />
8 Coloque de nuevo la unidad de afeitado en la<br />
afeitadora (“clic”).
48<br />
Français<br />
Introduction<br />
Félicitations pour votre achat et bienvenue dans<br />
l’univers <strong>Philips</strong> ! Pour profiter pleinement de<br />
l’assistance <strong>Philips</strong>, enregistrez votre produit sur le<br />
site à l’adresse suivante : www.philips.com/welcome.<br />
Important<br />
Lisez attentivement ce mode d’emploi avant d’utiliser<br />
l’appareil et conservez-le pour un usage ultérieur.<br />
Danger<br />
- Veillez à ce que l’adaptateur ne soit pas en contact<br />
avec de l’eau (votre adaptateur peut être différent<br />
de celui présenté sur la figure).<br />
Avertissement<br />
- L’adaptateur contient un transformateur. Afin<br />
d’éviter tout accident, n’essayez pas de remplacer<br />
la fiche de l’adaptateur.<br />
- Cet appareil n’est pas destiné à être utilisé par<br />
des personnes (notamment des enfants) dont les<br />
capacités physiques, sensorielles ou intellectuelles<br />
sont réduites, ou par des personnes manquant<br />
d’expérience ou de connaissances, à moins que<br />
celles-ci ne soient sous surveillance ou qu’elles<br />
n’aient reçu des instructions quant à l’utilisation de<br />
l’appareil par une personne responsable de leur<br />
sécurité.<br />
- Veillez à ce que les enfants ne puissent pas jouer<br />
avec l’appareil.<br />
Attention<br />
- Ne plongez jamais le chargeur dans l’eau et ne le<br />
rincez pas sous le robinet.<br />
- Placez toujours le chargeur sur une surface<br />
imperméable et solide.
Français 49<br />
- Utilisez, rechargez et conservez l’appareil à une<br />
température comprise entre 5 °C et 35 °C.<br />
- Utilisez exclusivement l’adaptateur et le chargeur<br />
fournis.<br />
- N’utilisez pas le rasoir/chargeur s’il est<br />
endommagé.<br />
- Si l’adaptateur est endommagé, remplacez-le<br />
toujours par un adaptateur de même type pour<br />
éviter tout accident.<br />
Conformité aux normes<br />
- Ce rasoir est conforme aux normes<br />
internationales de sécurité. Il peut être utilisé<br />
dans le bain ou sous la douche et nettoyé à l’eau<br />
courante en toute sécurité.<br />
- Cet appareil <strong>Philips</strong> est conforme à toutes les<br />
normes relatives aux champs électromagnétiques<br />
(CEM). Il répond aux règles de sécurité établies<br />
sur la base des connaissances scientifiques<br />
actuelles s’il est manipulé correctement et<br />
conformément aux instructions de ce mode<br />
d’emploi.<br />
Général<br />
- L’adaptateur transforme la tension de 100-240 V<br />
en une tension de sécurité de moins de 24 V.<br />
Aperçu (fig. 4)<br />
A Rasoir<br />
1 Capot de protection<br />
2 Unité de rasage<br />
3 Cartouche de lotion de rasage<br />
4 Bouton de lotion de rasage<br />
5 Voyant de charge<br />
6 Bouton marche/arrêt<br />
B Accessoires<br />
1 Flacon de lotion de rasage <strong>NIVEA</strong> <strong>FOR</strong> <strong>MEN</strong>
50<br />
Français<br />
2 Chargeur<br />
3 Brosse de nettoyage<br />
4 Adaptateur (votre adaptateur peut être différent<br />
de celui présenté sur la figure)<br />
Pour démarrer<br />
Charge<br />
1 Enfoncez la petite fiche dans le chargeur et<br />
l’adaptateur dans la prise secteur.<br />
2 Placez le rasoir dans le chargeur.<br />
, Le rasoir est en cours de charge.<br />
3 Chargez le rasoir pendant 8 heures.<br />
Remarque : Chargez le rasoir avant la première<br />
utilisation ou lorsque le voyant de batterie faible<br />
s’allume (voir la section « Informations relatives à la<br />
charge »).<br />
Remarque : Un rasoir complètement chargé offre une<br />
autonomie de rasage de 30 minutes environ.<br />
Informations relatives à la charge<br />
Charge<br />
- En cours de charge, le voyant de charge s’allume<br />
en vert.<br />
Batterie faible<br />
- Lorsque le niveau de charge de la batterie est<br />
insuffisant, le voyant de charge s’allume en rouge.<br />
Lorsque vous arrêtez le rasoir, le voyant rouge<br />
s’éteint progressivement.
Français 51<br />
Remplissage de la cartouche de lotion de<br />
rasage<br />
1 Enlevez la languette du flacon de lotion de<br />
rasage <strong>NIVEA</strong> <strong>FOR</strong> <strong>MEN</strong>.<br />
2 Tournez le bouchon du flacon de rasage dans<br />
le sens des aiguilles d’une montre (clic).<br />
, Le bouchon glisse vers le bas et l’embout<br />
apparaît.<br />
3 Placez l’embout du flacon de lotion de rasage<br />
dans l’orifice de remplissage de la cartouche.<br />
4 Agitez le flacon de haut en bas 5 fois environ<br />
de manière à ce que la lotion de rasage<br />
s’écoule dans la cartouche jusqu’à ce que cette<br />
dernière soit remplie.<br />
Ne remplissez pas la cartouche au-delà de<br />
l’indication de niveau maximal (MAX).<br />
Utilisation du rasoir<br />
Remarque : La peau a besoin de 2 ou 3 semaines pour<br />
s’habituer à un nouveau système de rasage.<br />
1 Vérifiez que la cartouche contient<br />
suffisamment de lotion de rasage.<br />
2 Mettez le rasoir en marche en appuyant sur le<br />
bouton marche/arrêt.
52<br />
Français<br />
3 Assurez-vous que le niveau de charge de la<br />
batterie est suffisant (voir le chapitre « Pour<br />
démarrer », section « Informations relatives à<br />
la charge »).<br />
4 Faites glisser l’unité de rasage sur votre peau<br />
en effectuant des mouvements circulaires et<br />
en appuyant sur le bouton de lotion de rasage<br />
jusqu’à ce que votre peau en soit suffisamment<br />
enduite pour un rasage tout en confort.<br />
- Dès que vous relâchez le bouton de lotion de<br />
rasage, l’apport de lotion cesse.<br />
- Appuyez de nouveau sur le bouton de lotion de<br />
rasage pour en appliquer davantage durant le<br />
rasage si vous sentez que cela est nécessaire, et<br />
ce, afin que le rasoir puisse continuer à glisser en<br />
douceur sur votre peau.<br />
Remarque : Ce bouton fonctionne uniquement lorsque<br />
le rasoir est en marche.<br />
Remarque : Ce rasoir peut s’utiliser sur le même<br />
principe qu’un rasoir mécanique : vous pouvez<br />
l’employer sur une peau humide. Contrairement à un<br />
rasoir électrique classique, cet appareil ne dispose<br />
pas d’un compartiment à poils de barbe. Pour éviter<br />
d’en avoir sur vos vêtements, appliquez de la lotion en<br />
suffisance en cours de rasage.<br />
5 Nettoyez soigneusement le rasoir après chaque<br />
utilisation (voir le chapitre « Nettoyage »).<br />
6 Placez le capot de protection sur le rasoir pour<br />
éviter tout dommage.<br />
Conseils pour un rasage optimal et tout en<br />
douceur<br />
- Faites doucement glisser le rasoir sur votre peau<br />
en effectuant des mouvements circulaires.
-<br />
-<br />
-<br />
Français 53<br />
N’exercez pas une pression trop forte sur le<br />
rasoir car cela pourrait entraîner des irritations de<br />
la peau.<br />
Appliquez uniformément la lotion pour un rasage<br />
tout en douceur.<br />
Le rasoir peut aussi s’utiliser sous la douche ou<br />
dans le bain.<br />
Nettoyage et entretien<br />
Nettoyez le rasoir après chaque utilisation.<br />
N’utilisez pas de détergents abrasifs, de tampons<br />
à récurer ni de liquides tels que de l’alcool, de<br />
l’essence ou de l’acétone pour nettoyer l’appareil.<br />
Veillez à ce que l’eau ne soit pas trop chaude pour<br />
ne pas vous brûler.<br />
Ne séchez jamais l’unité de rasage à l’aide d’une<br />
serviette au risque d’endommager les têtes de<br />
rasoir.<br />
Remarque : Le rasoir est étanche et peut être nettoyé à<br />
l’eau courante.<br />
1 Mettez le rasoir en marche en appuyant sur le<br />
bouton marche/arrêt.<br />
2 Nettoyez le rasoir en veillant à ce qu’il soit<br />
allumé.<br />
Le rasoir peut se nettoyer de deux manières :<br />
- Maintenez l’unité de rasage sous le robinet d’eau<br />
chaude pendant au moins 30 secondes.
54<br />
Français<br />
- Plongez l’unité de rasage dans l’eau chaude<br />
pendant au moins 30 secondes.<br />
3 Éteignez le rasoir et secouez-le pour retirer<br />
l’excès d’eau.<br />
4 Placez le capot de protection sur le rasoir pour<br />
éviter tout dommage.<br />
Remarque : Si les résultats de rasage ne sont pas aussi<br />
satisfaisants que d’habitude et que vous ne parvenez<br />
pas à résoudre le problème à l’aide des méthodes de<br />
nettoyage décrites dans ce chapitre, reportez-vous au<br />
chapitre « Foire aux questions » pour plus de précisions<br />
sur un nettoyage en profondeur du rasoir.<br />
Remplacement<br />
Cartouche de lotion de rasage<br />
Pour des raisons d’hygiène, il est conseillé de changer<br />
la cartouche de lotion de rasage deux fois par an.<br />
Vous pouvez commander votre nouvelle cartouche<br />
auprès du Service Consommateurs <strong>Philips</strong> par<br />
téléphone. Pour trouver le numéro de téléphone<br />
correspondant, visitez notre site Web à l’adresse<br />
www.philips.com et cliquez sur le lien du<br />
Service Consommateurs <strong>Philips</strong>.<br />
1 Retirez la cartouche de lotion de rasage du<br />
rasoir.
Français 55<br />
2 Insérez la languette supérieure de la nouvelle<br />
cartouche de lotion de rasage dans la fente<br />
située au bord du rasoir (1). Appuyez ensuite<br />
avec votre pouce (2) sur la partie inférieure de<br />
la cartouche afin de solidariser la cartouche au<br />
rasoir (clic).<br />
3 Remplissez la cartouche de lotion de rasage<br />
(voir le chapitre « Pour démarrer »).<br />
Unité de rasage<br />
Pour obtenir un résultat de rasage optimal,<br />
remplacez l’unité de rasage chaque année.<br />
Remplacez l’unité de rasage uniquement par une<br />
unité de rasage HS85 <strong>Philips</strong>.<br />
1 Détachez l’ancienne unité de rasage du rasoir.<br />
2 Placez une unité de rasage neuve sur le rasoir.<br />
Flacon de lotion de rasage <strong>NIVEA</strong> <strong>FOR</strong><br />
<strong>MEN</strong><br />
Employez exclusivement des flacons de lotion de<br />
rasage <strong>NIVEA</strong> <strong>FOR</strong> <strong>MEN</strong>.
56<br />
Français<br />
Mise au rebut<br />
-<br />
Lorsqu’il ne fonctionnera plus, ne jetez pas<br />
l’appareil avec les ordures ménagères, mais<br />
déposez-le à un endroit assigné à cet effet, où il<br />
pourra être recyclé. Vous contribuerez ainsi à la<br />
protection de l’environnement.<br />
- La batterie rechargeable contient des substances<br />
qui peuvent nuire à l’environnement. Veillez à<br />
toujours retirer la batterie avant de mettre le<br />
rasoir au rebut ou de le déposer à un endroit<br />
assigné à cet effet. Déposez la batterie usagée à<br />
un endroit assigné à cet effet. Si vous n’arrivez<br />
pas à retirer la batterie, vous pouvez apporter<br />
le rasoir dans un Centre Service Agréé <strong>Philips</strong><br />
qui prendra toute l’opération en charge pour<br />
préserver l’environnement.<br />
Mise au rebut de la batterie rechargeable<br />
Retirez la batterie rechargeable uniquement<br />
lorsque vous mettez le rasoir au rebut. Assurezvous<br />
que la batterie est complètement déchargée<br />
lorsque vous la retirez.<br />
Soyez prudent car les languettes de la batterie sont<br />
coupantes.<br />
1 Retirez la cartouche de lotion de rasage du<br />
rasoir.<br />
2 Dévissez les trois vis à l’arrière du rasoir.
Français 57<br />
3 Retirez la plaque arrière du logement de<br />
batterie à l’aide d’un tournevis.<br />
4 Retirez la batterie rechargeable.<br />
Garantie et service<br />
Si vous souhaitez obtenir des informations<br />
supplémentaires ou faire réparer l’appareil, ou si vous<br />
rencontrez un problème, rendez-vous sur le site<br />
Web de <strong>Philips</strong> à l’adresse www.philips.com<br />
ou contactez le Service Consommateurs <strong>Philips</strong><br />
de votre pays (vous trouverez le numéro de<br />
téléphone correspondant sur le dépliant de<br />
garantie internationale). S’il n’existe pas de Service<br />
Consommateurs <strong>Philips</strong> dans votre pays, renseignezvous<br />
auprès de votre revendeur <strong>Philips</strong> local.<br />
Limites de la garantie<br />
Étant susceptibles de s’user, les têtes de rasoir (lames<br />
et grilles) ne sont pas couvertes par la garantie<br />
internationale.<br />
La cartouche de lotion de rasage est un<br />
consommable et n’est pas couverte par la garantie<br />
internationale.<br />
Foire aux questions<br />
Ce chapitre reprend les questions les plus<br />
fréquemment posées au sujet du rasoir. Si vous ne<br />
trouvez pas la réponse à votre question ici, contactez<br />
le Service Consommateurs <strong>Philips</strong> de votre pays.
58<br />
Français<br />
Question<br />
Pourquoi l’unité<br />
de rasage ne<br />
glisse-t-elle pas<br />
en douceur sur<br />
ma peau ?<br />
Pourquoi les<br />
résultats de<br />
rasage ne sontils<br />
pas aussi<br />
satisfaisants que<br />
d’habitude ?<br />
Pourquoi<br />
le rasoir ne<br />
fonctionne-t-il<br />
pas lorsque<br />
j’appuie sur le<br />
bouton marche/<br />
arrêt ?<br />
Réponse<br />
Vous n’avez peut-être pas appliqué suffisamment de<br />
lotion de rasage. Appuyez sur le bouton de lotion de<br />
rasage jusqu’à ce qu’une quantité suffisante de lotion<br />
de rasage <strong>NIVEA</strong> <strong>FOR</strong> <strong>MEN</strong> ait été libérée. L’unité<br />
de rasage glissera de nouveau en douceur sur votre<br />
peau.<br />
Vous n’avez peut-être pas nettoyé le rasoir<br />
correctement. Procédez à un nettoyage minutieux<br />
(voir le chapitre « Nettoyage et entretien »).<br />
Les têtes de rasage sont peut-être bloquées par de<br />
longs poils. Pour les nettoyer, suivez les instructions<br />
décrites dans la section « Méthode de nettoyage en<br />
profondeur » ci-dessous.<br />
L’unité de rasage est peut-être endommagée ou<br />
usée. Remplacez l’unité de rasage (voir le chapitre<br />
« Remplacement »).<br />
La batterie est peut-être vide. Rechargez la batterie<br />
(voir le chapitre « Pour démarrer »).<br />
Il se peut que les têtes de rasage soient obstruées<br />
par de la lotion de rasage séchée. Nettoyez l’appareil<br />
en profondeur avant de continuer à vous raser (voir<br />
le chapitre « Nettoyage et entretien »).
Français 59<br />
Question<br />
Pourquoi la<br />
lotion de rasage<br />
s’écoule-t-elle<br />
si faiblement<br />
par les orifices<br />
alors que la<br />
cartouche en<br />
contient en<br />
suffisance ?<br />
Pourquoi la<br />
lotion de rasage<br />
ne s’écoule-telle<br />
pas lorsque<br />
j’appuie sur<br />
le bouton<br />
de lotion de<br />
rasage ?<br />
Réponse<br />
Vous n’avez peut-être pas remonté correctement<br />
l’unité de rasage après un nettoyage en profondeur.<br />
Lorsque vous remontez l’unité de rasage, assurezvous<br />
d’avoir tourné les grilles dans le sens inverse<br />
des aiguilles d’une montre jusqu’à ce qu’elles<br />
s’enclenchent.<br />
L’un des orifices de distribution de lotion de rasage<br />
est peut-être bouché. Rincez l’unité de rasage ou<br />
faites-la tremper. Si le problème persiste, agitez le<br />
flacon de lotion de rasage jusqu’à ce que celle-ci<br />
recommence à s’écouler par l’orifice préalablement<br />
bouché. Si le problème n’est toujours pas résolu,<br />
essayez la méthode suivante : 1) Éteignez le rasoir.<br />
2) Retirez l’unité de rasage du rasoir. 3) Placez<br />
votre doigt sur l’orifice non bouché. 4) Allumez le<br />
rasoir. 5) Appuyez pendant plusieurs secondes sur<br />
le bouton de lotion de rasage jusqu’à ce que celle-ci<br />
recommence à s’écouler par l’orifice préalablement<br />
bouché.<br />
Vous n’avez peut-être pas remonté les têtes de<br />
rasage dans leur support d’origine. L’une des têtes<br />
de rasage n’a pas d’orifice central de distribution<br />
pour lotion de rasage et ne peut être placée que sur<br />
le support le plus proche du bouton marche/arrêt<br />
lorsque l’unité de rasage est installée sur le rasoir.<br />
La cartouche est presque vide. Remplissez-la de<br />
lotion de rasage (voir le chapitre « Pour démarrer »).
60<br />
Français<br />
Question<br />
J’ai fait tomber<br />
le rasoir et<br />
l’unité de rasage<br />
s’est détachée.<br />
Comment puisje<br />
la remonter ?<br />
Pourquoi le<br />
rasoir émet-il<br />
soudainement<br />
un bruit<br />
inhabituel ?<br />
Réponse<br />
Placez les lames dans les supports de la tête de<br />
rasage en orientant le bloc tondeuse vers le haut.<br />
Montez les grilles sur les supports (sur les lames) et<br />
tournez-les dans le sens inverse des aiguilles d’une<br />
montre jusqu’à ce qu’elles s’enclenchent. L’une des<br />
grilles n’a pas d’orifice central de distribution pour<br />
lotion de rasage et ne peut être placée que sur le<br />
support le plus proche du bouton marche/arrêt,<br />
lorsque l’unité de rasage est installée sur le rasoir. Si<br />
les lames et les grilles ont été interverties, il pourrait<br />
falloir plusieurs semaines avant de recommencer à<br />
obtenir des résultats de rasage optimaux.<br />
Vous n’avez probablement pas remonté l’unité<br />
de rasage correctement. Placez les lames dans les<br />
supports de la tête de rasage en orientant le bloc<br />
tondeuse vers le haut. Montez les grilles sur les<br />
supports (sur les lames) et tournez-les dans le sens<br />
inverse des aiguilles d’une montre jusqu’à ce qu’elles<br />
s’enclenchent. L’une des grilles n’a pas d’orifice<br />
central de distribution pour lotion de rasage et ne<br />
peut être placée que sur le support le plus proche<br />
du bouton marche/arrêt, lorsque l’unité de rasage<br />
est installée sur le rasoir. Si les lames et les grilles ont<br />
été interverties, il pourrait falloir plusieurs semaines<br />
avant de recommencer à obtenir des résultats de<br />
rasage optimaux.
Français 61<br />
Méthode de nettoyage en profondeur<br />
Assurez-vous que l’appareil est éteint.<br />
1 Détachez l’unité de rasage du rasoir.<br />
2 Tournez la grille dans le sens des aiguilles d’une<br />
montre et retirez-la de l’unité de rasage.<br />
Remarque : Ne retirez qu’une seule tête de rasage<br />
à la fois. Vous éviterez ainsi de remonter une tête de<br />
rasage sur un support inapproprié, ce qui est important<br />
car deux têtes de rasage ont des orifices spéciaux de<br />
distribution pour lotion de rasage. De cette façon, vous<br />
ne pourrez pas non plus intervertir les lames et les<br />
grilles de différentes têtes de rasage, ce qui pourrait<br />
affecter les performances de l’appareil.<br />
3 Si nécessaire, retirez la lame de la grille.<br />
4 Nettoyez la lame et la grille à l’aide de la<br />
brosse fournie.<br />
5 Après le nettoyage, replacez la lame sur l’unité<br />
de rasage en orientant le bloc tondeuse vers le<br />
haut.<br />
6 Replacez la grille sur le support de la tête de<br />
rasage (sur la lame).
62<br />
Français<br />
7 Tournez la grille dans le sens inverse des<br />
aiguilles d’une montre jusqu’à ce qu’elle<br />
s’enclenche.<br />
8 Replacez l’unité de rasage sur le rasoir (clic).
Italiano<br />
63<br />
Introduzione<br />
Congratulazioni per l’acquisto e benvenuti in <strong>Philips</strong>!<br />
Per trarre il massimo vantaggio dall’assistenza<br />
<strong>Philips</strong>, registrate il vostro prodotto su www.philips.<br />
com/welcome.<br />
Importante<br />
Prima di utilizzare l’apparecchio, leggete<br />
attentamente il presente <strong>manual</strong>e e conservatelo<br />
per eventuali riferimenti futuri.<br />
Pericolo<br />
- Assicuratevi che l’adattatore non si bagni<br />
(l’adattatore potrebbe essere diverso da quello<br />
illustrato nella figura).<br />
Avvertenza<br />
- L’adattatore contiene un trasformatore. Non<br />
tagliate l’adattatore per sostituirlo con un’altra<br />
spina onde evitare situazioni pericolose.<br />
- L’apparecchio non è destinato a persone (inclusi<br />
bambini) con capacità mentali, fisiche o sensoriali<br />
ridotte, fatti salvi i casi in cui tali persone abbiano<br />
ricevuto assistenza o formazione per l’uso<br />
dell’apparecchio da una persona responsabile della<br />
loro sicurezza.<br />
- Adottate le dovute precauzioni per evitare che i<br />
bambini giochino con l’apparecchio.<br />
Attenzione<br />
- Non immergete mai il caricabatterie nell’acqua e<br />
non risciacquatelo sotto l’acqua corrente.<br />
- Posizionate il caricabatterie su una superficie<br />
impermeabile ai liquidi.<br />
- Utilizzate, ricaricate e riponete l’apparecchio a<br />
temperature comprese tra 5 e 35 °C.
64<br />
Italiano<br />
-<br />
-<br />
-<br />
Utilizzate esclusivamente l’adattatore e il<br />
caricabatterie in dotazione.<br />
Non utilizzate il rasoio o il caricabatterie se sono<br />
danneggiati.<br />
Nel caso in cui l’adattatore fosse danneggiato,<br />
dovrà essere sostituito esclusivamente con un<br />
adattatore originale al fine di evitare situazioni<br />
pericolose.<br />
Conformità agli standard<br />
- L’apparecchio è conforme alle norme di sicurezza<br />
approvate a livello internazionale e può essere<br />
utilizzato tranquillamente nel bagno o sotto la<br />
doccia.<br />
- Questo apparecchio <strong>Philips</strong> è conforme a tutti gli<br />
standard relativi ai campi elettromagnetici (EMF).<br />
Se utilizzato in modo appropriato seguendo le<br />
istruzioni contenute nel presente <strong>manual</strong>e utente,<br />
l’apparecchio consente un utilizzo sicuro come<br />
confermato dai risultati scientifici attualmente<br />
disponibili.<br />
Indicazioni generali<br />
- L’adattatore trasforma la tensione a 100-240 volt<br />
in una tensione più bassa e sicura inferiore ai 24<br />
volt.<br />
Panoramica (fig. 4)<br />
A Rasoio<br />
1 Cappuccio di protezione<br />
2 Unità di rasatura<br />
3 Cartuccia per la lozione di rasatura<br />
4 Pulsante per l’erogazione della lozione<br />
5 Spia di ricarica<br />
6 Pulsante on/off<br />
B Accessori<br />
1 Bottiglietta crema <strong>NIVEA</strong> <strong>FOR</strong> <strong>MEN</strong>
2 Caricabatterie<br />
3 Spazzolina per la pulizia<br />
4 Adattatore (l’adattatore potrebbe essere diverso<br />
da quello illustrato nella figura)<br />
Messa in funzione<br />
Italiano 65<br />
Come ricaricare l’apparecchio<br />
1 Inserite lo spinotto nel caricabatterie e<br />
collegate l’adattatore a una presa di corrente.<br />
2 Posizionate il rasoio nel caricabatterie.<br />
, Il rasoio viene ricaricato.<br />
3 Il tempo di ricarica del rasoio è di 8 ore.<br />
Nota il caricabatterie deve essere caricato prima di<br />
utilizzare l’apparecchio per la prima volta e quando la<br />
spia di ricarica indica che la batteria è scarica (vedere<br />
la sezione “Istruzioni di ricarica”).<br />
Nota quando il rasoio è completamente carico ha<br />
un’autonomia di rasatura massima di 30 minuti.<br />
Istruzioni di ricarica<br />
Come ricaricare l’apparecchio<br />
- Durante la ricarica, la relativa spia diventa di colore<br />
verde e rimane accesa.<br />
Batteria scarica<br />
- Quando la batteria è quasi scarica, la spia di<br />
ricarica diventa rossa. Quando spegnete il rasoio,<br />
anche la spia rossa si spegne lentamente.
66<br />
Italiano<br />
Riempimento della cartuccia della lozione<br />
1 Rimuovete la linguetta dalla bottiglietta di<br />
crema <strong>NIVEA</strong> <strong>FOR</strong> <strong>MEN</strong>.<br />
2 Ruotate in senso orario il tappo della<br />
bottiglietta facendola scattare in posizione.<br />
, Il tappo si apre verso il basso scoprendo l’ugello<br />
dell’erogatore<br />
3 Posizionate l’ugello della bottiglietta della<br />
lozione nell’apertura di riempimento della<br />
cartuccia della lozione.<br />
4 Spingete la bottiglietta su e giù circa 5 volte per<br />
pompare la crema di rasatura nella cartuccia fin<br />
quando non è piena.<br />
non superate il livello massimo di riempimento del<br />
serbatoio.<br />
Uso del rasoio<br />
Nota può essere necessario un periodo di adattamento<br />
di 2 o 3 settimane per consentire alla pelle di abituarsi<br />
al sistema di rasatura.<br />
1 Accertarsi che nel serbatoio della crema di<br />
rasatura sia presente una quantità sufficiente di<br />
crema.<br />
2 Premete il pulsante on/off per accendere il<br />
rasoio.
-<br />
-<br />
Italiano 67<br />
3 Accertatevi che la batteria non sia scarica<br />
(vedere capitolo “Messa in funzione”, alla<br />
sezione “Istruzioni di ricarica”).<br />
4 Spostate delicatamente il rasoio con movimenti<br />
circolari sulla pelle e premete il pulsante di<br />
erogazione della crema in modo che la quantità<br />
di crema sulla pelle sia sufficiente per una<br />
piacevole rasatura.<br />
Quando rilasciate il pulsante di erogazione della<br />
crema, l’unità interrompe l’erogazione della crema.<br />
Premete nuovamente il pulsante di erogazione<br />
per applicare una quantità maggiore di lozione<br />
durante la rasatura, al fine di ottenere un’azione<br />
più delicata del rasoio sulla pelle.<br />
Nota il pulsante di erogazione della lozione funziona<br />
solo se il rasoio è acceso.<br />
Nota il rasoio è stato concepito per essere utilizzato<br />
come una lametta e pertanto potete usarlo sulla pelle<br />
bagnata. A differenza dei comuni rasoi elettrici, questo<br />
apparecchio non è dotato di vaschetta di raccolta dei<br />
peli. Per evitare che i peli cadano sugli abiti, applicate<br />
una quantità sufficiente di crema durante la rasatura.<br />
5 Pulite a fondo l’apparecchio ogni volta che lo<br />
usate (vedere capitolo “Pulizia”).<br />
6 Inserite il cappuccio di protezione sul rasoio<br />
per evitare di danneggiarlo.<br />
Suggerimenti per un’estrema scorrevolezza<br />
e ottimi risultati di rasatura<br />
- Spostate delicatamente il rasoio sulla pelle<br />
compiendo movimenti circolari.<br />
- Non premete troppo sul rasoio per evitare di<br />
irritare la pelle.
68<br />
Italiano<br />
-<br />
-<br />
Per ottenere la giusta scorrevolezza, applicate<br />
regolarmente la crema.<br />
Potete utilizzare il rasoio nella vasca o nella doccia.<br />
Pulizia e manutenzione<br />
pulite il rasoio ogni volta che lo usate.<br />
non pulite l’apparecchio con detergenti abrasivi,<br />
spugnette o liquidi come alcool, benzina o acetone.<br />
Prestate particolare attenzione quando utilizzate<br />
l’acqua calda: verificate sempre che non sia troppo<br />
calda per evitare di scottarvi.<br />
Non asciugate l’unità di rasatura con un panno o<br />
asciugamano per evitare di danneggiare le testine<br />
di rasatura.<br />
Nota l’apparecchio è impermeabile e può essere lavato<br />
sotto l’acqua corrente.<br />
1 Premete il pulsante on/off per accendere il<br />
rasoio.<br />
2 Pulite il rasoio quando è acceso.<br />
Potete pulire il rasoio in due modi:<br />
- Sciacquate l’unità di rasatura sotto l’acqua<br />
corrente per almeno 30 secondi.<br />
- Immergete l’unità di rasatura in acqua calda per<br />
almeno 30 secondi.<br />
3 Spegnete il rasoio e rimuovete l’acqua residua<br />
scuotendolo
Italiano 69<br />
4 Inserite il cappuccio di protezione sul rasoio<br />
per evitare di danneggiarlo.<br />
Nota se il rasoio non funziona correttamente e non<br />
riuscite a risolvere il problema con i metodi di pulizia<br />
descritti in questo capitolo, consultate il capitolo<br />
“Domande frequenti” per un metodo di pulizia a fondo.<br />
Sostituzione<br />
Cartuccia per la lozione di rasatura<br />
Per motivi di igiene, consigliamo di sostituire il<br />
serbatoio contenente la crema di rasatura due volte<br />
l’anno. I serbatoi nuovi possono essere ordinati al<br />
telefono contattando il Centro Assistenza Clienti<br />
<strong>Philips</strong>. Per trovare il numero di telefono, visitate<br />
il sito Internet www.philips.com e fate clic su<br />
“Assistenza Clienti <strong>Philips</strong>”.<br />
1 Rimuovete la cartuccia della lozione dal rasoio.<br />
2 Inserite l’aletta posta sulla parte superiore<br />
delserbatoio della crema nella scanalatura sul<br />
bordo del rasoio (1). Premete la parte inferiore<br />
del serbatoio con il pollice (2) per inserirlo<br />
nel rasoio facendolo scattare in posizione.<br />
3 Riempite il serbatoio della crema (vedere<br />
capitolo “Messa in funzione”).<br />
Unità di rasatura<br />
Sostituite l’unità di rasatura ogni anno per avere<br />
sempre degli ottimi risultati di rasatura.<br />
Sostituite l’unità di rasatura solo con il modello HS85<br />
di <strong>Philips</strong>.
70<br />
Italiano<br />
1 Estraete la vecchia unità di rasatura dal rasoio<br />
2 Inserite la nuova unità di rasatura.<br />
Bottiglietta crema <strong>NIVEA</strong> <strong>FOR</strong> <strong>MEN</strong><br />
Si consiglia di utilizzare soltanto le bottigliette di<br />
crema <strong>NIVEA</strong> <strong>FOR</strong> <strong>MEN</strong>.<br />
Smaltimento<br />
-<br />
Per contribuire alla tutela dell’ambiente, non<br />
smaltite l’apparecchio insieme ai rifiuti domestici,<br />
ma consegnatelo a un centro di raccolta ufficiale.<br />
-<br />
La batteria ricaricabile contiene sostanze<br />
potenzialmente nocive per l’ambiente. Rimuovete<br />
sempre la batteria prima di smaltire il rasoio<br />
e consegnarlo a un centro di raccolta ufficiale.<br />
Conferite la batteria a un apposito centro di<br />
raccolta. In caso di difficoltà nello smontaggio<br />
della batteria, consegnate il rasoio a un centro di<br />
assistenza <strong>Philips</strong>, che si occuperà di rimuovere la<br />
batteria e di smaltire l’apparecchio.
Smaltimento della batteria ricaricabile<br />
rimuovete la batteria ricaricabile solo quando avete<br />
deciso di gettare il rasoio. Prima di rimuoverla,<br />
assicuratevi che sia completamente scarica.<br />
Attenzione: le estremità delle batterie sono molto<br />
affilate!<br />
1 Rimuovete la cartuccia della lozione dal rasoio.<br />
2 Svitate le tre viti sul retro del rasoio.<br />
Italiano 71<br />
3 Rimuovete il pannello posteriore<br />
dell’alloggiamento con un cacciavite.<br />
4 Rimuovete la batteria ricaricabile.<br />
Garanzia e assistenza<br />
Per assistenza o informazioni e in caso di<br />
problemi, visitate il sito Web <strong>Philips</strong> all’indirizzo<br />
www.philips.com oppure contattate il Centro<br />
Assistenza Clienti <strong>Philips</strong> del vostro paese (per<br />
conoscere il numero di telefono consultate<br />
l’opuscolo della garanzia). Se nel vostro paese non<br />
esiste un Centro Assistenza Clienti, rivolgetevi al<br />
vostro rivenditore <strong>Philips</strong>.
72<br />
Italiano<br />
Limitazioni della garanzia<br />
L’unità di rasatura (lame e portalame) non è<br />
coperta dalla garanzia internazionale perché è un<br />
componente soggetto a usura.<br />
La cartuccia che contiene la crema è un articolo usa<br />
e getta e non è coperto dai termini della garanzia<br />
internazionale.<br />
Domanda<br />
Domande frequenti<br />
Nel presente capitolo sono riportate le domande<br />
più frequenti relative al rasoio. Se non riuscite a<br />
trovare una risposta esaustiva alla vostra domanda,<br />
rivolgetevi al Centro Assistenza Clienti del vostro<br />
paese.<br />
Risposta<br />
Perché l’unità<br />
di rasatura non<br />
scorre in modo<br />
uniforme sulla<br />
pelle?<br />
Perché il rasoio<br />
non funziona come<br />
al solito?<br />
Probabilmente non avete applicato una quantità<br />
sufficiente di lozione per la rasatura. Premete il<br />
pulsante di erogazione fino a ottenere la quantità<br />
sufficiente della lozione <strong>NIVEA</strong> <strong>FOR</strong> <strong>MEN</strong>.<br />
In tal modo l’unità di rasatura potrà scorrere<br />
delicatamente sulla pelle.<br />
Forse non avete pulito correttamente il rasoio.<br />
Pulite il rasoio a fondo (vedere il capitolo “Pulizia<br />
e manutenzione”).<br />
I peli lunghi possono ostruire le testine di<br />
rasatura. Pulite le testine di rasatura seguendo i<br />
passaggi della pulizia a fondo riportati in basso.<br />
L’unità di rasatura potrebbe essere danneggiata<br />
o usurata. Sostituite l’unità di rasatura (vedere<br />
capitolo “Sostituzione”).
Italiano 73<br />
Domanda<br />
Perché il rasoio<br />
non funziona<br />
premendo il<br />
pulsante on/off?<br />
Perché dai fori<br />
fuoriesce solo una<br />
minima quantità di<br />
lozione anche se la<br />
cartuccia è piena?<br />
Risposta<br />
La batteria potrebbe essere scarica. Ricaricate la<br />
batteria (vedere capitolo “Messa in funzione”).<br />
La lozione esaurita può bloccare le testine<br />
nell’unità di rasatura. Pulite il rasoio prima di<br />
continuare la rasatura (vedere capitolo “Pulizia e<br />
manutenzione”).<br />
È possibile che non abbiate rimontato<br />
correttamente l’unità di rasatura dopo la pulizia<br />
a fondo. Quando rimontate l’unità di rasatura,<br />
assicuratevi di ruotare ciascun dispositivo di<br />
protezione in senso antiorario finché non scatta<br />
in posizione.<br />
Uno dei fori dell’erogatore potrebbe essere<br />
bloccato. Sciacquate o mettete in ammollo<br />
l’unità di rasatura. Se il problema non si risolve,<br />
aggiungete la crema nel serbatoio fino a quando<br />
non inizia a fuoriuscire dal foro ostruito. Se il<br />
problema non si risolve provate a: 1) Spegnere<br />
il rasoio 2) Estrarre l’unità di rasatura dal rasoio<br />
3) Posizionare un dito sul foro non ostruito 4)<br />
Accendere il rasoio 5) Premere il pulsante di<br />
erogazione per qualche secondo fino a quando<br />
dal foro ostruito non fuoriesce nuovamente la<br />
lozione.
74<br />
Italiano<br />
Domanda<br />
Perché dai fori di<br />
erogazione non<br />
fuoriesce la lozione<br />
quando premo<br />
il pulsante di<br />
erogazione?<br />
Il rasoio è caduto<br />
e l’unità di rasatura<br />
si è staccata. Come<br />
si rimonta l’unità di<br />
rasatura?<br />
Risposta<br />
È possibile che le testine di rasatura non siano<br />
state inserite nei supporti originali. Una delle<br />
testine di rasatura non ha il foro dell’erogatore<br />
al centro e deve essere posizionata nell’apposito<br />
supporto. Assicuratevi di posizionare la testina<br />
di rasatura priva di foro per l’erogatore nel<br />
supporto corretto, ossia quello più vicino al<br />
pulsante on/off quando l’unità di rasatura è fissata<br />
sul rasoio.<br />
Il serbatoio della crema è quasi vuoto. Riempite il<br />
serbatoio con la crema (vedere capitolo “Messa<br />
in funzione”).<br />
Posizionate le lame nei supporti delle testine<br />
di rasatura con i piedini rivolti verso l’alto.<br />
Posizionate i dispositivi di protezione sui supporti<br />
(al di sopra delle lame) e ruotatele in senso<br />
antiorario finché non scattano in posizione.<br />
Uno dei dispositivi di protezione è privo di foro<br />
dell’erogatore al centro e deve essere collegato<br />
sul relativo supporto, ossia quello più vicino<br />
al pulsante on/off quando l’unità di rasatura è<br />
montata sul rasoio. Se le lame e i dispositivi di<br />
protezione vengono mischiati, è possibile che<br />
siano necessarie diverse settimane prima di poter<br />
ripristinare le prestazioni di rasatura ottimali.
Italiano 75<br />
Domanda<br />
Perché il<br />
rasoio produce<br />
improvvisamente<br />
un rumore strano?<br />
Risposta<br />
È possibile che non abbiate montato<br />
correttamente l’unità di rasatura. Posizionate le<br />
lame nei supporti delle testine di rasatura con i<br />
piedini rivolti verso l’alto. Posizionate i dispositivi<br />
di protezione sui supporti (al di sopra delle<br />
lame) e ruotatele in senso antiorario finché<br />
non scattano in posizione. Uno dei dispositivi di<br />
protezione è privo di foro dell’erogatore al centro<br />
e deve essere collegato sul relativo supporto,<br />
ossia quello più vicino al pulsante on/off quando<br />
l’unità di rasatura è montata sul rasoio. Se le lame<br />
e i dispositivi di protezione vengono mischiati, è<br />
possibile che siano necessarie diverse settimane<br />
prima di poter ripristinare le prestazioni di<br />
rasatura ottimali.<br />
Metodo di pulizia a fondo<br />
Controllate che l’apparecchio sia spento.<br />
1 Estraete l’unità di rasatura dal rasoio.<br />
2 Ruotate il dispositivo di protezione in senso<br />
orario e sollevatelo dall’unità di rasatura.<br />
Nota rimuovete solo una testina di rasatura alla volta,<br />
in modo che possiate rimontare la testina sul supporto<br />
originale, operazione importante per le testine con<br />
speciali fori per l’erogatore. In questo modo, eviterete<br />
anche di mischiare le lame e i dispositivi di protezione<br />
delle diverse testine e preservare le prestazioni di<br />
rasatura.
76<br />
Italiano<br />
3 Se necessario, rimuovete la lama dal dispositivo<br />
di protezione.<br />
4 Pulite la lama e il dispositivo di protezione con<br />
la spazzola in dotazione.<br />
5 Dopo la pulizia, posizionate la lama di nuovo<br />
nell’unità di rasatura con i piedini rivolti verso<br />
l’alto.<br />
6 Posizionate il dispositivo di protezione nel<br />
supporto della testina di rasatura (al di sopra<br />
della lama).<br />
7 Ruotate il dispositivo di protezione in senso<br />
antiorario finché non scatta in posizione.<br />
8 Mettete l’unità di rasatura sul rasoio.
Nederlands<br />
77<br />
Inleiding<br />
Gefeliciteerd met uw aankoop en welkom bij <strong>Philips</strong>!<br />
Als u volledig wilt profiteren van de ondersteuning<br />
die <strong>Philips</strong> biedt, registreer uw product dan op www.<br />
philips.com/welcome.<br />
Belangrijk<br />
Lees deze gebruiksaanwijzing zorgvuldig door<br />
voordat je het apparaat gaat gebruiken. Bewaar de<br />
gebruiksaanwijzing om deze indien nodig te kunnen<br />
raadplegen.<br />
Gevaar<br />
- Voorkom dat de adapter nat wordt (uw adapter<br />
kan afwijken van die getoond in de afbeelding).<br />
Waarschuwing<br />
- De adapter bevat een transformator. Knip de<br />
adapter niet af om deze te vervangen door een<br />
andere stekker, aangezien dit een gevaarlijke<br />
situatie oplevert.<br />
- Dit apparaat is niet bedoeld voor gebruik door<br />
personen (waaronder kinderen) met verminderde<br />
lichamelijke, zintuiglijke of geestelijke vermogens,<br />
of die gebrek aan ervaring of kennis hebben, tenzij<br />
iemand die verantwoordelijk is voor hun veiligheid<br />
toezicht op hen houdt of hen heeft uitgelegd hoe<br />
het apparaat dient te worden gebruikt.<br />
- Houd toezicht op kinderen om te voorkomen dat<br />
ze met het apparaat gaan spelen.
78<br />
Nederlands<br />
Let op<br />
- Dompel de oplader nooit in water en spoel deze<br />
nooit af onder de kraan.<br />
- Plaats en gebruik de oplader altijd op een<br />
oppervlak dat vloeistofbestendig is.<br />
- Laad het apparaat op, gebruik het en bewaar het<br />
bij een temperatuur tussen 5°C en 35°C.<br />
- Gebruik uitsluitend de bijgeleverde adapter en<br />
oplader.<br />
- Gebruik het scheerapparaat of de oplader niet als<br />
deze beschadigd zijn.<br />
- Indien de adapter beschadigd is, laat deze dan<br />
altijd vervangen door een van het oorspronkelijke<br />
type om gevaar te voorkomen.<br />
Naleving van richtlijnen<br />
- Het scheerapparaat voldoet aan de internationaal<br />
erkende veiligheidsvoorschriften en kan veilig<br />
onder de douche en in bad worden gebruikt en<br />
onder de kraan worden schoongemaakt.<br />
- Dit <strong>Philips</strong>-apparaat voldoet aan alle richtlijnen<br />
met betrekking tot elektromagnetische<br />
velden (EMV). Mits het apparaat op de<br />
juiste wijze en volgens de instructies in deze<br />
gebruiksaanwijzing wordt gebruikt, is het<br />
veilig te gebruiken volgens het nu beschikbare<br />
wetenschappelijke bewijs.<br />
Algemeen<br />
- De adapter zet 100-240 volt om in een veilige<br />
laagspanning van minder dan 24 volt.<br />
Overzicht (fig. 4)<br />
A Scheerapparaat<br />
1 Beschermkap<br />
2 Scheerunit
3 Scheerconditionercartridge<br />
4 Scheerconditionerknop<br />
5 Oplaadlampje<br />
6 Aan/uitknop<br />
B Accessoires<br />
1 Fles met <strong>NIVEA</strong> <strong>FOR</strong> <strong>MEN</strong>-scheerconditioner<br />
2 Oplader<br />
3 Schoonmaakborsteltje<br />
4 Adapter (uw adapter kan afwijken van die<br />
getoond in de afbeelding)<br />
Het apparaat in gebruik nemen<br />
Nederlands 79<br />
Opladen<br />
1 Steek de kleine stekker in de oplader en steek<br />
de adapter in het stopcontact.<br />
2 Plaats het scheerapparaat in de oplader.<br />
, Het scheerapparaat wordt opgeladen.<br />
3 Laad het scheerapparaat 8 uur op.<br />
Opmerking: Laad het scheerapparaat op voordat u het<br />
voor de eerste keer gebruikt of als het oplaadlampje<br />
aangeeft dat de accu leeg is (zie ‘Oplaadaanduidingen’).<br />
Opmerking: Een volledig opgeladen scheerapparaat<br />
biedt een scheertijd tot 30 minuten.
80<br />
Nederlands<br />
Oplaadaanduidingen<br />
Opladen<br />
- Het oplaadlampje brandt tijdens het opladen<br />
groen.<br />
Accu bijna leeg<br />
- Als de accu bijna leeg is, brandt het oplaadlampje<br />
rood. Als u het scheerapparaat uitschakelt, gaat het<br />
rode lampje langzaam uit.<br />
De scheerconditionercartridge vullen<br />
1 Verwijder het lipje van de fles met <strong>NIVEA</strong> <strong>FOR</strong><br />
<strong>MEN</strong>-scheerconditioner.<br />
2 Draai de dop van de conditionerfles rechtsom<br />
(‘klik’).<br />
, De dop beweegt omlaag en de tuit van de fles<br />
wordt zichtbaar.<br />
3 Plaats de tuit van de conditionerfles in de<br />
vulopening van de conditionercartridge.<br />
4 Beweeg de fles ongeveer 5 keer omhoog en<br />
omlaag om scheerconditioner in de cartridge<br />
te pompen tot u ziet dat de cartridge vol is.<br />
Vul de cartridge nooit tot boven de MAXaanduiding.
Het scheerapparaat gebruiken<br />
Opmerking: Uw huid kan 2 tot 3 weken nodig hebben<br />
om aan een nieuw scheersysteem te wennen.<br />
-<br />
-<br />
1 Controleer of er voldoende scheerconditioner<br />
in de scheerconditionercartridge zit.<br />
2 Druk op de aan/uitknop om het<br />
scheerapparaat in te schakelen.<br />
Nederlands 81<br />
3 Zorg ervoor dat de accu niet leeg is (zie<br />
‘Oplaadaanduidingen’ in hoofdstuk ‘Het<br />
apparaat in gebruik nemen’).<br />
4 Beweeg de scheerunit voorzichtig met<br />
ronddraaiende bewegingen over uw huid en<br />
druk op de scheerconditionerknop tot er<br />
zich voldoende scheerconditioner op uw huid<br />
bevindt voor een comfortabele scheerbeurt.<br />
Als u de scheerconditionerknop loslaat, stopt het<br />
apparaat met het doseren van conditioner.<br />
Druk tijdens het scheren opnieuw op<br />
de scheerconditionerknop om meer<br />
scheerconditioner aan te brengen. Zo zorgt u<br />
ervoor dat de scheerunit soepel over uw huid<br />
blijft glijden.<br />
Opmerking: De scheerconditionerknop werkt alleen als<br />
het scheerapparaat is ingeschakeld.<br />
Opmerking: U kunt dit scheerapparaat op dezelfde<br />
manier gebruiken als een scheermesje. Dit wil zeggen<br />
dat u het scheerapparaat op een nat gezicht kunt<br />
gebruiken. In tegenstelling tot een conventioneel<br />
elektrisch scheerapparaat heeft dit apparaat geen<br />
haarkamer waarin de afgeschoren haartjes worden<br />
verzameld. Als u wilt voorkomen dat deze haartjes
82<br />
Nederlands<br />
op uw kleding terechtkomen, gebruik dan voldoende<br />
scheerconditioner tijdens het scheren.<br />
5 Maak het scheerapparaat na elk gebruik<br />
grondig schoon (zie hoofdstuk ‘Schoonmaken’).<br />
6 Schuif de beschermkap op het scheerapparaat<br />
om beschadigingen te voorkomen.<br />
Tips voor optimaal glijden en een glad<br />
scheerresultaat<br />
- Beweeg het scheerapparaat voorzichtig met<br />
ronddraaiende bewegingen over uw huid.<br />
- Oefen niet te veel druk uit op het scheerapparaat.<br />
Dit kan huidirritatie veroorzaken.<br />
- Breng regelmatig scheerconditioner aan zodat het<br />
scheerapparaat soepel over de huid glijdt.<br />
- U kunt het scheerapparaat ook in bad of onder<br />
de douche gebruiken.<br />
Schoonmaken en onderhoud<br />
Maak het scheerapparaat na elk gebruik schoon.<br />
Gebruik voor het reinigen van het apparaat geen<br />
agressieve schoonmaakmiddelen, schuurmiddelen<br />
of vloeistoffen als alcohol, benzine of aceton.<br />
Wees voorzichtig met heet water. Controleer altijd<br />
of het water niet te heet is om te voorkomen dat<br />
u uw handen verbrandt.<br />
Droog de scheerunit nooit met een handdoek<br />
of een papieren doekje omdat de scheerhoofden<br />
hierdoor beschadigd kunnen raken.<br />
Opmerking: Het scheerapparaat is waterdicht en kan<br />
onder de kraan worden schoongespoeld.<br />
1 Druk op de aan/uitknop om het<br />
scheerapparaat in te schakelen.
Nederlands 83<br />
2 Maak het scheerapparaat schoon terwijl het is<br />
ingeschakeld.<br />
U kunt het scheerapparaat op twee manieren<br />
schoonmaken:<br />
- Spoel de scheerunit minimaal 30 seconden af<br />
onder de warme kraan.<br />
-<br />
Dompel de scheerunit minimaal 30 seconden in<br />
warm water.<br />
3 Schakel het scheerapparaat uit en schud het<br />
overtollige water eraf.<br />
4 Schuif de beschermkap op het scheerapparaat<br />
om beschadigingen te voorkomen.<br />
Opmerking: Als het scheerapparaat minder goed<br />
scheert dan eerst en u er niet in slaagt om<br />
dit probleem op te lossen met behulp van de<br />
reinigingsmethoden in dit hoofdstuk, raadpleeg dan<br />
hoofdstuk ‘Veelgestelde vragen’ voor een extra grondige<br />
reinigingsmethode.<br />
Vervangen<br />
Scheerconditionercartridge<br />
Om hygiënische redenen raden wij u aan de<br />
scheerconditionercartridge tweemaal per jaar<br />
te vervangen. U kunt telefonisch een nieuwe<br />
scheerconditionercartridge bestellen bij <strong>Philips</strong><br />
Klantenservice. U vindt het telefoonnummer op<br />
www.philips.nl onder ‘<strong>Philips</strong> Klantenservice’.
84<br />
Nederlands<br />
1 Verwijder de scheerconditionercartridge van<br />
het scheerapparaat.<br />
2 Plaats het nokje aan de bovenzijde van de<br />
nieuwe cartridge in de sleuf in de rand van<br />
het scheerapparaat (1). Druk vervolgens<br />
met uw duim op het onderste gedeelte van<br />
de cartridge (2) om de cartridge op het<br />
scheerapparaat te bevestigen (‘klik’).<br />
3 Vul de scheerconditionercartridge (zie<br />
hoofdstuk ‘Het apparaat in gebruik nemen’).<br />
Scheerunit<br />
Vervang de scheerunit elk jaar voor een optimaal<br />
scheerresultaat.<br />
Vervang de scheerunit alleen door een HS85 <strong>Philips</strong>scheerunit.<br />
1 Trek de oude scheerunit van het<br />
scheerapparaat.<br />
2 Plaats de nieuwe scheerunit op het<br />
scheerapparaat.<br />
Fles met <strong>NIVEA</strong> <strong>FOR</strong> <strong>MEN</strong>scheerconditioner<br />
Gebruik alleen flessen met <strong>NIVEA</strong> <strong>FOR</strong> <strong>MEN</strong>scheerconditioner.
Het apparaat afdanken<br />
-<br />
-<br />
Gooi het apparaat aan het einde van zijn<br />
levensduur niet weg met het normale huisvuil,<br />
maar lever het in op een door de overheid<br />
aangewezen inzamelpunt om het te laten recyclen.<br />
Op die manier levert u een bijdrage aan een<br />
schonere leefomgeving.<br />
De accu van het scheerapparaat bevat stoffen die<br />
schadelijk kunnen zijn voor het milieu. Verwijder<br />
altijd de accu voordat u het scheerapparaat<br />
afdankt en inlevert op een door de overheid<br />
aangewezen inzamelpunt. Lever de accu in op<br />
een officieel inzamelpunt voor batterijen. Als u<br />
problemen ondervindt bij het verwijderen van de<br />
accu, kunt u met het scheerapparaat ook naar een<br />
<strong>Philips</strong>-servicecentrum gaan. Medewerkers van<br />
dit centrum verwijderen dan de accu voor u en<br />
zorgen ervoor dat deze op milieuvriendelijke wijze<br />
wordt verwerkt.<br />
De accu verwijderen<br />
Verwijder de accu alleen wanneer u het<br />
scheerapparaat afdankt. Zorg ervoor dat de accu<br />
helemaal leeg is wanneer u deze verwijdert.<br />
Pas op, de accustrips zijn scherp.<br />
Nederlands 85<br />
1 Verwijder de scheerconditionercartridge van<br />
het scheerapparaat.<br />
2 Draai de drie schroeven aan de achterzijde van<br />
het scheerapparaat los.
86<br />
Nederlands<br />
3 Verwijder het achterpaneel van de behuizing<br />
met een schroevendraaier.<br />
4 Verwijder de accu.<br />
Garantie en service<br />
Als u service of informatie nodig hebt of als u een<br />
probleem hebt, bezoek dan de <strong>Philips</strong>-website<br />
(www.philips.nl), of neem contact op met het<br />
<strong>Philips</strong> Consumer Care Centre in uw land (u vindt<br />
het telefoonnummer in het ‘worldwide guarantee’-<br />
vouwblad). Als er geen Consumer Care Centre in<br />
uw land is, ga dan naar uw <strong>Philips</strong>-dealer.<br />
Garantiebeperkingen<br />
De scheerhoofden (mesjes en kapjes) vallen niet<br />
onder de voorwaarden van de internationale<br />
garantie omdat deze onderhevig zijn aan slijtage.<br />
De conditionercartridge is een wegwerpartikel en<br />
valt niet onder de internationale garantie.<br />
Veelgestelde vragen<br />
In dit hoofdstuk vindt u de meestgestelde vragen<br />
over het scheerapparaat. Als u het antwoord op uw<br />
vraag niet kunt vinden, neem dan contact op met<br />
het Consumer Care Centre in uw land.
Nederlands 87<br />
Vraag<br />
Waarom glijdt de<br />
scheerunit niet soepel<br />
over mijn huid?<br />
Waarom scheert het<br />
scheerapparaat minder<br />
goed dan eerst?<br />
Waarom werkt het<br />
scheerapparaat niet als<br />
ik op de aan/uitknop<br />
druk?<br />
Antwoord<br />
U hebt mogelijk niet genoeg<br />
scheerconditioner gebruikt. Druk op de<br />
scheerconditionerknop tot er voldoende<br />
<strong>NIVEA</strong> <strong>FOR</strong> <strong>MEN</strong>-scheerconditioner is<br />
aangebracht. Hierdoor zal de scheerunit weer<br />
soepel over uw huid glijden.<br />
U hebt het scheerapparaat mogelijk niet goed<br />
schoongemaakt. Maak het scheerapparaat<br />
grondig schoon (zie hoofdstuk ‘Schoonmaken<br />
en onderhoud’).<br />
Mogelijk zitten er lange haren in de<br />
scheerhoofden. Maak de scheerhoofden<br />
schoon door de hieronder beschreven<br />
stappen voor een extra grondige reiniging te<br />
volgen.<br />
Mogelijk is de scheerunit beschadigd of<br />
versleten. Vervang de scheerunit (zie<br />
hoofdstuk ‘Vervangen’).<br />
De accu is mogelijk leeg. Laad de accu op (zie<br />
hoofdstuk ‘Het apparaat in gebruik nemen’).<br />
Opgedroogde scheerconditioner blokkeert<br />
mogelijk de scheerhoofden in de scheerunit.<br />
Maak het scheerapparaat grondig schoon<br />
voordat u doorgaat met scheren (zie<br />
hoofdstuk ‘Schoonmaken en onderhoud’).
88<br />
Nederlands<br />
Vraag<br />
Waarom komt<br />
er weinig<br />
scheerconditioner<br />
uit de openingen,<br />
hoewel er voldoende<br />
conditioner in de<br />
cartridge zit?<br />
Antwoord<br />
Mogelijk hebt u de scheerunit niet goed in<br />
elkaar gezet na de extra grondige reiniging.<br />
Draai elk kapje linksom totdat de kapjes<br />
vastklikken wanneer u de scheerunit weer in<br />
elkaar zet.<br />
Een van de conditioneropeningen is mogelijk<br />
geblokkeerd. Spoel de scheerunit schoon of<br />
laat deze weken. Als dit niet werkt, pompt u<br />
scheerconditioner in de cartridge tot er weer<br />
conditioner uit de geblokkeerde opening<br />
komt. Als dit ook niet werkt, kunt u de<br />
volgende methode proberen: 1) schakel het<br />
scheerapparaat uit 2) trek de scheerunit van<br />
het scheerapparaat 3) plaats uw vinger op de<br />
opening die niet is geblokkeerd 4) schakel het<br />
scheerapparaat in 5) druk enkele seconden<br />
op de scheerconditionerknop tot er weer<br />
conditioner uit de geblokkeerde opening<br />
komt.<br />
U hebt de scheerhoofden mogelijk niet<br />
teruggeplaatst in hun oorspronkelijke houders.<br />
Een van de scheerhoofden heeft in het<br />
midden geen opening voor scheerconditioner<br />
en dit scheerhoofd moet in een specifieke<br />
houder worden geplaatst. Zorg dat u het<br />
scheerhoofd zonder een opening voor<br />
conditioner in de juiste houder plaatst. Dit<br />
is de houder die zich het dichtst bij de aan/<br />
uitknop bevindt wanneer de scheerunit op<br />
het scheerapparaat zit.
Nederlands 89<br />
Vraag<br />
Waarom komt er geen<br />
scheerconditioner<br />
uit de openingen<br />
als ik op de<br />
scheerconditionerknop<br />
druk?<br />
Ik heb het<br />
scheerapparaat laten<br />
vallen en de scheerunit<br />
is uiteen gevallen. Hoe<br />
moet ik de scheerunit<br />
weer in elkaar zetten?<br />
Waarom maakt het<br />
scheerapparaat ineens<br />
een raar geluid?<br />
Antwoord<br />
De cartridge is bijna leeg. Vul de<br />
scheerconditionercartridge bij (zie hoofdstuk<br />
‘Het apparaat in gebruik nemen’).<br />
Plaats de messen in de scheerhoofdhouders<br />
met de mespootjes naar boven gericht. Plaats<br />
de kapjes op de houders (over de messen)<br />
en draai de kapjes linksom totdat deze<br />
vastklikken. Een van de kapjes heeft in het<br />
midden geen opening voor scheerconditioner<br />
en moet op een specifieke houder worden<br />
bevestigd. Dit is de houder die zich het<br />
dichtst bij de aan/uitknop bevindt wanneer<br />
de scheerunit op het scheerapparaat zit. Als<br />
de messen en de kapjes zijn verwisseld, kan<br />
het enkele weken duren voordat het apparaat<br />
weer optimaal scheert.<br />
U hebt de scheerunit mogelijk niet goed<br />
in elkaar gezet. Plaats de messen in de<br />
scheerhoofdhouders met de mespootjes<br />
naar boven gericht. Plaats de kapjes op de<br />
houders (over de messen) en draai de kapjes<br />
linksom totdat deze vastklikken. Een van de<br />
kapjes heeft in het midden geen opening voor<br />
scheerconditioner en moet op een specifieke<br />
houder worden geplaatst. Dit is de houder<br />
die zich het dichtst bij de aan/uitknop bevindt<br />
wanneer de scheerunit op het scheerapparaat<br />
zit. Als de messen en de kapjes zijn verwisseld,<br />
kan het enkele weken duren voordat het<br />
apparaat weer optimaal scheert.
90<br />
Nederlands<br />
Extra grondige reinigingsmethode<br />
Zorg ervoor dat het apparaat is uitgeschakeld.<br />
1 Trek de scheerunit van het scheerapparaat af.<br />
2 Draai het kapje rechtsom en verwijder het<br />
kapje van de scheerunit.<br />
Opmerking: Verwijder maar één scheerhoofd per keer.<br />
Hierdoor bent u er zeker van dat u het scheerhoofd<br />
altijd terugplaatst in de oorspronkelijke houder. Dit<br />
is belangrijk, omdat twee scheerhoofden speciale<br />
openingen hebben voor de scheerconditioner. Bovendien<br />
zorgt dit ervoor dat u de messen en de kapjes van de<br />
verschillende scheerhoofden niet verwisselt. Dit heeft<br />
namelijk een negatief effect op de scheerprestaties.<br />
3 Haal indien nodig het mes uit het kapje.<br />
4 Maak het mes en het kapje schoon met het<br />
bijgeleverde borsteltje.<br />
5 Plaats het mes na het schoonmaken terug in<br />
de scheerunit met de mespootjes naar boven<br />
gericht.<br />
6 Plaats het kapje terug op de<br />
scheerhoofdhouder (over het mes).<br />
7 Draai het kapje linksom totdat het vastklikt.
8 Plaats de scheerunit terug op het<br />
scheerapparaat (‘klik’).<br />
Nederlands 91
92<br />
Português<br />
Introdução<br />
Parabéns pela sua compra e bem-vindo à <strong>Philips</strong>!<br />
Para tirar todo o partido da assistência fornecida<br />
pela <strong>Philips</strong>, registe o seu produto em www.philips.<br />
com/welcome.<br />
Importante<br />
Leia cuidadosamente este <strong>manual</strong> do utilizador antes<br />
de utilizar o aparelho e guarde-o para consultas<br />
futuras.<br />
Perigo<br />
- Certifique-se de que o adaptador não se molha<br />
(o seu adaptador pode ser diferente do indicado<br />
na figura).<br />
Aviso<br />
- O adaptador contém um transformador. Não<br />
corte o adaptador para o substituir por outro,<br />
porque isso poderá dar origem a situações de<br />
perigo.<br />
- Este aparelho não se destina a ser utilizado por<br />
pessoas (incluindo crianças) com capacidades<br />
físicas, sensoriais ou mentais reduzidas, ou com<br />
falta de experiência e conhecimentos, salvo se<br />
tiverem recebido supervisão ou instruções sobre<br />
o uso do aparelho por alguém responsável pela<br />
sua segurança.<br />
- As crianças devem ser supervisionadas para<br />
garantir que não brincam com o aparelho.
Cuidado<br />
- Nunca mergulhe o carregador dentro de água<br />
nem o enxagúe à torneira.<br />
- Coloque e utilize sempre o carregador numa<br />
superfície impermeável.<br />
- Utilize, carregue e guarde o aparelho a uma<br />
temperatura entre 5 °C e 35 °C.<br />
- Utilize apenas o adaptador e o carregador<br />
fornecidos.<br />
- Não utilize a máquina de barbear ou o<br />
carregador se estiverem danificados.<br />
- Se o transformador se danificar, só deverá ser<br />
substituído por uma peça de origem para evitar<br />
situações de perigo.<br />
Conformidade com as normas<br />
- Esta máquina de barbear está em conformidade<br />
com as regulamentações de segurança aprovadas<br />
internacionalmente, podendo ser utilizada no<br />
banho ou no duche e lavada à torneira com total<br />
segurança.<br />
- Este aparelho <strong>Philips</strong> cumpre com todas<br />
as normas correspondentes a campos<br />
electromagnéticos (EMF). Se manuseado<br />
correctamente e de acordo com as instruções<br />
fornecidas neste <strong>manual</strong> do utilizador, o aparelho<br />
pode ser utilizado em segurança com base em<br />
provas científicas disponíveis actualmente.<br />
Geral<br />
- O adaptador transforma 100-240 volts numa<br />
tensão segura e baixa inferior a 24 volts.<br />
Visão geral (fig. 4)<br />
A Máquina de barbear<br />
1 Tampa de protecção<br />
Português 93
94<br />
Português<br />
2 Unidade de corte<br />
3 Cartucho do hidratante para a barba<br />
4 Botão do hidratante para a barba<br />
5 Luz de carga<br />
6 Botão de ligar/desligar<br />
B Acessórios<br />
1 Embalagem de hidratante para a barba <strong>NIVEA</strong><br />
<strong>FOR</strong> <strong>MEN</strong><br />
2 Carregador<br />
3 Escova de limpeza<br />
4 Adaptador (o seu adaptador pode ser diferente<br />
do indicado na figura)<br />
Começar a usar o seu aparelho<br />
Carregar<br />
1 Coloque a ficha pequena no carregador e<br />
introduza o adaptador numa tomada eléctrica.<br />
2 Coloque a máquina de barbear no carregador.<br />
, A máquina de barbear está a ser carregada.<br />
3 Carregue a máquina durante 8 horas.<br />
Nota: Carregue a máquina de barbear antes de a<br />
utilizar pela primeira vez ou quando a luz avisadora<br />
de carga indicar que a bateria está vazia (consulte a<br />
secção ‘Indicações de carga’).<br />
Nota: Estando com carga total, a máquina de barbear<br />
tem até 30 minutos de autonomia.
Português 95<br />
Indicações de carga<br />
Carregar<br />
- Durante a carga, a luz de carga acende-se a verde.<br />
Bateria fraca<br />
- Quando a bateria estiver fraca, a luz de<br />
carga acende-se a vermelho. Quando desliga<br />
a máquina de barbear, a luz vermelha apaga-se<br />
lentamente.<br />
Encher o cartucho do hidratante<br />
1 Retire a patilha da embalagem de hidratante<br />
para a barba <strong>NIVEA</strong> <strong>FOR</strong> <strong>MEN</strong>.<br />
2 Rode a tampa da embalagem de hidratante<br />
para a direita (‘clique’).<br />
, A tampa move-se para baixo e aparece o bocal<br />
do hidratante.<br />
3 Coloque o bocal da embalagem do hidratante<br />
na abertura de enchimento do cartucho do<br />
hidratante.<br />
4 Mova a embalagem para cima e para baixo<br />
cerca de 5 vezes para bombear o hidratante<br />
para a barba para o interior do cartucho, até<br />
ver que este está cheio.<br />
Não ultrapasse a indicação MAX do cartucho.
96<br />
Português<br />
Utilização da máquina de barbear<br />
Nota: A sua pele poderá precisar de 2 a 3 semanas<br />
para se adaptar a um novo sistema de barbear.<br />
-<br />
-<br />
1 Certifique-se de que existe hidratante para a<br />
barba suficiente no cartucho do hidratante.<br />
2 Prima o botão ligar/desligar para ligar a<br />
máquina de barbear.<br />
3 Certifique-se de que a bateria não está fraca<br />
(consulte o capítulo ‘Começar a usar o seu<br />
aparelho’, secção ‘Indicações de carga’).<br />
4 Mova suavemente a unidade de corte em<br />
círculos sobre a pele e prima o botão do<br />
hidratante para a barba até existir hidratante<br />
suficiente na pele para um barbear confortável.<br />
Quando soltar o botão do hidratante para a<br />
barba, o aparelho interrompe a aplicação do<br />
hidratante.<br />
Prima novamente o botão do hidratante para a<br />
barba para aplicar mais hidratante enquanto faz<br />
a barba, para garantir que a unidade de corte<br />
continua a deslizar suavemente pela pele.<br />
Nota: O botão do hidratante para a barba apenas<br />
funciona quando a máquina está ligada.<br />
Nota: Esta máquina de barbear pode ser utilizada de<br />
forma semelhante a uma lâmina de barbear: pode<br />
utilizar a máquina sobre o rosto molhado. Ao contrário<br />
de uma máquina de barbear eléctrica convencional,<br />
este aparelho não possui câmara de recolha para os<br />
pêlos curtos. Para evitar que estes pêlos caiam sobre<br />
a roupa, aplique hidratante suficiente enquanto faz a<br />
barba.
5 Limpe cuidadosamente a máquina de barbear<br />
após cada utilização (consulte o capítulo<br />
‘Limpeza’).<br />
6 Coloque a tampa de protecção na máquina de<br />
barbear para evitar danos.<br />
Sugestões para um deslizar perfeito e um<br />
resultado suave<br />
- Mova suavemente a máquina de barbear em<br />
círculos sobre a pele.<br />
- Não exerça demasiada pressão sobre a máquina<br />
de barbear, pois pode provocar irritações na pele.<br />
- Para garantir um deslizar adequado, aplique<br />
regularmente hidratante para a barba.<br />
- Pode também utilizar a máquina de barbear no<br />
banho ou no duche.<br />
Limpeza e manutenção<br />
Português 97<br />
Limpe a máquina de barbear após cada utilização.<br />
Não utilize produtos de limpeza abrasivos,<br />
desengordurantes ou líquidos como álcool,<br />
petróleo ou acetona na limpeza do aparelho.<br />
Tenha cuidado com a água quente. Verifique sempre<br />
se não está demasiado quente para evitar queimar<br />
as mãos.<br />
Nunca seque a unidade de corte com uma toalha<br />
ou tecido, pois pode danificar as cabeças de corte.<br />
Nota: A máquina de barbear é à prova de água e pode<br />
ser lavada à torneira.<br />
1 Prima o botão ligar/desligar para ligar a<br />
máquina de barbear.<br />
2 Limpe a máquina de barbear enquanto está<br />
ligada.
98<br />
Português<br />
Existem duas formas de limpar a máquina:<br />
- Enxagúe a unidade de corte debaixo da torneira<br />
de água quente durante, pelo menos, 30 segundos.<br />
- Mergulhe a unidade de corte em água<br />
quente durante, pelo menos, 30 segundos.<br />
3 Desligue a máquina de barbear e sacuda o<br />
excesso de água.<br />
4 Coloque a tampa de protecção na máquina de<br />
barbear para evitar danos.<br />
Nota: Se a máquina de barbear não barbeia tão bem<br />
como anteriormente e se não conseguir resolver o<br />
problema através dos métodos de limpeza descritos<br />
neste capítulo, consulte o capítulo ‘Perguntas mais<br />
frequentes’ para obter informações sobre um método<br />
de limpeza extra-profunda.<br />
Substituição<br />
Cartucho do hidratante para a barba<br />
Por razões de higiene, aconselha-se que substitua<br />
o cartucho do hidratante para a barba duas vezes<br />
por ano. Pode encomendar (por telefone) um<br />
novo cartucho do hidratante para a barba à <strong>Philips</strong><br />
Consumer Care. Poderá encontrar o número de<br />
telefone no Web site www.philips.pt (secção de<br />
“Contacto e Assistência”).
Português 99<br />
1 Retire o cartucho do hidratante para a barba<br />
da máquina.<br />
2 Introduza a saliência no topo do novo<br />
cartucho de hidratante para a barba na<br />
ranhura no bordo da máquina de barbear (1).<br />
Depois prima a parte inferior do cartucho<br />
com o polegar (2) para montar o<br />
cartucho na máquina (‘clique’).<br />
3 Encha o cartucho do hidratante (consulte o<br />
capítulo ‘Começar a usar o seu aparelho’).<br />
Unidade de corte<br />
A unidade de corte deve ser substituída todos<br />
os anos para manter a eficácia da máquina de<br />
barbear.<br />
Substitua apenas a unidade de corte por uma<br />
Unidade de Corte <strong>Philips</strong> HS85.<br />
1 Retire a antiga unidade de corte da máquina de<br />
barbear.<br />
2 Coloque a nova unidade de corte na máquina<br />
de barbear.<br />
Embalagem de hidratante para a barba<br />
<strong>NIVEA</strong> <strong>FOR</strong> <strong>MEN</strong><br />
Utilize apenas embalagens de hidratante para a<br />
barba <strong>NIVEA</strong> <strong>FOR</strong> <strong>MEN</strong>.
100 Português<br />
Eliminação<br />
-<br />
Não deite fora o aparelho juntamente com o<br />
lixo doméstico normal no final da sua vida útil<br />
e entregue-o num ponto de recolha autorizado<br />
para reciclagem. Ao fazê-lo, ajuda a preservar o<br />
meio ambiente.<br />
- A bateria recarregável da máquina de barbear<br />
contém substâncias que podem poluir o ambiente.<br />
Retire sempre a bateria antes de se desfazer da<br />
máquina e entregue a máquina num ponto de<br />
recolha oficial. Desfaça-se da bateria num ponto<br />
de recolha oficial para baterias. Se tiver problemas<br />
na remoção da bateria, pode também levar a<br />
máquina a um centro de assistência <strong>Philips</strong>, que<br />
poderá remover a bateria por si e eliminá-la de<br />
forma segura para o ambiente.<br />
Eliminação da bateria recarregável<br />
Retire apenas a bateria recarregável quando se<br />
desfizer da máquina de barbear. Certifique-se de<br />
que a bateria está completamente vazia quando a<br />
retirar.<br />
Tenha cuidado porque as bandas da pilha são<br />
aguçadas.<br />
1 Retire o cartucho do hidratante para a barba<br />
da máquina.<br />
2 Desaparafuse os três parafusos na parte<br />
traseira da máquina de barbear.
Português 101<br />
3 Retire o painel traseiro do corpo com uma<br />
chave de parafusos.<br />
4 Remova a bateria recarregável.<br />
Garantia e assistência<br />
Se necessitar de reparações, informações ou se<br />
tiver problemas, visite o Web site da <strong>Philips</strong> em<br />
www.philips.pt ou contacte o Centro de Assistência<br />
ao Consumidor local (pode encontrar o número<br />
de telefone no folheto de garantia mundial). Se não<br />
existir um Centro de Assistência no seu país, visite o<br />
seu representante <strong>Philips</strong> local.<br />
Restrições à garantia<br />
As cabeças de corte (lâminas e guardas) não estão<br />
abrangidas pelos termos da garantia internacional,<br />
uma vez que estão sujeitas a desgaste.<br />
A embalagem da emulsão é um artigo descartável<br />
e não é abrangida pelos termos da garantia<br />
internacional.<br />
Perguntas mais frequentes<br />
Este capítulo apresenta as perguntas mais frequentes<br />
sobre o aparelho. Se não conseguir encontrar a<br />
resposta à sua pergunta, contacte o Centro de<br />
Assistência <strong>Philips</strong> do seu país.
102 Português<br />
Pergunta<br />
Por que razão<br />
a unidade<br />
de corte<br />
não desliza<br />
suavemente<br />
pela minha<br />
pele?<br />
Por que é que<br />
a máquina de<br />
barbear não<br />
barbeia tão<br />
bem como<br />
anteriormente?<br />
Por que razão a<br />
máquina de<br />
barbear não<br />
funciona<br />
quando primo<br />
o botão ligar/<br />
desligar?<br />
Resposta<br />
Pode não ter aplicado hidratante para a barba<br />
suficiente. Prima o botão do hidratante até que uma<br />
quantidade suficiente do hidratante <strong>NIVEA</strong> <strong>FOR</strong><br />
<strong>MEN</strong> tenha sido aplicada. Assim, a unidade de corte<br />
desliza novamente de forma suave pela sua pele.<br />
Pode não ter limpo a máquina de<br />
barbear devidamente. Limpe cuidadosamente<br />
a máquina (consulte o capítulo ‘Limpeza e<br />
manutenção’).<br />
Pode haver pêlos compridos a obstruir as cabeças<br />
de corte. Limpe as cabeças de corte seguindo os<br />
passos descritos no método de limpeza extraprofunda.<br />
A unidade de corte pode estar danificada ou gasta.<br />
Substitua a unidade de corte (consulte o capítulo<br />
‘Substituição’).<br />
A bateria pode estar vazia. Recarregue a bateria<br />
(consulte o capítulo ‘Começar a usar o seu<br />
aparelho’).<br />
O hidratante para a barba seco pode bloquear<br />
as cabeças de corte na unidade de corte. Limpe<br />
cuidadosamente a máquina de barbear antes de<br />
continuar a fazer a barba (consulte o capítulo<br />
‘Limpeza e manutenção’).
Português 103<br />
Pergunta<br />
Por que razão<br />
sai pouco<br />
hidratante para<br />
a barba dos<br />
orifícios mesmo<br />
havendo<br />
hidratante<br />
suficiente no<br />
cartucho?<br />
Por que não sai<br />
hidratante para<br />
a barba dos<br />
orifícios quando<br />
primo o botão<br />
do hidratante?<br />
Resposta<br />
Pode não ter montado correctamente a unidade<br />
de corte após a limpeza extra-profunda. Quando<br />
montar a unidade de corte, certifique-se de que<br />
roda cada guarda para a esquerda até ficar bem<br />
encaixada.<br />
Um dos orifícios do hidratante para barbear pode<br />
estar bloqueado. Enxagúe ou mergulhe a unidade de<br />
corte. Se isto não resultar, introduza hidratante para<br />
a barba no cartucho do hidratante para a barba até<br />
que comece a sair hidratante pelo orifício bloqueado.<br />
Se isto também não resultar, tente o seguinte<br />
método: 1) Desligue a máquina de barbear 2) Retire<br />
a unidade de corte da máquina de barbear 3)<br />
Coloque o dedo no orifício que não está bloqueado<br />
4) Ligue a máquina 5) Prima o botão do hidratante<br />
durante vários segundos até que o hidratante<br />
comece a sair novamente pelo orifício bloqueado.<br />
Pode não ter voltado a colocar as cabeças de<br />
corte nos suportes originais. Uma das cabeças de<br />
corte não tem um orifício para hidratante para a<br />
barba no centro e tem de ser colocada num suporte<br />
específico. Certifique-se de que coloca a cabeça de<br />
corte sem o orifício para hidratante para a barba<br />
no suporte correcto. O suporte correcto para esta<br />
cabeça de corte é o que se encontra mais próximo<br />
do botão ligar/desligar quando a unidade de corte<br />
está montada na máquina de barbear.<br />
O cartucho está quase vazio. Encha o cartucho<br />
do hidratante para a barba (consulte o capítulo<br />
‘Começar a usar o seu aparelho’).
104 Português<br />
Pergunta<br />
Deixei cair a<br />
máquina de<br />
barbear e a<br />
unidade de<br />
corte separouse.<br />
Como devo<br />
voltar a montar<br />
a unidade de<br />
corte?<br />
Por que razão<br />
a máquina<br />
de barbear<br />
começou a<br />
produzir um<br />
ruído estranho?<br />
Resposta<br />
Coloque as lâminas nos suportes da cabeça de<br />
corte com os pernos da lâmina voltados para<br />
cima. Coloque as guardas nos suportes (sobre as<br />
lâminas) e rode-as para a esquerda até ficarem bem<br />
encaixadas. Uma das guardas não tem um orifício<br />
para hidratante para a barba no centro e tem de<br />
ser encaixada num orifício específico. O suporte<br />
correcto para esta guarda é o que se encontra mais<br />
próximo do botão ligar/desligar quando a unidade<br />
de corte está montada na máquina de barbear. Se os<br />
conjuntos das lâminas e das guardas forem alterados,<br />
a eficácia da máquina diminuirá e só passado<br />
algumas semanas voltará ao normal.<br />
Provavelmente não montou correctamente<br />
a unidade de corte. Coloque as lâminas nos<br />
suportes da cabeça de corte com os pernos da<br />
lâmina voltados para cima. Coloque as guardas<br />
nos suportes (sobre as lâminas) e rode-as para a<br />
esquerda até ficarem bem encaixadas. Uma das<br />
guardas não tem um orifício para hidratante para a<br />
barba no centro e tem de ser encaixada num orifício<br />
específico. O suporte correcto para esta guarda é<br />
o que se encontra mais próximo do botão ligar/<br />
desligar quando a unidade de corte está montada<br />
na máquina de barbear. Se os conjuntos das lâminas<br />
e das guardas forem alterados, a eficácia da máquina<br />
diminuirá e só passado algumas semanas voltará ao<br />
normal.
Português 105<br />
Método de limpeza extra-profunda<br />
Certifique-se de que o aparelho está desligado.<br />
1 Retire a unidade de corte da máquina de<br />
barbear.<br />
2 Rode a guarda para a direita e retire-a da<br />
unidade de corte.<br />
Nota: Remova uma cabeça de corte de cada vez.<br />
Desta forma, garante que coloca sempre a cabeça<br />
de corte no suporte original. Este procedimento é<br />
necessário, uma vez que duas das cabeças de corte<br />
possuem orifícios especiais para o hidratante para a<br />
barba. Desta forma, também garante que não altera os<br />
conjuntos das lâminas e guardas de diferentes cabeças<br />
de corte, o que afecta o desempenho da máquina.<br />
3 Se necessário, remova a lâmina da guarda.<br />
4 Limpe a lâmina e a guarda com a escova<br />
fornecida.<br />
5 Depois da limpeza, volte a colocar a lâmina<br />
na unidade de corte com os pernos da<br />
lâmina voltados para cima.<br />
6 Volte a colocar a guarda no suporte da cabeça<br />
de corte (sobre a lâmina).<br />
7 Rode a guarda para a esquerda para a fixar<br />
correctamente.
106 Português<br />
8 Volte a colocar a unidade de corte na máquina<br />
de barbear (‘clique’).
Giriş<br />
Türkçe 107<br />
Ürünümüzü satın aldığınız için teşekkür ederiz;<br />
<strong>Philips</strong>’e hoş geldiniz! <strong>Philips</strong>’in sunduğu destekten<br />
tam faydalanmak için lütfen ürününüzü şu adresten<br />
kaydedin: www.philips.com/welcome.<br />
Önemli<br />
Cihazı kullanmadan önce bu kullanım kılavuzunu<br />
okuyun ve gelecekte de başvurmak üzere saklayın.<br />
Tehlike<br />
- Adaptörün ıslanmasına izin vermeyin (adaptörünüz<br />
şekilde gösterilenden farklı olabilir).<br />
Uyarı<br />
- Adaptörde bir dönüştürücü bulunmaktadır. Tehlikeli<br />
bir duruma sebep olabileceğinden, adaptörü başka<br />
bir fişle değiştirmek için kesmeyin.<br />
- Bu cihaz, güvenliklerinden sorumlu kişilerin nezareti<br />
veya talimatı olmadan, fiziksel, motor ya da<br />
zihinsel becerileri gelişmemiş veya bilgi ve tecrübe<br />
açısından yetersiz kişiler tarafından (çocuklar da<br />
dahil) kullanılmamalıdır.<br />
- Küçük çocukların cihazla oynamaları<br />
engellenmelidir.<br />
Dikkat<br />
- Şarj cihazını kesinlikle suya batırmayın veya musluk<br />
altında durulamayın.<br />
- Şarj cihazını mutlaka sıvı geçirmez bir zemin<br />
üzerinde kullanın.<br />
- Cihaz, 5°C - 35°C arasında kullanılmalı, şarj<br />
edilmeli ve saklanmalıdır.<br />
- Sadece verilen adaptör ve şarj cihazını kullanın.<br />
- Hasarlanmış tıraş makinesini veya şarj cihazını<br />
kullanmayın.
108 Türkçe<br />
-<br />
Adaptör hasarlıysa, bir tehlikeyi önlemek için<br />
mutlaka orijinal modeli ile değiştirildiğinden emin<br />
olun.<br />
Standartlara uyum<br />
- Bu tıraş makinesi uluslararası onaylanmış güvenlik<br />
kurallarına uygun olup, banyo veya duşta güvenle<br />
kullanılabilir musluk altında yıkanabilir.<br />
- Bu <strong>Philips</strong> cihazı elektromanyetik alanlarla (EMF)<br />
ilgili tüm standartlara uygundur. Bu cihaz, gereği<br />
gibi ve bu kılavuzdaki talimatlara uygun şekilde<br />
kullanıldığında, bugünün bilimsel verilerine göre<br />
kullanımı güvenlidir.<br />
Genel<br />
- Adaptör 100-240 volt’u güvenli seviye olan 24<br />
volttan daha düşük değerlere çevirmektedir.<br />
Genel bakış (Şek. 4)<br />
A Tıraş makinesi<br />
1 Koruma kapağı<br />
2 Tıraş ünitesi<br />
3 Tıraş kremi kartuşu<br />
4 Tıraş kremi düğmesi<br />
5 Şarj ediliyor ışığı<br />
6 Açma/kapama düğmesi<br />
B Aksesuarlar<br />
1 <strong>NIVEA</strong> <strong>FOR</strong> <strong>MEN</strong> tıraş kremi şişesi<br />
2 Şarj Cihazı<br />
3 Temizleme fırçası<br />
4 Adaptör (adaptörünüz şekilde gösterilenden<br />
farklı olabilir)
Türkçe 109<br />
Başlangıç<br />
Şarj etme<br />
1 Küçük fişi şarj cihazına takın ve adaptörü de<br />
prize takın.<br />
2 Tıraş makinesini şarj cihazına takın.<br />
, Tıraş makinesi şarj olacaktır.<br />
3 Tıraş makinesini 8 saat şarj edin.<br />
Dikkat: Tıraş makinesini ilk kez kullanmadan önce ya<br />
da pilin boş olduğunu gösteren şarj ışığı yandığında şarj<br />
edin (bkz. ‘Şarj göstergeleri’ bölümü).<br />
Dikkat: Tamamen şarj olmuş bir tıraş makinesinin 30<br />
dakikaya kadar tıraş süresi vardır.<br />
Şarj göstergeleri<br />
Şarj etme<br />
- Şarj esnasında, şarj ışığı yeşil renkte yanar.<br />
Pil zayıf<br />
- Pil zayıfladığında, şarj ışığı kırmızı renkte yanar. Tıraş<br />
makinesini kapadığınızda, kırmızı ışık yavaşça söner.
110 Türkçe<br />
Tıraş kremi kartuşunun doldurulması<br />
1 <strong>NIVEA</strong> <strong>FOR</strong> <strong>MEN</strong> tıraş kremi şişesinin tırnağını<br />
açın.<br />
2 Krem şişesinin kapağını saat yönünde çevirin<br />
(‘klik’).<br />
, Kapak aşağı kayar ve krem başlığı görünür.<br />
3 Krem şişesinin başlığını krem kartuşunun<br />
doldurma deliğine yerleştirin.<br />
4 Kartuşun dolduğunu görene kadar şişeyi<br />
yaklaşık 5 kez yukarı aşağı hareket ettirerek<br />
kartuşa tıraş kremi pompalayın.<br />
Kartuşu MAX göstergesinin üzerinde bir seviyede<br />
doldurmayın.<br />
Tıraş makinesinin kullanımı<br />
Dikkat: Cildinizin yeni bir tıraş sistemine alışması 2-3<br />
hafta sürebilir.<br />
1 Tıraş kremi kartuşunda yeterli miktarda tıraş<br />
kremi olduğundan emin olun.<br />
2 Tıraş makinesini çalıştırmak için açma/kapama<br />
düğmesine basın.<br />
3 Pilin şarjının zayıf olmadığından emin olun (bkz.<br />
‘Başlangıç’ bölümü, ‘Şarj göstergeleri’).
Türkçe 111<br />
4 Tıraş makinesini cildiniz üzerinde daireler<br />
çizerek hafifçe hareket ettirin ve cildinizde<br />
rahat bir tıraş için yeterli miktarda tıraş kremi<br />
olana kadar tıraş kremi şişesine bastırın.<br />
- Tıraş kremi düğmesini bıraktığınızda, cihaz krem<br />
dağıtmayı durdurur.<br />
- Tıraş ünitesinin cildinizde rahatça hareket etmesini<br />
sağlamak amacıyla daha fazla tıraş kremi uygulamak<br />
için tıraş kremi düğmesine tekrar basabilirsiniz.<br />
Dikkat: Tıraş kremi düğmesi sadece tıraş makinesi<br />
açıkken çalışır.<br />
Dikkat: Bu tıraş makinesi tıraş bıçağına benzer şekilde<br />
kullanılabilir: tıraş makinesini ıslak bir cilt üzerinde<br />
kullanabilirsiniz. Klasik elektrikli tıraş makinelerinin<br />
aksine, bu cihazda kılları toplayan bir hazne yoktur.<br />
Kılların giysilerinize dökülmesini engellemek için tıraş<br />
sırasında yeterli miktarda tıraş kremi uygulayın.<br />
5 Her kullanım sonrası tıraş makinesini iyice<br />
temizleyin (bkz. ‘Temizlik’ bölümü).<br />
6 Hasar oluşmasını önlemek için tıraş makinesinin<br />
koruma kapağını kapatın.<br />
Optimum hareket ve pürüzsüz tıraş için<br />
ipuçları<br />
- Tıraş makinesini cildiniz üzerinde daireler çizerek<br />
hafifçe hareket ettirin.<br />
- Tıraş makinesine çok fazla güç uygulamayın, aksi<br />
takdirde cildiniz tahriş olabilir.<br />
- Tıraş makinesinin düzgün hareket etmesi için tıraş<br />
kremini düzenli olarak uygulayın.<br />
- Tıraş makinesini banyoda veya duşta da<br />
kullanabilirsiniz.
112 Türkçe<br />
Temizlik ve bakım<br />
Her kullanım sonrasında tıraş makinesini mutlaka<br />
temizleyin.<br />
Cihazın temizliğinde aşındırıcı, ovucu temizlik<br />
malzemeleri veya alkol, aseton, benzin gibi sıvalar<br />
kullanmayın.<br />
Sıcak suya dikkat edin. Ellerinizin yanmaması için<br />
daima suyun çok sıcak olmadığını kontrol edin.<br />
Tıraş ünitesini kuruturken kesinlikle havlu veya<br />
peçete kullanmayın. Tıraş başlıklarına zarar<br />
verebilirsiniz.<br />
Dikkat: Tıraş makinesi su geçirmez ve musluğun altına<br />
tutularak temizlenebilir.<br />
1 Tıraş makinesini çalıştırmak için açma/kapama<br />
düğmesine basın.<br />
2 Tıraş makinesini çalışırken de temizleyebilirsiniz.<br />
Tıraş makinesi iki şekilde temizlenebilir:<br />
- Tıraş ünitesini en az 30 saniye sıcak suyun altına<br />
tutun.<br />
- Tıraş ünitesini en az 30 saniye sıcak suya daldırın.<br />
3 Tıraş makinesini kapatın ve kalan suyu<br />
sallayarak boşaltın.<br />
4 Hasar oluşmasını önlemek için tıraş makinesinin<br />
koruma kapağını kapatın.<br />
Dikkat: Tıraş makinesi eskisi gibi iyi tıraş etmiyorsa ve<br />
sorunu bu bölümde anlatılan temizleme yöntemleriyle<br />
çözemiyorsanız, ekstra derinlemesine temizlik yöntemi<br />
için ‘Sık Sorulan Sorular’ bölümüne başvurun.
Türkçe 113<br />
Değiştirme<br />
Tıraş kremi kartuşu<br />
Hijyen nedeniyle yılda iki kez tıraş kremi kartuşunu<br />
değiştirmenizi tavsiye ediyoruz. Yeni tıraş kremini<br />
kartuşunu temin edebileceğiniz noktaları telefonla<br />
<strong>Philips</strong> Müşteri Hizmetlerinden öğrenebilirsiniz.<br />
Telefon numarası için www.philips.com adresine<br />
giderek ‘<strong>Philips</strong> Consumer Care’ üzerini tıklatın.<br />
1 Tıraş kremi kartuşunu tıraş makinesinden<br />
çıkarın.<br />
2 Yeni tıraş kremi kartuşunun üst kısmındaki<br />
menteşeyi tıraş makinesi gövdesi üzerindeki<br />
yuvaya takın (1). Sonra, kartuşu tıraş makinesine<br />
takmak için başparmağınızla (2) kartuşun alt<br />
kısmına bastırın (‘klik’).<br />
3 Tıraş kremi kartuşunu doldurun (bkz.‘Başlangıç’<br />
bölümü).<br />
Tıraş ünitesi<br />
En iyi tıraş sonuçlarını elde etmek için tıraş ünitesini<br />
her yıl değiştirin.<br />
Tıraş ünitesini sadece HS85 <strong>Philips</strong> Tıraş Ünitesi ile<br />
değiştirin.<br />
1 Eski tıraş ünitesini tıraş makinesinden çekip<br />
çıkarın.<br />
2 Yeni tıraş ünitesini tıraş makinesine yerleştirin.
114 Türkçe<br />
<strong>NIVEA</strong> <strong>FOR</strong> <strong>MEN</strong> tıraş kremi şişesi<br />
Sadece <strong>NIVEA</strong> <strong>FOR</strong> <strong>MEN</strong> tıraş kremi şişelerini<br />
kullanın.<br />
Atılması<br />
-<br />
-<br />
Kullanım ömrü sonunda, cihazı normal evsel<br />
atıklarınızla birlikte atmayın; bunun yerine, geri<br />
dönüşüm için resmi toplama noktalarına teslim<br />
edin. Böylece, çevrenin korunmasına yardımcı<br />
olursunuz.<br />
Şarj edilebilir tıraş makinesi pili, çevreyi<br />
kirletebilecek maddeler içermektedir. Tıraş<br />
makinesini atmadan ya da resmi toplama noktasına<br />
teslim etmeden önce mutlaka pili çıkartın. Pili,<br />
piller için resmi toplama noktasına teslim edin. Pili<br />
çıkartmakta güçlük çekiyorsanız, tıraş makinesini<br />
bir <strong>Philips</strong> servis merkezine verebilirsiniz. Burada<br />
pil sizin için çıkartılır ve atık işlemleri çevreye zarar<br />
vermeyecek şekilde gerçekleştirilir.<br />
Şarj edilebilir pilin atılması<br />
Şarj edilebilir pilleri, sadece tıraş makinesini<br />
atacağınız zaman çıkarın. Pilleri çıkarırken tamamen<br />
boş olduklarından emin olun.<br />
Pillerin uzun kenarları keskindir, dikkatli olun.<br />
1 Tıraş kremi kartuşunu tıraş makinesinden<br />
çıkarın.
Türkçe 115<br />
2 Tıraş makinesinin arkasındaki üç vidayı sökün.<br />
3 Bir tornavida kullanarak muhafazanın arka<br />
panelini çıkarın.<br />
4 Şarj edilebilir pili çıkarın.<br />
Garanti ve servis<br />
Servise ya da daha fazla bilgiye ihtiyaç duyarsanız<br />
veya bir sorunla karşılaşırsanız, www.philips.com.tr<br />
adresindeki <strong>Philips</strong> Internet sitesini ziyaret edin<br />
veya ülkenizdeki <strong>Philips</strong> Müşteri Hizmet Merkezi ile<br />
iletişim kurun (telefon numarasını dünya çapında<br />
geçerli garanti belgesinde bulabilirsiniz). Ülkenizde<br />
Müşteri Hizmet Merkezi yoksa, yerel <strong>Philips</strong> bayisine<br />
başvurun.<br />
Garanti sınırlamaları<br />
Tıraş başlıkları (bıçaklar ve koruyucular) aşınmaya<br />
maruz kaldığından uluslararası garanti kapsamında<br />
değildir.<br />
Tıraş kremi kartuşu, tek kullanımlık bir parçadır ve<br />
uluslararası garanti koşulları kapsamında değildir.<br />
Sıkça sorulan sorular<br />
Bu bölümde tıraş makinesiyle ilgili en sık sorulan<br />
sorular bulunmaktadır. Sorunuzun cevabını burada<br />
bulamıyorsanız, ülkenizdeki Müşteri Hizmetleri<br />
Merkezine başvurun.
116 Türkçe<br />
Soru<br />
Tıraş ünitesi<br />
cildim üzerinde<br />
neden yumuşak<br />
bir şekilde<br />
hareket<br />
etmiyor?<br />
Tıraş makinesi<br />
neden eskisi gibi<br />
iyi tıraş etmiyor?<br />
Açma/kapama<br />
düğmesine<br />
bastığımda tıraş<br />
makinesi neden<br />
çalışmıyor?<br />
Cevap<br />
Yeterli miktarda tıraş kremi uygulamamış olabilirsiniz.<br />
Yeterli miktarda <strong>NIVEA</strong> <strong>FOR</strong> <strong>MEN</strong> tıraş kremi<br />
çıkana kadar tıraş kremi düğmesine basın. Bu sayede<br />
tıraş ünitesi cildinizde yumuşak bir şekilde hareket<br />
edecektir.<br />
Tıraş makinesini iyi temizlememiş olabilirsiniz. Tıraş<br />
makinesini iyice temizleyin (bkz. ‘Temizlik ve bakım’<br />
bölümü).<br />
Uzun kıllar tıraş başlıklarını engelleyebilir.<br />
Tıraş başlıklarını aşağıda anlatılan ekstra<br />
derinlemesine temizlik yöntemini uygulayarak<br />
temizleyin.<br />
Tıraş ünitesi yıpranmış veya hasar görünmüş olabilir.<br />
Tıraş ünitesini değiştirin (bkz.‘Değiştirme’ bölümü).<br />
Pil bitmiş olabilir. Pili şarj edin (bkz.‘Başlangıç’ bölümü).<br />
Kuruyan tıraş kremi, tıraş ünitesindeki tıraş başlıklarını<br />
tıkayabilir. Tıraşa devam etmeden önce tıraş<br />
makinesini iyice temizleyin (bkz. ‘Temizlik ve bakım’<br />
bölümü).<br />
Ekstra derinlemesine temizlikten sonra tıraş ünitesini<br />
düzgün bir şekilde monte etmemiş olabilirsiniz. Tıraş<br />
ünitesini monte ettiğinizde, her bir koruyucuyu yerine<br />
kilitlenene kadar saat yönünün tersine çevirdiğinizden<br />
emin olun.
Türkçe 117<br />
Soru<br />
Kartuşta yeterli<br />
miktarda krem<br />
olmasına<br />
rağmen<br />
deliklerden<br />
neden az<br />
miktarda tıraş<br />
kremi geliyor?<br />
Tıraş kremi<br />
düğmesine<br />
bastığımda<br />
deliklerden<br />
neden tıraş<br />
kremi gelmiyor?<br />
Tıraş makinesini<br />
düşürdüm ve<br />
tıraş ünitesi<br />
parçalarına<br />
ayrıldı. Tıraş<br />
ünitesini tekrar<br />
nasıl monte<br />
etmeliyim?<br />
Cevap<br />
Krem deliklerinden biri tıkanmış olabilir. Tıraş ünitesini<br />
yıkayın veya suda bekletin. Eğer bu yöntem işe<br />
yaramazsa, tıkanmış delikten krem çıkmaya başlayana<br />
kadar tıraş kremi kartuşuna tıraş kremi pompalayın.<br />
Eğer bu yöntem de işe yaramazsa, aşağıdaki yöntemi<br />
deneyin: 1) Tıraş makinesini kapayın 2) Tıraş ünitesini<br />
tıraş makinesinden çıkarın 3) Parmağınızı tıkanmamış<br />
delik üzerine yerleştirin 4) Tıraş makinesini çalıştırın<br />
5) Krem tıkanmış delikten tekrar çıkmaya başlayana<br />
kadar tıraş kremi düğmesine birkaç saniye basın.<br />
Tıraş başlıklarını orijinal yuvalarına yerleştirmemiş<br />
olabilirsiniz. Tıraş başlıklarının birinin ortasında<br />
tıraş kremi deliği yoktur ve özel bir yuvaya<br />
yerleştirilmesi gerekir. Krem deliği olmayan tıraş<br />
başlığını doğru yuvaya yerleştirdiğinizden emin olun.<br />
Bu, tıraş ünitesi tıraş makinesine takıldığında açma/<br />
kapama düğmesine en yakın olan yuvadır.<br />
Tıraş kremi kartuşu bitmek üzeredir. Tıraş kremi<br />
kartuşunu tekrar doldurun (bkz.‘Başlangıç’ bölümü).<br />
Kesicileri, kesici ayaklar yukarıya bakacak şekilde<br />
tıraş başlığı yuvalarına yerleştirin. Koruyucuları<br />
yuvaların üzerine yerleştirin (kesicilerin üzerinden)<br />
ve yerlerine sabitlenene kadar saat yönünün tersine<br />
çevirin. Koruyucuların birinin ortasında tıraş kremi<br />
deliği yoktur ve özel bir yuvaya takılması gerekir.<br />
Bu, tıraş ünitesi tıraş makinesine takıldığında açma/<br />
kapama düğmesine en yakın olan yuvadır. Kesiciler<br />
ve koruyucular karıştırılırlarsa, optimum tıraş<br />
performansına ulaşılması birkaç hafta sürebilir.
118 Türkçe<br />
Soru<br />
Tıraş makinesi<br />
neden aniden<br />
olağandışı bir<br />
ses yapmaya<br />
başladı?<br />
Cevap<br />
Muhtemelen, tıraş ünitesi doğru olarak monte<br />
edilmemiştir. Kesicileri, kesici ayakları yukarı bakacak<br />
şekilde tıraş başlığı yuvalarına yerleştirin. Koruyucuları<br />
yuvaların üzerine yerleştirin (kesicilerin üzerinden)<br />
ve yerlerine sabitlenene kadar saat yönünün tersine<br />
çevirin. Koruyucuların birinin ortasında tıraş kremi<br />
deliği yoktur ve özel bir yuvaya takılması gereklidir.<br />
Bu, tıraş ünitesi tıraş makinesine takıldığında açma/<br />
kapama düğmesine en yakın olan yuvadır. Kesiciler<br />
ve koruyucular karıştırılırlarsa, optimum tıraş<br />
performansına ulaşılması birkaç hafta sürebilir.<br />
Ekstra derinlemesine temizlik yöntemi<br />
Cihazın kapalı olduğundan emin olun.<br />
1 Tıraş ünitesini tıraş makinesinden çekip çıkarın.<br />
2 Koruyucuyu saat yönünde çevirin<br />
ve tıraş ünitesinden kaldırarak çıkarın.<br />
Dikkat: Her seferinde sadece bir tıraş başlığını çıkarın.<br />
Bu sayede, tıraş başlığını her zaman kendi orijinal<br />
yuvasına takabilirsiniz; iki tıraş başlığında da özel tıraş<br />
kremi delikleri bulunduğundan, bu gereklidir. Ayrıca,<br />
farklı tıraş başlıklarının kesicilerini ve koruyucularını<br />
karıştırmamış ve bu sayede tıraş performansını<br />
etkilememiş olursunuz.<br />
3 Gerekiyorsa, kesiciyi koruyucudan çıkarın.<br />
4 Birlikte verilen fırça ile kesiciyi ve koruyucuyu<br />
temizleyin.
Türkçe 119<br />
5 Temizledikten sonra, kesici ayakları yukarı<br />
bakacak şekilde kesiciyi tıraş ünitesine takın .<br />
6 Koruyucuyu tıraş başlığı yuvasının üzerine<br />
yerleştirin (kesicinin üzerinden).<br />
7 Koruyucuyu yerine sabitlenene kadar saat<br />
yönünün tersine çevirin.<br />
8 Tıraş ünitesini tekrar tıraş makinesine takın<br />
(‘klik’).
120<br />
UK<br />
Beiersdorf UK Ltd.,<br />
Birmingham B 37 7 YS<br />
Germany<br />
Beiersdorf<br />
Hamburg - Wien<br />
Spain<br />
BDF Nivea SA<br />
Avda. de la Industria, 31<br />
Tres Cantos - Madrid<br />
Beiersdorf (AG) Hamburg<br />
France<br />
Beiersdorf<br />
77176 Savigny le Temple - Hamburg<br />
Italy<br />
Beiersdorf<br />
Milano - Hamburg<br />
Netherlands<br />
Beiersdorf<br />
Amsterdam - Brussels - Hamburg<br />
Portugal<br />
Beiersdorf Portuguesa, Lda<br />
Queluz de Baixo - Beiersdorf AG Hamburg<br />
Turkey<br />
EBC Eczacibasi-Beiersdorf<br />
Kozmetik Ürünler Sanayi ve Ticaret A.S.<br />
34394 Levent-Istanbul Turkey<br />
4222.002.4769.6


