

Samsung 1.9 cu. ft. Over-the-Range Microwave (White) - SMH1926W/XAA - Installation Guide ver. 1.0 (ENGLISH,3.78 MB)
Samsung 1.9 cu. ft. Over-the-Range Microwave (White) - SMH1926W/XAA - Installation Guide ver. 1.0 (ENGLISH,3.78 MB)
Samsung 1.9 cu. ft. Over-the-Range Microwave (White) - SMH1926W/XAA - Installation Guide ver. 1.0 (ENGLISH,3.78 MB)

Create successful ePaper yourself
Turn your PDF publications into a flip-book with our unique Google optimized e-Paper software.
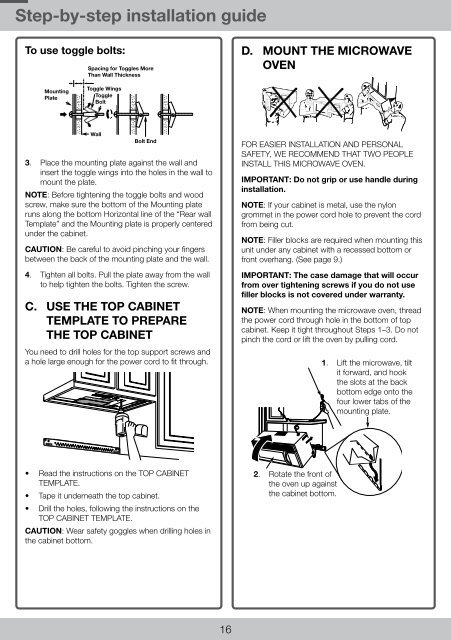
Step-by-step installation guide<br />
To use toggle bolts:<br />
Spacing for for Toggles Toggles More More<br />
Than Wall Thickness<br />
Toggle Wings<br />
Mounting<br />
Plate<br />
Toggle<br />
Bolt<br />
D. Mount <strong>the</strong> microwave<br />
oven<br />
Wall<br />
Bolt End<br />
3. Place <strong>the</strong> mounting plate against <strong>the</strong> wall and<br />
insert <strong>the</strong> toggle wings into <strong>the</strong> holes in <strong>the</strong> wall to<br />
mount <strong>the</strong> plate.<br />
NOTE: Before tightening <strong>the</strong> toggle bolts and wood<br />
screw, make sure <strong>the</strong> bottom of <strong>the</strong> Mounting plate<br />
runs along <strong>the</strong> bottom Horizontal line of <strong>the</strong> “Rear wall<br />
Template” and <strong>the</strong> Mounting plate is properly centered<br />
under <strong>the</strong> cabinet.<br />
CAUTION: Be careful to avoid pinching your fingers<br />
between <strong>the</strong> back of <strong>the</strong> mounting plate and <strong>the</strong> wall.<br />
4. Tighten all bolts. Pull <strong>the</strong> plate away from <strong>the</strong> wall<br />
to help tighten <strong>the</strong> bolts. Tighten <strong>the</strong> screw.<br />
C. Use <strong>the</strong> top cabinet<br />
template to prepare<br />
<strong>the</strong> top cabinet<br />
You need to drill holes for <strong>the</strong> top support screws and<br />
a hole large enough for <strong>the</strong> power cord to fit through.<br />
FOR EASIER INSTALLATION AND PERSONAL<br />
SAFETY, WE RECOMMEND THAT TWO PEOPLE<br />
INSTALL THIS MICROWAVE OVEN.<br />
IMPORTANT: Do not grip or use handle during<br />
installation.<br />
NOTE: If your cabinet is metal, use <strong>the</strong> nylon<br />
grommet in <strong>the</strong> power cord hole to prevent <strong>the</strong> cord<br />
from being <strong>cu</strong>t.<br />
NOTE: Filler blocks are required when mounting this<br />
unit under any cabinet with a recessed bottom or<br />
front o<strong>ver</strong>hang. (See page 9.)<br />
IMPORTANT: The case damage that will oc<strong>cu</strong>r<br />
from o<strong>ver</strong> tightening screws if you do not use<br />
filler blocks is not co<strong>ver</strong>ed under warranty.<br />
NOTE: When mounting <strong>the</strong> microwave oven, thread<br />
<strong>the</strong> power cord through hole in <strong>the</strong> bottom of top<br />
cabinet. Keep it tight throughout Steps 1–3. Do not<br />
pinch <strong>the</strong> cord or li<strong>ft</strong> <strong>the</strong> oven by pulling cord.<br />
1. Li<strong>ft</strong> <strong>the</strong> microwave, tilt<br />
it forward, and hook<br />
<strong>the</strong> slots at <strong>the</strong> back<br />
bottom edge onto <strong>the</strong><br />
four lower tabs of <strong>the</strong><br />
mounting plate.<br />
• Read <strong>the</strong> instructions on <strong>the</strong> TOP CABINET<br />
TEMPLATE.<br />
• Tape it underneath <strong>the</strong> top cabinet.<br />
• Drill <strong>the</strong> holes, following <strong>the</strong> instructions on <strong>the</strong><br />
TOP CABINET TEMPLATE.<br />
CAUTION: Wear safety goggles when drilling holes in<br />
<strong>the</strong> cabinet bottom.<br />
2. Rotate <strong>the</strong> front of<br />
<strong>the</strong> oven up against<br />
<strong>the</strong> cabinet bottom.<br />
16<br />
SMH1816_<strong>XAA</strong>-DE68-03943A-03-EN.indd 16<br />
2/4/2014 10:03:32 AM


