

Samsung PN50A650 - PN50A650T1FXZA - Quick Guide ver. 1.0 (ENGLISH, SPANISH,10.73 MB)
Samsung PN50A650 - PN50A650T1FXZA - Quick Guide ver. 1.0 (ENGLISH, SPANISH,10.73 MB)
Samsung PN50A650 - PN50A650T1FXZA - Quick Guide ver. 1.0 (ENGLISH, SPANISH,10.73 MB)

You also want an ePaper? Increase the reach of your titles
YUMPU automatically turns print PDFs into web optimized ePapers that Google loves.
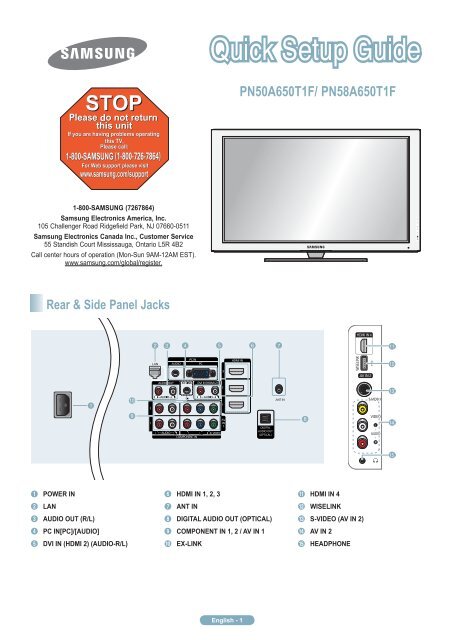
<strong>PN50A650</strong>T1F/ PN58A650T1F<br />
1-800-SAMSUNG (7267864)<br />
<strong>Samsung</strong> Electronics America, Inc.<br />
105 Challenger Road Ridgefield Park, NJ 07660-0511<br />
<strong>Samsung</strong> Electronics Canada Inc., Customer Service<br />
55 Standish Court Mississauga, Ontario L5R 4B2<br />
Call center hours of operation (Mon-Sun 9AM-12AM EST).<br />
www.samsung.com/global/register.<br />
Rear & Side Panel Jacks<br />
<br />
1 POWER IN<br />
2 LAN<br />
3 AUDIO OUT (R/L)<br />
4 PC IN[PC]/[AUDIO]<br />
5 DVI IN (HDMI 2) (AUDIO-R/L)<br />
6 HDMI IN 1, 2, 3<br />
7 ANT IN<br />
8 DIGITAL AUDIO OUT (OPTICAL)<br />
9 COMPONENT IN 1, 2 / AV IN 1<br />
0 EX-LINK<br />
! HDMI IN 4<br />
@ WISELINK<br />
# S-VIDEO (AV IN 2)<br />
$ AV IN 2<br />
% HEADPHONE<br />
English -
Remote Control Buttons<br />
You can use the remote control up to a distance of about 23 feet from the TV.<br />
1 POWER<br />
Turns the TV on and off.<br />
2 TV<br />
Selects the TV mode directly.<br />
3 NUMERIC BUTTONS<br />
Press to change the channel.<br />
4<br />
<br />
Press to select additional channels<br />
(digital and analog) being broadcast<br />
by the same station. For example,<br />
to select channel “54-3”, press “54”,<br />
then press “ ” and “3”.<br />
5 MUTE<br />
Press to temporarily cut off the<br />
sound.<br />
6 VOL<br />
Press to increase or decrease the<br />
volume.<br />
7 SOURCE<br />
Press to display and select the<br />
available video sources.<br />
8 CH LIST<br />
Used to display Channel Lists on the<br />
screen.<br />
9 TOOLS<br />
Use to quickly select frequently used<br />
functions.<br />
0 UP▲ / DOWN▼ / LEFT◄ /<br />
RIGHT► / ENTER<br />
Press the Up/Down/Left/Right<br />
sections of the wheel button and<br />
Enter to select on-screen menu<br />
items and change menu values.<br />
You can navigate up and down the<br />
menu, switch channels and adjust<br />
the volume by turning the wheel<br />
button. (See pages 18~19 of the<br />
owner's manual)<br />
! INFO<br />
Press to display information on the<br />
TV screen.<br />
@ COLOR BUTTONS<br />
Use these buttons in the Channel list<br />
and WISELINK, etc.<br />
# CC<br />
Controls the caption decoder.<br />
$ E.MODE<br />
Press to select the preset display<br />
and sound modes for sports, cinema<br />
and games.<br />
% Use these buttons in the DMA,<br />
WISELINK and Anynet+ modes.<br />
( : This remote can be used<br />
to control recording on <strong>Samsung</strong><br />
recorders with the Anynet+ feature)<br />
^ ON/OFF<br />
Press to backlight the buttons on the<br />
remote.<br />
This function is convenient for using<br />
at night or when the room is dark.<br />
(Using the remote control with the<br />
ON/OFF( ) light button set to On<br />
will reduce the battery usage time.)<br />
& PRE-CH<br />
Tunes to the previous channel.<br />
* CH<br />
Press to change channels.<br />
( MENU<br />
Displays the main on-screen menu.<br />
) W.LINK(WISELINK)<br />
This function enables you to view<br />
and play photo and music files from<br />
an external device. (Refer to pages<br />
71 (Photo) and 81 (Music) of the<br />
owner's manual)<br />
a RETURN<br />
Returns to the previous menu.<br />
b EXIT<br />
Press to exit the menu.<br />
c INFO.L<br />
Press to use the News, Stock<br />
Market and Weather Forecast<br />
information services available o<strong>ver</strong><br />
the network.<br />
(see page 95 of the owner's manual)<br />
d DMA (Digital Media Adapter)<br />
Use this when connecting a<br />
<strong>Samsung</strong> DMA device through an<br />
HDMI interface and switching to<br />
DMA mode.<br />
For more information on the<br />
operating procedures, refer to the<br />
user manual of the DMA.<br />
➢ This button is available when “<br />
Anynet+(HDMI-CEC)” is “On.<br />
(see page 99 of the owner's<br />
manual)<br />
e P.SIZE<br />
Picture size selection.<br />
f FAV.CH<br />
Press to switch to your favorite<br />
channels.<br />
Video Input Performance Comparison<br />
Audio Output Performance Comparison<br />
/ HDMI/DVI Best<br />
/ PC/COMPONENT Better<br />
OPTICAL (Digital)<br />
AUDIO (Analog)<br />
Best<br />
Normal<br />
S-VIDEO<br />
VIDEO<br />
Good<br />
Normal<br />
English -
Connecting a DVD Player or Cable Box /<br />
Satellite recei<strong>ver</strong> (Set-Top Box) via HDMI<br />
Connecting to HDMI (High Definition Multimedia Interface)<br />
DVD Player or Cable Box /<br />
Satellite recei<strong>ver</strong> (Set-Top Box)<br />
TV Rear Panel<br />
TV Side Panel<br />
<br />
Connect<br />
<br />
Press<br />
an HDMI Cable between<br />
the HDMI IN (1, 2, 3 or 4) jack on<br />
the TV and the HDMI jack on the<br />
DVD Player or Cable Box / Satellite<br />
recei<strong>ver</strong> (Set-Top Box).<br />
the SOURCE button on the<br />
remote control until you see the Set-<br />
Top Box signal (see “To Select the<br />
Source” on page 10).<br />
HDMI Cable (Not supplied)<br />
<br />
What is HDMI?<br />
• HDMI, or high-definition multimedia interface, is an interface that enables the transmission of digital audio and video<br />
signals using a single cable.<br />
• The difference between HDMI and DVI is that the HDMI device is smaller in size and has the HDCP (High Bandwidth<br />
Digital Copy Protection) coding feature installed.<br />
➢ Each DVD Player or Cable Box / Satellite recei<strong>ver</strong> (Set-Top Box) has a different back panel configuration.<br />
➢ The TV may not output sound and pictures may be displayed with abnormal color when DVD Player or Cable Box / Satellite<br />
recei<strong>ver</strong>s supporting HDMI <strong>ver</strong>sions older than 1.3 are connected. When connecting an older HDMI cable and there is no sound,<br />
connect the HDMI cable to the HDMI IN 2 jack and the audio cables to the DVI IN (HDMI2) [R-AUDIO-L] jacks on the back of<br />
the TV. If this happens, contact the company that provided the DVD Player or Cable Box / Satellite recei<strong>ver</strong> to confirm the HDMI<br />
<strong>ver</strong>sion, then request an upgrade.<br />
➢ HDMI cables that are not 1.3 may cause annoying flicker or no screen display.<br />
Connecting a DVD Player or Cable Box /<br />
Satellite recei<strong>ver</strong> (Set-Top Box) via DVI<br />
Connecting to DVI (Digital Visual Interface)<br />
DVD Player or Cable Box /<br />
Satellite recei<strong>ver</strong> (Set-Top Box)<br />
Audio Cable (Not supplied)<br />
TV Rear Panel<br />
2<br />
<br />
Connect<br />
<br />
Connect<br />
<br />
Press<br />
a HDMI/DVI Cable or DVI-<br />
HDMI Adapter between the HDMI<br />
IN 2 jack on the TV and the DVI jack<br />
on the DVD Player or Cable Box/<br />
Satellite recei<strong>ver</strong> (Set-Top Box).<br />
Audio Cables between the<br />
DVI IN (HDMI 2)<br />
[R-AUDIO-L] jack on the TV and the<br />
DVD Player or Cable Box / Satellite<br />
recei<strong>ver</strong> (Set-Top Box).<br />
the SOURCE button on the<br />
remote control until you see the Set-<br />
Top Box signal (see “To Select the<br />
Source” on page 10).<br />
HDMI/DVI Cable (Not supplied)<br />
<br />
➢ Each DVD Player or Cable Box / Satellite recei<strong>ver</strong> (Set-Top Box) has a different back panel configuration.<br />
➢ When connecting a DVD Player or Cable Box / Satellite recei<strong>ver</strong> (Set-Top Box), match the color of the connection terminal to the<br />
cable.<br />
➢ When using an HDMI / DVI cable connection, you must use the HDMI IN 2 jack.<br />
English - 3
Connecting a DVD Player or Cable Box /<br />
Satellite recei<strong>ver</strong> (Set-Top Box) via Component cables<br />
Connecting to Y, PB, PR<br />
DVD Player or Cable Box/<br />
Satellite recei<strong>ver</strong> (Set-Top Box)<br />
2<br />
<br />
Audio Cable (Not supplied)<br />
Component Cable (Not supplied)<br />
TV Rear Panel<br />
<br />
Connect<br />
<br />
Connect<br />
<br />
Press<br />
a Component Cable<br />
between the COMPONENT IN (1 or<br />
2) [Y, PB, PR] jacks on the TV and<br />
the COMPONENT [Y, PB, PR] jacks<br />
on the DVD Player or Cable Box /<br />
Satellite recei<strong>ver</strong>(Set-Top Box).<br />
Audio Cables between<br />
the COMPONENT IN (1 or 2) [R-<br />
AUDIO-L] jacks on the TV and the<br />
AUDIO OUT jacks on the DVD<br />
Player or Cable Box / Satellite<br />
recei<strong>ver</strong> (Set-Top Box).<br />
the SOURCE button on the<br />
remote control until you see the Set-<br />
Top Box signal. (see “To Select the<br />
Source” on page 10).<br />
➢ Component video separates the video into Y (Luminance (brightness), PB (Blue) and PR (Red) for enhanced video quality. Be sure<br />
to match the component video and audio connections. For example, if connecting a Component video cable to COMPONENT IN 1,<br />
connect the audio cable to COMPONENT IN 1 also.<br />
➢ Each DVD Player or Cable Box / Satellite recei<strong>ver</strong> (Set-Top Box) has a different back panel configuration.<br />
➢ When connecting a DVD Player or Cable Box / Satellite recei<strong>ver</strong> (Set-Top Box), match the color of the connection terminal to the<br />
cable.<br />
Connecting a Camcorder<br />
Camcorder<br />
or<br />
<br />
2<br />
S-Video Cable(Not supplied)<br />
Video Cable (Not supplied)<br />
Audio Cable (Not supplied)<br />
TV Side Panel<br />
<br />
Connect<br />
<br />
Connect<br />
<br />
Press<br />
a Video Cable<br />
(or S-Video Cable) between the AV<br />
IN 2 [VIDEO] (or S-VIDEO) jack on<br />
the TV and the VIDEO OUT jack on<br />
the Camcorder.<br />
Audio Cables between the<br />
AV IN 2 [L-AUDIO-R] jacks on the<br />
TV and the AUDIO OUT jacks on<br />
the Camcorder.<br />
the SOURCE button on the<br />
remote control until you see the<br />
Camcorder signal (see “To Select<br />
the Source” on page 10).<br />
➢ Each Camcorder has a different back<br />
panel configuration.<br />
➢ When connecting a Camcorder, match<br />
the color of the connection terminal to<br />
the cable.<br />
English - 4
Connecting a VCR<br />
Video Connection<br />
<br />
VCR Rear Panel<br />
2<br />
Audio Cable (Not supplied)<br />
S-Video Cable (Not supplied)<br />
Antenna Cable (Not supplied)<br />
TV Rear Panel<br />
TV Side Panel<br />
1<br />
2<br />
3<br />
Unplug the cable or antenna from<br />
the back of the TV.<br />
Connect the cable or antenna to the<br />
ANT IN terminal on the back of the<br />
VCR.<br />
Connect an Antenna Cable between<br />
the ANT OUT terminal on the VCR<br />
and the ANT IN terminal on the TV.<br />
Connect a Video Cable between the<br />
4 VIDEO OUT jack on the VCR and<br />
the AV IN 1 [Y/VIDEO] or AV IN 2<br />
[VIDEO] jack on the TV.<br />
5<br />
6<br />
Connect Audio Cables between the<br />
AUDIO OUT jacks on the VCR and<br />
the AV IN 1 (or AV IN 2)<br />
[R-AUDIO-L] jacks on the TV.<br />
Press the SOURCE button on the<br />
remote control until you see the<br />
VCR signal (see “To Select the<br />
Source” on page 10).<br />
➢ If you have a “mono” (non-stereo) VCR, use a Y-connector (not supplied) to connect to the right and left audio input jacks of the<br />
TV. Alternatively, connect the cable to the “R” jack. If your VCR is stereo, you must connect two cables.<br />
➢ Each VCR has a different back panel configuration.<br />
➢ When connecting a VCR, match the color of the connection terminal to the cable.<br />
➢ When connecting to AV IN 1, the color of the AV IN 1 [Y/VIDEO] jack (Green) does not match the color of the video cable (Yellow).<br />
S-Video Connection<br />
VCR Rear Panel<br />
2<br />
<br />
Antenna Cable (Not supplied)<br />
Audio Cable (Not supplied)<br />
S-Video Cable (Not supplied)<br />
TV Rear Panel<br />
TV Side Panel<br />
1<br />
2<br />
3<br />
4<br />
To begin, follow steps 1–3 in the<br />
previous section to connect the<br />
antenna or cable to your VCR and<br />
your TV.<br />
Connect an S-Video cable between<br />
the [S-VIDEO] jack on the TV and<br />
the S-VIDEO OUT jack on the VCR.<br />
Connect Audio Cables between the<br />
AUDIO OUT jacks on the VCR and<br />
the AV IN 2 [R-AUDIO-L] jacks on<br />
the TV.<br />
Press the SOURCE button on the<br />
remote control until you see the<br />
VCR signal (see “To Select the<br />
Source” on page 10).<br />
An S-Video cable may be included with your VCR. (If not, check your local electronics store.)<br />
➢ Each VCR has a different back panel configuration.<br />
➢ When connecting a VCR, match the color of the connection terminal to the cable.<br />
English - 5
➢<br />
➢<br />
➢<br />
Connecting a Digital Audio System<br />
Digital Audio System<br />
Optical Cable (Not supplied)<br />
TV Rear Panel<br />
<br />
<br />
Connect<br />
an Optical Cable<br />
between the DIGITAL AUDIO OUT<br />
(OPTICAL) jack on the TV and the<br />
Digital Audio Input (OPTICAL) jacks<br />
on the Digital Audio System.<br />
When a Digital Audio System is<br />
connected to the “DIGITAL AUDIO<br />
OUT (OPTICAL)” jack: Decrease<br />
the volume of the TV, and adjust<br />
the volume level with the system’s<br />
volume control.<br />
What is OPTICAL?<br />
• An optical cable con<strong>ver</strong>ts an<br />
electric signal into an optical<br />
light signal, and transmits it<br />
through glass fibers. S/PDIF is<br />
a transmission system of digital<br />
audio in the form of a light wave<br />
that uses a glass conductor.<br />
5.1CH audio is possible when the TV is connected to an external device supporting 5.1CH.<br />
Each Digital Audio System has a different back panel configuration.<br />
When the recei<strong>ver</strong> (home theater) is set to On, you can hear sound output from the TV’s Optical jack. When the TV is displaying a<br />
DTV(air) signal, the TV will send out 5.1 channel sound to the Home theater recei<strong>ver</strong>. When the source is a digital component such<br />
as a DVD and is connected to the TV via HDMI, only 2 channel sound will be heard from the Home Theater recei<strong>ver</strong>.<br />
If you want to hear 5.1 channel audio, connect the DIGITAL AUDIO OUT (OPTICAL) jack on the DVD player or Cable/Satellite Box<br />
directly to an Amplifier or Home Theater, not the TV.<br />
Connecting an Analog Amplifier / DVD Home Theater<br />
<br />
TV Rear Panel<br />
Audio Cable (Not supplied)<br />
Amplifier/<br />
DVD Home Theater<br />
<br />
Connect<br />
Audio Cables between the<br />
AUDIO OUT [R-AUDIO-L] jacks on<br />
the TV and AUDIO IN [L-AUDIO-R]<br />
jacks on the Amplifier/DVD Home<br />
Theater.<br />
When an audio amplifier is<br />
connected to the “AUDIO OUT<br />
[R-AUDIO-L]” jacks terminals:<br />
Decrease the volume of the TV,<br />
and adjust the volume level with the<br />
Amplifier’s volume control.<br />
➢ Each Amplifier / DVD Home<br />
Theater has a different back panel<br />
configuration.<br />
➢ When connecting an Amplifier / DVD<br />
Home Theater, match the color of the<br />
connection terminal to the cable.<br />
English - 6
Connecting a PC<br />
Using the D-Sub Cable<br />
PC<br />
TV Rear Panel<br />
Using the D-Sub Cable<br />
<br />
Connect a D-Sub Cable between<br />
PC IN [PC] jack on the TV and the<br />
PC output jack on your computer.<br />
Connect a PC Audio Cable between<br />
the PC IN [AUDIO] jack on the TV<br />
and the Audio Out jack of the sound<br />
card on your computer.<br />
PC Audio Cable (Not supplied)<br />
D-Sub Cable (Not supplied)<br />
2 <br />
Using the HDMI/DVI Cable<br />
PC<br />
TV Rear Panel<br />
Using the HDMI/DVI Cable<br />
<br />
Connect a HDMI/DVI cable between<br />
the HDMI IN 2 jack on the TV<br />
and the PC output jack on your<br />
computer.<br />
Connect a 3.5 mm Stereo plug to<br />
2RCA cable between the DVI IN<br />
(HDMI2) [R-AUDIO-L] jack on the<br />
TV and the Audio Out jack of the<br />
sound card on your computer.<br />
3.5 mm Stereo plug to RCA Cable (Not supplied)<br />
HDMI/DVI Cable (Not supplied)<br />
2<br />
<br />
➢ Each PC has a different back panel configuration.<br />
➢ When connecting a PC, match the color of the connection terminal to the cable.<br />
➢ When using an HDMI/DVI cable connection, you must use the HDMI IN 2 terminal.<br />
English - 7
Turning the TV On and Off<br />
Press the POWER button on the remote control.<br />
You can also use the POWER button on the TV.<br />
➢ It may take a while for the picture to appear.<br />
Viewing the Displays and Menus<br />
Viewing the Display<br />
<br />
Press<br />
the INFO button on the remote control.<br />
The TV will display the channel, the type of sound,<br />
and the status of certain picture and sound settings.<br />
TV #1<br />
DTV Air Dolby Digital<br />
13-1<br />
Wed, Jan 2 12:28am<br />
M. Spillane’s Mike Hammer<br />
Bonocrunch<br />
11:36 pm - 12:42 am<br />
480i 4:3 English<br />
Memorizing the Channels<br />
Your TV can memorize and store RETURN all of the available channels<br />
for both air and cable channels. After the available channels<br />
RETURN<br />
are memorized, use the CH<br />
EXIT or CH button to scan<br />
W.LINK<br />
through the channels. This eliminates the need to change<br />
EXIT CH LIST<br />
INFO<br />
channels by entering W.LINK the channel digits. There are three<br />
steps for memorizing CH LIST channels: TOOLS selecting a broadcast source,<br />
INFO<br />
memorizing the channels (automatic) and adding and deleting<br />
TOOLS<br />
channels (Channel Lists).<br />
Storing Channels in Memory<br />
(Automatic Method)<br />
Before your television can begin memorizing the available<br />
channels, you must specify the type of signal source that is<br />
connected to the TV (i.e. an Air or a Cable system).<br />
<br />
Press<br />
the MENU button to display the menu.<br />
Press the ▲ or ▼ button to select Channel, then<br />
press the ENTER button.<br />
Antenna<br />
: Air<br />
Channel<br />
Auto Program<br />
Clear Scrambled Channel<br />
Channel List<br />
Fine Tune<br />
Signal Strength<br />
►<br />
Viewing the Menus<br />
<br />
With<br />
the power on, press the MENU button.<br />
The main menu appears on the screen. The menu’s<br />
left side has icons: Picture, Sound, Channel,<br />
Setup, Input, Application.<br />
<br />
Press<br />
the ▲ or ▼ button to select Auto Program,<br />
then press the ENTER button.<br />
Auto Program<br />
Select the Antenna source to memorize.<br />
Air<br />
Cable<br />
Auto<br />
Start<br />
Start<br />
Start<br />
Move<br />
Enter<br />
Return<br />
<br />
Press<br />
<br />
Press<br />
Picture<br />
Mode<br />
Cell Light : 7<br />
Contrast : 80<br />
Brightness : 45<br />
Sharpness : 50<br />
Color : 50<br />
Tint (G/R)<br />
Detailed Settings<br />
the ▲ or ▼ button to select one of the icons.<br />
Then press the ENTER button to access the icon’s<br />
sub-menu.<br />
➢ To move to a lower menu, turn the wheel<br />
clockwise when the menu Display is on the<br />
screen. To move to a higher menu, turn the<br />
wheel counterclockwise.<br />
the EXIT button to exit.<br />
: Standard<br />
: G50/R50<br />
➢ It takes about one minute until the on-screen<br />
menu disappears.<br />
English - <br />
<br />
Press<br />
the ▲ or ▼ button to select an antenna<br />
connection, then press the ENTER button.<br />
➢ Air: Air antenna signal.<br />
Cable: Cable antenna signal.<br />
Auto: Air and Cable antenna signals.<br />
Auto Program<br />
Select the cable system.<br />
Analog STD HRC<br />
Digital<br />
STD<br />
HRC<br />
Start<br />
Move Enter<br />
IRC<br />
IRC<br />
Return
When<br />
<br />
The<br />
selecting the Cable TV system:<br />
Press the ENTER button to start the auto program.<br />
Press the ◄ or ► to select the correct analog signal<br />
cable system source among STD, HRC, and IRC,<br />
then press the ENTER button. If you have Digital<br />
cable TV, select the cable system signal source for<br />
both Analog and Digital.<br />
➢ STD, HRC, and IRC identify various types of<br />
cable TV systems. Contact your local cable<br />
company to identify the type of cable system<br />
that exists in your particular area. At this point<br />
the signal source has been selected.<br />
Auto Program<br />
Auto Program in Progress.<br />
DTV Air : 5 Air : 4<br />
DTV Cable : -- Cable : --<br />
Stop<br />
Enter<br />
Cable 3<br />
3%<br />
Return<br />
TV begins memorizing all available stations.<br />
➢ After all the available channels are stored, it<br />
starts to remove scrambled channels. The Auto<br />
program menu then reappears.<br />
➢ If you want to stop Auto Programming, press<br />
the ENTER button. The Stop Auto Program?<br />
message will be displayed. Select Yes by<br />
pressing the ◄ or ► button, then press the<br />
ENTER button.<br />
Changing the Picture Standard<br />
You can select the type of picture which best corresponds to<br />
your viewing requirements.<br />
<br />
Press<br />
<br />
Press<br />
the MENU button to display the menu.<br />
Press the ENTER button to select Picture.<br />
Picture Picture<br />
Mode : Standard ►<br />
Cell Light : 7<br />
Contrast : 80<br />
Brightness : 45<br />
Sharpness : 50<br />
Color : 50<br />
Tint (G/R)<br />
: G50/R50<br />
Detailed Settings<br />
the ENTER button to select Mode.<br />
Press the ▲ or ▼ button to select Dynamic,<br />
Standard, or Movie.<br />
Press the ENTER button.<br />
Mode : Dynamic<br />
Cell Light : 7Standard<br />
Contrast : 80 Movie<br />
Brightness : 45<br />
Sharpness : 50<br />
Color : 50<br />
Tint (G/R)<br />
: G50/R50<br />
Detailed Settings<br />
Press the EXIT button to exit.<br />
Auto Program<br />
Auto Program is completed.<br />
56 channels are memorized.<br />
DTV Air : 20 Air : 11<br />
DTV Cable : 15 Cable : 10<br />
OK<br />
Enter<br />
Return<br />
● Dynamic: Select the picture for high-definition in<br />
a bright room.<br />
● Standard: Select the picture for the optimum<br />
display in the normal environment.<br />
● Movie: Select the picture for viewing movies in a<br />
dark room.<br />
<br />
Press<br />
the EXIT button to exit.<br />
English -
To Select the Source<br />
Use to select TV or other external input sources such as<br />
DVD players or Cable Box/Satellite recei<strong>ver</strong>s (Set-Top Box)<br />
connected to the TV. Use to select the input source of your<br />
choice.<br />
<br />
Press<br />
the MENU button to display the menu.<br />
Press the ▲ or ▼ button to select Input, then press<br />
the ENTER button.<br />
Input<br />
Source List<br />
Edit Name<br />
<br />
Press<br />
the ENTER button to select Source List.<br />
Press the ▲ or ▼ button to select the signal source,<br />
then press the ENTER button.<br />
TV<br />
AV1 ----<br />
AV2 ----<br />
S-Video ----<br />
Component1 ----<br />
Component2 ----<br />
PC ----<br />
Refresh<br />
TOOLS Option<br />
➢ Available signal sources: TV, AV1, AV2,<br />
S-Video, Component1, Component2, PC,<br />
HDMI1, HDMI2/DVI, HDMI3, HDMI4, USB.<br />
➢ You can choose only those external devices<br />
that are connected to the TV. In the Source<br />
List, connected inputs will be highlighted and<br />
sorted to the top.<br />
Inputs that are not connected will be sorted to<br />
the bottom.<br />
English - 10
Troubleshooting<br />
If the TV seems to have a problem, first try this list of possible problems and solutions.<br />
If none of these troubleshooting tips apply, call your nearest <strong>Samsung</strong> service center.<br />
Problem<br />
Poor picture quality.<br />
Poor sound quality.<br />
No picture or sound.<br />
No sound or sound is too low at<br />
maximum volume.<br />
Picture rolls <strong>ver</strong>tically.<br />
The TV operates erratically.<br />
The TV won’t turn on.<br />
Remote control malfunctions<br />
Digital broadcasting screen problem.<br />
The image is too light or too dark.<br />
The image is too large or too small.<br />
The visual qualities of digital<br />
channels vary.<br />
Screen is black and power indicator<br />
light blinks steadily.<br />
Although the TV caption shows HD,<br />
the visual quality is not satisfactory.<br />
The distorted picture appears in the<br />
corner of the screen.<br />
A strange sound is heard.<br />
Pixels are visible on the screen.<br />
A distorted picture appears in the<br />
corner of the screen.<br />
This Plasma panel uses a panel<br />
consisting of sub pixels (6,220,800)<br />
which require sophisticated<br />
technology to produce.<br />
Try another channel.<br />
Adjust the antenna.<br />
Check all wire connections.<br />
Try another channel.<br />
Adjust the antenna.<br />
Try another channel.<br />
Press the SOURCE button.<br />
Make sure the TV is plugged in.<br />
Check the antenna connections.<br />
Make sure the MUTE button is off.<br />
Possible Solution<br />
First, check the volume of units connected to your TV (digital broadcasting recei<strong>ver</strong>,<br />
DVD, cable broadcasting recei<strong>ver</strong>, VCR, etc.). Then, adjust the TV volume accordingly.<br />
Check all connections.<br />
Unplug the TV for 30 seconds, then try operating it again.<br />
Make sure the wall outlet is working.<br />
Replace the remote control batteries.<br />
Clean the upper edge of the remote control (transmission window).<br />
Check the battery terminals.<br />
Press the TV button to put your remote control in the TV mode.<br />
Make sure the remote has batteries.<br />
Check that the “+” and “-” ends of the batteries are inserted correctly.<br />
Please check the digital signal strength and input antenna.<br />
Adjust the Brightness and Contrast.<br />
Adjust the Fine tuning.<br />
Adjust the Size settings.<br />
The visual qualities of digital channels may vary depending on the original production<br />
method (analog or digital).<br />
- If the original production method is digital: High visual quality.<br />
- If the original production method is analog: The digital program displayed on the<br />
screen is originally an analog program which has been con<strong>ver</strong>ted to digital.<br />
The visual quality is of an SD(Standard Definition) grade.<br />
On your computer; check the Power and Signal Cable.<br />
The TV is using its power management system.<br />
Move the computer’s mouse or press any key on the keyboard.<br />
On your equipment check (STB, DVD, etc) ; Power and Signal Cable.<br />
The TV is using its power management system.<br />
Press the Source button on the panel or remote control.<br />
Turn the TV off and on.<br />
The HD(High Definition) caption that appears when switching channels or when<br />
pressing the Information button on the remote control means the selected channel is<br />
a digital channel. If the broadcasting station con<strong>ver</strong>ts an analog signal into digital and<br />
transmits the signal, the visual quality may not be perfect.<br />
If Just Scan is selected in some external devices, a distorted picture may appear in<br />
the corner of the screen. This symptom is caused by external devices, not the TV.<br />
This is caused by minor systems operation and is not a defect.<br />
There may be few bright or dark pixels on the screen.<br />
These pixels will have no impact on the performance of the product.<br />
This appears when you press and hold the EXIT button for a while. The product<br />
settings are reset to the factory defaults.<br />
Howe<strong>ver</strong>, there may be few bright or dark pixels on the screen. These pixels will have<br />
no impact on the performance of the product.<br />
English - 11
Contact SAMSUNG WORLD-WIDE<br />
If you have any questions or comments relating to <strong>Samsung</strong> products, please contact the SAMSUNG customer care center.<br />
Country Customer Care Center Web Site Address<br />
CANADA 1-800-SAMSUNG (7267864) www.samsung.com/ca<br />
<strong>Samsung</strong> Electronics Canada Inc., Customer Service<br />
55 Standish Court Mississauga, Ontario L5R 4B2<br />
Canada<br />
<strong>Samsung</strong> Electronique Canada Inc., Service à la Clientèle<br />
55 Standish Court Mississauga, Ontario L5R 4B2<br />
Canada<br />
U.S.A 1-800-SAMSUNG (7267864) www.samsung.com<br />
<strong>Samsung</strong> Electronics America, Inc.<br />
105 Challenger Road<br />
Ridgefield Park, NJ 07660-0511
<strong>PN50A650</strong>T1F/ PN58A650T1F<br />
1-800-SAMSUNG (7267864)<br />
<strong>Samsung</strong> Electronics America, Inc.<br />
105 Challenger Road Ridgefield Park (New Jersey)<br />
07660-0511<br />
<strong>Samsung</strong> Electronics Canada Inc., Customer Service<br />
55 Standish Court Mississauga (Ontario) L5R 4B2<br />
Centre d’appel – heures de service (du lundi au dimanche,<br />
de 9 h à 12 h (HNE))<br />
www.samsung.com/global/register.<br />
Prises du panneau arrière et latéral<br />
<br />
1 ENTRÉE DE L’ALIMENTATION<br />
2 LAN<br />
3 AUDIO OUT (R/L)<br />
4 PC IN[PC]/[AUDIO]<br />
5 DVI IN (HDMI 2) (AUDIO-R/L)<br />
6 HDMI IN 1, 2, 3<br />
7 ANT IN<br />
8 DIGITAL AUDIO OUT (OPTICAL)<br />
9 COMPONENT IN 1, 2 / AV IN 1<br />
0 EX-LINK<br />
! HDMI IN 4<br />
@ WISELINK<br />
# S-VIDEO (AV IN 2)<br />
$ AV IN 2<br />
% ÉCOUTEURS<br />
Français -
Touches de la télécommande<br />
La télécommande peut être utilisée jusqu’à une distance d’environ 7 mètres (23 pieds) du téléviseur.<br />
W.LINK<br />
CH LIST<br />
W.LINK<br />
CH LIST<br />
W.LINK<br />
CH LIST<br />
1 POWER<br />
Permet d’allumer et d’éteindre le<br />
téléviseur.<br />
2 TV<br />
Pour sélectionner directement le mode<br />
RETURN TV.<br />
3 TOUCHES NUMÉRIQUES<br />
Sélectionner directement un canal.<br />
EXIT<br />
4<br />
INFO<br />
TOOLS<br />
RETURN<br />
EXIT<br />
Appuyer sur cette touche pour<br />
choisir des canaux supplémentaires<br />
(numériques et analogiques) diffusés<br />
par la même station. Par exemple, pour<br />
choisir le canal “54-3”, appuyer sur “54”,<br />
puis sur - et sur<br />
“ ” et “3”.<br />
INFO<br />
5 MUTE<br />
RETURN<br />
TOOLS Couper le son temporairement.<br />
RETURN<br />
6 VOL EXIT<br />
W.LINK<br />
Augmenter ou diminuer le volume.<br />
EXIT CH LIST<br />
INFO<br />
7 SOURCE<br />
Appuyer TOOLS sur cette touche pour afficher<br />
INFO<br />
et choisir les sources vidéo accessibles.<br />
TOOLS<br />
8 CH LIST<br />
Afficher la liste des canaux à l’écran.<br />
9 TOOLS<br />
Permettent de sélectionner les fonctions<br />
fréquemment utilisées.<br />
0 HAUT▲ / BAS▼ / GAUCHE◄ /<br />
DROITE► / ENTER<br />
Appuyer sur la partie supérieure,<br />
inférieure, gauche ou droite de la touche<br />
circulaire, puis sur Enter pour choisir<br />
des commandes de menu à l’écran<br />
et modifier des valeurs. Il est possible<br />
de parcourir le menu <strong>ver</strong>s le haut et le<br />
bas, de changer de canal et de régler le<br />
volume en tournant la touche circulaire.<br />
(Consulter les pages 18 et 19)<br />
Pendant l’utilisation des fonctions<br />
MENU, TOOLS et WISELINK, la<br />
touche fonction circulaire lance le<br />
mode d’économie d’énergie si au repos<br />
pendant plus de 20 secondes.Appuyer<br />
sur la touche circulaire pour désacti<strong>ver</strong><br />
le mode d’économie d’énergie.<br />
! INFO<br />
<br />
Appuyer sur cette touche pour afficher<br />
de l’information à l’écran.<br />
@ TOUCHES DE COULEUR<br />
Utiliser ces touches à partir de la liste<br />
des canaux, WISELINK, etc.<br />
# CC<br />
Permet de commander la fonction de<br />
sous-titrage.<br />
$ E.MODE<br />
Appuyer pour sélectionner l’affichage<br />
préréglé et les modes sonores pour les<br />
sports, le cinéma et les jeux.<br />
% Utiliser ces touches en modes DMA,<br />
WISELINK et Anynet+.<br />
( : Cette télécommande peut servir<br />
à commander l’enregistrement des<br />
enregistreurs DVD <strong>Samsung</strong> avec la<br />
fonction Anynet+)<br />
^ MARCHE/ARRÊT<br />
Appuyer sur cette touche afin de<br />
rétroéclairer les touches de la<br />
télécommande.<br />
Cette fonction est pratique le soir ou<br />
lorsque la pièce est sombre.<br />
(L’utilisation de la télécommande alors<br />
que la touche d’éclairage ON/OFF (<br />
) est réglée à On réduit le temps<br />
d’utilisation des piles.)<br />
& PRE-CH<br />
Permet d’écouter le canal précédent.<br />
* CH<br />
Permettent de changer de canal.<br />
( MENU<br />
Afficher le menu à l'écran principal.<br />
) W.LINK (WISELINK)<br />
Cette fonction permet de visualiser<br />
des photographies et d'écouter de la<br />
musique depuis un dispositif externe.<br />
Voir pages 71 (photo) et 81 (musique).<br />
a RETURN<br />
Retourner au menu précédent.<br />
b EXIT<br />
Permet de sortir du menu.<br />
c INFO.L<br />
Appuyer sur cette touche pour accéder<br />
aux services des nouvelles, des<br />
prévisions météorologiques et des cotes<br />
boursières sur le réseau. (Voir la page<br />
97)<br />
d DMA (Digital Media Adapter) Utiliser<br />
cette fonction lorsqu’un appareil<br />
<strong>Samsung</strong> DMA est branché à une<br />
interface HDMI ou lorsque le téléviseur<br />
est en mode DMA.<br />
Pour plus de renseignements sur les<br />
procédures d’utilisation, se reporter au<br />
guide de l’utilisateur du dispositif DMA.<br />
➢ Cette touche est accessible lorsque<br />
“Anynet+(HDMI-CEC” est “activé”.<br />
(Voir page 102)<br />
e P.SIZE<br />
Permet de sélectionner la taille d'image.<br />
f FAV.CH<br />
Naviguer entre les canaux favoris.<br />
Entrée vidéo – tableau comparatif des Performances<br />
Sortie audio – tableau comparatif des performances<br />
/ HDMI/DVI La meilleure<br />
/ PC/COMPONENT Excellente<br />
OPTICAL (Digital)<br />
AUDIO (Analog)<br />
La meilleure<br />
Normale<br />
S-VIDEO<br />
VIDEO<br />
Bonne<br />
Normale<br />
Français -
Branchementd’unlecteurDVDoud'uncâblosélecteurou<br />
récepteur (décodeur) à l’aide d’un câble HDMI<br />
Raccordement aux prises HDMI (High Definition Multimedia Interface)<br />
Lecteur DVD ou câblosélecteur/<br />
Récepteur (décodeur)<br />
Panneau arrière du téléviseur<br />
Panneau latéral du<br />
téléviseur<br />
<br />
Brancher<br />
<br />
Appuyer<br />
un câble HDMI entre la<br />
prise d'entrée HDMI IN (1, 2, 3 ou<br />
4) du téléviseur et la prise HDMI du<br />
lecteur DVD ou du câblosélecteur<br />
ou récepteur (décodeur).<br />
sur la touche SOURCE<br />
de la télécommande jusqu’à ce<br />
que le signal du récepteur satellite<br />
apparaisse (voir “Pour choisir la<br />
source” à la page 10).<br />
Câble HDMI (non fourni)<br />
<br />
Qu’est-ce que la HDMI?<br />
• La HDMI est une interface multimédia à haute définition qui permet la transmission de signaux numériques audio et vidéo à l’aide d’<br />
un seul câble.<br />
• La différence entre les interfaces HDMI et DVI réside dans le fait que la HDMI est de plus petites dimensions, qu’elle est dotée du<br />
composant de codage HDCP (protection contre la copie numérique à large bande passante).<br />
➢ La configuration du panneau arrière de chaque lecteur DVD ou câblosélecteur ou récepteur (décodeur) est différente.<br />
➢ Le téléviseur peut ne pas émettre de son ou afficher des images de couleur anormale lorsqu’est branché un lecteur DVD ou un<br />
câblosélecteur ou récepteur prenant en charge des <strong>ver</strong>sions HDMI antérieures à la <strong>ver</strong>sion 1.3. Si l’on branche un câble HDMI d’<br />
une <strong>ver</strong>sion antérieure et qu’il n’y a pas de son, il faut brancher le câble HDMI à la prise d’entrée HDMI IN 2 et les câbles audio<br />
aux prises DVI IN (HDMI 2) [R-AUDIO-L] sur le panneau arrière du téléviseur. Si cela se produit, communiquer avec le fournisseur<br />
du lecteur DVD ou du câblosélecteur ou récepteur afin de confirmer la <strong>ver</strong>sion HDMI, puis demander une mise à niveau.<br />
➢ Si les câbles HDMI ne sont pas compatibles avec la <strong>ver</strong>sion 1.3, il peut y avoir des scintillements désagréables à l’écran ou il n’y<br />
a pas d’image.<br />
Branchementd’unlecteurDVD,câblosélecteurourécepteur<br />
(décodeur) à l’aide d’un câble DVI<br />
Connexion à l'entrée d'interface vidéo numérique (DVI)<br />
Lecteur DVD ou câblosélecteur/<br />
Récepteur (décodeur)<br />
CâbleAudio (non fourni)<br />
Câble HDMI/DVI(non fourni)<br />
Panneau arrière du téléviseur<br />
2<br />
<br />
<br />
Brancher<br />
<br />
Brancher<br />
<br />
Appuyer<br />
un câble de raccordement<br />
HDMI/DVI ou un adaptateur DVI-<br />
HDMI entre la prise d'entrée HDMI<br />
IN 2 du téléviseur et la prise DVI<br />
du lecteur DVD, câblosélecteur ou<br />
récepteur (décodeur).<br />
les câbles audio entre<br />
la prise d’entrée DVI IN (HDMI 2)<br />
[R-AUDIO-L] du téléviseur et les<br />
prises de sortie AUDIO OUT du<br />
lecteur DVD ou du câblosélecteur<br />
ou récepteur (décodeur).<br />
sur la touche SOURCE<br />
de la télécommande jusqu’à ce<br />
que le signal du récepteur satellite<br />
apparaisse (voir “Pour choisir la<br />
source” à la page 10).<br />
➢ La configuration du panneau arrière de chaque lecteur DVD ou câblosélecteur ou récepteur (décodeur) est différente.<br />
➢ Au moment de brancher un lecteur DVD ou câblosélecteur ou récepteur (décodeur), les couleurs du câble et de la borne de<br />
raccordement doivent correspondre.<br />
➢ Dans le cas d’une connexion de câble HDMI/DVI, il faut utiliser la prise d'entrée HDMI IN 2.<br />
Français - 3
Branchementd’unlecteurDVD,câblosélecteurourécepteur(décodeur)àl’<br />
aide de câbles de composant<br />
BranchementàY,PB,PR<br />
Lecteur DVD ou câblosélecteur/<br />
Récepteur (décodeur)<br />
2<br />
<br />
CâbleAudio (non fourni)<br />
Câble de composant(non fourni)<br />
Panneau arrière du téléviseur<br />
<br />
Brancher<br />
<br />
Brancher<br />
<br />
Appuyer<br />
un câble de composant<br />
entre les prises d'entrée<br />
COMPONENT IN (1 ou 2) [Y, PB,<br />
PR] du téléviseur et les prises<br />
COMPONENT [Y, PB, PR] du<br />
lecteur DVD ou du câblosélecteur<br />
ou récepteur (décodeur).<br />
les câbles audio entre la<br />
prise d’entrée COMPONENT IN (1<br />
ou 2) [R-AUDIO-L] du téléviseur et<br />
les prises de sortie AUDIO OUT du<br />
lecteur DVD ou du câblosélecteur<br />
ou récepteur (décodeur).<br />
sur la touche SOURCE<br />
de la télécommande jusqu’à ce<br />
que le signal du récepteur satellite<br />
apparaisse (voir “Pour choisir la<br />
source” à la page 10).<br />
➢ Le composant vidéo sépare le vidéo en Y (luminance (luminosité)), PB (bleu) et PR (rouge) pour une qualité d'image supérieure.<br />
S'assurer que les branchements audio et vidéo correspondent. Par exemple, si un câble vidéo Composante est branché à la prise d’<br />
entrée COMPONENT IN 1, le câble audio doit être branché à la prise d’entrée COMPONENT IN 1 également.<br />
➢ La configuration du panneau arrière de chaque lecteur DVD ou câblosélecteur ou récepteur (décodeur) est différente.<br />
➢ Au moment de brancher un lecteur DVD ou câblosélecteur ou récepteur (décodeur), les couleurs du câble et de la borne de<br />
raccordement doivent correspondre.<br />
Branchementd’uncaméscope<br />
Caméscope<br />
ou<br />
<br />
2<br />
Panneau latéral du téléviseur<br />
Câble S-Vidéo (non fourni)<br />
Câble vidéo (non fourni)<br />
CâbleAudio (non fourni)<br />
<br />
Raccorder<br />
<br />
Raccorder<br />
<br />
Appuyer<br />
un câble vidéo (ou S-<br />
Vidéo) entre la prise d'entrée vidéo<br />
AV IN 2 [VIDEO] (ou S-VIDEO)<br />
du téléviseur et la prise de sortie<br />
VIDEO OUT du caméscope.<br />
les câbles audio entre les<br />
prises d'entrée AV IN 2 [L-AUDIO-R]<br />
du téléviseur et les prises de sortie<br />
AUDIO OUT du caméscope.<br />
sur la touche SOURCE de<br />
la télécommande jusqu’à ce que le<br />
signal du Caméscopes apparaisse<br />
(voir “Pour choisir la source” à la<br />
page 10).<br />
➢ Chaque caméscope possède une<br />
configuration de panneau arrière<br />
différente.<br />
➢ Lors du branchement d'un caméscope,<br />
les couleurs du câble et de la borne<br />
de branchement doivent correspondre.<br />
Français - 4
Branchementd’unmagnétoscope<br />
BranchementVidéo<br />
Panneau arrière du<br />
magnétoscope<br />
2<br />
Câble audio<br />
(non fourni)<br />
Câble vidéo (non fourni)<br />
Câble d’antenne (non fourni)<br />
Panneau arrière du téléviseur<br />
Panneau latéral du<br />
téléviseur<br />
1<br />
2<br />
3<br />
Débrancher le câble ou l’antenne à<br />
l’arrière du téléviseur.<br />
Brancher le câble ou l’antenne<br />
à l'entrée ANT IN à l’arrière du<br />
magnétoscope.<br />
Reliez au moyen d’un câble<br />
d’antenne la borne ANT OUT du<br />
magnétoscope et la borne ANT IN<br />
du téléviseur.<br />
Relier au moyen d’un câble<br />
4 vidéo la prise de sortie vidéo du<br />
magnétoscope et la prise AV IN 1<br />
[Y/VIDEO] ou AV IN 2 [VIDÉO] du<br />
téléviseur.<br />
5<br />
6<br />
Raccorder les câbles audio<br />
entre les sorties AUDIO OUT du<br />
magnétoscope et les entrées AV<br />
IN 1(ou AV IN 2) [R-AUDIO-L] du<br />
téléviseur.<br />
Appuyer sur la touche SOURCE de<br />
la télécommande jusqu’à ce que le<br />
signal du magnétoscope apparaisse<br />
(voir “Pour choisir la source” à la<br />
page 10).<br />
➢ Si le magnétoscope est un modèle “mono” (non stéréo), relier les prises d’entrée audio droite et gauche du téléviseur au moyen<br />
d’un connecteur en Y (non fourni). Il est également possible de brancher le câble à la prise “R”. Si le magnétoscope fonctionne en<br />
stéréo, deux câbles distincts doivent être branchés.<br />
➢ Le panneau arrière de chaque magnétoscope est différent.<br />
➢ Lors du branchement d’un magnétoscope, les couleurs du câble et de la borne de branchement doivent correspondre.<br />
➢ La couleur de la prise d’entrée AV IN 1 [Y/VIDEO] (<strong>ver</strong>t) ne correspond pas à la couleur du câble vidéo (jaune).<br />
BranchementS-Vidéo<br />
Panneau arrière du<br />
magnétoscope<br />
2<br />
<br />
Câble d’antenne (non fourni)<br />
Câble audio (non fourni)<br />
Câble S-Vidéo (non fourni)<br />
Panneau arrière du téléviseur<br />
Panneau latéral du<br />
téléviseur<br />
1<br />
2<br />
3<br />
4<br />
Pour commencer, suivre les étapes<br />
1 à 3 de la section précédente pour<br />
brancher l’antenne ou le câble au<br />
magnétoscope et au téléviseur.<br />
Raccorder un câble S-vidéo<br />
entre la sortie S-VIDEO OUT du<br />
magnétoscope et l'entrée AV IN 2<br />
[S-VIDEO] du téléviseur.<br />
Raccorder les câbles audio<br />
entre les sorties AUDIO OUT du<br />
magnétoscope et les entrées AV IN<br />
2 [R-AUDIO-L] du téléviseur.<br />
Appuyer sur la touche SOURCE de<br />
la télécommande jusqu’à ce que le<br />
signal du magnétoscope apparaisse<br />
(voir “Pour choisir la source” à la<br />
page 10).<br />
Le magnétoscope peut être doté d'une prise S-Vidéo. (Sinon, se procurer les câbles nécessaire dans un magasin d'électronique.)<br />
➢ Le panneau arrière de chaque magnétoscope est différent.<br />
➢ Lors du branchement d’un magnétoscope, les couleurs du câble et de la borne de branchement doivent correspondre.<br />
Français - 5
Branchementd’unsystèmeaudionumérique<br />
Système<br />
audionumérique<br />
Câble optique (non fourni)<br />
Panneau arrière du téléviseur<br />
<br />
<br />
Brancher<br />
un câble optique entre les<br />
prises de sortie numérique optique<br />
DIGITAL AUDIO OUT (OPTICAL)<br />
du téléviseur et les prises d'entrée<br />
audionumérique du système<br />
audionumérique.<br />
Lorsqu'un système audionumérique<br />
est branché à la prise “DIGITAL<br />
AUDIO OUT (OPTICAL)” : Réduire<br />
le volume du téléviseur et régler<br />
ensuite le niveau du volume à l’aide<br />
du contrôle de volume du système.<br />
Que signifie OPTIQUE?<br />
• Un câble optique con<strong>ver</strong>tit un<br />
signal électrique en un signal<br />
lumineux optique et le transmet<br />
par des fibres de <strong>ver</strong>re. Un<br />
système transmet des signaux<br />
audionumériques sous forme<br />
d’ondes lumineuses, le format<br />
S/PDIF, par le biais d’un<br />
conducteur en <strong>ver</strong>re.<br />
➢ La diffusion audio en 5.1 canaux est possible lorsque le téléviseur est raccordé à un appareil externe doté de cette fonction audio.<br />
➢ La configuration du panneau arrière de chaque système audionumérique est différente.<br />
➢ Lorsque le récepteur (cinéma maison) est réglé sur “On”, vous pouvez entendre du son provenant de la prise optique du téléviseur.<br />
Lorsque le téléviseur émet des signaux numériques (antenne), il transmet le son en 5.1 canaux au récepteur du cinéma maison.<br />
Lorsque la source est un composant numérique, comme un lecteur DVD, et que ce dernier est branché au téléviseur à l’aide d’un<br />
câble HDMI, seul un son deux canaux sera émis par le récepteur du cinéma maison.<br />
Pour entendre le son en 5.1 canaux, brancher la prise de sortie optique DIGITAL AUDIO OUT (OPTICAL) du lecteur DVD ou du<br />
câblosélecteur/récepteur satellite sur un amplificateur ou une chaîne de cinéma maison, et non pas sur le téléviseur.<br />
Branchementd’unamplificateuroud’unsystèmedecinémamaisonàDVD<br />
Panneau arrière du téléviseur<br />
<br />
CâbleAudio (non fourni)<br />
Amplificateuroud’unsystème<br />
de cinéma maison à DVD<br />
<br />
Brancher<br />
les câbles audio entre les<br />
prises de sortie AUDIO OUT [R-<br />
AUDIO-L] du téléviseur et les prises<br />
d’entrée AUDIO IN [L-AUDIO-R] de<br />
l’amplificateur ou du système de<br />
cinéma maison à DVD.<br />
Lorsqu'un amplificateur audio est<br />
branché aux sorties AUDIO OUT<br />
[R-AUDIO-L] : Réduire le volume du<br />
téléviseur et régler ensuite le niveau<br />
du volume à l’aide du contrôle de<br />
volume de l’amplificateur.<br />
➢ Chaque amplificateur/système de<br />
cinéma maison à DVD possède une<br />
configuration de panneau arrière<br />
différente.<br />
➢<br />
Lors du branchement d’un<br />
amplificateur ou système de cinéma<br />
maison à DVD, les couleurs du câble<br />
et de la borne de branchement doivent<br />
correspondre.<br />
Français - 6
Branchementd’unordinateur<br />
À l’aide du câble D-Sub<br />
PC<br />
Panneau latéral du téléviseur<br />
À l’aide du câble D-Sub<br />
<br />
Brancher un câble D-Sub entre<br />
la prise d’entrée PC IN [PC] du<br />
téléviseur et la prise de sortie PC de<br />
l’ordinateur.<br />
<br />
Brancher un câble audio PC entre<br />
la prise d’entrée PC IN [AUDIO] du<br />
téléviseur et la prise de sortie audio<br />
de la carte son de l’ordinateur.<br />
CâbleAudio (non fourni)<br />
Câble D-Sub (non fourni)<br />
2 <br />
À l’aide du câble HDMI/DVI<br />
PC<br />
Panneau latéral du téléviseur<br />
À l’aide du câble HDMI/DVI<br />
<br />
Brancher un câble HDMI/DVI entre<br />
la prise d’entrée HDMI1/DVI IN du<br />
téléviseur et la prise de sortie PC de<br />
l’ordinateur.<br />
<br />
Brancher un câble stéréo/2RCA<br />
de 3,5 mm entre la prise d’entrée<br />
DVI IN (HDMI 2) [R-AUDIO-L] du<br />
téléviseur et la prise de sortie audio<br />
de la carte son de l’ordinateur.<br />
Câble stéréo/2RCA de 3,5 mm (non fourni)<br />
2<br />
<br />
Câble HDMI/DVI (non fourni)<br />
➢ La configuration du panneau arrière de chaque ordinateur est différente.<br />
➢ Lors du branchement d’un ordinateur, les couleurs du câble et de la borne de<br />
branchement doivent correspondre.<br />
➢ Il faut brancher un câble HDMI/DVI dans la prise HDMI IN 2.<br />
Français - 7
Mise sous tension/hors tension du téléviseur<br />
Appuyer sur la touche POWER de la télécommande.<br />
Il est aussi possible d’utiliser la touche POWER du téléviseur.<br />
➢ Le téléviseur peut prendre un certain temps avant de<br />
s'allumer.<br />
Affichage des paramètres et menus<br />
Affichage des paramètres<br />
<br />
Appuyer<br />
sur la touche INFO de la télécommande.<br />
Le téléviseur affiche alors le canal, le type de<br />
configuration sonore et l'état de certains paramètres<br />
du son et de l'image.<br />
TV #1<br />
DTV Air Dolby Digital<br />
13-1<br />
Horloge non régle<br />
M. Spillane’s Mike Hammer<br />
Bonocrunch<br />
12:59 pm - 1:59 pm<br />
480i 4:3 Coréen<br />
Le téléviseur peut RETURN mémoriser tous les canaux captés par<br />
l’antenne ou le câble. Une fois les canaux mémorisés,<br />
RETURN<br />
la touche CH ou EXIT CH permet de les parcourir<br />
W.LINK<br />
successivement, ce qui évite de syntoniser chaque canal<br />
EXIT CH LIST<br />
INFO<br />
manuellement avec les touches numériques. La mémorisation<br />
des canaux s’effectue TOOLS en trois étapes : sélection de la source<br />
INFO<br />
de diffusion, mémorisation automatique des canaux et ajout<br />
TOOLS<br />
ou suppression manuelle de canaux (listes des canaux).<br />
W.LINK<br />
CH LIST<br />
Memorizing the Channels<br />
Mémorisation des canaux (méthode<br />
automatique)<br />
Pour que le téléviseur puisse mémoriser les canaux<br />
accessibles, il faut préciser la source de signal à laquelle il<br />
est raccordé (air ou câble).<br />
<br />
Appuyer<br />
sur la touche MENU pour afficher le menu.<br />
Appuyer sur la touche ▲ ou ▼ pour sélectionner<br />
Canal, suivie de la touche ENTER.<br />
Antenne<br />
: Air<br />
Chaîne<br />
Prog. auto<br />
►<br />
Liste des canaux<br />
Effacer les canaux brouillés<br />
Syn. Précise<br />
Puissance signal<br />
Affichage des menus<br />
<br />
Alors<br />
que le téléviseur est allumé, appuyer sur la<br />
touche MENU.<br />
Le menu principal s’affiche à l'écran. Le côté gauche<br />
du menu présente des icônes : Image, Son, Canal,<br />
Configuration, Entrée, Application.<br />
<br />
Appuyer<br />
sur la touche ▲ ou ▼ pour sélectionner<br />
Prog. Auto, suivie de la touche ENTER.<br />
Prog. auto<br />
Choisir les antennes à mettre en mémoire.<br />
Air<br />
Câble<br />
Auto<br />
Dépl.<br />
Intro.<br />
Démarrer<br />
Démarrer<br />
Démarrer<br />
Retour<br />
<br />
Appuyer<br />
<br />
Appuyer<br />
Image<br />
Mode<br />
: Standard<br />
Lumière cellule : 7<br />
Contraste : 95<br />
Luminosité : 45<br />
Netteté : 50<br />
Couleur : 50<br />
Teinte (V/R)<br />
: V50/R50<br />
Réglages des détails<br />
sur la touche ▲ ou ▼ pour sélectionner<br />
une des icônes.<br />
Ensuite, appuyer sur ENTER pour accéder au sousmenu<br />
de l’icône.<br />
➢ To move to a lower menu, turn the wheel<br />
clockwise when the menu Display is on the<br />
screen. To move to a higher menu, turn the<br />
wheel counterclockwise.<br />
sur la touche EXIT pour quitter le menu.<br />
➢ Le menu à l'écran disparaît après environ une<br />
minute.<br />
<br />
Appuyer<br />
sur la touche ▲ ou ▼ pour sélectionner le<br />
branchement d'antenne, suivie de la touche ENTER.<br />
➢ Air: Signal d’antenne Air<br />
Câble: Signal d'antenne Câble.<br />
Auto: Signaux d'antenne de type Air et Câble.<br />
Prog. auto<br />
Choisir le tableau de câblodiffusion.<br />
analogique<br />
numérique<br />
STD<br />
STD<br />
HRC<br />
HRC<br />
Démarrer<br />
Dépl. Intro.<br />
IRC<br />
IRC<br />
Retour<br />
Français -
Au<br />
<br />
moment de la sélection du système de<br />
télévision par câble :<br />
Appuyer sur ENTER pour amorcer la<br />
programmation automatique.<br />
Appuyer sur les touches ◄ ou ► pour choisir la<br />
source du signal analogique appropriée STD, HRC,<br />
ou IRC, puis sur ENTER. Si le câble est numérique,<br />
sélectionner la source de signal pour une diffusion<br />
analogique et numérique.<br />
➢ STD, HRC et IRC désignent différents<br />
systèmes de câblodistribution. Pour connaître<br />
le système utilisé dans un secteur particulier,<br />
communiquer avec le câblodistributeur. La<br />
sélection de la source de signal est maintenant<br />
terminée.<br />
Prog. auto<br />
Progr. Aut. en cours.<br />
DTV Air : 5 Air : 4<br />
DTV Câble : -- Câble : --<br />
Arrêt<br />
Le téléviseur commence alors à mémoriser tous les<br />
canaux disponibles.<br />
➢ Une fois tous les canaux mémorisés, le<br />
téléviseur commence à éliminer les canaux<br />
brouillés. Puis le menu Prog. auto s’affiche.<br />
➢ Pour arrêter la programmation automatique,<br />
appuyer sur ENTER.<br />
Le message Arrêter la programmation<br />
automatique? s’affiche. Appuyer sur la touche<br />
◄ ou ► pour sélectionner Oui, suivie de la<br />
touche ENTER.<br />
Appuyer sur la touche EXIT pour quitter.<br />
Prog. auto<br />
Progr. Aut. Non terminée.<br />
56 canaux sont mémorisés.<br />
DTV Air : 20 Air : 11<br />
DTV Câble : 15 Câble : 10<br />
OK<br />
Intro.<br />
Intro.<br />
Câble 3<br />
3%<br />
Retour<br />
Retour<br />
Changement du format normal de l'image<br />
Il est possible de choisir le type d’image qui correspond le plus<br />
à ses exigences.<br />
<br />
Appuyer<br />
<br />
Appuyer<br />
<br />
Appuyer<br />
sur la touche MENU pour afficher le menu.<br />
Appuyer sur la touche ▲ ou ▼ pour sélectionner<br />
Image, puis sur ENTER.<br />
Image Image<br />
Mode : Standard ►<br />
Lumière cellule : 7<br />
Contraste : 95<br />
Luminosité : 45<br />
Netteté : 50<br />
Couleur : 50<br />
Teinte (V/R)<br />
Réglages des détails<br />
: V50/R50<br />
sur ENTER pour sélectionner Mode.<br />
Appuyer sur la touche ▲ ou ▼ pour choisir<br />
Dynamique, Standard ou Film.<br />
Appuyer sur la touche ENTER.<br />
Mode : Dynamique<br />
Lumière cellule : 7Standard<br />
Contraste : 80 Cinéma<br />
Luminosité : 45<br />
Netteté : 50<br />
Couleur : 50<br />
Teinte (V/R)<br />
Réglages des détails<br />
: V50/R50<br />
● Dynamique : Choisit l’image pour la haute<br />
définition dans une pièce claire.<br />
● Standard : Choisit la meilleure image possible<br />
dans un environnement normal.<br />
● Cinéma: Choisit la meilleure image pour regarder<br />
des films dans une pièce sombre.<br />
sur la touche EXIT pour quitter.<br />
Français -
Pour choisir la source<br />
Sélectionner le téléviseur ou une autre source d’entrée<br />
externe branchée au téléviseur, comme un lecteur DVD,<br />
câblosélecteur ou récepteur. Sélectionner pour choisir la<br />
source d'entrée désirée.<br />
<br />
Appuyer<br />
sur la touche MENU pour afficher le menu.<br />
Appuyer sur la touche ▲ ou ▼ pour sélectionner<br />
Entrée, puis sur ENTER.<br />
Entrée<br />
Liste source<br />
Entrer le nom<br />
<br />
Appuyer<br />
sur ENTER pour sélectionner la Liste<br />
source.<br />
Appuyer sur la touche ▲ ou ▼ pour choisir la<br />
source du signal, puis sur ENTER.<br />
TV<br />
AV1 ----<br />
AV2 ----<br />
S-Vidéo ----<br />
Composante 1 ----<br />
Composante 2 ----<br />
PC ----<br />
Rafraîchir<br />
TOOLS Option<br />
➢ Sources de signal accessibles: TV, AV1, AV2,<br />
S-Video, Component1, Component2, PC,<br />
HDMI1, HDMI2/DVI, HDMI3, HDMI4, USB.<br />
➢ Seuls les appareils externes branchés au<br />
téléviseur peuvent être sélectionnés.<br />
Les entrées raccordées sont surlignées et<br />
figurent au haut de la Liste source. Les entrées<br />
non raccordées figurent à la fin.<br />
Français - 10
Dépannage<br />
Le tableau ci-dessous dresse la liste des problèmes courants et suggère des solutions.<br />
Si aucun de ces conseils ne permet de corriger le problème, communiquer avec le centre de service <strong>Samsung</strong> le plus près.<br />
Problème<br />
Image de mauvaise qualité.<br />
Son de mauvaise qualité.<br />
Pas d’image ni de son.<br />
Aucun son ou le son est trop faible<br />
au volume maximum.<br />
Défilement <strong>ver</strong>tical de l’image.<br />
Fonctionnement anormal du téléviseur.<br />
Le téléviseur ne s’allume pas.<br />
La télécommande fonctionne mal.<br />
Problème d’écran en diffusion<br />
numérique.<br />
L’image est trop pâle ou trop foncée.<br />
L’image est trop grande ou trop petite.<br />
La qualité visuelle des canaux<br />
numériques varie.<br />
L’écran est noir et le témoin<br />
d’alimentation clignote.<br />
Même si le téléviseur indique<br />
HD, la qualité visuelle n’est pas<br />
satisfaisante.<br />
L’image détériorée apparaît dans un<br />
angle de l’écran.<br />
Un son étrange se fait entendre.<br />
Ce panneau à plasma est constitué<br />
de sous-pixels (6,220,800), produits<br />
par une technologie évoluée.<br />
Le message “rétablit tous les paramètres<br />
aux réglages prédéfinis” s’affiche.<br />
Solution possible<br />
Essayer un autre canal.<br />
Réorienter l’antenne.<br />
Vérifier toutes les branchements de câbles.<br />
Essayer un autre canal.<br />
Réorienter l’antenne.<br />
Essayer un autre canal.<br />
Appuyer sur la touche SOURCE.<br />
Vérifier si le téléviseur est branché.<br />
Vérifier les branchements de l’antenne.<br />
Vérifier que la touche MUTE n’est pas enfoncée.<br />
En premier lieu, vérifier le volume des appareils branchés au téléviseur (récepteur<br />
numérique, lecteur DVD, câblosélecteur, magnétoscope, etc.). Régler ensuite le<br />
volume du téléviseur en conséquence.<br />
Vérifier toutes les branchements de câbles.<br />
Débrancher le téléviseur pendant 30 secondes, le rebrancher et le rallumer.<br />
Vérifier que la prise murale fonctionne.<br />
Remplacer les piles de la télécommande.<br />
Nettoyer l’extrémité supérieure de la télécommande (hublot de transmission).<br />
Vérifier les bornes des piles.<br />
Appuyer sur la touche TV pour régler la télécommande au mode TV.<br />
Vérifier s’il y a des piles dans la télécommande.<br />
Vérifier si les bornes “ + ” et “ - ” des batteries sont insérées correctement.<br />
Vérifier la puissance du signal numérique et l’entrée de l’antenne.<br />
Régler la luminosité et le contraste.<br />
Utiliser le réglage de précision.<br />
Redimensionner l’image.<br />
La qualité visuelle des canaux numériques peut varier selon la méthode de production<br />
d’origine (analogue ou numérique).<br />
- Si la méthode de production d’origine est numérique : Une émission de haute qualité<br />
visuelle.<br />
- Si la méthode de production d’origine est analogue : Le programme numérique affiché<br />
à l’écran est un programme analogue à l’origine, mais con<strong>ver</strong>ti au format numérique.<br />
La qualité visuelle est de calibre SD (définition standard).<br />
Sur l’ordinateur, Sur l’ordinateur, vérifier l’alimentation et le câble de signal.<br />
Le téléviseur est en mode d’économie d’énergie.<br />
Déplacer la souris de l’ordinateur ou appuyer sur une touche du clavier.<br />
Sur le matériel, vérifier le mode (STB, DVD, etc.), l’alimentation et le câble de signal.<br />
Le téléviseur est en mode d’économie d’énergie.<br />
Appuyer sur la touche Source du panneau ou de la télécommande.<br />
Éteindre le téléviseur et le rallumer.<br />
L’indication HD (haute définition) affichée lors d’un changement de poste ou lorsque la<br />
touche Information de la télécommande est enfoncée signifie que le canal sélectionné<br />
est un canal numérique.<br />
Si le diffuseur con<strong>ver</strong>tit un signal analogue au format numérique et transmet ce signal,<br />
il est possible que la qualité visuelle ne soit pas parfaite.<br />
Si la fonction Numérisation seulement est sélectionnée sur un appareil externe, l’image<br />
détériorée peut apparaître dans un angle de l’écran. Ce dommage est causé par les appareils<br />
externes et non par le téléviseur.<br />
Cela est causé par le fonctionnement des appareils; il ne s’agit pas d’une défectuosité.<br />
Toutefois, il peut y avoir des pixels plus lumineux ou plus sombres à l’écran. Ces<br />
pixels n’ont aucune incidence sur le rendement du produit.<br />
Ce message s’affiche lorsque vous appuyez et maintenez la touche EXIT enfoncée pendant un<br />
moment. Les valeurs par défaut du produit sont rétablies selon les paramètres prédéfinis à l’usine.<br />
Français - 11
Contact SAMSUNG WORLD-WIDE<br />
If you have any questions or comments relating to <strong>Samsung</strong> products, please contact the SAMSUNG customer care center.<br />
Comment contacter <strong>Samsung</strong> dans le monde<br />
Si vous avez des suggestions ou des questions concernant les produits <strong>Samsung</strong>, veuillez contacter le Service Consommateurs<br />
<strong>Samsung</strong>.<br />
Country Customer Care Center Web Site Address<br />
CANADA 1-800-SAMSUNG (7267864) www.samsung.com/ca<br />
<strong>Samsung</strong> Electronics Canada Inc., Customer Service 55<br />
Standish Court Mississauga, Ontario L5R 4B2 Canada<br />
<strong>Samsung</strong> Electronique Canada Inc., Service à la Clientèle<br />
55 Standish Court Mississauga, Ontario L5R 4B2<br />
Canada<br />
U.S.A 1-800-SAMSUNG (7267864) www.samsung.com<br />
<strong>Samsung</strong> Electronics America, Inc. 105 Challenger Road<br />
Ridgefield Park, NJ 07660-0511<br />
BN68-01363K-00


