MTI-4005 Neptune Arming Instructions
Arming instructions for the Neptune, an auto inflatable USCG Type III PFD made by MTI Adventurewear.
Arming instructions for the Neptune, an auto inflatable USCG Type III PFD made by MTI Adventurewear.

Create successful ePaper yourself
Turn your PDF publications into a flip-book with our unique Google optimized e-Paper software.
24g Automatic<br />
Inflatable Life Jacket<br />
NEPTUNE<br />
INSTRUCTIONS FOR ARMING OR RE-ARMING YOUR LIFE JACKET<br />
Note: Re<strong>Arming</strong> must follow the entire sequence below.<br />
Step 1:<br />
Step 8:<br />
Open the life jacket so that the inflator is accessible.<br />
If you are arming the jacket for the first time skip to Step 8,<br />
your bobbin is already installed.<br />
Step 2: Remove the spent CO2 cylinder by firmly rotating the<br />
cylinder counterclockwise, then pull out. Discard cylinder.<br />
Step 3:<br />
Step 4:<br />
Note:<br />
Step 5:<br />
Step 6:<br />
Step 7:<br />
Note:<br />
Remove cap by turning counterclockwise.<br />
Remove bobbin from cap or housing unit. Discard bobbin (yellow).<br />
Check housing to be sure it is clear and dry.<br />
The bobbin (yellow) body may remain in the housing or in the<br />
cap assembly when you remove the cap.<br />
The bobbin must be removed prior to rearming.<br />
A new bobbin must be used. New bobbin must have been<br />
purchased within three (3) years. If the bobbin purchase date is<br />
unknown, check date stamped on the bobbin, purchase a new bobbin<br />
if the date is more than three (3) years old.<br />
IMPORTANT! Bobbin (yellow) must be installed into the HOUSING<br />
(**see figure), white side up, aligning the slots on the bobbin with<br />
the ridges inside the threaded housing.<br />
The bobbin will slide in easily if installed correctly.<br />
Install cap by screwing clockwise until it meets the housing shoulder.<br />
No gap between the cap and the housing shoulder.<br />
Check the new cylinder to be sure it has the sensor ring attached.<br />
Confirm that the bobbin is installed in the cap by lifting/pressing the yellow<br />
lever arm up. If the bobbin is not in place the lever arm will be very difficult to lift.<br />
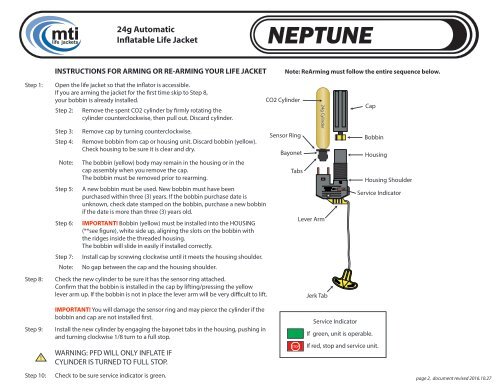
CO2 Cylinder<br />
Sensor Ring<br />
Bayonet<br />
Tabs<br />
24g Cylinder<br />
Lever Arm<br />
Jerk Tab<br />
Cap<br />
Bobbin<br />
Housing<br />
Housing Shoulder<br />
Service Indicator<br />
Step 9:<br />
!<br />
IMPORTANT! You will damage the sensor ring and may pierce the cylinder if the<br />
bobbin and cap are not installed first.<br />
Install the new cylinder by engaging the bayonet tabs in the housing, pushing in<br />
and turning clockwise 1/8 turn to a full stop.<br />
WARNING: PFD WILL ONLY INFLATE IF<br />
CYLINDER IS TURNED TO FULL STOP.<br />
Service Indicator<br />
If green, unit is operable.<br />
If red, stop and service unit.<br />
Step 10:<br />
Check to be sure service indicator is green.<br />
page 2, document revised 2016.10.27