

Epson Epson WorkForce 545 All-in-One Printer - Start Here
Epson Epson WorkForce 545 All-in-One Printer - Start Here
Epson Epson WorkForce 545 All-in-One Printer - Start Here

You also want an ePaper? Increase the reach of your titles
YUMPU automatically turns print PDFs into web optimized ePapers that Google loves.
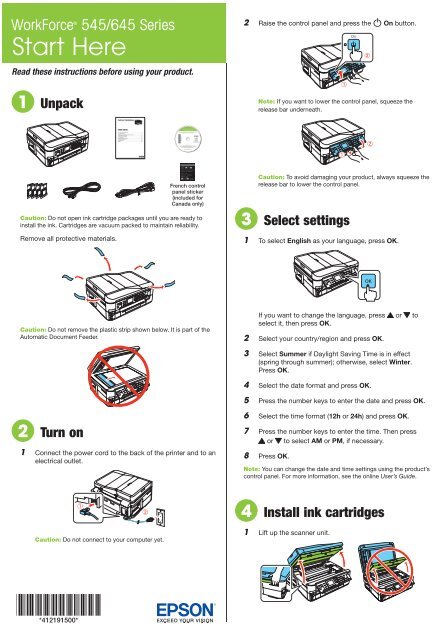
<strong>WorkForce</strong> ® <strong>545</strong>/645 Series<br />
<strong>Start</strong> <strong>Here</strong><br />
Read these <strong>in</strong>structions before us<strong>in</strong>g your product.<br />
1 Unpack<br />
2 Raise the control panel and press the On button.<br />
Note: If you want to lower the control panel, squeeze the<br />
release bar underneath.<br />
French control<br />
panel sticker<br />
(<strong>in</strong>cluded for<br />
Canada only)<br />
Caution: Do not open <strong>in</strong>k cartridge packages until you are ready to<br />
<strong>in</strong>stall the <strong>in</strong>k. Cartridges are vacuum packed to ma<strong>in</strong>ta<strong>in</strong> reliability.<br />
Remove all protective materials.<br />
Caution: To avoid damag<strong>in</strong>g your product, always squeeze the<br />
release bar to lower the control panel.<br />
3 Select sett<strong>in</strong>gs<br />
1 To select English as your language, press OK.<br />
Caution: Do not remove the plastic strip shown below. It is part of the<br />
Automatic Document Feeder.<br />
If you want to change the language, press or to<br />
select it, then press OK.<br />
2 Select your country/region and press OK.<br />
3 Select Summer if Daylight Sav<strong>in</strong>g Time is <strong>in</strong> effect<br />
(spr<strong>in</strong>g through summer); otherwise, select W<strong>in</strong>ter.<br />
Press OK.<br />
4 Select the date format and press OK.<br />
5 Press the number keys to enter the date and press OK.<br />
2 Turn on<br />
1 Connect the power cord to the back of the pr<strong>in</strong>ter and to an<br />
electrical outlet.<br />
6 Select the time format (12h or 24h) and press OK.<br />
7 Press the number keys to enter the time. Then press<br />
or to select AM or PM, if necessary.<br />
8 Press OK.<br />
Note: You can change the date and time sett<strong>in</strong>gs us<strong>in</strong>g the product’s<br />
control panel. For more <strong>in</strong>formation, see the onl<strong>in</strong>e User’s Guide.<br />
4 Install <strong>in</strong>k cartridges<br />
Caution: Do not connect to your computer yet.<br />
1 Lift up the scanner unit.<br />
*412191500*<br />
*412191500*
2 Open the cartridge cover.<br />
3 Shake the <strong>in</strong>k cartridges gently 4 or 5 times, then unpack<br />
them.<br />
5 Load paper<br />
You can load letter-, A4-, or legal-size paper, as well as<br />
various photo papers. For <strong>in</strong>formation on the papers available<br />
for your product, see the Quick Guide. For <strong>in</strong>structions on<br />
load<strong>in</strong>g legal-size or photo paper, see the onl<strong>in</strong>e User’s<br />
Guide.<br />
1 Pull out the paper cassette at the bottom of the pr<strong>in</strong>ter.<br />
4 Remove only the yellow tape from each cartridge.<br />
2 Slide the edge guides outward.<br />
Caution: Don’t remove any other seals or the cartridges<br />
may leak.<br />
5 Insert the cartridges <strong>in</strong> the holder for each color.<br />
3 Position the guide shown below for the size of paper<br />
you’re us<strong>in</strong>g.<br />
Letter<br />
LTR<br />
4 Insert the paper with the glossy or pr<strong>in</strong>table side<br />
facedown.<br />
6 Press each cartridge down until it clicks.<br />
7 Close the cartridge cover. Press down until it clicks.<br />
5 Slide the edge guides aga<strong>in</strong>st the paper, but not too<br />
tight. Make sure the paper is under the tabs on the<br />
edge guides.<br />
8 Lower the scanner unit.<br />
6 Gently <strong>in</strong>sert the paper cassette.<br />
9 Press OK to prime the <strong>in</strong>k delivery system. This takes<br />
about 5 m<strong>in</strong>utes.<br />
Note: Your pr<strong>in</strong>ter ships with full cartridges and part of the <strong>in</strong>k<br />
from the first cartridges is used for prim<strong>in</strong>g the pr<strong>in</strong>ter.<br />
Caution: Don’t turn off the pr<strong>in</strong>ter while it is prim<strong>in</strong>g or you’ll<br />
waste <strong>in</strong>k.<br />
10 When you see this menu on<br />
your product’s LCD screen,<br />
do not press the OK button<br />
yet. Cont<strong>in</strong>ue with the<br />
<strong>in</strong>structions <strong>in</strong> the follow<strong>in</strong>g<br />
sections to load paper <strong>in</strong> your<br />
product and <strong>in</strong>stall software.<br />
7 Extend the output tray as shown.
6 Connect the fax l<strong>in</strong>e<br />
To fax, connect the <strong>in</strong>cluded<br />
phone cord to a telephone<br />
wall jack and to the LINE port<br />
on the back of your product.<br />
To connect a telephone or<br />
answer<strong>in</strong>g mach<strong>in</strong>e, use the EXT.<br />
port on your product. See the<br />
Quick Guide for more details.<br />
Note: If you’re connect<strong>in</strong>g to a DSL phone l<strong>in</strong>e,<br />
you must use a DSL filter or you won’t be able to fax.<br />
Contact your DSL provider for the necessary filter.<br />
7 Install software<br />
Note: If your computer does not have a CD/DVD drive, you can<br />
download the software from the <strong>Epson</strong> website (see “<strong>Epson</strong> technical<br />
support”).<br />
Caution: Be sure to close your other programs, <strong>in</strong>clud<strong>in</strong>g any screen<br />
savers and virus protection software, before beg<strong>in</strong>n<strong>in</strong>g this software<br />
<strong>in</strong>stallation.<br />
1 Make sure the pr<strong>in</strong>ter is<br />
NOT CONNECTED to your<br />
computer.<br />
W<strong>in</strong>dows ® : If you see a Found<br />
New Hardware screen, click Cancel<br />
and disconnect the USB cable. You<br />
can’t <strong>in</strong>stall your software that way.<br />
2 Insert the product CD.<br />
3 W<strong>in</strong>dows: If you see the AutoPlay w<strong>in</strong>dow, click Run<br />
Setup.exe. If you see the User Account Control screen,<br />
click Yes or Cont<strong>in</strong>ue.<br />
Mac OS ® X: Double-click the<br />
<strong>Epson</strong> icon.<br />
Connection options<br />
Wireless connection<br />
You must <strong>in</strong>stall the software on every computer from which<br />
you want to pr<strong>in</strong>t. For the first <strong>in</strong>stallation, we recommend<br />
us<strong>in</strong>g a temporary USB cable connection to simplify wireless<br />
setup. After the pr<strong>in</strong>ter is connected to the network, you will<br />
be prompted to remove the cable.<br />
If you’re us<strong>in</strong>g Mac OS X 10.6 or 10.7, or you don’t have<br />
a USB cable, you will need to use the control panel on the<br />
pr<strong>in</strong>ter to select wireless sett<strong>in</strong>gs. Follow the <strong>in</strong>structions on<br />
your computer screen dur<strong>in</strong>g software <strong>in</strong>stallation; they will<br />
expla<strong>in</strong> how to connect the pr<strong>in</strong>ter wirelessly this way.<br />
Make sure you know your network name (SSID) and network<br />
password:<br />
• Network name<br />
• Network password<br />
If you don’t have this <strong>in</strong>formation, contact the person who set<br />
up your network.<br />
Direct USB connection<br />
Make sure you have a USB cable (not <strong>in</strong>cluded).<br />
Wired network connection<br />
Make sure you have an Ethernet ® network cable (not<br />
<strong>in</strong>cluded). You must <strong>in</strong>stall the software on every computer<br />
from which you want to pr<strong>in</strong>t.<br />
Any problems?<br />
If you experience problems dur<strong>in</strong>g setup, see below:<br />
Network setup was unsuccessful.<br />
• Make sure you select the right network name (SSID).<br />
• If you see a firewall alert message, click Unblock or <strong>All</strong>ow<br />
to let setup cont<strong>in</strong>ue.<br />
• If your network has security enabled, make sure you enter<br />
your network password (WEP key or WPA passphrase)<br />
correctly. If it has uppercase (ABC) or lowercase (abc)<br />
letters, make sure you enter them correctly.<br />
4 Click Install (W<strong>in</strong>dows) or Cont<strong>in</strong>ue (Mac OS X) and<br />
follow the <strong>in</strong>structions on your computer screen.<br />
Function buttons<br />
5 When you see the Select Your Connection screen, check<br />
the “Connection options” section on this sheet for more<br />
<strong>in</strong>formation.<br />
Choose your connection. Then click Next (W<strong>in</strong>dows) or<br />
Cont<strong>in</strong>ue (Mac OS X) and follow the <strong>in</strong>structions on your<br />
computer screen.<br />
Press , , , or on the pr<strong>in</strong>ter to highlight a letter or<br />
function button.<br />
Press OK to select it.<br />
Note: Passwords must be entered <strong>in</strong> the correct case. Use the<br />
function buttons to select uppercase (AB12), lowercase (ab12),<br />
symbols (!#%@), or spaces ( ), and to delete characters ( ).<br />
Highlight Done and press OK.<br />
The pr<strong>in</strong>ter’s screen is dark.<br />
Press any button (except<br />
sleep mode.<br />
On) to wake the pr<strong>in</strong>ter from
Setup is unable to f<strong>in</strong>d my pr<strong>in</strong>ter after connect<strong>in</strong>g it<br />
with a USB cable.<br />
Make sure it is securely connected as shown:<br />
Need paper and <strong>in</strong>k?<br />
Try <strong>Epson</strong> paper with DURABrite ® Ultra Ink for professional<br />
results. For the right supplies at the right time, you can<br />
purchase them at <strong>Epson</strong> Supplies Central at<br />
www.epson.com/<strong>in</strong>k3 (U.S. sales) or www.epson.ca<br />
(Canadian sales). You can also purchase supplies from an<br />
<strong>Epson</strong> authorized reseller. To f<strong>in</strong>d the nearest one,<br />
call 800-GO-EPSON (800-463-7766).<br />
Any questions?<br />
Quick Guide<br />
Basic <strong>in</strong>structions for copy<strong>in</strong>g, pr<strong>in</strong>t<strong>in</strong>g, fax<strong>in</strong>g,<br />
scann<strong>in</strong>g, and solv<strong>in</strong>g problems.<br />
On-screen help with your software<br />
Select Help or ? when you’re us<strong>in</strong>g your<br />
software.<br />
User’s Guide<br />
Click the icon on your desktop (or <strong>in</strong> the Applications/<strong>Epson</strong><br />
Software/Guide folder <strong>in</strong> Mac OS X) to access the onl<strong>in</strong>e<br />
User’s Guide, software downloads, <strong>Epson</strong> Supplies Central ® ,<br />
and more (requires an Internet connection). If you don’t have<br />
a User’s Guide icon, you can <strong>in</strong>stall it from the CD or go to the<br />
<strong>Epson</strong> website (see “<strong>Epson</strong> technical support”).<br />
Genu<strong>in</strong>e <strong>Epson</strong> paper<br />
<strong>Epson</strong> offers a wide variety of bus<strong>in</strong>ess and photo papers<br />
to meet your needs; visit <strong>Epson</strong> Supplies Central for more<br />
<strong>in</strong>formation.<br />
Genu<strong>in</strong>e <strong>Epson</strong> <strong>in</strong>ks<br />
Presentation Paper Matte<br />
Smooth, non-glare, <strong>in</strong>stant-dry<strong>in</strong>g paper ideal<br />
for home, school and bus<strong>in</strong>ess projects.<br />
Look for the numbers below<br />
to f<strong>in</strong>d your cartridges. It’s as<br />
easy as remember<strong>in</strong>g your number!<br />
<strong>WorkForce</strong> <strong>545</strong>/645 Series <strong>in</strong>k cartridges<br />
Color High-capacity Extra High-capacity<br />
Black 126 127<br />
Cyan 126 127<br />
<strong>Epson</strong> technical support<br />
Visit epson.com/support (U.S.) or epson.ca/support<br />
(Canada) where you can download drivers, view manuals, get<br />
FAQs, or e-mail <strong>Epson</strong>.<br />
You may also speak with a support specialist by call<strong>in</strong>g:<br />
• U.S.: (562) 276-4382, 6 AM to 8 PM, Pacific Time, Monday<br />
through Friday, and 7 AM to 4 PM Saturday<br />
• Canada: (905) 709-3839, 6 AM to 8 PM, Pacific Time,<br />
Monday through Friday<br />
Days and hours of support are subject to change without<br />
notice. Toll or long distance charges may apply.<br />
Magenta 126 127<br />
Yellow 126 127<br />
<strong>Epson</strong> Connect<br />
Get <strong>in</strong>stant, wireless pr<strong>in</strong>t<strong>in</strong>g of photos and<br />
attachments right from smartphones, iPads,<br />
tablets, and other popular mobile devices.<br />
See www.epson.com/connect for details.<br />
Software technical support<br />
ABBYY ® F<strong>in</strong>eReader ®<br />
(408) 457-9777<br />
www.abbyyusa.com<br />
support@abbyyusa.com<br />
Recycl<strong>in</strong>g<br />
<strong>Epson</strong> offers a recycl<strong>in</strong>g program for end of life hardware<br />
and <strong>in</strong>k cartridges. Please go to www.epson.com/recycle<br />
for <strong>in</strong>formation on how to return your products for proper<br />
disposal.<br />
<strong>Epson</strong>, Supplies Central, <strong>WorkForce</strong>, and DURABrite are registered trademarks, and <strong>Epson</strong><br />
Exceed Your Vision is a registered logomark of Seiko <strong>Epson</strong> Corporation.<br />
General Notice: Other product names used here<strong>in</strong> are for identification purposes only and<br />
may be trademarks of their respective owners. <strong>Epson</strong> disclaims any and all rights <strong>in</strong> those<br />
marks.<br />
This <strong>in</strong>formation is subject to change without notice.<br />
© 2011 <strong>Epson</strong> America, Inc. 8/11 CPD-34357R1<br />
Pr<strong>in</strong>ted <strong>in</strong> XXXXXX


