

Canon PIXMA iP3000 - iP3000 Easy Setup Instructions
Canon PIXMA iP3000 - iP3000 Easy Setup Instructions
Canon PIXMA iP3000 - iP3000 Easy Setup Instructions

You also want an ePaper? Increase the reach of your titles
YUMPU automatically turns print PDFs into web optimized ePapers that Google loves.
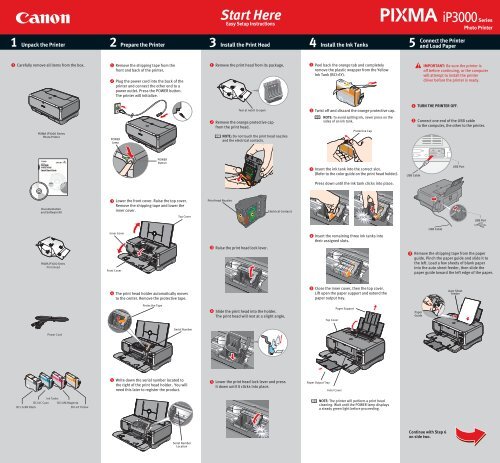
Start Here<br />
<strong>Easy</strong> <strong>Setup</strong> <strong>Instructions</strong><br />
1 2 3 4 5<br />
Unpack the Printer<br />
Prepare the Printer<br />
Install the Print Head<br />
Install the Ink Tanks<br />
Connect the Printer<br />
and Load Paper<br />
<strong>iP3000</strong> Series<br />
Photo Printer<br />
1<br />
Carefully remove all items from the box.<br />
1<br />
2<br />
Remove the shipping tape from the<br />
front and back of the printer.<br />
Plug the power cord into the back of the<br />
printer and connect the other end to a<br />
power outlet. Press the POWER button.<br />
The printer will initialize.<br />
1<br />
Remove the print head from its package.<br />
1<br />
Peel back the orange tab and completely<br />
remove the plastic wrapper from the Yellow<br />
Ink Tank (BCI-6Y).<br />
IMPORTANT: Be sure the printer is<br />
off before continuing, or the computer<br />
will attempt to install the printer<br />
driver before the printer is ready.<br />
Tear at notch to open<br />
2<br />
Twist off and discard the orange protective cap.<br />
1<br />
TURN THE PRINTER OFF.<br />
<strong>PIXMA</strong> <strong>iP3000</strong> Series<br />
Photo Printer<br />
POWER<br />
Lamp<br />
2<br />
Remove the orange protective cap<br />
from the print head.<br />
NOTE: Do not touch the print head nozzles<br />
and the electrical contacts.<br />
NOTE: To avoid spilling ink, never press on the<br />
sides of an ink tank.<br />
Protective Cap<br />
2<br />
Connect one end of the USB cable<br />
to the computer, the other to the printer.<br />
POWER<br />
Button<br />
3<br />
Insert the ink tank into the correct slot.<br />
(Refer to the color guide on the print head holder).<br />
Press down until the ink tank clicks into place.<br />
Documentation<br />
and Software Kit<br />
3<br />
Lower the front cover. Raise the top cover.<br />
Remove the shipping tape and lower the<br />
inner cover.<br />
Top Cover<br />
Print Head Nozzles<br />
Electrical Contacts<br />
click<br />
Inner Cover<br />
4<br />
Insert the remaining three ink tanks into<br />
their assigned slots.<br />
<strong>PIXMA</strong> <strong>iP3000</strong> Series<br />
Print Head<br />
Front Cover<br />
3<br />
Raise the print head lock lever.<br />
3<br />
Remove the shipping tape from the paper<br />
guide. Pinch the paper guide and slide it to<br />
the left. Load a few sheets of blank paper<br />
into the auto sheet feeder, then slide the<br />
paper guide toward the left edge of the paper.<br />
4<br />
The print head holder automatically moves<br />
to the center. Remove the protective tape.<br />
5<br />
Close the inner cover, then the top cover.<br />
Lift open the paper support and extend the<br />
paper output tray.<br />
Auto Sheet<br />
Feeder<br />
Protective Tape<br />
4<br />
Slide the print head into the holder.<br />
The print head will rest at a slight angle.<br />
Top Cover<br />
Paper Support<br />
Paper<br />
Guide<br />
Power Cord<br />
Serial Number<br />
5<br />
Write down the serial number located to<br />
the right of the print head holder . You will<br />
need this later to register the product.<br />
5<br />
Lower the print head lock lever and press<br />
it down until it clicks into place.<br />
Paper Output Tray<br />
Inner Cover<br />
Ink Tanks<br />
BCI-6C Cyan BCI-6M Magenta<br />
BCI-3eBK Black<br />
BCI-6Y Yellow<br />
NOTE: The printer will perform a print head<br />
cleaning. Wait until the POWER lamp displays<br />
a steady green light before proceeding.<br />
Serial Number<br />
Location<br />
click<br />
Continue with Step 6<br />
on side two.
6 Cassette Loading<br />
NOTE: Loading paper in the cassette provides additional<br />
paper handling flexibility. For additional information<br />
visit the electronic User's Guide.<br />
2 Remove the top cover of the cassette. 3 Slide the long edge paper guide to the left and<br />
the short edge paper guide toward you.<br />
5 Replace the top cover of the cassette.<br />
7 Ensure that the auto sheet feeder lamp<br />
is lit. If not, press the paper feed switch.<br />
Top Cover<br />
Long Edge<br />
Guide<br />
Top Cover<br />
1 Pull out the cassette from the bottom of<br />
the printer.<br />
Short Edge<br />
Guide<br />
Auto<br />
Sheet Feeder<br />
Lamp<br />
Cassette<br />
Feeder<br />
Lamp<br />
NOTE: For letter-size<br />
(8.5" x 11") paper, push<br />
the cassette release lever<br />
and extend the tray.<br />
4 Load paper so that the top right corner touches<br />
the inside corner of the cassette. Adjust paper<br />
guides to the edges of paper.<br />
6 Insert cassette completely into the printer<br />
until it clicks into place.<br />
Paper Feed<br />
Switch<br />
Cassette<br />
Release Lever<br />
click<br />
IMPORTANT: To successfully<br />
complete the next step, Software<br />
Installation, ensure 8.5" x 11"<br />
paper is loaded in the Auto Sheet<br />
Feeder (top paper feeder).<br />
Top Right<br />
Corner<br />
NOTE: For letter-size (8.5" x 11")<br />
paper, the front edge of the cassette<br />
will extend beyond the bottom<br />
of the printer.<br />
7 Windows ® Printer Driver Installation and Print Head Alignment<br />
7<br />
Macintosh ® Printer Driver Installation and Print Head Alignment<br />
Windows<br />
Macintosh<br />
NOTE: For Mac OS 9.x printer driver instructions,<br />
refer to the "Appendix" of the Quick Start Guide.<br />
1<br />
Be sure to TURN THE PRINTER OFF<br />
before continuing.<br />
NOTE: For Windows ® XP or Windows<br />
2000, log on to Windows as a member<br />
of the Administrators group before<br />
continuing.<br />
IMPORTANT: If you see the Found New<br />
Hardware Wizard, click Cancel.<br />
4<br />
When the "Printer Connection" window appears,<br />
TURN THE PRINTER ON. The software will begin<br />
identifying the printer port being used.<br />
1<br />
2<br />
Turn on your Mac and your printer and insert the<br />
“<strong>Setup</strong> Software & User's Guide” CD-ROM.<br />
NOTE: Log on as an Administrator<br />
before continuing.<br />
Double-click the CD-ROM icon, then the<br />
Mac OS X folder, then the Printer Driver folder.<br />
6<br />
Start the print head alignment procedure.<br />
a. Double-click the Macintosh HD icon, then<br />
Applications folder. Double-click the Utilities<br />
folder, then the Printer <strong>Setup</strong> Utility icon.<br />
b. When the Printer List screen appears, select<br />
<strong>PIXMA</strong> <strong>iP3000</strong>, then click the Utility icon.<br />
7<br />
8<br />
Click Quit to exit the BJ Printer Utility. Print head<br />
alignment is now complete.<br />
Access your CD-ROM again. From the<br />
Application folder on the CD-ROM, doubleclick<br />
on the software to be installed.<br />
IMPORTANT: If your computer cannot<br />
detect a printer port, click Help and<br />
refer to the online instructions.<br />
2<br />
3<br />
Close any open software applications<br />
including anti-virus, computer security<br />
and other software. Then insert the <strong>Setup</strong><br />
Software & User’s Guide CD-ROM. The<br />
setup program should run automatically.<br />
NOTE: If the setup program does not<br />
run, click Start, then Run, then type<br />
D:\msetup.exe, where D is your<br />
CD-ROM drive.<br />
When the main menu appears,<br />
click <strong>Easy</strong> Install.<br />
5<br />
6<br />
7<br />
Follow the on-screen instructions to install the<br />
remaining software. When the "Installation<br />
Results" window appears, click OK.<br />
Follow the on-screen instructions to register<br />
your product.<br />
When the "Print Head Alignment" screen<br />
appears, ensure that letter size paper is loaded<br />
in the auto sheet feeder (top paper feeder). Click<br />
Execute and follow on-screen instructions.<br />
3<br />
Double-click the <strong>iP3000</strong> 260.pkg icon,<br />
then follow the on-screen instructions.<br />
NOTE: When the "Authenticate" screen appears,<br />
enter your administrator name and password.<br />
If you do not know your administrator name<br />
or password, click , then follow the<br />
on-screen instructions.<br />
c. Select <strong>PIXMA</strong> <strong>iP3000</strong> and click Maintenance.<br />
d. Ensure that letter size paper is loaded in the<br />
auto sheet feeder (top paper feeder).<br />
e. Click the down-arrow to select Test Print.<br />
Click the Print Head Alignment icon and<br />
follow the on-screen instructions.<br />
9<br />
Follow the on-screen instructions. When the<br />
“Installation has finished” screen appears,<br />
click OK.<br />
10 Double-click on the Product Registration<br />
icon, found in the Mac OS X folder, to<br />
register your product.<br />
4<br />
When the message "The software was<br />
successfully installed" appears, click Restart.<br />
NOTE: Print head alignment will take<br />
several minutes to complete.<br />
5<br />
When a message asking you to align the print<br />
head appears, click OK.<br />
NOTE: Select <strong>Easy</strong> Install in order to install<br />
all of the application software, electronic<br />
manual and printer driver. Select Custom<br />
Install in order to choose the options you<br />
would like to install.<br />
8<br />
When the "Installation completed successfully"<br />
screen appears, click Restart.<br />
NOTE: Print head alignment will take<br />
several minutes to complete.<br />
Part no. QA7-3222-V01 © 2004 <strong>Canon</strong> U.S.A., Inc. <strong>Canon</strong> is a Registered Trademark of <strong>Canon</strong> Inc. All other products and brand names are registered trademarks or trademarks of their respective owners. Specifications subject to change without notice. P-<strong>iP3000</strong>-ESI-0304 Printed in Thailand.


