Commando News December 2016

Create successful ePaper yourself
Turn your PDF publications into a flip-book with our unique Google optimized e-Paper software.
their ammunition. Although he was running low on ammuni -<br />
tion, King launched an immediate counter-attack on the<br />
Japanese, which took them by surprise.<br />
Lieutenant Derrick Watson's C Platoon set out at around<br />
06:15 and advanced to the edge of Village 3, a distance of<br />
about 200 yards (180 m), before becoming pinned down by<br />
heavy Japanese fire. King then sent Captain Gordon<br />
Blainey's A Platoon around the right flank, towards the high<br />
ground on Mission Hill, which overlooked the battlefield. It<br />
was secured by 07:30. In the meantime, some of the Squad -<br />
ron signallers and headquarters personnel gathered together<br />
what ammunition they could, and delivered it to C Platoon at<br />
around 07:00. C Platoon then fixed bayonets and continued<br />
its advance.<br />
A bullet, apparently fired by one of his own men, nicked<br />
the commander of No. 9 Section of C Platoon, Lieutenant<br />
Bob Balderstone. He led his section in an advance across 70<br />
yards (64 m) of open ground, and attacked three Japanese<br />
machine gun posts with hand grenades. He was later<br />
awarded the Military Cross for his "high courage and leader -<br />
ship". Lieutenant Reg Hallion led his No. 3 Section of A<br />
Platoon against the Japanese positions at the base of Mission<br />
Hill. He was killed in an attack on a machine gun post, but his<br />
section captured the position and killed twelve Japanese. By<br />
10:00, the action was over.<br />
After the action, King's men counted 214 Japanese<br />
bodies, and estimated that another 50 or more lay dead in<br />
the tall grass. Yonekura was among the dead. The Australians<br />
suffered 14 killed and 23 wounded. Abandoned equipment<br />
included 19 machine guns, 150 rifles, 6 grenade throwers and<br />
12 Japanese swords.<br />
Results<br />
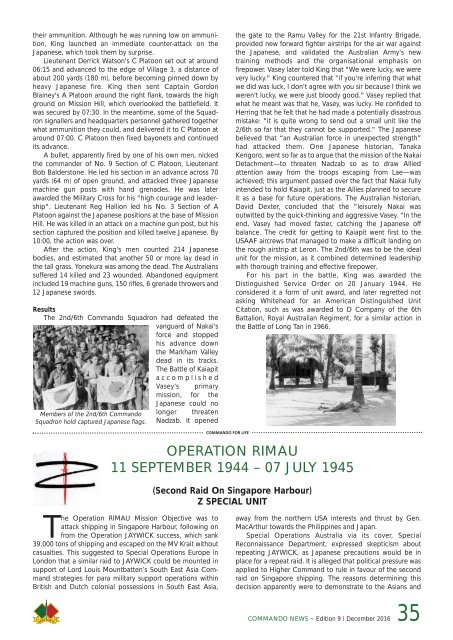
The 2nd/6th <strong>Commando</strong> Squadron had defeated the<br />
vanguard of Nakai's<br />
force and stopped<br />
his advance down<br />
the Markham Valley<br />
dead in its tracks.<br />
The Battle of Kaiapit<br />
accomplished<br />
Vasey's primary<br />
mission, for the<br />
Japanese could no<br />
Members of the 2nd/6th <strong>Commando</strong><br />
Squadron hold captured Japanese flags.<br />
longer threaten<br />
Nadzab. It opened<br />
the gate to the Ramu Valley for the 21st Infantry Brigade,<br />
provided new forward fighter airstrips for the air war against<br />
the Japanese, and validated the Australian Army's new<br />
training methods and the organisational emphasis on<br />
firepower. Vasey later told King that "We were lucky, we were<br />
very lucky." King countered that "if you're inferring that what<br />
we did was luck, I don't agree with you sir because I think we<br />
weren't lucky, we were just bloody good." Vasey replied that<br />
what he meant was that he, Vasey, was lucky. He confided to<br />
Herring that he felt that he had made a potentially disastrous<br />
mistake: "it is quite wrong to send out a small unit like the<br />
2/6th so far that they cannot be supported." The Japanese<br />
believed that “an Australian force in unexpected strength”<br />
had attacked them. One Japanese historian, Tanaka<br />
Kengoro, went so far as to argue that the mission of the Nakai<br />
Detachment—to threaten Nadzab so as to draw Allied<br />
attention away from the troops escaping from Lae—was<br />
achieved; this argument passed over the fact that Nakai fully<br />
intended to hold Kaiapit, just as the Allies planned to secure<br />
it as a base for future operations. The Australian historian,<br />
David Dexter, concluded that the "leisurely Nakai was<br />
outwitted by the quick-thinking and aggressive Vasey. “In the<br />
end, Vasey had moved faster, catching the Japanese off<br />
balance. The credit for getting to Kaiapit went first to the<br />
USAAF aircrews that managed to make a difficult landing on<br />
the rough airstrip at Leron. The 2nd/6th was to be the ideal<br />
unit for the mission, as it combined determined leadership<br />
with thorough training and effective firepower.<br />
For his part in the battle, King was awarded the<br />
Distinguished Service Order on 20 January 1944. He<br />
considered it a form of unit award, and later regretted not<br />
asking Whitehead for an American Distinguished Unit<br />
Citation, such as was awarded to D Company of the 6th<br />
Battalion, Royal Australian Regiment, for a similar action in<br />
the Battle of Long Tan in 1966.<br />
COMMANDO FOR LIFE<br />
OPERATION RIMAU<br />
11 SEPTEMBER 1944 – 07 JULY 1945<br />
(Second Raid On Singapore Harbour)<br />
Z SPECIAL UNIT<br />
The Operation RIMAU Mission Objective was to<br />
attack shipping in Singapore Harbour, following on<br />
from the Operation JAYWICK success, which sank<br />
39,000 tons of shipping and escaped on the MV Krait without<br />
casualties. This suggested to Special Operations Europe in<br />
London that a similar raid to JAYWICK could be mounted in<br />
support of Lord Louis Mountbatten’s South East Asia Com -<br />
mand strategies for para military support operations within<br />
British and Dutch colonial possessions in South East Asia,<br />
away from the northern USA interests and thrust by Gen.<br />
MacArthur towards the Philippines and Japan.<br />
Special Operations Australia via its cover, Special<br />
Reconnaissance Department, expressed skepticism about<br />
repeating JAYWICK, as Japanese precautions would be in<br />
place for a repeat raid. It is alleged that political pressure was<br />
applied to Higher Command to rule in favour of the second<br />
raid on Singapore shipping. The reasons determining this<br />
decision apparently were to demonstrate to the Asians and<br />
COMMANDO NEWS ~ Edition 9 I <strong>December</strong> <strong>2016</strong> 35