Roofing
2kZ2j9o
2kZ2j9o

You also want an ePaper? Increase the reach of your titles
YUMPU automatically turns print PDFs into web optimized ePapers that Google loves.
Lead<br />
Life on the Edge – Essential Weatherings to Keep Buildings Watertight<br />
Darren Tutt, Technical Officer, Lead Sheet Association<br />
We like nothing better in this country than to have a good<br />
chat about the weather and with good reason, as we never<br />
quite know what it is going to throw at us! For that reason,<br />
keeping our buildings watertight, in particular the many<br />
beautiful historic and listed buildings in this country, can<br />
sometimes be a challenge. Areas that need particularly close<br />
attention are the ledges and cornices which were designed<br />
with the original purpose of throwing rainwater away from the<br />
structure. Often these became highly decorative features and<br />
in many cases they were weathered with lead.<br />
As time has gone by, these coverings have needed replacing,<br />
usually due to the way in which they were originally fitted. In<br />
the past, there was very little understanding of the thermal<br />
properties of lead – the way in which it expands and contracts<br />
with temperature variations. As a result these highly<br />
decorative features were often fitted in a way which, years<br />
down the line, has ended up with them splitting or cracking.<br />
There are also many instances, both in older buildings and in<br />
many modern ones, whereby parapet walls require weathering<br />
and lead sheet has long been used to achieve this.<br />
As part of the Lead Sheet Association’s technical team we<br />
often get involved in helping leadworkers called in to do<br />
remedial work on historic buildings or install new<br />
weatherings, so we thought it would be useful to take a look<br />
at some of the potential pitfalls in this type of work and the<br />
methods we employ today to ensure future longevity.<br />
Thickness and spacing<br />
All of the LSA’s recommendations are based on the use of British Standard Rolled Lead<br />
Sheet. The thickness of the material you use for weatherings of this nature largely<br />
depends on the size of the individual pieces and the exposure and quality of the<br />
building concerned. For important and historical buildings codes 6 and 7 lead are<br />
usually specified, whilst codes 4 and 5 are normally used for modern applications. As<br />
there are so many different designs, there is a basic set of guidelines to follow which<br />
incorporate other aspects of leadwork detailing. These other aspects, such as clipping,<br />
ventilation and underlays, to name but a few, can be found in The Rolled Lead Sheet<br />
Manual and should be used where necessary. (see Table 7, bottom left).<br />
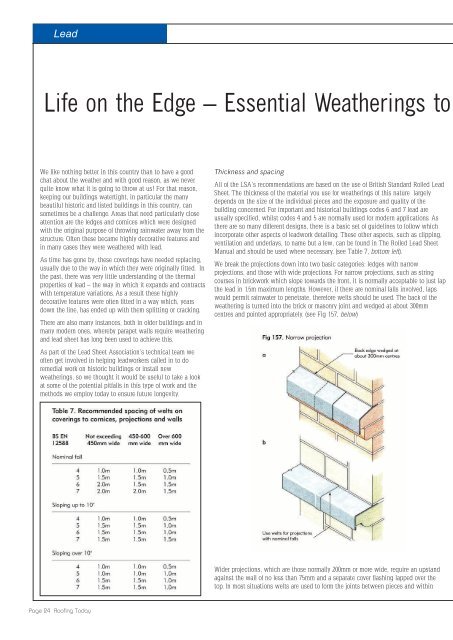
We break the projections down into two basic categories: ledges with narrow<br />
projections, and those with wide projections. For narrow projections, such as string<br />
courses in brickwork which slope towards the front, it is normally acceptable to just lap<br />
the lead in 1.5m maximum lengths. However, if there are nominal falls involved, laps<br />
would permit rainwater to penetrate, therefore welts should be used. The back of the<br />
weathering is turned into the brick or masonry joint and wedged at about 300mm<br />
centres and pointed appropriately. (see Fig 157, below)<br />
these are 50mm wide copper or stainless steel clips at intervals.<br />
Clipping, especially at the leading edges, is extremely important and<br />
the exposure of the building and its susceptibility to the elements<br />
should be considered carefully when deciding the best method to<br />
employ. (See Fig 158, below)<br />
is to provide as much thermal movement as possible to the individual<br />
pieces and avoid premature failing through cracks or splits. With more<br />
modern applications where railing posts are required, small, lead-welded<br />
upstands should be fitted with small weathering collars attached to the<br />
posts over the top of them. Alternatively, a mastic seal can be applied, but<br />
this will require future maintenance and is therefore not the best solution in<br />
the long term. (See Fig 167, below).<br />
In some cases it may be necessary to introduce intermediate fixings<br />
through the lead itself and the Rolled Lead Sheet Manual gives<br />
details of the methods to use in more depth, however, it is important<br />
to position these correctly to allow for thermal movement.<br />
Parapet walls sometimes require covering in lead sheet and the<br />
methods employed are similar to those used for horizontal<br />
projections. Spacing of joints, again, is important, and this spacing<br />
has a direct bearing on the thickness of the Rolled Lead Sheet you<br />
need to use to ensure that cracking as a result of fatigue and creep is<br />
minimised. Once again, clipping details are extremely important,<br />
and exposure of each project should be taken into account.<br />
There are many ways to successfully weather the details mentioned here<br />
and each should be treated on its own merits, but generally the points<br />
raised here, and the more in depth details contained within the Rolled Lead<br />
Sheet Manual, if followed correctly, will ensure that weatherings of this type<br />
will be protecting our buildings for many, many years to come.<br />
Wider projections, which are those normally 200mm or more wide, require an upstand<br />
against the wall of no less than 75mm and a separate cover flashing lapped over the<br />
top. In most situations welts are used to form the joints between pieces and within<br />
Balustrades and railings<br />
There are plenty of instances where balustrades or railings are sat on<br />
top of parapet walls, usually as fall protection of one kind or another.<br />
The design of these normally requires penetrations through the lead<br />
sheet to provide structural support, and in these instances it is very<br />
important to position any joints centrally between them. Again, this<br />
If you have a query about this, or any other technical issues, don’t forget the<br />
LSA can help. You can email technical@leadsheet.co.uk or call 01622 872<br />
432.<br />
For details about the LSA’s latest Manual, which is available as a hard copy<br />
and an e-book visit www.leadsheet.co.uk/manual.<br />
Page 24 <strong>Roofing</strong> Today<br />
<strong>Roofing</strong> Today Page 25